FLYTECH TECHNOLOGY P263L31 Mobile PC User Manual POS260 D31L User Manual V1 0
FLYTECH TECHNOLOGY CO., LTD Mobile PC POS260 D31L User Manual V1 0
UserManual.wiki
>
FLYTECH TECHNOLOGY
>
P263L31 User Manual
Users Manual
Navigation menu
Upload a User Manual
Namespaces
Wiki Guide
HTML
PDF
Info
Views
User Manual
Discussion / Help
Navigation


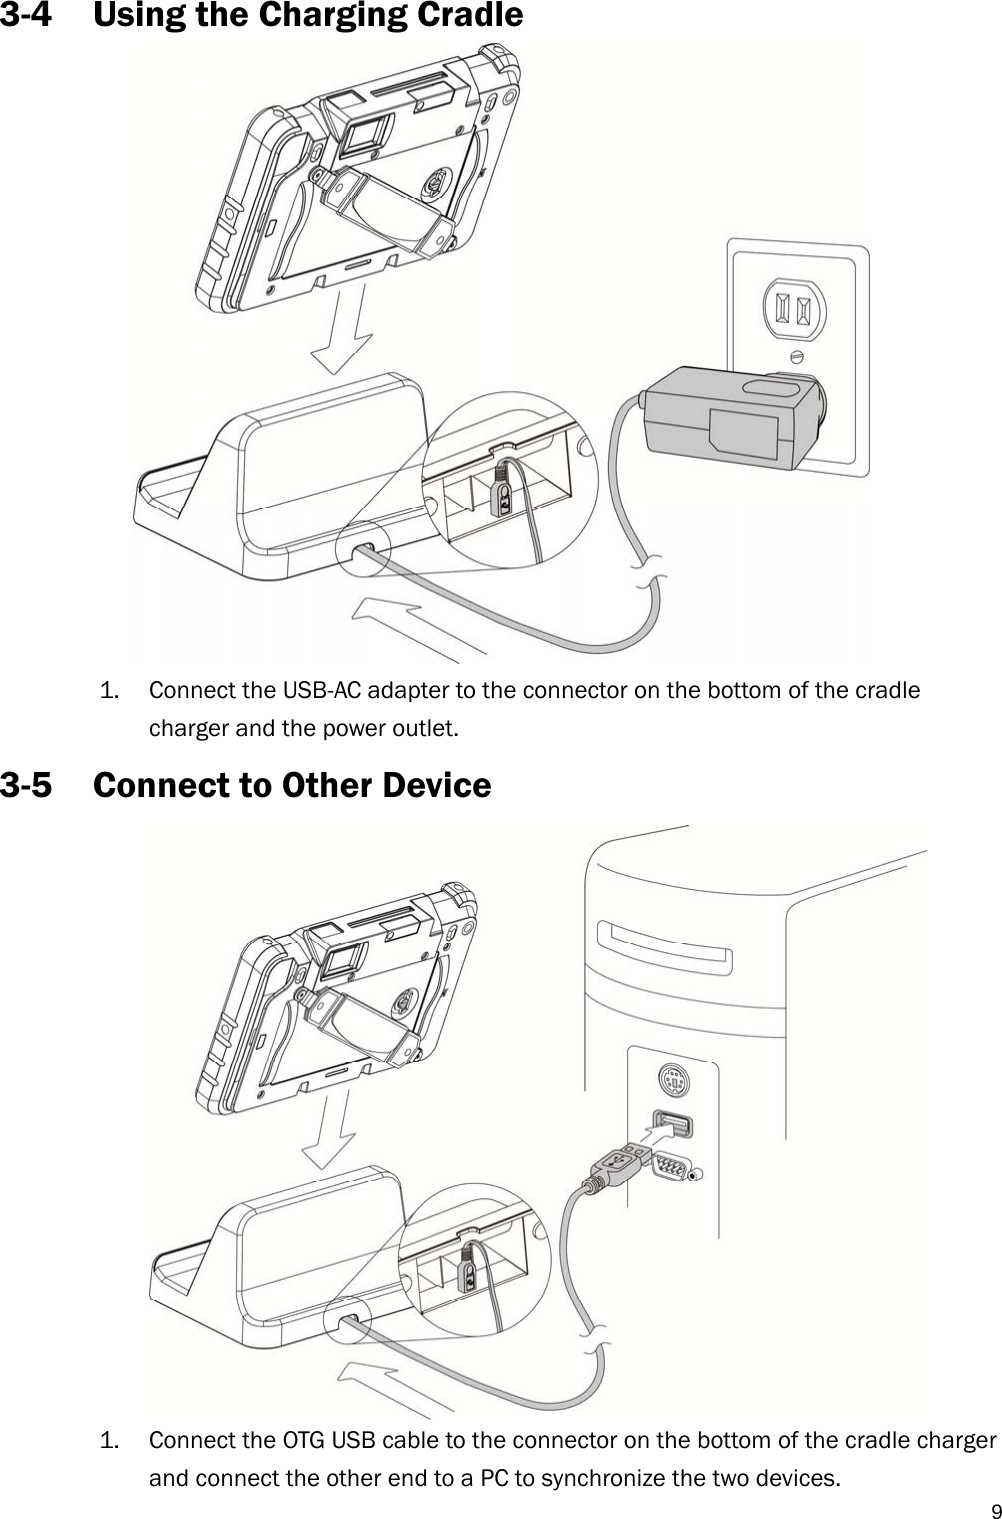
![134-1 OpenFunKeyLib [Function] This opens the Function Key API service. [Format] int OpenFunKeyLib(char *FunKeyControlVersion) [Argument] uchar *FunKeyControlVersion → get EC version. [Return Value] If opening service was successful, the return SV_ERROR_SUCCESS value, If there is can’t found EC control, the SV_ERROR_FAILED_NO_FOUND_DEVICE are returned, if return SV_ERROR_FAIL the service can’t form EC control get return value. [Explanation] Before using an API function other than this function, it is necessary that this function be executed first. [Example] char HIDVer[100]; If(OpenFunKeyLib(HIDVer) == SV_ERROR_SUCCESS) //Normal Processing Printf(HIDVer); else //Error Processing](https://usermanual.wiki/FLYTECH-TECHNOLOGY/P263L31/User-Guide-2765370-Page-21.png)
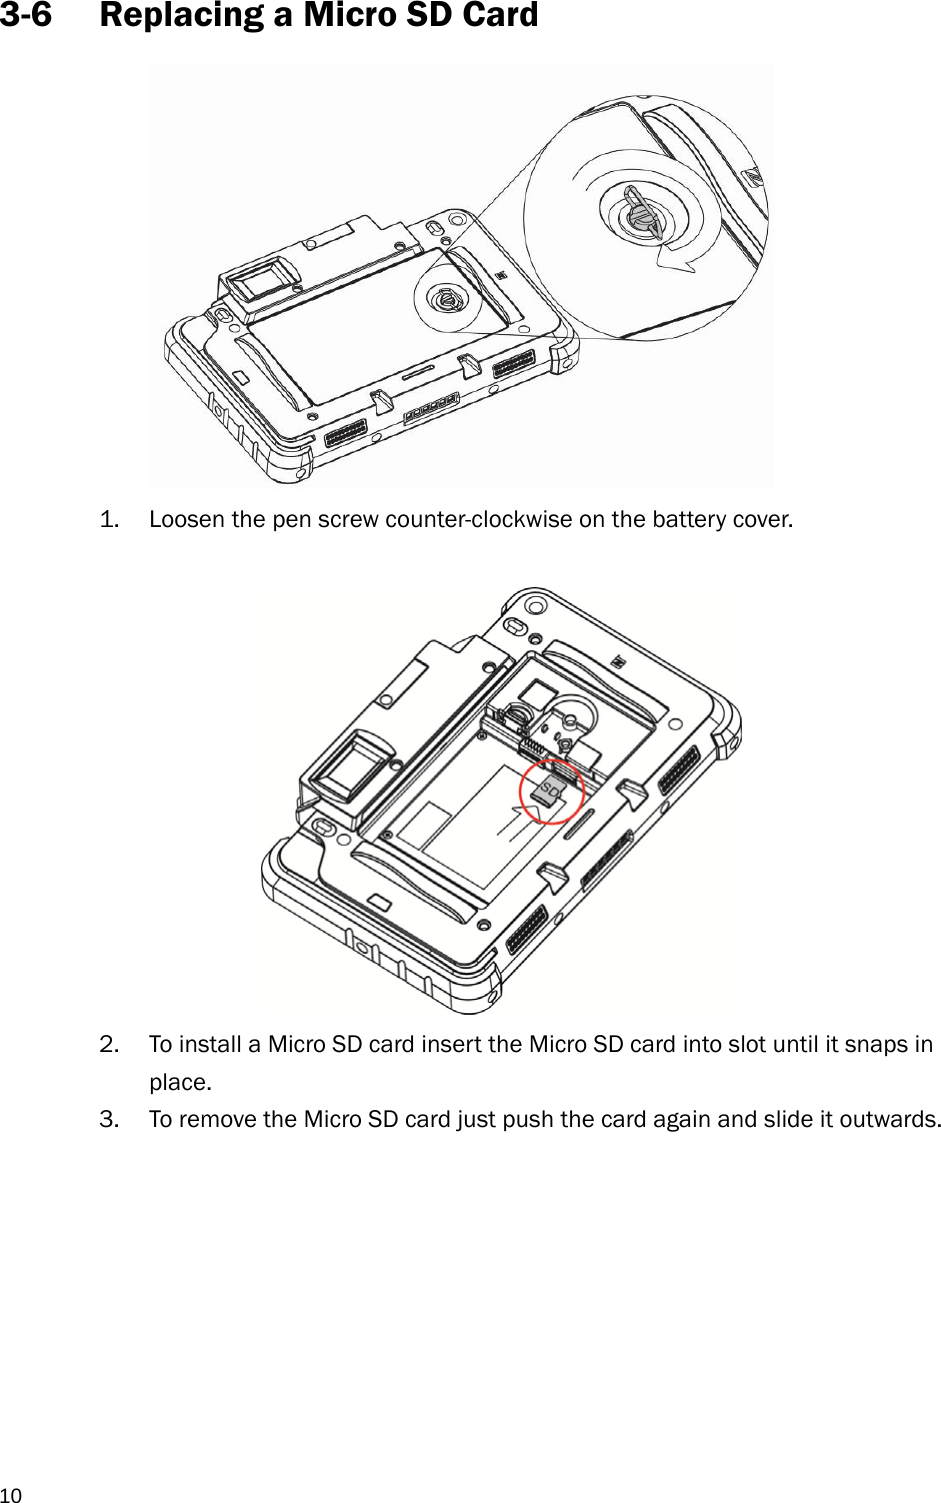
![14 4-2 SetFunKey1 [Function] Set Button 1 output key. [Format] int SetFunKey1(const char* SetKey, bool ButtonEnable) [Argument] const char* SetKey → Set button1 output key. bool ButtonEnable → Enable/Disable key output. Trur is enable, False is disable. [Return Value] If set value successful, the return SV_ERROR_SUCCESS value. If there is an error, the SV_ERROR_FAIL are returned. [Explanation] None [Example] DWORD Rtn; Rtn = SetFunKey1("A", true); //Set button 1 output ‘A’](https://usermanual.wiki/FLYTECH-TECHNOLOGY/P263L31/User-Guide-2765370-Page-22.png)
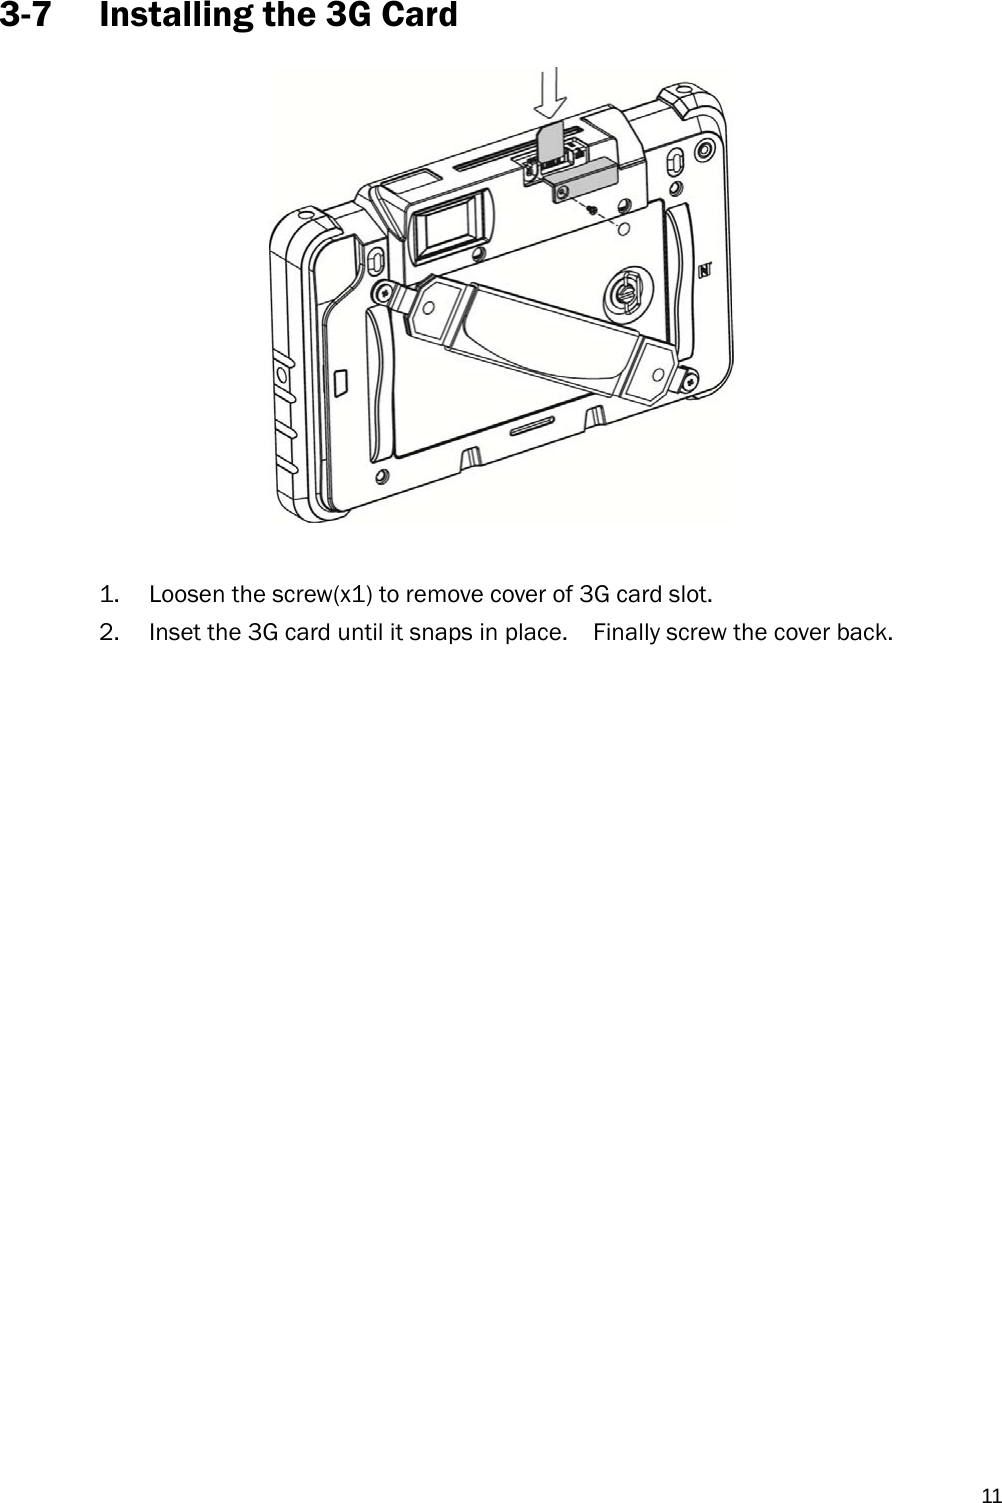
![154-3 SetFunKey2 [Function] Set Button 2 output key. [Format] int SetFunKey2(const char* SetKey, bool ButtonEnable) [Argument] const char* SetKey → Set button1 output key. bool ButtonEnable → Enable/Disable key output. Trur is enable, False is disable. [Return Value] If set value successful, the return SV_ERROR_SUCCESS value. If there is an error, the SV_ERROR_FAIL are returned. [Explanation] None [Example] DWORD Rtn; //Set button 2 is barcode reader’s trigger Rtn = SetFunKey2("<BarCode>", true);](https://usermanual.wiki/FLYTECH-TECHNOLOGY/P263L31/User-Guide-2765370-Page-23.png)
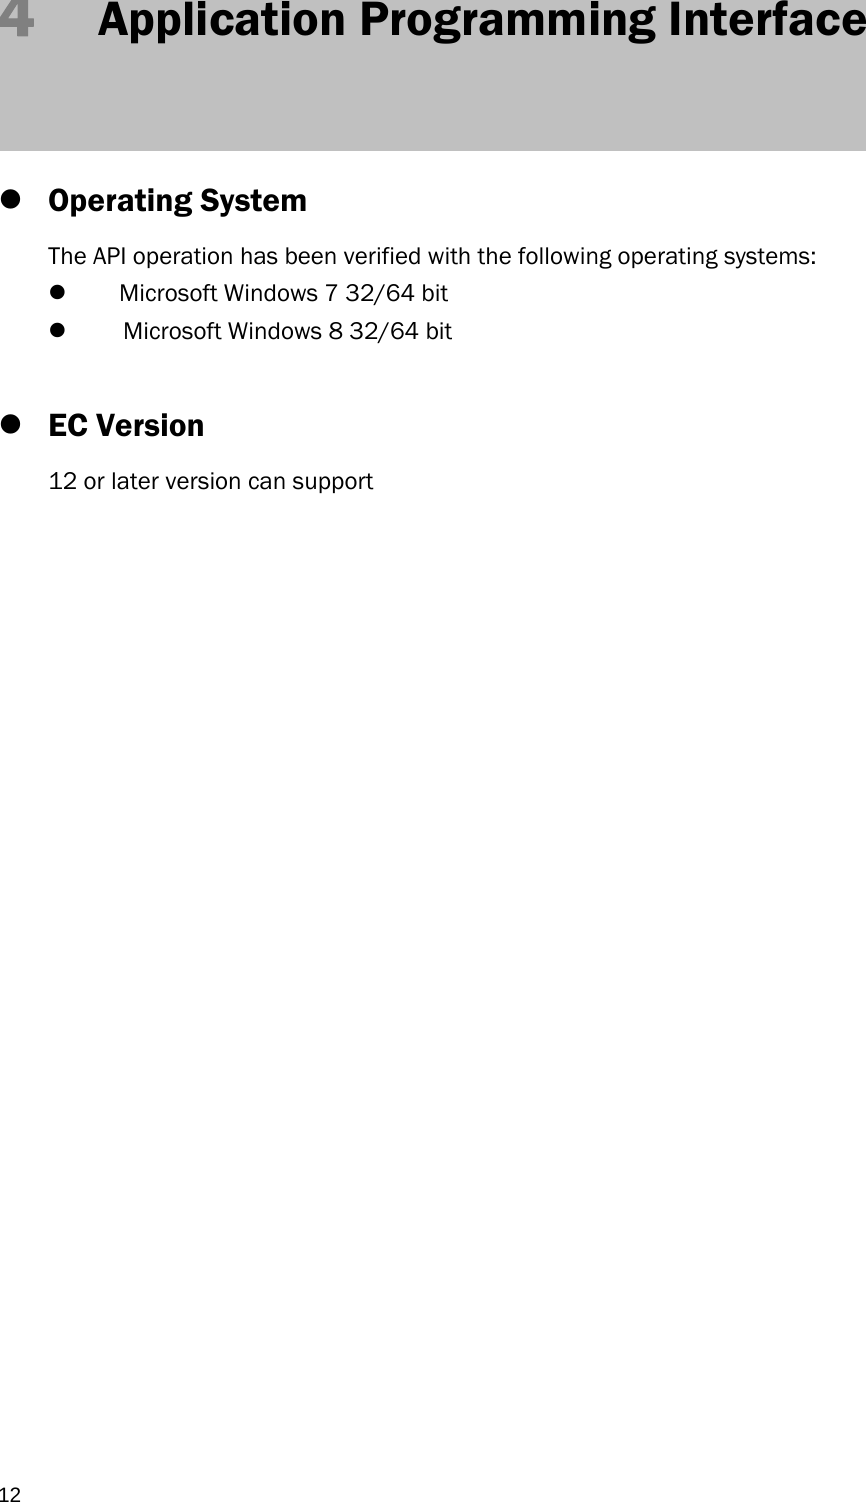
![16 4-4 Appendix A: KeyMap.ini [ASCII] 32=2C 44=36 56=25 68=07 80=13 92=31 104=0B 116=17 33=1E 45=2D 57=26 69=08 81=14 93=30 105=0C 117=18 34=34 46=37 58=33 70=09 82=15 94=35 106=0D 118=19 35=20 47=38 59=33 71=0A 83=16 95=2D 107=0E 119=1A 36=21 48=27 60=36 72=0B 84=17 96=35 108=0F 120=1B 37=22 49=1E 61=2E 73=0C 85=18 97=04 109=10 121=1C 38=24 50=1F 62=37 74=0D 86=19 98=05 110=11 122=1D 39=36 51=20 63=38 75=0E 87=1A 99=06 111=12 123=2F 40=26 52=21 64=1F 76=0F 88=1B 100=07 112=13 124=31 41=27 53=22 65=04 77=10 89=1C 101=08 113=14 125=30 42=25 54=23 66=05 78=11 90=1D 102=09 114=15 126=35 43=2E 55=24 67=06 79=12 91=2F 103=0A 115=16](https://usermanual.wiki/FLYTECH-TECHNOLOGY/P263L31/User-Guide-2765370-Page-24.png)
![17[FunctionKey] {Return}=28 {F11}=44 {NumLock}=53 {KeypadPointDelete}=63 {Escape}=29 {F12}=45 {KeypadDivision}=54 {KeyboardPower}=66 {Backspace}=2A {PrintScreen}=46 {KeypadMultiplication}=55 {KeyboardVolUp}=80 {Tab}=2B {ScrollLock}=47 {KeypadSubtraction}=56 {KeyboardVolDn}=81 {Space}=2C {Break}=48 {KeypadAdd}=57 {CapsLock}=82 {CapsLock}=39 {Pause}=48 {KeypadEnter}=58 {NumLock}=83 {F1}=3A {Insert}=49 {Keypad1End}=59 {ScrollLock}=84 {F2}=3B {Home}=4A {Keypad2Down}=5A {LeftCtrl}=E0 {F3}=3C {PageUp}=4B {Keypad3PageDn}=5B {LeftShift}=E1 {F4}=3D {Delete}=4C {Keypad4Left}=5C {LeftAlt}=E2 {F5}=3E {End}=4D {Keypad5}=5D {RightCtrl}=E4 {F6}=3F {PageDown}=4E {Keypad6Right}=5E {RightShift}=E5 {F7}=40 {RightArrow}=4F {Keypad7Hoem}=5F {RightAlt}=E6 {F8}=41 {LeftArrow}=50 {Keypad8Up}=60 {F9}=42 {DownArrow}=51 {Keypad9PageUp}=61 {F10}=43 {UpArrow}=52 {Keypad0Insert}=62](https://usermanual.wiki/FLYTECH-TECHNOLOGY/P263L31/User-Guide-2765370-Page-25.png)
![18 [MediaKey] (ScanNextTrack)=00B5 (VolumeDown)=00EA (WWWSearch)=0221 (ScanPreviousTrack)=00B6 (BassUp)=0152 (WWWHome)=0223 (Stop)=00B7 (BassDown)=0153 (WWWBack)=0224 (Play/Pause)=00CD (TrebleDown)=0155 (WWWForward)=0225 (Mute)=00E2 (MediaSelect)=0183 (WWWStop)=0226 (BassBoost)=00E5 (Mail)=018A (WWWRefresh)=0227 (Loudness)=00E7 (Calculator)=0192 (WWWFavorites)=022A (VolumeUp)=00E9 (MyComputer)=0194 [SpecialKey] <BarCode>=1111](https://usermanual.wiki/FLYTECH-TECHNOLOGY/P263L31/User-Guide-2765370-Page-26.png)