FORTUNE POWER ELEC TECH ANJ-361 Wireless Game Pad User Manual
FORTUNE POWER ELEC. TECH. CO., LTD Wireless Game Pad
User Manual
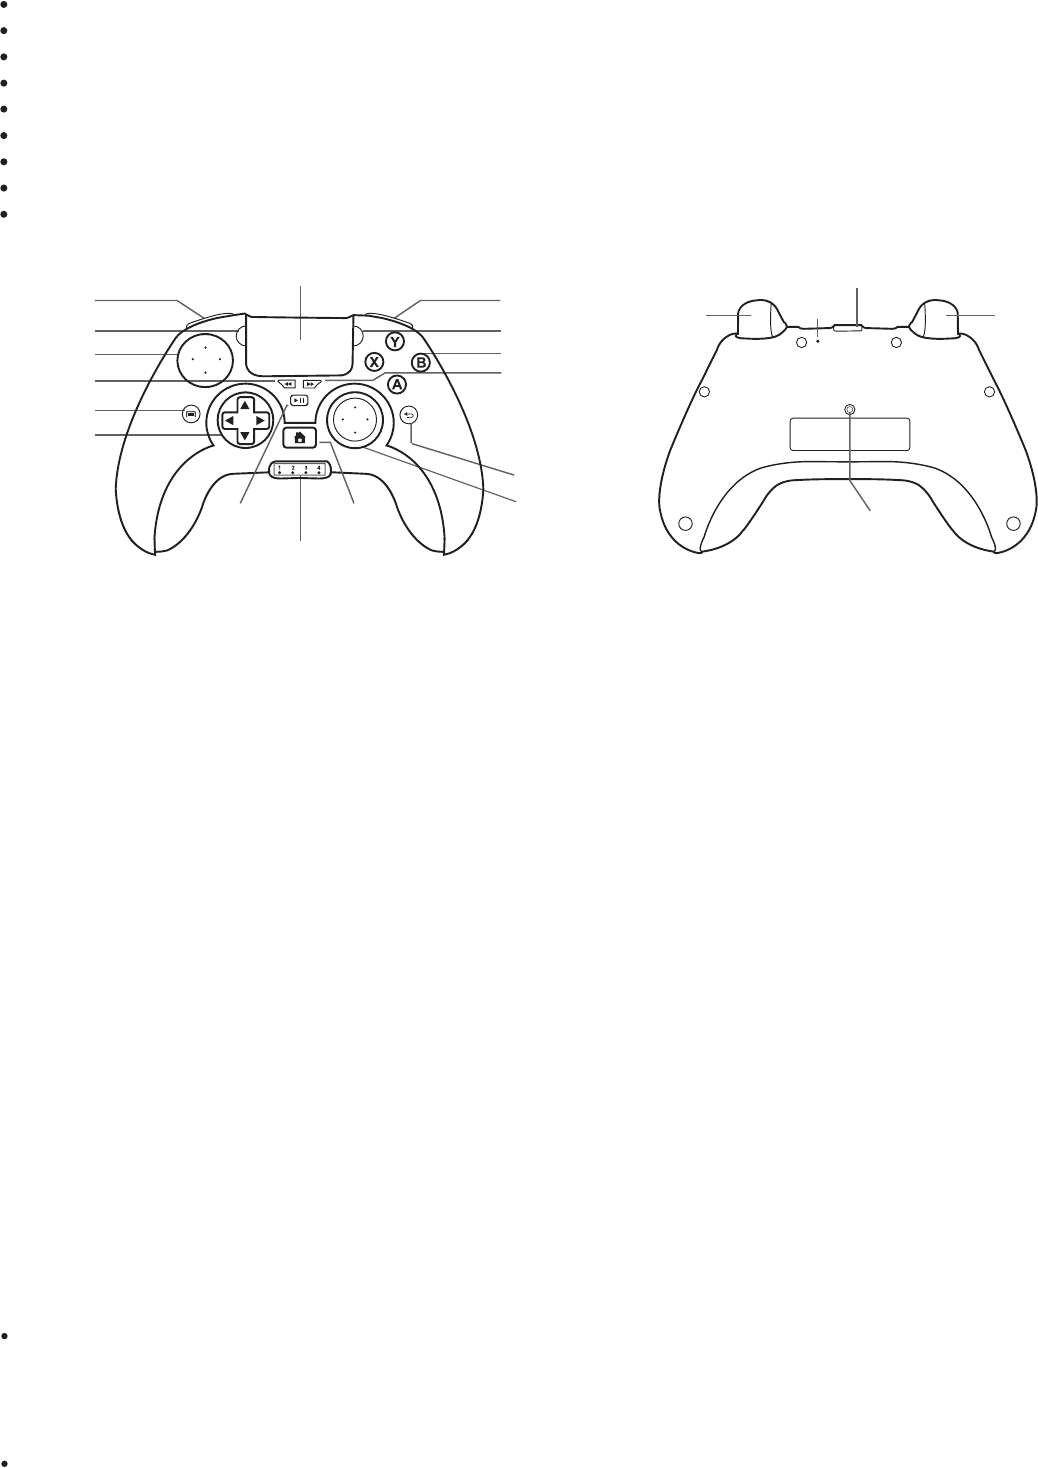
Button
Specication / Features
SELECT START
L1 R1
INPUT BOTTONS
BACK
RIGHT STICKS
TOUCH PANEL
LED INDICATORS
HOMEPLAY/PAUSE
LEFT STICKS
MENU
REWIND FORWARD
D-PAD
Supports dierent device for Set Box TV, Tablet, smart phones running by Android version 3.2 and up, PC
Standard Bluetooth HID data transmission, No require the PIN code when pair with the device
Dual Analog Mini Sticks with 8 way Direction Pad
2 Shoulder and 2 Trigger buttons
3 Media key, 3 system buttons and A / B / X / Y input buttons
Built-in rechargeable battery (380mAH), chargeable via Micro USB port
4 LED light indicators for charging , working and function mode connection
Support mode change after pair with device
A special TOUCH panel design easy to control and support more of the touch or mouse games
POWER/MODE CHANGE
L2 RESET
USB(MICRO B) PORT
R2
Pairing your gamepad with your BT device
Make sure that your connect device is powered on. Press and hold the POWER / MODE buttons around 6 seconds until the LED
Indicator on the bottom of gamepad blinks slowly , then release the button. Press the POWER / MODE buttons again around 3
seconds the LED should be blinking fast to pair the device.
Now activate Bluetooth on your device and search available Bluetooth devices. Select the [Game Controller] to pair your device
with your controller. As soon as the LED on the controller stops blinking and stays lit, the connection had been established. The
rst entry mode will follow the previous mode and indicator.
Pairing your gamepad through the dongle for comuter
Make sure that your dongle is connect via the USB port of computer and open the Bluetooth device. Press and hold the POWER /
MODE buttons around 6 seconds as above operated way start to pair the device. Select and add a Bluetooth device. Wait a few
moments as your device searching for nearby discoverable controllers. You will see “ Bluetooth HID” appear when open the Game
Controllers panel.
The representing the various operating modes with action buttons are indicator overview on sheet. Press and hold the button
corresponding to the mode which to congure plus the POWER / MODE button for approx. Three seconds, until the correspond-
ing LED on the controller begins to blink rapidly.
Mark :
IF you pair your controller with a tablet, smart phone, STB or PC, you can turn your controller o and on again without having to go
through the pairing process again, as long as you haven’t used the controller with another device in the meantime. The controller will
return to the last operating mode when it starts back up.
IF you pair the controller with another device in the meantime, though, you will have to go through the pairing process again. When
the controller is pairing with an already known device, the LEDs will ash slowly. If it does not nd the device it was paired with, it will
automatically turn o. The controller will only pair to a new device when the LEDs are ashing rapidly.
IF there request a password to pair between the Bluetooth device and gamepad. Please input the “0000” for less than 2.0 versions
Mode for Controller
Gamepad mode :
The gamepad oers two dierent operating modes as well as a variation of the game controller mode. You can push the POWER /
MODE button to change between the GAMEPAD and Mouse / Keyboard (Touch pad) mode after pair the device and based on
the dierent game type to set up for operation.
Mouse / Keyboard (Touch pad) mode :
As a standard mouse to operated for PC USB device ; and allows you to operated touch-screen-controlled Android applications
and games as mouse on android. The two shoulder buttons represent the left and right mouse buttons, respectively.
A standard HID gamepad with two analog sticks and 8 way D-pad. As normally 4 axes 12 / 16 buttons with POV function game-
pad on PC ; for Android support 3.2 version or above used for all android platform incl. STB, smart phone or tablet.
A Analog Triggers (L2, R2) mode support some of special android games as google pad’s games on android market
ANJ-361 USER Manual
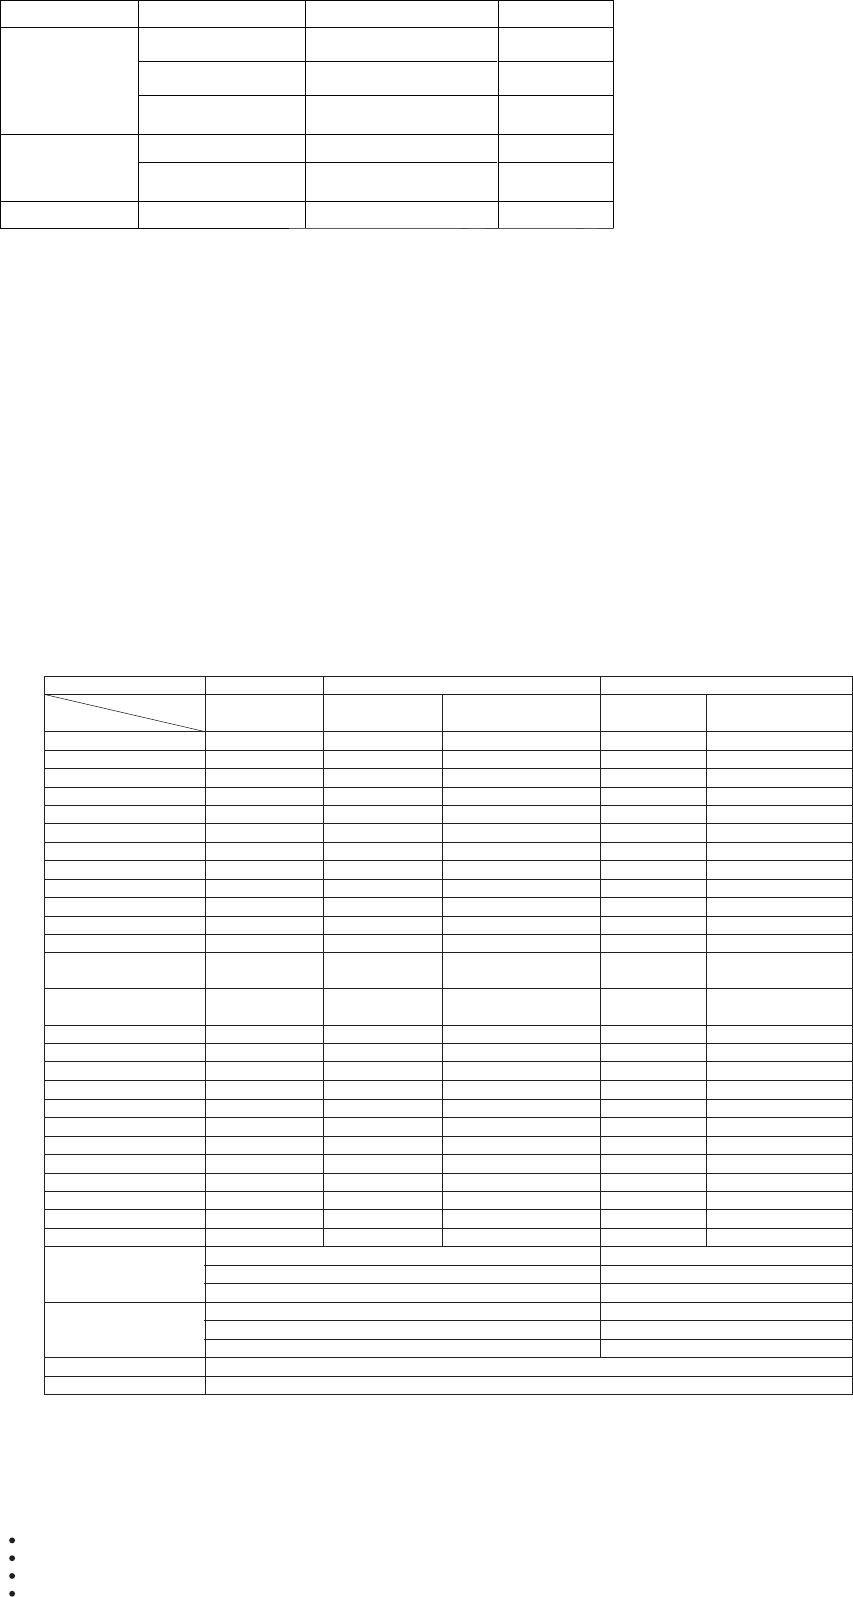
Overview of operation modes and LED indicator
Device Mode Setting / Switch LED Indicator
Android
Amazon Fire TV
Gamepad L2,R2 Digital POWER / MODE + A button
POWER / MODE + Y button
POWER / MODE + B button
POWER / MODE + X button
POWER / MODE + B button
□■□□
Gamepad L2,R2 Analog □■■□
Mouse (Touch Pad)
Keyboard □□■□
PC USB
Gamepad □□□■
Mouse (Touch Pad)
Keyboard □□■□
Charging indicator ■□□□
Button Mapping
Device Amazon
Mode
Button Gamepad
PC USBAndroid
Gamepad mode Gamepad mode Mouse( TOUCH pad) /
KB mode
Mouse( TOUCH pad) /
KB mode
D-pad UP
D-pad Down
D-pad Left
D-pad Right
Left Analog UP
Left Analog Down
Left Analog Left
Left Analog Right
Right Analog UP
Right Analog Down
Right Analog Left
Right Analog Right
UP
DOWN
LEFT
RIGHT
Y Axis
Y Axis
X Axis
X Axis
Z Rotate Axis
Z Rotate Axis
Z Axis
Z Axis
UP
DOWN
LEFT
RIGHT
Y Axis
Y Axis
X Axis
X Axis
Z Rotate Axis
Z Rotate Axis
Z Axis
Z Axis
UP
DOWN
LEFT
RIGHT
UP
DOWN
LEFT
RIGHT
-
-
-
-
POV UP
POV DOWN
POV LEFT
POV RIGHT
Y Axis
Y Axis
X Axis
X Axis
Z Rotate Axis
Z Rotate Axis
Z Axis
Z Axis
UP
DOWN
LEFT
RIGHT
UP
DOWN
LEFT
RIGHT
-
-
-
-
Touch pad up / down
Touch pad left / right
Button A
Button B
Button X
Button Y
L1
R1
L2
R2
Left Ananlog / L3(push)
Right Ananlog / R3(push)
-
-
A
B
X
Y
L1
R1
L2
R2
THUMBR
THUMBR
-
-
A
B
X
Y
L1
R1
L2
R2
THUMBR
THUMBR
Mouse UP / DOWN
navigation
Mouse LEFT / RIGHT
navigation
J
K
M
I
Mouse_Left_Key
Mouse_Right_Key
X
Z
O
L
-
-
Button 1
Button 2
Button 3
Button 4
Button 5
Button 6
Button 7
Button 8
Button 11
Button 12
Mouse UP / DOWN
navigation
Mouse LEFT / RIGHT
navigation
J
K
M
I
Mouse_Left_Key
Mouse_Right_Key
X
Z
O
L
Button Select
Button Start
System buttons
Media control buttons
Button RESET
Button POWER / MODE
-
-
HOME
BACK
MENU
REWIND : Previous
FORWARD : Next
PLAY / PAUSE
RESET
Mode change and Power ON / OFF
SELECT
START
R
Y
Button 9
Button 10
go th IE
back page on IE
-
-
-
-
R
Y
When the battery is low, the LED will blink slowly. Connect the controller to a standard, active USB micro B port (PC, charger for your
tablet or smart phone, etc.). While the controller is charging, LED will be illuminated. Once the battery is fully charged, LED will shut o.
The controller will turn itself o when the battery charge is too low for normal use. When the controller is not paired with a device, it
shuts-o automatically if it is inactive for one minutes. IF the controller is paired with a device, it will shut-o after ve minutes of
inactivity in order to conserve power for sleep mode.
Charging your Controller and Sleep mode
Many games that support external controllers require “button mapping”, which means that you have to setting between the action
buttons on the controller with the game. Check the settings and/or options menu of your game to see if this is the case.
Mark :
1. Controller doesn’t work with [game].
Is it possible that you tried to change the operating mode of your controller without un-pairing and re-pairing it with your tablet/smart
phone? As described in the “Pairing the controller with your Android tablet or smart phone” section, it is only possible to change the mode
if you un-pair the controller and then pair it again with the new mode selected. This is a limitation of the Bluetooth technology and not
something that we can avoid.
2. Controller is not recognized and does not work, even though it is active and paired.
Warning: Changes or modications to this unit not expressly approved by the party responsible for compliance could void the user’s authority to operate the equipment.
Note: This equipment has been tested and found to comply with the limits for a Class B digital device, pursuant to Part 15 of the FCC Rules. These limits are designed to provide
reasonable protection against harmful interference in a residential installation. This equipment generates, uses and can radiate radio frequency energy and, if not installed and used
in accordance with the instructions, may cause harmful interference to radio communications. However, there is no guarantee that interference will not occur in a particular
installation. If this equipment does cause harmful interference to radio or television reception, which can be determined by turning the equipment o and on, the user is
encouraged to try to correct the interference by one or more of the following measures:
Reorient or relocate the receiving antenna.
Increase the separation between the equipment and receiver.
Connect the equipment into an outlet on a circuit dierent from that to which the receiver is connected.
Consult the dealer or an experienced radio/TV technician for help.
This equipment has been tested and found to comply with the limits for a Class B
digital device, pursuant to Part 15 of the FCC Rules. These limits are designed to
provide reasonable protection against harmful interference in a residential installation.
This equipment generates, uses and can radiate radio frequency energy and, if not
installed and used in accordance with the instructions, may cause harmful interference
to radio communications. However, there is no guarantee that interference will not
occur in a particular installation. If this equipment does cause harmful interference
to radio or television reception, which can be determined by turning the equipment off
and on, the user is encouraged to try to correct the interference by one of the
following measures:
Reorient or relocate the receiving antenna.
Increase the separation between the equipment and receiver.
Connect the equipment into an outlet on a circuit different from that to which
the receiver is connected.
Consult the dealer or an experienced radio/TV technician for help.