FOXCONN T77H121050 802.11n 1x1 PCIe MINICARD TRANSCEIVER User Manual FT30 En Sch V1 1 Standard 3 2
FOXCONN INTERNATIONAL INC 802.11n 1x1 PCIe MINICARD TRANSCEIVER FT30 En Sch V1 1 Standard 3 2
UserManual.wiki
>
FOXCONN
>
T77H121050 User Manual
Users Manual
Navigation menu
Upload a User Manual
Namespaces
Wiki Guide
HTML
PDF
Info
Views
User Manual
Discussion / Help
Navigation
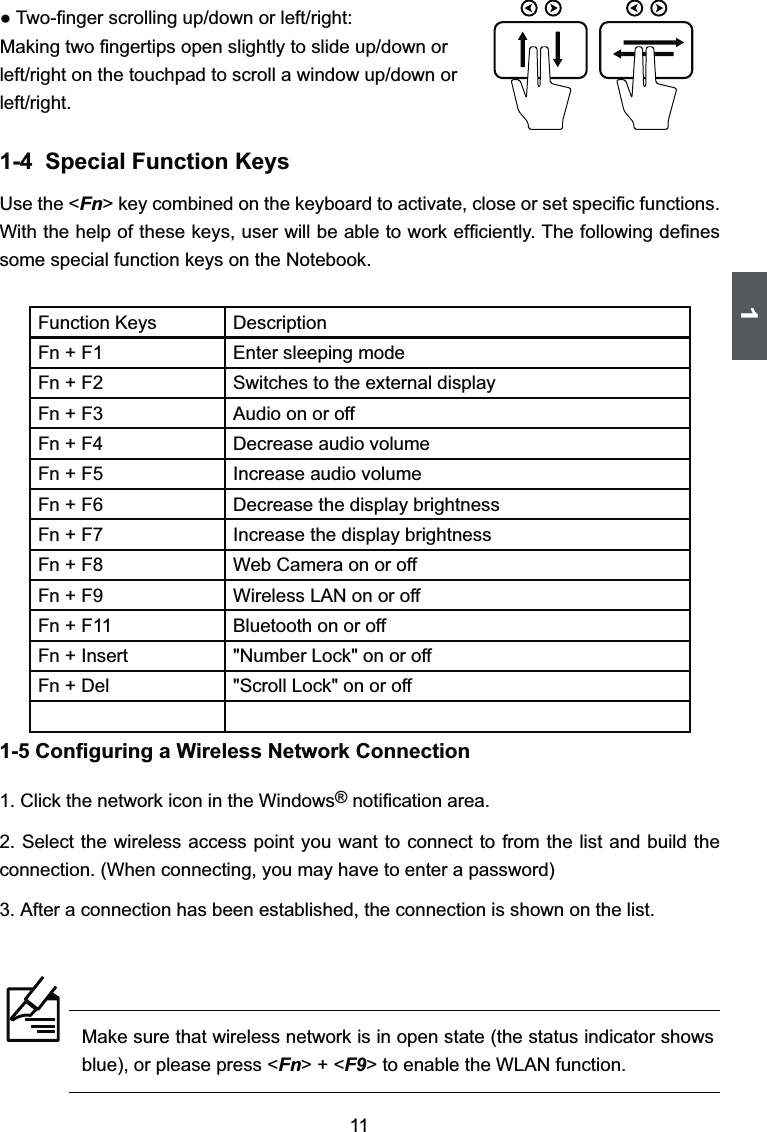
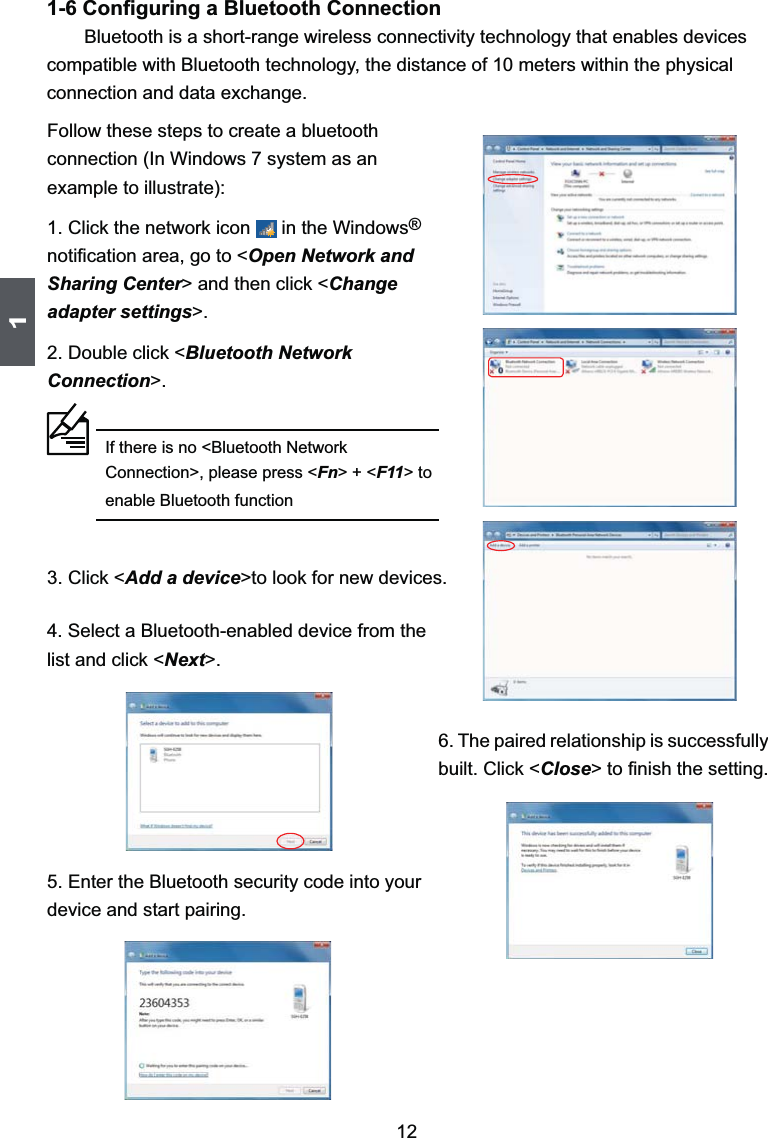

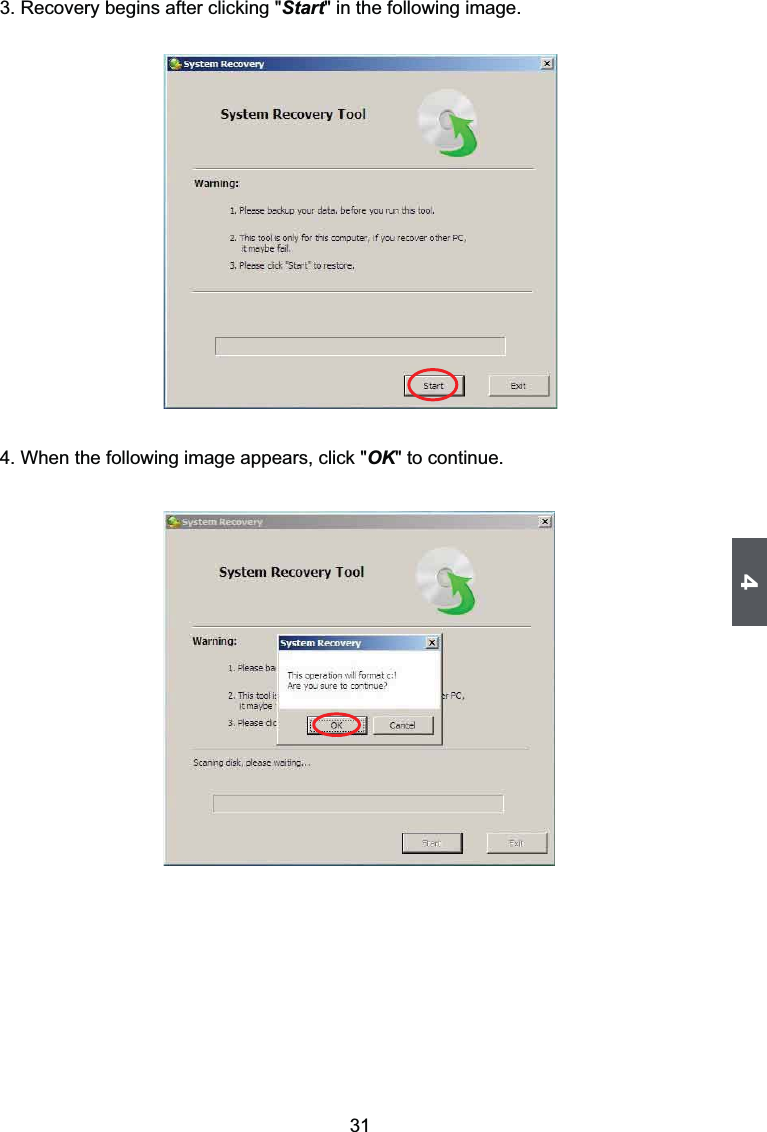
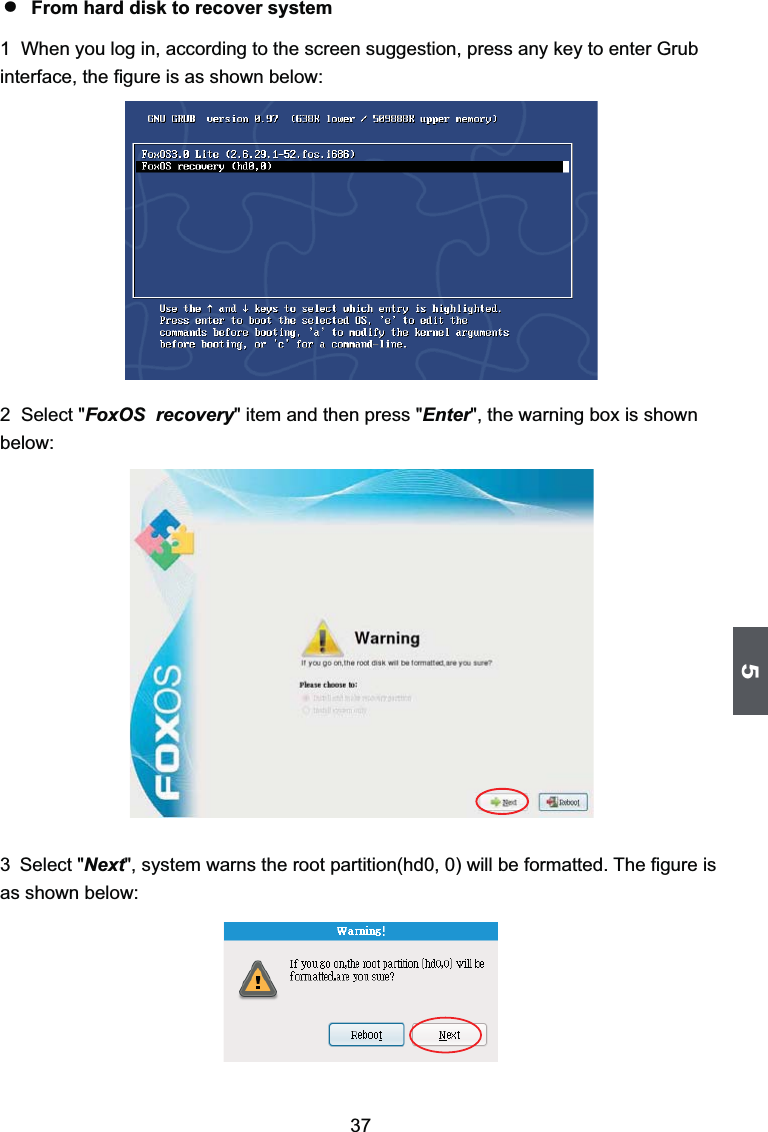
![1629. Check if the diskette contains the driver files.²Setting BIOS and Install a New Windows XP1. Press <Del> to enter BIOS setup during POST, set "1st Boot Device" to "USB : SONY DVD-ROM D"(DVD drive name) in "Boot" -> "Boot Device Priority" menu, the figure is as shown below. And then save changes and exit BIOS. Boot Device Priority Specifies the boot sequence from the 1st Boot Device [USB : SONY DVD-ROM D] available devices . 2nd Boot Device [HDD : PO-WDC WD2500B] A device enclosed in parenthesis has been disabled in the corresponding type menu. ↑↓ ←→ : Move +/-/ :Change Option Enter:Select Esc :Exit F1 :General help F2/3 :Change color F9 : Optimal defaults F10 : Save and exitv02.67 (C)Copyright 1985-2009, American Megatrends, Inc.BootBIOS SETUP UTILITY](https://usermanual.wiki/FOXCONN/T77H121050/User-Guide-1255580-Page-24.png)
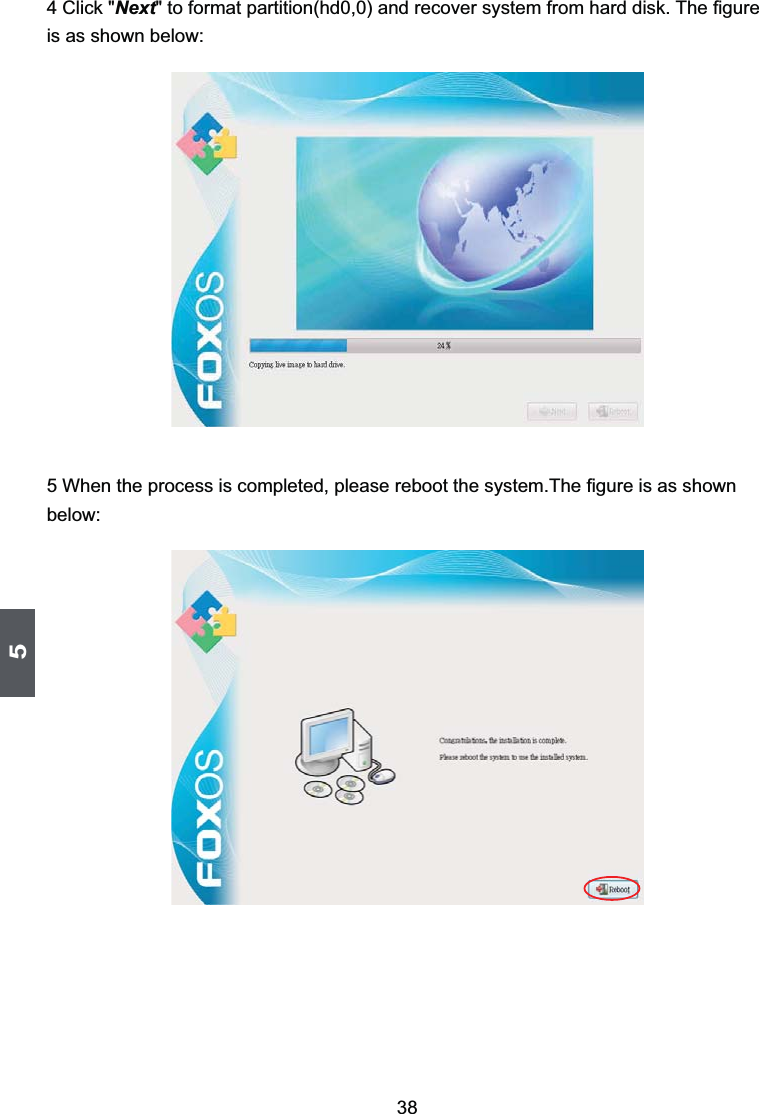
![2029. Press <Enter> to install Windows XP. The process will ask you to format hard disk,copy files...etc, follow the installation steps until the system is installed complete.² Install drivers in Windows XP1. After installing Windows XP, you have to install necessary drivers before using the Notebook. Insert the Notebook driver CD to the USB DVD drive, waiting for a few seconds, the main menu will be displayed on your Notebook screen. 2. Clicking these options to install all the drivers for your system. You must firstly click "Intel Chipset Driver" to install and then click "One Click Setup" to install the other drivers left, or you can click each individual driver to install it manually.3. After all the drivers are installed, you need to restart your Notebook, then you can use it.Windows XP Professional Setup The following list shows the existing partitions andunpartitioned space on this computer.Use the UP ad DOWN ARROW keys to select an item in the list. ● To set up Windows XP on the selected item, press ENTER. ● To create a partition in the unpartitioned space, press C. ● To delete the selected partitions, press D. 114471 MB Disk 0 at id 0 on bus 0 on atapi [MBR] D: Partition2 [Unknown] 64464 MB < 64463 MB free> Unpartitioned space 8 MB Unknown Disk <There is no disk in this drive.> Unknown Disk <There is no disk in this drive.> ENTER=Install D=Delete Partition F3=QuitC:Partition1 [NTFS] 49999 MB < 48568 MB free>](https://usermanual.wiki/FOXCONN/T77H121050/User-Guide-1255580-Page-28.png)
![2122-2 Install Windows XP system in IDE modeThe default setting of SATA hard disk is AHCI in the Notebook, if you want to install Windows XP system in IDE mode, please change the mode of SATA hard disk to IDE in BIOS firstly, otherwise can meet the problem which is unable to install.What kinds of hardware and software you need here :An USB DVD drive, a Notebook driver CD, Windows XP Install CD.Before you continue :■ Shut down your computer.■ Connect the DVD drive to an USB port of Notebook and connect the power cord to AC power.²Setting BIOS and Install a New Windows XP1. Power on the Notebook, press <Del> to enter BIOS setup during POST, set "Configure SATA#1 as" to "IDE " in "Advanced" -> "SATA Configuration" menu, the figure is as shown below:2. To set "1st Boot Device" to "USB : SONY DVD-ROM D"(DVD drive name) in "Boot" -> "Boot Device Priority" menu, the figure is as shown below. And then save changes and exit BIOS. SATA Configuration SATA#1 Configuration [Compatible] IDE Configure SATA#1 as [IDE] AHCI AHCI Settings ► AHCI Port0 [Hard Disk] ↑↓ ←→ : Move +/-/ :Change Option Enter:Select Esc :Exit F1 :General help F2/3 :Change color F9 : Optimal defaults F10 : Save and exitv02.67 (C)Copyright 1985-2009, American Megatrends, Inc.AdvancedBIOS SETUP UTILITYOptions](https://usermanual.wiki/FOXCONN/T77H121050/User-Guide-1255580-Page-29.png)
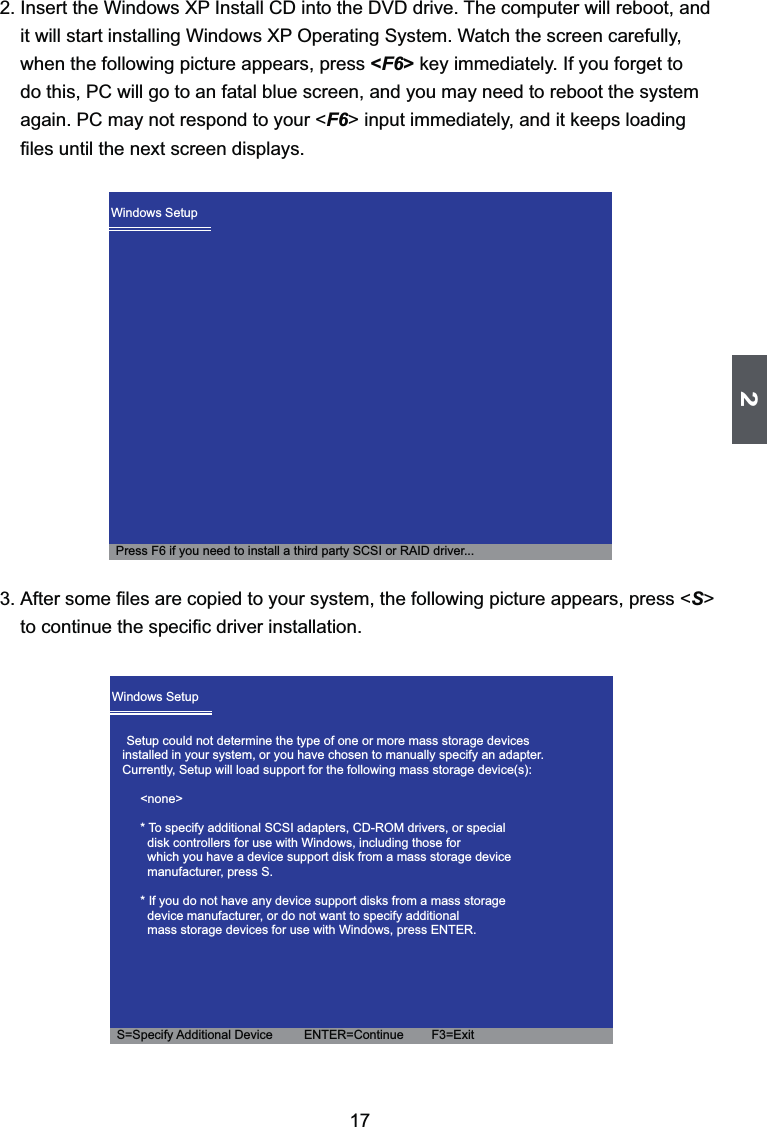
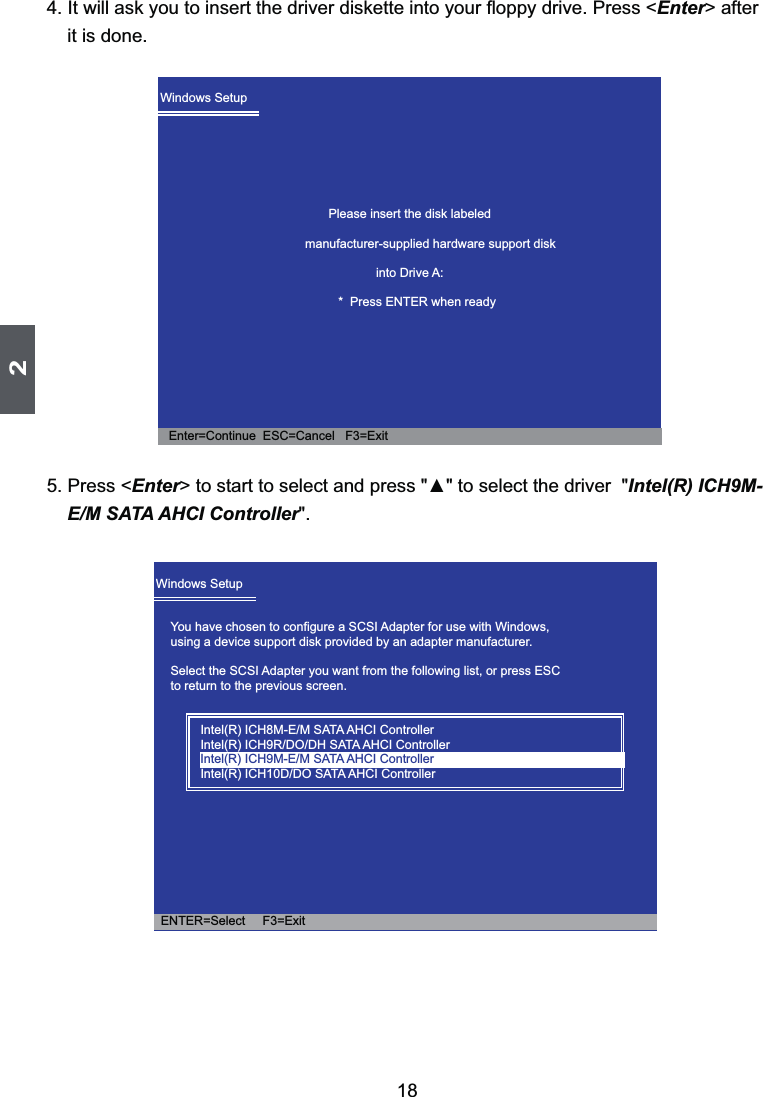
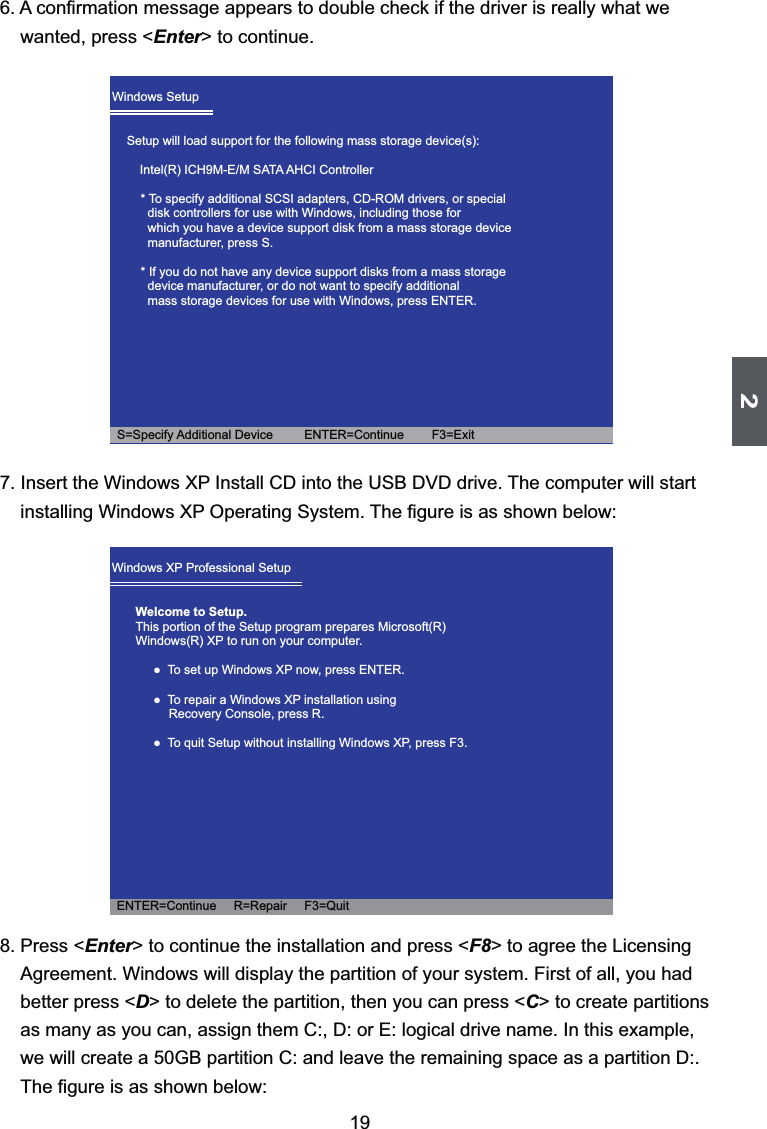
![222 Boot Device Priority Specifies the boot sequence from the 1st Boot Device [USB : SONY DVD-ROM D] available devices . 2nd Boot Device [HDD : PO-WDC WD2500B] A device enclosed in parenthesis has been disabled in the corresponding type menu. ↑↓ ←→ : Move +/-/ :Change Option Enter:Select Esc :Exit F1 :General help F2/3 :Change color F9 : Optimal defaults F10 : Save and exitv02.67 (C)Copyright 1985-2009, American Megatrends, Inc.BootBIOS SETUP UTILITY3. Insert the Windows XP Install CD into the USB DVD drive. The computer will reboot, and it will start installing Windows XP Operating System. The figure is as shown below:4. Press <Enter> to continue the installation and press <F8> to agree the Licensing Agreement. Windows will display the partition of your system. First of all, you had better press <D> to delete the partition, then you can press <C> to create partitions as many as you can, assign them C:, D: or E: logical drive name. In this example, we will create a 50GB partition C: and leave the remaining space as a partition D:. The figure is as shown below:Windows XP Professional Setup Welcome to Setup.This portion of the Setup program prepares Microsoft(R)Windows(R) XP to run on your computer. ● To set up Windows XP now, press ENTER. ● To repair a Windows XP installation using Recovery Console, press R. ● To quit Setup without installing Windows XP, press F3. ENTER=Continue R=Repair F3=Quit](https://usermanual.wiki/FOXCONN/T77H121050/User-Guide-1255580-Page-30.png)
![2325. Press <Enter> to install Windows XP. The process will ask you to format hard disk,copy files...etc, follow the installation steps until the system is installed completely.² Install drivers in Windows XP1. After installing Windows XP, you have to install necessary drivers before using the Notebook. Insert the Notebook driver CD to the USB DVD drive, waiting for a few seconds, the main menu will be displayed on your Notebook screen. 2. Clicking these options to install all the drivers for your system. You must firstly click "Intel Chipset Driver" to install and then click "One Click Setup" to install the other drivers left, or you can click each individual driver to install it manually.3. After all the drivers are installed, you need to restart your Notebook, then you can use it.Windows XP Professional Setup The following list shows the existing partitions andunpartitioned space on this computer.Use the UP ad DOWN ARROW keys to select an item in the list. ● To set up Windows XP on the selected item, press ENTER. ● To create a partition in the unpartitioned space, press C. ● To delete the selected partitions, press D. 114471 MB Disk 0 at id 0 on bus 0 on atapi [MBR] D: Partition2 [Unknown] 64464 MB < 64463 MB free> Unpartitioned space 8 MB Unknown Disk <There is no disk in this drive.> Unknown Disk <There is no disk in this drive.> ENTER=Install D=Delete Partition F3=QuitC:Partition1 [NTFS] 49999 MB < 48568 MB free>](https://usermanual.wiki/FOXCONN/T77H121050/User-Guide-1255580-Page-31.png)
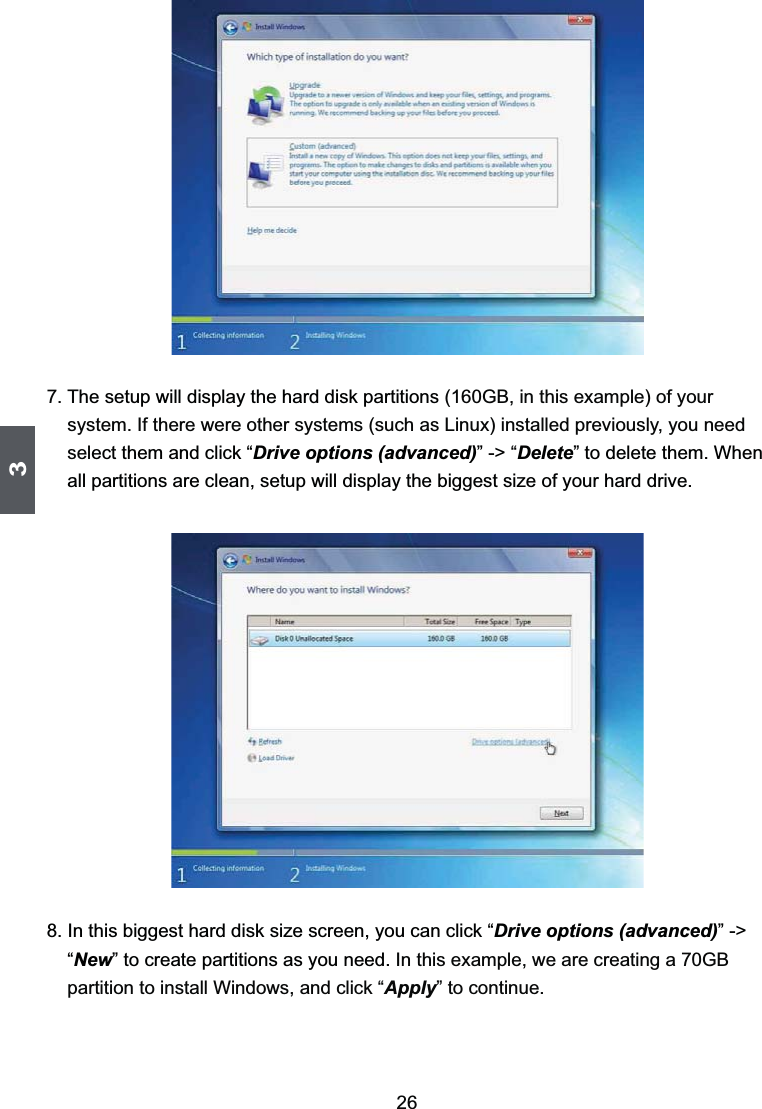
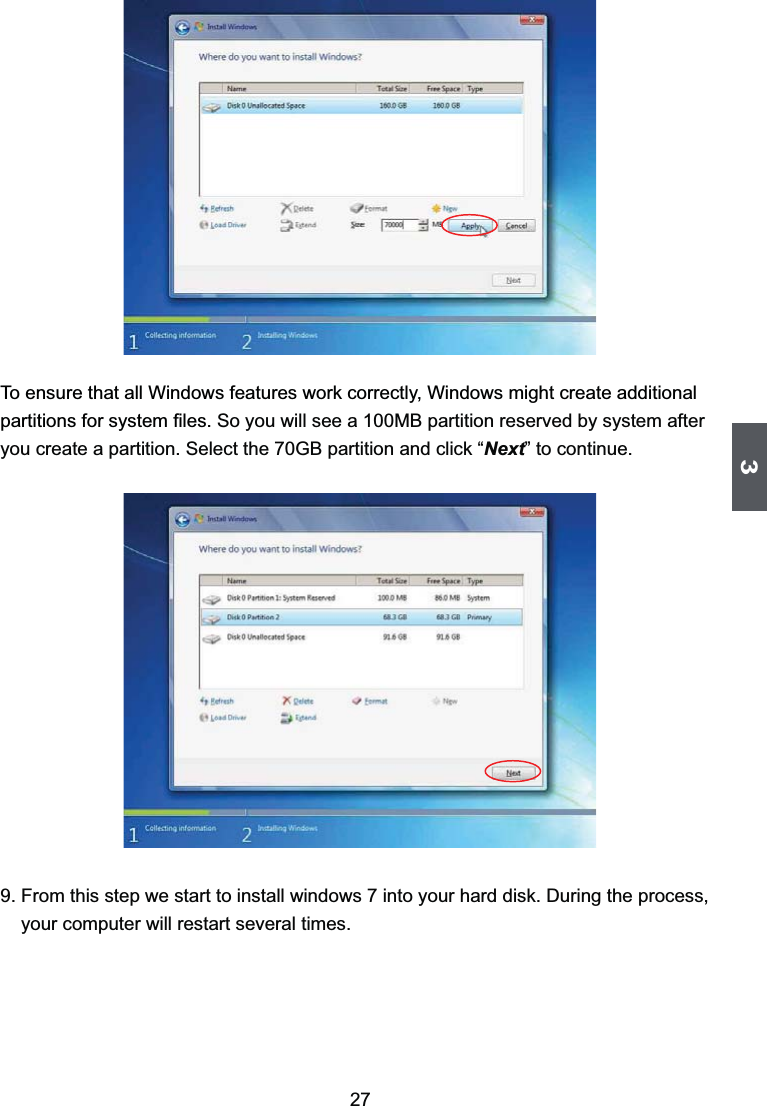
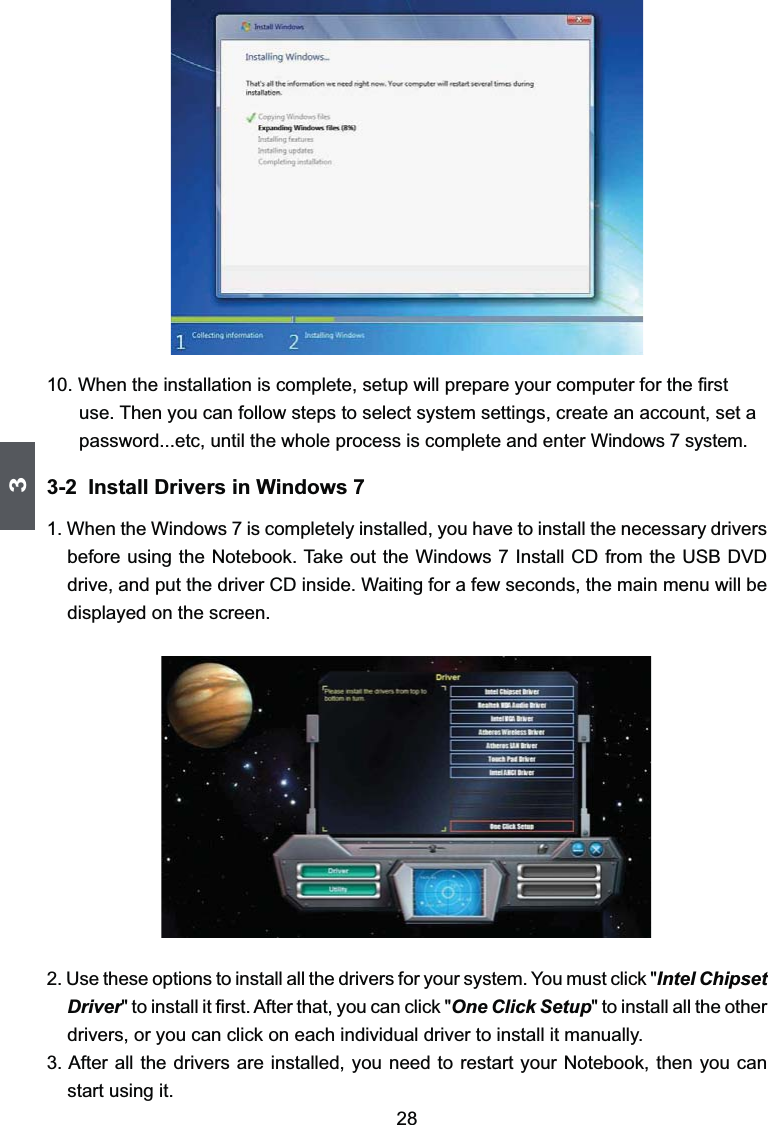
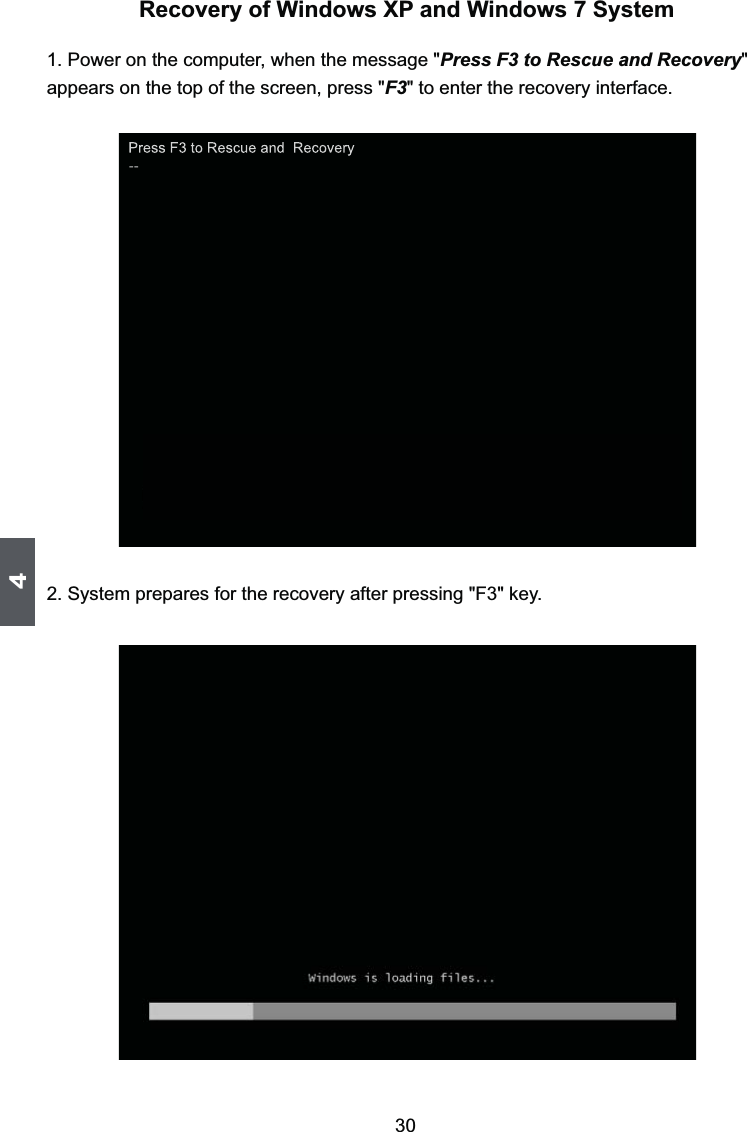
![253Install Windows 7 in NotebookMake sure you have these ready:An USB DVD drive, a Notebook driver CD, Windows 7 Install CDBefore you continue :■ Shut down your computer■ Connect the USB DVD drive to an USB port of Notebook and connect the power cord to AC power3-1 Setting BIOS and Install a new Windows 7 system1. Power on your Notebook, then press <Del> to enter BIOS setup during POST, set "1st Boot Device" to "USB : SONY DVD-ROM D"(DVD drive name) in "Boot" -> "Boot Device Priority" menu, the figure is as shown below. And then save changes and exit BIOS.2. Put the Windows 7 Install CD into the USB DVD drive.3. The computer will reboot, and it will start loading files for installing Windows 7 system.4. After that, it will start Windows and come out a “Install Windows” dialog box to set the “Language to install”, “Time and current format” and “Keyboard or input method”. Click “Next” to continue and click “Install now” button to start the setup.5. When the license terms appears, select to accept and click “Next” to continue.6. It then asks you to select the installation type. Click “Custom (advanced)” to install a new copy of Windows. Boot Device Priority Specifies the boot sequence from the 1st Boot Device [USB : SONY DVD-ROM D] available devices . 2nd Boot Device [HDD : PO-WDC WD2500B] A device enclosed in parenthesis has been disabled in the corresponding type menu. ↑↓ ←→ : Move +/-/ :Change Option Enter:Select Esc :Exit F1 :General help F2/3 :Change color F9 : Optimal defaults F10 : Save and exitv02.67 (C)Copyright 1985-2009, American Megatrends, Inc.BootBIOS SETUP UTILITY](https://usermanual.wiki/FOXCONN/T77H121050/User-Guide-1255580-Page-33.png)