FUJIFILM Business Innovation LUFX Limited Modular Transmitter User Manual Lupin IOT
Fuji Xerox Corporation Limited Limited Modular Transmitter Lupin IOT
Contents
- 1. Users Manual
- 2. Users manual with statement
Users manual with statement

5About Consumables
5.1 Available Consumables.................................................................... 72
5.2 EP Cartridge .................................................................................... 74
5.3 Fuser Unit ........................................................................................ 77
5.4 Transfer Roll Cartridge ..................................................................... 81
5.5 Feed Roll.......................................................................................... 85
Lupin_IOT.book Page 71 Monday, February 24, 2003 10:23 AM
72
5
About Consumables
5.1
Available Consumables
The following consumables are available for this printer. To order these, contact our Printer
Support Desk.
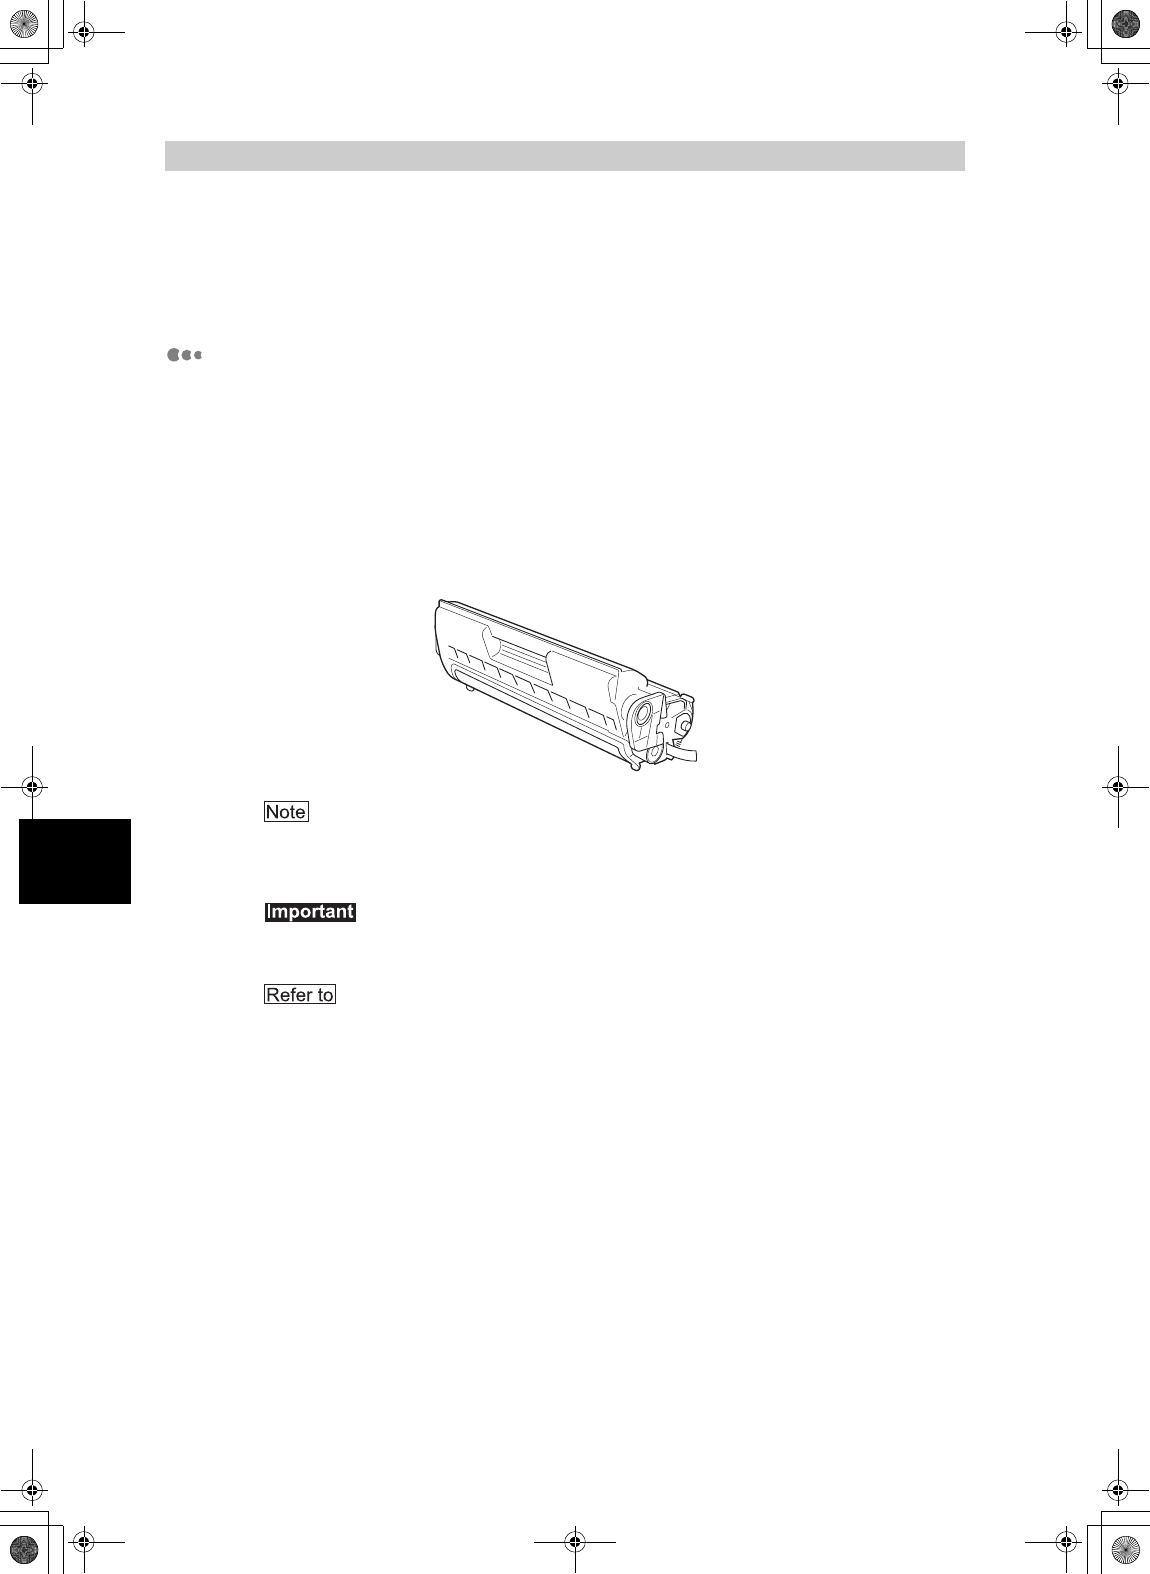
EP cartridge
The EP cartridge includes the toner and the photosensitive drum. If the toner in
the EP cartridge is insufficient, the printout will become light and blurred. If it is
time for replacement, replace with a new EP cartridge.
The following types of EP cartridge are available:
z6 Kpv: can print approximately 6,000 pages
z10 Kpv: can print approximately 10,000 pages
z15 Kpv: can print approximately 15,000 pages
The possible number of pages that can be printed is based on A4 size paper with a print ratio
of 5% and the default density setting using one EP cartridge. The number of pages that can
be actually printed varies according to the conditions of use.
Use of EP cartridges not recommended by our company may impair print quality or printer
performance. Use only EP cartridges recommended by our company on this printer.
“5.2 EP Cartridge” for details on how to replace the EP cartridge.
Lupin_IOT.book Page 72 Monday, February 24, 2003 10:23 AM
Note:
The user is cautioned that changes or modifications not expressly approved by the party responsible for compliance could void the
user's authority to operate the equipment.
5.1 Available Consumables
73
5
About Consumables
Regular replacement parts
Regular replacement parts packaged together include the fuser unit, the transfer
roll cartridge, and the feed roll. About 100,000 pages for a fuser unit and about
200,000 pages for a transfer roll cartridge and a feed roll can be printed. When
these parts have reached this limit, replace them with new ones.
The possible number of pages that can be printed is based on A4 size paper with a print ratio
of 5% and the default density setting. The number of pages that can be actually printed
varies according to the conditions of use.
z“5.3 Fuser Unit” for details on how to replace the fuser unit.
z“5.4 Transfer Roll Cartridge” for details on how to replace the transfer roll cartridge.
z“5.5 Feed Roll” for details on how to replace the feed roll.
Fuser unit Transfer roll cartridge
Feed roll
Lupin_IOT.book Page 73 Monday, February 24, 2003 10:23 AM
74
5
About Consumables
5.2
EP Cartridge
This section explains about the EP cartridge.
5.2.1 Cautions on Handling the EP Cartridge
When handling the EP cartridge, take note of the following points:
zDo not subject it to direct sunlight or strong light.
zWhen installing the EP cartridge, select a location not subject to strong light
and try to finish the installation within 5 minutes.
zDo not touch the surface of the photosensitive drum. Do not let the EP
cartridge stand or place it upside down. The drum might get damaged.
zA drum shutter protects the photosensitive drum from light. Do not open the
drum shutter.
zAlthough the toner is not harmful to the body, wash it off immediately if your
hands or clothes are stained with it.
zIt is recommended to use up the EP cartridge within 1 year after opening it.
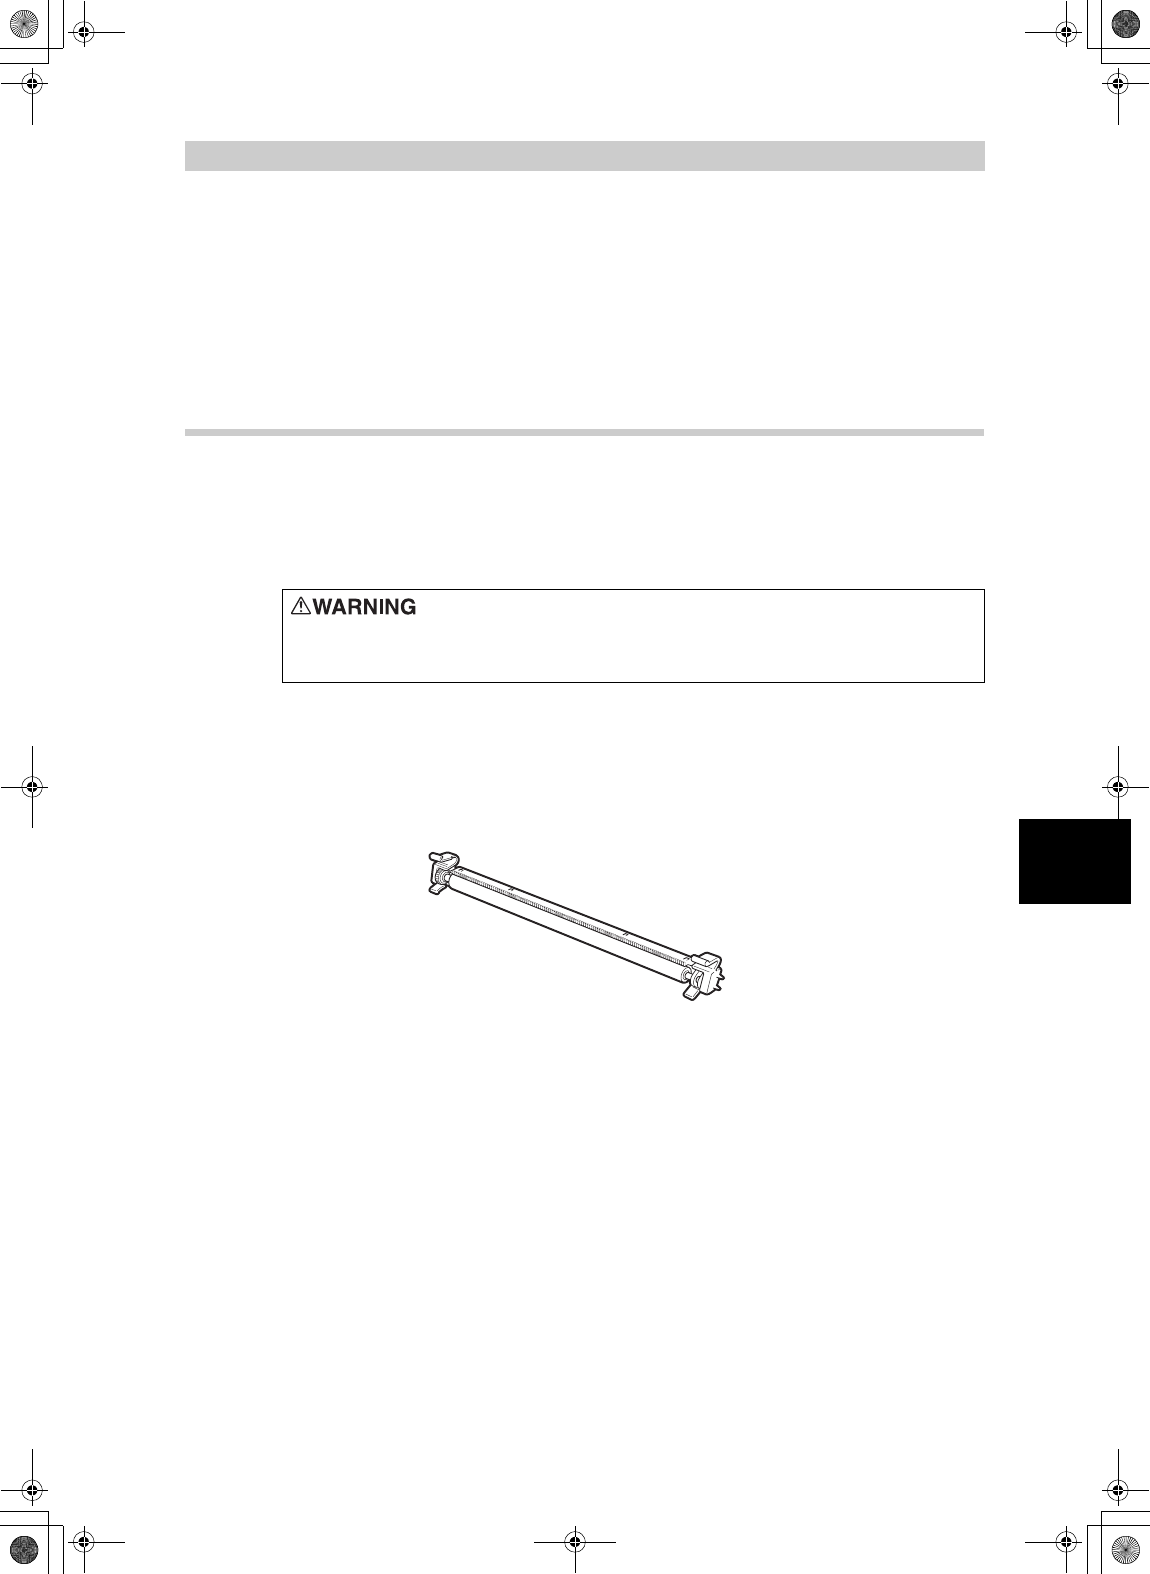
5.2.2 Replacing the EP Cartridge
Procedure
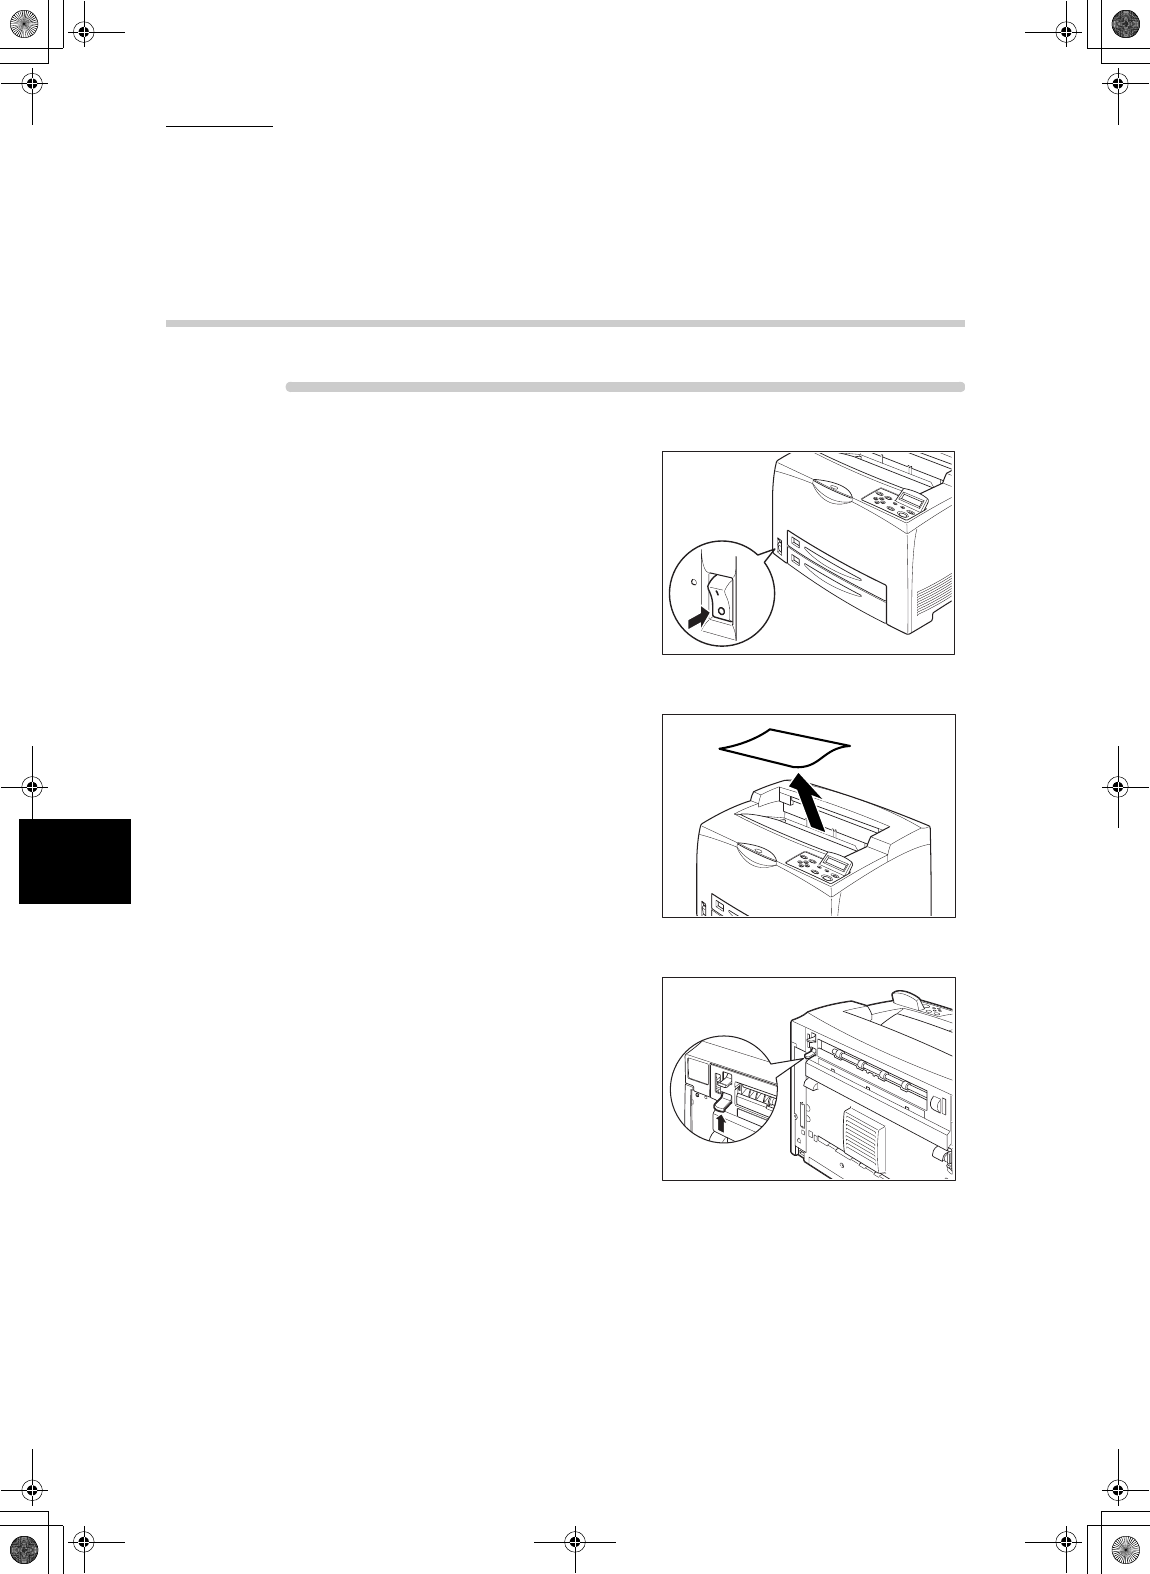
1
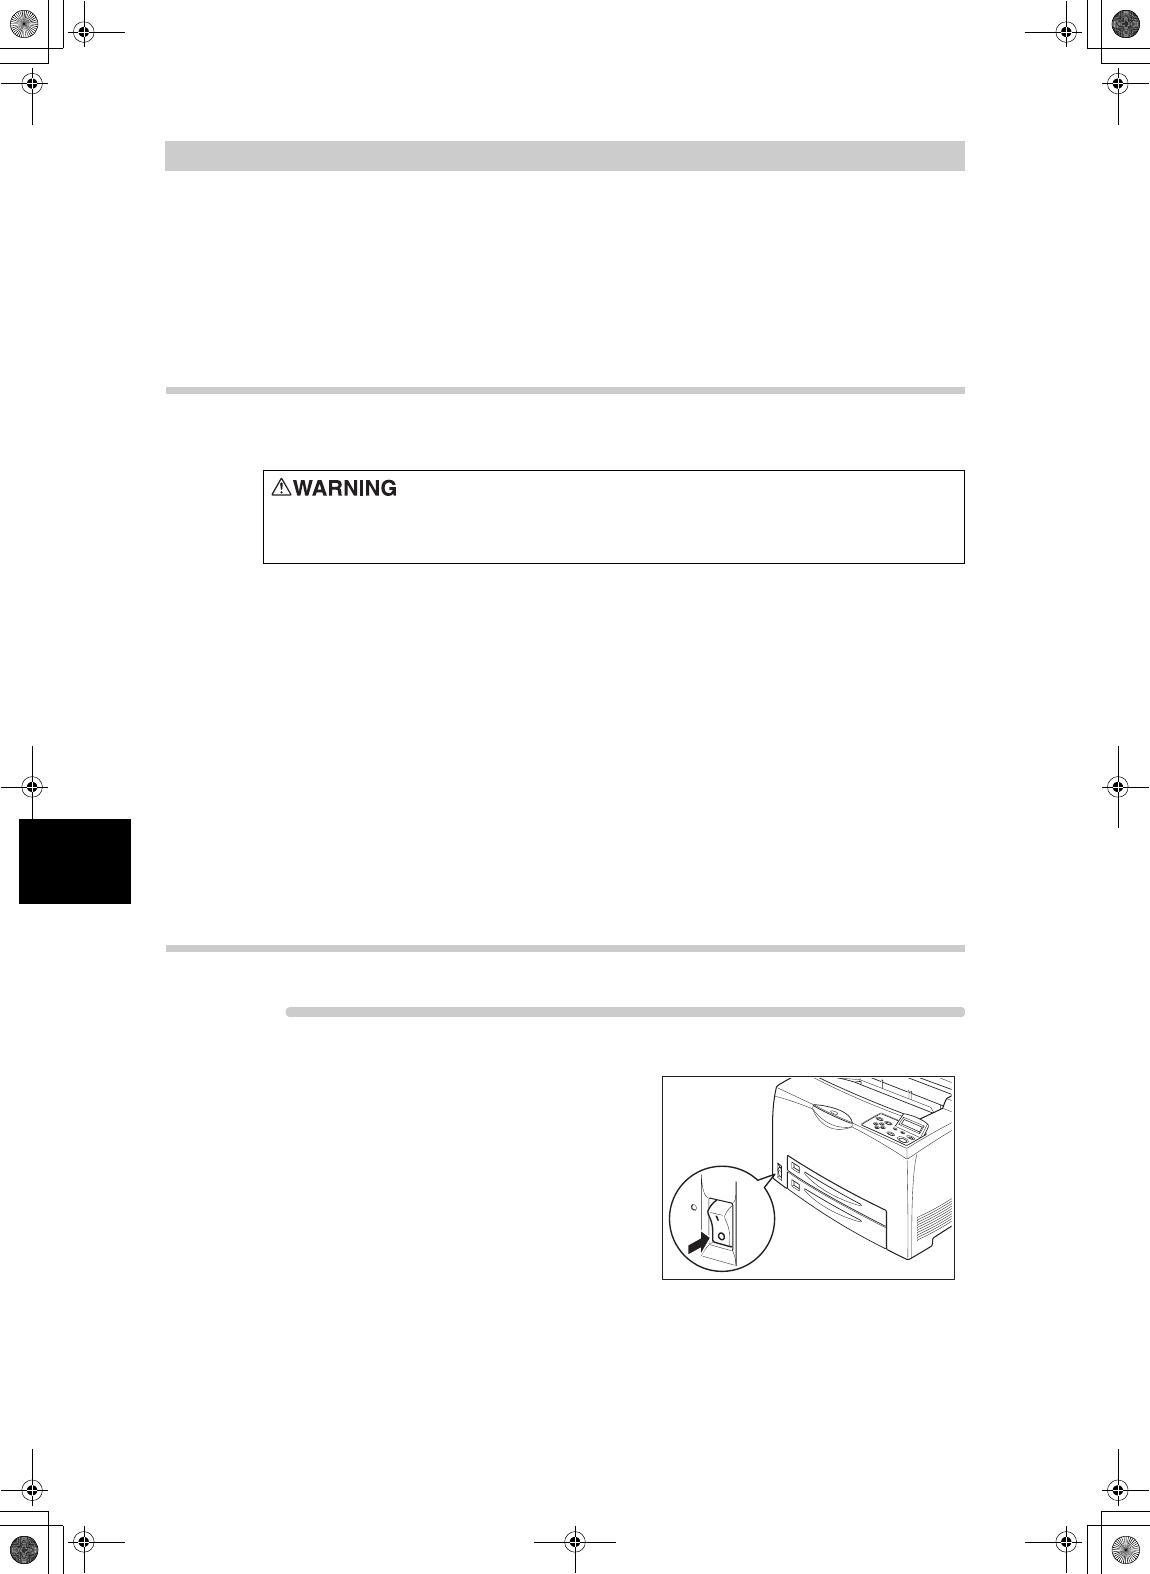
Switch off the power of the printer.
Never throw an EP cartridge into an open flame. It can cause an
explosion and you can get burnt.
Lupin_IOT.book Page 74 Monday, February 24, 2003 10:23 AM
5.2 EP Cartridge
75
5
About Consumables
2
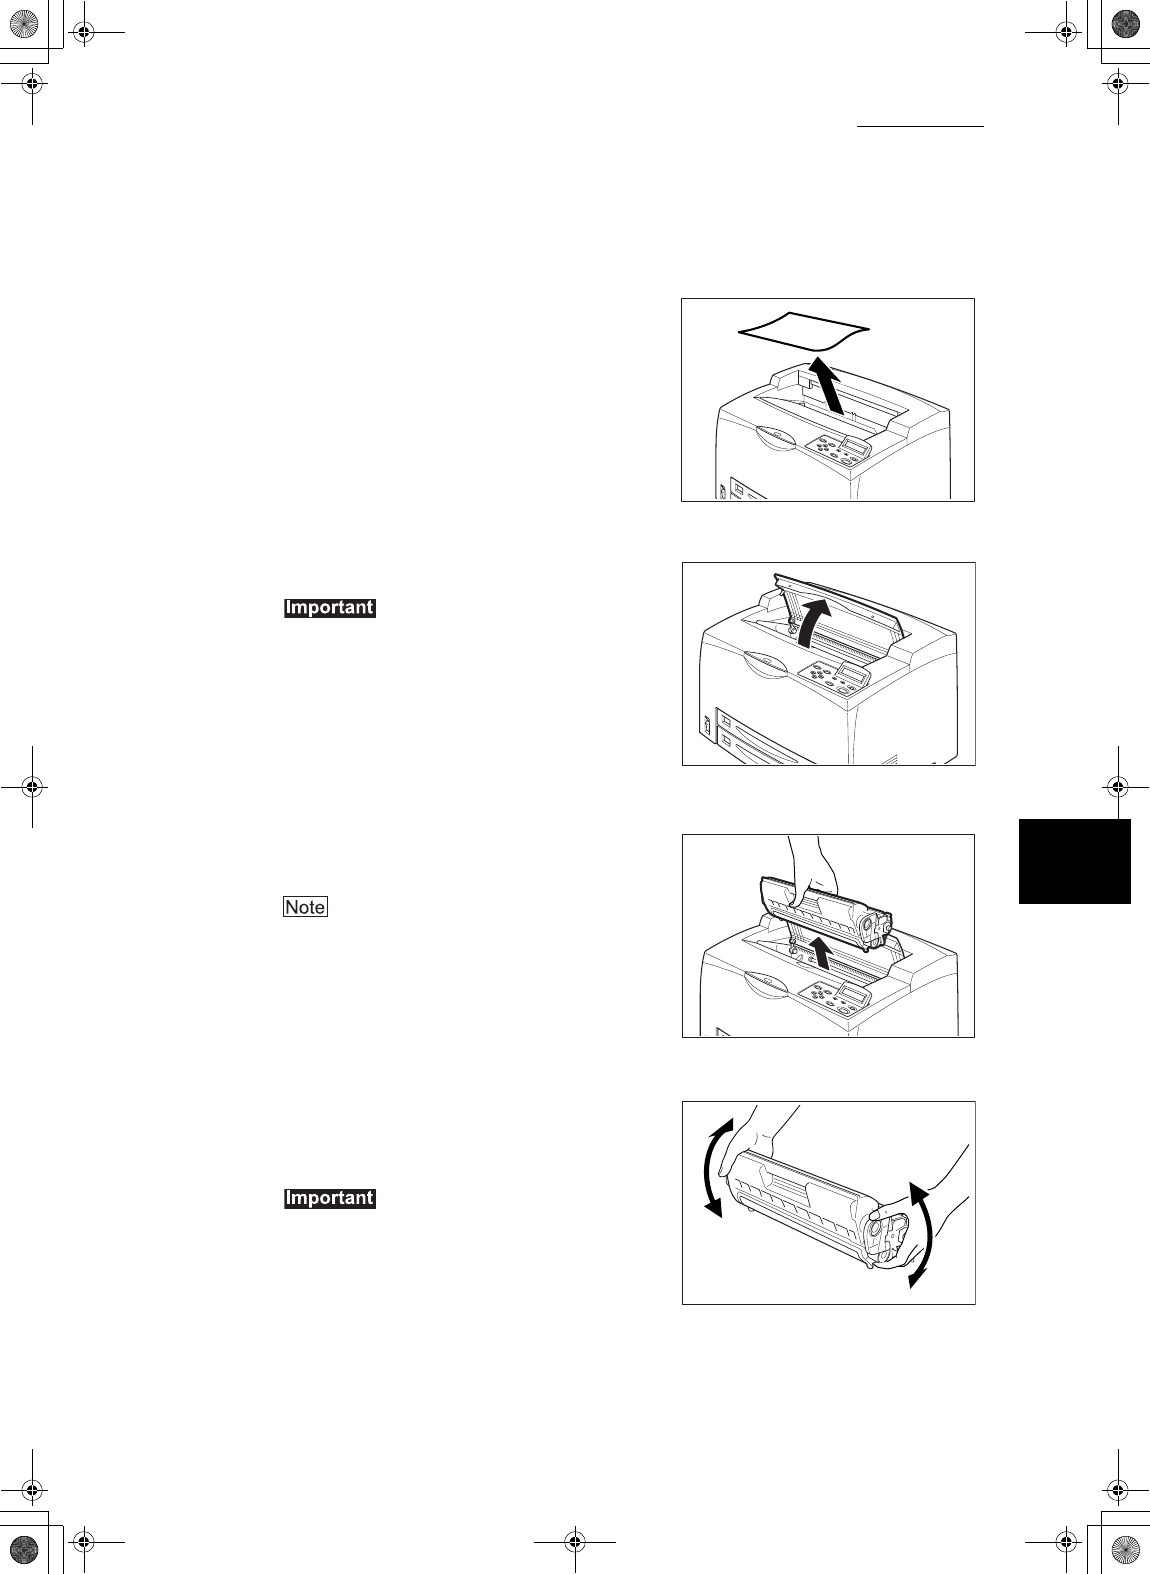
Remove any paper in the center
output tray.
3
Open the top cover.
Do not touch any parts inside the printer.
4
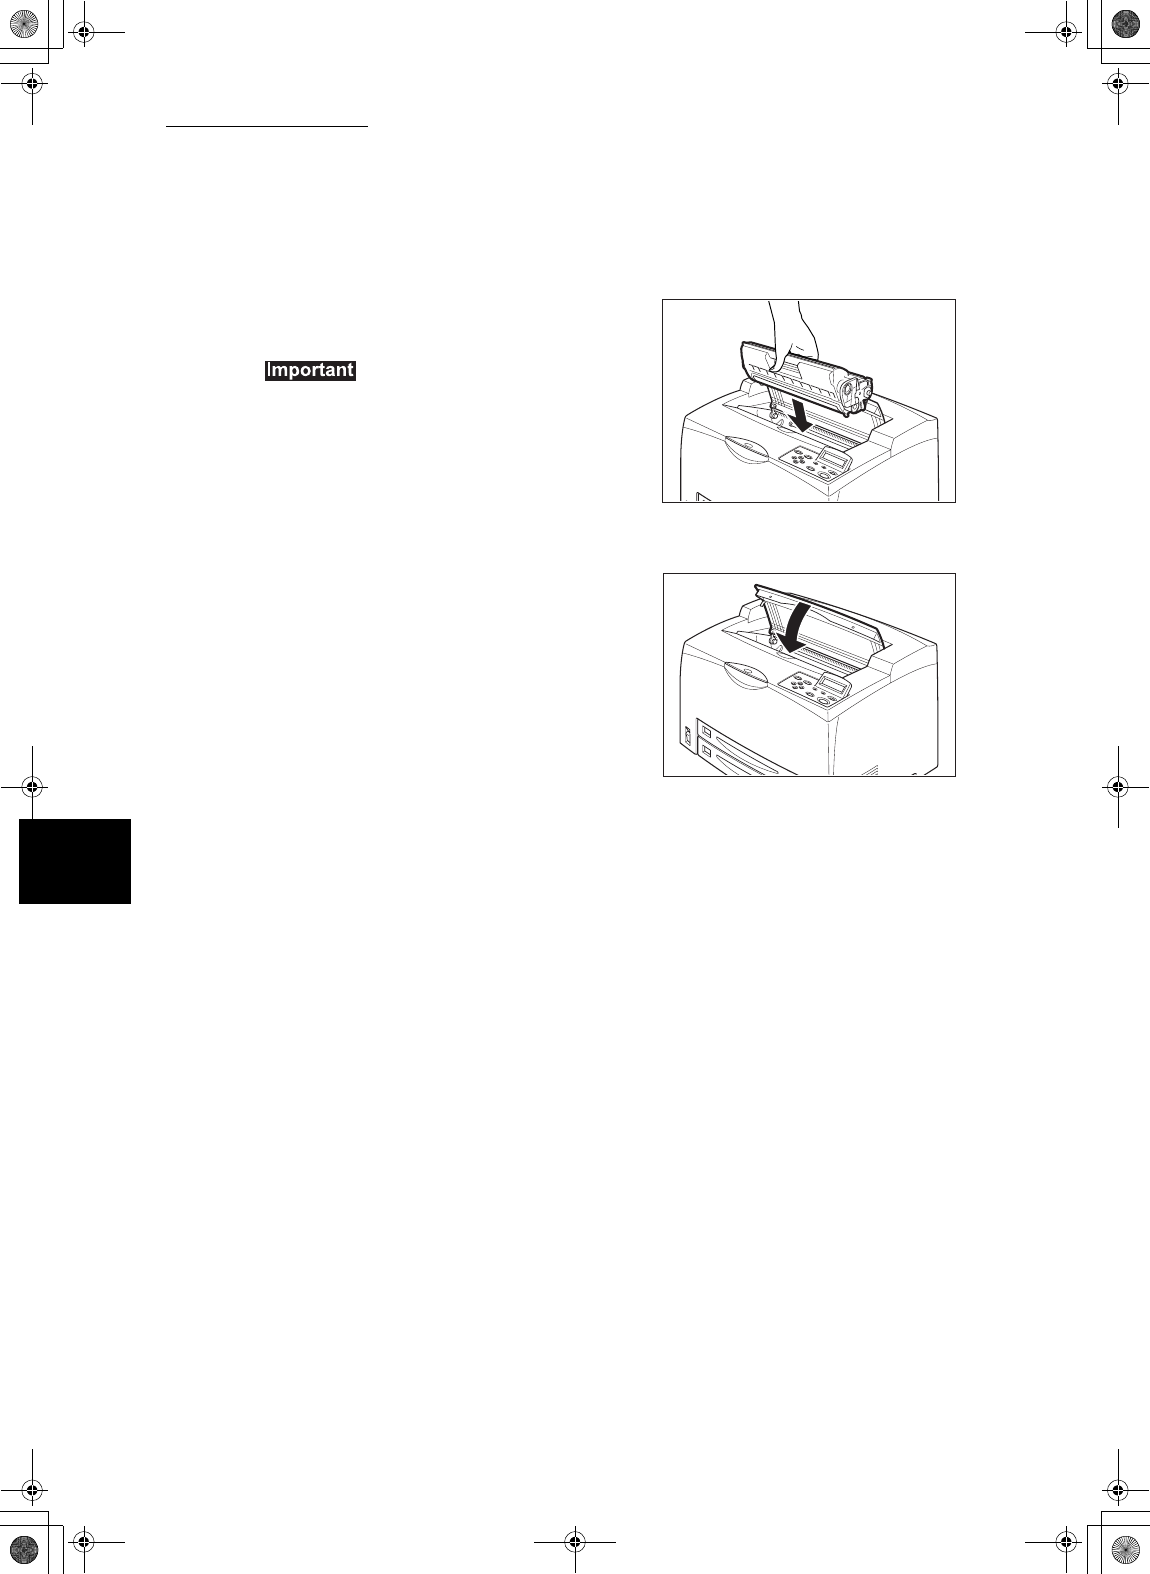
Hold the EP cartridge by the grip and
pull it out slowly.
To prevent the toner from dirtying the floor, lay a
piece of paper on the floor first before putting the
EP cartridge down.
5
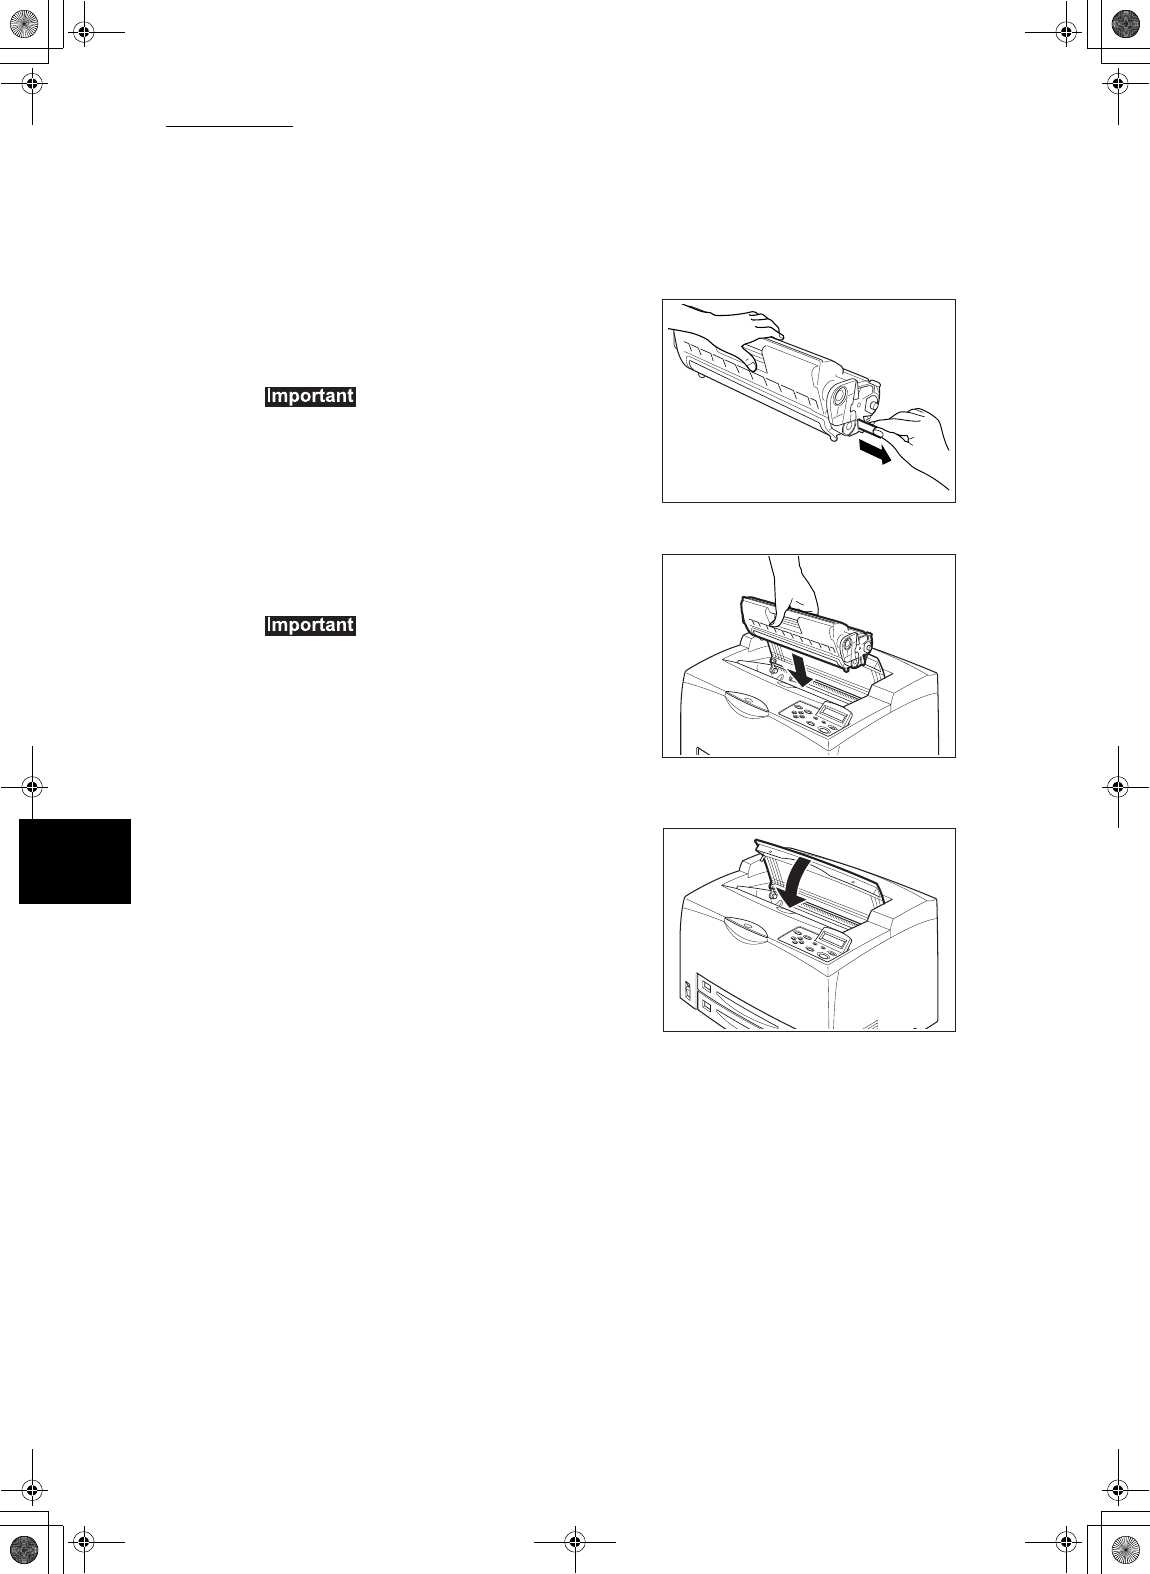
Take the new EP cartridge out of the
box and shake it 7 to 8 times in the
manner as shown in the diagram.
zIf the toner is not evenly spread out, the print
quality may drop. Also, if you did not shake the
EP cartridge well, there may be operating noise
or the interior of the EP cartridge may be
damaged during operation.
zDo not touch the surface of the photosensitive
drum.
Lupin_IOT.book Page 75 Monday, February 24, 2003 10:23 AM
5.2 EP Cartridge
76
5
About Consumables
6
Place the EP cartridge on a flat
surface and pull out the seal
horizontally.
zWhen pulling out the seal, pull it out
horizontally. The tape might break if it is pulled
out diagonally.
zAfter the seal has been pulled out, do not shake
or dump the EP cartridge.
7
Hold the EP cartridge by the grip and
insert it into the slot inside the printer.
zDo not touch any parts inside the printer.
zEnsure that the EP cartridge is firmly set.
8
Close the top cover securely.
Lupin_IOT.book Page 76 Monday, February 24, 2003 10:23 AM

77
5
About Consumables
5.3
Fuser Unit
This section explains about the fuser unit.
5.3.1 Caution on Handling the Fuser Unit
The fuser unit is included as one of the regular replacement parts. Before
replacing the fuser unit, open the box of the regular replacement parts and get
the new fuser unit ready.
When handling the fuser unit, take note of the following points:
zDo not replace the fuser unit immediately after using the printer. You may get
burnt.
zNever touch a labeled area found on or near the heat roller. You can get
burnt. If a sheet of paper is wrapped around the heat roller, do not try to
remove it by yourself to avoid injuries or burns. Switch off the machine
immediately, and contact our Printer Support Desk.
zBe sure to switch off and unplug the machine before accessing the
interior of the machine for cleaning, maintenance, or fault clearance.
Access to a live machine’s interior can cause electric shock.
Lupin_IOT.book Page 77 Monday, February 24, 2003 10:23 AM
5.3 Fuser Unit
78
5
About Consumables
5.3.2 Replacing the Fuser Unit
Procedure
1
Switch off the power of the printer and
leave it for 30 minutes until the fuser
unit cools down.
2
Remove any paper in the center
output tray.
3
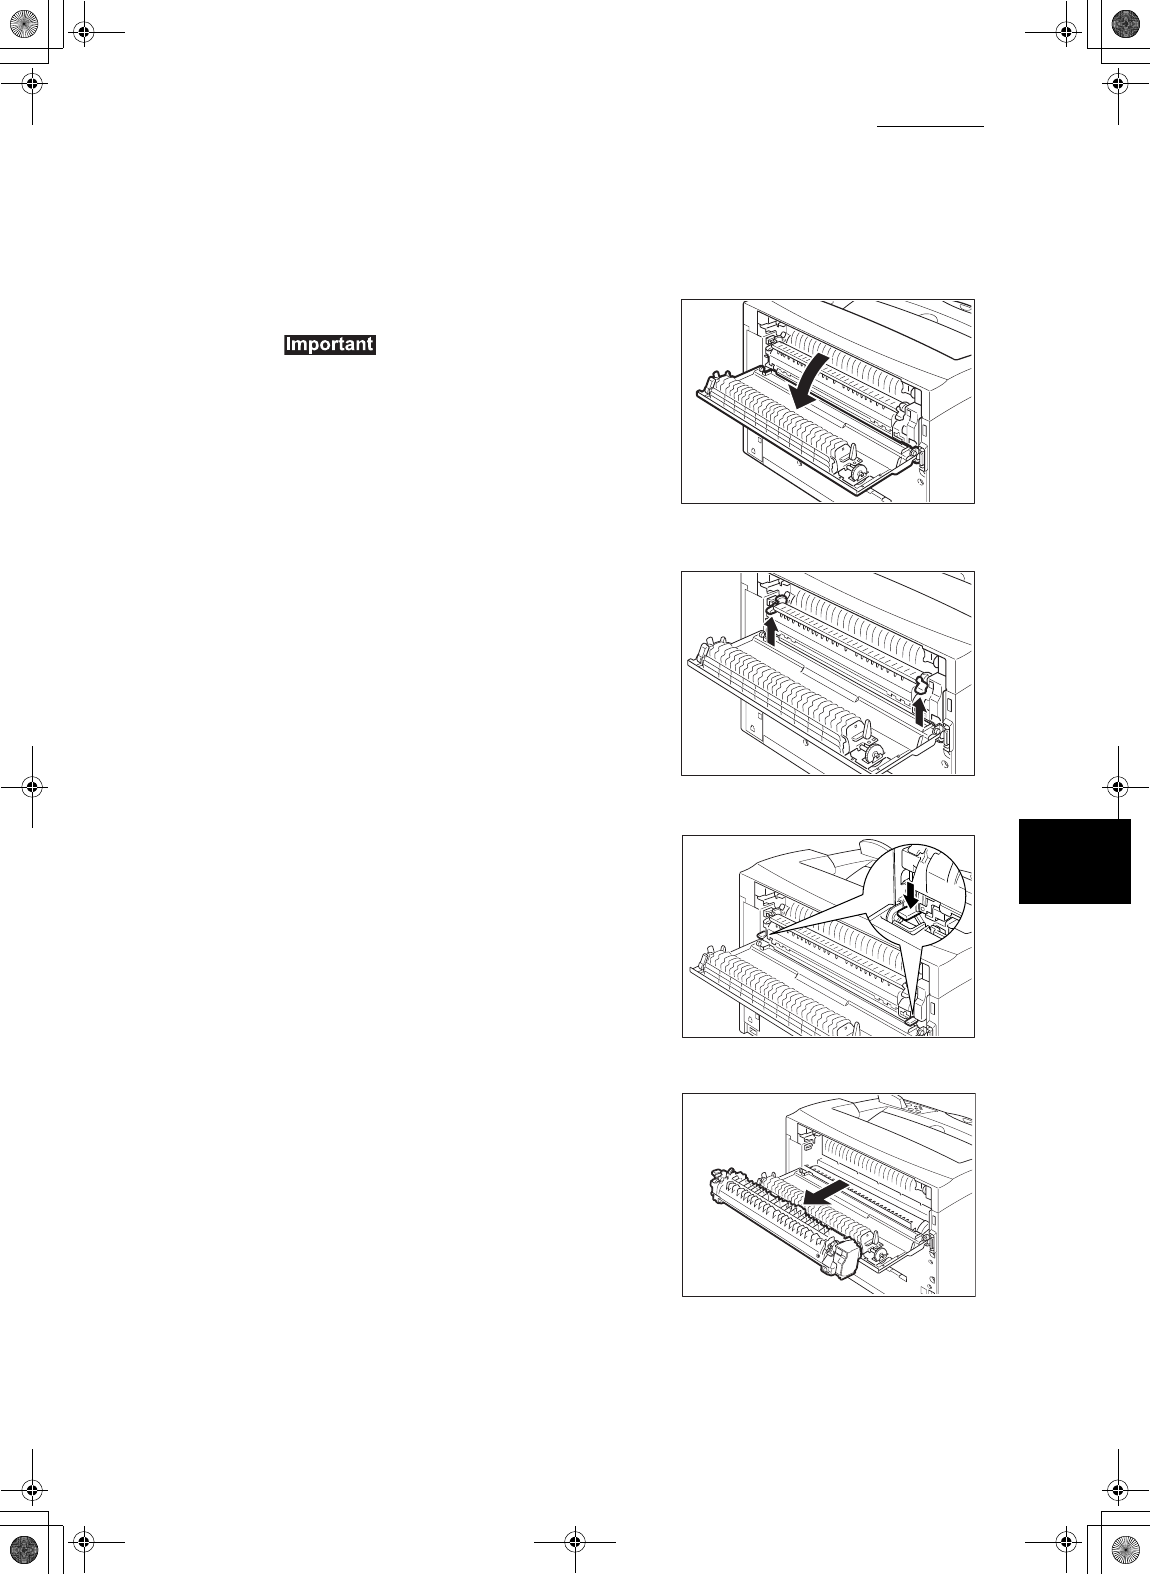
Lift the second lever from the top left
corner of the back of the printer.
Lupin_IOT.book Page 78 Monday, February 24, 2003 10:23 AM
5.3 Fuser Unit
79
5
About Consumables
4
Open the rear cover.
Do not touch any parts inside the printer.
5
Lift the lever at both ends of the fuser
unit to unlock it.
6
Pull down the 2 levers at the bottom of
the fuser unit.
7
Remove the fuser unit slowly.
Lupin_IOT.book Page 79 Monday, February 24, 2003 10:23 AM
5.3 Fuser Unit
80
5
About Consumables
8
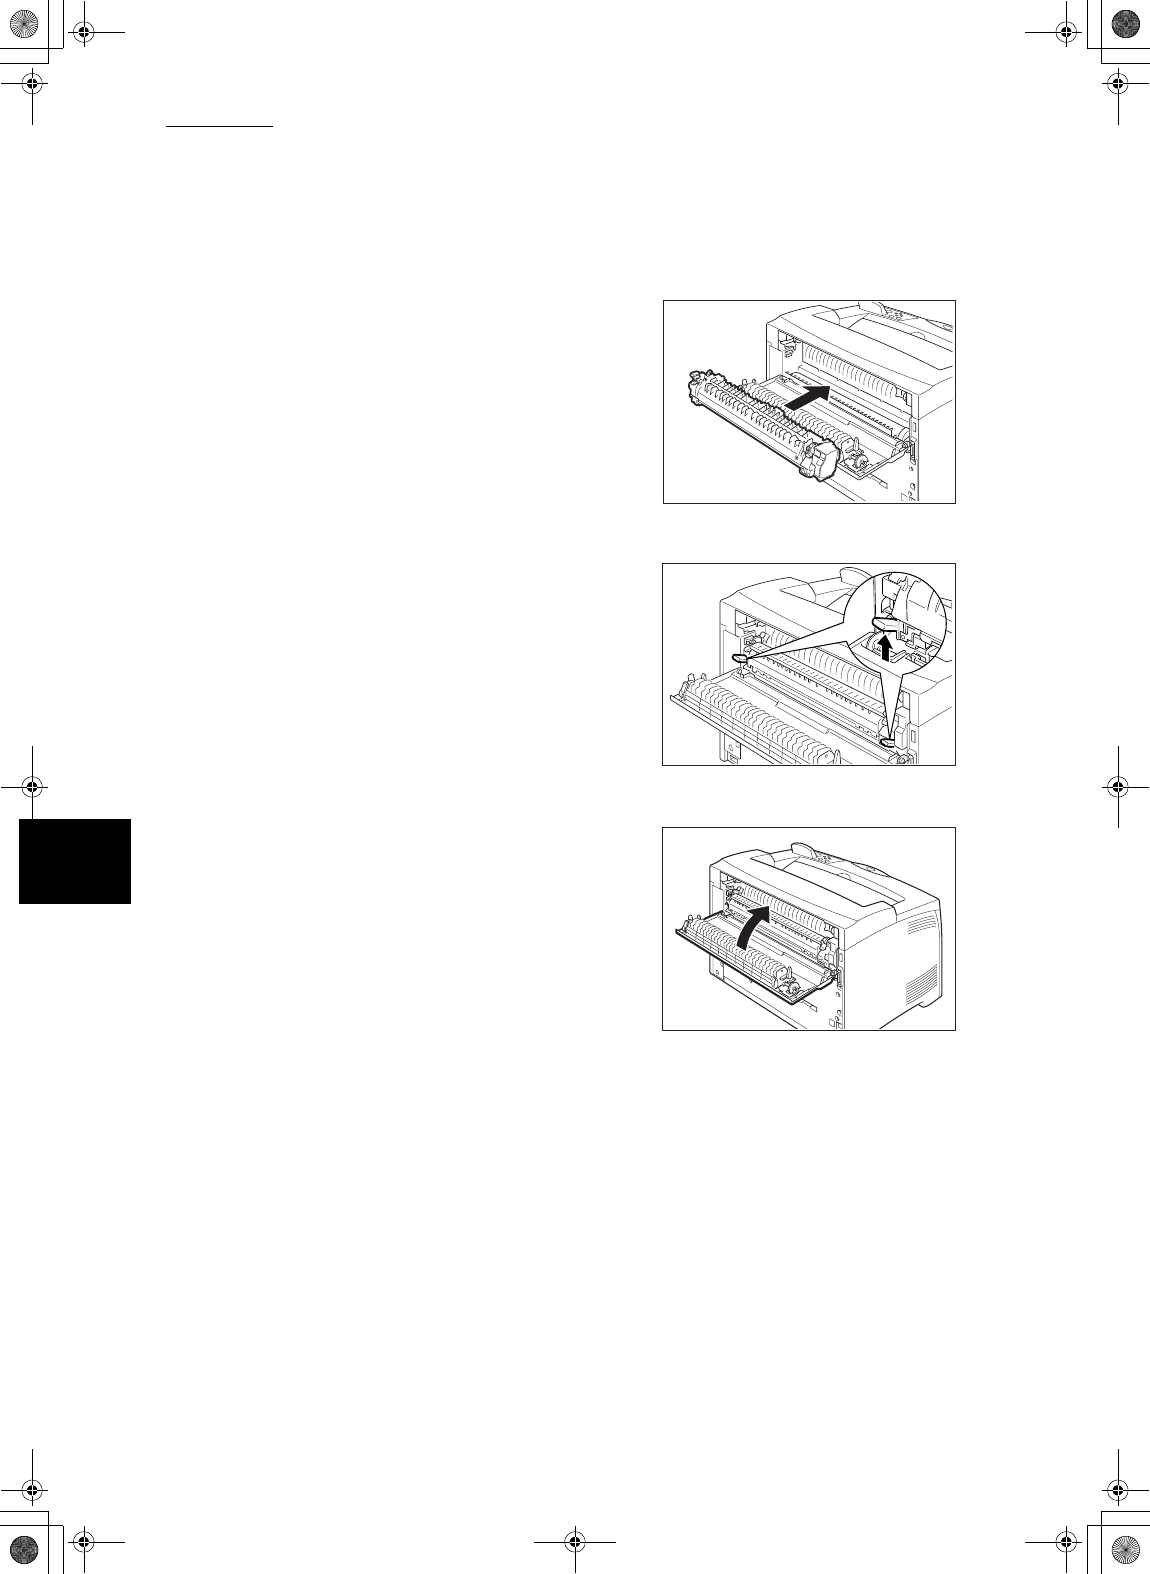
Set the new fuser unit slowly.
9
Lift up the 2 levers at the bottom of the
fuser unit and push down the levers at
both ends of the fuser unit to lock it.
10
Close the rear cover.
Lupin_IOT.book Page 80 Monday, February 24, 2003 10:23 AM
81
5
About Consumables
5.4
Transfer Roll Cartridge
This section explains about the transfer roll cartridge.
5.4.1 Caution on Handling the Transfer Roll
Cartridge
The transfer roll cartridge is included as one of the regular replacement parts.
Before replacing the transfer roll cartridge, open the box of the regular
replacement parts and get the new transfer roll cartridge ready.
When handling the transfer roll cartridge, take note of the following points:
zDo not remove and reinsert the transfer roll cartridge in use.
zWhen the message to replace the transfer roll cartridge appears, replace the
transfer roll cartridge immediately. Otherwise, the printer will be forcibly
stopped.
Never throw an transfer roll cartridge into an open flame. It can cause an
explosion and you can get burnt.
Lupin_IOT.book Page 81 Monday, February 24, 2003 10:23 AM

5.4 Transfer Roll Cartridge
82
5
About Consumables
5.4.2 Replacing the Transfer Roll Cartridge
Procedure
1
Switch off the power of the printer.
2
Remove any paper in the center
output tray.
3
Open the top cover.
Do not touch any parts inside the printer.
Lupin_IOT.book Page 82 Monday, February 24, 2003 10:23 AM
5.4 Transfer Roll Cartridge
83
5
About Consumables
4
Hold the EP cartridge by the grip to
pull it out slowly.
To prevent the toner from dirtying the floor, lay a
piece of paper on the floor before putting the EP
cartridge down.
5
Squeeze the levers on both ends of
the transfer roll cartridge and pull it out
slowly towards you.
6
Pick up the new transfer roll cartridge
by the levers at both ends and slowly
slot it in.
Lupin_IOT.book Page 83 Monday, February 24, 2003 10:23 AM
5.4 Transfer Roll Cartridge
84
5
About Consumables
7
Hold the EP cartridge by the grip and
insert it into the slot inside the printer.
zDo not touch any parts inside the printer.
zEnsure that the EP cartridge is firmly set.
8
Close the top cover securely.
Lupin_IOT.book Page 84 Monday, February 24, 2003 10:23 AM

85
5
About Consumables
5.5
Feed Roll
This section explains about the feed roll.
5.5.1 Caution on Handling the Feed Roll
The feed roll is included as one of the regular replacement parts. Before
replacing the feed roll, open the box of the regular replacement parts and get the
new feed roll ready.
When handling the feed roll, take note of the following points:
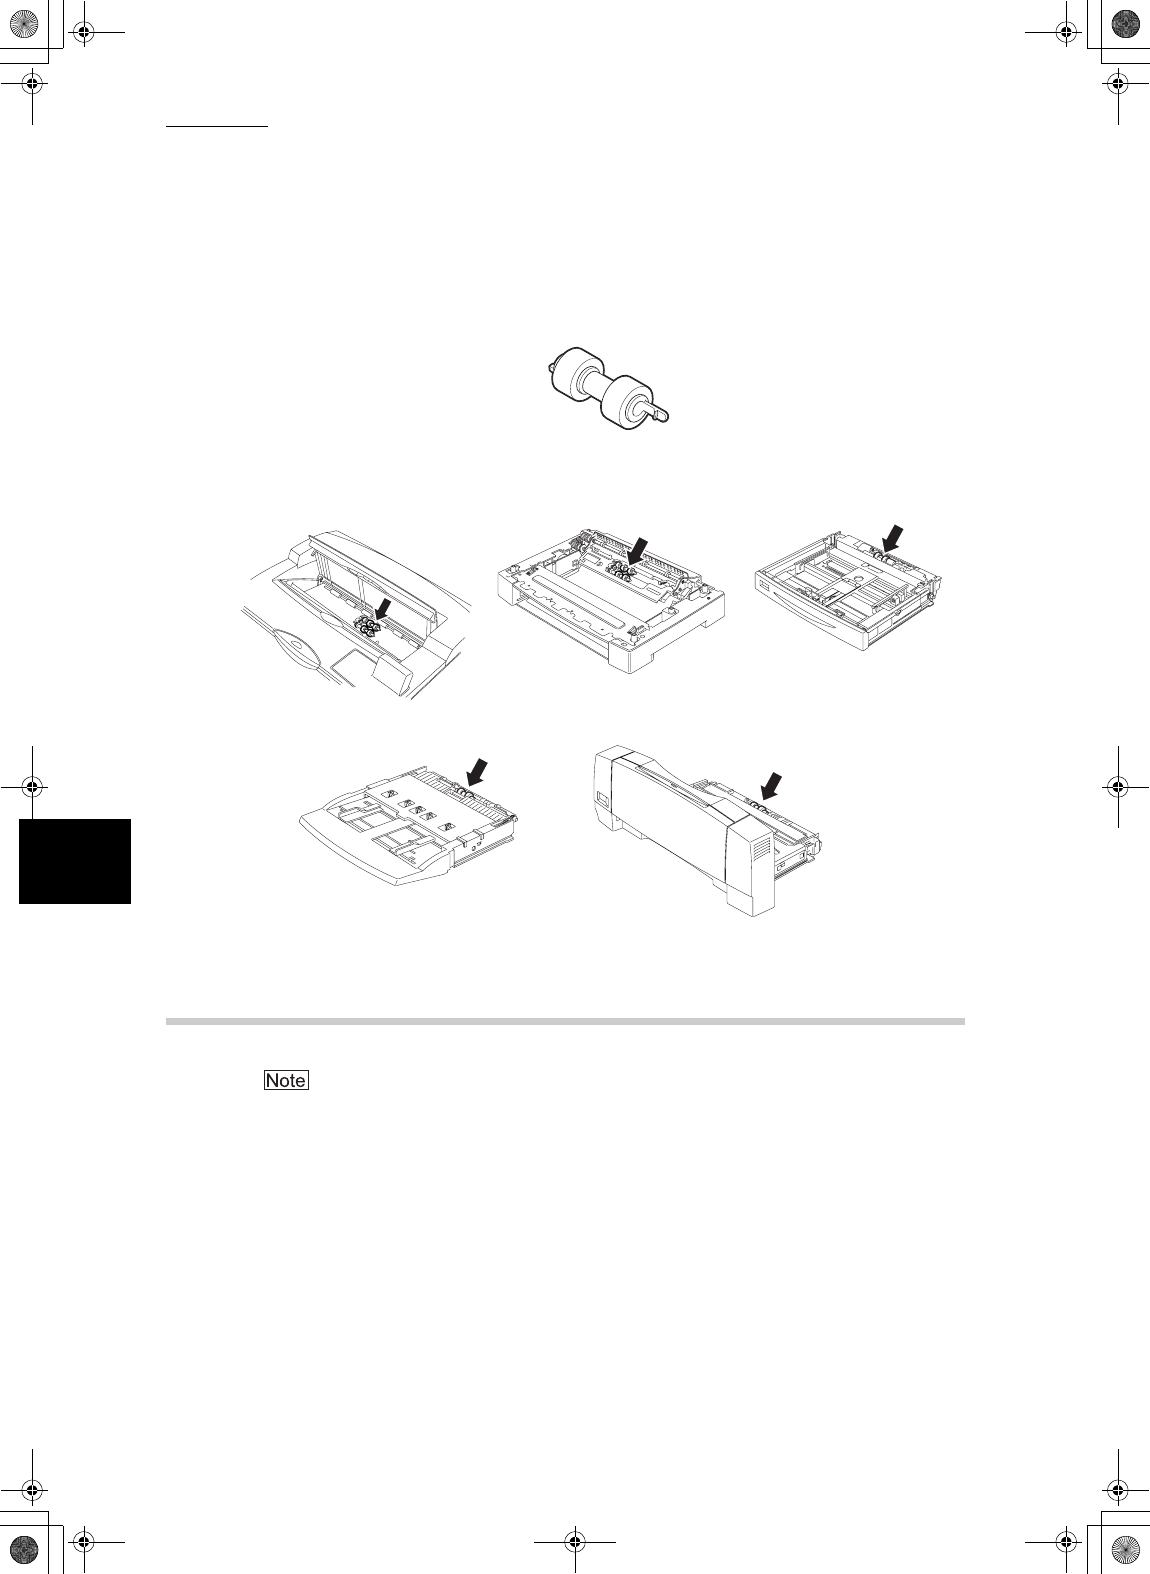
There are feed rolls inside the interior of the printer (2 in 2 locations, 4 in total),
tray module (1 location), paper tray (1 location), single-sheet bypass tray (1
location) and multiple-sheet bypass tray (1 location).
Be sure to switch off and unplug the machine before accessing the
interior of the machine for cleaning, maintenance, or fault clearance.
Access to a live machine’s interior can cause electric shock.
Lupin_IOT.book Page 85 Monday, February 24, 2003 10:23 AM
5.5 Feed Roll
86
5
About Consumables
5.5.2 Replacing the Feed Roll
The following procedure explains how to replace the feed roll of the paper tray. Follow the
procedure here for replacing the feed roll of the tray module as well.
Inside the printer (2 locations)
Single-sheet bypass tray (1 location) Multiple-sheet bypass tray (1 location)
Feed roll
Tray module (1 location) Paper tray (1 location)
Lupin_IOT.book Page 86 Monday, February 24, 2003 10:23 AM
5.5 Feed Roll
87
5
About Consumables
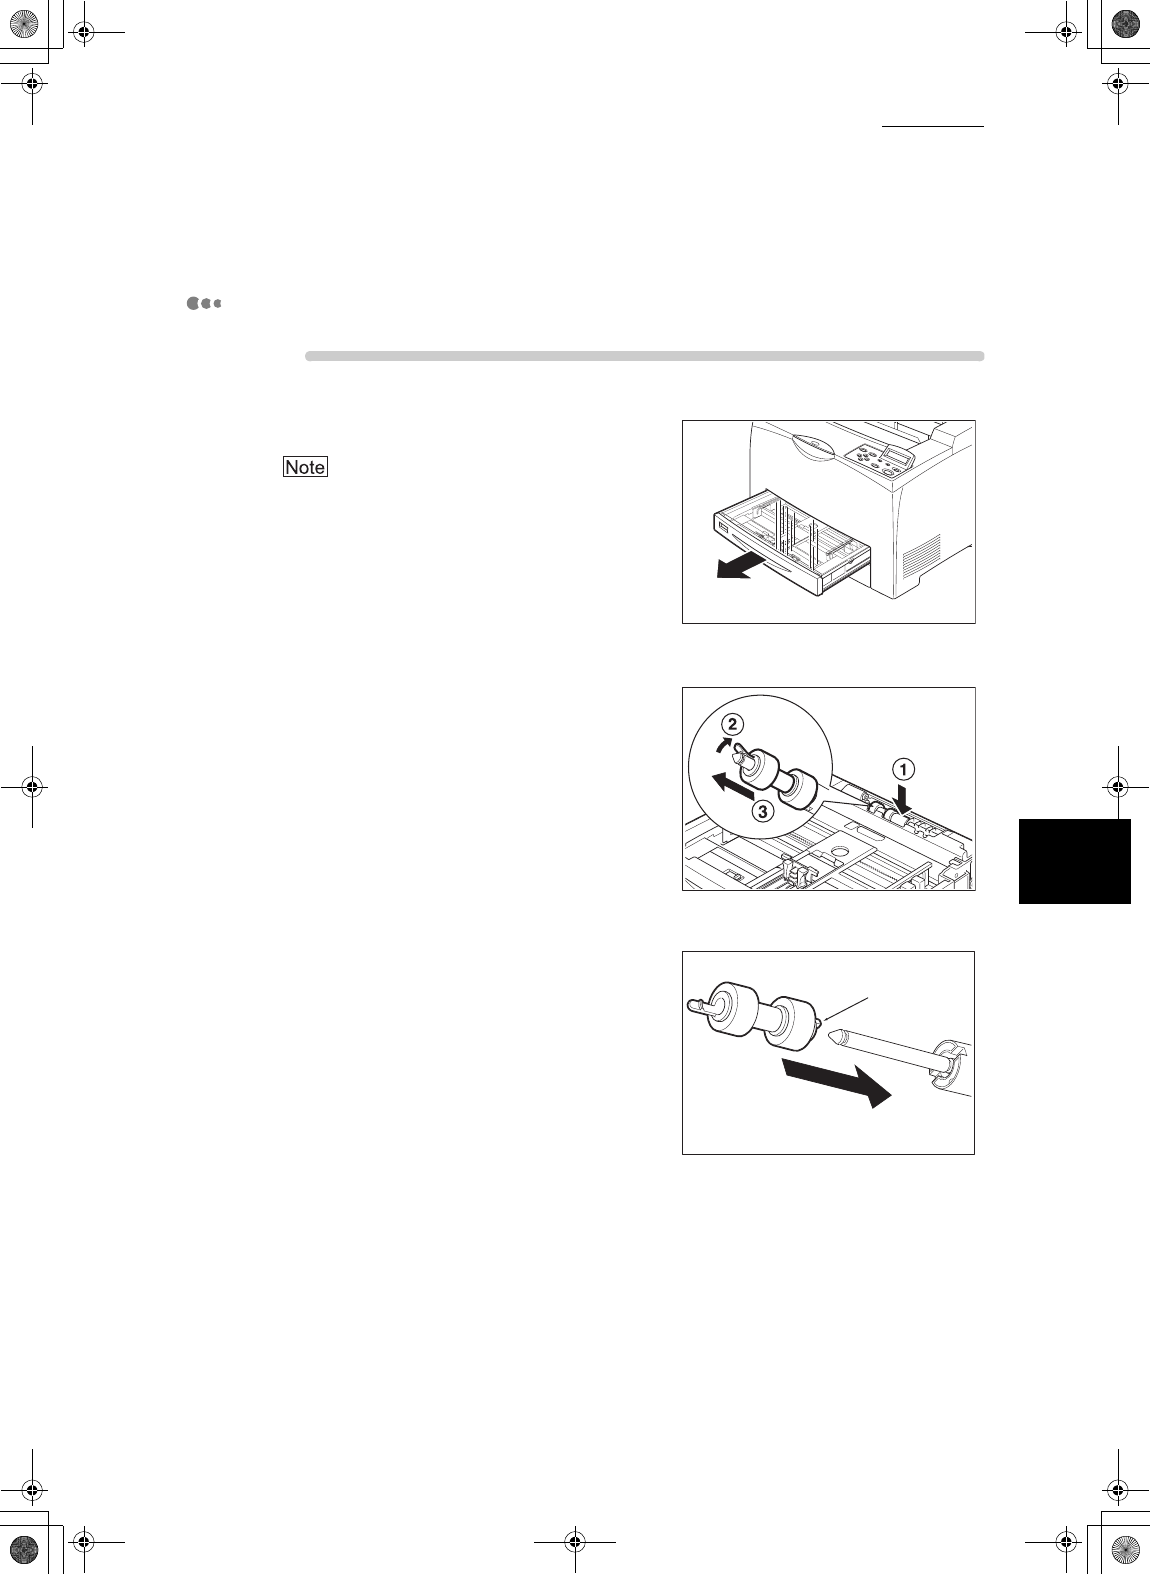
Feed roll at the paper tray
Procedure
1
Pull the paper tray out of the printer.
The feed roll on tray modules can be replaced
without pulling out the paper tray.
2
While pushing down the shaft of the
feed roll as shown in the diagram (1),
widen the tab of the feed roll to loosen
it (2) and then slowly remove the feed
roll from the shaft on the paper tray
(3).
3
Hold the tab on the new feed roll as
shown in the diagram and slowly push
it into the shaft on the paper tray. Ta b
Lupin_IOT.book Page 87 Monday, February 24, 2003 10:23 AM
5.5 Feed Roll
88
5
About Consumables
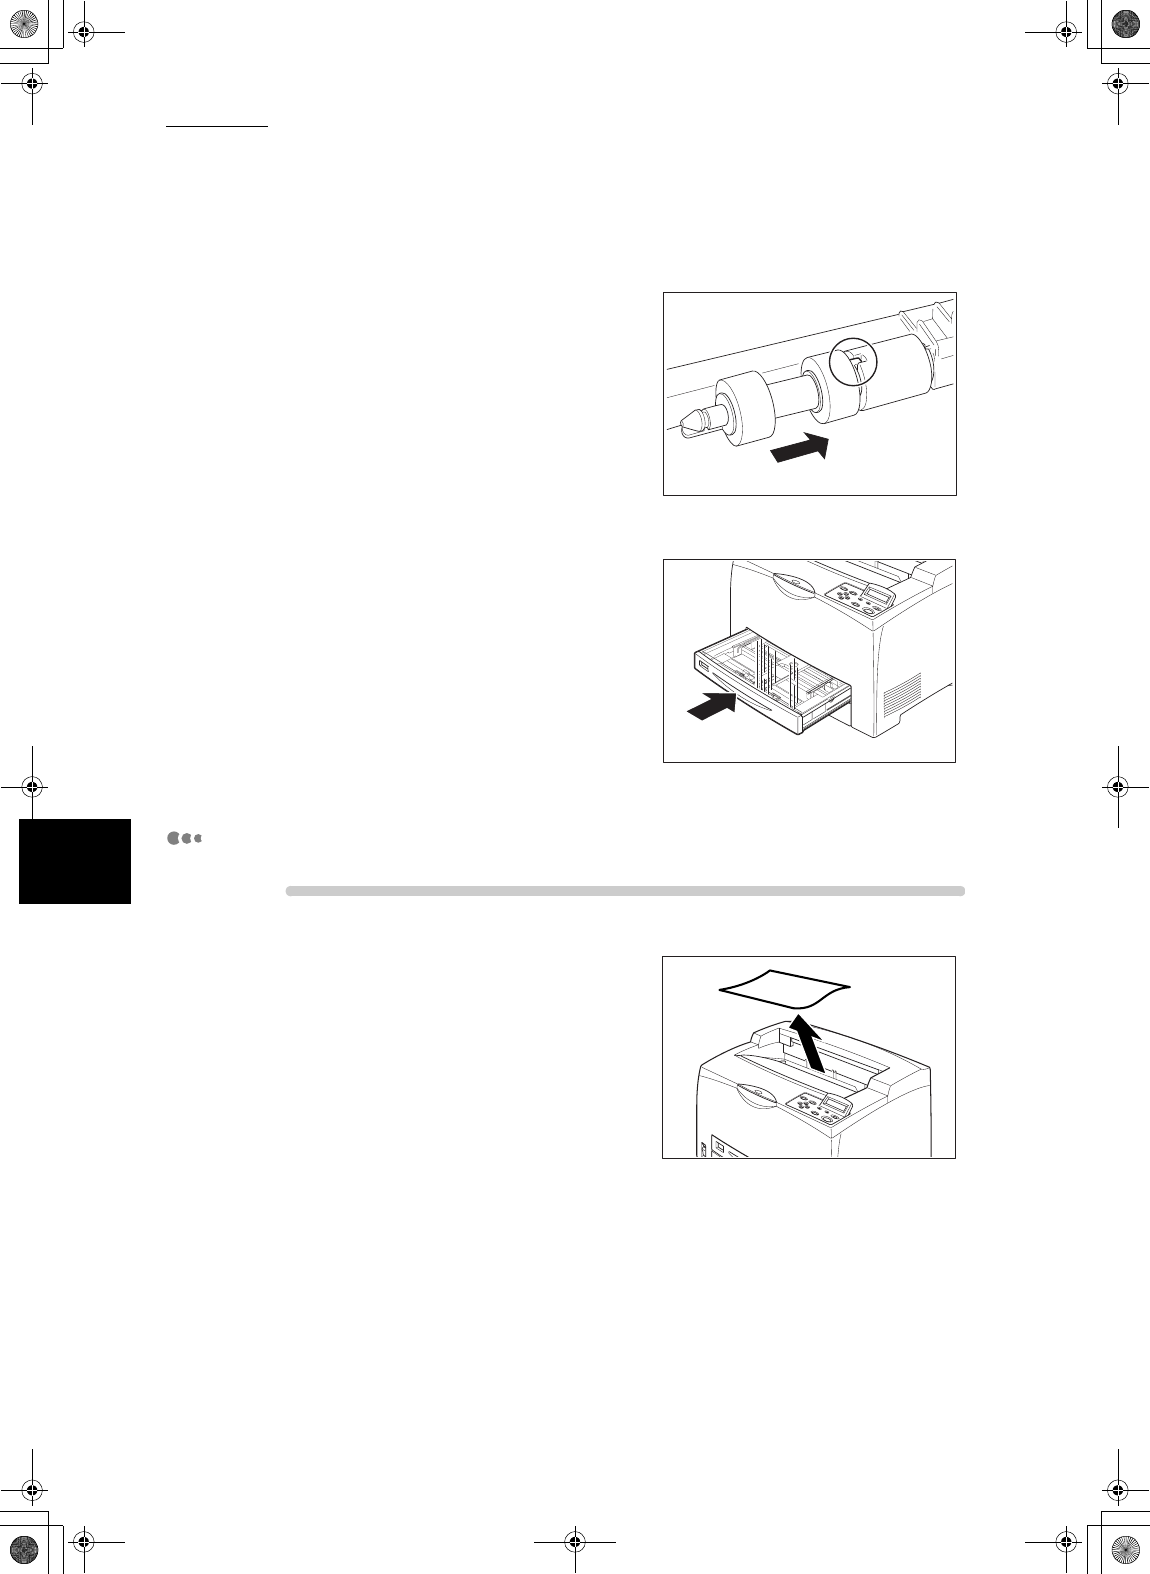
By aligning the small tabs on the feed
roll with the slots of the shaft, push the
feed roll completely in so that the tab
fits into the slot.
4
Push the paper tray completely into
the printer.
Feed roll inside the printer
Procedure
1
Remove any paper in the center
output tray.
Lupin_IOT.book Page 88 Monday, February 24, 2003 10:23 AM
5.5 Feed Roll
89
5
About Consumables
2
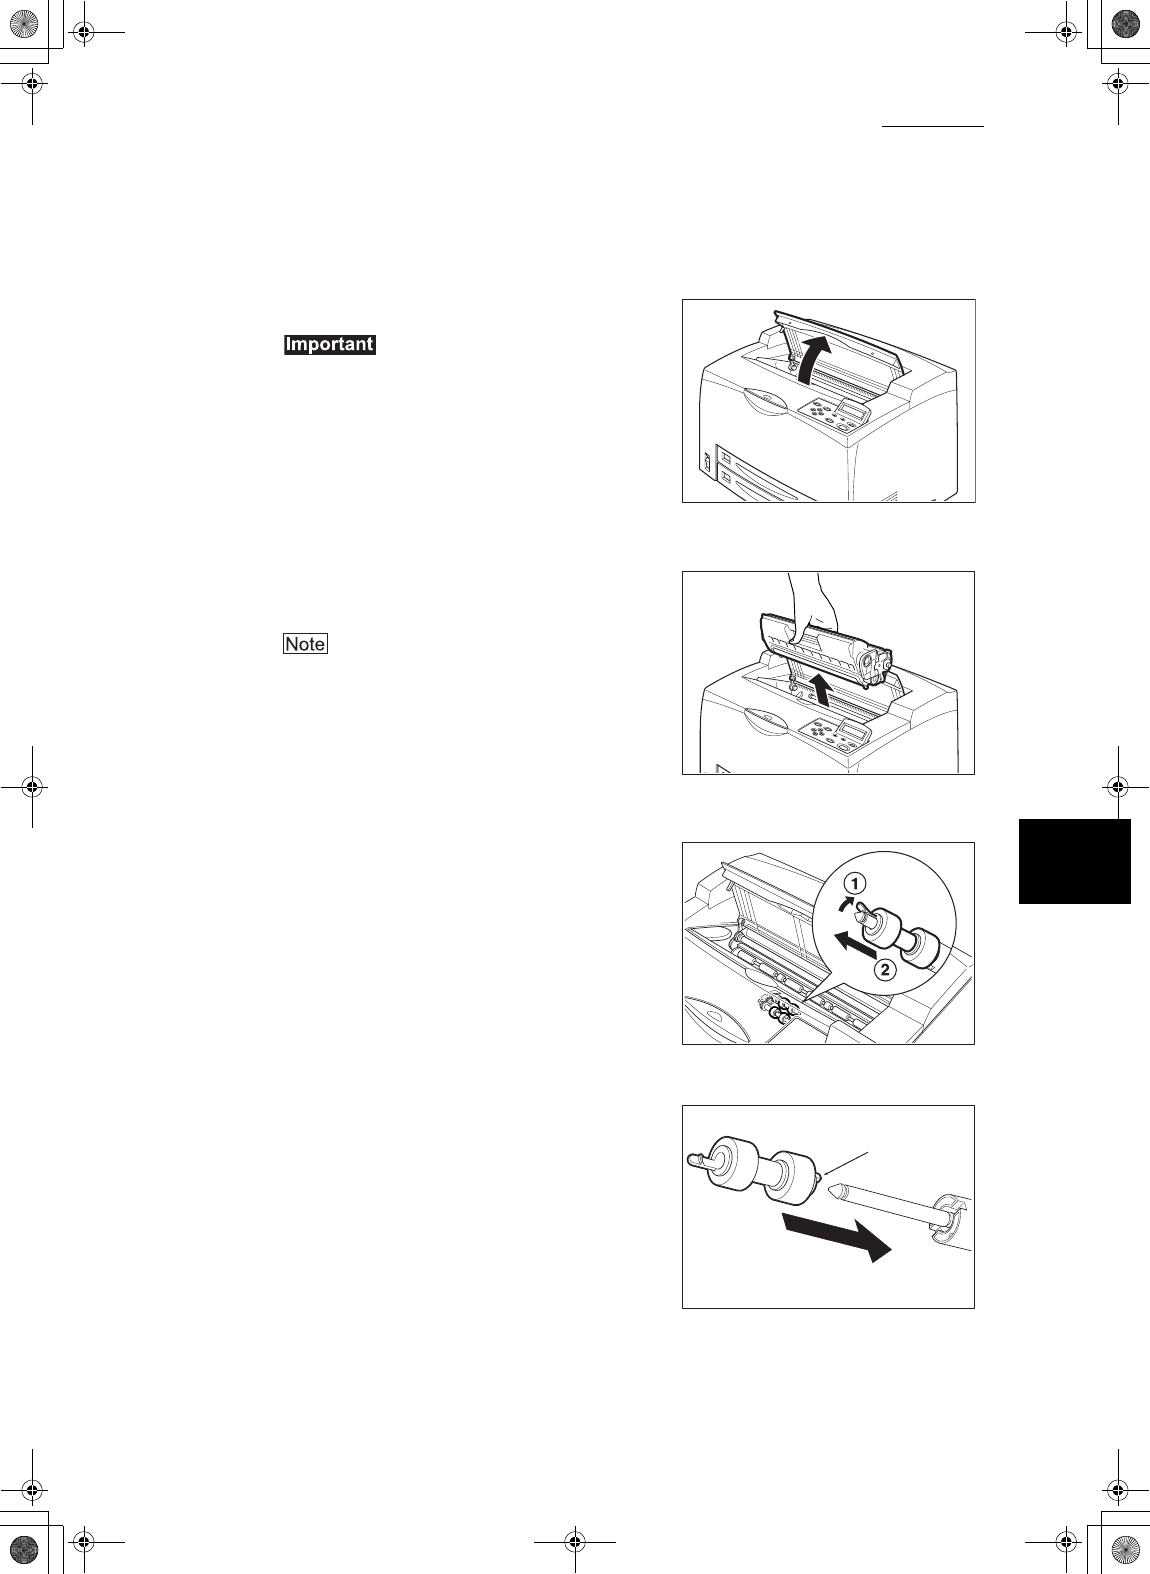
Open the top cover.
Do not touch any parts inside the printer.
3
Hold the EP cartridge by the grip and
pull it out slowly.
To prevent the toner from dirtying the floor, lay a
piece of paper on the floor first before putting the
EP cartridge down.
4
While pushing down the shaft of the
feed roll as shown in the diagram,
widen the tab on the feed roll to loosen
it (1) and then slowly remove the feed
roll from the shaft of the paper tray (2).
5
Hold the tab on the new feed roll as
shown in the diagram and slowly push
it into the shaft on the paper tray. Ta b
Lupin_IOT.book Page 89 Monday, February 24, 2003 10:23 AM
5.5 Feed Roll
90
5
About Consumables
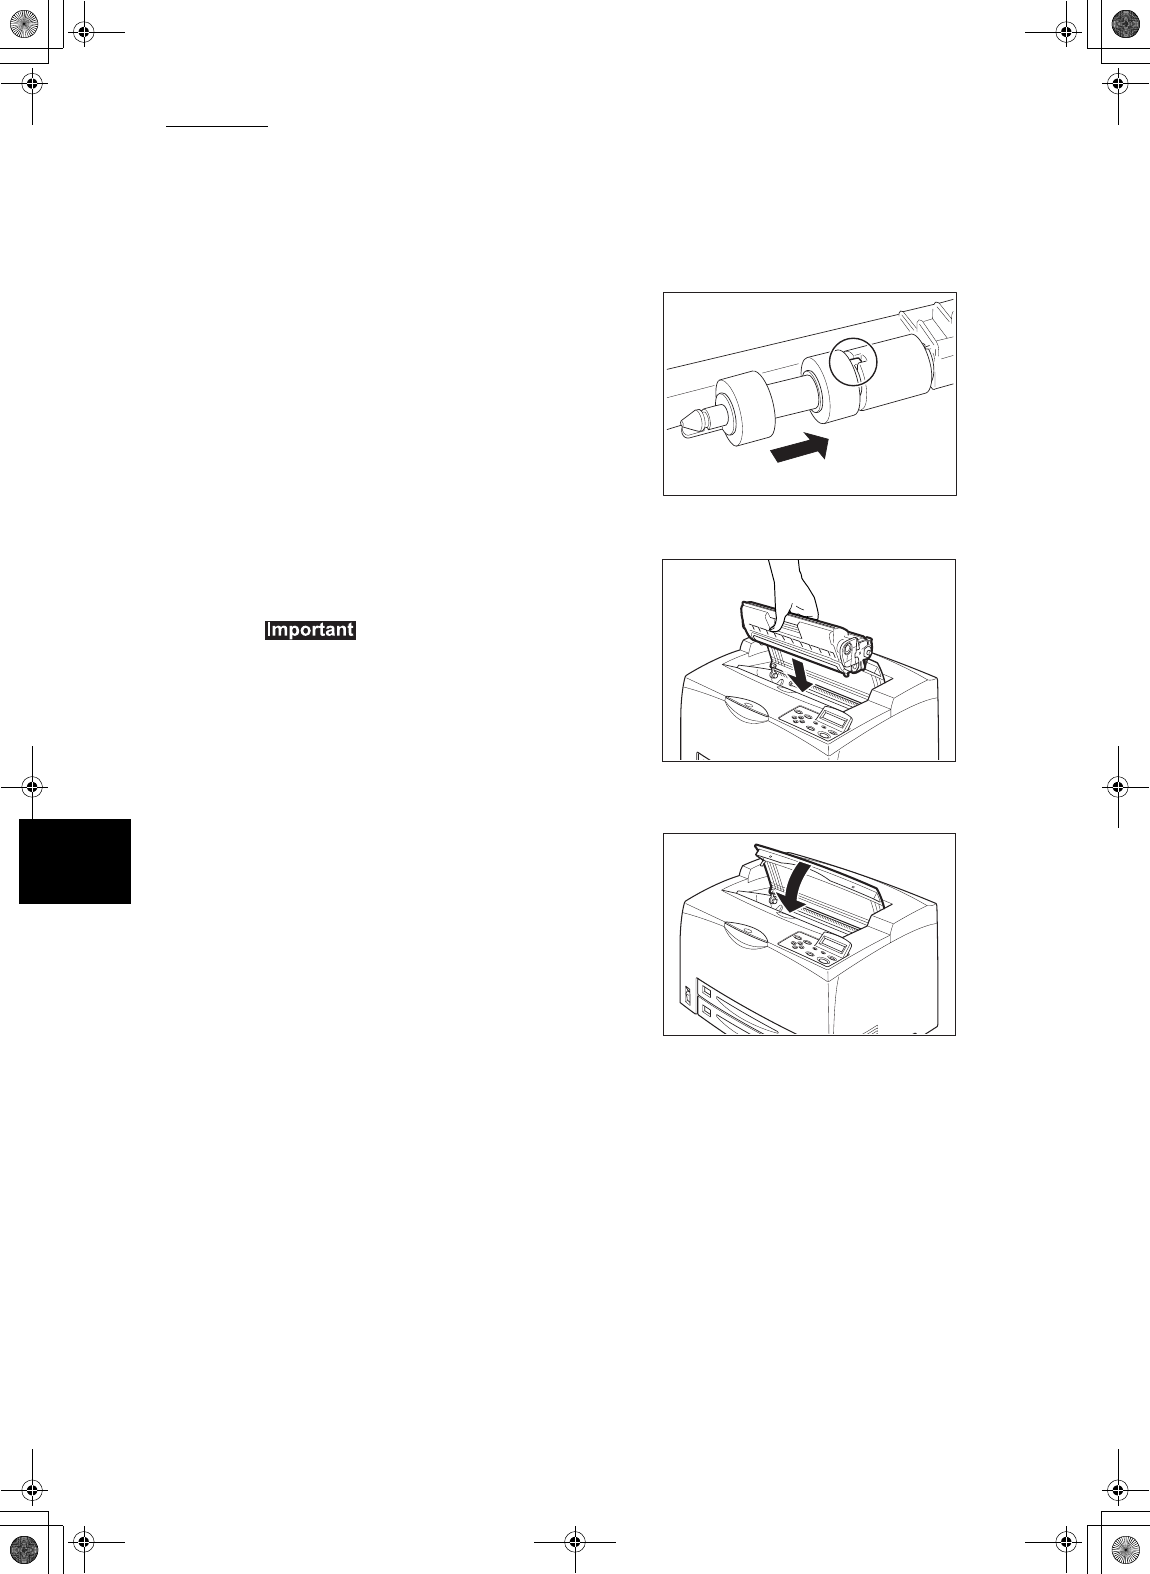
By aligning the small tabs on the feed
roll with the slots of the shaft, push the
feed roll completely in so that the tab
fits into the slot.
6
Hold the EP cartridge by the grip and
insert it into the slot inside the printer.
zDo not touch any parts inside the printer.
zEnsure that the EP cartridge is firmly set.
7
Close the top cover securely.
Lupin_IOT.book Page 90 Monday, February 24, 2003 10:23 AM
1.4 Installation Procedure
10
Installing the Printer
1
1.4.3 Installing the EP Cartridge
When installing the EP cartridge, take note of the following points:
zDo not subject it to direct sunlight or strong light.
zWhen installing the EP cartridge, select a location not subject to strong light
and try to finish the installation within 5 minutes.
zDo not touch the surface of the photosensitive drum. Do not stand or place the
EP cartridge upside down. The drum might get damaged.
zA drum shutter protects the photosensitive drum from light. Do not open the
drum shutter.
zAlthough the toner is not harmful to the body, wash it off immediately if your
hands or clothes are stained with it.
zIt is recommended to use up the EP cartridge within 1 year after opening it.
Procedure
“5.2.2 Replacing the EP Cartridge” for details when replacing the EP cartridge.
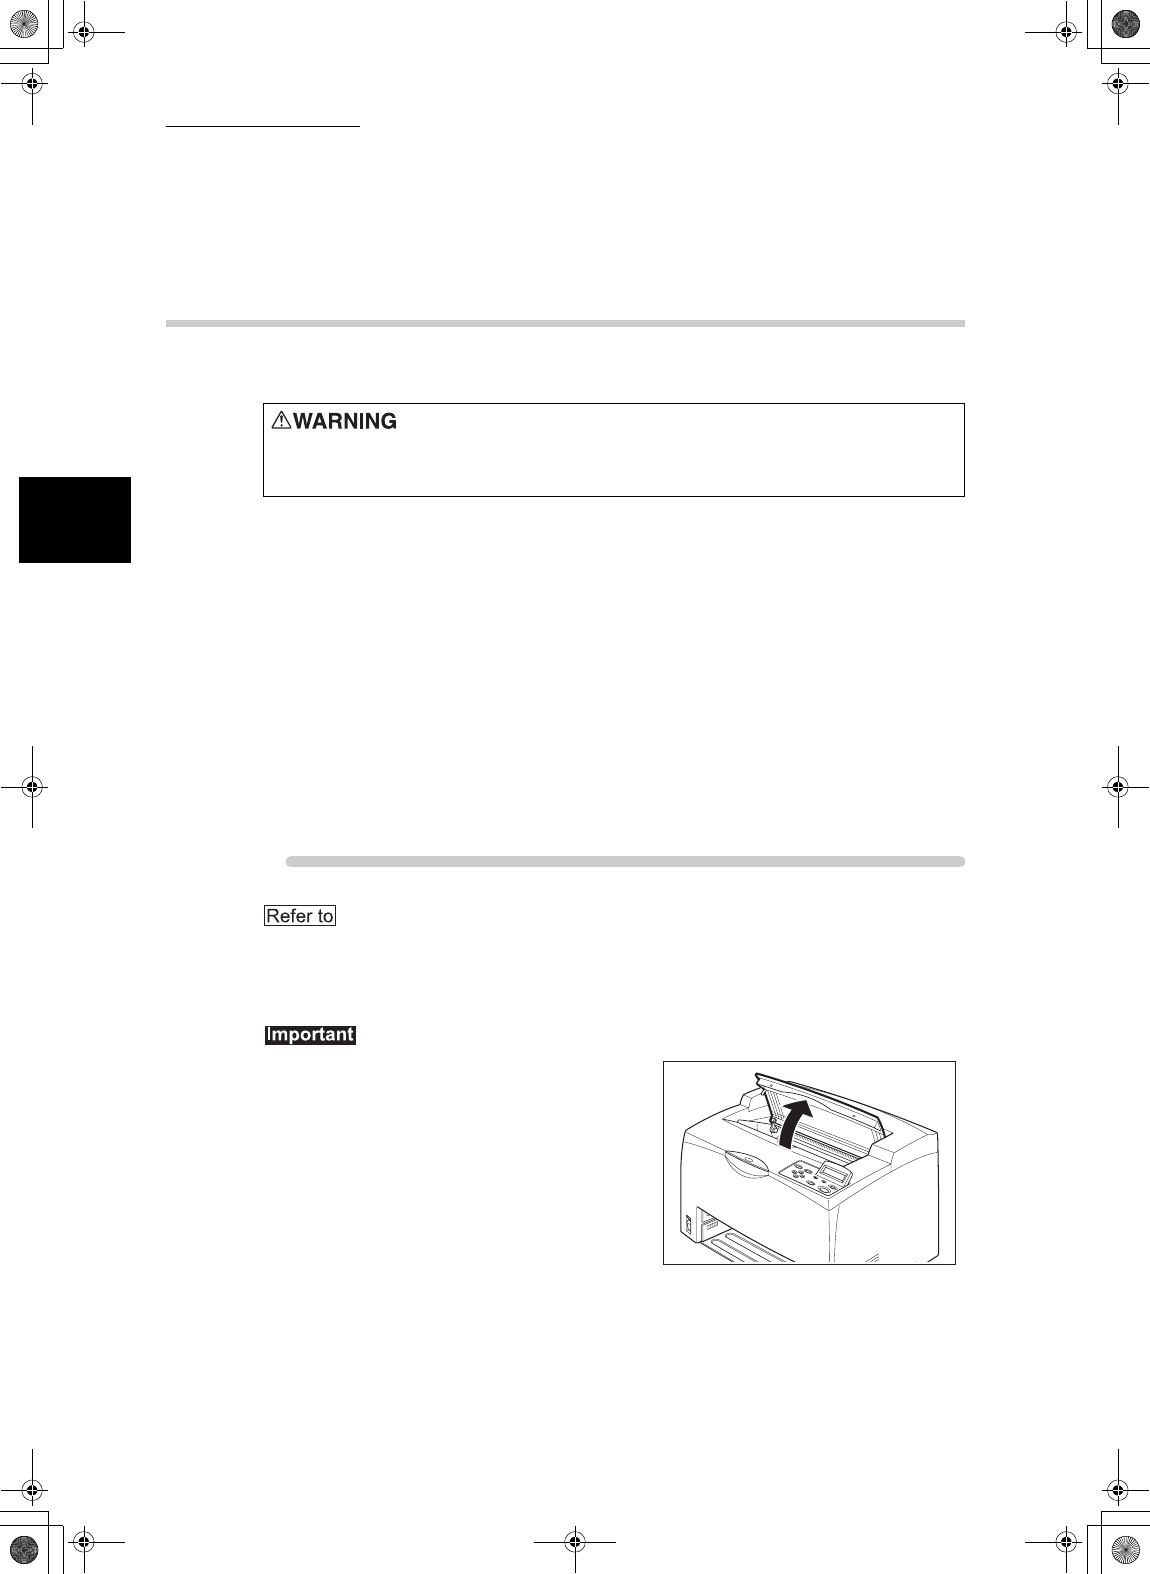
1
Open the top cover.
Do not touch any parts inside the printer.
Never throw an EP cartridge into an open flame. It can cause an
explosion and you can get burnt.
Lupin_IOT.book Page 10 Monday, February 24, 2003 10:23 AM
1.4 Installation Procedure
11
Installing the Printer
1
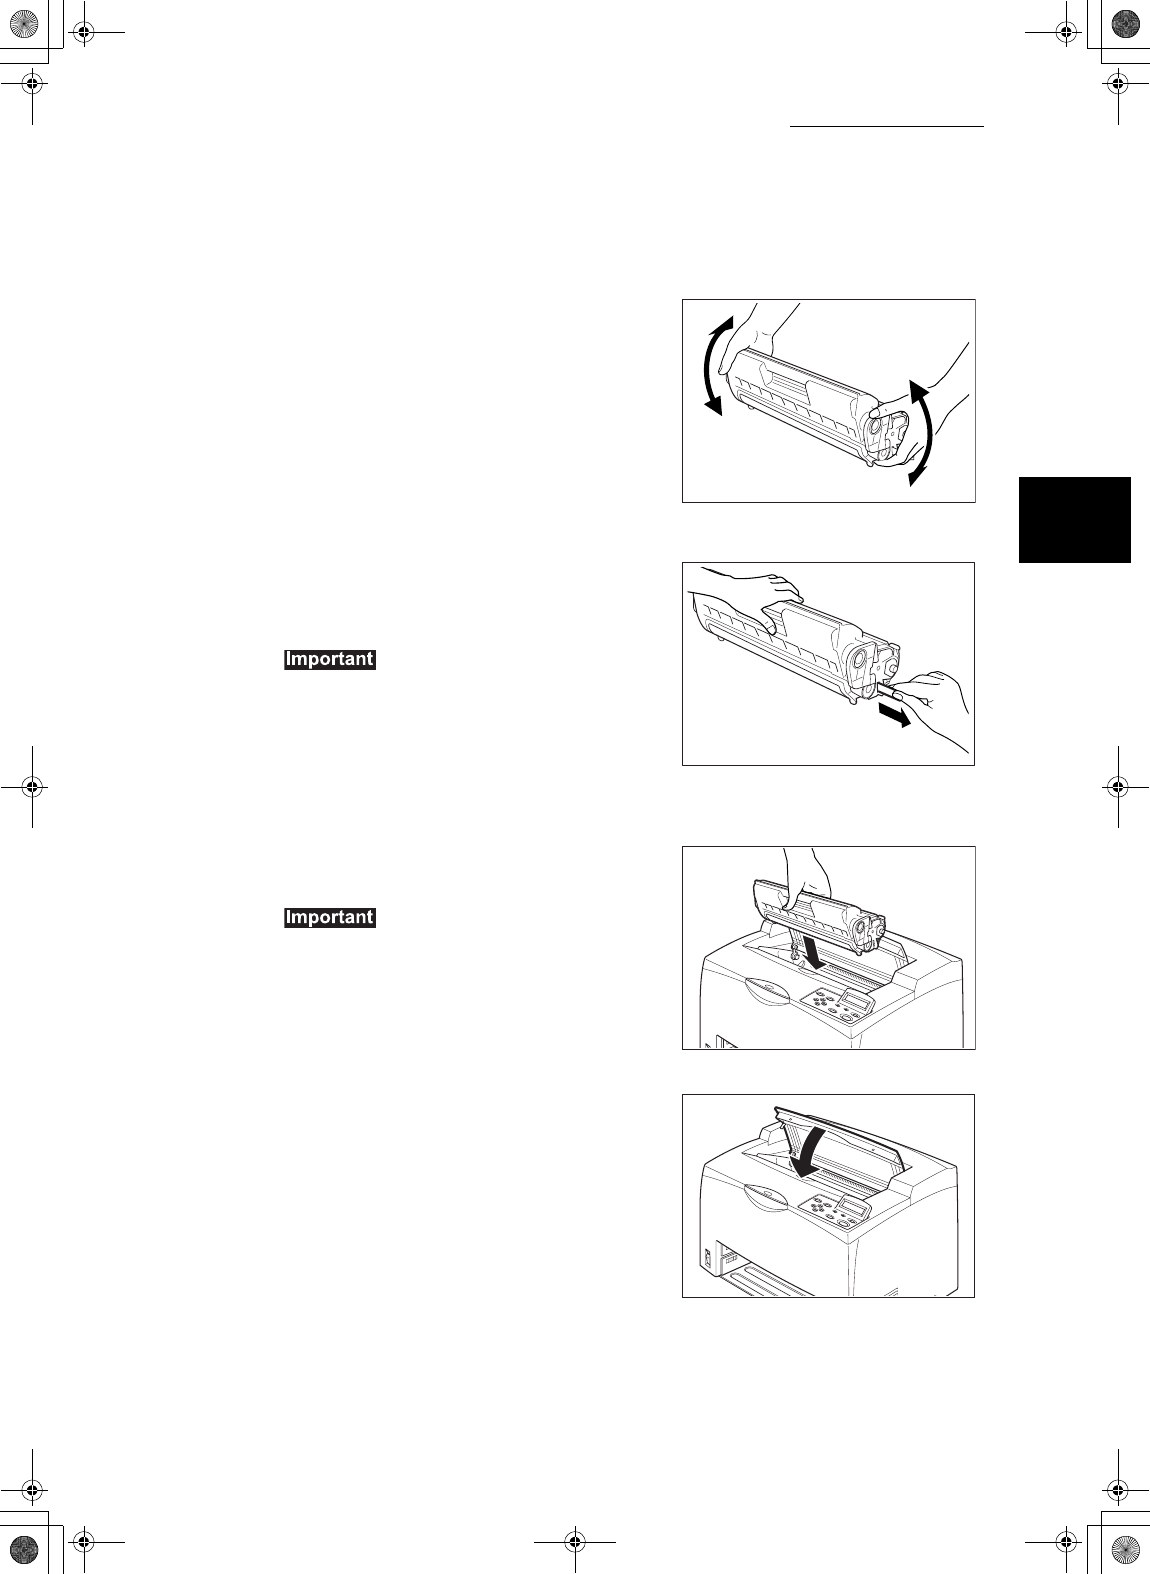
2
Take the EP cartridge out of the box
and shake it 7 to 8 times as shown in
the diagram.
3
Place the EP cartridge on a flat
surface and pull the seal out
horizontally.
zWhen pulling out the seal, pull it out
horizontally. The tape might break if it is pulled
out diagonally.
zAfter the seal has been pulled out, do not shake
or bump the EP cartridge.
4
Hold the EP cartridge by the grip and
insert it into the slot inside the printer.
zDo not touch any parts inside the printer.
zEnsure that the EP cartridge is firmly set.
5
Close the top cover securely.
Lupin_IOT.book Page 11 Monday, February 24, 2003 10:23 AM