FUJIFILM Business Innovation YIA-7 Printer cartridge toner level reader User Manual Chapter0
Fuji Xerox Corporation Limited Printer cartridge toner level reader Chapter0
Contents
- 1. User Manual Part 1
- 2. User Manual Part 2
User Manual Part 1
A3 40ppmLBP(@A4LEF)
A3 40ppmLBP(@A4LEF)A3 40ppmLBP(@A4LEF)
A3 40ppmLBP(@A4LEF)
Operation Manual
Operation ManualOperation Manual
Operation Manual
Ver. 3.0
October. 12, 2000

ii Saja Operation Manual
10/12/00
Chapter0.fm
Warning:
• Do not operate the equipment in ways not described in this manual, to prevent the pos-
sibility of damage. The manufacturer will not be responsible for any problems or damage
that arises from improper use.
• Electrical specifications and safety regulations differ in various countries. You should
purchase only a product and consumables designed to be used in your country. Do not
take the product or consumables to other countries.
• Contents of this manual are subject to change without prior notice.
• Reproduction of this manual in whole or in part on any kind of media is strictly prohibited.
• Comments about this manual are welcome. If you notice any problems, the manufac-
turer would appreciate hearing from you.

Saja Operation Manual iii
10/12/00
Chapter0.fm
Introduction
Thank you for selecting this laser printer. In this manual you will find important information
regarding operation and care of your printer. Please read this manual in its entirety and
keep it at hand for later reference.
Sections marked [!] denote important instructions for assuring safe use of the printer. Pay
special attention to these sections and read them fully before operating the printer.
This printer is certified as a Class 1 laser product under the U.S. Department of Health
and Human Services (DHHS) Radiation Performance Standard according to the Radiation
Control for Health and Safety Act of 1968. This means that the printer does not emit haz-
ardous laser radiation.
Since radiation emitted inside the printer is completely confined within the protective hous-
ings and external covers, the laser beam cannot escape from the machine during any
phase of user operation.
The Center for Devices and Radiological Health (CDRH) of the U.S. Food and Drug
Administration implemented regulations for laser products on August 1976. These regula-
tions apply to laser products marketed in the United States. The label on the printer indi-
cates compliance with the CDRH regulations and must be attached to laser products
marketed in the United States.
Warning:
Use of controls, adjustments or performance of procedures other than
those specified in this manual may result in hazardous laser radiation
exposure.
Radio Interference
* Class B Equipment
This equipment has been tested and found to comply with the limits for a Class B digital
device, pursuant to Part 15 of FCC Rules. These limits are designed to provide reason-
able protection against harmful interference in a residential installation. This equipment
generates, uses, and can radiate radio frequency energy and, if not installed and used in
accordance with the instructions, may cause harmful interference to radio communica-
tions. However, there is no guarantee that interference will not occur in a particular instal-
lation. If this equipment does cause harmful interference to radio or television reception,
which can be determined by turning the equipment off and on, the user is encouraged to
try to correct the interference by one or more of the following measures:
• Reorient or relocate the receiving antenna.
• Increase the separation between the equipment and receiver.
• Connect the equipment to an outlet on a circuit different from that to which the receiver
is connected.
• Consult with the dealer or an experienced radio/television technician for help.

iv Saja Operation Manual
10/12/00
Chapter0.fm
What This Manual Contains
This manual consists of four chapters and the appendixes section.
Chapter 1 Before Installation
Describes contents of the package and names of parts, as well as information on how
paper travels during the printing process.
Chapter 2 Installation
Walks you through installing the printer. Be sure to read this chapter before installing the
printer.
Chapter 3 Daily Operations
Explains how to replenish paper, replace the EP cartridge, and perform other tasks neces-
sary for day-to-day operations of the printer.
Chapter 4 Troubleshooting
Covers procedures to isolate and solve problems that may occur during use of the printer.
Appendixes
The appendixes section contains details on paper, consumables, Optional Paper Cas-
settes and Feeder, High Capacity Stacker, Duplex Printing Unit, High Capacity Feeder,
and specifications.

Saja Operation Manual v
10/12/00
Chapter0.fm
Manual Conventions
The following conventions are used in this manual.
Important: Provides information required to successfully complete an operation or pro-
cedure. Be sure to read this before performing the relevant operation.
Note: Provides useful additional information.
Reference: Provides further information for reference.
Throughout the manual, the personal computer or workstation to which the printer is to be
connected is called the “host computer”.

vi Saja Operation Manual
10/12/00
Chapter0.fm
Features
This printer offers the following outstanding features.
High-quality printing
The laser printer engine assures razor-sharp output of graphics and text, even at very
small point sizes, at resolution up to 1200 dpi x 1200 dpi (Option).
Ergonomic operation
The easy-to-read display clearly shows the operation status of the printer. Ergonomically
shaped front-panel buttons are used to control all functions.
User-friendly EP cartridge
The integrated EP cartridge contains both the toner and the photosensitive drum in a sin-
gle housing, which makes it easy to replace the cartridge.
Flexible paper handling
The front-side paper tray can be set for a wide variety of paper sizes, both standard and
non-standard max. 305 x 508 mm, including extended A3 for camera-ready copy. It can
also accommodate envelopes and labels. The paper cassette is a universal type which
can hold up to 500 sheets and can be set to any size from A3 to A5. A dedicated cassette
that can hold 500 sheets of extended A3 for camera-ready copy (330 x 470 mm) is avail-
able as an option. Various other optional cassettes such as the 2000-sheet High Capacity
Feeder are also available.
Continuous printing of up to 3150 sheets
Two optional 500-sheet paper cassettes can be added to the printer, resulting in a com-
bined capacity of 1500 sheets. Together with the front paper tray (150 sheets) and the
optional High Capacity Feeder (2000 sheets), the maximum total capacity for continuous
printing therefore is 3150 sheets.
High-volume output
The printer offers high-volume output of up to 40 pages per minutes (ppm) for A4 size
paper.
Duplex printing (Option)
The optional duplex printing unit allows the printer to print on both sides of a sheet.
High Capacity Stacker (Option)
Installing the optional HCS unit enables the printer to output up to 1000 sheets.

Saja Operation Manual vii
10/12/00
Chapter0.fm
Table of Contents
Introduction .....................................................................v
What This Manual Contains ........................................... vi
Manual Conventions ..................................................... vii
Features ....................................................................... viii
Safety Notes ................................................................... xi
Chapter1 Before Installation
1.1 Unpacking the Printer ......................................... 1-2
1.2 Parts of the Printer .............................................. 1-3
1.3 Paper Path .......................................................... 1-6
Chapter2 Installation
2.1 Installation Precautions....................................... 2-2
2.2 Installing the EP Cartridge .................................. 2-4
2.3 Using the Paper Cassette ................................... 2-8
2.4 Connecting the Power Cord.............................. 2-12
2.5 Turning the Printer On and Off.......................... 2-14
2.6 Using the Front Paper Tray............................... 2-16
Chapter3 Daily Operations
3.1 Replenishing Paper ............................................. 3-2
3.2 Replacing the EP Cartridge ................................ 3-9
3.3 Replacing the BTR Roller ................................. 3-14
3.4 Replacing the Fuser .......................................... 3-19
3.5 Replacing the Feed Rollers(HCF) ..................... 3-23
3.6 Cleaning ............................................................ 3-28
3.7 Daily Maintenance ............................................ 3-33
3.8 If the Printer is Not Used Over an Extended
Period of Time ................................................... 3-34
3.9 Checking the Power Cord ................................. 3-36
3.10 Relocating the Printer ....................................... 3-37

viii Saja Operation Manual
10/12/00
Chapter0.fm
Chapter4 Troubleshooting
4.1 Power-On Problems .............................................4-2
4.2 Print Quality Problems .........................................4-3
4.3 Error Messages ....................................................4-7
4.4 Paper Jams ..........................................................4-9
4.5 Other Problems ..................................................4-37
Appendix
Appendix A Print Media ............................................. A-2
Appendix B Options and Consumables ..................... A-8
Appendix C Installing the Optional Paper Feeder .... A-14
Appendix D Loading Paper into the A3 500-sheet
Universal Cassette A-26
Appendix E Using the Optional HCS Unit ................ A-31
Appendix F Installing the Optional Duplex
Printing Unit A-40
Appendix G Using the Optional HCF Unit ................ A-46
Appendix H Loading Paper into the HCF Unit.......... A-53
Appendix I Installing/removing the side cover ........ A-55
Appendix J Specifications ....................................... A-58
Saja Operation Manual ix
10/12/00
Chapter0.fm
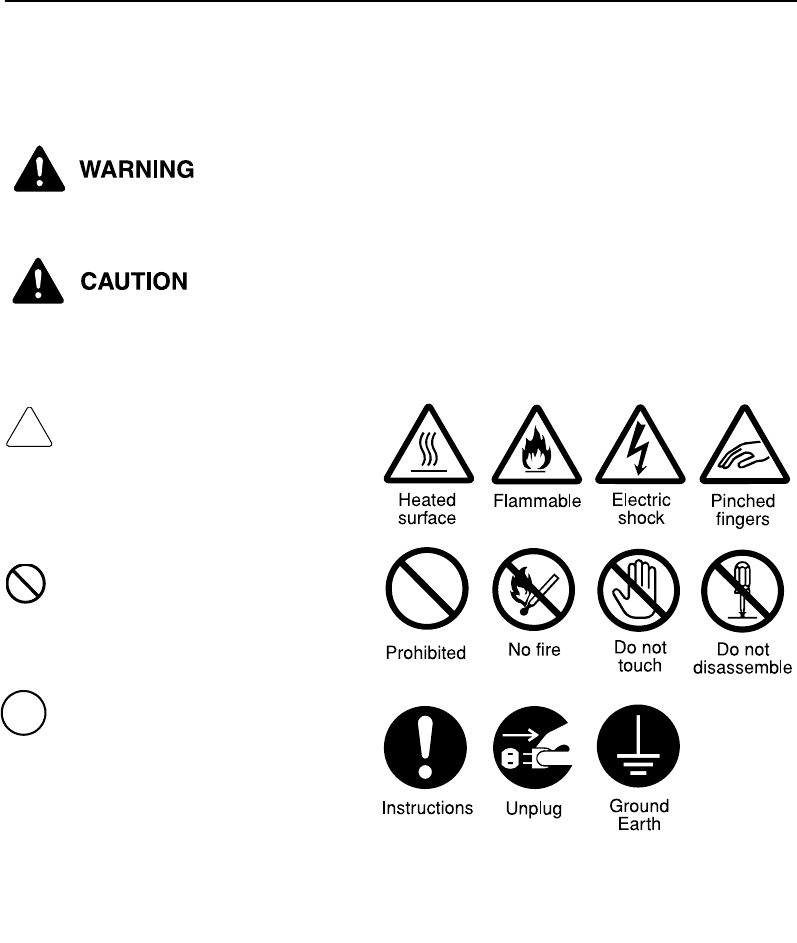
Safety Notes
Read this section carefully to ensure that you operate your machine safely.
This section describes the graphic symbols used throughout the guide.
is used to alert operators to an operating procedure, practice,
or condition that, if not strictly observed may result in severe
injury or loss of life.
is used to alert operators to an operating procedure, practice,
or condition that if not strictly observed, might result in safety
hazards to personnel or damage to equipment.
This symbol is used to alert oper-
ators to a specific operating procedure
that requires close attention. Read and
follow instructions carefully.
This symbol is used to alert opera-
tors to a specific operating procedure
that must not be performed. Read and
follow instructions carefully.
This symbol is used to alert opera-
tors to a specific operating procedure
that should be emphasized for operat-
ing safety. Read instructions carefully
before performing the required proce-
dure.
xSaja Operation Manual
10/12/00
Chapter0.fm
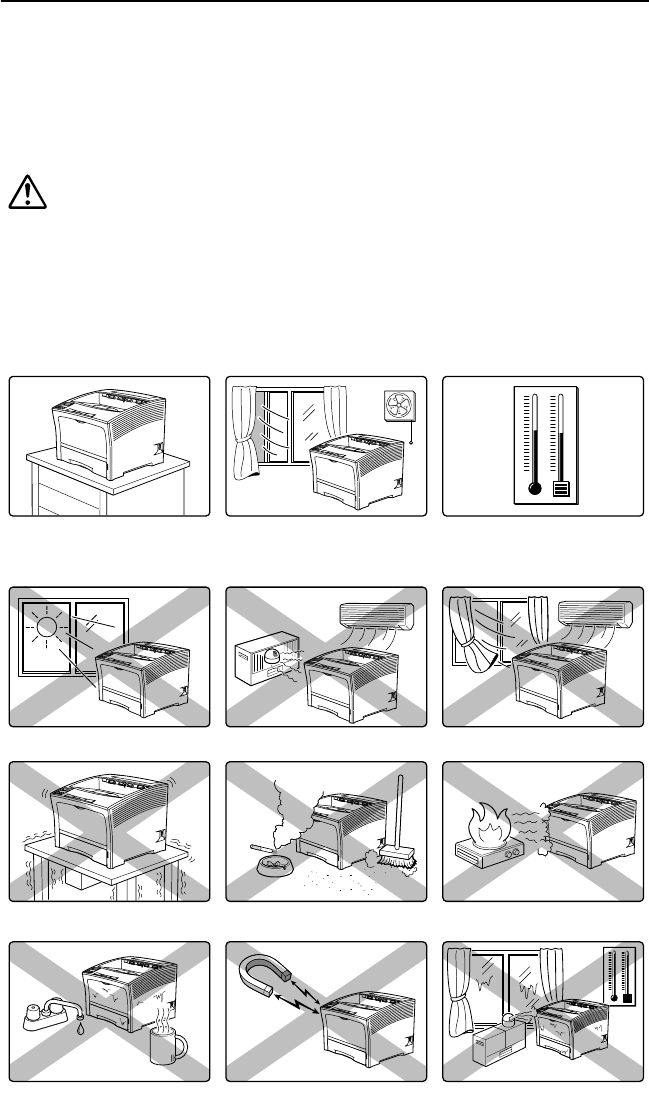
Installations and relocation
Do not place the machine in a hot, humid, dusty, or poorly venti-
lated environment. Prolonged exposure to these adverse condi-
tions can cause a fire or shock hazard.
Do not place the machine near heaters or volatile, flammable,
or combustible materials such as curtains that may catch fire.
Place the machine on a level and sturdy surface that can with-
stand the machine weight. If tilted, the machine may fall over
and cause injuries.
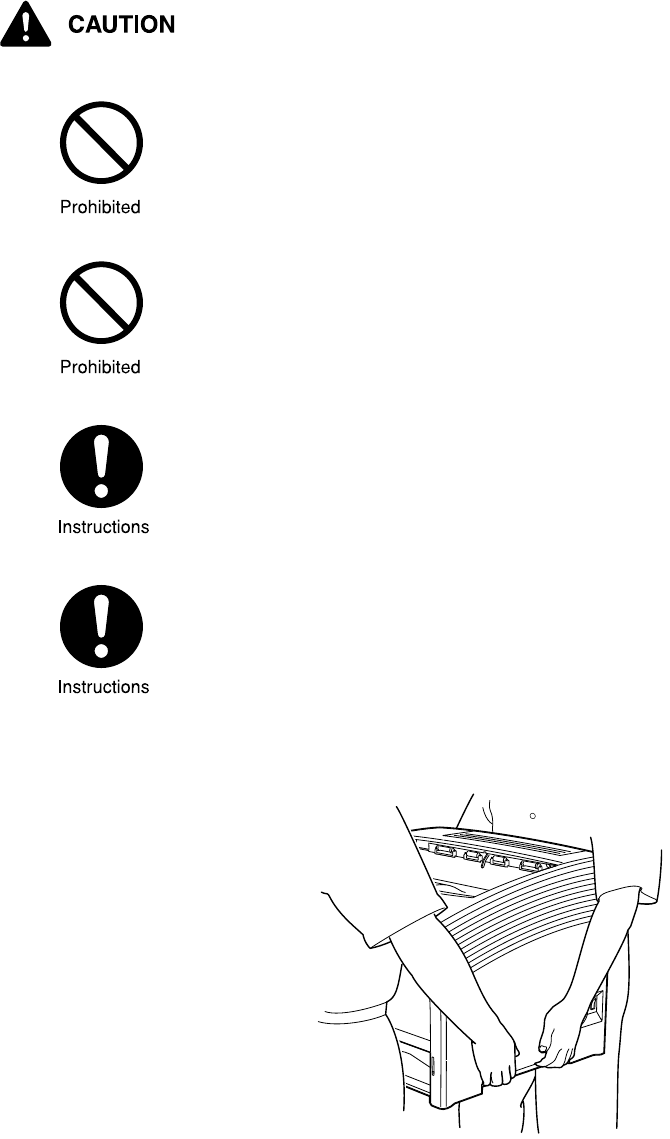
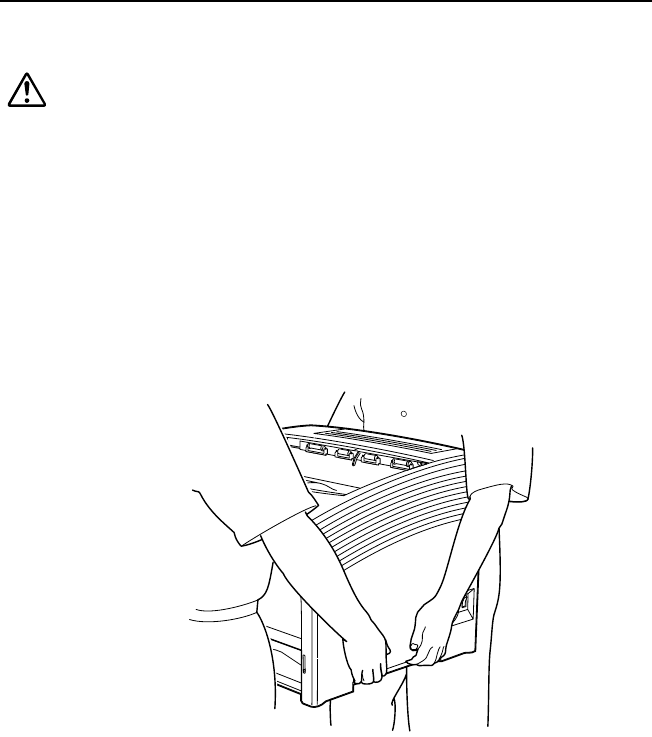
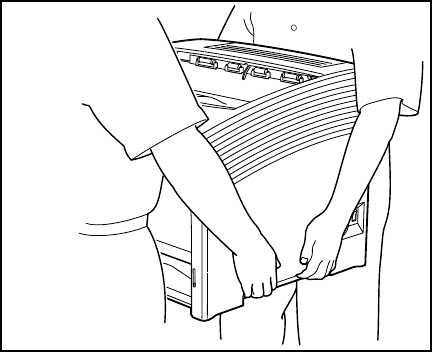
The machine weighs 26kg. When carrying the equipment, play
it safe. Get help.
When lifting the machine face the front panel and firmly grip the
recessed areas provided on both sides and the bottom left of
the machine. Never try to lift the machine by gripping any other
areas. Lifting the machine by gripping any other areas can
cause the machine to fall, resulting in injuries.
Saja Operation Manual xi
10/12/00
Chapter0.fm
When lifting the machine, get a firm footing and bend your
knees to avoid possible injuries to your back.
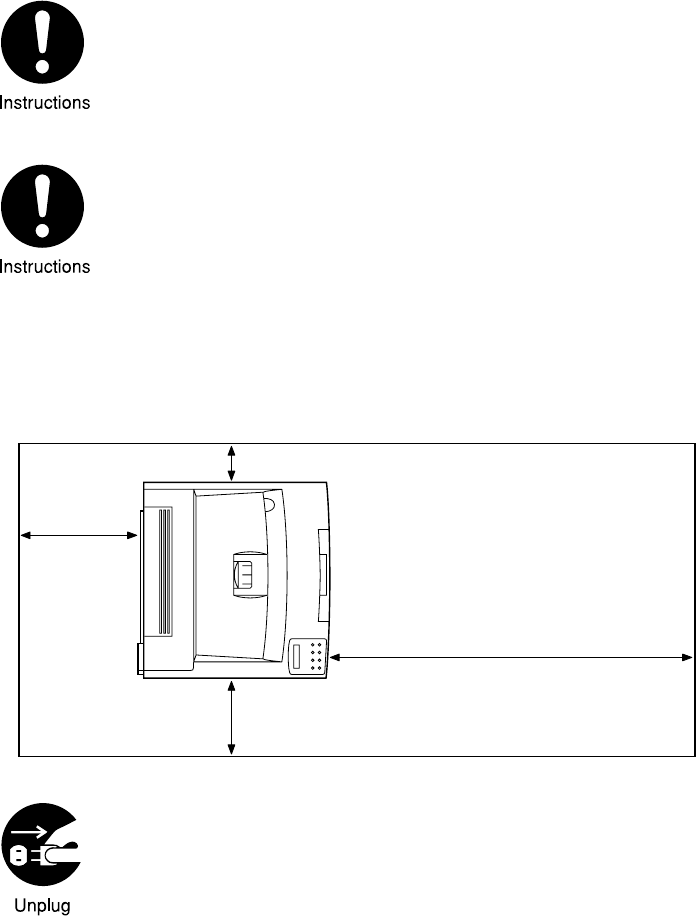
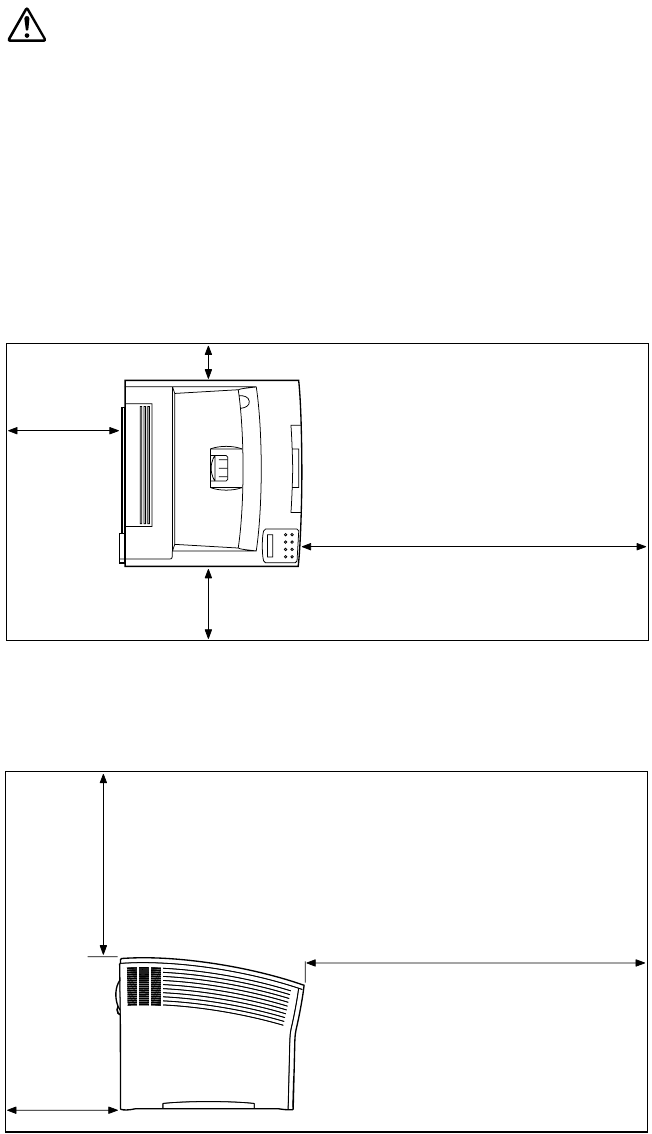
The machine has ventilation holes on the rear panel and side
panel. Ensure that the machine is installed with a minimum
clearance of 100mm from its right side to the wall and 200mm
from its left side to the wall and 300mm from the rear vent to the
wall. A poorly ventilated machine can cause excessive internal
heat and a fire. The accompanying diagram shows the mini-
mum clearances required for normal operation, consumables
replacement, and maintenance to ensure your machine oper-
ates at peak performance.
When moving the machine, be sure to unplug the power cord
from the outlet. If the machine is moved with the power cord
connected, it can cause damage to the cord which could result
in a fire or shock hazard.
100 mm
300 mm
760 mm
200 mm
xii Saja Operation Manual
10/12/00
Chapter0.fm
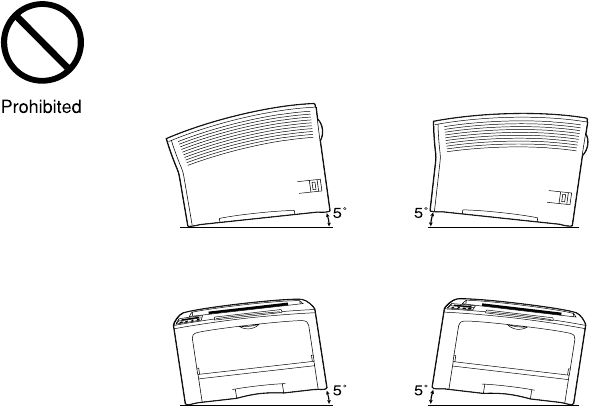
When moving the machine, do not tilt it more than indicated
below. If tilted excessively, the machine may fall over and cause
injuries.
Other Precautions
!The machine is capable of operating normally within the fol-
lowing recommended environmental limits.
Temperature range 10 - 32°C
Humidity range 15 - 85% (no condensation)
!Humidity should be 70% or below at 32°C, and temperature
should be 28°C or below at 85% humidity.
Note: Sudden temperature fluctuations can affect copy
quality. Rapid heating of a cold room can cause
condensation inside the machine, directly inter-
fering with image transfer.
!Do not expose the machine to direct sunlight. Exposure to
direct sunlight can adversely affect the machine's perfor-
mance.
!Do not allow the machine to tilt more than x mm front to
back and more than xx mm left to right. If tilted excessively,
consumables may spill and cause machine damage.

Saja Operation Manual xiii
10/12/00
Chapter0.fm
Power requirements and earthing connection
Three power specifications are listed below. The specifications
that apply to your machine depend on your machine configura-
tion. Connect the power plug only to a properly rated power out-
let. Otherwise, it can cause a fire or shock hazard. If in doubt,
contact the Xerox Customer Support Centre.
• Rated voltage: 100V
Rated frequency: 50/60Hz
•Rated voltage: 120V
Rated frequency: 50/60Hz
•Rated voltage: 220-240V
Rated frequency: 50/60Hz
Never use multi-plug adaptors to plug multiple power plugs in
the same outlet. Be sure to operate the machine on a sole-use
receptacle. Multiple connectors can cause the outlet to overheat
and cause a fire.
Ensure that the plug connection is free of dust. In a damp envi-
ronment, a contaminated connector can draw a non-negligible
amount of current that can generate heat and eventually cause
a fire over an extended period of time.
Always use the power cord provided with your machine. When
an extension power cord is required, always use a properly
rated cord.
• In Japan: 125V/15A
• In other countries: Contact the Xerox Customer Support
Centre.
If you use a cord with an unspecified current rating, the
machine or plug may emit smoke or become hot to the
touch externally.

xiv Saja Operation Manual
10/12/00
Chapter0.fm
Do not attempt to rework, pull, bend, chafe, or otherwise dam-
age the power cord. Do not place a heavy object on the cord. A
damaged cord can cause a fire or shock hazard.
Never touch a power cord with wet hands. Danger of electric
shock exists.
Stop operation immediately if your machine produces smoke,
excessive heat, unusual noise, or smell, or if water is spilt into
the machine. These conditions can result in a fire. Immediately
switch off and unplug the machine, and contact the Xerox Cus-
tomer Support Centre.
To prevent a fire or shock hazard, follow the instruction below
based on your machine configuration. If in doubt, contact the
Xerox Customer Support Centre.
•If your machine is a 220-240V model, there is no need to
attach a separate earth line since the earth connection is
incorporated in the power line. Plug it into a properly rated
outlet.
• If your machine is a 100 or 110V model, use the green earth
wire bundled with the power cord, located at the rear of the
machine.
The earth wire must be connected to one of the following
conductors.
Earth terminal of the specified power outlet
A piece of copper buried in the earth 650mm or deeper
Earth terminal with Class 3* earthing.
* Class 3 is the regulation for Japan only.
Never connect the earth wire to any of the following.
• Gas pipe, which can cause ignition or an explosion
•Telephone line earth wire or lightning rod, which can draw
an excessive electric current if hit by lightning
• Water faucet or pipe whose electrical conductivity is broken
by a non-metal part
If the power cord is broken or insulated wires are exposed, ask
the Xerox Customer Support Centre for a replacement. Using a
damaged cord can cause a fire or shock hazard.

Saja Operation Manual xv
10/12/00
Chapter0.fm
Do not unplug or replug the machine when it is on. Unplugging
a live connector can deform the plug and cause a fire.
When unplugging the machine, grasp the plug instead of the
cord. Forcibly pulling on the cord can damage it and cause a
fire or shock hazard.
Be sure to switch off and unplug the machine before accessing
the interior of the machine for cleaning, maintenance, or fault
clearance. Access to a live machine’s interior can cause a
shock hazard.
When the machine is not used over an extended period of time,
switch it off and unplug it. If an unused machine is left con-
nected to a power source for a long period, degraded insulation
can cause a shock, leak current or fire hazard.
Once a month, unplug the machine and check the power cord
for the following.
•The power cord is plugged in firmly into a receptacle.
• The plug is not excessively heated, rusted, or bent.
•The plug and receptacle are free of dust.
•The cord is not cracked or frayed.
If you notice any unusual conditions, contact our Xerox Cus-
tomer Support Centre.
Switch off the machine before connecting the interface cable.
Connecting the cable with a live machine can cause a shock
hazard.
xvi Saja Operation Manual
10/12/00
Chapter0.fm
Other Precautions
!When installed at a certain location, the machine may cause
interference with radio and television reception. If you notice
flickering or distorted images or noises on your audio-visual
units, your machine may be causing radio interference.
Switch it off, and if the interference disappears, the machine
is the cause of radio interference. Perform the following pro-
cedure until the interference is corrected.
Move the machine and the TV and/or radio away from each
other.
• Reposition or reorient the machine and TV and/or radio.
• Unplug the machine, TV and/or radio, and replug them into
outlets that operate on different circuits.
• Reorientate the TV and/or radio antennas and cables until
the interference stops. For an outdoor antenna, ask your
local electrician for support.
• Use coaxial cable antennas.

Saja Operation Manual xvii
10/12/00
Chapter0.fm
Operating precautions
Do not place any liquid container such as a vase or coffee cup
on the machine. Spilt water can cause a fire or shock hazard.
Do not place any metal part such as staples or clips on the
machine. If metal and flammable parts migrate into the
machine, they can short internal components, and cause a fire
or shock hazard.
If debris (metal or liquid) migrates into the machine, switch off
and unplug the machine. Contact the Xerox Customer Support
Centre. Operating a debris-contaminated machine can cause a
fire or shock hazard.
Never open or remove machine covers that are secured with
screws unless specifically instructed in the Operation Manual.
A high voltage component can cause a shock hazard.
Do not try to alter the machine configuration, or modify any
parts. An unauthorized modification can cause smoke or fire.
xviii Saja Operation Manual
10/12/00
Chapter0.fm
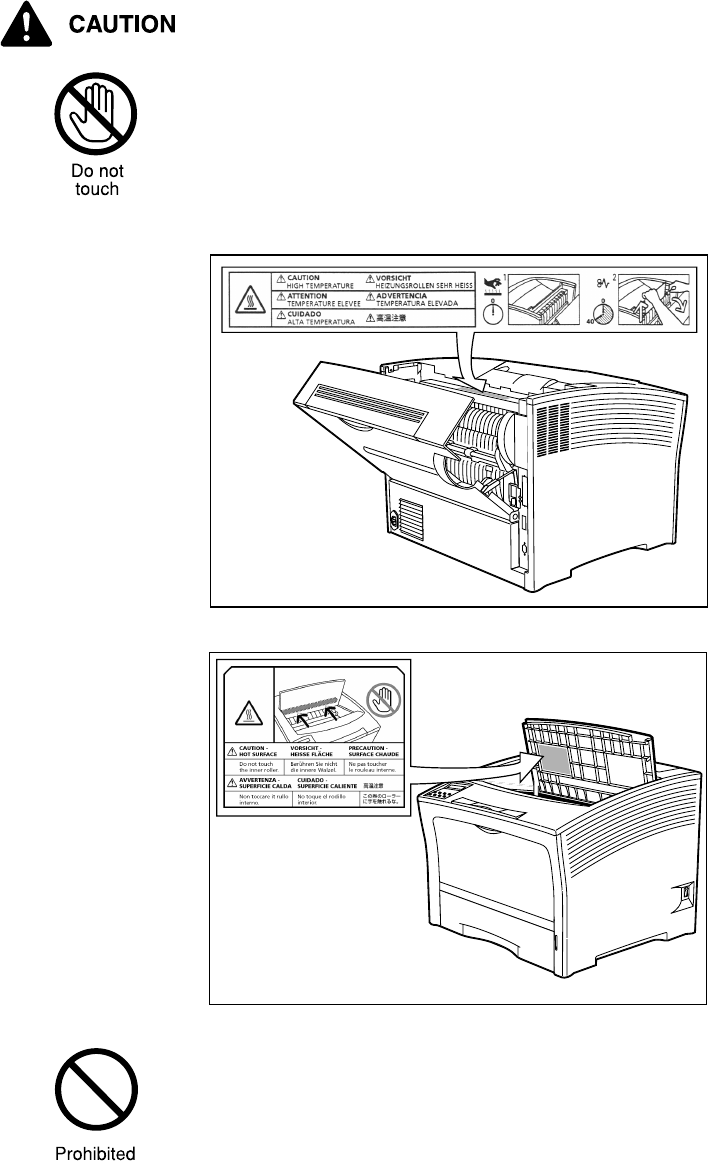
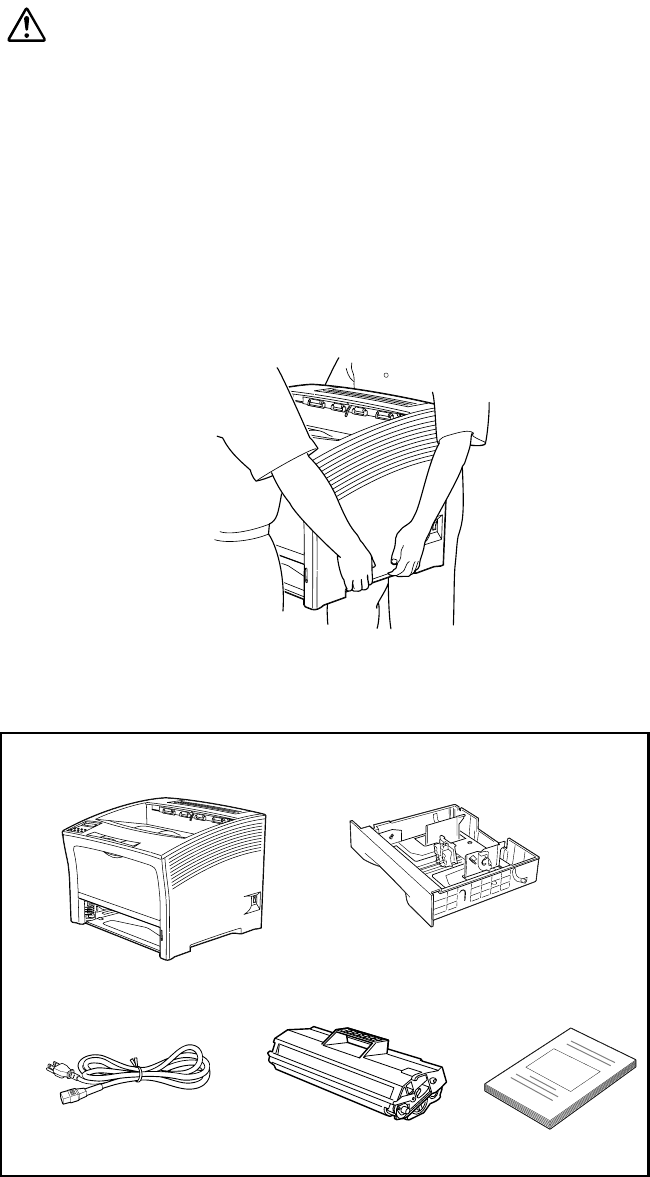
Never touch a labelled area found on or near the fuser. You can
get burnt.
If a sheet of paper is wrapped around the fuser, do not try to
remove it by yourself to avoid injuries or burns. Switch off the
machine immediately, and contact the Xerox Customer Support
Centre.
Do not place any heavy object on the machine. An off-balance
machine can fall over or the heavy object can fall, causing inju-
ries.

Saja Operation Manual xix
10/12/00
Chapter0.fm
Do not use a highly flammable spray or solvent near the
machine. It can cause a fire.
When removing jammed paper, make sure that no pieces of
torn paper are left in the machine. A piece of paper remaining in
the machine can cause a fire.
If a sheet of paper is wrapped around the heat roller, or when
clearing a jammed paper that is difficult or impossible to see, do
not try to remove it by yourself. Doing so can cause injuries or
burns. Switch off the machine immediately, and contact the
Xerox Customer Support Centre.
Other Precautions
!Refer to this manual for the procedures to clear paper jams
and to resolve other troubles that might occur.

xx Saja Operation Manual
10/12/00
Chapter0.fm
Handling consumables
Never throw a EP cartridge into an open flame. It can cause an
explosion and you can get burnt.
Other Precautions
!Do not unpack consumables before use. Store consum-
ables in a cool, dry, and clean environment, away from an
open flame, and out of direct exposure to sunlight.
!When using consumables, read and observe operating
instructions and safeguards given on the package and con-
tainer.
!Administer emergency first aid as follows:
•If toner gets into your eyes, rinse them well with plenty of
clear water. Consult a doctor, if necessary.
•If toner adheres to your skin, wash it with soap and water
then rinse it well.
•If you inhale toner, exit the area immediately and gargle
with plenty of water.
•If you swallow toner, induce vomiting and consult a doctor
immediately.

Chapter 1
Chapter 1 Chapter 1
Chapter 1
Before Installation
Before InstallationBefore Installation
Before Installation
This chapter describes contents of the package and names of parts, as
well as information on how paper travels during the printing process.
1.1 Unpacking the Printer .......................................... 1-2
1.2 Parts of the Printer............................................... 1-3
1.3 Paper Path........................................................... 1-6
1-2 Saja Operation Manual
10/12/00
Before Installation Chapter1.fm
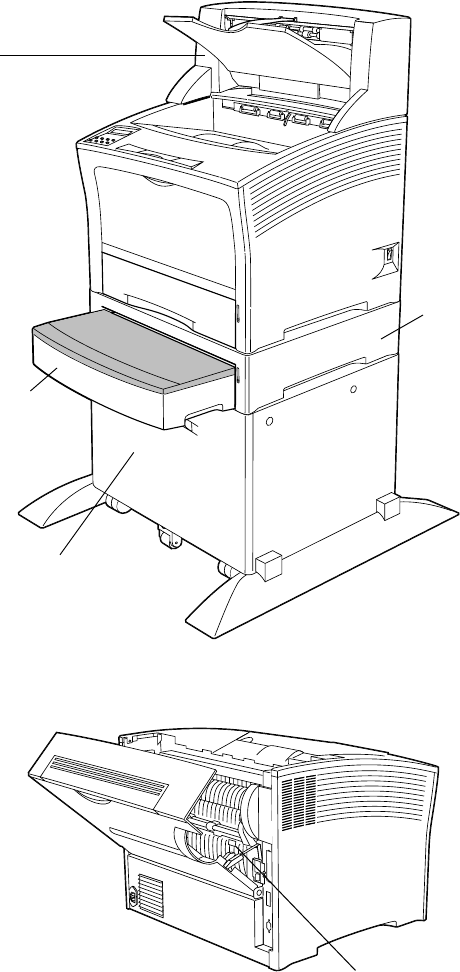
1.1 Unpacking the Printer
When you unpack the printer, make sure that all the items shown below
are included. If any items are missing or damaged, contact your dealer.
Caution:
• This printer is very heavy. The weight of the main unit with-
out paper cassette, consumables, and paper is about 26
kg. Never attempt to lift the printer by yourself. The printer
should always be carried by two persons.
• To carry the printer, have two persons facing each other
from the front (with operation panel) and the rear of the
printer. Grasp the four bottom corners. Never try to lift the
printer while holding any part other than the bottom cor-
ners. Otherwise there is a severe risk of injury if the printer
is dropped.
• When lifting the printer, correct posture is important to pre-
vent back injuries.
Note: Save the carton and packing materials for later use in case
you need to ship the printer.
A4 500-sheet universal cassette
Printer main unit
EP cartridge
Power cord Operation Manual

Saja Operation Manual 1-3
10/12/00
Chapter1.fm Before Installation
1.2 Parts of the Printer
The various parts of the printer are explained below.
Main unit
Front
Rear
500-sheet universal cassette
Hold paper up to postcard.
Paper amount indicator
Indicates the remaining amount
of paper.
Power switch
Serves to turn the
printer on and off.
Operation panel
Contains all controls
required for opera-
tion of the printer.
Front paper tray
Various paper sizes
can be loaded in this
tray. When A4 paper
is inserted sideways,
the tray cover can be
closed.
Extension tray
(paper stopper)
Holds paper output
with size B4 or A3.
Paper exit slot
The printed sheets
are deposited here
(face down).
Paper feeder
The paper cassette is
inserted here.
Paper output tray
Used when printing on paper sizes A3 - B4.
A3 500-sheet universal cassette
Can hold paper sizes from A3 to A5.
Top cover
Open it to replace the EP
cartridge or remove paper
jam.
Ventilation slot
Hot air produced
inside the printer
exits here, to pre-
vent overheating.
Power cord
receptacle
Plug the power
cord into here.
Rear cover
O
pen this cover to
remove jammed
paper
HCS cover
Remove it when installing
the optional HCS unit.
1-4 Saja Operation Manual
10/12/00
Before Installation Chapter1.fm
Internal parts
Operation panel
Top cover
Open the cover when replacing
the EP cartridge or removing
jammed paper.
EP cartridge
The integrated car-
tridge contains the
toner and the photo-
sensitive drum.
Front paper tray
Leave it open when loading paper
of size from B4 to A3. For smaller
size paper such as postcards, take
out the tray and set the paper.
Fuser
Fixes toner onto the paper.
Caution:
The fuser becomes very hot in
operation. If a paper jam has
occurred, turn the power off
and wait at least 40 minutes
before removing the drum car-
tridge and touching the fuser
section.
Rear cover
Open the cover for removing
jammed paper.
Display
Shows error messages and
other status
Saja Operation Manual 1-5
10/12/00
Chapter1.fm Before Installation
Option
Front
Rear
HCS Unit
Delivers up to 1000
sheets of printouts.
Paper Feeder
Holds a 500-sheet
A3-size universal
paper cassette or
a 500-sheet A4-
size universal
paper cassette.
HCF Unit
Stores up to 2000
sheets of A4- or
Letter-size paper.
A3 500-sheet
Universal
Cassette
Stores A5- to
A4-size paper.
Duplex printing Unit
Enables printing on both
sides of a sheet of paper.
1-6 Saja Operation Manual
10/12/00
Before Installation Chapter1.fm
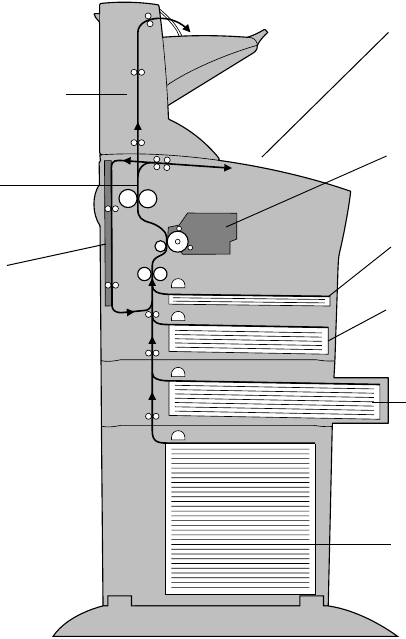
1.3 Paper Path
The paper path inside the printer is shown in the illustration below.
(1) The paper is pulled out of the front paper tray or the cassette.
(2) The image is transferred by the photosensitive drum.
(3) The toner on the paper is fixed by the fuser.
(4) After passing the duplex printing unit, the paper is fed once more
through steps (2) and (3).
(5) The paper emerges onto the output tray, or the HCS tray if the
optional HCS tray is installed.
(5) High Capacity
Stacker
(option)
(3) Fuser
(6) Duplex
Printing Unit
(option)
(4) Face Down Tray
(2) Toner Cartridge
(1) Multi Bypass
Feeder
Paper Feeder and
Paper Cassette
(standard)
Paper Feeder and
Paper Cassette
(option)
High Capacity
Feeder (option)

Chapter 2
Chapter 2 Chapter 2
Chapter 2
Installation
Installation Installation
Installation
This chapter describes how to install the printer. Be sure to read this chap-
ter before installing the printer.
2.1 Installation Precautions........................................ 2-2
2.2 Installing the EP Cartridge ................................... 2-4
2.3 Using the Paper Cassette.................................... 2-8
2.4 Connecting the Power Cord............................... 2-12
2.5 Turning the Printer On and Off........................... 2-14
2.6 Using the Front Paper Tray................................ 2-16
2-2 Saja Operation Manual
10/12/00
Installation Chapter2.fm
2.1 Installation Precautions
To make optimum use of the printer, observe the following precautions.
Environment
Install the printer at a location described below.
Caution:
The installation surface must be stable and very sturdy to
support the considerable weight of the printer. If the printer
falls over, this will cause a severe risk of injuries.
Note: Place the printer on a table that is less than 700mm in height.
Placing the printer at a high location makes paper jam clearing
and the EP cartridge replacement difficult to perform.
Note: If there are drastic fluctuations in temperature or humidity,
condensation may occur inside the printer which will degrade
print quality. If this has happened, wait for at least one hour
before using the printer, to allow the moisture to evaporate.
Horizontal, sturdy and stable surface
Subject to direct sunlight
Exposed to vibrations
Subject to water and high humidity Subject to magnetic Subject to extreme variations in
temperature and humidity
Close to an open flameExposed to high levels of dust
and contamination
Close to heating appliances Exposed to direct air currents
Location with good ventilation Location with stable temperature
and humidity
Do not install the printer at locations such as those described below.
Saja Operation Manual 2-3
10/12/00
Chapter2.fm Installation
Space requirements
Caution:
The machine has ventilation holes on the rear panel and side
panel. Ensure that the machine is installed with a minimum
clearance of 100mm from its right side to the wall and
200mm from its left side to the wall and 300mm from the rear
vent to the wall. A poorly ventilated machine can cause
excessive internal heat and a fire. The accompanying dia-
gram shows the minimum clearances required for normal
operation, consumables replacement, and maintenance to
ensure your machine operates at peak performance.
Top view
Side view
100 mm
760 mm
200 mm
300 mm
500 mm
760 mm
300 mm
2-4 Saja Operation Manual
10/12/00
Installation Chapter2.fm
2.2 Installing the EP Cartridge
Install the EP cartridge in the printer using the procedure described
below.
Reference: For information on removing the EP cartridge, please refer to
“3.2 Replacing the EP Cartridge”.
Handling Precautions
• Do not expose the cartridge to direct sunlight or other strong light
sources.
• Do not carry out the procedure at a brightly lit location, and com-
plete the installation procedure as quickly as possible (within about
5 minutes).
• The drum shutter protects the photosensitive drum from external
light. Do not open the drum shutter by hand.
• Never touch the surface of the photosensitive drum. Do not turn the
cartridge over and do not stand it on edge.
• Toner is not harmful to humans, but if some toner has come into
contact with your hands or clothes, wash it off with cold water.
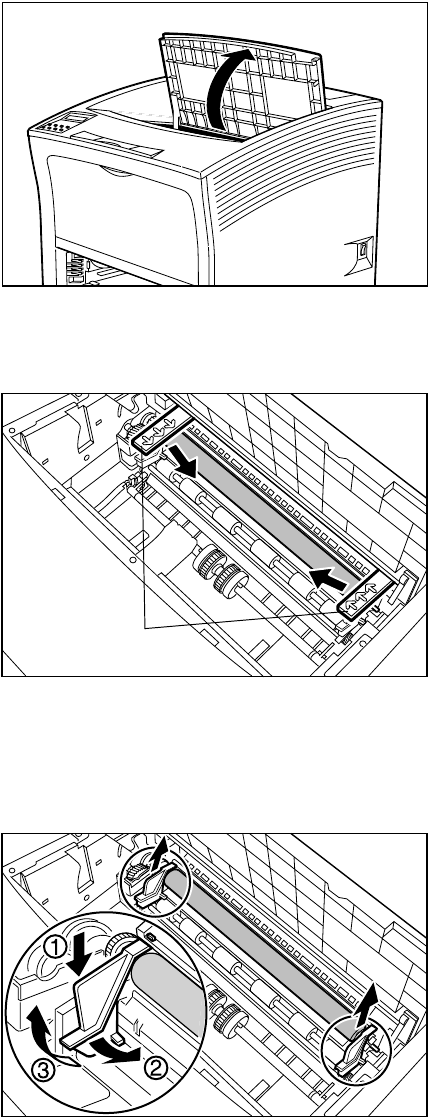
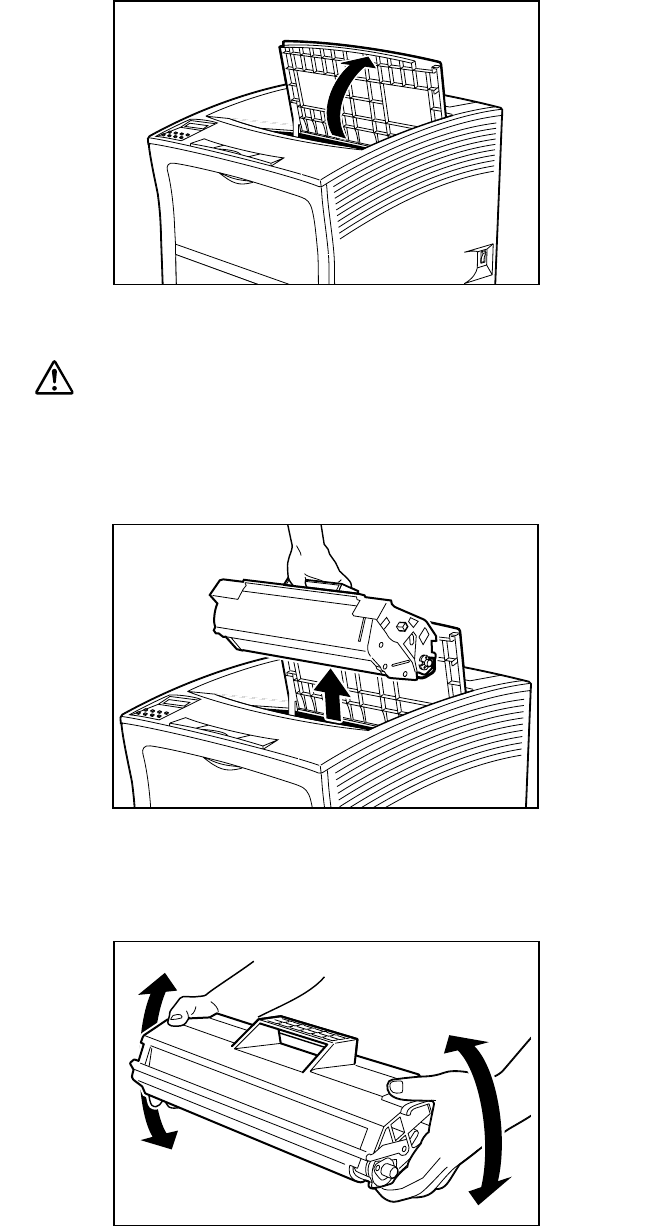
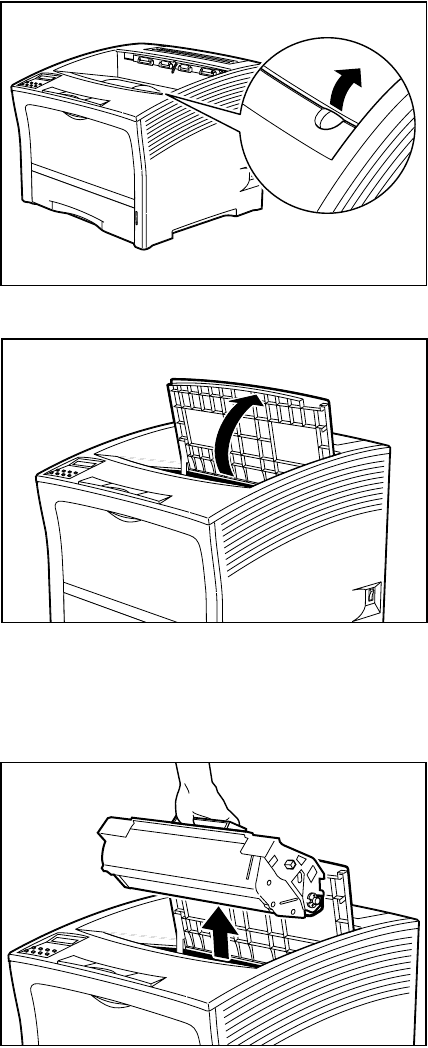
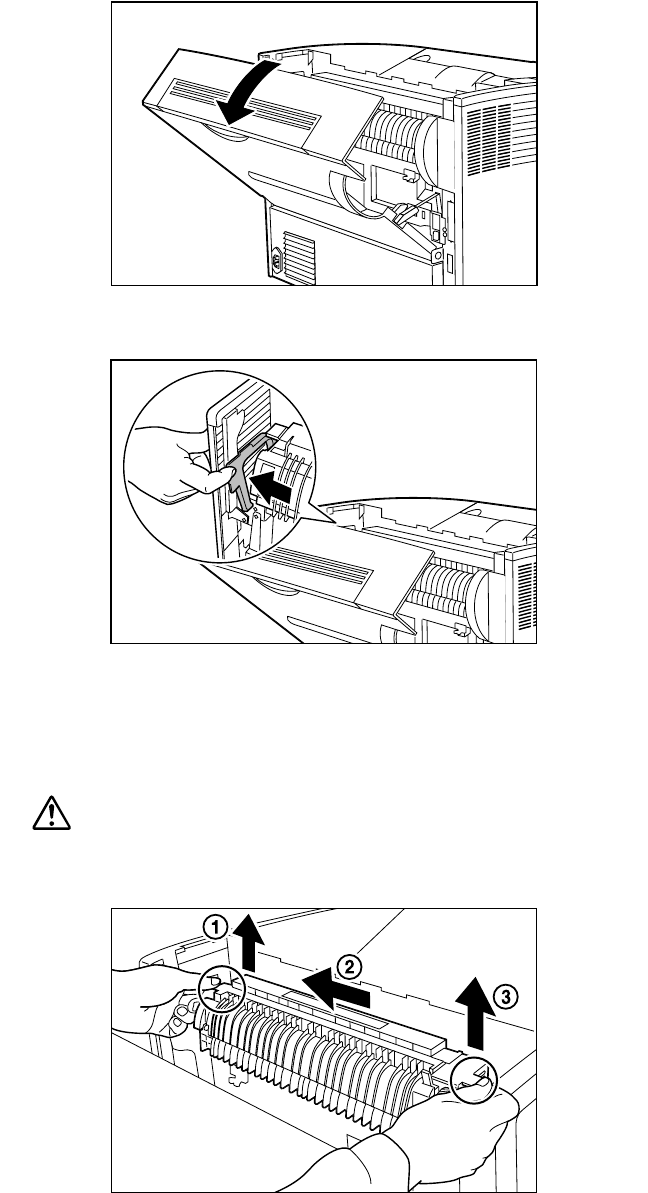
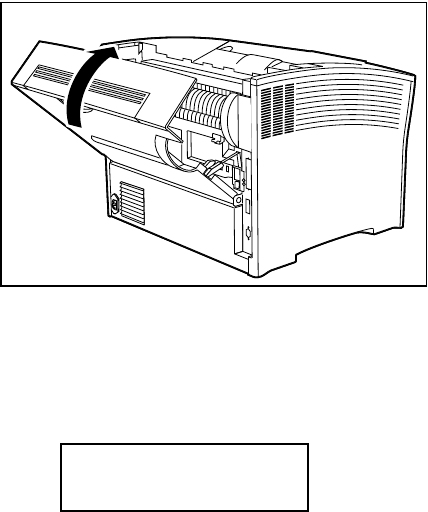
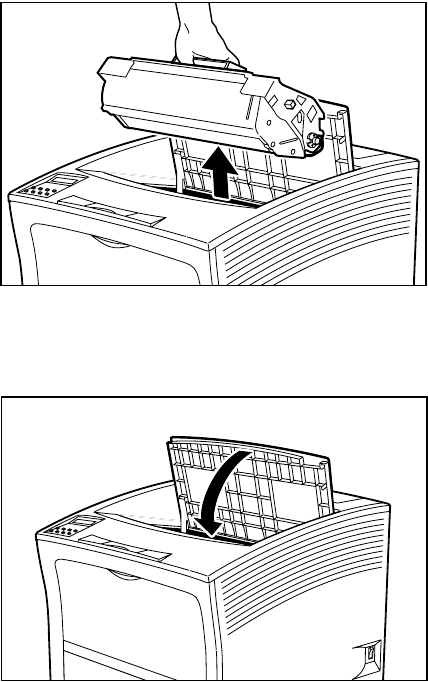
1. Hold the recessed area and lift to open the top cover.
Warning:
Make sure the top cover is opened all the way to the
back until it stops. (Also, when closing, slowly close the
top cover.)
Important: If printouts still remain in the paper exit area, remove
them before opening the top cover; otherwise paper jam
may result.
Important: Do not touch any parts inside the printer.
Saja Operation Manual 2-5
10/12/00
Chapter2.fm Installation
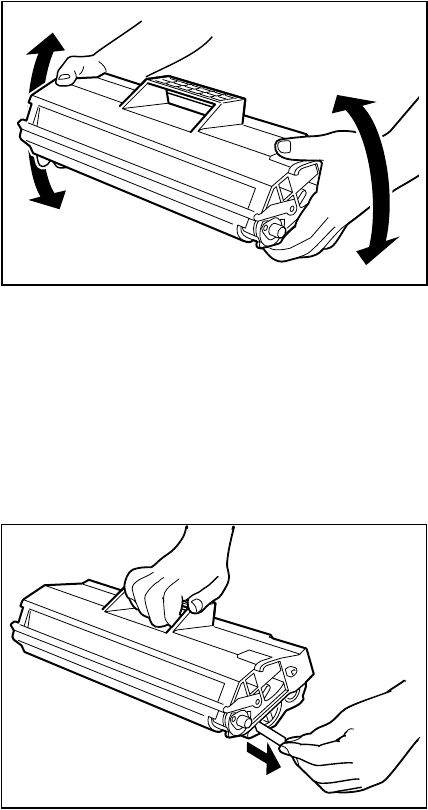
2. Pull the fuser’s nip spacer (one on each side) in the direction of the
arrows to remove it.
3. Remove the two orange spacers installed to prevent the BTR roller
from falling off. Hold a spacer; then while pressing slide it towards the
inside of the printer and pull it out. Repeat the same procedure with
the other spacer.
Nip spacer
2-6 Saja Operation Manual
10/12/00
Installation Chapter2.fm
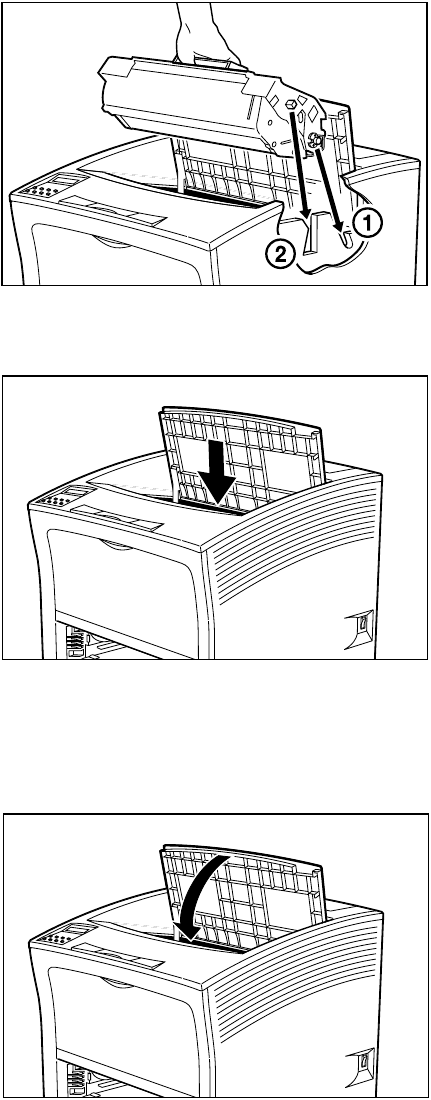
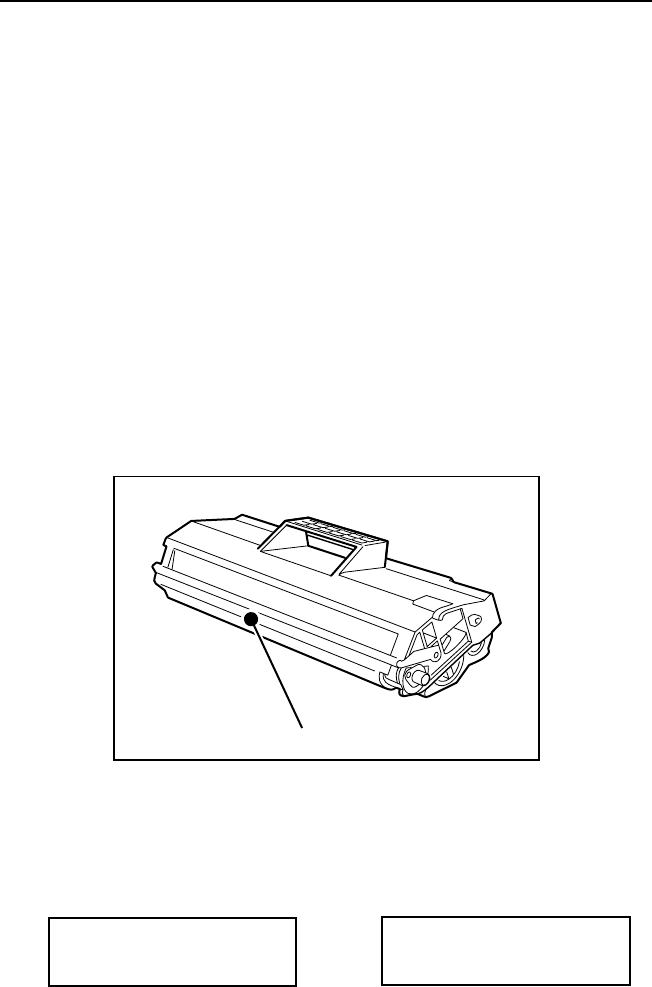
4. Remove the EP cartridge from the packing, and pull out the protective
paper sheet from the drum shutter. Then shake the cartridge seven to
eight times as shown in the illustration, to free the toner.
Important: Uneven toner distribution may degrade print quality. If
the toner has not been properly freed by shaking the
cartridge, a noise may be heard when turning on the
printer and the EP cartridge may be damaged.
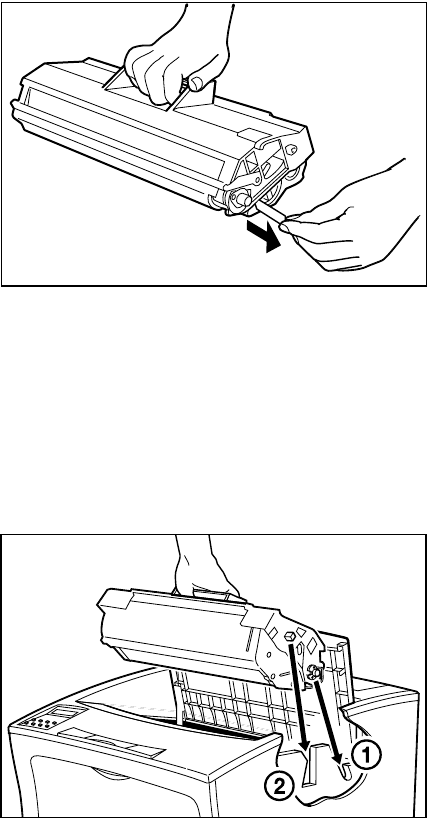
5. Place the EP cartridge on a flat surface and press it down with one
hand. Then grasp the end tab of the sealing tape and pull the tape
straight out horizontally.
Important: If the tape is pulled out at an angle, it may break.
After pulling out the sealing tape, do not shake the car-
tridge or subject it to shocks.
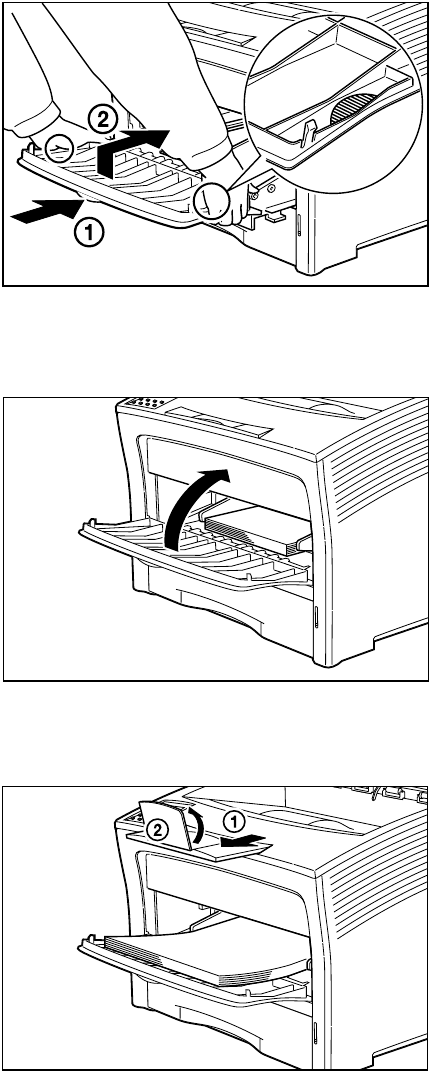
6. Hold the EP cartridge as shown. Then, ➀ insert the projecting parts
on the cartridge into the guide channels of the printer, and ➁ lower
the cartridge into the printer.
Important: Do not touch any parts inside the printer.
Saja Operation Manual 2-7
10/12/00
Chapter2.fm Installation
7. Push the EP cartridge all the way in.
Important: Make sure the cartridge is seated properly.
8. Close the top cover.
Press the center part of the top cover until it locks securely.
Important: Make sure that the top cover is properly locked. Other-
wise print quality problems may occur.
If the top cover cannot be closed, remove the EP car-
tridge completely and reinsert it all the way into the
printer. Then try to close the top cover again.
2-8 Saja Operation Manual
10/12/00
Installation Chapter2.fm
2.3 Using the Paper Cassette
Follow the steps below to load paper into the A4 500-sheet universal cas-
sette.
Reference: For details on print media and sheet capacity with this paper
cassette, please refer to “Appendix A Print Media”.
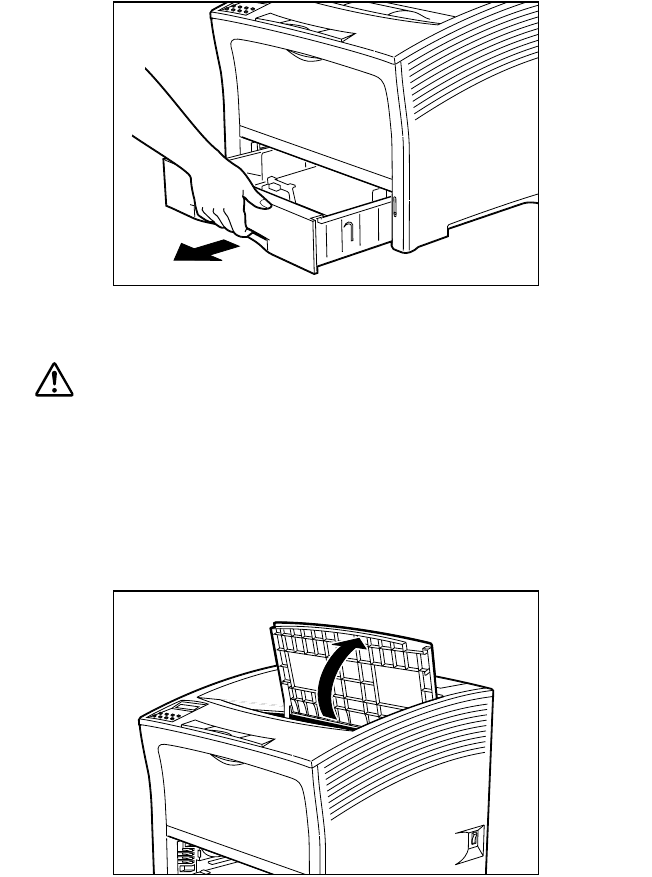
1. Place the paper cassette on a flat surface.
Note: If the paper cassette is already inserted into the printer,
lift the cassette until it stops, pull it out, then gently
remove it from the printer while lifting it up.
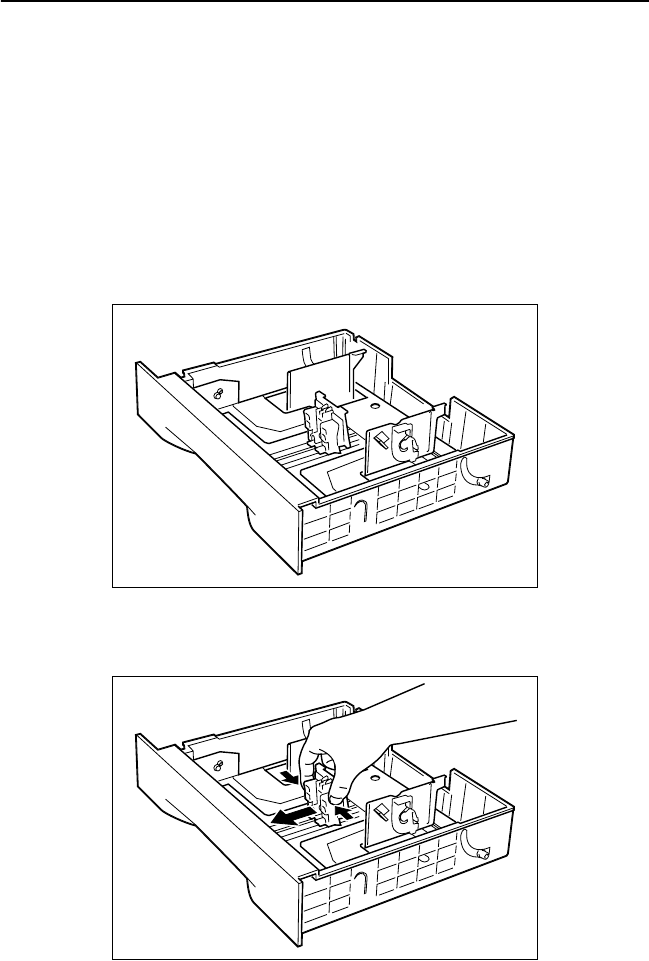
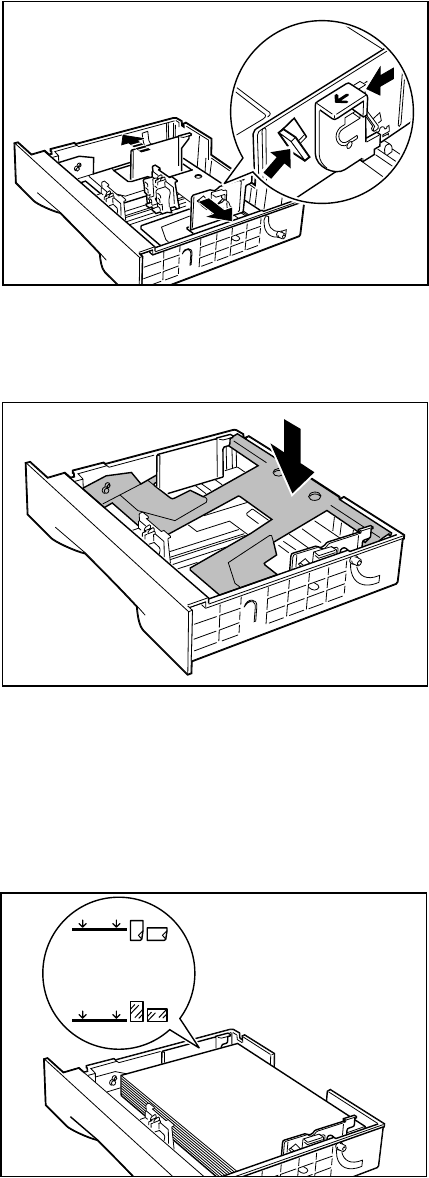
2. Gently squeeze the length guide, lift it up and slide it all the way out.
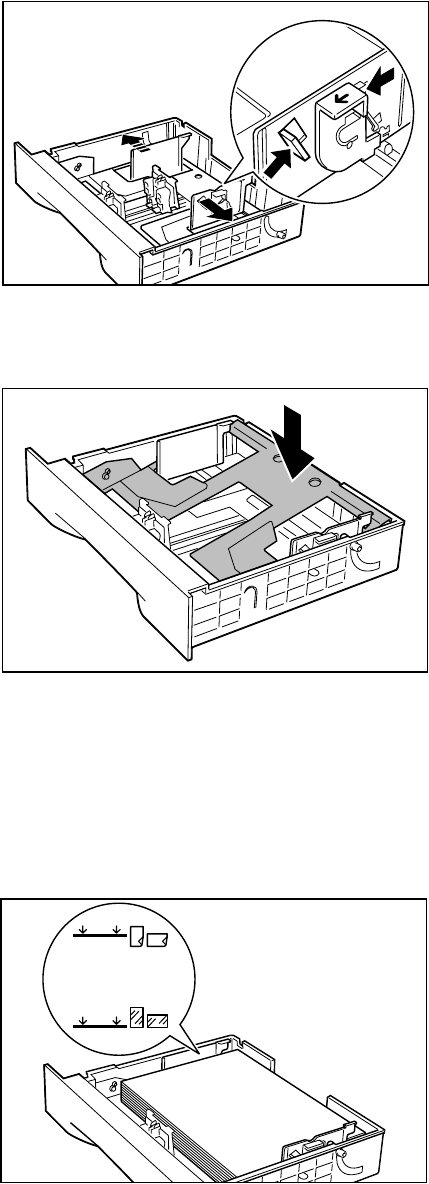
Saja Operation Manual 2-9
10/12/00
Chapter2.fm Installation
3. Gently squeeze the side guides and slide them all the way out.
Note: If the cassette’s plate remain raised, press it down to
lock it.
4. Align the four corners of the paper and place the paper in the cassette
with the print side up. Make sure the paper is placed at the center of
the cassette.
Important: Do not use paper with creases or wrinkles. When using
special paper, fan it before insertion. Do not overload the
cassette. Make sure the paper stack is under the retain-
ing clips on both sides.

2-10 Saja Operation Manual
10/12/00
Installation Chapter2.fm
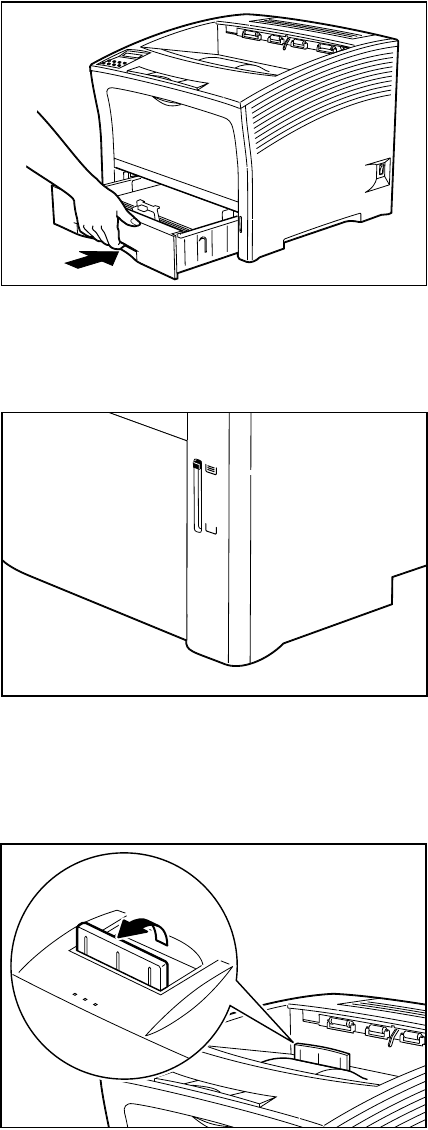
5. While pressing the side guides, adjust them to the paper width.
Important: Make sure the stack is under the retaining clips on both
sides.
Adjust the side guides to the paper size correctly; other-
wise paper may not be transported correctly and may
result in paper jam.
6. When the side guides are aligned, adjust the length guide to the
paper width.
Important: Make sure the stack is under the retaining clip on the
guide. Also make sure that the guide stopper is locked
firmly in the guide hole on the bottom of the cassette.
Adjust the length guide to the paper size correctly; oth-
erwise paper may not be transported correctly and may
result in paper jam.
Saja Operation Manual 2-11
10/12/00
Chapter2.fm Installation
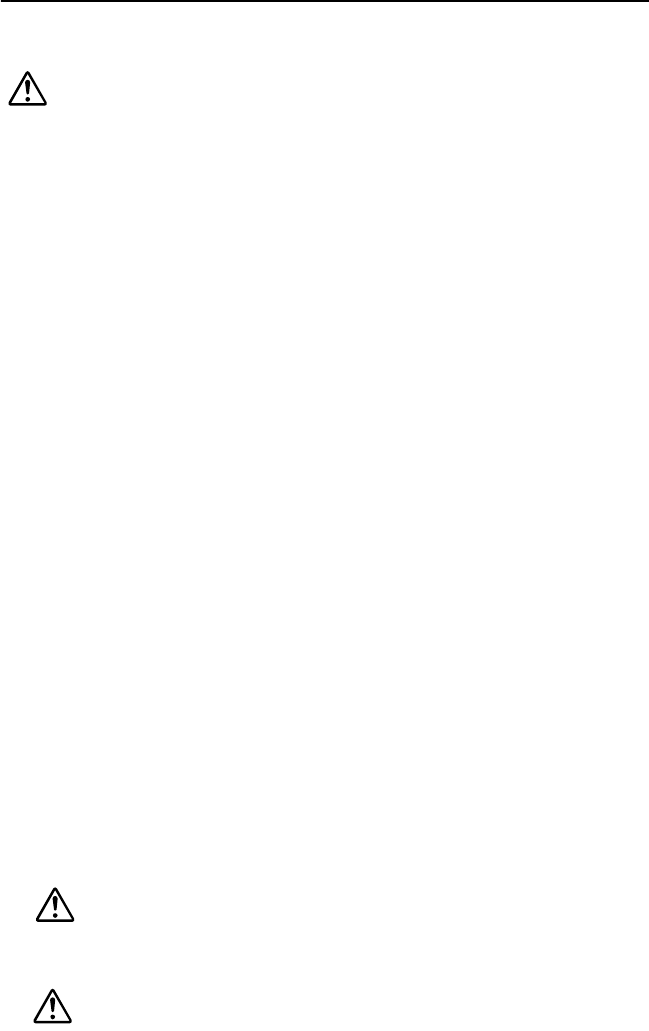
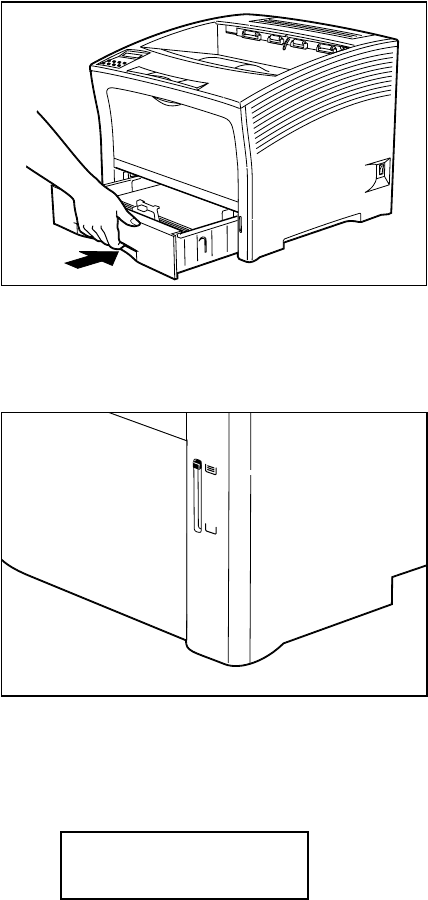
7. Insert the cassette all the way into the printer. Make sure the cassette
is properly seated.
Note: An indicator on the right side of the cassette shows the
remaining paper amount. Use it as a general hint to
decide when to replenish paper.
Note: When printing large amounts using general paper or
other media, the stack of output sheets may scatter. in
this case stand up the paper stopper in the paper output
tray.
2-12 Saja Operation Manual
10/12/00
Installation Chapter2.fm
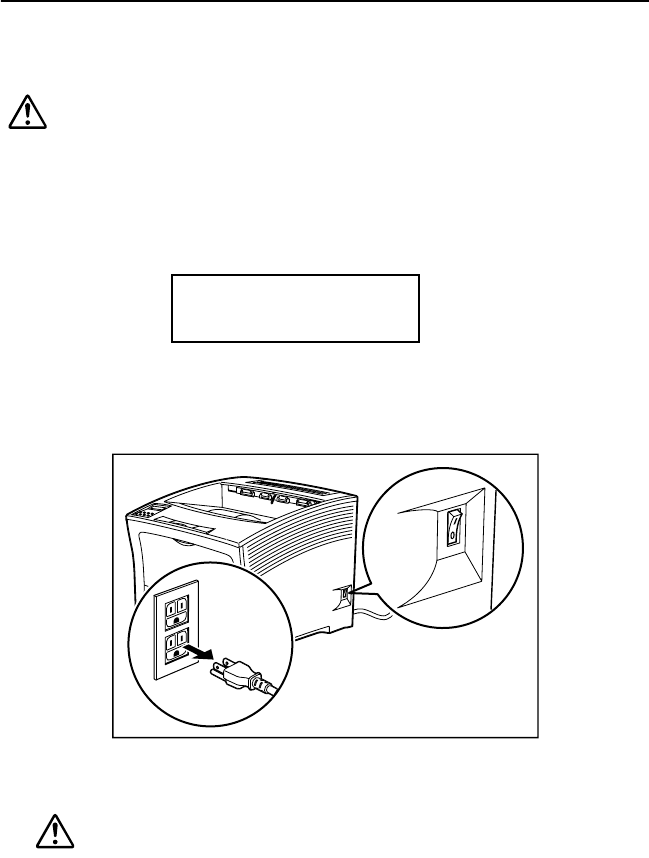
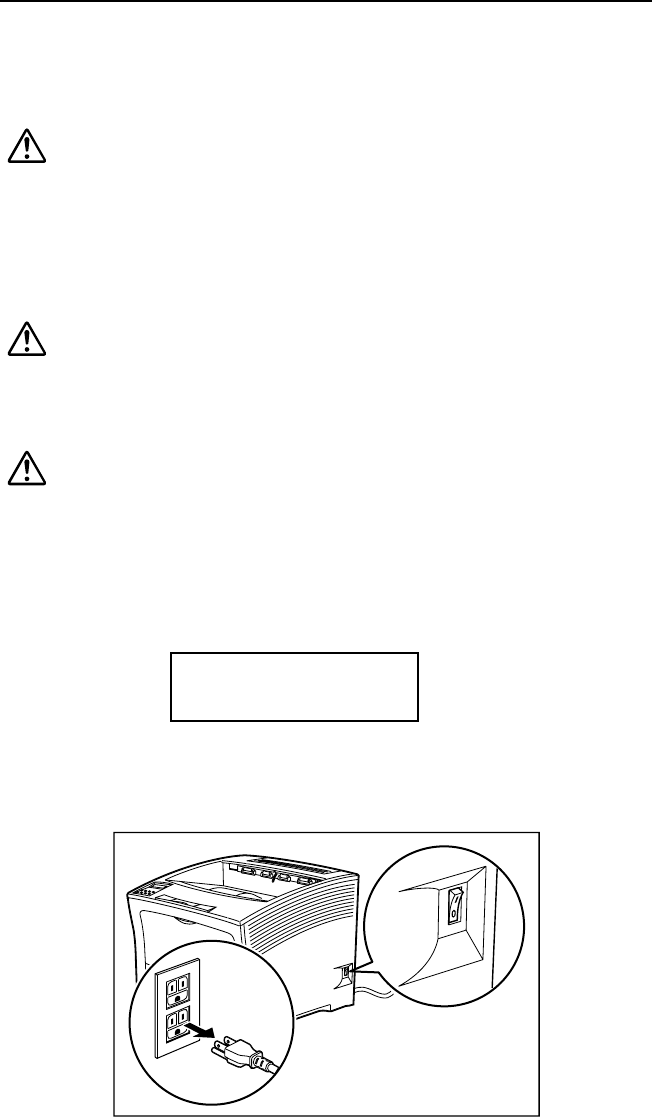
2.4 Connecting the Power Cord
Connect the printer to an AC outlet as described below.
Warning:
• Three power specifications are listed below. The spec-
ifications that apply to your machine depend on your
machine configuration. Connect the power plug only
to a properly rated power outlet. Otherwise, it can
cause a fire or shock hazard. If in doubt, contact the
Xerox Customer Support Centre.
- Rated voltage: 100V
Rated frequency: 50/60Hz
- Rated voltage: 120V
Rated frequency: 50/60Hz
- Rated voltage: 220-240V
Rated frequency: 50/60Hz
• To prevent a fire or shock hazard, follow the instruc-
tion below based on your machine configuration. If in
doubt, contact the Xerox Customer Support Centre.
- If your machine is a 220-240V model, there is no
need to attach a separate earth line since the earth
connection is incorporated in the power line. Plug it
into a properly rated outlet.
- If your machine is a 100 or 110V model, use the
green earth wire bundled with the power cord,
located at the rear of the machine.
The earth wire must be connected to one of the fol-
lowing conductors.
Earth terminal of the specified power outlet
A piece of copper buried in the earth 650mm or
deeper
Earth terminal with Class 3* earthing.
* Class 3 is the regulation for Japan only.
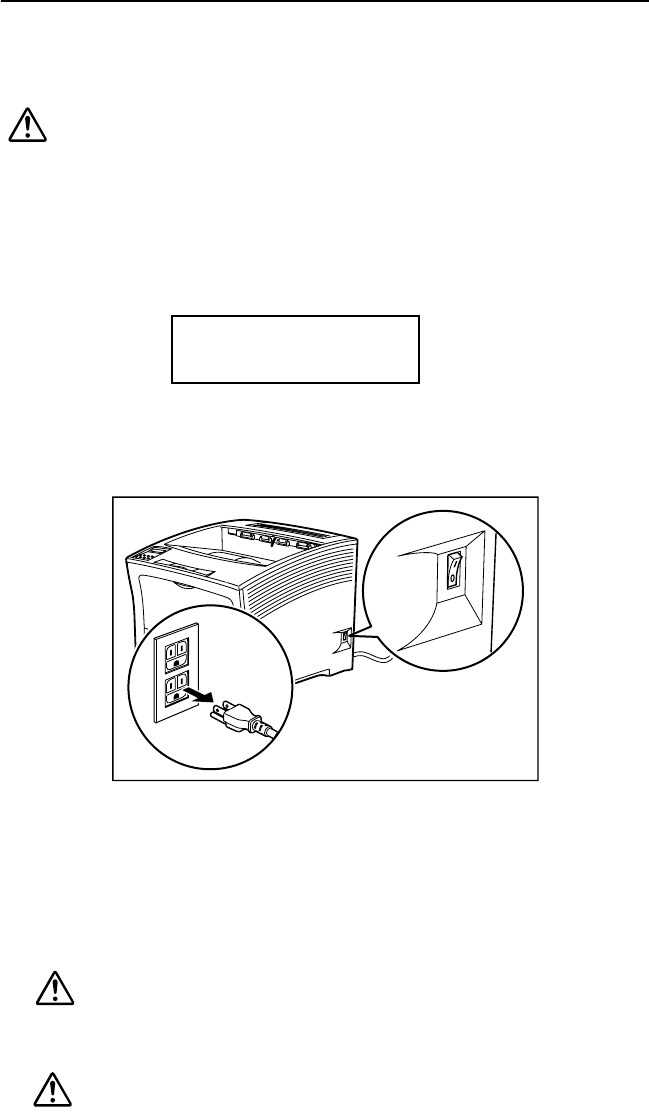
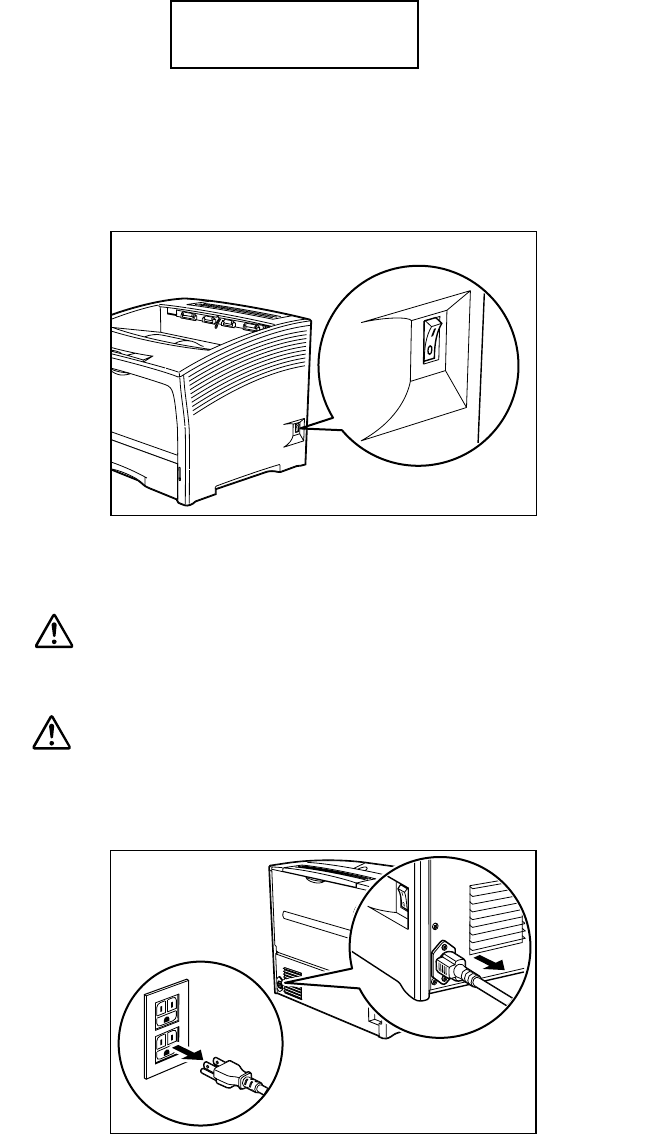
1. Insert the power cord into the AC connector on the rear of the printer.
Warning:
Never touch the power cord or plug with wet hands, to
prevent the risk of electric shock.
Caution:
When disconnecting, always grasp the plug and do not pull
on the cable. Damage to the cord can lead to fire and electric
shock.
Saja Operation Manual 2-13
10/12/00
Chapter2.fm Installation
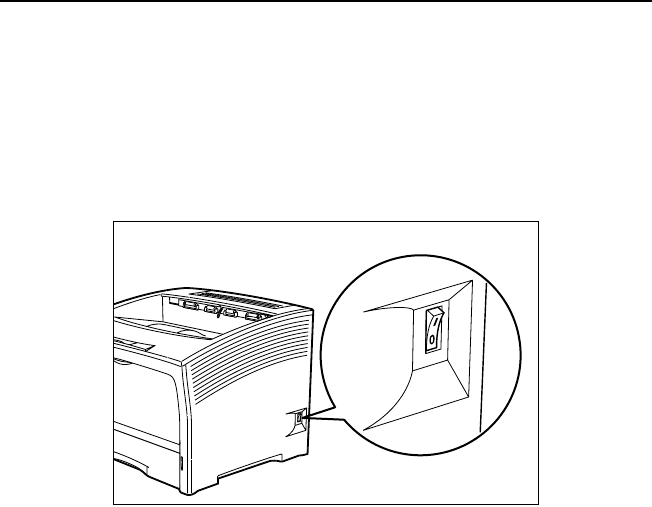
2. Verify that the power switch of the printer is set to the [O] (off) position,
then insert the plug of the power cord into the AC outlet.
Connect the ground cable to the ground terminal.
2-14 Saja Operation Manual
10/12/00
Installation Chapter2.fm
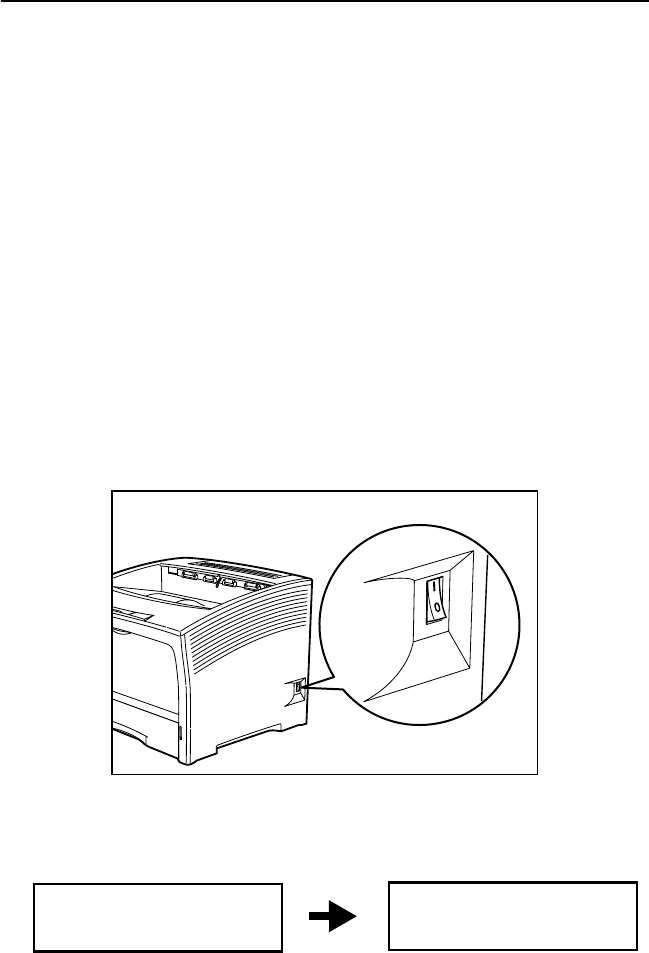
2.5 Turning the Printer On and Off
When you turn on the power switch of the printer, the printer will take
about 40 seconds to warm up before printing will become ready.
Turn off the printer at the end of the day or if the printer will not be used for
a long time.
Note: When the printer is turned off, all print data still in the printer
memory will be lost.
Important: If there is paper in the front paper tray, remove the paper
before turning the printer on. Reinsert the paper after the
printer is turned on.
Turning the printer on
Turn the printer on as follows.
1. Set the power switch on the right side of the printer to [ I ] to turn on
the printer.
2. The indication [WARM UP] appears on the display. Wait until the indi-
cation changes to [PRINT RDY].
Note: While the indication [WARM UP] is shown, the printer is
still warming up. During this period, printing is not possi-
ble. After about 40 seconds, the indication changes to
[PRINT RDY], indicating that printing is ready now.
Reference: If an error message is shown, please refer to “4.3 Error
Messages”.
WARM UP PRINT RDY
Saja Operation Manual 2-15
10/12/00
Chapter2.fm Installation
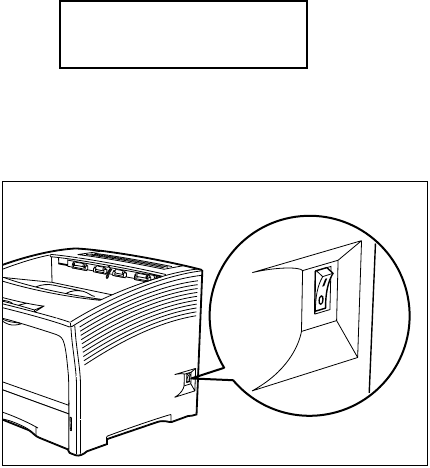
Turning the printer off
Turn the printer off as follows.
Note: When the printer is turned off, all print data and settings in
the printer memory will be lost.
1. Check the indication to make sure the printer is not performing any
task.
2. Set the power switch on the right side of the printer to [ O ] to turn off
the printer.
PRINT RDY
2-16 Saja Operation Manual
10/12/00
Installation Chapter2.fm
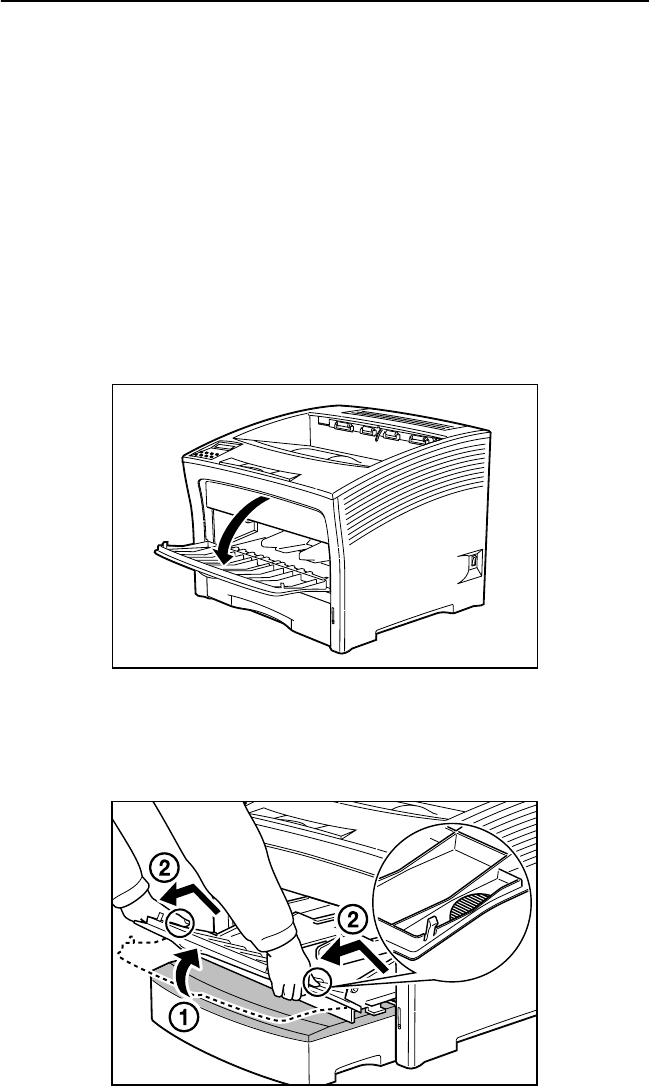
2.6 Using the Front Paper Tray
To load print media in the printer, proceed as described below.
Important: Insert the paper only after the printer is turned on.
Loading paper into the front paper tray
Reference: For information on paper sizes that can be loaded into the
front paper tray, please refer to “Appendix A Print Media”.
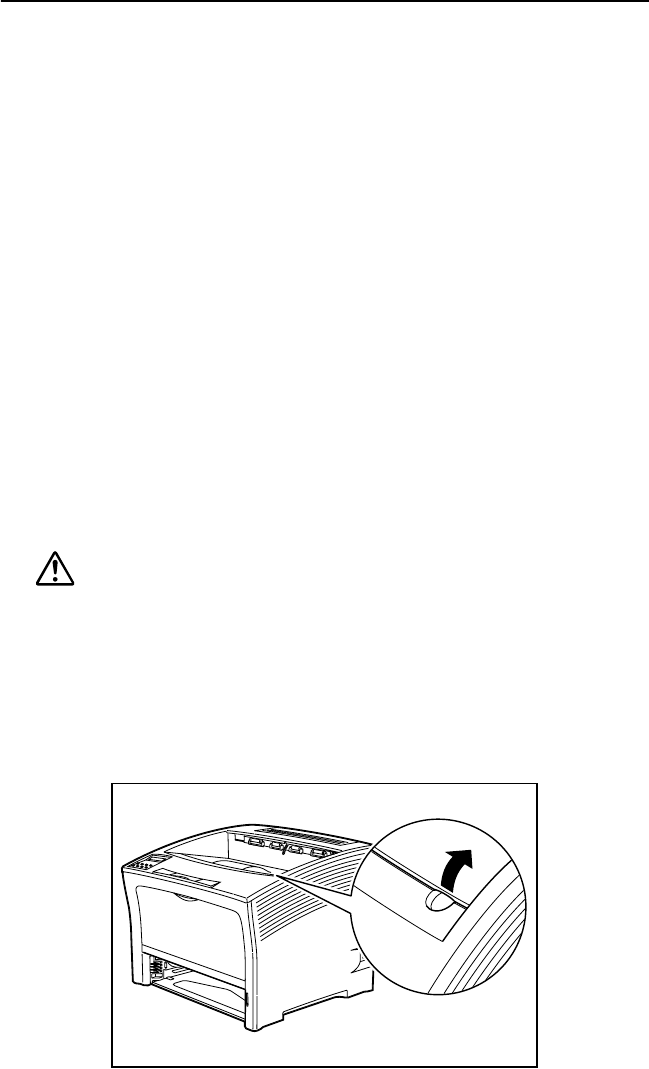
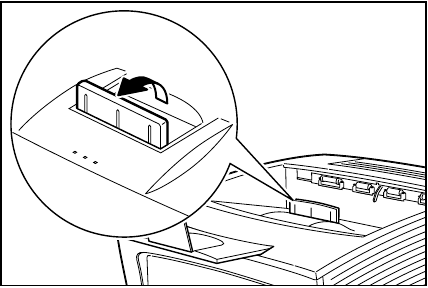
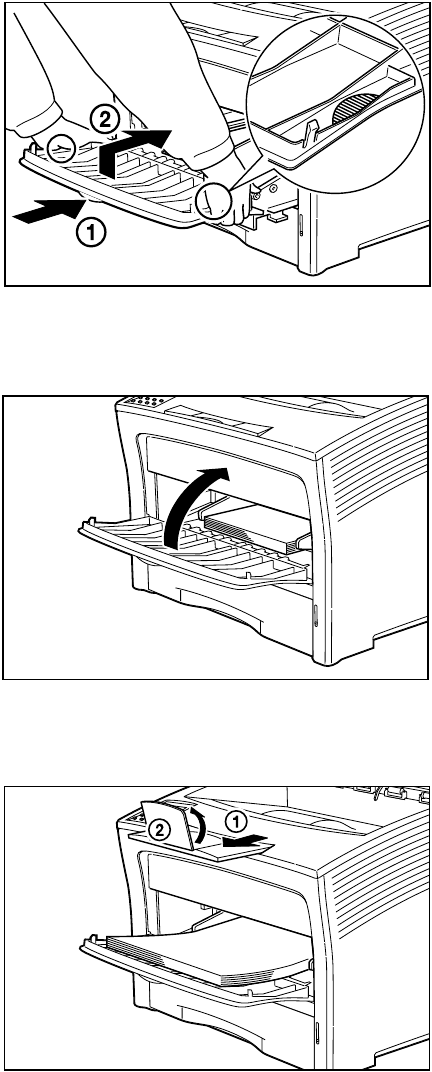
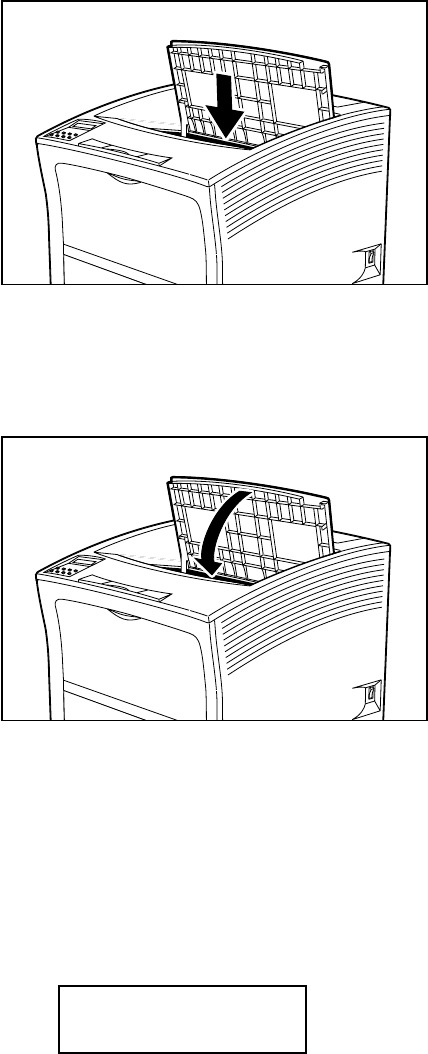
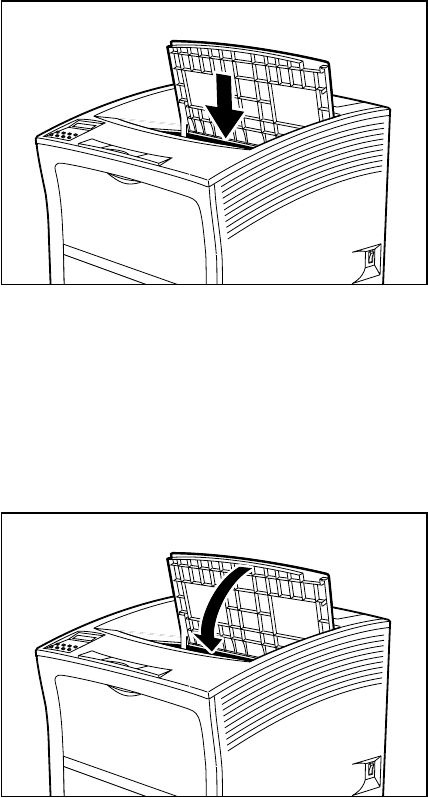
1. Open the front paper tray by pulling the latch at the top center.
Important: The front paper tray opens to an angle of about 80
degrees. Do to exert strong pressure on the tray, and do
not place any heavy objects besides paper on the tray,
to prevent damage.
2. For small-size paper (postcard, etc.), pull out the paper tray. Hold
both sides of the tray and tilt it slightly. Then, gently lift the tray up and
then pull it towards you.
Saja Operation Manual 2-17
10/12/00
Chapter2.fm Installation
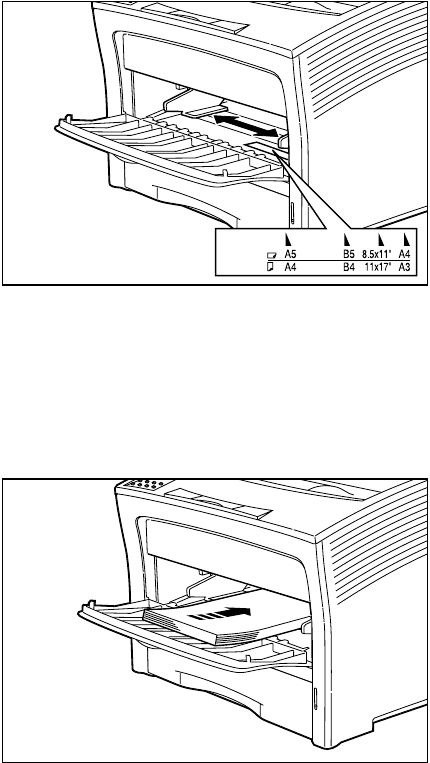
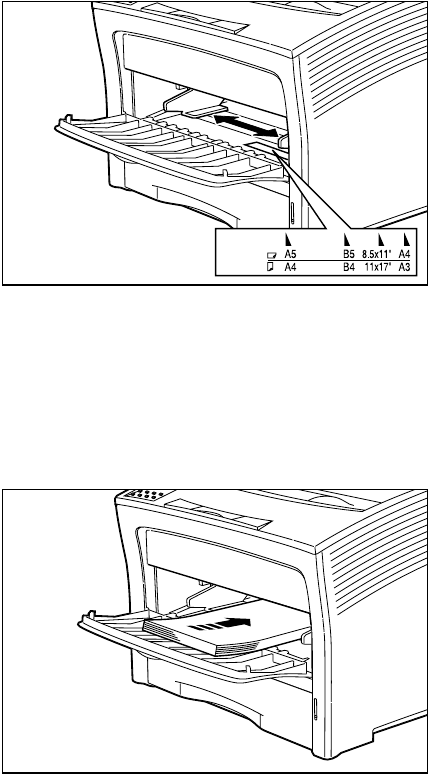
3. Adjust the paper guide to fit the paper you intend to use.
Important: Adjust the paper guides to the paper size correctly; oth-
erwise paper may not be transported correctly and may
result in paper jam.
4. Align the four corners of the paper and place the paper on the tray
with the print side up. Insert the paper all the way in until it gently
touches the stopper of the printer.
Important: Do not use paper with creases or wrinkles, and do not
overload the front paper tray. The maximum number of
sheets is about 150 for regular paper.
2-18 Saja Operation Manual
10/12/00
Installation Chapter2.fm
5. If small size paper was loaded, return the paper tray to its normal
position. Hold both sides of the paper tray and push it into the printer
until it stops. Lift it up gently, and then further push it to return it to its
original position.
6. When using paper with a length less than A4 width, the front paper
tray can be closed during operation.
Note: When delivering printouts larger than B4, pull out the
extension tray and open the paper stopper.
Saja Operation Manual 2-19
10/12/00
Chapter2.fm Installation
Note: When printing large amounts using general paper or
other media, the stack of output sheets may scatter. in
this case stand up the paper stopper in the paper output
tray.
2-20 Saja Operation Manual
10/12/00
Installation Chapter2.fm

Chapter 3
Chapter 3Chapter 3
Chapter 3
Daily Operations
Daily Operations Daily Operations
Daily Operations
This chapter explains how to replenish paper, replace the EP cartridge,
and perform other tasks necessary for day-to-day operations of the
printer.
3.1 Replenishing Paper .............................................3-2
3.2 Replacing the EP Cartridge .................................3-9
3.3 Replacing the BTR Roller ..................................3-14
3.4 Replacing the Fuser ...........................................3-19
3.5 Replacing the Feed Rollers(HCF) ......................3-23
3.6 Cleaning .............................................................3-28
3.7 Daily Maintenance .............................................3-33
3.8 If the Printer is Not Used Over an Extended
Period of Time ....................................................3-34
3.9 Checking the Power Cord ..................................3-36
3.10 Relocating the Printer ........................................3-37
3-2 Saja Operation Manual
10/12/00
Daily Operations Chapter3.fm
3.1 Replenishing Paper
When the printer runs out of paper, a warning message appears on the
display. When this happens, load more paper using the following proce-
dure.
Loading paper into the front paper tray
Reference:
For information on paper sizes that can be loaded into the front paper
tray, please refer to “Appendix A Print Media”.
1. Open the front paper tray by pulling the latch at the top center.
Important: The front paper tray opens to an angle of about 80
degrees. Do to exert strong pressure on the tray, and do
not place any heavy objects besides paper on the tray,
to prevent damage.
2. For small-size paper (postcard, etc.), pull out the paper tray. Hold
both sides of the tray and tilt it slightly. Then, gently lift the tray up and
then pull it towards you.
Saja Operation Manual 3-3
10/12/00
Chapter3.fm Daily Operations
3. Adjust the paper guide to fit the paper you intend to use.
Important: Adjust the paper guide to the paper size correctly; other-
wise paper may not be transported correctly and may
result in paper jam.
Note: When adding paper of the same size, there is no need to
adjust the paper guide.
4. Align the four corners of the paper and place the paper into the tray
with the print side up. Insert the paper all the way in until it gently
touches the stopper of the printer.
Important: Do not use paper with creases or wrinkles, and do not
overload the front paper tray. The maximum number of
sheets is about 150 for regular paper.
3-4 Saja Operation Manual
10/12/00
Daily Operations Chapter3.fm
5. If small size paper was loaded, return the paper tray to its normal
position. Hold both sides of the paper tray and push it into the printer
until it stops. Lift it up gently, and then further push it to return it to its
original position.
6. When using paper whose length is less than A4's width, the front
paper tray can be closed during operation.
Note: When delivering printouts larger than B4, pull out the
extension tray and open the paper stopper.

Saja Operation Manual 3-5
10/12/00
Chapter3.fm Daily Operations
7. Check the display and make sure the printer is ready for printing.
Important: If an error message is shown, please refer to “4.3 Error
Messages”.
Adding paper to the A4 500-sheet universal cassette
Follow the steps below to load paper into the A4 500-sheet universal cas-
sette.
Reference: For details on print media and sheet capacity with this paper
cassette, please refer to “Appendix A Print Media”.
1. Remove the paper cassette from the printer and place it on a flat sur-
face.
Note: Lift the cassette until it stops, pull it out, then gently
remove it from the printer while lifting it up.
2. Gently squeeze the length guide, lift it up and slide it all the way out.
Note: When adding paper of the same size, there is no need to
adjust the paper guide.
PRINT RDY
3-6 Saja Operation Manual
10/12/00
Daily Operations Chapter3.fm
3. Gently squeeze the side guides and slide them all the way out.
Note: If the cassette’s plate remain raised, press it down to
lock it.
4. Align the four corners of the paper and place insert it into the cassette
with the print side up. Make sure the paper is placed at the center of
the cassette.
Important: Do not use paper with creases or wrinkles. When using
special paper, fan it before insertion. Do not overload
the cassette.
Saja Operation Manual 3-7
10/12/00
Chapter3.fm Daily Operations
5. While pressing the side guides, adjust them to the paper width.
Important: Make sure the stack is under the retaining clips on both
sides.
Adjust the side guides to the paper size correctly; other-
wise paper may not be transported correctly and may
result in paper jam.
6. When the side guides are aligned, adjust the length guide to the paper
width.
Important: Make sure the stack is under the retaining clip on the
guide. Also Make sure the guide stopper is locked firmly
in the guide hole on the bottom of the cassette.
Adjust the length guide to the paper size correctly; other-
wise paper may not be transported correctly and may
result in paper jam.
3-8 Saja Operation Manual
10/12/00
Daily Operations Chapter3.fm
7. Insert the cassette completely the printer. Make sure the cassette is
properly seated.
Note: The indicator on the right side of the cassette shows the
remaining paper amount. Use it as a general hint to
decide when to replenish paper.
8. Check the display and make sure the printer is ready for printing.
Reference: If an error message is shown, please refer to “4.3 Error
Messages”.
PRINT RDY
Saja Operation Manual 3-9
10/12/00
Chapter3.fm Daily Operations
3.2 Replacing the EP Cartridge
When it becomes necessary, replace the EP cartridge with a new one,
using the procedure described below.
Handling Precautions
• Do not expose the cartridge to direct sunlight or other strong light
sources.
• Do not carry out the procedure at a brightly lit location, and com-
plete the installation procedure as quickly as possible (within about
5 minutes).
• The drum shutter protects the photosensitive drum from external
light. Do not open the drum shutter by hand.
• Never touch the surface of the photosensitive drum. Do not turn the
cartridge over and do not stand it on edge.
• Toner is not harmful to humans, but if some toner has come into
contact with your hands or clothes, wash it off with cold water.
1. Make sure the indication J5:[EP CARTRIDGE NEED TO REPLACE]
or [PRINT RDY] is shown on the display.
Drum Shutter
PRINT RDY
J5:EP CARTRIDGE
NEED TO REPLACE or

3-10 Saja Operation Manual
10/12/00
Daily Operations Chapter3.fm
2. Turn the printer off by pressing the [ O ] side of the power switch on
the right side of the unit.
Note: You can replace the EP cartridge with the printer still
turn on.
3. Hold the recessed area and lift to open the top cover.
Warning:
Make sure the top cover is opened all the way to the
back until it stops. (Also, when closing, slowly close the
top cover.)
Important: If printouts still remain in the paper exit area, remove
them before opening the top cover; otherwise paper jam
may result.
Important: Do not touch any parts inside the printer.
Saja Operation Manual 3-11
10/12/00
Chapter3.fm Daily Operations
4. Hold the EP cartridge as shown in the illustration and pull it out slowly.
Warning:
Never dispose of the EP cartridge in fire! Remaining toner
in the cartridge may explode, posing a severe risk of injury.
Note: To prevent stains, place the cartridge on a surface cov-
ered with some old newspaper.
5. Remove a new EP cartridge from the packing, and pull out the protec-
tive paper sheet from the drum shutter. Then shake the cartridge
seven to eight times as shown in the illustration, to free the toner.
3-12 Saja Operation Manual
10/12/00
Daily Operations Chapter3.fm
Important: Uneven toner distribution may degrade print quality. If
the toner has not been properly freed by shaking the
cartridge, a noise may be heard when turning on the
printer and the EP cartridge may be damaged.
6. Place the EP cartridge on a flat surface and press it down with one
hand. Then grasp the end tab of the sealing tape and pull the tape
straight out horizontally.
Important: If the tape is pulled out at an angle, it may break.
After pulling out the sealing tape, do not shake the car-
tridge or subject it to shocks.
7. Hold the EP cartridge as shown. Then, ➀ insert the projecting parts
on the cartridge into the guide channels of the printer, and ➁ lower
the cartridge into the printer.
Important: Do not touch any parts inside the printer.
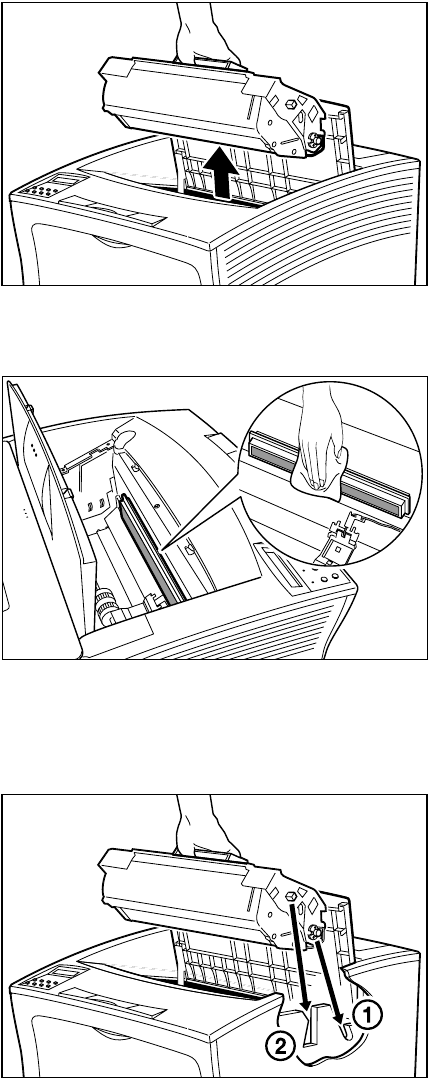
Saja Operation Manual 3-13
10/12/00
Chapter3.fm Daily Operations
8. Push the EP cartridge all the way in.
Important: Make sure the cartridge is seated properly.
9. Close the top cover.
Press the center part of the top cover until it locks securely.
Important: Make sure the top cover is properly locked. Otherwise
print quality problems may occur.
If the top cover cannot be closed, remove the EP car-
tridge completely and reinsert it all the way into the
printer. Then try to close the top cover again.
10. Check the display and make sure the printer is ready for printing.
Important: If an error message is shown, please refer to “4.3 Error
Messages”.
PRINT RDY
3-14 Saja Operation Manual
10/12/00
Daily Operations Chapter3.fm
3.3 Replacing the BTR Roller
When it becomes necessary, replace the BTR roller with a new one, using
the procedure described below.
Caution:
Be sure to switch off and unplug the printer before accessing
its interior for cleaning, maintenance, or fault clearance.
Access to a live printer’s interior can cause a shock hazard.
1. Make sure the indication [PRINT RDY] is shown on the display.
2. Set the power switch on the right side of the printer to [ O ] to turn off
the printer. Then disconnect the power cord from the AC outlet.
3. Hold the recessed area and lift to open the top cover.
Warning:
Make sure the top cover is opened all the way to the
back until it stops. (Also, when closing, slowly close the
top cover.)
Important: If printouts still remain in the paper exit area, remove
them before opening the top cover; otherwise paper jam
may result.
Do not touch any parts inside the printer.
PRINT RDY
Saja Operation Manual 3-15
10/12/00
Chapter3.fm Daily Operations
4. Hold the EP cartridge as shown in the illustration and pull it out slowly.
Note: To prevent stains, place the cartridge on a surface cov-
ered with some old newspaper.
3-16 Saja Operation Manual
10/12/00
Daily Operations Chapter3.fm
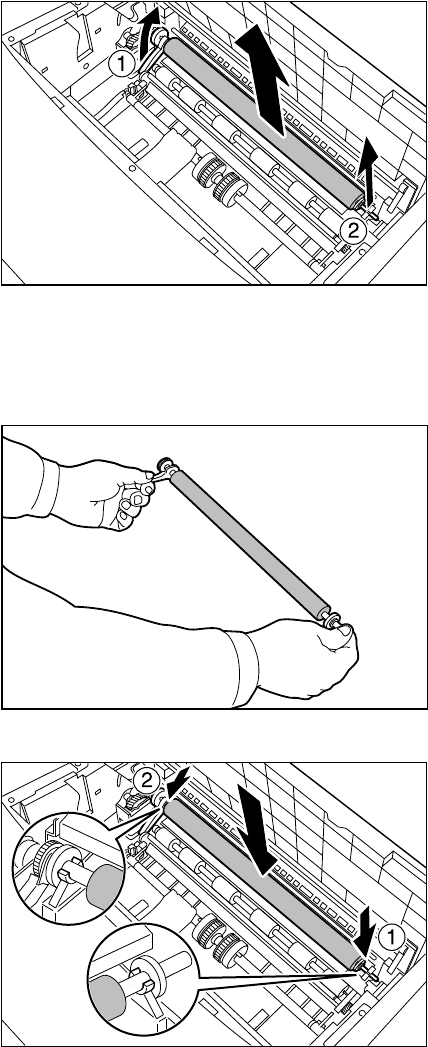
5. While holding the pins on left side of the BTR roller, pull it towards you
and lift it out.
6. Hold the new BTR roller with the pin on the left side. First, insert the
shaft into the right bearing. Then, insert the left shaft.
Important: Make sure the shaft is seated firmly in the bearing
Saja Operation Manual 3-17
10/12/00
Chapter3.fm Daily Operations
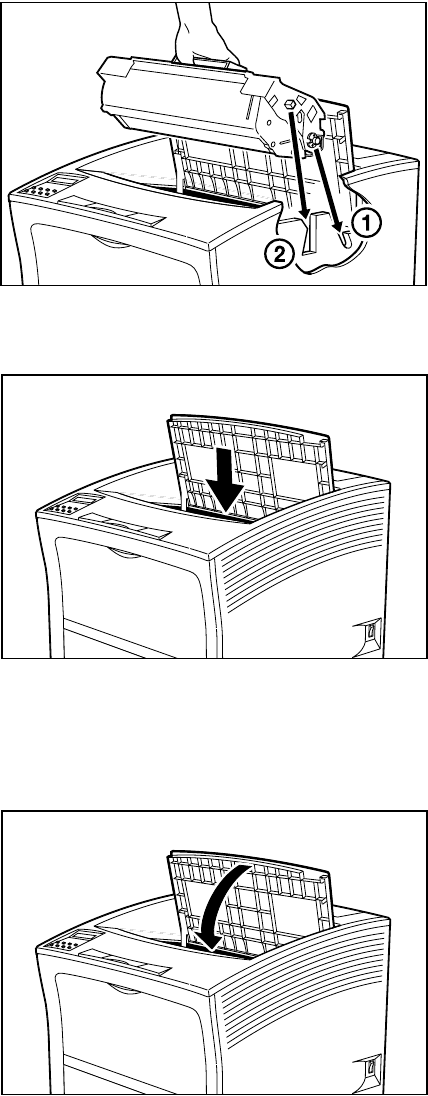
7. Hold the EP cartridge as shown. Then, ➀ insert the projecting parts
on the cartridge into the guide channels of the printer, and ➁ lower the
cartridge into the printer.
Important: Do not touch any parts inside the printer.
8. Push the EP cartridge all the way in.
Important: Make sure the cartridge is seated properly.
9. Close the top cover.
Press the center part of the top cover until it locks securely.

3-18 Saja Operation Manual
10/12/00
Daily Operations Chapter3.fm
Important: Make sure the top cover is properly locked. Otherwise
print quality problems may occur.
10. Turn on the printer again, then check the display and make sure the
printer is ready for printing.
Reference: If an error message is shown, please refer to “4.3 Error
Messages”.
PRINT RDY
Saja Operation Manual 3-19
10/12/00
Chapter3.fm Daily Operations
3.4 Replacing the Fuser
When it becomes necessary, replace the fuser using the procedure
described below.
Caution:
Never touch the heater area (where a label indicating high
temperature is located), or else burns may result. If paper is
jammed at the heater or roller area, do not remove the paper
by force; otherwise personal injury may result. Instead,
immediately turn off the power and contact your local dealer
for assistance.
Warning:
Do not replace the fuser right after the printer has been
used. The high temperature may cause injury. Instead,
wait for the printer to cool down.
Caution:
Be sure to switch off and unplug the machine before access-
ing the interior of the machine for cleaning, machine mainte-
nance, or fault clearance. Access to a live machine’s interior
can cause a shock hazard.
1. Make sure the indication [PRINT RDY] is shown on the display.
2. Set the power switch on the right side of the printer to [ O ] to turn off
the printer. Then disconnect the power cord from the AC outlet.
PRINT RDY
3-20 Saja Operation Manual
10/12/00
Daily Operations Chapter3.fm
3. Pull on the recessed area to open the top rear cover, as shown.
4. Open the lever on the left side of the fuser.
5. While holding the pins on both sides of the fuser, lift up its left end.
Then, slide it and remove the tab on the right, and lift it up to remove
the fuser.
Important: Do not touch any parts inside the printer.
Caution:
Before replacing the fuser, be sure to turn off the power and
wait for 40 minutes to allow the printer to cool down.

Saja Operation Manual 3-21
10/12/00
Chapter3.fm Daily Operations
6. Pull the new fuser’s nip spacer (one on each side) in the direction of
the arrows to remove it.
7. Install a new fuser. Insert the projecting part on the right side of the
fuser into the groove of the printer.
8. Press the left side to return the lever to its original position and secure
the fuser.
3-22 Saja Operation Manual
10/12/00
Daily Operations Chapter3.fm
9. Close the rear cover.
10. Turn on the printer again, then check the display and make sure the
printer is ready for printing.
Reference: If an error message is shown, please refer to “4.3 Error
Messages”.
PRINT RDY
Saja Operation Manual 3-23
10/12/00
Chapter3.fm Daily Operations
3.5 Replacing the Feed Rollers(HCF)
When it becomes necessary to replace the feed rollers in the optional
High Capacity Feeder(HCF), follow the procedure below.
There are all together three feed rollers. When replacing the rollers, be
sure to replace all of them at the same time.
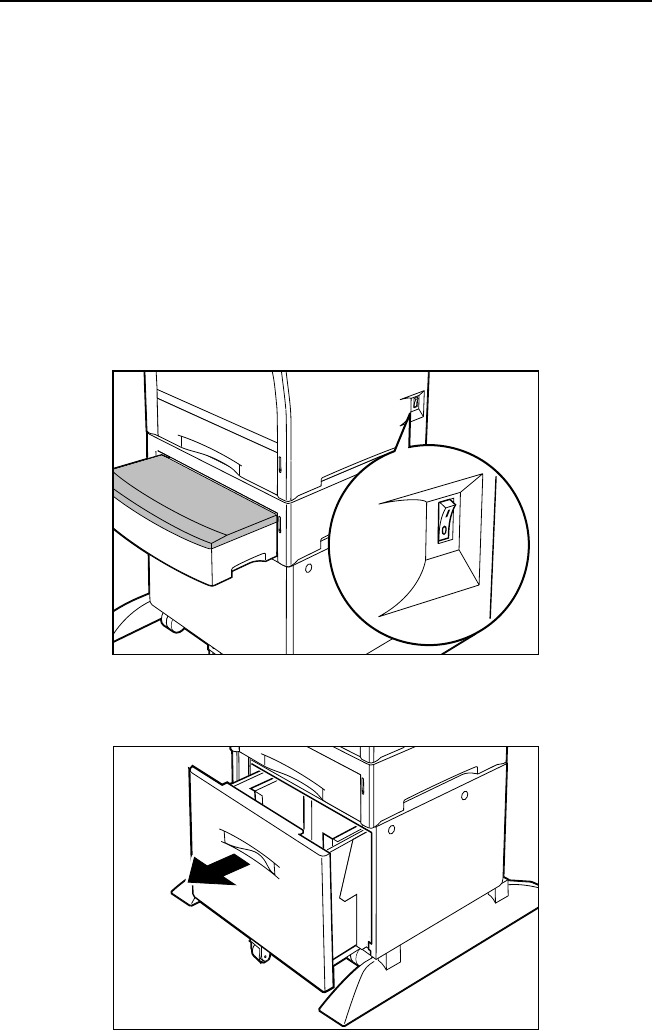
1. Make sure the PRINT RDY message is displayed on the control
panel.
2. Set the switch on the right side of the printer to the [O] position to turn
the power off.
Important: Do not use cleaning alcohol or other volatile substances,
to prevent the possibility of discoloration, cracking, and
deformation of the printer housing.
3. Pull the front paper tray out a little.
3-24 Saja Operation Manual
10/12/00
Daily Operations Chapter3.fm
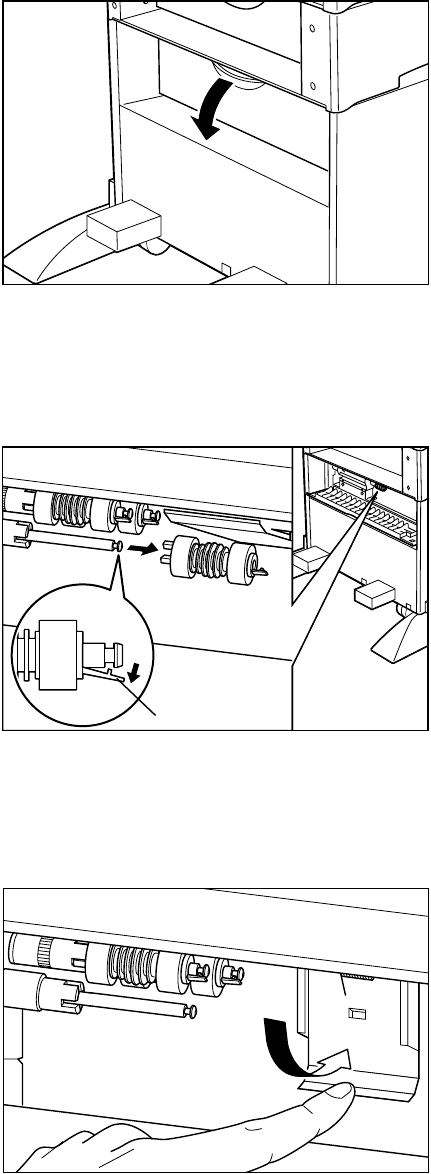
4. Grasp the recessed at the top of the rear cover on the high capacity
feeder, and pull it towards you to open the cover. Remove the paper
cassette.
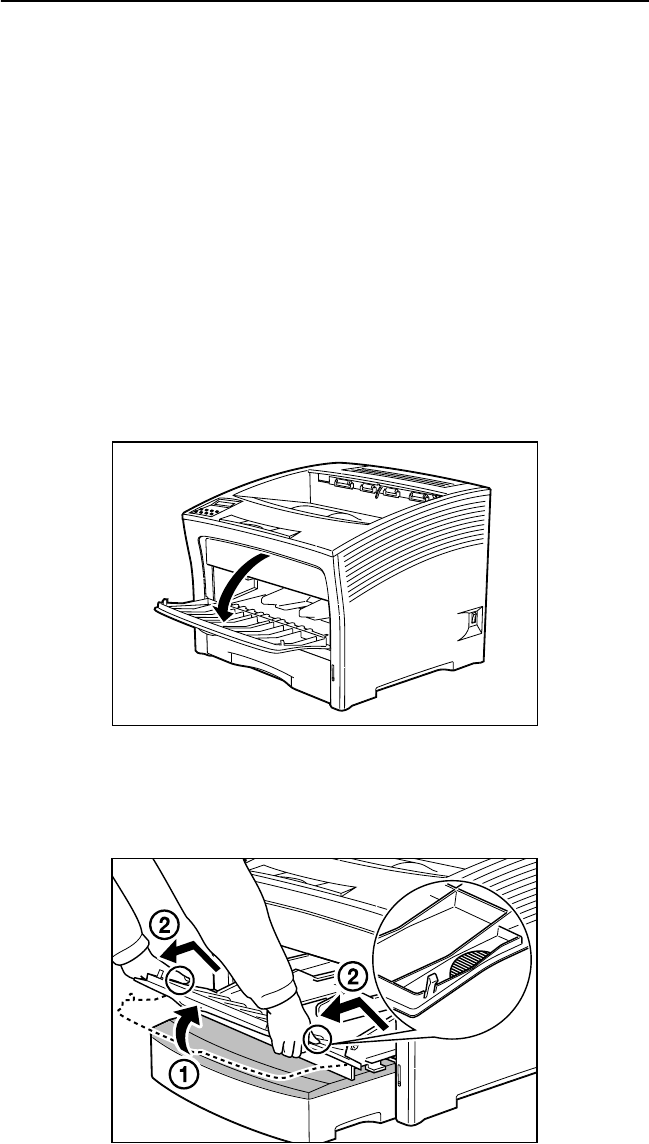
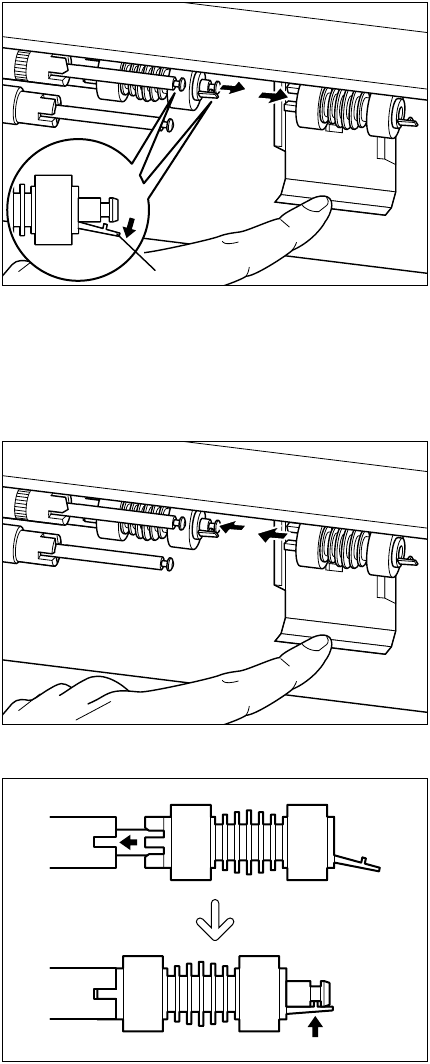
5. First, expand the clip on the feed roller closest to you and remove it.
Important: If the clip is located at the rear of the feeder roller, use
your hand to turn the roller so that the tab comes to the
front, and then preform the replacement.
6. Next, Fold the metal stopper inside the rear at the top down and
towards you.
Important: The stopper springs back into position when you let it
go. Be careful not to get your fingers caught.
clip
Saja Operation Manual 3-25
10/12/00
Chapter3.fm Daily Operations
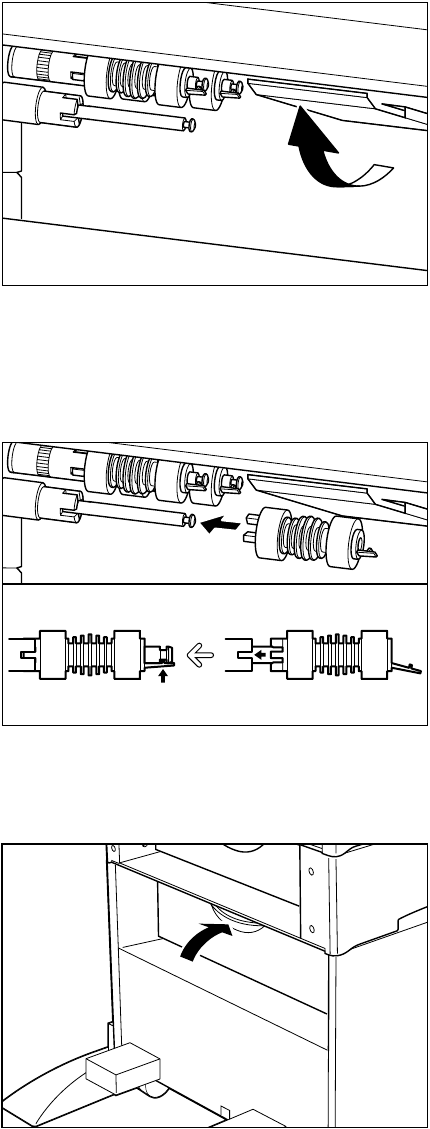
7. While holding the stopper down with your finger, expand the clip on
the feed roller closest to you and remove it, then do the same for the
feed roller that is furthest away from you.
Important: If the clip is located at the rear of the feeder roller, use
your hand to turn the roller so that the tab comes to the
front, and then preform the replacement.
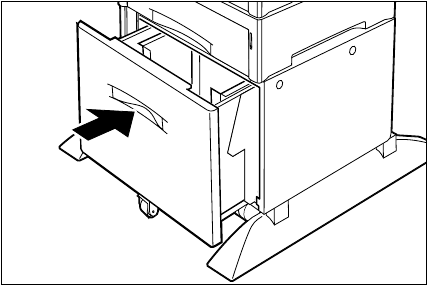
8. Fit a new feed roller onto the shaft furthest away. The tabs on the left
fit into the slots on the spacer and the clip on the right fits into the
groove on the shaft. When you hear a clicking sound, the feed roller is
firmly in place. Fit the front feed roller in the same manner.
clip
3-26 Saja Operation Manual
10/12/00
Daily Operations Chapter3.fm
9. Let go of the metal stopper so it springs back into position.
Important: The stopper springs back into position when you let it go.
Be careful not to get your fingers caught.
10. Fit a new feed roller onto the shaft closest to you. The tabs on the left
fit into the slots on the spacer and the clip on the right fits into the
groove on the shaft. When you hear a clicking sound, the feed roller is
firmly in place.
11. Close the rear cover
Important: Make sure that the rear cover is firmly shut.
Saja Operation Manual 3-27
10/12/00
Chapter3.fm Daily Operations
12. Return the paper cassette into the front.
13. Turn the power on and make sure the PRINT RDY message is dis-
played on the control panel.
Reference: If an error message appears on the display, see 4.3”Error
Messages”
3-28 Saja Operation Manual
10/12/00
Daily Operations Chapter3.fm
3.6 Cleaning
In order to keep the printer in optimum working condition, clean it about
once per month as described below.
Also, after replacing the EP cartridge or removing paper jams, check and
if necessary clean the printer as required.
Caution:
Before cleaning the printer or performing any other mainte-
nance steps, be sure to turn the printer off and disconnect
the power cord from the AC outlet, to prevent the risk of elec-
tric shock.
Important: Do not use cleaning alcohol or other volatile substances, to
prevent the possibility of discoloration, cracking, and defor-
mation of the printer housing.
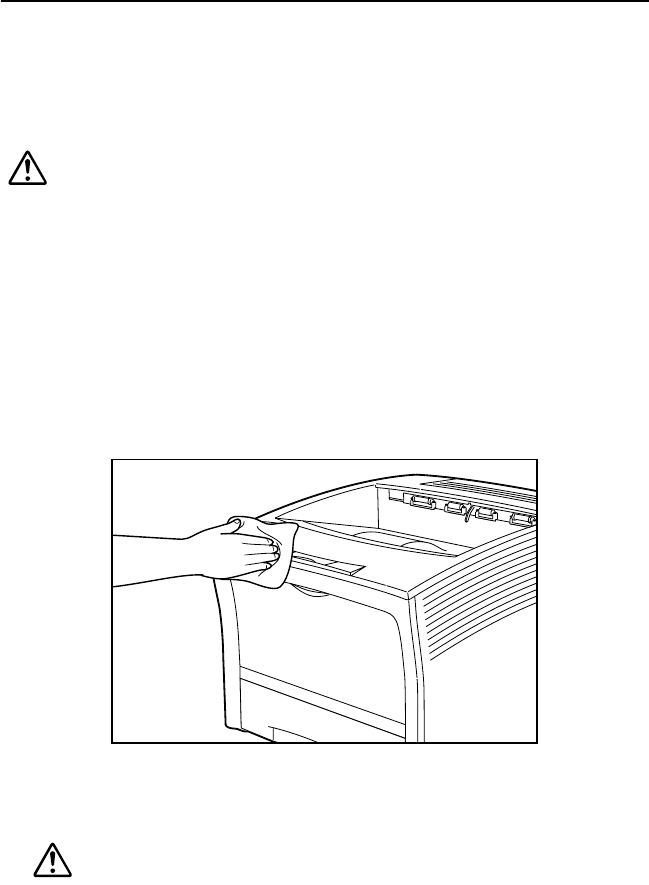
Cleaning the exterior of the printer
1. Carefully wipe the outside of the printer with a soft cloth, lightly moist-
ened with water.
Caution:
Use only water or mailed detergent for the cleaning.
Note: To remove stubborn stains, soak the cloth in a mild
detergent solution and wring it thoroughly before use.
2. Wipe the printer dry with a soft, dry cloth.
Important: Never use any other cleaning materials except water
and neutral detergent.
Saja Operation Manual 3-29
10/12/00
Chapter3.fm Daily Operations
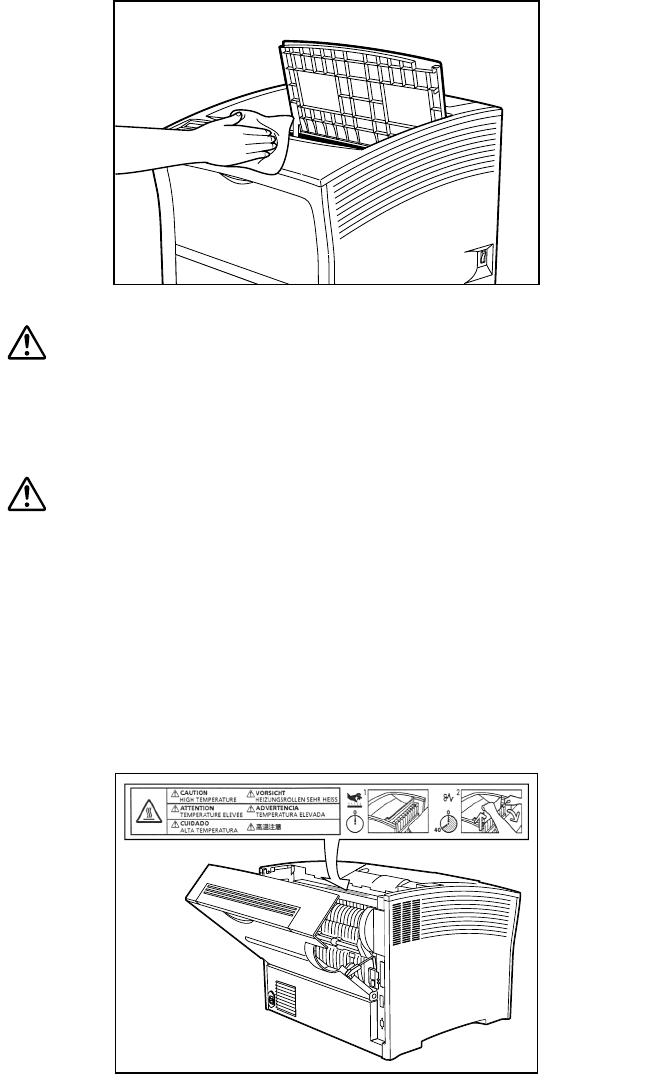
Cleaning the interior of the printer
After removing a paper jam or replacing the EP cartridge, check the inside
of the printer. Remove any paper scraps and wipe off paper dust using a
dry, clean cloth.
Warning:
Make sure the top cover is opened all the way to the
back until it stops. (Also, when closing, slowly close the
top cover.) If the top cover is not in a steady position, it
may close rapidly and cause injuries to your hands.
Caution:
The fuser becomes very hot in operation. If a paper jam has
occurred, turn the power off and wait at least 40 minutes
before removing the drum cartridge and touching the fuser
section.
Never touch the heater area (where a label indicating high
temperature is located), or else burns may result. If paper is
jammed at the heater or roller area, do not remove the paper
by force; otherwise personal injury may result. Instead,
immediately turn off the power and contact your local dealer
for assistance.
3-30 Saja Operation Manual
10/12/00
Daily Operations Chapter3.fm
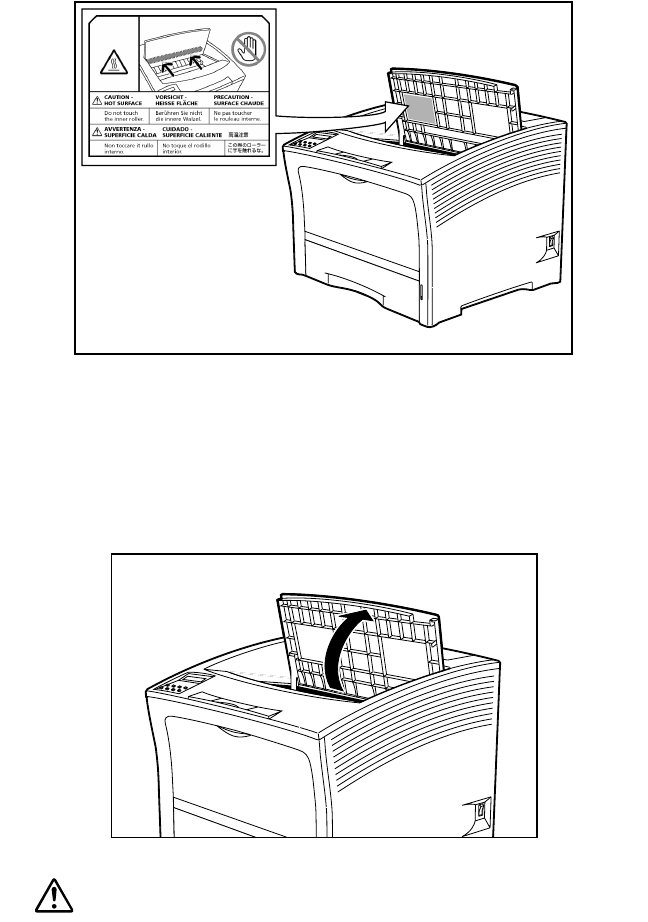
Cleaning the ROS sealed glass
1. Open the top cover all the way to the back until it stops.
Warning:
Make sure the top cover is opened all the way to the
back until it stops. (Also, when closing, slowly close the
top cover.)
Important: If printouts still remain in the paper exit area, remove
them before opening the top cover; otherwise paper jam
may result.
Saja Operation Manual 3-31
10/12/00
Chapter3.fm Daily Operations
2. Hold the EP cartridge as shown in the illustration and pull it out slowly.
3. Use a dry cloth to clean the glass.
4. Hold the EP cartridge as shown. Then (1) insert the projecting parts
on the cartridge into the guide channels of the printer, and (2) lower
the cartridge into the printer.
3-32 Saja Operation Manual
10/12/00
Daily Operations Chapter3.fm
5. Push the EP cartridge all the way in.
Important: Make sure the cartridge is seated properly.
6. Close the top cover. Press the center part of the top cover until it locks
securely.
Important: Make sure the top cover is properly locked. Otherwise
print quality problems may occur.
If the top cover cannot be closed, remove the EP car-
tridge completely and reinsert it all the way into the
printer. Then try to close the top cover again.
Saja Operation Manual 3-33
10/12/00
Chapter3.fm Daily Operations
3.7 Daily Maintenance
At the end of the day, turn off the power as follows.
1. Check the indication to make sure the printer is not performing any
task.
2. Set the power switch on the right side of the printer to [ O ] to turn off
the printer.
Important: If an error message is shown, please refer to “4.3 Error
Messages”.
3-34 Saja Operation Manual
10/12/00
Daily Operations Chapter3.fm
3.8 If the Printer is Not Used Over an Extended
Period of Time
Remove any paper from the front paper tray and cassette and store it in a
location with low levels of dust and humidity.
Caution:
Before cleaning the printer or performing any other mainte-
nance steps, be sure to turn the printer off and disconnect
the power cord from the AC outlet, to prevent the risk of elec-
tric shock.
1. Check the indication to make sure the printer is not performing any
task.
2. Set the power switch on the right side of the printer to [ O ] to turn off
the printer. Then disconnect the power cord from the AC outlet.
Important: If an error message is shown, please refer to “4.3 Error
Messages”.
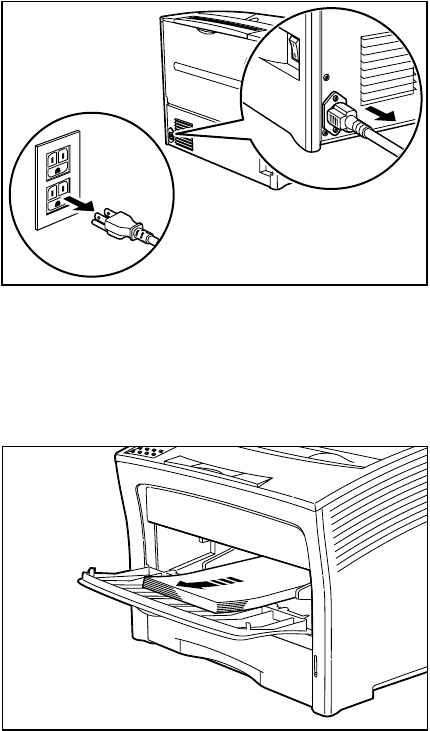
3. Disconnect the power cord from the AC connector on the AC outlet
and the printer.
Warning:
Never touch the power cord or plug with wet hands, to
prevent the risk of electric shock.
Caution:
When disconnecting, always grasp the plug and do not pull
at the cable. Damage to the cord can lead to fire and electric
shock.
PRINT RDY
Saja Operation Manual 3-35
10/12/00
Chapter3.fm Daily Operations
4. Remove the paper from the front paper tray as well as the paper cas-
sette, and store it in a location with low levels of dust and humidity.
Reference: For detailed information on storage, please refer to
“Appendix A Print Media”.

3-36 Saja Operation Manual
10/12/00
Daily Operations Chapter3.fm
3.9 Checking the Power Cord
Caution:
Perform the following checks about once per month. Turn the
printer off before making the checks. If any problems are
detected, please contact your dealer or an authorized ser-
vice station.
Verify that the plug of the power cord is firmly plugged into
the AC outlet.
Check the plug of the power cord for heat damage, rust, bent
prongs or other damage.
Verify that the plug and AC outlet are free of accumulated
dust.
Check the power cord for cracks, tear, abrasion or other
damage.
Saja Operation Manual 3-37
10/12/00
Chapter3.fm Daily Operations
3.10Relocating the Printer
To move the printer, follow the procedures outlined here.
Caution:
• Caution:This printer is very heavy. The weight of the main
unit without paper cassette, consumables, and paper is
about 26kg. Never attempt to lift the printer by yourself. The
printer should always be carried by two persons.
• To carry the printer, grasp the four bottom corners from the
right and left side, not the front (operation panel) and back
side. Never try to lift the printer while holding any part other
than the bottom corners. Otherwise there is a severe risk of
injury if the printer is dropped.
• When lifting the printer, correct posture is important to pre-
vent back injuries.
Note: Remove any options such as paper feeder and duplex print-
ing unit before moving the printer. For instructions on how to
remove the options, please refer to the respective section in
the appendix. To move the printer over long distances, reuse
the shipping carton and other packing material.
3-38 Saja Operation Manual
10/12/00
Daily Operations Chapter3.fm
1. Check the indication to make sure the printer is not performing any
task.
2. Set the power switch on the right side of the printer to [O] to turn off
the printer.
Important: If an error message is shown, please refer to “4.3 Error
Messages”.
3. Disconnect the power cord from the AC connector on the AC outlet
and the printer.
Warning:
Never touch the power cord or plug with wet hands, to
prevent the risk of electric shock.
Caution:
When disconnecting, always grasp the plug and do not pull
at the cable. Damage to the cord can lead to fire and electric
shock.
PRINT RDY
Saja Operation Manual 3-39
10/12/00
Chapter3.fm Daily Operations
4. Take out the paper cassette from the printer, and remove any paper
still in the front paper tray.
Note: If paper is loaded in the paper cassette, then remove the
paper and wrap it up.
5. Open the top cover all the way to the back until it stops.
Warning:
Make sure the top cover is opened all the way to the
back until it stops. (Also, when closing, slowly close the
top cover.)
Important: If printouts still remain in the paper exit area, remove
them before opening the top cover; otherwise paper jam
may result.
Do not touch any parts inside the printer.
3-40 Saja Operation Manual
10/12/00
Daily Operations Chapter3.fm
6. Hold the EP cartridge as shown in the illustration and pull it out slowly.
Note: To prevent stains, place the cartridge on a surface cov-
ered with some old newspaper.
Important: If the printer is transported with the cartridge in place,
toner may spill inside printer.
Do not shake the removed EP cartridge, to prevent
toner spills.
Replace the removed toner cartridge in its aluminum
bag or wrap it in thick cloth, to protect it from light.
7. Close the top cover.
Press the center part of the top cover until it locks securely.
Note: Close the paper stopper if it is open.
Saja Operation Manual 3-41
10/12/00
Chapter3.fm Daily Operations
8. Together with a second person, lift and carry the printer to its new
location. To move the printer over long distances, reuse the shipping
carton and other packing material.
9. Reinstall the printer at the new location.
Reference: Follow the same procedures as described in “Chapter2
Installation” .
3-42 Saja Operation Manual
10/12/00
Daily Operations Chapter3.fm

Chapter 4
Chapter 4 Chapter 4
Chapter 4
Troubleshooting
Troubleshooting Troubleshooting
Troubleshooting
This chapter covers procedures to isolate and solve problems that may
occur during use of the printer.
4.1 Power-On Problems ............................................4-2
4.2 Print Quality Problems .........................................4-3
4.3 Error Messages ...................................................4-7
4.4 Paper Jams ..........................................................4-9
4.5 Other Problems ..................................................4-37
4-2 Saja Operation Manual
10/12/00
Troubleshooting Chapter4.fm
4.1 Power-On Problems
This section describes problems that can occur when starting up the
printer. If the trouble still persists even after performing the checks listed
below, turn the printer off, disconnect the power cord from the AC outlet,
and contact your dealer or an authorized service station.
Warning:
Do not attempt to modify the printer in any way, to pre-
vent the risk of fire or smoke generation.
Caution:
Before cleaning the printer or performing any other mainte-
nance steps, be sure to turn the printer off and disconnect
the power cord from the
AC outlet, to prevent the risk of electric shock.
Description Possible Cause Action
There is no power. The power switch is not
turned on.
(The switch is not set to
[ I ].)
Check the power switch.
See “2.5 Turning the Printer
On and Off”.
The power cord is not prop-
erly plugged into an AC
outlet or into the AC con-
nector on the rear side of
the printer.
Set the power switch to [ O
] (off) and then connect the
power cord firmly.
See “2.4 Connecting the
Power Cord”.
Voltage of the AC power is
not correct.
Verify that the AC outlet is
rated for 100 V AC, 15 A.
Power is frequently
interrupted.
The printer is malfunction-
ing.
Turn the printer off and dis-
connect the power cord
from the AC outlet. Then
contact your dealer or an
authorized service station.
Saja Operation Manual 4-3
10/12/00
Chapter4.fm Troubleshooting
4.2 Print Quality Problems
This section describes possible quality problems during printing. Go
through the list below to find the condition that most resembles the prob-
lem, and follow the recommended action. If the trouble persists, turn the
printer off and disconnect the power cord from the AC outlet. Then contact
your dealer or an authorized service station.
Description Possible Cause Action
Faded print The print media is moist. Remove the moist media
and load new, dry media.
See “3.1 Replenishing
Paper”.
The EP cartridge is old or
damaged.
Replace the EP cartridge.
See “3.2 Replacing the EP
Cartridge”.
Toner in the EP cartridge is
low.
Replace the EP cartridge.
See “3.2 Replacing the EP
Cartridge”.
The ROS sealed grass is
dirty.
Clean the ROS sealed
grass.
See “3.6 Cleaning”.
Black dots The print media is outside
the recommended specifi-
cations.
Use the recommended
print media.
See “3.1 Replenishing
Paper”.
The EP cartridge is old or
damaged.
Replace the EP cartridge.
See “3.2 Replacing the EP
Cartridge”.
Vertical black
streaks
The EP cartridge is old or
damaged.
Replace the EP cartridge.
See “3.2 Replacing the EP
Cartridge”.
4-4 Saja Operation Manual
10/12/00
Troubleshooting Chapter4.fm
Description Possible Cause Action
Repetitive defects The paper path is dirty. Print out several blank
sheets.
The EP cartridge is old or
damaged.
Replace the EP cartridge.
See “3.2 Replacing the EP
Cartridge”.
Character voids The print media is outside
the recommended specifi-
cations.
Use the recommended
print media.
See “3.1 Replenishing
Paper” and “Appendix A
Print Media”.
The EP cartridge is old or
damaged.
Replace the EP cartridge.
See “3.2 Replacing the EP
Cartridge”.
Toner smears when
rubbed
The print media is moist. Remove the moist media
and load new, dry media.
See “3.1 Replenishing
Paper”.
The print media is outside
the recommended specifi-
cations.
Use the recommended
print media.
See “3.1 Replenishing
Paper” and “Appendix A
Print Media”.
The top cover not fully
closed.
Close the top cover prop-
erly.
Black page The EP cartridge is old or
damaged.
Replace the EP cartridge.
See “3.2 Replacing the EP
Cartridge”.
The high-voltage power
supply may be defective.
Contact your dealer or an
authorized service station.
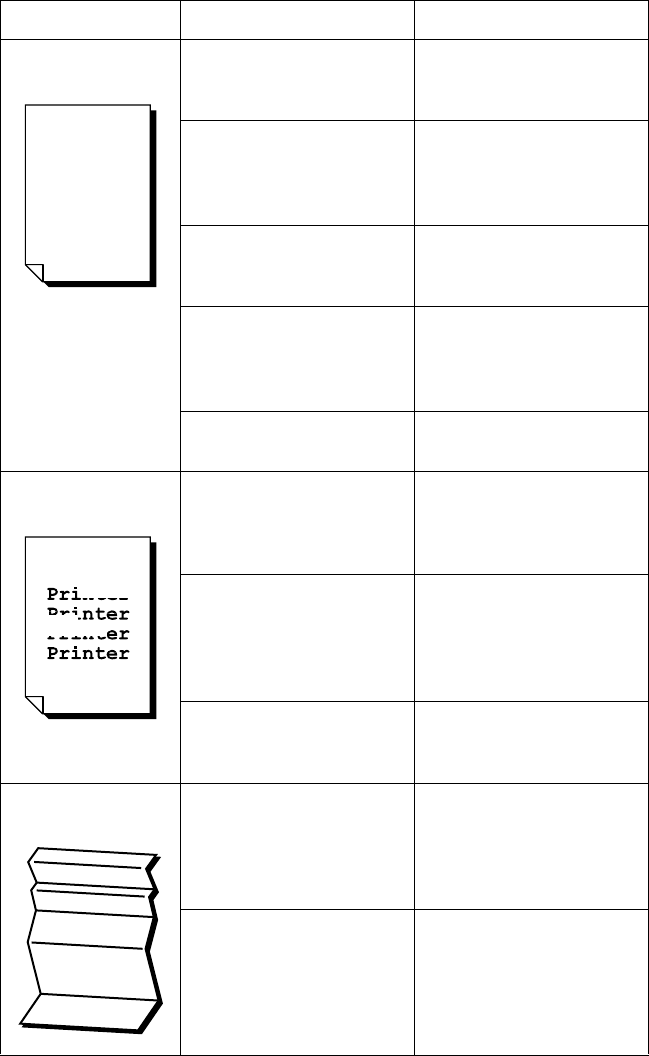
Saja Operation Manual 4-5
10/12/00
Chapter4.fm Troubleshooting
Description Possible Cause Action
Blank page The sealing tape of the EP
cartridge is not pulled out.
Pull out the sealing tape.
See “3.2 Replacing the EP
Cartridge”.
The printer feeds two or
more sheets at a time.
Avoid adding paper to a
nearly full stack.
See “3.1 Replenishing
Paper”.
The EP cartridge is old or
damaged.
Replace the EP cartridge.
See “3.2 Replacing the EP
Cartridge”.
The toner in the EP car-
tridge is low. Replace the EP cartridge.
See “3.2 Replacing the EP
Cartridge”.
The high-voltage power
supply may be defective.
Contact your dealer or an
authorized service station.
Partial blanks The print media is moist. Remove the moist media
and load new, dry media.
See “3.1 Replenishing
Paper”.
The print media is outside
the recommended specifi-
cations.
Use the recommended
print media.
See “3.1 Replenishing
Paper” and “Appendix A
Print Media”.
The sealing tape of the EP
cartridge is not fully pulled
out.
Replace the EP cartridge.
See “3.2 Replacing the EP
Cartridge”.
Creased paper The print media is outside
the recommended specifi-
cations.
Use the recommended
print media.
See “3.1 Replenishing
Paper” and “Appendix A
Print Media”.
The print media is moist. Remove the moist media
and load new, dry media.
See “3.1 Replenishing
Paper”.
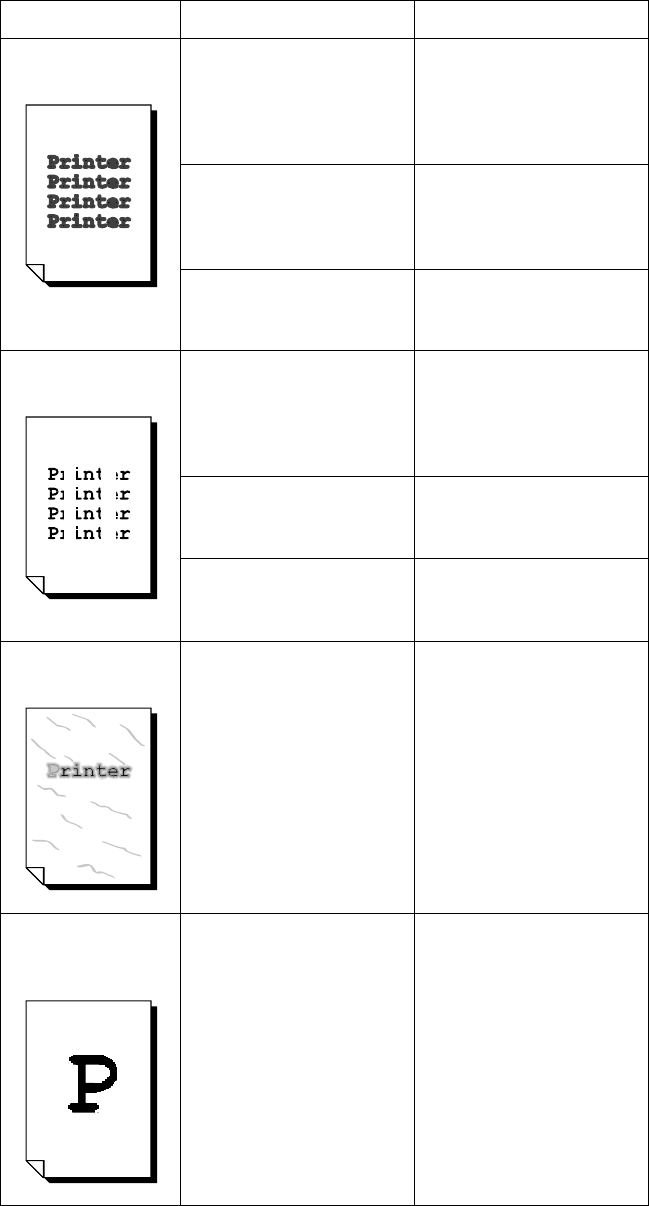
4-6 Saja Operation Manual
10/12/00
Troubleshooting Chapter4.fm
Description Possible Cause Action
Plotted print The print media is outside
the recommended specifi-
cations.
Use the recommended
print media.
See “3.1 Replenishing
Paper” and “Appendix A
Print Media”.
The print media is moist. Remove the moist media
and load new, dry media.
See “3.1 Replenishing
Paper”.
The EP cartridge is old or
damaged.
Replace the EP cartridge.
See “3.2 Replacing the EP
Cartridge”.
Vertical blanks The EP cartridge is not
installed correctly.
Remove the EP cartridge
and reinstall it.
See “2.2 Installing the EP
Cartridge” and “3.2 Replac-
ing the EP Cartridge”.
The EP cartridge is old or
damaged.
Replace the EP cartridge.
See “3.2 Replacing the EP
Cartridge”.
The ROS sealed grass is
dirty.
Clean the ROS sealed
grass.
See “3.6 Cleaning”.
Blurred print The EP cartridge is old or
damaged.
Replace the EP cartridge.
See “3.2 Replacing the EP
Cartridge”.
Bold print appears
shaded
The EP cartridge is old or
damaged.
Replace the EP cartridge.
See “3.2 Replacing the EP
Cartridge”.

Saja Operation Manual 4-7
10/12/00
Chapter4.fm Troubleshooting
4.3 Error Messages
The table below lists status codes, error messages, and any action you
need to take.
Status
Code
Error Message Possible Cause and
Action
E0
E1, E2-1
E2-2,
E3, E4
E7, E8
E0: PAPER JAM INSIDE HCF
E1: PAPER JAM TRAY TO REGI.
E2-1: PAPER JAM MISFEED
E2-2: PAPER JAM MISFEED DUPLEX
E3: PAPER JAM REGI. TO FUSER.
E4: PAPER JAM EXIT
E7: JAM DUPLEX PLEASE CLEAR JAM
E8: PAPER JAM HCS
A paper jam has occurred
inside the printer. Remove
the jammed paper.
See “4.4 Paper Jams”
E5 TOP CVR OPEN PLEASE CLOSE CVR
HCS CVR OPEN PLEASE CLOSE CVR
HCF CVR OPEN PLEASE CLOSE CVR
P HAND UNIT NOT IN POSITION
The top/rear/HCS/HCF
cover is open. Close the
cover.
Front paper tray is not in
position.
J3 EP CARTRIDGE NOT IN POSITION
INSTALL/RESEAT PRINT CARTRIDGE
The EP cartridge is not
installed, or a wrong car-
tridge is installed. Install
the correct EP cartridge
according to the specifica-
tions.
See “2.2 Installing the
EP Cartridge”.
C3 TRAY OUT INSTALL TRAY
TRAY OUT INSTALL TRAY1
TRAY OUT INSTALL TRAY2
TRAY OUT INSTALL TRAY3
HCF CARRIAGE NOT IN POSITION
The selected cassette is
not installed. Install the
cassette.
C5 ADD PAPER TO FRONT TRAY
ADD PAPER TO CASSETTE
ADD PAPER TO TRAY1
ADD PAPER TO TRAY2
ADD PAPER TO TRAY3
There is no paper in the
front paper tray or in the
selected cassette.
Replenish paper.
See “3.1 Replenishing
Paper”.
WRONG SIZE FOR DUPLEX
WRONG SIZE FOR UPPER TRAY
Paper of a non-supported
size was inserted while
the optional duplex print-
ing unit or HCF unit is
installed. Choose a sup-
ported paper size.
See “3.1 Replenishing
Paper” and “Appendix A
Print Media”.

4-8 Saja Operation Manual
10/12/00
Troubleshooting Chapter4.fm
Status
Code
Error Message Possible Cause and
Action
U2 ROS FALL PWR OFF THEN ON ROS have occurred. Turn
the printer off and then
back on again.
See “2.5 Turning the Printer
On and Off”.
U4 FUSER FAIL PWR OFF THEN ON There is a problem with the
fuser. Turn the printer off
and then back on again.
See “2.5 Turning the Printer
On and Off”.
P1 PUSER PAUSE The host computer has
sent a standby command.
Cancel the standby com-
mand.
FAN ABNORMAL There is a problem with the
cooling fan. Turn the printer
off and then back on again.
See “2.5 Turning the Printer
On and Off”.
TBD The print media is outside
the recommended specifi-
cations. Make sure to load
the correct size of paper.
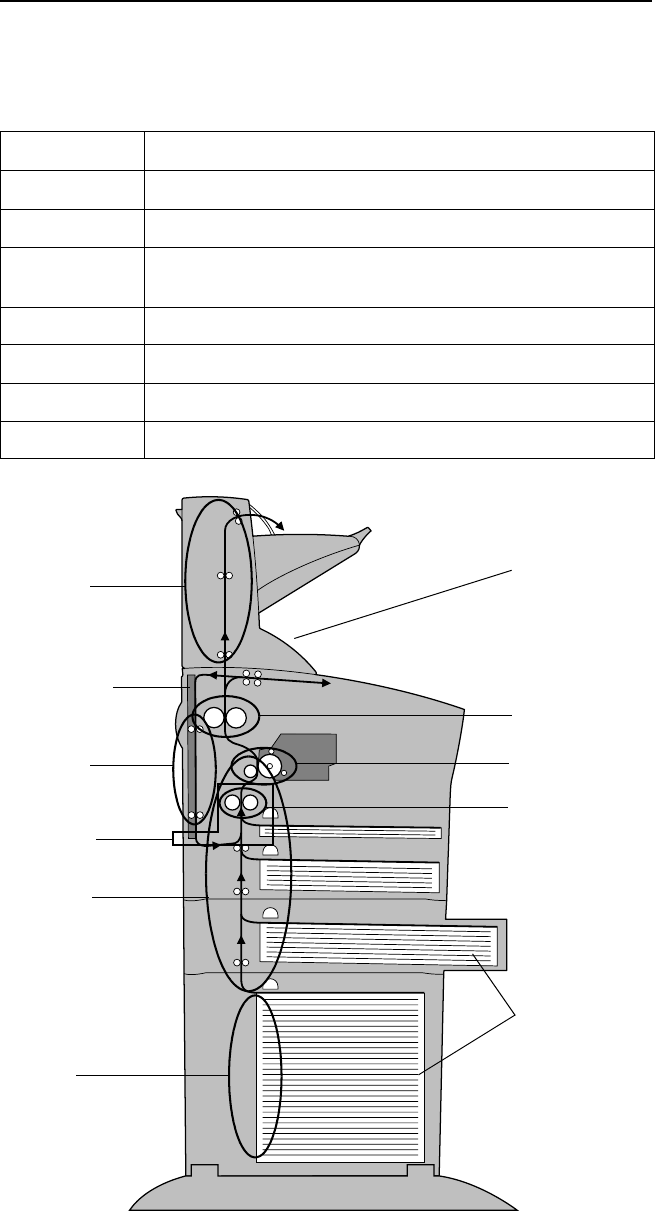
Saja Operation Manual 4-9
10/12/00
Chapter4.fm Troubleshooting
4.4 Paper Jams
When paper gets jammed inside the printer, printing stops and a status
code indicating the position of the jam appears on the display.
Status Code Paper Jam Location
E0 At the HCF unit
E1 Near the EP cartridge
E2 Between the paper feed section (front paper tray or cassette)
and the EP cartridge
E3 Between the EP cartridge and the fuser unit
E4 At the paper exit slot
E7 At the Duplex Printing Unit
E8 At the HCS unit
Paper feeder
cassettes
*option
HCS unit
*option
E3
E8
E7
E2-1
Duplex
printing unit
*option
E1
E4
E2-2
E0
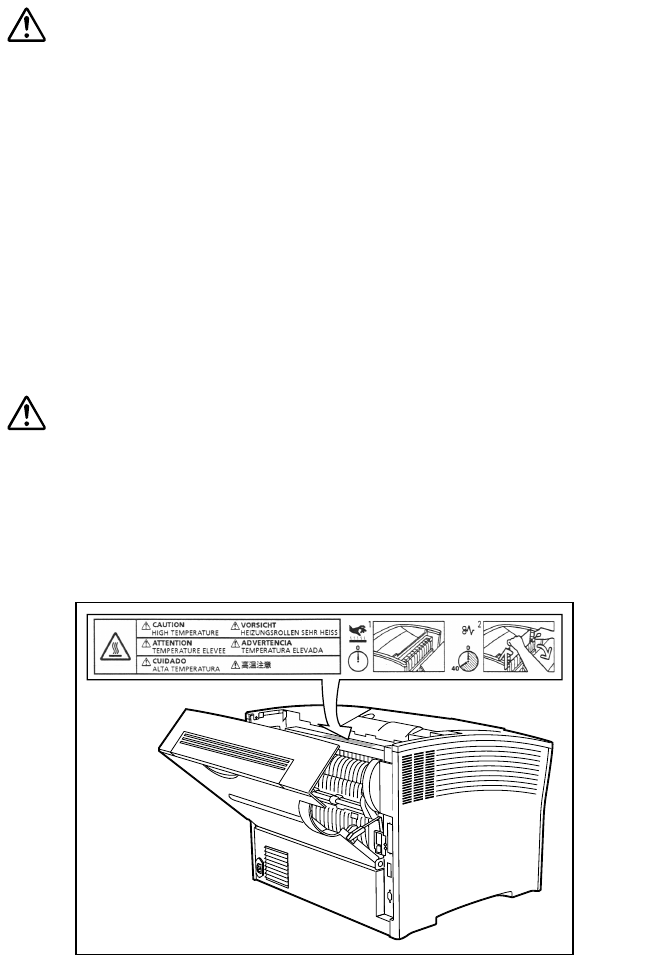
4-10 Saja Operation Manual
10/12/00
Troubleshooting Chapter4.fm
Typical causes of paper jams
The most common causes of paper jams are:
• The printer is not placed on a level surface.
• The print media does not conform to the specifications.
• The paper is not loaded correctly in the front paper tray or the cassette.
• The paper is wrinkled or curled.
• The paper guide is not set correctly.
Caution:
• If paper is jammed in a hard to reach or hard to see loca-
tion in the printer, do not try to remove it by force. Contact
your dealer or an authorized service station.
• When removing jammed paper, make sure that no paper
scraps or paper dust remain in the printer. Paper remnants
in the printer can become a fire hazard. If paper cannot be
removed or is tightly wound around the heater or a roller,
do not try to remove it by force. Contact your dealer or an
authorized service station.
Important: Remove jammed paper slowly and carefully, to prevent tear-
ing the paper.
Handling Precautions
Caution:
Never touch the heater area (where a label indicating high
temperature is located), or else burns may result. If paper is
jammed at the heater or roller area, do not remove the paper
by force; otherwise personal injury may result. Instead,
immediately turn off the power and contact your local dealer
for assistance.
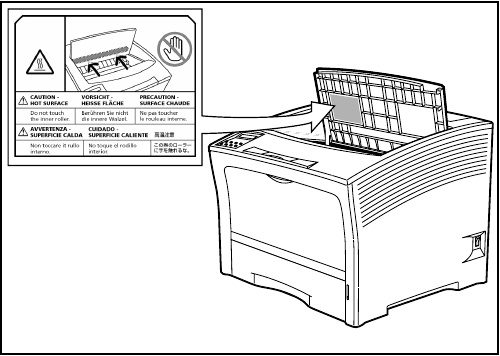
Saja Operation Manual 4-11
10/12/00
Chapter4.fm Troubleshooting