FUJIFILM Business Innovation YIA-7 Printer cartridge toner level reader User Manual Chapter0
Fuji Xerox Corporation Limited Printer cartridge toner level reader Chapter0
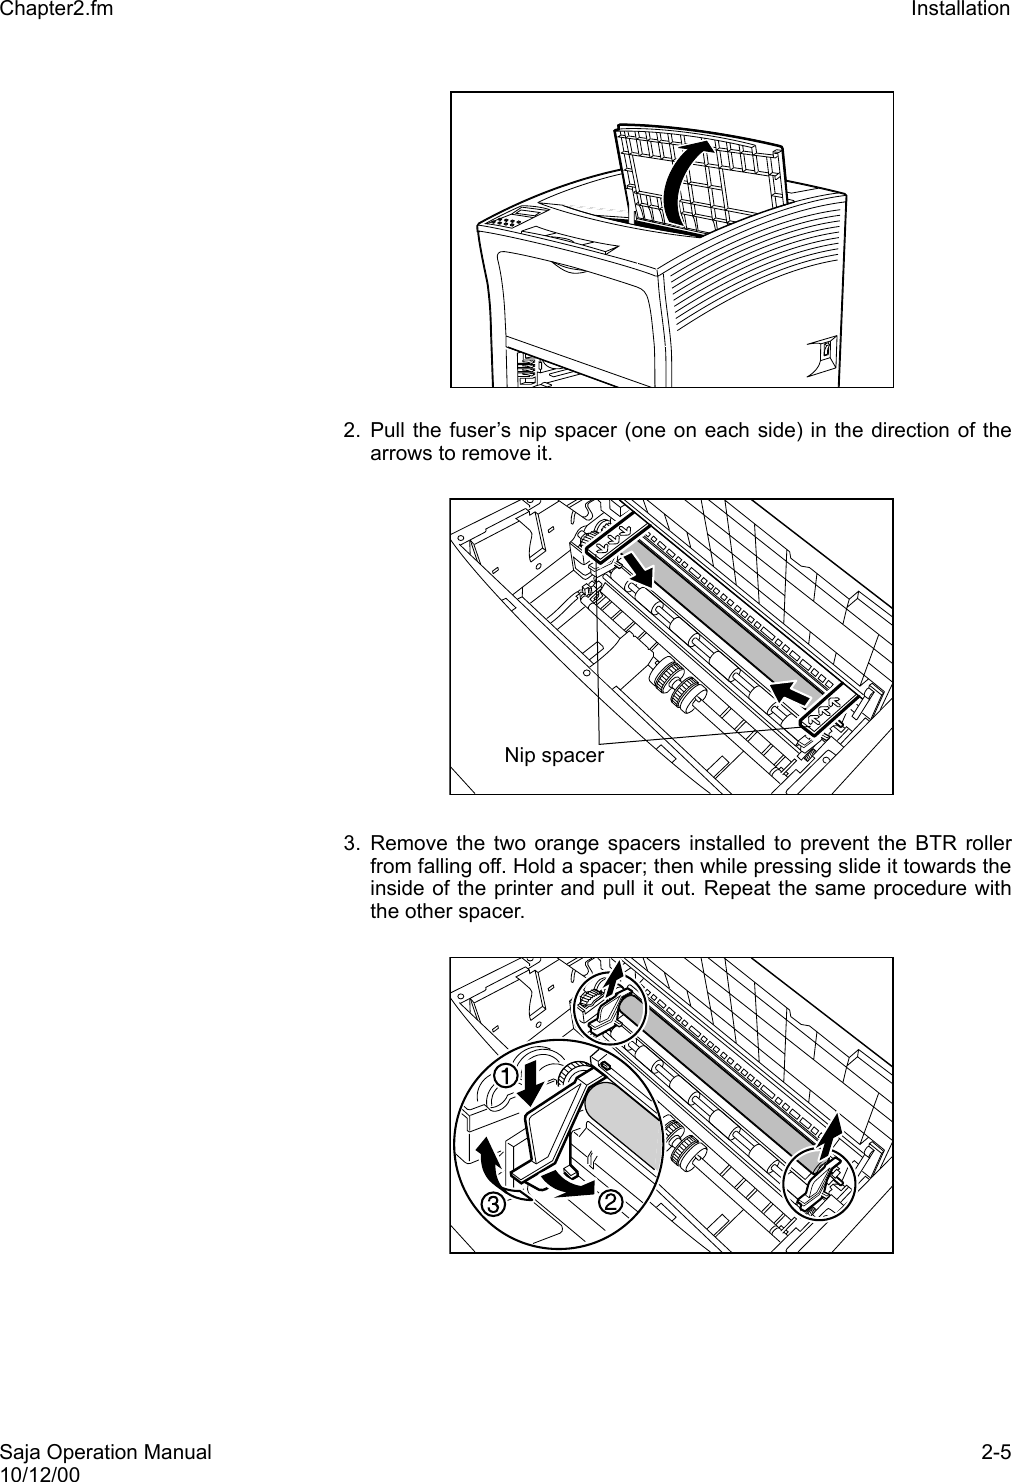
UserManual.wiki
>
FUJIFILM Business Innovation
>
YIA-7 User Manual
>
User Manual Part 1
Contents
1.
User Manual Part 1
2.
User Manual Part 2
User Manual Part 1
Navigation menu
Upload a User Manual
Namespaces
Wiki Guide
HTML
PDF
Info
Views
User Manual
Discussion / Help
Navigation
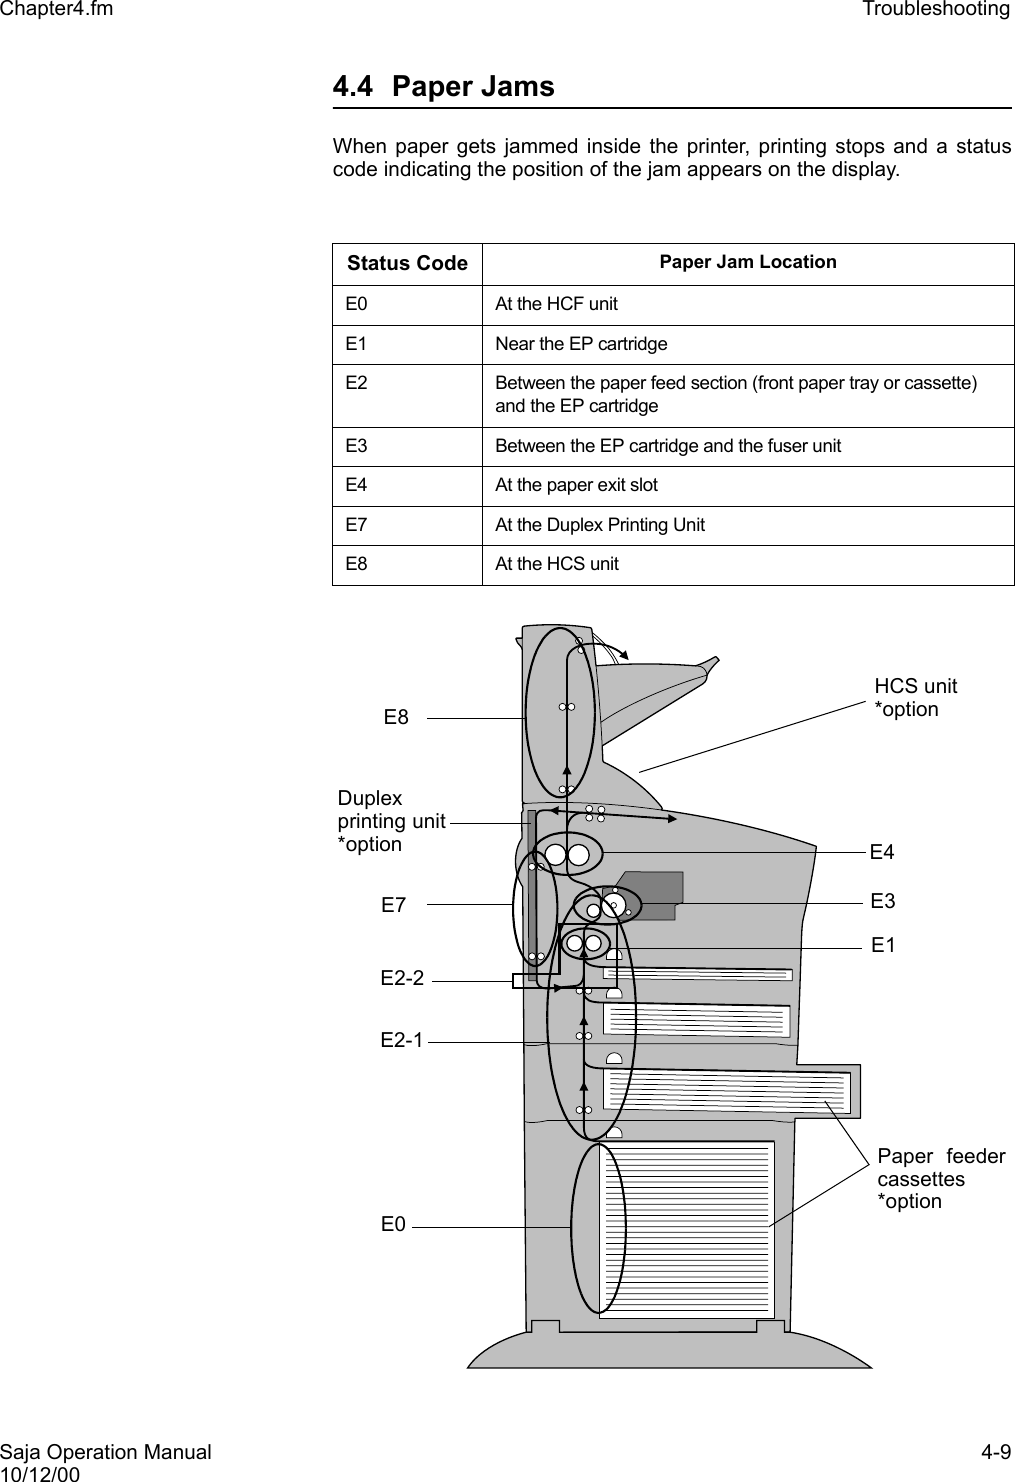
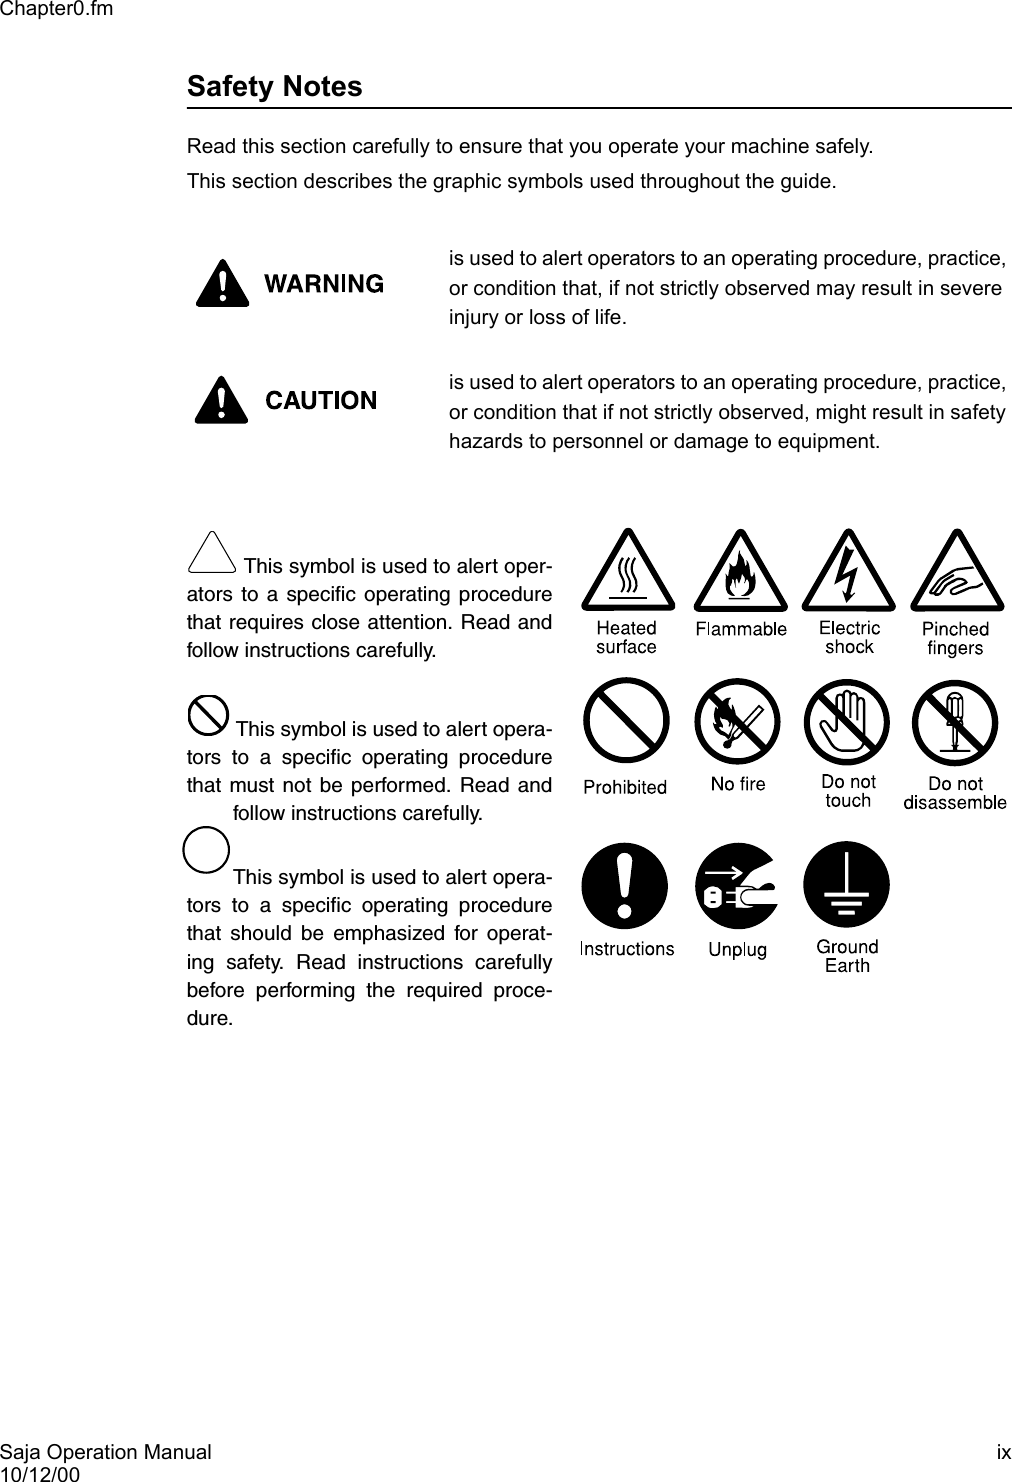
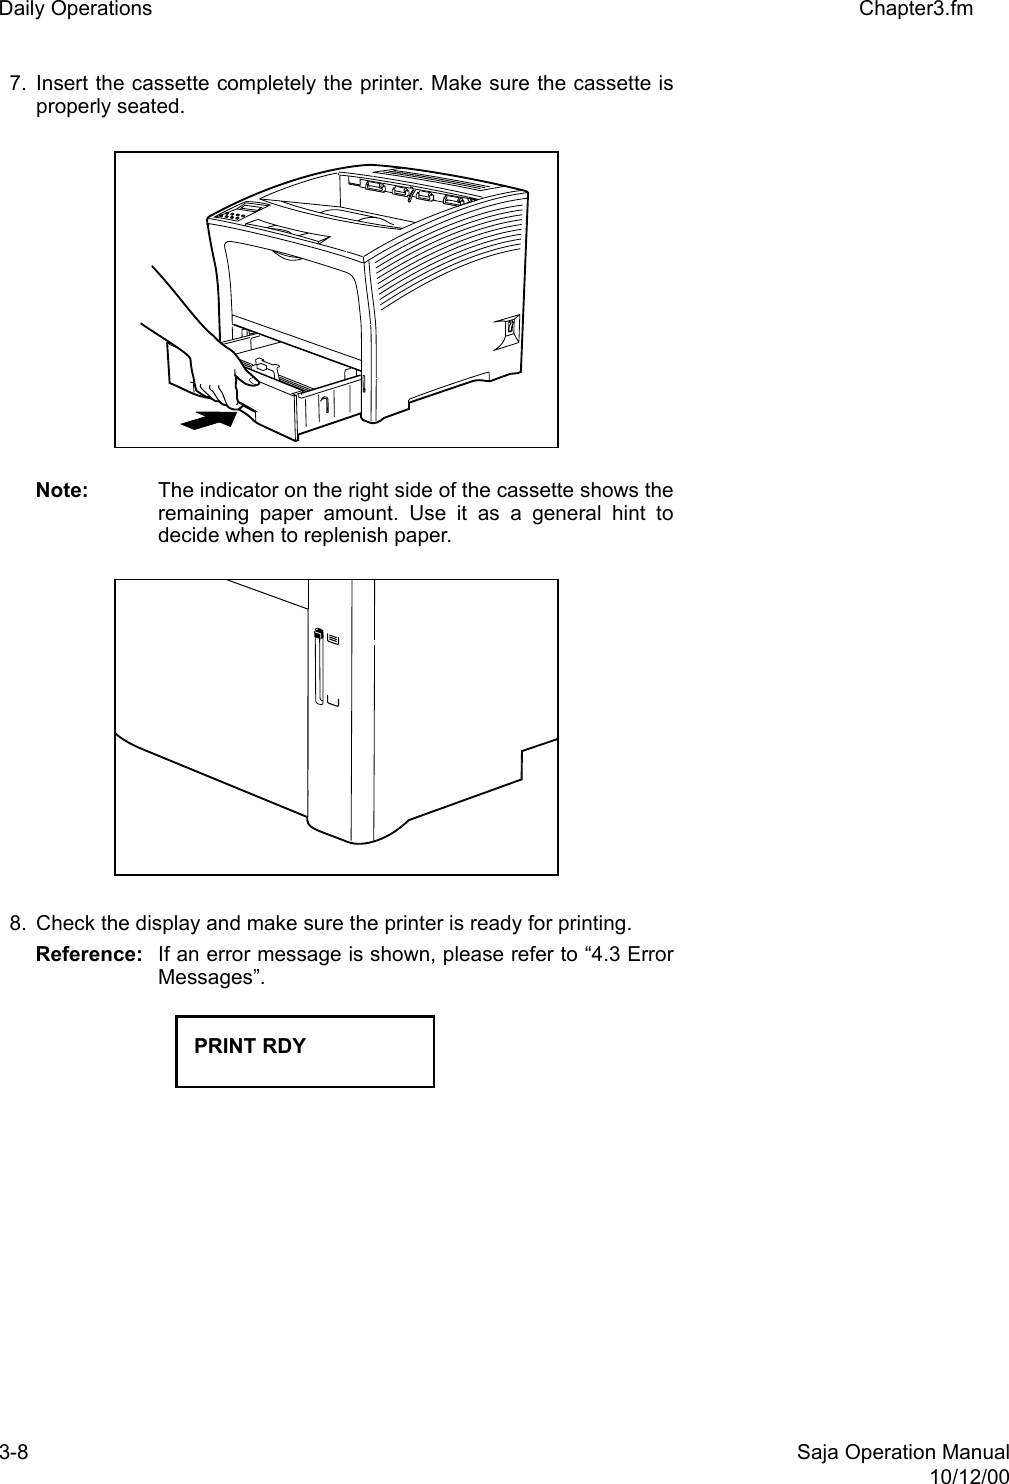
![Saja Operation Manual iii10/12/00Chapter0.fmIntroduction Thank you for selecting this laser printer. In this manual you will find important informationregarding operation and care of your printer. Please read this manual in its entirety andkeep it at hand for later reference. Sections marked [!] denote important instructions for assuring safe use of the printer. Payspecial attention to these sections and read them fully before operating the printer. This printer is certified as a Class 1 laser product under the U.S. Department of Healthand Human Services (DHHS) Radiation Performance Standard according to the RadiationControl for Health and Safety Act of 1968. This means that the printer does not emit haz-ardous laser radiation. Since radiation emitted inside the printer is completely confined within the protective hous-ings and external covers, the laser beam cannot escape from the machine during anyphase of user operation. The Center for Devices and Radiological Health (CDRH) of the U.S. Food and DrugAdministration implemented regulations for laser products on August 1976. These regula-tions apply to laser products marketed in the United States. The label on the printer indi-cates compliance with the CDRH regulations and must be attached to laser productsmarketed in the United States. Warning: Use of controls, adjustments or performance of procedures other thanthose specified in this manual may result in hazardous laser radiationexposure. Radio Interference * Class B Equipment This equipment has been tested and found to comply with the limits for a Class B digitaldevice, pursuant to Part 15 of FCC Rules. These limits are designed to provide reason-able protection against harmful interference in a residential installation. This equipmentgenerates, uses, and can radiate radio frequency energy and, if not installed and used inaccordance with the instructions, may cause harmful interference to radio communica-tions. However, there is no guarantee that interference will not occur in a particular instal-lation. If this equipment does cause harmful interference to radio or television reception,which can be determined by turning the equipment off and on, the user is encouraged totry to correct the interference by one or more of the following measures: • Reorient or relocate the receiving antenna. • Increase the separation between the equipment and receiver. • Connect the equipment to an outlet on a circuit different from that to which the receiveris connected. • Consult with the dealer or an experienced radio/television technician for help.](https://usermanual.wiki/FUJIFILM-Business-Innovation/YIA-7.User-Manual-Part-1/User-Guide-267240-Page-3.png)


![Saja Operation Manual 2-1310/12/00Chapter2.fm Installation2. Verify that the power switch of the printer is set to the [O] (off) position,then insert the plug of the power cord into the AC outlet.Connect the ground cable to the ground terminal.](https://usermanual.wiki/FUJIFILM-Business-Innovation/YIA-7.User-Manual-Part-1/User-Guide-267240-Page-39.png)
![2-14 Saja Operation Manual10/12/00Installation Chapter2.fm2.5 Turning the Printer On and Off When you turn on the power switch of the printer, the printer will take about 40 seconds to warm up before printing will become ready. Turn off the printer at the end of the day or if the printer will not be used for a long time.Note: When the printer is turned off, all print data still in the printermemory will be lost. Important: If there is paper in the front paper tray, remove the paperbefore turning the printer on. Reinsert the paper after theprinter is turned on. Turning the printer on Turn the printer on as follows. 1. Set the power switch on the right side of the printer to [ I ] to turn onthe printer. 2. The indication [WARM UP] appears on the display. Wait until the indi-cation changes to [PRINT RDY]. Note: While the indication [WARM UP] is shown, the printer isstill warming up. During this period, printing is not possi-ble. After about 40 seconds, the indication changes to[PRINT RDY], indicating that printing is ready now. Reference: If an error message is shown, please refer to “4.3 ErrorMessages”. WARM UP PRINT RDY](https://usermanual.wiki/FUJIFILM-Business-Innovation/YIA-7.User-Manual-Part-1/User-Guide-267240-Page-40.png)
![Saja Operation Manual 2-1510/12/00Chapter2.fm InstallationTurning the printer off Turn the printer off as follows. Note: When the printer is turned off, all print data and settings inthe printer memory will be lost. 1. Check the indication to make sure the printer is not performing anytask. 2. Set the power switch on the right side of the printer to [ O ] to turn offthe printer. PRINT RDY](https://usermanual.wiki/FUJIFILM-Business-Innovation/YIA-7.User-Manual-Part-1/User-Guide-267240-Page-41.png)


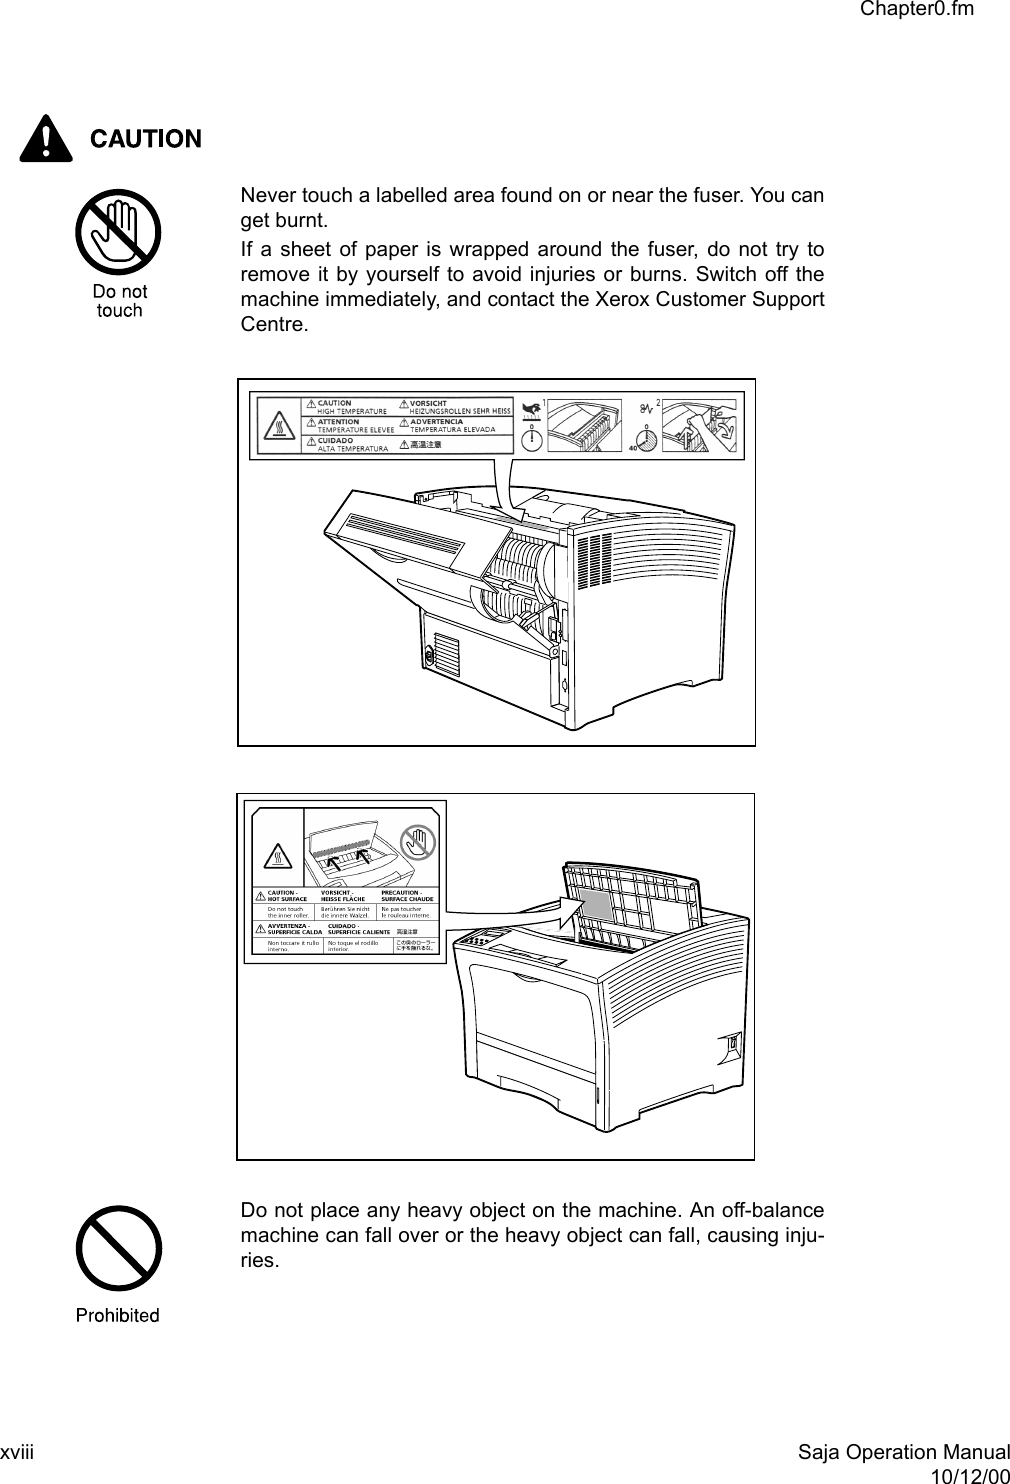
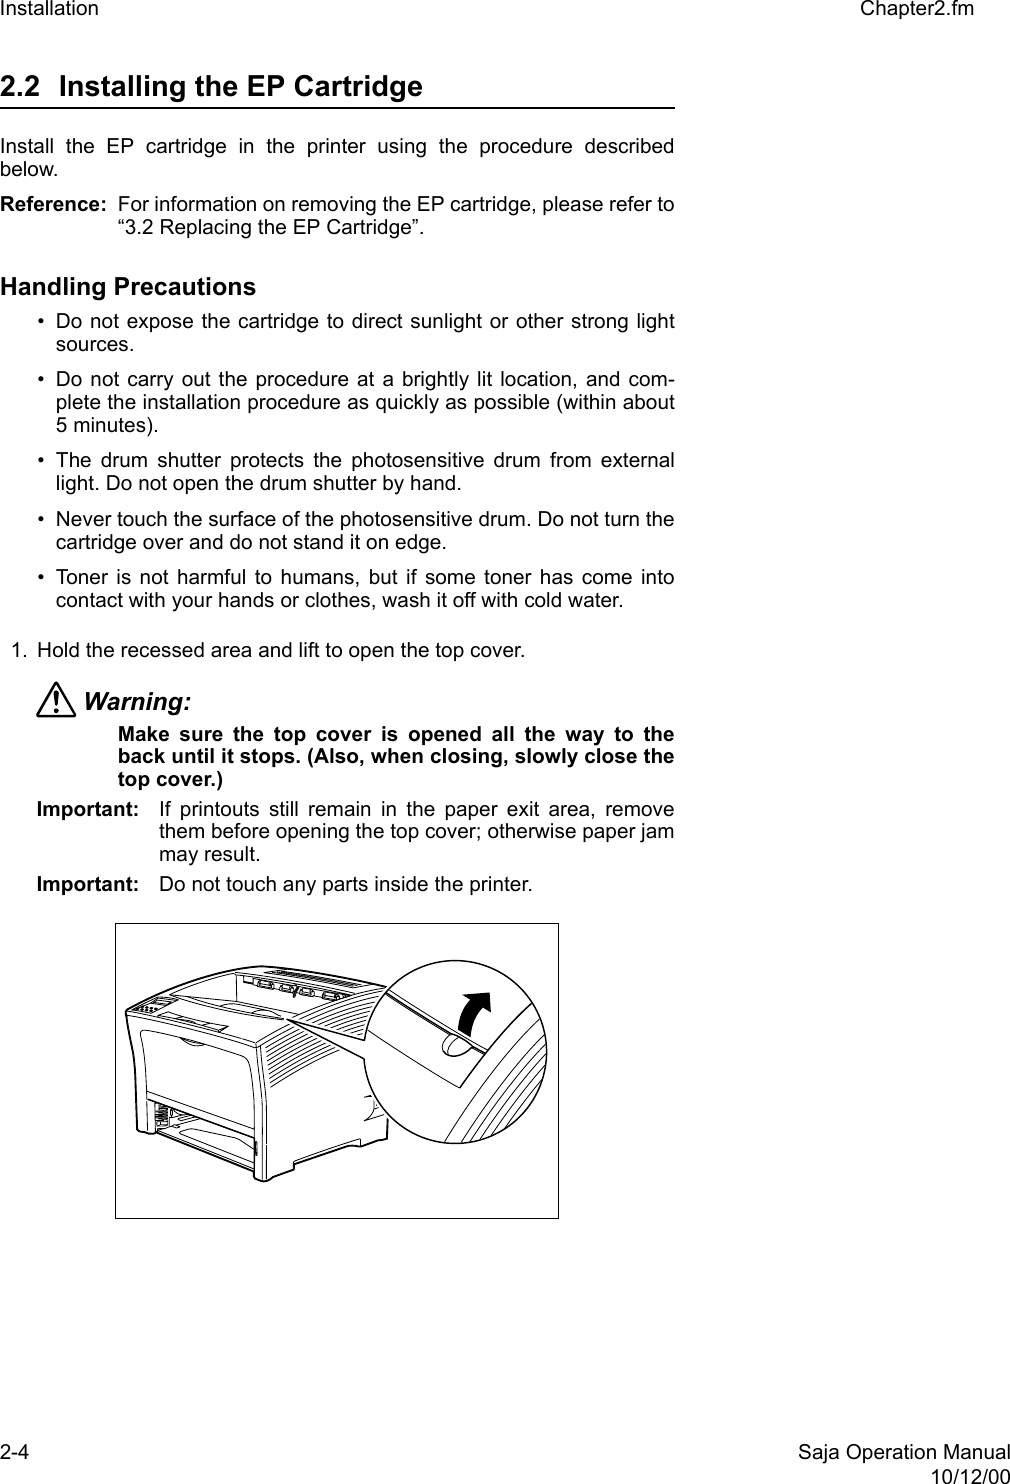
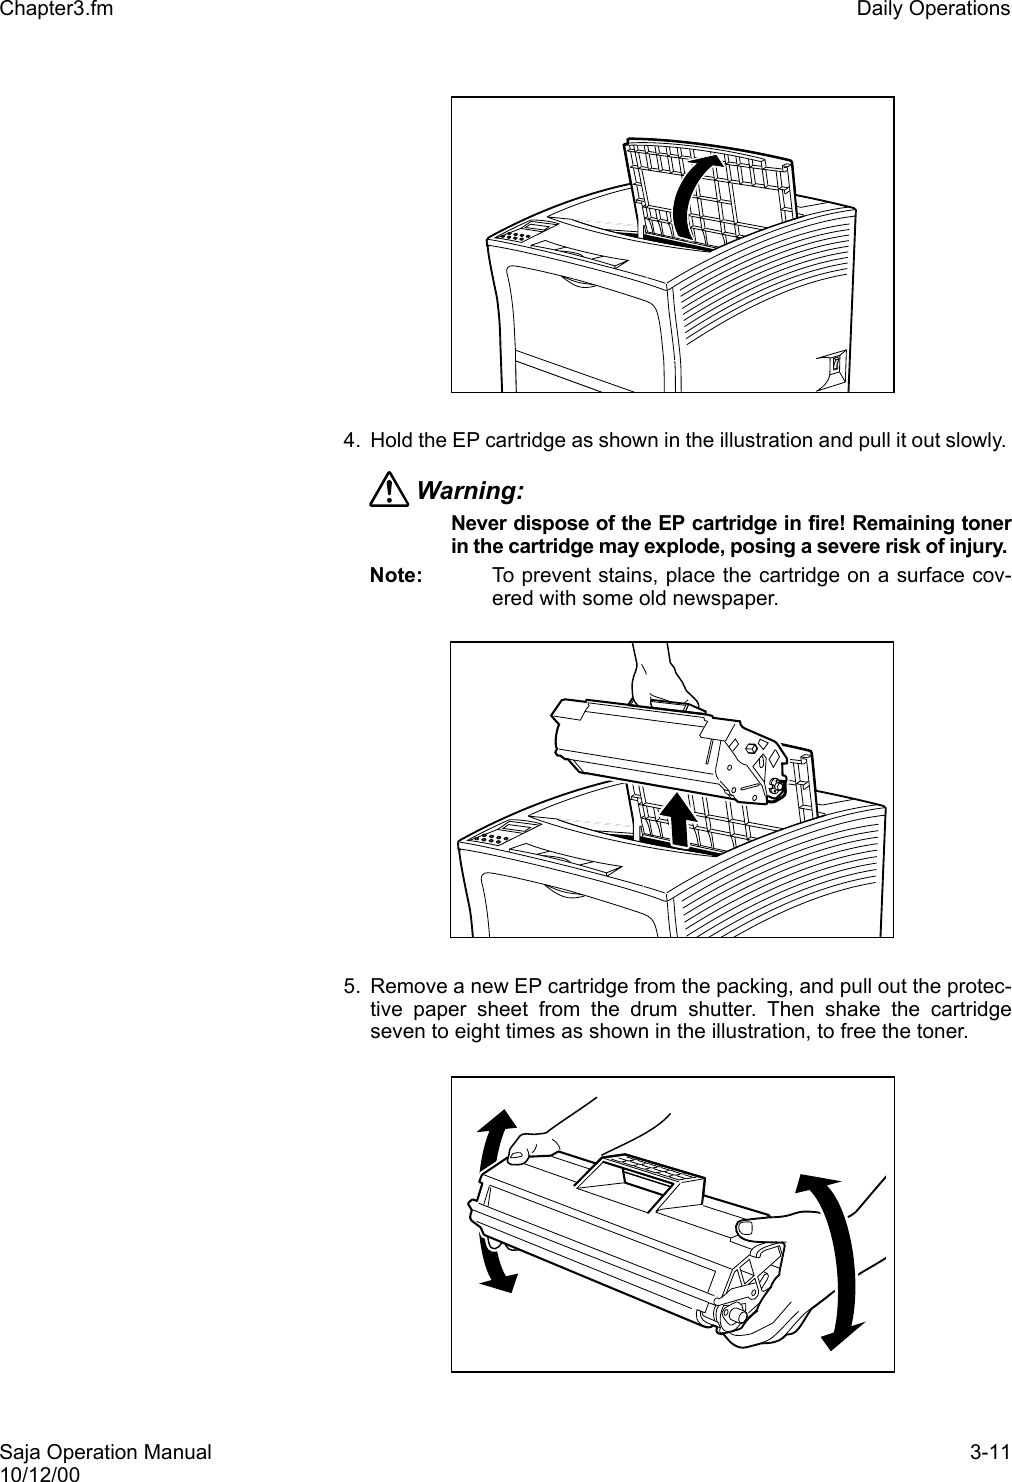
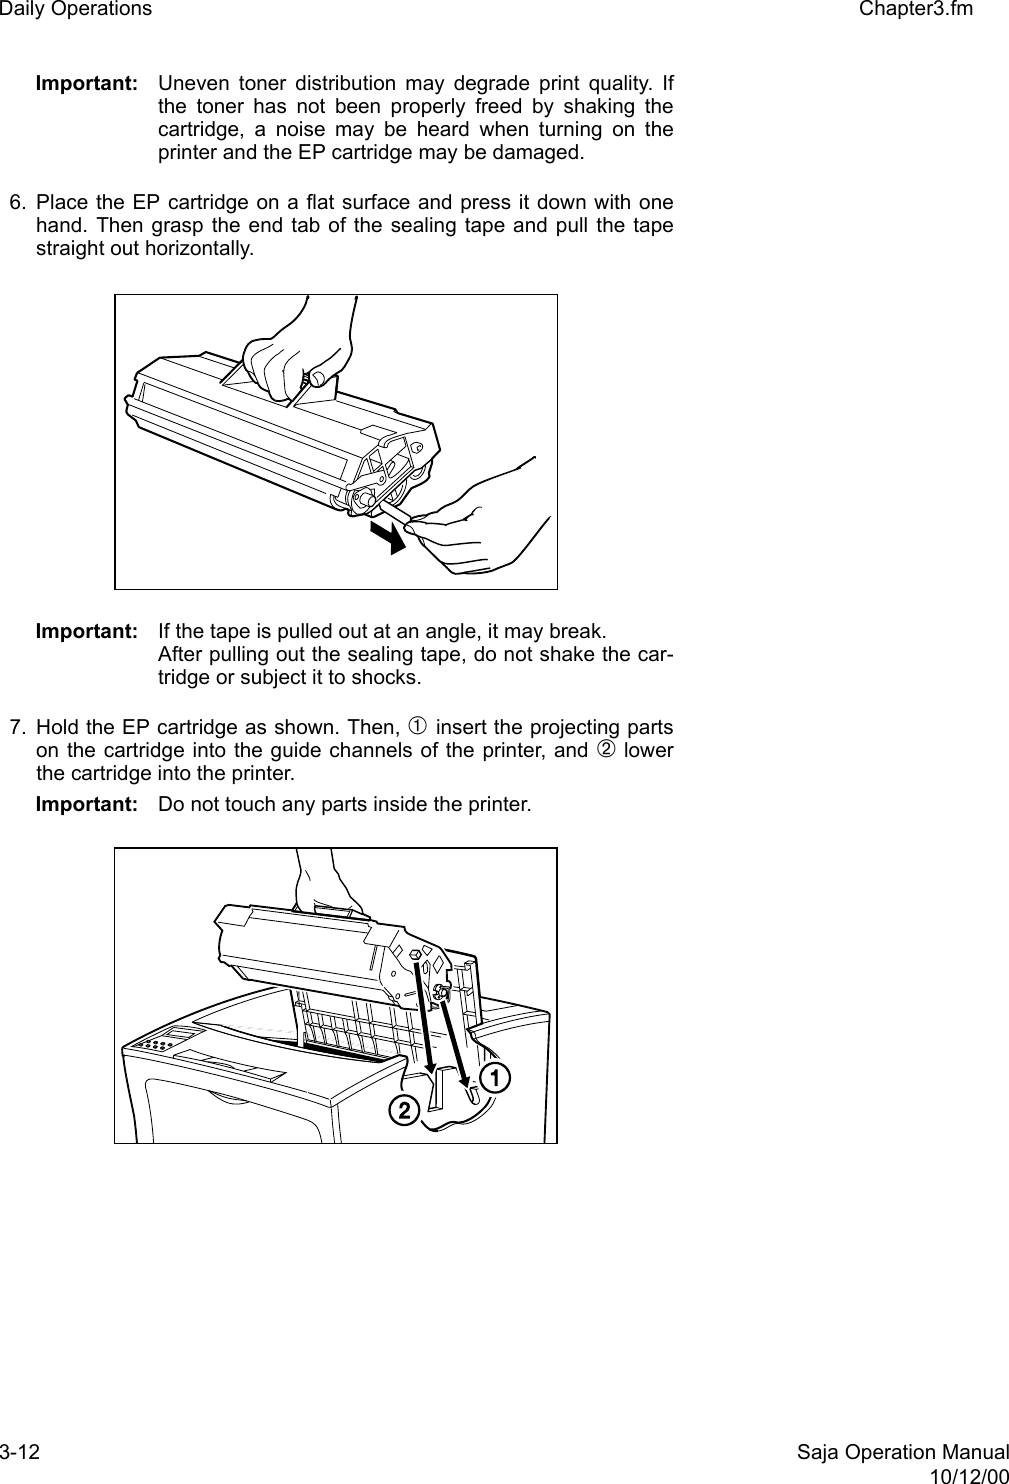
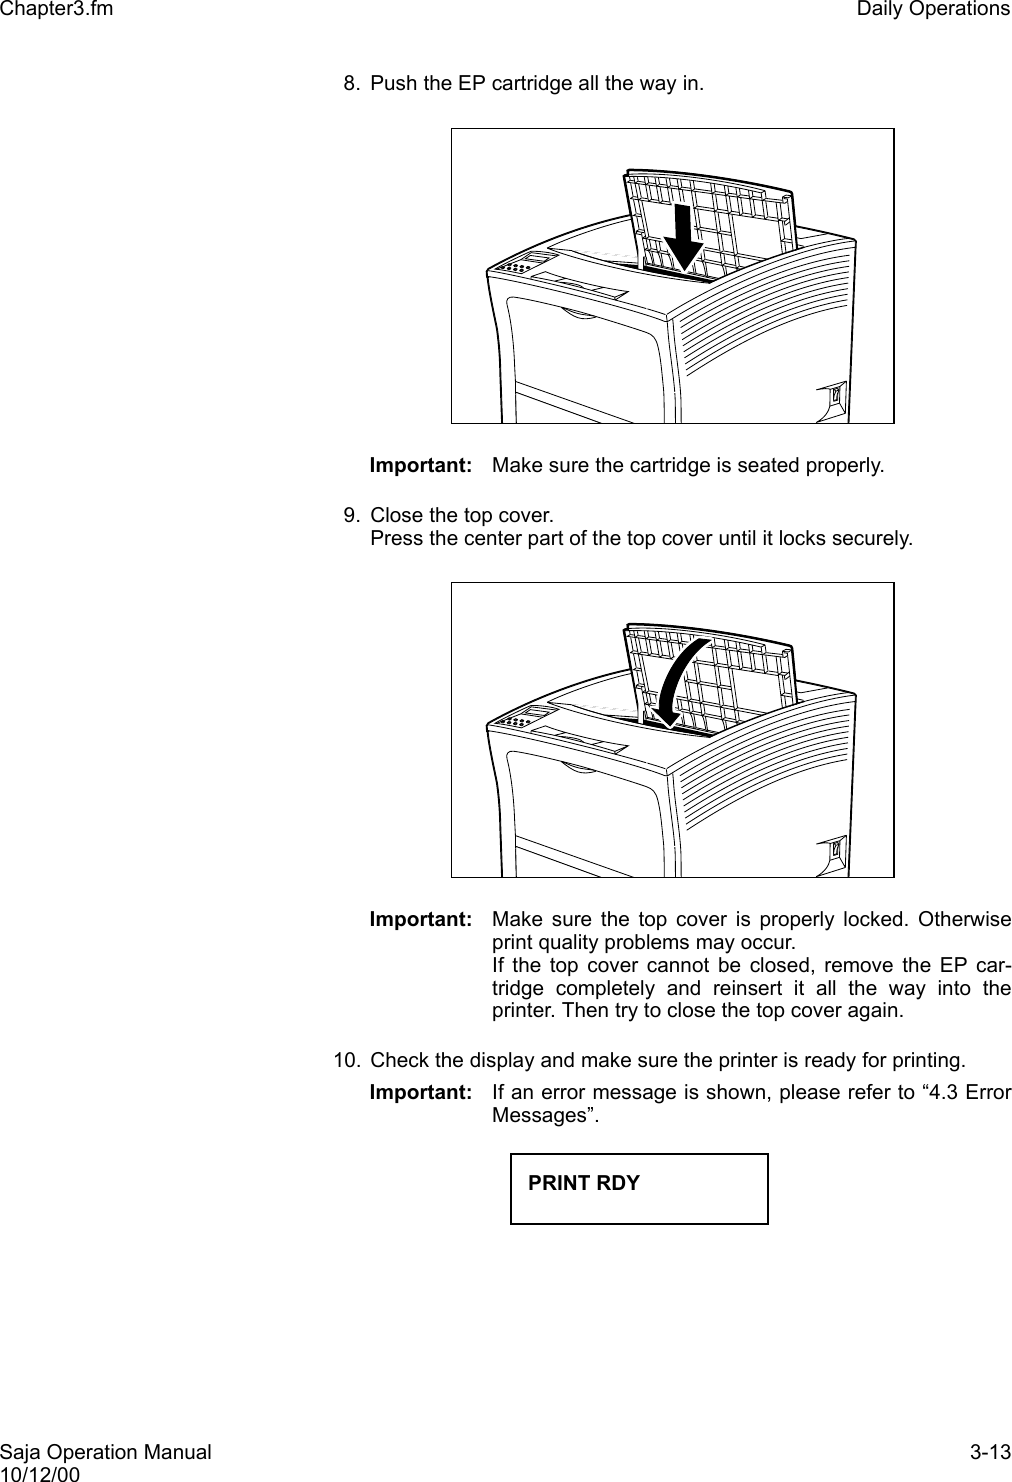
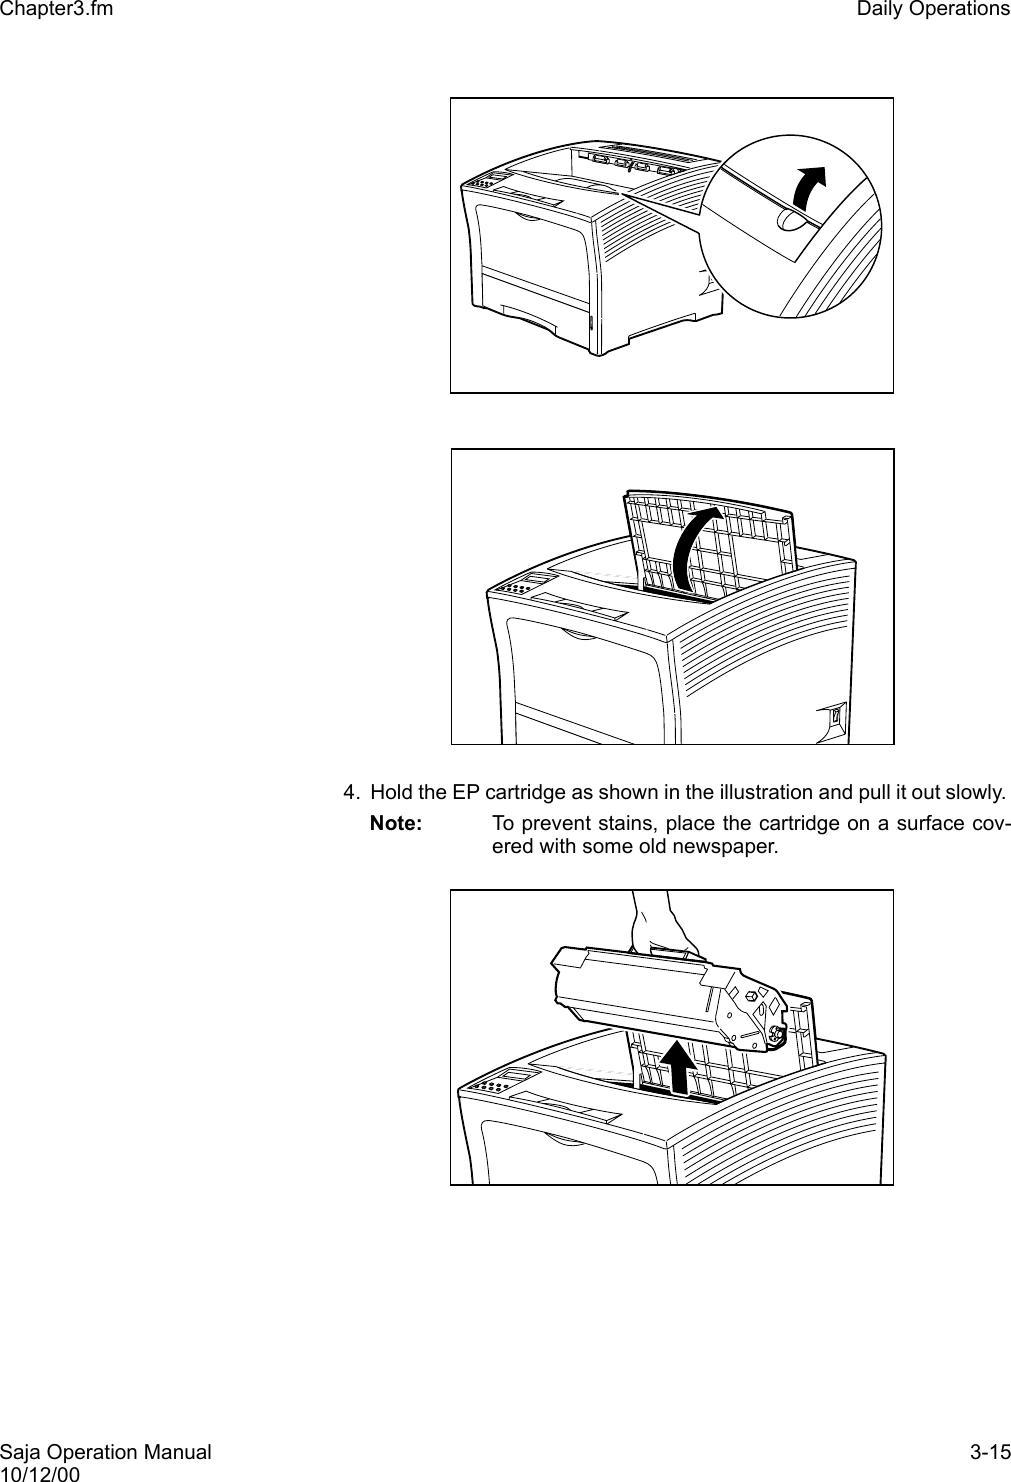
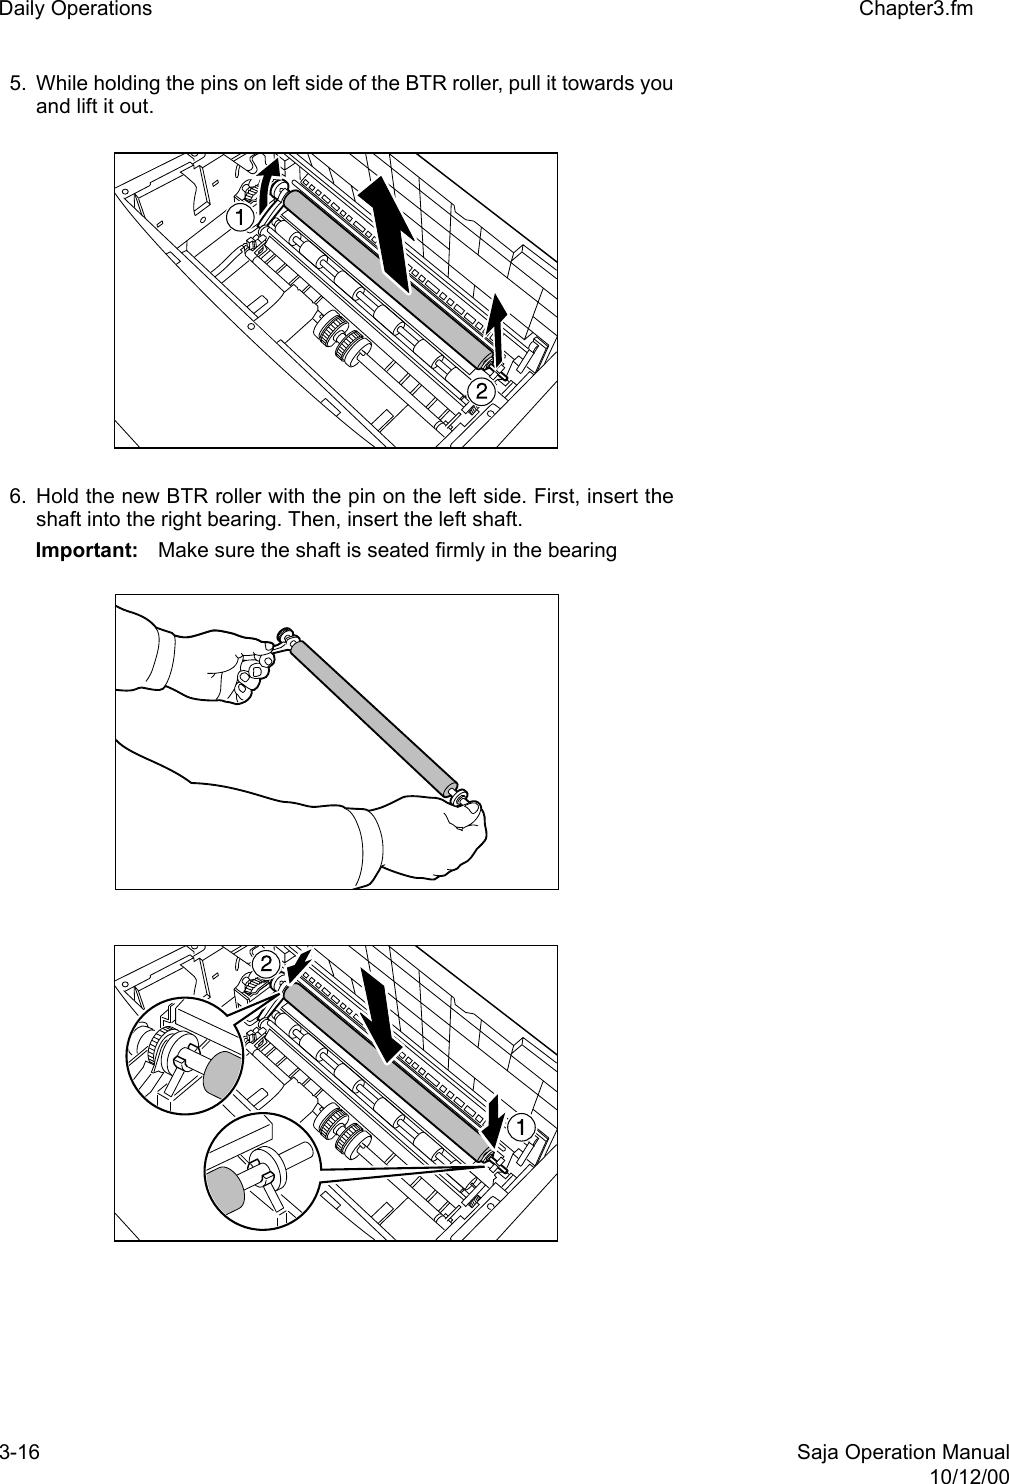
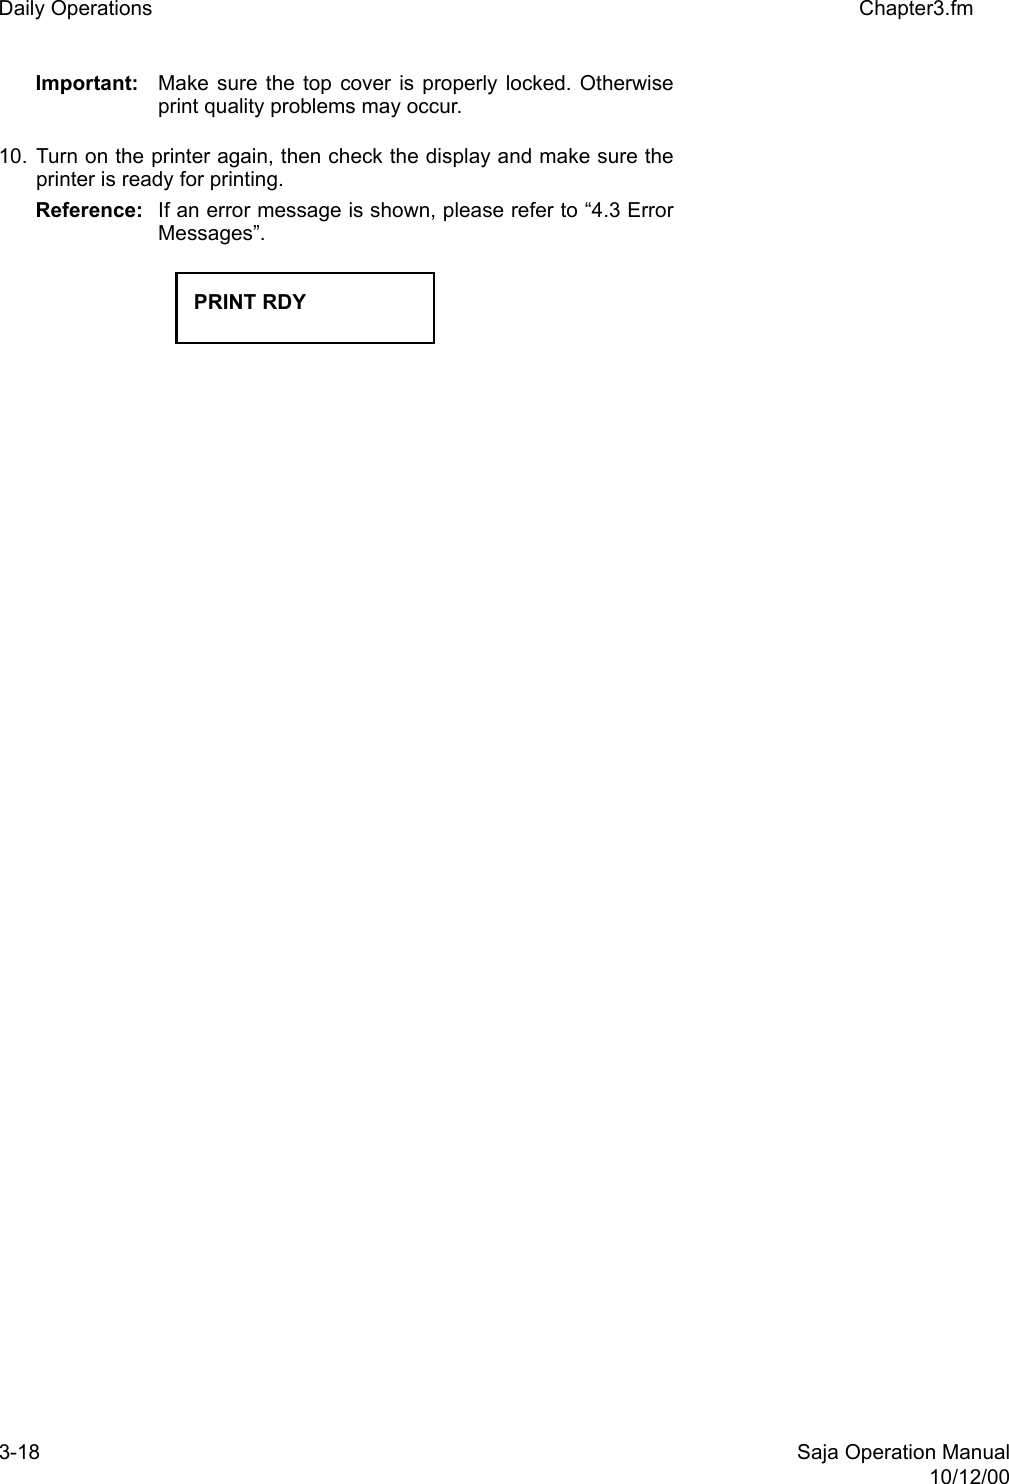
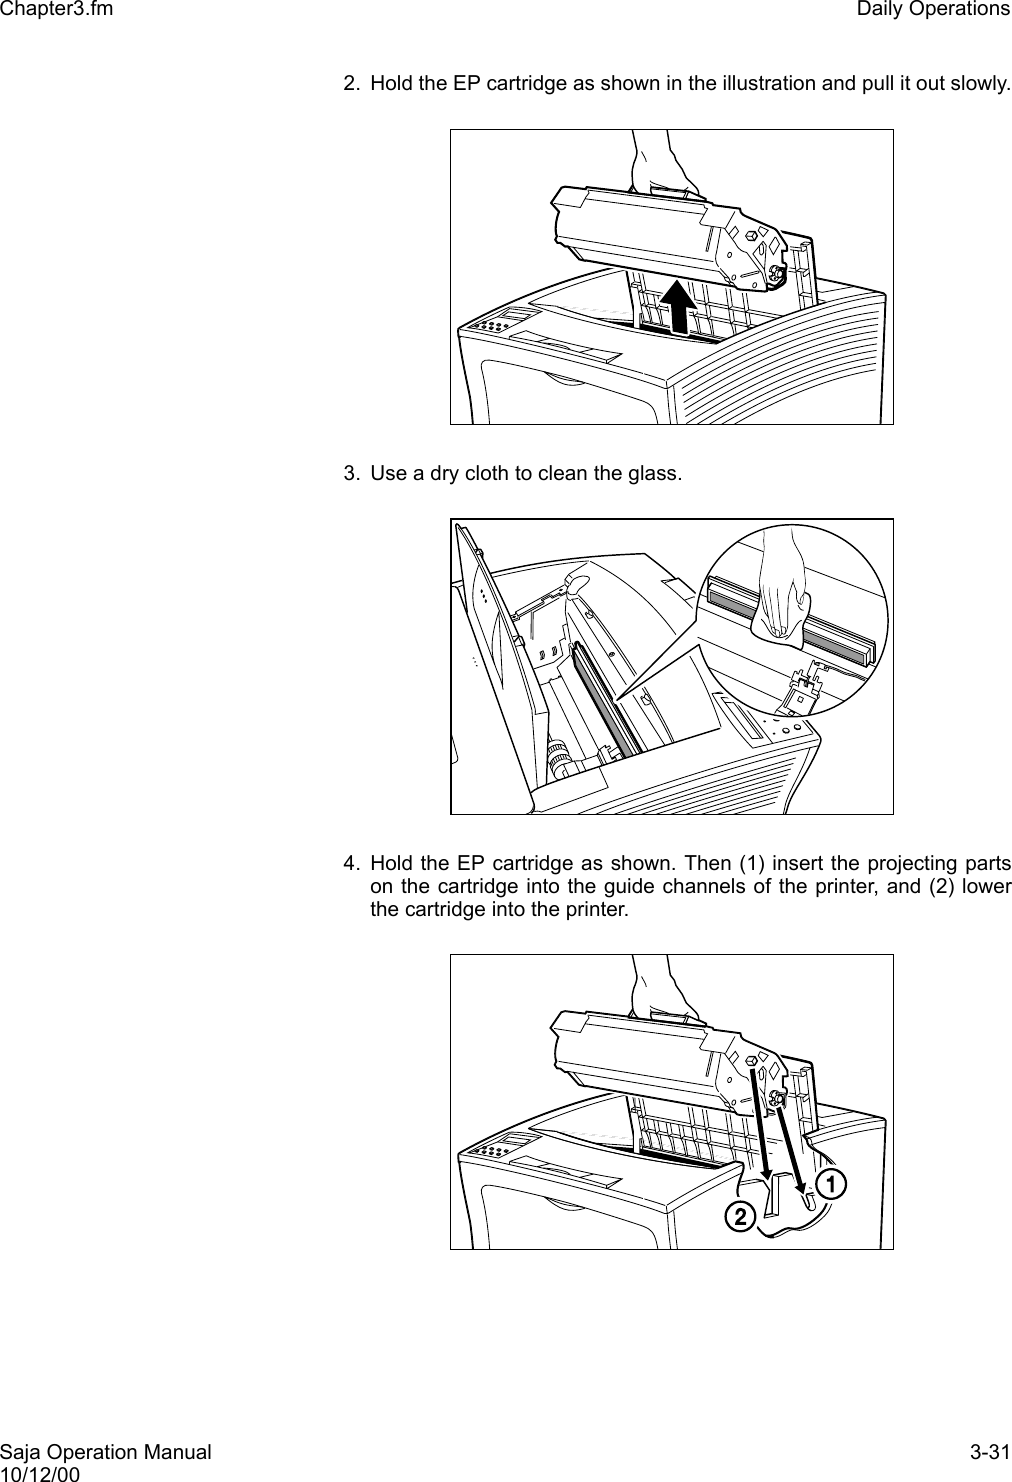
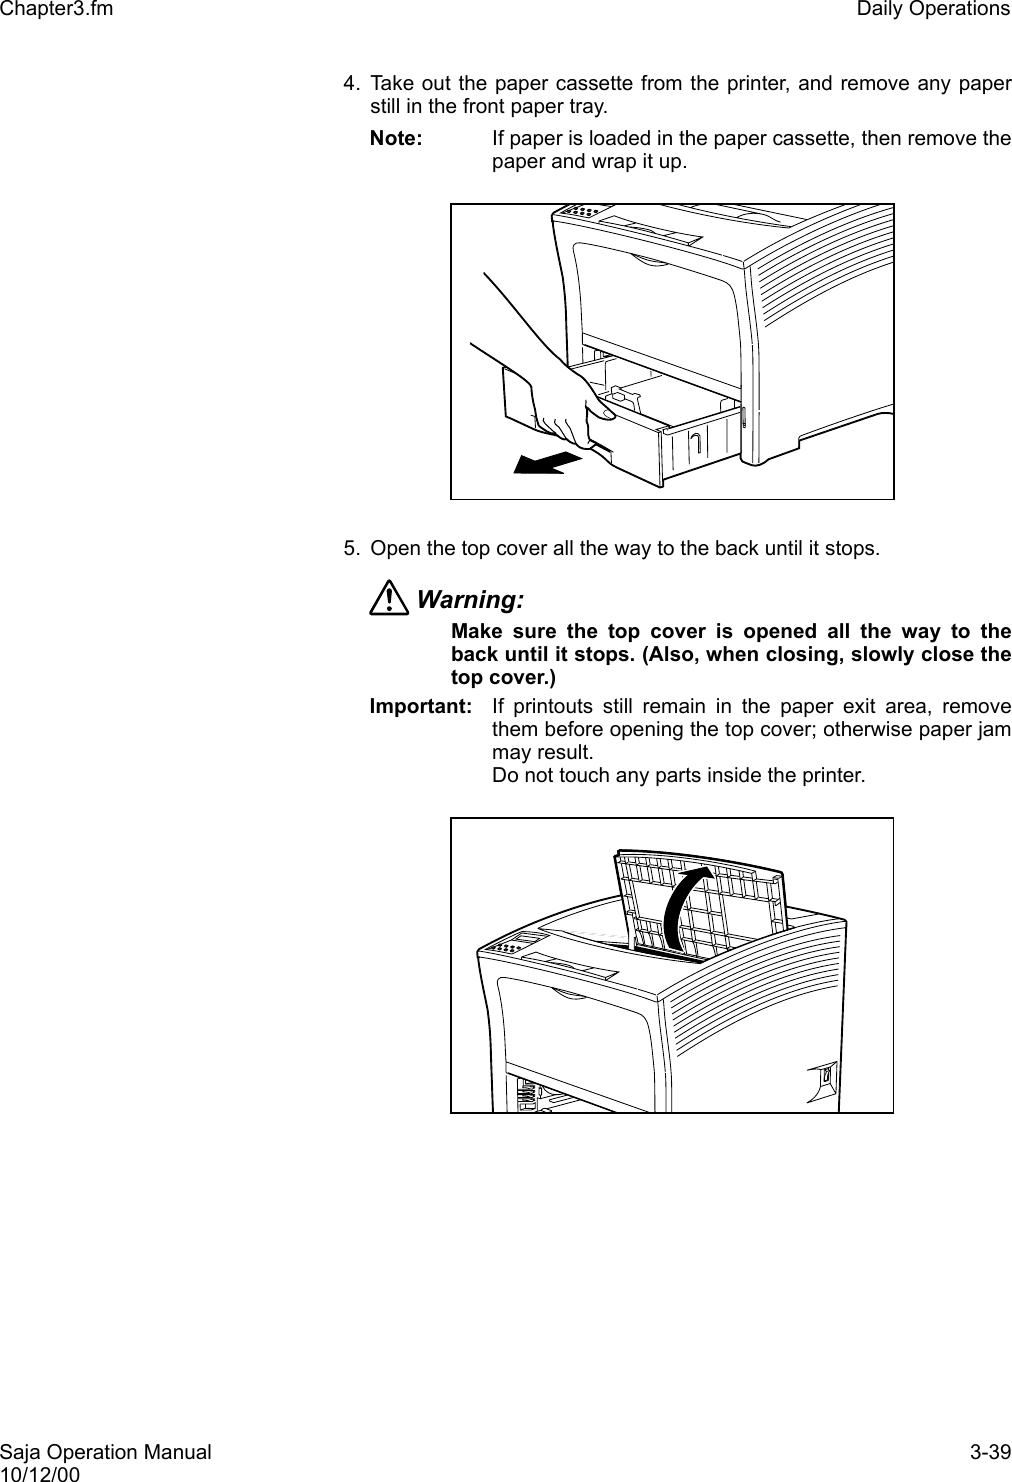
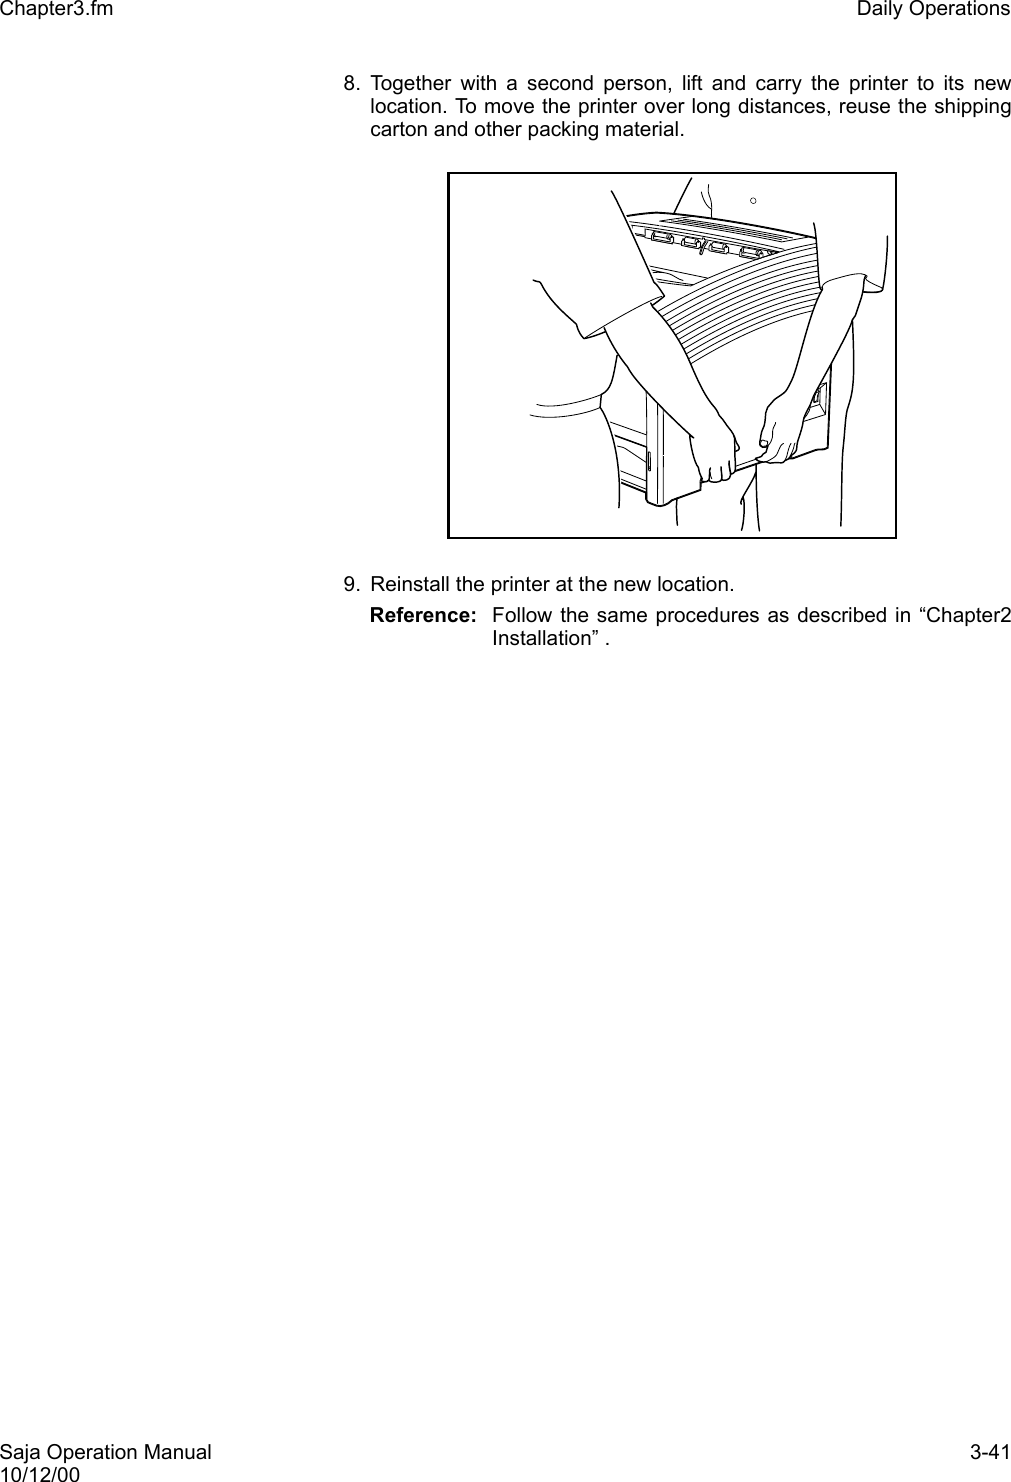
![Saja Operation Manual 3-910/12/00Chapter3.fm Daily Operations3.2 Replacing the EP Cartridge When it becomes necessary, replace the EP cartridge with a new one,using the procedure described below.Handling Precautions • Do not expose the cartridge to direct sunlight or other strong lightsources. • Do not carry out the procedure at a brightly lit location, and com-plete the installation procedure as quickly as possible (within about5 minutes). • The drum shutter protects the photosensitive drum from externallight. Do not open the drum shutter by hand. • Never touch the surface of the photosensitive drum. Do not turn thecartridge over and do not stand it on edge. • Toner is not harmful to humans, but if some toner has come intocontact with your hands or clothes, wash it off with cold water. 1. Make sure the indication J5:[EP CARTRIDGE NEED TO REPLACE]or [PRINT RDY] is shown on the display. Drum ShutterPRINT RDYJ5:EP CARTRIDGENEED TO REPLACE or](https://usermanual.wiki/FUJIFILM-Business-Innovation/YIA-7.User-Manual-Part-1/User-Guide-267240-Page-55.png)
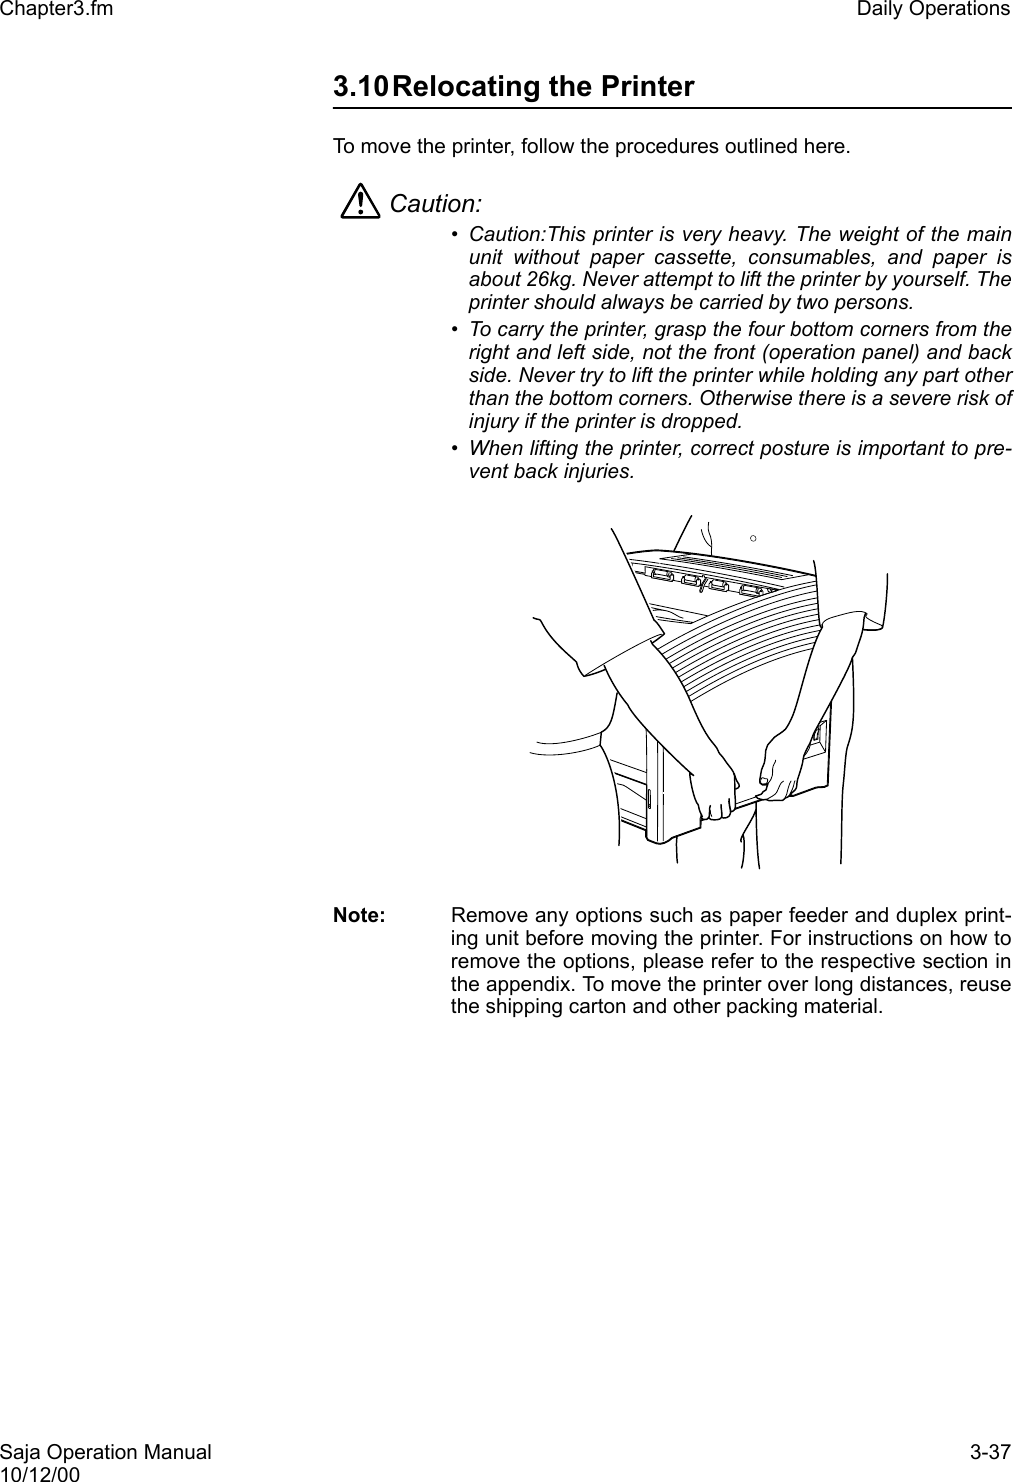
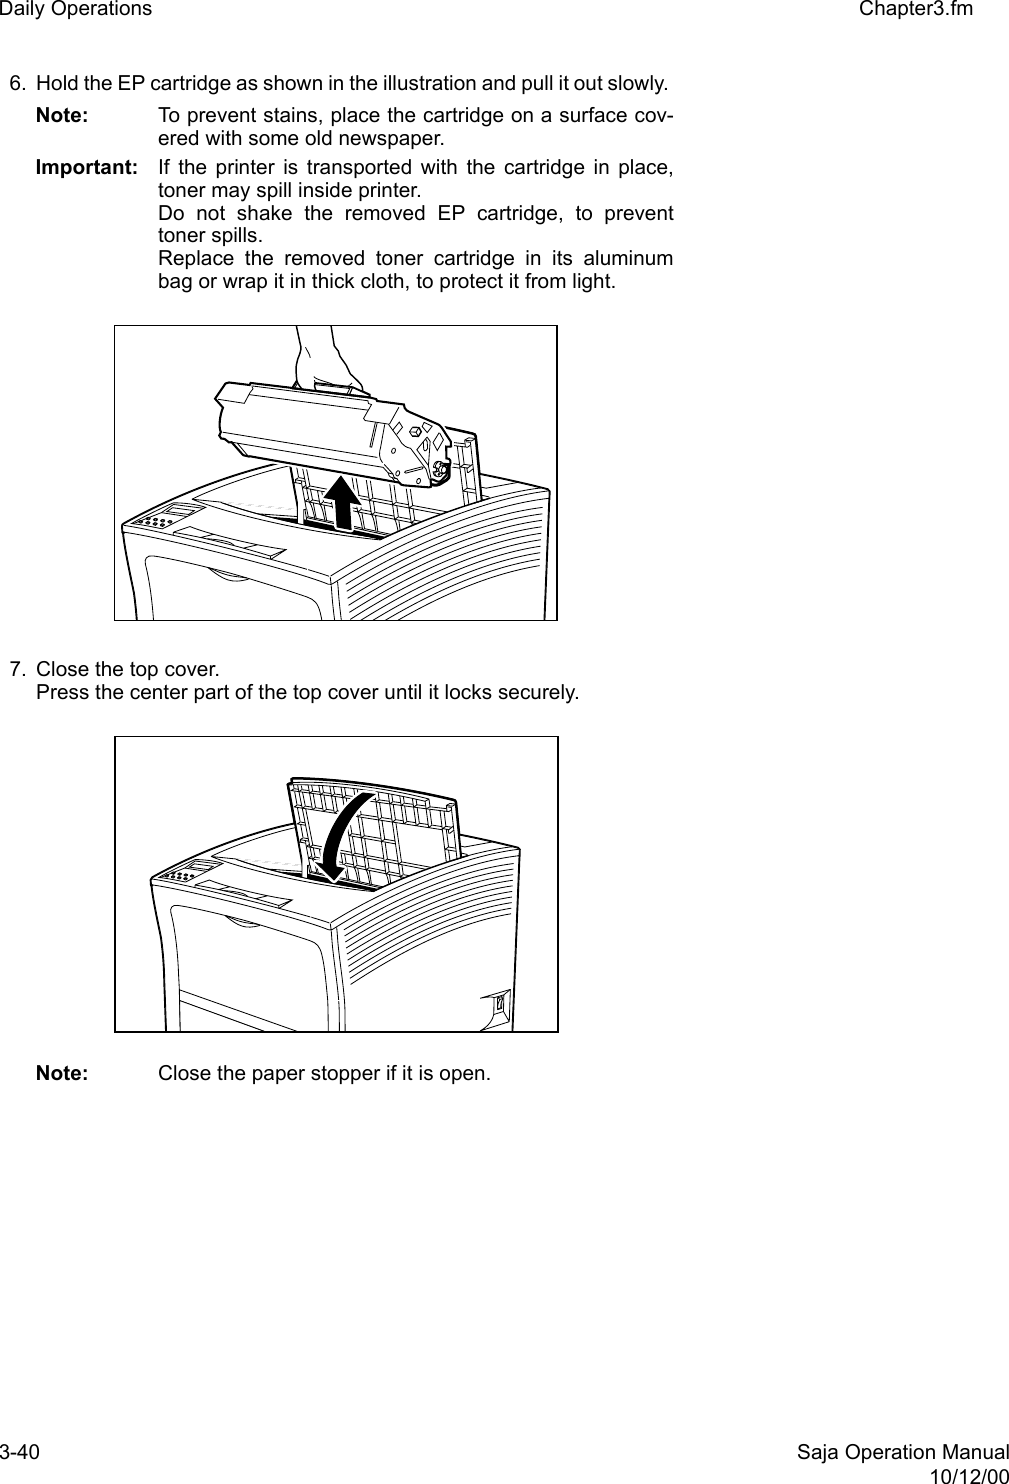
![3-10 Saja Operation Manual10/12/00Daily Operations Chapter3.fm2. Turn the printer off by pressing the [ O ] side of the power switch onthe right side of the unit. Note: You can replace the EP cartridge with the printer stillturn on.3. Hold the recessed area and lift to open the top cover.Warning: Make sure the top cover is opened all the way to theback until it stops. (Also, when closing, slowly close thetop cover.) Important: If printouts still remain in the paper exit area, removethem before opening the top cover; otherwise paper jammay result.Important: Do not touch any parts inside the printer.](https://usermanual.wiki/FUJIFILM-Business-Innovation/YIA-7.User-Manual-Part-1/User-Guide-267240-Page-56.png)
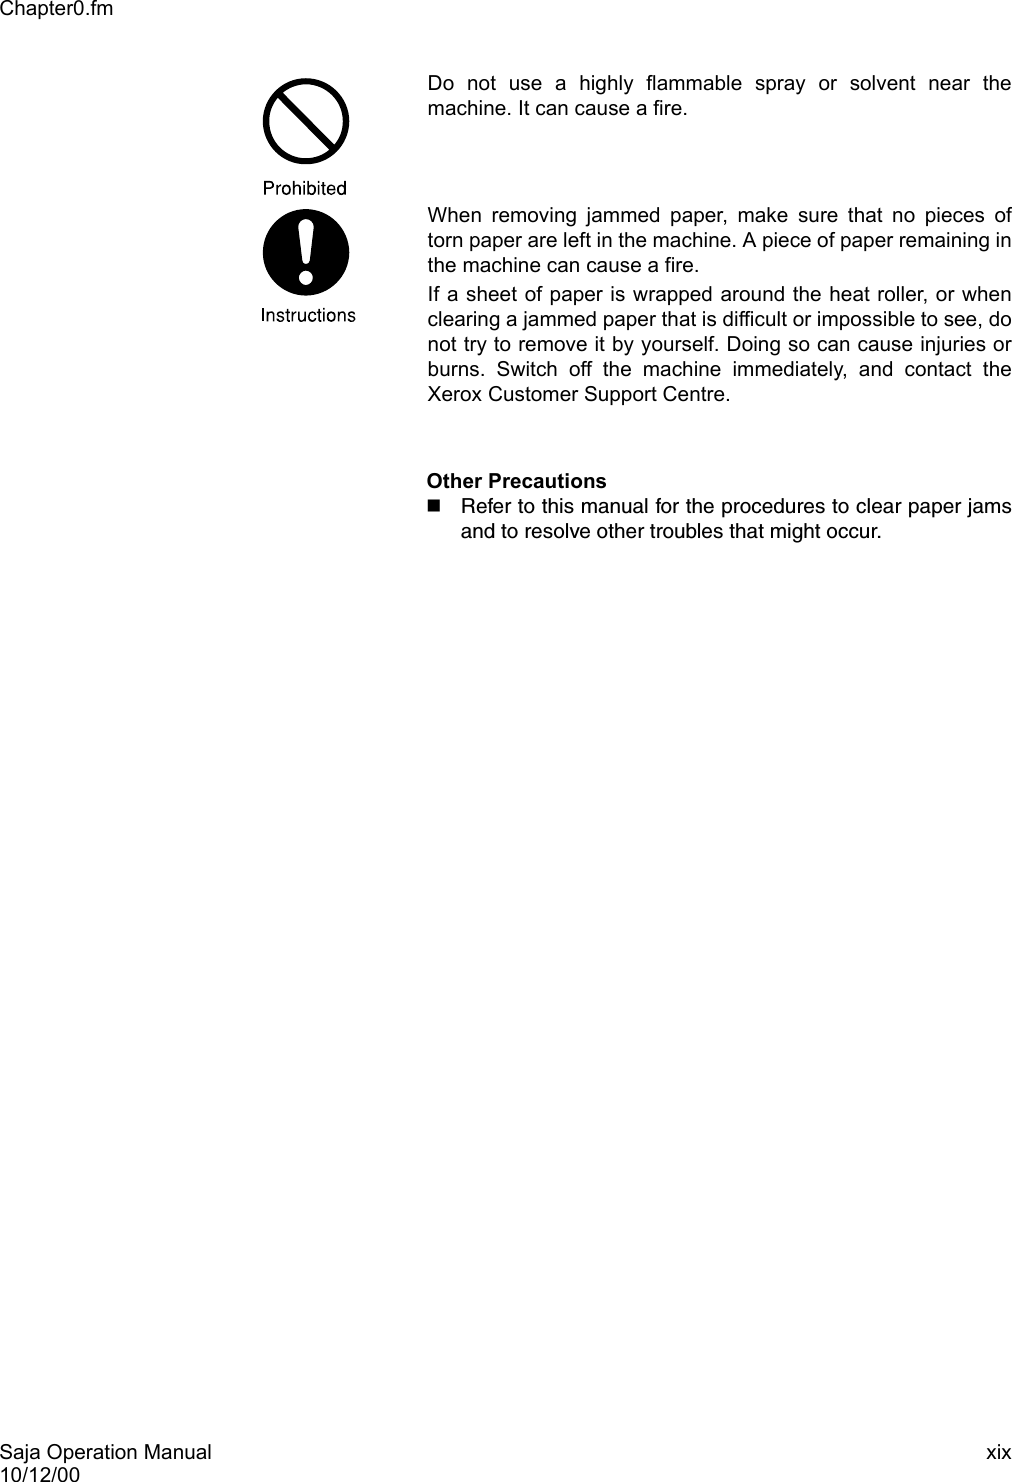
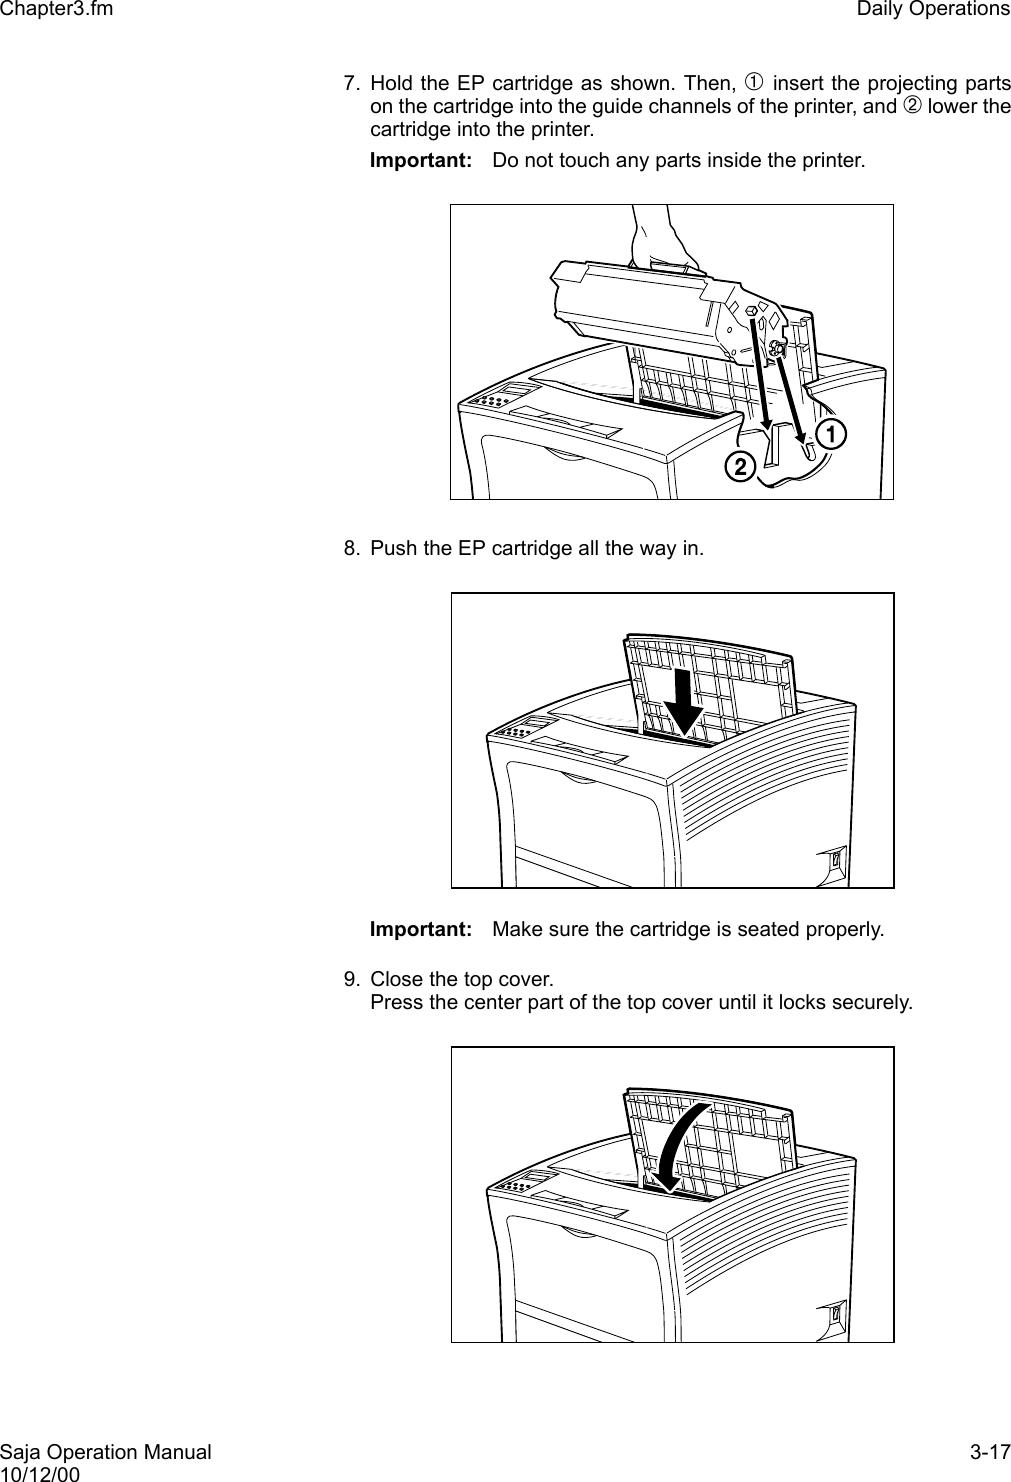
![3-14 Saja Operation Manual10/12/00Daily Operations Chapter3.fm3.3 Replacing the BTR RollerWhen it becomes necessary, replace the BTR roller with a new one, usingthe procedure described below.Caution: Be sure to switch off and unplug the printer before accessingits interior for cleaning, maintenance, or fault clearance.Access to a live printer’s interior can cause a shock hazard.1. Make sure the indication [PRINT RDY] is shown on the display. 2. Set the power switch on the right side of the printer to [ O ] to turn offthe printer. Then disconnect the power cord from the AC outlet.3. Hold the recessed area and lift to open the top cover.Warning: Make sure the top cover is opened all the way to theback until it stops. (Also, when closing, slowly close thetop cover.) Important: If printouts still remain in the paper exit area, removethem before opening the top cover; otherwise paper jammay result.Do not touch any parts inside the printer. PRINT RDY](https://usermanual.wiki/FUJIFILM-Business-Innovation/YIA-7.User-Manual-Part-1/User-Guide-267240-Page-60.png)
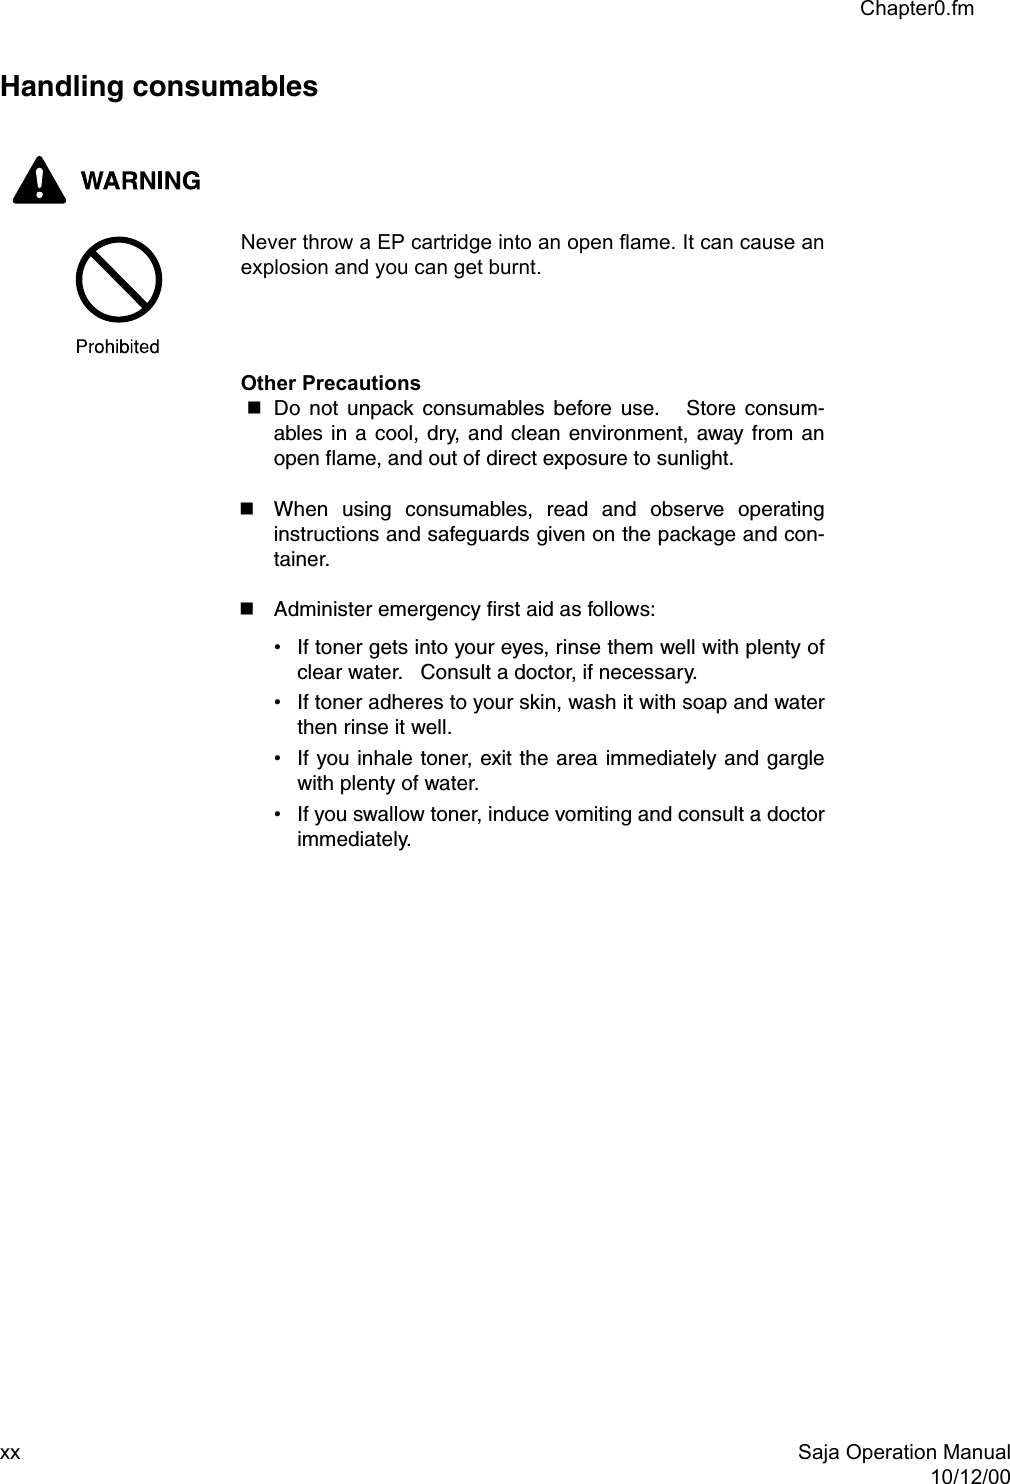
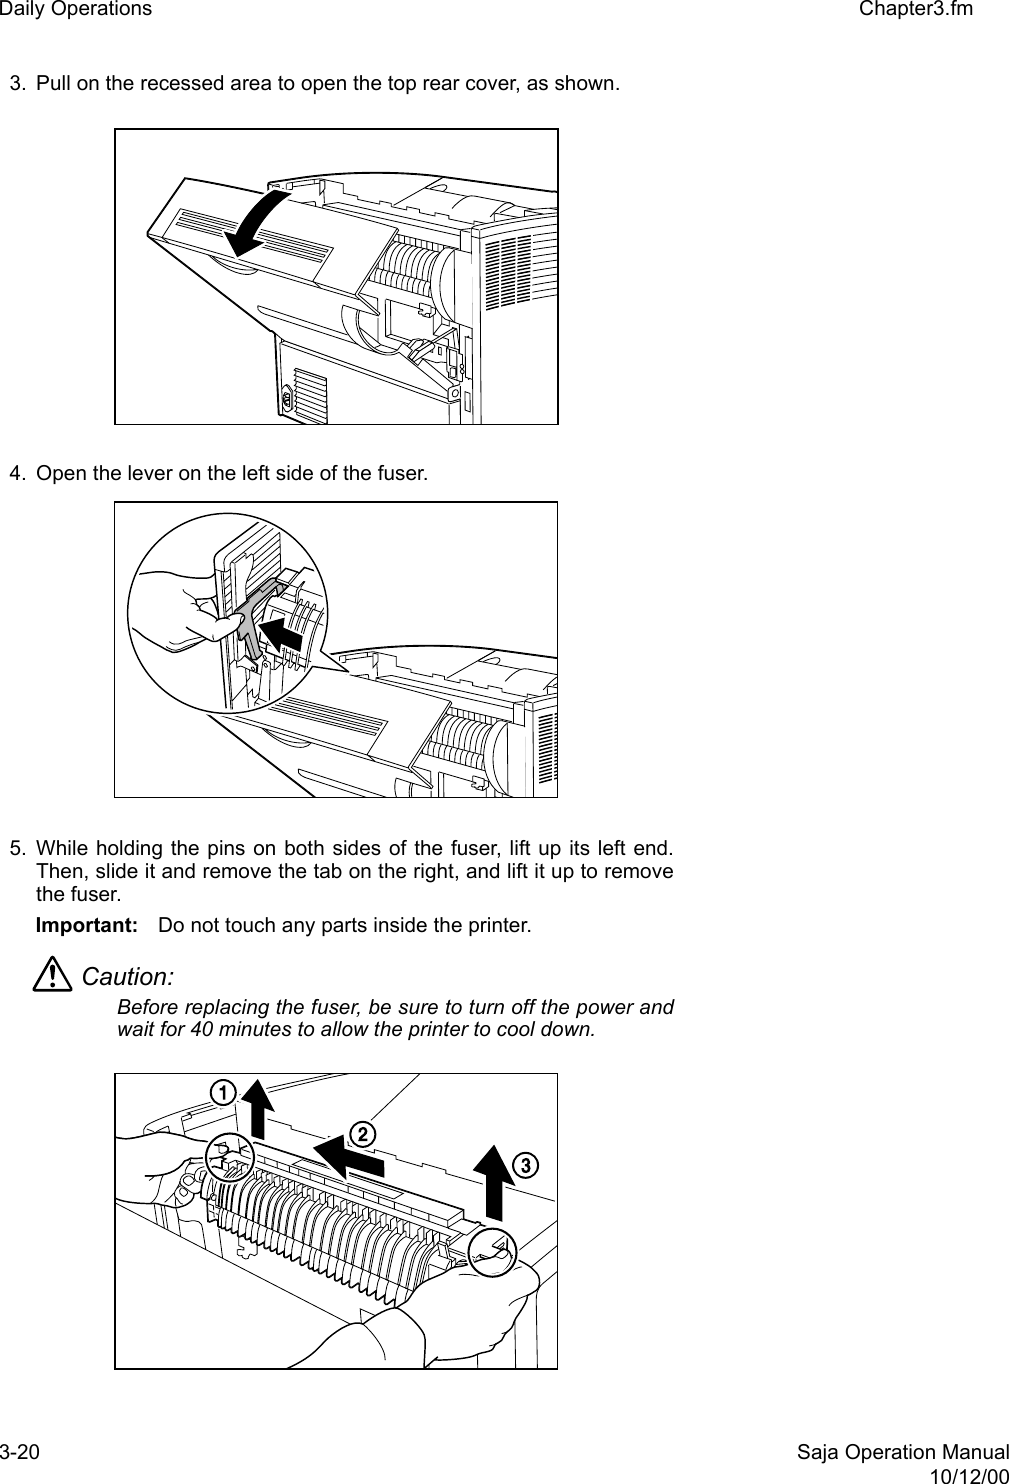
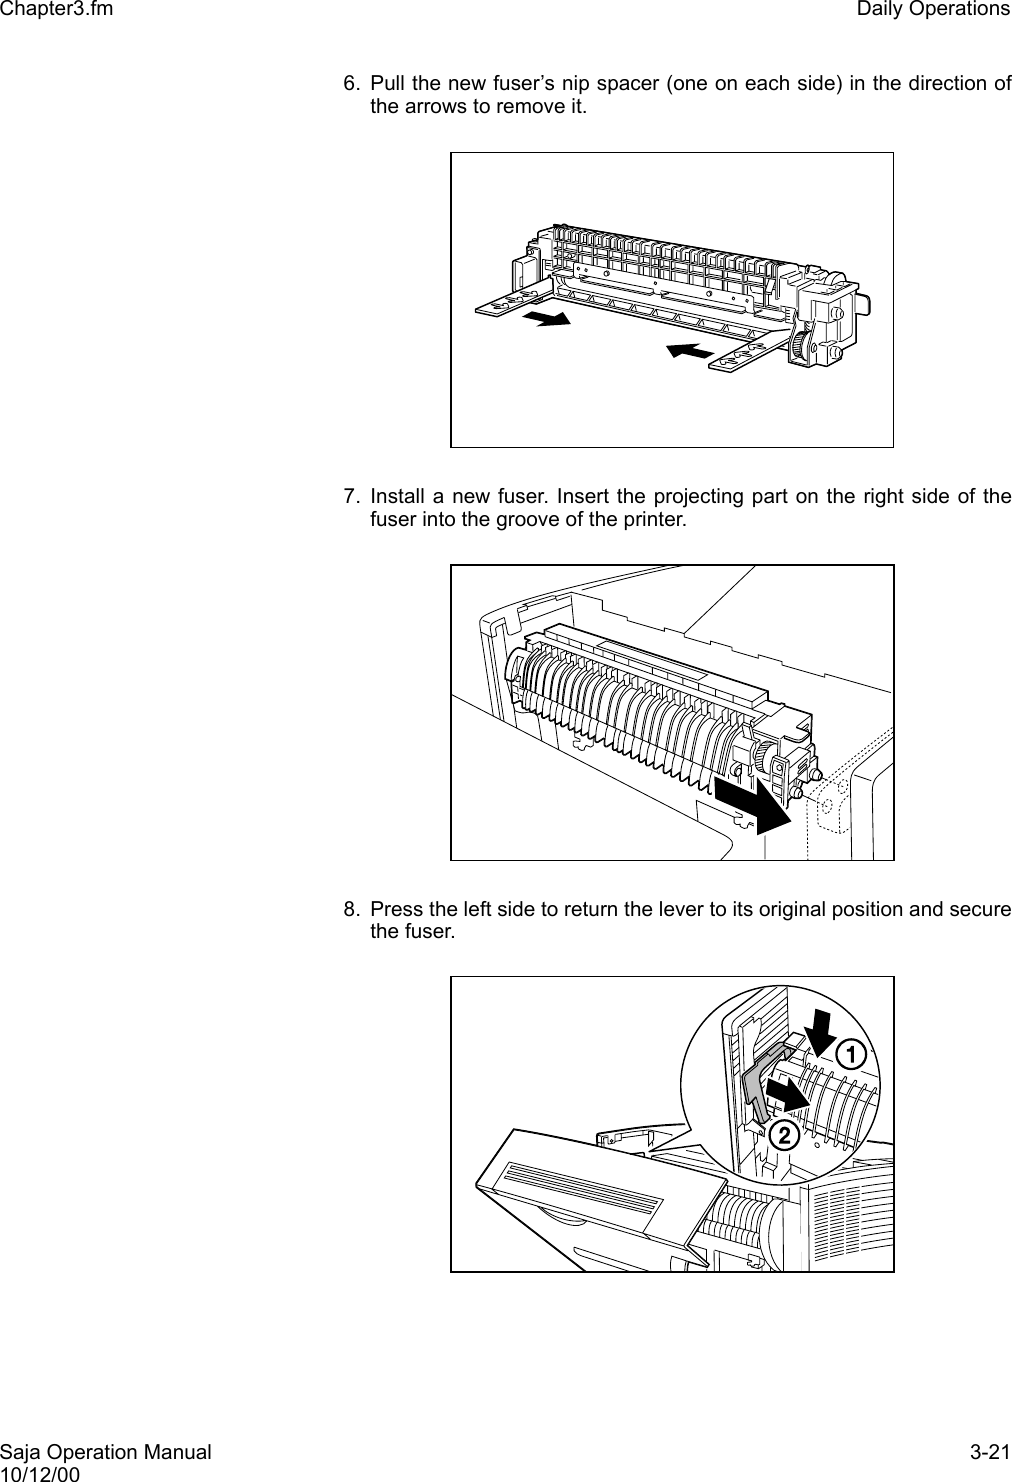
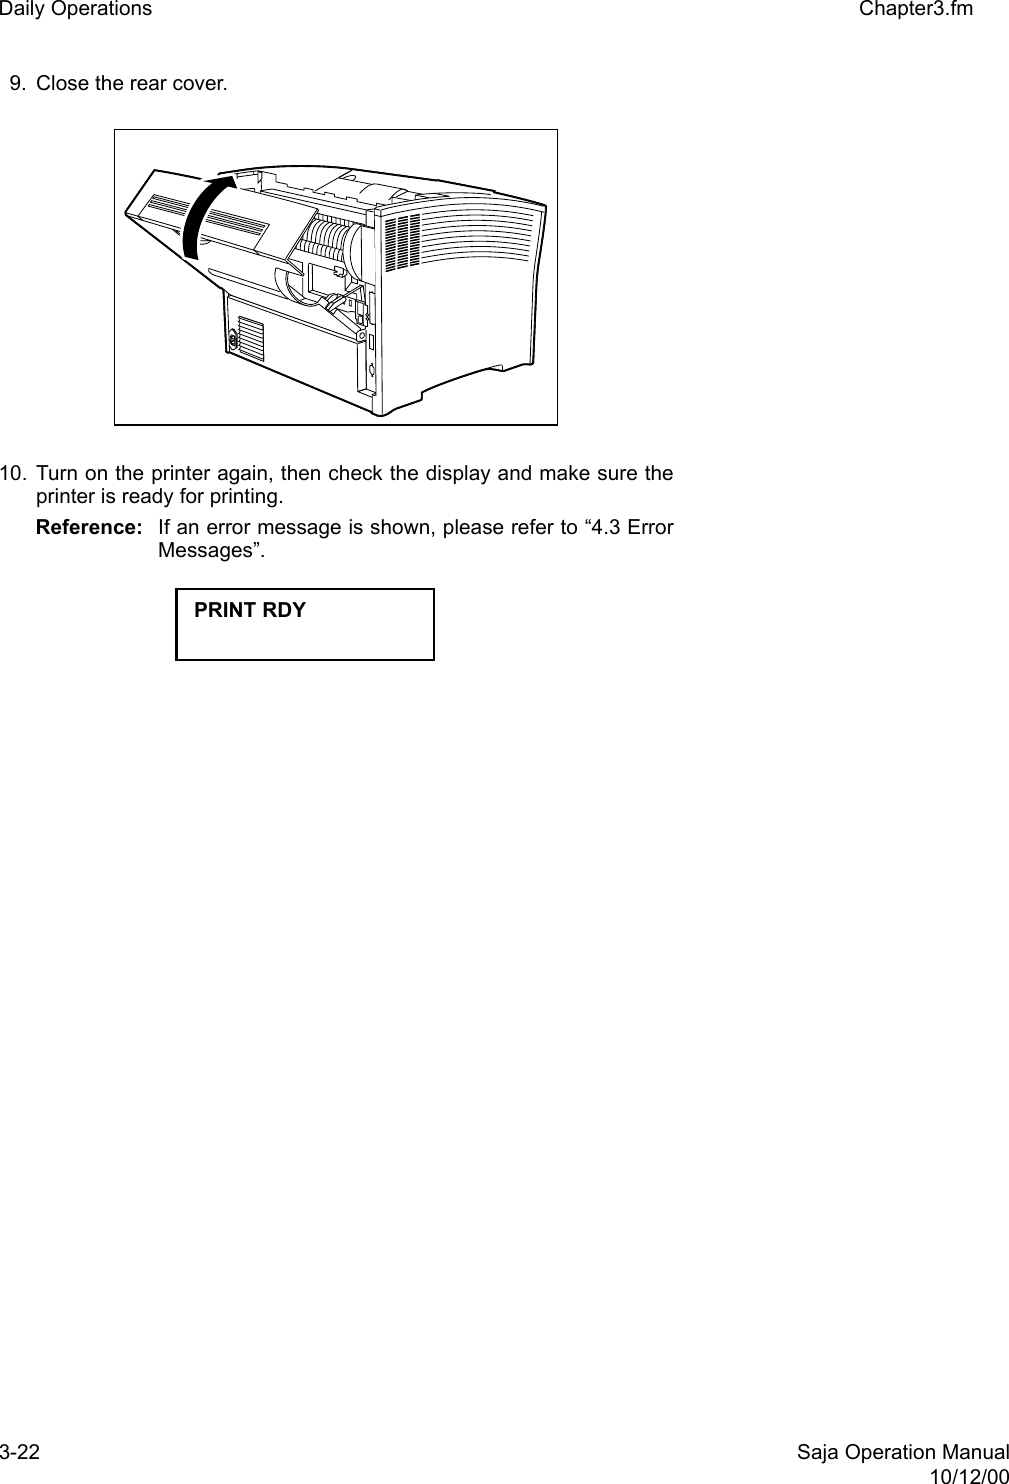
![Saja Operation Manual 3-1910/12/00Chapter3.fm Daily Operations3.4 Replacing the FuserWhen it becomes necessary, replace the fuser using the proceduredescribed below.Caution: Never touch the heater area (where a label indicating hightemperature is located), or else burns may result. If paper isjammed at the heater or roller area, do not remove the paperby force; otherwise personal injury may result. Instead,immediately turn off the power and contact your local dealerfor assistance.Warning: Do not replace the fuser right after the printer has beenused. The high temperature may cause injury. Instead,wait for the printer to cool down. Caution: Be sure to switch off and unplug the machine before access-ing the interior of the machine for cleaning, machine mainte-nance, or fault clearance. Access to a live machine’s interiorcan cause a shock hazard.1. Make sure the indication [PRINT RDY] is shown on the display. 2. Set the power switch on the right side of the printer to [ O ] to turn offthe printer. Then disconnect the power cord from the AC outlet. PRINT RDY](https://usermanual.wiki/FUJIFILM-Business-Innovation/YIA-7.User-Manual-Part-1/User-Guide-267240-Page-65.png)
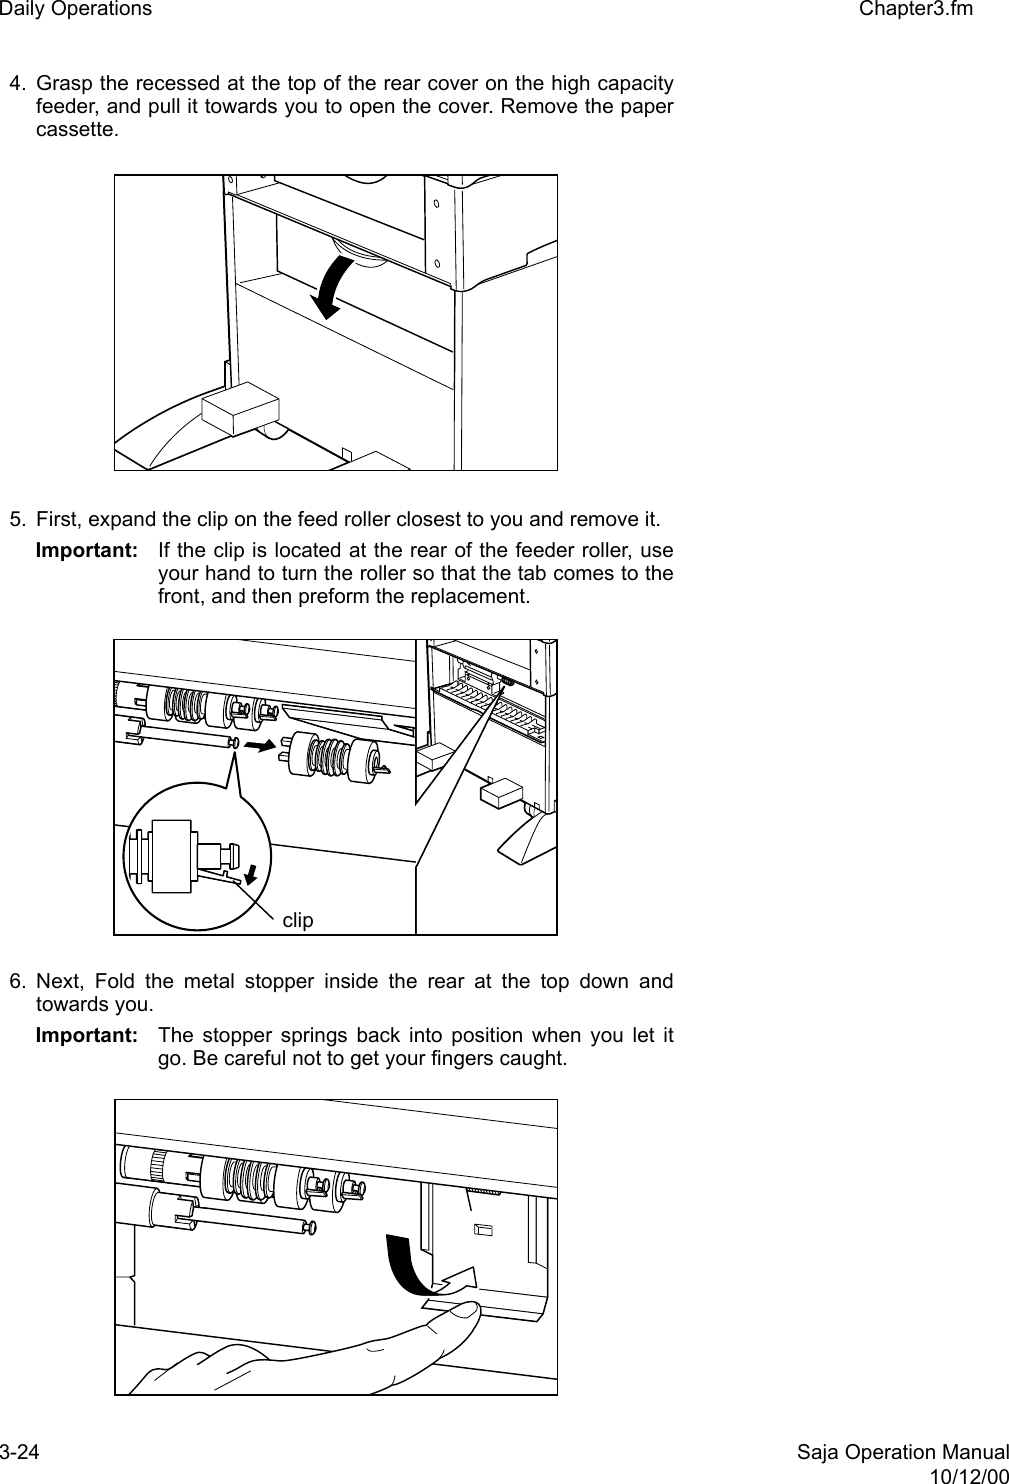
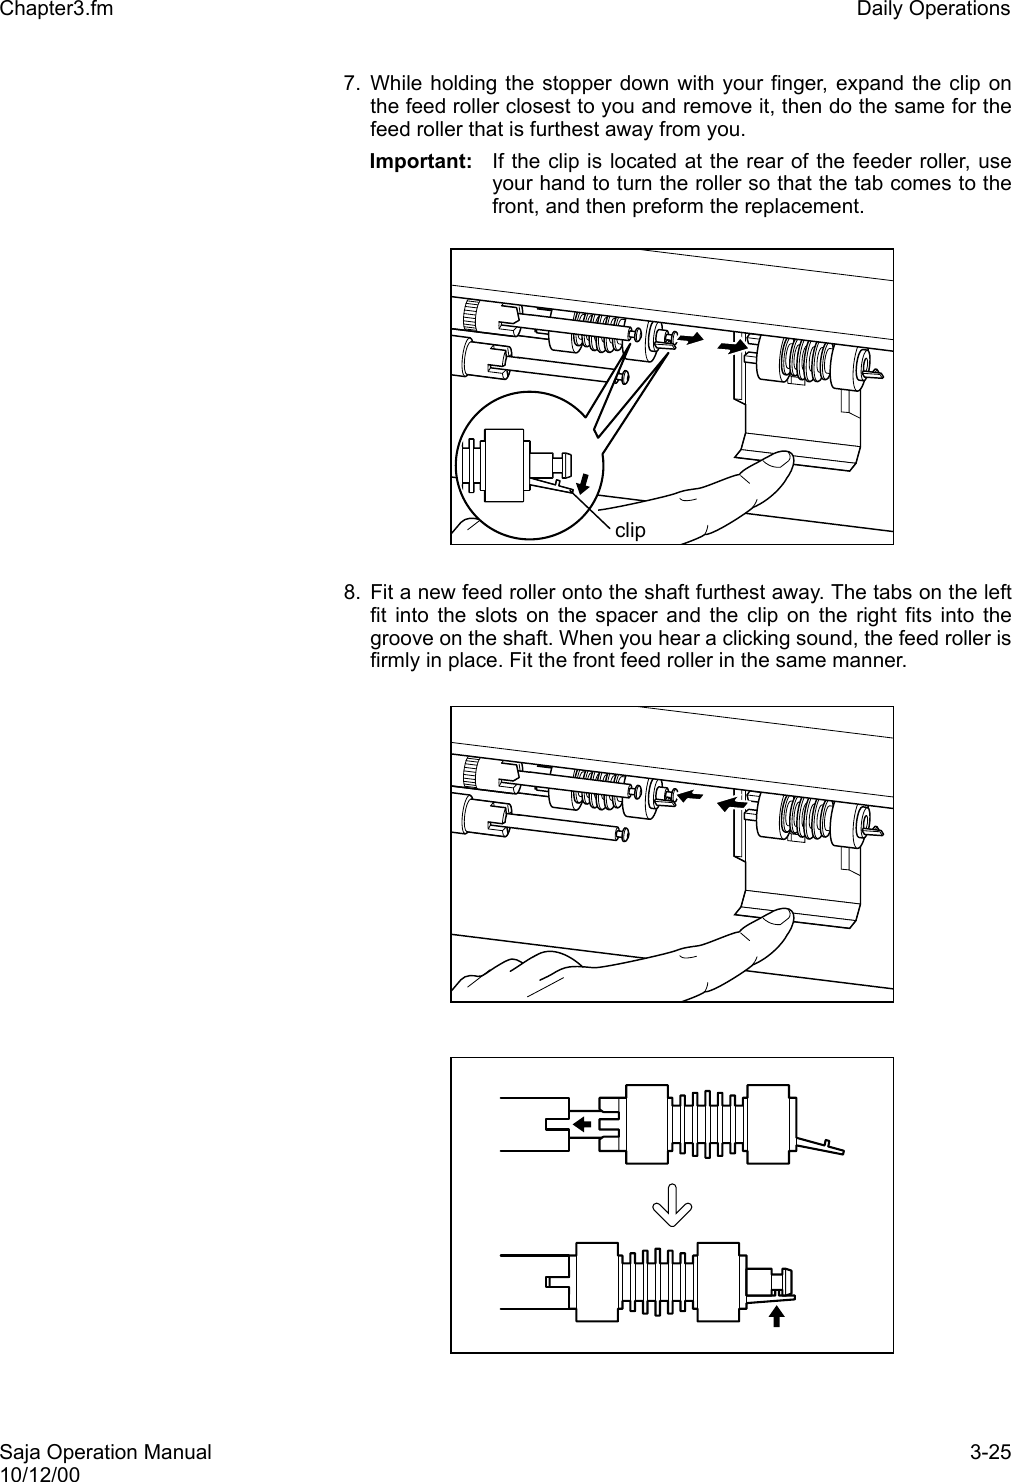
![Saja Operation Manual 3-2310/12/00Chapter3.fm Daily Operations3.5 Replacing the Feed Rollers(HCF)When it becomes necessary to replace the feed rollers in the optionalHigh Capacity Feeder(HCF), follow the procedure below.There are all together three feed rollers. When replacing the rollers, besure to replace all of them at the same time.1. Make sure the PRINT RDY message is displayed on the controlpanel.2. Set the switch on the right side of the printer to the [O] position to turnthe power off.Important: Do not use cleaning alcohol or other volatile substances,to prevent the possibility of discoloration, cracking, anddeformation of the printer housing.3. Pull the front paper tray out a little.](https://usermanual.wiki/FUJIFILM-Business-Innovation/YIA-7.User-Manual-Part-1/User-Guide-267240-Page-69.png)

![Saja Operation Manual 3-3310/12/00Chapter3.fm Daily Operations3.7 Daily Maintenance At the end of the day, turn off the power as follows. 1. Check the indication to make sure the printer is not performing anytask. 2. Set the power switch on the right side of the printer to [ O ] to turn offthe printer. Important: If an error message is shown, please refer to “4.3 ErrorMessages”.](https://usermanual.wiki/FUJIFILM-Business-Innovation/YIA-7.User-Manual-Part-1/User-Guide-267240-Page-79.png)
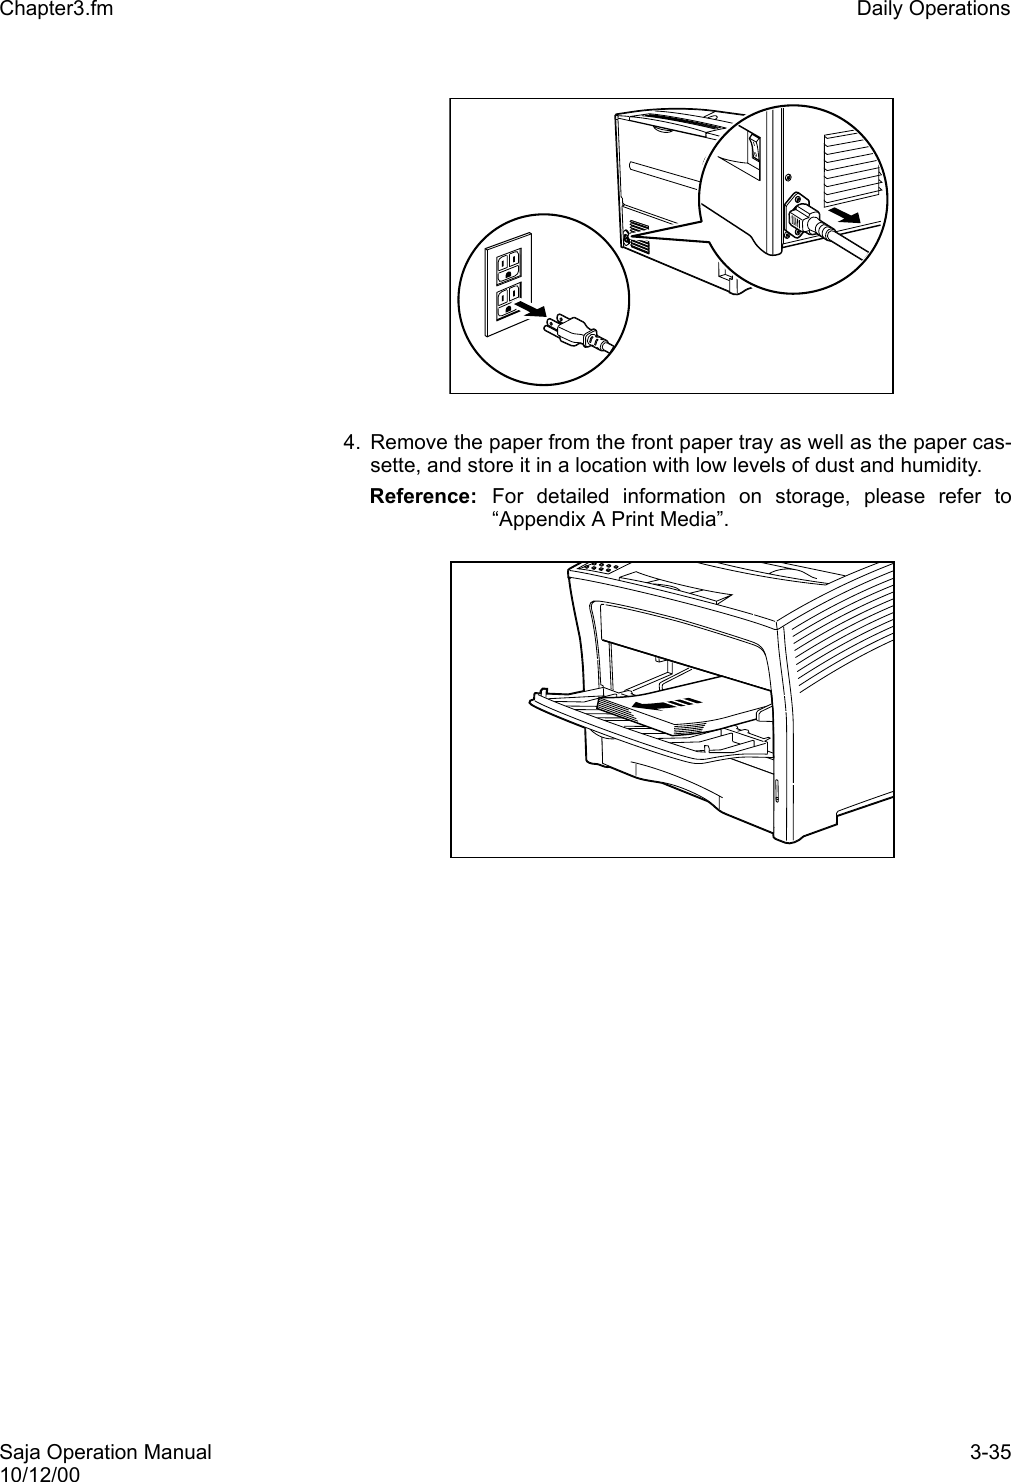
![3-34 Saja Operation Manual10/12/00Daily Operations Chapter3.fm3.8 If the Printer is Not Used Over an Extended Period of Time Remove any paper from the front paper tray and cassette and store it in a location with low levels of dust and humidity. Caution: Before cleaning the printer or performing any other mainte-nance steps, be sure to turn the printer off and disconnectthe power cord from the AC outlet, to prevent the risk of elec-tric shock. 1. Check the indication to make sure the printer is not performing anytask. 2. Set the power switch on the right side of the printer to [ O ] to turn offthe printer. Then disconnect the power cord from the AC outlet. Important: If an error message is shown, please refer to “4.3 ErrorMessages”. 3. Disconnect the power cord from the AC connector on the AC outletand the printer. Warning: Never touch the power cord or plug with wet hands, toprevent the risk of electric shock. Caution: When disconnecting, always grasp the plug and do not pullat the cable. Damage to the cord can lead to fire and electricshock. PRINT RDY](https://usermanual.wiki/FUJIFILM-Business-Innovation/YIA-7.User-Manual-Part-1/User-Guide-267240-Page-80.png)
![3-38 Saja Operation Manual10/12/00Daily Operations Chapter3.fm1. Check the indication to make sure the printer is not performing anytask. 2. Set the power switch on the right side of the printer to [O] to turn offthe printer. Important: If an error message is shown, please refer to “4.3 ErrorMessages”. 3. Disconnect the power cord from the AC connector on the AC outletand the printer.Warning: Never touch the power cord or plug with wet hands, toprevent the risk of electric shock. Caution: When disconnecting, always grasp the plug and do not pullat the cable. Damage to the cord can lead to fire and electricshock. PRINT RDY](https://usermanual.wiki/FUJIFILM-Business-Innovation/YIA-7.User-Manual-Part-1/User-Guide-267240-Page-84.png)

![4-2 Saja Operation Manual10/12/00Troubleshooting Chapter4.fm4.1 Power-On Problems This section describes problems that can occur when starting up theprinter. If the trouble still persists even after performing the checks listedbelow, turn the printer off, disconnect the power cord from the AC outlet,and contact your dealer or an authorized service station. Warning: Do not attempt to modify the printer in any way, to pre-vent the risk of fire or smoke generation. Caution: Before cleaning the printer or performing any other mainte-nance steps, be sure to turn the printer off and disconnectthe power cord from the AC outlet, to prevent the risk of electric shock. Description Possible Cause ActionThere is no power. The power switch is not turned on. (The switch is not set to [ I ].) Check the power switch. See “2.5 Turning the Printer On and Off”.The power cord is not prop-erly plugged into an AC outlet or into the AC con-nector on the rear side of the printer.Set the power switch to [ O ] (off) and then connect the power cord firmly. See “2.4 Connecting the Power Cord”. Voltage of the AC power is not correct.Verify that the AC outlet is rated for 100 V AC, 15 A.Power is frequently interrupted.The printer is malfunction-ing.Turn the printer off and dis-connect the power cord from the AC outlet. Then contact your dealer or an authorized service station.](https://usermanual.wiki/FUJIFILM-Business-Innovation/YIA-7.User-Manual-Part-1/User-Guide-267240-Page-90.png)