Faurecia Clarion Electronics CZ500 Car CD Player User Manual
Clarion Co Ltd Car CD Player
UserManual.wiki
>
Faurecia Clarion Electronics
>
CZ500 User Manual
User Manual
Navigation menu
Upload a User Manual
Namespaces
Wiki Guide
HTML
PDF
Info
Views
User Manual
Discussion / Help
Navigation

![English6Remove the DCPThe control panel can be detached to prevent theft. When detaching the control panel, store it in the DCP (DETACHABLE CONTROL PANEL) case to prevent scratches.We recommend taking the DCP with you when leaving the car.1. Press the [ ] button (2 sec.) to turn off the power.2. Deeply push in [OPEN] button to unlock the DCP.3. Hold the side popped out, take off the DCP.Re-attach the DCP1. Hold the DCP and ensure that the panel faces towards you. Set the right side of the DCP into the DCP bracket. 2. Press the left side of the DCP until it locks.Hold the DCP, in the orientation as shown in the gure below, and put it into the supplied DCP case. (Ensure the DCP is in the correct orientation.)Storing the DCP in the DCP CaseCAUTION• The DCP can easily be damaged by shocks. After removing it, be carefully not to drop it or subject it to strong shocks.• If the FLIP DOWN PANEL is kept open, the DCP may drop due to vibration of the car. This results in damage to the DCP. So close the FLIP DOWN PANEL or remove the DCP to store into the case.• The connector connecting the source unit and the DCP is an extremely important part. Be careful not to damage it by pressing on it with ngernails, screwdrivers, etc.Note:If the DCP is dirty, wipe off the dirt with a soft, dry cloth only.DCPDCP case](https://usermanual.wiki/Faurecia-Clarion-Electronics/CZ500/User-Guide-1196917-Page-6.png)
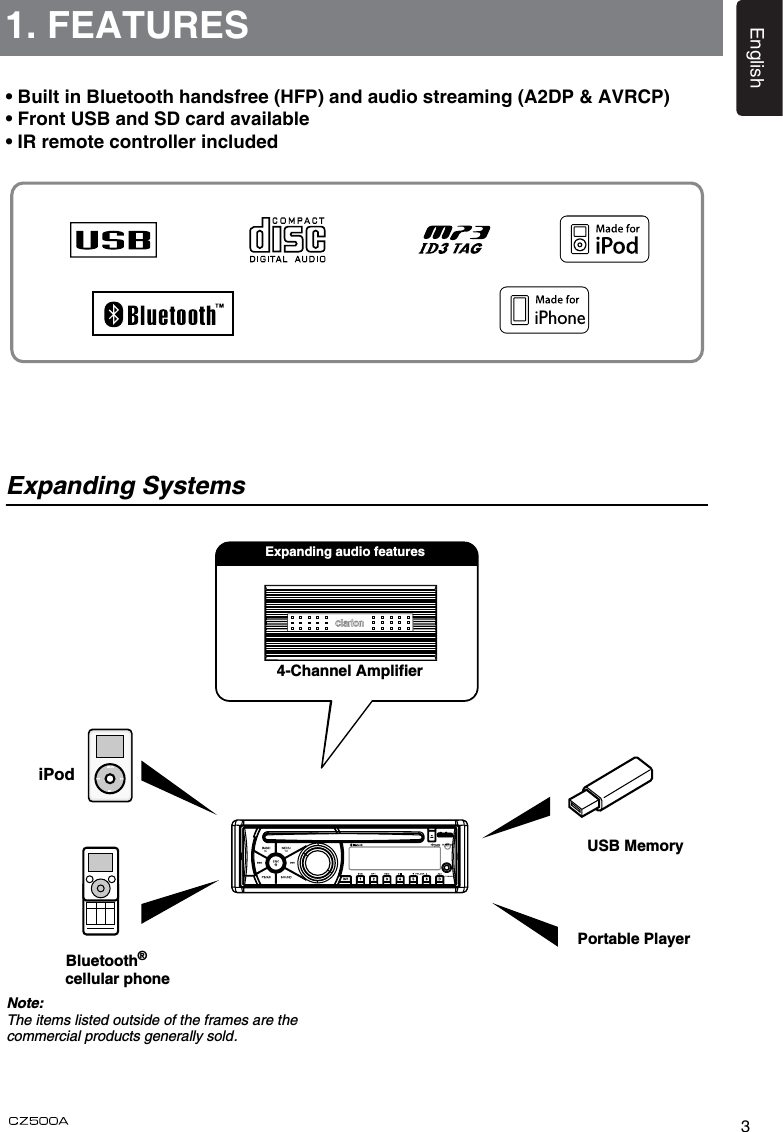
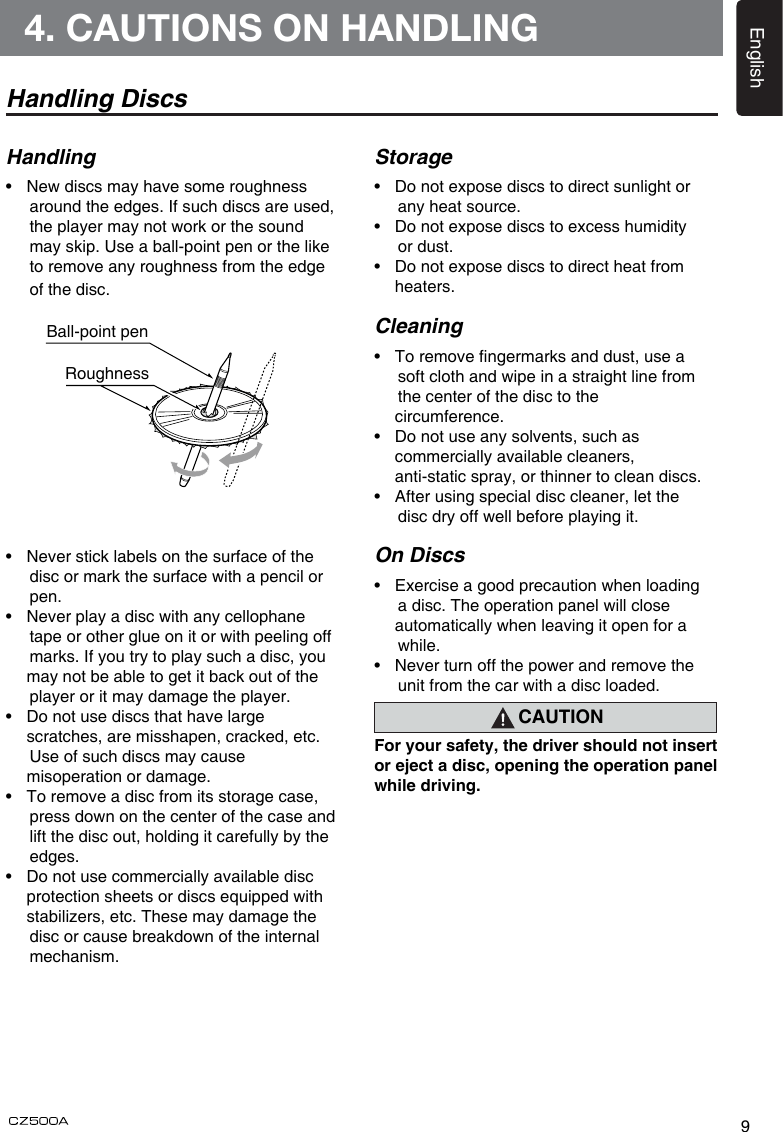
![7English[ / SRC] Key• Power / Toggle the audio source[BAND / ] Key• Select tuner band / Dial / Answer[MENU / ] Key• System menu / Terminate call[ ] Key• Eject the disc in the unit.[ , ] Key• Previous(Next) / Search[Open] Key• Unlock the front panel.[PS / AS] KeyAuto memory store / MP3 search[SOUND] Key• Sound effect setting[VOLUME] Key • Adjust volume level / Conrm[ISR] Key • Trafc announcement [1~6] Key • [1] Key: Scan play / Preset station 1. • [2] Key: Repeat play / Preset station 2. • [3] Key: Random play / Preset station 3. • [4] Key: Play / Pause / Preset station 4. • [5] Key: Previous folder / Preset station 5. 10 tracks down (long press) • [6] Key: Next folder / Preset station 6. 10 tracks up (long press)[ADJ] Key• Display switch / System menu[ , ][POWER/SRC][OPEN][BAND/ ] [MENU/ ]Disc Slot [ ][PS/AS] [SOUND][VOLUME] [ADJ][ISR][1~6] AUX Jack3. CONTROLSOperational PanelNames of Buttons](https://usermanual.wiki/Faurecia-Clarion-Electronics/CZ500/User-Guide-1196917-Page-7.png)
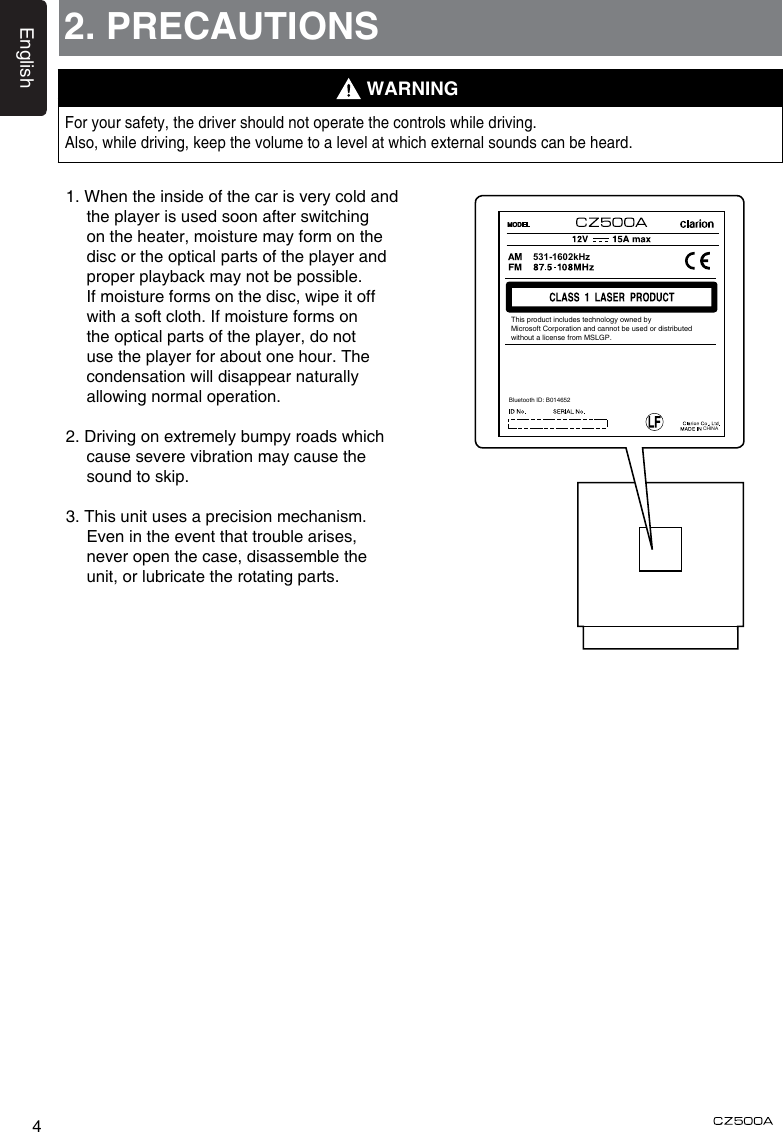
![English8Remote ControlNotes of remote control usingUninstall BatteryPull out the battery holder while pressing the stopper. Install Battery Insert the button-type battery with the stamped(+) mark facing upward.Insert the battery holder into the remote control.1. Aim the remote control at the remote sensor on the unit.2. Remove the battery from the remote control or insert a battery insulator if the battery has not been used for a month or longer.3. DO NOT store the remote control under direct sunlight or in high temperature environment, or it may not function properly.4. The battery can work for 6 months under normal condition. If the remote control can’t work, please change the battery.5. Use “button shaped” lithium battery “CR2025” (3V) only.6. DO NOT recharge, disassemble, heat or expose the battery in re.[POWER/SRC] Key• POWER / Toggle the audio source[ , ] Key• Previous(Next) / Search[SCN/PS/AS] Key• Scan play / Auto memory store / MP3 search[BND/DISC UP/TOP] Key• Select tuner band / Top play[ , ] Key• Tune / MP3/WMA search[ ] Key• Play / Pause[ISR] Key• Trafc announcement [DISP] Key• Display switch[ RDM/TV/VTR] Key• Random play[RPT] Key• Repeat play[ , ][ ]SRCPOWERDISC UPTOPBNDMUTEDISPISRSCNPS/ASTV/VTRRDMRPT[POWER/SRC][BND/DISC UP/TOP][DISP][ISR][RDM/TV/VTR][RPT][ , ][MUTE][SCN/PS/AS](CR2025)7. Insert the battery in proper direction according to the (+) and (-) poles.8. Store the battery in a place where children cannot reach to avoid the risk of accident.](https://usermanual.wiki/Faurecia-Clarion-Electronics/CZ500/User-Guide-1196917-Page-8.png)
![English105. OPERATIONSBasic OperationsNote:• Be sure to read this chapter referring to the chapter “3. CONTROLS”CAUTIONWhen the unit is turned on, starting and stopping the engine with its volume raised to the maximum level may harm your hearings. Be careful about adjusting the volume.Power on / offNotes:• Start the engine before using this unit.• Be careful about using this unit for a long time without running the engine. If you drain the car’s battery too far, you may not be able to start the engine and this can reduce the service life of the battery.1. Start the engine. The power button / knob illumination on the unit will light up. Engine ON position2. Press the [ ] key on the front panel or [POWER] key on the remote control to turn on the power under standby mode. The unit goes back to the last status after power on.3. Press and hold the [ ] key on the front panel or press the [POWER] key on the remote control to turn off the power under work mode.CT (Clock Time) display• The displayed clock data is based on the CT (clock time) data in the RDS signal.MutePress the [MUTE] key on the remote control to mute the volume from the unit.Note: Doing the operation above again or adjusting volume will release muting.Volume adjustmentTurn the volume knob on the front panel or press the [ , ] key on the remote control.The adjustable range of volume is 0 to 40.CAUTIONWhile driving, keep the volume level at which external sounds can be heard.Playing source selectionPress [SRC] key on the front panel and remote control repeatedly to choose desired playing source.Notes:1. Playing source selection means selecting work mode, such as DISC mode, Radio mode, Aux mode, etc.2. When some devices are not ready, they cannot be selected. Display system timePress the [ADJ] key on the front panel or [DISP] key on the remote control to switch the display information between RDS information, system time and playing source.](https://usermanual.wiki/Faurecia-Clarion-Electronics/CZ500/User-Guide-1196917-Page-10.png)
![11EnglishSelect tuner as playing sourcePress [SRC] button once or more to enter radio mode. Select one radio bandPress the [BAND] key on the panel or [BND] key on the remote control to select one radio band among FM1, FM2, FM3, MW1 and MW2.Manual tuningDuring manual tuning, the frequency will be changed in steps.Press the [ ]/[ ] key on the panel or remote control to tune in a higher / lower station.Auto tuningPress and hold the [ ]/[ ] key on the panel or remote control to seek a higher / lower station.To stop searching, repeat the operation above or press other keys having radio functions.Note:When a station is received, searching stops and the station is played.If the unit receives a stereo broadcasting, the indicator light of stereo ‘ST’ on the LCD display will be lighted.Auto saveOnly stations with sufcient signal strength will be detected and stored in the memory.Press and hold the [PS/AS] (2 sec.) to start automatic station search.To stop auto save, press other keys having radio functions.Notes:1. After auto save, the previous saved stations will be overwritten.2. The unit has 5 bands, such as FM1, FM2, FM3, MW1, MW2 and each band can store 6 stations; hence CZ500 can store 30 stations in total.3. During automatic station search, the detected 6 stations will be stored only to FM3 band.Radio OperationsManual saveWhen one expected radio station has been detected, press and hold number key 1~6 to save it in the memory.Recall the stored stationsPress one numeric key among 1 to 6 on the panel or on the remote control to select the corresponding stored station.Local seekingWhen LOCAL seeking is on, only those radio stations with strong radio signal could be received.To open or close LOCAL function, press and hold the [ADJ] key on the front panel, then press [ ] key repeatedly until LO or DX displays on the screen, rotate the knob to select Local or Distant mode.Note:The number of radio stations that can be received will decrease after the local seeking mode is on.HD RadioAfter connect to HD radio box, [HD] lights up on the screen.Press [MENU] key and rotate the knob to choose PTY or SUB-CH. Press the knob to conrm selection.](https://usermanual.wiki/Faurecia-Clarion-Electronics/CZ500/User-Guide-1196917-Page-11.png)
![English122. The folder name and file name can be displayed as the title during MP3/WMA play but the title must be within 64 single byte alphabetical letters and numerals (including an extension).3. Do not afx a name to a le inside a folder having the same name.Folder structureA disc with a folder having more than 8 hierarchical levels will be impossible.Number of les or folders1. Up to 999 files can be recognized per folder. Up to 65535 les can be played.2. Tracks are played in the order that they were recorded onto a disc. (Tracks might not always be played in the order displayed on the PC.)3. Some noise may occur depending on the type of encoder software used while recording.Backup Eject functionJust pressing the [ ] button, ejects the disc even if the power to the unit was not turned on.Notes:• If you force a CD into before auto reloading, this can damage the CD.• If a CD (12 cm) is left in the ejected position for 15 seconds, the CD is automatically reloaded (Auto reload).Listening to a disc already loa ded in the unitPress the [SRC] button to select the CD/MP3/WMA mode.When the unit enters the CD/MP3/WMA mode, play starts automatically.If there is no disc loaded, the indication “NODISC” appears in the title display. Loading a CD Insert a CD into the center of the CD SLOT with the labeled side facing up. The CD plays automatically after loading.This unit can play back MP3/WMA les Notes:• If you play a file with DRM (Digital Rights Management) for WMA remaining ON, no audio is output (The WMA indicator blinks).• Windows Media™, and the Windows® logo are trademarks, or registered trademarks of Microsoft Corporation in the United States and/or other countries.To disable DRM (Digital Rights Management) When using Windows Media Player 9/10/11, click on TOOL OPTIONS MUSIC RECORD tab, then under Recording settings, unclick the Check box for RECORD PROTECTED MUSIC. Then, reconstruct les.Personally constructed WMA files are used at your own responsibility.Precautions when creating MP3/WMA leUsable sampling rates and bit rates1. MP3: Sampling rate 8 kHz-48 kHz, Bit rate 8 kbps-320 kbps / VBR 2. WMA: Bit rate 8 kbps-320 kbpsFile extensions1. Always add a le extension “.MP3”, “.WMA” or “.M4A” to MP3, WMA le by using single byte letters. If you add a file extension other than specied or forget to add the le extension, the le cannot be played.2. Files without MP3/WMA data will not play. The les will be played soundlessly if you attempt to play files without MP3/WMA data. * When VBR les are played, the play time display may differ the play location. * When MP3/WMA les are played, a little no sound part is caused between tunes.Logical format (File system)1. When writing MP3/WMA file on a CD-R disc or CD-RW disc, please select “ISO9660 level 1, 2 or JOLIET or Romeo” or APPLE ISO as the writing software format. Normal play may not be possible if the disc is recorded on another format.CD/MP3/WMA Operations](https://usermanual.wiki/Faurecia-Clarion-Electronics/CZ500/User-Guide-1196917-Page-12.png)
![13EnglishCD/MP3/WMA OperationsNotes:• Never insert foreign objects into the CD SLOT.• If the CD is not inserted easily, there may be another CD in the mechanism or the unit may require service.• Discs not bearing the TEXT or TEXT mark and CD-ROMs cannot be played by this unit.• Some CDs recorded in CD-R/CD-RW mode may not be usable.Pausing play1. Press the [ 4 / ] button to pause play. “PAUSE” appears in the display.2. To resume CD play, press the [ 4 / ] button again.Displaying CD titlesThis unit can display title data for CD-text/MP3/WMA disc and user titles input with this unit.Each time you press the [BAND] button to change the title display.CD-TEXT discUser > Track > Disc/Artist > User...MP3/WMA discTrack > Folder > Title/Album > Artist > Track ...Notes:• If the CD playing is not a CD-text CD or no user title has been input, “NO TITLE” appears in the display.• If MP3/WMA disc is not input TAG, “NO TITLE” appears in the display.• Only ASCII characters can be displayed in Tags.Selecting a trackTrack-up1. Press the [ ] button to move ahead to the beginning of the next track.2. Each time you press the [ ] button, the track advances ahead to the beginning of the next track.3. Press and hold the [ 6 ] button to move ahead to +10 tracks.Track-down1. Press the [ ] button to move back to the beginning of the current track.2. Press the [ ] button twice to move back to the beginning of the previous track.3. Press and hold the [ 5 ] button to move back to -10 tracks.Fast-forward/Fast-reverseFast-forwardPress and hold the [ ] button .Fast-reversePress and hold the [ ] button .* For MP3/WMA discs, it takes some time until the start of searching and between tracks. In addition, the playing time may have a margin of error.Folder SelectThis function allows you to select a folder containing MP3/WMA les and start playing from the rst track in the folder.1. Press the [ 5 ] or [ 6 ] button. Press the [ 6 ] button to move the next folder. Press the [ 5 ] button to move the previous folder.2. To select a track, press the [ ] or [ ] button.Top functionThe top function resets the CD player to the rst track of the disc. Press [TOP] button on the remote to play the rst track (track No. 1) on the disc.* In case of MP3/WMA, the first track of a folder being played will be returned.Other various play functionsScan playThis function allows you to locate and play the rst 10 seconds of all the tracks recorded on a disc.Press the [SCN] button to perform scan play.](https://usermanual.wiki/Faurecia-Clarion-Electronics/CZ500/User-Guide-1196917-Page-13.png)
![English14Repeat playThis function allows you to play the current track repeatedly or play a track currently being played in the MP3/WMA folder repeatedly.1. Press the [RPT] button once or more until [RPT TRK] appears on the LCD to perform repeat play.2. Press [RPT] button repeatedly until [RPT FOLD] appears on the LCD for folder repeat play.1. Insert a USB device into the USB connector. When connecting a USB device, the unit will read the les automatically.2. To remove the USB device, you should first select another source, in order to avoid damaging the USB device. Then take off the USB device.Press [SRC] button on the panel or remote control to select AUX.AUX is just for Audio content with 3.5mm Jack connector plugged into audio-in socket on the front panel.USB OperationsAUX OperationsCD/MP3/WMA Operations3. Press [RPT] button repeatedly until [RPT OFF] appears on the LCD to cancel repeat playback. Random playThis function allows you to play all tracks recorded on a disc in a random order.Press the [RDM] button to perform random play.](https://usermanual.wiki/Faurecia-Clarion-Electronics/CZ500/User-Guide-1196917-Page-14.png)
![15EnglishBluetooth OperationsThe Bluetooth allows you to utilize your car’s built-in audio system for wireless mobile phone or music handsfree communication. Some Bluetooth mobile phones have the audio features, and some portable audio players support Bluetooth feature. This system can play audio data stored in a Bluetooth audio device. The car stereo with Bluetooth installed will be able to retrieve phonebook contacts, received call, dialed call, missed call, incoming calls, outgoing call and listen to music.Notes:• Do not leave the microphone of Bluetooth handsfree in the places with wind passing such as air outlet of the air conditioner, etc. This may cause a malfunction.• If leave it in the places subjected to direct sun, high temperature can cause distortion, discoloration which may result in a malfunction.• This system will not operate or may operate improperly with some Bluetooth audio players.• Clarion cannot guarantee the compatibility of all mobile phones together with CZ500.• Audio playback will be set to the same volume level as set during telephone call. This might cause problems, if extreme volume level is set during telephone call.Handsfree OperationsPairing1. Turn on Bluetooth function of your mobile phone.2. Enter mobile phone’s Bluetooth setup menu.3. Search for new Buetooth devices.4. Select CEM250 BTROM from the pairing list on the mobile phone.5. Enter “0000” as the password.DisconnectingIf you want to disconnect the Bluetooth from the phone, press [SRC] for more than 2 seconds. ReconnectingPress [SRC] button for more than 2 seconds to reconnect manually.Make a callDirect Number CallPress the [ ] button to select DIAL NUM.1. Use number buttons on the remote control or rotate and press the volume knob to select phone number. • Press [ ] / [ ] to change digit position. • Press [ ] button to reset entered number.2. Press [ ] to dial out.Operation from Bluetooth menuPress the [SRC] button to switch the source to “BT MUSIC”. Press MENU button to select a way to make outgoing call:• Dial NumberSame operation as “Direct Number Call”.• Dialled/Missed/ Received Call HistoryYou can search any Dialled/Missed/Received Call History.1. Rotate the knob to select “DIALLED”, “MISSED” or “RECEIVED”.2. Press the volume knob to enter the selected call history.3. Use the [ ] / [ ] buttons on the remote control or rotate the volume knob to scroll the contacts.4. When the contact name or mobile phone No. is displayed, press the [ ] button to call the mobile phone No. of that contact. * Press the [ ] button to end the call.• Call from PhonebookUser can search the contact name in the phonebook and make call.1. Rotate the knob to select “SIM PHONE BOOK”, “MEMORY PHONE BOOK“ or “TETEPHONE BOOK” .2. Press the volume knob to enter the selected phonebook.3. Use the [ ] / [ ] buttons on the remote control or rotate the volume knob to scroll](https://usermanual.wiki/Faurecia-Clarion-Electronics/CZ500/User-Guide-1196917-Page-15.png)
![English16Bluetooth Operationsthe contacts.4. When the contact name is displayed, press the [ ] button to call the mobile phone No. of that contact. * Press the [ ] button to end the call.• Answering a call1. You can answer an incoming call by pressing the [ ] button. * Press the [ ] button to reject an incoming call.Audio Streaming OperationsWhat is audio streaming?Audio streaming is a technique for transferring audio data such that it can be processed as a steady and continuous stream. Users can stream music from their external audio player to their car stereo wirelessly and listen to the tracks through the car’s speakers. Please consult your nearest Clarion dealer for more information on the product of wireless audio streaming transmitter offered.CAUTIONPlease avoid operating your connected mobile phone while audio streaming as this may cause noise or sound choppy on the song playback.Audio streaming may or may not resume aft er t ele phon e in terr upt as thi s i s dependent on mobile phone.System will always return to Radio mode if audio streaming is disconnected.Note:Be sure to read the chapter “Pairing before proceeding.Play / Pause a track1. Push the [ 4 / ] button to pause audio playback.2. To resume audio playback, push the [ 4 / ] knob again.Selecting a trackTrack-up1. Press the [ ] button to move to the beginning of the next track.2. Each time the [ ] button is pressed, playback proceeds to another track in the advancing direction.Track-down1. Press the [ ] button to move the to beginning of the previous track.2. Each time the [ ] button is pressed, playback proceeds to previous track in the reverse direction.Note:Playing order will depend on Bluetooth® audio player. When [ ] button is pressed, some A2DP devices will restart the current track depends on the duration of playback.During music streaming playback, “A2DP” will be shown on the display. Information about tracks (e.g. the elapsed playtime, songtitle, etc.) cannot be displayed on this unit. When A2DP device is disconnected, “BT DISCONNECT” will be shown on the displayand return to previously selected audio source. Some Bluetooth® audio players may not have play / pause synchronized with this unit. Please make sure both device and main unit are in the same play / pause status in BT MUSIC mode.](https://usermanual.wiki/Faurecia-Clarion-Electronics/CZ500/User-Guide-1196917-Page-16.png)
![17EnglishPress the [SOUND] key to enter sound effect setting mode. First Press shows current EQ. Rotate the volume knob to changes BEAT EQ in this order:OFF -> B-BOOST -> IMPACT -> EXCITE -> CUSTOMAudio SetupAt radio mode, press and hold [ADJ] button to enter system MENU. Press [ , ] to select options, rotate the volume knob to adjust. LANGUAGERotate the knob to choose display language.DX/LORotate the knob to choose radio local or distant.LO: Only stations with strong signal can be broadcast.DX: Stations with strong and weak signals can be broadcast.SCRN SVR: ON/OFFRotate the knob to choose screen saver on or off.ROLL: ON/OFFFor track information that is longer than the display panel:When ROLL is ON, the LCD will display ID3 TAG information cyclely, e.g: TRACK->FOLDER->FILE->ALBUM->TITLE->ARTIST->TRACK->...When ROLL is OFF, the LCD will display one of the ID3 TAG information, the default is TRACK, but user can adjust it to other ID3 TAG information by press DISP.DIMMER: ON/OFFRotate the knob to choose dimmer on or off.BEEP: ON/OFFRotate the knob to choose button beep sound on or off.System Setup12/24H Rotate the knob to choose time format 12 or 24 HOURS mode. BT MENUAt BT mode, press and hold [ADJ] button to enter BT MENU. Press [ , ] to select options, rotate the volume knob to adjust.RING VOLRotate the knob to choose ring volume.AUTO CONRotate the knob to choose connect automatically or not.PIN CODERotate and press the knob to choose a 4-digit password. Press the knob more than 2 seconds to conrm.Press the [SOUND] key, then press [ , ] to select USER preset including:BALANCE -> FADER -> M-B EX -> LPF(low pass lter) -> SUBW VOL, rotate the volume knob to select a value.](https://usermanual.wiki/Faurecia-Clarion-Electronics/CZ500/User-Guide-1196917-Page-17.png)
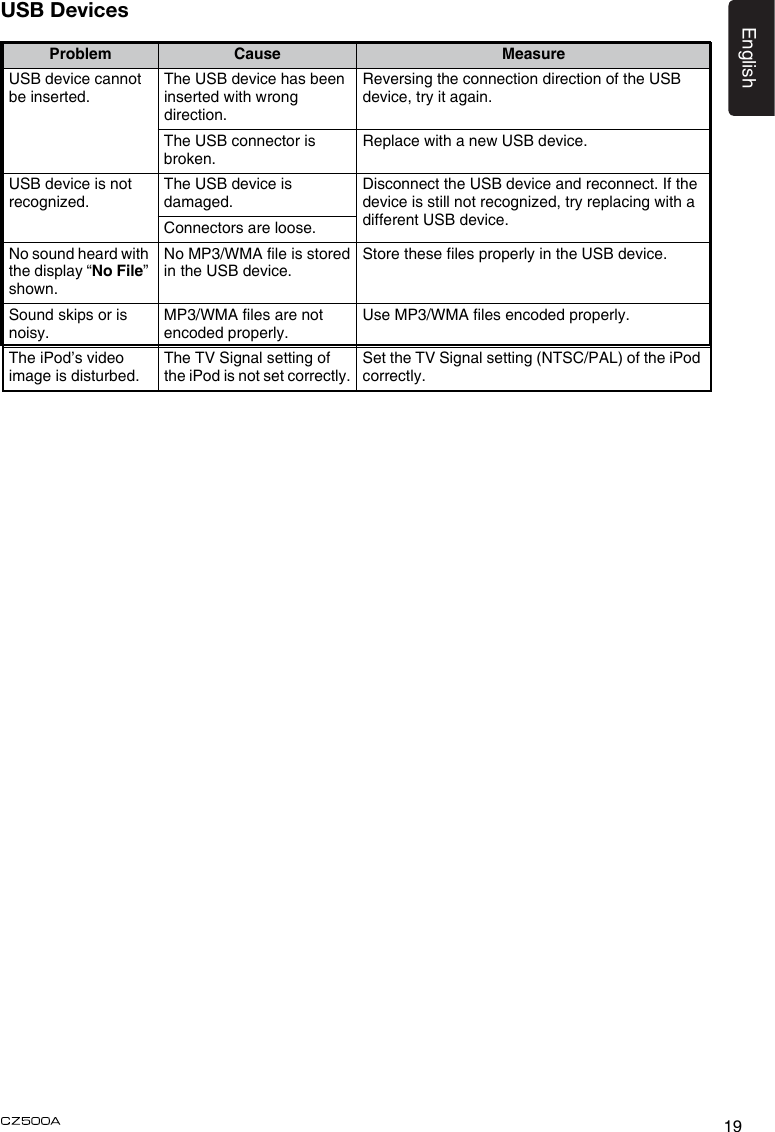
![English186. TROUBLESHOOTINGGENERALTurn off the power, then press the [OPEN] button and remove the DCP.](https://usermanual.wiki/Faurecia-Clarion-Electronics/CZ500/User-Guide-1196917-Page-18.png)