Faurecia Clarion Electronics NX602 CAR DVD PLAYER User Manual
Clarion Co Ltd CAR DVD PLAYER Users Manual
UserManual.wiki
>
Faurecia Clarion Electronics
>
NX602 User Manual
Users Manual
Navigation menu
Upload a User Manual
Namespaces
Wiki Guide
HTML
PDF
Info
Views
User Manual
Discussion / Help
Navigation
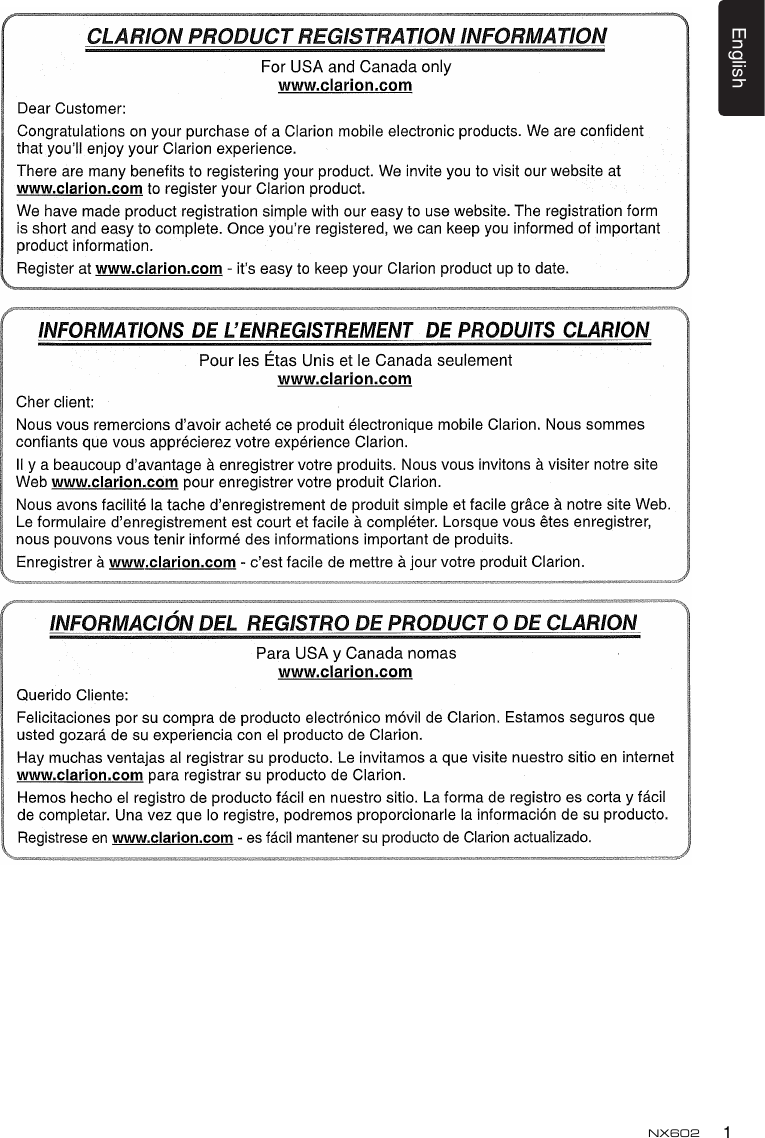
![English8NX602[POWER/VOL]Knob • Press to power on the system when ignition on. • When power on, short press to cut the sound. • Rotate the knob to increase or decrease the volume. • Press and hold this key more than 2 seconds to turn off the system.[ALL]Button• Short press to show/exit shortcut menu.• Long press to show/exit main source menu.[ ]Button• Press to enter navigation mode; • Press again to return current source.[ ]Button• Press to eject disc.[ MIC ] Hole • Internal microphone[RESET]Button• Press to load original settings. Note: When the [RESET] button is pressed, frequencies of radio stations, titles, etc. stored in memory are cleared.4. CONTROLSOperational PanelNames of ButtonsAUXJackSD Card Slot[ ][ ALL ] [MIC] DiscSlotRESET[ ][POWER/vOL]MapCardSlotNX602](https://usermanual.wiki/Faurecia-Clarion-Electronics/NX602/User-Guide-1578937-Page-9.png)
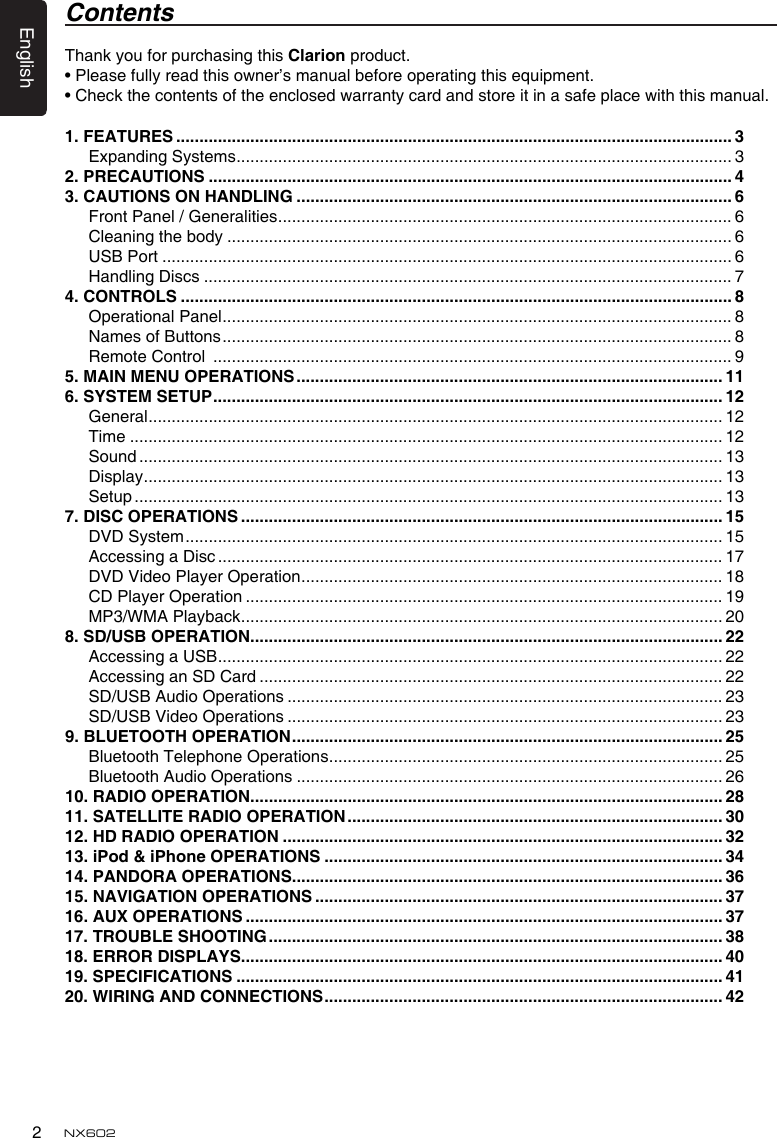
![9EnglishNX602Remote Control [SRC / ]Button• Toggle the audio source• Power on / Power off (long press) [OPEN]Button• Not used [+],[-]Buttons • Adjust volume level [MAP]Button • Enter navigation mode [PIC]Button • Adjust screen [BAND]Button• Select tuner band [TAG]Button• SIRIUS mode – Select category [TITLE]Button • DVD TITLE MENU [RPT]Button • Repeat playback [ENT]Button • Enter [RDM]Button • Random playback [ROOT]Button • DVD ROOT MENU [],[ ]Buttons• Manual tune• Fast backward/forward playback [SUB.T]Button • DVD subtitle [ANGLE]Button • DVD angle [],[ ]Buttons(Rear)• Chapter up/down• Fast backward/forward playback (long press) [SEND/END]Button • Pick up • Hang up [MUTE]Button • Mute the volume [0]~[9]Button • Numeric key [SRCH]Button • SIRIUS/DVB-T mode – Number input mode [BACK]Button • DvD mode – Back [ ],[ ],[ ],[ ]Buttons • Move cursor up/down/left/right](https://usermanual.wiki/Faurecia-Clarion-Electronics/NX602/User-Guide-1578937-Page-10.png)
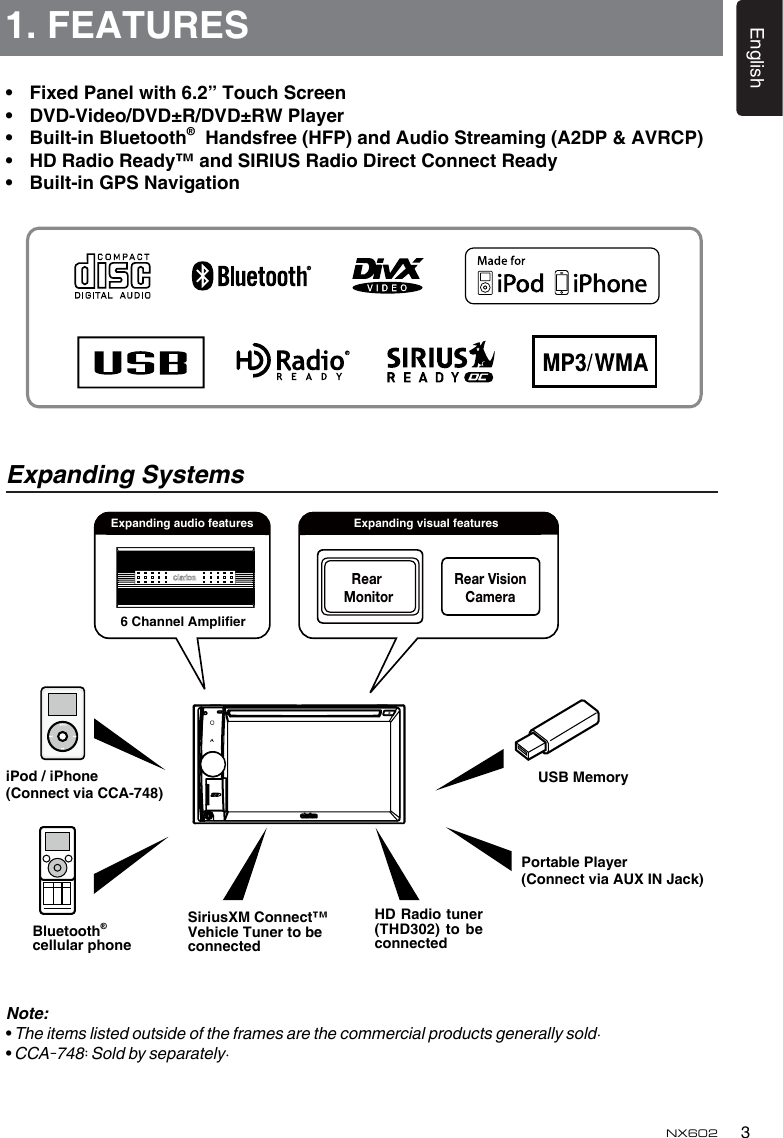
![English10 NX602 [ /STOP]Button • Play/Pause • Stop (long press) [ ],[ ]Buttons• Previous / next preset station • Auto tune (long press) [ZOOM]Button• ZOOM (DVD) [AUDIO]Button • DVD audio [SRC]Button(Rear) • Change next source [ ]Button(Rear) • Play/Pause • Stop (long press)Remote Control Use and care of the remote controlUsing the remote control Point the remote control in the direction of the front panel to operate.When using for the rst time, pull out the lm protruding from the tray.Replacing the battery1 Slide the back cover of the remote control out.2. Insert the battery with the plus (+) and minus (–) poles aligned properly. • When using for the rst time, pull out the lm protruding from the tray.3. Close the back cover. CAUTION• Keep the battery out of the reach of children. Should the battery be swallowed, consult a doctor immediately.• Batteries (battery pack or batteries installed)must not be exposed to excessive heat such as sunshine, re or the like.CAUTION• Use one CR2025 (3 V) lithium battery.• Remove the battery if the remote control is not used for a month or longer.• There is a danger of explosion if the battery is incorrectly replaced. Replace only with the same or equivalent type.• Do not handle the battery with metallic tools.• Do not store the battery with metallic objects.• If the battery leaks, wipe the remote control completely clean and install a new battery.• When disposing o f u s e d b a t t e r i e s , comply with governmental regulations or environmental public institutions’ rules that apply in your country/area.Important• Do not store the remote control in high temperatures or direct sunlight.• The remote control may not function properly in direct sunlight.• Do not let the remote control fall onto the oor, where it may become jammed under the brake or accelerator pedal.](https://usermanual.wiki/Faurecia-Clarion-Electronics/NX602/User-Guide-1578937-Page-11.png)
![11EnglishNX6025. MAIN MENU OPERATIONSLong press [ALL] button on the PANEL to show main source menu. Front Zone SourceTouch [Front] on the bottom of screen to show front zone sources. Change page by draging left or right.Touch the icons on the screen to enter corresponding work mode, such as Disc mode, Tuner mode, Telephone mode, etc.Touch [AudioOff] to mute the volume.Rear Zone SourceTouch [Rear] on the bottom of screen to show rear zone sources. Touch the icons on the screen to enter corresponding work mode, such as Disc mode, USB mode, iPod mode, etc.Touch [2ZoneOff] to turn off the rear zone monitor.Custom SettingTouch [Custom] on the bottom of screen to show custom setting menu. [Setting]: Touch the icon to enter system setting menu. (see “System Setup”)[BeatEQ]: Touch the icon to enter equalizer setting menu. (see “System Setup”)[ShortCut]: Touch the icon to enter Shortcut setting menu. Hold the desired icon for more than 2 seconds until it’s activated, then drag it to the bottom. The name will appear on the bottom. • Hold the center of the screen and drag left or right to show more icons.• You can make total 5 shortcuts.• You can access the shortcut list by pressing the [ALL] button. [IllumiColor]: Touch the icon to enter Illumination color setting menu. (see “System Setup”)[Wallpaper]: Touch the icon to enter Wallpaper setting menu. (see “System Setup”)[MonitorOff]: Touch the icon to turn off the monitor.](https://usermanual.wiki/Faurecia-Clarion-Electronics/NX602/User-Guide-1578937-Page-12.png)
![English12 NX602At all mode, long press [ALL] button to enter main source menu. Touch [Custom] on the bottom left of the screen, then select [Settings] on the screen to enter Setting menu. Touch the icons on the left of screen to select category: General, Time, Sound, Display or Setup. To exit Setting menu, touch [ ] on the bottom left of the screen.GeneralSystemlanguageTouch the button to the right of “System language” to show language list. Select desired language, touch [OK] to confirm, or touch [Cancel] to exit without saving.CloseoperationbarWhen select [Auto], the operation bar will close automatically after 10 seconds.When select [Manual], the operation bar will not close unless you touch the blank area on the screen.MainMenuIconsWhen select [Active], main menu show animation icons. When select [Simple], main menu show simple icons.KeyIlluminationTouch [Set] to the right of “Key Illumination” to show key illumination setting menu.ScanColor: Scan 12 preset button backlight, touch [Enter] to select desired one.EditColor: There are 12 preset colors and 3 custom colors, you can select one color by touch Color 1~12 or Custom 1~3. Touch [Adjust] to show edit color menu. Drag the color bar or inputting the RGB value to select one color, touch [Enter] to conrm.Initialize: Load original Buttons backlight.Touch [MENU] on the top left of the screen to return to main setting menu.WallpaperimagesTouch [Set] to the right of “Wallpaper images” to show Wallpaper setting menu.Touch [ ] or [ ] button to select the scene, and touch the picture le name on the right to preview it, then touch [Set] to conrm the setting.Touch [Import] to import the images from mobile storage.BeepTouch [On] or [Off] to turn on/off the key beep sound.BlinkingLEDTouch [On] or [Off] to turn on/off the blinking LED.At blinking LED [On] mode, when ACC off, the LED on the top left of the panel will blink.ScreencalibrationTouch [Set] to calibrate the screen.SystemsoftwareTouch [Version] to show current software version.RestorefactorydefaultTouch [Restore] to load the original factory settings.TimeGPSsyncTouch [On] to synchronize time with GPS and the following settings are disable: “Date” and “Time”.DateTouch the button to the right of “Date” to show date setting menu. Touch [ ] or [ ] to select month, date or year. Touch [Set] to conrm or [Back] to exit without saving.DateformatTouch the button to the right of “Date format” to select a date format from the sub-menu. TimeTouch the button to the right of “Time” to show time setting menu. Touch [ ] or [ ] button to select hour or minute. Touch [Set] to conrm or [Back] to exit without saving.6. SYSTEM SETUP](https://usermanual.wiki/Faurecia-Clarion-Electronics/NX602/User-Guide-1578937-Page-13.png)
![13EnglishNX60224-HourformatTouch [On] to select 24-Hour format. Touch [Off] to select 12-Hour format.SoundBeatEQTouch the button to the right of “Beat EQ” to show EQ setting menu. You can select : “Bass Boost”, “Impact”, “Excite”, “Custom” or “Off”.To adjust the value, touch [-] or [+] button on the screen. Touch [Back] to exit.Balance/FaderTouch [Set ] to the right of “Balance/Fader” to show Balance/Fader setting menu.Touch [ ] or [ ] button to adjust Fader, and touch [ ] or [ ] button to adjust Balance.Touch [Center] to reset the value.Touch [Back] to exit. SubwoofercontrolTouch [-] or [+] button on the right of “Sub woofer control” to adjust sub woofer level.SubwooferphaseTouch to select sub woofer phase Normal or Reverse.HighpasslterTouch the button to the right of “High pass Filter” to show the sub-menu, then select the lter: “Through”, “55Hz”, “85Hz” or “120Hz”.Touch [Cancel] to exit.LowpasslterTouch the button to the right of “Low pass Filter” to show the sub-menu, then select the lter: “Through”, “62Hz”, “95Hz” or “135Hz”.Touch [Cancel] to exit.AMPCancelTouch [On] to turn off the amplier.Touch [Off] to turn on the amplier.MagnaBassExTouch [On] to turn on the loudness.DisplayDimmerModeTouch [Auto], [Day] or [Night] to choose dimmer mode.Auto: The dimmer is controlled by your car light.DimmerTouch [-] or [+] button to the right of “Dimmer” to adjust dimmer.The setting is only for Day or Night.SetupTouch [Setup] on the right of screen to spread the setting list. then touch the button to the right of desired option to adjust or show the sub-menu. Touch [Close] to close the list.AUX• Input Aux Level Choose “Low”, “Middle“ or “High” input level of auxiliary device.Bluetooth• Bluetooth Choose Bluetooth function on or off.• TelephoneSpeaker Choose Front Left or Front Right speaker at telephone mode.• ToneSelect Touch [Auto] to use ringtones of your mobile phone. Touch [Internal] to use preset ringtone of the unit.• SoftwareUpdate Update the software.Camera• CameraInterrupt Choose [On], the screen will switch to rear camer menu automatically when backing.DivX• RegistrationCode Display DivX Registration Code.](https://usermanual.wiki/Faurecia-Clarion-Electronics/NX602/User-Guide-1578937-Page-14.png)
![English14 NX602DVD• MenuLanguage Select menu language from list.• AudioLanguage Select audio language from list.• SubtitleLanguage Select subtitle language from list.• SetPassword To set password for parental control, Touch [Set] to show password menu. Input numbers by touching the digit and [OK] buttons. Touch [X] button to delete a digit inputted. Touch [Back] to exit.• ParentalControl Touch the button to the right of “Parental Control” to show parental control menu. Enter password, then select a parental level. Touch [OK] to confirm or [Back] to exit.Navigation• NavigationInterrupt Select navigation interrupt On, Popup or Off.• VoiceGuidance Turn on or off the voice guidance.](https://usermanual.wiki/Faurecia-Clarion-Electronics/NX602/User-Guide-1578937-Page-15.png)

![17EnglishNX602CAUTIONFor your satety, the driver should notinsertorejectadiscwhiledriving.Eject functionJust pressing the [ ] button, ejects the disc even if the power to the unit was not turned on.Notes:• If you force a disc into before auto reloading, this can damage the disc.• If a disc (12 cm) is left ejected for 15 seconds, the disc is automatically reloaded (Auto reload).Listening to a disc already loaded in the unitLong press [ ALL ] button to enter main source menu, then select [ Disc ] to enter Disc mode.If Disc is not on the current source menu, touch [Front] on the bottom of the screen, then hold the center of screen and drag left/right to show more icons.When the unit enters the Disc mode, play starts automatically.Loading a disc Insert a disc into the center of the disc slot with label facing up. The disc plays automatically after loading.Notes:• Never insert foreign objects into the disc slot.• If the disc is not inserted easily, there may be another disc in the mechanism or the unit may require service.Accessing a Disc](https://usermanual.wiki/Faurecia-Clarion-Electronics/NX602/User-Guide-1578937-Page-18.png)
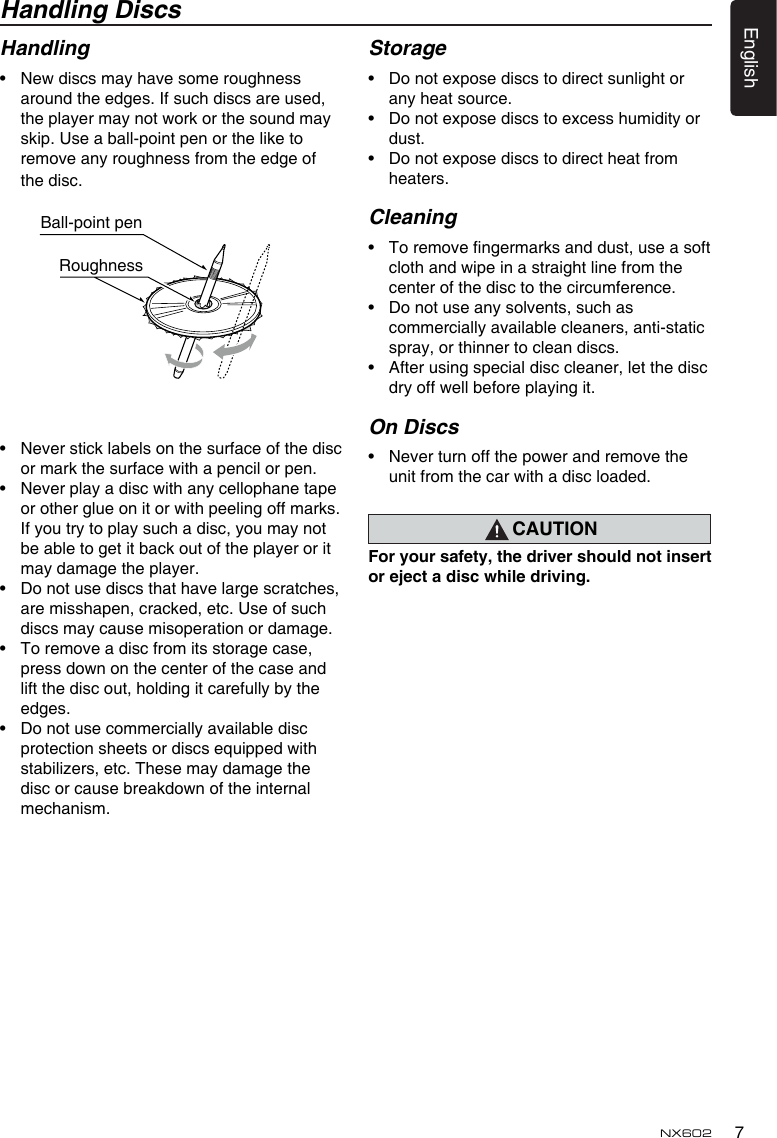
![English18 NX602Playback menuTouch the bottom half of screen to show operation bar. 1. Play/Pause2. Show cursor keys in DVD title menu3. Previous chapter Fast-backward (long press)4. Progress bar5. Next chapter Fast-forward (long press)6. DVD title menu7. Show other optionsPausing play1. Touch the [ ] button on the screen to pause play.2. Touch [ ] button to resume play.Selecting a chapterChapter-up Touch the [ ] button to move to the beginning of the next chapter.Chapter-downTouch the [ ] button to move back to the beginning of the previous chapter.Fast-forward/Fast-reverseFast-forwardTouch and hold the [ ] button for more than 2 seconds.Fast-reverseTouch and hold the [ ] button for more than 2 seconds.RepeatDuring playback, touch [ ], [ Repeat] buttons to repeat play.Search functionDuring playback, touch [ ], [ ] buttons to show search menu.Input number by digit buttons, touch [ OK ] to began searching or touch [ Close ] to clear inputting.Touch [Chapter] or [Title] to show DVD chapter/title list.DVD audio selectDuring playback, touch [ ], [ Audio ] buttons to select audio language to listen if the DVD has multiple audio languages.DVD subtitle selectDuring playback, touch [ ], [ Subtitle] buttons to select the subtitle language if the DVD has multiple language subtitles.Playback informationDuring playback, touch [ ], [ Information] buttons to view playback information. Adjust pictureDuring playback, touch [ ], [ AdjustPicture] buttons to select wide screen.DVD angle selectDuring playback, touch [ ], [ Angle] buttons to select different angle to view if the DVD has multiple-angle views.DVD Video Player Operation](https://usermanual.wiki/Faurecia-Clarion-Electronics/NX602/User-Guide-1578937-Page-19.png)
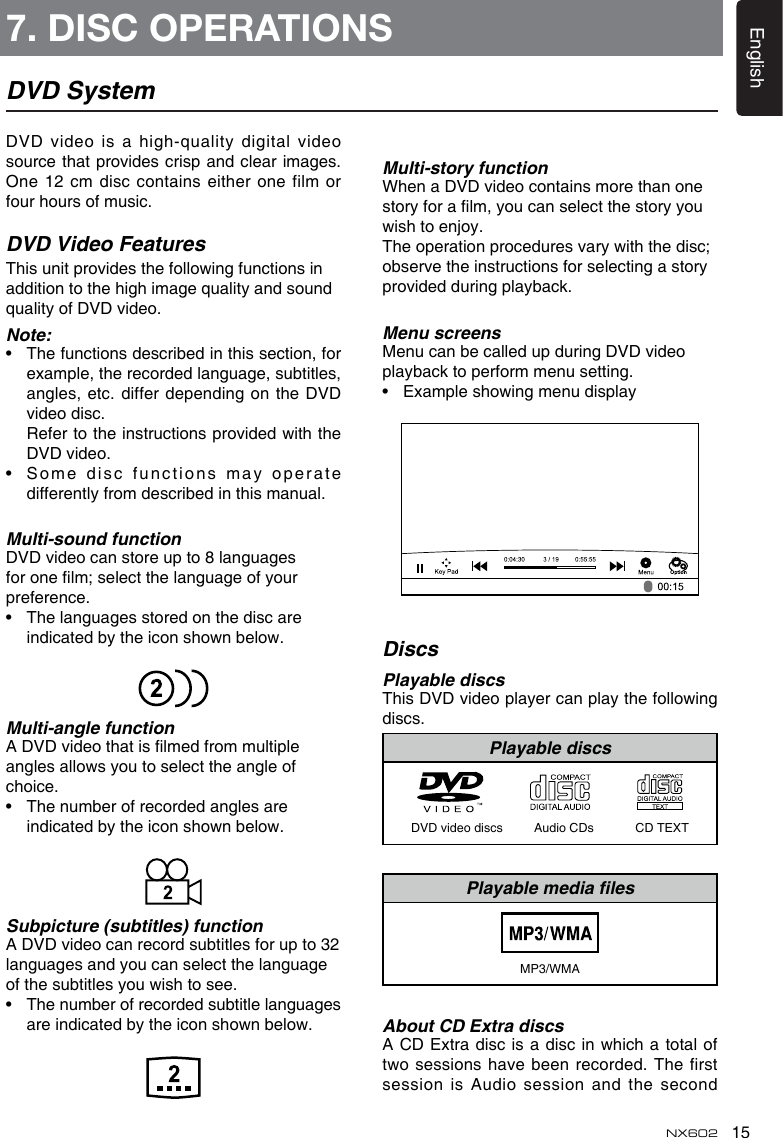
![19EnglishNX602CD Player OperationPlayback menuTouchthebottomhalfofscreentoshowoperationbar.1. Show track list.2. Title/Artist/Album information3. Track information Touch and drag left/right to look through the tracks.4. Play/Pause5. Repeat play6. Previous track Fast-reverse (long press)7. Playing time indicator8. Next track Fast-forward (long press)9. Random play10. Show other optionsPausing play1. Touch the [ ] button on the bottom left of the screen to pause play. “PAUSE” appears in the display, and [ ] button becomes [ ] .2. Touch [ ] button to resume play.Selecting a trackTrack-up1. Touch the [ ] button to move to the beginning of the next track.2. Each time you touch the [ ] button, the track advances to the beginning of the next track.Track-down1. Touch the [ ] button to move back to the beginning of the current track.2. Touch the [ ] button twice to move back to the beginning of the previous track.Fast-forward/Fast-reverseFast-forwardTouch and hold the [ ] button .Fast-reverseTouch and hold the [ ] button .* For MP3/WMA discs, it takes some time until the start of searching and between tracks. In addition, some error may occur in the play time.Search Function1. Touch the [ ] button to show track list. Touch [ ] button to enter search menu. 2 Input numbers by touching digit buttons, then touch [Search] to began searching. To delete numbers, touch [ ] button.3. Touch [ ] button to exit.Other various play functionsScanplayThis function allows you to locate and play the rst 10 seconds of all the tracks recorded on a disc.Touch the [ ] button, then touch [Scan] to scan play.RepeatplayThis function allows you to play the current track repeatedly or play a track currently being played in the MP3/WMA folder repeatedly.Touch the [ ] button to select Track Repeat, Folder Repeat or All Repeat.RandomplayThis function allows you to play all tracks recorded on a disc in a random order.Touch the [ ] button to perform random play.](https://usermanual.wiki/Faurecia-Clarion-Electronics/NX602/User-Guide-1578937-Page-20.png)
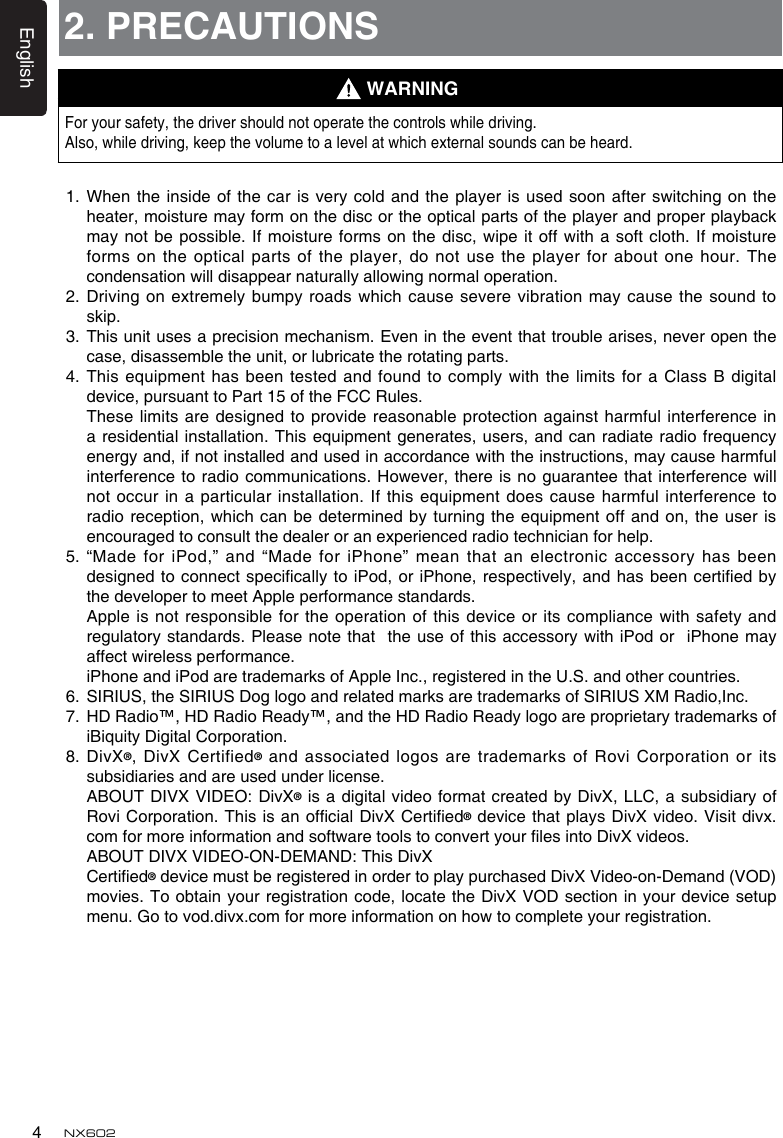
![21EnglishNX602(?)0?1?2♪①♪②?5♪⑧♪⑦?6?7♪⑨♪③?3?4♪④♪⑤♪⑥Layer1 Layer 2 Layer 3 Layer 4 Layer5○Root Folder?Folder♪FileThe player will only recognize three folder levels and does not display folders containing other folders. In the example above, the unit will display folders 2, 3, 5 and 7, but 1 and 6 since they do not contain others.Playback menuTouch the bottom half of screen to show operation bar. 1. Show folder/le list.2. Title/Artist/Album information3. Track information Touch and drag left/right to look through the tracks. Touch and drag up/down to look through the albums.4. Play/Pause5. Repeat play6. Previous track Fast-reverse (long press)7. Progress bar8. Next track Fast-forward (long press)9. Random play10. Show other optionsFolder SelectThis function allows you to select a folder containing MP3/WMA les and start playing from the rst track in the folder.Touch the [ ] button on the upper left of the screen to show folder/file list. You can select a folder or le by touching it.Search Function1. Touch the [ ] button to show folder/le list. Touch [ ] button to enter search menu. 2 Input numbers by touching digit buttons, then touch [Search] to began searching. To delete numbers, touch [ ] button.Other operations about playing MP3/WMA are almost same as CD Player mode.](https://usermanual.wiki/Faurecia-Clarion-Electronics/NX602/User-Guide-1578937-Page-22.png)
![English22 NX6021. Insert a USB device into the USB cable. When connecting a USB device, the unit will read the les automatically.2. To remove the USB device, you should first select another source or turn off the power, in order to avoid damaging the USB device. Then take off the USB device. 3. T o ac ce s s a U S B d e v i c e al re ad y connected to the unit, long press [ ALL ] button to enter main source menu, then select [ USB ] to enter USB mode. If [USB] is not on the current source menu, touch [Front] on the bottom of the screen, then hold the center of screen and drag left/right to show more icons.1. Push the cover of the card slot located on the bottom left of the panel to the right. Insert a SD card into the card slot. When inserting a card, the unit will read the les automatically.2. To remove the card, you should rst select another source or turn off the power, in order to avoid damaging the card. Press to pop it out, then take off the card. Close the cover to the left.3. To access a USB device already inserted in the unit, long press [ ALL ] button to enter main source menu, then select [ SD ] to enter SD mode. If [SD] is not on the current source menu, touch [Front] on the bottom of the screen, then hold the center of screen and drag left/right to show more icons.Accessing a USBAccessing an SD Card8. SD/USB OPERATION](https://usermanual.wiki/Faurecia-Clarion-Electronics/NX602/User-Guide-1578937-Page-23.png)
![23EnglishNX602SD/USB Audio OperationsSD/USB Video OperationsThis system can play audio les (MP3/WMA) stored in an SD card or USB memory. You can use it as an audio device by simply copying desired audio les into it.Note:This system will not operate or may operate improperly with some card or USB.Files protected with any DRM cannot be played.This system can play video files (MP4, etc) stored in an SD card or USB memory. You can use it as an video device by simply copying desired video les into it.Note:This system will not operate or may operate improperly with some card or USB.Files protected with any DRM cannot be played.Select SD/USB Video modeTouch top left corner of the screen until SD Video or USB Video appears.Touch [ ] button to show folder/file list. Select a desired le to play.Playback menuWhen playing, touch the bottom half of screen to show operation bar. 1. Play/Pause2. Stop3. Previous le Fast-reverse (long press)4. Progress barSelect SD/USB Audio modeTouch top left corner of the screen until SD Audio or USB Audio appears.Operations about SD/USB audio operations are almost same as MP3/WMA playback mode.5. Next le Fast-forward (long press)6. Show video menu7. Show other options [ ]: Repeat playback. [ ]: Select audio channel. [ ]: Select DVD subtitle. [Information]: Show current video information.Pausing play1. Touch the [ ] button on the screen to pause play. “ PAUSE” appears in the display.2. Touch [ ] button to resume play.Selecting a leFile-up Touch the [ ] button to move to the beginning of the next le.File-downTouch the [ ] button to move back to the beginning of the previous le.Fast-forward/Fast-reverseFast-forwardHold the [ ] button .Fast-reverseHold the [ ] button .Repeat playThis function allows you to play the current file repeatedly or play files currently being](https://usermanual.wiki/Faurecia-Clarion-Electronics/NX602/User-Guide-1578937-Page-24.png)
![English24 NX602played in the folder repeatedly.Touch the [ ] button and touch [Repeat] button to select File Repeat, Folder Repeat, All Repeat or Repeat Off.Search function1. At video main menu, touch the [ ] button to show folder/le list. 2. Touch [ ] button to enter search menu. 3 Input numbers by touching digit buttons, then touch [Search] to began searching. To delete numbers, touch [ ] button.Audio selectTouch the [ ] button and touch [ AUDIO ] button to select audio language to listen if the file has multiple audio languages.Subtitle selectTouch the [ ] button and touch [ SUBTITLE ] to select the subtitle language if the le has multiple language subtitles.](https://usermanual.wiki/Faurecia-Clarion-Electronics/NX602/User-Guide-1578937-Page-25.png)
![25EnglishNX602Bluetooth Telephone OperationsHandsfree OperationsPairing1. Turn on the Bluetooth function of the unit.(see <System Setup>, <Bluetooth>)2. Turn on Bluetooth function of your mobile phone.3. Enter mobile phone’s Bluetooth setup menu.4. Search for new Bluetooth devices.5. Select NX602 from the pairing list on the mobile phone.6. Enter “0000” as the password.6. After pairing successfully, icon on the bottom right of the screen turns blue.Choose paired deviceAfter paired, the mobile device information appears on the right of screen, such as model number, Signal, Battery.1. To select other paired devide, hold the middle right of the screen, and drag it left or right, touch it to show control buttons.2. Touch [Connect] to connect the bluetooth device. Touch [Cut] to disconnect.3. Touch [ ] to delete the paired device from pairing list.Telephone menuLong press [ ALL ] button to enter main source menu, then select [Telephone] to enter telephone mode.If [Telephone] is not on the current source menu, touch [Front] on the bottom of the screen, then hold the center of screen and drag left/right to show more icons 1. Show history categories.2. Input box3. Backspace4. Connect to a paired Bluetooth device5. Delete a paired device name.6. Number pad7. Call/Hang up8. Paired device information9. Bluetooth indicator10. System time11. Look through paired devices.9. BLUETOOTH OPERATIONThe Bluetooth allows you to utilize your car’s built-in audio system for wireless mobile phone or music handsfree communication. Some Bluetooth mobile phones have the audio features, and some portable audio players support Bluetooth feature. This system can play audio data stored in a Bluetooth audio device. The car stereo with Bluetooth will be able to retrieve phonebook contacts, received call, dialled call, missed call, incoming calls, outgoing call and listen to music.Note:• Do not leave the microphone of Bluetooth handsfree in the places with wind passing such as air outlet of the air conditioner, etc. This may cause a malfunction.• If leave it in the places subjected to direct sun, high temperature can cause distortion, discoloration which may result in a malfunction.• This system will not operate or may operate improperly with some Bluetooth audio players.• Clarion cannot guarantee the compatibility of all mobile phones together with the unit.• Audio playback will be set to the same volume level as set during telephone call. This might cause problems, if extreme volume level is set during telephone call.](https://usermanual.wiki/Faurecia-Clarion-Electronics/NX602/User-Guide-1578937-Page-26.png)
![English26 NX602Making a call•DialNumber1. Input numbers by digit-keys on the screen.2. Touch [ ] button to dial. Touch [ ] button to delete characters.3. Touch [ ] button to terminate call.•Dialed/Received/MissedCallHistoryYou can search any Dialled/Missed/Received Call History.1. Touch [ ] button to show following history categories: Dialed, Received, Missed and Contacts. Touch [Dialer] to dial number manually.2. Touch to select a category, the numbers of the category are displayed.4. Select a number, touch [ ] button to dial. Touch [ ] to return previous menu.•CallfromPhonebookYou can search the contact name in the phonebook and make call.1. Touch [ ] button and select [Contacts]. It may take a few minutes to synchronize the phone book at rst time.2. Select a number, touch [ ] button to dial. Touch [ ] to return previous menu.Note:Some cellular phones may not be able to transfer the Phone Book data.•AnsweringacallYou can answer an incoming call by pressing the [ ] button.* Touch [ ] button to reject an incoming call.Operation barTouch lower right of the screen to shwo the operation bar, touch [ ] or [ ] button to show more icons and touch [ ] to exit. BT Power: Turn on/off the bluetooth function.Auto Connect: Turn on the function to re-connect automatically.Auto Answer: Turn on the function to answering a call automatically.PinCode: Touch to set a PIN code on the key pad.MicroPhone: Touch to select internal or external microphone.Microphone Gain: Touch to set the gain of microphoneInformation: Touch to show Bluetooth version. Audio Streaming OperationsWhat is audio streaming?Audio streaming is a technique for transferring audio data such that it can be processed as a steady and continuous stream. Users can stream music from their external audio player to their car stereo wirelessly and listen to the tracks through the car’s speakers. Please consult your nearest Clarion dealer for more information on the product of wireless audio streaming transmitter offered.CAUTIONPleaseavoid operatingyourconnectedmobilephonewhileaudiostreamingasthismaycausenoiseorsoundchoppyonthesongplayback.Audiostreamingmayormaynotresumeafte r t e lephone in t e r rupt as th i s i sdependentonmobilephone.Systemwill alwaysreturntoRadiomodeifaudiostreamingisdisconnected.Note:Be sure to read the chapter “Pairing” and “Choose paired device” before proceeding.Playback menuTouch the bottom half of screen to show operation bar. Bluetooth Audio Operations](https://usermanual.wiki/Faurecia-Clarion-Electronics/NX602/User-Guide-1578937-Page-27.png)
![27EnglishNX6021. Title/Artist/Album information2. Device Information3. Play/Pause4. Previous track Fast-reverse (long press)5. Stop6. Next track Fast-forward (long press)7. Bluetooth indicator8. System timePlay / Pause a track1. Touch the [ ] button to pause audio playback.2. To resume audio playback, touch the [ ]button.Selecting a trackTrack-up1. Touch the [ ] button to move to the beginning of the next track.2. Each time you touch the [ ] button, the track advances to the beginning of the next track.Track-down1. Touch the [ ] button to move back to the beginning of the current track.2. Touch the [ ] button twice to move back to the beginning of the previous track.Stop playbackTouch [ ] button to stop playback. Note:Playing order will depend on Bluetooth audio player. When [ ] button is pressed, some A2DP devices will restart the current track depends on the duration of playback.Some Bluetooth audio players may not have play/pause synchronized with this unit. Please make sure both device and main unit are in the same play/pause status in Bluetooth Audio mode.](https://usermanual.wiki/Faurecia-Clarion-Electronics/NX602/User-Guide-1578937-Page-28.png)
![English28 NX602Select tuner as playing sourceLong press [ ALL ] button to enter main source menu, then select [Tuner] to enter Tuner mode.If Tuner is not on the current source menu, touch [Front] on the bottom of the screen, then hold the center of screen and drag left/right to show more icons.Playback menuTouch the bottom half of screen to show operation bar. 1. Band switch2. Information area3. Preset station number4. Current station frequency5. Show preset stations list.6. Scan preset stations.7. Manual tune backward. Auto tune backward. (long press)8. Frequency bar9. Manual tune forward. Auto tune forward. (long press)10. Show other optionsTouchthebottomhalfofscreentoshowoperationbar.Select one radio bandTouch the top left corner of the screen to select one radio band among FM1, FM2, FM3 and AM.Manual tuningDuring manual tuning, the frequency will be changed in steps.Touch the [ ] or [ ] button on the operation bar to tune in a higher / lower station.Auto tuningHold the [ ] or [ ] button on the operation bar for more than 2 seconds to seek a higher / lower station.To stop searching, repeat the operation above or press other buttons having radio functions.Note:When a station is received, searching stops and the station is played.Preset scan Preset scan receives the stations stored in preset memory in order. This function is useful when searching for a desired station in memory. 1. Touch the [ ] button on the operation bar.2. When a desired station is tuned in, press the [ ] button to continue receiving that station. Auto storeOnly stations with sufcient signal strength will be detected and stored in the memory.To star automatic station search, touch following buttons on the operation bar in sequence: [ ] -> [ ] -> [Auto Store] -> [OK] .To stop auto store, press other buttons having radio functions.Notes:1. After auto store, the previous stored stations will be overwritten.2. The unit has 4 bands, such as FM1, FM2, FM3 and AM. FM3 and AM can store by AS function. Each bands can store 6 stations, NX602 can store 24 stations in total.Manual storeWhen one expected radio station has been detected, touch [ ] button on the right edge of the screen to show the preset station list, hold one of the six preset stations for more than 2 seconds to store it in the memory. 10. RADIO OPERATION](https://usermanual.wiki/Faurecia-Clarion-Electronics/NX602/User-Guide-1578937-Page-29.png)
![29EnglishNX602Touch [ ] button near the center of screen to hide the preset station list.Recall the stored stationsTouch [ ] button on the right edge of the screen to show the preset station list, touch to select a preset station.Touch [ ] button near the center of screen to hide the preset station list.Local seekingWhen LOCAL seeking is on, only those radio stations with strong radio signal could be received.To open or close LOCAL function, touch [ ] button on the operation bar, then touch the [Mode] button to select “Local” or “DX”.Note:The number of radio stations that can be received will decrease after the local seeking mode is on.](https://usermanual.wiki/Faurecia-Clarion-Electronics/NX602/User-Guide-1578937-Page-30.png)
![English30 NX602Listeners can subscribe to SIRIUS® Radio on the Web by visiting www.sirius.com, or by calling (888) 539-SIRIUS. Customers should have their SIRIUS ID ready (SIRIUS ID is located on the SCC1: SIRIUS Connect Vehicle Tuner, solid separately). Customers can listen to music samples by tuning to channel 184.Accessing satellite radio modeLong press [ ALL ] button to enter main source menu, then select [SiriusXM] to enter SiriusXM mode.If [SiriusXM] is not on the current source menu, touch [Front] on the bottom of the screen, then hold the center of screen and drag left/right to show more icons.Operation menuTouch the bottom half of screen to show operation bar. 1. Band switch2. Show channel list3. Information area4. Current channel information Touch and drag up/down to view other channels.5. Show preset channels list.6. Add tag7. Manual tune backward. Auto tune backward. (long press)8. Select search mode.9. Manual tune forward. Auto tune forward. (long press)10. Show memorize sub-menu.11. Show other optionsDisplaying the Identication (ID) CodeBefore you listen to satellite radio, you must subscribe to the service using your radio’s identication number. To display the radio ID, touch following buttons on the operation bar in sequence: [ ] -> [ ] -> [SIRIUS ID]The screen displays the radio ID where the channel name is usually displayed.Select a bandTouch the top left corner of the screen to change between three SiriusXM bands (SiriusXM1, SiriusXM2 and SiriusXM3). Each band stores up to six preset stations.Select a stationTouch the [ ] or [ ] button on the operation bar to tune to another station. Preset modeSix numbered preset buttons store and recall stations for each band. Preset scan1. Touch the [ ] button on the operation bar.2. When a desired station is tuned in, press the [ ] button to continue receiving that station. Storing a stationTo access Preset Channels Store menu, touch [ ] button.Select a preset position on the screen. Touch [ ] to store. Touch [ ] button to delete.Delete preset channelTo access Delete Preset Channel menu, touch [ ] button.Select a channel and touch [ ] to delete it.Recalling a channel1. Select a band (if needed).2. Touch [ ] button on the upper left of the screen to show list menu. 3. Touch to select the corresponding stored station.11. SATELLITE RADIO OPERATION](https://usermanual.wiki/Faurecia-Clarion-Electronics/NX602/User-Guide-1578937-Page-31.png)
![31EnglishNX602Category and Channel search1. Touch [ ] button on the upper left of the screen to show list menu. 2. Touch [ ], then select Channel or Category list.3. Hold the list and drag it up or down to scroll.4. Touch to select it.Direct searchTo access search menu, touch following buttons: [ ] -> [ ] . Input numbers by touching digit buttons, then touch [Search] to began searching. To delete numbers, touch [ ] button.PasswordTo access password setting menu, touch following buttons on the operation bar in sequence: [ ] -> [ ] -> [Password] .Input old password by touching digit buttons, then touch [OK] to conrm.To delete a number, touch [ ] button.To delete all numbers, touch [Clear] button.Then input a new 4-digit password as above.(Original password: 0000)Lock / UnlockTo show channel lock menu, touch following buttons on the operation bar in sequence: [ ] -> [ ] -> [Lock]. You need input password.Touch [ ] or [ ] button to scroll the list.Touch [ ] to lock station, and [ ] to unlock.Song/Artist AlartTouch [ ] button on the operation bar to show Memorize sub-menu. Touch [This song] to add it to the “Song Alart” list. Touch [This artist] to add it to the “Artist Alart” list.When the memorized song/artist is played on other Channel. Select [OK] on the dialogue box to change the channel to play memorized song/artist.Touch [Cancel] on the dialogue box to return to previous screen.](https://usermanual.wiki/Faurecia-Clarion-Electronics/NX602/User-Guide-1578937-Page-32.png)
![English32 NX602About HD Radio™ TechnologyHD Radio Technology allows CD-quality digital broadcasting of your local AM and FM radio stations. HD Radio broadcasts can include multiple channels on the same frequency, which is called multicasting. With multicasting, you can receive up to eight additional multicast channels: HD1~HD8. With an HD Radio tuner connected, you will receive HD Radio digital broadcasts automatically when tuned to a station that offers HD Radio Technology. NOTE: Not all FM or AM stations offer HD Radio (digital) broadcasting. You can receive both analog and digital stations with the unit.Accessing radio modeLong press [ ALL ] button to enter main source menu, then select [HD Radio] to enter HD Radio mode.If HD Radio is not on the current source menu, touch [Front] on the bottom of the screen, then hold the center of screen and drag left/right to show more icons.1. Band switch2. Information area3. Current preset station number4. Current station frequency5. Show preset stations list.6. Scan preset stations.7. Add tag8. Manual tune backward. Auto tune backward. (long press)9. Frequency bar10. Manual tune forward. Auto tune forward. (long press)11. Show multicast sub-menu.12. Show other optionsTouchthebottomhalfofscreentoshowoperationbar.Select a bandTouch the top left corner of the screen to select one radio band among FM1, FM2, FM3 and AM.Tuning-SeekTuningHold the [ ] or [ ] button for more than 2 seconds on the operation bar to seek a higher / lower station. -ManualTuningPress the [ ] or [ ] button on the operation bar to move the radio frequency number up or down one step.Preset stationsUp to six stations on each band can be stored as presets, which can then be instantly recalled by pressing the associated preset button. To store a station, turn the radio on and select the desired band and station. Press and hold the desired preset button (numbered one through six on the face of the radio or remote control) for more than 1 second. When stored, the preset number will appear in the display. The station is now stored and can be recalled by pressing the corresponding preset button. Repeat for the remaining five presets on the current band and for presets on the other four bands.NOTE: Multicast stations can be stored as presets, but the unit must be in Digital or Auto reception mode to receive them.Preset scanPreset scan receives the stations stored in preset memory in order. This function is useful when searching for a desired station in memory. 12. HD RADIO OPERATION](https://usermanual.wiki/Faurecia-Clarion-Electronics/NX602/User-Guide-1578937-Page-33.png)
![33EnglishNX6021. Touch the [ ] button on the operation bar.2. When a desired station is tuned in, press the [ ] button to continue receiving that station. Automatic store (AS)Only stations with sufcient signal strength will be detected and stored in the memory.To star automatic station search, touch following buttons on the operation bar in sequence: [ ] -> [ ] -> [Auto Store] -> [OK] .To stop auto store, press other buttons having radio functions.HD Radio multicast channelsTouch [ ] button to swith to next sub-station of the channel.](https://usermanual.wiki/Faurecia-Clarion-Electronics/NX602/User-Guide-1578937-Page-34.png)
![English34 NX602Connect an iPod or iPhone to the USB connector via CCA-748 cable.When connecting a device, the unit will read the files automatically. The track information display on the screen once playback start.7. Progress bar8. Next track Fast-forward (long press)9. Random play10. Show other optionsPausing play1. Touch the [ ] button on the bottom left of the screen to pause play. “PAUSE” appears in the display, and [ ] button becomes [ ] .2. Touch [ ] button to resume play.Selecting a trackTrack-up1. Touch the [ ] button to move to the beginning of the next track.2. Each time you touch the [ ] button, the track advances to the beginning of the next track.Track-down1. Touch the [ ] button to move back to the beginning of the current track.2. Touch the [ ] button twice to move back to the beginning of the previous track.Fast-forward/Fast-reverseFast-forwardTouch and hold the [ ] button .Fast-reverseTouch and hold the [ ] button .* For MP3/WMA discs, it takes some time until the start of searching and between tracks. In addition, some error may occur in the play time.Repeat playThis function allows you to play the current track repeatedly or play a track currently being played in the MP3/WMA folder repeatedly.Touch the [ ] button to select Track Repeat, Folder Repeat or All Repeat.Random playThis function allows you to play all tracks recorded on a disc in a random order.Touch the [ ] button to perform random play.CCA-748Accessing iPod modeLong press [ ALL ] button to enter main source menu, then select [iPod] to enter iPod mode.If [iPod] is not on the current source menu, touch [Front] on the bottom of the screen, then hold the center of screen and drag left/right to show more icons.At iPod Audio mode, touch the bottom half of screen to show operation bar.1. Show le list.2. Song/Artist/Album information3. Track information Touch and drag left/right to look through the tracks. Touch and drag up/down to look through the albums.4. Play/Pause5. Repeat play6. Previous track Fast-reverse (long press)13. iPod & iPhone OPERATIONS](https://usermanual.wiki/Faurecia-Clarion-Electronics/NX602/User-Guide-1578937-Page-35.png)
![35EnglishNX602Search function1. Touch the [ ] button to show le list. Touch [ ] button to enter search menu. 2 Input characters by touching buttons on the screen, then touch [Search] to began searching. Touch [123] to show digit keypad, touch [ABC] to show letter keypad. Touch [Space] to input a blank space. Touch [ ] button to delete characters.Setting iPod simple control modeUse this function if you wish to operate through your iPod connected to this unit via the USB cable.Touch the [ ] button, then touch [Simple Control] to set it to [On].iPod menu alphabet searchThis function searches the subfolders for desired alphabetical letters.1. Touch the [ ] button to show le list. 2. Touch [ ], [ ] and [ ] buttons to show the following categories: Playlists, Songs, Artists, Albums, Genres, Composers, Audiobooks, Podcasts3. Touch to select a category, the contents of the category are displayed.4. Select an option to search.iPod video playbackTo playback video from iPod, touch top left corner of the screen, then select a video le to play.During playback, touch the bottom half of screen to show operation bar.1. Play/Pause2. Repeat play3. Previous le Fast-reverse (long press)4. Progress bar5. Next le Fast-forward (long press)6. Show iPod menu7. Show other optionsReturn to video list menuTouch [ ] button on the operation bar to return to video list menu.Play videos in wide screenTo play videos in wide screen, touch the [ ] button, then touch [Wide screen] to set it to [On].](https://usermanual.wiki/Faurecia-Clarion-Electronics/NX602/User-Guide-1578937-Page-36.png)
![English36 NX602Connect an iPhone to the unit via CCA-748 cable. (see “Wiring and Connections”)Enable the Pabdora function in your iPhone.Then the unit will switch to Pandora mode.Touch the bottom half of screen to show operation bar.1. Show le list.2. Song/Title/Artist/Album information3. Current song/station information4. Play/Pause5. Skip6. Thumbs Down7. Progress bar8. Thumbs Up9. Add bookmark10. Show other optionsAdd bookmarkTouch [ ] button, then select [Song] or [Artist] to add it to the bookmark list.Store a new stationTouch [ ] button and [New Station] button. Then select [Song] or [Artist] to add it to the station list.Thumbs up/downTouch [ ] button, “Thumbs-Up” feedback will be sent to Pandora station.Touch [ ] button, “Thumbs-Down” feedback will be sent to Pandora station.14. PANDORA OPERATIONSSelect a stored stationTouch [ ] button to show station list. Touch [By Date] to list the stations by date. Touch [A-Z] to list the stations from A to Z.Drag up or down to scroll the list, select a desired station to play it.](https://usermanual.wiki/Faurecia-Clarion-Electronics/NX602/User-Guide-1578937-Page-37.png)
![37EnglishNX602Access navigation mode1. Push the cover of the card slot located on the bottom left of the panel to the right. Insert a map card into the mini card slot. 2. To remove the card, you should rst select another source or turn off the power, in order to avoid damaging the card. Press to pop it out, then take off the card. Close the cover to the left.3. Press [ ] button on panel to visit Navigation mode.Control buttons1. Touch top left cornerof the screen to show GPS informations. Touch [Back] to return.2. Touch bottom left corner of the screen to enter Navigation menu. Touch [Show Map] to return.3. Touch top right corner of the screen to show shortcuts of general functions. Touch [ ] button to hide.4. Touch bottom right corner of the screen to show Distance/Time Left/Arrival Time. Touch it again to hide.5. Touch the blank area to show control buttons. Top left corner: Plane/three-dimensional Top right corner: Cursor location. [ ]/[ ]: Move left/right [ ]/[ ]: Move up/down [ ]/[ ]: Enlarge/reduce the map [Back]: Hide the buttons. [More]: Show more informations. [Select]: Select the route.Long press [ ALL ] button to enter main source menu, then select [AUX-1] to visit front auxiliary device, and touch [AUX-2] to enter rear auxiliary device.If [AUX] is not on the current source menu, touch [Front] on the bottom of the screen, then hold the center of screen and drag left/right to show more icons.AUX is just for audio content with 3.5mm Jack connector plugged into audio-in socket on the front panel.15. NAVIGATION OPERATIONS16. AUX OPERATIONS](https://usermanual.wiki/Faurecia-Clarion-Electronics/NX602/User-Guide-1578937-Page-38.png)
![English38 NX60217. TROUBLE SHOOTINGGENERALProblem Cause MeasureUnit can not power on.Unit fuse blown. Replace with new fuse of correct rating.Car battery fuse blown. Replace with new fuse of correct rating.Unit can not power on.Nothing happens when buttons are pressed.Display is not accurate.The microprocessor has malfunctioned due to noise, etc.Turn o the power and remove the DCP.Press the [RESET] button with a thin rod.Note:When the [RESET] button is pressed, turn o the ACC power.** When the [RESET] button is pressed, frequencies of radio stations, titles, etc. stored in memory are cleared.Remote control does not work.Battery depleted. Change the battery.Battery installed incorrectly. Install the battery correctly.No/low audio outputImproper audio output connection. Check wiring and correct.Volume set too low. Increase volume level.Speakers damaged. Replace speakers.Heavily biased volume balance. Adjust the channel balance to center position.Speaker wiring is in contact with metal part of car. Insulate all speaker wiring connections.Poor sound quality or distortionNon-standard disc used. Use a standard disc.Speaker power rating does not match unit. Replace speakers.Wrong connections. Check wiring and correct.Speaker is shorted. Check wiring and correct.Unit resets itself when engine is o.Incorrect connection between ACC and Battery. Check wiring and correct.DISC PlayerProblem Cause MeasureDisc cannot be loaded.Another disc is already loaded. Eject the disc before loading the new one.There is an object installed inside the unit. Remove the object inside the unit.Sound skips or is noisy.Compact disc is dirty. Clean the compact disc with a soft cloth.Compact disc is heavily scratched or warped.Replace with a compact disc with no scratches.Sound is bad when power is rst turned on.Condensation may form on the internal lens when the car is parked in a humid place.Let dry for about 1 hour with power on.](https://usermanual.wiki/Faurecia-Clarion-Electronics/NX602/User-Guide-1578937-Page-39.png)
![English40 NX60218. ERROR DISPLAYSDisplay Cause MeasureDisc loading Disc is being read Please wait, it may take several minutes for some disc or storage device.No DiscDisc is dirty Clean disc with soft clothDisc is upside down Insert disc with label side upDisc not present in loading compartment Insert discBad Disc Disc is dirty Clean disc with soft clothDisc is upside down Insert disc with label side upUnknown disc Disc format is not compatible with this unit Change another disc.Region Error DVD is not compatible with region code of unitUse discs with corresponding regional code.Error Illegal mechanism operation Press EJECT key for 5 seconds to reset loading mechanismIf an error occurs, one of the following displays is displayed. Take the measures described below to solve the problem.If an error display other than the ones described above appears, press the [RESET] button. If the problem persists, turn off the power and consult your store of purchase.* When the [RESET] button is pressed, frequencies of radio stations, titles, etc. stored in memory are cleared.](https://usermanual.wiki/Faurecia-Clarion-Electronics/NX602/User-Guide-1578937-Page-41.png)