Faurecia Clarion Electronics NX602 CAR DVD PLAYER User Manual
Clarion Co Ltd CAR DVD PLAYER Users Manual
Users Manual

Owner's manual & Installation manual
2-DIN DVD MULTIMEDIA STATION WITH BUILT-IN
NAVIGATION & 6.2" TOUCH PANEL
NX602
1
English
NX602

English
2NX602
1. FEATURES ........................................................................................................................ 3
Expanding Systems ........................................................................................................... 3
2. PRECAUTIONS ................................................................................................................. 4
3. CAUTIONS ON HANDLING .............................................................................................. 6
Front Panel / Generalities .................................................................................................. 6
Cleaning the body ............................................................................................................. 6
USB Port ........................................................................................................................... 6
Handling Discs .................................................................................................................. 7
4. CONTROLS ....................................................................................................................... 8
Operational Panel .............................................................................................................. 8
Names of Buttons .............................................................................................................. 8
Remote Control ................................................................................................................ 9
5. MAIN MENU OPERATIONS ............................................................................................ 11
6. SYSTEM SETUP .............................................................................................................. 12
General ............................................................................................................................ 12
Time ................................................................................................................................ 12
Sound .............................................................................................................................. 13
Display ............................................................................................................................. 13
Setup ............................................................................................................................... 13
7. DISC OPERATIONS ........................................................................................................ 15
DVD System .................................................................................................................... 15
Accessing a Disc ............................................................................................................. 17
DVD Video Player Operation ........................................................................................... 18
CD Player Operation ....................................................................................................... 19
MP3/WMA Playback ........................................................................................................ 20
8. SD/USB OPERATION ...................................................................................................... 22
Accessing a USB ............................................................................................................. 22
Accessing an SD Card .................................................................................................... 22
SD/USB Audio Operations .............................................................................................. 23
SD/USB Video Operations .............................................................................................. 23
9. BLUETOOTH OPERATION ............................................................................................. 25
Bluetooth Telephone Operations ..................................................................................... 25
Bluetooth Audio Operations ............................................................................................ 26
10. RADIO OPERATION ...................................................................................................... 28
11. SATELLITE RADIO OPERATION ................................................................................. 30
12. HD RADIO OPERATION ............................................................................................... 32
13. iPod & iPhone OPERATIONS ...................................................................................... 34
14. PANDORA OPERATIONS ............................................................................................. 36
15. NAvIGATION OPERATIONS ........................................................................................ 37
16. AUX OPERATIONS ....................................................................................................... 37
17. TROUBLE SHOOTING .................................................................................................. 38
18. ERROR DISPLAYS........................................................................................................ 40
19. SPECIFICATIONS ......................................................................................................... 41
20. WIRING AND CONNECTIONS ...................................................................................... 42
Thank you for purchasing this Clarion product.
• Please fully read this owner’s manual before operating this equipment.
• Check the contents of the enclosed warranty card and store it in a safe place with this manual.
Contents
3
English
NX602
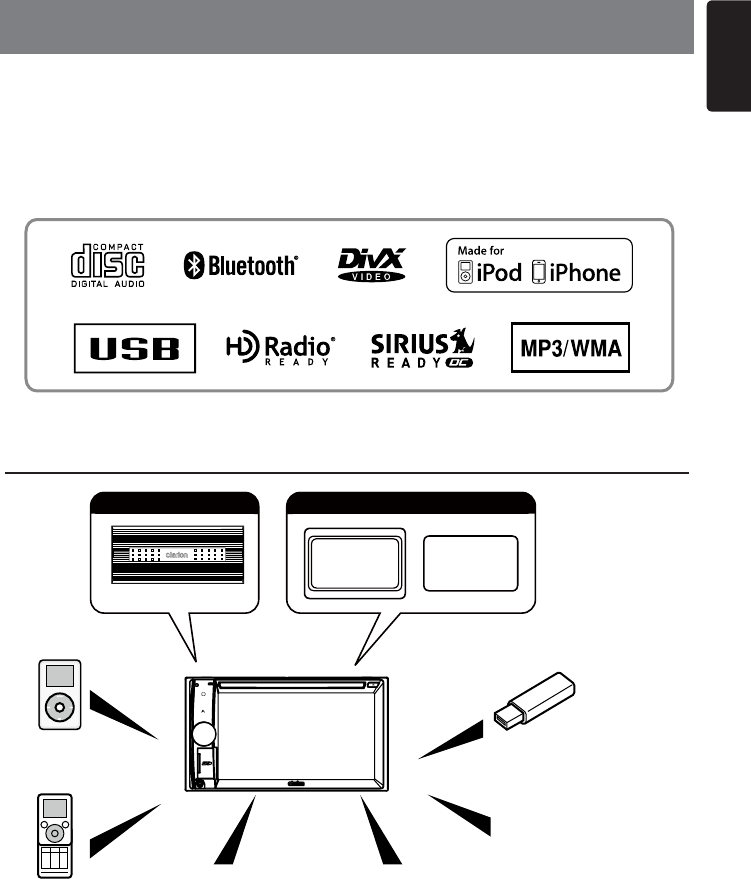
1. FEATURES
• FixedPanelwith6.2”TouchScreen
• DVD-Video/DVD±R/DVD±RWPlayer
• Built-inBluetooth®Handsfree(HFP)andAudioStreaming(A2DP&AVRCP)
• HDRadioReady™andSIRIUSRadioDirectConnectReady
• Built-inGPSNavigation
Expanding Systems
PortablePlayer
(ConnectviaAUXINJack)
USBMemory
Bluetooth®
cellularphone
HDRadiotuner
(THD302)tobe
connected
SiriusXMConnect™
VehicleTunertobe
connected
iPod / iPhone
(ConnectviaCCA-748)
Note:
• The items listed outside of the frames are the commercial products generally sold.
• CCA-748: Sold by separately.
6ChannelAmplier
Expandingaudiofeatures
Rear
Monitor
Rear Vision
Camera
Expandingvisualfeatures

English
4NX602
2. PRECAUTIONS
For your safety, the driver should not operate the controls while driving.
Also, while driving, keep the volume to a level at which external sounds can be heard.
1. When the inside of the car is very cold and the player is used soon after switching on the
heater, moisture may form on the disc or the optical parts of the player and proper playback
may not be possible. If moisture forms on the disc, wipe it off with a soft cloth. If moisture
forms on the optical parts of the player, do not use the player for about one hour. The
condensation will disappear naturally allowing normal operation.
2. Driving on extremely bumpy roads which cause severe vibration may cause the sound to
skip.
3. This unit uses a precision mechanism. Even in the event that trouble arises, never open the
case, disassemble the unit, or lubricate the rotating parts.
4. This equipment has been tested and found to comply with the limits for a Class B digital
device, pursuant to Part 15 of the FCC Rules.
These limits are designed to provide reasonable protection against harmful interference in
a residential installation. This equipment generates, users, and can radiate radio frequency
energy and, if not installed and used in accordance with the instructions, may cause harmful
interference to radio communications. However, there is no guarantee that interference will
not occur in a particular installation. If this equipment does cause harmful interference to
radio reception, which can be determined by turning the equipment off and on, the user is
encouraged to consult the dealer or an experienced radio technician for help.
5. “Made for iPod,” and “Made for iPhone” mean that an electronic accessory has been
designed to connect specically to iPod, or iPhone, respectively, and has been certied by
the developer to meet Apple performance standards.
Apple is not responsible for the operation of this device or its compliance with safety and
regulatory standards. Please note that the use of this accessory with iPod or iPhone may
affect wireless performance.
iPhone and iPod are trademarks of Apple Inc., registered in the U.S. and other countries.
6. SIRIUS, the SIRIUS Dog logo and related marks are trademarks of SIRIUS XM Radio,Inc.
7. HD Radio™, HD Radio Ready™, and the HD Radio Ready logo are proprietary trademarks of
iBiquity Digital Corporation.
8. DivX®, DivX Certified® and associated logos are trademarks of Rovi Corporation or its
subsidiaries and are used under license.
ABOUT DIVX VIDEO: DivX® is a digital video format created by DivX, LLC, a subsidiary of
Rovi Corporation. This is an ofcial DivX Certied® device that plays DivX video. Visit divx.
com for more information and software tools to convert your les into DivX videos.
ABOUT DIVX VIDEO-ON-DEMAND: This DivX
Certied® device must be registered in order to play purchased DivX Video-on-Demand (VOD)
movies. To obtain your registration code, locate the DivX VOD section in your device setup
menu. Go to vod.divx.com for more information on how to complete your registration.
WARNING
5
English
NX602
INFORMATION FOR USERS:
Changes or modifications to this product
unapproved by the manufacturer will void the
warranty and will violate FCC approval.

English
6NX602
Front Panel / Generalities
For a longer service life, be sure to read the following cautions.
• Do not allow any liquids on the set from drinks, umbrellas, etc. Doing so may damage the
internal circuitry.
• Do not disassemble or modify the set in any way. Doing so may result in damage.
• Do not let cigarettes burn the display. Doing so may damage or deform the body.
• If a problem should occur, have the set inspected at your store of purchase.
• The remote control unit may not work if the remote control sensor is exposed to direct
sunlight.
Cleaning the body
• Use a soft, dry cloth and gently wipe off the dirt.
• For tough dirt, apply some neutral detergent diluted in water to a soft cloth, wipe off the dirt
gently, then wipe again with a dry cloth.
• Do not use benzene, thinner, car cleaner, etc., as these substances may damage the body
or cause the paint to peel. Also, leaving rubber or plastic products in contact with the body for
long periods of time may cause stains.
USB Port
• The USB memory stick may stick out when inserted, so it may cause danger during driving.
When connect USB memory stick to the main unit, please use a USB extension cable.
• The USB memory sticks must be recognized as “USB mass storage class“ to work properly.
Some models may not operate correctly.
Whenthememorizeddataislostordamagedbyanychance,Clarionshallnotbeliable
foranydamage.
When using an USB memory stick, we recommend that you backup your data stored on it
before using a personal computer etc.
• Data les may be broken when using USB memory sticks in the following situation: When
disconnecting the USB memory stick or turning the power off during reading data.
When affected static electricity or electric noise.
Connect/disconnect the USB memory stick when it is not accessed.
• Connecting with the computer is not covered.
3. CAUTIONS ON HANDLING
7
English
NX602
Handling Discs
Handling
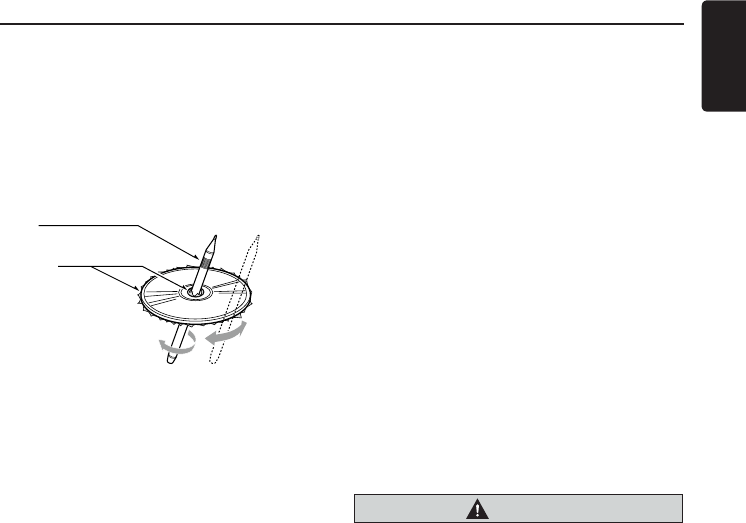
• New discs may have some roughness
around the edges. If such discs are used,
the player may not work or the sound may
skip. Use a ball-point pen or the like to
remove any roughness from the edge of
the disc.
• Never stick labels on the surface of the disc
or mark the surface with a pencil or pen.
• Never play a disc with any cellophane tape
or other glue on it or with peeling off marks.
If you try to play such a disc, you may not
be able to get it back out of the player or it
may damage the player.
• Do not use discs that have large scratches,
are misshapen, cracked, etc. Use of such
discs may cause misoperation or damage.
• To remove a disc from its storage case,
press down on the center of the case and
lift the disc out, holding it carefully by the
edges.
• Do not use commercially available disc
protection sheets or discs equipped with
stabilizers, etc. These may damage the
disc or cause breakdown of the internal
mechanism.
Storage
• Do not expose discs to direct sunlight or
any heat source.
• Do not expose discs to excess humidity or
dust.
• Do not expose discs to direct heat from
heaters.
Cleaning
• To remove ngermarks and dust, use a soft
cloth and wipe in a straight line from the
center of the disc to the circumference.
• Do not use any solvents, such as
commercially available cleaners, anti-static
spray, or thinner to clean discs.
• After using special disc cleaner, let the disc
dry off well before playing it.
On Discs
• Never turn off the power and remove the
unit from the car with a disc loaded.
CAUTION
Foryoursafety,thedrivershouldnotinsert
orejectadiscwhiledriving.
Ball-point pen
Roughness
English
8NX602
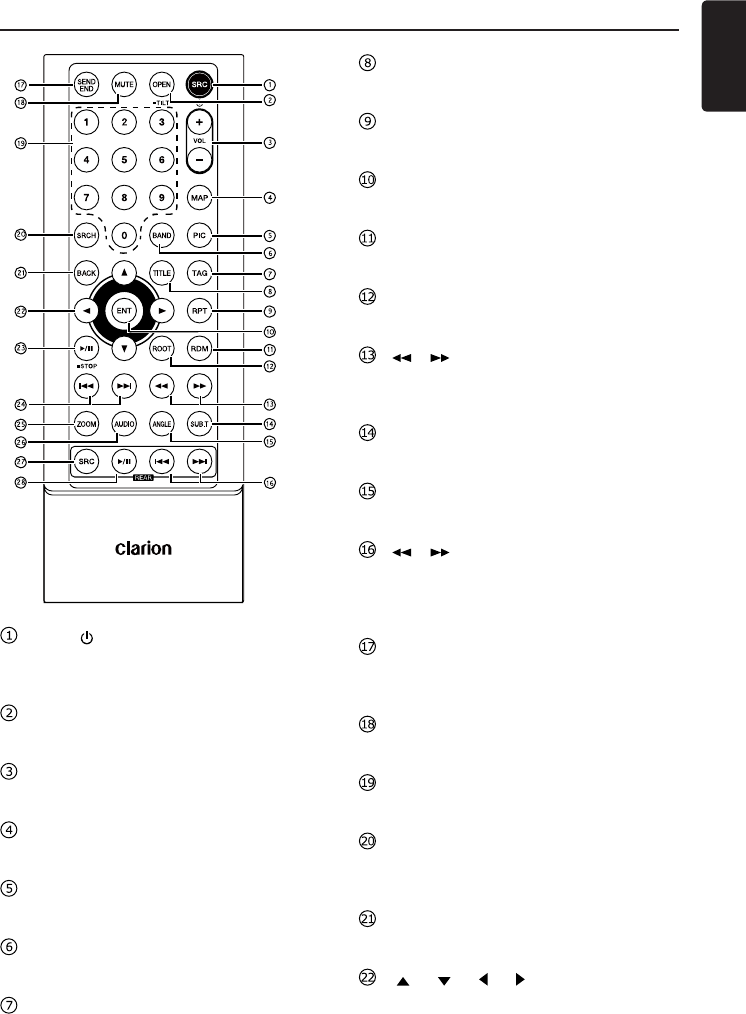
[POWER/VOL]Knob
• Press to power on the system when ignition on.
• When power on, short press to cut the sound.
• Rotate the knob to increase or decrease the volume.
• Press and hold this key more than 2 seconds to turn off the system.
[ALL]Button
• Short press to show/exit shortcut menu.
• Long press to show/exit main source menu.
[ ]Button
• Press to enter navigation mode;
• Press again to return current source.
[ ]Button
• Press to eject disc.
[ MIC ] Hole
• Internal microphone
[RESET]Button
• Press to load original settings.
Note: When the [RESET] button is pressed, frequencies of radio stations, titles, etc. stored
in memory are cleared.
4. CONTROLS
Operational Panel
Names of Buttons
AUXJack
SD Card
Slot
[ ]
[ ALL ] [MIC] DiscSlot
RESET
[ ]
[POWER/vOL]
MapCardSlot
NX602
9
English
NX602
Remote Control
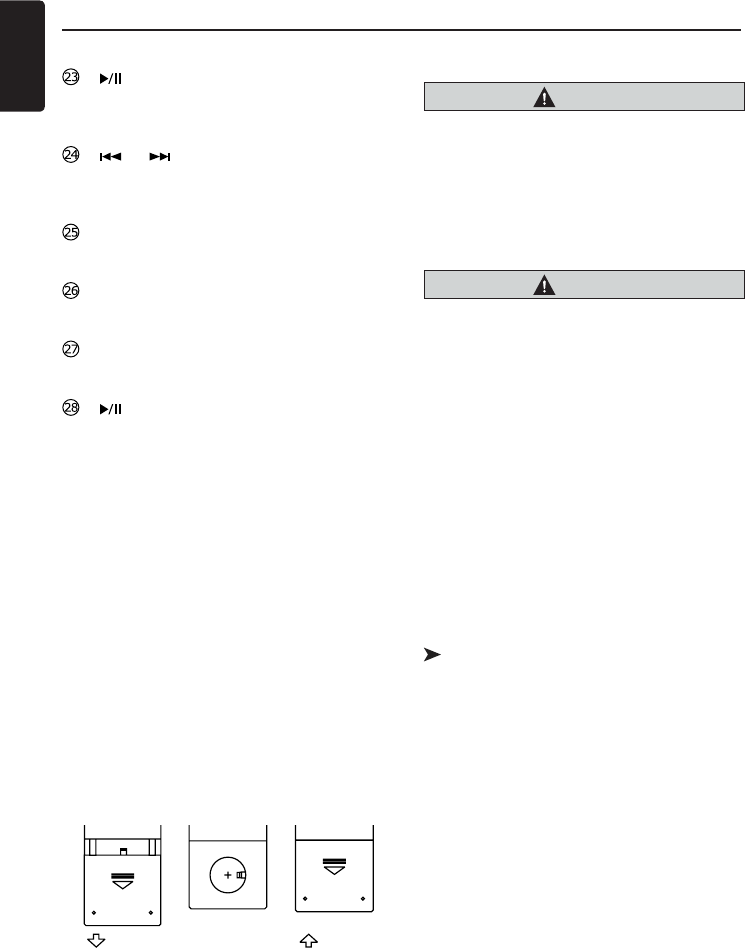
[SRC / ]Button
• Toggle the audio source
• Power on / Power off (long press)
[OPEN]Button
• Not used
[+],[-]Buttons
• Adjust volume level
[MAP]Button
• Enter navigation mode
[PIC]Button
• Adjust screen
[BAND]Button
• Select tuner band
[TAG]Button
• SIRIUS mode – Select category
[TITLE]Button
• DVD TITLE MENU
[RPT]Button
• Repeat playback
[ENT]Button
• Enter
[RDM]Button
• Random playback
[ROOT]Button
• DVD ROOT MENU
[],[ ]Buttons
• Manual tune
• Fast backward/forward playback
[SUB.T]Button
• DVD subtitle
[ANGLE]Button
• DVD angle
[],[ ]Buttons(Rear)
• Chapter up/down
• Fast backward/forward playback (long
press)
[SEND/END]Button
• Pick up
• Hang up
[MUTE]Button
• Mute the volume
[0]~[9]Button
• Numeric key
[SRCH]Button
• SIRIUS/DVB-T mode – Number input
mode
[BACK]Button
• DvD mode – Back
[ ],[ ],[ ],[ ]Buttons
• Move cursor up/down/left/right
English
10 NX602
[ /STOP]Button
• Play/Pause
• Stop (long press)
[ ],[ ]Buttons
• Previous / next preset station
• Auto tune (long press)
[ZOOM]Button
• ZOOM (DVD)
[AUDIO]Button
• DVD audio
[SRC]Button(Rear)
• Change next source
[ ]Button(Rear)
• Play/Pause
• Stop (long press)
Remote Control
Use and care of the remote control
Using the remote control
Point the remote control in the direction of the
front panel to operate.
When using for the rst time, pull out the lm
protruding from the tray.
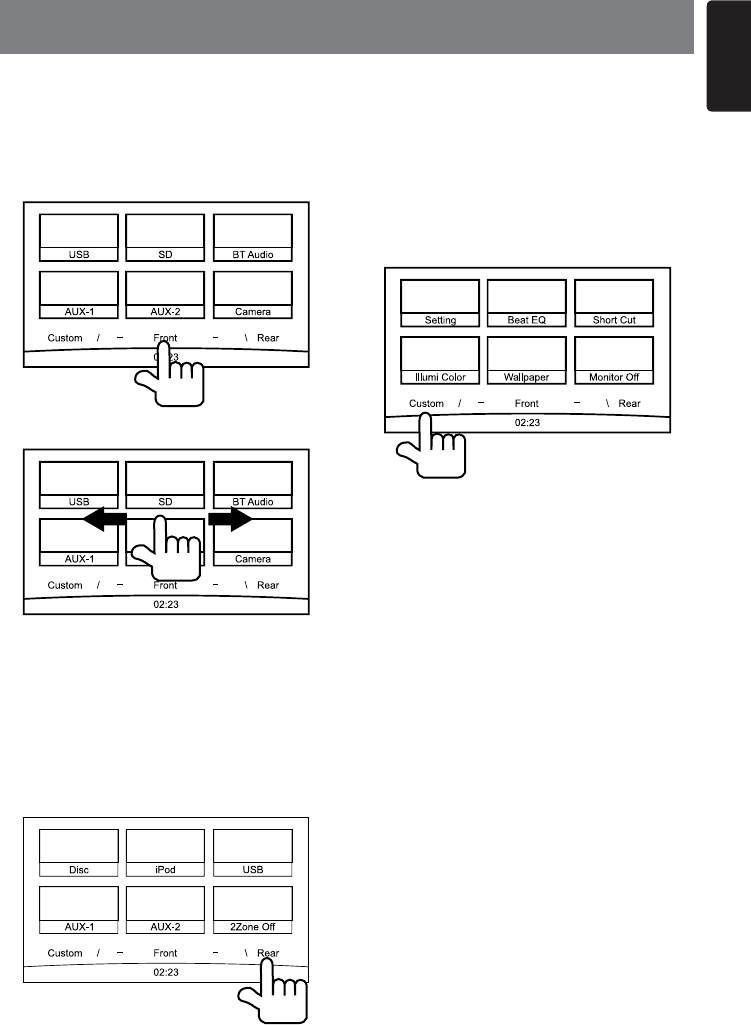
Replacing the battery
1 Slide the back cover of the remote control
out.
2. Insert the battery with the plus (+) and
minus (–) poles aligned properly.
• When using for the rst time, pull out the
lm protruding from the tray.
3. Close the back cover.
CAUTION
• Keep the battery out of the reach of
children.
Should the battery be swallowed, consult
a doctor immediately.
• Batteries (battery pack or batteries
installed)must not be exposed to excessive
heat such as sunshine, re or the like.
CAUTION
• Use one CR2025 (3 V) lithium battery.
• Remove the battery if the remote control is
not used for a month or longer.
• There is a danger of explosion if the
battery is incorrectly replaced. Replace
only with the same or equivalent type.
• Do not handle the battery with metallic
tools.
• Do not store the battery with metallic
objects.
• If the battery leaks, wipe the remote
control completely clean and install a new
battery.
• When disposing o f u s e d b a t t e r i e s ,
comply with governmental regulations or
environmental public institutions’ rules that
apply in your country/area.
Important
• Do not store the remote control in high
temperatures or direct sunlight.
• The remote control may not function
properly in direct sunlight.
• Do not let the remote control fall onto the
oor, where it may become jammed under
the brake or accelerator pedal.
11
English
NX602
5. MAIN MENU OPERATIONS
Long press [ALL] button on the PANEL to
show main source menu.
Front Zone Source
Touch [Front] on the bottom of screen to
show front zone sources.
Change page by draging left or right.
Touch the icons on the screen to enter
corresponding work mode, such as Disc
mode, Tuner mode, Telephone mode, etc.
Touch [AudioOff] to mute the volume.
Rear Zone Source
Touch [Rear] on the bottom of screen to
show rear zone sources.
Touch the icons on the screen to enter
corresponding work mode, such as Disc
mode, USB mode, iPod mode, etc.
Touch [2ZoneOff] to turn off the rear zone
monitor.
Custom Setting
Touch [Custom] on the bottom of screen to
show custom setting menu.
[Setting]: Touch the icon to enter system
setting menu. (see “System Setup”)
[BeatEQ]: Touch the icon to enter equalizer
setting menu. (see “System Setup”)
[ShortCut]: Touch the icon to enter Shortcut
setting menu. Hold the desired icon for more
than 2 seconds until it’s activated, then drag
it to the bottom. The name will appear on the
bottom.
• Hold the center of the screen and drag left
or right to show more icons.
• You can make total 5 shortcuts.
• You can access the shortcut list by
pressing the [ALL] button.
[IllumiColor]: Touch the icon to enter
Illumination color setting menu. (see “System
Setup”)
[Wallpaper]: Touch the icon to enter
Wallpaper setting menu. (see “System
Setup”)
[MonitorOff]: Touch the icon to turn off the
monitor.

English
12 NX602
At all mode, long press [ALL] button to
enter main source menu. Touch [Custom]
on the bottom left of the screen, then select
[Settings] on the screen to enter Setting
menu. Touch the icons on the left of screen
to select category: General, Time, Sound,
Display or Setup. To exit Setting menu, touch
[ ] on the bottom left of the screen.
General
Systemlanguage
Touch the button to the right of “System
language” to show language list. Select
desired language, touch [OK] to confirm, or
touch [Cancel] to exit without saving.
Closeoperationbar
When select [Auto], the operation bar will
close automatically after 10 seconds.
When select [Manual], the operation bar will
not close unless you touch the blank area on
the screen.
MainMenuIcons
When select [Active], main menu show
animation icons.
When select [Simple], main menu show
simple icons.
KeyIllumination
Touch [Set] to the right of “Key Illumination”
to show key illumination setting menu.
ScanColor: Scan 12 preset button backlight,
touch [Enter] to select desired one.
EditColor: There are 12 preset colors and
3 custom colors, you can select one color by
touch Color 1~12 or Custom 1~3.
Touch [Adjust] to show edit color menu.
Drag the color bar or inputting the RGB value
to select one color, touch [Enter] to conrm.
Initialize: Load original Buttons backlight.
Touch [MENU] on the top left of the screen to
return to main setting menu.
Wallpaperimages
Touch [Set] to the right of “Wallpaper images”
to show Wallpaper setting menu.
Touch [ ] or [ ] button to select the scene,
and touch the picture le name on the right
to preview it, then touch [Set] to conrm the
setting.
Touch [Import] to import the images from
mobile storage.
Beep
Touch [On] or [Off] to turn on/off the key beep
sound.
BlinkingLED
Touch [On] or [Off] to turn on/off the blinking
LED.
At blinking LED [On] mode, when ACC off,
the LED on the top left of the panel will blink.
Screencalibration
Touch [Set] to calibrate the screen.
Systemsoftware
Touch [Version] to show current software
version.
Restorefactorydefault
Touch [Restore] to load the original factory
settings.
Time
GPSsync
Touch [On] to synchronize time with GPS
and the following settings are disable: “Date”
and “Time”.
Date
Touch the button to the right of “Date” to
show date setting menu. Touch [ ] or [ ]
to select month, date or year. Touch [Set] to
conrm or [Back] to exit without saving.
Dateformat
Touch the button to the right of “Date format”
to select a date format from the sub-menu.
Time
Touch the button to the right of “Time” to
show time setting menu. Touch [ ] or [ ]
button to select hour or minute. Touch [Set]
to conrm or [Back] to exit without saving.
6. SYSTEM SETUP

13
English
NX602
24-Hourformat
Touch [On] to select 24-Hour format.
Touch [Off] to select 12-Hour format.
Sound
BeatEQ
Touch the button to the right of “Beat EQ” to
show EQ setting menu. You can select : “Bass
Boost”, “Impact”, “Excite”, “Custom” or “Off”.
To adjust the value, touch [-] or [+] button on
the screen.
Touch [Back] to exit.
Balance/Fader
Touch [Set ] to the right of “Balance/Fader” to
show Balance/Fader setting menu.
Touch [ ] or [ ] button to adjust Fader,
and touch [ ] or [ ] button to adjust
Balance.
Touch [Center] to reset the value.
Touch [Back] to exit.
Subwoofercontrol
Touch [-] or [+] button on the right of “Sub
woofer control” to adjust sub woofer level.
Subwooferphase
Touch to select sub woofer phase Normal or
Reverse.
Highpasslter
Touch the button to the right of “High pass
Filter” to show the sub-menu, then select the
lter: “Through”, “55Hz”, “85Hz” or “120Hz”.
Touch [Cancel] to exit.
Lowpasslter
Touch the button to the right of “Low pass
Filter” to show the sub-menu, then select the
lter: “Through”, “62Hz”, “95Hz” or “135Hz”.
Touch [Cancel] to exit.
AMPCancel
Touch [On] to turn off the amplier.
Touch [Off] to turn on the amplier.
MagnaBassEx
Touch [On] to turn on the loudness.
Display
DimmerMode
Touch [Auto], [Day] or [Night] to choose
dimmer mode.
Auto: The dimmer is controlled by your car
light.
Dimmer
Touch [-] or [+] button to the right of “Dimmer”
to adjust dimmer.
The setting is only for Day or Night.
Setup
Touch [Setup] on the right of screen to
spread the setting list. then touch the button
to the right of desired option to adjust or show
the sub-menu. Touch [Close] to close the list.
AUX
• Input Aux Level
Choose “Low”, “Middle“ or “High” input
level of auxiliary device.
Bluetooth
• Bluetooth
Choose Bluetooth function on or off.
• TelephoneSpeaker
Choose Front Left or Front Right speaker
at telephone mode.
• ToneSelect
Touch [Auto] to use ringtones of your
mobile phone.
Touch [Internal] to use preset ringtone of
the unit.
• SoftwareUpdate
Update the software.
Camera
• CameraInterrupt
Choose [On], the screen will switch to rear
camer menu automatically when backing.
DivX
• RegistrationCode
Display DivX Registration Code.

English
14 NX602
DVD
• MenuLanguage
Select menu language from list.
• AudioLanguage
Select audio language from list.
• SubtitleLanguage
Select subtitle language from list.
• SetPassword
To set password for parental control,
Touch [Set] to show password menu. Input
numbers by touching the digit and [OK]
buttons. Touch [X] button to delete a digit
inputted. Touch [Back] to exit.
• ParentalControl
Touch the button to the right of “Parental
Control” to show parental control menu.
Enter password, then select a parental
level. Touch [OK] to confirm or [Back] to
exit.
Navigation
• NavigationInterrupt
Select navigation interrupt On, Popup or
Off.
• VoiceGuidance
Turn on or off the voice guidance.
15
English
NX602
DVD System
DVD video is a high-quality digital video
source that provides crisp and clear images.
One 12 cm disc contains either one film or
four hours of music.
DVD Video Features
This unit provides the following functions in
addition to the high image quality and sound
quality of DVD video.
Note:
• The functions described in this section, for
example, the recorded language, subtitles,
angles, etc. differ depending on the DVD
video disc.
Refer to the instructions provided with the
DVD video.
• Some disc functions may operate
differently from described in this manual.
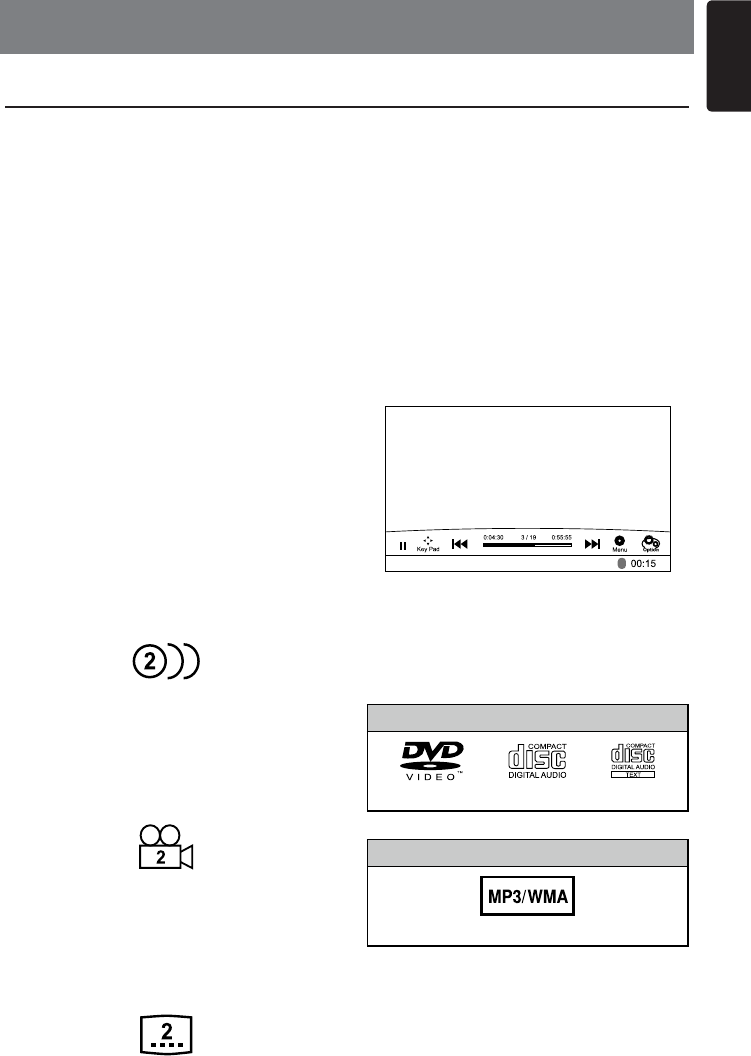
Multi-sound function
DVD video can store up to 8 languages
for one lm; select the language of your
preference.
• The languages stored on the disc are
indicated by the icon shown below.
Multi-angle function
A DVD video that is lmed from multiple
angles allows you to select the angle of
choice.
• The number of recorded angles are
indicated by the icon shown below.
Subpicture (subtitles) function
A DVD video can record subtitles for up to 32
languages and you can select the language
of the subtitles you wish to see.
• The number of recorded subtitle languages
are indicated by the icon shown below.
Multi-story function
When a DVD video contains more than one
story for a lm, you can select the story you
wish to enjoy.
The operation procedures vary with the disc;
observe the instructions for selecting a story
provided during playback.
Menu screens
Menu can be called up during DVD video
playback to perform menu setting.
• Example showing menu display
Discs
Playable discs
This DVD video player can play the following
discs.
Playable discs
DVD video discs Audio CDs CD TEXT
Playable media les
MP3/WMA
About CD Extra discs
A CD Extra disc is a disc in which a total of
two sessions have been recorded. The first
session is Audio session and the second
7. DISC OPERATIONS

English
16 NX602
session is Data session. Your personally-
created CDs with more than second data
sessions recorded cannot be played on this
DVD video player.
Note:
• When you have a CD Extra disc, only the
rst session will be recognized.
About playing a CD-R/CD-RW disc (MP3,
WMA)
This player can play CD-R/CD-RW discs
previously recorded in music CD format (MP3.
WMA)
About playing a DVD-R/RW or DVD+R/
RW disc
This player cannot play DVD-R/RW and
DVD+R/RW discs previously recorded in
video CD format.
However, MP3/WMA files recorded on
DVD-R/RW and DVD+R/RW discs can be
played.
Discs that cannot be played back
This DVD video player cannot play back
DVD-Audio, DVD-RAM, Photo CDs, etc.
Note:
It may also not be possible to play back CDs
recorded on a CD-R unit and CD-RW unit.
(Cause: disc characteristics, cracks, dust/dirt,
dust/dirt on player’s lens, etc.)
If a CD-R or CD-RW disc that has not been
nalized is played, it will take a long time to
start playing. Also, it may not be possible to
play depending on its recording conditions.
You cannot play SuperAudio CDs Playback
of the CD player is not supported even if it is
a hybrid disc.
About MP3/WMA playback
This unit can play back CD-R/CD-RW,
DVD-R/RW and DVD+R/RW discs on which
MP3/WMA music data have been recorded.
For a detailed information, see the section
entitled “Listening to MP3/WMA”.
Note on region numbers
The DVD video system assigns a region
number to DVD video players and DVD discs
by sales area. DVD video players sold in the
America can play back DVD discs with the
region number “ALL”, “4” or any combination
of numbers that also incorporate a “4”.
The DVD video region number is marked on
the disc jacket as shown below.
24
46

17
English
NX602
CAUTION
For your satety, the driver should not
insertorejectadiscwhiledriving.
Eject function
Just pressing the [ ] button, ejects the disc
even if the power to the unit was not turned
on.
Notes:
• If you force a disc into before auto
reloading, this can damage the disc.
• If a disc (12 cm) is left ejected for 15
seconds, the disc is automatically reloaded
(Auto reload).
Listening to a disc already loaded
in the unit
Long press [ ALL ] button to enter main
source menu, then select [ Disc ] to enter
Disc mode.
If Disc is not on the current source menu,
touch [Front] on the bottom of the screen,
then hold the center of screen and drag left/
right to show more icons.
When the unit enters the Disc mode, play
starts automatically.
Loading a disc
Insert a disc into the center of the disc
slot with label facing up. The disc plays
automatically after loading.
Notes:
• Never insert foreign objects into the disc
slot.
• If the disc is not inserted easily, there may
be another disc in the mechanism or the
unit may require service.
Accessing a Disc
English
18 NX602
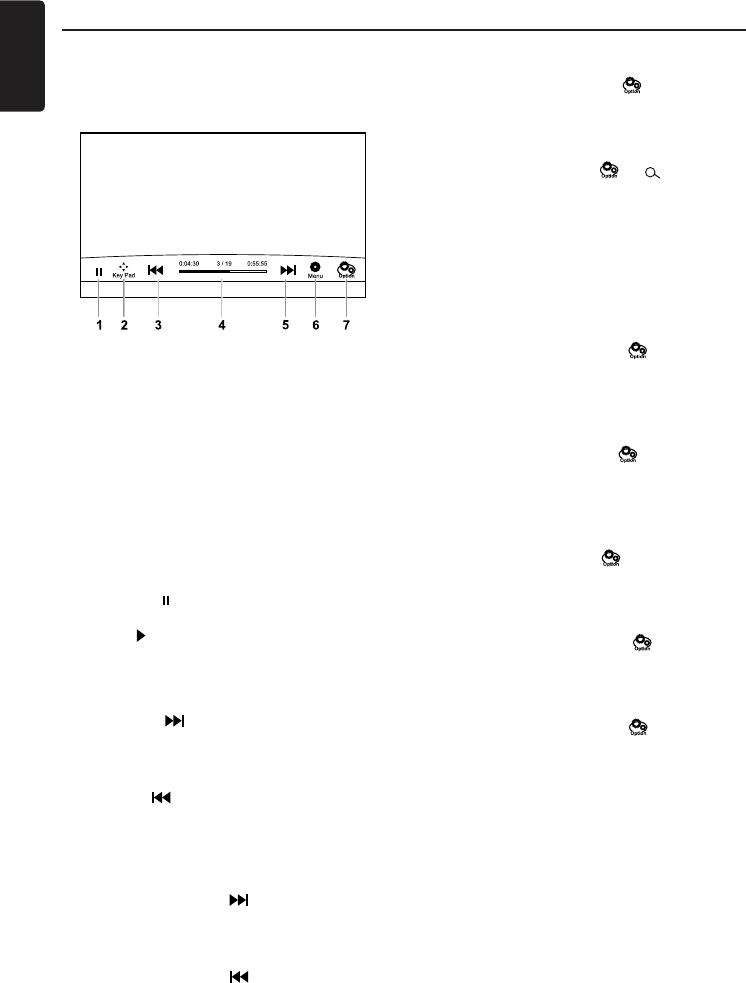
Playback menu
Touch the bottom half of screen to show
operation bar.
1. Play/Pause
2. Show cursor keys in DVD title menu
3. Previous chapter
Fast-backward (long press)
4. Progress bar
5. Next chapter
Fast-forward (long press)
6. DVD title menu
7. Show other options
Pausing play
1. Touch the [ ] button on the screen to pause
play.
2. Touch [ ] button to resume play.
Selecting a chapter
Chapter-up
Touch the [ ] button to move to the
beginning of the next chapter.
Chapter-down
Touch the [ ] button to move back to the
beginning of the previous chapter.
Fast-forward/Fast-reverse
Fast-forward
Touch and hold the [ ] button for more
than 2 seconds.
Fast-reverse
Touch and hold the [ ] button for more
than 2 seconds.
Repeat
During playback, touch [ ], [ Repeat]
buttons to repeat play.
Search function
During playback, touch [ ], [ ] buttons to
show search menu.
Input number by digit buttons, touch [ OK ]
to began searching or touch [ Close ] to clear
inputting.
Touch [Chapter] or [Title] to show DVD
chapter/title list.
DVD audio select
During playback, touch [ ], [ Audio ]
buttons to select audio language to listen if
the DVD has multiple audio languages.
DVD subtitle select
During playback, touch [ ], [ Subtitle]
buttons to select the subtitle language if the
DVD has multiple language subtitles.
Playback information
During playback, touch [ ], [ Information]
buttons to view playback information.
Adjust picture
During playback, touch [ ], [ Adjust
Picture] buttons to select wide screen.
DVD angle select
During playback, touch [ ], [ Angle]
buttons to select different angle to view if the
DVD has multiple-angle views.
DVD Video Player Operation
19
English
NX602
CD Player Operation
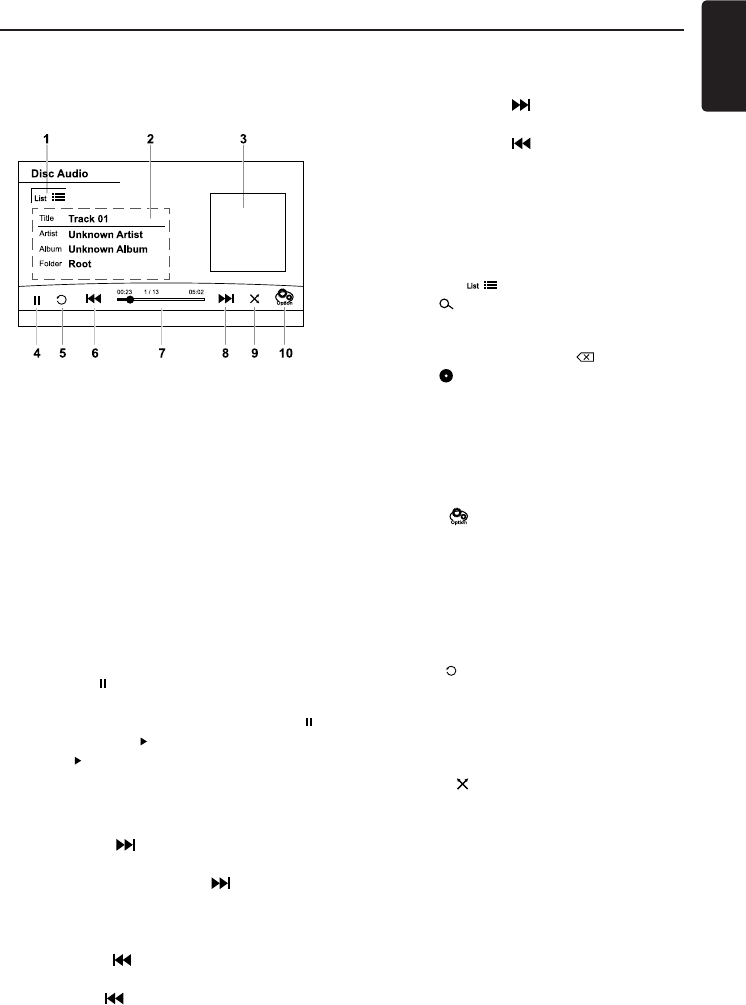
Playback menu
Touchthebottomhalfofscreentoshow
operationbar.
1. Show track list.
2. Title/Artist/Album information
3. Track information
Touch and drag left/right to look through
the tracks.
4. Play/Pause
5. Repeat play
6. Previous track
Fast-reverse (long press)
7. Playing time indicator
8. Next track
Fast-forward (long press)
9. Random play
10. Show other options
Pausing play
1. Touch the [ ] button on the bottom left of the
screen to pause play.
“PAUSE” appears in the display, and [ ]
button becomes [ ] .
2. Touch [ ] button to resume play.
Selecting a track
Track-up
1. Touch the [ ] button to move to the
beginning of the next track.
2. Each time you touch the [ ] button, the
track advances to the beginning of the
next track.
Track-down
1. Touch the [ ] button to move back to
the beginning of the current track.
2. Touch the [ ] button twice to move back
to the beginning of the previous track.
Fast-forward/Fast-reverse
Fast-forward
Touch and hold the [ ] button .
Fast-reverse
Touch and hold the [ ] button .
* For MP3/WMA discs, it takes some time
until the start of searching and between
tracks. In addition, some error may occur in
the play time.
Search Function
1. Touch the [ ] button to show track list.
Touch [ ] button to enter search menu.
2 Input numbers by touching digit buttons,
then touch [Search] to began searching.
To delete numbers, touch [ ] button.
3. Touch [ ] button to exit.
Other various play functions
Scanplay
This function allows you to locate and play
the rst 10 seconds of all the tracks recorded
on a disc.
Touch the [ ] button, then touch [Scan] to
scan play.
Repeatplay
This function allows you to play the current
track repeatedly or play a track currently
being played in the MP3/WMA folder
repeatedly.
Touch the [ ] button to select Track Repeat,
Folder Repeat or All Repeat.
Randomplay
This function allows you to play all tracks
recorded on a disc in a random order.
Touch the [ ] button to perform random
play.

English
20 NX602
MP3/WMA Playback
This unit is an ID3 Tag compatible model.
This unit supports the ID3 TAGs of the
Version 2.4, 2.3, 1.1 and 1.0.
In displaying, this unit gives priority to the
Version 2.3 and 2.4 TAGs.
What is MP3/WMA
MP3 is an audio compression method
and classied into audio layer 3 of MPEG
standards.
WMA is an audio compression method
developed by Microsoft Corporation.
These audio compression methods have
penetrated into PC users and become a
standard format.
These features compress the original audio
data to about 10 percent of its initial size with
a high sound quality. This means that about
10 music CDs can be recorded on a CD-R
disc or CD-RW disc to allow a long listening
time without having to change CDs.
Note: Some CDs recorded on CD-R/RW
mode may not be usable.
Displaying MP3/WMA TAG titles
Tag information such as title, artist and
album title can be displayed for MP3/WMA
le containing Tag information.
Precautions when creating MP3/
WMA le
Usablesamplingratesandbitrates
1. MP3: Sampling rate 8 kHz-48 kHz, Bit rate
8 kbps-320 kbps / VBR
2. WMA: Bit rate 8 kbps-320 kbps
Fileextensions
1. Always add a file extension “.MP3”,
“.WMA” to MP3, WMA le by using single
byte letters. If you add a file extension
other than specified or forget to add the
le extension, the le cannot be played.
2. Files without MP3/WMA data will not play.
The les will be played soundlessly if you
attempt to play files without MP3/WMA
data.
* When VBR les are played, the play time
display may differ the play location.
* When MP3/WMA les are played, a little
no sound part is caused between tunes.
Logicalformat(Filesystem)
1. When writing MP3/WMA file on a CD-R
disc or CD-RW disc, please select
“ISO9660 level 1, 2 or Joliet or Romeo” or
Apple ISO as the writing software format.
Normal play may not be possible if the
disc is recorded on another format.
2. The folder name and file name can be
displayed as the title during MP3/WMA
play but the title must be within 32 single
byte alphabetical letters and numerals
(including an extension).
3. Do not afx a name to a le inside a folder
having the same name.
Folderstructure
A disc with a folder having more than 8
hierarchical levels will be impossible.
Numberoflesorfolders
1. Up to 999 files can be recognized per
folder.
Up to 3000 les can be played.
2. Tracks are played in the order that they
were recorded onto a disc. (Tracks
may not always be played in the order
displayed on the PC.)
3. Some noise may occur depending on
the type of encoder software used while
recording.
PlayingMP3folders
When selected for play, files and folders
(Folder Search, File Search or Folder Select)
are accessing in the order in which they were
written to the media.
As a result, the order in which they are
expected to be played may not match the
order in which they are actually played.
You may be able to set the order in which
MP3/WMA les are to be played by assigning
file names beginning with play sequence
numbers such as “01” to “99”.
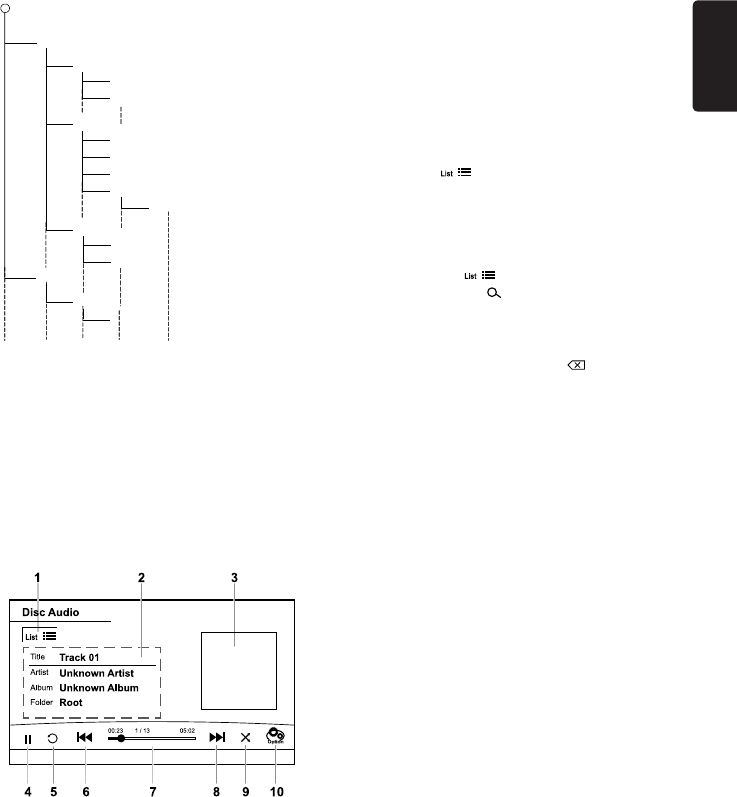
For example, a medium with the following
folder/file hierarchy is subject to Folder
Search, File Search or Folder Select.
See the diagram below.
21
English
NX602
(?)
0
?
1
?
2♪①
♪②
?
5
♪⑧
♪⑦
?
6
?
7♪⑨
♪③
?
3
?
4
♪④
♪⑤
♪⑥
Layer1 Layer 2 Layer 3 Layer 4 Layer5
○Root Folder
?Folder
♪File
The player will only recognize three folder
levels and does not display folders containing
other folders. In the example above, the unit
will display folders 2, 3, 5 and 7, but 1 and 6
since they do not contain others.
Playback menu
Touch the bottom half of screen to show
operation bar.
1. Show folder/le list.
2. Title/Artist/Album information
3. Track information
Touch and drag left/right to look through
the tracks.
Touch and drag up/down to look through
the albums.
4. Play/Pause
5. Repeat play
6. Previous track
Fast-reverse (long press)
7. Progress bar
8. Next track
Fast-forward (long press)
9. Random play
10. Show other options
Folder Select
This function allows you to select a folder
containing MP3/WMA les and start playing
from the rst track in the folder.
Touch the [ ] button on the upper left of
the screen to show folder/file list. You can
select a folder or le by touching it.
Search Function
1. Touch the [ ] button to show folder/
le list. Touch [ ] button to enter search
menu.
2 Input numbers by touching digit buttons,
then touch [Search] to began searching.
To delete numbers, touch [ ] button.
Other operations about playing MP3/WMA
are almost same as CD Player mode.
English
22 NX602
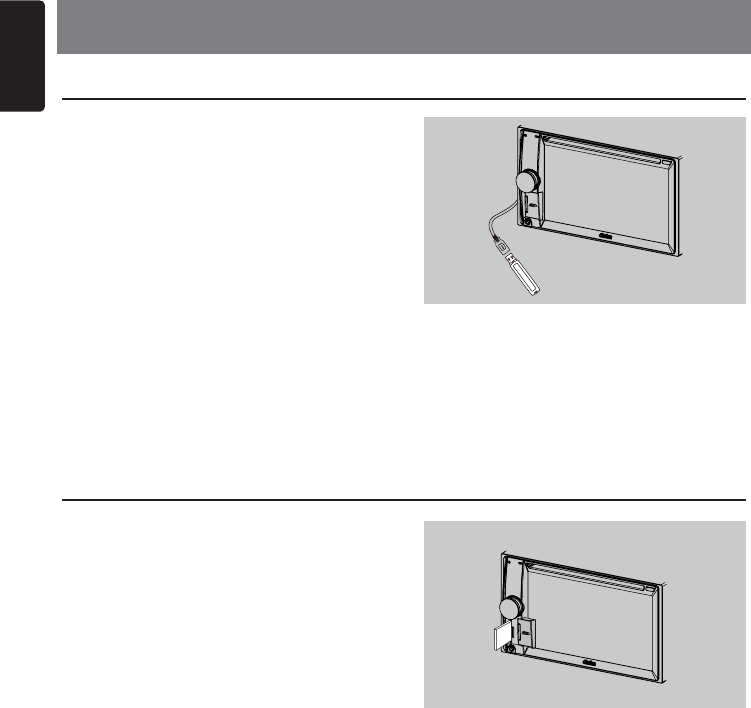
1. Insert a USB device into the USB cable.
When connecting a USB device, the unit
will read the les automatically.
2. To remove the USB device, you should
first select another source or turn off
the power, in order to avoid damaging
the USB device. Then take off the USB
device.
3. T o ac ce s s a U S B d e v i c e al re ad y
connected to the unit, long press [ ALL ]
button to enter main source menu, then
select [ USB ] to enter USB mode.
If [USB] is not on the current source menu,
touch [Front] on the bottom of the screen,
then hold the center of screen and drag
left/right to show more icons.
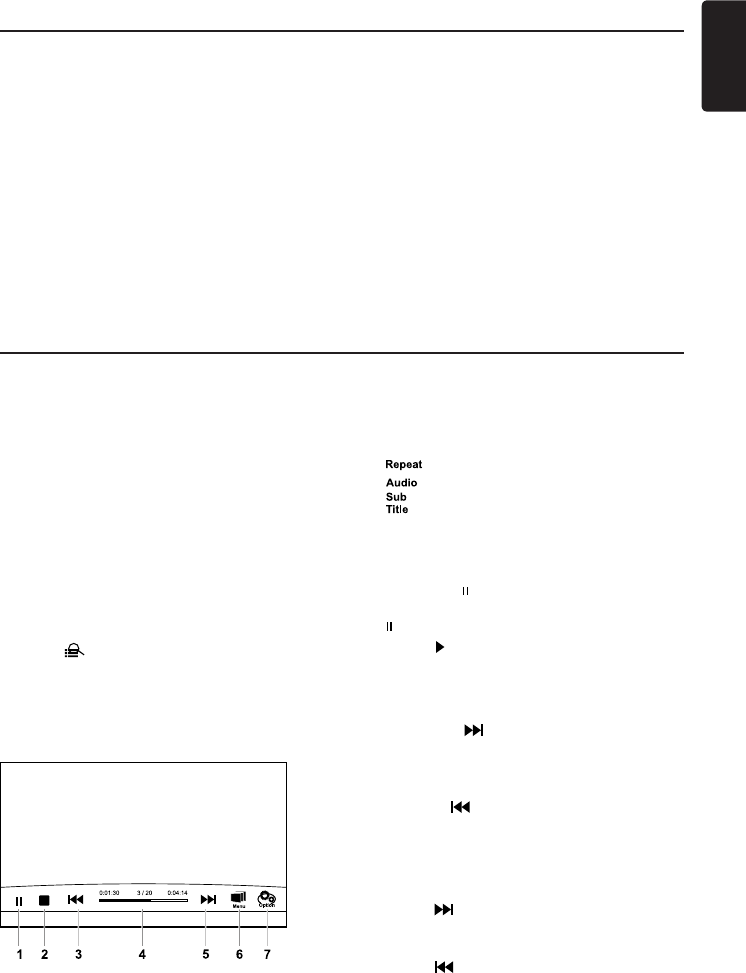
1. Push the cover of the card slot located on
the bottom left of the panel to the right.
Insert a SD card into the card slot.
When inserting a card, the unit will read
the les automatically.
2. To remove the card, you should rst select
another source or turn off the power, in
order to avoid damaging the card. Press to
pop it out, then take off the card. Close the
cover to the left.
3. To access a USB device already inserted
in the unit, long press [ ALL ] button to
enter main source menu, then select [ SD
] to enter SD mode.
If [SD] is not on the current source menu,
touch [Front] on the bottom of the screen,
then hold the center of screen and drag
left/right to show more icons.
Accessing a USB
Accessing an SD Card
8. SD/USB OPERATION
23
English
NX602
SD/USB Audio Operations
SD/USB Video Operations
This system can play audio les (MP3/WMA)
stored in an SD card or USB memory. You
can use it as an audio device by simply
copying desired audio les into it.
Note:
This system will not operate or may operate
improperly with some card or USB.
Files protected with any DRM cannot be
played.
This system can play video files (MP4, etc)
stored in an SD card or USB memory. You
can use it as an video device by simply
copying desired video les into it.
Note:
This system will not operate or may operate
improperly with some card or USB.
Files protected with any DRM cannot be
played.
Select SD/USB Video mode
Touch top left corner of the screen until SD
Video or USB Video appears.
Touch [ ] button to show folder/file list.
Select a desired le to play.
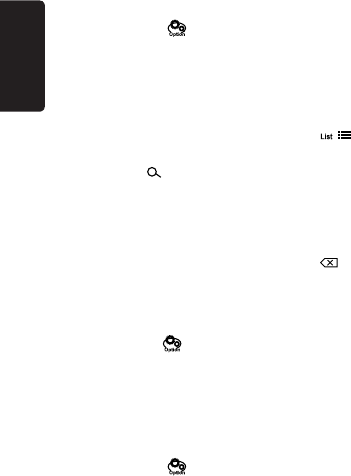
Playback menu
When playing, touch the bottom half of
screen to show operation bar.
1. Play/Pause
2. Stop
3. Previous le
Fast-reverse (long press)
4. Progress bar
Select SD/USB Audio mode
Touch top left corner of the screen until SD
Audio or USB Audio appears.
Operations about SD/USB audio operations
are almost same as MP3/WMA playback
mode.
5. Next le
Fast-forward (long press)
6. Show video menu
7. Show other options
[ ]: Repeat playback.
[ ]: Select audio channel.
[ ]: Select DVD subtitle.
[Information]: Show current video information.
Pausing play
1. Touch the [ ] button on the screen to pause
play.
“ PAUSE” appears in the display.
2. Touch [ ] button to resume play.
Selecting a le
File-up
Touch the [ ] button to move to the
beginning of the next le.
File-down
Touch the [ ] button to move back to the
beginning of the previous le.
Fast-forward/Fast-reverse
Fast-forward
Hold the [ ] button .
Fast-reverse
Hold the [ ] button .
Repeat play
This function allows you to play the current
file repeatedly or play files currently being
English
24 NX602
played in the folder repeatedly.
Touch the [ ] button and touch
[Repeat] button to select File Repeat,
Folder Repeat, All Repeat or Repeat Off.
Search function
1. At video main menu, touch the [
] button to show folder/le list.
2. Touch [ ] button to enter search
menu.
3 Input numbers by touching digit
buttons, then touch [Search] to began
searching.
To delete numbers, touch [ ]
button.
Audio select
Touch the [ ] button and touch [
AUDIO ] button to select audio language
to listen if the file has multiple audio
languages.
Subtitle select
Touch the [ ] button and touch
[ SUBTITLE ] to select the subtitle
language if the le has multiple language
subtitles.
25
English
NX602
Bluetooth Telephone Operations
Handsfree Operations
Pairing
1. Turn on the Bluetooth function of the unit.
(see <System Setup>, <Bluetooth>)
2. Turn on Bluetooth function of your mobile
phone.
3. Enter mobile phone’s Bluetooth setup
menu.
4. Search for new Bluetooth devices.
5. Select NX602 from the pairing list on the
mobile phone.
6. Enter “0000” as the password.
6. After pairing successfully, icon on the
bottom right of the screen turns blue.
Choose paired device
After paired, the mobile device information
appears on the right of screen, such as
model number, Signal, Battery.
1. To select other paired devide, hold the
middle right of the screen, and drag it left
or right, touch it to show control buttons.
2. Touch [Connect] to connect the bluetooth
device. Touch [Cut] to disconnect.
3. Touch [ ] to delete the paired device
from pairing list.
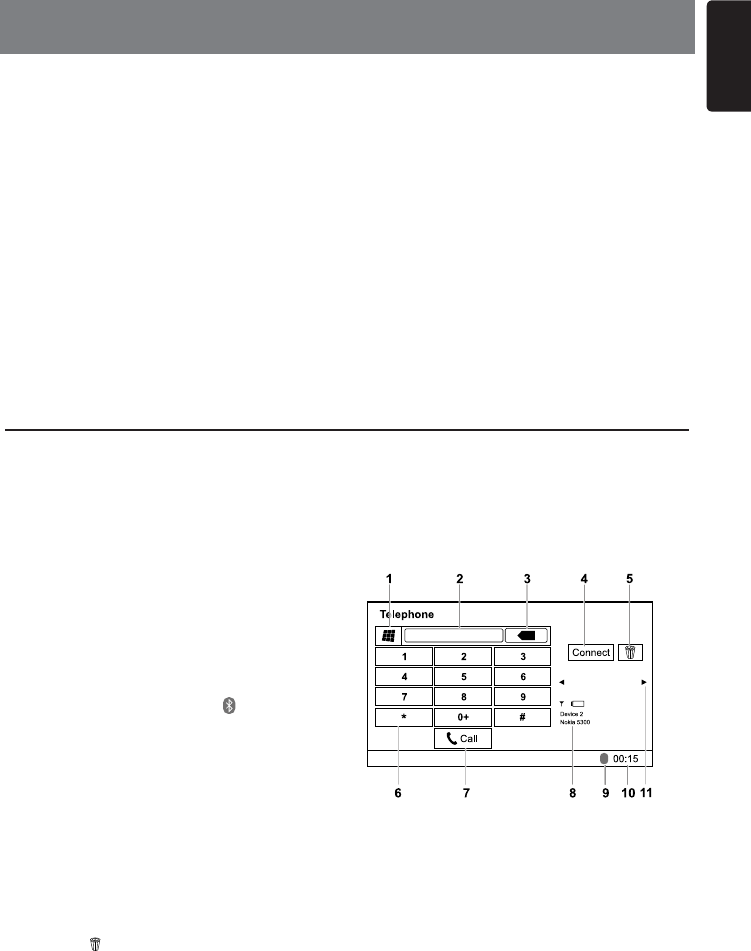
Telephone menu
Long press [ ALL ] button to enter main
source menu, then select [Telephone] to
enter telephone mode.
If [Telephone] is not on the current source
menu, touch [Front] on the bottom of the
screen, then hold the center of screen and
drag left/right to show more icons
1. Show history categories.
2. Input box
3. Backspace
4. Connect to a paired Bluetooth device
5. Delete a paired device name.
6. Number pad
7. Call/Hang up
8. Paired device information
9. Bluetooth indicator
10. System time
11. Look through paired devices.
9. BLUETOOTH OPERATION
The Bluetooth allows you to utilize your car’s built-in audio system for wireless mobile phone or
music handsfree communication. Some Bluetooth mobile phones have the audio features, and
some portable audio players support Bluetooth feature. This system can play audio data stored
in a Bluetooth audio device. The car stereo with Bluetooth will be able to retrieve phonebook
contacts, received call, dialled call, missed call, incoming calls, outgoing call and listen to music.
Note:
• Do not leave the microphone of Bluetooth handsfree in the places with wind passing such as
air outlet of the air conditioner, etc. This may cause a malfunction.
• If leave it in the places subjected to direct sun, high temperature can cause distortion,
discoloration which may result in a malfunction.
• This system will not operate or may operate improperly with some Bluetooth audio players.
• Clarion cannot guarantee the compatibility of all mobile phones together with the unit.
• Audio playback will be set to the same volume level as set during telephone call. This might
cause problems, if extreme volume level is set during telephone call.
English
26 NX602
Making a call
•DialNumber
1. Input numbers by digit-keys on the screen.
2. Touch [ ] button to dial.
Touch [ ] button to delete characters.
3. Touch [ ] button to terminate call.
•Dialed/Received/MissedCallHistory
You can search any Dialled/Missed/Received
Call History.
1. Touch [ ] button to show following
history categories: Dialed, Received,
Missed and Contacts.
Touch [Dialer] to dial number manually.
2. Touch to select a category, the numbers of
the category are displayed.
4. Select a number, touch [ ] button to
dial.
Touch [ ] to return previous menu.
•CallfromPhonebook
You can search the contact name in the
phonebook and make call.
1. Touch [ ] button and select [Contacts].
It may take a few minutes to synchronize
the phone book at rst time.
2. Select a number, touch [ ] button to
dial.
Touch [ ] to return previous menu.
Note:
Some cellular phones may not be able to
transfer the Phone Book data.
•Answeringacall
You can answer an incoming call by pressing
the [ ] button.
* Touch [ ] button to reject an incoming
call.
Operation bar
Touch lower right of the screen to shwo the
operation bar, touch [ ] or [ ] button to show
more icons and touch [ ] to exit.
BT Power: Turn on/off the bluetooth function.
Auto Connect: Turn on the function to re-
connect automatically.
Auto Answer: Turn on the function to
answering a call automatically.
PinCode: Touch to set a PIN code on the key
pad.
MicroPhone: Touch to select internal or
external microphone.
Microphone Gain: Touch to set the gain of
microphone
Information: Touch to show Bluetooth
version.
Audio Streaming Operations
What is audio streaming?
Audio streaming is a technique for transferring
audio data such that it can be processed as
a steady and continuous stream. Users can
stream music from their external audio player
to their car stereo wirelessly and listen to the
tracks through the car’s speakers. Please
consult your nearest Clarion dealer for more
information on the product of wireless audio
streaming transmitter offered.
CAUTION
Pleaseavoid operatingyourconnected
mobilephonewhileaudiostreamingas
thismaycausenoiseorsoundchoppyon
thesongplayback.
Audiostreamingmayormaynotresume
afte r t e lephone in t e r rupt as th i s i s
dependentonmobilephone.
Systemwill alwaysreturntoRadiomode
ifaudiostreamingisdisconnected.
Note:
Be sure to read the chapter “Pairing” and
“Choose paired device” before proceeding.
Playback menu
Touch the bottom half of screen to show
operation bar.
Bluetooth Audio Operations
27
English
NX602
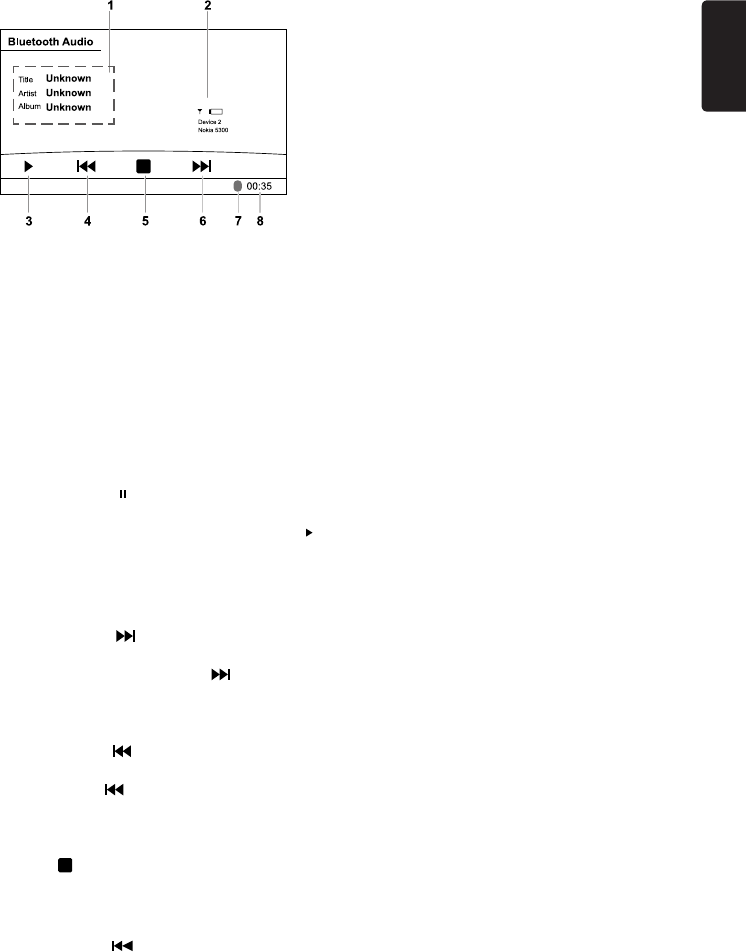
1. Title/Artist/Album information
2. Device Information
3. Play/Pause
4. Previous track
Fast-reverse (long press)
5. Stop
6. Next track
Fast-forward (long press)
7. Bluetooth indicator
8. System time
Play / Pause a track
1. Touch the [ ] button to pause audio
playback.
2. To resume audio playback, touch the [ ]
button.
Selecting a track
Track-up
1. Touch the [ ] button to move to the
beginning of the next track.
2. Each time you touch the [ ] button, the
track advances to the beginning of the
next track.
Track-down
1. Touch the [ ] button to move back to
the beginning of the current track.
2. Touch the [ ] button twice to move back
to the beginning of the previous track.
Stop playback
Touch [ ] button to stop playback.
Note:
Playing order will depend on Bluetooth audio
player. When [ ] button is pressed, some
A2DP devices will restart the current track
depends on the duration of playback.
Some Bluetooth audio players may not
have play/pause synchronized with this unit.
Please make sure both device and main
unit are in the same play/pause status in
Bluetooth Audio mode.
English
28 NX602
Select tuner as playing source
Long press [ ALL ] button to enter main
source menu, then select [Tuner] to enter
Tuner mode.
If Tuner is not on the current source menu,
touch [Front] on the bottom of the screen,
then hold the center of screen and drag left/
right to show more icons.
Playback menu
Touch the bottom half of screen to show
operation bar.
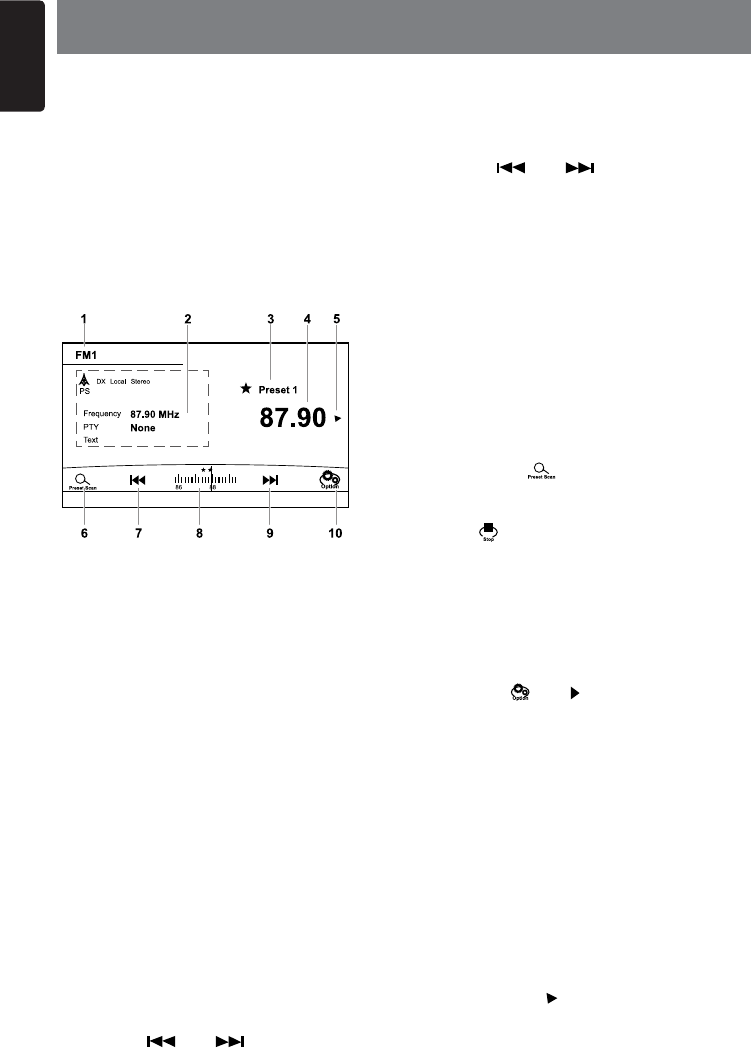
1. Band switch
2. Information area
3. Preset station number
4. Current station frequency
5. Show preset stations list.
6. Scan preset stations.
7. Manual tune backward.
Auto tune backward. (long press)
8. Frequency bar
9. Manual tune forward.
Auto tune forward. (long press)
10. Show other options
Touchthebottomhalfofscreentoshow
operationbar.
Select one radio band
Touch the top left corner of the screen to
select one radio band among FM1, FM2,
FM3 and AM.
Manual tuning
During manual tuning, the frequency will be
changed in steps.
Touch the [ ] or [ ] button on the
operation bar to tune in a higher / lower
station.
Auto tuning
Hold the [ ] or [ ] button on the
operation bar for more than 2 seconds to
seek a higher / lower station.
To stop searching, repeat the operation
above or press other buttons having radio
functions.
Note:
When a station is received, searching stops
and the station is played.
Preset scan
Preset scan receives the stations stored
in preset memory in order. This function is
useful when searching for a desired station
in memory.
1. Touch the [ ] button on the operation
bar.
2. When a desired station is tuned in, press
the [ ] button to continue receiving that
station.
Auto store
Only stations with sufcient signal strength
will be detected and stored in the memory.
To star automatic station search, touch
following buttons on the operation bar in
sequence: [ ] -> [ ] -> [Auto Store] ->
[OK] .
To stop auto store, press other buttons
having radio functions.
Notes:
1. After auto store, the previous stored
stations will be overwritten.
2. The unit has 4 bands, such as FM1, FM2,
FM3 and AM. FM3 and AM can store
by AS function. Each bands can store 6
stations, NX602 can store 24 stations in
total.
Manual store
When one expected radio station has been
detected, touch [ ] button on the right edge
of the screen to show the preset station list,
hold one of the six preset stations for more
than 2 seconds to store it in the memory.
10. RADIO OPERATION

29
English
NX602
Touch [ ] button near the center of screen
to hide the preset station list.
Recall the stored stations
Touch [ ] button on the right edge of the
screen to show the preset station list, touch
to select a preset station.
Touch [ ] button near the center of screen
to hide the preset station list.
Local seeking
When LOCAL seeking is on, only those radio
stations with strong radio signal could be
received.
To open or close LOCAL function, touch [
] button on the operation bar, then touch the
[Mode] button to select “Local” or “DX”.
Note:
The number of radio stations that can be
received will decrease after the local seeking
mode is on.
English
30 NX602
Listeners can subscribe to SIRIUS® Radio
on the Web by visiting www.sirius.com, or
by calling (888) 539-SIRIUS. Customers
should have their SIRIUS ID ready (SIRIUS
ID is located on the SCC1: SIRIUS Connect
Vehicle Tuner, solid separately). Customers
can listen to music samples by tuning to
channel 184.
Accessing satellite radio mode
Long press [ ALL ] button to enter main
source menu, then select [SiriusXM] to enter
SiriusXM mode.
If [SiriusXM] is not on the current source
menu, touch [Front] on the bottom of the
screen, then hold the center of screen and
drag left/right to show more icons.
Operation menu
Touch the bottom half of screen to show
operation bar.
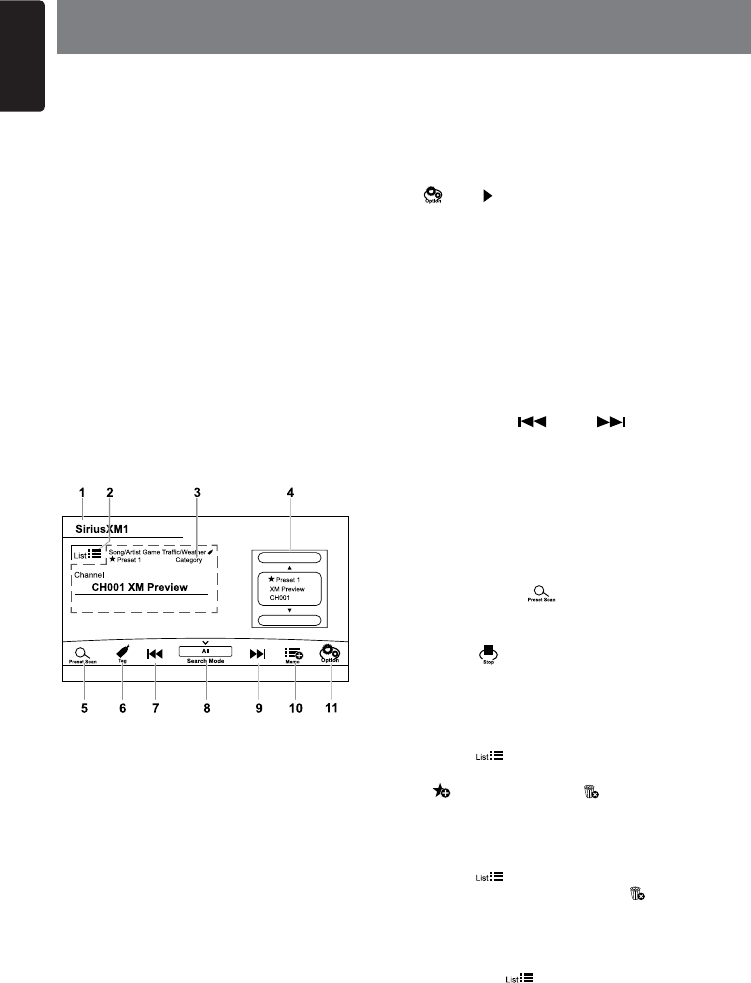
1. Band switch
2. Show channel list
3. Information area
4. Current channel information
Touch and drag up/down to view other
channels.
5. Show preset channels list.
6. Add tag
7. Manual tune backward.
Auto tune backward. (long press)
8. Select search mode.
9. Manual tune forward.
Auto tune forward. (long press)
10. Show memorize sub-menu.
11. Show other options
Displaying the Identication (ID) Code
Before you listen to satellite radio, you must
subscribe to the service using your radio’s
identication number.
To display the radio ID, touch following
buttons on the operation bar in sequence: [
] -> [ ] -> [SIRIUS ID]
The screen displays the radio ID where the
channel name is usually displayed.
Select a band
Touch the top left corner of the screen to
change between three SiriusXM bands
(SiriusXM1, SiriusXM2 and SiriusXM3). Each
band stores up to six preset stations.
Select a station
Touch the [ ] or [ ] button on the
operation bar to tune to another station.
Preset mode
Six numbered preset buttons store and recall
stations for each band.
Preset scan
1. Touch the [ ] button on the operation
bar.
2. When a desired station is tuned in, press
the [ ] button to continue receiving that
station.
Storing a station
To access Preset Channels Store menu,
touch [ ] button.
Select a preset position on the screen. Touch
[ ] to store. Touch [ ] button to delete.
Delete preset channel
To access Delete Preset Channel menu,
touch [ ] button.
Select a channel and touch [ ] to delete it.
Recalling a channel
1. Select a band (if needed).
2. Touch [ ] button on the upper left of
the screen to show list menu.
3. Touch to select the corresponding stored
station.
11. SATELLITE RADIO OPERATION
31
English
NX602
Category and Channel search
1. Touch [ ] button on the upper left of
the screen to show list menu.
2. Touch [ ], then select Channel or
Category list.
3. Hold the list and drag it up or down to
scroll.
4. Touch to select it.
Direct search
To access search menu, touch following
buttons: [ ] -> [ ] .
Input numbers by touching digit buttons, then
touch [Search] to began searching.
To delete numbers, touch [ ] button.
Password
To access password setting menu, touch
following buttons on the operation bar in
sequence: [ ] -> [ ] -> [Password] .
Input old password by touching digit buttons,
then touch [OK] to conrm.
To delete a number, touch [ ] button.
To delete all numbers, touch [Clear] button.
Then input a new 4-digit password as above.
(Original password: 0000)
Lock / Unlock
To show channel lock menu, touch following
buttons on the operation bar in sequence: [
] -> [ ] -> [Lock].
You need input password.
Touch [ ] or [ ] button to scroll the list.
Touch [ ] to lock station, and [ ] to
unlock.
Song/Artist Alart
Touch [ ] button on the operation bar to
show Memorize sub-menu. Touch [This
song] to add it to the “Song Alart” list. Touch
[This artist] to add it to the “Artist Alart” list.
When the memorized song/artist is played on
other Channel. Select [OK] on the dialogue
box to change the channel to play memorized
song/artist.
Touch [Cancel] on the dialogue box to return
to previous screen.
English
32 NX602
About HD Radio™ Technology
HD Radio Technology allows CD-quality
digital broadcasting of your local AM and
FM radio stations. HD Radio broadcasts
can include multiple channels on the same
frequency, which is called multicasting. With
multicasting, you can receive up to eight
additional multicast channels: HD1~HD8.
With an HD Radio tuner connected, you
will receive HD Radio digital broadcasts
automatically when tuned to a station that
offers HD Radio Technology.
NOTE: Not all FM or AM stations offer
HD Radio (digital) broadcasting. You can
receive both analog and digital stations
with the unit.
Accessing radio mode
Long press [ ALL ] button to enter main
source menu, then select [HD Radio] to
enter HD Radio mode.
If HD Radio is not on the current source
menu, touch [Front] on the bottom of the
screen, then hold the center of screen and
drag left/right to show more icons.
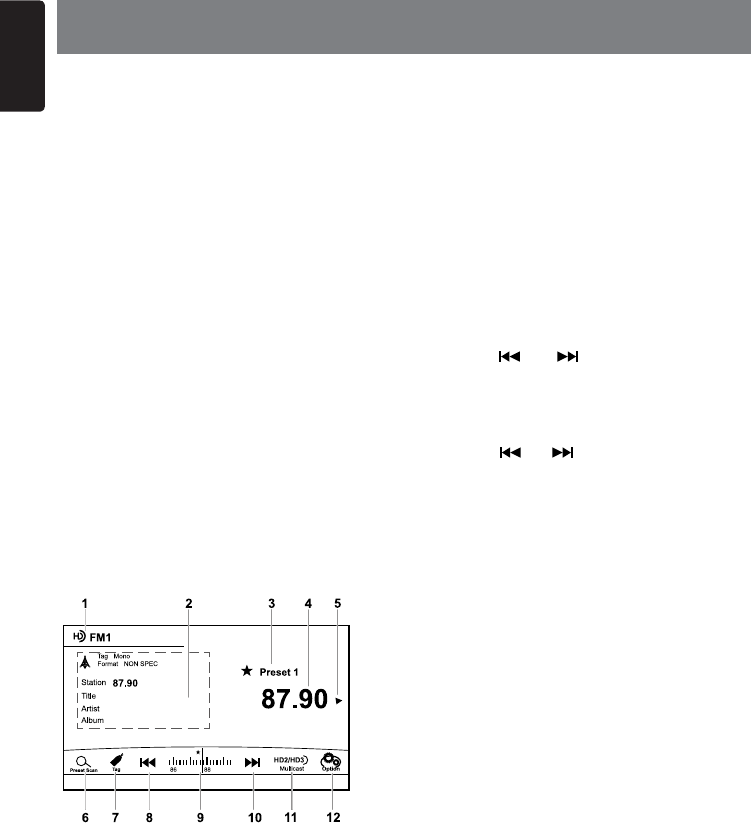
1. Band switch
2. Information area
3. Current preset station number
4. Current station frequency
5. Show preset stations list.
6. Scan preset stations.
7. Add tag
8. Manual tune backward.
Auto tune backward. (long press)
9. Frequency bar
10. Manual tune forward.
Auto tune forward. (long press)
11. Show multicast sub-menu.
12. Show other options
Touchthebottomhalfofscreentoshow
operationbar.
Select a band
Touch the top left corner of the screen to
select one radio band among FM1, FM2,
FM3 and AM.
Tuning
-SeekTuning
Hold the [ ] or [ ] button for more than
2 seconds on the operation bar to seek a
higher / lower station.
-ManualTuning
Press the [ ] or [ ] button on the operation
bar to move the radio frequency number up
or down one step.
Preset stations
Up to six stations on each band can be
stored as presets, which can then be instantly
recalled by pressing the associated preset
button. To store a station, turn the radio on
and select the desired band and station.
Press and hold the desired preset button
(numbered one through six on the face of
the radio or remote control) for more than
1 second. When stored, the preset number
will appear in the display. The station is now
stored and can be recalled by pressing the
corresponding preset button. Repeat for the
remaining five presets on the current band
and for presets on the other four bands.
NOTE: Multicast stations can be stored as
presets, but the unit must be in Digital or
Auto reception mode to receive them.
Preset scan
Preset scan receives the stations stored
in preset memory in order. This function is
useful when searching for a desired station
in memory.
12. HD RADIO OPERATION
33
English
NX602
1. Touch the [ ] button on the operation
bar.
2. When a desired station is tuned in, press
the [ ] button to continue receiving that
station.
Automatic store (AS)
Only stations with sufcient signal strength
will be detected and stored in the memory.
To star automatic station search, touch
following buttons on the operation bar in
sequence: [ ] -> [ ] -> [Auto Store] ->
[OK] .
To stop auto store, press other buttons
having radio functions.
HD Radio multicast channels
Touch [ ] button to swith to next sub-
station of the channel.
English
34 NX602
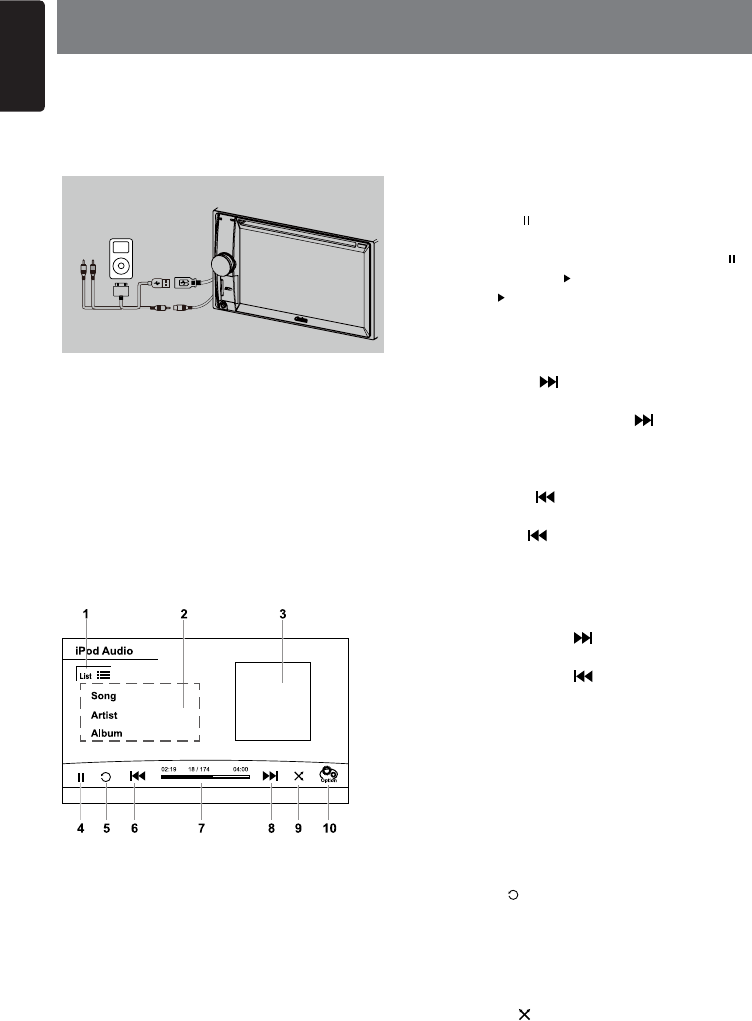
Connect an iPod or iPhone to the USB
connector via CCA-748 cable.
When connecting a device, the unit will read
the files automatically. The track information
display on the screen once playback start.
7. Progress bar
8. Next track
Fast-forward (long press)
9. Random play
10. Show other options
Pausing play
1. Touch the [ ] button on the bottom left of the
screen to pause play.
“PAUSE” appears in the display, and [ ]
button becomes [ ] .
2. Touch [ ] button to resume play.
Selecting a track
Track-up
1. Touch the [ ] button to move to the
beginning of the next track.
2. Each time you touch the [ ] button, the
track advances to the beginning of the
next track.
Track-down
1. Touch the [ ] button to move back to
the beginning of the current track.
2. Touch the [ ] button twice to move back
to the beginning of the previous track.
Fast-forward/Fast-reverse
Fast-forward
Touch and hold the [ ] button .
Fast-reverse
Touch and hold the [ ] button .
* For MP3/WMA discs, it takes some time
until the start of searching and between
tracks. In addition, some error may occur in
the play time.
Repeat play
This function allows you to play the current
track repeatedly or play a track currently
being played in the MP3/WMA folder
repeatedly.
Touch the [ ] button to select Track Repeat,
Folder Repeat or All Repeat.
Random play
This function allows you to play all tracks
recorded on a disc in a random order.
Touch the [ ] button to perform random
play.
CCA-748
Accessing iPod mode
Long press [ ALL ] button to enter main
source menu, then select [iPod] to enter
iPod mode.
If [iPod] is not on the current source menu,
touch [Front] on the bottom of the screen,
then hold the center of screen and drag left/
right to show more icons.
At iPod Audio mode, touch the bottom half of
screen to show operation bar.
1. Show le list.
2. Song/Artist/Album information
3. Track information
Touch and drag left/right to look through
the tracks.
Touch and drag up/down to look through
the albums.
4. Play/Pause
5. Repeat play
6. Previous track
Fast-reverse (long press)
13. iPod & iPhone OPERATIONS
35
English
NX602
Search function
1. Touch the [ ] button to show le list.
Touch [ ] button to enter search menu.
2 Input characters by touching buttons on
the screen, then touch [Search] to began
searching.
Touch [123] to show digit keypad, touch
[ABC] to show letter keypad.
Touch [Space] to input a blank space.
Touch [ ] button to delete characters.
Setting iPod simple control mode
Use this function if you wish to operate
through your iPod connected to this unit via
the USB cable.
Touch the [ ] button, then touch [Simple
Control] to set it to [On].
iPod menu alphabet search
This function searches the subfolders for
desired alphabetical letters.
1. Touch the [ ] button to show le list.
2. Touch [ ], [ ] and [ ] buttons to show
the following categories: Playlists, Songs,
Artists, Albums, Genres, Composers,
Audiobooks, Podcasts
3. Touch to select a category, the contents of
the category are displayed.
4. Select an option to search.
iPod video playback
To playback video from iPod, touch top left
corner of the screen, then select a video le
to play.
During playback, touch the bottom half of
screen to show operation bar.
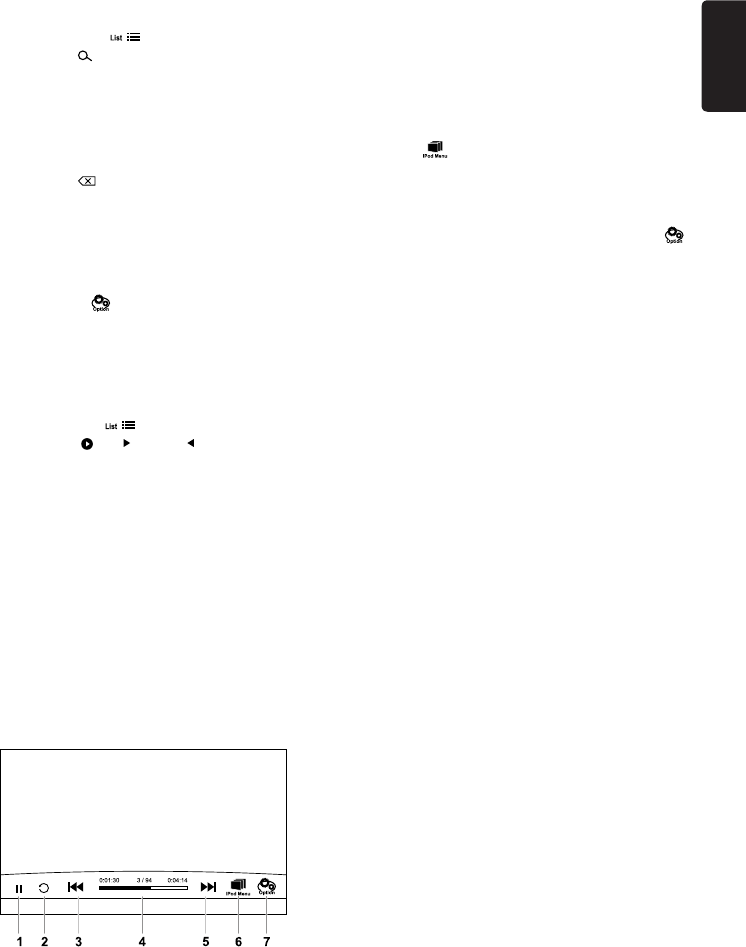
1. Play/Pause
2. Repeat play
3. Previous le
Fast-reverse (long press)
4. Progress bar
5. Next le
Fast-forward (long press)
6. Show iPod menu
7. Show other options
Return to video list menu
Touch [ ] button on the operation bar to
return to video list menu.
Play videos in wide screen
To play videos in wide screen, touch the [
] button, then touch [Wide screen] to set it to
[On].
English
36 NX602
Connect an iPhone to the unit via CCA-748
cable. (see “Wiring and Connections”)
Enable the Pabdora function in your iPhone.
Then the unit will switch to Pandora mode.
Touch the bottom half of screen to show
operation bar.
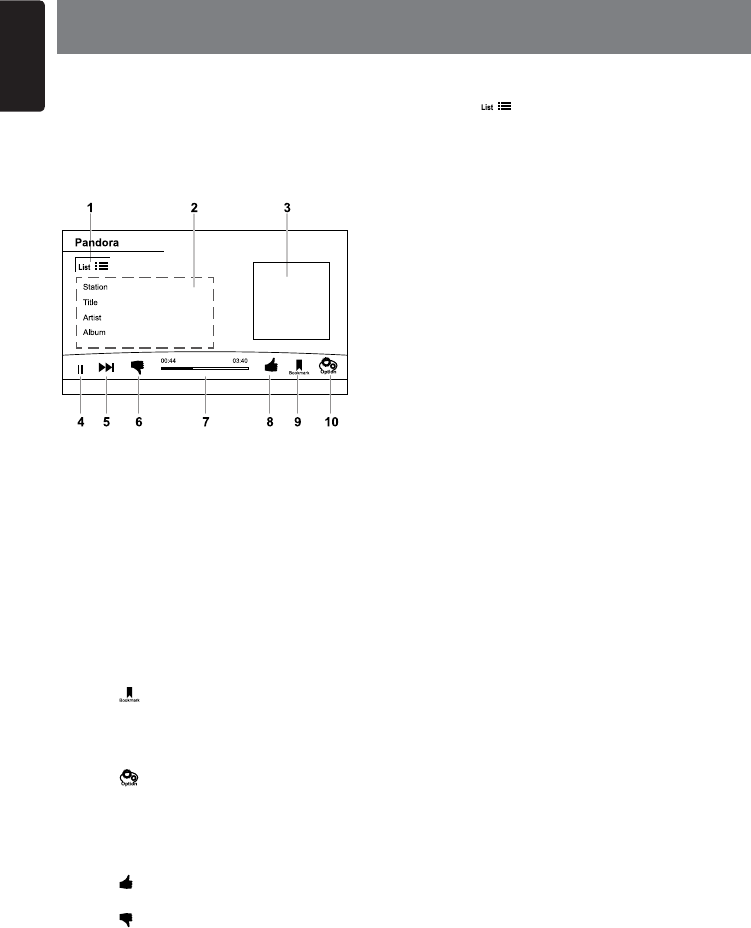
1. Show le list.
2. Song/Title/Artist/Album information
3. Current song/station information
4. Play/Pause
5. Skip
6. Thumbs Down
7. Progress bar
8. Thumbs Up
9. Add bookmark
10. Show other options
Add bookmark
Touch [ ] button, then select [Song] or
[Artist] to add it to the bookmark list.
Store a new station
Touch [ ] button and [New Station] button.
Then select [Song] or [Artist] to add it to the
station list.
Thumbs up/down
Touch [ ] button, “Thumbs-Up” feedback
will be sent to Pandora station.
Touch [ ] button, “Thumbs-Down” feedback
will be sent to Pandora station.
14. PANDORA OPERATIONS
Select a stored station
Touch [ ] button to show station list.
Touch [By Date] to list the stations by date.
Touch [A-Z] to list the stations from A to Z.
Drag up or down to scroll the list, select a
desired station to play it.
37
English
NX602
Access navigation mode
1. Push the cover of the card slot located on
the bottom left of the panel to the right.
Insert a map card into the mini card slot.
2. To remove the card, you should rst select
another source or turn off the power, in
order to avoid damaging the card. Press to
pop it out, then take off the card. Close the
cover to the left.
3. Press [ ] button on panel to visit
Navigation mode.
Control buttons
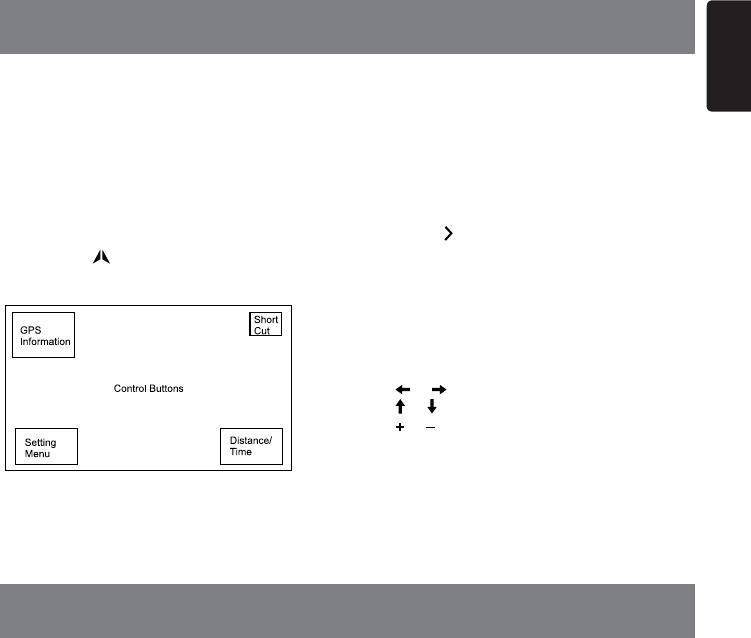
1. Touch top left cornerof the screen to show
GPS informations. Touch [Back] to return.
2. Touch bottom left corner of the screen to
enter Navigation menu. Touch [Show Map]
to return.
3. Touch top right corner of the screen
to show shortcuts of general functions.
Touch [ ] button to hide.
4. Touch bottom right corner of the screen
to show Distance/Time Left/Arrival Time.
Touch it again to hide.
5. Touch the blank area to show control
buttons.
Top left corner: Plane/three-dimensional
Top right corner: Cursor location.
[ ]/[ ]: Move left/right
[ ]/[ ]: Move up/down
[ ]/[ ]: Enlarge/reduce the map
[Back]: Hide the buttons.
[More]: Show more informations.
[Select]: Select the route.
Long press [ ALL ] button to enter main
source menu, then select [AUX-1] to visit
front auxiliary device, and touch [AUX-2] to
enter rear auxiliary device.
If [AUX] is not on the current source menu,
touch [Front] on the bottom of the screen,
then hold the center of screen and drag left/
right to show more icons.
AUX is just for audio content with 3.5mm
Jack connector plugged into audio-in socket
on the front panel.
15. NAVIGATION OPERATIONS
16. AUX OPERATIONS
English
38 NX602
17. TROUBLE SHOOTING
GENERAL
Problem Cause Measure
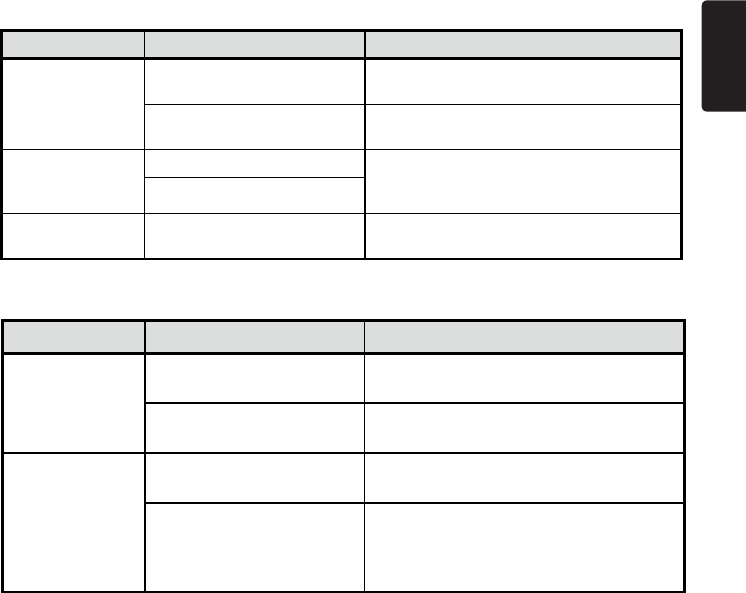
Unit can not
power on.
Unit fuse blown. Replace with new fuse of correct rating.
Car battery fuse blown. Replace with new fuse of correct rating.
Unit can not
power on.
Nothing happens
when buttons are
pressed.
Display is not
accurate.
The microprocessor has
malfunctioned due to noise, etc.
Turn o the power and remove the DCP.
Press the [RESET] button with a thin rod.
Note:
When the [RESET] button is pressed, turn o
the ACC power.*
* When the [RESET] button is pressed,
frequencies of radio stations, titles, etc. stored
in memory are cleared.
Remote control
does not work.
Battery depleted. Change the battery.
Battery installed incorrectly. Install the battery correctly.
No/low audio
output
Improper audio output connection. Check wiring and correct.
Volume set too low. Increase volume level.
Speakers damaged. Replace speakers.
Heavily biased volume balance. Adjust the channel balance to center position.
Speaker wiring is in contact with
metal part of car. Insulate all speaker wiring connections.
Poor sound quality
or distortion
Non-standard disc used. Use a standard disc.
Speaker power rating does not
match unit. Replace speakers.
Wrong connections. Check wiring and correct.
Speaker is shorted. Check wiring and correct.
Unit resets itself
when engine is o.
Incorrect connection between
ACC and Battery. Check wiring and correct.
DISC Player
Problem Cause Measure
Disc cannot be
loaded.
Another disc is already loaded. Eject the disc before loading the new one.
There is an object installed inside
the unit. Remove the object inside the unit.
Sound skips or is
noisy.
Compact disc is dirty. Clean the compact disc with a soft cloth.
Compact disc is heavily scratched
or warped.
Replace with a compact disc with no
scratches.
Sound is bad when
power is rst turned
on.
Condensation may form on the
internal lens when the car is parked
in a humid place.
Let dry for about 1 hour with power on.
39
English
NX602
USB Devices
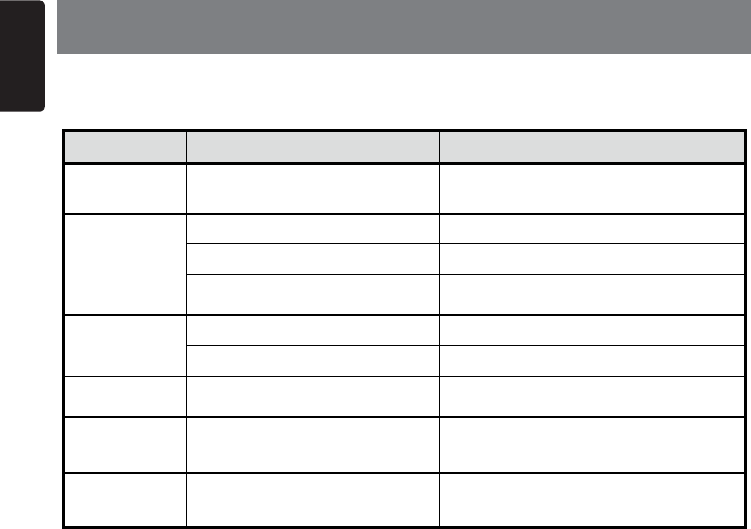
Problem Cause Measure
USB device cannot
be inserted.
The USB device has been
inserted with wrong direction.
Reversing the connection direction of the USB
device, try it again.
The USB connector is broken. Replace with a new USB device.
USB device is not
recognized.
The USB device is damaged. Disconnect the USB device and reconnect. If
the device is still not recognized, try replacing
with a different USB device.
Connectors are loose.
Sound skips or is
noisy.
MP3/WMA les are not encoded
properly. Use MP3/WMA les encoded properly.
Bluetooth
Problem Cause Measure
Cannot pair the
Bluetooth enabled
device with the car
audio system.
The device does not support the
proles required for the system. Use another device to connect.
The Bluetooth function of the
device is not enabled.
Refer to the user manual of the device for how
to enable the function.
The audio quality
is poor after
connection with a
Bluetooth-enabled
device.
The internal microphone gain is
not set correctly.
Adjust the gain of the internal microphone in
System Setup.
The external microphone is
not set correctly nor properly
positioned.
Adjust the gain and position of the external
microphone.
For example, stick the microphone onto the
dashboard so it is close to the driver.
English
40 NX602
18. ERROR DISPLAYS
Display Cause Measure
Disc loading Disc is being read Please wait, it may take several minutes
for some disc or storage device.
No Disc
Disc is dirty Clean disc with soft cloth
Disc is upside down Insert disc with label side up
Disc not present in loading
compartment Insert disc
Bad Disc Disc is dirty Clean disc with soft cloth
Disc is upside down Insert disc with label side up
Unknown disc Disc format is not compatible
with this unit Change another disc.
Region Error DVD is not compatible with
region code of unit
Use discs with corresponding regional
code.
Error Illegal mechanism operation Press EJECT key for 5 seconds to reset
loading mechanism
If an error occurs, one of the following displays is displayed.
Take the measures described below to solve the problem.
If an error display other than the ones described above appears, press the [RESET] button. If
the problem persists, turn off the power and consult your store of purchase.
* When the [RESET] button is pressed, frequencies of radio stations, titles, etc. stored in
memory are cleared.
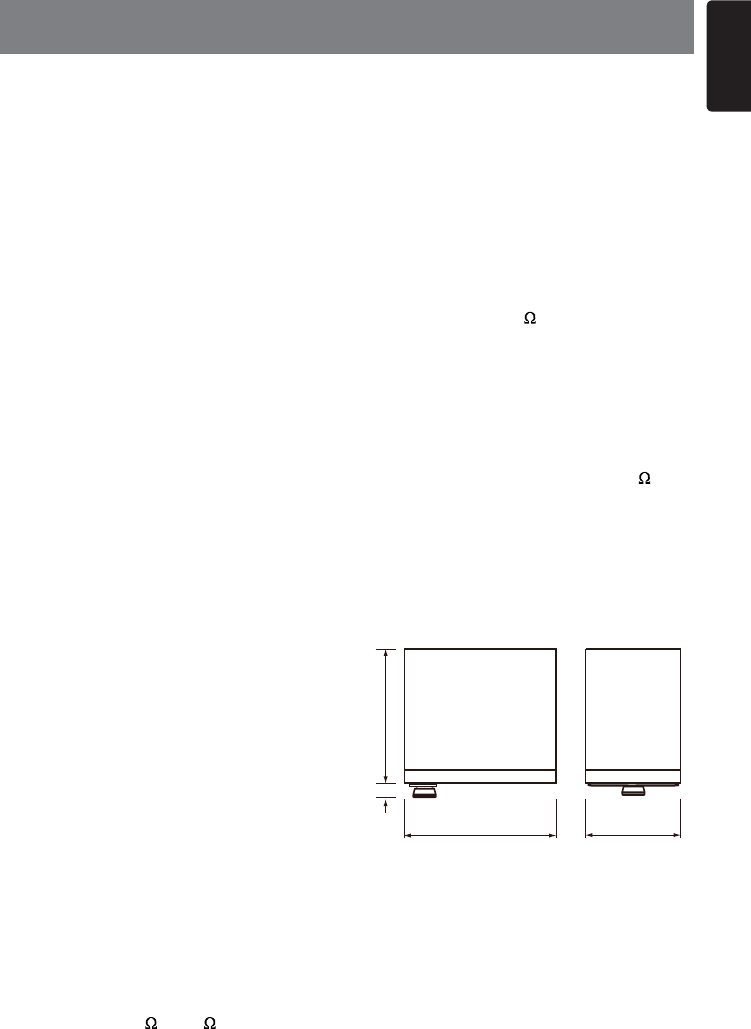
41
English
NX602
FM Tuner
Frequency range: 87.9-107.9MHz
Usable sensitivity: 8dBμ
Frequency response: 30Hz-15kHz
Stereo separation: 30dB(1kHz)
Signal/noise ratio: >55dB
AM Tuner
Frequency range: 530-1710kHz
Usable sensitivity (S/N=20dB): 30dBμ
Disc Player
System: Disc digital audio system
Frequency response: 20Hz-20kHz
Signal/noise ratio: >80dB
Total harmonic distortion: Less than 0.1% (1kHz)
Channel separation: >60dB
Video signal output: NTSC/PAL
Video output level: 1±0.2V
Video signal input: NTSC/PAL
MP3/WMA mode
MP3 sampling rate: 8 kHz to 48 kHz
MP3 bit rate: 8 kbps to 320 kbps / VBR
WMA bit rate: 8 kbps to 320 kbps
Logical format: ISO9660 level 1,2
Joliet or Romeo le system
USB
Specication: USB 1.0/2.0
Playable audio format:
MP3(.mp3): MPEG 1/2/Audio Layer-3
WMA(.wma): Ver 7/8/9.1/9.2
Bluetooth
Specication: Bluetooth Ver. 2.0+EDR
Prole: HFP (Hands-free Prole)
A2DP (Advanced Audio Distribution Prole)
AVRCP (AV Remote Control Prole)
PBAP (Phone Book Access Prole)
Send/Receive Sensitivity: Class 2
Audio Amplier
Maximum power output:
200W (50W x 4)
Speaker impedance: 4 (4 to 8 allowable)
19. SPECIFICATIONS
6.2 Inch TFT LCD
Display resolution (dot): 800RGB (H) x 480(V)
Active area (mm): 137.52(H) x 77.232 (V)
Screen size (inch): 6.2 (Diagonal)
Dot pitch (mm): 0.1719(H) x 0.1609(V)
Brightness: 400 cd/m2
Input
Audio input sensitivity:
High: 320mV (at 1V output)
Mid: 650mV (at 1V output)
Low: 1.3V (at 1V output)
(input impedance 10 k or greater)
Aux-in level: ≤2V
General
Power supply voltage:
14.4VDC (10.8 to 15.6V allowable),
negative ground
Pre-Amp output voltage:
4.0V (CD play mode: 1kHz, 0dB, 10k load,
volume max.)
Fuse: 15A
Dimensions of the Main Unit:
178mm Width × 100mm Height × 163mm Depth
Weight of the Main Unit: 1.90kg
Dimensions of the Remote Control unit:
49mm Width × 12mm Height × 139mm Depth
Weight of the Remote Control Unit:
55g (including battery)
Notes:
• Specifications and design are subject
to change without notice for further
improvement.
178mm 100mm
13mm 163mm
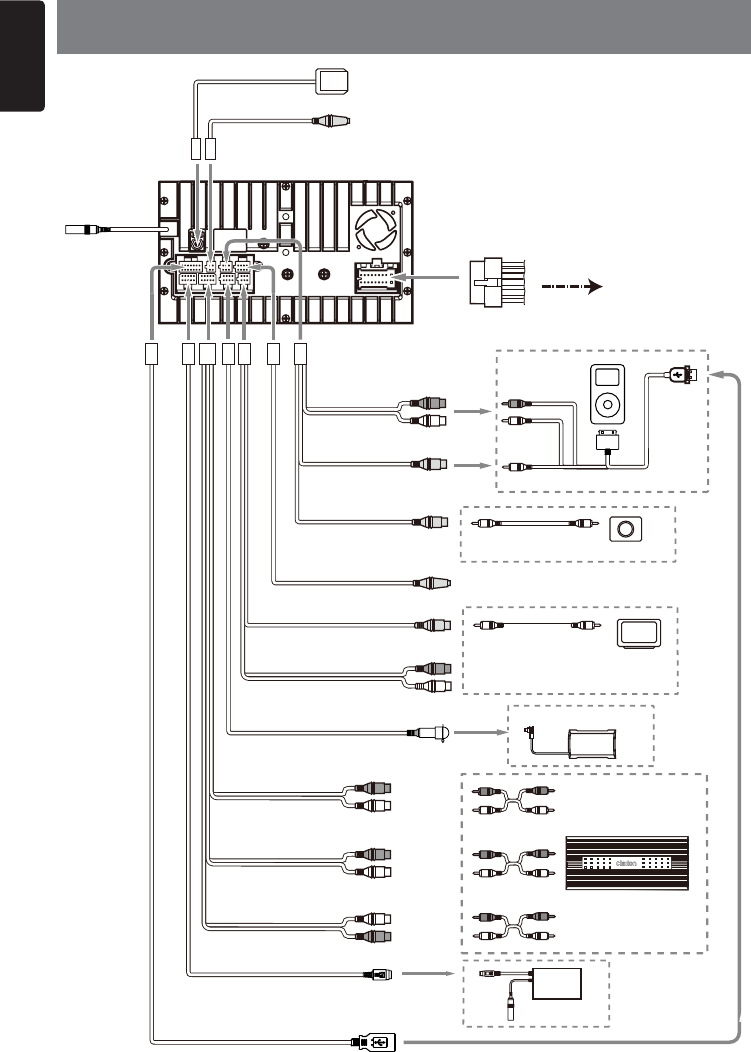
English
42 NX602
20. WIRING AND CONNECTIONS
SIRIUS/XM (sold separately.)
THD302
(sold separately.)
Black
Sirius/XM
Black
White
HD Radio
White
Refer to the right.
6-Channel Amplifier
Video In
Rear Zone
Monitor
Video Out
Rear Vision Camera
Yellow
VISUAL IN
Black
Yellow
CAMERA
Black
Red
White
AUX IN 2
Red
Steering Wheel Remote Control Terminal
Gray Gray
External Microphone
Connection
Black Black
GPS Antenna
(Black)
Black
USB connector
Red
White
Line Out
Front Right
Line Out
Front Left
Gray
Red
White
Line Out
Rear Right
Line Out
Rear Left
Black
Red
White
Subwoofer 1
Subwoofer 2
Purple
Yellow
VIDEO OUT
Black
Red
White
2 ZONE OUT
Green
Radio Antenna
(Black)
Video Out
iPod/iPhone
CCA-748 (sold separately)
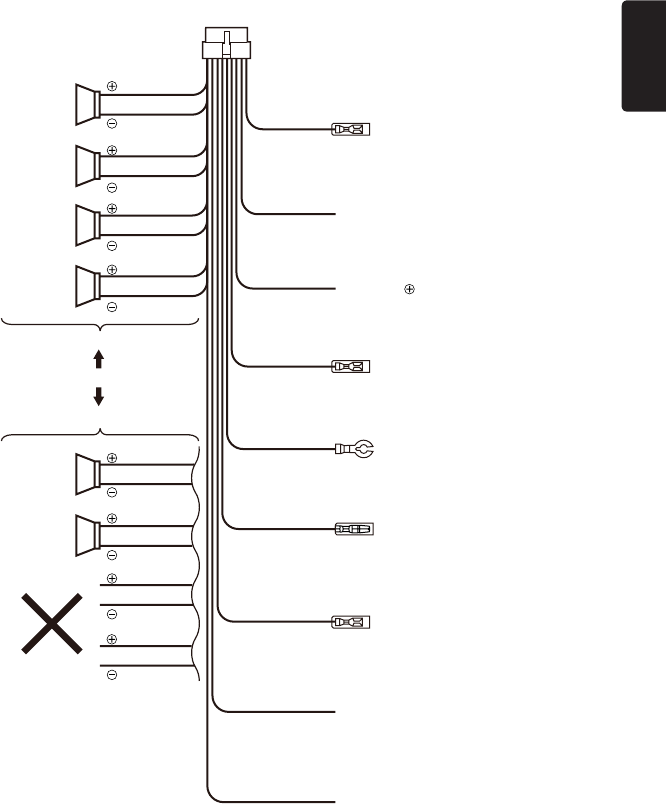
43
English
NX602
•Connectingtotheexternalamplier
External ampliers can be connected to the 4 channel RCA output connections.
Ensure that the connectors are not grounded or shorted to prevent damage to the
unit.
Connect it to the car power supply terminal
for illumination
Connect it to the car power supply terminal
for antenna
Blue/White wire (Amplifier turn-on lead)
Connect to remote turn-on lead of amplifier
18-Pin Connector Extension Lead
(attached to the source unit)
Brown wire (Phone mute lead)
Yellow wire (Memory back-up lead)
Red wire (Power lead)
Black wire (Ground lead)
Orange/White wire (Illumination lead)
Blue wire (Auto antenna lead)
Connect it to the car power supply terminal
for parking
Fresh Green wire (Parking)
Connect it to the car power supply terminal
for reverse
Purple/White wire (Reverse)
Connect to vehicle chassis ground
Connect to cellular phone mute lead.
Connect directly to battery
Accessory 12V
Front Right
Front Right
Gray
Gray
White
White
Purple
Purple
Green
Green
Gray/Black
Gray/Black
White/Black
White/Black
Purple/Black
Purple/Black
Green/Black
Green/Black
4-Speaker system
2-Speaker system
or
Rear Right
Rear Left
Not used.
Insulate each wire
Front Left
Front Left

ClarionCo.,Ltd.
All Rights Reserved. Copyright © 2012: Clarion Co., Ltd.
Printed in China
PN: 12707500XXX
English
FCC STATEMENT
1. This device complies with Part 15 of the FCC Rules. Operation is subject to the following two
conditions:
(1) This device may not cause harmful interference.
(2) This device must accept any interference received, including interference that may cause
undesired operation.
2. Changes or modifications not expressly approved by the party responsible for compliance could
void the user's authority to operate the equipment.
NOTE: This equipment has been tested and found to comply with the limits for a Class B digital
device, pursuant to Part 15 of the FCC Rules. These limits are designed to provide reasonable
protection against harmful interference in a residential installation.
This equipment generates uses and can radiate radio frequency energy and, if not installed and
used in accordance with the instructions, may cause harmful interference to radio communications.
However, there is no guarantee that interference will not occur in a particular installation. If this
equipment does cause harmful interference to radio or television reception, which can be
determined by turning the equipment off and on, the user is encouraged to try to correct the
interference by one or more of the following measures:
Reorient or relocate the receiving antenna.
Increase the separation between the equipment and receiver.
Connect the equipment into an outlet on a circuit different from that to which the receiver is
connected.
Consult the dealer or an experienced radio/TV technician for help.
FCC Radiation Exposure Statement
This equipment complies with FCC radiation exposure limits set forth for an uncontrolled
environment. This equipment should be installed and operated with minimum distance 20cm
between the radiator & your body
English