Faurecia Clarion Electronics NX702 CAR DVD PLAYER User Manual
Clarion Co Ltd CAR DVD PLAYER Users Manual
Users Manual

Owner's manual
DVD MULTIMEDIA STATION WITH BUILT-IN NAVIGATION
& 7" TOUCH PANEL CONTROL
NX702
1
English
NX702

English
2NX702
1. FEATURES ........................................................................................................................ 3
Expanding Systems ........................................................................................................... 3
2. PRECAUTIONS ................................................................................................................. 4
3. CAUTIONS ON HANDLING .............................................................................................. 6
Front Panel / Generalities .................................................................................................. 6
Cleaning the body ............................................................................................................. 6
USB Port ........................................................................................................................... 6
SD Slot .............................................................................................................................. 6
Handling Discs .................................................................................................................. 7
4. CONTROLS ....................................................................................................................... 8
Operational Panel .............................................................................................................. 8
Names of Buttons .............................................................................................................. 9
Remote Control .............................................................................................................. 10
5. MAIN MENU OPERATION .............................................................................................. 12
6. SYSTEM SETUP .............................................................................................................. 13
7. DISC OPERATION ........................................................................................................... 17
DVD System .................................................................................................................... 17
Accessing a Disc ............................................................................................................. 19
DVD Player Operation ..................................................................................................... 20
CD Player Operation ....................................................................................................... 22
MP3/WMA Playback ........................................................................................................ 23
MP4 Playback ................................................................................................................. 25
8. SD/USB OPERATION ...................................................................................................... 26
Accessing an USB ........................................................................................................... 26
Accessing an SD Card .................................................................................................... 26
SD/USB Audio Operation ................................................................................................ 27
SD/USB Video Operation ................................................................................................ 27
9. BLUETOOTH OPERATION ............................................................................................. 28
Bluetooth Telephone Operation ...................................................................................... 28
Bluetooth Audio Operation .............................................................................................. 30
10. SiriusXM Satellite Radio OPERATION ........................................................................ 31
11. HD Radio OPERATION ................................................................................................. 34
12. iTunes Tagging ............................................................................................................. 36
13. iPod & iPhone OPERATION ......................................................................................... 37
14. PANDORA OPERATION ............................................................................................... 39
15. NAvIGATION OPERATION ........................................................................................... 40
16. AUX OPERATION.......................................................................................................... 40
17. TROUBLE SHOOTING .................................................................................................. 41
18. ERROR DISPLAYS........................................................................................................ 44
19. SPECIFICATIONS ......................................................................................................... 45
20. WIRING AND CONNECTIONS ...................................................................................... 47
21. WARNING ...................................................................................................................... 49
Thank you for purchasing this Clarion product.
• Pleasefullyreadthisowner’smanualbeforeoperatingthisequipmentandstoreitinasafe
place.
• Checkthecontentsofthe enclosed warrantycardandstoreitina safeplacewiththis
manual.
Contents
3
English
NX702
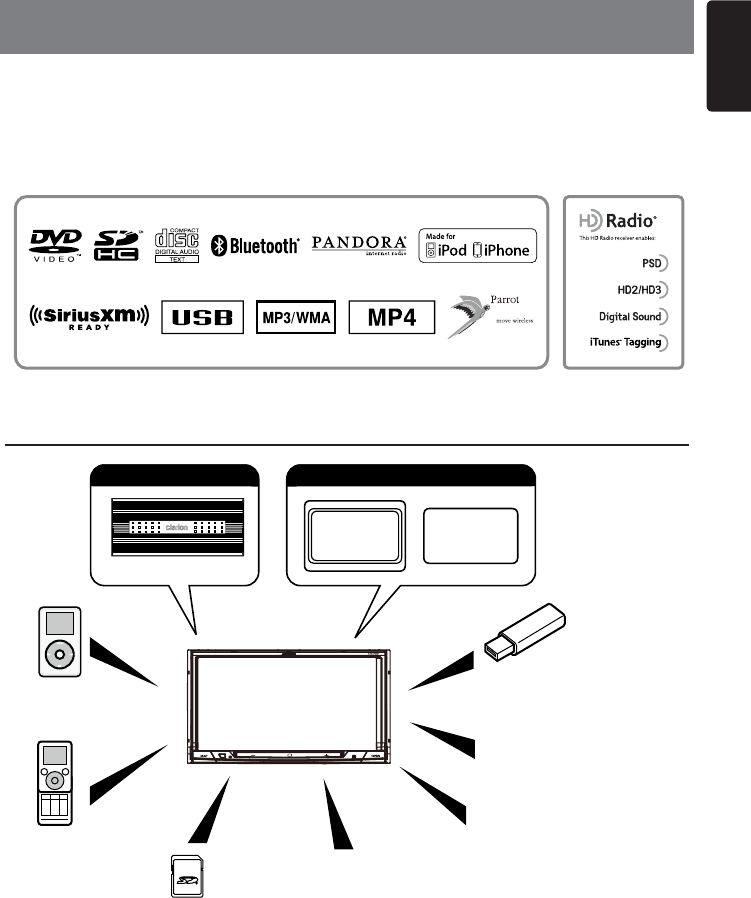
1. FEATURES
• 7”Wide-VGAcolorLCDTOUCHPANEL
• 4V/6chRCA OutputwithDigital TimeAlignment, 3-way Crossoverand 5
BandParametricEqualizer
• SiriusXM-Ready™andHDRadio™receiverwithiTunes® Tagging
• LatestMapGuarantee
Expanding Systems
PortablePlayer
(ConnectviaAUXIN)
USBMemory
SD Card
Bluetooth®
cellularphone
HDRadio™Tuner
(THD301)
SiriusXM-Connect
VehicleTuner
iPod® / iPhone®
(ConnectviaCCA-750)
Notes:
•
•
6ChannelAmplier
Expandingaudiofeatures
Rear
Monitor
Rear Vision
Camera
Expandingvisualfeatures

English
4NX702
2. PRECAUTIONS
Foryoursafety,thedrivershouldnotoperatethecontrolswhiledriving.
Also,whiledriving,keepthevolumetoalevelatwhichexternalsoundscanbeheard.
1.Whentheinteriorofthecarisextremelycold andtheplayerisusedsoonafterswitching
on the heater, moisture may form on the disc or the optical parts of the player and proper
playbackmaynotbepossible.Ifmoistureformsonthedisc, wipeitoffwithasoftcloth.If
moisture forms on the optical parts of the player, do not use the player for about one hour.
Thecondensationwilldisappearnaturallyallowingnormaloperation.
2. Driving on extremely bumpy or rough roads can cause the disc to skip during playback.
3. This unit uses precision parts and components for its operation. In the event that trouble
arises, never open the case, disassemble the unit, or lubricate the rotating parts. Contact your
Clarion dealer or service center.
4. FCC STATEMENT
1.ThisdevicecomplieswithPart15oftheFCCRules.Operationissubjecttothefollowing
twoconditions:
(1) This device may not cause harmful interference.
(2) This device must accept any interference received, including interference that may cause
undesired operation.
2. Changesormodicationsnotexpresslyapprovedbythepartyresponsibleforcompliance
couldvoidtheuser’sauthoritytooperatetheequipment.
NOTE: Thisequipment hasbeentested andfoundtocomply with thelimits foraClassB
digital device, pursuant to Part 15 of the FCC Rules. These limits are designed to provide
reasonable protection against harmful interference in a residential installation.
Thisequipmentgeneratesusesandcanradiateradiofrequencyenergyand,ifnotinstalled
andused inaccordancewiththeinstructions,maycauseharmfulinterferencetoradio
communications.However,thereisnoguaranteethatinterferencewillnotoccurinaparticular
installation.Ifthisequipmentdoescauseharmfulinterferencetoradioortelevisionreception,
whichcanbedeterminedbyturningtheequipmentoffandon,theuserisencouragedtotry
tocorrecttheinterferencebyoneormoreofthefollowingmeasures:
•Reorientorrelocatethereceivingantenna.
•Increasetheseparationbetweentheequipmentandreceiver.
•Connecttheequipmentintoanoutletonacircuitdifferentfromthattowhichthereceiveris
connected.
•Consultthedealeroranexperiencedradio/TVtechnicianforhelp.
5. FCCRadiationExposureStatementThis equipment complieswith FCCradiation exposure
limitssetforthfor anuncontrolledenvironment.Thisequipmentshouldbeinstalledand
operatedwithminimumdistance20cmbetweentheradiator&yourbod.
6. “Made for iPod,” and “Made for iPhone” mean that an electronic accessory has been
designedto connectspecicallytoiPod,oriPhone,respectively,andhasbeencertiedby
the developer to meet Apple performance standards.
Appleisnotresponsiblefortheoperationofthisdeviceor itscompliancewithsafetyand
regulatorystandards.PleasenotethattheuseofthisaccessorywithiPod oriPhone may
affectwirelessperformance.
iPhone, iPod and iTunes are trademarks of Apple Inc., registered in the U.S. and other
countries.
7. HDRadio™TechnologymanufacturedunderlicensefromiBiquityDigitalCorporation.
U.S. and Foreign Patents. HD Radio™ and the HD, HD Radio, and “Arc” logos are proprietary
trademarksofiBiquityDigitalCorp.
8. SiriusXM™ and all related marks and logos are trademarks of Sirius XM Radio, Inc. All rights
reserved.
WARNING

5
English
NX702
INFORMATION FOR USERS:
Changes or modifications to this product
unapprovedbythemanufacturerwillvoidthe
warrantyandwillviolateFCCapproval.
9.
Manufactured under license from Dolby Laboratories.
“Dolby” and the double-D symbol are trademarks of Dolby Laboratories.
10. This product incorporates copyright protection technology that is protected by U.S. patents
and other intellectual property rights. Use of this copyright protection technology must be
authorizedbyRoviCorporation,andisintendedforhomeandotherlimitedviewinguses
onlyunlessotherwiseauthorizedbyRoviCorporation.Reverseengineeringordisassembly
is prohibited.
UseofthisproductbythecustomerisrestrictedtoplayprogrammaterialstowhichtheRovi
copyright protection process has been applied.
11. The Bluetooth®wordmarkandlogosareregisteredtrademarksownedbyBluetoothSIG,
Inc. and any use of such marks by Clarion Co.,Ltd, is under license.
CHINA
530-1710kHz 87.9-107.9MHz
THIS DEVICE COMPLIES WITH PART 15 OF THE FCC RULES.
OPERATION IS SUBJECT TO
THE FOLLOWING TWO CONDITIONS:
(1)THIS DEVICE MAY NOT CAUSE HARMFUL INTERFERENCE, AND
(2)THIS DEVICE MUST ACCEPT ANY INTERFERENCE RECEIVED,
INCLUDING INTERFERENCE THAT MAY CAUSE UNDESIRED OPERATION.
THIS DEVICE COMPLIES WITH DHHS RULES 21 CFR CHAPTER I SUBCHAPTER J
APPLICABLE AT DATE OF MANUFACTURE.
CLARION CO.,LTD.
7-2,SHINTOSHIN,CHUO-KU,SAITAMA-SHI,SAITAMA-KEN,JAPAN
This product includes technology owned by Microsoft Corporation and cannot be used
or distributed without a license from MSLGP.
MANUFACTURED:
URF
HD Radio Technology manufactured under license from iBiquity Digital Corporation.
U.S. and Foreign Patents. HD Radio™ and the HD, HD Radio, and “Arc” logos are
proprietary trademarks of iBiquity Digital Corp.
PN:127071000890
TX-1087B-A
FCC ID: AX2NX702
NX702
U.S.Patent Nos.6,836,549; 6381,747; 7,050,698; 6,516,132; and 5,583,936.
Covered by one or more of the following U.S. patents: 7,295,673;7,460,668; 7,515,710;
7,519,274
Manufactured under license from Dolby Laboratories. “Dolby” and the double-D symbol
are trademarks of Dolby Laboratories.

English
6NX702
3. CAUTIONS ON HANDLING
Front Panel / Generalities
Foralongerservicelife,besuretoreadthefollowingcautions.
• Donotallowanyliquidsontheunitfromdrinks,umbrellas,etc.Doingsomaydamagethe
internal circuitry.
• Donotdisassembleormodifytheunitinanyway.Doingsomayresultindamage.
• Donotletcigarettesburnthedisplay.Doingsomaydamageordeformthebody.
• Ifaproblemshouldoccur,havetheunitinspectedatyourstoreofpurchase.
• Theremotecontrolunitmaynotworkiftheremotecontrolsensorisexposedtodirect
sunlight.
Cleaning the body
• Useasoft,dryclothandgentlywipeoffanydirtand/ordust.
• Fortoughdirt,applysomeneutraldetergentdilutedinwatertoasoftcloth,wipeoffthedirt
gently,thenwipeagainwithadrycloth.
• Donotusebenzene,thinner,carcleaner,etc.,asthesesubstancesmaydamagethebody
orcausethepainttopeel.Also,leavingrubberorplasticproductsincontactwiththebodyfor
long periods of time may cause stains.
USB Port
• TheUSBmemorysticksmustberecognizedas“USBmassstorageclass“toworkproperly.
Some models may not operate correctly.
Whenthememorizeddataislostordamagedbyanychance,Clarionshallnotbeliable
foranydamage.
When usinganUSBmemorystick, werecommendthatyoubackupyour datastoredonit
before using a personal computer etc.
• Datales maybebroken whenusingUSB memory sticksinthefollowingsituation: When
disconnectingtheUSBmemorystickorturningthepoweroffduringreadingdata.
When affected static electricity or electric noise.
Connect/disconnecttheUSBmemorystickwhenitisnotaccessed.
• Connectingwiththecomputerisnotcovered.
SD Slot
• WhenusingaSDcard,werecommendthatyoubackupyourdatastoredonitbeforeusinga
personal computer etc.
• DatalesmaybebrokenwhenusingSDcardinthefollowingsituation:Whentakingoffthe
cardorturningthepoweroffduringreadingdata.
When affected static electricity or electric noise.
• Connectingwiththecomputerisnotcovered.
7
English
NX702
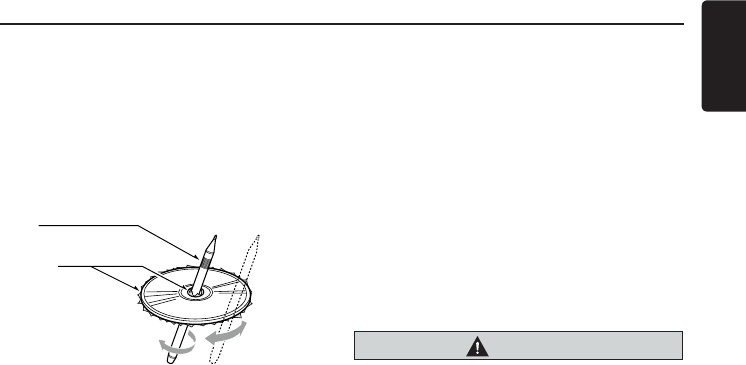
Handling Discs
Handling
• Newdiscsmayhavesomeroughness
around the edges. If such discs are used,
theplayermaynotworkorthesoundmay
skip. Use a ball-point pen or the like to
remove any roughness from the edge of
the disc.
• Neversticklabelsonthesurfaceofthedisc
ormarkthesurfacewithapencilorpen.
• Neverplayadiscwithanycellophanetape
orotherglueonitorwithpeelingoffmarks.
If you try to play such a disc, you may not
be able to get it back out of the player or it
may damage the player.
• Donotusediscsthathavelargescratches,
are misshapen, cracked, etc. Use of such
discs may cause misoperation or damage.
• Toremoveadiscfromitsstoragecase,
pressdownonthecenterofthecaseand
lift the disc out, holding it carefully by the
edges.
• Donotusecommerciallyavailabledisc
protectionsheetsordiscsequippedwith
stabilizers, etc. These may damage the
discorcausebreakdownoftheinternal
mechanism.
Storage
• Donotexposediscstodirectsunlightor
any heat source.
• Donotexposediscstoexcesshumidityor
dust.
• Donotexposediscstodirectheatfrom
heaters.
Cleaning
• Toremovengermarksanddust,useasoft
clothandwipeinastraightlinefromthe
center of the disc to the circumference.
• Donotuseanysolvents,suchas
commercially available cleaners, anti-static
spray, or thinner to clean discs.
• Afterusingspecialdisccleaner,letthedisc
dryoffwellbeforeplayingit.
On Discs
• Neverturnoffthepowerandremovethe
unitfromthecarwithadiscloaded.
CAUTION
Foryoursafety,thedrivershouldnotinsert
orejectadiscwhiledriving.
Ball-point pen
Roughness
English
8NX702
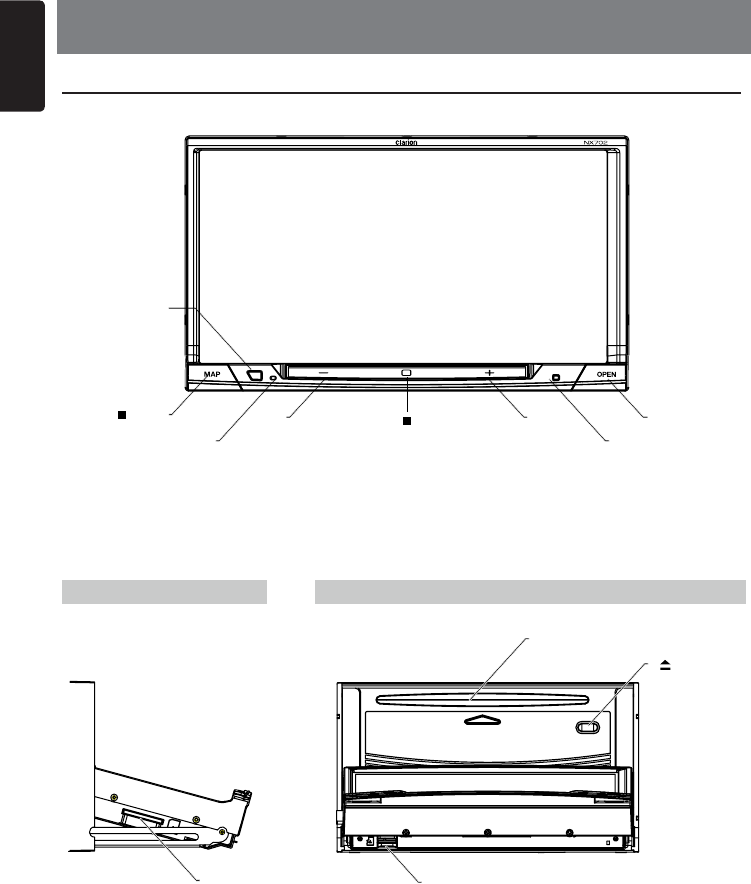
Short press [OPEN] button to slide down the panel.
LeftSide Front Side
4. CONTROLS
Operational Panel
SD Card Slot
[MENU ALL ]
[MIC]
[MAP PWR]
RemoteSensor
[-] [ + ]
DiscSlot
[ ] EJECT
RESET
[OPEN/vR]
MicroSDcardslot
Only navigation map card is available and don't
removeitwhenunitispoweron.
9
English
NX702
Names of Buttons
[MAP PWR] Knob
• Presstopoweronthesystemwhen
ignition on.
• Whenpoweron,presstoenternavigation
mode.
• Pressandholdthiskeymorethan1
second to turn off the system.
[ MENU ALL ] Button
• Shortpresstoshow/exitshortcutmenu.
• Longpresstoshow/exitmainsource
menu.
[-,+]buttons
• Presstodecreaseorincreasethevolume.
[ MIC ] Hole
• Internalmicrophone
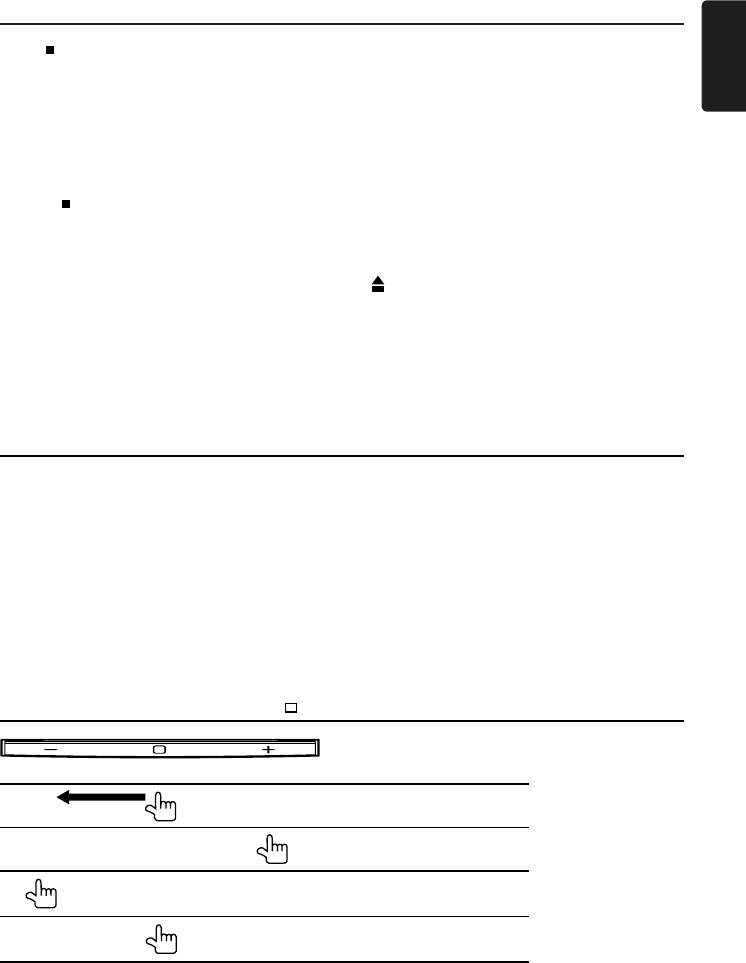
The way of SENSOR control ( /+/-)
MUTE
VOL UP (1 degree)
VOL DOWN (1 degree)
MENU (long press)
Speaker Setting Mode
Whenpoweronrsttime,“SpeakerSettingMode”dialogappears.
1. Select “Initial settings”, all speaker settings return to default setting.
3 Memory of previous speaker mode are deleted.
Touch [OK] on the dialog box, then select a mode.
2. Select “Load settings”, currennt speaker settings are kept.
3. Speaker Setting Mode
Normalmode:FrontL,R;RearL,R;SubwooferL,R
3Waymultimode:MIDL,R;HIGHL,R;SubwooferL,R
2Waymultimode:MIDL,R;HIGHL,R;REARL,R
[RESET] Button
• Presstoloadoriginalsettings.
Note: When the [RESET] button is pressed,
frequencies of radio stations, titles, etc.
stored in memory are cleared.
[ OPEN/vR ] Button
• Shortpresstoslidedownandclosethe
panel.
• LongpresstoVR(VoiceRecognition)
function.
[ ] EJECT Button
• Presstoejectdisc.
English
10 NX702
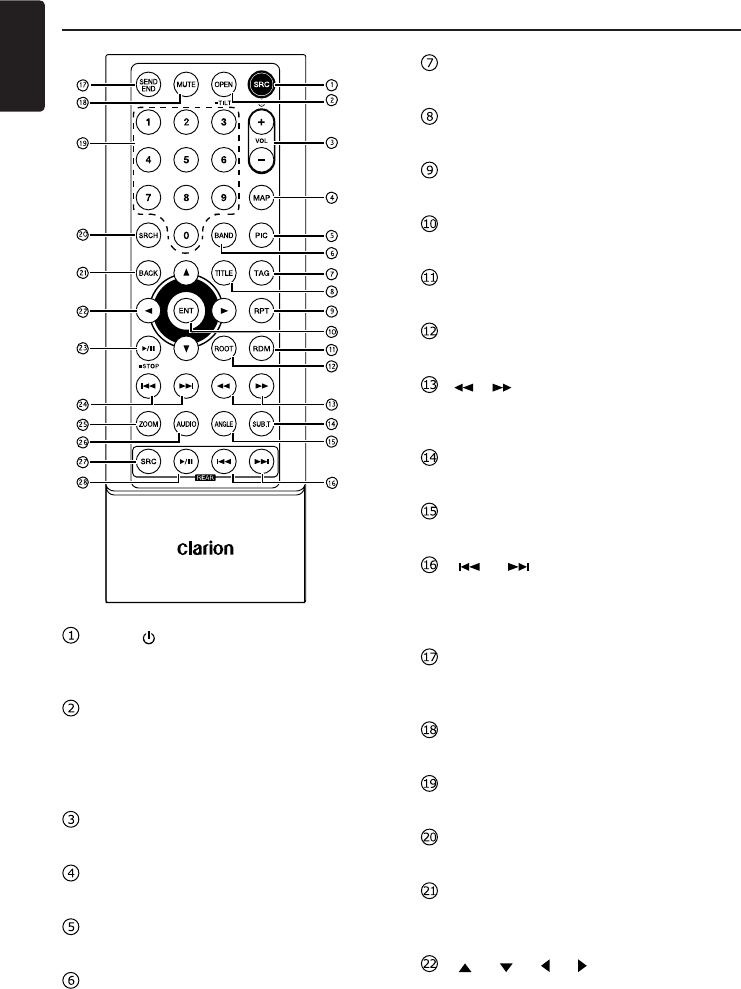
Remote Control
[SRC / ] Button
• Showmainsourcemenu
• Poweron/Poweroff(longpress)
[OPEN] Button
• Shortpresstoslidedownandclosethe
panel.
• LongpresstoVR(VoiceRecognition)
function.
[+],[-]Buttons
• Adjustvolumelevel
[MAP] Button
• Enternavigationmode
[PIC] Button
• Adjustscreen
[BAND] Button
• Selecttunerband
[TAG] Button
• SiriusXM / HD Radio mode – Tagging
[TITLE] Button
• DVDTITLEMENU
[RPT] Button
• Repeatplayback
[ENT] Button
• Enter
[RDM] Button
• Randomplayback
[ROOT] Button
• DVDROOTMENU
[],[ ] Buttons
• Manualtune
• Fastbackward/forwardplayback
[SUB.T] Button
• DVDsubtitle
[ANGLE] Button
• DVDangle
[ ],[ ]Buttons(Rear)
• Chapterup/down
• Fastbackward/forwardplayback(long
press)
[SEND/END] Button
• Pickup
• Hangup
[MUTE] Button
• Mute the volume
[0]~[9] Button
• Numerickey
[SRCH] Button
• Numberinputmode
[BACK] Button
• Backfromsourcemenureturntoprevious
display
[ ],[ ],[ ],[ ] Buttons
• Movecursorup/down/left/right
11
English
NX702
[ / STOP] Button
• Play/Pause
• Stop(longpress)
[ ],[ ] Buttons
• RADIO / HD RADIO / DAB mode
• Previous/nextpresetstation
• Seekdown/up(longpress)
• SiriusXM mode
• Previous/nextposition.
• Seekdown/up(longpress)
• DvD mode
Previous/next chapter.
• CD/BLUETOOTH mode
Previous/next track.
[ZOOM] Button
• ZOOM(DVD)
[AUDIO] Button
• DVDaudiostreamchange.
[SRC]Button(Rear)
• Changenextrearsource
[ ]Button(Rear)
• Play/Pause
• Stop(longpress)
Remote Control
Use and care of the remote control
Using the remote control
Point the remote control in the direction of the
front panel to operate.
Whenusingforthersttime,pulloutthelm
protruding from the tray.
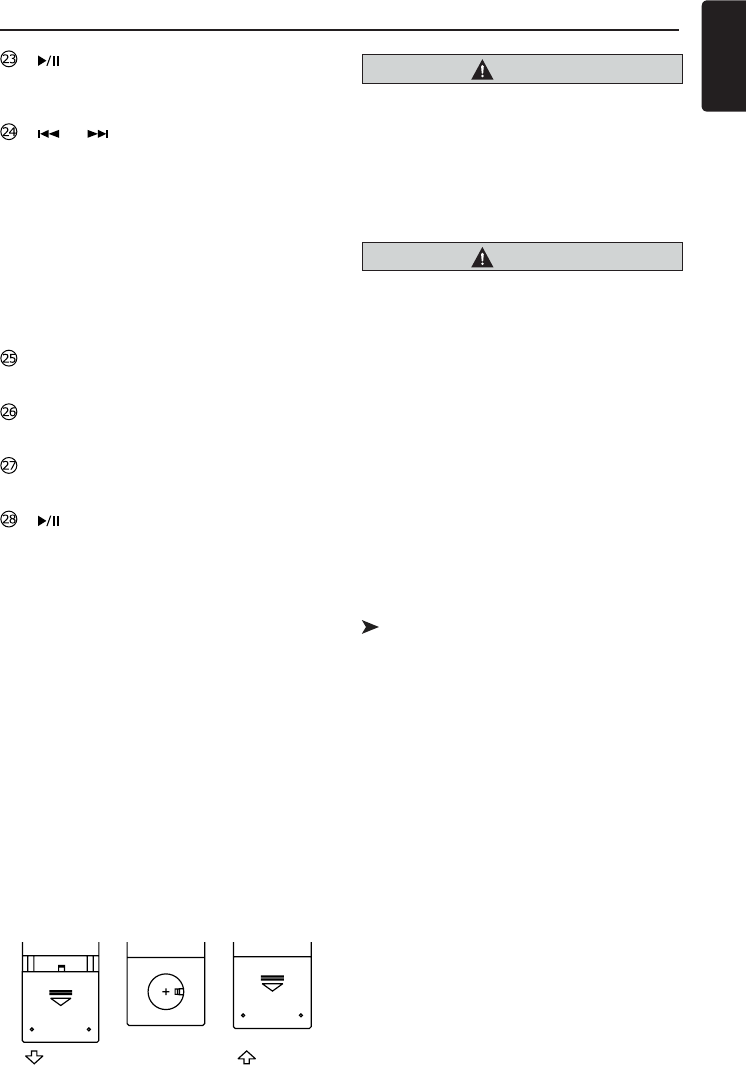
Replacing the battery
1 Slide out the back cover of the remote
control.
2.Insertthebatterywith theplus(+)and
minus (–) poles aligned properly.
•Whenusingforthersttime,pulloutthe
lmprotrudingfromthetray.
3. Close the back cover.
CAUTION
• Keepthebatteryoutofthereachof
children.
Should thebatterybeswallowed,consult
a doctor immediately.
• Batteries(batterypackorbatteries
installed)must not be exposed to excessive
heatsuchassunshine,reorthelike.
CAUTION
• UseoneCR2025(3V)lithiumbattery.
• Removethebatteryiftheremotecontrolis
not used for a month or longer.
• Thereisa dangerofexplosionifthe
battery is incorrectly replaced. Replace
onlywiththesameorequivalenttype.
• Donothandlethebatterywithmetallic
tools.
• Donotstorethebatterywithmetallic
objects.
• Ifthebatteryleaks,wipetheremote
controlcompletelycleanandinstallanew
battery.
• Wh e n dispo s i n g of use d b a tterie s ,
complywithgovernmentalregulationsor
environmentalpublicinstitutions’rulesthat
apply in your country/area.
Important
• Donotstoretheremotecontrolinhigh
temperatures or direct sunlight.
• Theremotecontrolmaynotfunction
properly in direct sunlight.
• Do notlettheremotecontrolfallontothe
oor,whereitmaybecomejammedunder
the brake or accelerator pedal.
English
12 NX702
5. MAIN MENU OPERATION
Long press [ MENU ALL ] button on the
PANELtoshowmainsourcemenu.
Short press [ MENU ALL ]buttontoshow
Short cut menu.
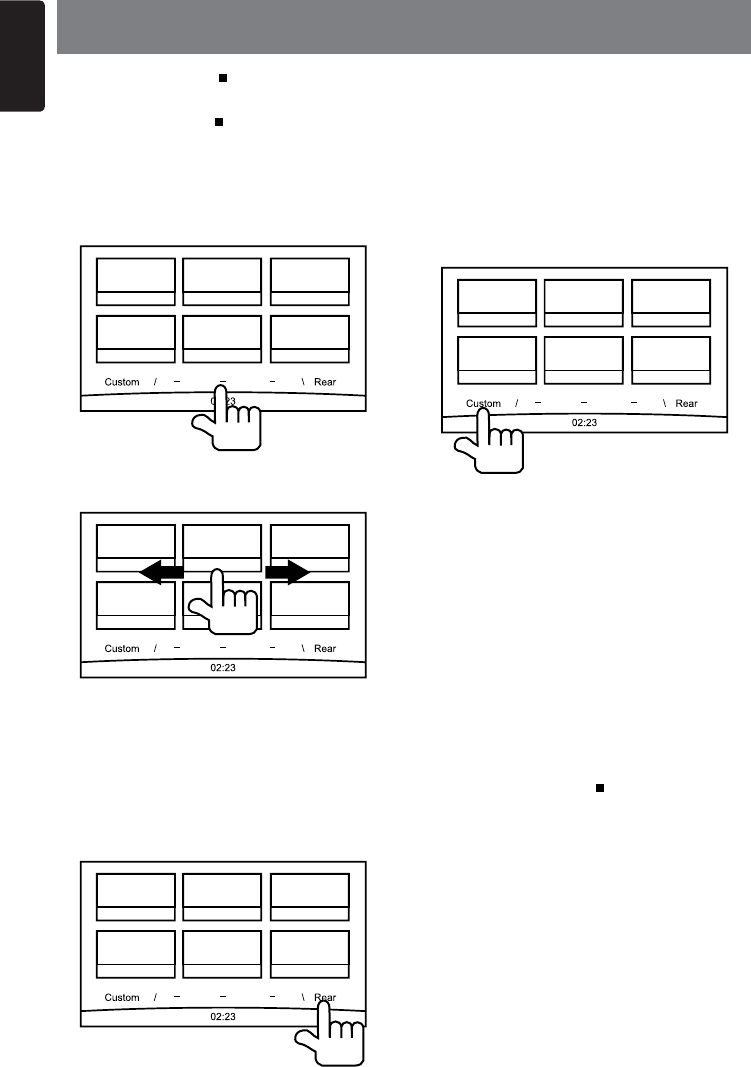
Front Zone Source
Touch [-]onthebottomofscreentoshow
front zone sources.
Change page by dragging left or right or
touching other [-] buttons.
Touch the icons on the screen to enter
correspondingworkmode,suchas Disc
mode, Tuner mode, Telephone mode, etc.
Touch [AudioOff] to mute the volume.
Rear Zone Source
Touch [Rear] on the bottom of screen to
showrearzonesources.
Touch the icons on the screen to enter
correspondingworkmode,suchas Disc
mode, USB mode, iPod mode, etc.
Touch [2ZoneOff] to turn off the rear zone
monitor.
Custom Setting
Touch [Custom] on the bottom of screen to
showcustomsettingmenu.
[Settings]:Touchthe icontoentersystem
setting menu. (see “System Setup”)
[Beat EQ]:Touchtheicontoenterequalizer
setting menu. (see “System Setup”)
[Short Cut]:TouchtheicontoenterShortcut
setting menu. Hold the desired icon for more
than2 secondsuntilit’sactivated,then drag
ittothebottom.Thenamewillappearonthe
bottom.
• Hold the center of the screen and drag left
orrighttoshowmoreicons.
• You can make total 5 shortcuts.
• You can access the shortcut list by
pressing the [ MENU ALL ] button.
[IllumiColor]: Touch the icon to enter
Illumination color setting menu. (see “System
Setup”)
[Wallpaper]:Touchtheicontoenter
Wallpaper setting menu. (see “System
Setup”)
[MonitorOff]:Touch theicontoturnoffthe
monitor.
To turn on the monitor, touch the monitor
again.
13
English
NX702
At all mode, long press [ MENU ALL ]
button to enter main source menu. Touch
[Custom] on the bottom left of the screen,
then select [Settings] on the screen to enter
Setting menu. Touch the icons on the left of
screento selectcategory:General,Time,
Sound, Display or Setup. To exit Setting
menu, touch [ ] on the bottom left of the
screen.
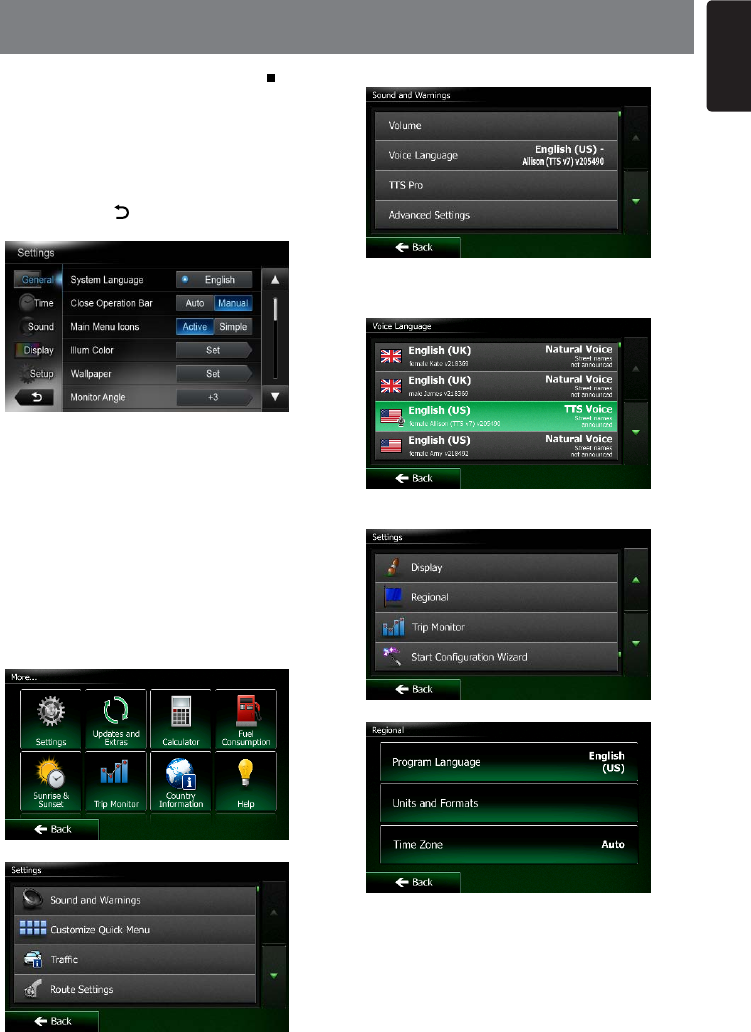
General
SystemlanguageandBluetoothVR
language
Touch the button to the right of “System
language and Bluetooth VR language” to
showlanguagelist.Selectdesiredlanguage,
touch [OK] to confirm, or touch [Cancel] to
exitwithoutsaving.
NavigationVRlanguagesetting
Touch “Settings” button from navigation
menu.
Touch “Sound and Warnings” button.
Touch “VoiceLanguage” button.
Select desired language.
(When select the TTS Voice, navigation VR
functionwillwork)
Touch “Regional” button from navigation
menu.
Touch “ProgramLanguage” button.
Select desired language.
(When select the same language(Voice
language and Program Language),
navigationVRfunctionwillwork)
6. SYSTEM SETUP

English
14 NX702
Closeoperationbar
When select [Auto],theoperationbarwill
close automatically after 10 seconds.
When select [Manual],theoperationbarwill
not close unless you touch the blank area on
the screen.
MainMenuIcons
When select [Active],mainmenushow
animation icons.
When select [Simple],mainmenushow
simple icons.
IllumiColor
Touch [Set] to the right of “Illumi Color” to
showkeyilluminationsettingmenu.
Edit Color: Thereare12presetcolors and
3 custom colors, you can select one color by
touch Color 1~12 or Custom 1~3.
Touch [Adjust]toshoweditcolormenu.
Drag the color bar or inputting the RGB value
to select one color, touch [OK]toconrm.
Initialize:Loadoriginalbuttonsbacklight.
Touch [ BACK ] on the bottom left of the
screen to return to main setting menu.
Wallpaper
Touch [Set]totherightof“Wallpaper”toshow
Wallpaper setting menu.
Touch [ ] or [ ] button to select the scene,
and touch the picture file name on the right
topreviewit, thentouch[Set]toconrmthe
setting.
To import images, touch [Import].
Select a mobile storage device on the list,
then select desired images and touch [Import].
Touch [Cancel] to exit.
Monitor Angle
Touch0~+6buttonsonthescreentoselecta
monitor angle.
Beep
Touch [On] or [Off] to turn on/off the key beep
sound.
Blinking LED
Touch [On] or [Off] to turn on/off the blinking
LED.
At blinking LED [On]mode,whenACCoff,
theLEDonthetopleftofthepanelwillblink.
Ampliercancel
Touch [On] or [Off] to set the internal
amplieronoroff.
Systemsoftware
Touch [version]toshow currentsoftware
version.
Factorydefault
Touch [Restore] to load the original factory
settings.
Time
GPSsync
Touch [On] tosynchronizetimewithGPS
andthefollowingsettingisdisable:“Time”.
Time
Touch the button to the right of “Time” to
showtimesettingmenu.Touch[ ] or [ ]
button to select hour or minute. Touch [Set]
toconrmor[Back]toexitwithoutsaving.
24-Hourformat
Touch [On] to select 24-Hour format.
Touch [Off] to select 12-Hour format.
Sound
Beat EQ
Touch the button to the right of “Beat EQ” to
showEQsettingmenu.Youcanselect:“Bass
Boost”, “Impact”, “Excite”, “Custom” or “Off”.
Toadjustthevalue,touch[-] or [+] button on
the screen.
Touch [Back] to exit.
Balance/Fader
Touch [Set] to the right of “Balance/Fader” to
showBalance/Fadersettingmenu.
Touch [ ] or [ ]buttonto adjustFader,
and touch [ ] or [ ]buttontoadjust
Balance.
Touch [Center] to reset the value.
Touch [Back] to exit.

15
English
NX702
Subwoofercontrol
Touch [-] or [+] button on the right of
“Subwoofercontrol”toadjustsubwoofer
level.
Subwooferphase
TouchtoselectsubwooferphaseNormalor
Reverse.
Highpasslter
Touch the button to the right of “High pass
lter”toshowthe sub-menu,thenselectthe
lter:“Through”,“55Hz”,“85Hz”or“120Hz”.
Touch [Cancel] to exit.
Lowpasslter
Touch the button to the right of “Low pass
Filter”toshowthesub-menu,thenselectthe
lter:“Through”,“62Hz”,“95Hz”or“135Hz”.
Touch [Cancel] to exit.
TimeAligment(NormalMode)
Touch [-] or [+]buttontoadjusttimealigment.
FrontHPF/LPF(NormalMode)
Touch [Setup] on the right to Front HPF/LPF
to spread the setting list. Touch buttons on
thescreentoadjust.
RearHPF/LPF(NormalMode)
Touch [Setup] on the right to Rear HPF/LPF
to spread the setting list. Touch buttons on
thescreentoadjust.
SWHPF/LPF(NormalMode)
Touch [Setup] on the right to SW HPF/LPF to
spread the setting list. Touch buttons on the
screentoadjust.
X-OverHigh(2WAY/3WayMultiMode)
Touch [Setup] on the right to X-Over High to
spread the setting list. Touch buttons on the
screentoadjust.
X-OverMid(2WAY/3WayMultiMode)
Touch [Setup] on the right to X-Over Mid to
spread the setting list. Touch buttons on the
screentoadjust.
X-OverSW(2WAY/3WayMultiMode)
Touch [Setup] on the right to X-Over SW to
spread the setting list. Touch buttons on the
screentoadjust.
SpeakerGain(2WAY/3WayMultiMode)
Touch [Set] on the right to Speaker Gain.
Touchbuttonsonthescreentoadjust.
Store Settings
Touch [Store] on the right to Store Setting,
select Memory0, Memory1 or Memory2 to
store current settings.
RecallSettings
Touch Memory0, Memory1 or Memory2 to
recall corresponding settings.
Reset Setting Mode
Touch[Reset]and[OK]buttons,thesystem
restartandshow“SpeakerSettingMode”
menu.
Display
DimmerMode
Touch [Auto], [Day] or [Night] to choose
dimmer mode.
Auto:Thedimmeriscontrolledby yourcar
light.
Dimmer
Touch [-] or [+] button to the right of “Dimmer”
toadjustdimmer.
The setting is only for Day or Night.
Setup
Touch [Setup] on the right of screen to
spread the setting list. Then touch the button
totherightof desiredoptiontoadjustor
showthesub-menu. Touch[Close] to close
the list.
AUX
• InputAuxSense(AUX1)
Choose“Low”,“Middle“or “High”input
sense of auxiliary device.
Bluetooth
• Bluetooth
Choose Bluetooth function on or off.
• TelephoneSpeaker
Choose Front Left or Front Right speaker
at telephone mode.

English
16 NX702
• ToneSelect
Touch [Auto] to use ringtones of your
mobile phone.
Touch [Internal] to use preset ringtone of
the unit.
• SoftwareUpdate
Updatethesoftware.
Camera
• CameraInterrupt
Choose [On],thescreenwillswitchtorear
cameramenuautomaticallywhenbacking.
DVD
• Menu Language
Select menu language from list.
• Audio Language
Select audio language from list.
• Subtitle Language
Select subtitle language from list.
• SetPassword
Tosetpasswordforparentalcontrol,
Touch [Set]toshowpasswordmenu.
Input numbers by touching the digit and
[OK] buttons. Touch [X] button to delete a
digit inputted. Touch [Back] to exit.
• Parental Control
Touch the button to the right of “Parental
Control”toshowparentalcontrolmenu.
Enterpassword,thenselectaparental
level. Touch [OK]toconrmor [Back] to
exit.
Navigation
• NavigationInterrupt
Select navigation interrupt On, Pop-Up or
Off.
• VoiceGuidance
ON:Interruptfunctionofvoiceguidance
is on. While interrupting no attenuate
function of AV sound.
MUTE:Interruptfunctionofvoiceguidance
is on. While interrupting attenuate function
of AV sound is on.
OFF:Interruptfunctionofvoiceguidance
is off. While interrupting no attenuate
function of AV sound.
PANDORA
• PANDORA
Select PANDORA On or Off.
IfyouriPhonewithPANDORA application,
please set on, else set off.
Anti Theft
• AntiTheftcode
You can set an Anti-theft code. After set
successfully,whenBatterywirereconnect,
you need to input the Anti-theft code.
1. Long press the [General] button until a
dialog box popped up. Touch [Yes] to set
a personal code of Anti-Theft.
2. Input a 4-digit code. Touch [OK]toconrm.
Theninputitagainforconrmation.
3. To remove the code, long press the
[General] button and input the old
password.
Note:
Please make a note of the Anti theft code not
to forget. if the right code is not inputted, it
becomes impossible to operate this unit.
17
English
NX702
DVD System
DVDvideoisahigh-qualitydigitalvideo
source that provides crisp and clear images.
One 12 cm disc contains either one film or
four hours of music.
DVD Video Features
Thisunitprovidesthefollowingfunctionsin
additiontothehighimagequalityandsound
qualityofDVDvideo.
Notes:
• Thefunctionsdescribedinthissection,for
example, the recorded language, subtitles,
angles, etc. differ depending on the DVD
video disc.
Refer to the instructions provided with the
DVD video.
• Somedisc functionsmayoperate
differently from described in this manual.
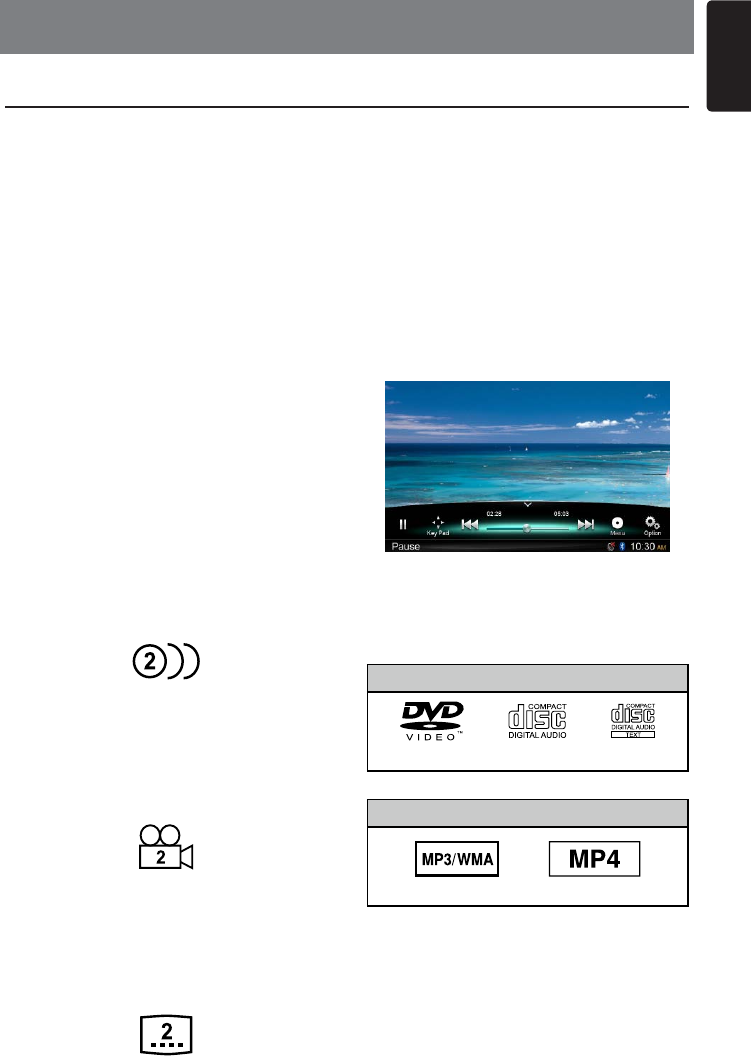
Multi-sound function
DVD video can store up to 8 languages
foronelm;selectthelanguageofyour
preference.
• Thelanguagesstoredonthediscare
indicatedbytheiconshownbelow.
Multi-angle function
ADVDvideothatislmedfrommultiple
anglesallowsyoutoselecttheangleof
choice.
• Thenumberofrecordedanglesare
indicatedbytheiconshownbelow.
Subpicture (subtitles) function
A DVD video can record subtitles for up to 32
languages and you can select the language
ofthesubtitlesyouwishtosee.
• Thenumberofrecordedsubtitlelanguages
areindicatedbytheiconshownbelow.
Multi-story function
When a DVD video contains more than one
storyforalm,youcanselectthestoryyou
wishtoenjoy.
Theoperationproceduresvarywiththedisc;
observe the instructions for selecting a story
provided during playback.
Menu screens
Menu can be called up during DVD video
playback to perform menu setting.
• Exampleshowingmenudisplay
Discs
Playable discs
ThisDVDvideoplayercanplaythefollowing
discs.
Playable discs
DVD video discs Audio CDs CD TEXT
Playable media les
MP3/WMA MP4
About CD Extra discs
ACDExtradiscisa disc inwhichatotalof
twosessions havebeenrecorded.Thefirst
session is Audio session and the second
session is Data session. Your personally-
createdCDswithmorethanseconddata
7. DISC OPERATION

English
18 NX702
sessions recorded cannot be played on this
DVD video player.
Note:
• WhenyouhaveaCDExtradisc,onlythe
first session will be recognized.
About playing a CD-R/CD-RW disc (MP3,
WMA)
This player can play CD-R/CD-RW discs
previously recorded in music CD format (MP3,
WMA)
About playing a DVD-R/RW or DVD+R/
RW disc
This player cannot play DVD-R/RW and
DVD+R/RWdiscspreviouslyrecordedin
video CD format.
However,MP3/WMAfilesrecordedon
DVD-R/RWandDVD+R/RWdiscscanbe
played.
Discs that cannot be played back
This DVD video player cannot play back
DVD-Audio, DVD-RAM, Photo CDs, etc.
Notes:
• Itmayalsonotbe possibletoplayback
CDsrecordedonaCD-RunitandCD-RW
unit.(Cause:disccharacteristics,cracks,
dust/dirt,dust/dirtonplayer’slens,etc.)
• If a CD-R or CD-RW disc that has not
been finalized is played, it will take a long
time to start playing. Also, it may not be
possible to play depending on its recording
conditions.
• YoucannotplaySuperAudioCDsPlayback
oftheCDplayerisnotsupportedevenifit
is a hybrid disc.
About MP3/WMA playback
This unit can play back CD-R/CD-RW,
DVD-R/RWandDVD+R/RWdiscsonwhich
MP3/WMA music data have been recorded.
For a detailed information, see the section
entitled “Listening to MP3/WMA”.
Note on region numbers
The DVD video system assigns a region
number to DVD video players and DVD discs
by sales area. DVD video players sold in the
AmericacanplaybackDVDdiscswiththe
region number “ALL”, “1” or any combination
of numbers that also incorporate a “1”.
The DVD video region number is marked on
thediscjacketasshownbelow.
4
6
19
English
NX702
CAUTION
For your safety, the driver should not
insertorejectadiscwhiledriving.
Eject function
Press [OPEN]buttontoslidedownthepanel,
then press the [ ]buttontoejectthedisc
evenifthepower totheunitwasnotturned
on.
Notes:
• If you force a disc into be fore au to
reloading, this can damage the disc.
• Toavoiddamaging,removethediscfrom
the unit after it pops up.
Listening to a disc already loaded
in the unit
Long press [ MENU ALL ] button to enter
main source menu, then select [Disc] to
enter Disc mode.
If Disc is not on the current source menu,
touch [-] buttons on the bottom of the
screen, or hold the center of screen and drag
left/righttoshowmoreicons.
When the unit enters the Disc mode, play
starts automatically.
Loading a disc
Press [OPEN] buttontoslidedownthe
panel, insert a disc into the center of the
discslotwithlabel facingup.Thediscplays
automatically after loading.
Notes:
• Neverinsertforeignobjectsintothedisc
slot.
• Ifthediscisnotinsertedeasily,theremay
be another disc in the mechanism or the
unit may require service.
Accessing a Disc
English
20 NX702
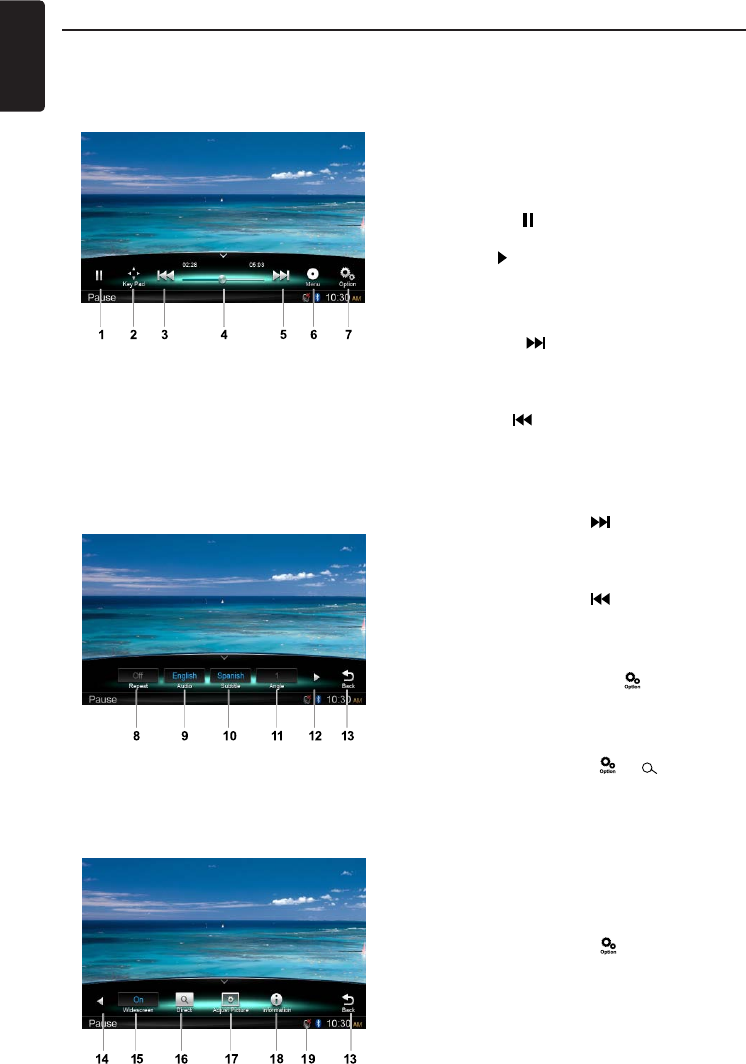
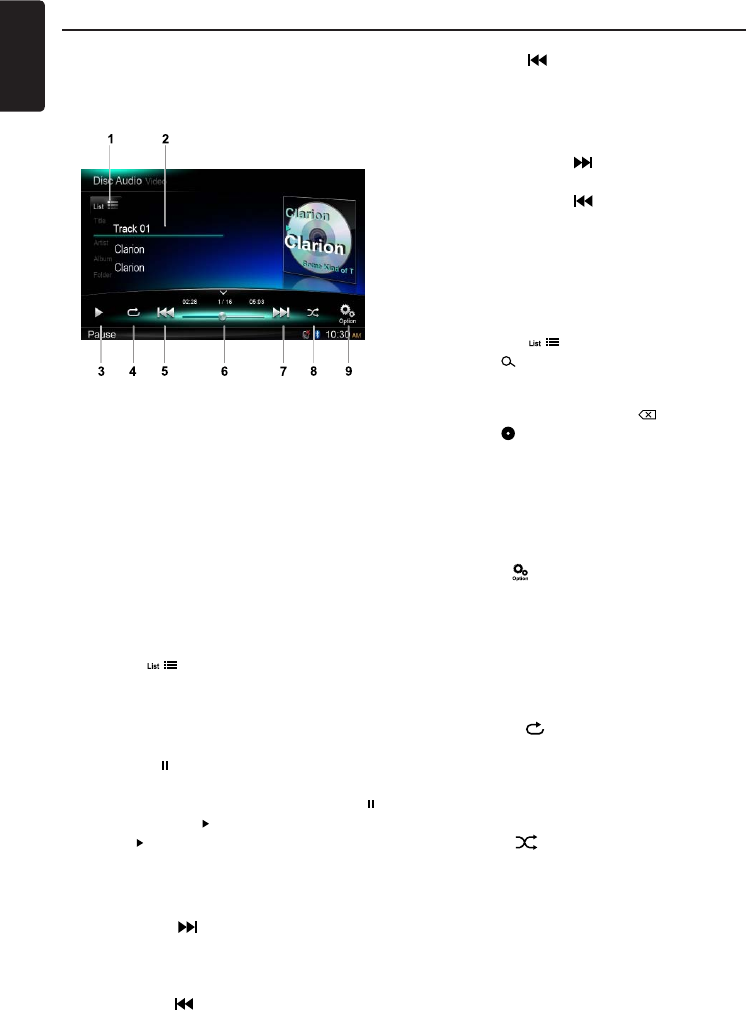
Playback menu
Touchthe bottomhalfofscreento show
operation bar.
1. Play/Pause
2. ShowcursorkeysinDVDtitlemenu
3. Previous chapter
Fast-backward(longpress)
4. Progress bar
5. Next chapter
Fast-forward(longpress)
6. Root menu
Root Title (long press)
7. Showotheroptions
8. Repeat play
9. Select audio language
10. Select subtitle language
11. Shownextpage
12. Select DVD angle
13. Back to main operation bar
14. Showpreviouspage
15. Turn on Widescreen mode
16. Direct search
17. Adjustpictureeffect
18. Showplaybackinformation
19. Mute indicator
Pausing play
1. Touch the [ ] button on the screen to pause
play.
2. Touch [ ] button to resume play.
Selecting a chapter
Chapter-up
Touch the [ ] button to move to the
beginning of the next chapter.
Chapter-down
Touch the [ ] button to move back to the
beginning of the current or previous chapter.
Fast forward/Fast reverse
Fastforward
Touch and hold the [ ] button for more
than 2 seconds.
Fastreverse
Touch and hold the [ ] button for more
than 2 seconds.
Repeat
During playback, touch [ ], [ Repeat]
buttons to repeat play.
Search function
During playback, touch [ ], [ ] buttons to
showsearchmenu.
Input number by digit buttons, touch [OK]
to begin searching or touch [Close] to clear
inputting.
Touch [Chapter] or [Title]toshowDVD
chapter/title list.
DVD audio select
During playback, touch [ ], [Audio] buttons
to select audio language to listen if the DVD
has multiple audio languages.
DVD Player Operation

21
English
NX702
DVD subtitle select
During playback, touch [ ], [Subtitle]
buttons to select the subtitle language if the
DVD has multiple language subtitles.
Playback information
During playback, touch [ ], [ Information]
buttonstoviewplaybackinformation.
Adjust picture
During playback, touch [ ], [ Adjust
Picture] button, then use [-], [+] buttons to
adjustDimmer/Brightness/Contrast/Color.
DVD angle select
During playback, touch [ ], [ Angle ]
buttonstoselectdifferentangletoviewifthe
DVDhasmultiple-angleviews.
English
22 NX702
CD Player Operation
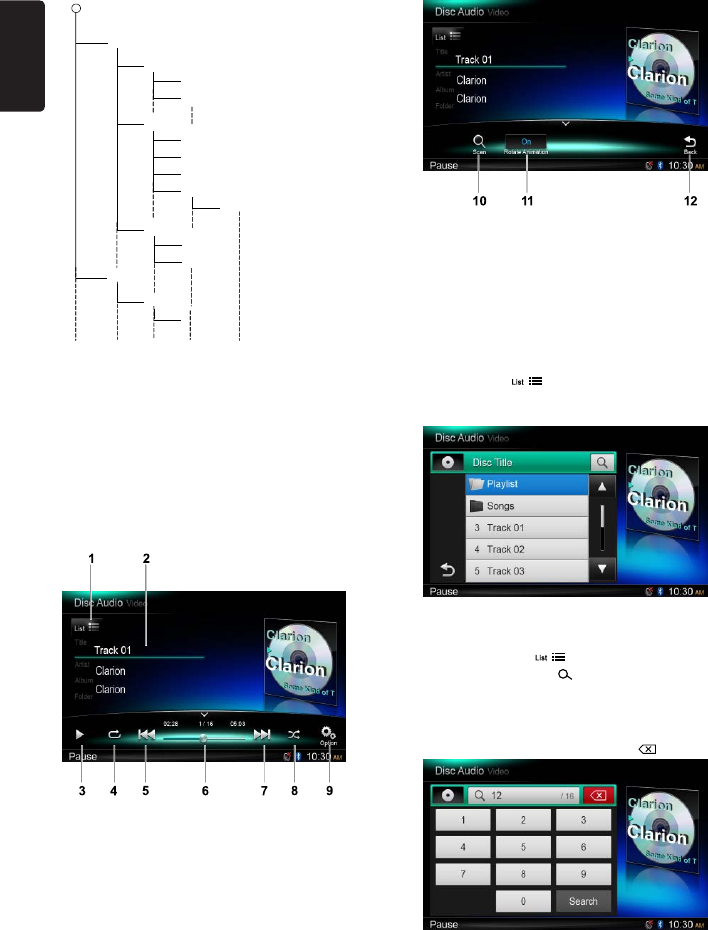
Playback menu
Touchthebottomhalfofscreentoshow
operationbar.
1. Showtracklist(Browse)
2. Title/Artist/Album information
3. Play/Pause
4. Repeat play
5. Previous track
Fast reverse (long press)
6. Progress bar
7. Next track
Fastforward(longpress)
8. Random play
9. Showotheroptions
Scan:Scanplaystoredstations
Browse mode
Touch the [ ]buttontoshowtracklist.
Dragup/downtobrowsethetracks,and
touch desired track to select it.
Pausing play
1. Touch the [ ] button on the bottom left of the
screen to pause play.
“PAUSE” appears in the display, and [ ]
button becomes [ ] .
2. Touch [ ] button to resume play.
Selecting a track
Track-up
1. Touch the [ ] button to move to the
beginning of the next track.
Track-down
1. Touch the [ ] button to move back to
the beginning of the current track.
2. Touch the [ ]buttontwicetomoveback
to the beginning of the previous track.
Fast forward/Fast reverse
Fastforward
Touch and hold the [ ] button .
Fastreverse
Touch and hold the [ ] button .
* For MP3/WMA discs, it takes some time
untilthestartofsearchingandbetween
tracks. In addition, some error may occur in
the play time.
Search Function
1. Touch the [ ]buttontoshowtracklist.
Touch [ ] button to enter search menu.
2. Input numbers by touching digit buttons,
then touch [Search] to begin searching.
To delete numbers, touch [ ] button.
3. Touch [ ] button to exit.
Other various play functions
Scanplay
Thisfunction allows youtolocate and play
therst10secondsofallthetracksrecorded
on a disc.
Touch the [ ] button, then touch [Scan] to
scan play.
Repeatplay
Thisfunctionallows youtoplaythecurrent
track repeatedly or play a track currently
being played in the MP3/WMA folder
repeatedly.
Touch the [ ] button to select Track
Repeat, Folder Repeat or All Repeat.
Randomplay
This function allows you to play all tracks
recorded on a disc in a random order.
Touch the [ ] button to perform random
play.

23
English
NX702
MP3/WMA Playback
This unit is an ID3 Tag compatible model.
This unit supports the ID3 TAGs of the
Version 2.4, 2.3, 1.1 and 1.0.
In displaying, this unit gives priority to the
Version 2.3 and 2.4 TAGs.
What is MP3/WMA
MP3 is an audio compression method
andclassiedintoaudiolayer3ofMPEG
standards.
WMA is an audio compression method
developed by Microsoft Corporation.
These audio compression methods have
penetrated into PC users and become a
standard format.
These features compress the original audio
datatoabout10percentofitsinitialsizewith
ahighsoundquality.Thismeansthatabout
10 music CDs can be recorded on a CD-R
discorCD-RWdisctoallowalonglistening
timewithouthavingtochangeCDs.
Note:SomeCDsrecordedonCD-R/RW
mode may not be usable.
Displaying MP3/WMA TAG titles
Tag information such as title, artist and
album title can be displayed for MP3/WMA
lecontainingTaginformation.
Precautions when creating MP3/
WMA le
Usablesamplingratesandbitrates
1. MP3:Samplingrate8kHz-48kHz,Bitrate
8 kbps-320 kbps / VBR
2. WMA:Bitrate8kbps-320kbps
File extensions
1.Alwaysaddafileextension“.MP3”,
“.WMA”toMP3,WMAlebyusingsingle
byte letters. If you add a file extension
other than specified or forget to add the
leextension,thelecannotbeplayed.
2. FileswithoutMP3/WMAdatawillnotplay.
Theleswillbeplayedsoundlesslyifyou
attemptto playfileswithoutMP3/WMA
data.
*WhenVBRlesareplayed,theplaytime
display may differ the play location.
*WhenMP3/WMAlesareplayed,alittle
nosoundpartiscausedbetweentunes.
Logicalformat(Filesystem)
WhenwritingMP3/WMAleonaCD-Rdisc
or CD-RW disc, please select “ISO9660 level
1, 2 or Joliet or Romeo” or Apple ISO as the
writingsoftwareformat.Normalplaymaynot
be possible if the disc is recorded on another
format.
Folderstructure
A disc with a folder having more than 8
hierarchicallevelswillbeimpossible.
Numberoflesorfolders
1. Up to 999 files can be recognized per
folder.
Upto6000lescanbeplayed.
2. Tracks are played in the order that they
wererecordedontoadisc.(Tracks
may not always be played in the order
displayed on the PC.)
3. Some noise may occur depending on
thetype ofencodersoftwareusedwhile
recording.
PlayingMP3folders
When selected for play, files and folders
(Folder Search, File Search or Folder Select)
areaccessingintheorderinwhichtheywere
writtentothemedia.
Asa result,theorderinwhichtheyare
expected to be played may not match the
orderinwhichtheyareactuallyplayed.
Youmay beabletosettheorderinwhich
MP3/WMAlesaretobeplayedbyassigning
filenamesbeginningwithplaysequence
numbers such as “01” to “99”.
Forexample,amediumwiththefollowing
folder/filehierarchyissubject toFolder
Search, File Search or Folder Select.
Seethediagrambelow.
English
24 NX702
()
0
1
2♪①
♪②
5
♪⑧
♪⑦
6
7♪⑨
♪③
3
4
♪④
♪⑤
♪⑥
Layer1 Layer 2 Layer 3 Layer 4 Layer5
○Root Folder
Folder
♪File
Theplayerwill onlyrecognizethreefolder
levels and does not display folders containing
other folders. In the example above, the unit
willdisplayfolders2,3,5and7,but1and6
since they do not contain others.
Playback menu
Touchthe bottomhalfofscreento show
operation bar.
1. Showfolder/lelist(Browse)
2. Folder/Title/Artist/Album information
3. Play/Pause
4. Repeat play
5. Previous track
Fast reverse (long press)
6. Progress bar
7. Next track
Fastforward(longpress)
8. Random play
9. Showotheroptions
10. Scan play
11. Rotate the album image
12. Back to main operation bar
Folder Select
This function allows you to select a folder
containingMP3/WMA lesandstartplaying
fromthersttrackinthefolder.
Touch the [ ] button on the upper left of
thescreentoshow folder/filelist. Youcan
selectafolderorlebytouchingit.
Search Function
1. Touch the [ ]buttontoshowfolder/
lelist.Touch[ ] button to enter search
menu.
2. Input numbers by touching digit buttons,
then touch [Search] to begin searching.
To delete numbers, touch [ ] button.
Other operations about playing MP3/WMA
are as CD Player mode.
25
English
NX702
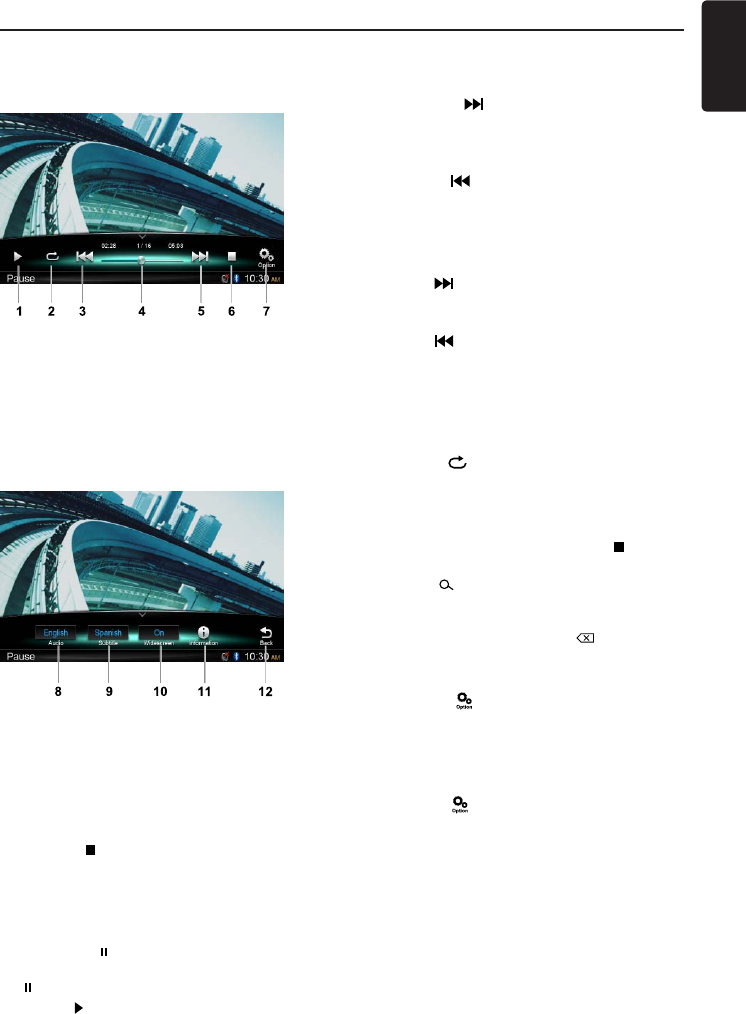
MP4 Playback
Playback menu
When playing, touch the bottom half of
screentoshowoperationbar.
1. Play/Pause
2. Repeat playback
3. Previousle
Fast reverse (long press)
4. Progress bar
5. Nextle
Fastforward(longpress)
6. Stopandshowlistmenu(Browse)
7. Showotheroptions
8. Select audio language
9. Select subtitle language
10. Turn on Widescreen mode
11. Showplaybackinformation
12. Back to main operation bar
Browse mode
Touch the [ ]buttontoshowfolder/lelist.
Dragup/downtobrowse,and touchdesired
option to select it.
Pausing play
1. Touch the [ ] button on the screen to pause
play.
“ PAUSE” appears in the display.
2. Touch [ ] button to resume play.
Selecting a le
File-up
Touch the [ ] button to move to the
beginningofthenextle.
File-down
Touch the [ ] button to move back to the
beginningofthecurrentorpreviousle.
Fast forward/Fast reverse
Fastforward
Hold the [ ] button .
Fastreverse
Hold the [ ] button .
Repeat play
Thisfunctionallows youtoplaythecurrent
file repeatedly or play files currently being
played in the folder repeatedly.
Touch the [ ] button to select File Repeat,
Folder Repeat, All Repeat or Repeat Off.
Search function
1. At video main menu, touch the [ ] button
toshowfolder/lelist.
2. Touch [ ] button to enter search menu.
3. Input numbers by touching digit buttons,
then touch [Search] to begin searching.
To delete numbers, touch [ ] button.
Audio select
Touch the [ ] button and touch [Audio]
button to select audio language to listen if the
lehasmultipleaudiolanguages.
Subtitle select
Touch the [ ] button and touch [Subtitle]
toselectthesubtitlelanguageif thelehas
multiple language subtitles.

English
26 NX702
1. Insert an USB device into the USB cable.
When connecting an USB device, the unit
willreadthelesautomatically.
2. To remove the USB device, you should
first select another source or turn off
thepower, inordertoavoiddamaging
the USB device. Then take off the USB
device.
3. To a cc e ss an U S B d e v i c e a l r e a d y
connected to the unit, long press [ MENU
ALL ] button to enter main source menu,
then select [USB] to enter USB mode.
If [USB] is not on the current source menu,
touch [-] buttons on the bottom of the
screen, or hold the center of screen and
dragleft/righttoshowmoreicons.
1. Press [OPEN]buttontoslidedown the
panel. Insert an SD card into the card slot
located on the left side of the panel.
Wheninsertingacard,theunitwillread
thelesautomatically.
2. Toremovethecard,youshouldrstselect
another source or turn off the power, in
order to avoid damaging the card. Press to
pop it out, then take off the card. Close the
panel.
3. To access an SD card already inserted in
the unit, long press [ MENU ALL ] button
to enter main source menu, then select
[SD] to enter SD mode.
If [SD] is not on the current source menu,
touch [-] buttons on the bottom of the
screen, or hold the center of screen and
dragleft/righttoshowmoreicons.
Accessing an USB
Accessing an SD Card
8. SD/USB OPERATION

27
English
NX702
SD/USB Audio Operation
SD/USB Video Operation
Thissystemcanplayaudioles(MP3/WMA)
stored in a SD card or USB memory. You can
use it as an audio device by simply copying
desiredaudiolesintoit.
Notes:
• Thissystemwillnotoperateormayoperate
improperly with some card or USB.
• Files protected with any DRM cannot be
played.
This system can play video files (MP4, etc)
stored in an SD card or USB memory. You
can use it as an video device by simply
copyingdesiredvideolesintoit.
Notes:
• Thissystemwillnotoperateormayoperate
improperly with some card or USB.
• Files protected with any DRM cannot be
played.
Operation about SD/USB video is same as
MP4 playback mode.
Select SD/USB Audio mode
Touch top left corner of the screen until SD
Audio or USB Audio appears.
Operation about SD/USB audio is same as
MP3/WMA playback mode.

English
28 NX702
Bluetooth Telephone Operation
Pairing
1. Turn on the Bluetooth function of the unit.
(see <System Setup>, <Bluetooth>)
2. Turn on Bluetooth function of your mobile
phone.
3.Entermobilephone’sBluetoothsetup
menu.
4. SearchfornewBluetoothdevices.
5. Select NX702 from the pairing list on the
mobile phone.
6. Enter “0000”asthepassword.
7.
After pairing successfully, indicator on
the bottom right of the screen turns blue.
Search from the unit
You can search Bluetooth device from the
unit.
1. Touch [Add] on the right of the screen, the
unitwillsearchtheBluetoothdevicesand
list on the screen.
2. If your desired device isn’t on the list,
touch the button on the bottom left of the
screen to refresh.
To stop searching, touch [Cancel].
3. Touch the device name on the screen to
select it, then input PIN code on the sub-
menu.
4. After paired successfully, select device
image, touch [OK]toconrm.
5. If connect unsuccessfully, select [Retry] to
reconnect or select [Cancel] to return to
list menu.
Choose paired device
After paired, the mobile device information
appears on the right of screen, such as
model number, Signal, Battery.
1. To select other paired device, hold the
middle right of the screen, and drag it left
orright,touchittoshowcontrolbuttons.
2. Touch [Connect] to connect the Bluetooth
device. Touch [Cut] to disconnect.
3. Touch [ ] to delete the paired device
from pairing list.
Telephone menu
Long press [ MENU ALL ] button to enter
main source menu, then select [Telephone]
to enter telephone mode.
If [Telephone] is not on the current source
menu, touch [-] buttons on the bottom of the
screen, or hold the center of screen and drag
left/righttoshowmoreicons.
9. BLUETOOTH OPERATION
TheBluetoothallowsyoutoutilizeyourcar’sbuilt-inaudiosystemforwirelessmobilephoneor
music handsfree communication. Some Bluetooth mobile phones have the audio features, and
some portable audio players support Bluetooth feature. This system can play audio data stored
ina Bluetoothaudiodevice.ThecarstereowithBluetoothwillbeabletoretrieve phonebook
contacts, received call, dialled call, missed call, incoming calls, outgoing call and listen to music.
Notes:
• DonotsetthemicrophoneofBluetoothhandsfreeintheplaceswithwindpassingsuchasair
outlet of the air conditioner, etc. This may cause a malfunction.
• Ifsetitintheplacessubjectedtodirectsun,hightemperaturecancausedistortion,
discoloration which may result in a malfunction.
• ThissystemwillnotoperateormayoperateimproperlywithsomeBluetoothaudioplayers.
• Clarion cannot guarantee the compatibility of all mobile phones together with the unit.
• Audioplaybackwillbesettothesamevolumelevelassetduringtelephonecall.Thismight
cause problems, if extreme volume level is set during telephone call.
29
English
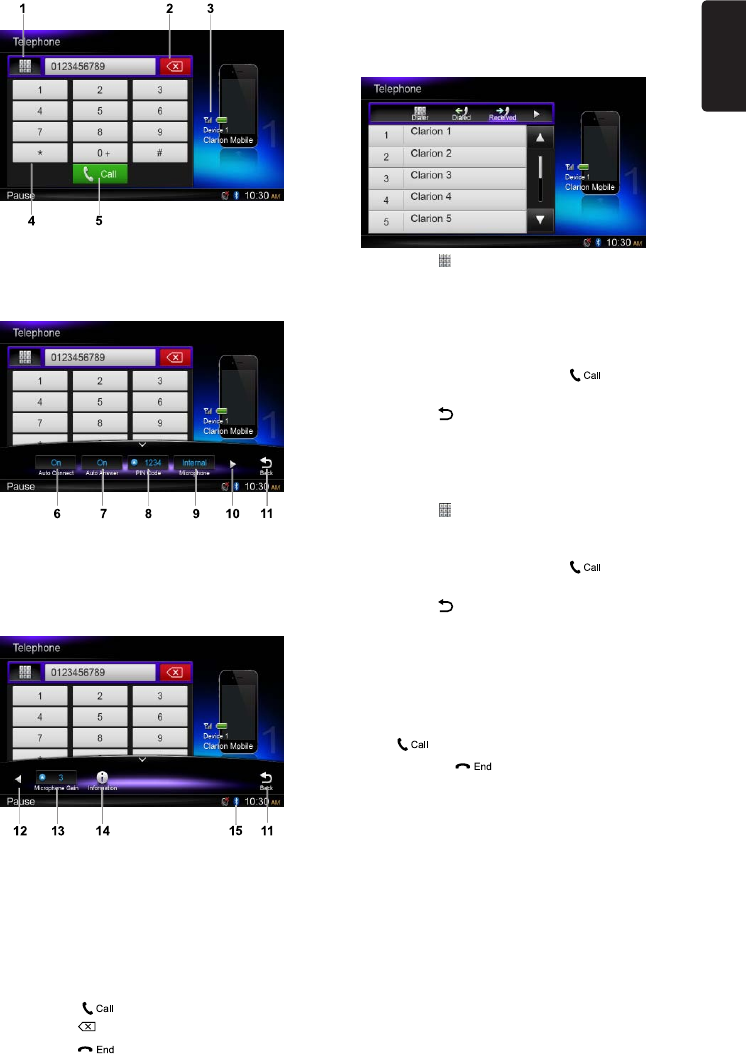
NX702
1. Showhistorycategories
2. Backspace
3. Paired device information
4. Number pad
5. Call/Hang up
6. Turn on/off Auto Connect function
7. Turnon/offAutoAnswerfunction
8. Set PIN code
9. Select internal or external microphone
10. Shownextpage
11. Back to main operation bar
12. Showpreviouspage
13. Adjustmicrophonegain
14. ShowBluetoothinformation
15. Bluetooth indicator
Making a call
•DialNumber
1. Input numbers by digit-keys on the screen.
2. Touch [ ] button to dial.
Touch [ ] button to delete characters.
3. Touch [ ] button to terminate call.
•Dialed/Received/MissedCallHistory
You can search any Dialled/Missed/Received
Call History.
1. Touch [ ]buttontoshowfollowinghistory
categories:Dialed,Received,Missedand
Contacts.
Touch [Dialer] to dial number manually.
2. Touch to select a category, the numbers of
the category are displayed.
3. Select a number, touch [ ] button to
dial.
Touch [ ] to return previous menu.
•CallfromPhonebook
You can search the contact name in the
phonebook and make call.
1. Touch [ ] button and select [Contacts].
It maytakeafewminutes tosynchronize
thephonebookatrsttime.
2. Select a number, touch [ ] button to
dial.
Touch [ ] to return previous menu.
Note:
Some cellular phones may not be able to
transfer the Phone Book data.
•Answeringacall
Youcanansweranincomingcallbypressing
the [ ] button.
* T o uch [ ] bu t ton t o reje c t an
incoming call.
English
30 NX702
Bluetooth Audio Operation
Audio Streaming Operation
What is audio streaming?
Audiostreamingisatechniquefortransferring
audio data such that it can be processed as
a steady and continuous stream. Users can
stream music from their external audio player
totheircarstereowirelesslyandlistentothe
tracksthroughthecar’sspeakers.Please
consult your nearest Clarion dealer for more
informationontheproductofwirelessaudio
streaming transmitter offered.
CAUTION
Pleaseavoidoperating yourconnected
mobilephone whileaudiostreamingas
thismaycausenoiseorsoundchoppyon
thesongplayback.
Audiostreamingmayormaynotresume
aftertelephone interruptasthisis
dependentonmobilephone.
Note:
Besure toreadthechapter“Pairing”and
“Choosepaireddevice”beforeproceeding.
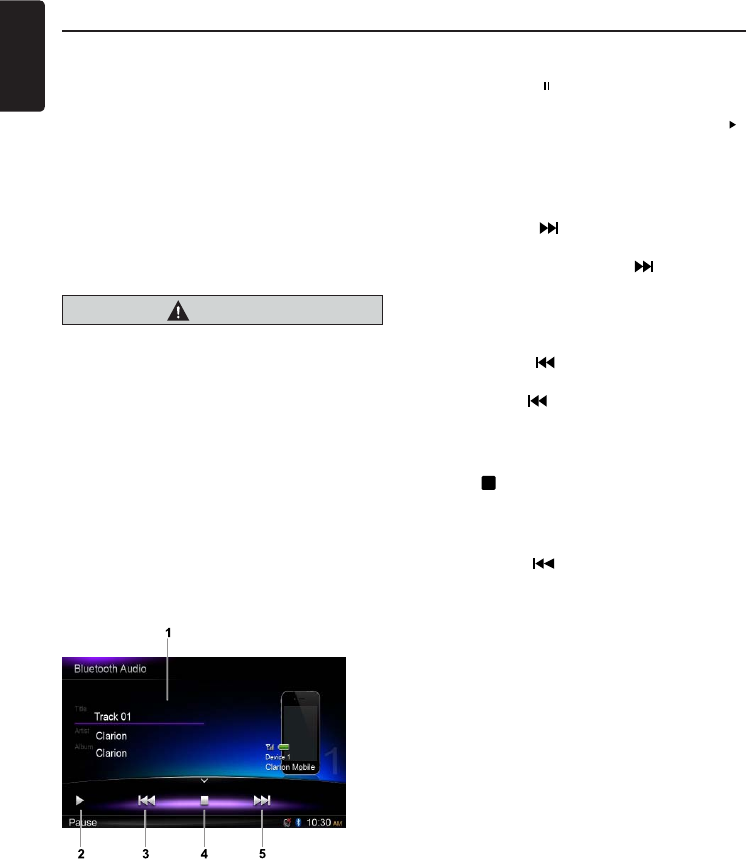
Playback menu
Touchthe bottomhalfofscreento show
operation bar.
1. Title/Artist/Album information
2. Play/Pause
3. Previous track
Fast reverse (long press)
4. Stop
5. Next track
Fastforward(longpress)
Play / Pause a track
1. Touch the [ ] button to pause audio
playback.
2. To resume audio playback, touch the [ ]
button.
Selecting a track
Track-up
1. Touch the [ ] button to move to the
beginning of the next track.
2. Each time you touch the [ ] button, the
track advances to the beginning of the
next track.
Track-down
1. Touch the [ ] button to move back to
the beginning of the current track.
2. Touch the [ ]buttontwicetomoveback
to the beginning of the previous track.
Stop playback
Touch [ ] button to stop playback.
Note:
Playing order will depend on Bluetooth audio
player. When [ ] button is pressed, some
A2DP devices will restart the current track
depends on the duration of playback.
Some Bluetooth audio players may not
have play/pause synchronized with this unit.
Please make sure both device and main
unit are in the same play/pause status in
Bluetooth Audio mode.
31
English
NX702
Everythingworthlisteningtois onSiriusXM,
getting over 130 channels, including the
most commercial-free music, plus the best
sports,news, talkandentertainment.A
SiriusXM Vehicle Tuner (sold separately)
and Subscription are required. For more
information,visitwww.siriusxm.com.
Accessing satellite radio mode
Long press [ ALL ] button to enter main
source menu, then select [SiriusXM] to enter
SiriusXM mode.
If [SiriusXM] is not on the current source
menu, hold the center of screen and drag
left/righttoshowmoreicons.
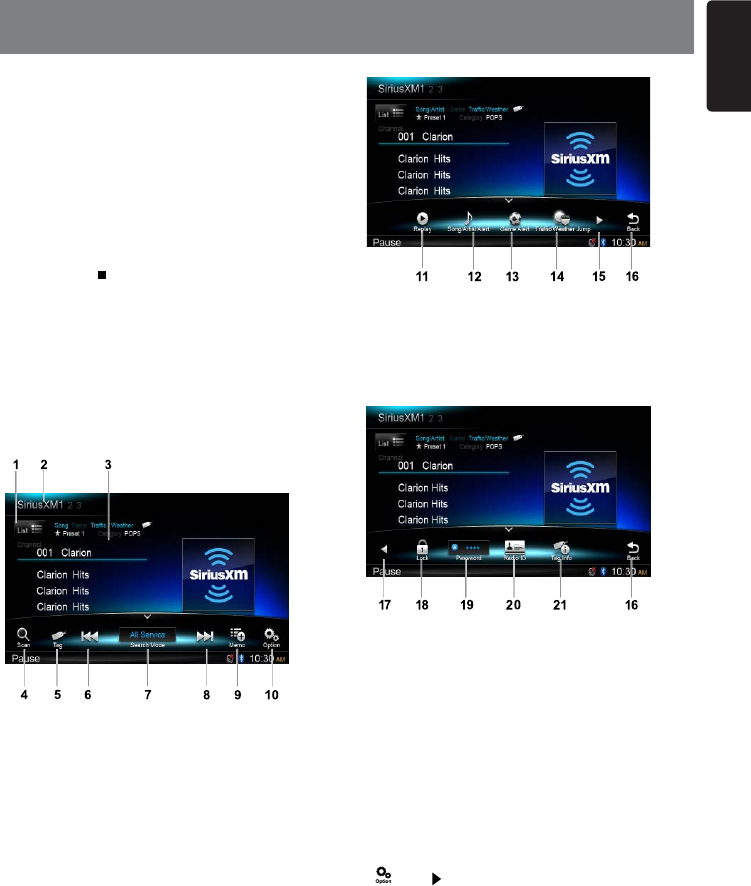
Operation menu
Touchthe bottomhalfofscreento show
operation bar.
1. Showchannellist
2. Bandswitch
3. Information area
4. Scan play (Depends on search mode)
5. iTunes tag
6. Manualtunebackward(Dependson
search mode)
Rapidbrowsebackward(longpress)
7. Select search mode
8. Manualtuneforward(Dependsonsearch
mode)
Rapidbrowseforward(longpress)
9. Add Artist/Song for Alert list
10. Showotheroptions
11. Enter Replay mode
12. Select Song/Artist Alert
13. Select Game Alert
14. SelectTrafc/WeatherJump
15. Shownextpage
16. Back to main operation bar
17. Showpreviouspage
18. ShowParentalLocksettingmenu
19. Showpasswordsettingmenu
20. ShowSiriusXMRadioID
21. ShowTaginformation
Displaying the Identification (ID)
Code
Before you listen to satellite radio, you must
subscribe to the service using the SiriusXM
Radio ID number.
Todisplay theradioID,touchfollowing
buttonsontheoperationbarin sequence:
[ ] -> [ ] -> [Radio ID]
Thescreen displaystheradioIDwhere the
channel name is usually displayed.
The SiriusXM Radio ID can be found by
tuning to Channel 0. In addition, the Radio
ID is located on the bottom of the SiriusXM
Connect Vehicle Tuner.
Please note that the SiriusXM Radio ID does
not include the letters I, O, S or F.
10. SiriusXM Satellite Radio OPERATION

English
32 NX702
Activate the SiriusXM Vehicle Tuner using
oneofthetwomethodsbelow:
• Online:Goto“www.siriusxm.com/
activatenow”andchooseACTIVATERADIO.
•Phone:Call1-800-XM-RADIO(1-800-967-
2346).
Select a band
Touch the top left corner of the screen to
changebetweenthreeSiriusXMbands
(SiriusXM1, SiriusXM2 and SiriusXM3). Each
band stores up to 10 preset stations.
Select a station
Touch the [ ] or [ ] button on the
operation bar to tune to another station.
Preset mode
10 numbered preset buttons store and recall
stations for each band.
Preset scan
1. Touch the [ ] button on the operation
bar.
2. When a desired station is tuned in, press
the [ ] button to continue receiving that
station.
Storing a station
To access Preset Channels Store menu,
touch [ ] button.
Touch [ ] to enter store menu. Select a
preset position on the screen to store current
channel.
Delete preset channel
To access Delete Preset Channel menu,
touch [ ] button.
Select unneeded channels and touch [ ] to
delete it.
Select Preset channel
1. Select a band (if needed).
2. Touch [ ] button on the upper left of
thescreentoshowlistmenu.
3. Touch the option on the preset channel list
to select corresponding stored station.
Category and Channel search
1. Touch [ ] button on the upper left of
thescreentoshowlistmenu.
2. Touch [ ], then select Channel or
Category list.
3.Holdthelistanddragitupordownto
scroll.
4. Touch to select it.
Direct search
Toaccesssearchmenu,touch following
buttons:[ ] -> [ ] .
Input numbers by touching digit buttons, then
touch [Search] to begin searching.
To delete numbers, touch [ ] button.
My Music / My Games search
Youcanaccessthechannelswhich
broadcast the contents in the activated Alert
list.
1. Touch [List] button on the upper left of the
screentoshowlistmenu.
2. Touch [ ], then select My Music or My
Games list.
3.Holdthelistanddragitupordownto
scroll.
4. Touch to select it.
The most recent Alert content is listed at the
top.
Password
Toaccesspasswordsettingmenu,touch
followingbuttonsontheoperationbarin
sequence:[ ] -> [ ] -> [Password] .
Inputoldpasswordbytouchingdigitbuttons,
then touch [OK]toconrm.
To delete a number, touch [ ] button.
To delete all numbers, touch [Clear] button.
Theninputanew4-digitpasswordasabove.
(Originalpassword:0000)
Parental Lock / Unlock
TheSiriusXMParentalControlfeatureallows
you to control access to channels that you
consider inappropriate for younger listener.
When enabled, the Parental Control feature
requiresyoutoenterapasscodetotuneto
the locked channels. Information on setting
up the passcode, setting up the channels
to be locked, and the method to access the
lockedchannelsisdescribedbelow.
Toshowchannellockmenu,touchfollowing
33
English
NX702
buttonsontheoperationbarinsequence:
[ ] -> [ ] -> [Lock].
Youneedinputpassword.
Touch [ ] or [ ] button to scroll the list.
Touch [ ] to lock station, and [ ] to
unlock.
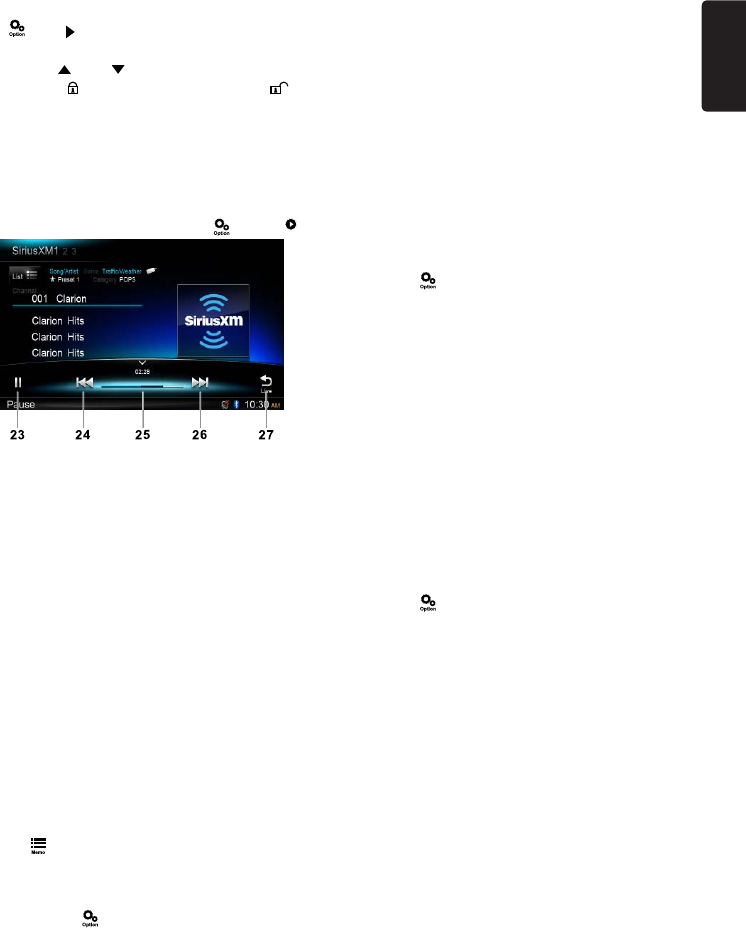
Replay
TheReplay featureallowsyoutopause,
rewind,andreplayupto30minutesoflive
SiriusXM Satellite Radio.
To enter replay mode, touch [ ] and [ Replay ].
23. Play/Pause
24. Previous track/program
Fast reverse (long press)
25. ProgressBartoshowremaintimeand
current position
26. Next track/program
Fastforward(longpress)
27. Exit replay mode
Artist & Song Alerts
While listening to SiriusXM Satellite Radio,
youcanbealertedwhenyourfavoritesongs
or artists are playing on other channels. The
radiowilldisplayan Alertmessagewhena
matching artist or song is found on another
channel.Thenyoucanchooseifyouwantto
tune to that favorite or you can ignore it and
stay on your current channel. Information
on setting up the Artist and Song alerts is
describedbelow.
1. While listening to favorite song, touch
[ ]buttonontheoperationbartoshow
Memorize sub-menu. Touch [This song]
to add it to the “Song Alert” list. Touch [This
artist] to add it to the “Artist Alert” list.
2. Touch [ ] button on the operation bar,
then touch [Song/Artist Alert]toshowthe
sub-menu.
Select [On] / [Off] to set alert function On
or Off.
Toadjust the alertlist, touch[Edit], then
select [Enable] / [Disable] to enable/
disable the alert function for each Artist
or Song. To remove it from the list, touch
[Delete].
3. When the memorized song/artist is
broadcasted on another Channels. Alert
dialog box is displayed. Select [OK] on the
dialogue box to broadcast desired artist or
song.
Touch [Cancel] on the dialogue box to
return to previous screen.
Alerted artist/song contents are listed in
MyMusic whilethosecontentsarebeing
broadcasted.
Game Alerts
Touch [ ] button on the operation bar, then
touch[GameAlert]toshowthesub-menu.
Select [On] / [Off] to set alert function on/off.
Toadjustthealertlist,touch[Edit], select
League and Team on the list menu, then
select [Enable] / [Disable] to enable/disable
the alert function.
When the memorized game is broadcasted
on another Channels. Alert dialog box is
displayed. Select [OK] on the dialogue box to
broadcast desired game.
Trafc/Weather Jump
Thisfeatureallowsyoutotunetothechannel
broadcastingthetrafficandweatherreport
for the city you selected.
Operationisdescribedbelow.
Touch [ ] button on the operation bar, then
long touch [Trafc/WeatherJump] and [Edit]
to select state and City on the list menu for
desired city. You can select only one city for
Trafc/WeatherJumpfeature.
While you listen to a certain channel, touch
[Traffic/WeatherJump] forjumptoanother
channelbroadcastingselectedcity’sreport.
(Traffic/Weatherindicatorwillbe turnedon
during tuning to this channel.) Touch again
[Trafc/WeatherJump]toreturntoprevious
channel.
If there is no channel broadcasting for
selectedcity,Jump willbependinguntil
desiredcity reportwillbestarted.(indicator
willbeblinkingduringpendingmode)
English
34 NX702
About HD Radio™ Technology
HDRadioTechnologyallows CD-quality
digital broadcasting of your local AM and
FM radio stations. HD Radio broadcasts
can include multiple channels on the same
frequency,whichiscalledmulticasting.With
multicasting, you can receive up to eight
additionalmulticastchannels:HD1~HD8.
With an HD Radio tuner connected, you
willreceive HDRadiodigitalbroadcasts
automaticallywhentunedto astationthat
offers HD Radio Technology.
NOTE: Not all FM or AM stations offer
HD Radio (digital) broadcasting. You can
receive both analog and digital stations
with the unit.
Accessing radio mode
Long press [ MENU ALL ] button on the
panel to enter main source menu, then select
[HD Radio] to enter HD Radio mode.
If [HD Radio] is not on the current source
menu, touch [-] buttons on the bottom of the
screen, or hold the center of screen and drag
left/righttoshowmoreicons.
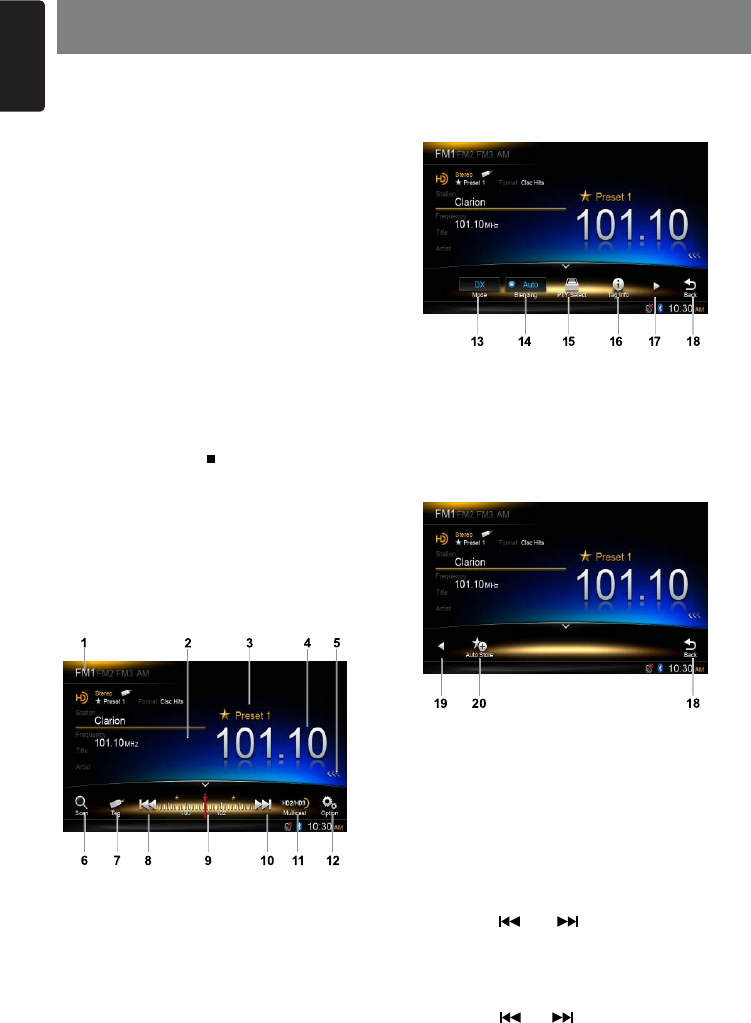
Atradiomode,touchthebottomhalfof
screentoshowoperationbar.
1. Bandswitch
2. Information area
3. Preset station number
4. Currentstationfrequency
5. Showpresetstationslist
6. Scan preset stations
7. Store iTunes® Tagging info
8. Manualtunebackward
Autotunebackward.(longpress)
9. Frequencybar
10. Manualtuneforward
Autotuneforward(longpress)
11. Select next multicast
12. Showotheroptions
13. Select local or distant seeking mode
14. Select Blending mode
15. Select PTY type
16. ShowTagInformation(Touch[OK]after
information Box displayed to delete all
tag)
17. Shownextpage
18. Back to main operation bar
19. Showpreviouspage
20. Auto store preset stations
Select a band
Touch the top left corner of the screen to
select one radio band among FM1, FM2,
FM3 and AM.
Tuning
-SeekTuning
Hold the [ ] or [ ] button for more than
2 seconds on the operation bar to seek a
higher/lowerstation.
-ManualTuning
Press the [ ] or [ ] button on the operation
bar to movetheradiofrequencynumberup
ordownonestep.
11. HD Radio OPERATION
35
English
NX702
Preset stations
Up to six stations on each band can be
storedaspresets,whichcanthenbeinstantly
recalled by pressing the associated preset
button.
NOTE: Multicast stations can be stored as
presets, but the unit must be in Digital or
Auto reception mode to receive them.
Preset scan
Preset scan receives the stations stored
in preset memory in order. This function is
usefulwhensearchingforadesiredstation
in memory.
1. Touch the [ ] button on the operation
bar.
2. When a desired station is tuned in, press
the [ ] button to continue receiving that
station.
Automatic store (AS)
Onlystationswithsufcientsignalstrength
willbedetectedandstoredinthememory.
To star automatic station search, touch
followingbuttonsontheoperationbarin
sequence:[ ] -> [ ] -> [Auto Store] ->
[OK] .
To stop auto store, press other buttons
having radio functions.
Notes:
1. After auto store, the previous stored
stations will be overwritten.
2. Theunithas4bands,suchasFM1,FM2,
FM3and AM.FM3and AMcanstore
by AS function. Each bands can store 6
stations, NX702 can store 24 stations in
total.
HD Radio multicast channels
Touch [ ]buttontoswitchtonextsub-
station of the channel.
Digital,CD-qualitysound.HD Radio
Technology enables local radio stations to
broadcast a clean digital signal. AM sounds
liketoday’sFMandFMsoundslikeaCD.
ProgramServiceData:Contributestothe
superior user experience of HD Radio
Technology. Presents song name, artist,
station IDs, HD2/HD3 Channel Guide, and
other relevant data streams.
Adjacent to traditional main stations are
extra local FM channels. These HD2/HD3
Channelsprovidenew,originalmusicaswell
as deep cuts into traditional genre.
iTunes® Tagging provides you the
opportunitytodiscoverawiderangeof
content and the means to “tag” that content
for later review and purchase from the
iTunes® Store.

English
36 NX702
TheNX702offersiTunes Tagging,which
allowstheuserto“Tag”songsplayingonHD
Radio™ and SiriusXM stations for purchase
later through iTunes. When touch [Tag]
button, the unit stores the title and artist song
information that can then be transferred to
youriPod whenconnectedtotheunit.A list
titled“Tagged”willappeariniTunes,allowing
you the option to purchase your tagged
songs.
Note:
“iTunesTagging”functionworksbyconnecting
THD301orSXV100(soldseparately).
iPod compatibility
For detailed information on the playable iPod
models,seeourhomepage:www.clarion.
com
Notes:
• iPhonecanalsobeconnectedtothis
systemand“iPod”appearinginthismanual
shouldbereferredtoas“iPod/iPhone”.
• Thissystem willnotoperateormay
operate improperly with unsupported
versions.
Tagging music
To begin tagging music, tune to an HD Radio
station. The DIGITAL icon at the display must
be illuminated, indicating a digital station
is beingreceived. TAG icon lightsupwhen
Tagging function is ready. Touch the [Tag]
button on the screen. The tagging function
is highly depends on the receptions of the
radio station. If the channel reception is
insufcient,itwilleffecttheoperationofthe
tagging function.
“Tagging Finished...##%100”willappearin
the display. The song information is saved to
the unit memory until an iPod is connected.
You can tag up to 100 songs before the tags
must be transferred to an iPod or deleted.
When the Tag memory reaches capacity
(100 tags) the bottom of the screen displays
“MemoryFull”.
12. iTunes Tagging
Table 5: TAG Messages
Tag Message Reason
Tagging
Finished...##%100
Tag data is stored on the
unit.
Tagging... Searching tag data.
Tagging Fail Tagging is unsuccessful.
Note:
Tags saved to your iPod can be managed
using the iTunes software, available at www.
apple.com/itunes.
Downloading tags to your iPod
TodownloadtagstoyouriPod,plugan
iPod into the unit. All existing tags are
automatically transferred to the iPod and
deletedfromtheheadunit’smemory.
Note:
When transferring Tags to an iPod, the unit
must remain in HD Radio mode. To purchase
tagged songs, you must sync your iPod to
iTunesandthenclickthe“Tagged”listonthe
leftsideoftheiTunessoftwarescreen. Click
the“view”buttonforpurchasinginformation.
• Thetagging operationsofSiriusXMare
thesamewithHDRadiomode.
37
English
NX702
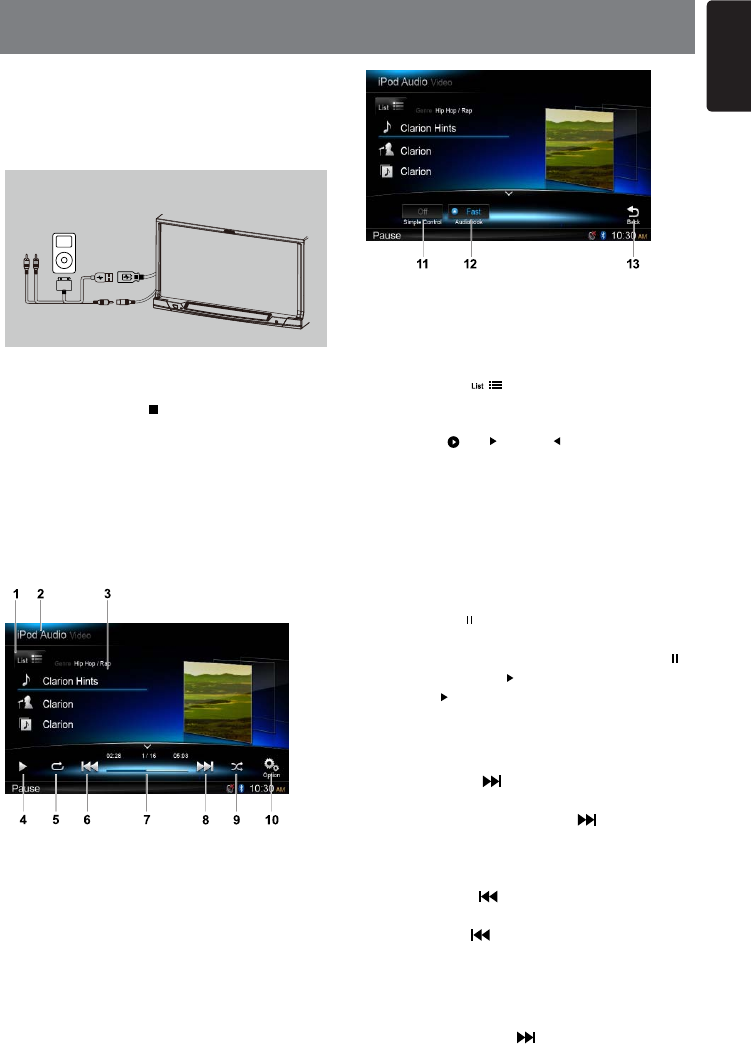
Connect an iPod or iPhone to the USB
connector via CCA-750 cable.
Whenconnectingadevice,theunitwillread
theles automatically.Thetrackinformation
display on the screen once playback start.
11. Turn on / off Simple Control
12. Select Audiobook play speed
13. Back to main operation bar
Browse mode
1. Touch the [ ]buttontoshowlelist.
Dragup/downtobrowse.Touchaitemof
list on the screen to select it.
2. Touch [ ], [ ] and [ ]buttonstoshow
thefollowingcategories:Playlists,Songs,
Artists, Albums, Genres, Composers,
Audiobooks, Podcasts.
Touch to select a category, the contents of
thecategoryaredisplayed.Dragup/down
tobrowse.Touchanoptiontoselectit.
Pausing play
1. Touch the [ ] button on the bottom left of the
screen to pause play.
“PAUSE” appears in the display, and [ ]
button becomes [ ] .
2. Touch [ ] button to resume play.
Selecting a track
Track-up
1. Touch the [ ] button to move to the
beginning of the next track.
2. Each time you touch the [ ] button, the
track advances to the beginning of the
next track.
Track-down
1. Touch the [ ] button to move back to
the beginning of the current track.
2. Touch the [ ]buttontwicetomoveback
to the beginning of the previous track.
Fast forward/Fast reverse
Fastforward
Touch and hold the [ ] button .
CCA-750
Accessing iPod mode
Long press [ MENU ALL ] button to enter
main source menu, then select [iPod] to
enter iPod mode.
If [iPod] is not on the current source menu,
hold the center of screen and drag left/right
toshowmoreicons.
At iPod Audio mode, touch the bottom half of
screentoshowoperationbar.
1. Showlelist(Browse)
2. SwitchbetweeniPodAudioandVideo
3. Song/Artist/Album information
4. Play/Pause
5. Repeat play
6. Previous track
Fast reverse (long press)
7. Progress bar
8. Next track
Fastforward(longpress)
9. Random play
10. Showotheroptions
13. iPod & iPhone OPERATION
English
38 NX702
Fastreverse
Touch and hold the [ ] button .
Repeat play
Thisfunctionallowsyoutoplaythetrack
repeatedly.
Touch the [ ] button to select Repeat one
or Repeat all.
Random play
Thisfunctionallowsyoutoplayalltracksina
random order.
Touch the [ ] button to perform random
play.
iPod menu alphabet search
This function searches the subfolders for
desired alphabetical letters.
1. Touch the [ ]buttontoshowlelist.
Touch [ ] button to enter search menu.
2 Input characters by touching buttons on
the screen, then touch [Search] to begin
searching.
Touch [123]toshowdigitkeypad,touch
[ABC]toshowletterkeypad.
Touch [Space] to input a blank space.
Touch [ ] button to delete characters.
Setting iPod simple control mode
Usethis functionifyouwishto operate
through your iPod connected to this unit via
the USB cable.
Touch the [ ] button, then touch [Simple
Control] to set it to [On].
iPod video playback
To playback video from iPod, touch top left
cornerofthescreen, thenselectavideole
to play.
During playback, touch the bottom half of
screentoshowoperationbar.
1. Play/Pause
2. Repeat play
3. Previousle
Fast reverse (long press)
4. Progress bar
5. Nextle
Fastforward(longpress)
6. ShowiPodlistmenu
7. Showotheroptions
8. Turn on / off Simple Control
9. Turn on Widescreen mode
10. Back to main operation bar
Return to video list menu
Touch [ ] button on the operation bar to
return to video list menu.
Play videos in wide screen
Toplayvideosinwidescreen,touchthe[ ]
button, then touch [Wide screen] to set it to
[On].
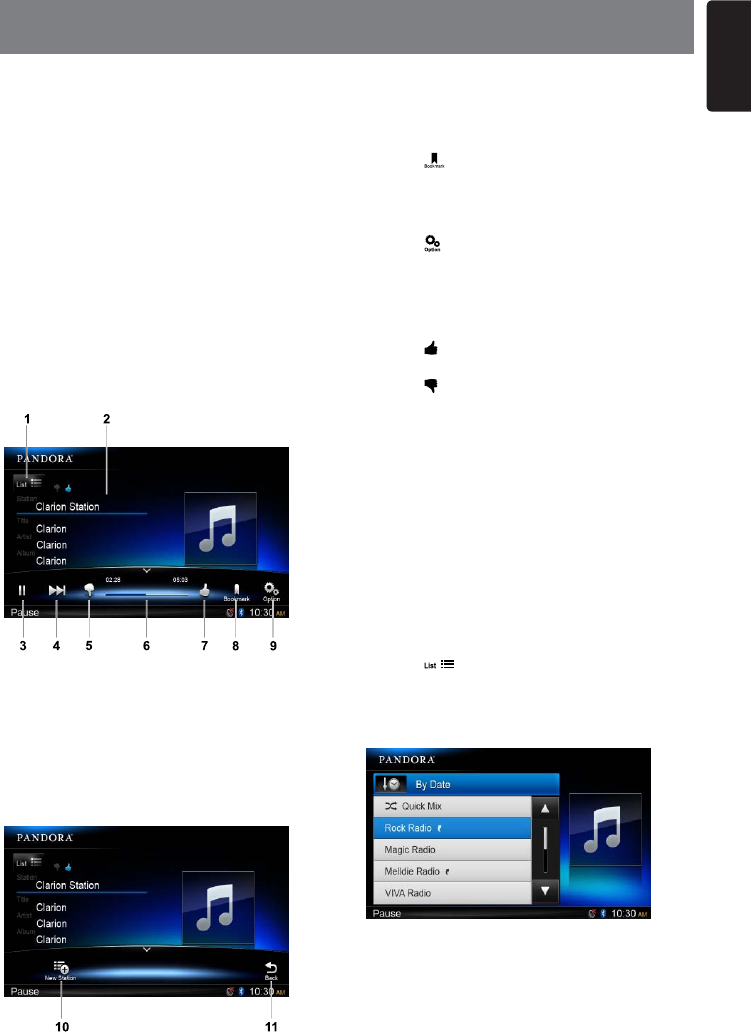
39
English
NX702
PANDORA, the leading internet radio
service, gives people music they love
anytime, anywhere, through personalized
radiostationsavailableon awidevarietyof
connected devices.
To listen to PANDORA internet radio, you
candoasfollows:
1. Connect a compatible iPhone to the unit.
(refer to “Wiring and Connections”).
2. Touch PANDORA icon from Main Source
Menu and open PANDORA mode.
3. PANDORA willautomatically startto play
streaming. If it does not start automatically,
justlaunchPANDORAAppontheiPhone.
Touchthebottomhalfofscreentoshow
operation bar.
1. Showstationlist
2. Track/Title/Artist/Album information
3. Play/Pause
4. Skip
5. ThumbsDown
6. Progress bar
7. Thumbs Up
8. Add bookmark
9. Showotheroption
14. PANDORA OPERATION
10. Createanewstation
11. Back to main operation bar
Add bookmark
Touch [ ] button, then select [Track] or
[Artist] to add it to the bookmark list.
Create a new station
Touch [ ] button and [NewStation] button.
Then select [Track] or [Artist] to add it to the
station list.
Thumbs up/down
Touch [ ] button, “Thumbs-Up” feedback
willbesenttoPANDORA station.
Touch [ ]button,“Thumbs-Down”feedback
willbesenttoPANDORA station.
PANDORA limits the number of Skip or
Thumbsdownallowedontheirservice.If
youattempt toSkiporThumbsdownsongs
beyond the limit, the current song continues
to playback.
PANDORAlimitsthenumberofthumbsdown
allowedontheirservice.
Ifyouattempttothumbsdownsongsbeyond
the limit, the current song continues to
playback.
Select a stored station
Touch [ ]buttontoshowstationlist.
Touch [ByDate] to list the stations by date.
Touch [A-Z]tolistthestationsfromAtoZ.
Dragupordowntoscrollthelist,selecta
desired station to play it.
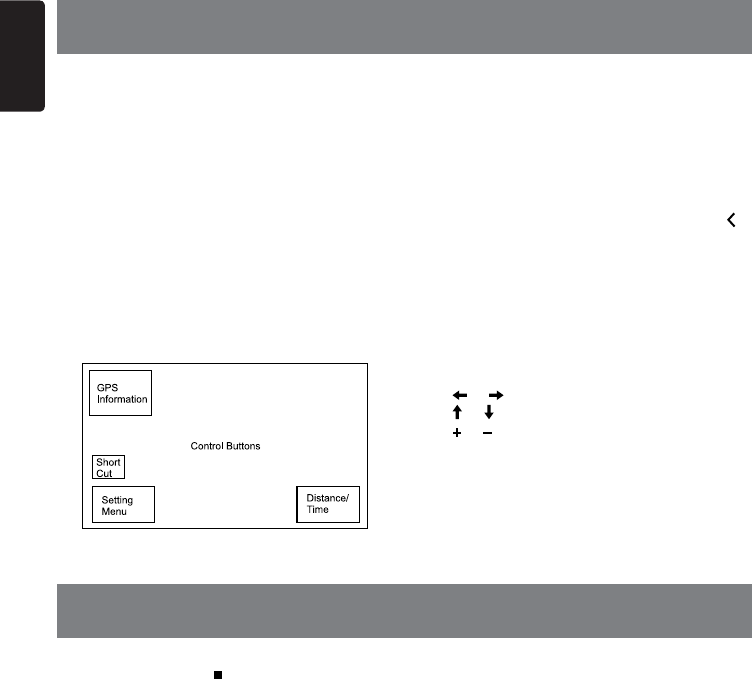
English
40 NX702
Access navigation mode
1. Press [OPEN]buttontoslidedown the
panel. Insert a MicroSD card into the mini
card slot located on the bottom of the
panel.
2. Toremovethecard,youshouldrstselect
another source or turn off the power, in
order to avoid damaging the card. Press to
pop it out, then take off the card. Close the
panel.
3. Press [ MAP ] button on panel to visit
Navigation mode.
* The navigation operations depend on your
map,itmaybedifferentfromthefollowing
content.
Control buttons
1. Touchtopleftcornerofthescreentoshow
GPS informations. Touch [Back] to return.
2. Touch bottom left corner of the screen
to enter Navigation menu. Touch [Show
Map] to return.
3. Touchmiddleleft ofthescreentoshow
shortcuts of general functions. Touch [ ]
button to hide.
4. Touch bottom right corner of the screen
toshow Distance/TimeLeft/ArrivalTime.
Touch it again to hide.
5.Touchtheblankareatoshowcontrol
buttons.
Topleftcorner:Plane/three-dimensional
Toprightcorner:Cursorlocation.
[ ]/[ ]:Moveleft/right
[ ]/[ ]:Moveup/down
[ ]/[ ]:Enlarge/reducethemap
[Back]:Hidethebuttons.
[More]:Showmoreinformations.
[Select]:Selecttheroute.
Long press [ MENU ALL ] button to enter
main source menu, then select [AUX] to visit
rear auxiliary device.
If [AUX] is not on the current source menu,
touch [-] buttons on the bottom of the
screen, or hold the center of screen and drag
left/righttoshowmoreicons.
15. NAVIGATION OPERATION
16. AUX OPERATION
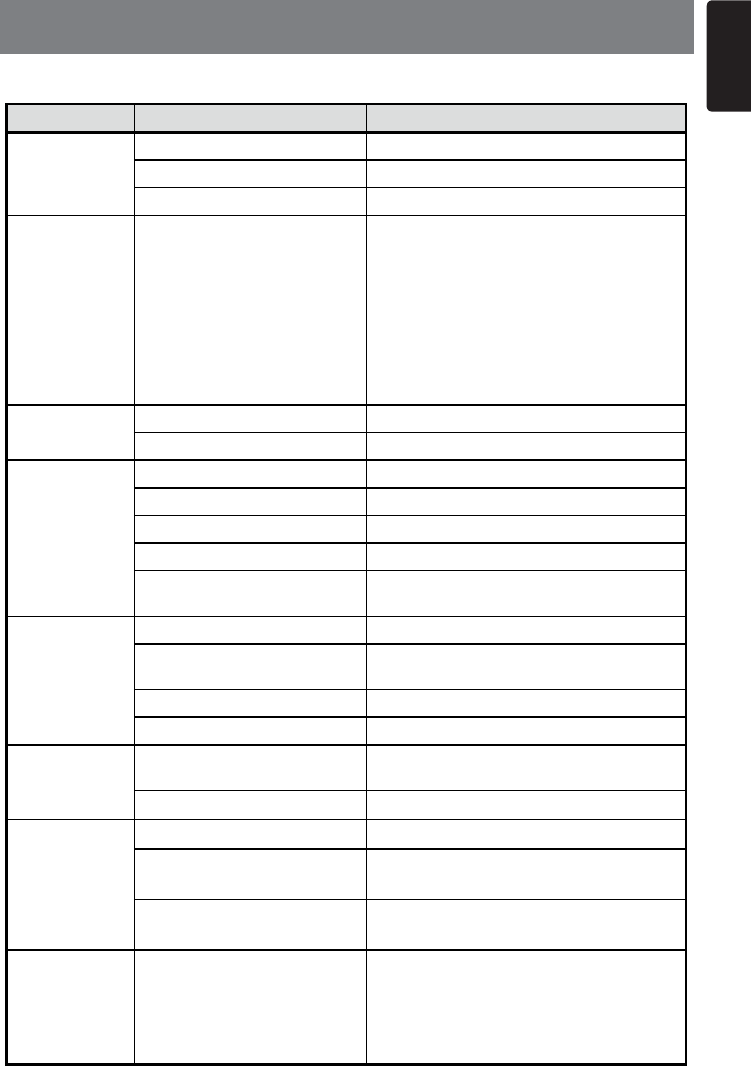
41
English
NX702
17. TROUBLE SHOOTING
GENERAL
Problem Cause Measure
Unit can not
power on.
Unit fuse blown. Replace with new fuse of correct rating.
Car battery fuse blown. Replace with new fuse of correct rating.
ACC power is turn o Turn on the ACC
Unit can not
power on.
Nothing happens
when buttons are
pressed.
Display is not
accurate.
The microprocessor has
malfunctioned due to noise, etc.
Turn o the power and press the [RESET]
button with a thin rod.
Note:
RESET
RESET
Remote control
does not work.
Battery depleted. Change the battery.
Battery installed incorrectly. Install the battery correctly.
No/low audio
output
Improper audio output connection. Check wiring and correct.
Volume set too low. Increase volume level.
Speakers damaged. Replace speakers.
Heavily biased volume balance. Adjust the channel balance to center position.
Speaker wiring is in contact with
metal part of car. Insulate all speaker wiring connections.
Poor sound quality
or distortion
Non-standard disc used. Use a standard disc.
Speaker power rating does not
match unit. Replace speakers.
Wrong connections. Check wiring and correct.
Speaker is shorted. Check wiring and correct.
Unit resets itself
when engine is o.
Incorrect connection between
ACC and Battery. Check wiring and correct.
Battery voltage is too low Charging the battery, or replace the new battery.
The display is
dark.
Thebrightnesscontrolistoolow. Adjustthebrightnessproperly.
The operating condition is not
good.
The temperature inside the vehicle may be 0°C
orlower.Settoanappropriatetemperature
(25°C or so) and check it again.
The headlight of the vehicle is lit.
The display is made dark at night to prevent
the glare (When the headlight of the vehicle is
lit in the daytime, the display gets dark.)
There are red,
green, and blue
points in display
____________________
This is not a faiure, but a phenomenon peculiar
toaliquidcrystalpanel(Theliquidcrystal
panel is produced according to technology
withveryhighprecision.Notethat,though
there are effective pixels of 99.99% or more,
pixel missing or normally lit pixels account for
0.01%).
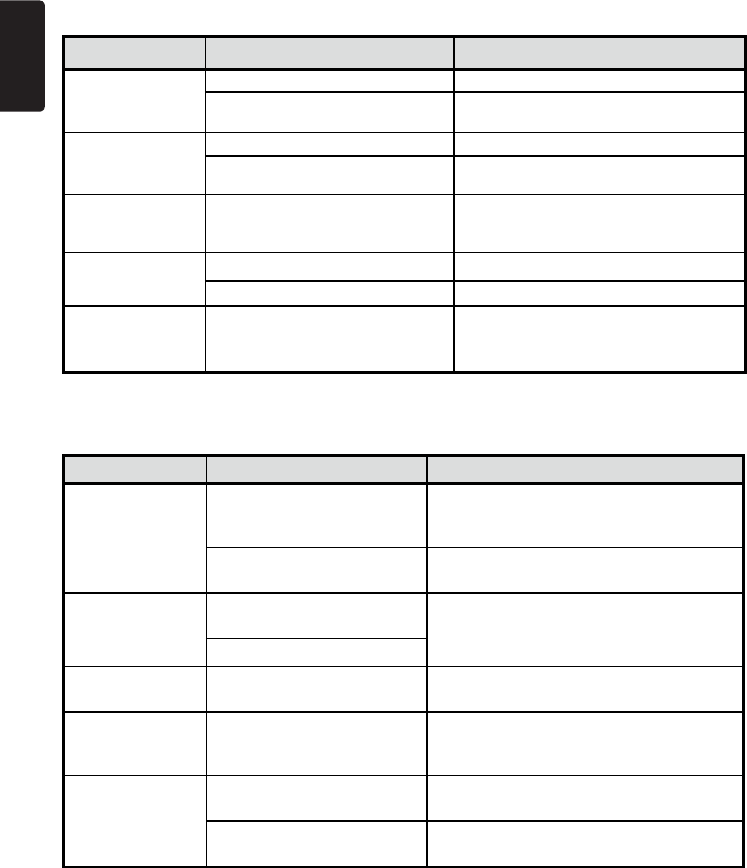
English
42 NX702
DISC Player
Problem Cause Measure
Disc cannot be
loaded.
Another disc is already loaded. Ejectthediscbeforeloadingthenewone.
Thereisanobjectinstalledinside
the unit. Removetheobjectinsidetheunit.
Sound skips or is
noisy.
Disc is dirty. Cleanthecompactdiscwithasoftcloth.
Discisheavilyscratchedorwarped. Replacewithacompactdiscwithno
scratches.
Soundisbadwhen
powerisrstturned
on.
Condensation may form on the
internallenswhenthecarisparked
in a humid place.
Letdryforabout1hourwithpoweron.
Video images are
not displayed.
The parking brake is not engaged. Check that the parking brake is engaged.
Thedimmercontrolistoolow. Adjustthedimmerproperly.
Disc cannot play
withthedisplay
“PARENTAL
VIOLATION”shown.
Feature exceeds set parental level.
Releasetheviewlimitationorchangethe
parental level.
See the subsection “Setting up the
parental level.”
SD/USB Devices
Problem Cause Measure
SD card or USB
device cannot be
inserted.
The SD card or USB device
hasbeeninsertedwithwrong
direction.
Reversing the connection direction of the SD
card or USB device, try it again.
The SD card or USB connector
is broken. ReplacewithanewcardorUSBdevice.
SD card or USB
device is not
recognized.
The SD card or USB device is
damaged. Disconnect the card or USB device and
reconnect. If still not recognized, try replacing
withadifferentcardorUSBdevice.
Connectors are loose.
Sound skips or is
noisy.
MP3/WMAlesarenotencoded
properly. UseMP3/WMAlesencodedproperly.
No sound heard
withthedisplay“NO
FILE”shown.
No MP3/WMA le is stored in
the card or USB device.
Store these les properly in the card or USB
device.
No video image
of iPod Video
The video signal is no connect Use connection cable for
iPod Video.(CCA-750)
Thevideosignaliswrong
connection. Checkwiringandcorrect.
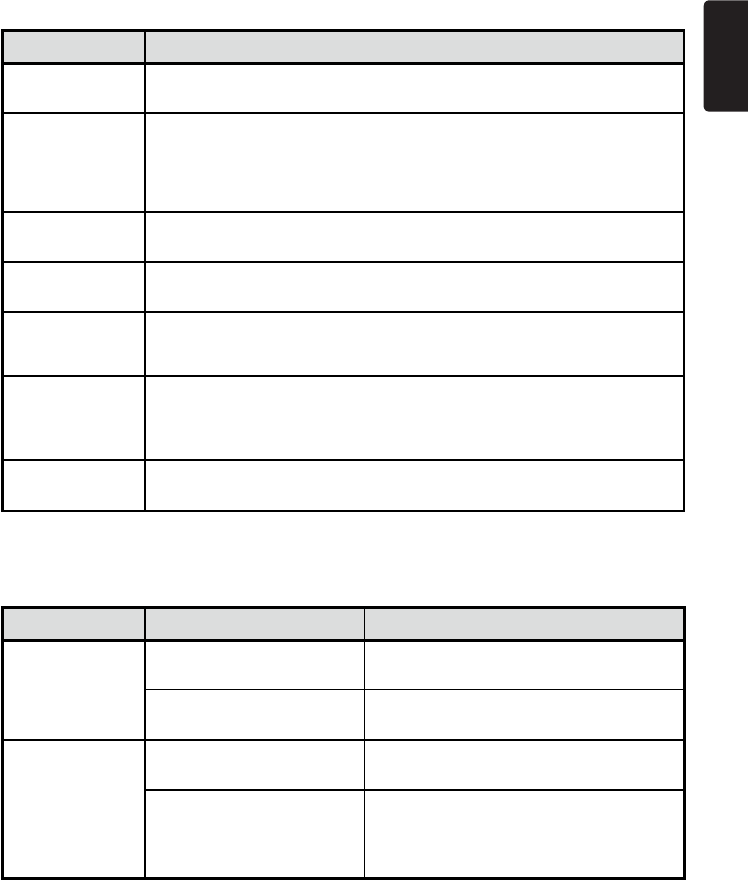
43
English
NX702
Bluetooth
Problem Cause Measure
Cannot pair the
Bluetooth enabled
devicewiththecar
audio system.
The device does not support the
prolesrequiredforthesystem. Use another device to connect.
The Bluetooth function of the
device is not enabled.
Refertotheusermanualofthedeviceforhow
to enable the function.
Theaudioquality
is poor after
connectionwitha
Bluetooth-enabled
device.
The internal microphone gain is
not set correctly.
Adjustthegainoftheinternalmicrophonein
System Setup.
The external microphone is
not set correctly nor properly
positioned.
Adjustthegainandpositionoftheexternal
microphone.
For example, stick the microphone onto the
dashboard so it is close to the driver.
SiriusXMAdvisoryMessages
Message Description
Check Tuner Check the SiriusXM tuner connection on the back of the unit to ensure that its
correctly connected.
Check Antenna
Ensure the SiriusXM antenna cable is connected to the SiriusXM tuner correctly.
ChecktheSiriusXMantennawireforbreaksorsharpbends.Replacethe
antenna if necessary.
Load “Factory default” settings on Setting menu. If the message remains, the
antenna may have been damaged.
No Signal Thevehiclemustbeoutside,andtheantennamusthaveaclearviewofthe
southern sky.
Channel Not
Subscribed
This channel is not included in your SiriusXM subscription plan. Call 1-800-XM-
RADIO (1-800-967-2346) to subscribe.
Channel Not
Available
This channel is not a valid SiriusXM channel.
Thechannelnumberhasbeenenteredincorrectly,orthechannelwasremoved
from the SiriusXM channel lineup.
Channel Locked
The selected channel has been locked by the parental controls, or a mature
channel has been selected.
Aprompttoentertheunlockcodewillappear.Entertheunlockcodeas
described on page 32.
Subscription
Updated
An update to your SiriusXM subscription has been received by the SiriusXM
tuner. Press any button to continue.
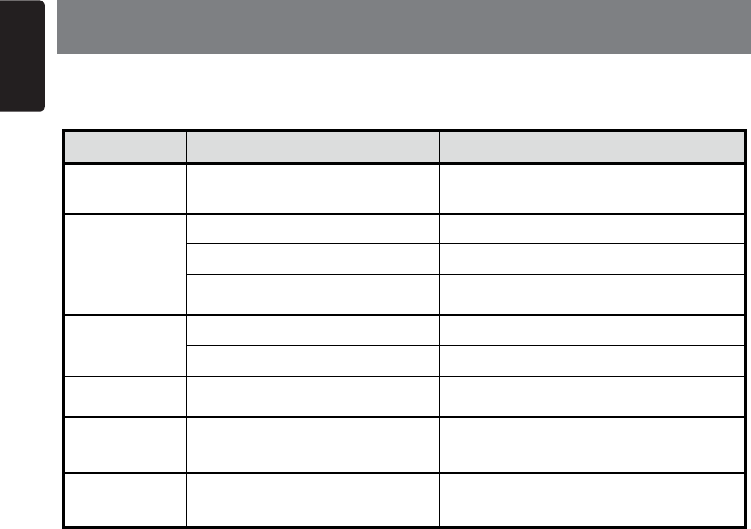
English
44 NX702
18. ERROR DISPLAYS
Display Cause Measure
Disc loading Disc is being read Pleasewait,itmaytakeseveralminutes
for some disc or storage device.
No Disc
Disc is dirty Cleandiscwithsoftcloth
Discisupsidedown Insertdiscwithlabelsideup
Disc not present in loading
compartment Insert disc
Unsupported
Disc
Disc is dirty Cleandiscwithsoftcloth
Discisupsidedown Insertdiscwithlabelsideup
Unknowndisc Disc format is not compatible
withthisunit Change another disc.
Region Error DVDisnotcompatiblewith
region code of unit
Usediscswithcorrespondingregional
code.
Error Illegal mechanism operation Press EJECT key for 5 seconds to reset
loading mechanism
Ifanerroroccurs,oneofthefollowingdisplaysisdisplayed.
Takethemeasuresdescribedbelowtosolvetheproblem.
If an error display other than the ones described above appears, press the [RESET] button. If
theproblempersists,turnoffthepowerandconsultyourstoreofpurchase.
* When the [RESET]buttonispressed,frequenciesof radiostations,titles,etc.storedin
memory are cleared.
45
English
NX702
FM Tuner
Frequencyrange:87.9-107.9MHz
Usablesensitivity:13dBf
Frequencyresponse:30Hz-15kHz
Stereoseparation:30dB(1kHz)
Signal/noiseratio:>55dB
AM Tuner
Frequencyrange:530-1710kHz
Usablesensitivity(S/N=20dB):30dBμ
Disc Player
System:Discdigitalaudiosystem
Frequencyresponse:20Hz-20kHz
Signal/noiseratio:>93dB
Totalharmonicdistortion:
Less than 0.1% (1kHz)
Channelseparation:>60dB
Videosignaloutput:NTSC
Videooutputlevel:1±0.2V
MP3/WMA mode
MP3samplingrate:8kHzto48kHz
MP3bitrate:8kbpsto320kbps/VBR
WMAbitrate:8kbpsto320kbps
USB
Specication:USB1.0/2.0
Playableaudioformat:
MP3(.mp3):MPEG1/2/AudioLayer-3
MP4(.MPEG4 / .AAC)
WMA(.wma):Ver7/8/9.1/9.2
Playablevideoformat:
AVI,MP4,MPG/MPEG,3GP
480x272
SD
Memorycards:
Standard SD/SDHC, microSD/SDHC
Filesystem:FAT,FAT16,FAT32
Playableaudioformat:
MP3(.mp3):MPEG1/2/AudioLayer-3
MP4(.MPEG4 / .AAC)
WMA(.wma):Ver7/8/9.1/9.2
Playablevideoformat:
AVI,MP4,MPG/MPEG,3GP
480x272
19. SPECIFICATIONS
Bluetooth
Specication:BluetoothVer.2.0+EDR
Prole:HFP(Hands-freeProle)
A2DP (Advanced Audio Distribution
Prole)
AVRCP(AVRemoteControlProle)
PBAP(PhoneBookAccessProle)
Send/ReceiveSensitivity:Class2
Audio Amplier
Maximumpoweroutput:
200W (50W x 4)
Speakerimpedance:4 (4 to 8 allowable)
7 Inch TFT LCD
Displayresolution(dot):
800RGB (H) x 480(V)
Activearea(mm):157.2(H) x 87.3(V)
Screensize(inch):7(Diagonal)
Dotpitch(mm):0.1965(H) x 0.1715(V)
Input
Audioinputsensitivity:
High:320mV(at2Voutput)
Mid:650mV(at2Voutput)
Low:1.3V(at2Voutput)
(input impedance 10 k or greater)
AUX-inAudiolevel:≤2V
Videolevel:NTSC/PAL1Vp-p@75Ω
General
Powersupplyvoltage:
14.4VDC(10.8to15.6Vallowable),
negative ground
Pre-Ampoutputvoltage:
4.0V(CD play mode:1kHz, 0dB, 10k
load, volume max.)
Fuse:15A
DimensionsoftheMainUnit:
7”(Width) × 4”(Height) × 6.4”(Depth)
[178(W) × 100(H) × 163(D)mm]
WeightoftheMainUnit:5.1lb(2.30kg)
DimensionsoftheRemoteControlunit:
1.9”(Width) × 0.5”(Height) × 5.5”(Depth)
[49(W) × 12(H) × 139(D)mm]
WeightoftheRemoteControlUnit:
1.94oz (55g) (including battery)
English
46 NX702
Note:
• Specificationsand designaresubject
to change without notice for further
improvement.
PowerOutput:
18WRMSx4 Channelsat4Ω
and≤1%THD+N
Signal to Noise Ratio:
93dBA(reference:1Winto4Ω)
178mm 100mm
163mm
7" 4"
6.4"
1" 27.5mm
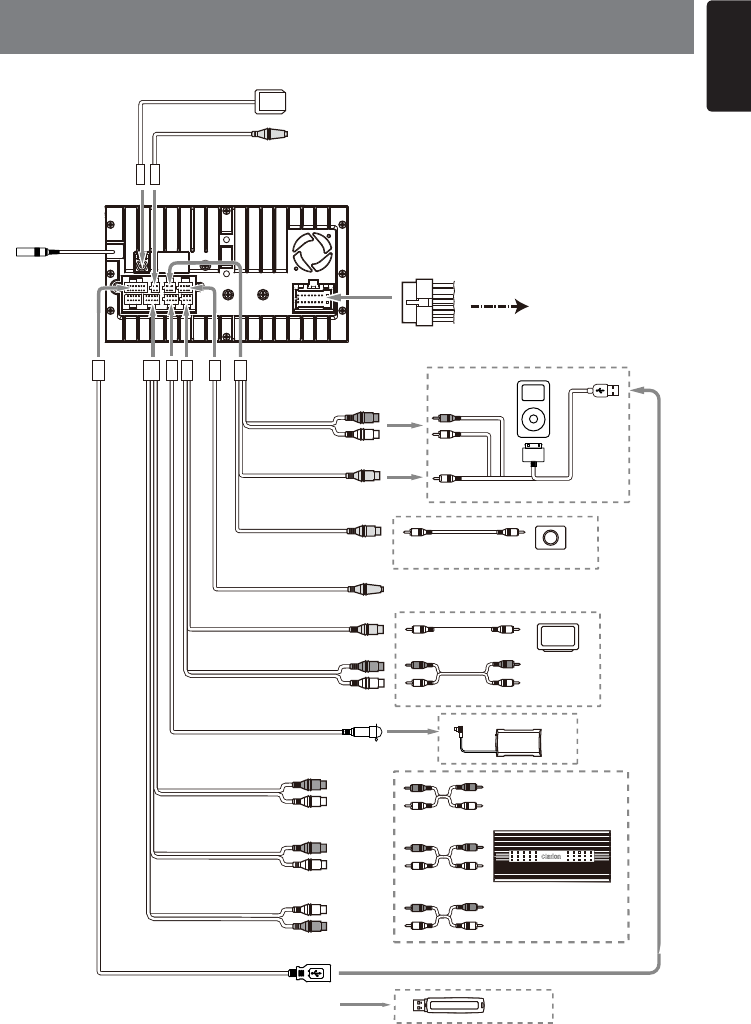
47
English
NX702
20. WIRING AND CONNECTIONS
SiriusXM (sold separately.)
USB Memory
Black
SiriusXM
Black
Refer to the right.
NX702
Connect it to the car power supply terminal
for illumination
Connect it to the car power supply terminal
for antenna
Blue/White wire (Amplifier turn-on lead)
Connect to remote turn-on lead of amplifier
18-Pin Connector Extension Lead
(attached to the source unit)
Brown wire (Phone mute lead)
Yellow wire (Memory back-up lead)
Red wire (Power lead)
Black wire (Ground lead)
Orange/White wire (Illumination lead)
Blue wire (Auto antenna lead)
Connect it to the car power supply terminal
for parking
Fresh Green wire (Parking)
Connect it to the car power supply terminal
for reverse
Purple/White wire (Reverse)
Connect to vehicle chassis ground
Connect to cellular phone mute lead.
Connect directly to battery
Accessory 12V
Front Right
Front Right
Gray
Gray
White
White
Purple
Purple
Green
Green
Gray/Black
Gray/Black
White/Black
White/Black
Purple/Black
Purple/Black
Green/Black
Green/Black
4-Speaker system
2-Speaker system
or
Rear Right
Rear Left
Not used.
Insulate each wire
Front Left
Front Left
6-Channel Amplifier
Video In
Audio In
Rear Zone
Monitor
Video Out
Rear Vision Camera
Yellow
VISUAL IN
Black
Yellow
CAMERA
Black
Red
White
AUX IN 2
Red
Steering Wheel Remote Control Terminal
Gray Gray
External Microphone
Connection
(Black) Black
GPS Antenna
(Black)
Black
USB connector
Red
White
Line Out
Front Right
Line Out
Front Left
Gray
Red
White
Line Out
Rear Right
Line Out
Rear Left
Black
Red
White
Subwoofer 1
Subwoofer 2
Purple
Yellow
VIDEO OUT
Black
Red
White
2 ZONE OUT
Green
Radio Antenna
(Black)
Video Out
iPod/iPhone
CCA-750 (sold separately)
or
• BesuretoconnectSiriusXMcable
properly. Mistakenly connect to SiriusXM
cable may cause damage to your unit or
the connected device.
(Black)
(Black) (Black)
(Black)
Radio Antenna
Refer to next page.
GPS Antenna
External Microphone
Connection
Red
Black
VISUAL IN
CAMERA
Black
Black
Red
iPod/iPhone
Video Out
Video Out
Rear Vision Camera
CCA-750 (sold separately)
White
Yellow
Yellow
AUX IN 2
VIDEO OUT
2ZONEOUT
Black
Black
SiriusXM
Green
Gray Gray
Red
Video In
Steering Wheel Remote Control Terminal
Audio In
RearZone
Monitor
White
Yellow
Gray
Black
Black
or
USB connector
6-ChannelAmplier
SiriusXM (sold separately.)
Purple
Red
Red
Red
White
White
White
USB Memory
Line Out
Front Right
/MID-R
Line Out
Rear Right
/HIGH-R
Line Out
Front Left
/MID-L
Line Out
Rear Left
/HIGH-L
SubwooferL
/REAR-L
SubwooferR
/REAR-R

English
48 NX702
18-Pin Connector Extension Lead
(attached to the source unit)
Yellowwire(Memoryback-uplead)
Brownwire(Phonemutelead)
Redwire(Powerlead)
Blue/Whitewire(Amplierturn-onlead)
Blackwire(Groundlead)
Orange/Whitewire(Illuminationlead)
Bluewire(Autoantennalead)
FreshGreenwire(Parking)
Purple/Whitewire(Reverse)
Connecttoremoteturn-onleadofamplier
Connect to vehicle chassis ground
Connectittothecarpowersupplyterminal
for illumination
Connectittothecarpowersupplyterminal
for antenna
Connectittothecarpowersupplyterminal
for parking
Connectittothecarpowersupplyterminal
for reverse
Connect directly to battery
Connect to cellular phone mute lead.
Accessory 12V
Front Right
Gray
Gray
White
White
Purple
Purple
Green
Green
Gray/Black
Gray/Black
White/Black
White/Black
Purple/Black
Purple/Black
Green/Black
Green/Black
4-Speaker system
or
2-Speaker system
Not used.
Insulateeachwire
Front Left
Front Right /MID-R
Rear Right /HIGH-R
Rear Left /HIGH-L
Front Left /MID-L

-English:"
ThisdevicecomplieswithindustryCanadalicence-exemptRSSstandard(s).
Operationissubjecttothefollowingtwoconditions:
(1) this device may not cause interrence, and
(2) this device must accept any interference, including interference that may cause undersired
operation of the device."
-French:"
LeprésentappareilestconformeauxCNRd’IndustrieCanadaapplicablestechnicienaux
appareilsradioexemptsdelicence.L’exploitationestautoriséeauxdeuxconditionssuivantes:
(1)l’appareilnedoitpasproduiredebrouillage,et
(2)l’utilisateurdel’appareildoitacceptertoutbrouillageradioélectriquesubi,mêmesile
brouillageestsusceptibled’encompromettrelefonctionnement.»
21. WARNING

ClarionCo.,Ltd.
All Rights Reserved. Copyright © 2012: Clarion Co., Ltd.
Printed in China