Faurecia Clarion Electronics QY8900 CAR NAVIGATION User Manual
Clarion Co., Ltd. CAR NAVIGATION
User manual.pdf
QY-8900 MODEL
Navigation system manual
Car Navigation

1
English
Table of contents
Names of Various Parts ��������������������������������������������������� 3
Basic Operations ������������������������������������������������������� 4
Bluetooth Operation ������������������������������������������������������ 5
Navigation ����������������������������������������������������������� 6
Navigation System Settings ������������������������������������������������� 8
Route Guidance �������������������������������������������������������� 9
About Information ������������������������������������������������������ 10
2
English
Warning
●Changes or modifications to this unit not expressly ap-
proved by the party responsible for compliance could
void the user’s authority to operate the equipment.
NOTE:
G This equipment has been tested and found to comply with
the limits for a Class B digital device, pursuant to Part 15
of the FCC Rules. These limits are designed to provide
reasonable protection against harmful interference in a
residential installation. This equipment generates, uses and
can radiate radio frequency energy and, if not installed and
used in accordance with the instructions, may cause harmful
interference to radio communications.
However, there is no guarantee that interference will not
occur in a particular installation. If this equipment does
cause harmful interference to radio or television recep-
tion, which can be determined by turning the equipment
off and on, the user is encouraged to try to correct the
interference by one or more of the following measures:
zReorient or relocate the receiving antenna.
zIncrease the separation between the equipment and receiver.
zConnect the equipment into an outlet on a circuit differ-
ent from that to which the receiver is connected.
zConsult the dealer or an experienced radio/TV technician for help.
The device must not be co-located or operating in con-
junction with any other antenna or transmitter.
To comply with FCC’s and Industry Canada’s RF radia-
tion exposure limits for general population/uncontrolled
exposure,this device must be installed to provide a sepa-
ration distance of at least 20cm from all persons.”
This device complies with Part 15 of the FCC Rules. Op-
eration is subject to the following two conditions :
●This device may not cause harmful interference, and
●This device must accept any interference received,
including interference that may cause undesired opera-
tion.
Shielded cables must be used with this unit to ensure
compliance with the Class B FCC limits.
3
English
Names of Various Parts
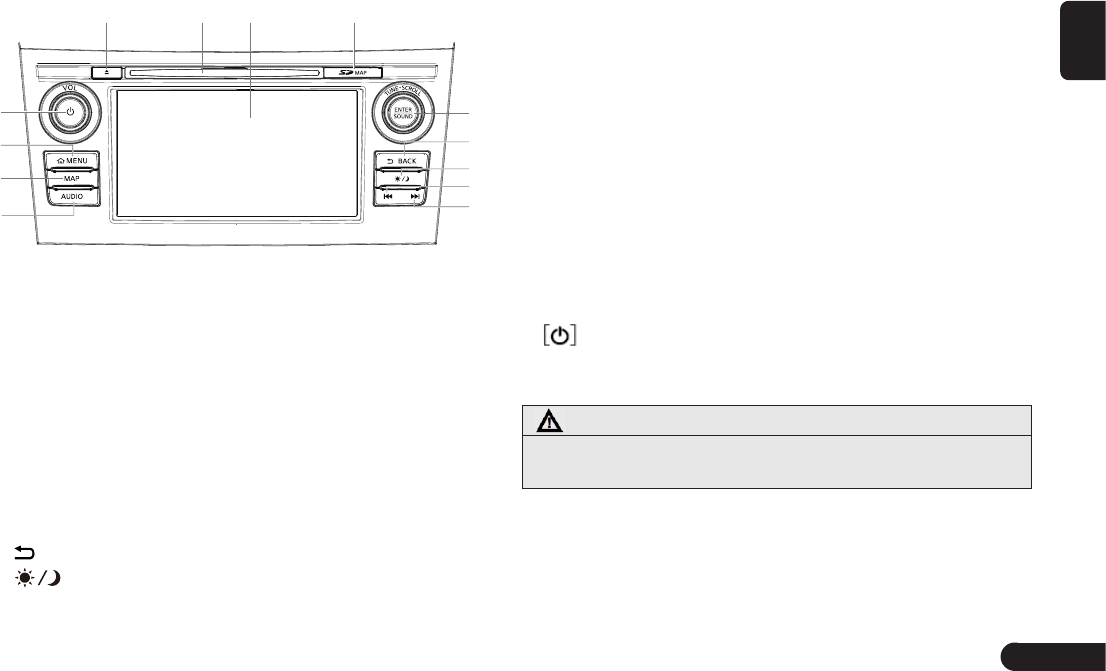
Panel Buttons
1 2 3 4
6
8
9
5
!
0
@
#
7
1
[Q]Eject button: Short press it to eject the disc inside
the unit.
2
Disc slot: CD disc can be inserted for playing.
3
LCD(touch screen): To display the working statuses of
various modes.
4
SD card slot: Map SD card.
5
[TUNE-SCROLL] knob/[ENTER/SOUND] button: In
AM/FM mode, rotate to search radio station frequency
manualy; press to store radio stations in memory. Press
and turn the knob to jump to previous or next touch key
and select it in source and menu mode. In other mode,
press and turn the knob to adjust the volume balance.
6
[BACK] button: Back to the previous mode.
7
[ ]Day/night button: Press to switch between day
or night mode.
8
[CAMERA] button: To enter camera mode.
9
[x]Next Track button: In CD/USB/iPod/Bluetooth Au-
dio Device mode, short press it to select the next track
to play, and long press it to Fast Forward; in AM/FM
mode, short press to search radio station frequency up
automatically.
0 [v]Previous Track button: In CD/USB/iPod/ Bluetooth
Audio Device mode, short press it to select the previous
track to play, and long press it to Fast Reverse; in AM/
FM mode, short press to search radio station frequency
down automatically.
![AUDIO] Audio button: To enter audio selection screen
or Audio Mode.
@[MAP] Map button: Press to enter the map screen.
#[MENU] Menu button:Press to enter Menu Screen to
select audio function or navigation function.
$button/Volume Knob: Switch to adjust volume; short
press to turn off/on audio device.
Caution
●It is prohibited to pull out the map SD card or the
system will not work.
4
English
Basic Operations
Mode Switch
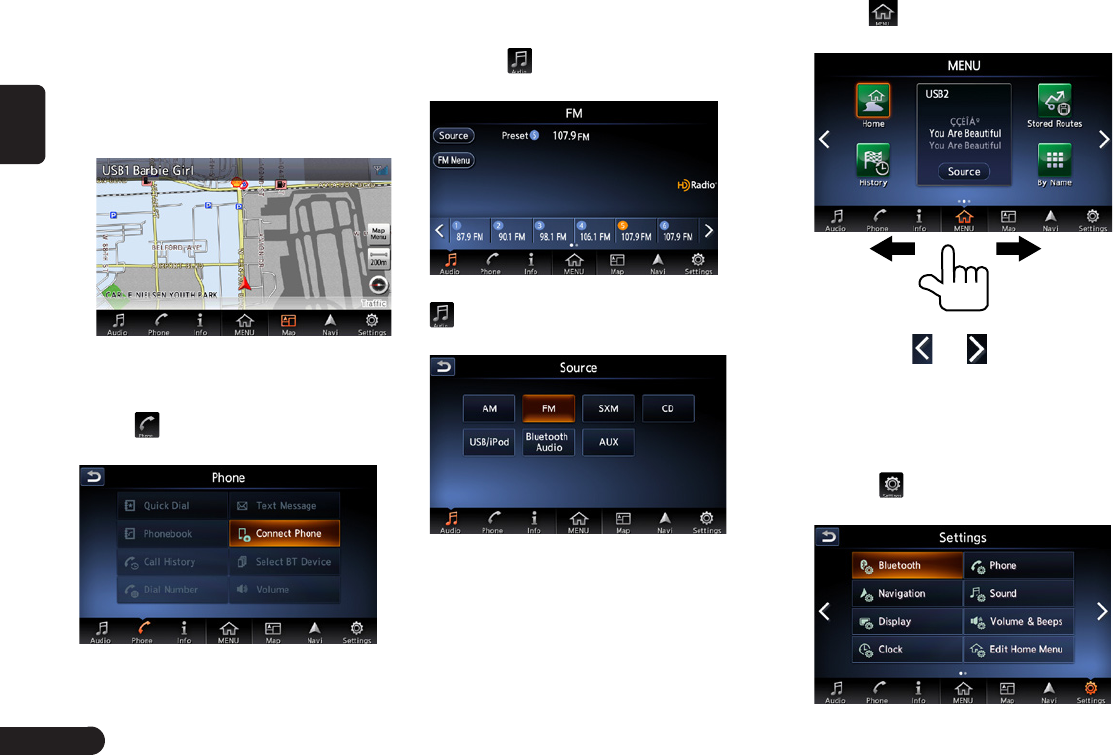
■Switch to navigation mode
Press [MAP] button on the panel to
switch to navigation mode for map
display.
■Switch to Bluetooth mobile
phone mode
Touch switch to Bluetooth mobile
phone mode.
■Switch to source mode
Press [AUDIO] button on the panel
or touch to switch to source mode
such as Radio mode.
Press [AUDIO] button or touch
in Source mode to switch
to source selection screen.
Main menu operations
On main menu screen you can enter
corresponding work mode by touch
the icons on the screen.
1
Press [MENU] on the panel or
touch to enter main menu
screen.
zChange page by dragging left or
right or touch and .
Basic Settings
1
Press [MENU] button on the
panel.
2
Touch to enter Settings
Screen.
5
English
3
Touch the icon to enter the appro-
priate setting.
Source Media Mode
1
Press [AUDIO] button on the
panel or touch to enter source
screen.
2
Touch the icon to enter the appro-
priate source media.
Bluetooth Operation
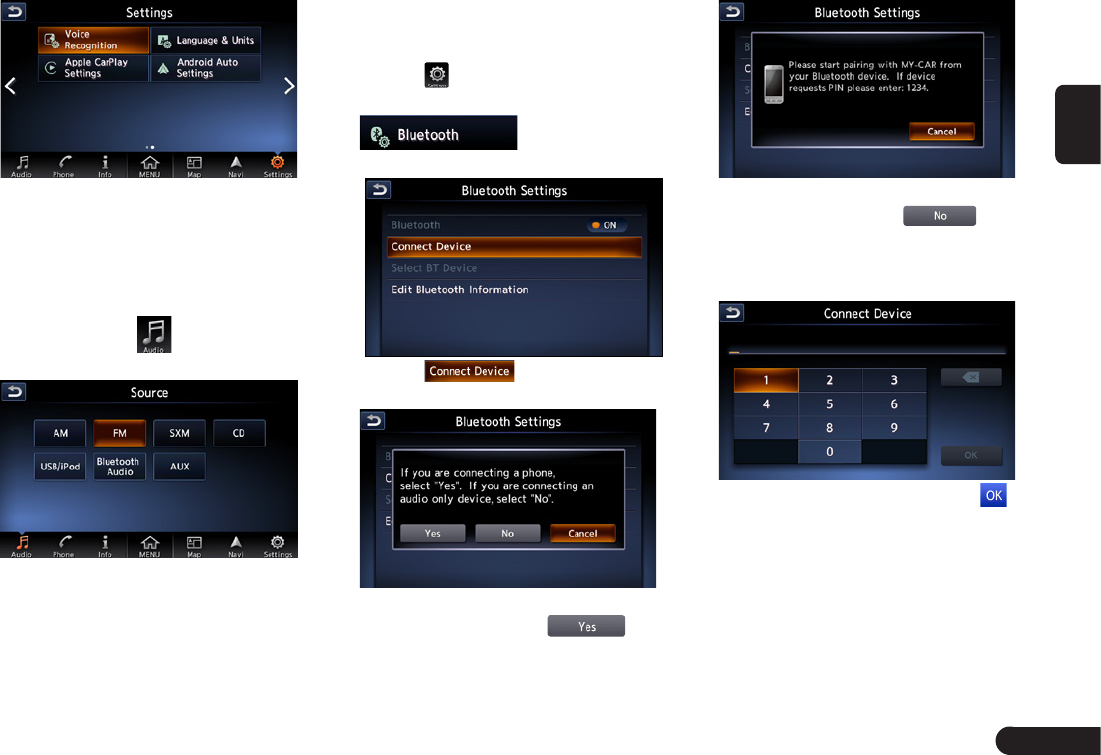
Pair Bluetooth Device
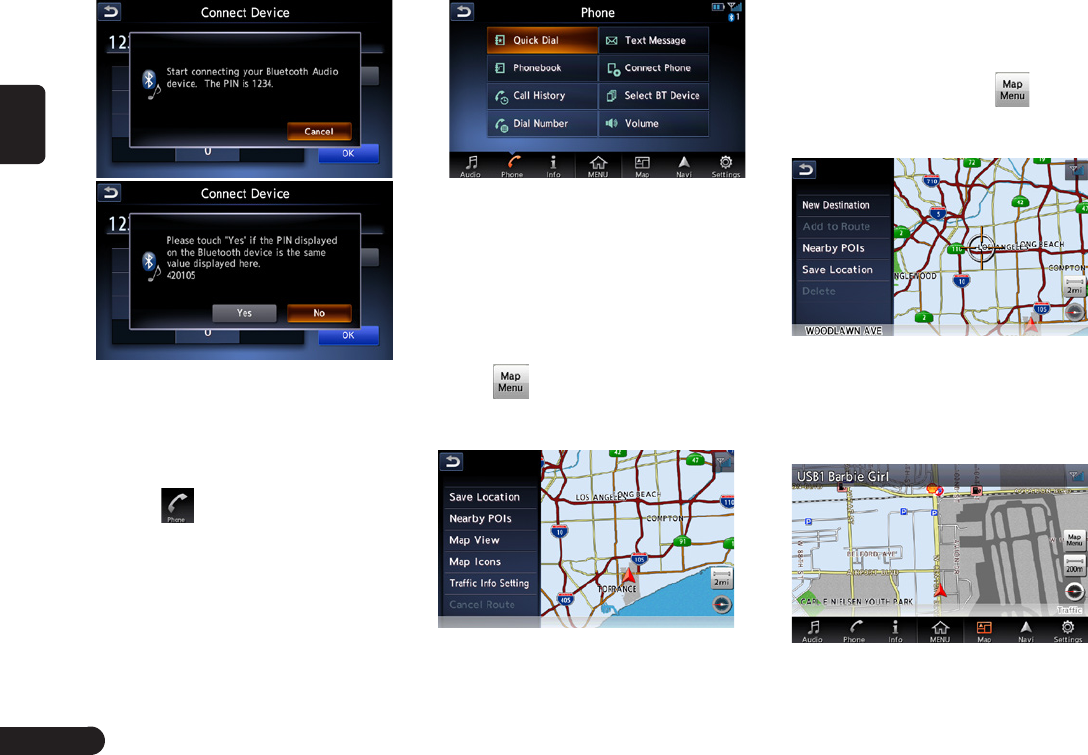
1
Touch to enter Set-
tings Screen.Then touch
to enter Blue-
tooth setting screen.
2
Touch to select the mo-
bile phone or audio device to pair.
3
If you want to select the mobile
phone 秋to pair, touch .
4
If you want to select the audio
device秋to pair, touch , and
you have to edit the PIN (minimum
4 digits and maximum 16 digits) to
pair the audio device.
5
After entering the PIN, touch
and operate as per the information
prompted.
6
English
2
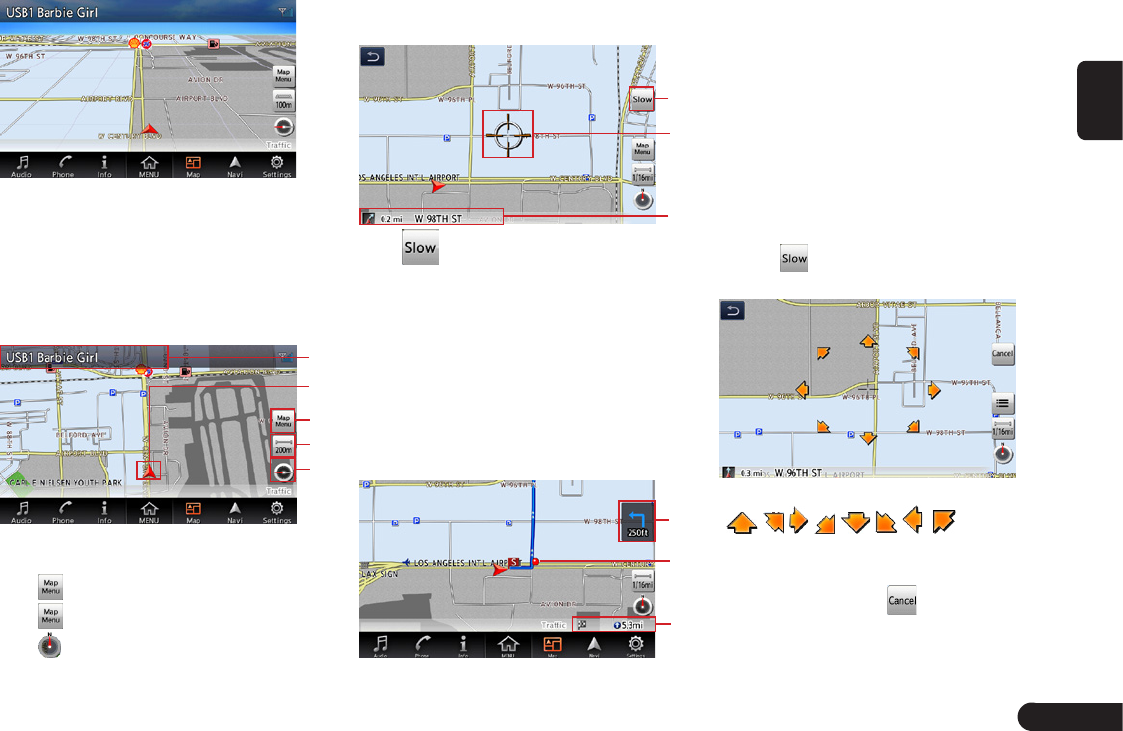
Touch the icon to enter the appro-
priate function.
Navigation
Menu Types and Operation
■Map menu (Menu on current
location map)
Touch on the map screen to
display the Map menu at the left side
of the screen.
■Location menu (Menu on
scrolled map)
After scrolling the map by touching
the Map screen, touch on the
screen to display the Location menu
at the left side of the screen.
Map Screen Features
■Types of the map
There are two types of map: the 2D
map and the 3D map.
●2D Map
6
After successful pairing, it will
automatically return to Bluetooth
Setting screen.
Bluetooth Telephone
1
Touch to enter Phone screen.
7
English
●3D Map
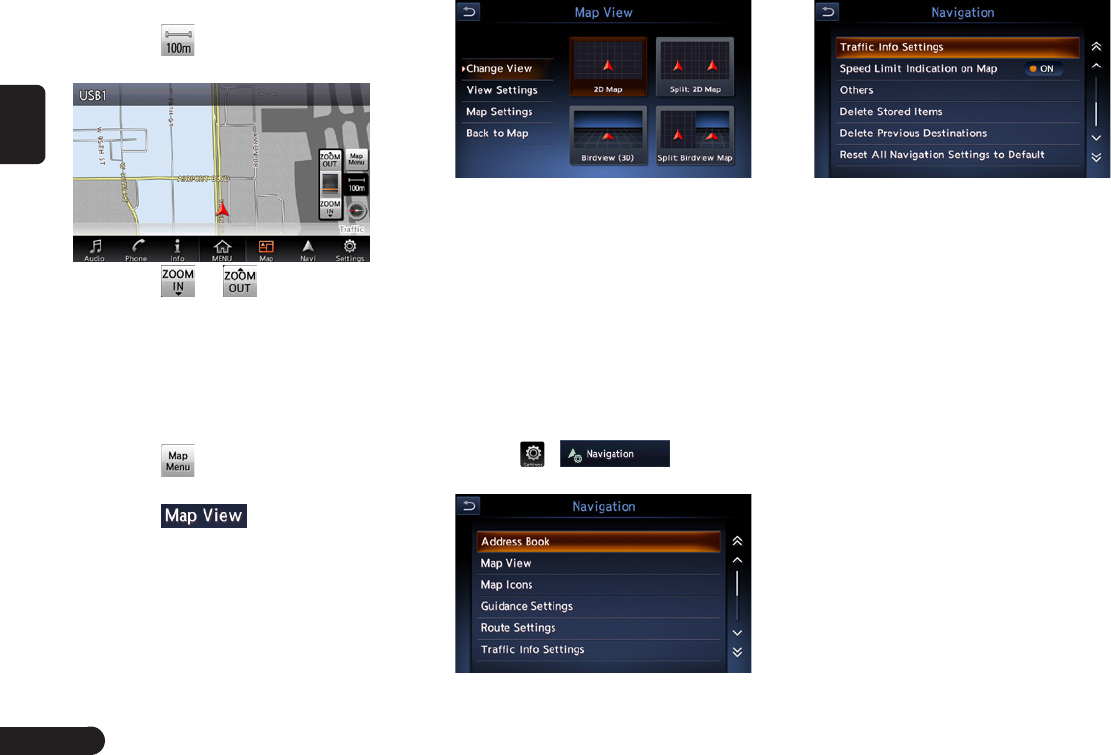
■Indicators on the map
Indicators displayed on the Map
screen are different according to the
conditions at that time.
Indicators on the map of the current
location
1
3
2
3
4
1
Audio mark
2
Vehicle mark
3
[ ]Map Menu key
4
[ ]Map scale key
5
[ ]Map bearing mark
Indicators on the scrolled map
Indicators are displayed after scrolling
the map.
1
2
3
1
[ ] (Slow Scroll)key
2
Displays the name of the street
under the cursor.
Indicators displayed during the route
guidance mode
After a destination is set and travelling
is started, the guidance route and
various guidance information are
displayed on the map.
1
3
2
1
Small Turn Arrow display
2
Guidance point
3
Distance to the waypoint/
destination
Manipulating the Map Screen
■Scrolling the map
Touching the Map screen displays
a cursor at the centre of the screen,
you can scroll the map.
■Slow scroll mode operation
Touch while scrolling the 2D map
to display the following screen:
Keep touching the desired arrow key
( , , , , , , , .) moves
the map slowly towards the corre-
sponding direction. To quit the slow
scroll mode, touch .
8
English
■Zooming IN/OUT the map
1
Touch to display the zoom in/
out key.
2
Touch or to change the
map scale.
■Changing the map appearance
The Map screen can be adjusted
regarding orientation or appearance
of the map.
1
Touch on the Map screen of
the current vehicle location.
2
Touch to enter Map
View screen.
3
Touch the corresponding key to
change the map view.
Navigation System
Settings
1
Press [MENU]/[MAP]/[AUDIO]
button on the panel to display the
function bar.
2
Touch , to enter
Navigation Settings Screen.
3
Touch the item to enter the appro-
priate setting.
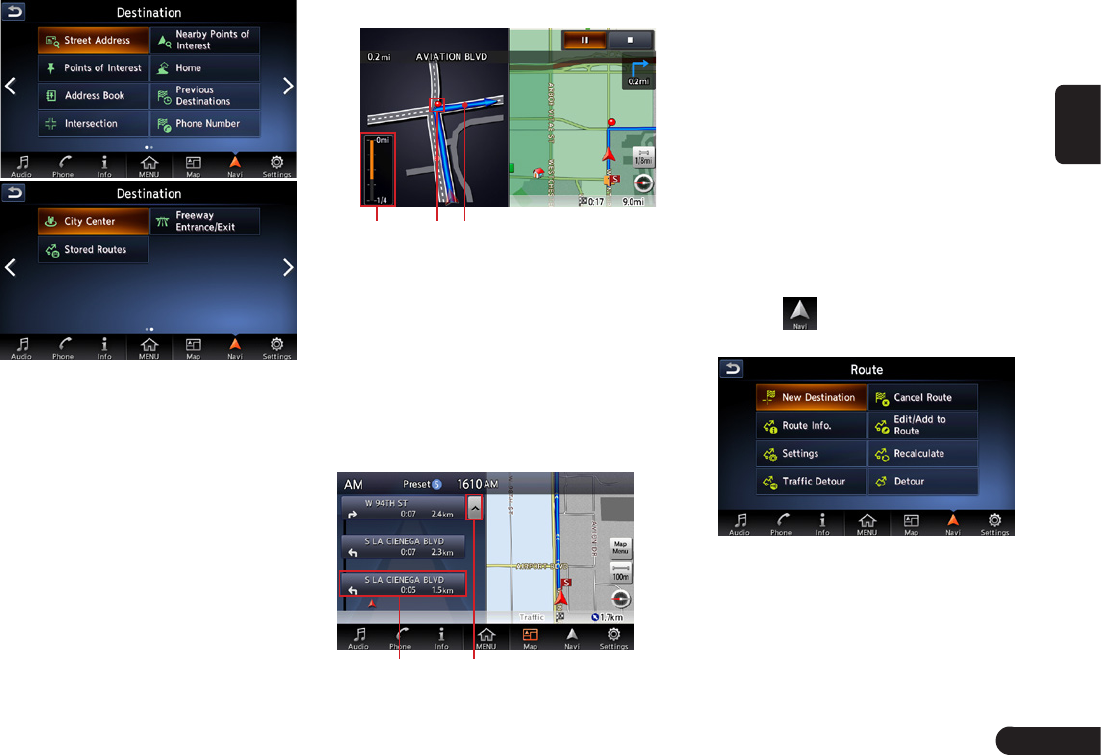
Entering the Destination
Searching Your Destination
from the Destination Menu
You can search for a destination from
the Destination menu by using vari-
ous methods. Use a suitable search-
ing method according to the place
you wish to go to, then operate as
per the information prompted.
Destination menu screen
9
English
Route Guidance
After you have entered the destina-
tion and started the route guidance,
you will be guided along the route by
screen display and by voice.
Junction Map
1 23
1
Remaining distance indication
2
Guidance route
3
Guidance point
Turn list on Route
The screen is always divided into two
displays and the Turn List on Route
is displayed on the left display if Turn
List is activated.
12
1
Turn List
2
Scrolling key
Changing/Editing the Route
Settings
From the Route menu, editing the
current route, confirming the route
information, setting the conditions
of the route calculation, etc. can be
performed.
1
Press [MENU] button on the
panel.
2
Touch to enter Route menu
screen when a route had exist.
3
Touch the desired item to change
or edit the route settings.
10
English
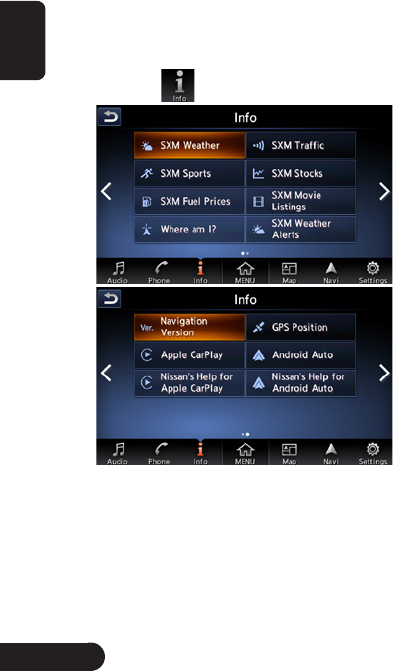
About Information
This screen sets or displays various
information that is helpful for using
the vehicle safely and comfortably.
1
Press [MENU] button on the
panel.
2
Touch to enter Info screen.
3
Touch the desired item to view the
information, and about some items
you can operate as per the infor-
mation prompted.