Fego Precision Co FPG2003B FEGO BLE GlucoPedo Pedometer and Blood Glucose Monitoring System User Manual Rev 01 150129
Fego Precision Industrial Co Ltd FEGO BLE GlucoPedo Pedometer and Blood Glucose Monitoring System Rev 01 150129
User Manual-Rev.01(150129)
1
FEGO BLE GlucoPedo
Pedometer and Blood Glucose Monitoring system
User Guide
Table of Content
Introduction ................................................... 2
FEDERAL COMMUNICATIONS
COMMISSION INTERFERENCE STATEMENT
.......................................................................... 3
Getting to Know Your System .................. .4
Intended Use............................................. 4
Meter.......................................................... 4
LCD Screen Display................................. 5
Blood Glucose Test Strip......................... 6
Battery........................................................ 6
Setting You Meter......................................... 7
Step Counter .................................................. 8
Before Using the Step Counter............... 8
Step Counting Mode ............................... 8
Receive your pedometer test data from the
phone APP ........................................................ 9
Blood Glucose Test..................................... 10
Before Using the Blood Glucose Meter10
Principle of Measurement ..................... 11
Performance Characteristics .................12
About Alternative Site Testing ............. 12
Prepare For Blood Sampling.................13
Performing Blood Test........................... 14
Blood Glucose Memory Recall .............18
Receive your blood glucose measurement test
data from the phone APP...........................17
Understanding Your Blood Glucose
Levels........................................................ 17
Control Solution Test .............................18
Caring for Your Meter and Test Strip..20
Bluetooth 4.0 BLE function ........................22
Display Messages........................................22
System Specifications.................................25
Symbol Description.................................... 26
Dealer / Manufacturer Information ......... 28
2
Introduction
Thank you for choosing BLE GlucoPedo. The BLE GlucoPedo system allows you to record daily
steps, measure your blood glucose values, and use as a USB driver.
Please read all instructions carefully before use. To ensure you operate the BLE GlucoPedo
correctly to measure the accurate blood glucose (blood sugar), read all instructions thoroughly
and practice the test. Call your local agent or contact our sales representative if you have any
question.
IMPORTANT SAFETY INFORMATION
Please read all instructions before use and follow below precautions.
Use the device only for the intended use described in this manual.
The product has measurement and record function. If the time and date are not set
correctly, the data might get loss or error. Please set the current time and date correctly
before use. Time setting is guided in the manual.
No modification is allowed on the product.
If the electromagnetic field is too strong, it will interfere with the correct operation of BLE
GlucoPedo. Do not use the product at a place close to strong electromagnetic radiation.
To avoid the generation of static electricity, please do not use the product in a very dry
environment, especially in the artificial synthetic material environment.
Close supervision is necessary when the device is used by, on, or near children,
handicapped persons or invalids.
Please discard the product properly according to the regulations of your country.
Do not use the device if it is not working properly, or if it has suffered any damage.
CAUTION: Please keep all small parts out of the reach of children. The bottle cap, the
test strip, and the lancets may cause a choking hazard. Please do not swallow. Go to the
doctor immediately if accidentally swallowed.
Keep the user guide in case of emergency.
3
FEDERAL COMMUNICATIONS COMMISSION INTERFERENCE STATEMENT
This equipment has been tested and found to comply with the limits for a Class B digital device, pursuant
to Part 15 of the FCC Rules. These limits are designed to provide reasonable protection against harmful
interference in a residential installation.
This equipment generates, uses and can radiate radio frequency energy and, if not installed and used in
accordance with the instructions, may cause harmful interference to radio communications. However,
there is no guarantee that interference will not occur in a particular installation. If this equipment does
cause harmful interference to radio or television reception, which can be determined by turning the
equipment off and on, the user is encouraged to try to correct the interference by one or more of the
following measures:
-- Reorient or relocate the receiving antenna.
-- Increase the separation between the equipment and receiver.
-- Connect the equipment into an outlet on a circuit different from that to which the receiver is connected.
-- Consult the dealer or an experienced radio/TV technician for help.
CAUTION:
To assure continued FCC compliance:
1. Any changes or modifications not expressly approved by the grantee of this device could void the user's
authority to operate the equipment.
FCC Label Compliance Statement:
This device complies with Part 15 of the FCC Rules. Operation is subject to the following two conditions:
(1) this device may not cause harmful interference, and (2) this device must accept any interference
received, including interference that may cause undesired operation.
4
Getting to Know Your System
The BLE GlucoPedo is for recording personal daily blood glucose and recording daily walking
steps.
Intended use
The glucose test function in BLE GlucoPedo is intended for use outside of the body
self-testing (in vitro diagnostic use only). It should be used only for testing blood glucose (blood
sugar) and only with fresh capillary whole blood samples. The system should not be used for
the diagnosis of diabetes or for the testing of newborns. It can use in the home and in clinical
settings.
This pedometer function in BLE GlucoPedo counts and stores the number of steps (0~100000
steps), the covered distance (distance measurements 0~9999.99 KM) and the calories burnt
(0~9999.99 KCAL) hereby. This product is not suitable for commercial, industrial or medical use.
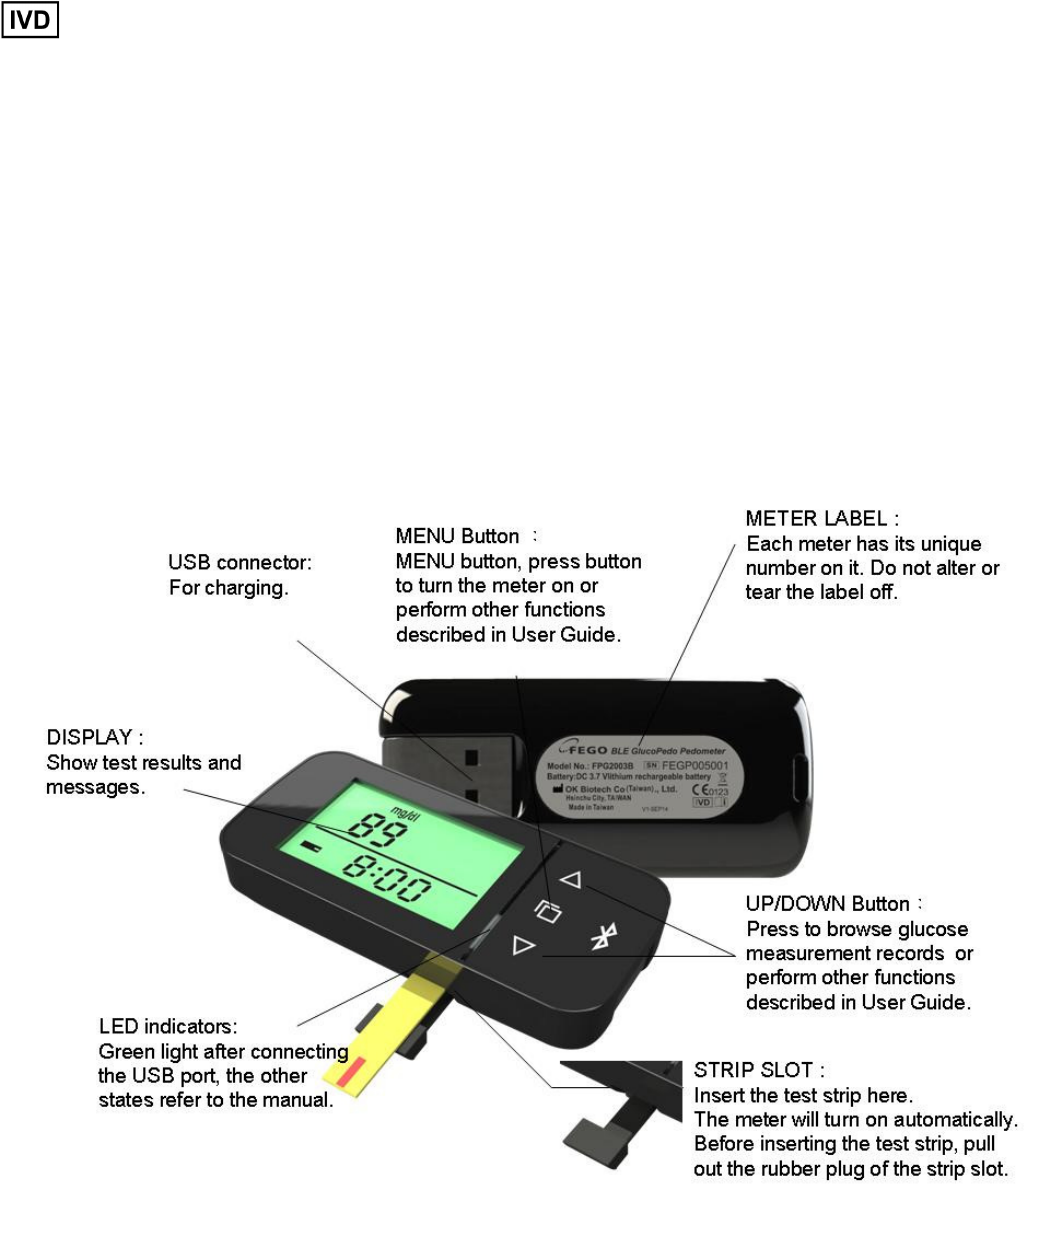
Meter
5
Description of the buttons
:MENU Button
Power on/off: Turn on / off the pedometer by pressing and hold the button for 3
seconds.
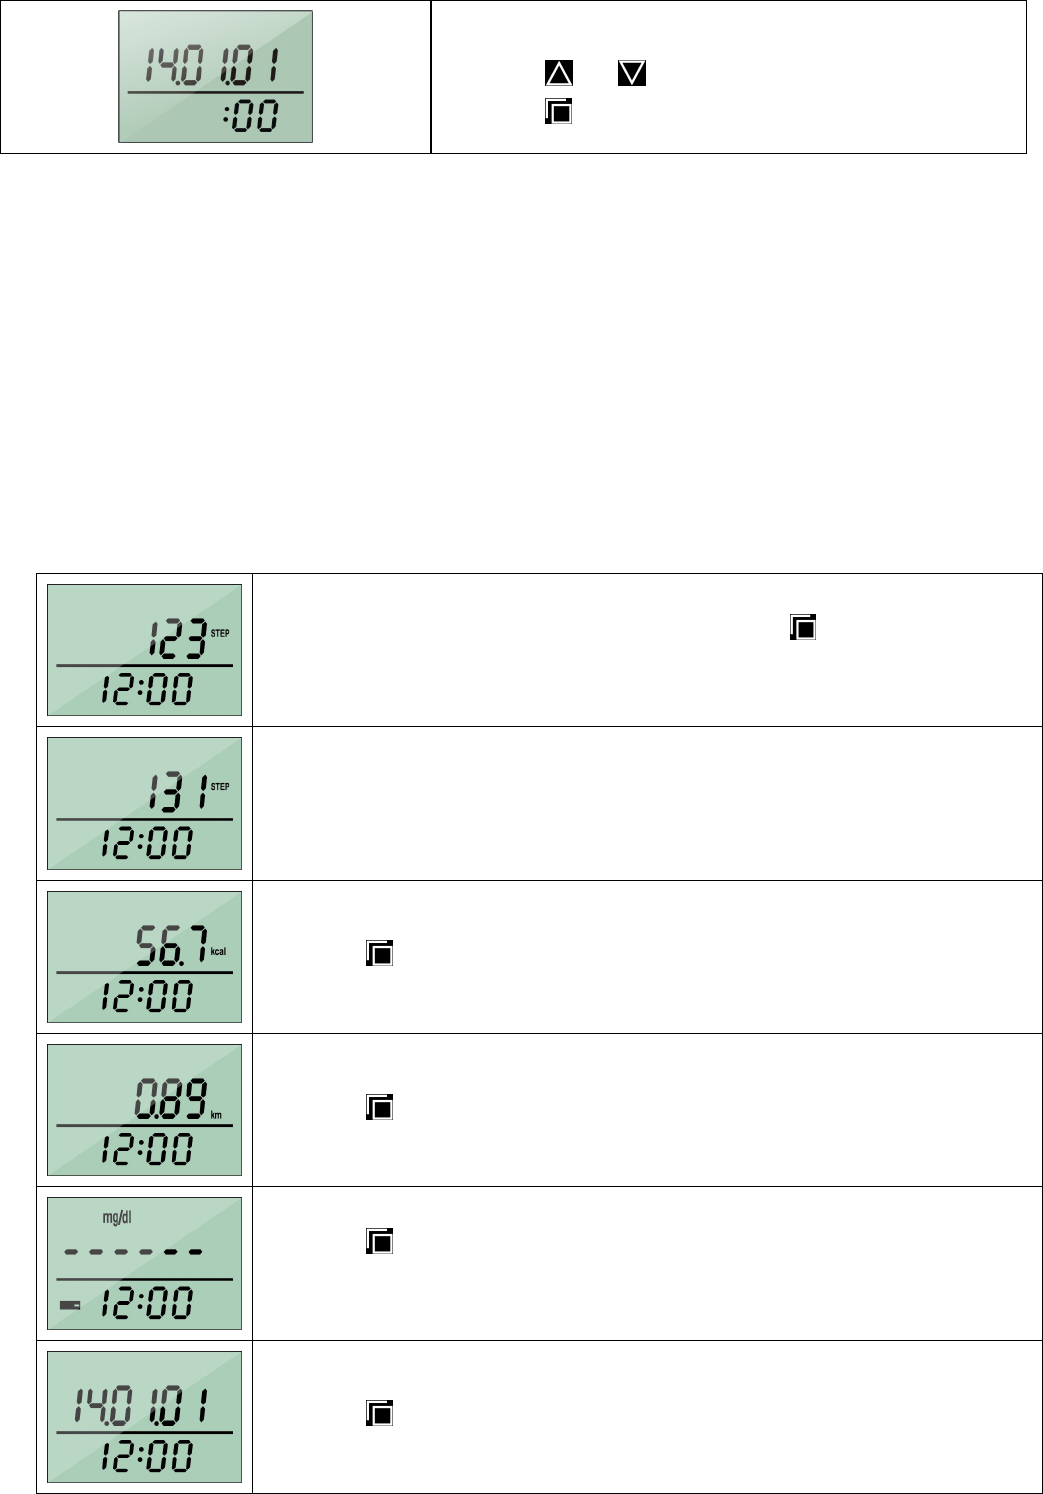
Standby mode-Short press to switch the figures display sequentially in Step→
Calorie→ Distance→ Blood Glucose→ Date.
Setting mode-the button is the enter function. Set year→ month→ date→12/24
hours → hour → minute→ second sequentially.
+:
::
:UP/DOWN Button
Press UP + DOWN buttons together for 5 seconds to enter setting mode to set date
and time.
:UP button
Memory mode: Press to navigate between the blood glucose test records.
Setting mode: Short press to increase value and long press for rapidly increase
value.
:DOWN Button
Memory mode: Press to navigate between the blood glucose test records.
Setting mode: Short press to decrease value and long press for rapidly decrease
value.
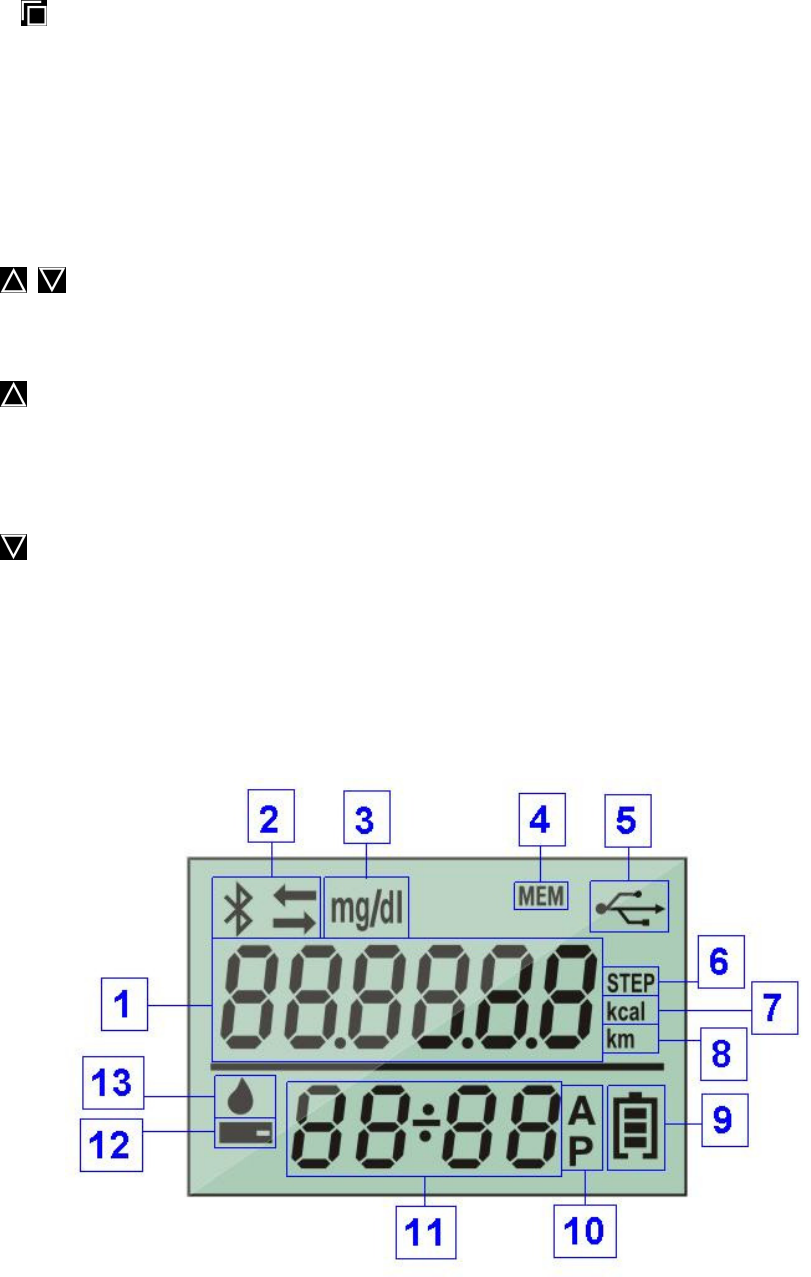
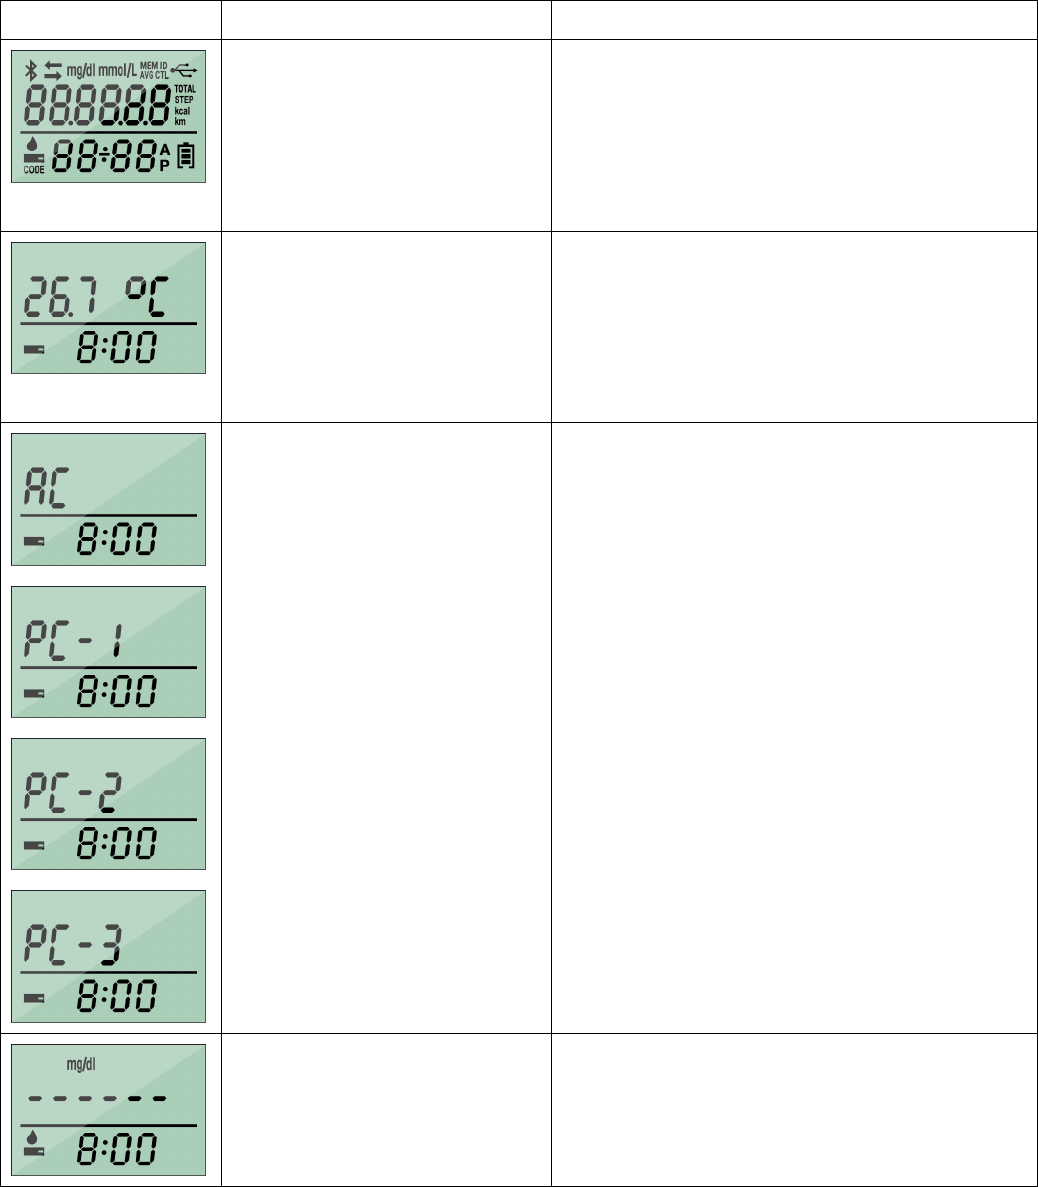
LCD Screen Display
(1) Main window:Shows glucose/temperature/steps/calories/distance/date/error message.
(2) Bluetooth status: the left symbol flashes indicates no connection with the phone, constant light for
the connection, and turns off the Bluetooth function is turned off; arrow symbol constant light
indicates data is being transmitted.
6
(3) mg/dL:Unit of measure for blood glucose. Displays with blood glucose test results.
(4) Memory icon:Displays when the meter is in blood glucose memory mode.
(5) USB symbol: When connected to a computer or other USB charging device for displaying the main
window displays the date.
(6) STEP:Unit of measure for step counter. Displays when the meter is showing the step
counter.
(7) KCAL:Unit of measure for calories (kilocalorie). Displays when the meter is showing the
value of consumed calories.
(8) KM:Unit of measure for distance (kilometer). Displays when the meter is showing the
value of consumed calories.
(9) Battery icon:Displays when the meter power is low. Charge the battery immediately by
connecting the meter to a computer with its USB connector. The charging is complete when
the icon stops flashing (while connecting to a computer).
(10) 12-hour display: When the time is set to 12-hour display.
(11) Time display window:The window displays time. In memory mode, it alternately shows
date and time of the glucose test result.
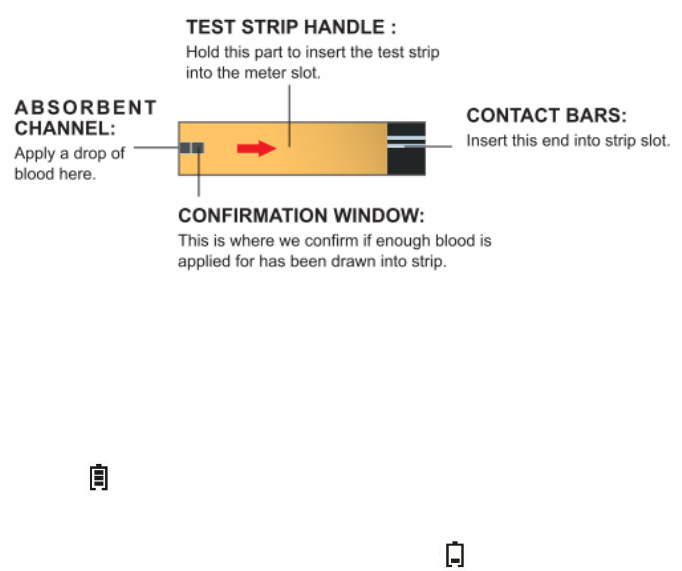
(12) Test strip icon:Displays when a test strip is inserted to the meter.
(13) Blood icon:Flashes when the test strip is ready for blood sample to be applied. Do not
apply blood until this icon shows up.
Blood Glucose Test Strip
Battery
Charge the battery before your first use of the BLE GlucoPedo meter by plugging the USB
connector to a computer or other USB charger. Charge for at least 2.5 hours or until the
battery icon displays all the time without flashing.
Charge the battery when the low battery icon displays.
Please keep away from high temperature when charging.
Please contact the agent or sales representative if the battery icon is still flashing after 3
7
hours charging.
The battery of this product is not intended to be changed.
8
Setting Your Meter
Before using the BLE GlucoPedo for the first time, please set the correct date and time to keep
correct records of daily steps and blood glucose values.
To enter setting mode, turn on the meter first by pressing MENU Button for 3 seconds, and
press + buttons together for 5 seconds.
Turn on the meter
Turn on the meter first by pressing MENU
button for 3 seconds, and the meter is now in
standby mode.
Enter setting mode
Press + buttons together for 5 seconds until
the number of the year is flashing.
Set the year
Press or to navigate the value, and press
to confirm and move on to the next setting.
Set the month
Press or to navigate to the current year.
Press to confirm and move on to the next
setting.
Set the date
Press or to navigate to the current
month. Press to confirm and move on to the
next setting.
Set the hour format
Press or to navigate to your preferred
hour format (24 hr/12 hr). Press to confirm
and move on to the next setting.
Set the hour
Press or to navigate to the current hour.
Press to confirm and move on to the next
setting.
Set the minute
Press or to navigate to the current
minute. Press to confirm and move on to the
next setting.
9
1. Set the second
Press or to navigate to the current second.
Press to confirm and return to standby mode.
Step Counter
Before Using the Step Counter
The step counter automatically returns to zero every day. Make sure you have set the meter
date and time to keep a correct record of your daily steps; refer to Setting Your Meter chapter for
details.
BLE GlucoPedo use triaxial accelerometer sensor which detects changes in acceleration. The
number of steps walked are measured based on the vertical movement. Take care to affix the
device securely near your waist line into a suitable location such as a pocket or belt pouches etc.
Step Counting Mode
1. Turn the meter on by pressing MENU Button for 3 seconds, and
the meter is in standby mode, showing the number of steps today.
2. After consecutive walks (8 steps), the meter starts the pedometer
function.
3. Press button to switch the display data to calories.
4. Press button to switch the display data to distance.
5. Press button to switch to blood glucose value display.
For details of blood glucose measuring, refer to Blood Glucose Test chapter.
6. Press button to switch to date display.
10
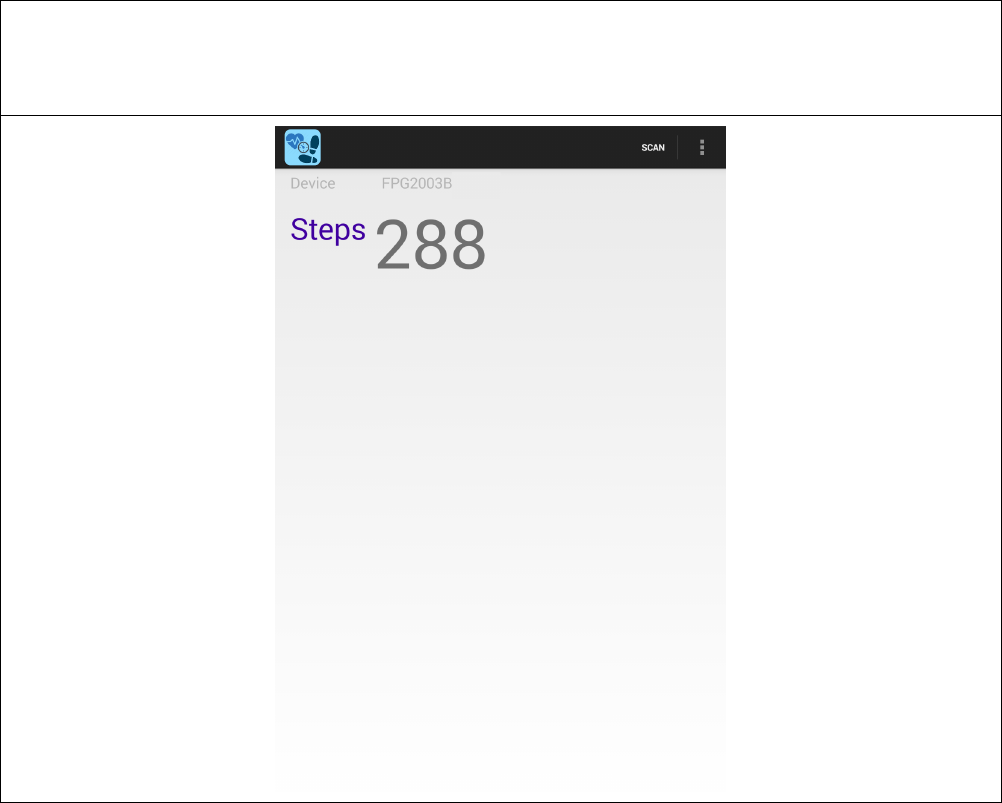
Receive your pedometer test data from the
phone APP
To receive a pedometer, please open the following FEGO BLE Communication Protocol compatible
mobile phone or tablet terminal APP, pedometer data will be transmitted via a fixed time BLE to the
phone side.
11
Blood Glucose Test
Before Using the Blood Glucose Meter
Before using the product to test your blood glucose value, read all instructions thoroughly and
practice the test by using the control solution. Do all quality control checks as directed. Make
sure you have set the correct date and time for the meter; refer to Setting Your Meter chapter for
details.
CAUTION:
::
: To measure the accurate glucose value, please do not use test strips and
control solutions which are not supplied by the manufacturer.
CAUTION
The measured blood glucose is for reference only. It is not to be used for the diagnosis of
diabetes. The user should not take any decision of medical relevance by the meter. Please
consult the doctor or medical practitioner for further instructions.
If you experience symptoms that are not consistent with your blood glucose test result, please
repeat the test. If the second test result is still inconsistent, please call your doctor
immediately.
If the blood contains high concentrations of vitamin C, uric acid or other reducing substances,
it may cause inaccurate measurement result. Please consult a physician before testing.
High attitudes above than 3,402 meter (11,161ft) may affect the test result.
Temperatures outside the range of 10°C to 40°C (50°F to 104°F) may affect the test results. Do
not test beyond of temperature range.
Important health information
Apply only capillary whole blood sample to test your blood glucose. Applying other
substances or plasma, serum will cause wrong results.
Severe dehydration and excessive water loss may cause false low results. If you believe you
are suffering from severe dehydration, consult your healthcare professional immediately.
Test results below 60 mg/dL (3.3 mmol/L)*1 indicates low blood glucose (hypoglycemia).
Test results greater than 240 mg/dL (13.3 mmol/L)*2 indicates high blood glucose
(hyperglycemia).If your results are below 60 mg/dL (3.3 mmol/L) or above 240 mg/dL (13.3
mmol/L), repeat the test, and if the results are still below 60 mg/dL (3.3 mmol/L) or above 240
mg/dL (13.3 mmol/L), consult your healthcare professional immediately.
Inaccurate results may occur in severely hypertensive individuals or patients in shock.
Inaccurate low results may occur for individuals experiencing a
hyperglycemic-hyperosmolar state, with or without ketosis. Critically ill patients should not
be tested with blood glucose meters.
Abnormal red blood cell counts (hematocrit level below 20% or above 60%) may cause false
12
results. Please consult your healthcare professional if you do not know your hematocrit level.
Interference: Reducing substances occurring in the blood naturally (say, uric acid) or from
therapeutic treatments (ascorbic acid, acetaminophen) will not significantly affect BLE
GlucoPedo test results. However, elevated concentrations of these substances may affect test
results. The compounds listed in the table were found to have no affect at the concentration
indicated
Compounds Highest concentrations tested at which no interference occurred
Acetaminophen
≦
8.0 mg/dL (0.53 mmol/L)
Ascorbic Acid
≦
5.0 mg/dL (0.28
mmol/L)
Aspirin
≦
60 mg/dL (3.33 mmol/L)
Bilirubin
≦
90 mg/dL (1.54 mmol/L)
Cholesterol
≦
500 mg/dL (12.9 mmol/L)
Creatinine
≦
5.0 mg/dL (0.44 mmol/L)
Dopamine
≦
2.0 mg/dL (0.11 mmol/L)
EDTA
≦
360 mg/dL (12.3 mmol/L)
Galactose
≦
900 mg/dL (50 mmol/
L)
Gentisic Acid
≦
5.0 mg/dL (0.32 mmol/L)
Glutathione
≦
53 mg/dL (1.72 mmol/L)
Haemoglobin
≦
500 mg/dL (0.08 mmol/L)
Heparin
≦
8,000 U/dL
Hydroxyurea
≦
3.0 mg/dL (0.39 mmol/L)
Ibuprofen
≦
50 mg/dL (2.42 mmol/L)
Icodextrin
≦
13 mg/dL (0.01 mmol/L)
L
-
dopa
≦
10 mg/dL (0.51 mmol/L)
Maltose
≦
900 mg/dL (26.3 mmol/L)
Methyldopa
≦
3.0 mg/dL (0.13 mmol/L)
Pralidoxime
≦
25 mg/dL (0.94 mmol/L)
Salicylate
≦
60 mg/dL (4.34 mmol/L)
Tolazamide
≦
100 mg/dL (3.21 mmol/L)
Tolbutamide
≦
400 mg/dL (14.8
mmol/L)
Triglycerides
≦
2,000 mg/dL (22.6 mmol/L)
Uric Acid
≦
8.0 mg/dL (0.48 mmol/L)
Xylose
≦
100 mg/dL (6.66 mmol/L)
Please read test strip instruction carefully.
Reference 1 Jabbour, Serge, Elizabeth A. Stephens, Irl Bennett Hirsch. Type 1 Diabetes in Adults. USA CRC
Press, 2007.
Reference 2 Unger, Jeff. Diabetes Management in Primary Care. USA Lippincott Williams & Wilkins, 2006.
Principle of Blood Glucose Measurement
Blood glucose is measured by an electrical current that is produced when a blood sample mixes
with the reagent (special chemicals) of the test strip. The electrical current changes with the
amount of glucose in the blood sample. The BLE GlucoPedo measures the strength of the
electrical current, calculates your blood glucose level and then displays your result in
13
milligrams of glucose per deciliter (mg/dL).
Performance Characteristics for Blood Glucose Test
The BLE GlucoPedo adopts state-of-the-art technology to measure blood sugar easily and
comfortably. The required amount of blood is less than 0.7 μL. It tests and displays the glucose
value in 6 seconds.
ACCURACY : 95 % of the measured glucose values were within either ±15 mg/dL (± 0.83
mmol/L) of the average measured values of the reference measurement procedure at glucose
concentrations <100 mg/dL (< 5.55 mmol/L) or within ± 15 % at glucose concentrations ≧ 100
mg/dL ( ≧ 5.55 mmol/L).
PRECISION: CVs (%) of intermediate precision and repeatability were less than 5%.
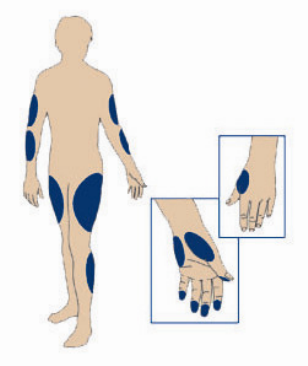
About Alternative Site for Blood Glucose Testing (AST)
There are important limitations for doing AST. Please consult your healthcare professional
before you perform AST.
What is AST?
Alternative Site Testing (AST) means you can use parts of the
body other than your fingertips to check your blood glucose
levels. The BLE GlucoPedo meter allows you to test your palm,
forearm, upper arm, calf, or thigh with equivalent results to
fingertip testing.
What is the advantage?
Fingertips feel pain more readily because they are full of nerve
endings (receptors). At other body sites, nerve endings are not so
numerous and you will not feel as much pain as you will experience at the fingertip.
When to use AST?
Food, medication, illness, stress and exercise can affect blood glucose levels. Capillary blood at
fingertip reflects these changes faster than capillary blood at other sites. Therefore, if you are
testing blood glucose level during or immediately after meal, physical exercise or stressful event,
take the blood sample from your fingertip only.
Use AST only:
In a pre-meal or fasting state (more than 2 hours since the last meal).
Two hours or more after taking insulin.
Two hours or more after exercise.
During steady state blood glucose conditions.
Do NOT use AST if:
14
You have reason to believe you have hypoglycemia or hyperglycemia.
Your routine glucose results are often fluctuating.
You are pregnant.
How to increase the accuracy?
Stimulating blood perfusion by rubbing the puncture site prior to blood extraction has a
significant influence on the glucose value obtained.
Blood from the site without rubbing exhibits a measurably different glucose concentration
than blood from the fingertip. When the puncture site was rubbed prior to blood extraction,
the difference was significantly reduced.
Important: To increase the accuracy when using AST, rub the puncture site more than 20
seconds before extracting blood.
Prepare For Blood Sampling
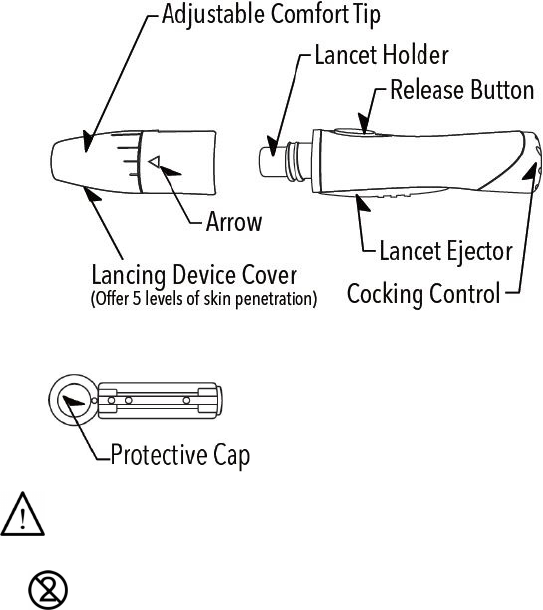
Your lancing device and lancets are used for obtaining blood samples from the puncture site.。
Lancing Device
Lancet
Important Lancing Device and Lancets Information
Lancet is for single use only。
Keep lancing device and lancets clean。
Use caution when removing the used lancet from the device and when disposing the used
lancet.
The meter and lancing device are for single patient use.
Do NOT share them with anyone including other family members.
15
Do NOT use on multiple patients.
Prepare For Blood Sampling
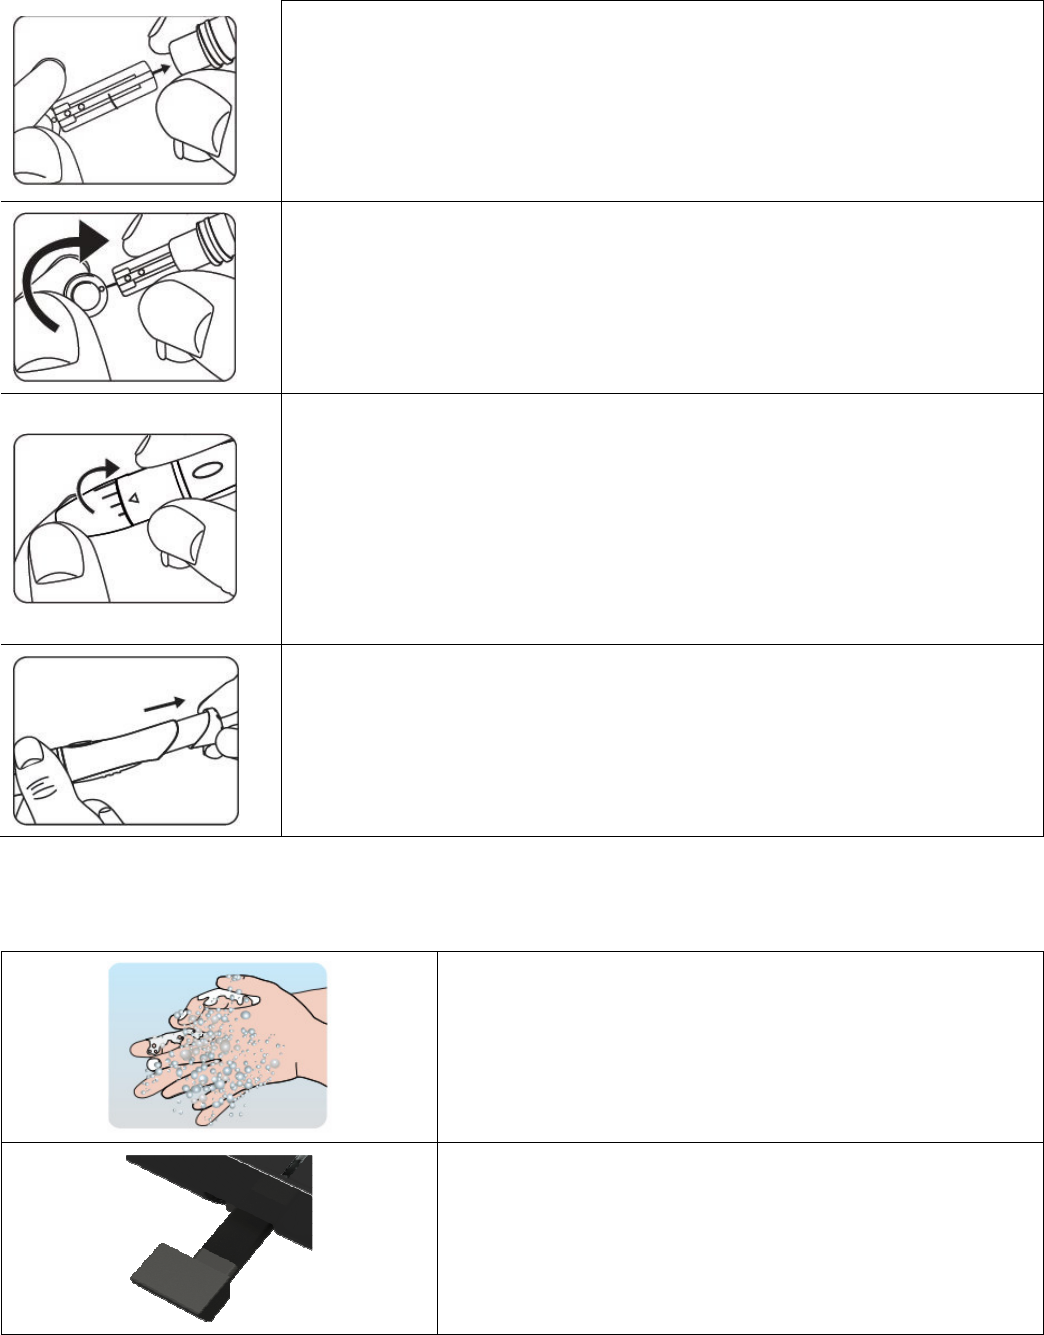
STEP 1:
Remove the cap of the lancing device by twisting it off.
Insert a sterile lancet into the lancet holder of the lancing device and
push down firmly until the lancet is fully seated. Do not twist the
lancet.
STEP 2 :
Remove the protective cap from the lancet by twisting it and then
save it for later use.
STEP 3 :
Replace the lancing device cap and set the puncture depth to the
desired number. To select the best depth:
1-2: For soft or thin skin
3: For averag skin
4-5: For thick or callused skin
STEP 4 :
Pull back the cocking control until it makes a click, and then release.
If it does not click, the device may have been cocked when the lancet
was inserted.
Performing Blood Test
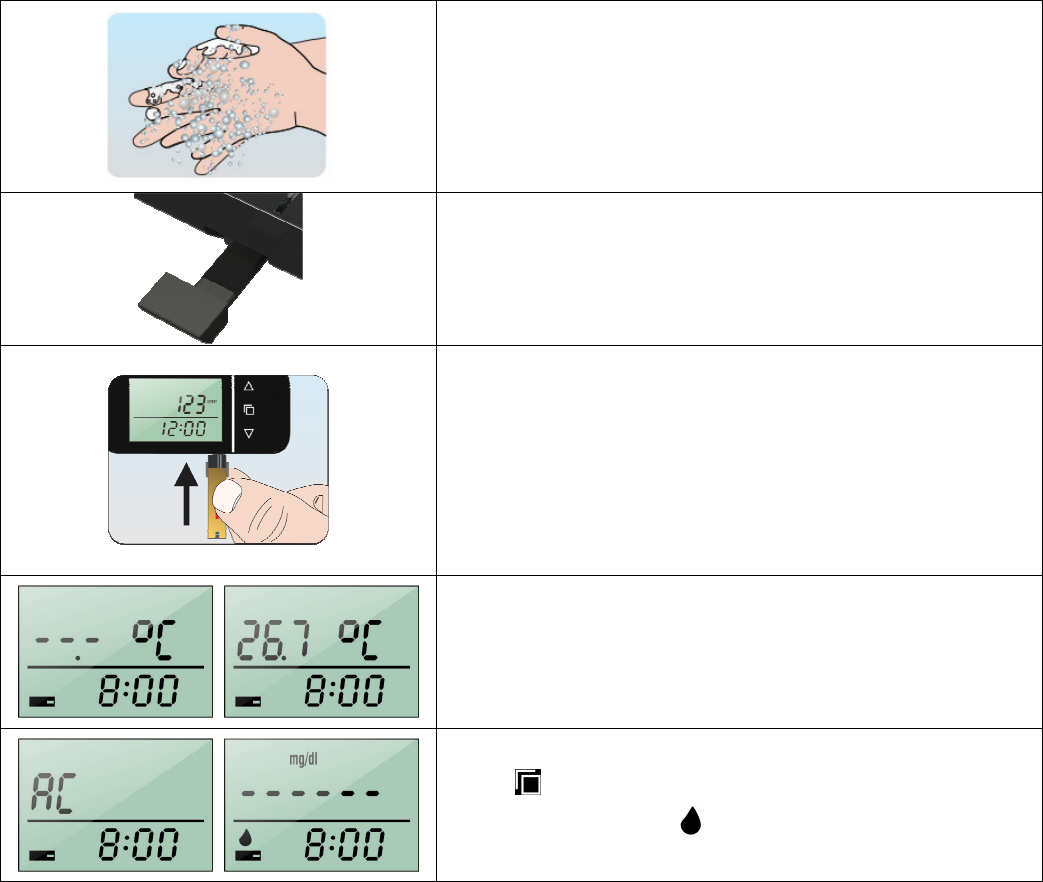
Wash Your Hands and the Puncture Site
Wash your hands in warm, soapy water. Rinse and dry
completely.
Warm your fingers to increase blood flow。
Pull Out the Rubber Plug
The strip slot is protected by the rubber plug. Pull out
the rubber plug before inserting a test strip.
16
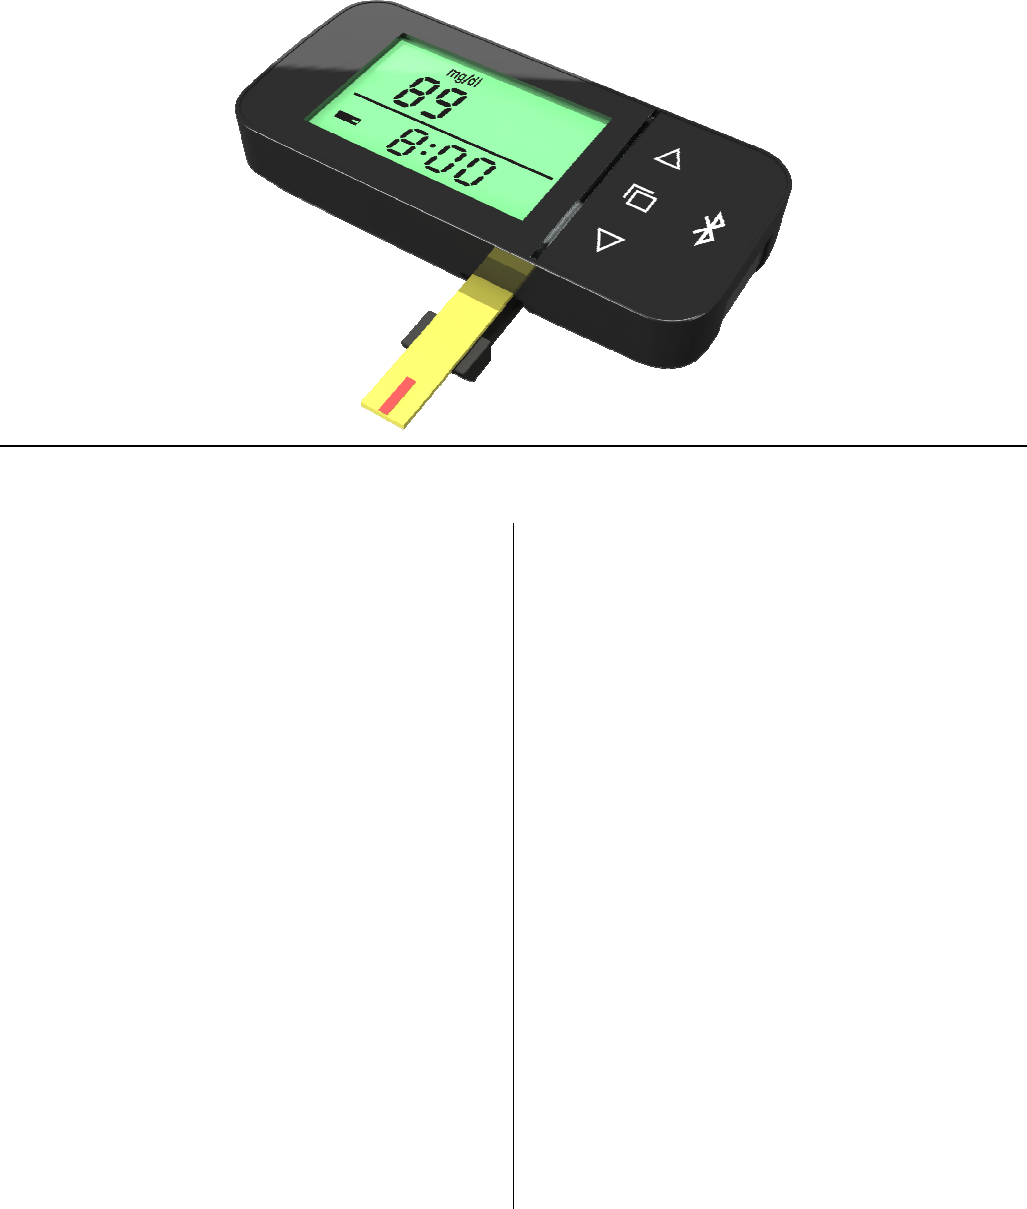
Insert Test Strip
Remove a new test strip from vial. Be sure to tightly
replace vial cap after removing test strips. Insert a test
strip with the contact bar end entering into the test
strip slot first. Push the test strip as far as it will go
without bending it. The meter turns on automatically.
Detecting Temperature
After the meter is turned on by inserting the test strip,
the meter detects ambient temperature and displays
for 0.5 seconds, it enters scenario selection mode.
Select the Measuring Scenario
Press or button to navigate to your current
status.
AC: Before meal (default)
PC-1: 2hr after breakfast
PC-2: 2hr after lunch
PC-3: 2hr after dinner
Press button to confirm the selection.
Ready for Blood Sample
When the blood icon is flashing, the meter is ready
to test your blood.
Select and Lance a Puncture Site
* For Fingertip
Hold the lancing device firmly against the side of your
finger. Press the release button. You will hear a click,
indicating that the puncture is complete.
* For AST
Please refer to the “About Alternative Site Testing
(AST)” section. Please consult your healthcare
professional before obtaining blood from site other
than your fingertip.
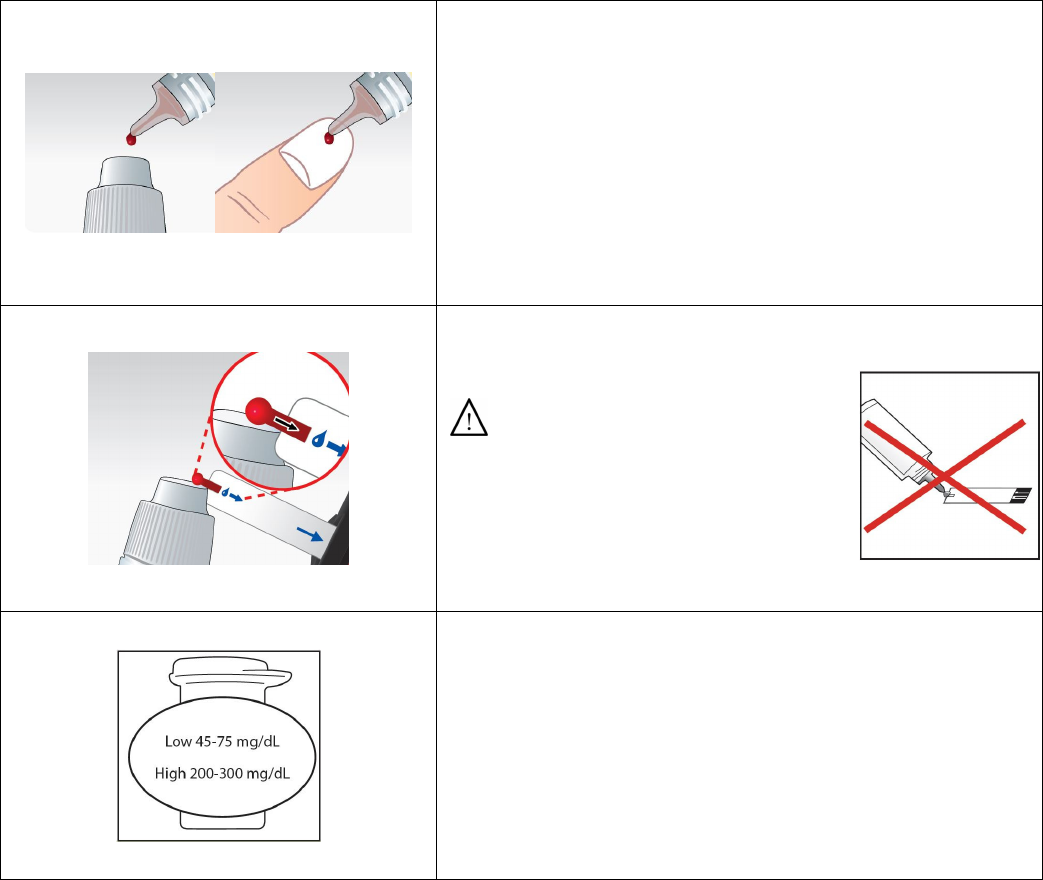
Obtain a Blood Sample
Gently massage your finger or puncture site to obtain
the required blood volume. To perform the test, you
need only 0.7 μL of blood sample. Do not smear the
blood sample. To obtain best accurate result, wipe off
the first drop of blood and gently squeeze another
drop of blood.
17
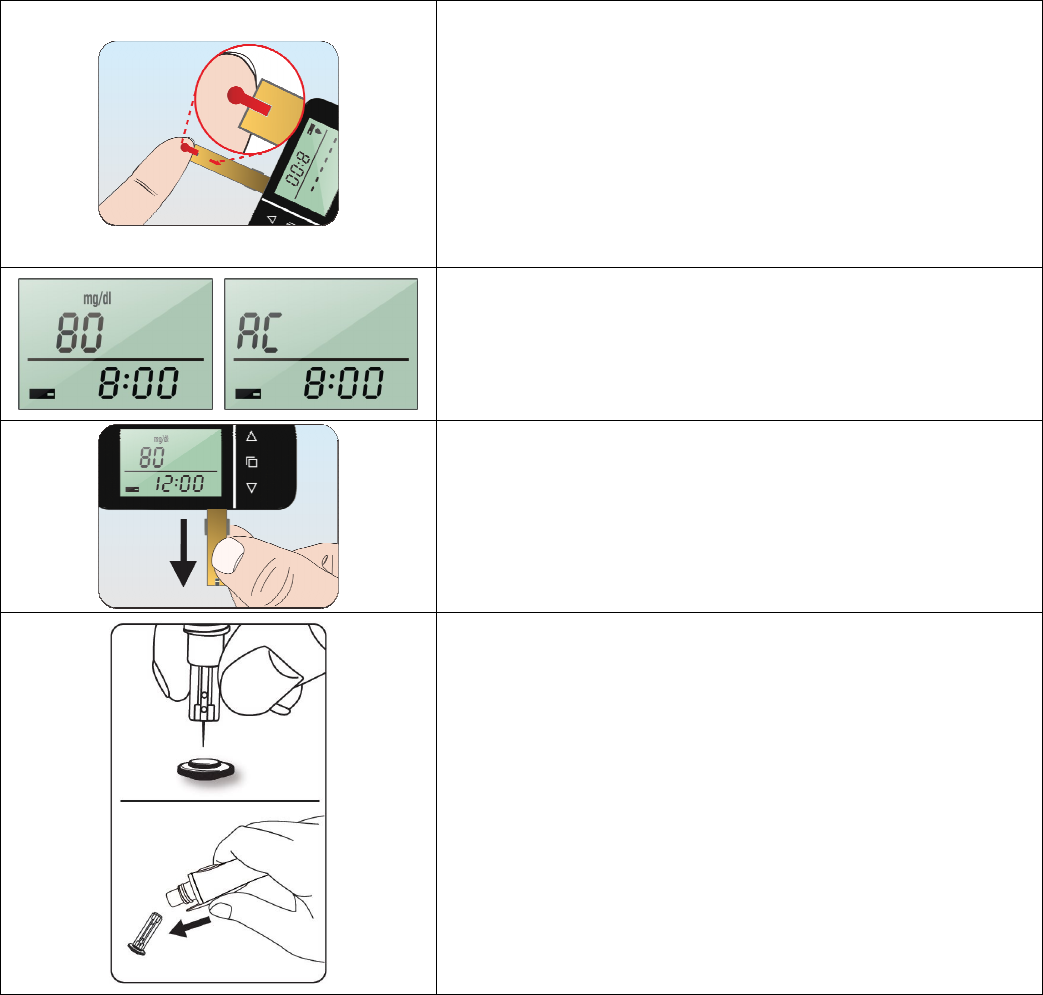
Apply Blood Sample
Apply the blood sample to the opening of absorbent
channel of test strip until the confirmation window is
fully covered with blood. Blood will be drawn into the
test strip. If the test strip confirmation window is full,
you will hear a beep, and the meter starts to count
down from 6 to 1.
Read Your Result
After 6 seconds, the meter displays your blood glucose
test result.
Remove the Used Test Strip
Your blood glucose result is automatically stored in the
meter memory. Leave the Blood Glucose Mode by
removing the test strip. Discard the used strip and
lancet safely in a puncture resistant container.
Remove the Used Lancet
Remove the Lancing Device Cap. Push the Lancet
Protective Cap back onto the exposed needle of the
lancet. Direct the lancing device away from you and
slide the Lancet Ejector in a forward motion, disposing
the lancet in an approved container.
18
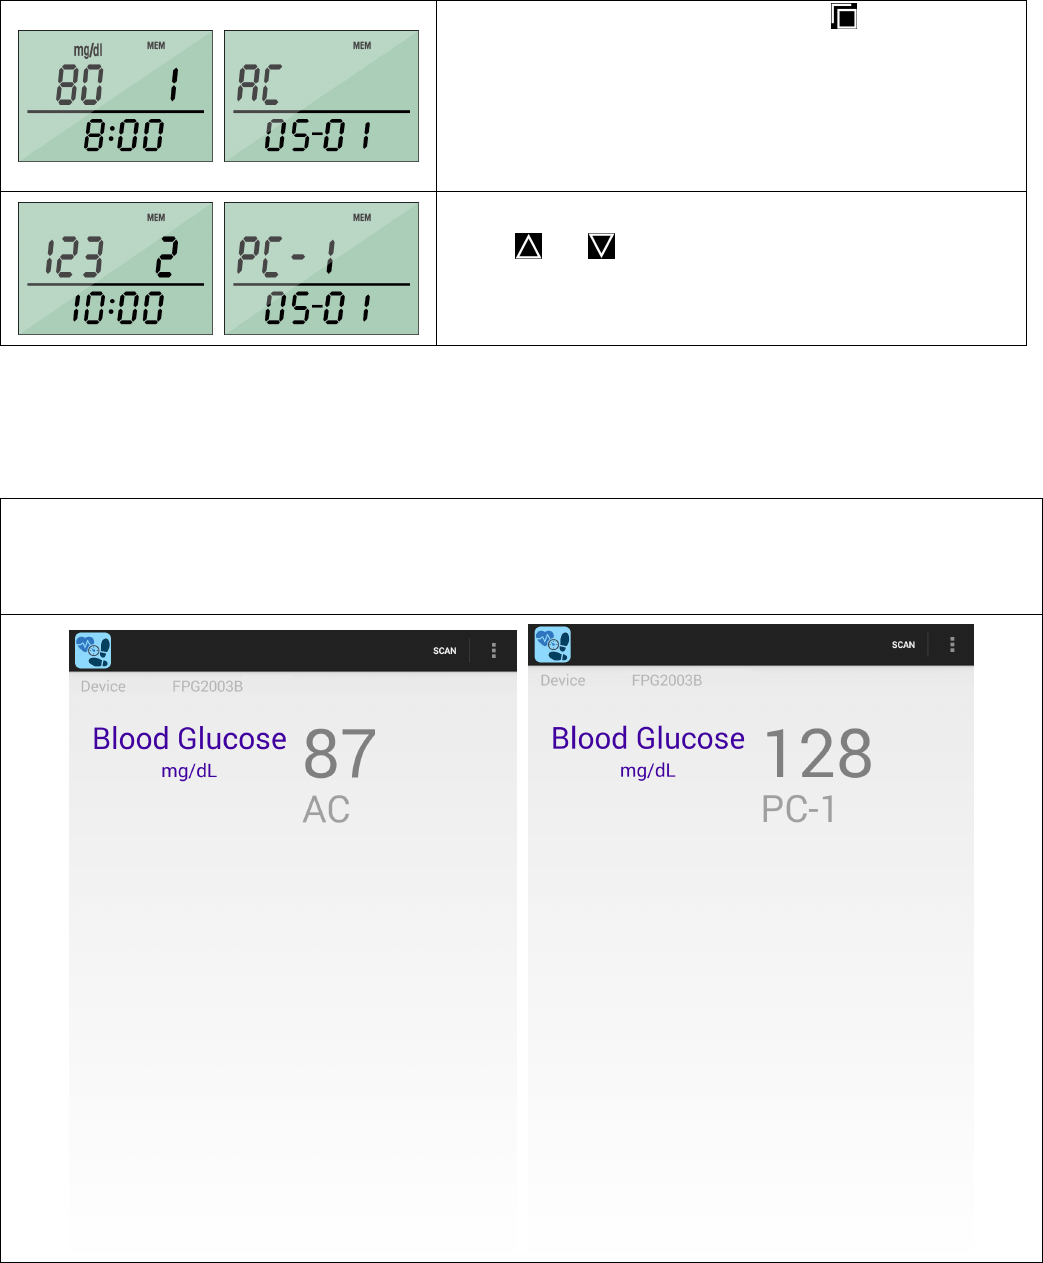
Blood Glucose Memory Recall
The BLE GlucoPedo meter automatically stores 99 test results, letting you review them
in order from the most recent to the oldest.
You can either view your individual blood glucose test results on the meter or on a computer.
View Your Blood Glucose Test Results on the Meter
While the meter is turned on, press button
shortly and repeatedly to navigate to memory mode.
The meter shows the memory record number / test
result / time and measuring scenario / date
alternately.
Press or to navigate the blood glucose test
results.
Receive your Blood Glucose Measurement
test data from the phone APP
To receive information on blood glucose measurements, turn follows FEGO BLE Communication
Protocol compatible mobile terminal APP, blood glucose data will be measured after the completion of
the transfer to the phone side by BLE.

19
Understanding Your Blood Glucose Levels
The normal blood glucose range is below 100 mg/dL (5.6 mmol/L) for a fasting, nondiabetic
adult, but less than 140 mg/dL (7.8 mmol/L) two hours after meals.* Consult your healthcare
professional to find out your target blood glucose value.
If your blood glucose result seems unusually high or low, or inconsistent with your previous
results, check the following:
1. Was the blood sample applied immediately to the test strip after removing it from the vial?
2. Was the volume of the blood sample sufficient?
3. Was the test strip vial cap tightly sealed?
4. Was the test strip used before the expiration date?
5. Were the test strips stored away from extreme temperatures in very cold or hot weather or
from areas of high humidity?
Then run a control test with control solution. If the control test result is within the acceptable
range, review testing procedure and repeat your blood glucose test with a new test strip. If your
blood glucose value is still inconsistent with your previous results, glucose trend, or how you
feel, contact your doctor immediately for help.
Reference:
* American Diabetes Association Website (http://www.diabetes.org)
Control Solution Test
If your FEGO control solution did not come with a FEGO Control Solution Insert, the following
information shall take the place of the insert.
Intended Use :
The FEGO Control solution is a liquid containing a measured amount of glucose which reacts
with the FEGO test strip and meter. Only for use with FEGO BLE GlucoPedo meter and test
strips as a quality control measure to verify the accuracy of the blood glucose test results. The
FEGO Control solution is for in vitro diagnostic use.
Important Information :
•Use only FEGO control solutions with your FEGO BLE GlucoPedo meter.
•Check the expiration date on the bottle. Do not use if expired.
•Use within a period of 90 days from the date that you first open it. Record the discard
date on the control solution bottle when you first open it to serve as a reminder to
discard after 90 days.
•The control solution ranges are located on the back of the FEGO test strip vial. They
are not recommended target ranges for your blood glucose.
•For in vitro diagnostic use.
•Do not add any liquid to the FEGO Control Solution.
•Do not take internally or inject.
20
Why Perform a Control Solution Test :
•To ensure that your meter and test strips are working properly together.
•To allow you to practice testing without using your own blood.
When to Use :
•Once a week (to ensure that you continue to have accurate results).
•When you begin using a new vial of test strips
•When test strips have been exposed to extreme environmental conditions.
•If you drop the meter.
Storage and Handling:
•Store the control solution tightly closed at temperatures between 4°C (39°F) and 30°C
(86°F).
•Do not refrigerate, freeze, heat or expose to direct sunlight.
• Recap the bottle after use.
Performing a Control Solution Test
Wash Your Hands and the Puncture Site
Wash your hands in warm, soapy water. Rinse and dry
completely.
Warm your fingers to increase blood flow。
Pull Out the Rubber Plug
The strip slot is protected by the rubber plug. Pull out
the rubber plug before inserting a test strip.
Insert Test Strip
Remove a new test strip from vial. Be sure to tightly
replace vial cap after removing test strips. Insert a test
strip with the contact bar end entering into the test
strip slot first. Push the test strip as far as it will go
without bending it. The meter turns on automatically.
Detecting Temperature
After the meter is turned on by inserting the test strip,
the meter detects ambient temperature and displays
for 0.5 seconds, it enters scenario selection mode.
Select the Measuring Scenario
Press button to confirm the default AC selection.
When the blood icon is flashing, the meter is ready
to perform a control solution test.
21
Apply Control Solution
Check the expiration and discard dates on your control
solution and test strip vials. Shake the control solution
bottle well, then remove cap. Squeeze the bottle and
discard the first drop then wipe the dispenser tip with
clean tissue paper or cotton. Squeeze the bottle again
to get a second drop onto a clean, non-absorbent
surface or on your clean fingertip.
Bring the tip of the test strip to touch the drop of
solution until the meter beeps.
Caution:
To avoid contaminating the control
solution with the content of the test
strip, DO NOT DIRECTLY APPLY
CONTROL SOLUTION ONTO THE TEST STRIP.
Check if the Test Result is in Range.
After six (6) seconds, the control solution test result
appears on the display. Compare the test result with
the range printed on the test strip vial. Each vial of
FEGO Test Strips may have a different control solution
range. The result should fall within the printed range
on the test strip vial.
Caring for Your Meter and Test Strip
To avoid the meter and test strips getting dirt, dust or other contaminants, please wash and dry
your hands thoroughly before use.
Cleaning
Your meter does not require special maintenance. As long as no blood or control solution comes
in direct contact with the meter, there is no special cleaning required. To clean the meter exterior,
wipe with a cloth moistened with tap water or a mild cleaning agent, then dry the device with a
soft and dry cloth. Do not flush with water. Do not use organic solvents to clean the meter. Your
meter is a precision instrument. Please handle it with care.
Storage
◎Meter (BLE GlucoPedo)
* Storage condition: -20ºC~50ºC (-4ºF~122ºF), below 90% relative humidity.
* Avoid dropping and strong impact.
* Avoid direct sunlight and humidity.
22
◎Test Strip
* Storage condition: 4ºC~40ºC (39ºF~104ºF), and 10~85% relative humidity. Do not
refrigerate.
* Store your test strips in their original vial only. Do not transfer to other container.
* Store test strip packages in a cool and dry place. Keep away from direct sunlight
and heat.
* After removing a test strip from the vial, immediately replace the vial cap and close
it tightly.
* You may touch the test strip anywhere with clean, dry hands when removing it
from the vial or inserting it into the meter.
* Use each test strip immediately after removing it from the vial.
* Do not bend, cut, or alter a test strip in any way.
* Keep the strip vial away from children since the cap and the test strip can be a
potential choking hazard. If swallowed, please seek medical assistance
immediately.
◎Control solution
* Storage condition: Store the control solution tightly closed at temperatures
4ºC(39ºF )~30ºC (86ºF).
* Do not refrigerate.
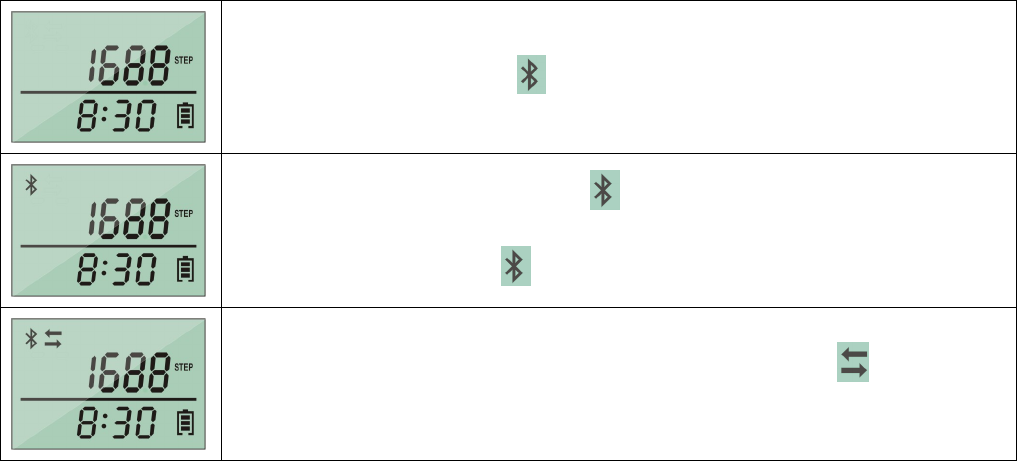
Bluetooth 4.0 BLE function
1.Power OFF state under BLE disabled.
Under 2.Power ON state, BLE enabled.
3. APP may end through FEGO BLE Communication Protocol compatible phone or tablet, receive information
pedometer and blood glucose measurement data.
4. Through FEGO BLE Communication Protocol compatible phone or tablet terminal APP, set the timer on and
time off BLE function.
BLE function turned off, the pattern is not displayed.
BLE feature enabled, the display represents the connection with your
phone or tablet, the pattern blinking feature turned wait connection.
When the function is activated and BLE connection, display, said
information being transferred to the phone or tablet.
23
Display Messages
The following is a summary of the display messages and symbols of Fego BLE GlucoPedo
Meter.
These messages help to identify certain problems but do not appear in all cases when a problem
has occurred.
Improper use may cause an inaccurate result without producing an error message.
In the event of a problem, refer to information under "ACTION TO TAKE".
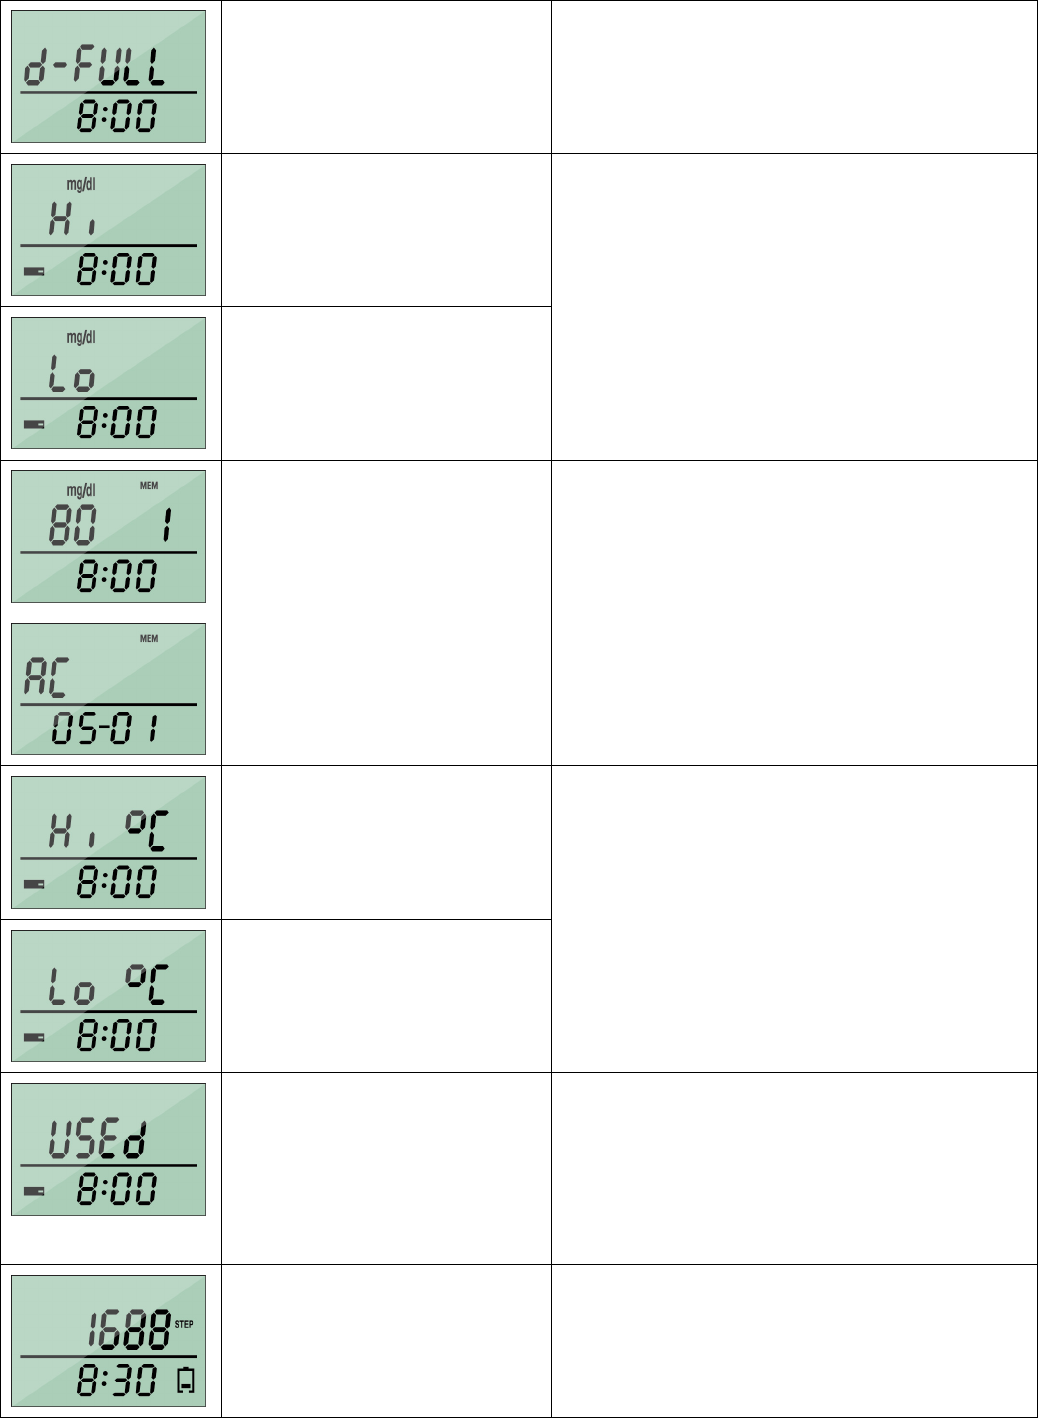
DISPLAY DESCRIPTION ACTION TO TAKE
All LCD segment on for
display checking.
All LCD segment on for display checking
every time the test strip is inserted.
If some parts of the display are not
working. Contact your local distributor for
help.
Display Temperature
Move BLE GlucoPedo to a place with
temperature between 10° C - 40° C. Wait for
30 minutes before performing the test. If
the display keeps staying in this mode,
please contact local distributor for help.
Scenario Selection
Select the scenario before the test:
AC: Before meal
PC-1: 2hr after breakfast
PC-2: 2hr after lunch
PC-3: 2hr after dinner
Blinking Blood Drop Icon The meter is ready for blood sample
applying into the test strip
24
Data full Please connect the phone or tablet were
immediately upload data through the BLE.
Test result is higher than 600
mg/dL (33.3 mmol/L)
Test result is lower than 20
mg/dL (1.1 mmol/L)
If this is not confirmed by the way you feel,
review proper testing procedure and
perform a control test. Repeat blood test, if
the display still appears, please call medical
assistance immediately.
Display the last record
Toggle Display
1. Record Counts / Blood Glucose Value /
Time
2. Scenario / Date
The ambient temperature is
higher than the allowed
operating temperature
range.
The ambient temperature is
lower than the allowed
operating temperature
range.
The meter is not working. Move to an area
with temperature between 10ºC to 40ºC
(50ºF - 104ºF) and wait at least 30 minutes.
Do not artificially heat or cool the meter.
Possible Reason:
1. The test strip has been
used or the test strip is
wed.
2. The meter is defective.
Please
1. Insert a new test strip.
2. Please contact local distributors or
customer services for help.
Battery is weak.
Please charge the BLE GlucoPedo meter as
soon as possible by connecting it to a
computer
25
Battery is dead.
Please charge the BLE GlucoPedo meter as
soon as possible by connecting it to a
computer
Memory (EEPROM) is
defective.
Please contact local distributors or
customer services for help.
System Error Please contact local distributors or
customer services for help.
BLE GlucoPedo
meter has no
response after the
test strip is
inserted
Possible Reason:
1. Wrong strip is inserted.
3. Meter is defective
Please
2. Insert FEGO test strip provided by us.
3. Contact local distributors or customer
services for help.
BLE GlucoPedo
meter does not
perform blood
glucose test after
the blood sample
is applied to the
test strip
Possible Reason:
1. The volume of the blood
sample is not adequate.
2. BLE GlucoPedo meter is
defective.
Please
1. Insert a new test strip and test again by
applying enough blood.
2. Contact local distributors or customer
services for help.
Nothing shown
on LCD Possible Reason
1. Run out of battery.
2. Power is off.
3. Meter is defective.
Please
1. Charge the device.
2. Press and hold to turn on the meter.
3. Contact local distributors or customer
services for help.
No calorie or
distance value Possible Reason
1. No step is counted
2. meter is defective
1. Step counting function will be activated
after 8 consecutive steps are detected.
2. If after 8 to 10 steps, the meter is still
inactive. Please contact local distributors
or customer services for help.
26
System Specifications
Model Name FEGO BLE Pedometer and Blood Glucose Monitoring
System
Model Number FPG2003B
Display Content Blood Glucose / Step Counts / Distance / Calories / Time /
Date/ BLE connection status
USB indicator Orange LED Blinking:accessing data
Green LED:accessing data done
Assay Method Electrochemical biosensor
Wakeup Method
1. 3G Sensor
2. Any Button
3. Insert The Test Strip
Entering Sleep Mode No activity for 10 seconds
Power Supply DC 3.7V(Maximum battery voltage of 4.2V rechargeable lithium
battery x 1)
Battery Life
3.7V rechargeable lithium battery
Full charged state is enough for 500blood glucose tests or
10,000 steps per day.
Low Battery Indicator 3.7V
Memory Capacity
1. 128KB EEPROM:Keep step counts and raw data for 1~2
weeks if walk 10,000 steps daily (suggest to connect BLE
GlucoPedo to computer to upload data to computer to
release the memory on BLE GlucoPedo)
LCD Size 32(L)x21mm(W)
Dimensions 66.4 mm (L) x 31 mm (W) x 14.5 mm (H)
Weight 27g
Material PC/ABS
Operating Condition for
Blood Glucose Testing
4℃~+40℃,Humidity 10- 85%RH,
Altitude≦ 3,402 m (11,161 ft) above the sea level.
Storage/ Transportation
Condition for Blood
Glucose Testing
4℃~+40℃,Humidity 10- 85%RH (with strip included)
General Information
Manufacturer Warranty 1 Year
Test Sample Capillary whole blood
Test Result Calibration Referenced to plasma glucose value
Sample Size 0.7μL
Blood
Glucose
Measuring Time 6 seconds
27
Measuring Range 20~600 mg/dL(1.1~33.3 mmol/L)
Memory 99 test memories
Acceptable Hematocrit
Range 20~60%
Pedometer sensor 3G sensor
Steps Range 0~100000 steps
Distance Range 0.0~9999.99 Km
Steps
Calories Range 0.0~9999.99 Kcal
BLE
BLE
BLE
BLE
BLE Bluetooth function
1.e-Signal SMD8105-A07-00A(AMICCOM A8105)Module。
2.Frequency Range: 2400 ~ 2483.5 MHz ISM (channel spacing is
1MHz).
3.Modulate mode: GFSK.
4.Support the application of data rate from 4Kbps to 2Mbps.
5.Using AES-128 CCM encryption algorithm.
6.All packets are using the 24-bit CRC checksum.
7.Automatically adapt to the fast frequency hopping.
8.Bluetooth 4.0 BLE SMART.
9.The state of motion and instant connection with the phone APP
pedometer data transfer.
10.Glucose measurements done automatically transfer data.
28
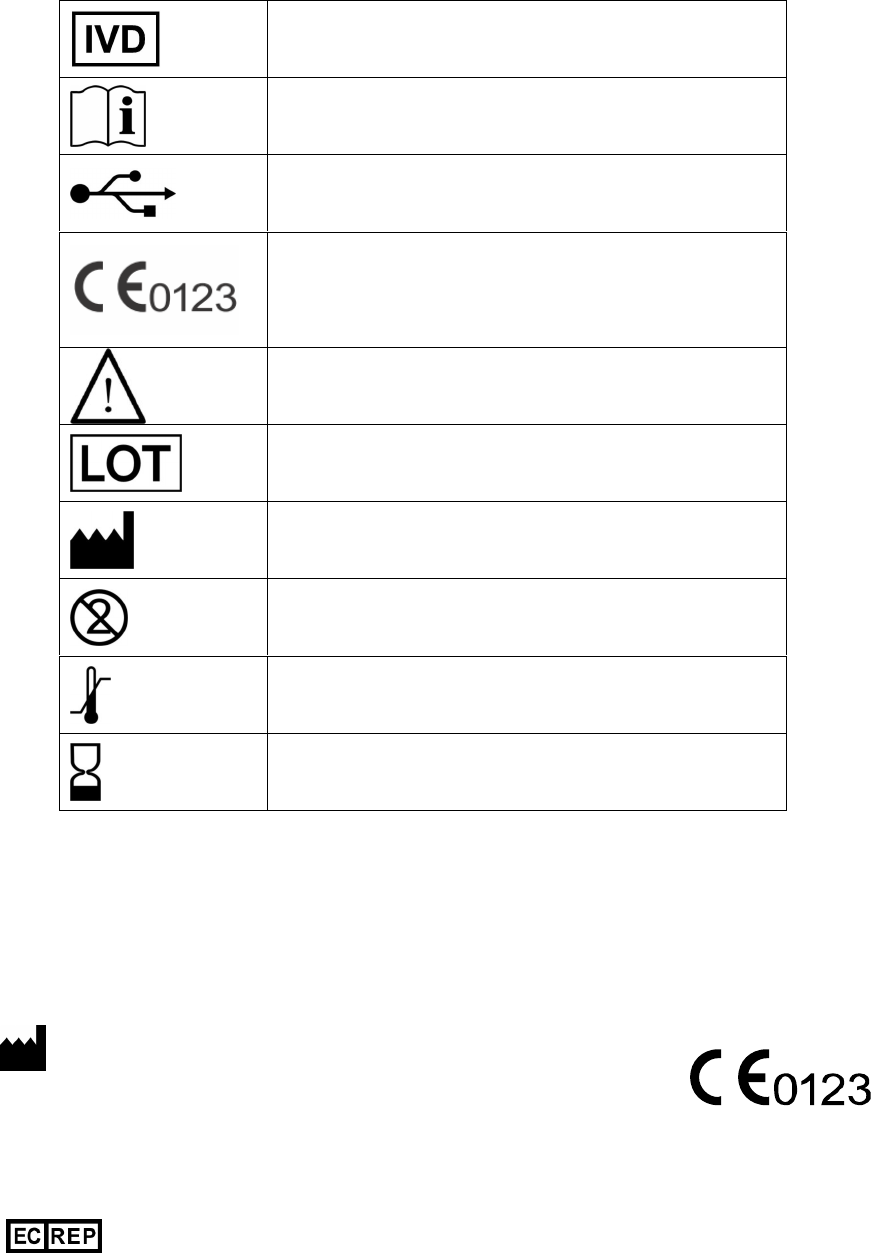
Symbol Description
Dealer / Manufacturer Information
Dealer:Fego Precision Industrial Co., Ltd
Dealer Address:947 Lin-Sen Rd. Wu-Fong Tai-Chung 413 Taiwan ROC
Dealer Phone:+886-4-23391802
Pharmacist/Manufacture:OK Biotech Co., Ltd.
Address:No. 91, Sec. 2, Gongdao 5th Rd., 30070 Hsinchu, TAIWAN
MDSS GmbH
Schiffgraben 41, 30175 Hannover, GERMANY
For in vitro diagnostic use
Please consult instructions for use
USB Connection
This product fulfils the requirements of
Directive CE and IEC/EN 60601-1-2 standard
in vitro diagnostic medical device.
Caution, consult accompanying document
Lot number
Manufacturer
Do not reuse
Temperature limitation / Store at
Use by / Expiry date