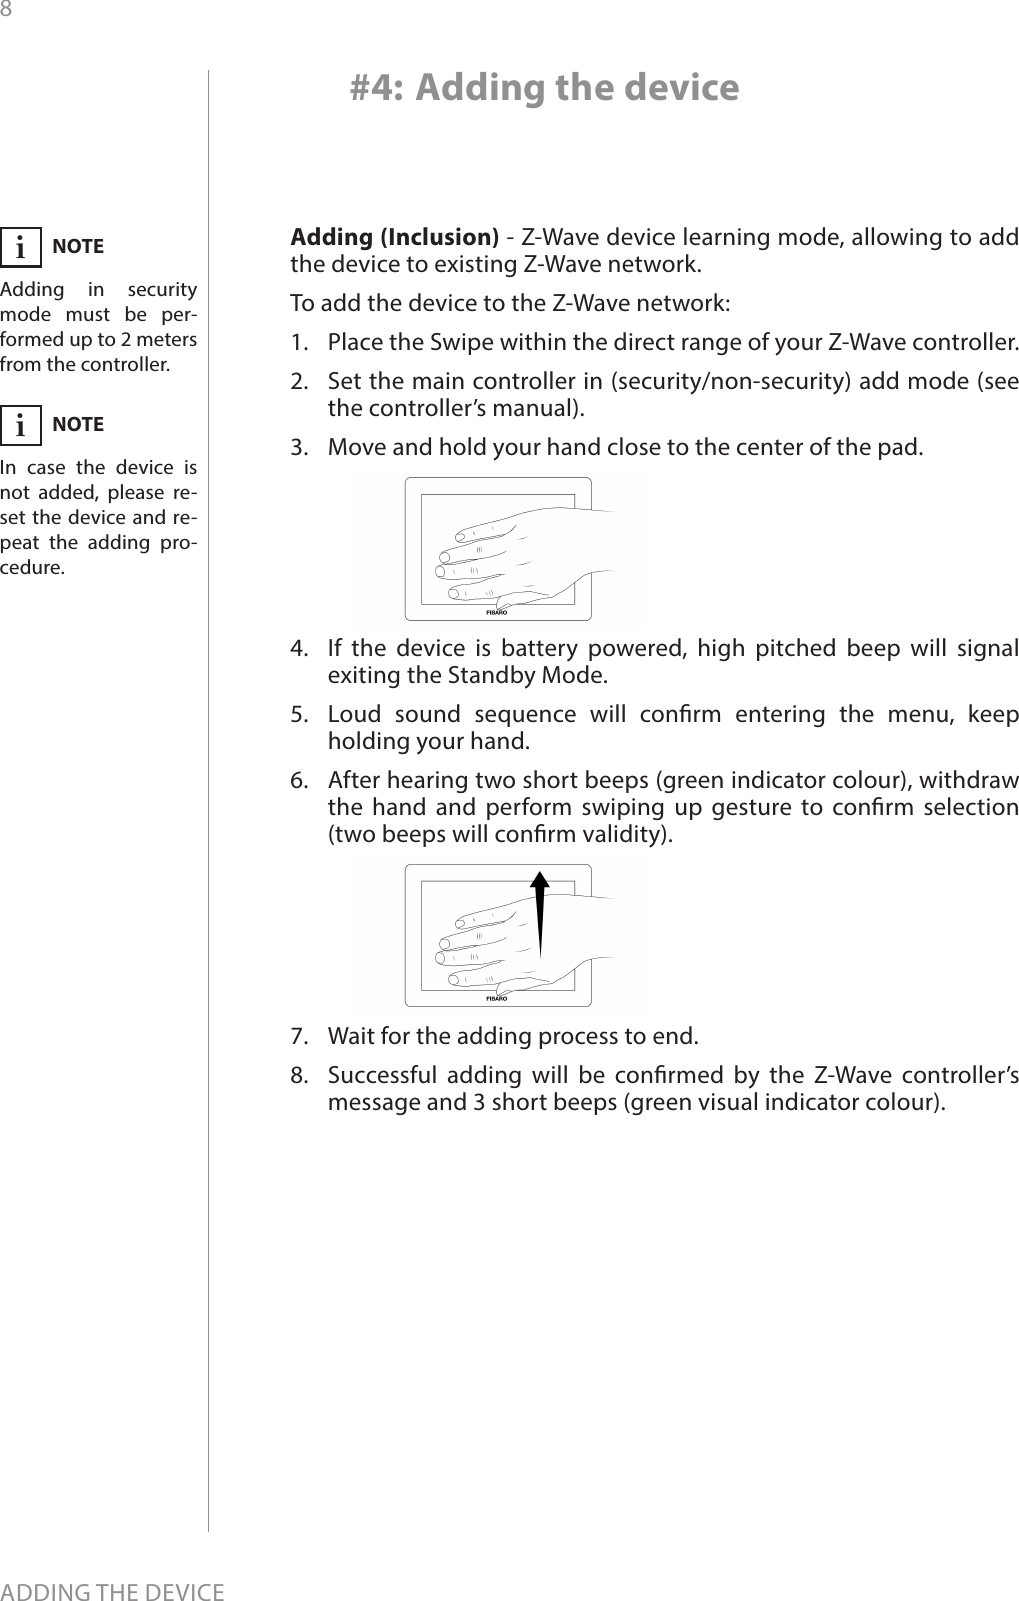
Fibar Group FGGC001 Swipe User Manual 6 FGGC 001 US T v1 0 1 Manual

Fibar Group S.A. Swipe 6 FGGC 001 US T v1 0 1 Manual

6 FGGC-001-US-T-v1.0-1 Manual

OPERATINGMANUALFIBARO SWIPEFGGC-001CONTENTS#1: Description and features  4#2: Gestures overview  5#3: Basic activation  6#4: Adding the device  8#5: Removing the device  9#6: Operating the device  10#7: Scene ID  11#8: Sequences of gestures  12#9: Powering modes  14#10: Additional features  15#11: Associations  16#12: Advanced parameters  17#13: Specications  23#14: Guarantee  24v1.0FIBAROUS
3 Important safety informationRead this manual before attempting to install the device! Failure to observe recommendations included in this manual may be dangerous or cause a violation of the law. The manufacturer, Fibar Group S.A. will not be held responsible for any loss or damage resulting from not following the instructions of operating manual.!General information about  the FIBARO SystemFIBARO is a wireless smart home automation system, based on the Z-Wave protocol. All of available devices can be controlled through a computer (PC or Mac), smartphone or tablet. Devices are not only receivers, but can also repeat the signal, increasing the Z-Wave network’s range. It gives advantage over traditional wireless systems that require direct link between transmitter and receiver, as a result the construction of the building could aect network’s range negatively.Every FIBARO network has its unique identication number (home ID). Multiple independent networks can exist in the building without interfering. Transmission security of FIBARO System is comparable to wired systems.Z-Wave technology is the leading solution in smart home automation. There is a wide range of Z-Wave devices that are mutually compatible, independently of manufacturer. It gives the system the ability to evolve and expand over time. For more information visit:  www.baro.com.
4DESCRIPTION AND FEATURESMain features of FIBARO Swipe:•  Compatible with any Z-Wave or Z-Wave+ Controller.•  Supports protected mode (Z-Wave network security mode) with AES-128 encryption.•  Allows contactless gesture detection.•  Battery and/or VDC powered. When connected to an external, VDC power source, the battery serves as an emergency power source.•  Gestures and actions are conrmed by the buzzer and can be indicated additionally by the built-in LED diode.•  Gesture controlled menu - allows to operate the device without dismounting it.FIBARO Swipe is a revolutionary battery gesture control pad that allows you to control devices in your Z-Wave network without actually touching anything. Swipe up, down, left, right, make a circular gesture and use sequences to get full and intuitive control of your home.Installed device perfectly matches your interior design, as it resembles a picture frame. You can even personalize it with your favourite picture. Gesture controlled menu allow to add/remove or reset the device without dismounting it. The device is equipped with a buzzer that conrms performed gestures and other actions.#1: Description and featuresFIBARO Swipe is a fully compatible Z-Wave PLUS device.NOTEThis device may be used with all de-vices certied with  the Z-Wave Plus cer-ticate and should be compatible with such devices produced by other manufacturers.iNOTEFIBARO Swipe is a  Security Enabled Z-Wave Plus product and a Security Ena-bled Z-Wave Control-ler must be used in or-der to fully utilize the product.i
5GESTURES OVERVIEW#2: Gestures overviewBasic gestures are used to turn ON and OFF associated devices or trigger scenes.Swipe up Swipe downSwipe left Swipe rightCircular gestures are used to e.g. dim/brighten the lights or adjust the blinds via associations. They can also trigger scenes.After performing rst circle, the device will start changing the value (clockwise - increase, counter-clockwise - decrease). Withdrawing the hand will stop the change.Clockwise Counter clockwiseSequences are composed of two or three gestures. User can create up to 6 custom sequences. They can operate other devices via scenes only.Sequence
6BASIC ACTIVATION1.  Remove the front magnetic cover.2.  Unmount the Swipe from the back case by sliding the device down.3.  Remove paper strip protecting the batteries.4.  Mount the Swipe back into the back case by sliding the device up.5.  The device will conrm powering up with an acoustic signal.6.  Place the front magnetic cover.7.  Place the Swipe onto its holder.8.  Place the Swipe within the direct range of your Z-Wave controller. #3: Basic activation
7BASIC ACTIVATION9.  Plug the power source into the micro-USB port if required.10. Set the main controller in (security/non-security) add mode (see the controller’s manual).11. Move and hold your hand close to the center of the pad.12. If the device is battery powered, high pitched beep will signal exiting the Standby Mode.13. Loud sound sequence will conrm entering the menu, keep holding your hand.14. After hearing two short beeps (green indicator colour), withdraw the hand and perform swiping up gesture to conrm selection  (two beeps will conrm validity).15. Wait for the adding process to end.16. Successful adding will be conrmed by the Z-Wave controller’s message and 3 short beeps (green visual indicator colour).
8ADDING THE DEVICE#4: Adding the deviceAdding (Inclusion) - Z-Wave device learning mode, allowing to add the device to existing Z-Wave network.To add the device to the Z-Wave network:1.  Place the Swipe within the direct range of your Z-Wave controller.2.  Set the main controller in (security/non-security) add mode (see the controller’s manual).3.  Move and hold your hand close to the center of the pad.4.  If the device is battery powered, high pitched beep will signal exiting the Standby Mode.5.  Loud sound sequence will conrm entering the menu, keep holding your hand.6.  After hearing two short beeps (green indicator colour), withdraw the hand and perform swiping up gesture to conrm selection  (two beeps will conrm validity).7.  Wait for the adding process to end.8.  Successful adding will be conrmed by the Z-Wave controller’s message and 3 short beeps (green visual indicator colour).NOTEAdding in security mode must be per-formed up to 2 meters from the controller.iNOTEIn case the device is not added, please re-set the device and re-peat the adding pro-cedure.i
9REMOVING THE DEVICERemoving (Exclusion) - Z-Wave device learning mode, allowing to remove the device from existing Z-Wave network.To remove the device to the Z-Wave network:1.  Place the Swipe within the direct range of your Z-Wave controller.2.  Set the main controller in remove mode (see the controller’s manual).3.  Move and hold your hand close to the center of the pad.4.  If the device is battery powered, high pitched beep will signal exiting the Standby Mode.5.  Loud sound sequence will conrm entering the menu, keep holding your hand.6.  After hearing two short beeps (green indicator colour), withdraw the hand and perform swiping up gesture to conrm selection (two beeps will conrm validity).7.  Wait for the removing process to end.8.  Successful removing will be conrmed by the Z-Wave controller’s message and sequence of 2 short beeps, pause, 1 short beep (red visual indicator colour).NOTERemoving the Swipe from the Z-Wave net-work restores all the default parameters of the device.iNOTEIf the device is bat-tery powered, high pitched beep will sig-nalize exiting from the Standby Mode before entering the menu.i#5: Removing the device
10OPERATING THE DEVICE#6: Operating the deviceAcoustic and visual indications:The Swipe is equipped with a buzzer and LED diode, signalling ges-ture detection, menu position and status of the device.Validity of every detected gesture or sequence is signalled by:•  2 short beeps (GREEN) - gesture/sequence is valid•  Intermittent tone (GREEN) - smooth control using circular  gesture•  1 long beep (RED) - gesture/sequence is invalidReset procedure of the Swipe: Reset procedure allows to restore the device back to its factory set-tings, which means all information about the Z-Wave controller and user conguration will be deleted. In order to reset the device:1.  Make sure the device is powered.2.  Choose 3rd menu position (3 short beeps).3.  After few seconds the device will be restarted. Not being added to the Z-Wave network will be signalized with sequence of 2 short beeps, pause, 1 short beep (RED).Waking up the device: The Swipe needs to be woken up to receive information about the new conguration from the Z-Wave controller, like parameters and associations. Use 1st menu position to wake up the device or click the button on the back of the device once.Menu allows to perform Z-Wave network actions. In order to use the menu:1.  Move and hold your hand close to the center of the pad.2.  Loud sound sequence will conrm entering the menu, keep holding your hand.3.  Wait for the buzzer to indicate the desired menu position:•   1 short beep (WHITE indicator colour) - wake up the device•   2 short beeps (GREEN indicator colour) - learning mode  (adding/removing)•   3 short beeps (YELLOW indicator colour) - the device reset4.  To select current position, withdraw the hand and perform swiping up gesture to conrm selection (two beeps will conrm validity).NOTEResetting the device is not the recommend-ed way of removing the device from the Z-Wave network. Use the reset procedure only if the primary controller is missing or inoperable. Certain device removal can be achieved by the pro-cedure of removing described in "Adding the device" on page 8.iNOTEGestures are not in-dicated by the LED diode by default. In order to enable it, set the value of parame-ter 3 to 1.iNOTEIf the device is battery powered, high pitch beep will signalize ex-iting from the Standby Mode before entering the menu.iNOTEMenu can also be operated using the service button B (see "Additional features" on page 15)i
11SCENE ID#7: Scene IDScene ID:Every basic gesture and sequence has its own Scene ID that is send to the main controller after recognizing it. Scene activation for basic gestures is send after second gesture or timeout.Scene IDGesture or se-quence Attribute Default action1/\ Key Pressed 1 time ON/\ /\ Key Pressed 2 times OFF2\/ Key Pressed 1 time ON\/ \/ Key Pressed 2 times OFF3< Key Pressed 1 time ON< < Key Pressed 2 times OFF4> Key Pressed 1 time ON> > Key Pressed 2 times OFF5Circular gesture  (clockwise)Key Held Down Change state UPKey Released STOP6Circular gesture  (counter-clockwise)Key Held Down Change state DOWNKey Released STOP71st sequence Key Pressed 1 time User-dened82nd sequence Key Pressed 1 time User-dened93rd sequence Key Pressed 1 time User-dened10 4th sequence Key Pressed 1 time User-dened11 5th sequence Key Pressed 1 time User-dened12 6th sequence Key Pressed 1 time User-denedNOTEToggle Mode (param-eter 12) disallows dou-bled gestures.i
12SEQUENCES OF GESTURESSequences:User can create sequences of two or three gestures to expand num-ber of possible actions. Every sequence is saved in its advanced pa-rameter (no. 31-36) with 16 bits, every basic gesture is identied with 4 bits.Value 4 bits Ges-ture00000 empty10001 /\20010 \/30011 <40100 >#8: Sequences of gesturesRules of creating sequences:•  Maximum of six sequences can be created. •  Each sequence must be unique. •  Sequence can consist of two or three basic gestures (left, right, up or down).•  Two identical gestures cannot be used next to each other.Bit mask of parameter OverallSize 4 bits 4 bits 4 bits 4 bits 16 bitsPurpose reserved rst  gesturesecond  gesturethird  gestureExample none /\ > <Example: binary valuesalways 0000 0001 0100 0011Example: decimal values always 0 1 * 256 4 * 16 3 * 1 sum = 323Learning a new sequence:To perform automatic learning of a sequence:1.  Change value of parameter 30 to number of sequence slot you want to ll (1 to 6). 2.  Wake up the device using 1st menu position (see "Operating the device" on page 10)3.  The device will enter learning mode, which is signalled by con-stant beeping.4.  Perform a desired sequence.NOTEIn case of sequence of two gesture, eld for third gesture should be set to 0.iGesture values:
13SEQUENCES OF GESTURESNOTESetting parameter to 0 will delete the se-quence.iCreating and editing sequences manually:To manually create or edit a sequence slot:1.  Calculate new value of parameter using table and formula:Value of parameter = 256 * Value of rst gesture +  + 16 * Value of second gesture +  Value of third gesture2.  Change the value of corresponding parameter (parameters 31 to 36 for slots 1 to 6).Creating and conguring sequences in the Home Center interface:1.  Go to the device options by clicking the icon on its bar: 2.  Drag and drop two or three gestures to create a desired sequence. 3.  Conrm the selection by clicking “Conrm a new sequence”.4.  Wake up the device using 1st menu position (see "Operating the device" on page 10).5.  Click the plus icon ("New Reaction") next to the newly created se-quence.6.  Select the device you want to control.7.  From the available options select the reaction of the controlled device and complete the setup by clicking "Save".
14POWERING MODES#9: Powering modesThere are two powering modes of the Swipe. By default, powering mode of the device is updated automatically (in intervals specied in parameter 5) after changing type of supply. The Swipe sends detected gestures to the Z-Wave network immediately, but conguration parameters and associations settings only at wake up (in time intervals or manually), independently of the powering mode.Battery powering mode - by default, the Swipe is supplied with 4 batteries included with the device (type AA 1.5V). They are not rechargeable and should be replaced after wearing out. The device in this mode uses power saving function to preserve battery life.External supply mode - the Swipe can be supplied with a 5V DC power supply connected to the micro-USB port. In this mode batteries will work as an emergency supply.CAUTIONUsing batteries other than specied may re-sult in explosion. Dis-pose of properly, ob-serving environmental protection rules.!Power saving:When battery powered, the Swipe will enter Standby Mode by default (signalled with a low pitch beep) after 5 seconds of inactivity to reduce the battery usage. In Standby Mode range and frequency of detection are reduced preventing normal gesture detection. Operation of power saving mode can be modied in parameter 6.In order to exit Standby Mode:1.  Move your hand close to the centre of the pad.2.  Wait for the high pitch beep.3.  Move your hand away from the pad.4.  The device is ready to detect gestures.NOTEThe device does not work as a Z-Wave  repeater, even when connected to the ex-ternal power supply.i
15ADDITIONAL FEATURES#10: Additional featuresService button B:The Swipe is equipped with a service B-button, which allows to use the menu. The B-button is located on back of the device and requires dismounting the Swipe from its back case.In order to operate the menu using the B-button:1.  Make sure the device is powered via micro-USB port.2.  Press and hold the B-button.3.  Loud sound sequence will conrm entering the menu, keep holding your hand.4.  Wait for the buzzer to indicate the desired menu position with short beeps:•   1 short beep (WHITE) - wake up the device•   2 short beeps (GREEN) - learning mode (adding/removing)•   3 short beeps (YELLOW) - the device reset5.  Release the B-button.6.  Click the B-button to conrm selection.
16ASSOCIATIONSTo add an association (using the Home Center controller):1.  Go to the device options by clicking the icon: 2.  Select the „Advanced” tab.3.  Specify to which group and what devices are to be associated.4.  Wait for the conguration process to end. Sending relevant infor-mation to devices added to associated groups may take even a few minutes.5.  Wake up the device manually to speed up the conguration process (1st menu position).#11: AssociationsThe Swipe provides the association of six groups:1st association group – “Lifeline” reports the device status and al-lows for assigning single device only (main controller by default).2nd association group –  “Flick UP” is assigned to moving the hand up over the panel (sends Basic Set command frames).3rd association group – “Flick DOWN” is assigned to moving the hand down over the panel (sends Basic Set command frames).4th association group – “Flick LEFT” is assigned to moving the hand from the right to the left side of the panel (sends Basic Set command frames).5th association group – “Flick RIGHT” is assigned to moving the hand from the left to the right side of the panel (sends Basic Set com-mand frames) .6th association group – “Circular AirWheel” is assigned to circu-lar move of the hand clockwise or counter-clockwise over the panel (sends Switch Multilevel Start/Stop Level Change command frames).The Swipe in 2nd to 6th group allows to control 5 regular or multichan-nel devices per an association group, with the exception of “LifeLine” that is reserved solely for the controller and hence only 1 node can  be assigned.It is not recommended to associate more than 10 devices in general, as the response time to control commands depends on the number of associated devices. In extreme cases, system response may be delayed.Association (linking devices) - direct control of other devices within the Z-Wave system network e.g. Dimmer, Relay Switch, Roller Shutter or scene (may be controlled only through a Z-Wave controller).NOTEAssociation ensures direct transfer of control commands between devices, is performed without participation of the main controller and requires associated device to be in the di-rect range.iNOTEBy default 2nd-5th association groups are set to toggle  mode - single gesture will reverse state of the association group (turns ON when it’s OFF, turns OFF when it’s ON). Can be modi-ed via parameter 12.iNOTEStates of the associa-tion groups are aect-ed only by assigned gestures. Changing state of associated de-vice by other means will not update re-membered state of as-sociation group.i
17ADVANCED PARAMETERS#12: Advanced parameters1. Device orientationParameter determines orientation of the Swipe in relation to its de-fault position. Required for proper gestures recognition.Available settings: 0 - default orientation1 - 180° rotation2 - 90° clockwise rotation3 - 90° counter-clockwise rotationDefault setting:  0Parameter size: 1 [byte]2. Buzzer - acoustic signal settingsAcoustic signalling of gestures detection.Available settings: 0 - gestures detection is not signalled1 - gestures detection is signalledDefault setting:  1Parameter size: 1 [byte]The Swipe allows to customize its operation to user’s needs. The set-tings are available in the FIBARO interface as simple options that may be chosen by selecting the appropriate box.In order to congure the Swipe (using the Home Center controller):1.  Go to the device options by clicking the icon:   2.  Select the „Advanced” tab.NOTEActive acoustic signals can be selected in parameter 4.iWake up intervalAvailable settings: 0 or 60-64800 (in seconds, 1min - 18h)Default setting: 21 600 (every 6 hours)The Swipe will wake up at each dened time interval and always try to connect with the main controller. After successful communication at-tempt, the device will update conguration parameters, associations and settings and then will go into Z-Wave communication standby. After failed communication attempt (eg. no Z-Wave range) the device will go into Z-Wave communication standby and retry to establish connection with the main controller after the next time interval.Setting wake up interval to 0 disables sending Wake Up notication to the controller automatically. Wake up may be still performed man-ually using 1st menu position.Longer time interval  means less frequent communication and thus a longer battery life
18ASSOCIATIONS3. LED diode - visual indicator settingsVisual indication of gestures detection.Available settings: 0 - gestures detection is not indicated1 - gestures detection is indicatedDefault setting:  0Parameter size: 1 [bytes]4. Buzzer - signalling result of gesture recognitionAcoustic signalling of gesture recognition result (using the built-in buzzer).Available settings: 1 - only successful recognition is signalled2 - only failed recognition is signalled3 - successful and failed recognition is signalledDefault setting:  3Parameter size: 1 [byte]5. Powering mode - interval of updating the current modeThis parameter determines how often the device checks if the USB power supply is connected and updates powering mode if needed. Available settings: 0 - powering mode is not updated1-1080 (in minutes) - time intervalDefault setting:  4 (4 minutes)Parameter size: 2 [bytes]6. Power saving mode (battery mode)This parameter determines operation of gesture detection when bat-tery powered. When Standby Mode is selected, hold gesture must be performed to exit power saving mode and reactivate normal gesture recognition. The device in Standby Mode consumes the least battery life.When Simple Mode mode is selected, gesture recognition is always active, but only slowly performed gestures will be recognized proper-ly (high battery consumption).Available settings: 0 - Standby Mode1 - Simple Mode2 - the Swipe does not enter power saving modeDefault setting:  0Parameter size: 1 [byte]7. Hold gesture to enter the menuThis parameter allows to choose if the menu can be entered using the Hold gesture.Available settings: 0 - Hold gesture to enter the menu enabled1 - Hold gesture to enter the menu disabledDefault setting:  0 (enabled) Parameter size: 1 [byte]NOTEParameter 4 is rele-vant only if parameter 2 is set to 1.iCAUTIONAfter disabling the Hold gesture in param-eter 7, menu can be entered by using the B-button only!!
19ASSOCIATIONSNOTEParameter 11 values may be combined, e.g. 1+2=3 means that 2nd & 3rd group are sent as secure.i10. Scenes sent to the controllerDenes which actions result in sending scenes to 1st “Lifeline” group. Available settings: 1 - scenes for ick UP gesture enabled2 - scenes for ick DOWN gesture enabled4 - scenes for ick LEFT gesture enabled8 - scenes for ick RIGHT gesture enabled16 - scenes for clockwise circular gesture ena-bled32 - scenes for counter-clockwise circular ges-ture enabledDefault setting:  15 Parameter size: 1 [byte]11. Associations in Z-Wave network security modeParameter defines how commands are sent in specified association groups: as secure or non-secure. Parameter is active only in Z-Wave network security mode. It does not apply to 1st “Lifeline” association group.Available settings: 1 - 2nd group ”Flick UP” sent as secure2 - 3rd group ”Flick DOWN” sent as secure4 - 4th group „Flick LEFT” sent as secure8 - 5th group „Flick RIGHT” sent as secure16 - 6th group „Circular AirWheel” sent as secureDefault setting:  31 Parameter size: 1 [byte]12. Control mode of 2nd - 5th „Flick UP/DOWN/LEFT/RIGHT” asso-ciation groups and scenesParameter allows to choose control mode for 2nd-5th groups and scenes. By default, Toggle Mode is active, meaning that a single ick turns ON the group and the same ick turns it OFF, doubled icks are inactive. After disabling Toggle Mode a single ick will turn the device ON and the same ick doubled will turn it OFF.Available settings: 1 - Toggle Mode enabled for 2nd association group 2 - Toggle Mode enabled for 3rd association group 4 - Toggle Mode enabled for 4th association group8 - Toggle Mode enabled for 5th association groupDefault setting:  15 Parameter size: 1 [byte]NOTEParameter 10 values may be combined, e.g. 1+2=3 means that scenes for ick UP and DOWN are enabled.iNOTEParameter 12 values may be combined, e.g. 1+2=3 means that 2nd & 3rd group are selected.iNOTEDisabling Toggle Mode will introduce delay when performing sin-gle gestures.i
20ASSOCIATIONS13. Rate of smooth level controlParameter allows to choose how long the hand has to be held near the center of the pad after "AirWheel" gesture for the associated devices to reach their maximum/minimum level.Available settings: 0-10 - duration in seconds255 - default settings of controlled devicesDefault setting:  255 Parameter size: 2 [bytes]ASSOCIATIONS - CONTROL FRAMES CONFIGURATION20. SWITCH ON control frame value for FLICK UP gestureThis parameter allows to set value sent in SWITCH ON command frame to the association group.Available settings: 0-99 or 255Default setting:  255 Parameter size: 2 [bytes]21. SWITCH OFF control frame value for FLICK UP gestureThis parameter allows to set value sent in SWITCH OFF command frame to the association group.Available settings: 0-99 or 255Default setting:  0Parameter size: 2 [bytes]22. SWITCH ON control frame value for FLICK DOWN gestureThis parameter allows to set value sent in SWITCH ON command frame to the association group.Available settings: 0-99 or 255Default setting:  255 Parameter size: 2 [bytes]23. SWITCH OFF control frame value for FLICK DOWN gestureThis parameter allows to set value sent in SWITCH OFF command frame to the association group.Available settings: 0-99 or 255Default setting:  0Parameter size: 2 [bytes]24. SWITCH ON control frame value for FLICK LEFT gestureThis parameter allows to set value sent in SWITCH ON command frame to the association group.Available settings: 0-99 or 255Default setting:  255 Parameter size: 2 [bytes]NOTESetting parameters 20-27 to appropriate value will result in:0  - turning o associ-ated devices1-99 - forcing level of associated devices255 - setting associat-ed devices to the last remembered state or turning them oniNOTECommands sent to association group for turn ON/OFF can be adjusted in parame-ters 20-27.i
21ASSOCIATIONS25. SWITCH OFF control frame value for FLICK LEFT gestureThis parameter allows to set value sent in SWITCH OFF command frame to the association group.Available settings: 0-99 or 255Default setting:  0Parameter size: 2 [bytes]26. SWITCH ON control frame value for FLICK RIGHT gestureThis parameter allows to set value sent in SWITCH ON command frame to the association group.Available settings: 0-99 or 255Default setting:  255 Parameter size: 2 [bytes]27. SWITCH OFF control frame value for FLICK RIGHT gestureThis parameter allows to set value sent in SWITCH OFF command frame to the association group.Available settings: 0-99 or 255Default setting:  0Parameter size: 2 [bytes]SEQUENCES OF GESTURES30. Sequence learning modeParameter activated by the main Z-Wave controller.  Change its value to launch sequence learning procedure for the desired slot.Available settings: 0 - learning mode disabled1-6 - launch sequence learning for selected slotDefault setting:  0Parameter size: 1 [byte]31. 1st gestures sequence (SLOT 1)Value containing sequence of gestures. See "Sequences of gestures" on page 12 for more information.Available settings: 0-1076Default setting:  0Parameter size: 2 [bytes]32. 2nd gestures sequence (SLOT 2)Value containing sequence of gestures. See "Sequences of gestures" on page 12 for more information.Available settings: 0-1076Default setting:  0Parameter size: 2 [bytes]NOTESequences does not allow to use same gestures next to each  other.iNOTEParameters 31-36 can also be used to manu-ally set a sequence ac-cording to details de-scribed in "Sequences of gestures" on page 12.i
22ASSOCIATIONS33. 3rd gestures sequence (SLOT 3)Value containing sequence of gestures. See "Sequences of gestures" on page 12 for more information.Available settings: 0-1076Default setting:  0Parameter size: 2 [bytes]34. 4th gestures sequence (SLOT 4)Value containing sequence of gestures. See "Sequences of gestures" on page 12 for more information.Available settings: 0-1076Default setting:  0Parameter size: 2 [bytes]35. 5th gestures sequence (SLOT 5)Value containing sequence of gestures. See "Sequences of gestures" on page 12 for more information.Available settings: 0-1076Default setting:  0Parameter size: 2 [bytes]36. 6th gestures sequence (SLOT 6)Value containing sequence of gestures. See "Sequences of gestures" on page 12 for more information.Available settings: 0-1076Default setting:  0Parameter size: 2 [bytes]
23SPECIFICATIONS#13: SpecicationsPower supply:  Operational current:  DC supply connector:  Battery type:  EU directives compliance:     Radio protocol:  Radio frequency:     Range:Dimensions:5V DC power supply and/or batteries  < 60mA  micro-USB  4 x 1.5V AA  EMC  2004/108/EC R&TTE 1999/5/EC RoHS 2011/65/EU LVD 2006/95/EC  Z-Wave+  868.4 or 869.8 MHz EU; 908.4 or 916.0 MHz US; 921.4 or 919.8 MHz ANZ; 869.0 MHz RU;  up to 164 ft (50 m) outdoors up to 131 ft (40 m) indoors  (depending on terrain and building structure)7.01 x 5.11 x 1.14 inch  (178 x 130 x 29 mm)
24GUARANTEE#14: GuaranteeThis limited warranty is provided by Fibar USA, LLC (the “Company”), 1040 E. Lake Ave., Glenview, Illinois 60025, as the sole and exclusive remedy oered to a purchaser (the “Customer”) of the products (the “Prod-ucts”) for any alleged defects in any of the Products. The warranty is subject to all terms sets forth below. 1. LIMITED WARRANTY:Subject to the limitations of section 2, the company warrants that the products sold by the company to the customer will be free from defects in material and workmanship under normal use and regular service and maintenance for a period of one (1) year from the date of purchase of the products. The one-year period may be referred to as the “limited warranty period”.This is the sole and exclusive warranty given by the company with respect to the products and is in lieu of and excludes all other warranties, express or implied, arising by operation of law or otherwise, including without limitation, any implied warranties of merchantability, tness for a particular purpose, non-infringe-ment and the implied condition of satisfactory quality.The product is not, is not intended to function or be used as, should not be used as, and shall not be deemed to be, an alarm system or home security system. The product’s intended use shall not include use as an alarm system or home security system. This limited warranty does not extend to any losses or damages due in whole or in part to misuse, accident, abuse, neglect, normal wear and tear, negligence (other than the Company’s), unauthorized modication or alteration, use beyond rated capacity, unsuitable power sources or environmental conditions, improp-er installation, repair, handling, maintenance or application, third party actions or omissions (whether as an agent or apparent agent of the Company), criminal acts, or any other cause not the direct fault of the Company.2. LIMITATION OF REMEDY:If within the limited warranty period, the Customer discovers any covered warranty defects and noties the Company  within thirty (30) days of such discovery, pursuant to the Claims Procedure in Section 4 below, the Company shall, at its option and as the Customer’s exclusive remedy, repair or replace F.O.B. point of manufacture.The remedies set forth in this limited warranty are exclusive. The sole and exclusive remedy for breach of any warranty hereunder shall be limited to repair or replacement of the products.  In the event that the product cannot be repaired or replaced, the company reserves the right to substitute a product of similar technical parameters.The company will not refund the purchase price of the original product. Failure by the Customer to give such written notice within the thirty (30) day time period shall be deemed an absolute and unconditional waiver of the Customer’s claim for such covered defects.  All costs and expenses of dismantling, reinstallation and freight, including the time of the Company’s personnel and representatives for site travel and diagnosis under this limited warranty, shall be borne by the Customer unless accepted in writing by the Company.  Products repaired or replaced during the limited warranty period shall be covered by the foregoing limited warranty for the remainder of the limited warranty period. The Customer assumes all other responsibility for any loss, damage, or injury to persons or property arising out of, connected with, or resulting from the use of Products, either alone or in combination with other products/components.3. LIMITATION OF LIABILITY:In no event, regardless of the form of the claim or cause of action (whether based in contract, infringement, negligence, strict liability, other tort or otherwise), shall the company’s liability to the customer or any third party exceed the price paid by the customer for the specic products giving rise to the claim or cause of action. To the maximum extent permitted by applicable law, the company shall not be liable to the customer or any third party for any general, direct, indirect, incidental, special, consequential, or punitive damages, in-cluding, but not limited to, loss of prots or anticipated prots, business interruption, loss of use, revenue, reputation and data, costs incurred, loss or damage to property or equipment, bodily injury, or death, aris-ing from any claim or cause of action relating to the product, whether such is based on warranty, contract, tort (including negligence and strict liability.These limitations shall apply notwithstanding any failure of essential purpose of any remedy. Some states and/or jurisdictions do not allow the exclusion or limitation of incidental or consequential damages so the above exclusions may not apply to certain customers.      The Customer assumes all other responsibility for any loss, damage, or injury to persons or property arising out of, connected with, or resulting from the use of Products, either alone or in combination with other products/components.
25GUARANTEE4. CLAIMS PROCEDURE: The Customer shall make a claim by written notice to the Company through the contact information listed on its website at www.baro.com or by contacting the Company through the telephone number listed on the website. Any telephone conversations will be recorded. The Company will issue a designated claim number for each claim made. The Customer may be contacted by an authorized warranty service represen-tative to arrange a date for an inspection of the Product. This inspection shall be in the presence of the Cus-tomer. The Product that is the subject of the claim shall be made available by the Customer together with complete standard equipment and the documents conrming the Product’s purchase. Covered defects (as determined by the Company or its authorized service representative) found during the limited warranty period shall be remedied within thirty (30) days from the date of inspection or the date the Product is delivered to the Company or its authorized service representative, whichever is later. The limited warranty period shall be extended by the time that the Product is in the possession of the authorized service repre-sentative or the Company.Remember: before you submit a warranty claim, contact our technical support using telephone or e-mail. More than 50% of operational problems is resolved remotely, saving time and money spent to initiating claim procedure.5. GOVERNING LAW AND BINDING ARBITRATION: Please read this section carefully. It aects customers’ rights and will have a substantial impact on how claims the company and the customer have against each other are resolved. This limited warranty contains a binding arbitration provision which may be enforced by the parties.The Company and the Customer agree that any claim or dispute at law or equity that has arisen or may arise between them relating in any way to or arising out of this limited warranty or the Products will be resolved in accordance with the provisions set forth in this Section.A.  Applicable Law.  The Customer and the Company agree that, except to the extent inconsistent with or preempted by federal law, the laws of the State of Illinois, without regard to principles of conict of laws, will govern the limited warranty and Products and any claim or dispute that has arisen or may arise between the Company and the Customer, except as otherwise stated herein. The Federal Arbitration Act governs the interpretation and enforcement of this Section 5. The U.N. Convention on Contracts for the International Sales of Goods shall not apply.B.  Agreement to Arbitrate.  The Company and the Customer each agree that any and all disputes or claims that have arisen or may arise between them relating to or arising out of this limited warranty or the Products shall be resolved exclusively through nal and binding arbitration, rather than in a court proceeding. Alternatively, the Customer may assert his/her claims in small claims court, if the claims qualify and so long as the matter remains in such court and advances only on an individual (non-class, non-rep-resentative) basis. The Company and the Customer agree that each of them may bring claims against the other only on an individual basis and not as a plainti or class member in any purported class or representative action or proceeding. Unless both the Company and the Customer agree, the arbitration may not consolidate or join more than one person’s claims and many not otherwise preside over any form of a consolidated, represen-tative, or class proceeding.C.  Opt-Out.  The Customer may opt-out of this agreement to arbitrate by sending the Company a writ-ten opt-out notice, via certied mail and postmarked no later than 30 days after the date of purchase of the Product. The opt-out notice must include the Customer’s name and address, the serial number of the Product purchased, and the date and location of the purchase. All other parts of this limited warranty will still apply. D.  Procedures.  The arbitration shall be administered by JAMS pursuant to its Comprehensive Arbitration Rules and Procedures or pursuant to JAMS’ Streamlined Arbitration Rules and Procedures, whichever as applicable. JAMS’ rules are available at www.jamsadr.com. The use of the word “arbitrator” in this provision shall not be construed to prohibit more than one arbitrator from presiding over the arbitration; rather, the JAMS’ rules will govern the number of arbitrators that may preside over an arbitration. The Customer will have a reasonable opportunity to participate in the selection of the arbitrator.   A Customer who intends to seek arbitration must rst make a written claim against the Company pursuant to Section 4. If the Customer and the Company are unable to resolve the claim within thirty (30) days from the date of the notice, the Company or the Customer may initiate arbitration proceedings. A form for ini-tiating arbitration proceedings is available on JAMS’ website. In addition to ling the form with JAMS, the party initiating the arbitration must mail a copy of the completed form to the other party. In the event the Company initiates arbitration against a Customer, it will send a copy of the completed form to the physical address the Company has on le for the Customer. The arbitration hearing shall be held in the county in which the Customer resides or at another mutually agreed location.  Arbitration uses a neutral arbitrator instead of a judge or jury. Discovery or the exchange of non-privileged information will be allowed pursuant to JAMS’ rules. The arbitrator will decide the substance of all claims in accordance with applicable law, including recognized principles of equity, and will honor all claims of privilege recognized by law.  An arbitrator can award the same damages and relief on an individual basis that a court can award to an individual.  The arbitrator’s award shall be nal and binding and judgment on the award rendered by the arbitrator may be entered in any court having jurisdiction thereof. An award will consist of a written statement stating the disposition of each claim, and will include a concise written statement of the essential ndings and conclusions on which the award is based.
26GUARANTEEPayment of all ling, administration and arbitrator fees is governed by JAMS; provided, however, that when a Customer initiates arbitration against the Company, the fee required to be paid by the Customer is that amount designated by JAMS for consumer arbitrations. All other costs will be paid by the Company. If an arbitrator or court decides that any part of this limited warranty is invalid or unenforceable, the other parts of the limited warranty shall still apply to the extent applicable. In the event that this agreement to arbitrate is wholly inapplicable, the Customers agree that any claim or dispute that has arisen or may arise between the Customer and the Company must be resolved exclusively by a state or federal court located in Cook County, Illinois. The Customer agrees to submit to the personal jurisdiction of the courts located within Cook County, Illinois, for the purpose of litigating all such claims or disputes.THE MANUFACTURER IS NOT RESPONSIBLE FOR ANY RADIO OR TV INTERFERENCE CAUSED BY UNAUTHO-RIZED MODIFICATIONS TO THIS EQUIPMENT. SUCH MODIFICATIONS COULD VOID THE USER’S AUTHORITY TO OPERATE THE EQUIPMENT.This device complies with Part 15 of the FCC Rules. Operation is subject to the following two conditions:1. This device may not cause harmful interference2. This device must accept any interference received, including interference that may cause undesired ope-ration. This equipment has been tested and found to comply with the limits for a Class B digital device, pursuant to part 15 of the FCC Rules. These limits are designed to provide reasonable protection against harmful interference in a residential installation. This equipment generates, uses and can radiate radio frequency energy and, if not installed and used in accordance with the instructions, may cause harmful interference to radio communications. However, there is no guarantee that interference will not occur in a particular installation. If this equipment does cause harmful interference to radio or television reception, which can be determined by turning the equipment o and on, the user is encouraged to try to correct the interference by one or more of the following measures:• Reorient or relocate the receiving antenna.• Increase the separation between the equipment and receiver.• Connect the equipment into an outlet on a circuit dierent from that to which the receiver is connected.• Consult the dealer or an experienced radio/TV technician for help.Industry Canada (IC) Compliance NoticeThis device complies with Industry Canada license-exempt RSSs. Operation is subject to the following two conditions: (1) this device may not cause interference, and (2) this device must accept any interference, including interference that may cause undesired operation of the device.Cet appareil est conforme aux normes d’exemption de licence RSS d’Industry Canada. Son fonctionne-ment est soumis aux deux conditions suivantes : (1) cet appareil ne doit pas causer d’interférence et (2) cet appareil doit accepter toute interférence, notamment les interférences qui peuvent aecter son fonc-tionnement.Legal NoticesAll information, including, but not limited to, information regarding the features, functionality, and/or other product specication are subject to change without notice. Fibaro reserves all rights to revise or update its products, software, or documentation without any obligation to notify any individual or entity.Fibaro, Fibar Group logo, and Fibaro Swipe are trademarks of Fibar Group S.A. All other brands and product names referred to herein are trademarks of their respective holders.DisclaimerThe information contained herein is provided in connection with Fibaro products. No license, expressed or implied by estoppel or otherwise, to any intellectual property rights is granted by this documents.This documentation may contain references to third-party sources of information, hardware or software, products or services (“collectively the “Third-Party Products or Services”).  Fibaro does not control the Thir-d-Party Products or Services and is not responsible for any Third-Party Products or Services.Except as provided above or except to the extent prohibited by applicable law, Fibaro shall not be liable for any incidental or consequential damages caused by the breach of any express or implied warranty.  Fibaro assumes no liability whatsoever, and Fibaro disclaims any express or implied warranty, relating to the sale and/or use of the Fibaro products, including, but to limited to, liabilities and/or warranties relating to tness for a particular purpose, merchantability, and/or infringement of any patent, copyright and/or other intellectual property right. Except to the extent prohibited by applicable law, Fibaro’s liability shall not exceed the price paid for the Fibaro products from direct, indirect, special, incidental or consequential damages resulting from the sue of the products, its accompanying software, or product specications, manuals, installation guides and/or any other documentation. Some states, provinces or jurisdictions do not allow the exclusion or limitation of incidental or consequen-tial damages or other limitations on warranties, so the above limitations or exclusion may not apply to you. You may also have other rights that vary from state to state or province to province.The Device may be used with any certied Z-Wave product and should work with devices from other pro-ducers. Each certied, Z-Wave compatible device, may be added to Fibaro System.FIBARGROUP FIBAROwww.baro.com

Navigation menu