First Computer MB02W3BB Notebook Computer With 802.11b WLAN Module User Manual 11b
First International Computer Inc Notebook Computer With 802.11b WLAN Module 11b
Contents
- 1. Page 1 to 30 of user manual
- 2. Page 31 to 42 of user manual
- 3. Page 43 to 60 of user manual
- 4. Pge 61 to 80 of user manual
- 5. Page 81 to 113 of user manual
Page 43 to 60 of user manual

Notebook User Guide
44
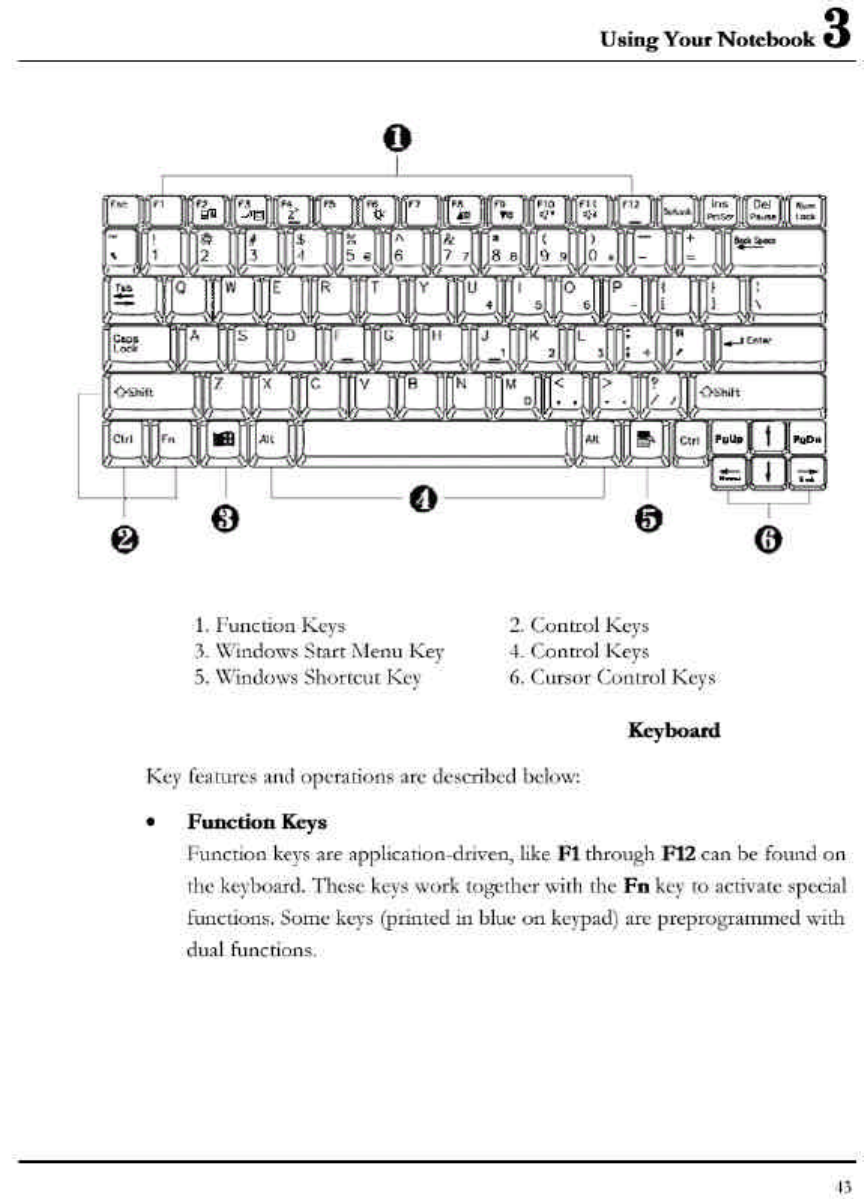
• Control keys — Ctrl, Alt, Fn, and Shift are controls used in conjunction
with other keys to change their functions. To use control keys, press and
hold the control key while pressing another key. For example, "Press Ctrl-
C" means to hold down the Ctrl key and type the letter C. Key
combinations work especially to the application you are running.
• Windows keys
Use the following two keys to facilitate your work:
ß Start Menu key
Displays the Start menu.
ß Shortcut/Application key
Provides quick access to shortcut menus. This key acts like a right
mouse button.
• Cursor Control keys
Cursor control keys let you position the cursor on the screen where you
want. In the screen, the cursor is a blinking underline, block, or vertical bar
depending on the application. The cursor indicates where the next text
typed is inserted.
• Typewriter keys
Typewriter keys (also called alphanumeric keys) are used to enter text and
characters. Keys with blue print on them behave differently when
combined with control keys.
Using Your Notebook 3
45
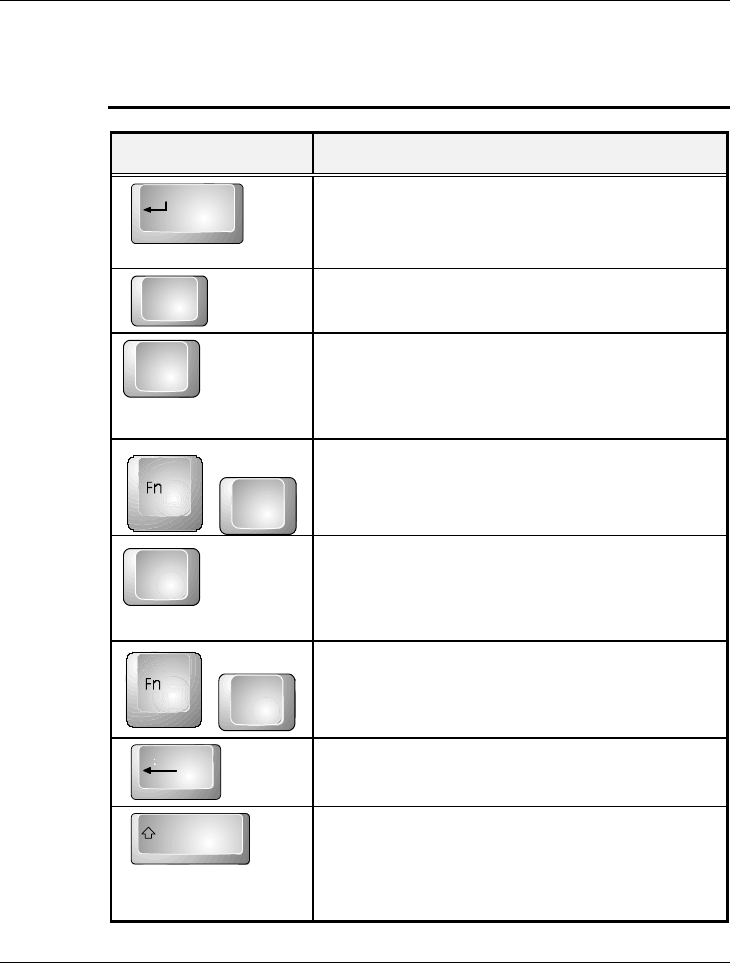
BASIC KEYBOARD FUNCTIONS
Keypad Function Description
Enter
<Enter> key. Execute a command. Within many
text editing application programs, the <Enter>
key inserts a hard carriage return, just like what
ordinary typewriter does.
Esc
<Esc> key. Press this key to cancel or escape
from a command or function.
PrtScr
Ins
<Ins> key. Known as the Insert key. Press this
key to toggle the keyboard data entry from insert
to type over mode.
+
PrtScr
Ins
Fn+<PrtSc> key. Known as the Print Screen key.
Press this key to map the whole screen to share
memory for your specific usage.
Pause
Del
<Del> key. Known as the Delete key. Press this
key to delete the character to the right of the
cursor, or delete marked texts or items.
+
Pause
Del
Fn+<Pause> key. Press this key to temporarily
halt execution of a command. Pressing any other
key to resume execution of a command.
Backspace
<Backspace> key. Press this key to delete the
character to the left of the cursor.
Shift
<Shift> key. Press this key in combination with
alphabet letters to produce uppercase letters in
typing. Use this key in combination with those
two-character keys (found on the second row of
the keyboard) to produce the upper marked keys.
Notebook User Guide
46
Keypad Function Description
Also used in most application program in
combination with other keys to execute a certain
command.
Tab
<Tab> key. Press this key to move the cursor to
the next tab stop on the right. This key works
much the same as in ordinary typewriter.
Ctrl
<Ctrl> key. Known as the Control key. Used in
most application program in combination with
other keys to execute a certain command.
Alt
<Alt> key. Known as the Alternate key. Used in
most application program in combination with
other keys to execute a certain command.
Num
LocK
<Num Lock> key. Activates the embedded 15-
key numeric keypad. The keys are color coded
blue.
Caps
Lock
<Caps Lock> key. Used in most application
program to always activate uppercase alphabet
characters.
ScrLocK
<Scroll Lock> key. Used in most application
program to scroll the screen without having to
move the cursor.
CURSOR CONTROL KEYS
Keypad Function Description
Up arrow key. Moves the cursor up one line at a
time.

Using Your Notebook 3
47
Keypad Function Description
Down arrow key. Moves the cursor down one
line at a time.
Home
Left arrow key. Moves the cursor to the left one
space at a time.
End
Right arrow key. Moves the cursor to the right
one space at a time.
SCREEN CONTROL KEYS
Keypad Function Description
Fn
+Home
<Home> key. Moves the cursor to the
beginning of a screen or line.
PgUp
<PgUp> key. Moves the cursor up one
screen at a time
PgDn
<PgDn> key. Moves the cursor down
one screen at a time
+End
<End> key. Moves the cursor to the
end of a screen or line.
Notebook User Guide
48
WINDOWS HOT KEYS
Keypad Function Description
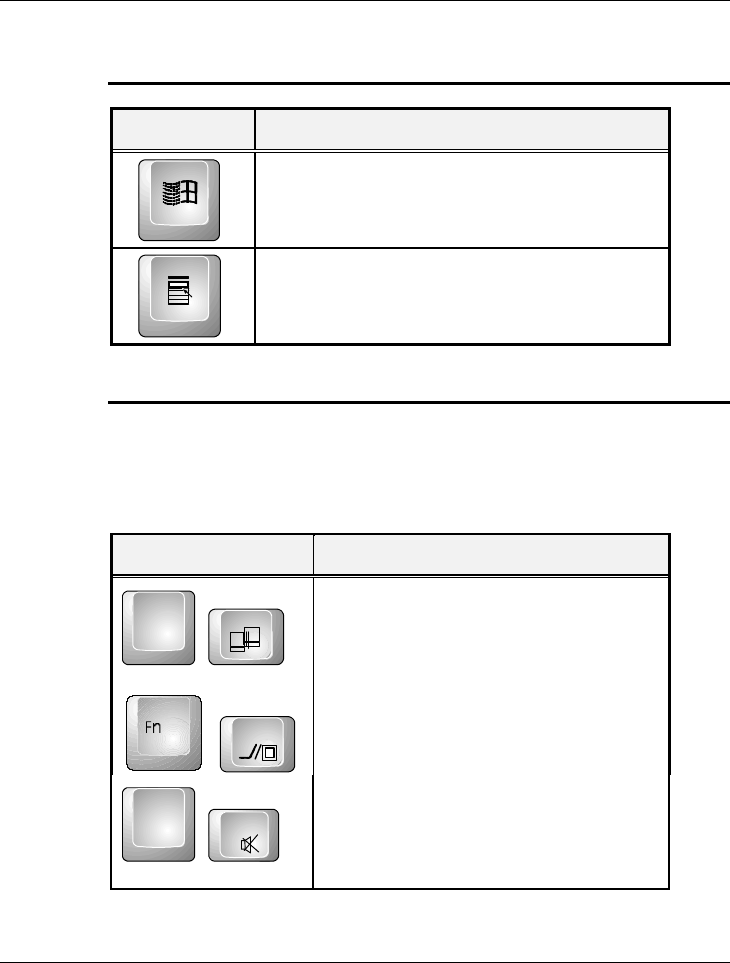
<Start> key. Pulls up the Windows Start menu.
<Right Click> key. Performs a mouse right-click
function for Windows system.
SPECIAL FUNCTION KEYS
The notebook has special system function keys that activate key serving dual
functions. When pressed in conjunction with the <Fn> key, these keys set
specific system parameters and are sometimes referred to as "hot keys".
Keypad Function Description
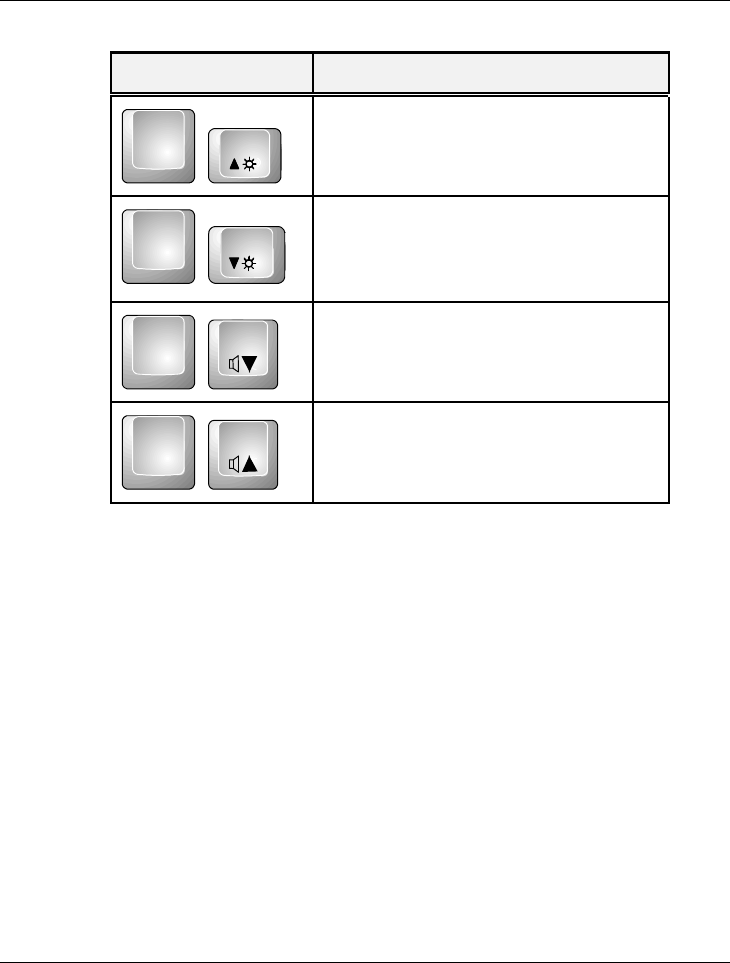
Fn
+
F2
Enable or Disables the built-in wireless
LAN.
+F3
Switches display between LCD, CRT, or
LCD and CRT simultaneously.
Fn
+
F6
Enable or Disables the built-in system
speaker.
Using Your Notebook 3
49
Keypad Function Description
Fn
+F8
Increases the brightness of LCD display
incrementally.
Fn
+
F9
Decreases the brightness of LCD display
incrementally.
Fn
+F10
Decreases the audio volume of the
notebook incrementally.
Fn
+F11
Increases the audio volume of the
notebook incrementally.
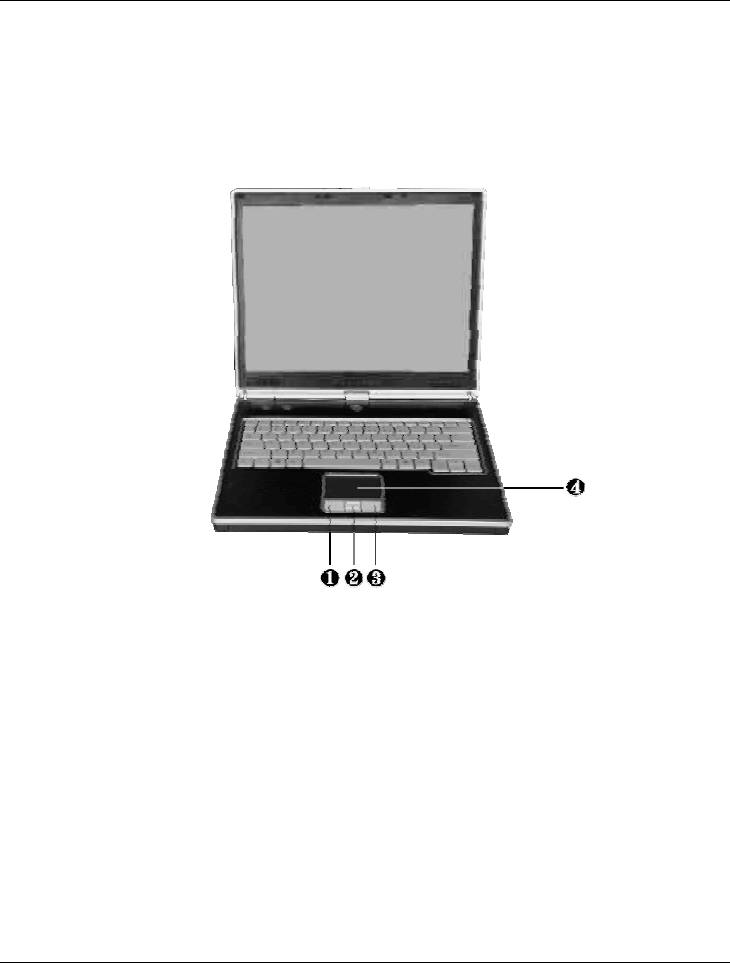
3.3 Using the Glide Pad Pointing Device
Your computer comes with a built-in Glide Pad pointing device that is found
on the center of the palm-rest surface.
The Glide Pad offers a number of options that let you customize how it
functions. To access these options, locate the Control Panel and double click
on the Mouse icon. The options let you control the size and color of the
cursor, cursor speed, the accepted double-click speed, and selection button
orientation.
The Glide Pad works a mouse pointing device replacement that is used under
Windows-based operating system. You can use the standard Microsoft driver
that is compatible with the Glide Pad device and is normally used under
Notebook User Guide
50
Windows-based operating system. However, if you want to utilize the added
features of the Glide Pad, you may want to try installing its own device driver
that comes with added utilities for enhancing the function of the device.
1. Left Selection Button 2. Scroll Button
3. Right Selection Button 4. Glide Pad
Glide Pad Features
Here how to use the Glide Pad pointing device:
1. The rectangular surface acts like a miniature duplicate of your display
screen. To move the mouse cursor, place the finger lightly on the sensor
pad and move in the desired direction. If you reach the end of the pad, lift
your finger and place it back down on the other side of the pad.

Using Your Notebook 3
51
2. To select an item, click on the item by pressing the left button control or
by simply tapping on the surface once. A light, quick tap always works
best. To execute an item, click the left button twice or do a quick double
tap on the surface.
3. To simulate holding the mouse button down (dragging an icon or
selection), use the tap-and-drag gesture. This feels much like a double-
click, except that the finger remains on the pad after the second tap: Tap,
lift, tap, hold and move. The simulated button remains held as long as the
finger remains on the pad.
4. To scroll up or down the screen, just slide up or down the scroll button to
move the screen up or down.
++ Avoid spilling any liquid on the Glide pad surface and always keep the Glide
pad surface and pointing finger dry from sweat built-up. Also do not expose
Glide pad to any magnetic source object.
3.4 Configuring Your Screen Display
The VGA display function of your notebook is based on a high performance
AGP local bus controller and is fully IBM VGA compatible. This controller
offers a large set of extended functions and higher resolutions especially useful
when you are connecting an external high-resolution and high-frequency CRT
or LCD.
Please Refer to Section 5 "Installing the Notebook Device Drivers" of Chapter
2 in this manual for the procedures on how to install the VGA device driver
under Windows. After installing the VGA driver, you would then configure the
display resolution or screen size to match your LCD display panel. This
notebook computer model provides 1024x768 as well as 1400x1050 LVDS
Notebook User Guide
52
panels. You would also probably want to set the amount of color output to
display sharper images and photos.
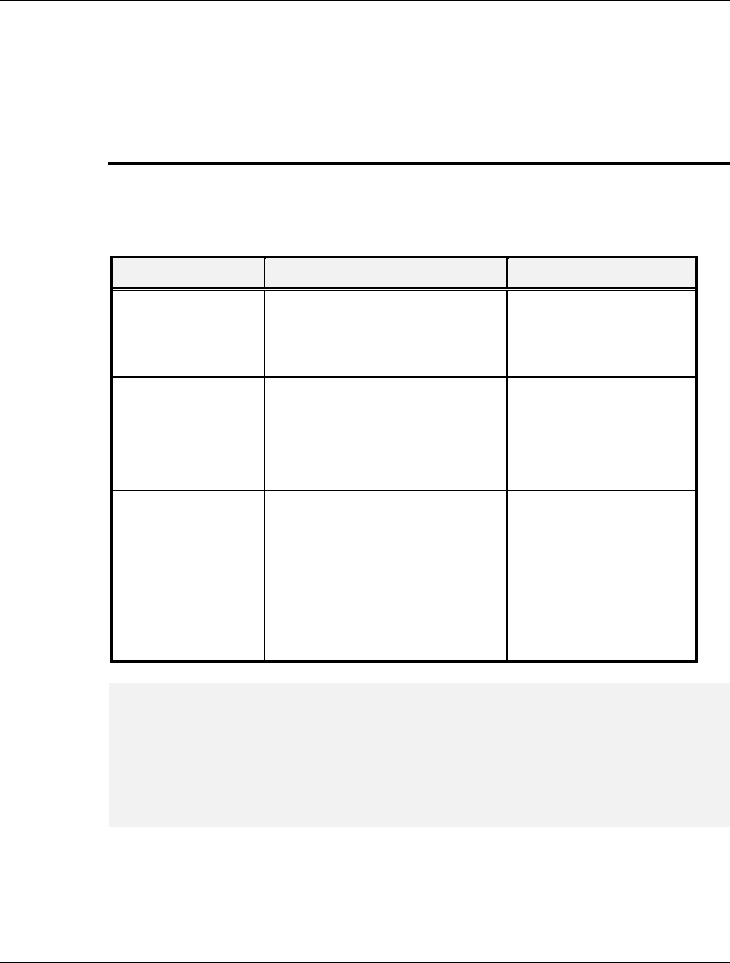
POSSIBLE DISPLAY CONFIGURATIONS
The table below shows you the possible display resolution you can set when
using either the LCD display or the external monitor (CRT):
Display Possible Resolution Maximum Colors
1024x768
XGA LCD 640x480
800x600
1024x768
16 million colors
16 million colors
16 million colors
1400x1050
SXGA+ LCD 640x480
800x600
1024x768
1400x1050
16 million colors
16 million colors
16 million colors
16 million colors
CRT Only 640x480
800x600
1024x768
1152 x 768
1280x1024
1400x1050
16 million colors
16 million colors
16 million colors
16 million colors
16 million colors
16 million colors
++ 65,536 or 64K colors is also equivalent to 16-bit high color while 16 million or
16M colors is equivalent to 32-bit true color.
++ You can use the <Fn> + <F3> hot-key to switch the display between LCD
only, CRT only, or both LCD and CRT display.

Using Your Notebook 3
53
CHANGING THE DISPLAY PROPERTIES UNDER WINDOWS
To change the display properties of your screen under Windows system, just
right-click on the desktop area and select Properties or go to the Control Panel
and click on the Display icon. The Display Properties dialog box will appear on
your screen. Click on the Settings tab to set your desired configuration. Make
sure to follow the configuration table above.
++ If you cannot configure the display properties, change the display driver
first as mentioned on Section 5 "Installing the Notebook Device Drivers" of
Chapter 2 in this manual. Consult your dealer for the latest Windows VGA
driver.
3.5 Knowing the Power Saving Features
One of the great features in your notebook computer aside from its superior
performance is the ability to save energy power. Your computer is designed to
incorporate intelligent and advanced power management functions that turn off
power of most components when system is idle or not in use. This does not
affect the performance of your system as it monitors the activity of your
computer and resumes power and operating speed when activity is detected.
This feature not only gives you longer battery hours but cooler systems and
components as well. For more information on how to control the power
management features of your computer, refer to Power Management function
in Control Panel of Windows.
The definitions of power management mode are depicted as follows:

Notebook User Guide
54
Full-On Mode
No device in the system is executed in power management, the system can
respond to all applications at maximum performance.
Suspend to RAM mode
All devices are powered off except the other supporting components and
system memory where your working files are stored. You can activate this
either pressing the power button or setting the Suspend timer on the Power
Management function of the Control Panel in Windows. To resume full-on
state, press the power button.
Suspend to Disk mode
When this mode is activated, the context of the entire system is saved to disk
and all components and devices are powered off, while all clocks are also
stopped (except Real Time Clock or RTC). You can activate this by setting the
Hibernate (Windows Me/2000/XP) mode on the Power Management function
of the Control Panel in Windows. To resume full-on state, you can press the
power button.
Mechanical off Mode
All power, except the RTC (real time clock), has been turned off from the
system. This includes external AC power source and battery power source.
3.6 Working with the Built-in HDD
Your notebook computer is equipped with a built-in large capacity 2.5 inch IDE
hard disk drive where you store or install your computer operating system and

Using Your Notebook 3
55
all application software programs. You need to format the hard disk before
using. The internal hard disk is normally assigned as Drive C after formatting.
Sometimes divided into two partitions, adding a Drive D. Since your computer
supports different hard disk capacities (up to 60 GB), you also need to setup
the disk type first on your computer’s BIOS SETUP program before
formatting the disk drive. Your computer supports Auto-detect hard disk type,
so you do not need to set it manually. Your dealer should already have done all
of this for you. You can refer to Chapter 6 on how to run the BIOS SETUP
program.
You can increase the system’s storage capacity by replacing the standard hard
disk drive with a drive of greater storage capacity.
++ If you wish to replace your hard disk, contact your local dealer for more
information about this dealer-installable device.
++ Always turn off your computer first before removing the hard disk drive.
Failure to do so will damage the computer and the hard disk. Avoid jarring
or moving the computer while the hard disk is still being accessed.
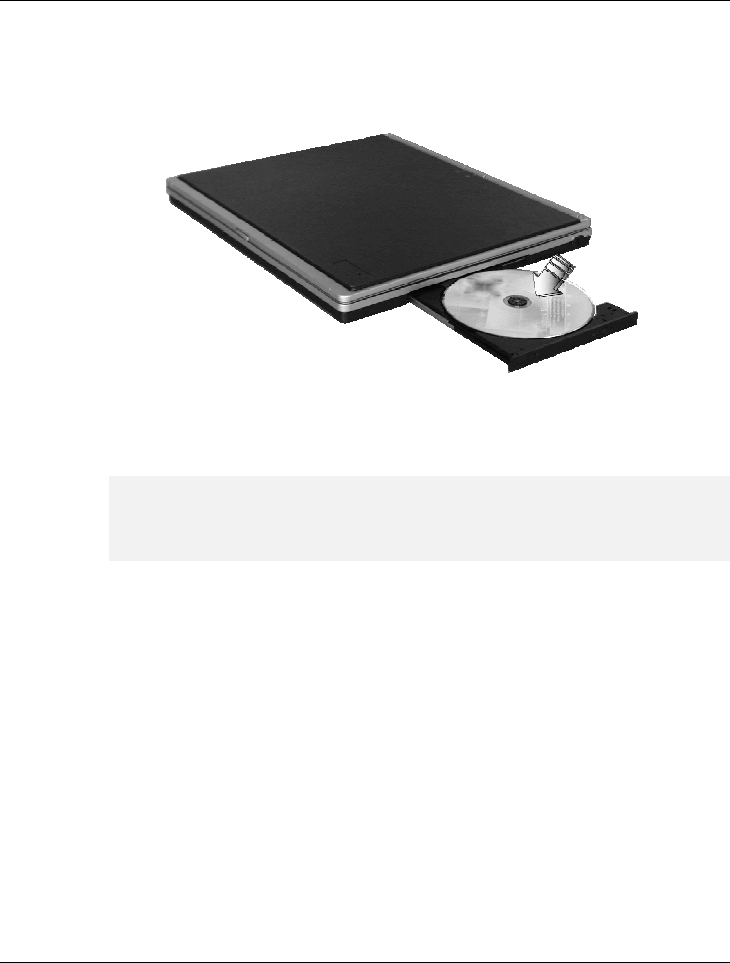
3.7 How to Access the Combo Drive
Your system ships with either a CD-RW/DVD combo drive installed on the
right side of your computer. You would normally use the drive for installing
operating system and software application programs.
To insert and remove a disc on the drive:
1. Make sure the computer is turned on. Press the eject button found on the
door cover of the combo drive. The CD tray mechanism will pop-out
slightly and slowly pull out the whole length of the tray.
Notebook User Guide
56
2. Place the disc on top of the CD tray with the label side facing up. Gently
press the compact disc onto the center spindle to secure the disc.
3. To remove the disc, press on the center spindle and pull up the disc from
the side until the disc snaps out of the spindle lock.
++ If the eject function is disabled by software or a power failure occurs, the
Emergency Eject Hole allows you to manually remove a CD from the
reader.
4. To close the combo drive, simply push the CD tray inside. The combo
drive LED will activate when the disc is detected. Wait until the LED has
turned off and then start to read the disc.
How to care the CD
When you handle CDs, pay attention to the following guidelines:
• Always pick up the CD by its edges.
• Avoid scratching or soiling either side of the CD.
• Do not write with the hard ball-point pen or apply labels on either side of
the CD.
Using Your Notebook 3
57
• Keep the CD away from direct sunlight or high temperatures.
• Clean fingerprints or dust from the CD by wiping it with a soft cloth.
The above points also apply to other optical storage media.
++ The Combo drive is a Class 1 Laser Product.
3.8 Using PCMCIA Cards
WHAT IS PCMCIA?
PCMCIA or Personal Computer Memory Card International Association is a
non-profit trade association that defines the industry standard for the PC Card
technology. The goal of PCMCIA is to ensure that any PC Card can work in
any mobile computer built with a PCMCIA slot.
A PC Card is a peripheral device that can add a wide variety of capabilities to
your computer including memory, mass-storage, LAN, fax/modem, wireless
communications, and multimedia. The PCMCIA standardized PC Card is
roughly the dimension of a credit card, and has a standardized 68-pin
connector at one end. The main benefits of the PC Card are its low-power
consumption, small size and ruggedness.
To allow manufacturers to add functions and technologies in the PC Card form
factor, PCMCIA has defined two PC Card types:
Type Thickness Sample Devices
Type II 5.0 mm Fax/Modem & Network Cards
Type III 10.5 mm Hard Disks (ATA Cards)

Notebook User Guide
58
Type II Cards
Type II card has a thickness of 5.0 millimeters (mm). Type II cards are often
storage or communications devices such as Flash Memory, LAN, and Small
Computer System Interface (SCSI). Typical Type II cards include input/output
(I/O) features such as modems and LANs. The features for Type II Cards
include following characters:
• Type II Extended Cards
Many PC cards are Type II extended cards. The extended card has an
additional physical component that protrudes beyond the traditional card
size. The extension can be as large as 40 mm deep by 9.65 mm high. This
extension provides room for additional electronics as well as a location for
external connectors. The GPRS card is an example. The extended part is
for additional electronics and antenna.
• Communication Cards
Both network PC cards and fax/modem cards can use with your notebook
computer. However, if you use built-in LAN/Modem options of this
computer, it is not necessary to use those cards. If you start the
LAN/Modem application without inserting the fax/modem card or had
the built-in LAN/Modem options installed, the application typically does
not find the card.
• Storage Cards
When you insert a storage PC card, PC card Adapter for other memory
card (i.e. Compact Flash card, Smart Media card...) or small hard drive card
in the notebook computer, it appears as a unique drive depending on the
type of card you are using.
The following table provides sample drive designations.
Sample Drive Designations

Using Your Notebook 3
59
Drive letter Location/Device
C: Internal hard disk
D: Internal hard disk, 2nd partition
E: CD/DVD/RW/Combo drive
F: Slot 0, high-speed memory card
Type III Cards
Type III cards are thicker (10.5 mm) than Type II cards and allow no
extensions. This notebook does not support Type III Card.
WHAT IS CARDBUS?
CardBus is the high-performance 32-bit PCI bus master interface from
PCMCIA. It runs up to 33MHz clock speed and operates at only 3.3V. Your
notebook computer incorporates the CardBus inside the PC card slot. Aside
from 3.3V CardBus PC cards, you can also insert 5V 16-bit PC cards that can
also be detected and used by your computer.
INSERTING AND REMOVING A PCMCIA CARD
Your computer includes hot swapping capability, that allows you to exchange
cards while the computer is turn on and start using it immediately.
Inserting PC Cards
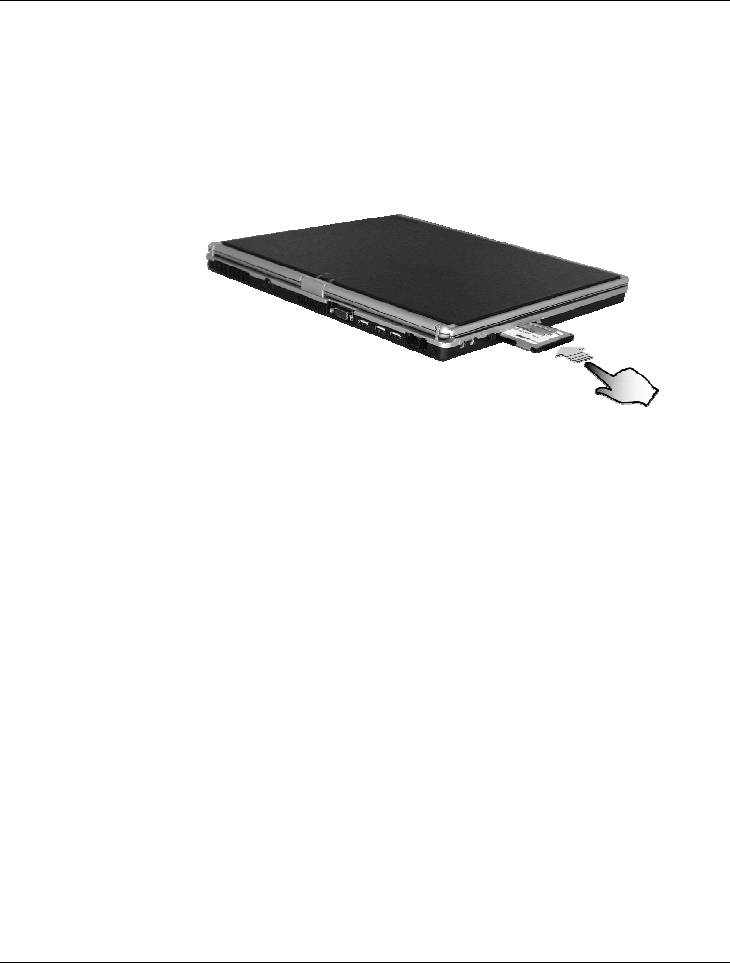
To insert a PC card into the PCMCIA slot:
1. Locate the PC card slot cover on the left side of the computer.
2. Insert the side of PC card with the 68-pin socket into the PC slot. The face
label of the card should also be facing up.
Notebook User Guide
60
3. When the full length of the card is almost inside the slot, push firmly but
slowly, to ensure full connection with the computer. The PC card will be
detected and once the needed driver is installed, it will generate a beep
sound to indicate that the card is detected.
Removing PC Cards
To remove a PC card from the PCMCIA slot, you should first disable the
PCMCIA card setting in the system as described followings:
1. Double click the PC card icon on the right bottom side of the task bar.
2. Select the socket from the list that you want to remove, and click Stop
button. The system then disables the function of PCMCIA card.
3. Then you can remove the inserted PC card, push the button found on the
right side of the PC slot to release the eject button. Then push it again to
release the PC card.
4. When the PC card has moved out a space out of the slot, hold the edges of
the card and slowly slide it out.