First Computer MR031BT Notebook PC User Manual
First International Computer Inc Notebook PC
UserManual.wiki
>
First Computer
>
MR031BT User Manual
manual
Navigation menu
Upload a User Manual
Namespaces
Wiki Guide
HTML
PDF
Info
Views
User Manual
Discussion / Help
Navigation


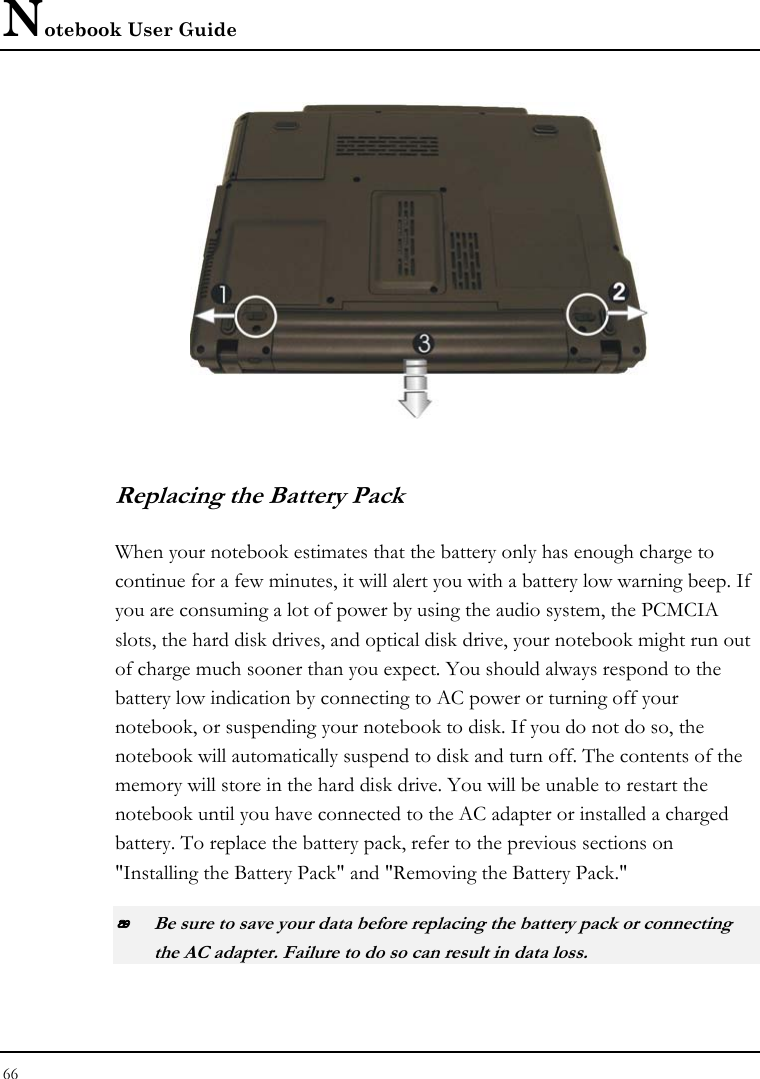


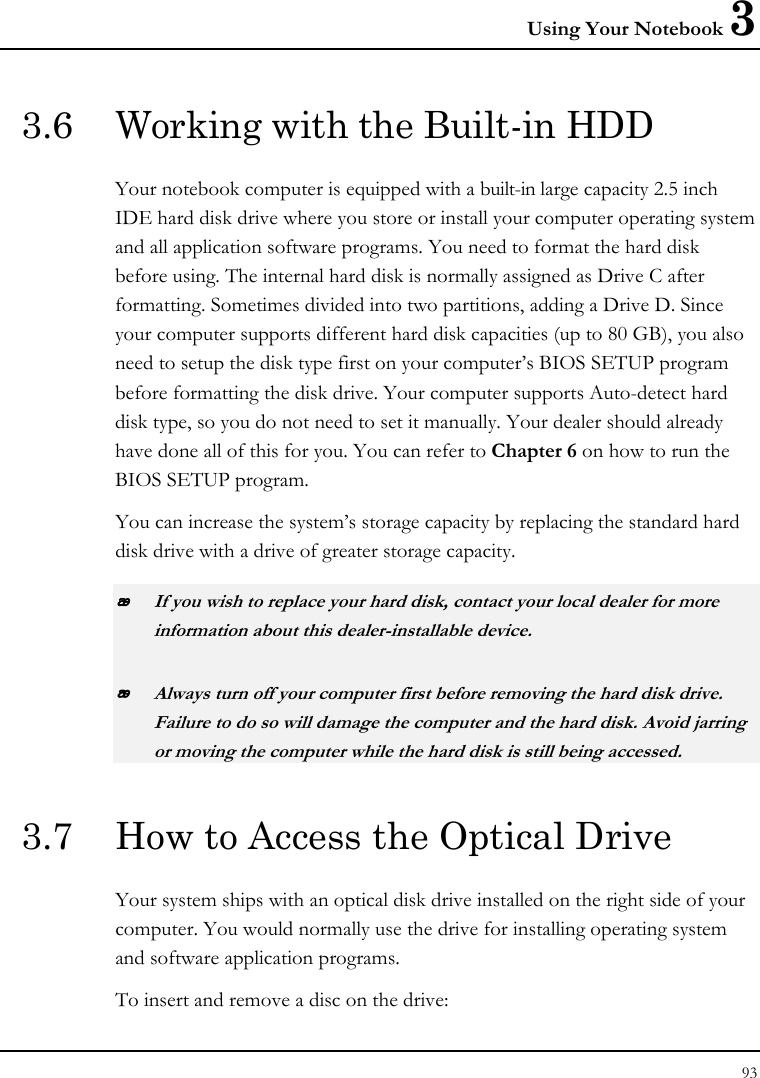


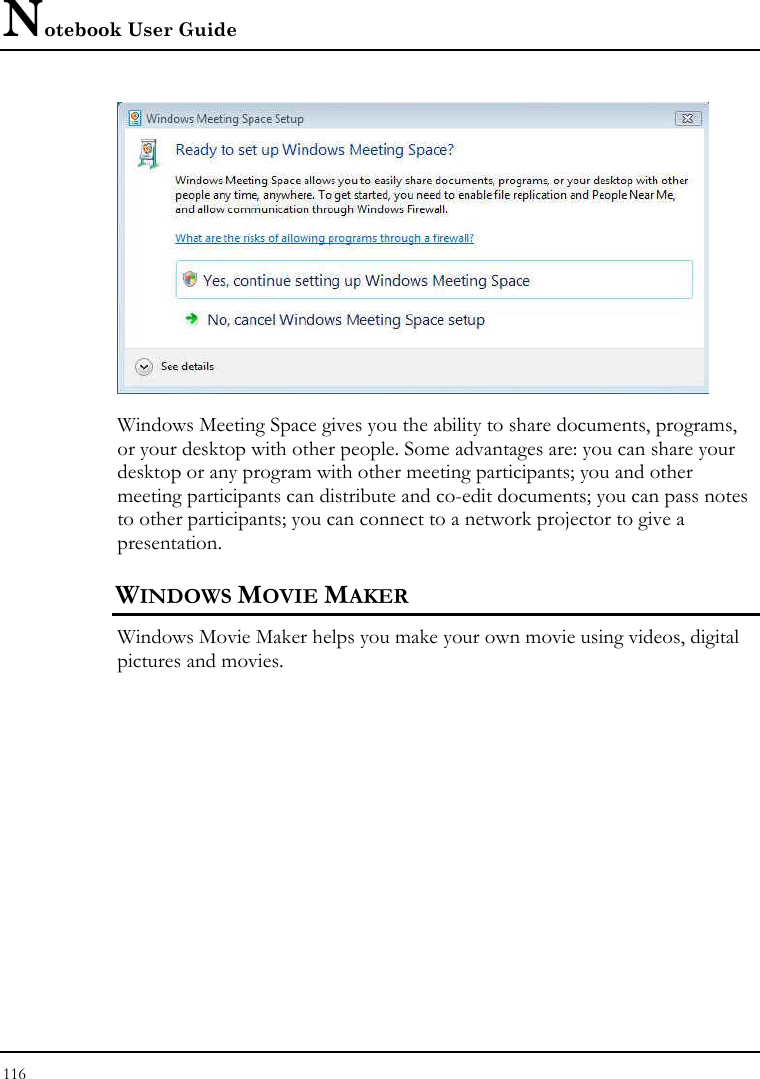


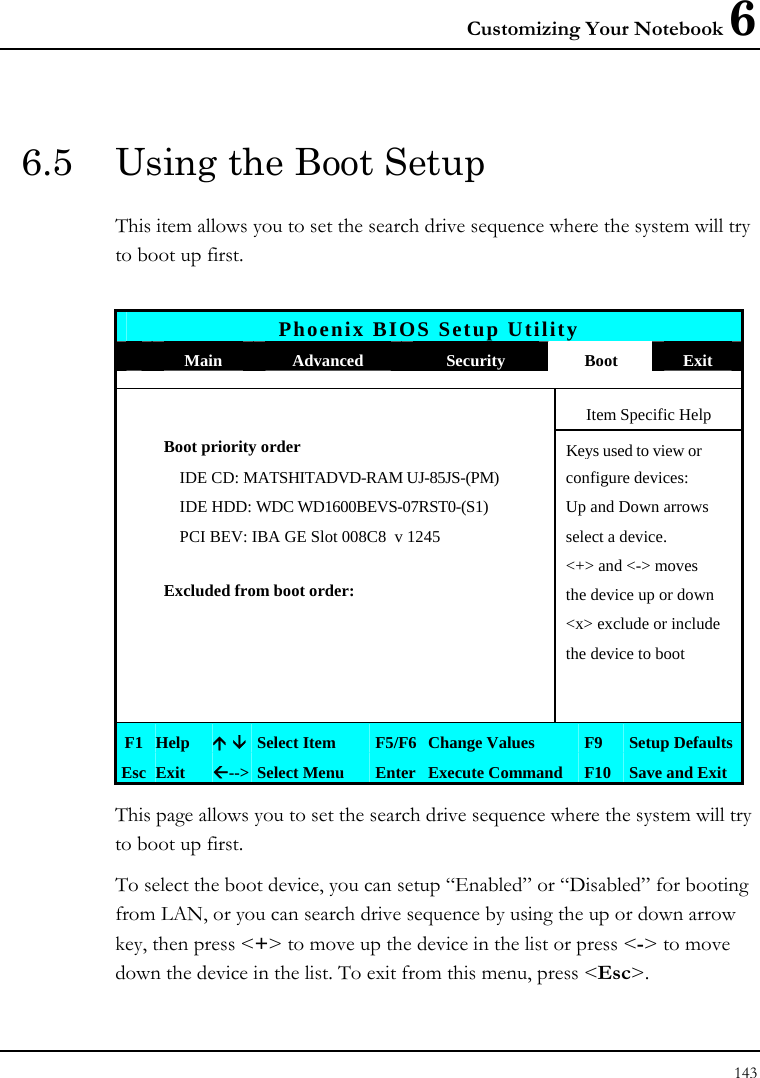
![Notebook User Guide 136 6.2 Using the Main Menu Setup Phoenix BIOS Setup Utility Main Advanced Security Boot Exit Item Specific Help System Time: [07:54:32] System Date: [10/12/2007] <Tab>, <Shift-Tab>, or <Enter> selects 4Primary Master [MATSHITADVD-RAM UJ-85JS-(PM)] field. 4Secondary Master [WDC WD1600BEVS-07RST0-(S1)] CPU Type Intel (R) Core (TM)2 Duo CPU CPU Speed T7250 2.0GHz System Memory: 640 KB Extended Memory: 1038336 KB BIOS Version: 0.4A-1471-0011 F1 Help Ç È Select Item -/+ Change Values F9 Setup Defaults Esc Exit Å--> Select Menu Enter Select Sub-Menu F10 Save and Exit • System Time Allows you to change the system time using the hour: minute: second format of the computer. Enter the current time for reach field and use the <Tab>, <Shift>+<Tab>, or <Enter> key to move from one field or back to another. You can also change the system time from your operating system.](https://usermanual.wiki/First-Computer/MR031BT/User-Guide-877937-Page-136.png)
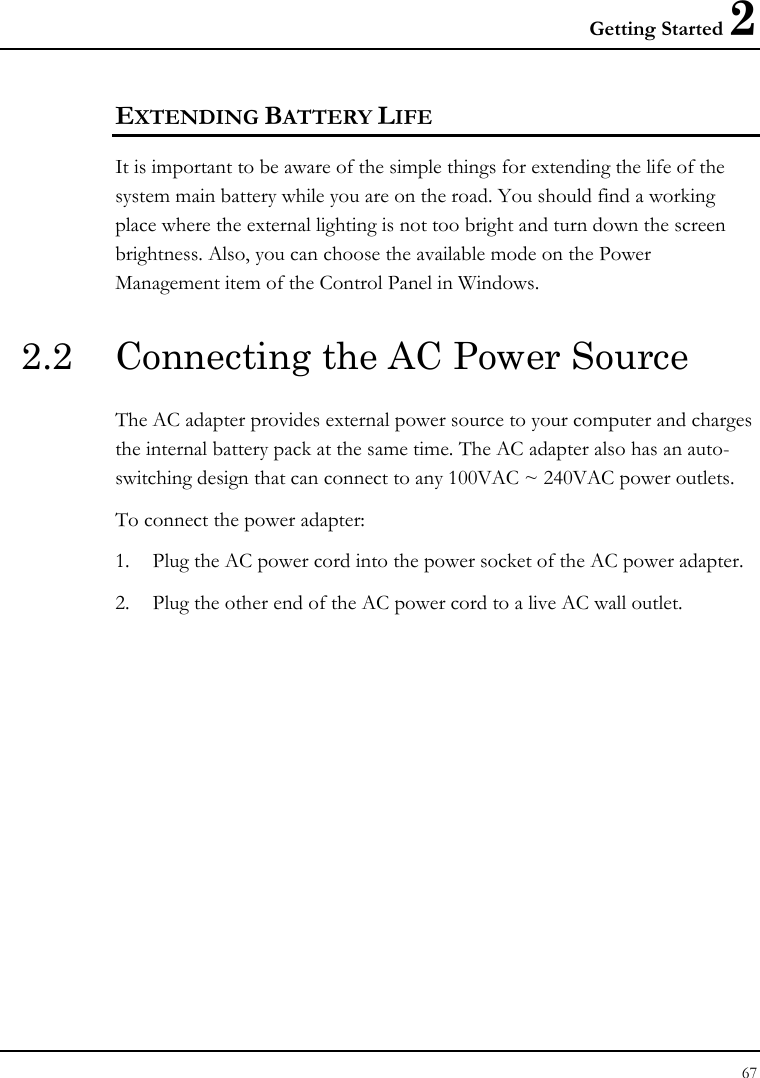
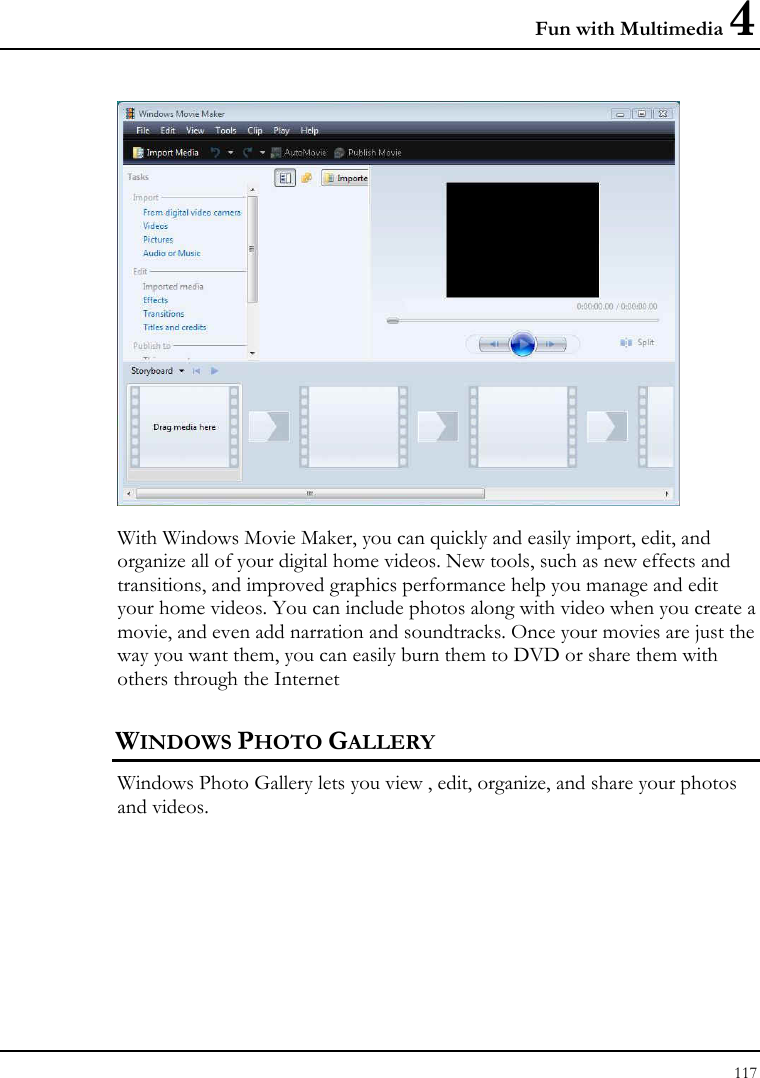
![Customizing Your Notebook 6 137 • System Date Allows you to set the system date using the month/date/year format. Enter the current time for reach field and use the <Tab>, <Shift>+<Tab>, or <Enter> key to move from one field or back to another. You can also change the system time from your operating system. • IDE Primary/Master This field displays various parameters for the hard disk drive. If type [Auto] is selected, the system automatically sets these parameters. If type [User] is selected, Cylinders, Heads and Sectors and other value can be edited. • SATA Port 1 This field is for information only as the BIOS automatically detects the drive. • CPU Type This field reports the CPU type information detected by the BIOS during Power-On Self-Test (POST). • CPU Speed This field reports the CPU speed information detected by the BIOS during Power-On Self-Test (POST). • System Memory This field reports the amount of base (or conventional) memory found by the BIOS during Power-On Self-Test (POST). • Extended Memory This field reports the amount of extended memory found by the BIOS during Power-On Self-Test (POST).](https://usermanual.wiki/First-Computer/MR031BT/User-Guide-877937-Page-137.png)
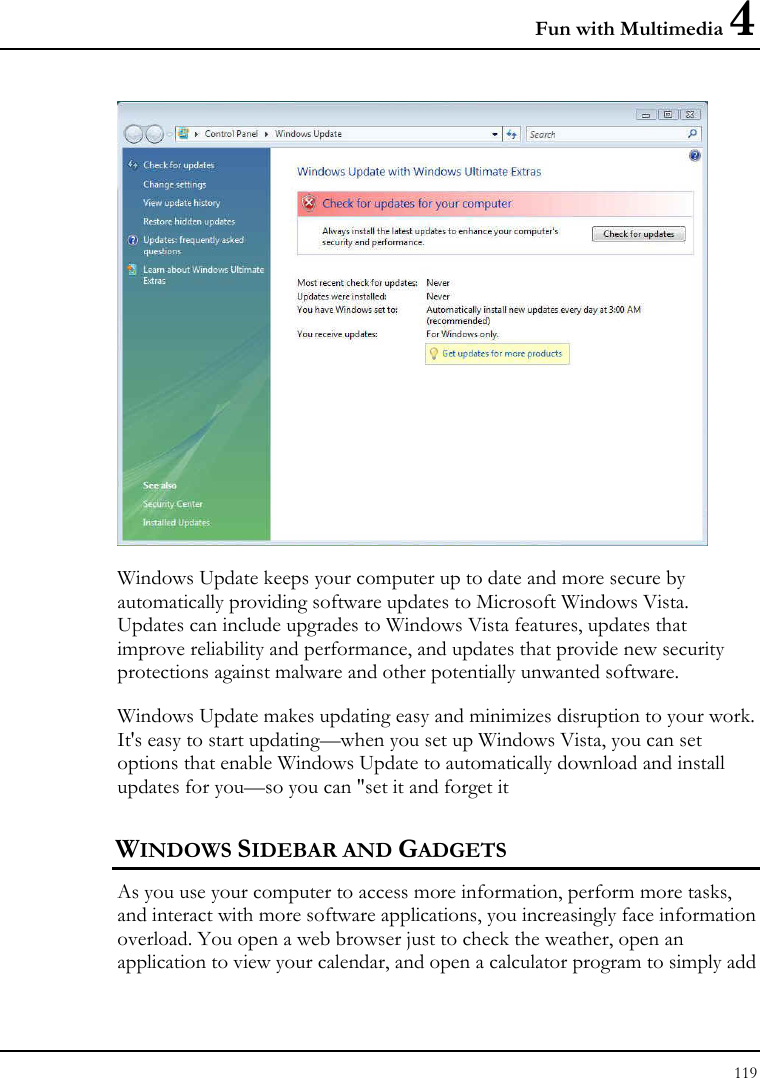
![Notebook User Guide 138 • BIOS Version This field is for information only as the BIOS displays the BIOS version during the Power-On Self-Test (POST). 6.2.1 PRIMARY MASTER SUB-MENU Phoenix BIOS Setup Utility Main Primary Master [MATSHITADVD-RAM UJ-85JS-(PM)] Item Specific Help User = you enter Type: [Auto] parameters of hard-disk drive installed at this Multi-Sector Transfers: [Disabled] connection. LBA Mode Control: [Disabled] Auto = autotypes hard- 32 Bit I/O: [Disabled] disk drive installed here. Transfer Mode: [FPIO 4 / DMA 2] CD-ROM = a CD-ROM Ultra DMA Mode: [Mode 2] drive is installed here. ATAPI Removable = removable disk drive is installed here. F1 Help Ç È Select Item -/+ Change Values F9 Setup Defaults Esc Exit Å--> Select Menu Enter Select Sub-Menu F10 Save and Exit Use the Type field to select the drive type installed. You can select different drive types as CD-DVD, User, Auto or None by pressing <Space> bar. Set this option to Auto so your computer will automatically detect the drive type during power on. Set this option to None when your computer is not installed any devices. Press <Esc> to return to the Main Menu.](https://usermanual.wiki/First-Computer/MR031BT/User-Guide-877937-Page-138.png)
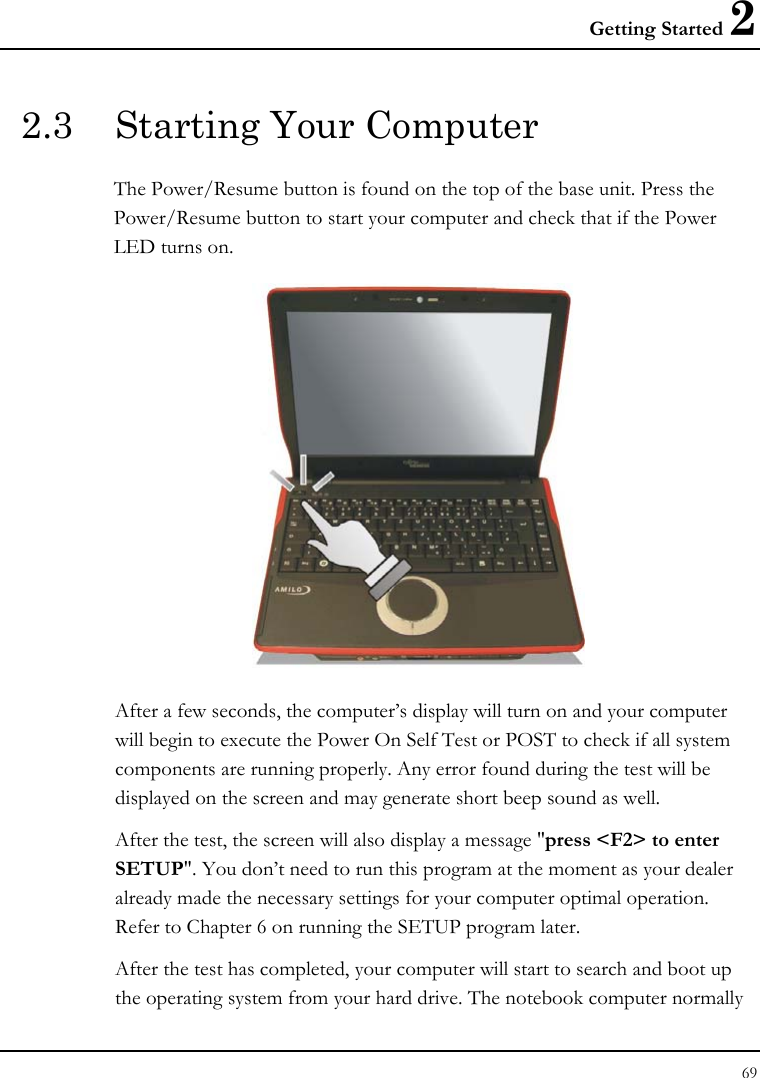
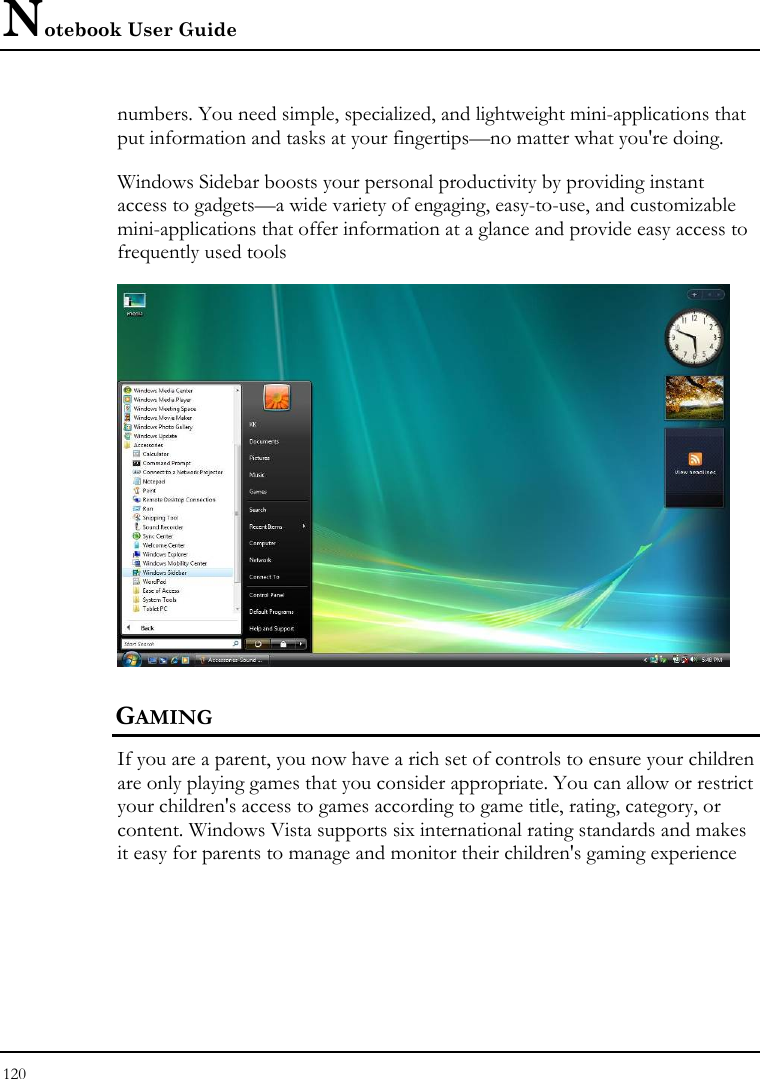
![Customizing Your Notebook 6 139 6.2.2 SECONDARY MASTER SUB-MENU Phoenix BIOS Setup Utility Main Secondary Master [WDC WD1600BEVS-07RST0-(S1)] Item Specific Help Type: [Auto]User = you enter LBA Format parameters of hard-disk Total Sector: 312581808 drive installed at this Maximum Capacity: 160GB SATA1 connection. Auto = autotypes Multi-Sector Transfers: [16 Sectors] hard-disk drive LBA Mode Control: [Enabled] installed here. 32 Bit I/O: [Disabled] CD-ROM = a CD-ROM Transfer Mode: [FPIO 4 / DMA 2] drive is installed here. Ultra DMA Mode: [Mode 5] ATAPI Removable = removable disk drive is installed here. F1 Help Ç È Select Item -/+ Change Values F9 Setup Defaults Esc Exit Å--> Select Menu Enter Select Sub-Menu F10 Save and Exit Use the Type field to select the drive type installed. You can select different drive types by pressing <Space> bar. Set this option to Auto so your computer will automatically detect the drive type during power on. Set this option to None when your computer is not installed any devices. Press <Esc> to return to the Main Menu.](https://usermanual.wiki/First-Computer/MR031BT/User-Guide-877937-Page-139.png)
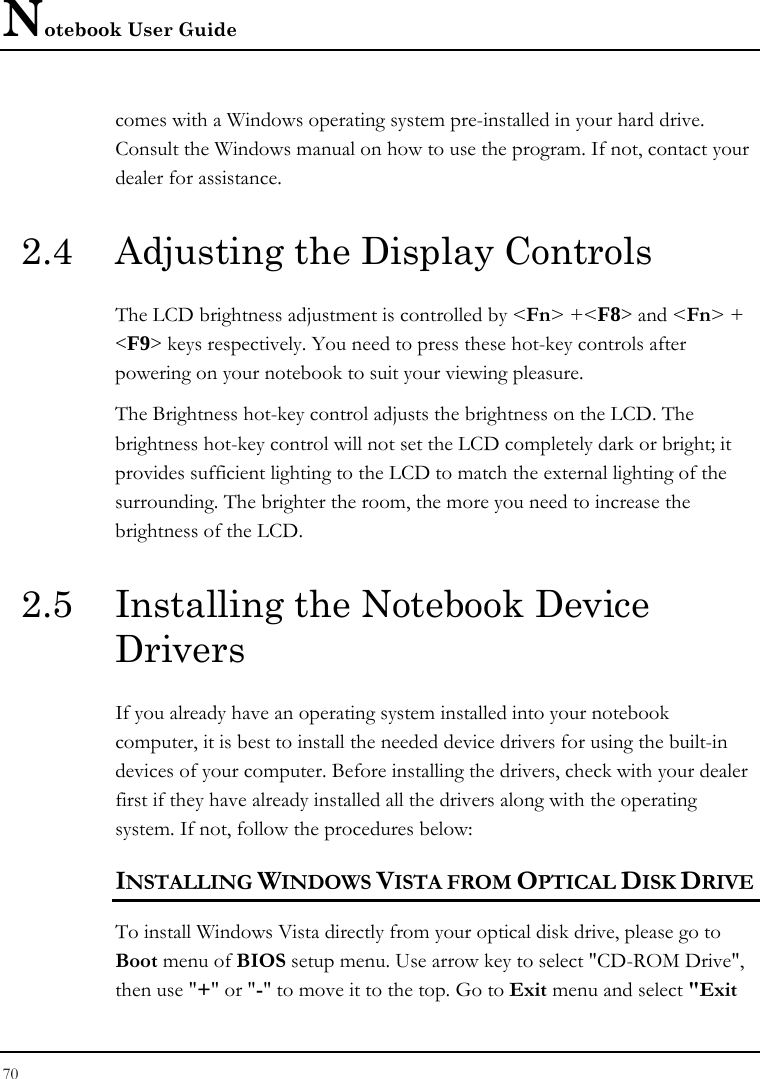
![Notebook User Guide 140 6.3 Using the Advanced CMOS Setup Phoenix BIOS Setup Utility Main Advanced Security Boot Exit Item Specific Help Legacy USB Support [Enabled] Enable support for Disable Logo screen: [Disabled] Legacy Universal Serial Bus SATA – Device 31, Function 2: [Enhanced] AHCI Configuration: [Enabled] F1 Help Ç È Select Item -/+ Change Values F9 Setup Defaults Esc Exit Å--> Select Menu Enter Select Sub-Menu F10 Save and Exit • Legacy USB Support Enable or disable the USB Bus support when in connection with USB device. • Disable Logo Screen Lets you display POST screen or Logo screen by choosing “Enabled” or “Disabled”, respectively. • SATA – Device 31, Function 2: This function lets you choose “Compatible” or “Enhanced” to define the SATA or PATA controller mode. For enabling the AHCI configuration, you should choose “Enhanced” option first.](https://usermanual.wiki/First-Computer/MR031BT/User-Guide-877937-Page-140.png)
![Customizing Your Notebook 6 141 • AHCI Configuration Lets you choose “Enabled” or “Disabled” to activate or inactive the AHCI mode for Windows Vista driver. 6.4 Using Security Menu Setup Phoenix BIOS Setup Utility Main Advanced Security Boot Exit Item Specific Help Supervisor Password Is: Clear User Password Is: Clear Supervisor Password controls access to the Set Supervisor Password [Enter] setup utility. Set User Password [Enter] Fixed disk boot sector [Normal] Password on boot [Disabled] F1 Help Ç È Select Item -/+ Change Values F9 Setup Defaults Esc Exit Å--> Select Menu Enter Select Sub-Menu F10 Save and Exit • Supervisor Password Is Set/Clear selections show that the notebook is under controlled by Supervisor Password or not. • User Password Is Set/Clear selections show that the notebook is under controlled by User Password or not.](https://usermanual.wiki/First-Computer/MR031BT/User-Guide-877937-Page-141.png)