First Computer R02501 SERVER User Manual USERS MANUAL 1
First International Computer Inc SERVER USERS MANUAL 1
Contents
- 1. USERS MANUAL 1
- 2. USERS MANUAL 2
USERS MANUAL 1
1
FIC Maat user manual V4.0
CHAPTER 1 HARDWARE INSTALLATION .....................................................................................4
1.1 HARDWARE SPECIFICATION:..........................................................................................................4
1.2 HARDWARE INSTALLATION..............................................................................................................5
1.3 CLIENT PC CONFIGURATION..........................................................................................................7
1.4 FORMAT STORAGE ......................................................................................................................8
CHAPTER 2 QUICK SETUP..............................................................................................................10
2.1 MAIN MENU SETUP ......................................................................................................................10
2.2 STEPS OF QUICK SETUP...............................................................................................................11
CHAPTER 3 NETWORK INTERFACE ............................................................................................16
CHAPTER 4 SYSTEM CONFIGURATION......................................................................................20
4.1 SHUTDOWN AND REBOOT ............................................................................................................20
4.1.1 Shutdown.............................................................................................................................20
4.1.2 Reboot..................................................................................................................................21
4.2 LOAD DEFAULTS ...........................................................................................................................21
4.3 SYSTEM NTPTIME/DATE / TIMEZONE...........................................................................................22
4.3.1 System NTPtime/date........................................................................................................22
4.3.2 System Timezone...............................................................................................................22
4.4 EVENT NOTIFY..............................................................................................................................22
4.5 UPGRADE......................................................................................................................................23
4.6 SYSTEM LANGUAGE .....................................................................................................................23
4.7 SAVE SYSTEM CONFIGURE FILE...................................................................................................24
4.8 SYSTEM LOGGING ........................................................................................................................24
CHAPTER 5 ACCOUNT MANAGEMENT.......................................................................................26
5.1 ADD ACCOUNTS............................................................................................................................28
5.1.1 Create Single-user Accounts:...........................................................................................28
5.1.2 Create Multi-user Accounts by Serial Number...............................................................29
5.2 ADD ACCOUNTS IN BATCH ............................................................................................................30
5.3 ACCOUNT QUERY .........................................................................................................................32
5.3.1 Query....................................................................................................................................32
5.3.2 Hidden..................................................................................................................................33
5.3.3 Modify & Delete Single User.............................................................................................34
5.3.4 Modify & Delete Multiple Users........................................................................................35
5.4 DEFAULTS FOR ACCOUNT.............................................................................................................36
5.5 CHANGE ADMIN USER PASSWORD ..............................................................................................36
5.6 ACCOUNT VERIFICATION...............................................................................................................37
5.7 USER LOG LOGGING ....................................................................................................................37
2
CHAPTER 6 SERVICE .......................................................................................................................38
6.1 ADMINTOOL...................................................................................................................................38
6.1.1 Configuration:......................................................................................................................39
6.1.2 Firewall Configure: .............................................................................................................39
6.2 WEB CACHE .................................................................................................................................40
6.2.1 Steps of Cache Configuration...........................................................................................40
6.2.2 Enable Transparent Mode.................................................................................................41
6.2.3 Client-end Browser Configuration (Microsoft Windows Client)...................................43
6.2.4 Cache Peer ..................................................................................... 錯誤! 尚未定義書籤。
6.2.5 Multi Router Traffic Grapher (MRTG).......................................... 錯誤! 尚未定義書籤。
6.2.6 Cache Management....................................................................... 錯誤! 尚未定義書籤。
6.3 DHCP SERVICE ....................................................................................... 錯誤! 尚未定義書籤。
6.3.1 Steps of DHCP Configuration....................................................... 錯誤! 尚未定義書籤。
6.3.2 DHCP Client-End Configuration................................................... 錯誤! 尚未定義書籤。
6.3.3 DHCP Logging................................................................................ 錯誤! 尚未定義書籤。
6.4 DNS ......................................................................................................... 錯誤! 尚未定義書籤。
6.4.1 Configurations................................................................................. 錯誤! 尚未定義書籤。
6.5 FTP .......................................................................................................... 錯誤! 尚未定義書籤。
6.5.1 Steps of FTP Configuration........................................................... 錯誤! 尚未定義書籤。
6.5.2 Anonymous Configuration............................................................. 錯誤! 尚未定義書籤。
6.6 MAIL.......................................................................................................... 錯誤! 尚未定義書籤。
6.6.1 Mail Configuration .......................................................................... 錯誤! 尚未定義書籤。
6.6.2 Mail Alias.......................................................................................... 錯誤! 尚未定義書籤。
6.6.3 Mail Access List Configuration ..................................................... 錯誤! 尚未定義書籤。
6.6.4 Configure Mail Domain for Localhost.......................................... 錯誤! 尚未定義書籤。
6.6.5 Configure Email-Relay Domain.................................................... 錯誤! 尚未定義書籤。
6.6.6 Configure Group Mail Domain...................................................... 錯誤! 尚未定義書籤。
6.6.7 Mail Queue ...................................................................................... 錯誤! 尚未定義書籤。
6.6.8 Mail Logging(SendMail)................................................................. 錯誤! 尚未定義書籤。
6.6.9 Mail Logging(Simple)..................................................................... 錯誤! 尚未定義書籤。
6.6.10 Mail for root & sysop Managers................................................. 錯誤! 尚未定義書籤。
6.6.11 Mail Tools....................................................................................... 錯誤! 尚未定義書籤。
6.7 MRTG (MULTI ROUTER TRAFFIC GRAPHER) TRAFFIC MONITORING..... 錯誤! 尚未定義書籤。
6.7.1 MRTG Configuration...................................................................... 錯誤! 尚未定義書籤。
6.7.2 MRTG Logging................................................................................ 錯誤! 尚未定義書籤。
6.8 NAT .......................................................................................................... 錯誤! 尚未定義書籤。
6.8.1 Configuration................................................................................... 錯誤! 尚未定義書籤。
6.8.2 Port Redirection.............................................................................. 錯誤! 尚未定義書籤。
6.8.3 NAT Logging.................................................................................... 錯誤! 尚未定義書籤。
6.9 NETBIOS SERVICES ................................................................................. 錯誤! 尚未定義書籤。

3
6.9.1 NetBios Configuration.................................................................... 錯誤! 尚未定義書籤。
6.9.2 Volume Management..................................................................... 錯誤! 尚未定義書籤。
6.9.3 Connection ...................................................................................... 錯誤! 尚未定義書籤。
6.9.4 NetBios Logging ............................................................................. 錯誤! 尚未定義書籤。
6.10 POSTGRESQL........................................................................................ 錯誤! 尚未定義書籤。
6.10.1 Database Admin........................................................................... 錯誤! 尚未定義書籤。
6.10.2 Server Access Admin................................................................... 錯誤! 尚未定義書籤。
6.11 MYSQL................................................................................................... 錯誤! 尚未定義書籤。
6.12 SSH ....................................................................................................... 錯誤! 尚未定義書籤。
6.12.1 SSH Configuration ....................................................................... 錯誤! 尚未定義書籤。
6.13 TELNET ................................................................................................ 錯誤! 尚未定義書籤。
6.13.1 TELNET Configuration ................................................................ 錯誤! 尚未定義書籤。
6.14 WEB MAIL............................................................................................... 錯誤! 尚未定義書籤。
6.14.1 Operation Procedure to enter Open WebMail......................... 錯誤! 尚未定義書籤。
6.14.2 User Preferences ......................................................................... 錯誤! 尚未定義書籤。
6.14.3 Compose Message...................................................................... 錯誤! 尚未定義書籤。
6.14.4 Check Mails................................................................................... 錯誤! 尚未定義書籤。
6.14.5 Delete Mails .................................................................................. 錯誤! 尚未定義書籤。
6.14.6 Address Book................................................................................ 錯誤! 尚未定義書籤。
6.14.7 Web Mail Configure ..................................................................... 錯誤! 尚未定義書籤。
6.14.8 Web Mail Logging ........................................................................ 錯誤! 尚未定義書籤。
6.15 WEB SERVICE ........................................................................................ 錯誤! 尚未定義書籤。
6.15.1 Web Port Configure ..................................................................... 錯誤! 尚未定義書籤。
6.15.2 Web Service Logging .................................................................. 錯誤! 尚未定義書籤。
6.15.3 Place Homepage.......................................................................... 錯誤! 尚未定義書籤。
CHAPTER 7 FIREWALL ................................................................................ 錯誤! 尚未定義書籤。
7.1 ALLOW PORT CONFIGURE........................................................................ 錯誤! 尚未定義書籤。
7.2 DENY IP CONFIGURE ............................................................................... 錯誤! 尚未定義書籤。
CHAPTER 8 TIMEFINDER ............................................................................ 錯誤! 尚未定義書籤。
8.1 BACKUP TO HOST ..................................................................................... 錯誤! 尚未定義書籤。
8.2 BACKUP AND DOWNLOAD......................................................................... 錯誤! 尚未定義書籤。
8.3 TIMEFINDER FROM HOST.......................................................................... 錯誤! 尚未定義書籤。
8.4 TIMEFINDER FROM BROWSER .................................................................. 錯誤! 尚未定義書籤。
CHAPTER 9 ONLINE HELP.......................................................................... 錯誤! 尚未定義書籤。
FCC NOTE……………………………………………………………………………………………89

4
Chapter 1 Hardware Installation
1.1 Hardware Specification:
Dimension •246 mm * 56 mm * 240 mm
CPU •Transmeta Crusoe TM5600 500MHz
Memory •One 144 pin SODIMM slot, can support SDRAM 64 / 128 / 256 /
512MB
Storage
•2.5 “ IDE HDD, support 20/30/40/60GB capacity HDD
•CompactFlash™ Memory Card, support 16 / 32 / 64 / 128 /256MB
Module
Network
•4 10/100 Fast Ethernet NIC
•One 10/100 Mbps Fast Ethernet Up-Link Port
•Software Driver for Wireless LAN Card (AP) 802.11b
Power Supply •External 60W/12V AC Power Adaptor
LED Display
•Power LED
•System LED
•Ethernet Network LED
•WAN LED
•Wireless LAN AP LED
Expansion Port
•2 USB Port (Support USB 1.1)
•1 Parallel Port
•1 COM Port/RS-232 DB-9 Port (Console Port)
•1 Power Switch/Reset Button
•1 AC Power Adaptor Socket
•4 Ethernet Port (RJ45)
•1 WAN Port (RJ45)
Material of Box •Metal and Plastic Case
•Fanless
5
1.2 Hardware Installation
It’s very simple for the Maat installation. According to the diagram below, please connect
the power source and appropriate cable to the Maat system. You will easily to finish the
hardware installation.
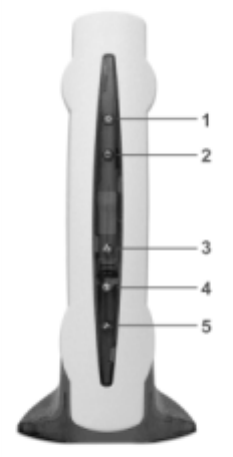
1. Power LED (Green):
It’s to indicate system power status.
2. System LED (Red):
While system in booting process the LED will be quickly blinking. It will turn to be
slowly flash while system in normal operation.
3. Ethernet LED (Yellow):
The Ethernet LED used to indicate the successful connection of Ethernet LAN port.
It will become flash to indicate the transmission of Ethernet packet.
4. WAN LED (Amber):
The WAN LED is used to indicate the successful connection of Ethernet WAN port. It
will become flash to indicate the transmission of Ethernet packet.
5. Wireless AP LED (Blue):
The LED is used to indicate the successful connection of wireless LAN port. It will
become flash to indicate the transmission of wireless LAN packet.
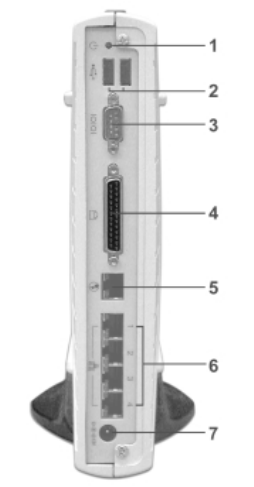
The diagram below is the layout of connector in rear Maat server. Please connect the
power and network cable to finish the Maat server installation.
6
1. Power Switch (Reset Switch):
It’s the switch for resetting the Maat system. The Maat system will automatic getting
up while you connect the power source.
2. Two USB Port:
The Maat server build in two USB ports. It provided “Plug and Play” function for
device connectivity.
3. COM Port (Console Port):
The system equip with an RS-232 (DB-9) console port. It allow system administrator
to connect any terminal or modem device for system configuration or diagnostic
purpose.
4. Parallel Port:
The Parallel Port is used to printer or scanner connection.
5. WAN Ethernet Port:
The WAN Ethernet Port is dedicated for connecting to WAN network. Please
connect this port to your Internet gateway device.
6. 4 RJ45 Ethernet Port (1、2、3、4):
Maat system equip with four 10/100 fast Ethernet ports. It allows user to connect
their client user or another Ethernet switch device.
7. AC Power Adaptor Socket:
Please connect the AC power adaptor cable to this socket.
After you connect the power adaptor to Maat system. The power will automatically
getting up while you connect the power source. The “Power Switch” button is just for
resetting the system.
While system booted up. You will see a login screen. Please Login to the system by
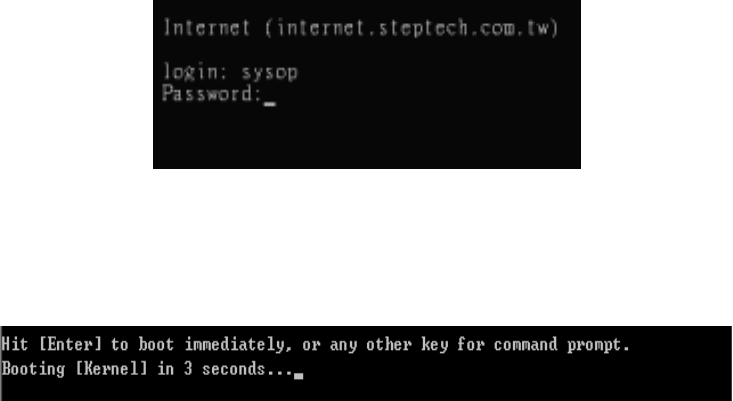
7
entering “sysop” for User Name and “steptech” for Password as following:
While in system boot process, you can press any key when the message “Hit [Enter] to
boot immediately, ….” is displayed on the screen. System will enter to “OK” prompt.
Here to describe three commands for system recovery function:
1. boot –s: is used to recover the sysop and root’s password to system default as
“steptech” and “no password”. The root’s password will reset to as “none”. For
security reason you are recommended to change their password through the Mail
Tool home page.
2. boot –c: is used to completely reset the system default.
3. boot –d: is used to perform the “fdisk” function. The login prompt will appear after the
“fdisk” process. You can login as “sysop” to continue performing “format” command
process. They will accompany with a melody sound effect while the format process is
in progress.
1.3 Client PC Configuration
Now connect another client PC to Maat server via crossover cable or hub.
Server will configure related settings via the browser. The default value of Maat system
network interfaces is as follows:
IP (public): 172.16.100.1 NetMask: 255.255.0.0
Client PC configurations are very simple, just requiring a few of steps as shown below:
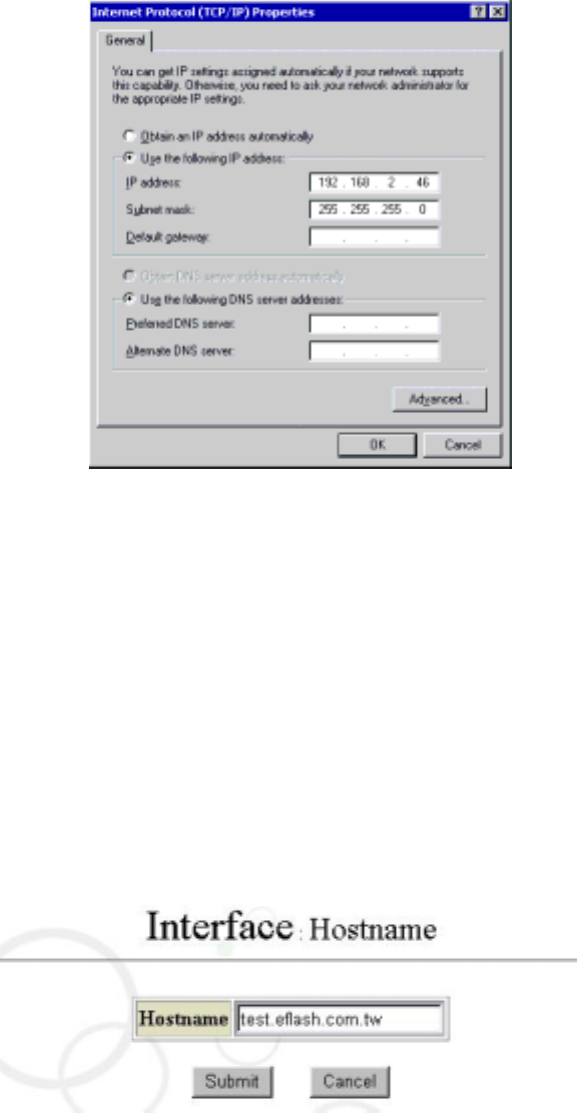
1. Click the right mouse button on the “My Network Places” and select “Properties”.
Then select “TCP / IP” “NIC”.
2. As shown in the figure below, enter related IP configurations before clicking OK. After
the reboot finishes, start up the browser. If the Proxy configurations are enabled,
disable the configuration. Let’s take IE as an example: Select Tools Internet
options Connections Local Area Network (LAN) configurations Disable the
“Use a proxy server” option.
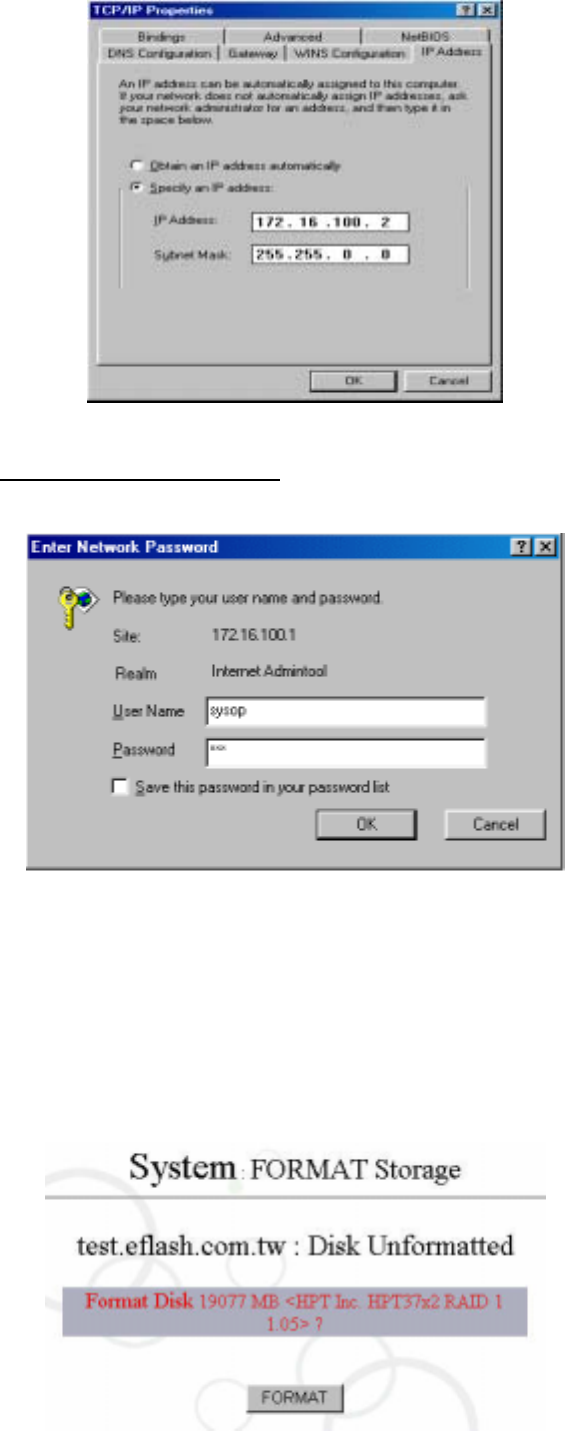
8
3. Enter the URL of http://172.16.100.1:10000/ on the browser.
4. Log on the monitoring interface by entering “sysop” for User Name and “steptech” for
Password.
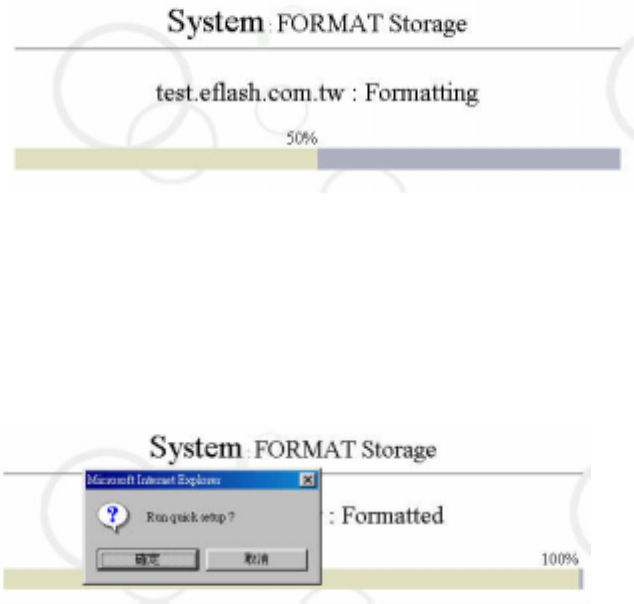
1.4 FORMAT Storage
If the HD has yet been formatted, a screen will be shown as follows:
9
In this case, click “Format” to format the HD. Before the format is completed, don’t
disrupt the browser window, or there will be unforeseeable errors. The figure below
shows the status during the formatting.
After the format is completed, a screen will be shown as follows. Since no reboot is required,
you can proceed with Quick Setup or other related configurations.
PS:Please don’t use the “fdisk” command on local as you wish lest to clear the partition of
Maat chip.

10
Chapter 2 Quick Setup
The quick setup of system configurations allows users to complete the basic settings of
system configurations in simple steps and within a short time. The basic settings include the
IP, Netmask, DNS server addresses, Time Zone, system time, Hostname, NetBios settings
(network neighborhood) of the NIC, as well as the applications provided by the system. After
the settings are completed, the basic configuration of the system is also completed – the
system can serve you right now without any trivial settings required.
2.1 Main Menu Setup
Log in the system by using “root” password “steptech” as an account in the host’s control
panel screen, and then a main menu initially configured by the system will immediately
appear. The screen allows users to configure initial settings before they are able to enter
the browser’s management interface to change settings, so as to facilitate subsequent
connection. In the main menu, what you have to do is set up the HOSTNAME, IP
address, Netmask and Default Router. Then, without the hassle of reboot, you can apply
these settings and enter the browser’s management interface to change other settings.
Start with setting up the IP Address of NIC for the private network here, so that you can
use a nearby browser to configure other settings afterwards.
“6. Reset Admintool password”, the sixth item of the main menu, allows you to restore
the factory default password of “steptech” when you forgot the password “sysop”.
If you had changed some system settings that resulted in the system’s abnormal
operation, select “7. Write Default & Reboot” to conduct certain configurations and
thereby have these settings restore to the factory default settings.
“8. Reboot” means restarting the computer, and “9. Shutdown” turning off the machine.
After you select shutdown, bear in mind that there is no true shutdown without turning off
the host’s power supply. Or you can restart the computer by pressing any key.
The Main Menu is shown as follows:
MAIN MENU
Please select the action you wish to run
1 Exit this menu
2 Hostname: host.domain
3 Ip: 192.168.2.45
4 Netmsak: 255.255.255.0
5 Default Router: 192.168.2.254
6 Reset Admintool password
7 Write Default & Reboot
8 Reboot
9 Shutdown
OK Cancel
11
2.2 Steps of Quick setup
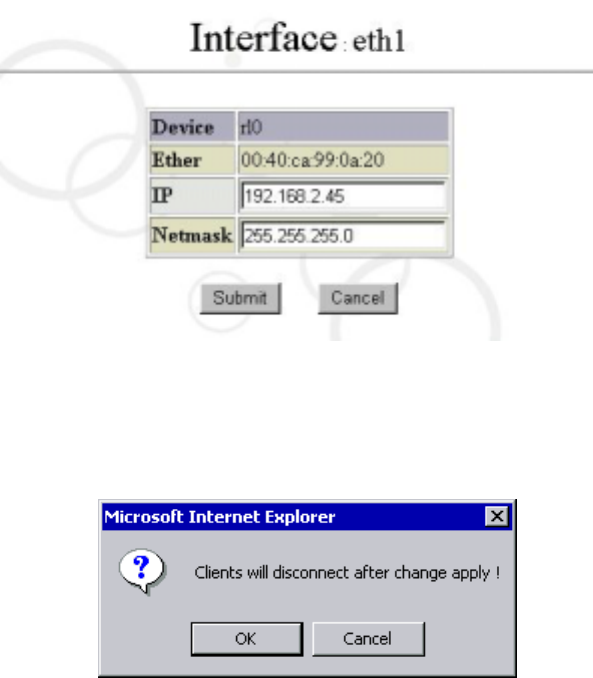
1. Interface:
As shown in the figure below (Realtek 8139-series is taken as an example here), it
automatically displays the name of devices and MAC Address. Enter related
configurations in individual fields, and then click “Submit”.
A window box will then appear, reminding you that client PCs will disconnect after
the change applied.
Change the TCP / IP configurations of client network configuration in accordance
with the IP and Netmask value you configured for the system.
Let’s take the IP / Netmask 192.168.2.45/255.255.255.0 of the system as an
example. The client configurations are shown as follows:
12
Upon the restart of PC, you can log on the system via the browser and thereby
proceed with other related configurations.
Now select the quick setup option at the left side, and then click “Submit” in the
“Interface”. Since the client and the system locate in the same network segment,
their IP and Netmask are the same, i.e., 192.168.2.46 and 255.255.255.0
respectively.
Then you can head for the completion of other related configurations by following
the subsequent steps of quick setup.
2. Hostname:
Enter the hostname in the Hostname field.
3. Routing Table:
Select Static Route or Routed for the Route Type. If you select Static Route, you can
configure the Default Router in the field below. If there are multiple routes in the
network environment, configure the settings in the fields of “Destination” and
“Gateway” that suit your needs.
13
4. Nameserver:
For setting up the Nameserver for the system.
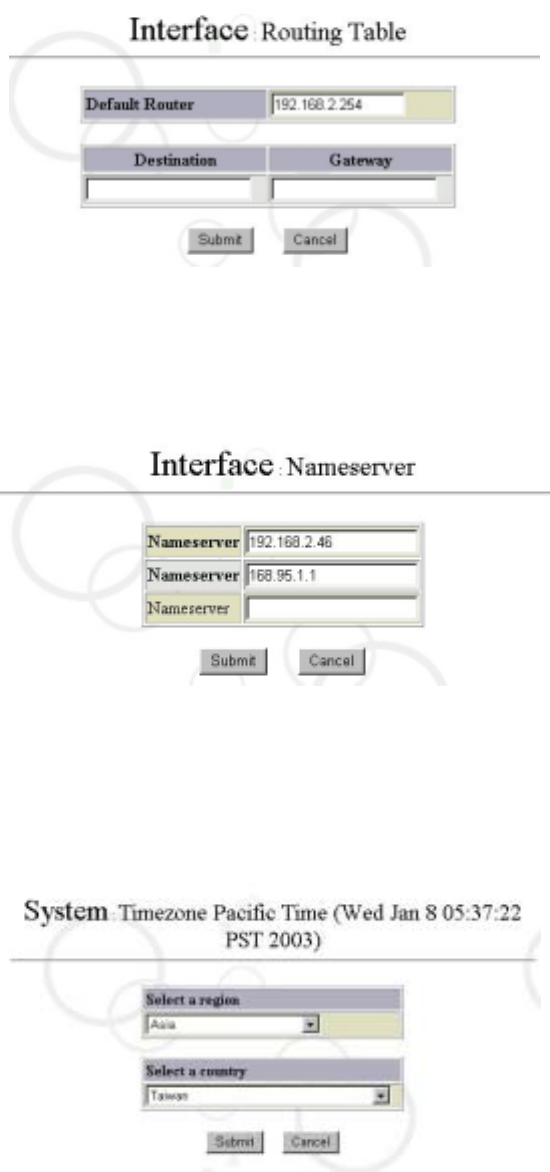
5. System Timezone:
For setting up the information on the timezone and country where the system is
located.
6. System NTPtime/date:
For setting up the current time and NTP Server for the system.
14
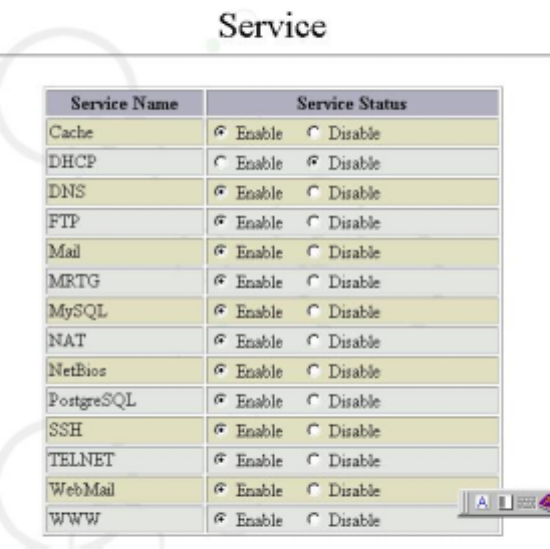
7. NetBios Configure:
For configuring the settings so that this server can be seen in the “My Network
Places”.
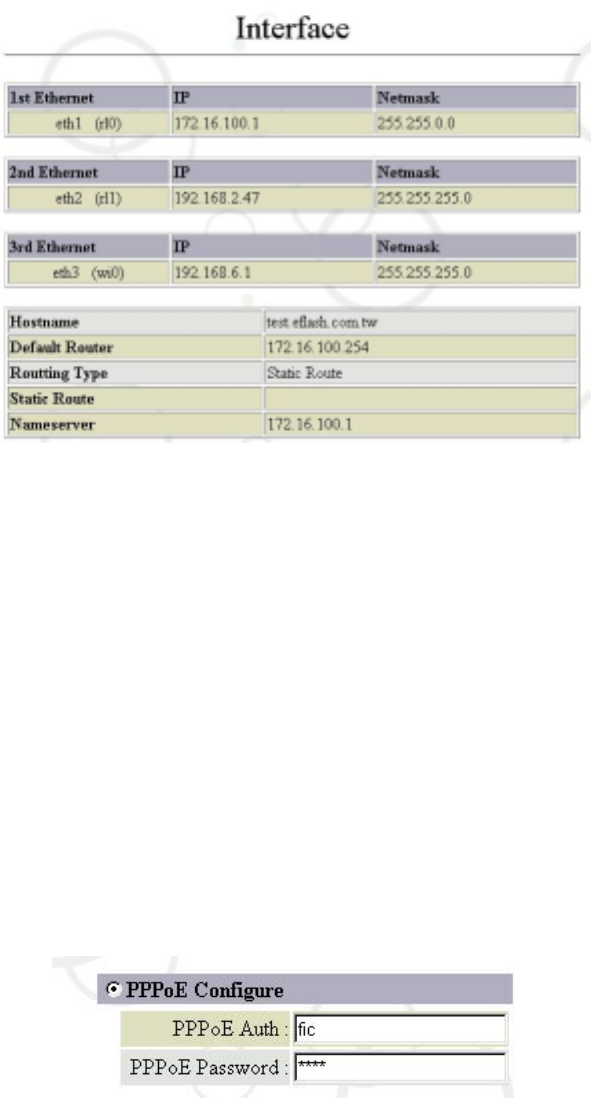
8. Service:
It is for setting up network services provided by the system. Each service item has
the options of Enable and Disable. If you want to start up a certain service, select
Enable, otherwise select Disable. After completing all of the settings, click “Submit”
to finish the basic configurations for the system. Then the screen will automatically
return to the homepage. For more detailed configurations, please refer to the
following chapters and sections.
15
16
Chapter 3 Network Interface
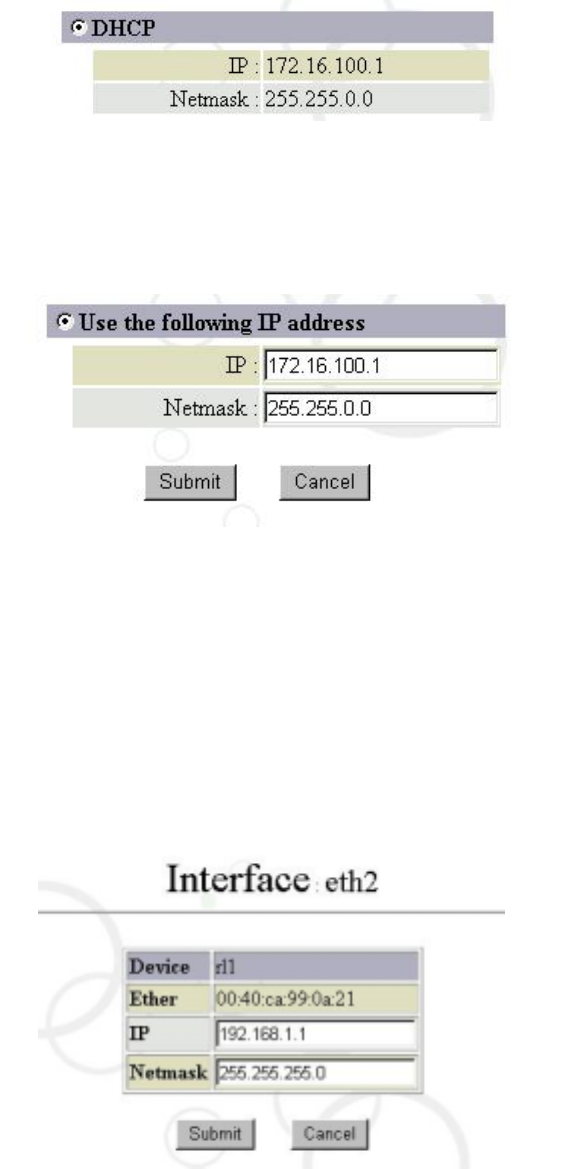
Select “Interface” of “System Management Tools”, and then a figure will appear as follows:
The figure displays current network configurations. If your system is equipped with more
than four Ethernet NICs, the menu will automatically extend and automatically detect the
manufacturers and the NIC types, without the hassle of manually setting up the driver.
Let’s have the description for each network NIC’s utilization:
1. 1st Ethernet NIC – It’s dedicated for connecting to WAN (Internet). For different
network connectivity requirement, there are three network architectures for user to
make desired configuration. Please select a correct architecture depends on your
network environment. The “Device” represents the NIC code identified by the system.
Here r1 stands for Realtek, fxp for Intel. The “Ether” represents MAC Address of the
NIC, that is the code of NIC manufacturers and serial number of the product.
1.1 PPPoE: If you are using ADSL for Internet connectivity. Than you have to enable
the PPPoE option. Please click on “PPPoE Configure”, the configuration table will
show as below. Please enter the authentication user and password information as
provided from ISP.
1.2 DHCP: If user using DHCP to dynamically apply for IP address from ISP. They
must to enable the DHCP function. Please click on “DHCP”, the configuration
table will show as below. You will find the acquired IP Address and Netmask
information in the field.
17
1.3 Fixed IP Address: You are capable to configure a fixed IP address for this NIC.
You can click on “Use a following IP Address”, the configuration table show as
below. Please enter the IP Address and Netmask information dedicated for this
NIC.
After you make any one of different configuration. Please click on “Submit” to apply
for changes.
2. 2nd Ethernet NIC – represents the NIC for connecting to your LAN network. Please
enter the IP address and Netmask information for the NIC. The Maat system also
equip with four RJ-45 Ethernet port for client user connection.
P.S. Please do NOT connect different network segment’s cable to same Ethernet switch
to avoid unexpected errors.
3. 4th Wireless NIC (Option) - The Maat system is capable to support wireless
connection from any client PC. If your Maat system equipped with wireless NIC, the
item field will automatically extend and automatically detect the manufacturers and
the NIC types, without the hassle of manually setting up the driver. Let’s take the
following wireless NIC as an example to describe how to configure each item.
Wireless AP(Access Point):
18
Maat is capable to support wireless network module. It provided Access Point
function for connection of wireless client. Client user will equip the wireless NIC and
connect to the Internet through the air.
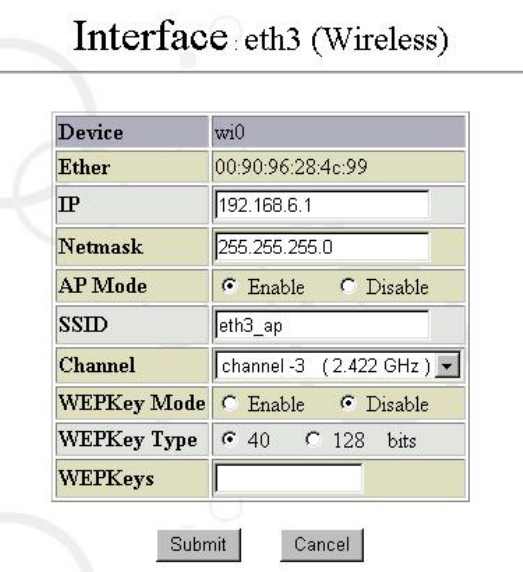
Click on the “4th Ethernet” to show the following:
AP Mode: Click on “Enable” to activate the Access Point Mode function on this
wireless NIC. If you select the “Disable” system will activate the wireless NIC in
normal user mode.(PS: If you want to use in Access Point Mode the wireless NIC
chip set must be Intersil PRISM with version 2.5 or above).
SSID:It’s to configure the network ID of Access Point. If you “Disable” the AP Mode
then you will enter network ID for another Access Point on the network.
Channel:It’s to configure the access channel among the standard 11 wireless
channel. The default is channel 3. You are allowed to change by your desired. In the
case of Access Point Mode. If user used the WindowsXP the system will
automatically detect the wireless channel.
WEPKey Mode:If you “Enable” the encryption function for wireless communication,
the transmission data will encrypted by WEP format. You must also to make
appropriate configuration in the client side.
WEPKey Type:Please choose the encryption key type among of 40 bits or 128 bits.
WEPKeys:Here please exactly to enter the key for data encryption. Please enter 5
characters for 40 bits encryption and 13 characters for 128 bits encryption.
4. Routing Table: For information on routing table configuration, please refer to Chapter
2 Quick Setup.
5. Hostname: For information on hostname configuration, please refer to Chapter 2
19
Quick Setup.
6. Nameserver: For information on Name Server configuration, please refer to Chapter
2 Quick Setup.
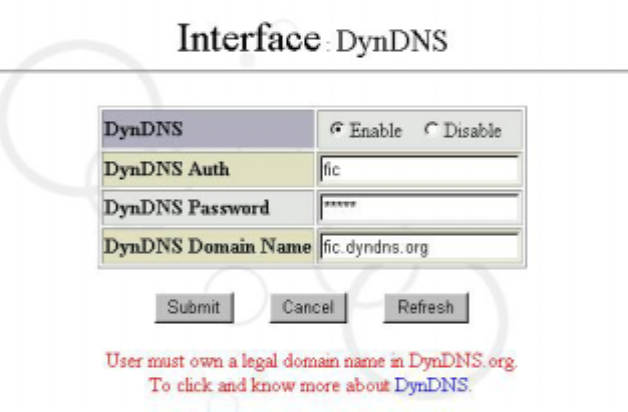
7. DynDNS: The Maat system support Dynamic DNS service. It provided user to create
their owned web home page even in case of using dynamic IP environment. Please
click on “DynDNS” the screen show as below. Before going to the configuration. You
must first to apply for required user account of dynamic DNS and their password. You
can click on the hyper link “DynDNS” on the lower right of following screen to apply
for above information. Then you are ready to input the user account, password and
domain name to following configuration table.
20
Chapter 4 System Configuration
System Configuration is the most basic parameter configuration of the Maat system. If you
have completed the quick setup mentioned in Chapter 2, part of parameters will automatically
appear in related fields configured by the system.
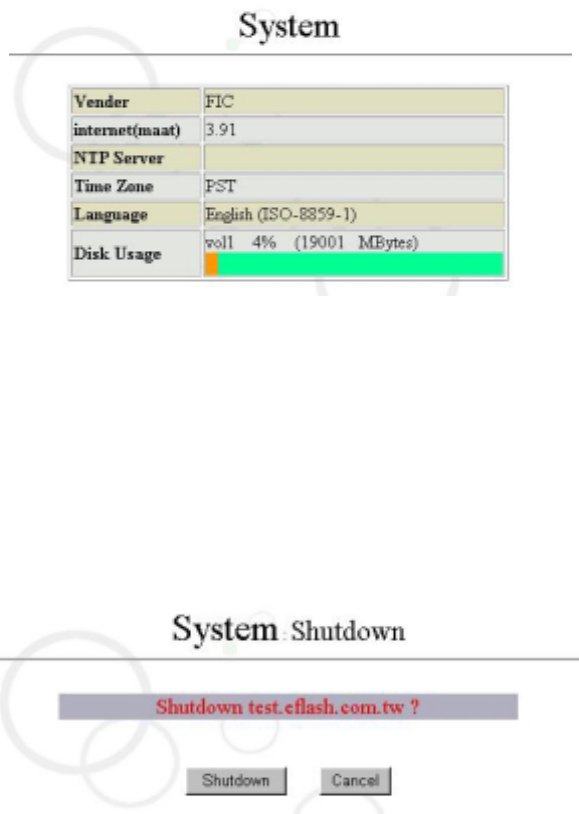
After clicking “System” on the left side of the management interface, a screen will appear as
follows:
4.1 Shutdown and Reboot
4.1.1 Shutdown
After clicking “Shutdown” in the “System” management interface, a figure will appear as
follows:
If you have determined to turn off the computer, select “Shutdown”. Then it just takes
30 seconds to one minute to shut down the power supply. You can also shut down the
power supply of the host when the following Maat screen appears!

21
syncing disks……done
The operating system has halted.
Please press any key to reboot
4.1.2 Reboot
After clicking on “Reboot” on the “System” management interface, a figure will appear as
follows:
If you have determined to restart the host, select “Reboot”.
※ NOTE:Please use the normal shutdown and reboot,otherwise the system will lost
the configuration until save the configuration itself.
4.2 Load Defaults
Maat system come with a function let system administrator to load system defaults. In
the case system become corrupted due for unknown reasons. This feature provided
system administrator a way to recover to original state. Please clicking “Load Defaults” to
show as follows:
You can press the “Submit” to load original defaults.
22
4.3 System NTPtime/date / Timezone
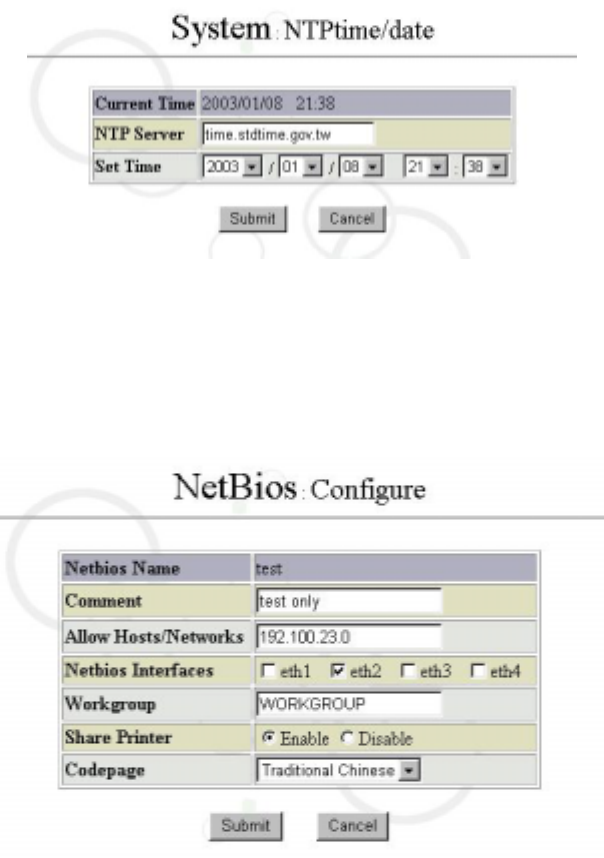
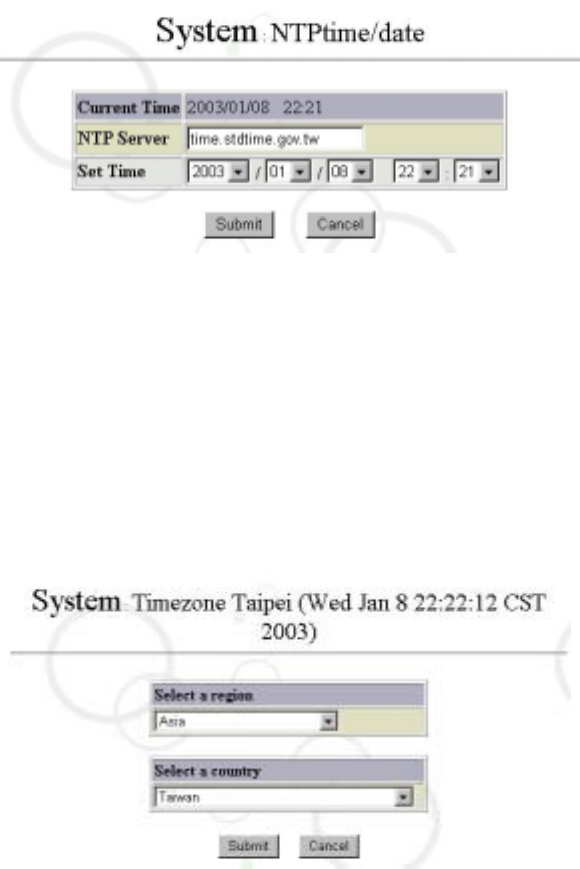
4.3.1 System NTPtime/date
After clicking “NTPtime/date” in the “System” management interface, a figure will appear as
follows:
If you want to edit the NTPtime/date, select the NTPtime/date you want in the “Set Time”
field, and then click “Submit”.
4.3.2 System Timezone
After clicking “Timezone” in the “System” management interface, a figure will appear
as follows:
You can select a region and a country where the system is located, and then click
“Submit”.
4.4 Event Notify
This allows you to set up which the system’s events are to be notified. After clicking
“Event” in the “System” management interface, a figure will appear as follows:

23
If you want to send a system message to managers, you can add the E-mail address of
managers to the “Event Notify” field.
4.5 Upgrade
After clicking on “Upgrade” on the “System” management interface, a figure will appear
as follows:
The system will automatically connect to the headquarters host. Select the upgrade
version you want to carry out upgrade via download. (Use this function very carefully.
Don’t make any selection if it is necessary at all.)
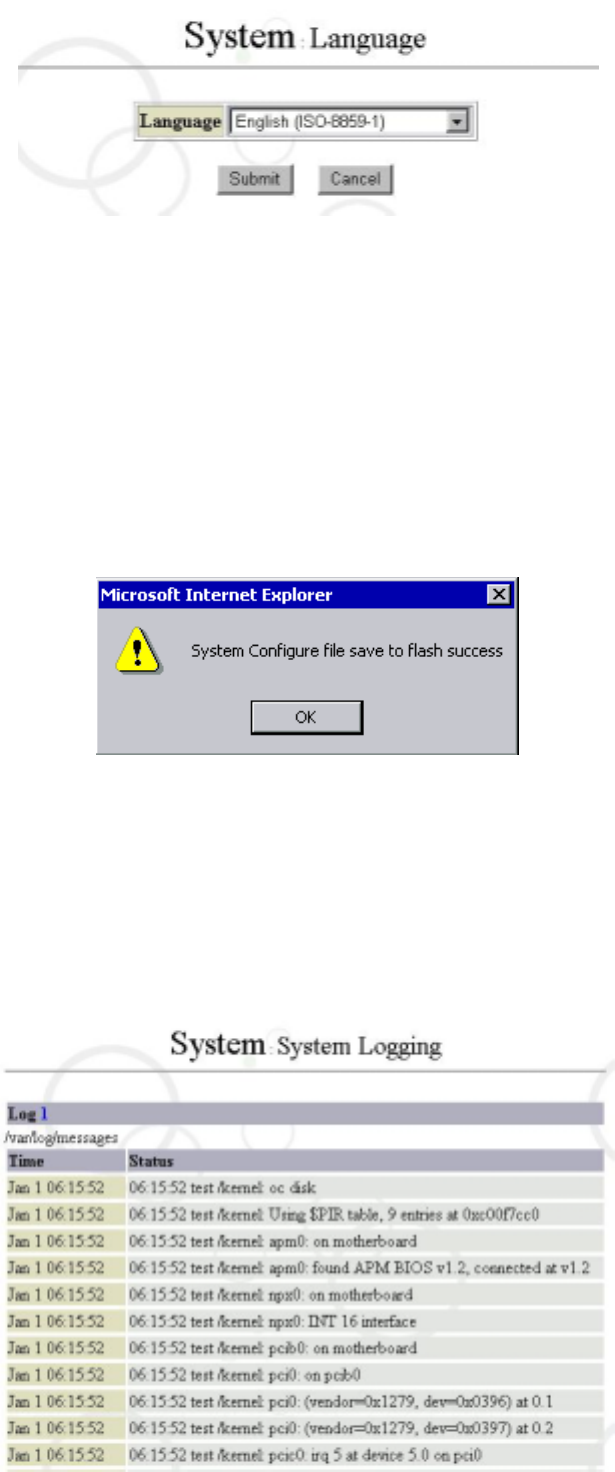
4.6 System Language
The system will automatically set up the same system language as the language used
by your browser. If the system fails in determining the browser’s language, it will
automatically come up with an English system interface. Of course, you can also set up
here a system language you want.
After clicking “System Language” in the “System” management interface, a figure will
appear as follows:
24
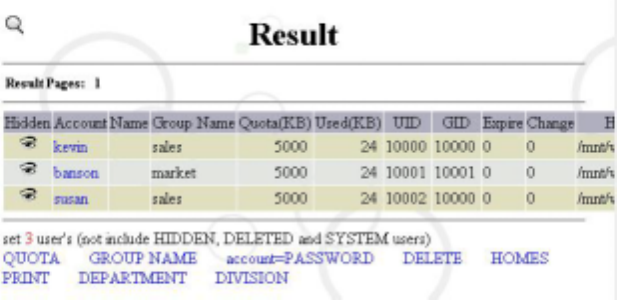
4.7 Save System Configure file
“WRI” allows you to save any configuration you made in the management interface into
Flash (Maat chip). Of course, the system will automatically save the System Configure
file when you shut down or restart the system.
After clicking on “System Configure file save” in the “System” management interface, a
figure will appear as follows:
Now the system has written the current system configurations into Flash.
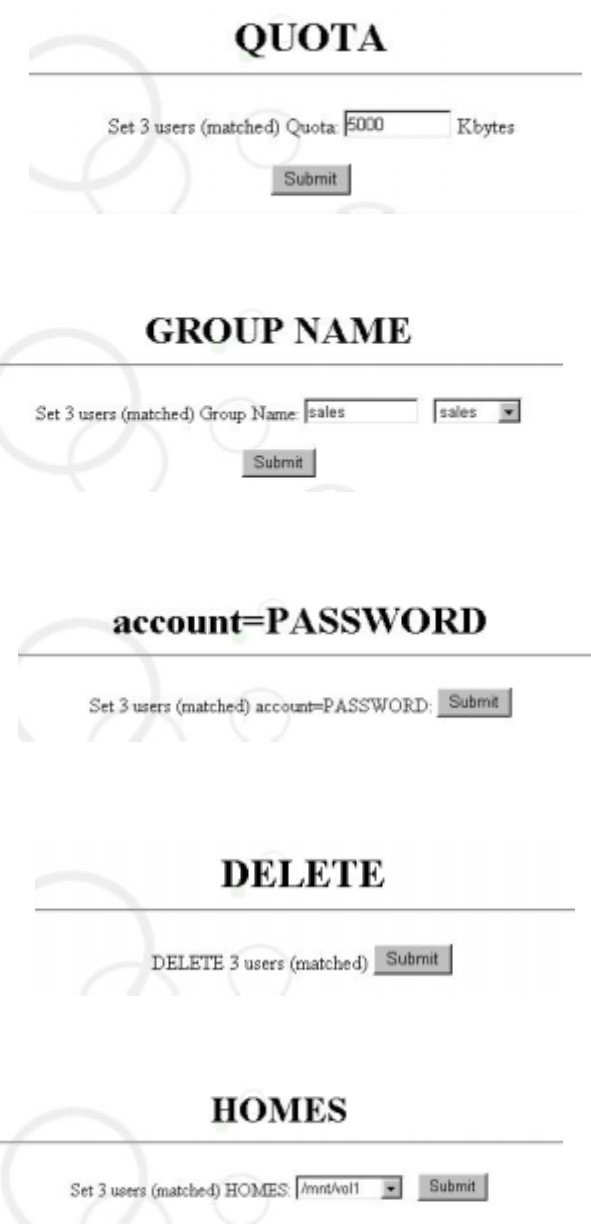
4.8 System Logging
After clicking “System Logging” in the “System” management interface, a figure will
appear as follows:
25
It allows you to check the information related to the operating system and hardware.
26
Chapter 5 Account Management
In the FreeBSD system, the files associated with accounts include /etc/master.passwd;
/etc/spwd.db; /etc/passwd/; /etc/pwd.db; /etc/group; /etc/aliases; /etc/aliases.db; and
/home/quota.user. The directories associated with accounts include /var/mail and /home/usr (a
default directory for the management interface to store user information). Actually, it is no piece of
cake for a UNIX beginner to edit so many files and directories at the same time.
In addition, it takes a long time to add, edit and delete massive accounts by using UNIX
commands. For instance, 1000 accounts generally takes one to two hours to go through process.
With its unique design, our system, however, allows you to handle that part of work simply by
editing the kernel, considerably enhancing the efficiency. With our system, the processing of
1000 – or even 10000 accounts – takes no more than a few seconds to finish, presenting you with
a perfect approach to account management!
After clicking “User” in the “Operator Menu”, a figure will be shown as follows:
(PS: After you finish configuring the system, “rootalias” will be set up automatically as a default
account. This account is mainly used to receive mails for sysop and root; in other words,
whenever there are mails sent to the mailbox of sysop or root, the mails will be delivered to the
rootalias account. Therefore managers are expected to use this account to receive mails. Note:
Now “rootalias” has already hidden, so you can’t see or delete it in User Mannagement.)
Click “User” in the “Operator Menu”, and the system will print out all user lists. Each option
described below allows you to carry out quick setup for the users listed above:
A. Quota: allows you to configure the Disk Quota for the listed users, and to set an upper limit of
the disk space occupied by users in the system. For example, 1024 Kbytes means 1MB
here.
27
B. Group: allows you to set up the name of the group to which users belong.
C. Account = Password: allows you to set listed users’ passwords the same as their accounts.
D. Delete All: allows you to delete all listed users.
E. HOMES: allows you to set up the root directory for listed users.
F. Print User List: is shown in the figure below.
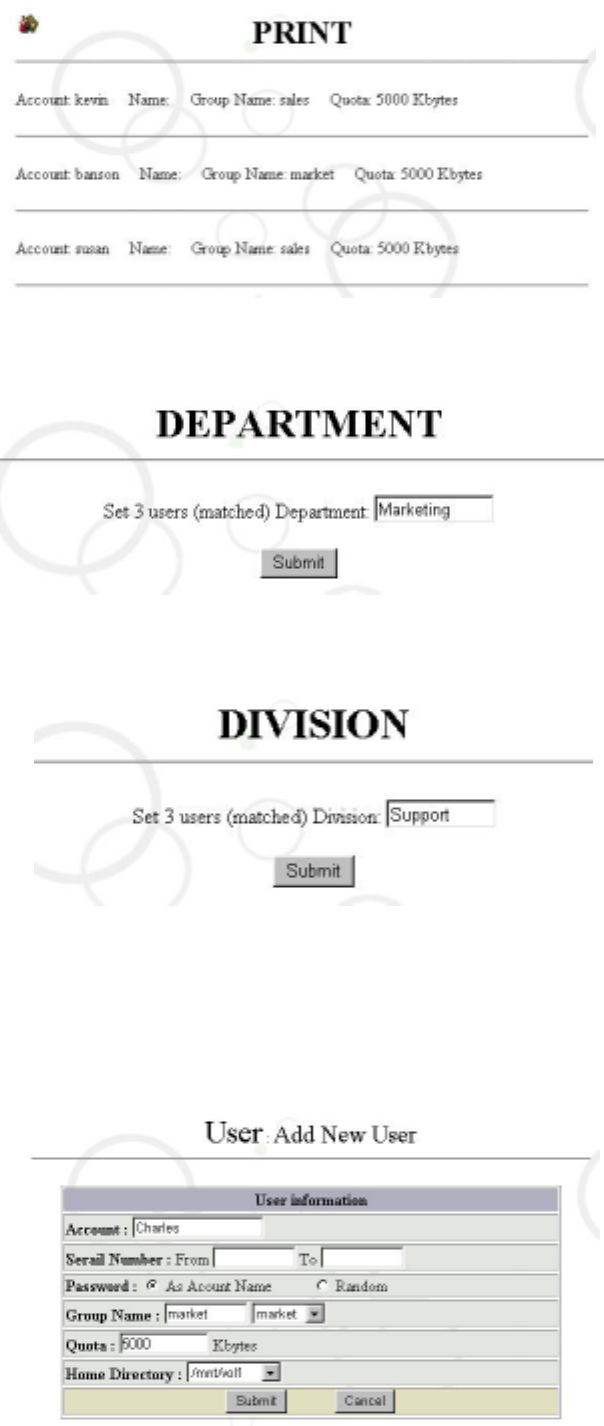
28
G. Department: allows you to set up departments for listed users.
H. Division: allows you to set up the division to which users belong to.
5.1 Add Accounts
After clicking “Add ” in the management interface, a figure will be shown as follows:
5.1.1 Create Single-user Accounts:
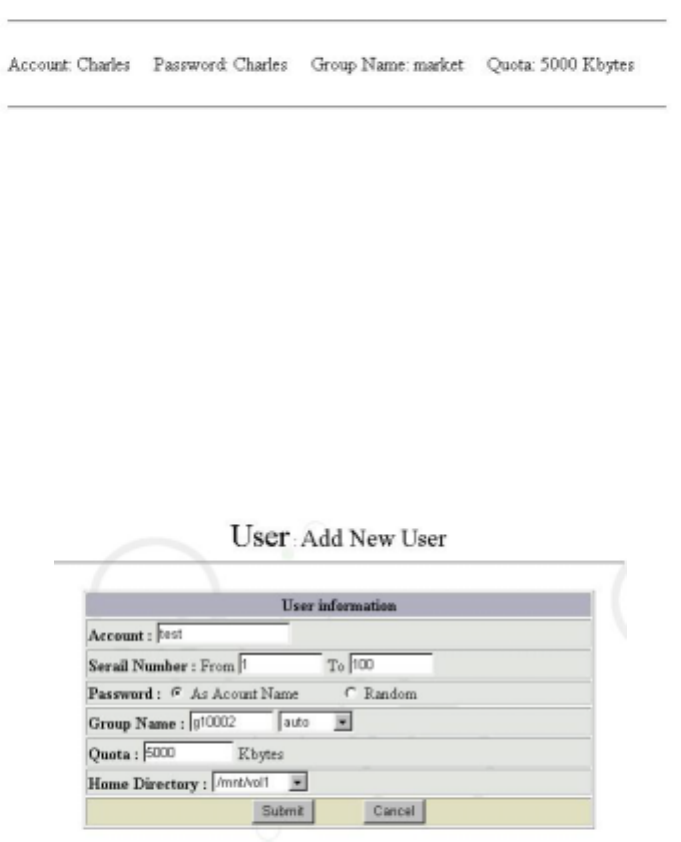
29
Enter the name you want, such as “Charles”, in the “Account” field. You can also enter “Group
Name”, “Way to generate password”, “Disk Quota”, or “User Directory” here by the way, and
then click “Submit” as shown in the figure below. There is the difference between the upper
and lower cases of the account name of users in the UNIX system, therefore please pay
attention when entering the data. Recommend to use lowercase otherwise you may not sent
or received e-mail normally in MS-windows system.
5.1.2 Create Multi-user Accounts by Serial Number
This feature is similar to what is mentioned above, except for requiring additional entry fields.
After clicking “Add” in “User”, as shown in the figure below, enter the same account name in
the “Account” field. Then enter the range of serial number according to your requirement. The
settings of other parts are the same as those in adding single-user accounts.
For instance, create the accounts ranging from test001 to test100 as shown in the table
below.
Click “Submit” and a report will be generated based on the serial number, as shown in the
figure below:
30
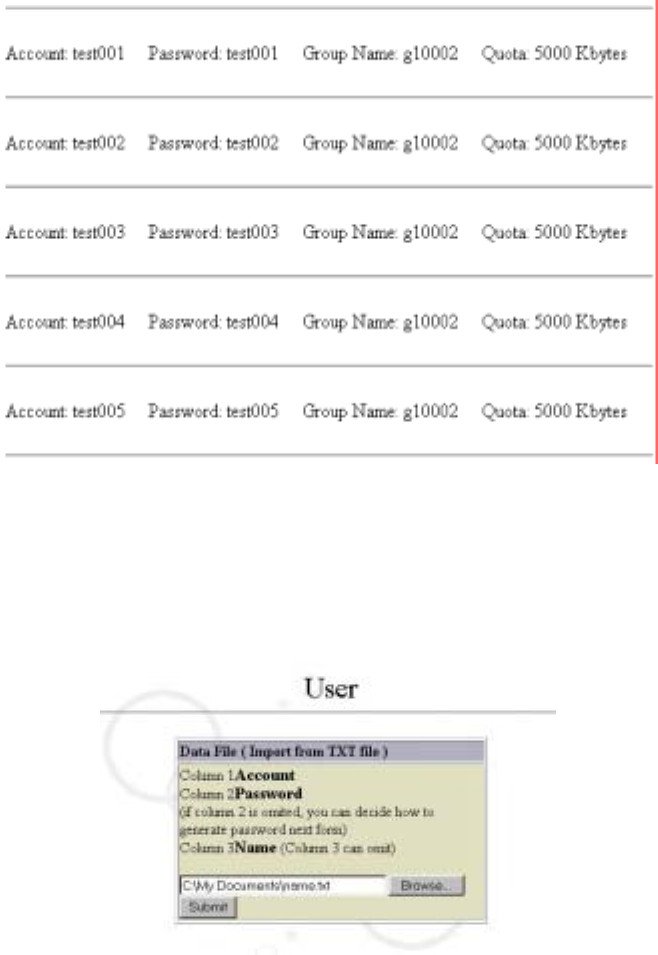
5.2 Add Accounts in Batch
Click “Import” in “User” management, as shown in the figure below:
Add a text file (e.g.: Name.txt) by using text editors like Notepad or WordPad. The content
includes three columns, of which is “Account”, “Password” and full “Name” .
The third column can be omitted.
For example, enter Kevin (Kevin haung) and Peggy (peggy li), as shown in the figure below.
Kevin abc Kevin haung
Peggy xyz Peggy li
Click “Browse” and select the edited text file (e.g.: Name.txt). Then click “Open”.
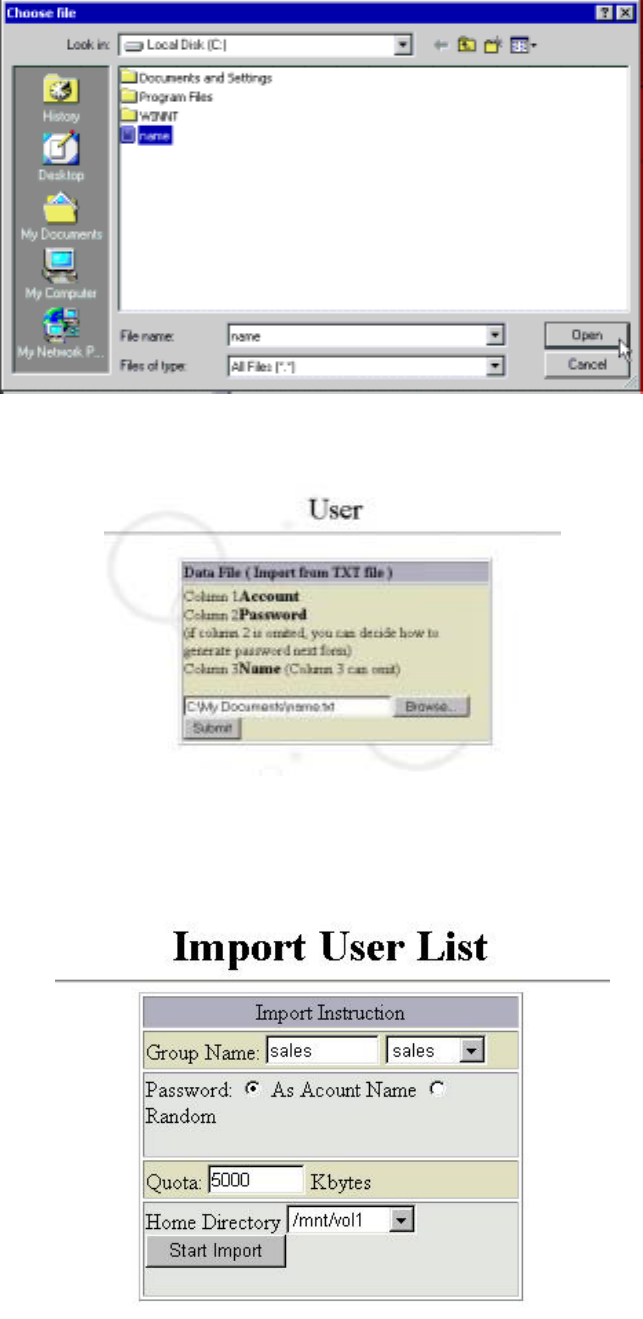
31
As shown in the figure below, click “Submit”.
Enter settings in the fields requiring related configurations.
Click “Start Import”, and the result will be as follows. The system will automatically import
the account written in the text file from the client into itself.
32
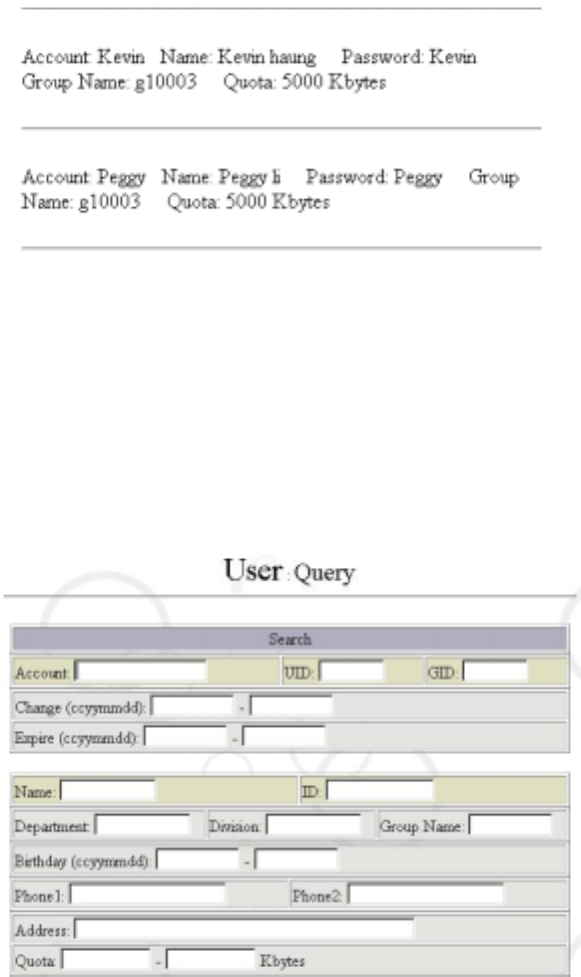
5.3 Account Query
Most frequently used by managers, this feature can find out specific subjects based on
the query conditions you entered – regardless of any modification in a whole group or
department – enabling you to fix related problems.
Descriptions of related fields:
UID : stands for User ID, a user code in the system. Different users cannot use a same
code (codes must be in numeric form).
GID : stands for Group ID, the group to which uses belong to. Different users can belong
to a same group (groups must be in numeric form).
“Change” / “Expire” / “Birthday” – requires a numeric entry in the YYMMDD order like
20011231.
5.3.1 Query
You can enter query terms in the figure above. If we want to have all users been displayed,
just click “Submit”. As shown in the figure below:
33
For more information on related configurations in the fields below, please refer to the
previous sections.
5.3.2 Hidden
The “Hidden” feature is designed especially for providing managers with higher flexibility
when entering query terms, freeing them from the hassle of entering a bundle of conditions
just for finding a single group. For example, you can delete an entire graduated class, while
retaining the account of two students, by following the steps below:
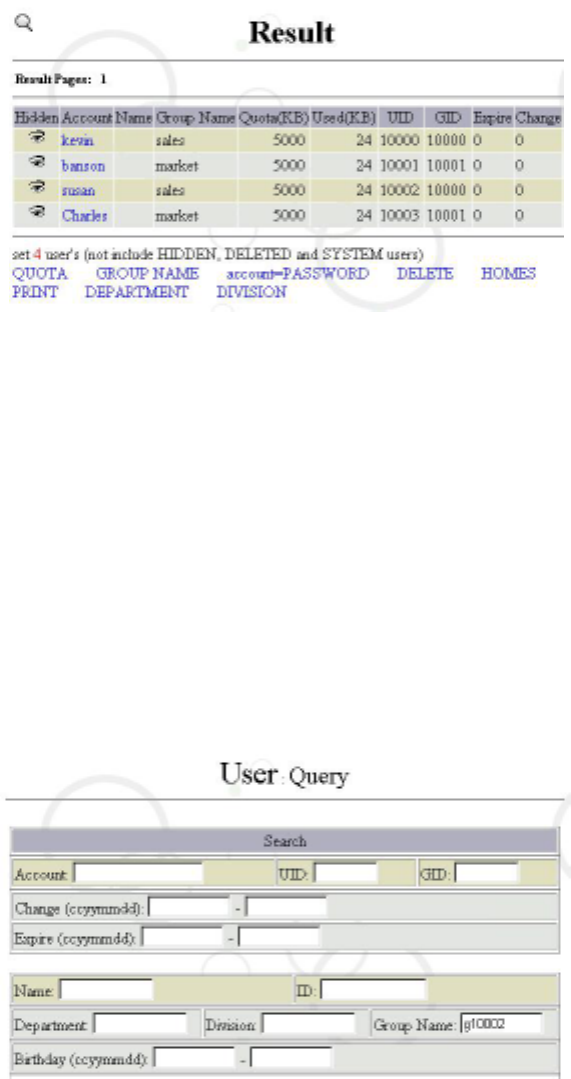
1. If the query term for “Group” = “g10002”, enter “g10002” in the group.
The system will then list all users in accordance with the group = “g10002”, as shown in the
figure below.
34
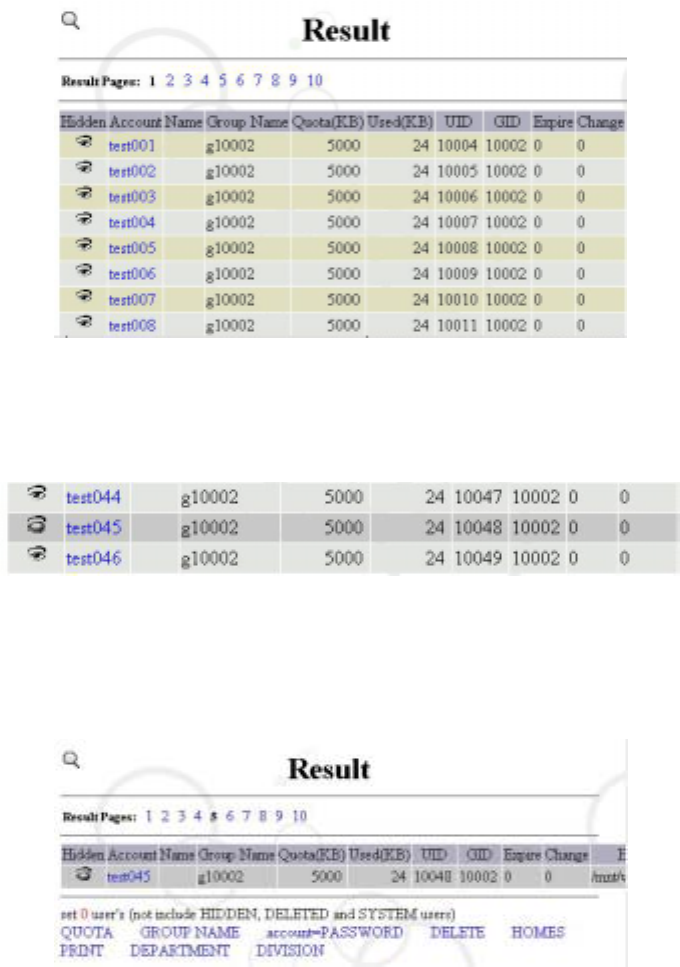
2. Click once on the “eye” of the account you want to retain (that account is supposed to be
gray and with a closed “eye”). For example, click once on “test045” on Page 5.
3. Click “Delete” under query results. Then the result displays that all users in the group =
“g10002” are deleted, except for the test045 due to having configured the “Hidden”
settings.
The “Hidden” is mainly to strengthen those query terms with odd declarations, and that is why
the feature is presented as “Hidden”. After selecting “Hidden”, “a total of ‘n’ query results”
under the query result will have the “Hidden” accounts automatically subtracted. If you want
to “Disable Hidden”, just click once the “eye” before the “Hidden” (gray) field.
5.3.3 Modify & Delete Single User
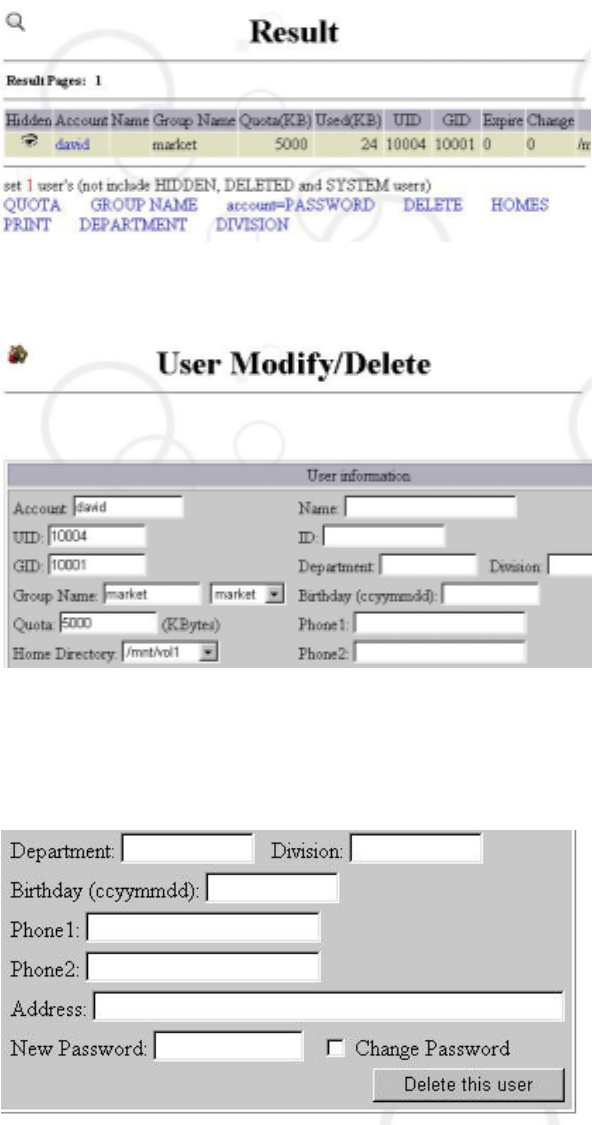
If you want to modify or delete the user information of the account called “david”, select
“Query” enter “david” in the user account “Submit”. Then a figure will be shown as
follows:
35
Click on the user account “david” and a screen will appear as follows.
Here you can modify user information before clicking “Submit” to update information on the
user account.
If you want to delete this user, just click “Delete this user” at the right -bottom side.
5.3.4 Modify & Delete Multiple Users
When modifying or deleting multiple users, the key is to enter “query terms”, and to proceed
by using the “Hidden” feature. Then click what you are looking for at the menu under the
query result.
36
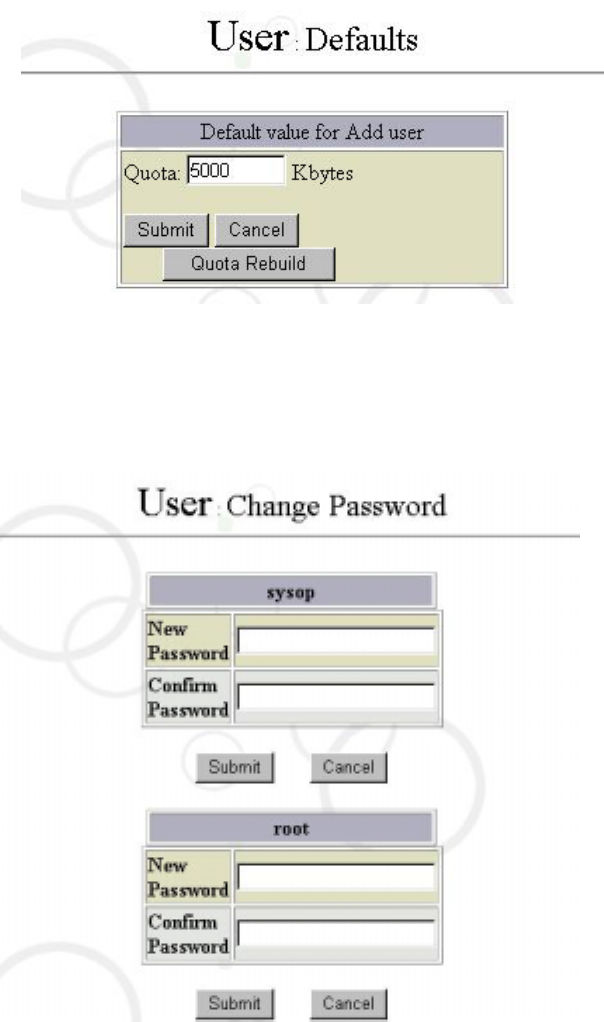
5.4 Defaults for Account
It can set up the Disk Quota defaulted when adding accounts, so as to confine the upper limit
of directory capacity occupied by users in the system (unit: Kbytes).
5.5 Change Admin User Password
Please click on “Change Admin User Password” it show as follows:
You can change “sysop” and “root” password here. Please enter the old password and
desired new password into these fields. For Maat you can also change the password from the
main page of GUI.
37
5.6 Account Verification
Please clicking on “Verify” it show as follows:
The page show there is 1 user waiting for verification. System administrator is capable to
verify whether to create this user account or not. If the result is “Yes”, then press “Submit” to
create the user. You can also press “Clean Petition List” to clear whole waiting user list.
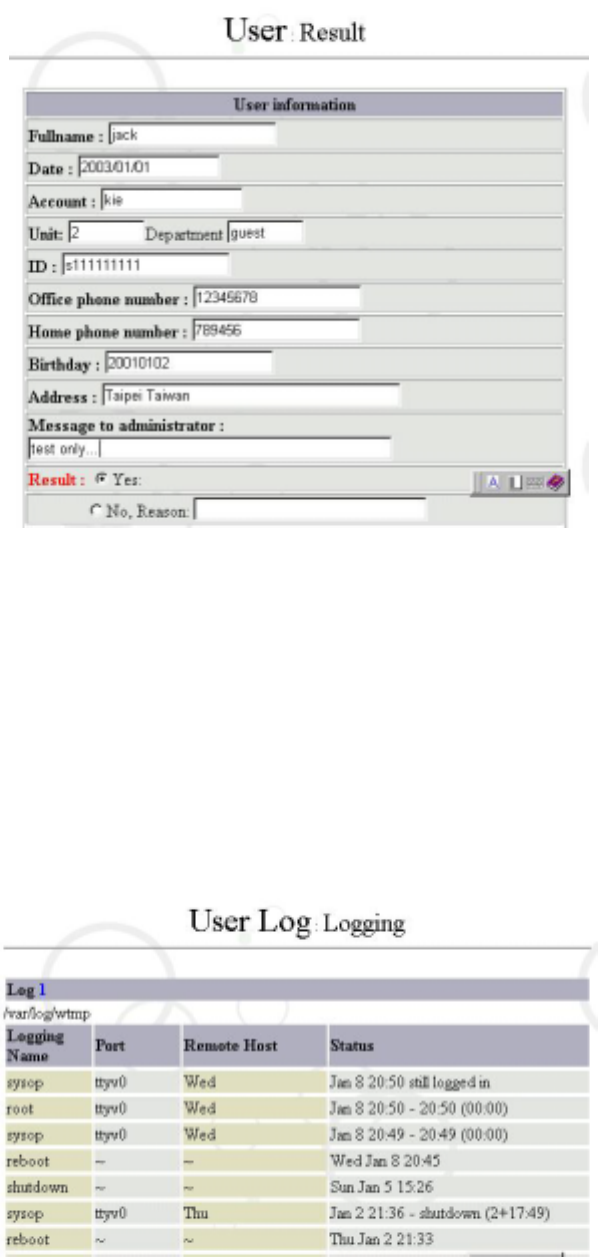
5.7 User Log Logging
It allows you to view operating history of the system, such as information related to login
names, login time, where users were logged in from, and system startup / shutdown.
38
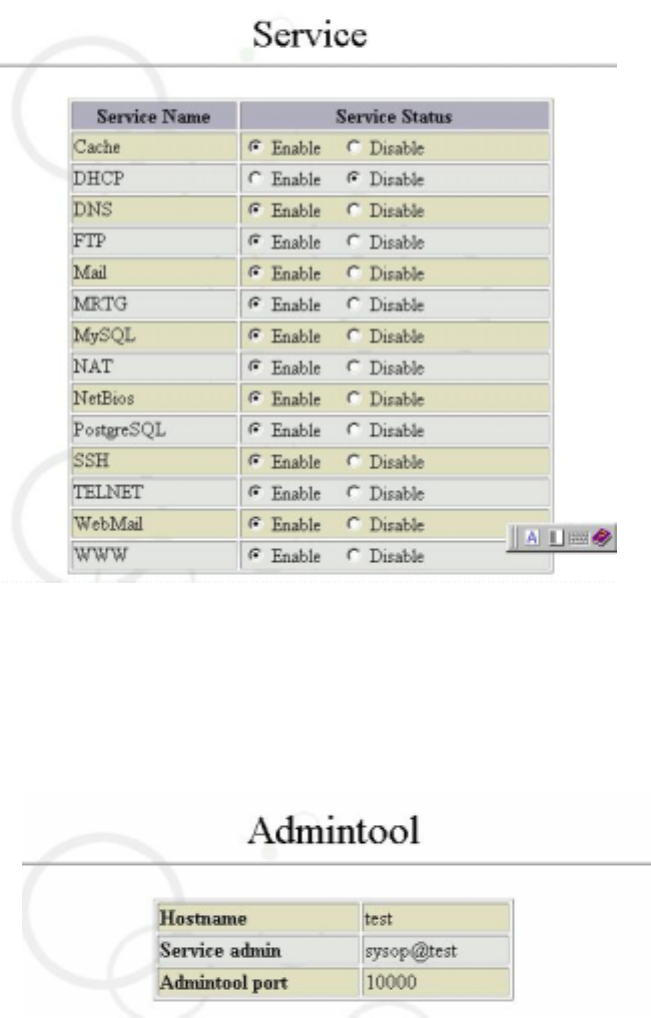
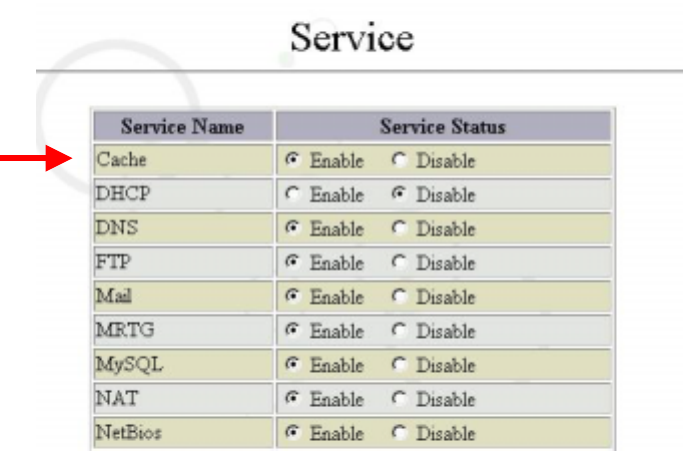
Chapter 6 Service
All the Service of this system shall be choice over here
.
6.1 Admintool
Select “Admintool” from “Service” as follows:
The setting list of “Admintool” appears in the above screen. This list shows all the applied
settings of “Admintool”.
39
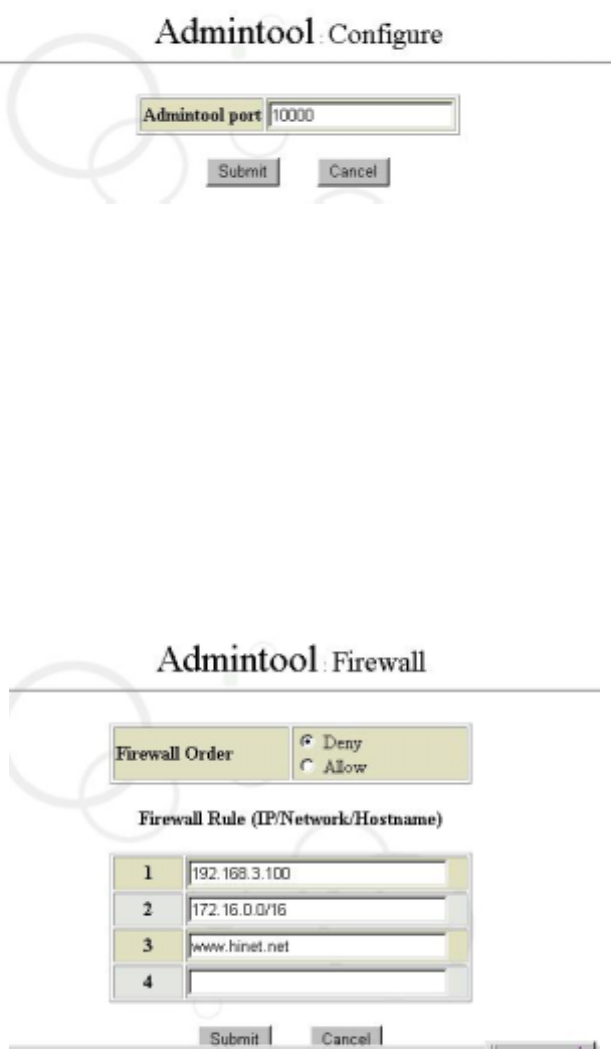
6.1.1 Configuration:
Select “Configure” to set up the Admintool port monitoring the interface. The default
value is 10000.
6.1.2 Firewall Configure:
This option allows administrators to set up which IPs, Networks, and Hostnames that are
permitted to manage connection. For example, we restrict IP:192.168.3.100、IP network
segment 172.16.0/16 of the client or the host www.hinet.net to use this Admintool. The
related parameters are illustrated as follows. If you want to change the rule from Deny to
Allow, remember to click “Submit” to re-Submit the Allow rule. Please remember, the rule
of this firewall allows only to deny or allow all IPs. It is not allowed to set some of the IPs
to Deny while some to Allow. If you do not want to set any firewall for Admintool, just skip
this configuration.
PS: All the firewall rules under the Service of this system shall be subject to the
aforementioned regulation.
PS: If you want to specify an IP network segment, remember providing information on
Subnet mask. For example, the “/16” in 172.16.0.0/16 stands for 255.255.0.0.
40
6.2 Web Cache
Cache is the so-called Proxy Network Service System. All of the webpages that users
access via the Internet are handled by cache, enabling clients to hide their IP addresses,
reducing the traffic and managing accesses. It has the basic firewall functions and can
accelerate the transmission of webpages and FTP.
Squid is one the commonly used cache services, with configuration file located at
/usr/local/etc/squid/squid.conf. It allows a number of parameters to be configured. For
your reference, the parameters listed in the Service Interface here are merely those
frequently used, while the rest are automatically configured by the system for you. If you
want to edit these parameters yourself, please edit the file located at
/usr/local/etc/squid/squid.conf and then have the management Interface read the
parameters all over again. (However, you are advised not to edit parameters yourself.)
6.2.1 Steps of Cache Configuration
1. Enable Cache
Click “Service” in the “System Management Tools” screen. Then select “Enable”
cache and click “Submit”.
As shown in the figure below:
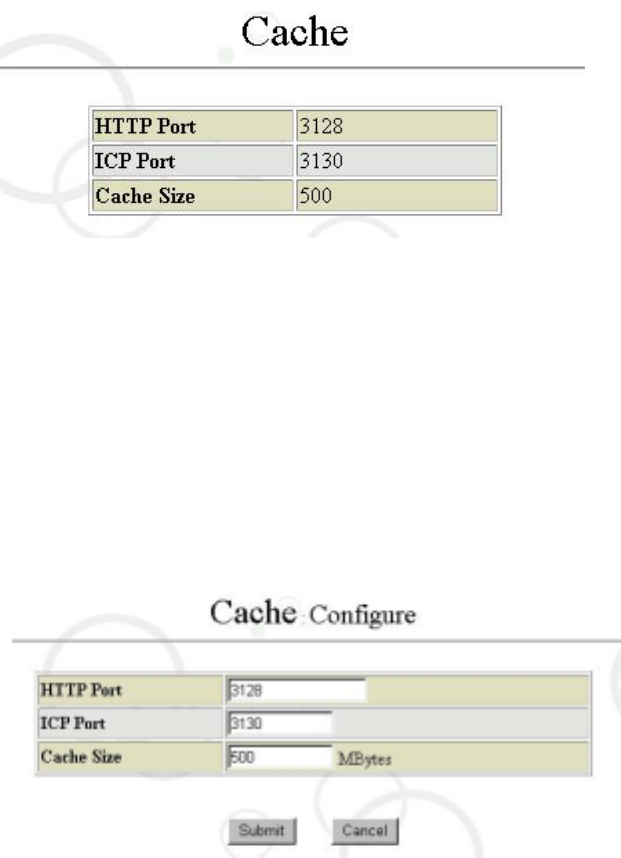
2. Default Value of Cache Configuration
Then click “Cache” in the “Service” screen. The default parameter screen of Cache
will appear as shown in the figure below:
41
The default of “HTTP Port” is 3128, “ICP Port” 3130 and “Cache Size” 2048. (If you
want to edit these parameters, go to the next step). Therefore, you may use cache
functions when setting the port of Proxy Server to 3128 from the browser at the PC
end.
3. Change in Default Value of Cache Configuration
We may select to start Cache and edit HTTP, ICP or Cache Size parameters in the
“Configure” screen of “Cache”. As shown in the figure below, we add a parameter of
8080 to HTTP Port and click “Submit” to make it effective.
ICP (Internet Cache Protocol) is a port for Proxy Servers to communicate each other.
Its default value is 3130, and you are advised not to make any changes to that value
unless you have specified other ICP ports.
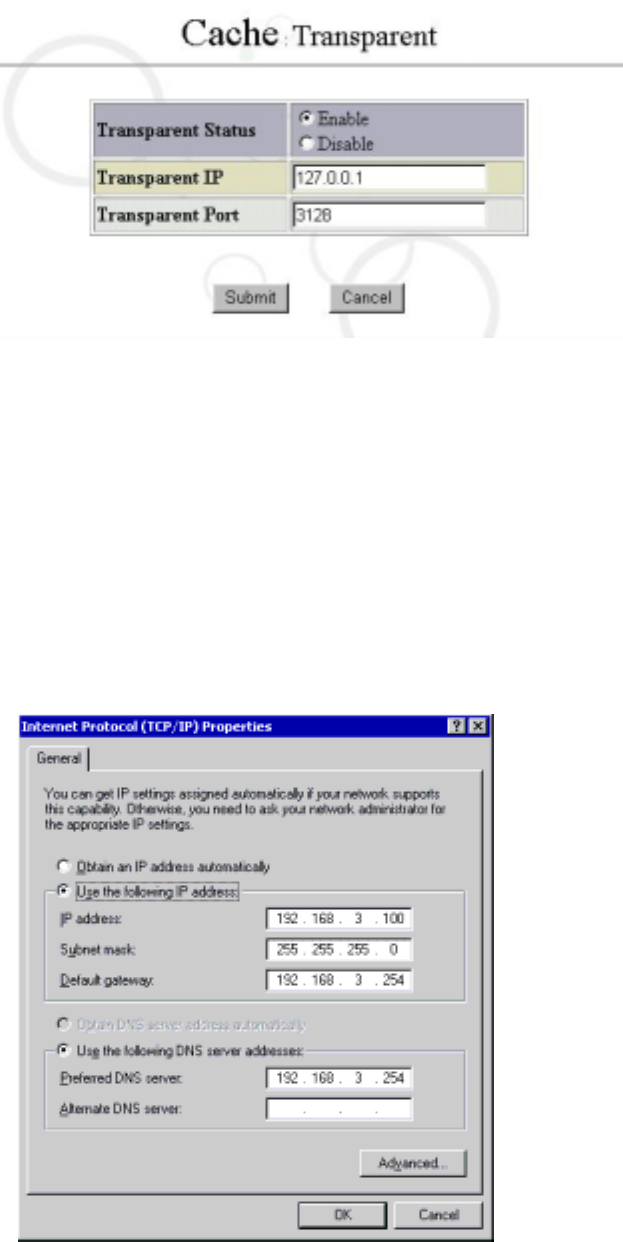
6.2.2 Enable Transparent Mode
Transparent Mode is the so-called Transparent Cache Mode. To use the cache function,
clients need only to specify the NIC IP of Maat to be Default Gateway, without the need to
specify the Proxy Server of the browser.
Users may choose to enable Transparent Status and other functions such as Transparent
Address, Transport Port and defaults on the “Transparent Configuration” screen of the “Web
Cache” (as shown in the following figure). If the specification of other Proxy Servers is
required, the only thing users must do is to change the Transparent Address and Transparent
Port.
42
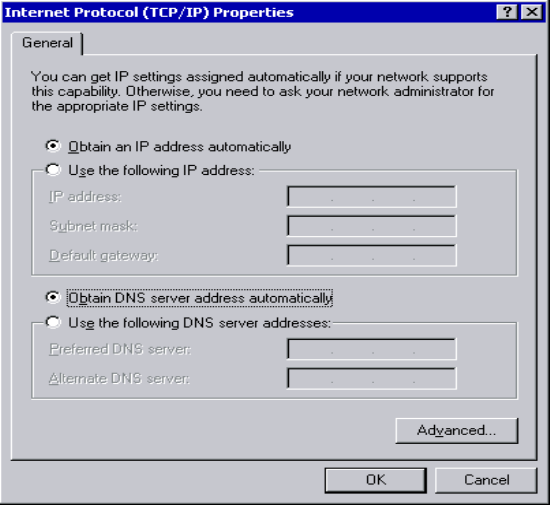
Client Network IP Configuration
1. For fixed IP users
For fixed IP users, click the right mouse button on “My Network Places”, select
“Properties” and “TCP / IP” NIC (eg, NE2000) [for win98], or click the right mouse
button on “My Network Places” and select “Properties”. Then select local connection,
press “Properties” again and select “Internet Protocal (TCP / IP)” [for win2000]. Key
in the IP address and subnet mask granted by MIS on the “IP Address” screen. As
shown in the following figure, we take the IP address 192.168.3.100 and the subnet
mask 255.255.255.0 as an example, Transparent Web Cache can be used
immediately when users key in the IP of the Maat.
2. DHCP Client Configuration
The configuration of DHCP Client is very easy. The steps for the configuration is
shown as follows:
Click the right mouse button on “My Network Places”, select “Properties” and “TCP /
IP” NIC (eg, NE2000) [for win98], or click the right mouse button on “My Network
43
Places” and select “Properties”. Then select local connection, press “Properties”
again and select “Internet Protocal (TCP / IP)” [for win2000]
Except selecting “Automatic Obtain IP Address” (Shown as in the figure above) on
“IP Address”, you do not need to configure related options. Click on “OK”, Client PC
will reboot. After rebooting computer, you can use command winipcfg under win98
to check if a set of IP values automatically obtained.
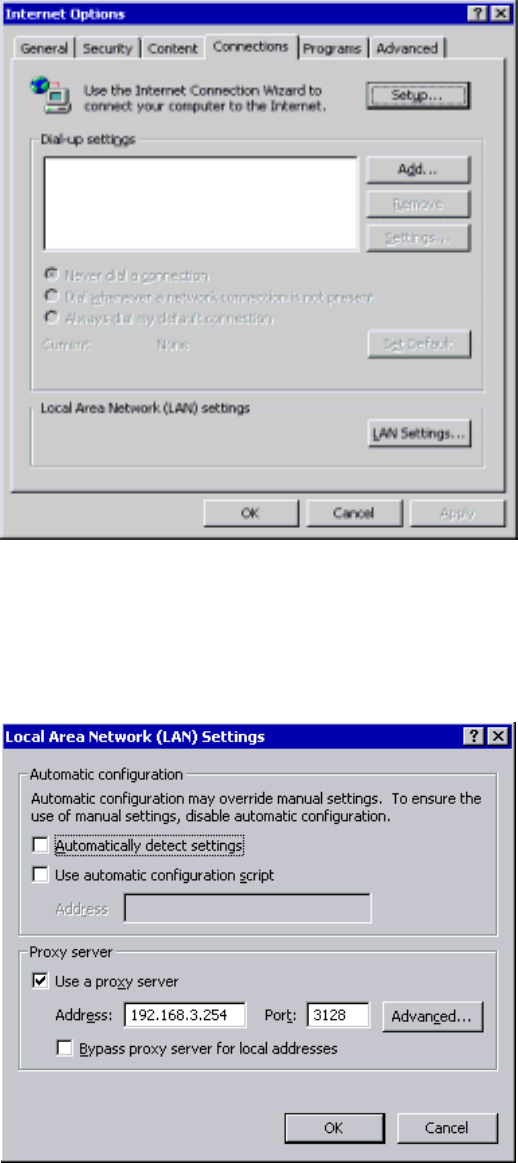
6.2.3 Client-end Browser Configuration (Microsoft Windows Client)
General Cache Mode
1. For IE Users
In the “Connection” screen of “Internet options”, click “LAN Setting” as shown in
the figure below:
44
Enter the IP address and HTTP Port of Maat in the “LAN Setting” screen. As shown in
the figure below, we enter the address 192.168.3.254 and HTTP Port 3128 for Maat.
2. For Netscape Users
Open Netscape browser and select “Preferences” “Advanced” “Proxies” in
“Edit”. Then click “Manual proxy configuration” as shown in the figure below:
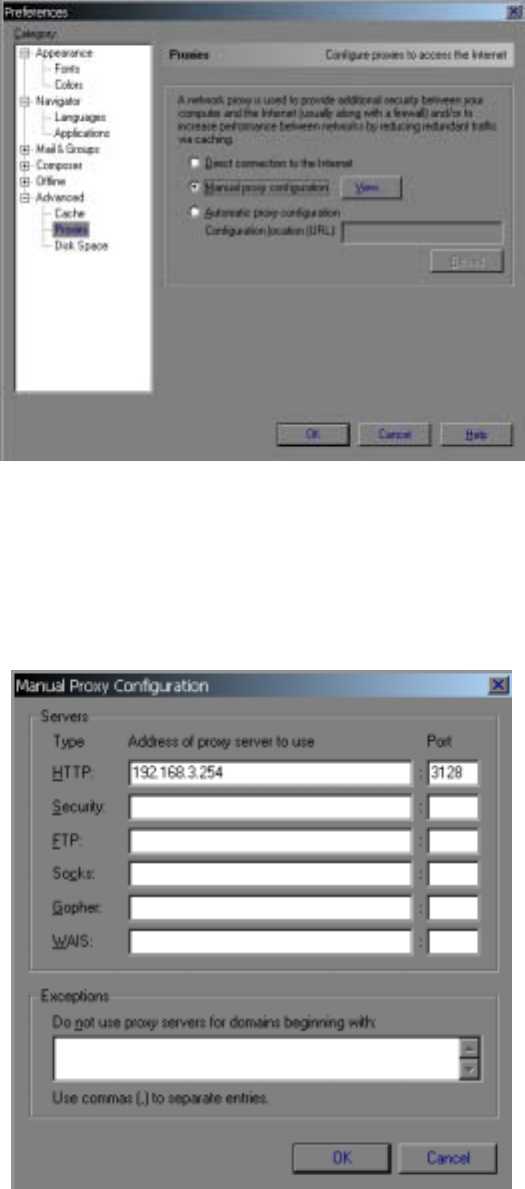
45
Enter the IP address and HTTP Port of Maat in the “Manual Proxy Configuration”
screen. As shown in the figure below, we enter the address 192.168.3.254 and
HTTP Port 3128 for Maat.