Fishman 494000582 Loudbox Mini Charge User Manual 513 300 271 r2 User Guide Loudbox Mini Charge
Fishman Loudbox Mini Charge 513 300 271 r2 User Guide Loudbox Mini Charge
Fishman >
User manual_513-300-271_r2_User_Guide,_Loudbox_Mini_Charge.pdf
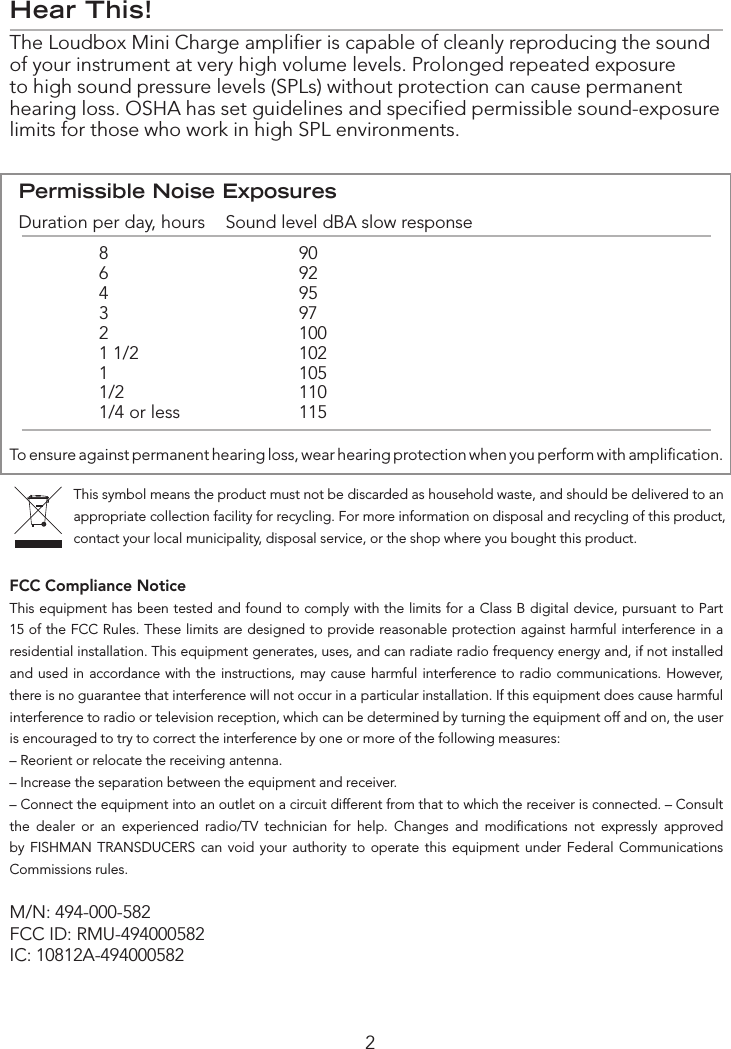
![1Important Safety InstructionsTo ensure your personal safety and the safety of others, operate this apparatus only after reading these instructions and heeding the warnings listed below. 1. Read these instructions.2. Keep these instructions.3. Heed all warnings.4. Follow all instructions.5. Do not use this apparatus near water.6. Clean only with a dry cloth.7. Do not block the ventilation openings. Install in accordance with the manufacturer's instructions.8. Do not install near any heat sources such as radiators, heat registers, stoves or other apparatus (including amplifiers) that produce heat.9. Do not defeat the safety purpose of the polarized or grounding-type plug. A polarized plug has two blades with one wider than the other. A grounding-type plug has two blades and a third grounding prong. The wide blade or the third prong are provided for your safety. If the provided plug does not fit into your outlet, consult an electrician for replacement of the obsolete outlet.10. Protect the power cord from being walked on or pinched, particularly at the plugs, convenience receptacles and the point where they exit from the apparatus.11. Use only attachments/accessories specified by the manufacturer.12. Use only with a cart, stand, tripod, bracket or table specified by the manufacturer, or sold with the apparatus. When a cart is used, use caution when moving the cart/apparatus combination to avoid injury from tip-over.13. Unplug this apparatus during lightning storms or when unused for long periods of time.14. Refer all servicing to qualified service personnel. Servicing is required when the apparatus has been damaged in any way, such as a power-supply cord or plug is damaged, liquid has been spilled or objects have fallen into the apparatus, the apparatus has been exposed to rain or moisture, does not operate normally, or has been dropped.15. Do not expose the apparatus to dripping or splashing liquids and do not place objects filled with liquids (such as a beverage container or a vase) on the apparatus.16. Warning” To reduce the risk of fire or electric shock, do not expose this apparatus to moisture.17. The device is designed and evaluated under the condition of non-tropical climate; and, it can be only used in locations in non-tropical climate areas. Using the device in tropical climate areas would result in high safety risk.18. Normal operating environmental temperature range: 0 °C [32 °F] to 35 °C [95 °F].19. WARNING: The battery (battery or batteries or battery pack) shall not be exposed to excessive heat such as sunshine, fire or the like.20. CAUTION: Danger of explosion if battery is incorrectly replaced. To replace battery use Fishman’s approved battery kit only at Certified Service Centers21. No naked flame sources, such as lighted candles, should be placed on the apparatus.22. Do not install this equipment in a confined or building-in space such as a book case or similar unit, and remain a well ventilation conditions at open site. The ventilation should not be impeded by covering the ventilation openings with items such as newspaper, table-cloths, curtains etc.Warning: The mains plug/appliance coupler is used as disconnect device, the disconnect device shall remain readily operable.Copyright © 2017 FISHMAN TRANSDUCERS, INC.All rights reserved. No part of this document may be reproduced in any form without the written permission of FISHMAN TRANSDUCERS, INC.CAUTIONRisk of electric shock.Do not open.No user serviceable parts inside.Refer servicing to qualified personnel.Do not expose to rain or moisture.Wherever this symbol appears, it alerts you to the presence of uninsulated dangerous voltage inside the enclosure that may be sufficient to constitute a risk of shock.Whenever this symbol appears, it alerts you to the presence of important operating and maintenance (servicing) instructions in the user’s manual for this amplifier.](https://usermanual.wiki/Fishman/494000582/User-Guide-3654130-Page-2.png)

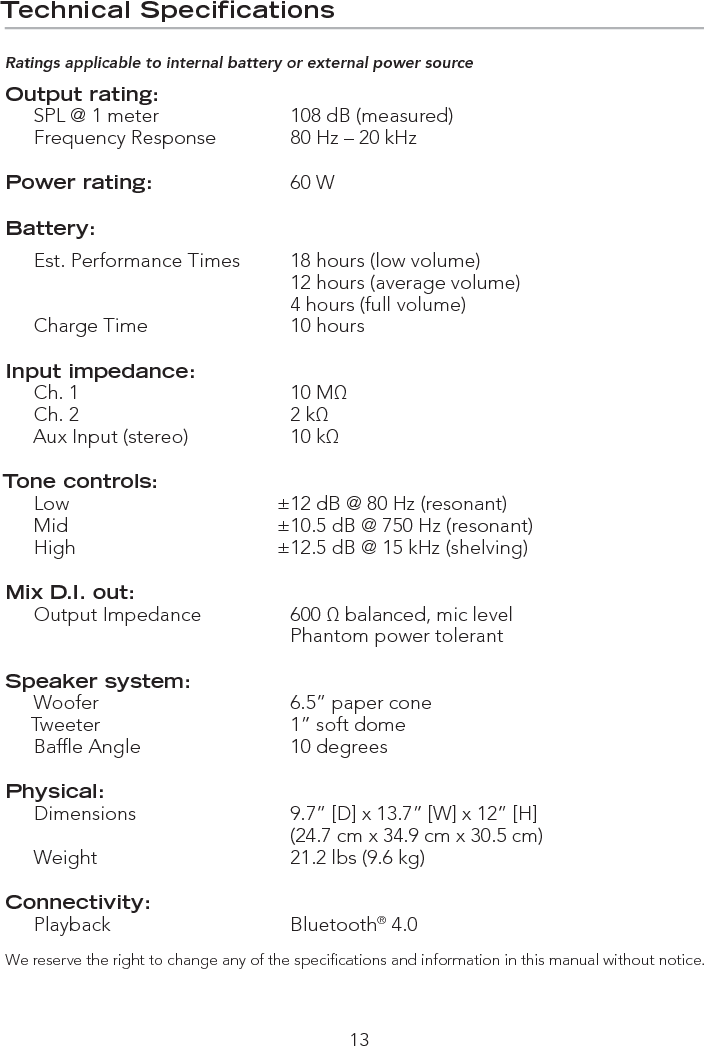
![13Technical Specifi cationsRatings applicable to internal battery or external power sourceOutput rating:SPL @ 1 meter 108 dB (measured)Frequency Response 80 Hz – 20 kHzPower rating: 60 WBattery: Est. Performance Times 18 hours (low volume) 12 hours (average volume) 4 hours (full volume)Charge Time 10 hoursInput impedance:Ch. 1 10 MΩCh. 2 2 kΩAux Input (stereo) 10 kΩTone controls:Low ±12 dB @ 80 Hz (resonant)Mid ±10.5 dB @ 750 Hz (resonant)High ±12.5 dB @ 15 kHz (shelving)Mix D.I. out:Output Impedance 600 Ω balanced, mic level Phantom power tolerantSpeaker system:Woofer 6.5” paper coneTweeter 1” soft domeBaffl e Angle 10 degreesPhysical:Dimensions 9.7” [D] x 13.7” [W] x 12” [H] (24.7 cm x 34.9 cm x 30.5 cm)Weight 21.2 lbs (9.6 kg)Connectivity:Playback Bluetooth® 4.0We reserve the right to change any of the specifi cations and information in this manual without notice.](https://usermanual.wiki/Fishman/494000582/User-Guide-3654130-Page-14.png)