FitLinxx UWM02 Universal Wireless RF Module User Manual EMPED EEPROM PROGRAMMING PROCEDURE
FitLinxx Universal Wireless RF Module EMPED EEPROM PROGRAMMING PROCEDURE
UserManual.wiki
>
FitLinxx
>
UWM02 User Manual
Exhibit D Users Manual per 2 1033 b3
Navigation menu
Upload a User Manual
Namespaces
Wiki Guide
HTML
PDF
Info
Views
User Manual
Discussion / Help
Navigation

![SUBJECT:A&D MEDICAL DIGITAL BLOODPRESSURE MONITOR ASSEMBLYDOCUMENT NUMBER:910-00059-01REVISION:08PAGE:8of 18All wireless devices should be removed from the test area, and the PC or laptop wireless capability should be turned off or disabled.No obstacles should be between the ActiLink and the UWM PCB under test.3.4 UWM Incoming Test Process The following test process can be used to verify the UWM PCB functionality prior to being reworked into Digital Blood Pressure Monitor.With an ActiLink installed in the PCs USB port, start the ActiBPMfgTest.exe test application from the shortcut on the desktop and select System Test. The Test Configuration limits must be set correctly as detailed in Section 3.23.4.1 Install the UWM PCB to be tested into the test fixture at the 100 foot (30.5 meters) distance with the UWM antenna tip facing the ActiLink. Power up the test fixture.3.4.2 In the upper right corner of the System Test screen above the [YES] [NO] tab, the ID Number of the UWM PCB to be tested will boldly appear approximately 5 seconds after power is applied, as shown below for ID Number FJHN-00256-00038.](https://usermanual.wiki/FitLinxx/UWM02/User-Guide-1005796-Page-8.png)
![SUBJECT:A&D MEDICAL DIGITAL BLOODPRESSURE MONITOR ASSEMBLYDOCUMENT NUMBER:910-00059-01REVISION:08PAGE:9of 18If the ID Number of a UWM PCB other than that to be tested appears in the upper rightof the test screen, selecting the [NO] tab will enable a filter preventing the application from detecting the unwanted sensor. This allows the operator to filter out all other UWM PCBs other than the specific UWM to be tested. To enable the application to detect all UWMs again, select the “Sensors” tab, then “Clear Reject List”.3.4.3 With the ID Number of the UWM PCB under test boldly displayed on the screen, the operator would select the [YES] tab to start the test.The application will now perform the following 4 sub-tests;●StartupThis test verifies that the application has RF communication with the UWM PCB prior to starting the test.●VersionThis test verifies the UWM PCB has the correct firmware Version as defined in the Min and Max test “Limits”.●ID NumberThis test verifies the Serial Number or ID Number of the UWM PCB is within the specified range as defined in the Min and Max test “Limits”. The operator should verify that the ID Number label on the UWM PCB matches the device being tested by the application.●RF FunctionThis test verifies the RF transmit and receive function of the UWM PCB.](https://usermanual.wiki/FitLinxx/UWM02/User-Guide-1005796-Page-9.png)
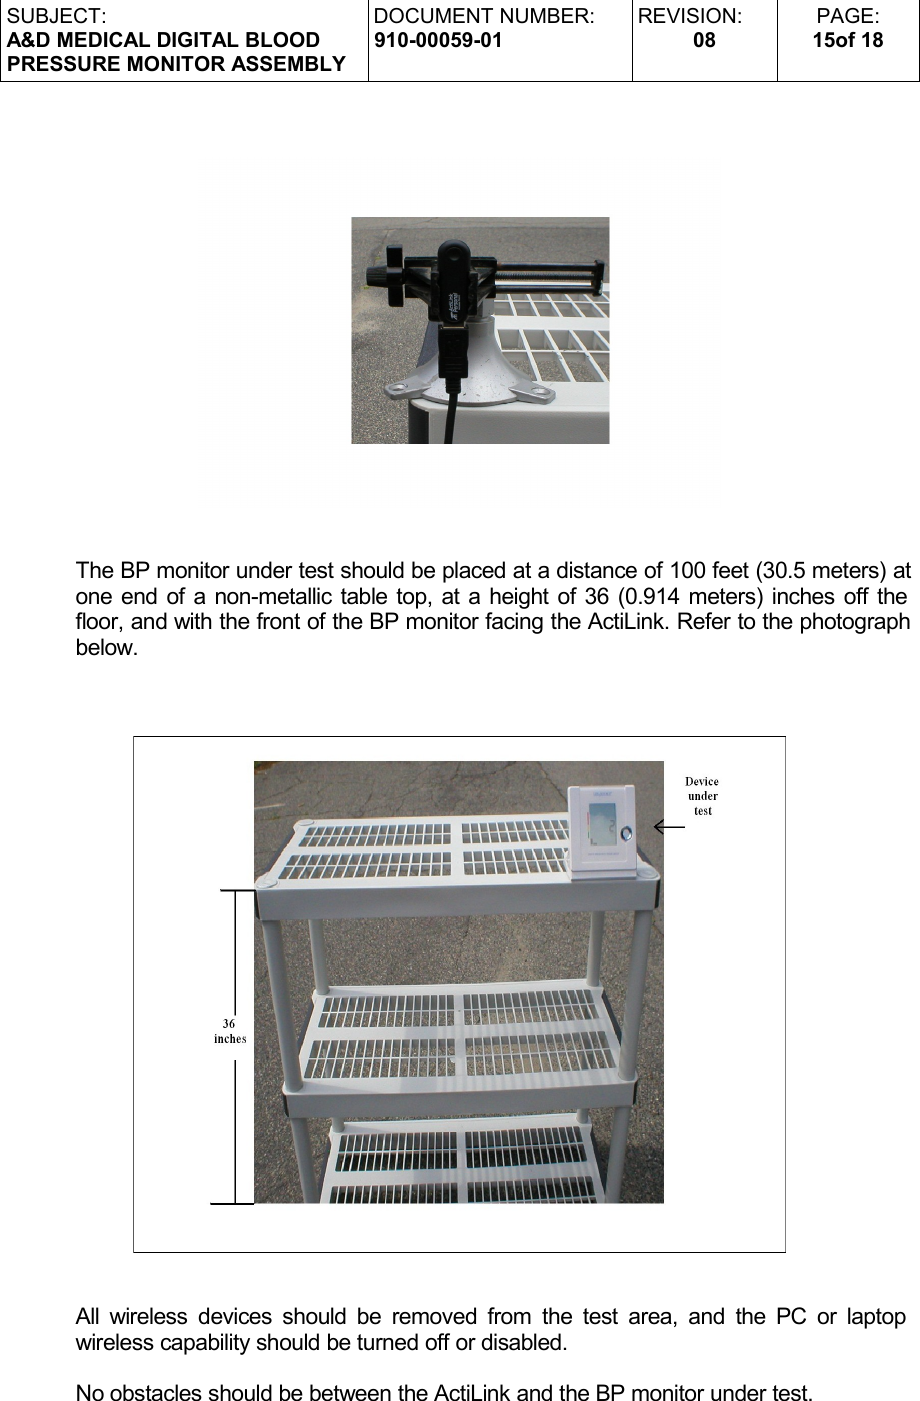
![SUBJECT:A&D MEDICAL DIGITAL BLOODPRESSURE MONITOR ASSEMBLYDOCUMENT NUMBER:910-00059-01REVISION:08PAGE:16of 185.4 Functional Test Process Two (2) operators are required to Functionally Test the BP monitor at a distance of 100 ft (30.50 meters). The first operator will control the test application on the laptop or PC. The second operator will operate the BP monitor.With an ActiLink installed in the PCs USB port, start the ActiBPMfgTest.exe test application from the shortcut on the desktop and select System Test. The Test Configuration limits must be set correctly as described in Section 5.2The following test process should be used to verify functionality of the BP monitor.5.4.1 The operator will activate the BP monitor and allow it to complete the measurement as indicated on the LCD display. With the results on the LCD display of the BP monitor, the operator should walk to a distance of at least 10 feet to the side or rear of the monitor to prevent interfering with the RF test.NOTEOnce the BP Monitor is powered up and activated, the operators have approximately 60 seconds to complete the test before the monitor enters a low power sleep mode.5.4.2 The PC operator will then watch the upper right of the System Test screen, just above the [YES] [NO] tab, for the ID Number of the BP monitor under test to boldly appear as shown in the screen capture below for ID Number FJHN-00256-00038. This will take approximately 5 seconds after the BP monitor has been activated.](https://usermanual.wiki/FitLinxx/UWM02/User-Guide-1005796-Page-16.png)
![SUBJECT:A&D MEDICAL DIGITAL BLOODPRESSURE MONITOR ASSEMBLYDOCUMENT NUMBER:910-00059-01REVISION:08PAGE:17of 18If the ID Number of any BP monitor other than that to be tested is displayed by the application, the operator selects the [NO] tab for each device detected until the UUT is detected. The [NO] tab will place the ID Number in a reject list, and the rejected device will not be displayed again by the application until the operator selects “Sensors”, then selects “Clear Rejected List”. 5.4.3 With the blood pressure results displayed on the LCD display of the BP monitor, the PC operator then starts the test as instructed on the test screen by selecting the [YES] tab.Start BP measurement.Click YES when done.The application will now perform the following 7 sub-tests;●StartupThis test verifies that the application has RF communication with the under test prior to starting the test.●VersionThis test verifies the UWM PCB in the has the correct firmware Version as defined in the Test Configuration Version limits.●ID NumberThis test verifies the ID Number of the UWM PCB in the is within the specified range as defined in the Test Configuration Min and Max ID Number limits. The operator should verify that the ID Number label on the matches the device being tested by the application.●RF FunctionThis test verifies the RF transmit and receive function of the UWM PCB.●Blood pressure test_SystolicThis test verify the UWM PCB was wired to the proper test point on the BP monitor, and that the UWM can RF transmit the value display on the BP monitor, to the test application.●Blood pressure test_DiastolicThis test verify the UWM PCB was wired to the proper test point on the BP monitor, and that the UWM can RF transmit the value display on the BP monitor, to the test application.●Blood pressure test_PulseThis test verify the UWM PCB was wired to the proper test point on the BP monitor, and that the UWM can RF transmit the value display on the BP monitor, to the test application.](https://usermanual.wiki/FitLinxx/UWM02/User-Guide-1005796-Page-17.png)