Flir BelgiumBA RAY215 Marine Transceiver User Manual
Raymarine UK Ltd. Marine Transceiver Users Manual
UserManual.wiki
>
Flir BelgiumBA
>
RAY215 User Manual
Users Manual
Navigation menu
Upload a User Manual
Namespaces
Wiki Guide
HTML
PDF
Info
Views
User Manual
Discussion / Help
Navigation
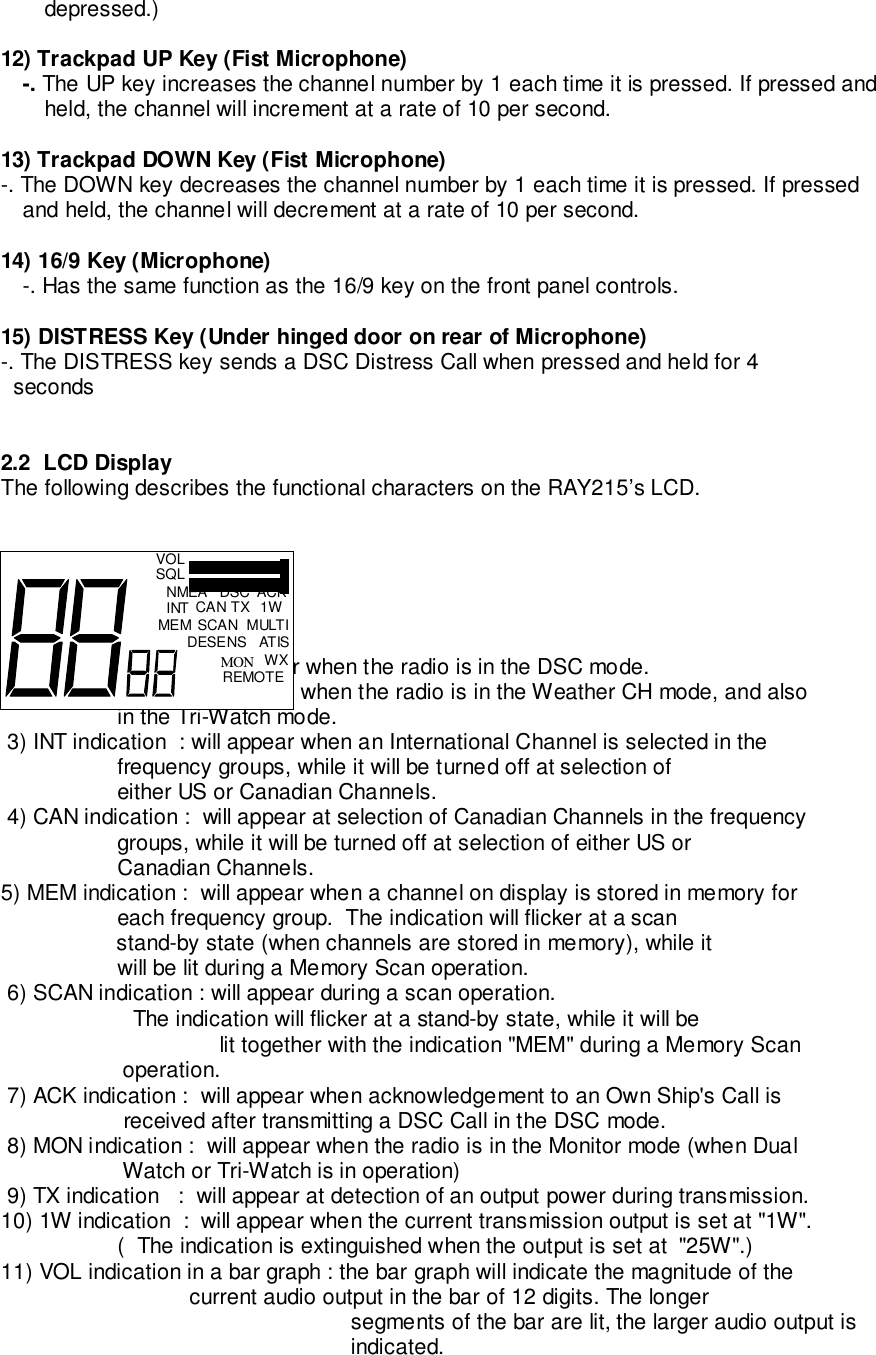
![-. When MON/ 1/25 is pressed and held for 2 seconds, the output power will be changed.7) 16/9 Key-. When pressed once, the Priority Channel (16 or 9) will be selected.- When pressed and held for 2 seconds, the priority channel can be changed (from 16 to9 or from 9 to 16).8) D/L/IC Key Pressing and releasing the key will place the radio into a desensitization state with an alarm put to sound. The key operation during the desensitization mode will cancel the mode while the key operation during the off state of the desensitization mode will initiate the mode. When the radio is in the mode, the indication [DESENS] is illuminated. Holding the key for 2 consecutive seconds will initiate the Intercom function (the details are described later) between the fist microphone on the base station and the remote Hand-set with the Alarm-1 put to sound. - Pressing and releasing the D/L I.C.Key with DSC/PRI key will put the unit to enterthe DSC mode.9) DSC/ PRI Key Pressing and releasing the DSC/PRI Key with D/L I.C. key will put the unit to enterthe DSC mode. Operation in the DSC mode includes Individual Ship's Call, All Ship's Call andDistress Call. In any case it is necessary to register Own Ship's ID in advance. The DSC mode may be exited at any time by pressing the [16/9] key. During indication of DSC, no display is given for Volume and Squelch. Function to recover the operation priority to the base station during, the use of theHand-set (option). Pressing and holding the key for 2 consecutive seconds when using the Hand-setwill enable the base station to recover the operation priority with the Alarm-1 put tosound.10) DIM Key Pressing and releasing the key will change LCD back-lighting level with an alarm put to sound. There are four levels to be set ; OFF, Low, Medium and High. At each subsequent pressing, four steps of the level change-over will result. When the key is left not pressed for 5 consecutive seconds, the present level value is entered in EEPROM and setting operation of the back-lighting level is suspended. At re-supply of the power the unit is put on at the same level as stored in EEPROM. Levels repeatable : OFF Low Medium High11) PTT Key (Fist Microphone) The PTT (Push To Talk) key operation enables the transmitter. When the current channel is selected on either of a Weather CH or a transmission -forbidden channel, the key operation is disabled with the Alarm-2 put to sound. When transmission state has been continued for 5 minutes or longer, transmission is interrupted and the Alarm-2 is kept sounding until once releasing the key. (Under the above-mentioned state, although the radio is placed in the receiving mode, no received audio tone is heard as the PTT is held](https://usermanual.wiki/Flir-BelgiumBA/RAY215/User-Guide-171325-Page-2.png)
![3.14 NMEA OperationThe RAY215 can receive valid position and time information from an external devicefrom an NMEA signal.Validating NMEA dataWhen an NMEA signal is received, it must be determined whether the data is valid.Receivable commands are limited to the position commands of GGA, GLL, RMC, andRMA and to the status commands of RMC, APB, GLL, and APA. If valid, the data isinput and the NMEA indicator is displayed on the LCD.3.15 DSC (Digital Selective Calling)The Digital Selective Calling protocol is a globally applied system used to send and receivedigital Distress calls as well as Individual and All-Ship’s calls on channel 70, the dedicatedDSC channel for Marine VHF. For a Distress call transmission, your RAY215 takes theposition and time information from the input NMEA data along with your Maritime MobileStation Identifier (MMSI) and converts it into a digital “packet”. When transmitted, thisdigital information lets other ships and shore stations know where you are and that you arein a Distress situation.Pressing and releasing the [DSC/PRI] key and [D/L I.C.] key simultaneously will enable the"DSC mode" with the Alarm-1 sounded. The [DSC/PRI] key remains to function as the[DSC] key until exiting the "DSC mode".Communications in the DSC-mode contain Individual Ship's Call , All Ship'sCall ,[Group Call], Distress Call and [Distress Relay Call]. In each case storing "OwnShip's ID" in memory is necessary.Since the Distress Call enabled by pressing and holding the [Distress Key] for 4consecutive seconds will automatically select the DSC mode, it is not necessary to pressthe [DSC/PRI] key and [D/L I.C.] Key for selecting the DSC mode. Pressing the [16/9] keywill exit the DSC mode at any time.During [DSC] is illumined in the display, no indications of volume and squelch levels aregiven (no received sounds or others audible).The DSC (Digital Selective Calling ) operation includes the following: 1. Transmitting/Receiving an Individual Call 2. Receiving a Group Call 3. Transmitting/Receiving an All Ships Call 4. Transmitting/Receiving a Distress Call 5. Receiving a Distress Relay Call3.15.1 Own Ship’s ID Entry(Own Ship’s MMSI Entry)Before the DSC system in your RAY215 will be operational, your MMSI number must firstbe entered. This number is currently obtained from the FCC by submitting a StationLicense application but other maritime companies will soon be distributing MMSI numbersas well.Once you have received your MMSI number, enter it into the radio as follows:a) Press and hold the DSC/PRI keys and D/L I.C.key simultaneously for 2 seconds.A tone will sound, the “DSC” indicator will appear, “0” will be displayed in the largecharacter display, and “1” will be in the small character display. If an MMSI numberis already in memory, an alarm tone will sound and MMSI entry is inhibited.b) Rotate the Channel Select knob (Channel UP/DOWN keys on the microphone areinhibited during this process) until the first digit of your MMSI number appears in thelarge character display. Press the DSC/PRI key once to accept.](https://usermanual.wiki/Flir-BelgiumBA/RAY215/User-Guide-171325-Page-7.png)
![c) The small character display will now show a “2” (designating the second digit inyour MMSI number). Rotate the Channel Select knob until the second digit of yourMMSI number appears in the large channel display.d) Press the DSC/PRI key once to accept.e) Enter all 9 digits of the MMSI number in the same way.f) Once the 9th digit has been entered and accepted, the RAY215 will play back the 9digits just entered for proper entry verification.NOTE: Insure the MMSI number entered is correct with this verificationplayback. Once the number is accepted as outlined in the next step, it can notbe changed except by Raymarine factory representatives.g) If the number is verified as correct, press and hold the DSC key for 2 secondsand a tone sounds. Your MMSI number has now been stored in memory.h) If the number is incorrect, press the DSC key once and release. The radio willrevert to the beginning of the entry process to start over again. This step can berepeated as many times as required until the number is entered correctly. When itis verified as correct, perform step g). After 2 seconds,MMSI entry statePress the [DSC/PRI] key and [D/L I.C] key for 2 seconds Stand-by for the 1st digit entry Determine the 1st digit by pressing the [DSC/PRI] keySelecting CH number by Channel Select Knob Selecting CH number by Channel SelectKnobSame entry to be effected hereafter up to the 9th digit When the entry operation through the 9th digit is finished,indication of the full digits is given. If correction required, pressagain the [DSC] key (just depressing) then repeat the above-mentioned procedure To finalize (or fix) the entry press and hold the [DSC/PRI] key for 2 secondfor securing data in memoryUser is disabled to change the MMSI number once stored in memory.Refer to the matter described in EN301 0255.4 "Ship'sNMEAMEMDSC NMEAMEMDSCNMEAMEMDSCNMEAVOLSQLNMEAVOLSQL NMEAMEMDSC](https://usermanual.wiki/Flir-BelgiumBA/RAY215/User-Guide-171325-Page-8.png)
![Identity".3.15.2 Individual Ship’s CallTo send an Individual Ship’s Call, perform the following:a) Press the DSC/PRI key and D/L I.C. keys once simultaneously. This will place theunit in the DSC mode. “70” will appear in the large channel display, the DSCindicator will illuminate, and “in” will appear in the small channel display to designate“in”dividual call.b) Press the DSC key once to enter Individual Ship’s Call mode.c) The display now prompts for entry of the Other Ship’s MMSI number. Enter the OtherShip’s number in the same manner as your Own Ship’s MMSI number was entered insection 3.5.16.1 above and if correct, press and hold the SCAN/MEM key for 2seconds.In the storing procedure appropriate alphabets are assigned to the "Target Ship's ID Number" being stored. The maximum ships' number allowed to be stored in memory is ten. For the detailed operation procedure for storing, see the operation chart shown later.Rotate the Channel Selection Knob until selecting the desired alphabet. Afterselecting an alphabet, complete its storing in memory by pressing the [SACN/MEM]key. The letters of alphabets usable for storage mentioned above are shown below, totaling 21. No data is stored in memory when, during the entry procedure, a wrong key operation or an interruption of the power supply occurs.δ) Once you have selected the Other Ship’s MMSI number with presssing and hold the[DSC/PRI] key for 2 seconds to secure the set number, the radio will prompt you forthe working channel you wish to communicate on. The large character display willshow 2 “dashes” and a “W” will appear in the small channel display. Using theChannel Select knob on the front panel, select the desired channel and press theDSC/PRI key once. The following 12 channels can be selected as working channel. CH6, 8, 9 , 10, 13, 15, 17, 67, 69, 72, 73, and 77.e) The TX indicator on the LCD will flash indicating the RAY215 is ready to transmit. Sendthe Individual Ship’s Call by pressing the PTT switch.f) Once the digital “packet” of information is sent, the radio will wait for anacknowledgement from the targeted ship or station. If the target station acknowledges, atone will sound and “ack” will illuminate on the LCD. After 2 seconds are passed, theRAY215 will then switch to the previously selected working channel.g) If the call is not acknowledged, you can exit the DSC mode be pressing the 16/9 key.h) If Individual Call is attempted to be transmitted to the MMSI No.of the ship stored inmemory, press DSC/PRI key to initiate DSC mode, then press SCAN/MEM to select theMMSI No. you wish to call. After selecting MMSI No. by rotating Channel Select knob,the radio is reverted to the situation of above d) situation by pressing SCAN/MEM key.NMEAVOLSQL NMEA NMEA DSC](https://usermanual.wiki/Flir-BelgiumBA/RAY215/User-Guide-171325-Page-9.png)
![DSC Mode MMPress the [DSC/PRI] key and [D/L I.C]key Stand-by for entry of the 1st digit Press and release the [DSC] key ,and the unit is put in the MMSI entry state Channel number selected by the Channel Select Knob Entry with Entry of digitDSC Key up to the 9th Stand-by for entry of the 2nd digit After entering the 9th digit, confirm the set contents Contents of respective digits (the 1st through the 9th) indicated 9th) indicated at every second Confirm them Contents of the 1st digit indicated Contents of the 9th digit indicated When resetting a channel number,press and release the [DSC] key. Stand-by for entry of the 1st digitPressing the [SCAN/MEM] key at this step will enable storing other ship's MMSInumber in memory. In case storing is not required, by skipping this operationitem further operation of an Individual Ship's Call is enabled.SCAN/ME / Press [SCAN/MEM] key…ΨRotate the rotary encoderuntil selecting the desired alphabet.DSCNMEA NMEA DSC NMEA DSCNMEA NMEA DSCNMEA DSCMEMDSCMEMDSCNMEA DSCMEMDSC](https://usermanual.wiki/Flir-BelgiumBA/RAY215/User-Guide-171325-Page-10.png)
![After selecting an alphabet, complete its storingin memory by pressing the [SACN/MEM] key.In case of this sample the number is stored in "E" area. Press and hold the [DSC/PRI] keyfor 2 seconds to secure the set number Select CH No. Entr Entryby CH Select Knob with DSC key Sand-by for entry of Selection of CH6 [TX] Flashinga communication-channel numberTransmitting data by pressing the PTT switch (transmit on CH 70) Stand-by for receiving "ACK" from the specified ship (reception on CH 70)[TX] display (to be exinguishedafter finish of data transmission) "ACK" signal received from the specified ship At elapse of 2 seconds after receiving an "ACK", unit is put to activate on a selected communication CH [ACK] displayed Ready to work on a communication CH∉ Calling the MMSI Number of other ship stored in memory in DSC modePress [DSC/PRI] and D/L I.C key Press [SCAN/MEM] key Memory calling state Rotate the rotary encoder until selecting the desired alphabet.Press [SCAN/MEM] keyDSCNMEA DSCNMEANMEA DSC A C KNMEA DSCTXNMEA DSCTX NMEA DSCNMEAVOLSQLNMEAVOLSQLNMEAMEMDSCMEMDSC DSC](https://usermanual.wiki/Flir-BelgiumBA/RAY215/User-Guide-171325-Page-11.png)

![channel display for “a”ll “s”hip’s call.c) Press the DSC key once and TX will begin to flash.d) Press the PTT switch to transmit the All-Ship’s Call. DSC modePress and release “DSC/PRI” key and “D/L I.C” Key All Ships mode selected by the CH Select Knob Press the [DSC] key to put the unitin stand-by state for transmission “TX” FlashingTransmitting an All Ship's Callby pressing the PTT key (transmit on CH70) After transmitting the signal,channel 16 is selected“TX” is displayedWhen receiving an All-Ship’s Call:a) A tone will sound and the radio will enter the DSC mode with “as” flashing. Pressthe DSC key once and the radio will automatically select channel 16. There is noacknowledge required for an All-Ship’s Call. Receiving an All Ship's Call “DSC”displayed ,” AS” Flashing Press the [DSC] key and select channel 16. Press ready to communicate on a selected communication-CHNMEAVOLSQL NMEA DSCNMEA DSC NMEA DSCTX 1WNMEA DSCTX 1WNMEAVOLSQLNMEAVOLSQL NMEA DSCNMEAVOLSQL](https://usermanual.wiki/Flir-BelgiumBA/RAY215/User-Guide-171325-Page-13.png)
![3.15.4 Distress CallA Distress Call allows you to send out a digital “packet” of data at high power that includesyour position, time, MMSI number, and other information in the event of an emergency (fire,flooding, sinking, piracy, etc.). All ship’s and stations outfitted with the correct type of DSCequipment will be able to pinpoint your position and either relay the information or responddirectly. Using the Distress key overrides all other functions.To send a Distress Call, perform the following:a) On the back of the microphone, lift the door marked “DISTRESS” and press andhold the red Distress key for 4 seconds. The LCD will count down from four tozero.b) The RAY215 automatically enters the DSC mode and sends the digital informationat high power. Once transmitted, the radio monitors channel 70 for a Distressacknowledge but also monitors channel 16 for emergency traffic.c) After finish of transmitting, if failed in receiving an acknowledgement from any of other ships to the transmitted Distress Call, press the PTT-key to transmit a Distress Calld) If a receiving station has Distress acknowledge capability and sends anacknowledge to you, the RAY215 LCD will sound the DSC tone, display “ack”, andexit the DSC mode where channel 16 is automatically selected. Press “DISTRESS” key Press and keep holding the key will effecta count-down operation in an order 4 3 2 1 (at every second) After finish of a count-down procedure,transmitting a Distress Call is initiated “TX” is displayed After finish of transmitting,wait for acknowledgment on CH 70 and 16 from other ships. In case no acknowledgment received, press the PTT key to transmit a Distress Call (no automatic transmission is enabled) When an acknowledgment received [AK] displayedNMEAVOLSQLNMEA DSCNMEA DSCNMEA DSCTXNMEA DSC NMEA DSC A C K](https://usermanual.wiki/Flir-BelgiumBA/RAY215/User-Guide-171325-Page-14.png)
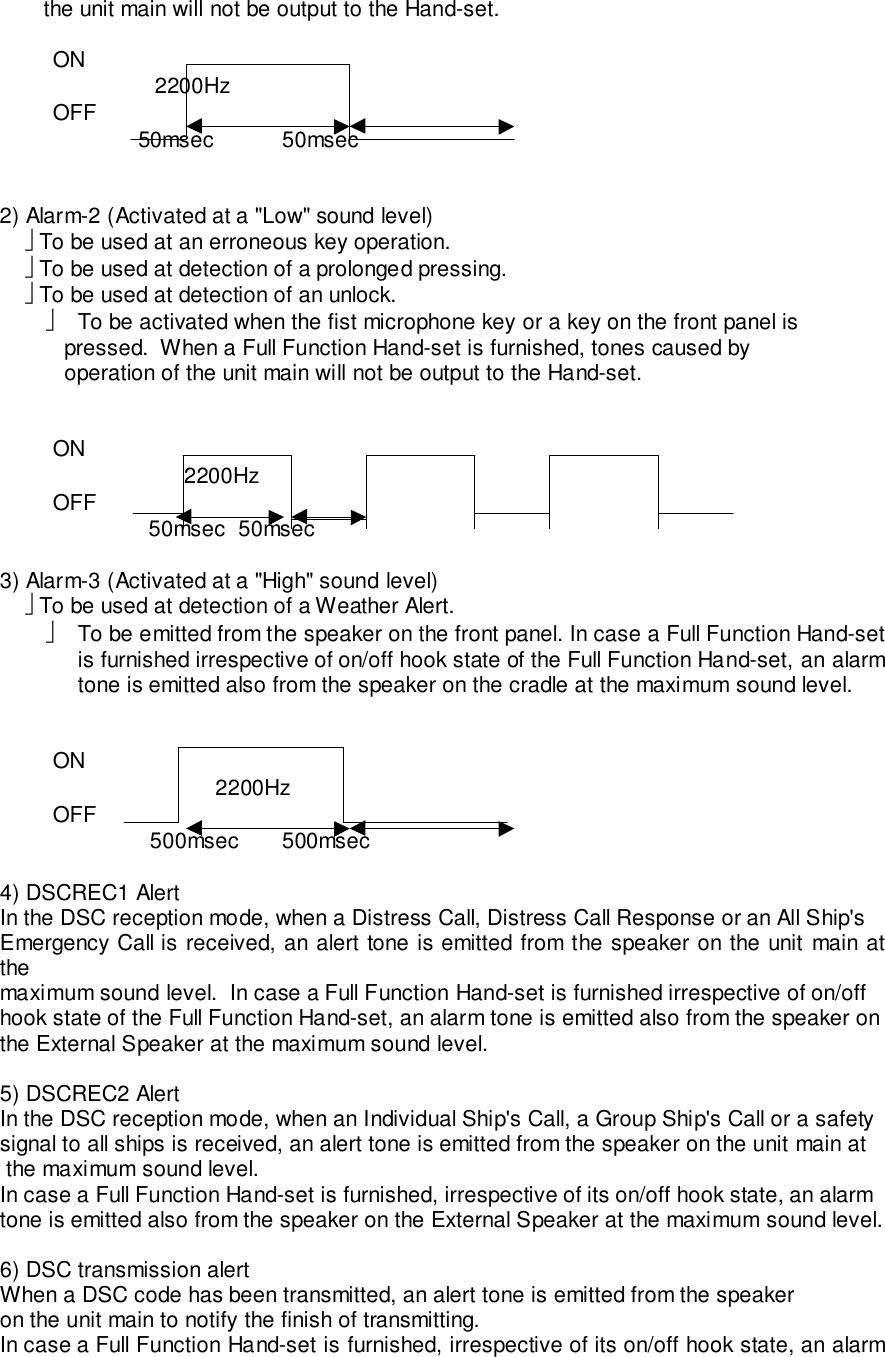
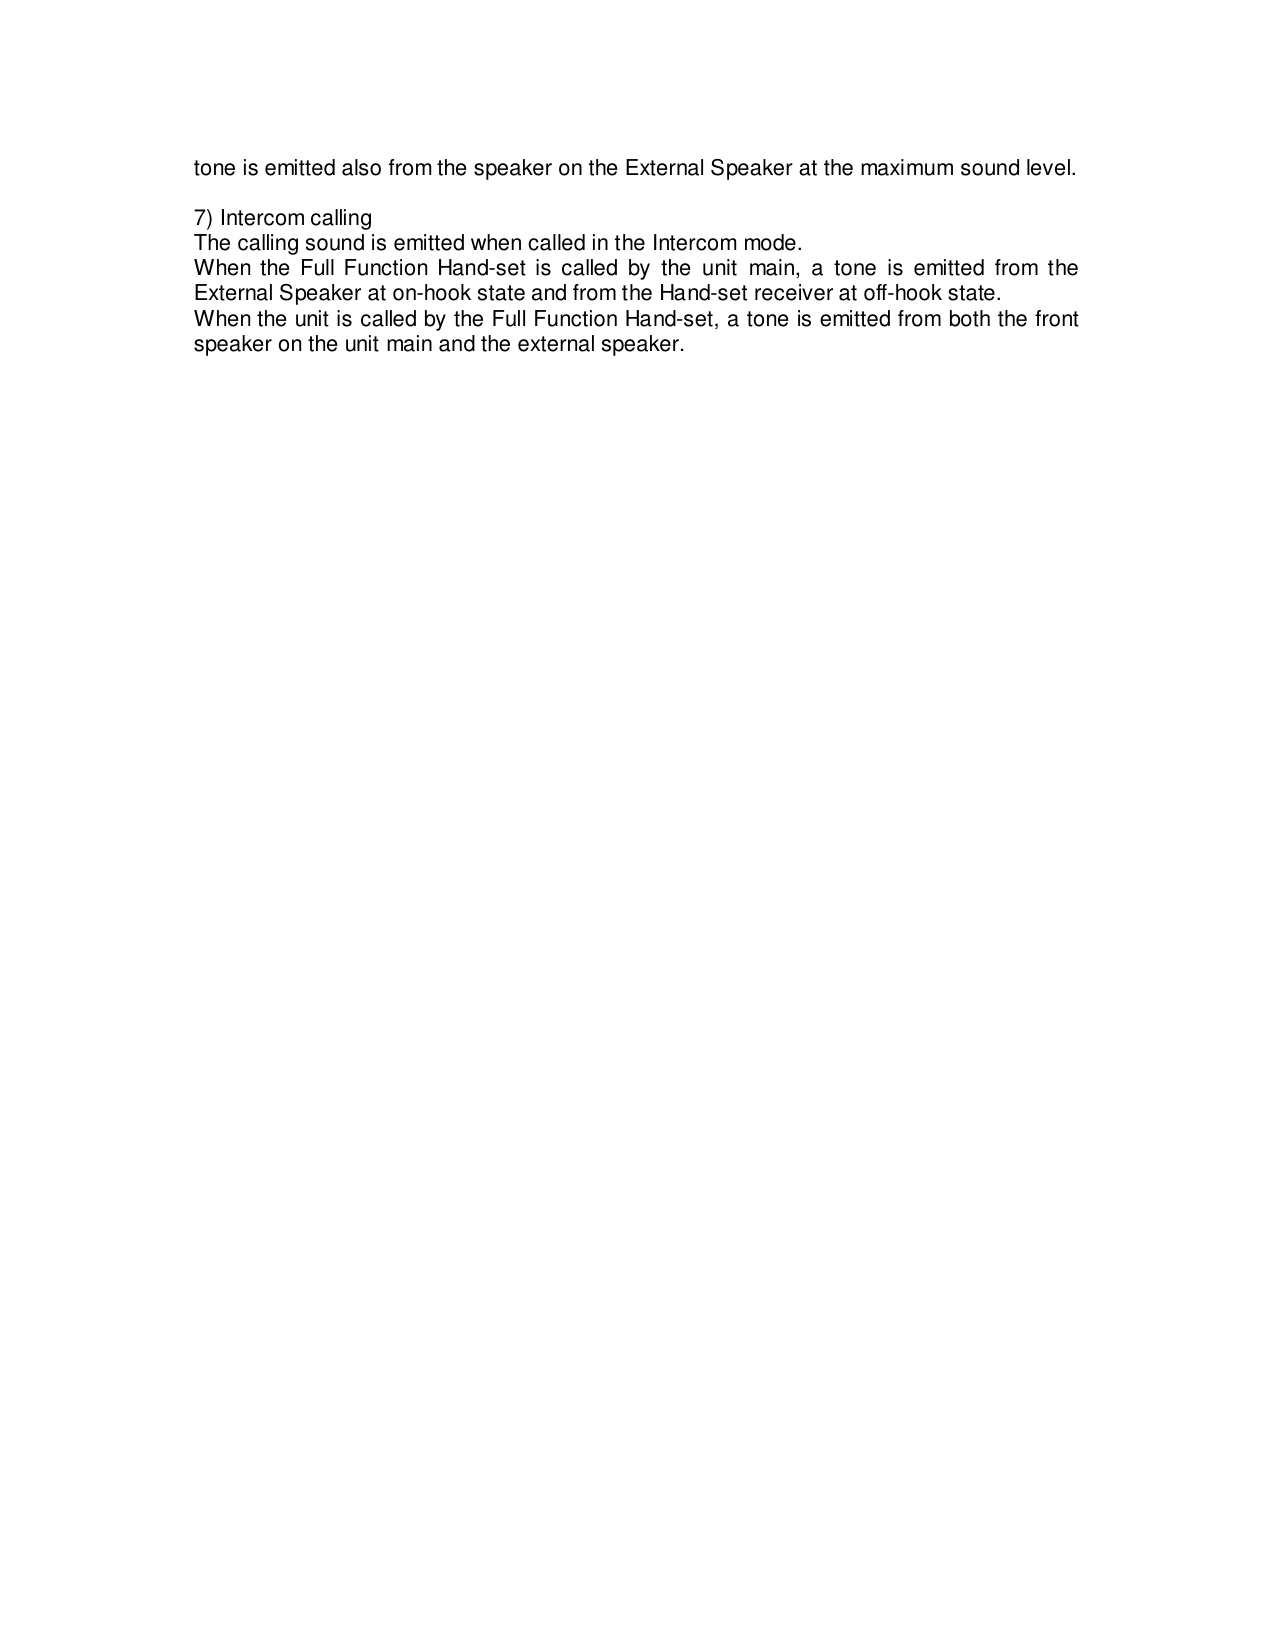
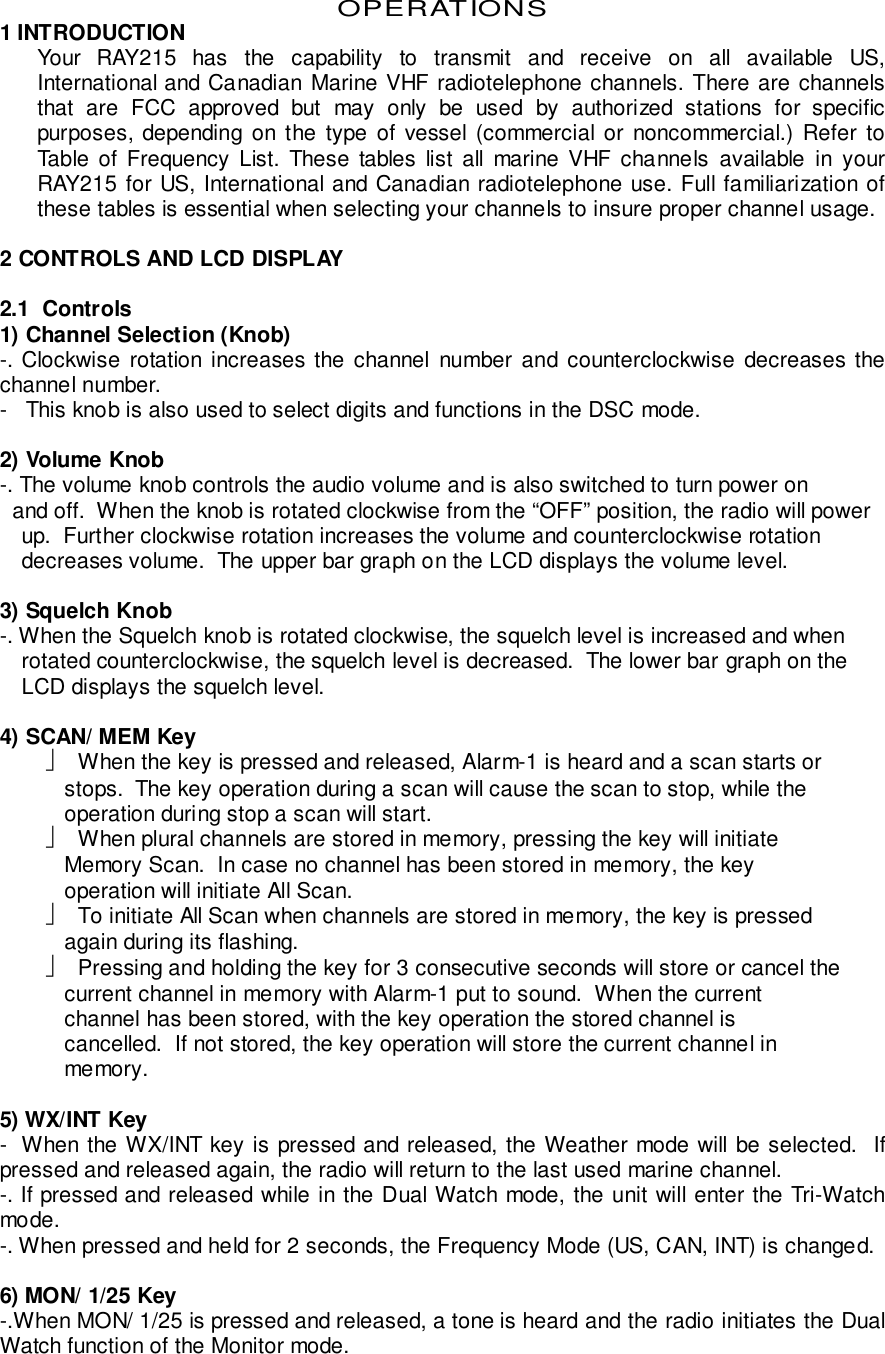
![[TX] extinguished “ACK” is displayed Channel 16 is selectedWhen receiving a Distress Call:a) Channel available for receiving a Distress Call is channel 70 only.The reception is enabled in any of such states as are on a selected working channel, inthe Monitor mode or in the scan mode. At receiving a calling signal, the unit isautomatically put in the DSC mode. the RAY215 will automatically sound the DSC toneand enter the DSC mode. A “d” will flash in the small channel display.b) Press the DSC key once and the radio will automatically select channel 16.c) The RAY215 does not have the ability to acknowledge or relay a DSC Distress Call soonce the Distress Call is received, you should attempt to contact the vessel in distress onchannel 16 and attempt to render assistance. When a Distress Call received “d” is Flashing Press the [DSC] key, and channel number 16 is selected3.16. Alert Operation AlarmsAlarms are given by on/off emission of a buzzer tone at 2.048 kHz controlled by a CPU.With the Alarm-3 a buzzer tone is emitted at a high sound level.1) Alarm-1 (Activated at a "Low" sound level) To be used as an acknowledge tone at a key operation (a click). To be activated at pressing the fist microphone key or a key on the front panel. Even when a Full Function Hand- set is furnished, tones caused by operation ofNMEAVOLSQLNMEAVOLSQLΜ Ο ΝNMEA DSCNMEAVOLSQL](https://usermanual.wiki/Flir-BelgiumBA/RAY215/User-Guide-171325-Page-15.png)