Flir BelgiumBA S100 S100 Controller - radio interface User Manual 81242 1
Raymarine UK Ltd. S100 Controller - radio interface 81242 1
Operation Manual
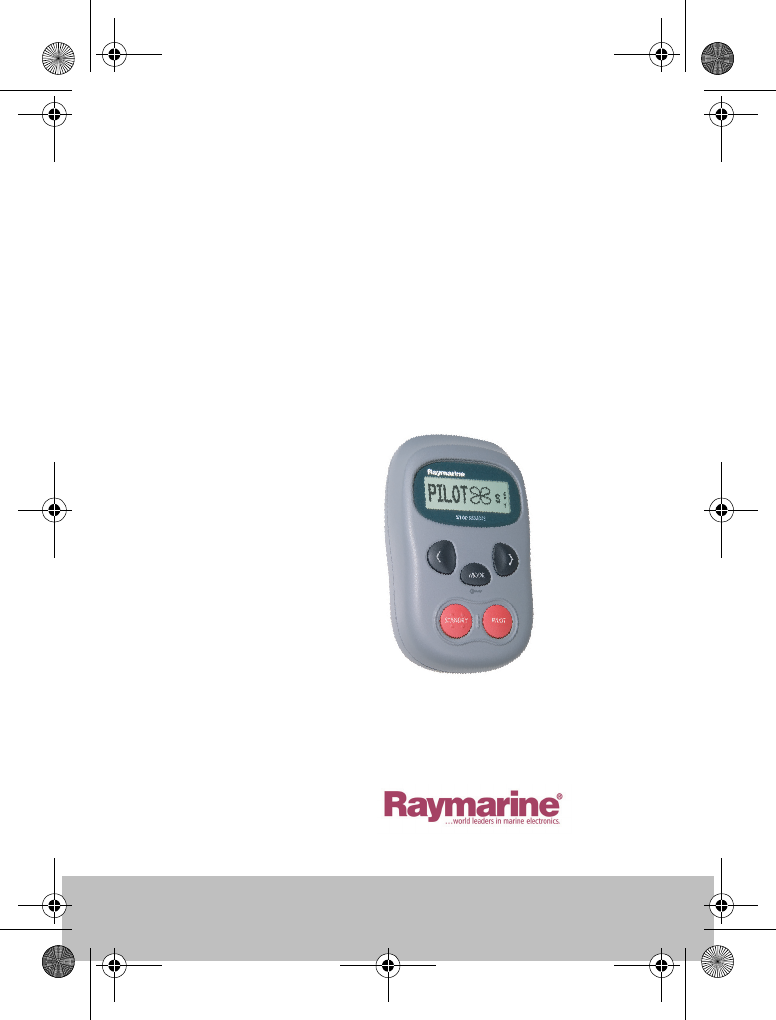
Raymarine
S100 Controller
User Guide
Welcome to the S100 Autopilot
Handbooks can be such daunting things, can’t they?
Please don’t worry, we have made this guide as simple as
possible.
Your guide contains an explanation on how to use your
S100, so finding your way around will become second
nature.
If all you want to do is power up and get going, that’s fine.
But if you want to know more about what your S100 will
do for you, you’ll find it here.
Document Number: 81242-1
Date: January 2005
D7637-1
81242_1.fm Page 1 Monday, January 10, 2005 4:01 PM
2Raymarine S100 Controller
Contents
S100 Controller
D7694-1
81242_1.fm Page 2 Monday, January 10, 2005 4:01 PM

User Guide 3
1 - Getting Started
Changing the Controller batteries ........................................ 5
The S100 Autopilot Controller .............................................. 6
How do I power the system on? ............................................ 7
2 - Using your S100
How do I use the autopilot?.................................................. 9
How do I automatically steer straight? ............................... 10
How do I follow a route from my GPS? ............................... 11
How do I follow a circle pattern? ........................................ 12
How do I follow a zig-zag pattern? ..................................... 13
How do I follow a cloverleaf pattern? ................................. 14
How do I steer to a fixed wind angle? ................................. 15
How do I tack using the autopilot? ..................................... 16
How do I dodge an obstacle? .............................................. 17
3 - Setting up your S100
How do I change the pattern direction? .............................. 19
How do I change my boat type? .......................................... 20
4 - Alarms and Troubleshooting
S100 Alarm messages ........................................................ 23
Fault finding ....................................................................... 25
General maintenance ......................................................... 26
Dealer Maintenance Procedures ......................................... 26
Product support .................................................................. 29
5 - Important Information
Safety Notices ..................................................................... 31
Intended Use ...................................................................... 33
Declaration of Conformity .................................................. 33
EMC Guidelines .................................................................. 34
81242_1.fm Page 3 Monday, January 10, 2005 4:01 PM
4Raymarine S100 Controller
Getting
started . . .
D7639-1
81242_1.fm Page 4 Monday, January 10, 2005 4:01 PM
User Guide 5
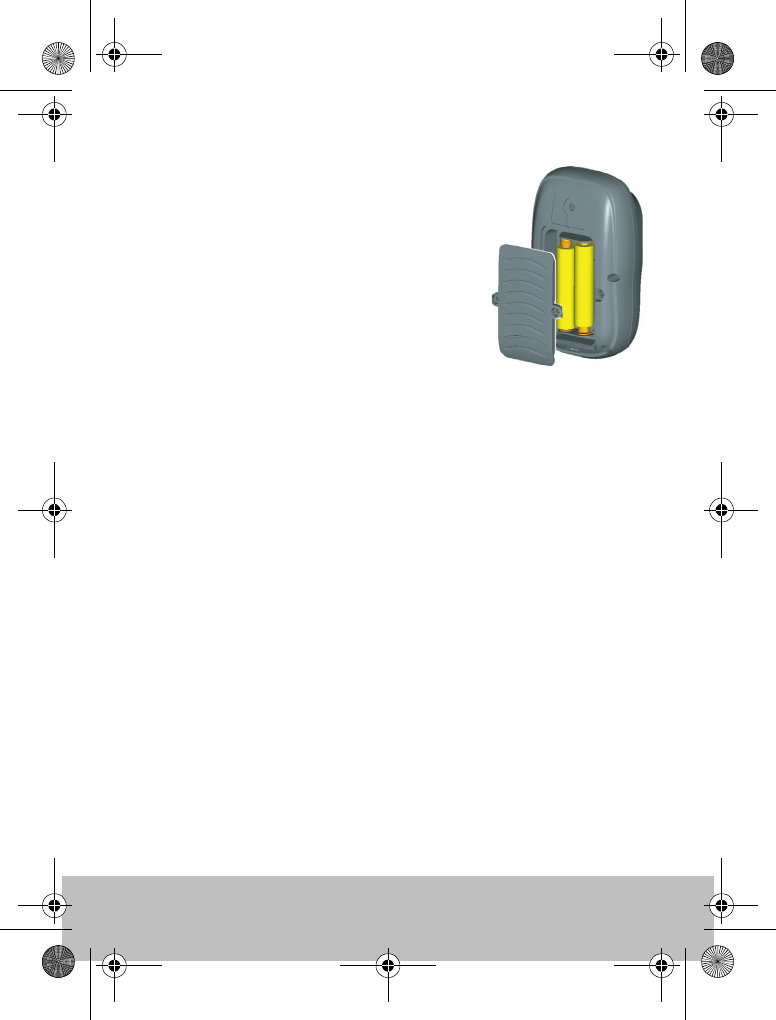
Changing the Controller batteries
The S100 Controller is powered by 2 AAA
batteries which are located in the back of the unit.
Ensure that only good quality alkaline batteries
are used. Do not use rechargeable batteries.
A small cross-head screwdriver will be required to
undo the battery cover screws.
Remove the batteries from the unit if you do not
intend using it for more than a month.
Follow the battery manufacturers’s instructions
for proper care and disposal of used batteries.
D7641-1
81242_1.fm Page 5 Monday, January 10, 2005 4:01 PM

6Raymarine S100 Controller
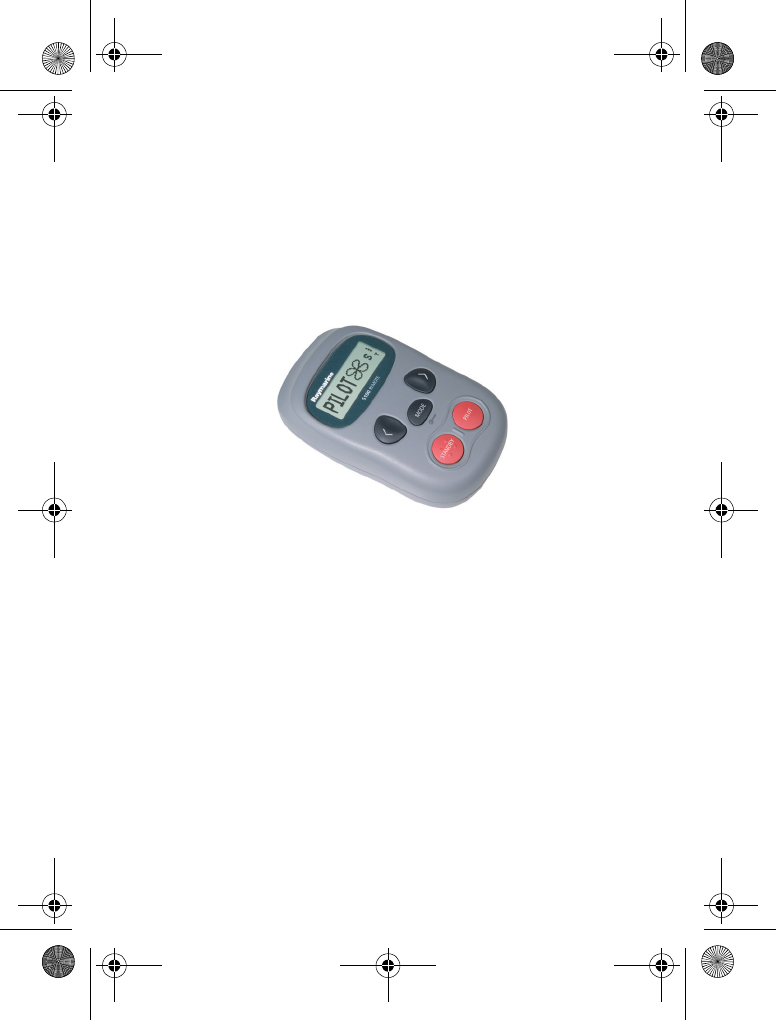
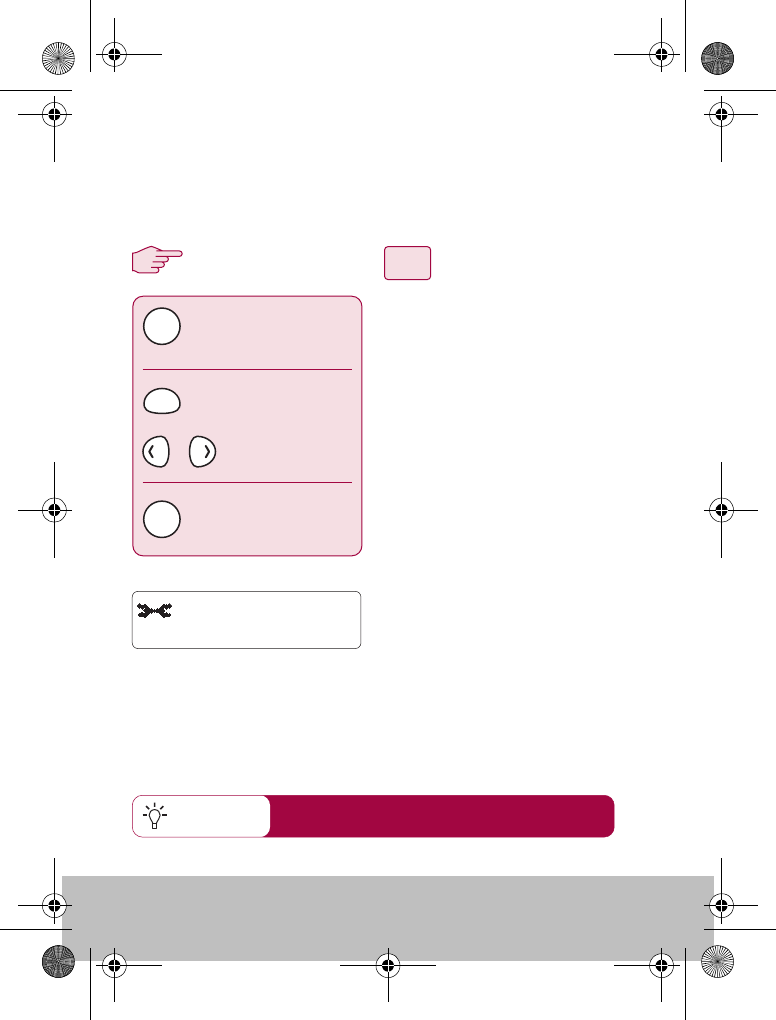
The S100 Autopilot Controller
PILOT Use to activate the autopilot.
NAVIGATE STARBOARD
Use in PILOT mode to power steer
your boat. Press and hold for Smart
Steer
STANDBY (POWER ON)
When off, press to power on the S100
Use to return to manual control of
your boat when in PILOT mode.
Press and hold to access Pilot Setup
MODE Press to select required pilot
mode.
NAVIGATE PORT Use in PILOT
mode to power steer your boat.
Press and hold for Smart Steer
D7642-1
81242_1.fm Page 6 Monday, January 10, 2005 4:01 PM
User Guide 7
How do I power the system on?
POWER ON
Ensure that you autopilot and basestation is powered on at the ships
breaker. On the controller, press and hold the STANDBY button. The
handset will beep, the display will read STANDBY and you’re ready to go.
Power Saving Mode
If you are in STANDBY mode (autopilot off), the handset will automatically
turn off if no button has been pressed for 5 minutes. This will help to extend
the battery life.
Wireless signal strength
Wireless signal strength (5 levels) is shown on the right hand side
of the display.
Keylock
When using your S100, you can temporarily lock the autopilot
keys to ensure that it is not accidentally operated.
How do I activate the keylock?
Press and hold the mode button until you see the key symbol and “LOCK”
message.
Note: You cannot activate keylock when the autopilot is in control of your
boat.
How do I turn off the keylock?
Press mode followed by the PILOT button. A “KEYLOCK OFF” message
will be displayed.
D7667-1
81242_1.fm Page 7 Monday, January 10, 2005 4:01 PM
8Raymarine S100 Controller
Using your
S100 Controller
D7695-1
81242_1.fm Page 8 Monday, January 10, 2005 4:01 PM
User Guide 9
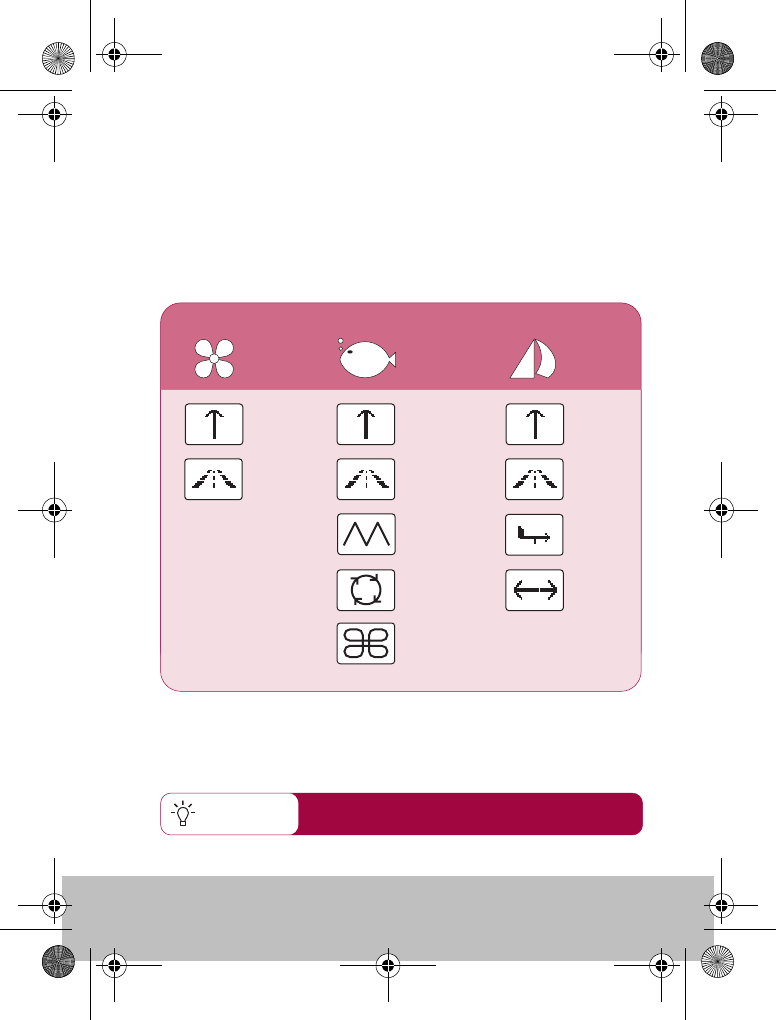
How do I use the autopilot?
You can change your boat type in the autopilot
setup pages
Quick Tip
Your autopilot can steer your boat according to one of its preset
modes. The modes that are available are dependant on your boat and
autopilot type. Each of these are explained on the following pages.
Available modes
POWER FISHING SAIL
AUTOAUTOAUTO
ZIGZAG*
CIRCLE*
CLOVER*
TRACK
TRACKTRACK
WIND
TACK
*S1000 autopilots only
D7616-1
81242_1.fm Page 9 Monday, January 10, 2005 4:01 PM
10 Raymarine S100 Controller
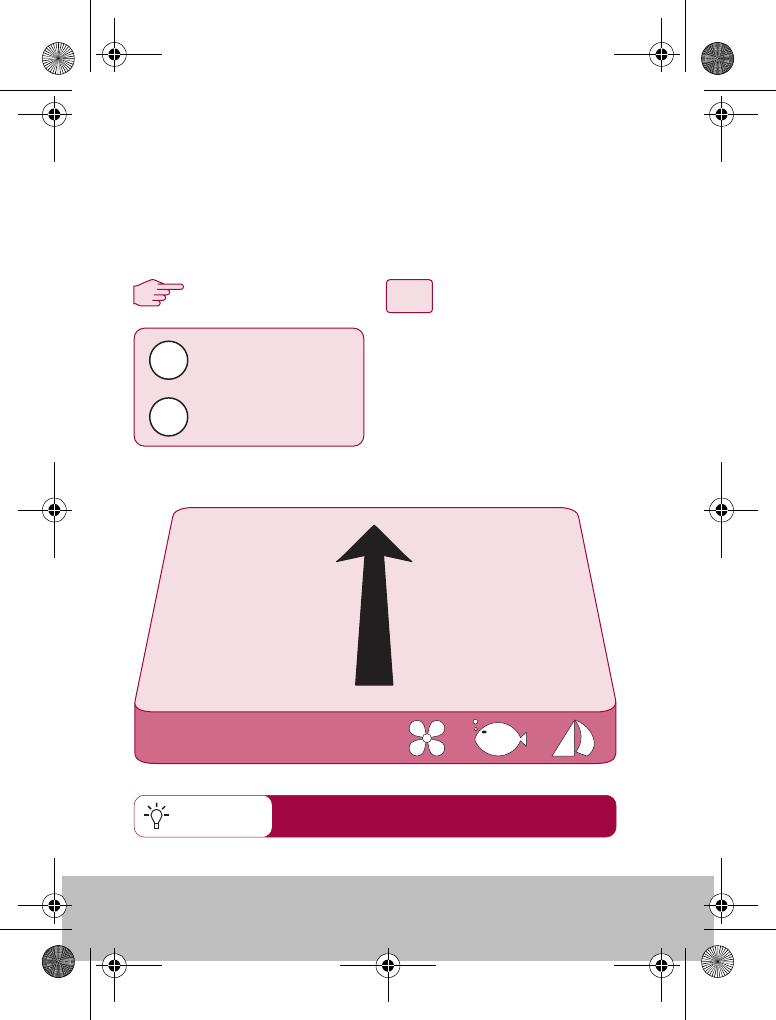
How do I automatically steer straight?
3
12
Quick Tip
From any screen:
1. Steer your boat onto the desired
heading.
2. Check that there are no
obstructions.
3. Press the PILOT key to activate
the autopilot.
PILOT
Activates autopilot in
AUTO mode
STANDBY
Returns the boat to
manual steering
To continue on your current heading under autopilot control, use the
AUTO mode. This will steer you in a straight line ahead until
commanded otherwise. AUTO mode can be used in conjunction with
SMARTSTEER to give you remote, power-steering control of your boat.
AUTO mode is also available for selection via
the MODE button
AUTO
D7617-1
81242_1.fm Page 10 Monday, January 10, 2005 4:01 PM
User Guide 11
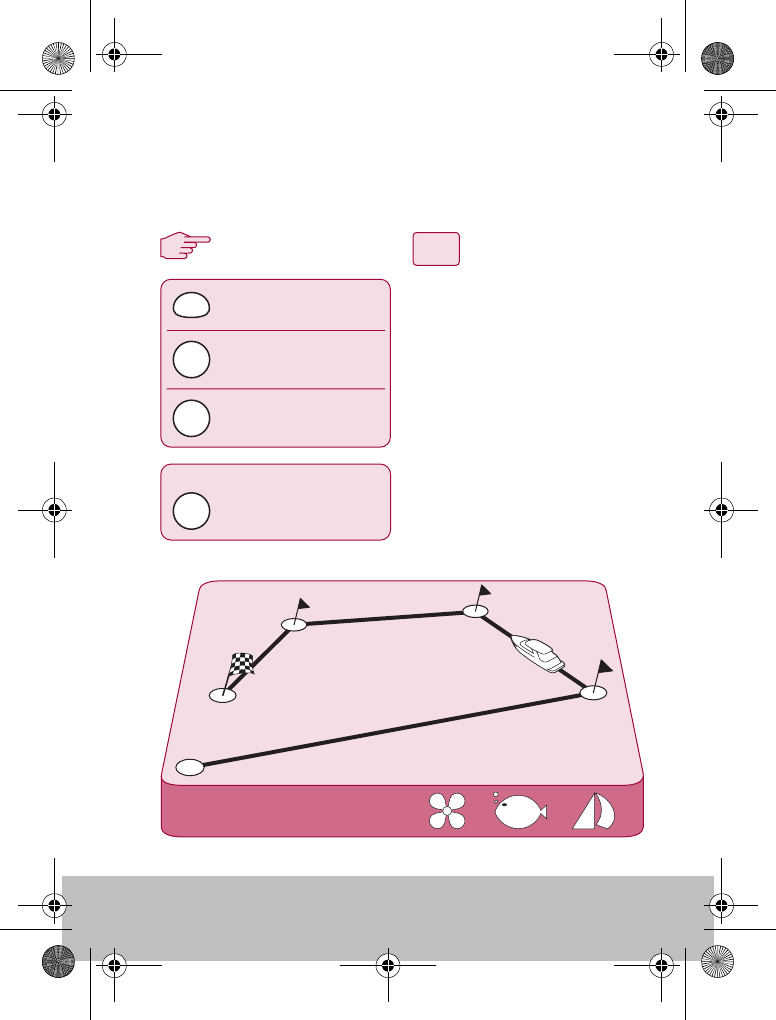
How do I follow a route from my GPS?
TRACK
activates autopilot
in TRACK mode
press repeatedly until
you reach TRACK
3
12
Press when asked to
accept new heading.
MODE
PILOT
PILOT
Press when asked to
accept new heading.
On arrival at each waypoint
Your autopilot can follow a route that you have previously set on your
GPS or Chartplotter. Ensure that your GPS/Chartplotter is sending valid
SeaTalk or NMEA 0183 data.
From any screen:
1. Press MODE repeatedly until
TRACK is displayed.
2. Press PILOT to activate TRACK
mode.
3. If a valid route is received, the
SmartController will tell you the
direction in which it will turn
the boat and the new heading
it will steer to. Press PILOT to
accept.
Note: At each waypoint,
confirmation of turn will be
required. Press PILOT to accept.
PILOT
D7618-1
81242_1.fm Page 11 Monday, January 10, 2005 4:01 PM
12 Raymarine S100 Controller
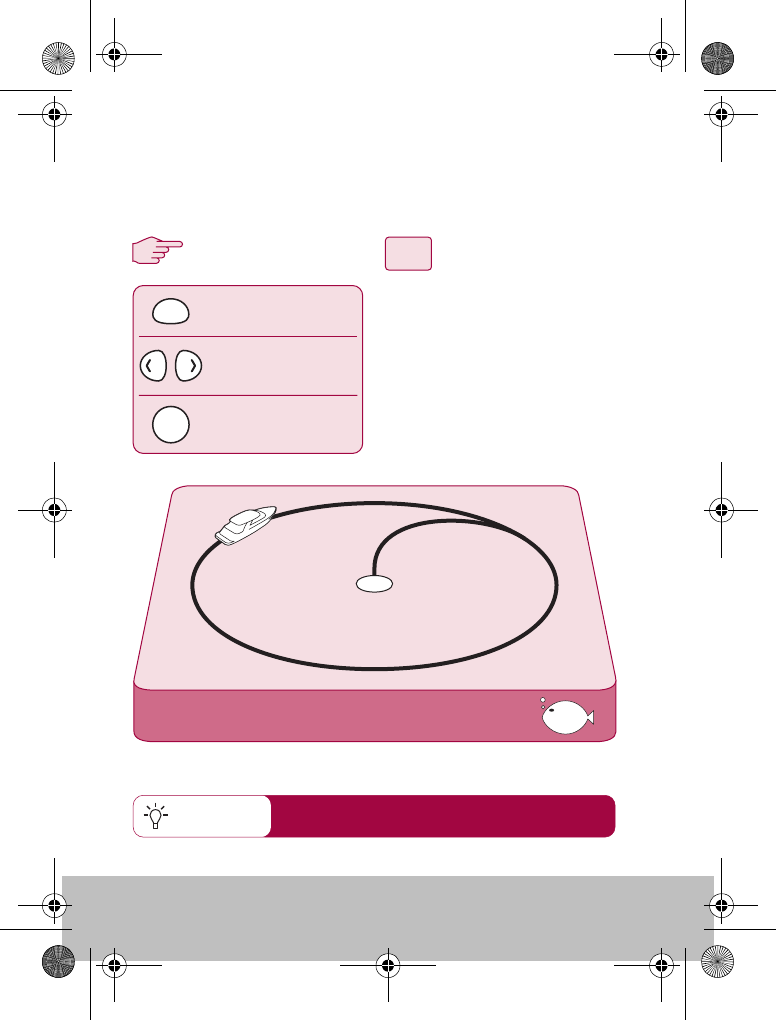
How do I follow a circle pattern?
3
12
Quick Tip
CIRCLE
When you select CIRCLE mode, your current position is marked as the
center of the circle pattern. Your autopilot will now gently steer your
boat into the circle of the selected size.
From any screen:
1. Press MODE repeatedly until
CIRCLE is displayed.
2. Use the PORT and
STARBOARD keys to change
the size (S, M or L) if required
3. Press the PILOT key to activate
the autopilot
change pattern size
(Sml, Med or Large)
press repeatedly until
you reach CIRCLE
activates autopilot
in CIRCLE mode
MODE
PILOT
If your circles are gradually becoming larger, increase
the response setting and restart the circle pattern.
D7612-1
81242_1.fm Page 12 Monday, January 10, 2005 4:01 PM
User Guide 13
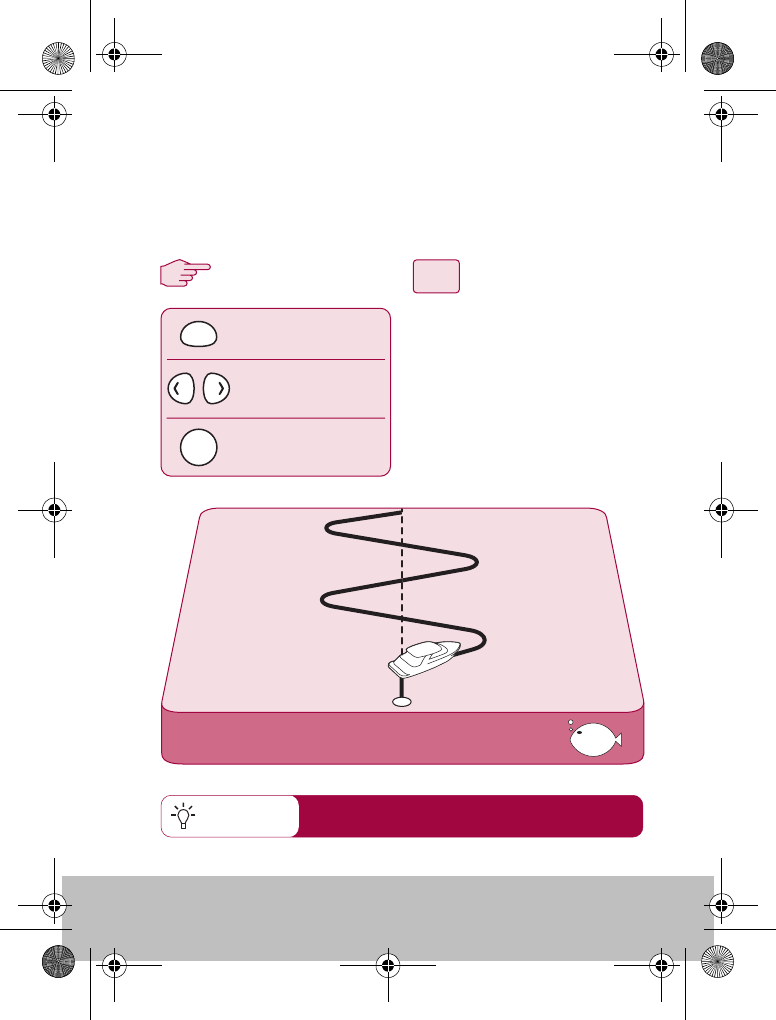
How do I follow a zig-zag pattern?
3
12
Quick Tip
ZIGZAG
From any screen:
1. Press MODE repeatedly until
ZIGZAG is displayed.
2. Use the PORT and
STARBOARD keys to change
the size (S, M or L) if required
3. Press the PILOT key to activate
the autopilot
change pattern size
(Sml, Med or Large)
press repeatedly until
you reach ZIGZAG
activates autopilot
in ZIG ZAG mode
MODE
PILOT
When you enter ZIGZAG mode, the autopilot will use your current
position and heading as the center line of the zig-zag. The autopilot
will now gently steer your boat into the pattern starting with a turn to
starboard.
Fishing patterns are designed to work at speeds
up to 15kts. Check your speed before starting.
D7621-1
81242_1.fm Page 13 Monday, January 10, 2005 4:01 PM
14 Raymarine S100 Controller
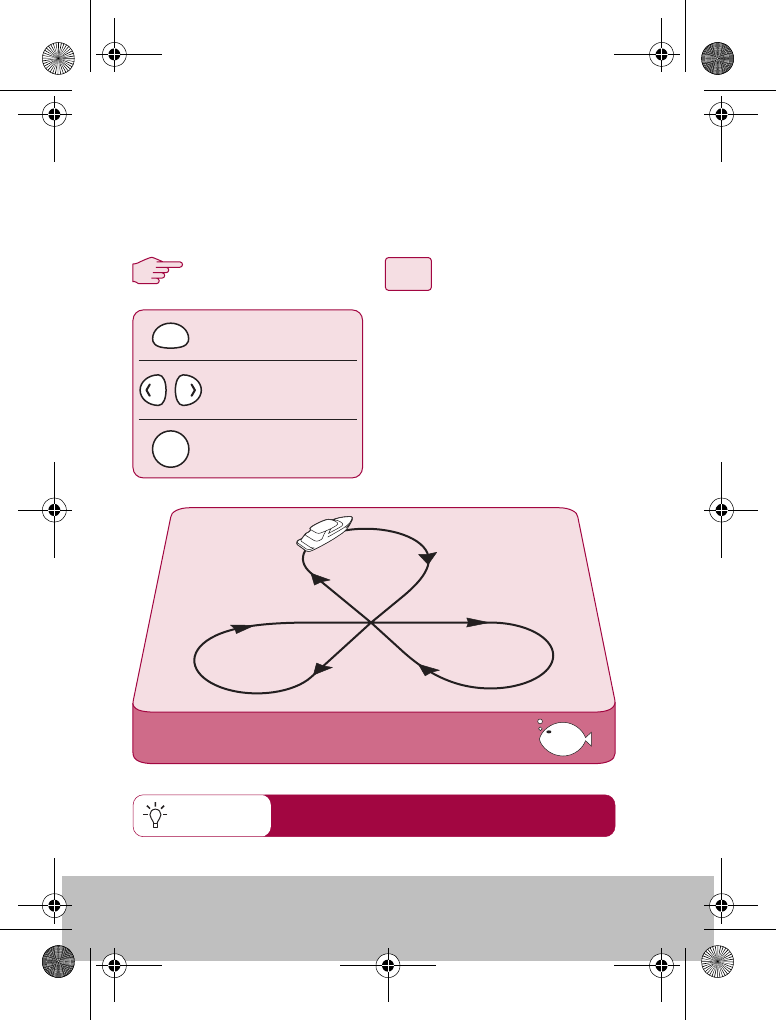
How do I follow a cloverleaf pattern?
Quick Tip
When you enter CLOVERLEAF mode, the autopilot will use your
current position as the center point. The autopilot will then steer your
boat through a series of starboard turns, repeatedly intersecting the
start point.
CLOVERLEAF
change pattern size
(Sml, Med or Large)
press repeatedly until
you reach CLOVERLEAF
3
12
activates autopilot
in CLOVERLEAF mode
MODE
PILOT
From any screen:
1. Press MODE repeatedly until
CLOVERLEAF is displayed.
2. Use the PORT and
STARBOARD keys to change
the size (S, M or L) if required
3. Press the PILOT key to activate
the autopilot
You can change the pattern direction in
PILOT SETUP (See section 3)
D7622-1
81242_1.fm Page 14 Monday, January 10, 2005 4:01 PM
User Guide 15
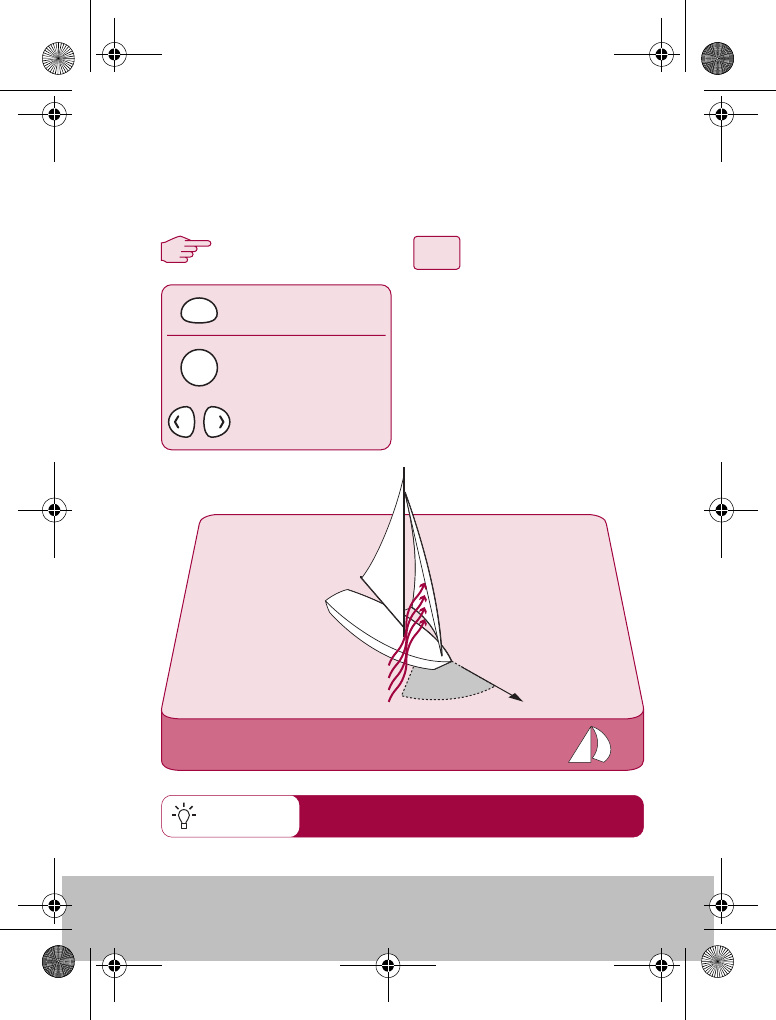
How do I steer to a fixed wind angle?
3
12
WIND
MODE
PILOT
press repeatedly until
you reach WIND
activates autopilot in
WIND mode and shows
current wind angle.
adjusts the desired
wind angle
If your boat is equipped with a wind transducer, you can set the
autopilot to steer at a fixed angle to the wind, WIND mode. You can
adjust this angle to suit your needs.
WIND
From any screen:
1. Press MODE repeatedly until
WIND is displayed.
2. Press PILOT to activate WIND
mode.
3. The current wind angle will be
displayed. Use the PORT and
STARBOARD keys to change
the angle as required.
Quick Tip For best results when heading upwind, sail slightly
freer of the wind than if you were hand steering.
D7623-1
81242_1.fm Page 15 Monday, January 10, 2005 4:01 PM
16 Raymarine S100 Controller
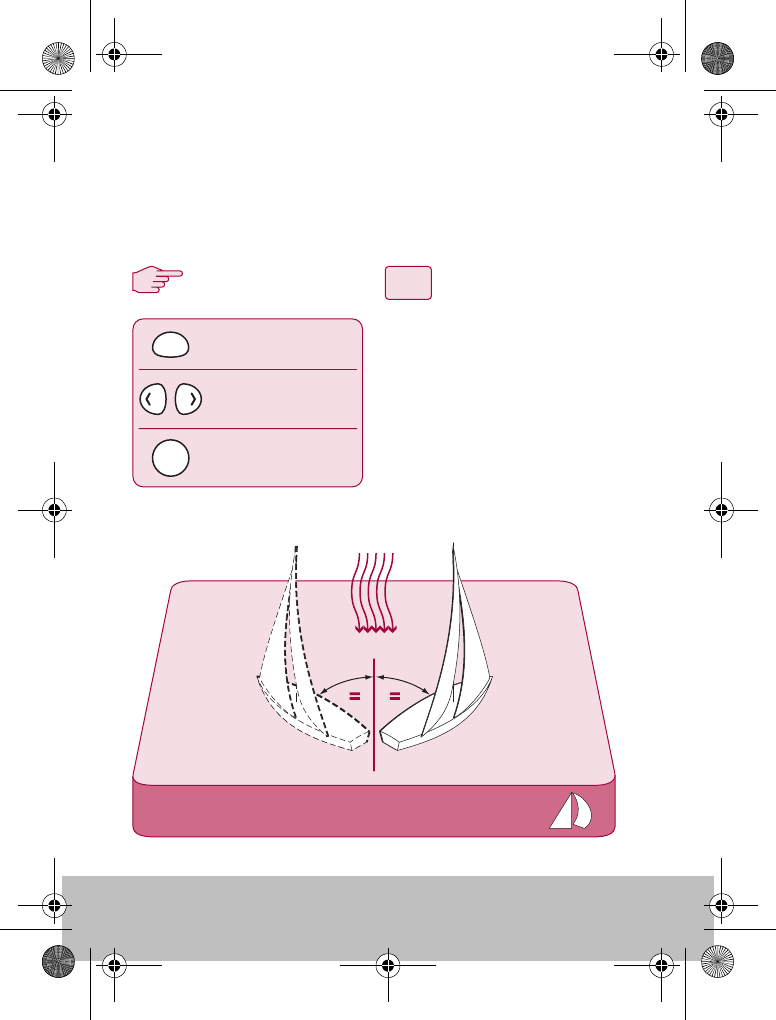
How do I tack using the autopilot?
When in WIND mode you can use the autopilot to execute a tack
maneuver. The degree of turn is set by the autopilot (Refer to the
handbook supplied with the autopilot for details on changing the tack
angle)
TACK
3
12
MODE
PILOT
WIND
From any screen:
1. Press MODE repeatedly until
TACK is displayed.
2. Use the PORT and
STARBOARD keys to select
the TACK direction.
3. Press PILOT to accept.
press repeatedly until
you reach TACK
press to start the
TACK maneuver
select the desired
tack direction
D7624-1
81242_1.fm Page 16 Monday, January 10, 2005 4:01 PM
User Guide 17
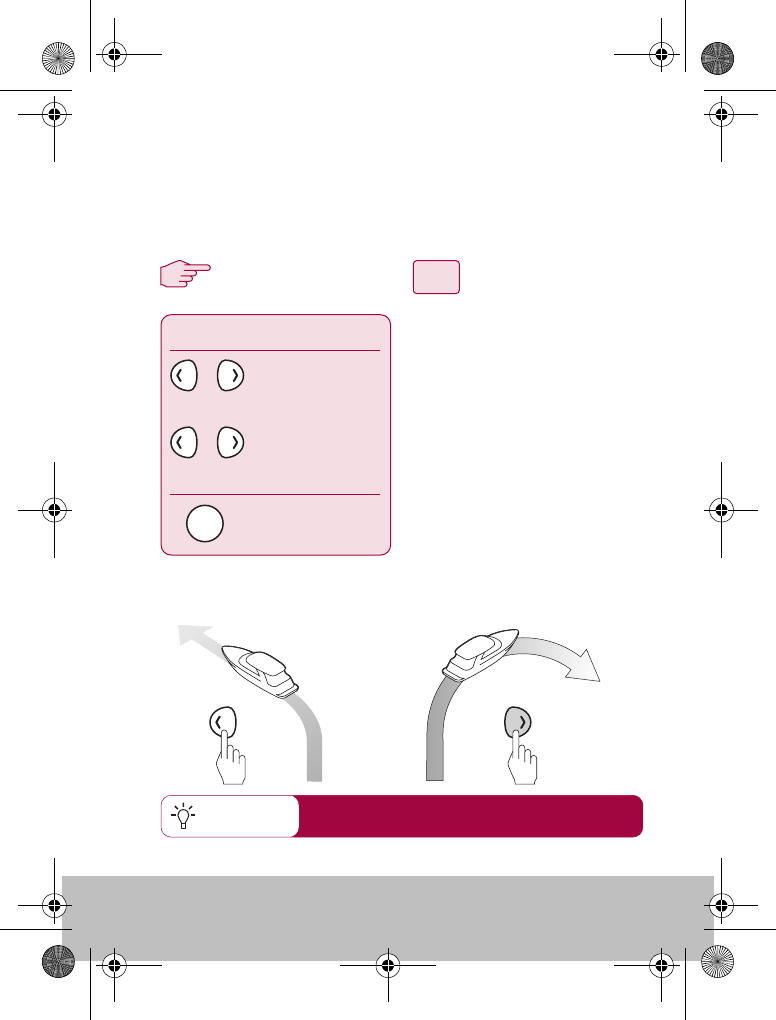
How do I dodge an obstacle?
3
12
Quick Tip When used with SMARTSTEER enabled autopilots, the
press-and-hold command will activate SMARTSTEER
Even when the autopilot is activated, you are are still able to override
it. If, for example, you encounter an obstacle, or you just wish to
change direction by a few degrees. This allows you to effectively
power-steer your boat.
With the autopilot activated:
1. A brief press of the PORT or
STARBOARD key will make a
1º course change in that
direction. Use this method for
course changes up to 20º
2. A press and hold of the PORT
or STARBOARD key will
execute a 10º turn in that
direction.
3. The autopilot will resume on
the new heading.
1º
Dodge
With the autopilot activated:
1º course change
10º course change
press
press and hold
returns the boat
to manual steering
or
or
STANDBY
D7625-1
10º
81242_1.fm Page 17 Monday, January 10, 2005 4:01 PM
18 Raymarine S100 Controller
Setting up
your S100
D7696-1
81242_1.fm Page 18 Monday, January 10, 2005 4:01 PM

User Guide 19
How do I change the pattern direction?
3
12
Quick Tip
You can change the default autopilot pattern direction.
1. Press and hold STANDBY for
2 seconds to enter PILOT
SETUP mode.
2. Press mode until the display
reads PATTERN DIRECTION
3. Press the PORT or
STARBOARD key to toggle
between CLOCKWISE and
ANTICLOCK
4. Press STANDBY to leave Pilot
setup and return to normal
mode.
press and hold
The default direction is CLOCKWISE. The first
turn in any pattern will always be to starboard
Pilot Setup
PATTERN DIRECTION
CLOCKWISE or
ANTICLOCK
Normal mode
MODE
STANDBY
STANDBY
D7649-1
or
PATTERN DIREC.
+ >< - CLOCKWISE
81242_1.fm Page 19 Monday, January 10, 2005 4:01 PM
20 Raymarine S100 Controller
How do I change my boat type?
3
12
Quick Tip
press and hold
Pilot Setup
BOAT TYPE
Normal mode
MODE
STANDBY
STANDBY
Your system can be set to suit the type of vessel to which it is fitted.
This ensures that the user interface will offer you the most relevant
features.
1. Press and hold STANDBY for
2 seconds to enter PILOT SETUP
mode.
2. Press mode until the display
reads BOAT TYPE
3. Press the PORT or
STARBOARD key to toggle
between POWER, SAIL and
FISHING
4. Press STANDBY to leave Pilot
setup and return to normal
mode.
S1000 Fishing patterns are only available in
FISHING mode
POWER
SAIL
or FISHING
D7650-1
or
BOAT TYPE
+ >< - FISHING
81242_1.fm Page 20 Monday, January 10, 2005 4:01 PM

User Guide 21
81242_1.fm Page 21 Monday, January 10, 2005 4:01 PM
22 Raymarine S100 Controller
Alarms and
Troubleshooting
D7633-1
81242_1.fm Page 22 Monday, January 10, 2005 4:01 PM
User Guide 23
S100 Alarm messages
When the S100 detects a fault or failure on the system, it will activate one of
the alarm messages listed in the following table.
Unless otherwise stated, you should respond to the alarm by pressing
standby to clear the alarm and return to manual control, before you attempt
to resolve the problem.
In some situations, the S100 will raise more than one alarm. When you have
dealt with the first alarm, it will display the next alarm.
ALARM MESSAGE POSSIBLE CAUSE and SOLUTION
CURRENT LIMIT Serious drive failure – the drive is taking too much
current due to short-circuit or jamming. Check the
drive unit and wiring.
DRIVE STOPPED The autopilot is unable to turn the rudder (this
occurs if the weather load on helm is too high.
Check drive.
INITIALISING This alarm occurs if you try to activate the pilot
before it is ready. Your boat must be run at more
than 3 knots for longer than 30 seconds before acti-
vating the pilot.
LARGE XTE This alarm will sound when you are more than
0.3nm from your planned track. The alarm will also
state if you are to PORT or STARBOARD of the track,
LRN FAIL 1, 2 or 4 AutoLearn not completed successfully.
Failure codes:
1 = AutoLearn has not been carried out
2 = AutoLearn failed, usually due to manual inter-
ruption
4 = AutoLearn failed, possibly due to drive failure
Repeat the AutoLearn procedure.
MOT POW SWAPPED Motor cables are connected to power terminals
(and power cables are connected to motor termi-
nals) at course computer. Turn off power and swap
over connections.
81242_1.fm Page 23 Monday, January 10, 2005 4:01 PM
24 Raymarine S100 Controller
NO DATA The autopilot is in Track mode and:
• the autopilot is not receiving SeaTalk navigation
data, or
• your GPS is receiving a low strength signal, this
will clear when the signal improves
Note: The autopilot stops adjusting the heading as
soon as it loses data.
NO GPS COG The S1000 autopilot is not receiving valid COG data
from your GPS system. Check the connections and
that your GPS unit is powered on and setup to
transmit COG data.
NO GPS FIX Your GPS is receiving a low strength signal, this will
clear when the signal improves
NO PILOT The controller is not receiving data from the autopi-
lot. Check connections and that the autopilot.
OFFCOURSE This alarm sounds if you have been off course from
the locked heading for more than 20 seconds. It
also states if you are to the PORT or STARBOARD of
the intended heading.
REGISTRATION INCOMPLETE The registration of your new handset cannot be
completed as the system has detected other hand-
sets. in the vicinity.
1. Switch off all other remote handheld units. and
repeat the registration process.
2. If this error persists, take your boat to open water
(with no other vessel within 100 ft) and repeat the
registration process.
ROUTE COMPLETE This sounds on the completion of a track. Press
PILOT to continue on the same heading or
STANDBY for manual control.
SHIPS BATTERY The ships battery voltage has dropped below
acceptable limits, check the charge state of the bat-
tery.
TOO SLOW Your speed has fallen below 3 knots. You must be
travelling faster for the pilot to operate
ALARM MESSAGE POSSIBLE CAUSE and SOLUTION
81242_1.fm Page 24 Monday, January 10, 2005 4:01 PM
User Guide 25
Fault finding
All Raymarine products are designed to provide many years of trouble-free
operation. We also put them through comprehensive testing and quality
assurance procedures before shipping.
If a fault occurs with your S100, use the fault finding tables in this section to
help identify the problem and provide a solution. If you cannot resolve the
problem yourself, refer to the product support information.
TOO FAST TO FISH Fishing patterns will only operate at speeds below
15kts. Check your speed.
WAYPOINT ADVANCE You have arrived at a waypoint on your route. The
autopilot is now requesting permission to turn onto
the next leg, press PILOT to accept.
SYMPTOM POSSIBLE CAUSE and SOLUTION
Display is blank No power – press standby to power up the S100
or change the batteries.
Autopilot not responding. Drive the boat for 30 seconds at above 2.5kts and
retry.
Check autopilot connections.
Check GPS is switched on and connected.
Boat turns slowly and takes a
long time to come onto course
Rudder gain too low. Complete AutoLearn or
increase gain setting.
Boat overshoots when turning
onto a new course
Rudder gain too high. Complete AutoLearn or
decrease gain setting.
Position information not
received
Navigator not transmitting the correct position
data.
The pilot will not auto advance
to the next waypoint.
No bearing to waypoint information received from
the navigator.
Instruments powered from
SeaTalk will not power up
Check connections
Check fuses
ALARM MESSAGE POSSIBLE CAUSE and SOLUTION
81242_1.fm Page 25 Monday, January 10, 2005 4:01 PM

26 Raymarine S100 Controller
General maintenance
Routine checks
The S100 controller does NOT contain user-serviceable parts. If you remove
the main cover you will invalidate the warranty. It should be serviced only by
authorized Raymarine service technician.
As a result, user maintenance is limited to the following checks
• make sure all cable connectors are firmly attached and free of
corrosion
• examine for signs of wear or damage – replace any damaged
cables
• replace batteries when necessary
Cleaning the S100
Take care when cleaning the display. Avoid wiping the display screen with a
dry cloth as this could scratch the screen coating. If necessary, only use a
mild detergent.
Never use chemical or abrasive materials to clean the computer or
controller. If it is dirty, wipe it with a clean, damp cloth.
Dealer Maintenance Procedures
This section includes procedures that have a significant impact on autopilot
operation and can affect your boat’s safety. You will not need to follow
these procedures in normal operation. We therefore recommend that these
are only performed by authorized service personnel.
Accessing the dealer calibration area.
From STANDBY mode, press and hold STANDBY for 10 seconds to enter
the dealer calibration area.
Press mode to cycle through the various calibration options.
81242_1.fm Page 26 Monday, January 10, 2005 4:01 PM

User Guide 27
Hardware and Software version numbers
Use this option to display the current hardware revision and the software
version numbers for the S1000 and S100. At VERSIONS, press the > key to
display more information.
Contrast
Use the < and > keys to adjust the contrast to a satisfactory level.
Self test
Press > to start the unit test sequence and then follow the on-screen
instructions. This will test the display, buzzer and button functions.
Diagnostics
This screen displays the status of the wireless link, press the > key to display
more information.
Handset Registration
Raymarine wireless systems demand that each wireless controller is
“registered” to a basestation. This registration process is to prevent
unauthorized control of your boat by another user nearby. Your S100 system
is supplied with the handset pre-registered to the basestation.
There may be instances where you want to move your controller to another
boat and use it with another system. In this case, you will need to de-register
from the current system and register with the new system. You can do this
using the REGISTRATION function.
81242_1.fm Page 27 Monday, January 10, 2005 4:01 PM
28 Raymarine S100 Controller
To Register a handset
In the DEALER menu, at
REGISTRATION, press PILOT.
If the S100 is not registered, the
display will read NOT REGISTERED.
Press > to start the registration
process, you can press < at any time
to stop the search.
When the basestation is found by the
SmartController and registration is
complete, the display will read REGISTERED
For successful registration, ensure that all other handheld units on your
boat are turned off. If you try to register a new handset with others active,
you will see a REGISTRATION INCOMPLETE message.
To de-register a handset.
In the DEALER menu, at
REGISTRATION, press PILOTIf the
S100 is already registered, then the
display will read REGISTERED. Press > to continue, or STANDBY to cancel
the operation.
The S100 will attempt to communicate with the basesation and de-register.
When complete, the display will read NOT REGISTERED.
If the S100 cannot communicate with the basestation, a BASE NOT FOUND
message will be displayed. It is still possible to de-register the S100 at this
point by pressing >. To leave without de-registering, press STANDBY.
Factory Reset
This option will clear all settings from the S100. Press and hold the PILOT
key for 2 seconds to activate the reset.
Note: A reset does not alter the registration status of the S100
REGISTER
START >
NOT REGISTERED
REG >
SEARCHING
D7657-1
< CANCEL
REGISTERED
DE-REG >
D7674-1
81242_1.fm Page 28 Monday, January 10, 2005 4:01 PM

User Guide 29
Product support
Raymarine products are supported by a worldwide network of distributors
and Authorized Service Representatives. If you encounter any difficulties
with this product, please contact either your national distributor, service
representative, or the Raymarine Technical Services Call Center. Refer to the
back cover or www.raymarine.com for contact details.
Before you consider returning the autopilot, make sure that the power
supply cable is sound and that all connections are tight and free from
corrosion. If the connections are secure, refer to the Fault Finding section in
this chapter.
If you cannot trace or rectify the fault, contact your nearest Raymarine
dealer or Service Center, specifying:
The S100 controller serial number:
• the controller serial number is printed on its rear cover
• the controller software version number
81242_1.fm Page 29 Monday, January 10, 2005 4:01 PM
30 Raymarine S100 Controller
Important Safety
Information
D7659-1
81242_1.fm Page 30 Monday, January 10, 2005 4:01 PM

User Guide 31
Safety Notices
Product installation
This equipment must be installed and operated in accordance with the
instructions contained in this handbook. Failure to do so could result in poor
product performance, personal injury and/or damage to your boat.
As correct performance of the boat’s steering is critical for safety, we
STRONGLY RECOMMEND that an Authorized Raymarine Service
Representative fits this product.
WARNING: Electrical Safety
Make sure the power supply is switched off before you make
any electrical connections.
WARNING: Navigation aid
Although we have designed this product to be accurate and
reliable, many factors can affect its performance. As a result,
it should only be used as an aid to navigation and should
never replace common sense and navigational judgement.
Always maintain a permanent watch so you can respond to
situations as they develop.
WARNING: Autopilot controller
If the wireless controller is your only method of operating
the autopilot, ensure that an in-line power switch is fitted to
the autopilot power supply as detailed in the S1000 autopilot
installation guide.
Your S100 will add a new dimension to your boating enjoyment. However, it
is the skipper’s responsibility to ensure the safety of the boat at all times by
following these basic rules:
• Ensure that someone is present at the helm AT ALL TIMES, to
take manual control in an emergency.
81242_1.fm Page 31 Monday, January 10, 2005 4:01 PM

32 Raymarine S100 Controller
• Make sure that all members of crew know how to disengage the
autopilot.
• Regularly check for other boats and any obstacles to navigation
– no matter how clear the sea may appear, a dangerous situation
can develop rapidly.
• Maintain an accurate record of the boat’s position by using
either a navigation aid or visual bearings.
• Maintain a continuous plot of your boat’s position on a current
chart. Ensure that the locked autopilot heading will steer the
boat clear of all obstacles. Make proper allowance for tidal set –
the autopilot cannot.
• Even when your autopilot is locked onto the desired track using a
navigation aid, always maintain a log and make regular
positional plots. Navigation signals can produce significant
errors under some circumstances and the autopilot will not be
able to detect these errors.
General Care and Safety
Do not leave the controller in places where the temperature could exceed
60ºC (140ºF).
Do not attempt to dismantle the S100 or any of its accessories.
Switch off your S100 system at a refuelling point, even if you are not
refuelling your own vessel.
The operation of some medical electronic devices such as hearing aids and
pacemakers, may be affected if a controller is used next to them. Observe
the manufacturers recommendations for such devices.
Radio frequency energy
Your S100 and basestation are low- power radio transmitters and receivers.
When it is turned on, they intermittently receive and transmit radio
frequency (RF) energy (radio waves).
81242_1.fm Page 32 Monday, January 10, 2005 4:01 PM
User Guide 33
Exposure to radio frequency energy
The S100 and basestation are designed not to exceed the limits for
exposure to RF energy set by national authorities and international health
agencies These limits establish permitted levels of radio wave exposure for
the general population. An example of a radio frequency exposure
guideline and standard that these are designed to conform to is:
BS EN 50371:2002 - Generic standard to demonstrate the compliance of
low-power electronic and electrical apparatus with the basic restrictions
related to human exposure to electromagnetic fields.
FCC Information
These devices comply with Part 15 of the FCC Rules. Operation is subject to
the following two conditions: (1) these devices may not cause harmful
interference and (2) these devices must accept interference received,
including interference that may cause undesired operation.
Changes or modifications to this equipment not expressly approved in
writing by Raymarine could violate compliance with FCC rules and void the
user's authority to operate the equipment.
Disposal
Disposal of this product, at the end of its useful life, should be in accordance
with local regulations.
Intended Use
The S100 controller and basestation are intended for use on leisure vessels
and small work boats
Declaration of Conformity
Hereby Raymarine UK Ltd., declare that the S100 and basestation are in
compliance with the essential requirements and other relevant provisions
of the Directive 1999/5/EC
81242_1.fm Page 33 Monday, January 10, 2005 4:01 PM

34 Raymarine S100 Controller
The original Declaration of Conformity certificate may be viewed on the
relevant product page at www.raymarine.com
EMC Guidelines
All Raymarine equipment and accessories are designed to the best industry
standards for use in the recreational marine environment. Their design and
manufacture conforms to the appropriate Electromagnetic Compatibility
(EMC) standards, but correct installation is required to ensure that
performance is not compromised.
Connections to other equipment
If your Raymarine equipment is to be connected to other equipment using a
cable not supplied by Raymarine, a suppression ferrite MUST always be
attached to the cable near to the Raymarine unit.
Handbook Information
To the best of our knowledge, the information in this handbook was correct
when it went to press. However, Raymarine cannot accept liability for any
inaccuracies or omissions it may contain. In addition, our policy of
continuous product improvement may change specifications without
notice. As a result, Raymarine cannot accept liability for any differences
between the product and the handbook.
SeaTalk® is a Registered Trademark of Raymarine
All other trademarks used in this document are acknowledged.
© Copyright Raymarine UK Limited 2004
81242_1.fm Page 34 Monday, January 10, 2005 4:01 PM