Flyingvoice Network Technology FIP16 Portable Wireless IP PHONE User Manual
Flyingvoice Network Technology Co., Ltd Portable Wireless IP PHONE
User manual
1

Contents FIP16 User Manual
1
About This User Guide .................................................................................................................................................4
Contact with FlyingVoice .............................................................................................................................5
Purpose .........................................................................................................................................................6
Cross references ............................................................................................................................................6
Declaration of Conformity ....................................................................................................................................6
Part 15 FCC Rules ........................................................................................................................................7
Warnings and Notes ..............................................................................................................................................1
Warnings .......................................................................................................................................................1
Notes .............................................................................................................................................................1
Chapter 1 Product description ....................................................................................................................................2
FIP16/FIP16/FIP16P .............................................................................................................................................3
Internet connection ...............................................................................................................................................4
Phone Start ....................................................................................................................................................4
Connect to a wireless network ......................................................................................................................4
Familiar with the phone ........................................................................................................................................6
Front panel ....................................................................................................................................................6
Chapter 2 Basic functions ..........................................................................................................................................9
SIP registration....................................................................................................................................................10
Dial number ........................................................................................................................................................ 11
Use the handle ............................................................................................................................................. 11
Use handsfree .............................................................................................................................................. 11
Use headphones .......................................................................................................................................... 11
Use the redial key ....................................................................................................................................... 11
Call from the phone book ........................................................................................................................... 11
Call from call log ........................................................................................................................................12
Answer the phone ...............................................................................................................................................12
Call mute .............................................................................................................................................................12
Hold ....................................................................................................................................................................13
3-way Conference ...............................................................................................................................................13
Call transfer ........................................................................................................................................................13
Attended call transfer ..................................................................................................................................13
Blind call transfer ........................................................................................................................................14
Call Forwarding ..................................................................................................................................................14
All Forwarding ............................................................................................................................................14
Busy Forward ..............................................................................................................................................15
No answer Forward .....................................................................................................................................16
Call Waiting ........................................................................................................................................................17
Auto Answer .......................................................................................................................................................18
DND ....................................................................................................................................................................19
End the call .........................................................................................................................................................20
Blacklist ..............................................................................................................................................................20
SMS ....................................................................................................................................................................22
Contents
Contents FIP16 User Manual
2
Send text messages .....................................................................................................................................22
Read text messages .....................................................................................................................................23
Voicemail ............................................................................................................................................................23
Chapter 3 LCD Configuration .................................................................................................................................25
Change language .................................................................................................................................................26
Change ringtone ..................................................................................................................................................26
Change Background ............................................................................................................................................26
Reboot .................................................................................................................................................................26
Factory Reset ......................................................................................................................................................26
Other parameters of the phone ............................................................................................................................27
Chapter 4 Web Configuration ..................................................................................................................................31
Login ...................................................................................................................................................................32
Status ...................................................................................................................................................................33
Basic ...........................................................................................................................................................33
LAN Host ....................................................................................................................................................34
Syslog .........................................................................................................................................................34
SIP Account ........................................................................................................................................................35
Account setting ...........................................................................................................................................35
SIP settings ..................................................................................................................................................40
VoIP QoS ....................................................................................................................................................42
Network ..............................................................................................................................................................43
LAN ............................................................................................................................................................43
VPN ............................................................................................................................................................44
DMZ ...........................................................................................................................................................46
Routing .......................................................................................................................................................47
Phone ..................................................................................................................................................................47
Preferences ..................................................................................................................................................48
Phonebook ..................................................................................................................................................49
Call log ........................................................................................................................................................51
Dial Rule .....................................................................................................................................................52
Administration ....................................................................................................................................................54
Management................................................................................................................................................54
Web Idle Timeout(0 - 60min) ......................................................................................................................................56
Firmware Management ...............................................................................................................................57
Provision .....................................................................................................................................................58
TR069 .........................................................................................................................................................59
Chapter 5 Common Troubleshooting ..........................................................................................................................61
The power is not reflected...................................................................................................................................62
No dial tone .........................................................................................................................................................62
Can not make a call .............................................................................................................................................62
Can not receive phone calls ................................................................................................................................62
No sound in the call ............................................................................................................................................62
Can’t login Web page ..........................................................................................................................................63
Forget password ..................................................................................................................................................63
Contents FIP16 User Manual
3
Contents FIP16 User Manual
4
Thank you for choosing FlyingVoiceFIP16. The FIP16
which have one line is a full-featured VoIP (Voice over
Internet Protocol) phone that provides voice communication
over an IP network.
This phone functions not only much like a traditional phone,
allowing to place and receive calls and enjoy other features
that traditional phone has, but also it own many data services
which you could not expect from traditional telephone.
This guide will help you easily use the various features and
services available on your phone.
TheFIP16, which support 2.4GHZ&5GHZ, It can suooprt
802.11 b/g/n, 802.11ac, 2T2R, And the FIP16 have 1.8''
126*160 TFT Color Screen.
This guide contains the following:
· Contact with FlyingVoice
· Purpose
· Cross reference
· Feedback
· Product Declaration of Conformity
· Warnings and cautions
About This User Guide

Contents FIP16 User Manual
5
Contact with FlyingVoice
Main website:
http://www.flyingvoice.com/
Sales enquiries:
sales1@flyingvoice.com
Support enquiries:
support@flyingvoice.com
Hotline:
010-67886296 0755-26099365
Address:
Room508-509, Bldg#1, Dianshi Business Park, No.49 Badachu Rd,Shijingshan
District, Beijing, China
Contents FIP16 User Manual
6
Purpose
The documents are intended to instruct and assist personnel in the operation, installation and maintenance of the
FlyingVoice equipment and ancillary devices. It is recommended that all personnel engaged in such activities be
properly trained.
FlyingVoice disclaims all liability whatsoever, implied or express, for any risk of damage, loss or reduction in system
performance arising directly or indirectly out of the failure of the customer, or anyone acting on the customer's
behalf, to abide by the instructions, system parameters, or recommendations made in this document.
Cross references
References to external publications are shown in italics. Other cross references, emphasized in blue text in
electronic versions, are active links to the references.
This document is divided into numbered chapters that are divided into sections. Sections are not numbered, but are
individually named at the top of each page, and are listed in the table of contents.
Feedback
We appreciate feedback from the users of our documents. This includes feedback on the structure, content,
accuracy, or completeness of our documents. Send feedback to support@flyingvoice.com.
Declaration of Conformity

Contents FIP16 User Manual
7
Part 15 FCC Rules
This device complies with Part 15 of the FCC Rules. Operation is subject to the following two conditions:
“This equipment complies with FCC RF radiation exposure limits set forth for an uncontrolled environment.
This equipment should be installed and operated with a minimum distance of 20 centimeters between the radiator
and your body.”
Warning
Changes or modifications to this unit not expressly approved by the party responsible for
compliance
could void the user’s authority to operate the equipment.
This equipment has been tested and found to comply with the limits for a Class B digital device,
pursuant to Part 15 of the FCC Rules.These limits are designed to provide reasonable protection against
harmful interference in a residential installation. This equipment generates, uses and can radiate radio
frequency energy and, if not installed and used in accordance with the instructions, may cause harmful
interference to radio communications. However, there is no guarantee that interference will not occur in a
particular installation.
If this equipment does cause harmful interference to radio or television reception,which can be determined
by turning the equipment off and on, the user is encouraged to try to correct the interference by one or
more of the following measures:
•
Reorient or relocate the receiving antenna.
•
Increase the separation between the equipment and receiver.
•
Connect the equipment into an outlet on a circuit different from that to which the receiver is
connected.
•
Consult the dealer or an experienced radio/TV technician for help
About This User Guide FIP16 User Manual
1
Warnings and Notes
The following describes how warnings and notes are used in this document and in all documents of the
FlyingVoice document set.
Warnings
Warnings precede instructions that contain potentially hazardous situations. Warnings are used to alert
the reader to possible hazards that could cause loss of life or physical injury. A warning has the
following format:
Warning
Warning text and consequence for not following the instructions in the warning.arning text
and consequence for not following the instructions in the warning.
Notes
A note means that there is a possibility of an undesirable situation or provides additional
information to help the reader understand a topic or concept. A note has the following format:
Notes
Notes text and consequence for not following the instructions in the Notes.

LCD Configuration FIP16 User Manual
2
Chapter 1 Product description
This chapter covers::
·FIP16
· Internet connection
· Familiar with the phone
LCD Configuration FIP16 User Manual
3
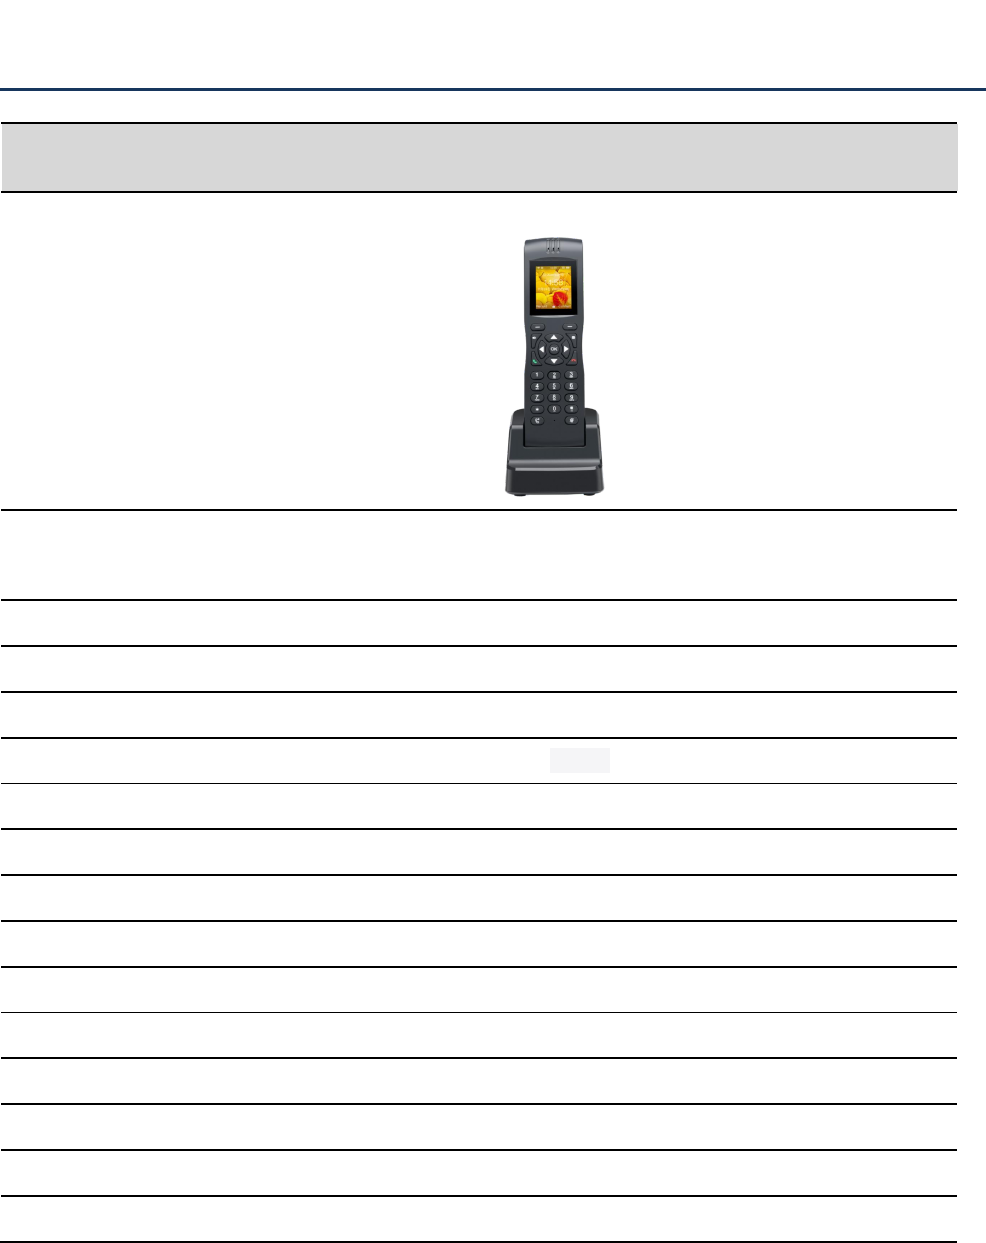
FIP16/FIP16/FIP16P
Port/Model
FIP16
Product Picture
LED
1.8 inch color LCD screen
126 * 160 resolution
Wi-Fi
2.4G&5G
Line
1
Ethernet Port
×
Headset
3.5mm
USB
1*USB for power adapter
Soft key
2
Code
G.711(A-law,U-law),G.723,G.729A/B,G.722,iBLC
TR069
√
SNMP
√
VPN
PPTP/L2TP/Open VPN
Auto configuration
TPTP/HTTP/HTTPS Tr069 Network management
Telephone book
√
Call history
√
SMS
√

LCD Configuration FIP16 User Manual
4
Internet connection
Phone Start
Please refer to the quick installation manual for the telephone assembly
Step 1.Press the power button more than 3s to power on the FIP16.
Step 2. After power on the FIP16, the LCD screen of the phone will display the signature of "FlyingVoice".
Step 3. When the phone has started normally,LED will go out and LCD will display the current status of the phone, including SIP
registration information, wifi connection information and so on.
Connect to a wireless network
You can configure a wireless connection in both the LCD and the web.
From the LCD menu:
Step 1. Press menu and then use the ▲ and ▼ buttons or enter " Wireless Network" or just press the wireless
in the right of LCD.
Step 2. Select " Wireless network connection" and the phone will scan and display the surrounding wireless
network.
Step 3. Using the ▲ and ▼ buttons to navigate, use the softkey "Connect" connection under the LCD to select
the network, the logo appears on the LCD,The line network is connected.
Note
Make sure you had recharge the FIP16 enough power for power on .
Note
If the phone does not display the above information, please re-confirm the installation and
connection. If these operations are ineffective, you can try unplugging the power plug and plug.
it in again. If you still can not see the show, contact your phone administrator or service
provider.。
Notes
If you need Wi - Fi certification, please fill in the authentication and password.
从网页:
LCD Configuration FIP16 User Manual
5
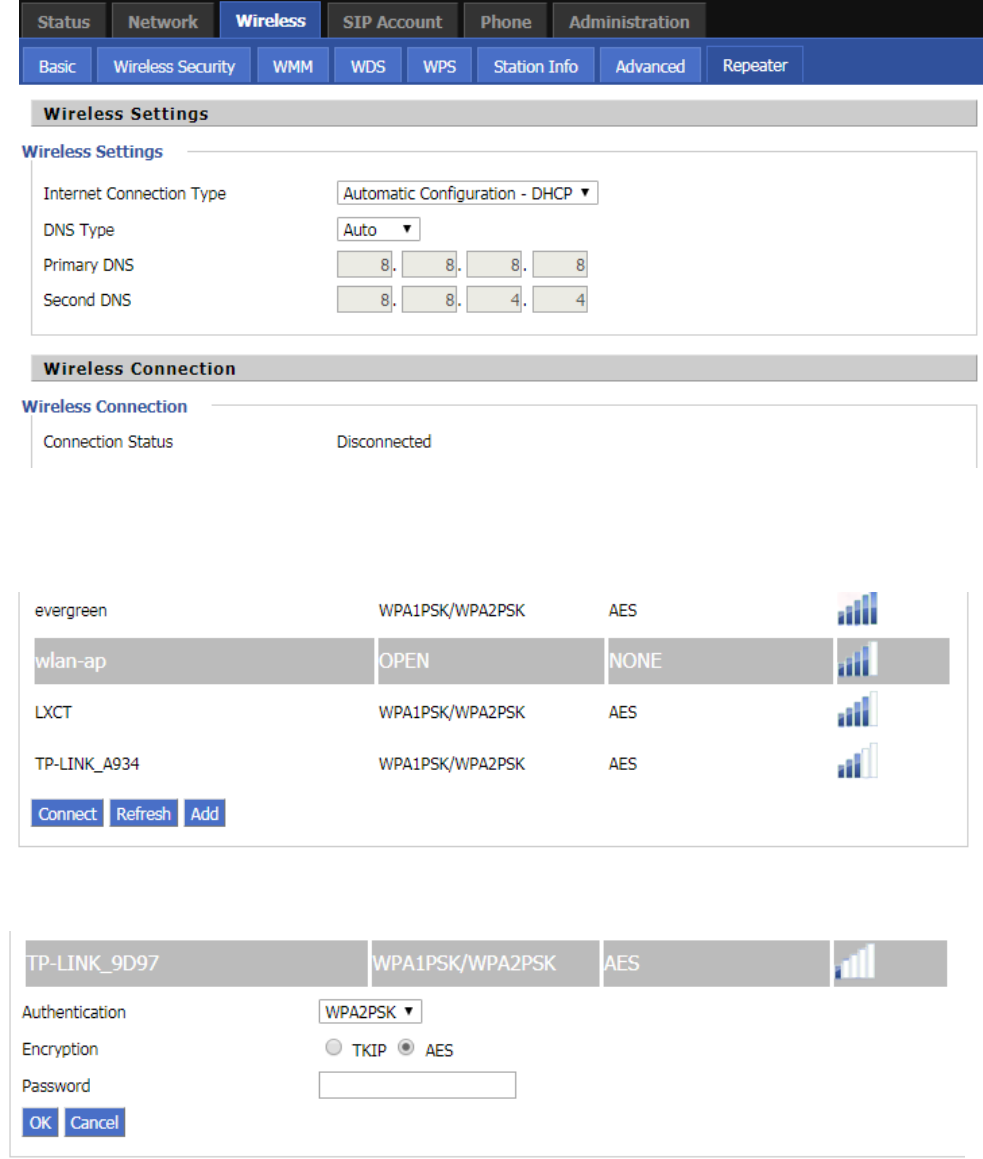
From the page:
Step 1. Log in to the website and switch to the Network / Wireless page.
Step 2. choose one wireless network to connect.
Step 3. Use “connect”button at the bottom of the page.
Step 4. If the connected wireless does not have a password, you can connect directly; if the wireless connection
has a password, enter the password and click "OK" to confirm the connection.
Step 5. If AP is connected,the wireless icon on the main screen of the LCD will appear as connected
LCD Configuration FIP16 User Manual
6
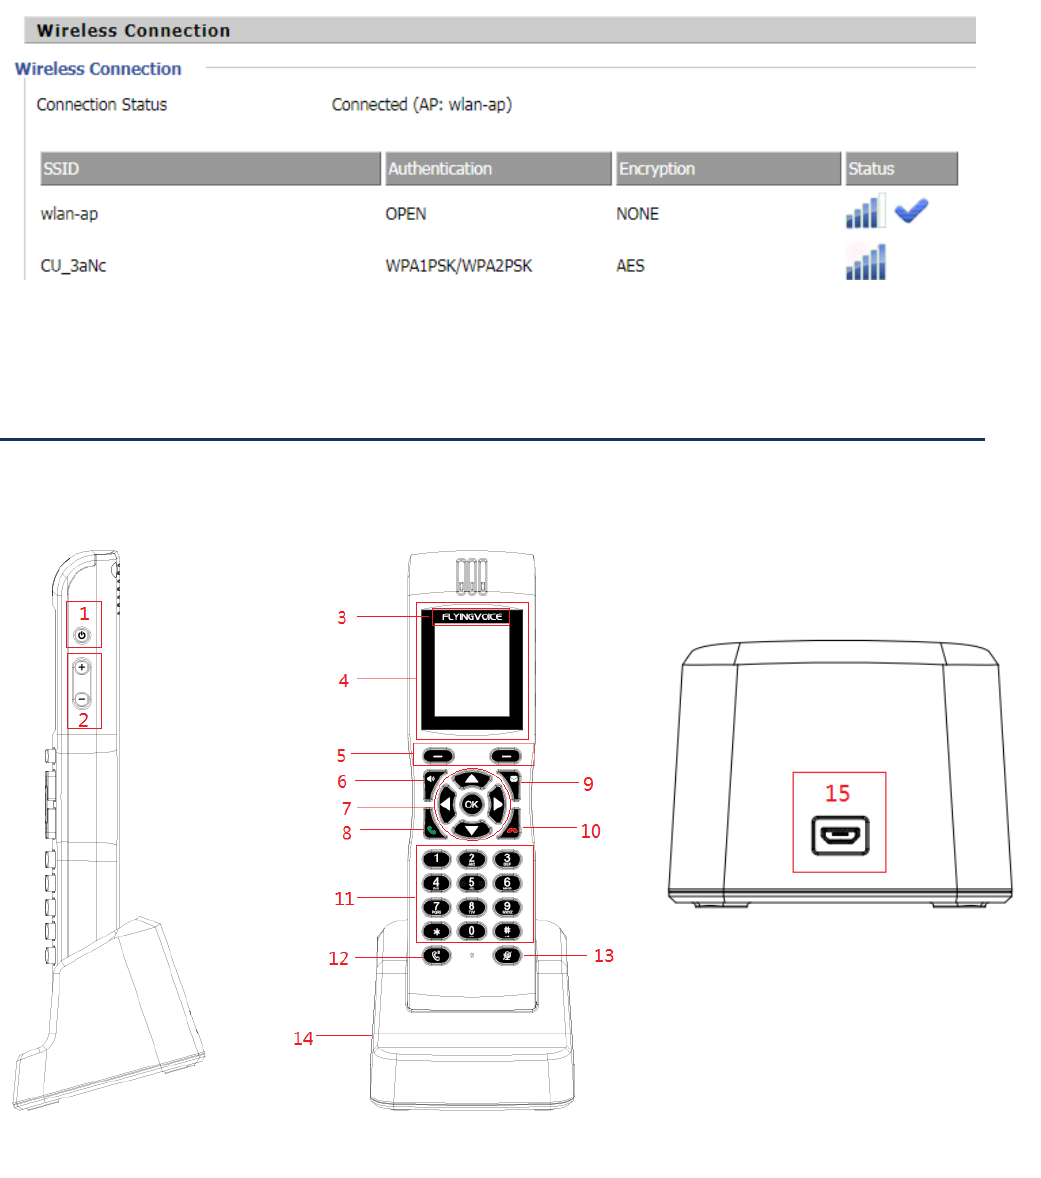
Front panel
Familiar with the phone

LCD Configuration FIP16 User Manual
7
No.
Name
Description
1
Power
Press the button for more than 3S to power on or power off
2
Volume button
Increase or decrease the volume
3
Logo
Flyingvoice Logo
4
LED
The LCD screen is used to display the status of the phone,
such as the IP address of the Internet port. Phone number and
line status
5
Soft key
You can select or control the operation items displayed below
the LCD screen. The function of the soft keys depends on the
contents of the corresponding LCD display at that time.
6
Handsfree
Switch to handsfree mode
7
Navigation key
1. Navigation keys, including up, down, turn left, right turn
and confirm keys
2. Turn left and right turn is also the volume of the shortcut
keys
3. The confirmation key is also a shortcut to view the current
network status
8
Pick up
Pick up the call
9
Voicemail
Voicemail shortcuts
10
Hang up
Press the button to hang up the call
11
Numeric Keypad
Enters numeric digits for initiating a call or for entering
configuration information.
12
Hold
To hold the current call, press the Hold key again to restore
the current call
13
Mute
When the phone is on, press to switch to silent mode
14
Base
Base is used to charge to the phone
15
USB
Connect to the power cord to charge the phone

LCD Configuration FIP16 User Manual
8
The description of icons in the home screen
Icons
Description
The wifi is connected(There is little signal)
The wifi is connected(A lattice signal)
The wifi is connected(Two lattice signal)
The wifi is connected(Three lattice signal)
The wifi is connected(Full lattice signal)
The wifi is disconnected
Missed Call
Short message
Headset
Battery charging state (charge 20%)
Battery charging state (charge 40%)
Battery charging state (charge 60%)
Battery charging state (charge 80%)
Battery charging state (charge 100%)
Power surplus 20%
Power surplus 40%
Power surplus 60%
Power surplus 80%
Power surplus 100%
Enable auto answer
Do not disturb
Mute
Call forward is enable

LCD Configuration FIP16 User Manual
9
This chapter contains the following:
· SIP registration
· Dial number
· Answer the phone
· Mute the call
· Hold
· 3-way conference
· Call transfer
· Call forward
· Call waitting
· Auto Answer
· DND
· End the call
· Blacklist
· SMS
· Voicemail
Chapter 2 Basic functions
LCD Configuration FIP16 User Manual
10
There are two ways to register a SIP account: register from the LCD and register from the web page
From the LCD:
Step 1. Press Menu.
Step 2. Use the ▲ and ▼ navigation keys to Setting--Account, you need to enter the login password.
Step 3. Select the line to register and fill in the relevant configuration as indicated by the LCD
Step 4. Use the soft key from to "save" the current configuration.
Step 5. Check the registration of the corresponding line on the display.
From the web page:
Step 1. Log in to the web page. Please refer to section 4.1 for details.
Step 2. Switch to the SIP Account configuration page.
Step 3. The account enable is set to "On" and the line can be used after opening.
Step 4. The registration server fills in the IP address of the SIP server.
Step 5. Display Name Fill in the content is the name of the number displayed on the LCD.
Step 6. The registration account is filled with the account provided by the SIP server.
Step 7. The name of the authentication is the SIP account provided by the SIP server.
Step 8. The password is filled with the password provided by the SIP server registration account.
Step 9. When you are finished, click the Save button at the bottom of the page to make the configuration take
effect.
Step 10. Check the registration of the corresponding line on the display / web status page.
SIP registration

LCD Configuration FIP16 User Manual
11
You can make a call by either of the following methods:
Use the handle
Step 1. Press the dial key to enter the destination number.
Step 2. Use the "Dial" / # / wait for 5 seconds to dial the phone number.。
Use handsfree
Step 1. Press the handsfree off-hook, the LCD display shows "Enter the number"
Step 2. Press the dial key to enter the destination number.
Step 3. Use the "Dial" / # / wait for 5 seconds to dial the phone number.
Use headphones
Step 1. Press the headset key to go off-hook, the LCD display shows "Enter number"
Step 2. Press the dial key to enter the destination number.
Step 3. Use the "Dial" / # / wait for 5 seconds to dial the phone number.
Use the redial key
In the standby mode, redial the number of the last call:
Step 1. Press the "History" softkey to quickly select the call log.
Step 2. Use the softkey to select "Redial List".
Step 3. Select a phone number and press the "Dial" softkey to redial the called number.
Call from the phone book
Add phone book:
From the LCD menu:
Step 1. Press menu button to enter the main menu and use the softkey to select phone book.(or you can just
press second softkey “pbook” to enter phoneebook.)
Step 2. Follow the prompts to add a phone book and press the "abc" softkey to toggle the input method
(numbers, uppercase and lowercase).
Use the phone book:
Notes
Step 3-9 is to fill in the required content, other parameters fill in the required
从网页:
Dial number

LCD Configuration FIP16 User Manual
12
Step 1. Press menu button to enter the menu item and use the ▲ and ▼ navigation keys or enter the number
1 to 1. Phonebook; Or use the phonebook shortcut kkeys in the LCD.
Step 2. Use the ▲ and ▼ keys to select the number you want to dial, press the "Call" softkey to make a call
immediately.
Call from call log
Step 1. Press menu button to enter the main menu and use the ▲ and ▼ navigation keys or enter the number 2
to 2. Call history,Or in the standby or dial-up interface, use the softkey to enter the "history"
Step 2. Select the dialed number of the dialed call / missed call / missed call. Press the "dial" softkey to dial the
call immediately.
Answer the phone
When there is a call, the LED in the upper right corner of the phone will flash and the phone rings.
You can answer the call in the following ways:
1. Press the corresponding line button.
2. Press the Handsfree key to answer.
3. Pick up the handle and answer.
4. Press the earphone key to answer.
5. Press “answer” softkey to answer.
6. Auto Answer: If the phone is enabled for automatic answering, the device will automatically answer the call
when there is an incoming call.
Call mute
Mute mute: During a call, press button, the MIC will be deactivated, the handle is available, and the
icon is displayed on the screen. This can prevent the caller from hearing your or your background sound.
Unmute: Press button again, the icon disappears and the sound can be sent normally.

LCD Configuration FIP16 User Manual
13
Hold
When the phone is talking:
Step 1. When A and B talk, A presses the HOLD button to keep the current call, and then the A handset
can hear the dial tone, and B will play keep music.
Step 2. At this point the A phone can enter another phone number to make a call.
Step 3. A Press the HOLD button again to release the current hold status and resume the previous call.
3-way Conference
Step 1. Start a conference call, A and B phone have a call ,during the call, A phone press button, the
current call is held, A phone to hear the dial Tone, B phone play to keep music.
Step 2. Dial the phone number of the C telephone.
Step 3. When the C phone answers the call, the A telephone presses the "conference" as the conference
presenter to open the conference call.Same conference call.
Step 4. If the A phone (conference host) hangs up, the other two calls will be disconnected; if the non-hosting
party B / C side hangs first, A phone can still talk to the other party.
Call transfer
Attended call transfer
Functional Description:
Attended call transfer: the phone as a middle side of attended call transfer, after asking the destination phone,
then it will make the call which is connectting transferred to the destination phone.
How to Use:
Step 1. A and B phone call, A phone button. The current call is held, A phone to hear the dial tone, B
phone to keep playing hold music.
Step 2. A call C.
Step 3. C phone answers, speaks to A (and A asks if C want to connect with B).
Step 4. If C agrees to answer the transfer call, the A phone presses the "Transfer" softkey to complete the transfer.

LCD Configuration FIP16 User Manual
14
Then A will be disconnect from all call.
Step 5. If C don’t agree to answer the transfer call, after A / C hangs up after the call, A presses button
to resume the call with B.
Blind call transfer
Functional Description:
Blind call transfer: the phone as a middle side of blind call transfer, will be connected directly to the destination
phone without asking.
How to Use:
Step 1. A and B phone is making a call, A presses the "transfer" soft key during the call, A phone will hear the dial
tone, B phone will hear hold music.
Step 2. A call C.
Step 3. C answer the call, then talking to B, A will automatically hang up.
Call Forwarding
All Forwarding
Functional Description:
Transfer all calls to another number. Can be configured from an LCD or Web page
From the LCD:
Step 1. Press button.
Step 2. Use the ▲ and ▼ navigation keys or enter the number 8 to 8. Call Forward and select one of them
1. CFWD All.
Step 3.Fill the relevant configuration according to LCD instructions: whether open all forward; target number; on
code; off code.
Step 4. Use the second soft key from the left to "save" the current configuration.
From Web page:
Step 1. Log in to the phone web page and switch to the "Phone - Preferences" page.
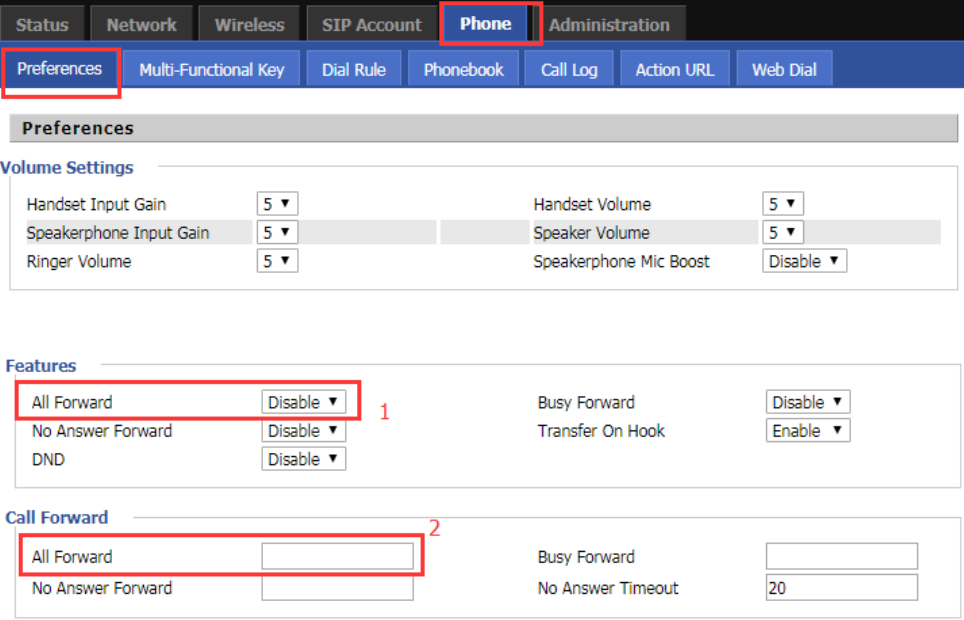
LCD Configuration FIP16 User Manual
15
Step 2. There is a call item in the middle of the page.
Step 3. Enable all forward at position 1 and fill the destination number at position 2.
Step 4. At the bottom of the page, click ‘Save’ / ‘Save& Apply’, and the configuration is complete.
How to Use
Step 1. The A handset assumes that the unconditional transfer has been configured and the target number is the
C telephone.
Step 2. B Telephone Calls a telephone
Step 3. The C ringing, off-hook and B calls. A phone in the process without any reaction.
Busy Forward
Functional Description:
When the line is busy, transfer all calls to another number.Can be configured from LCD or Web page
From LCD :
Step 1. Press mu button.
Step 2. Use the ▲ and ▼ navigation keys to Setting---Call Forward and select 2.CFWD When Busy.
Step 3. Fill the relevant configuration according to LCD instructions: whether to open the busy forward; target
number;on code; off code.
Step 4. Use the second soft key from the left to "save" the current configuration.
From Web page:
Step 1. Log in to the phone web page and switch to the "Phone - Preferences" page.
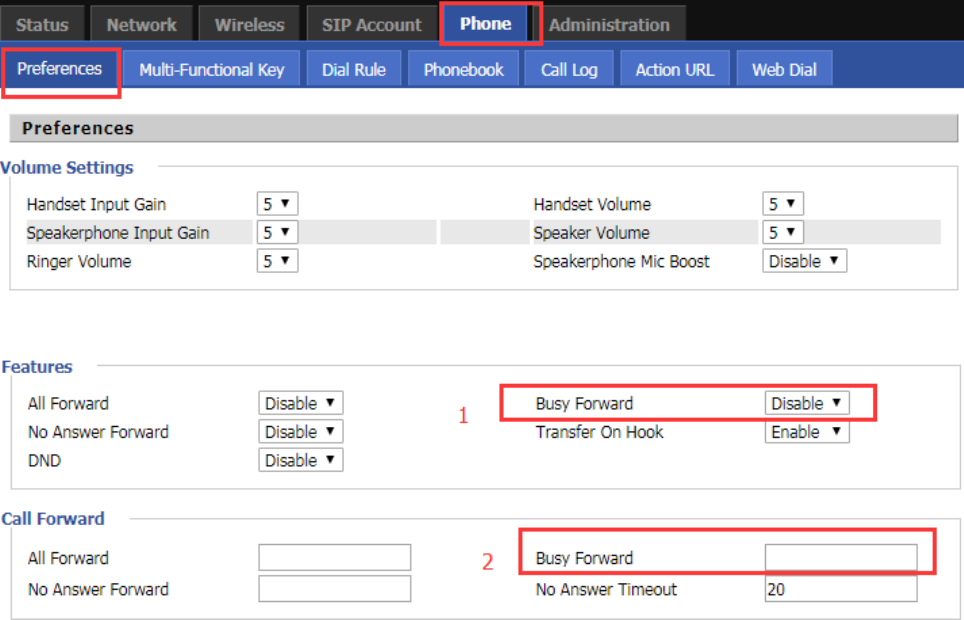
LCD Configuration FIP16 User Manual
16
Step 2. There is a call item in the middle of the page.
Step 3. Enable the busy forward at position 1 and fill destination number at position 2.
Step 4. At the bottom of the page, click ‘Save’ / ‘Save&Apply’, and the configuration is complete.
How to use:
Step 1. The A phone’s busy forward has been configured successfully,and the target phone is C.
Step 2. The A phone is calling with other phone (not B / C).
Step 3. B Calls A .
Step 3. Then C ringing, off-hook to make a connect with B, all this process A phone without any response.
No answer Forward
Functional Description:
When no one answers, the call is routed to another number. Can be configured from an LCD or Web page
From LCD:
Step 1. Press Menu button.
Step 2. Use the ▲ and ▼ navigation keys to Setting---Call Forward and select 3.CFWD When No Answer.
Step 3. Fill the relevant configuration according to LCD instructions: whether to open the no answer forward;
target number;on code; off code.
Step 4. Use the second soft key from the left to "save" the current configuration.
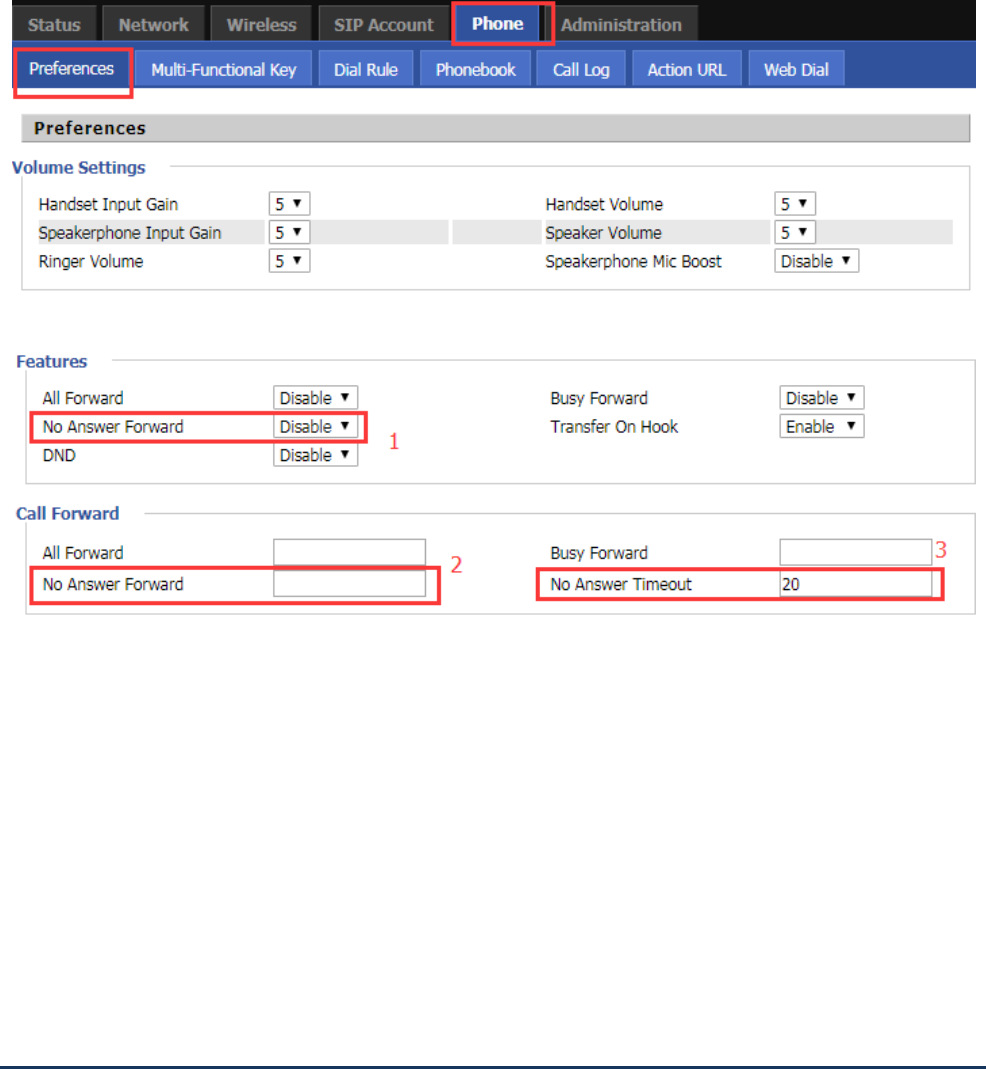
From Web page:
Step 1. Log in to the phone web page and switch to the "Phone - Preferences" page.
LCD Configuration FIP16 User Manual
17
Step 2. There is a call item in the middle of the page.
Step 3. Enable the no answer forward at position 1 and fill destination number at position 2.Potion 3 is no
answer to the forward time, default 20s.
Step 4. At the bottom of the page, click ‘Save’ / ‘Save&Apply’, and the configuration is complete.
How to use:
Step 1. The A handset assumes that no forwarding is configured and the destination number is the C telephone.
Step 2. B Telephone Calls a telephone.
Step 3. A phone rings, but nobody answers.
Step 4. After 20 seconds, the handset stops ringing and the C phone rings and goes off-hook with B.
Call Waiting
Functional Description:
Call waiting function: During the call, if a third party calls, the phone has a prompt, and the third party phone has
been ring back tone.
From LCD:
Step 1. Press Menu button.
Step 2. Use the ▲ and ▼ navigation keys to the Setting- Perference settings and select the 2.call waiting.
Step 3. Fill the relevant configuration according to LCD instructions:whether to enable call waiting.
From Web page:
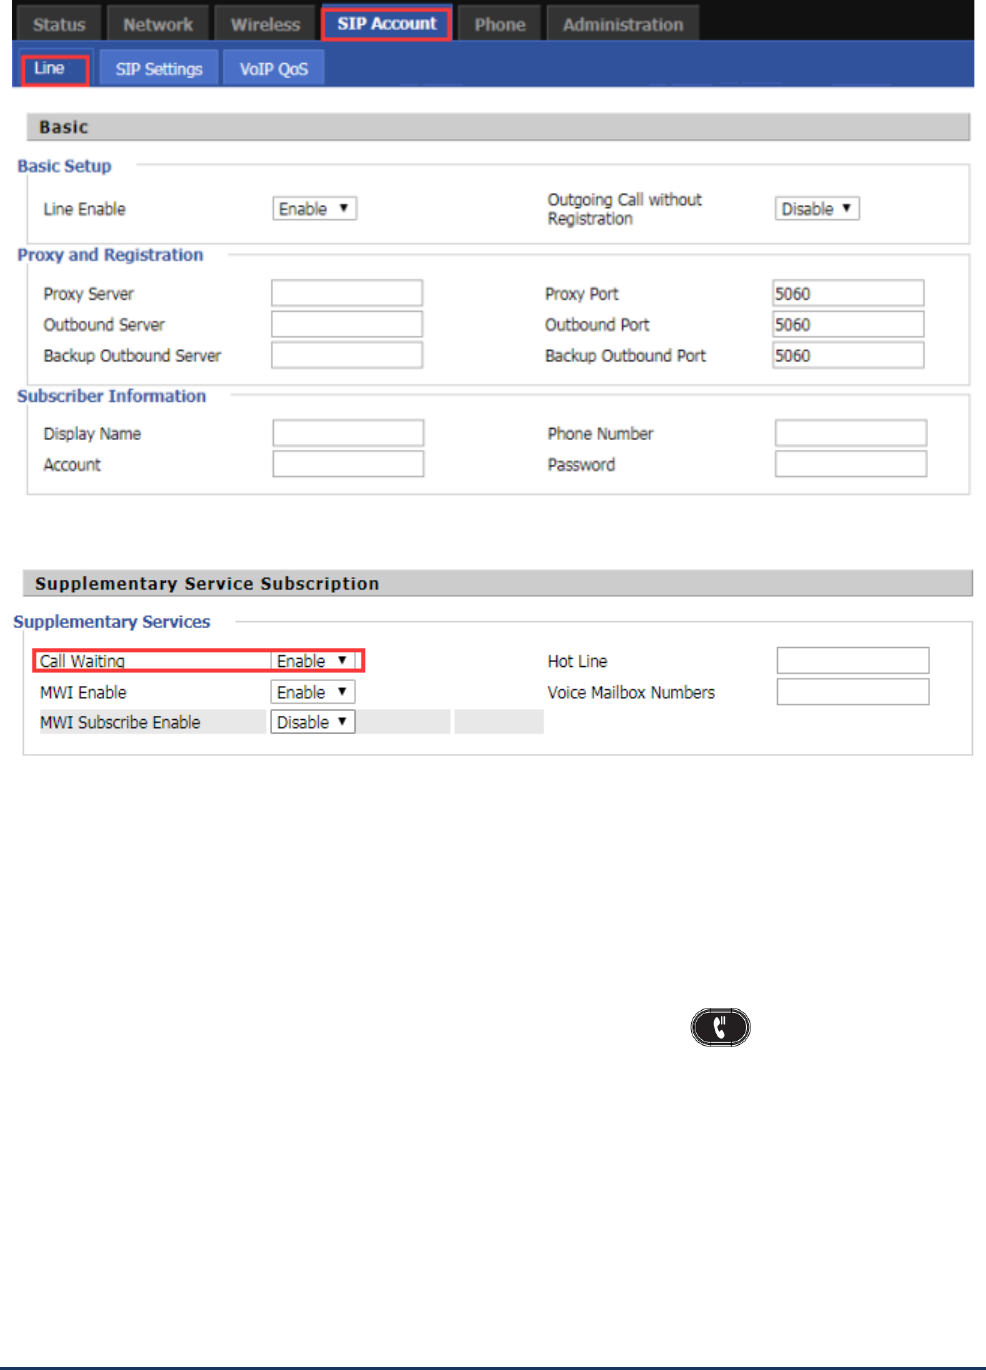
LCD Configuration FIP16 User Manual
18
Step 1. Log in to the web page and switch to the ‘VoIP-Line ’ Configuration page.
Step 2. There is a call waiting conifiguration item in the ‘Supplementary Service Subscription’ on this page.
Step 3. At position 1, you can configure whether to enable the call waiting function.
How to Use:
Step 1. The A phone call waiting function is configured.
Step 2. C calls A When A is connectting with B.
Step 3. A phone LED flashes, there will be a tone in the handle (prompted a new call), the screen will display a
new call.
Step 4. When prompted with a new call, use the appropriate line key or hold button to answer the new
call C and hold the call with B.
Step 5. When there is a new call, A ends the call with B, and C is still calling A, then ringing, picking up and
talking to C.
Step 6. If the call waiting function is off, then after C dials A, it will prompt the call to fail and have a busy tone.
Auto Answer

LCD Configuration FIP16 User Manual
19
Functional Description:
Auto Answer function: automatic answer when there is a call.
From LCD:
Step 1. Press Menu button.
Step 2. Use the ▲ and ▼ navigation keys Setting---- Perferencess settings and select the 3 Auto Answer.
Step 3. Fill the relevant configuration according to LCD instructions:whether to enable auto answer
From Web page
Step 1. Log in to the web page and switch to the "Phone - Preferences" configuration page.
Step 2. At the bottom of the page, there is auto answer configuration item.
Step 3. At position 1, you can configure whether to enable the auto answer function.; position 2 is configured to
wait for a few seconds after the automatic answer, for example setting 10,phone will auto answer after ringing
10s .
How to Use:
Step 1. The A phone auto answer function is configured and the auto answer delay time is 10s.
Step 2. B Calls A.
Step 3. After 10s, the A will automatically answer the call.
DND
Functional Description:
DND:Do not disturb, reject all calls.
LCD Configuration FIP16 User Manual
20
From LCD:
Step 1. In the main screen of the phone, from left to right the fourth software is DND softkey, use it, the screen
will appear a free play DND icon ,that means DND is enabled.
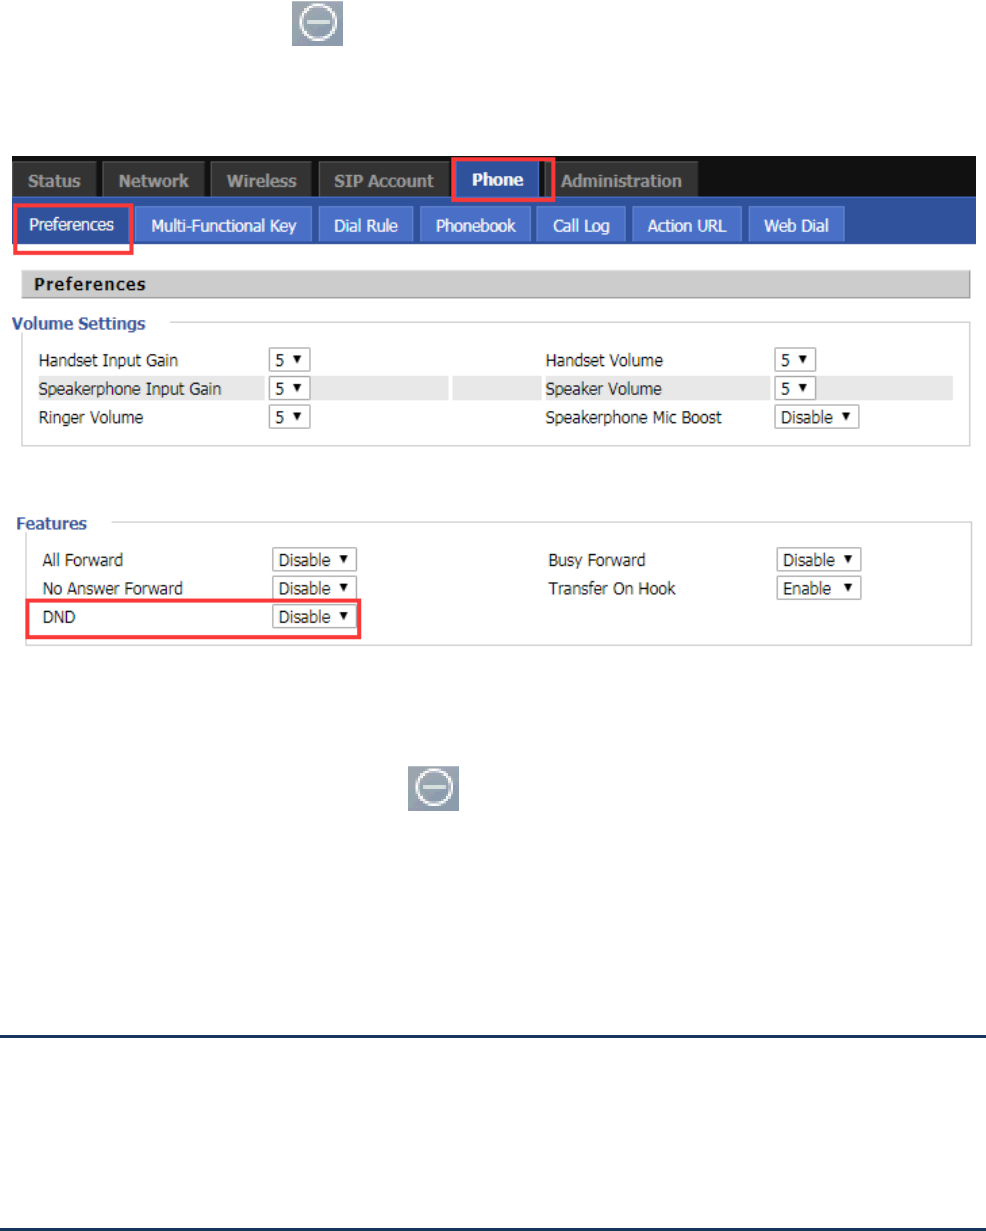
From Web page:
Step 1. Log in to the web page and switch to the "Phone - Preferences" configuration page.
Step 2. In the middle of the page there is a DND configuration item.
Step 3. You can configure whether to enable DND at position 1.
How to use:
Step 1. The A phone DND is enabled, the icon displayed on the screen
Step 2. B calls A.
Step 3. The A phone doesn’t have any respond, and the B phone prompts the call to fail and has a busy tone.
End the call
Method 1: To end the handle call, hang up.
Method 2: To end the handsfree call, press the Handsfree key.
Blacklist
Functional Decription:
Blacklist: If a number is blacklisted, the phone will block incoming calls to the number.
LCD Configuration FIP16 User Manual
21
From LCD:
Step 1. Press Menu buttons,
Step 2. Use the ▲ and ▼ navigation keys to Setting- Blacklist.
Step 3. Select "New Entry" and follow the prompt to add a blacklist.
From Web page:
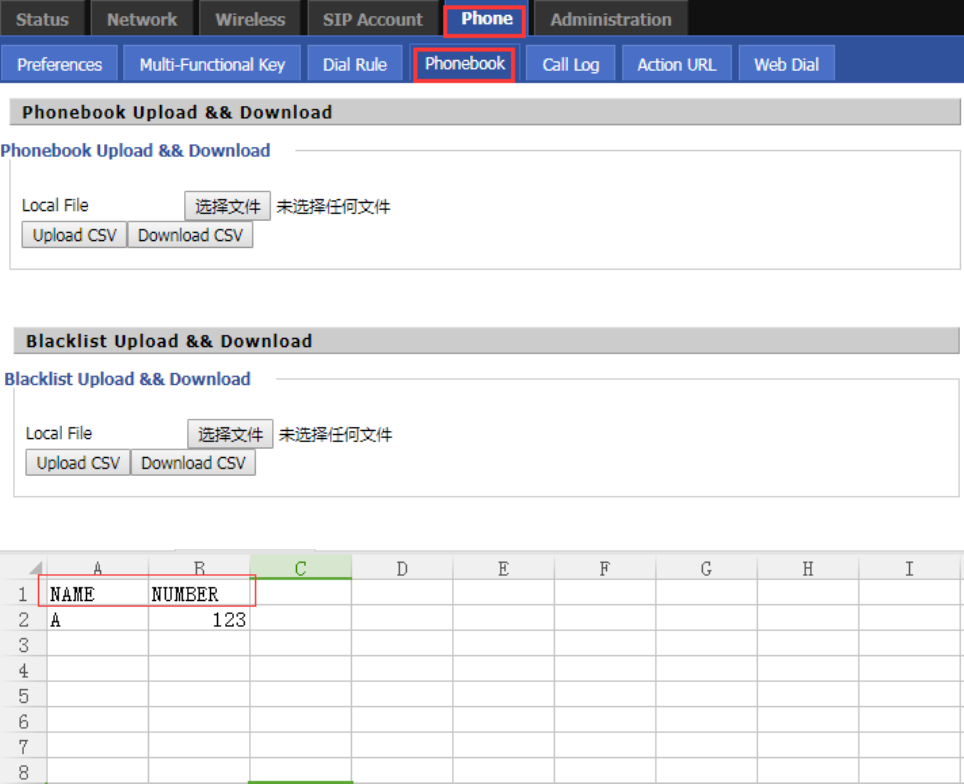
Step 1. Log in to the web page and switch to the "Phone - Phonebook" configuration page.
Step 2. At the bottom of the page there are blacklist uploads and add the configuration.
Step 3. When uploading the blacklist, please note that the file format is .csv file
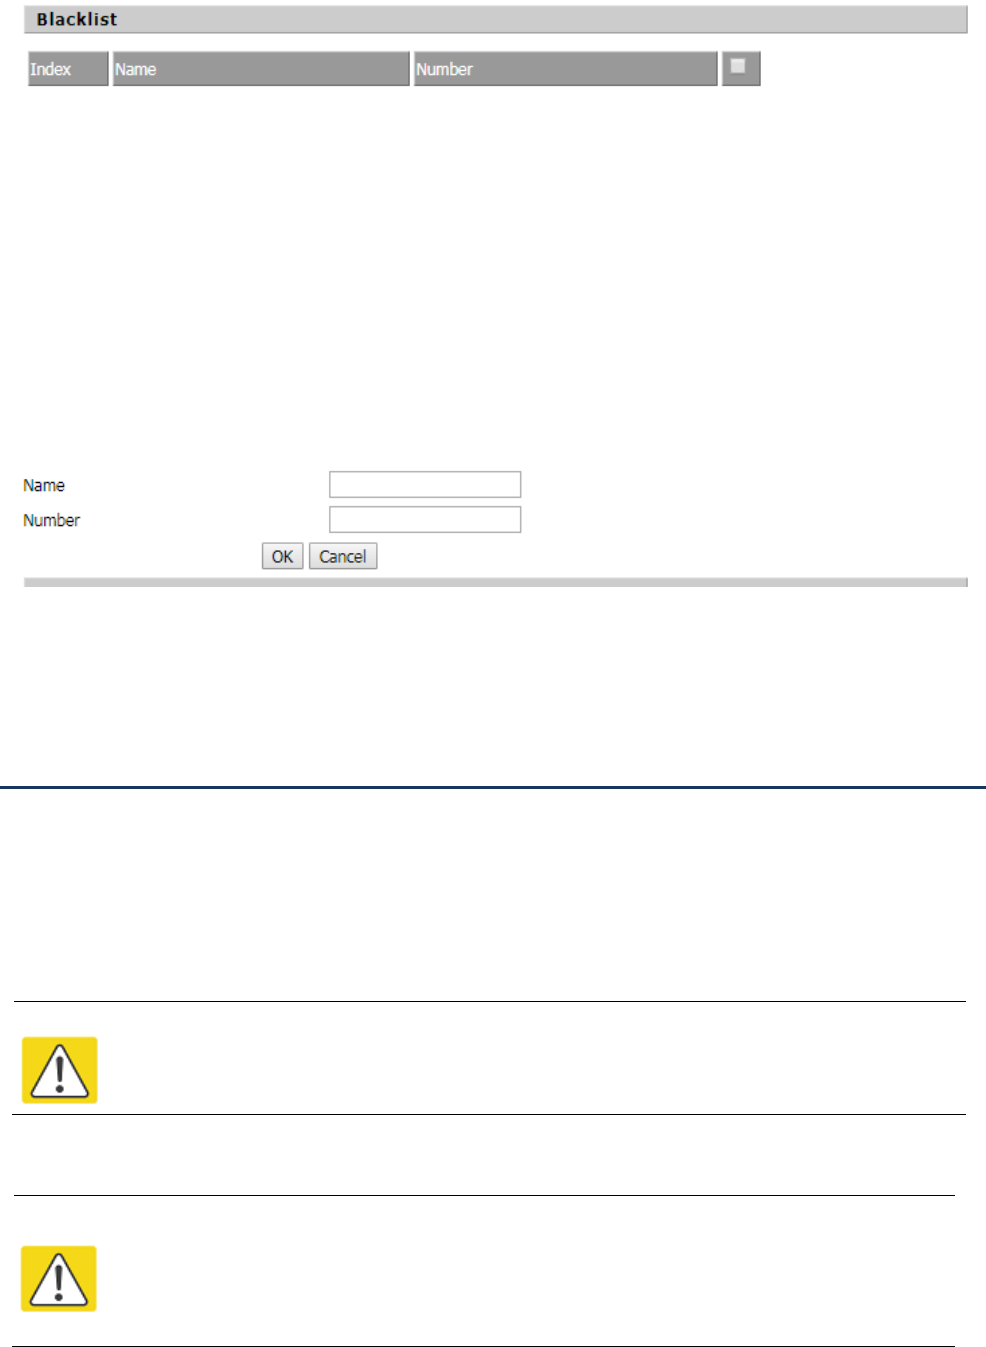
Step 4. When adding a blacklist, click the "Add" button and follow the prompts to add a blacklist.
LCD Configuration FIP16 User Manual
22
Step 5. Click "Save&Apply" / "Save" to make the configuration take effect
SMS
Send text messages
Step 1. Press Menu buttons,
Step 2. Use the ▲ and ▼ navigation keys to SMS.
Step 3. Select 1. SEND and follow the prompts to edit the text message.
Step 4. Press "OK" softkey to enter the recipient's phone number.
Step 5. Set the sender's phone number, the default setting is set to Line1 phone number.
Step 6. Select the "select" softkey to send text messages.
Notes
When the input text, according to ‘abc’ softkey to switch input method (number or letters),’123’
means number;’abc’ means lowercase letters;’ABC’ means capital letters
Write letters, 123 for numbers.
。
从网页:
Note
SMS has group messagefunction, user can send a message to up to 10 numbers; press the "OK"
softkey to enter the next received phone number input, if the recipient has entered the contact,
contact press twice to "complete"; you can also press the "directory" in the phone book to find
the phone number.
。
。
从网页:
LCD Configuration FIP16 User Manual
23
Read text messages
Step 1. When there is a new message, the phone screen will have a new message prompt, you can use the
softkey to read the message.
Step 2. Also you can press Menu button
Step 3. Use the ▲ and ▼ navigation keys or enter the number 3 to 3 SMS.
Step 4. select 2 Recived Box, or 3. Send Box.
Step 5. Use the ▲ and ▼ navigation keys to select the message and press the "read" softkey to read the
message.
Voicemail
From LCD:
Step 1. Press menu button to enter the menu item and then select Setting---Voice Mail.
Step 2. Enter the login password and select the line you want to configure.
Step 3. Then follow the prompts to enable voicemail, and enter the number in the "Voice Mail Number" (this
number is the number configured in the registration server code, not free to fill).
Step 4. Press the Save soft key to save your changes.
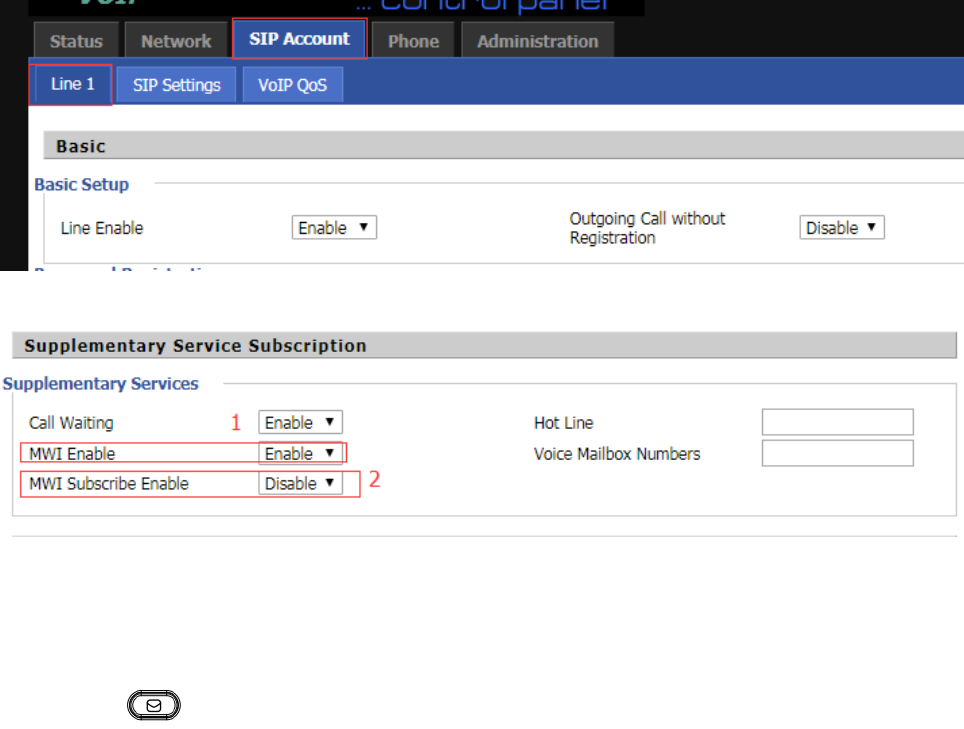
From Web page:
Step 1. Log in to the phone page and switch to the ‘Phone / Line1’ Configuration page.
Note:
The message in the Recived Box received from someone else, including new or old messages.
Send Box is a sent message
Outbox is a sent message.
Note:
The registration server needs to configure the relevant functions first.
Outbox is a sent message.
Note:
Voice mail number is when there is a voice message, off-hook dial to enter the number of voice
mail,and this number is offered from registration server.
Outbox is a sent message.
LCD Configuration FIP16 User Manual
24
Step 2. Enable MWI and fill in the Voice Mail Number.
Step 3. Use the ‘Save&Apply’ / ‘Save’ button to save your changes for the configuration to take effect.
How to Use:
Step 1. When there is a voice message, the LED in the upper right corner of the phone will flash.
Step 2. Press voice mail button to enter the mailbox
Step 3. Also you can use ‘Voice Mail Number’: phone goes off-hook and dials the Voice Mail Number.
Step 4. After entering the voicemail box, there will be a voice prompting how to operate. The user can listen to
new voicemail or old voicemail or reply to voice mail based on voice prompts.

LCD Configuration FIP16 User Manual
25
This chapter contains:
· Change language
· Change background
· Reboot
· Restore Factory
· Other parameters of the phone
Chapter 3 LCD Configuration

LCD Configuration FIP16 User Manual
26
Change language
Step 1. Use menu button, then select Setting---Preferences.
Step 2. Use the ▲ and ▼ navigation keys to select Setting---Preferences.
Step 3. Select 1. Language, use the "select" softkey to enter the language selection interface
Step 4. Use the ▲ and ▼ keys to select the language and use the "select" softkey to save the selected language.
Change ringtone
Step 1. Use Menu button and then select Setting---Sound--- Ring Tones.
Step 2. Use the ▲ and ▼ navigation keys or enter the number 6 to select 6 Ring Tones.
Step 3. Use the ▲ and ▼ keys to select a ringtone.
Step 4. Use the softkey "select" to save the selected ringtone.
Change Background
Change the background:
Step 1. Press menu button to select Setting--Display--Background.
Step 2. Select the background picture that you like.
Step 4. Press the "OK" softkey to save the changes.
Reboot
Step 1. Press menu button to select Setting---Reboot, Or just press the power button for a long time to reboot .
Step 2. Press the "select" button to restart.
Step 3. Then there will be "Confirm System Reboot?" Prompt, press the "select" softkey to confirm the restart.
Factory Reset
You can restore the factory settings on the LCD menu or on the phone's page. This setting is used when
configuring and troubleshooting the network. Please do not easily recover, if necessary or need to contact the
administrator.
From LCD:

LCD Configuration FIP16 User Manual
27
Step 1. Press menu button to select Setting---Factory Reaet.
Step 2. Press the "Select" softkey to select the factory settings.
Step 3. Then confirm the prompt, press the "OK" softkey to continue, the device automatically restore the factory
settings and restart.
Other parameters of the phone
Main menu
(LCD display)
Menu item
(LCD display)
Submenu item
(LCD display)
Functional description
1.Phonebook
New Entry
using four soft keys, you can add numbers to the
phone book.and up to 100 records can be saved
Contact
1. Select a contact to view the contact number
directly.
2. Use the four soft keys can dial someone,
sending text messages, editing, viewing, deleting,
moving to blacklist
2.Call History
Redial List
1. List the last 60 calls
2. Use the four soft keys to complete the quick
call, send text messages, save to the phone book
and other functions
Answered Calls
Missed Calls
3.Text Message
SEND
editor and send text messages
Recived Box
can list the latest send and receive 100 messages
Send Box
4.Black List
New Entry
With four soft keys, you can add numbers to the
blacklist,Up to 100 records can be saved
Contact
1. Select a blacklist contact to view the contact
number directly
2. Use the four soft keys to complete the call,
send text messages, edit, view, delete, move to
the phone book and other functions
5.Preference
Language
Select a different language
Call Waiting
enable or disable call waiting
Auto Answer
enable or disable auto answer
Preferred
Audioa Device
Choose whether to use the hands-free or
headset when answering automatically
BellType 1
BellType 2

LCD Configuration FIP16 User Manual
28
6.Ring Tone
BellType 3
Select a ringtone type, you can listen to the
ringtones, easy to distinguish and choose the
ringtones
BellType 4
BellType 5
BellType 6
BellType 7
BellType 8
BellType 9
BellType 10
7.Accounts
Line
Line Enable
Enable or disable lines
Password
The password for the SIP account
Account
The account number of the SIP account
Display Name
The display name on the LCD after registration is
successful
Phone number
SIP phone number
SIP Proxy Server
SIP server IP address / domain name
SIP Proxy Port
SIP server port
Outbound
Server
Proxy server IP address / domain name
Outbound
Server port
Proxy server port
Backup
Outbound
Server
Backup Outbound Server IP Address / Domain
Name
Backup
Outbound Port
Backup Outbound server port
8.Call Forward
CWFD All
CFWD All
Enable or disable all forward
Target Number
Set the target phone number for all forward
On Code
Used to enable the all forward
Off Code
Used to disable the all forward
CFWD When
Busy
CFWD When
Busy
Enable or disable busy forward
Target Number
Set the target phone number for busy forward
On Code
Used to enable the busy forward
Off Code
Used to disable the busy forward
CFWD When No
Answer
CFWD When
Busy
Enable or disable no answer forward
Target Number
Set the target phone number for no answer
forward
CFWD No Ans
Delay
Set the waiting time for no answer forward

LCD Configuration FIP16 User Manual
29
On Code
Used to enable the no answer forward
Off Code
Used to disable the busy forward
9.Time/Date
Time(H:M:S)
Set the current time of the phone
Date(M/D/Y)
Set the current date of the phone
10.Voice Mail
Line 1-8
MWI Enable
Enable or disable voice mail notification
Voice Mail
Number
Set the key to enter the voicemail number
11.Network
WAN
Connection
Type
1.View or change the current Internet port
connection type,
2. Internet port connection type can be set to
static, DHCP and PPPoE
Current IP
Change the IP address of the current Inernet port
Current
Netmask
Change the subnet mask of the current network,
Current
Gateway
Change the gateway of the current network
Primary DNS
Change the Primary DNS of the current network
Secondary DNS
Change the Seconary DNS of the current network
Enable WAN
Login
Enables or disables users to log on to the device
web page from the Internet port
Web Port
View or change the Web port
SIP QoS
View or change SIP QoS
RTP QoS
View or change RTP QoS
Data QoS
View or change data QoS
VLAN Tag
Enable or disable VLAN
VLAN ID
View or change the VLAN ID
802.1p Priority
View or change the priority of 802.1p
12.Wireless
Wireless Setting
Wifi Country
Region
View or change the current Wifi area
Wifi
Connection
Type
1. View or change the Wifi connection type
2. Currently supports DHCP and static types
Current IP
View or change the IP address of the current
wireless network
Current
Netmask
View or change the subnet mask for the current
wireless network
Current
Gateway
View or change the current wireless network
gateway
Primary DNS
`View or change Primary DNS for the current
wireless network

LCD Configuration FIP16 User Manual
30
Secondary DNS
View or change the Secondary DNS of the
current wireless network
Wireless
Connection
AP
To display the name of all APs.
13.Product
INFO
Product Nmae
To view the current information of Product
Name, Software Version, Hardware Version and
MAC Address.
Software
Version
Hardware
Version
MAC Address
Serial Number
14.Status
Internet Port
Status
View the current network information, including:
WAN connection type, IP address, subnet mask,
default gateway, Primary DNS,Second DNS, WAN
port status, WIFI connection status
VPN Status
View VPN Status: VPN Status, VPN IP Address
Registration
Status
The registration
status of lines
1-8
View the current registration status of lines 1-8
15.Reboot
Reboot Phone
16.Factory
Reset
To set phone factory default.
17.Set
Password
To reset password.
The password of LCD is same as the one of
Webpage.
Default is null.

Web Configuration FIP16 User Manual
31
This chapter contains:
· Login
· SIP account
· Line
· Network
· Phone
· Dial Plan
· Management
Chapter 4 Web Configuration
Web Configuration FIP16 User Manual
32
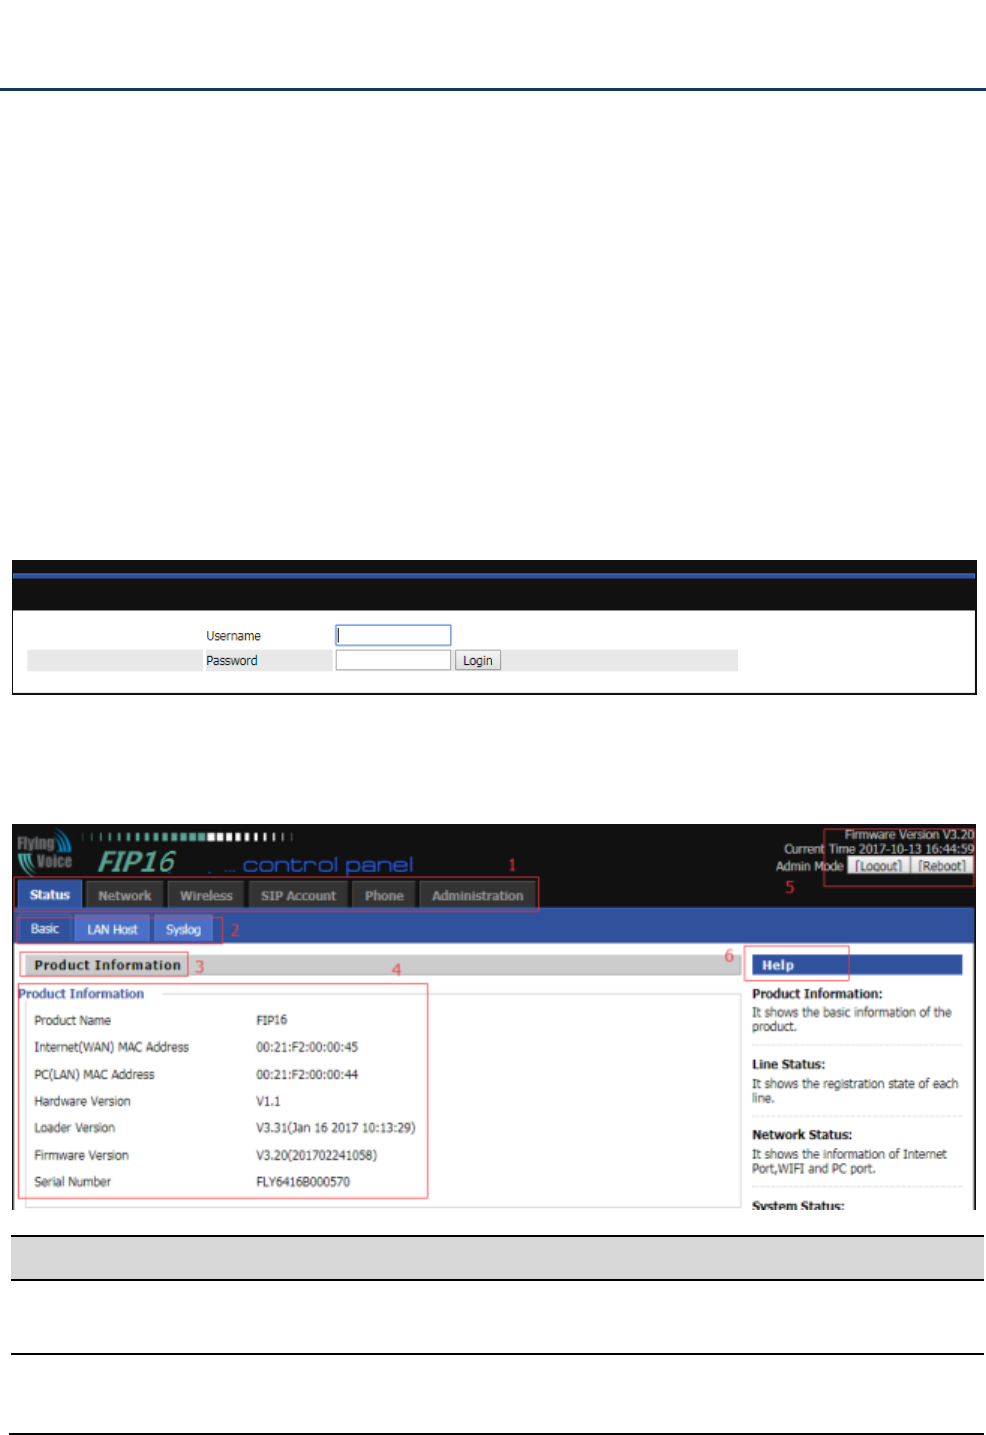
Login
There are two modes to login Web:
(1) admin mode: the default user name is admin, the password also is admin, you can view and configure
the Web interface, all settings.
(2) user mode: the default user name is user, password also is user, can only view and configure part of the
device parameters
Login steps:
Step 1. Connect the phone correctly and make sure that the device and the computer in the same network.
Step 2. View the device IP: Enter the menu, use the ▲ and ▼ navigation keys to select the Setting---status,
the select network view the device IP;
Step 3. Enter "http: // IP address of the phone" in the address field of the computer browser and press Enter to
display the device login page.
Step 4. Enter ‘admin’ or ‘user’ as the user name and enter the appropriate password. Click the "Login" button to
enter the configuration page.
Serial number
Name
Description
Postition 1
Main navigation bar
Click this navigation bar to bring up the corresponding
child navigation bar
Postition 2
navigation bar
Click the sub navigation bar to enter the configuration
page
Web Configuration FIP16 User Manual
33
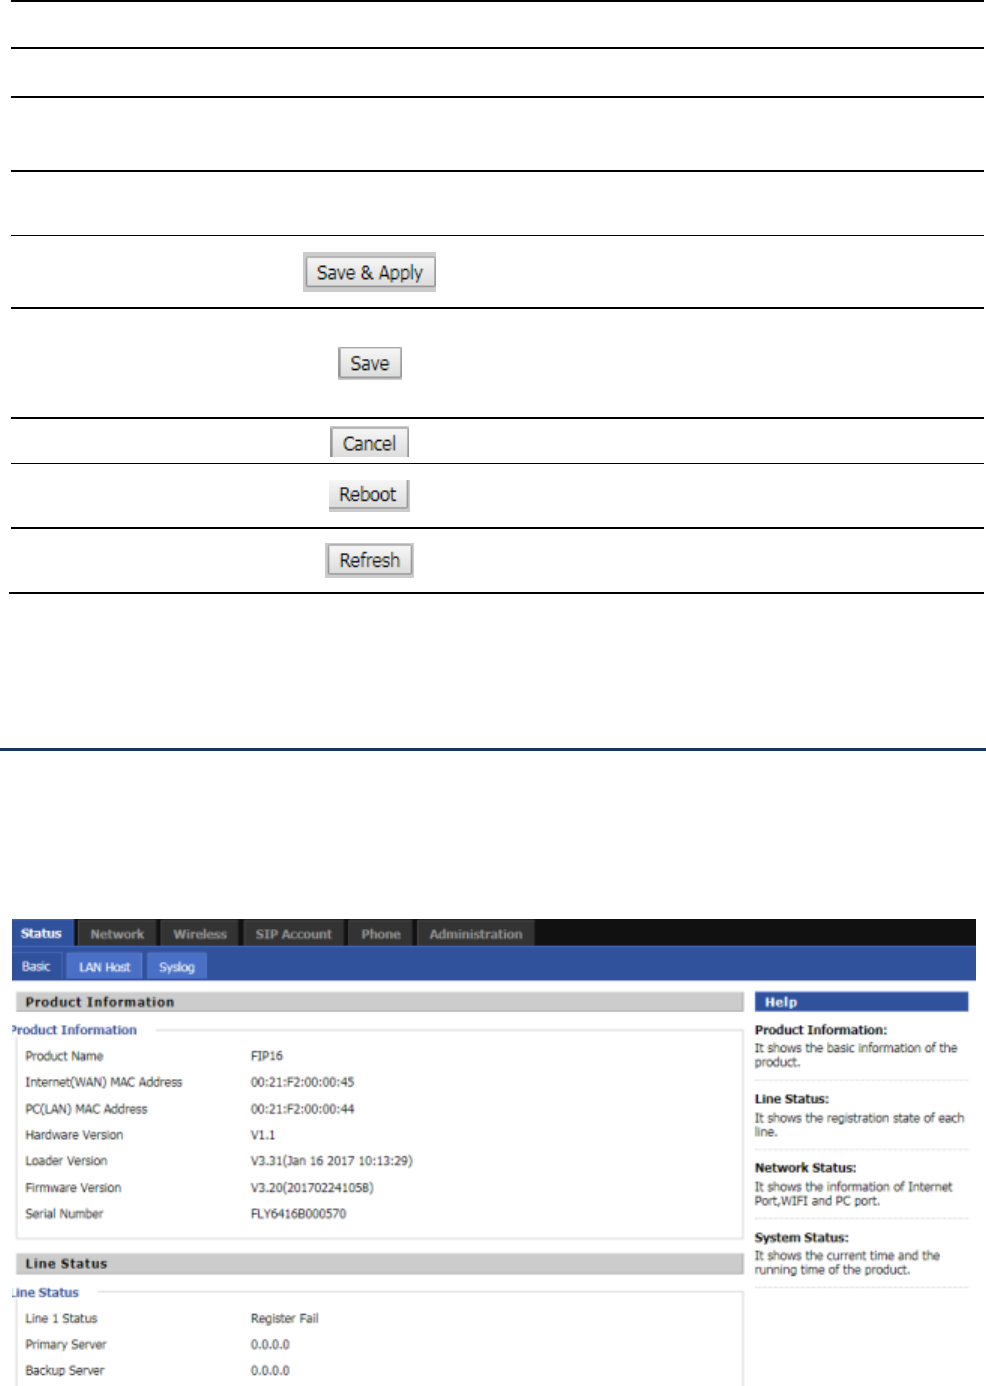
Status
Basic
This page shows the basic status of the phone: including product model, SIP account registration status, network
status, VPN status, PC port status and system status. Click the Refresh button to refresh.
Postition 3
Product Information
Device Information Configuration Title
Postition 4
Product Information
Show product information
Postition 5
Login/Logout
main information shows the firmware version, DSP
version, current time and management mode.
Postition 6
Help
help to display help information, users can get some
help here
Use this button,conifg will be saved and apply
After changing the parameters, you need to click this
button to save. After you click Save, there is a need to
restart the device.
Click to cancel the change
Click to restart
Refresh current page
Web Configuration FIP16 User Manual
34
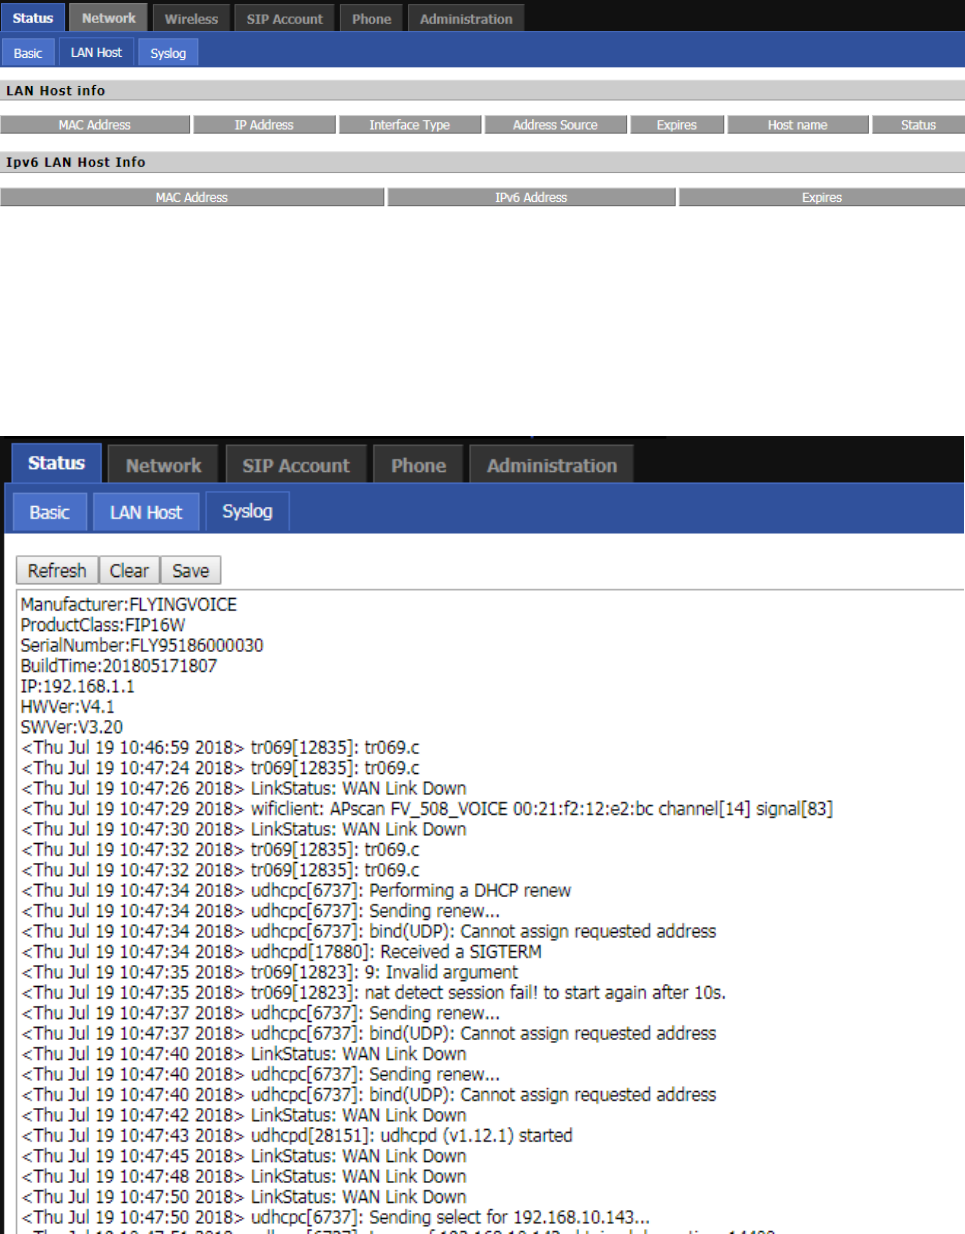
LAN Host
This page shows information about the device connected to the LAN port of the device.
Syslog
This page displays the system log: the user can use the ‘Clear’ button to delete all logs, clear all information; use
the ‘Refresh’ button to refresh the system log;Use the ‘Save’ button Save Log to the local computer to export the
log.
Web Configuration FIP16 User Manual
35
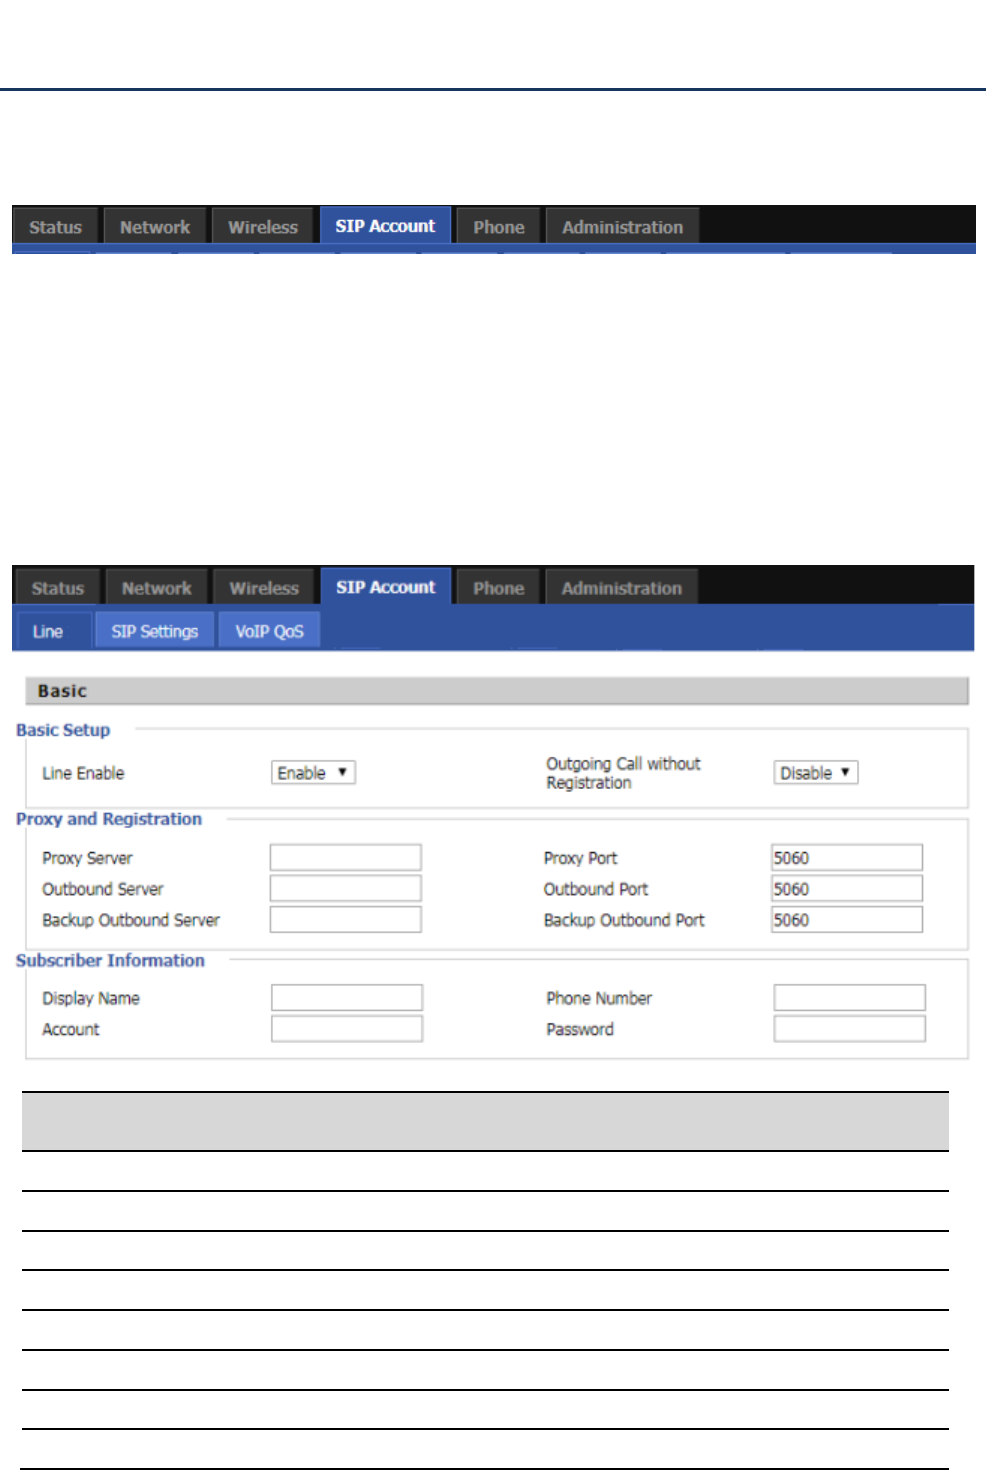
SIP Account
This page includes: account settings, SIP Settings and VoIP QoS settings, the following picture is the navigation
bar:
Account setting
The user can configure the parameters of line 1-8 in this page, including the following four parts: Basic, Audio
Configuration, Supplementary Service Subscription and Advanced.
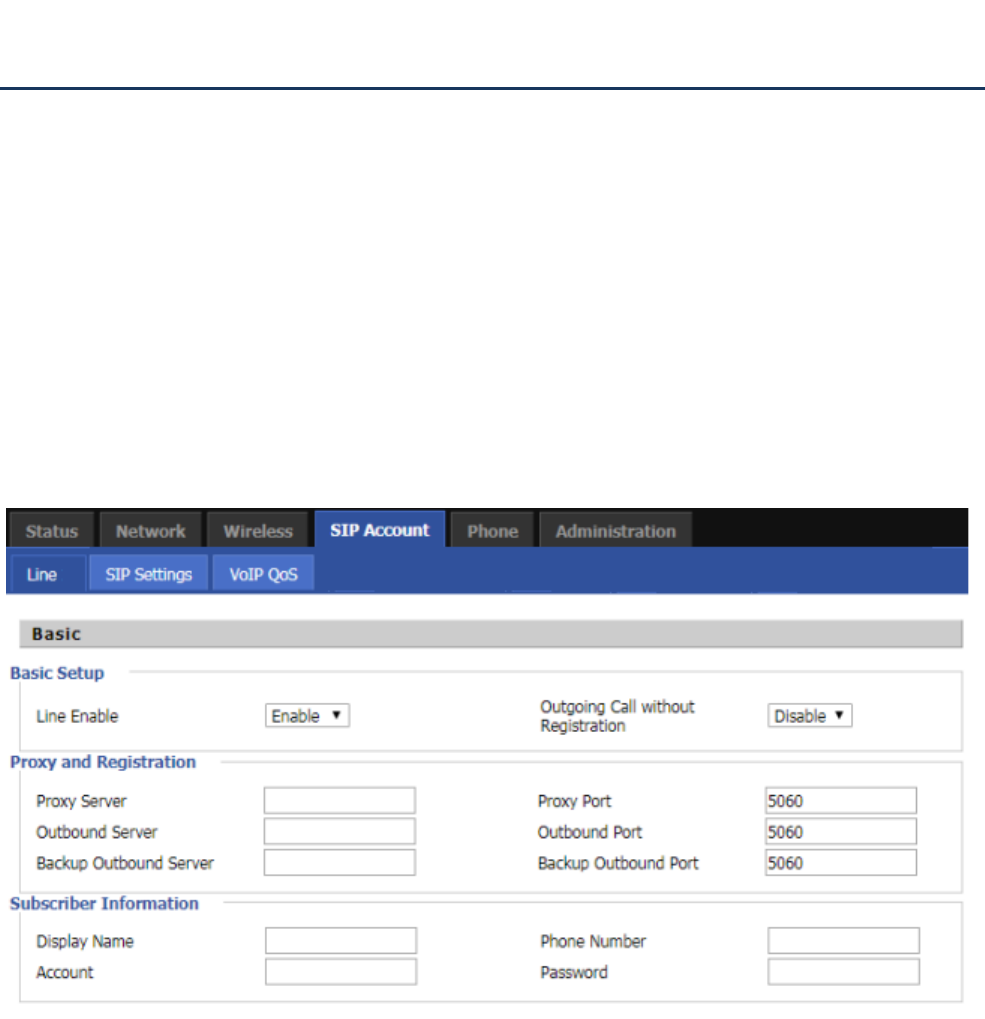
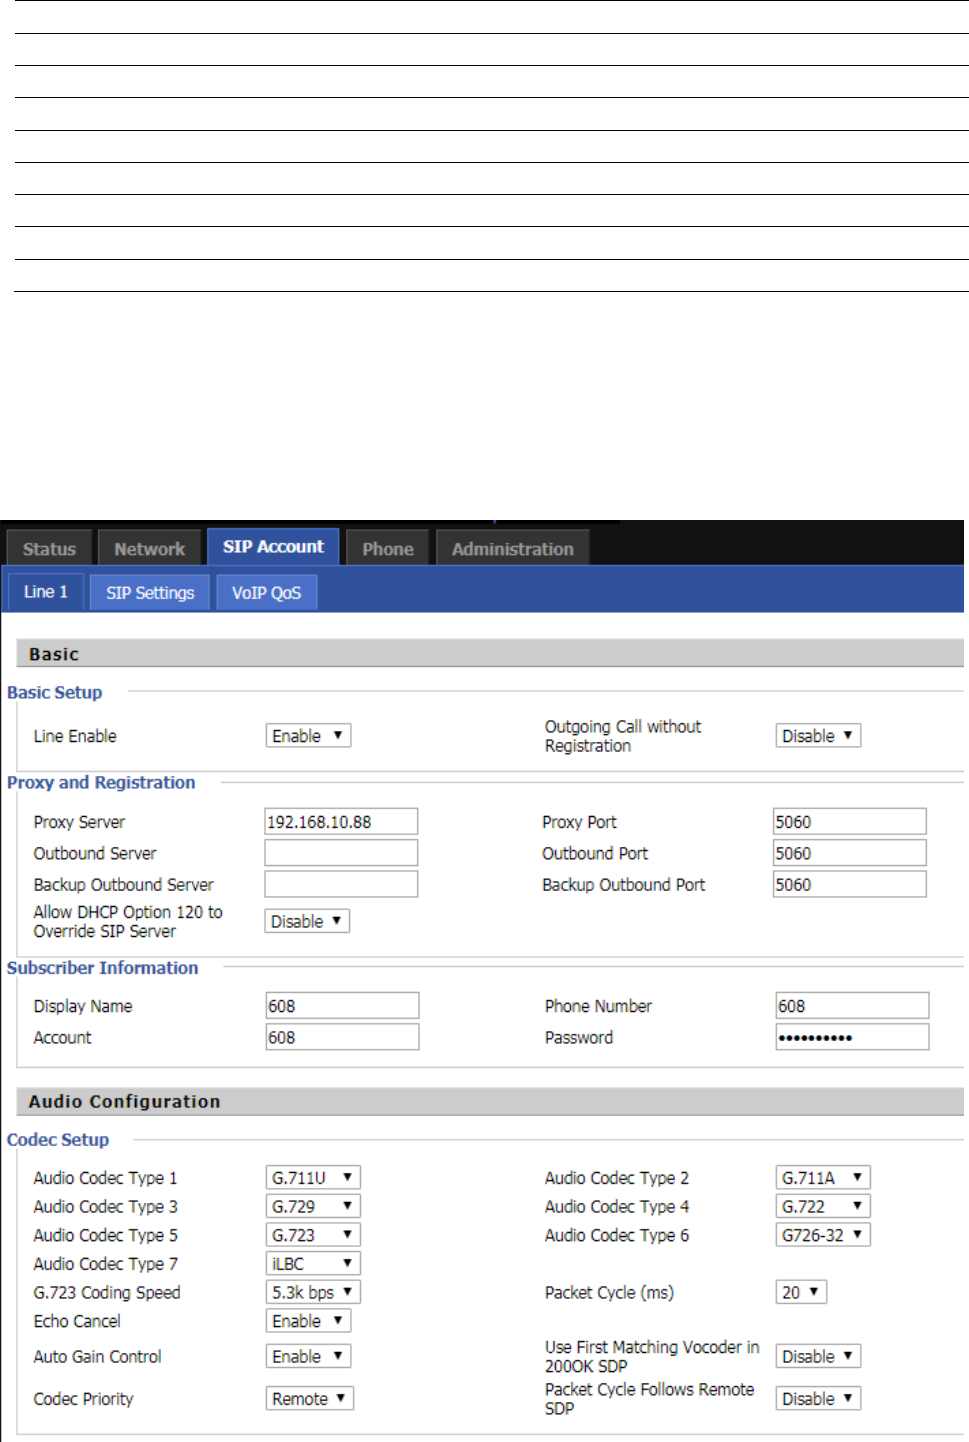
Basic
Set up your VoIP service provider to provide basic information such as phone number, account number, password,
SIP proxy, and so on.
Parameter name
Description
Line Enable
Whether to enable the corresponding Line
Proxy Server
SIP server domain name or IP
Poxy Port
SIP server supports VoIP service port, the default is 5060
Outbound Server
Proxy server IP or domain name
Outbound Port
The service port of the proxy server
Backup Outbound Server
Back up the proxy server
Backup Outbound Port
Back up the proxy server port
Display Name
This value will be displayed on the LCD screen
Web Configuration FIP16 User Manual
36
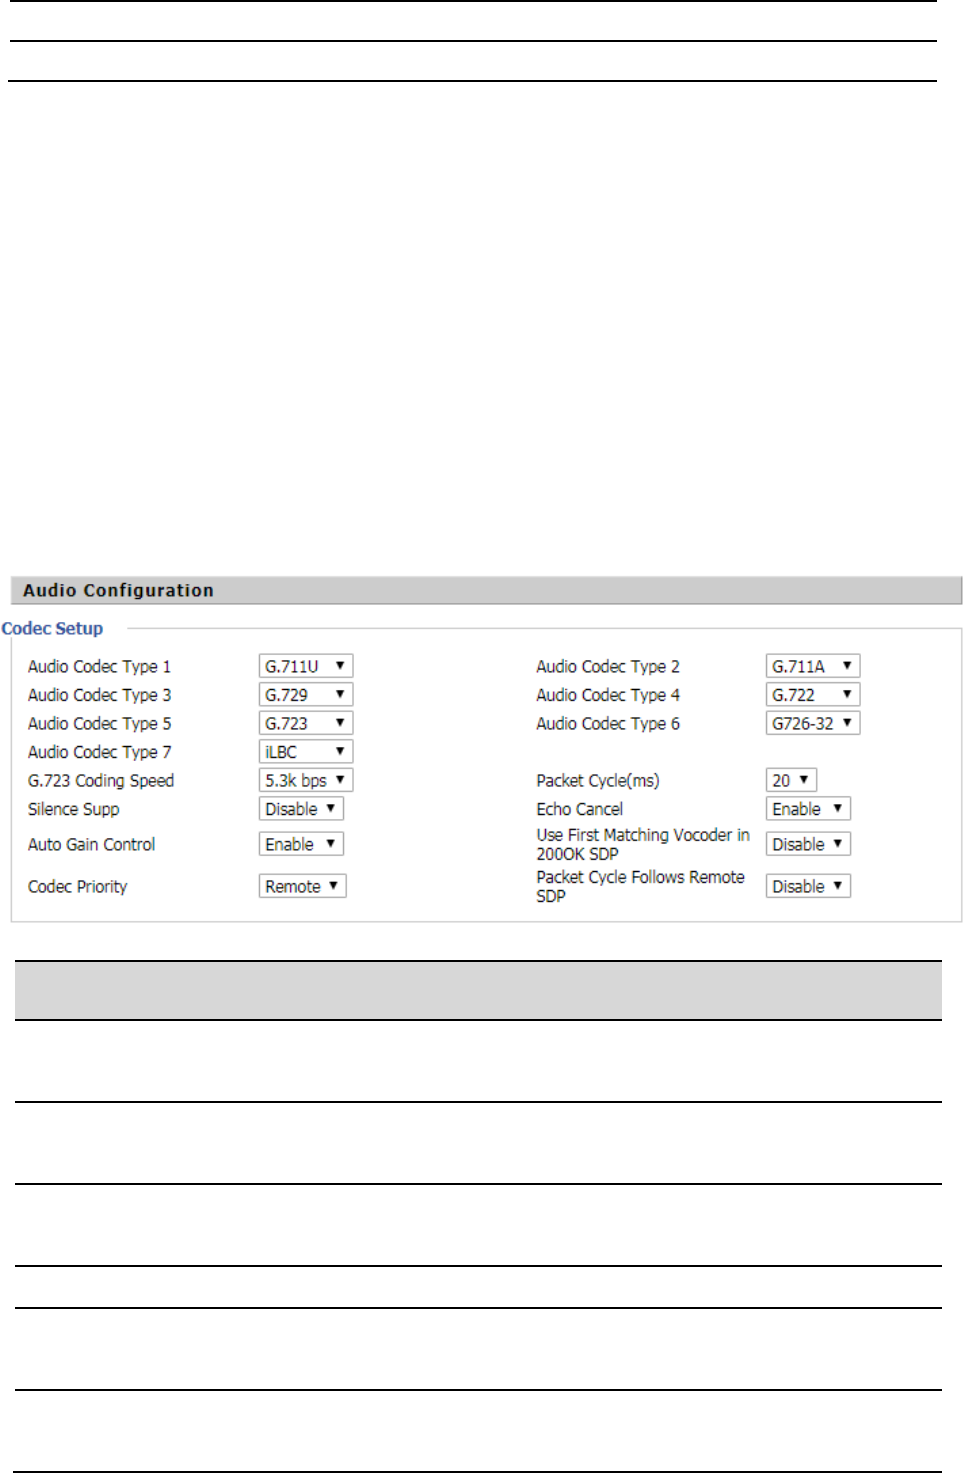
Audio Configuration
Select audio encoding format:
Phone Number
The phone number provided by the SIP server
Account
SIP server provided by the SIP server
Parameter name
Description
Audio Codec Type 12,3,4,5,6,7
Select the corresponding encoding mode from G.711A,
G.711U, G.722, G.729 and G.723 five encoding modes
G.723 Coding Speed
Select the encoding rate of G.723, there are two kinds of
5.3kbps and 6.3kbps
Packet Cycle(ms)
Set the RTP packaging cycle, the default configuration is
20ms
Silence Supp
Whether it is enabled.
Echo Cancel
Whether to enable echo cancellation, the default is
enabled
Auto Gain Control
Whether the automatic gain control is activated, the
automatic gain control is the automatic control method
Web Configuration FIP16 User Manual
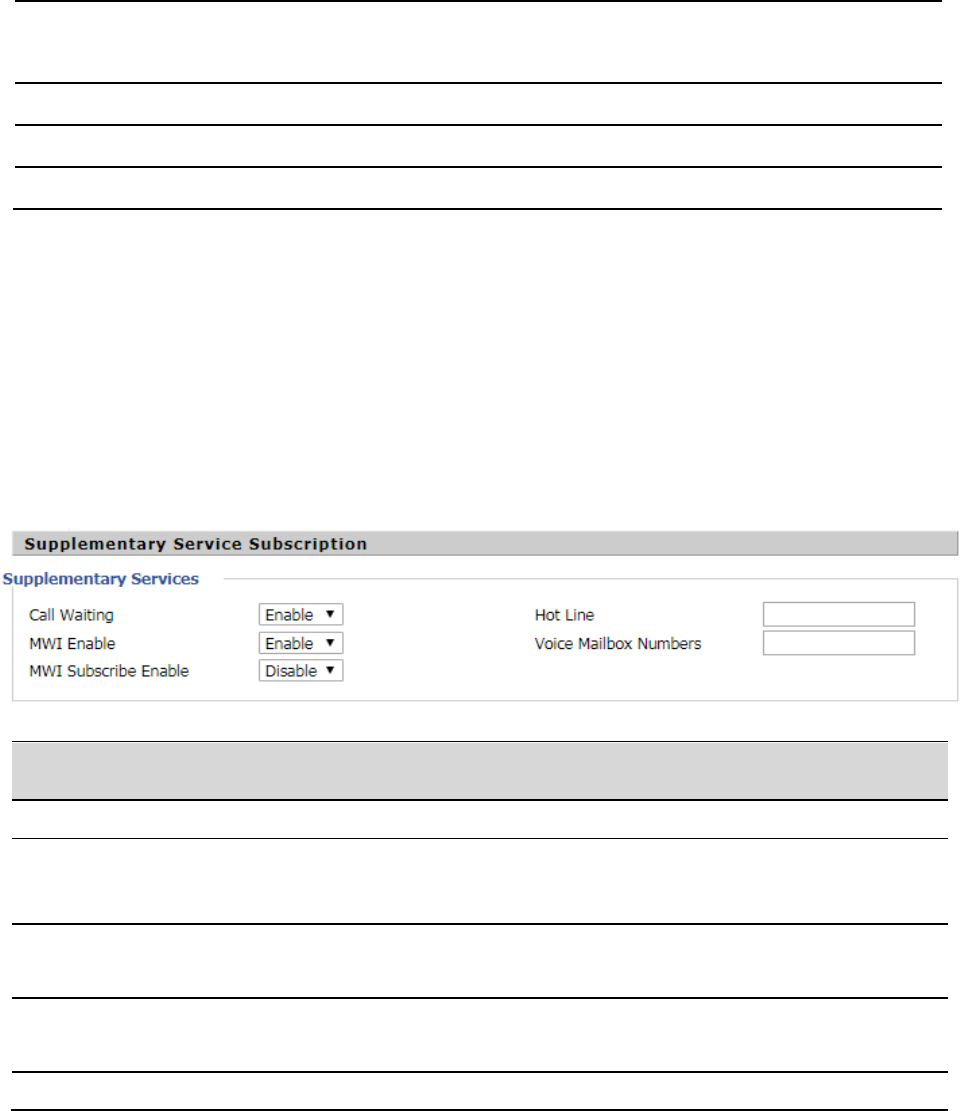
37
Supplementary Service Subscription
that automatically adjusts the gain of the amplifier circuit
with the signal strength
Use First Matching Vocoder in 200OK SDP
Whether to use the first matching speech code
Codec Priority
Coding priority strategies include local and remote
Packet Cycle Follows Remote SDP
Whether the packaging cycle to the main end
Parameter name
Description
Call Waiting
Whether to enable call waiting
Hot Line
Fill in the hotline number. After the user is set up, go off-hook
and immediately dial the hotline number automatically
MWI Enable
Whether to enable MWI (message waiting indication), if the user
needs to use voice mail, please enable the function
Voice Mailbox Numbers
Fill in the SIP server to provide voice mail signature code to Elatix
platform, for example, the voice mailbox signature * 97
MWI Subscribe Enable
Whether to enable MWI subscription
Web Configuration FIP16 User Manual
38
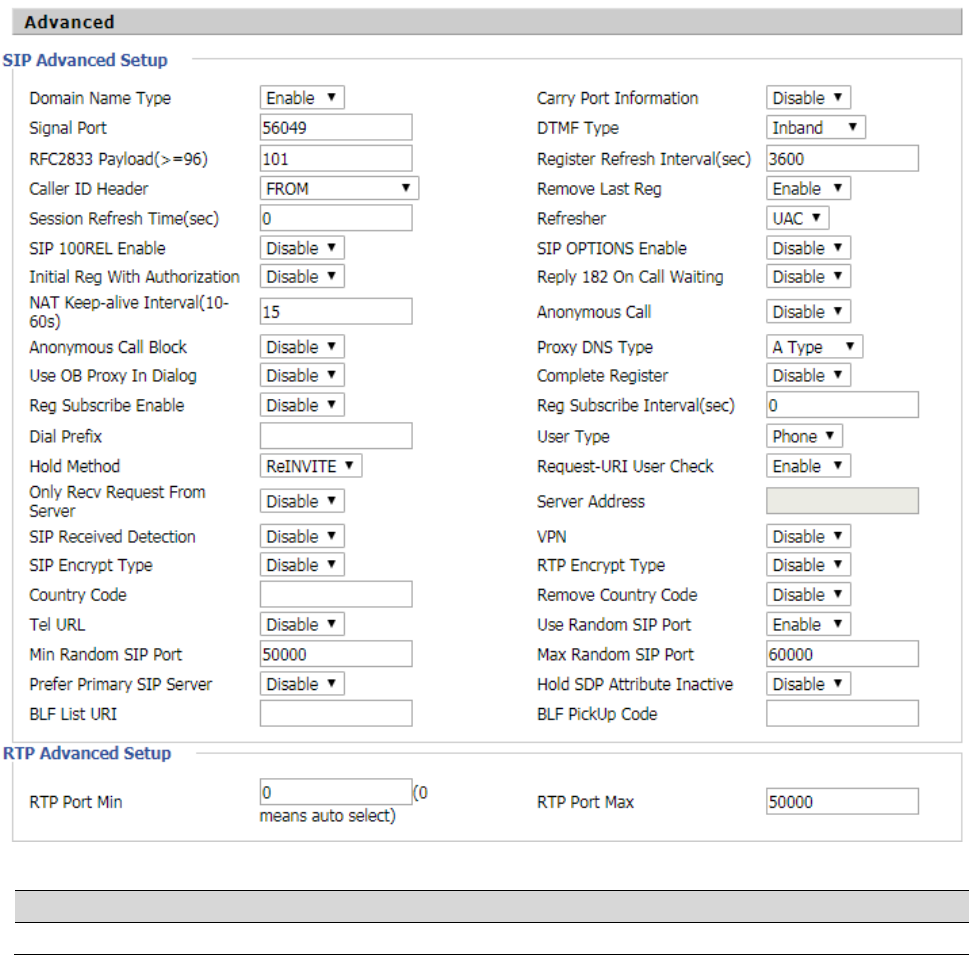
Advanced
Parameter name
Description
Domain Name Type
Whether to enable domain name recognition in SIP URIs

Web Configuration FIP16 User Manual
39
Carry Port Information
Whether to carry the SIP URI port information
Signal Port
The local port number of the SIP protocol
DTMF Type
Select the second way of dialing, optional items are In-band,
RFC2833 and SIP Info.
RFC2833 Payload(>=96)
The user can use the default settings
Register Refresh Interval(sec)
The time interval between two normal registration messages. The
user can use the default settings.
Caller ID Header
When enabled, an unregistered message will be sent before the
registration is disabled, and no unregistered messages will be sent
before registration; should be set according to the different server
requirements
Remove Last Reg
Whether to remove the last registration message
Session Refresh Time(sec)
The interval between two sessions, the user can use the default
settings
Refresher
Select Refresh from UAC and UAS
SIP 100REL Enable
If this option is enabled, the IP phone will send SIP-OPTION to the
server instead of sending Hello messages on a regular basis. The
interval for sending is the parameter set for the "NAT Hold Interval"
parameter.
SIP OPTIONS Enable
Whether to open the SIP OPTION function
Initial Reg With Authorization
Whether to carry the certification information when registering
Reply 182 On Call Waiting
Whether or not to send 182 when the call is waiting
NAT Keep-alive Interval(10-60s)
The time interval for sending empty packets
Anonymous Call
Whether anonymous calls are enabled
Anonymous Call Block
Whether to enable anonymous call blocking
Proxy DNS Type
Set the DNS server type, the optional items are Type A, DNS SRV, and
Auto
Use OB Proxy In Dialog
Whether the OB agent is used in the conversation
Complete Register
Whether to enable full registration
Reg Subscribe Enable
When enabled, the subscription message is sent after the registration
message; the subscription message is not sent when disabled
Reg Subscribe Interval(sec)
Set Reg Subscribe Interval,default is 0
Dial Prefix
Dial before prefix
User Type
Whether the end user is IP or Phone
Hold Method
Call hold is REINVITE or INFO
Request-URI User Check
Whether to allow the user to check
Only Recv Request From Server
If enabled, will only accept requests from the server, do not accept
other requests
Server Address
SIP server address
SIP Received Detection
Whether to allow SIP receive detection
VPN
Whether to enable VPN
SIP Encrypt Type
Whether to allow SIP message encryption
RTP Encrypt Type
Whether to allow RTP message encryption
Country Code
Country code
Remove Country Code
Whether to allow the removal of national codes
Tel URL
Whether to open the Tel URL
Web Configuration FIP16 User Manual
40
SIP settings
SIP Parameters
Use Random SIP Port
Whether to use random port
Min Random SIP Port
SIP minimum random port
Max Random SIP Port
SIP maximum random port
Prefer Primary SIP Server
Whether to enable the preferred primary server
Hold SDP Attribute Inactive
Whether to enable the call to keep the inactive attribute
BLF List URL
Set BLF List URL
BLF PickUp Code
Set BLF PickUp Code
RTP Port Min
RTP minimum port
RTP Port Max
RTP's maximum port
Web Configuration FIP16 User Manual
41
Parameters name
Description
SIP T1
The default value is 500
SIP User Agent Name
Enter the SIP User Agent header field
Max Forward
Modify the maximum hop value, the default is 70
Max Auth
Change the number of authentication failures, the default value is 2
Reg Retry Intvl
Registration failed again registration interval, default is 30
Reg Retry Long Intvl
Registration failed Register again for the long interval Default 1200
Mark All AVT Packets
The default enable is on
RFC 2543 Call Hold
The default enable is on
SRTP
The default is disabled
SRTP Prefer Encryption
Support for AES_CM and ARIA_CM
Service Type
Default general
DNS Refresh Timer
Modify the DNS refresh time, the default value of 0
Transport
The transmission type defaults to UDP
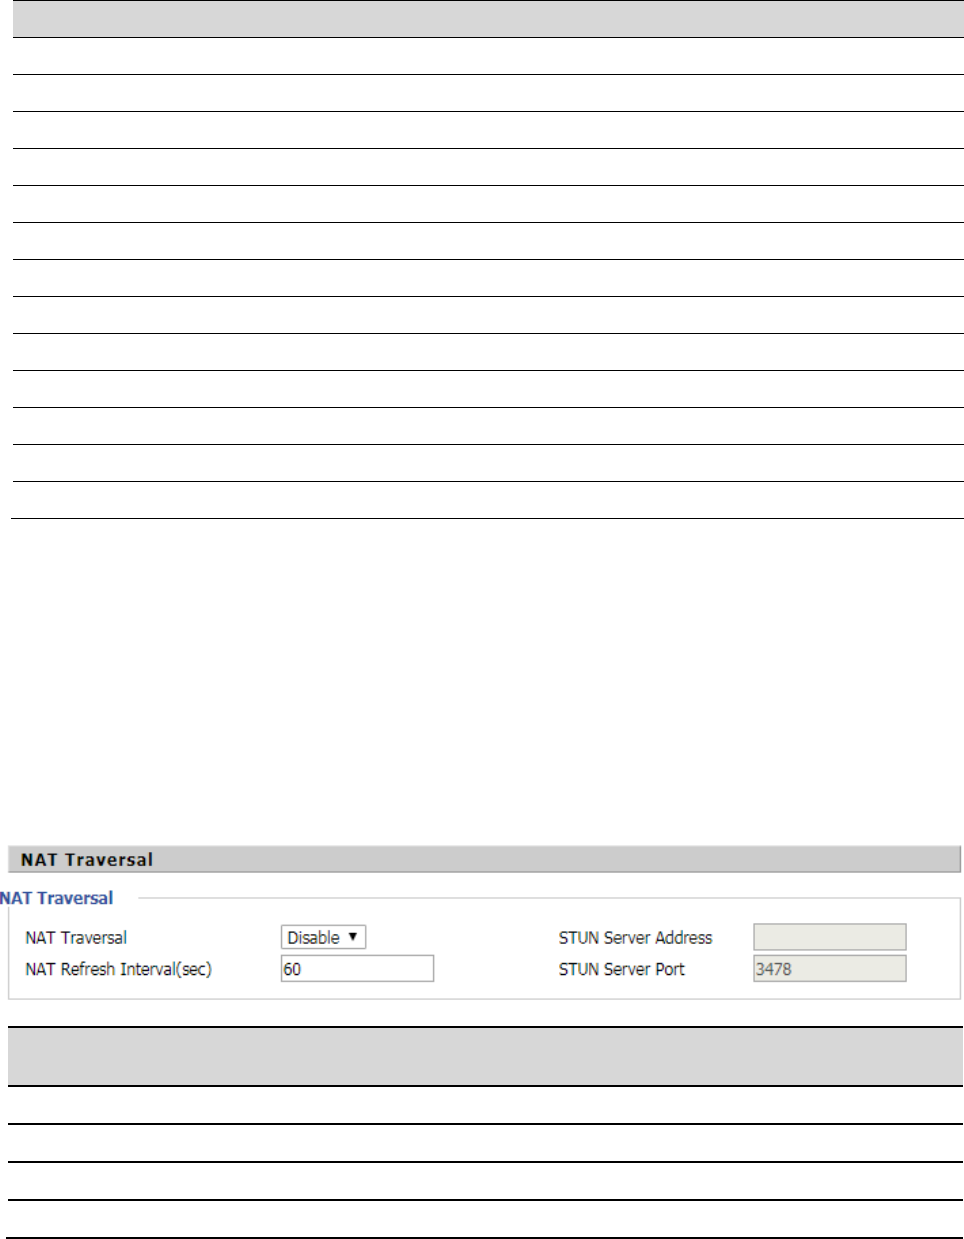
NAT Traversal
Parameters name
Description
NAT Traversal
Whether to enable NAT mode, or select STUN to penetrate
STUN Server Address
STUN server IP address
NAT Refresh Interval(sec)
Refresh interval
STUN Server Port
STUN port, the default is 3478
Web Configuration FIP16 User Manual
42
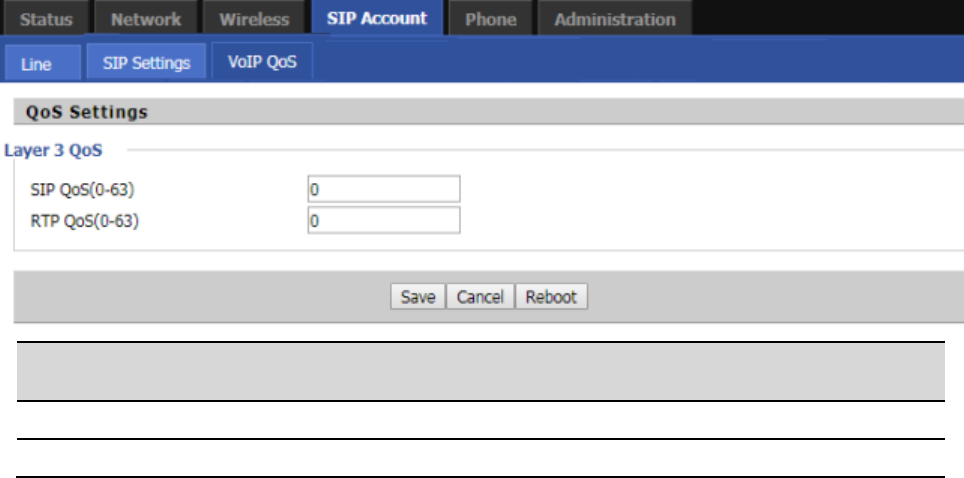
VoIP QoS
Configuration can be based on the scene environment to modify the parameters
Parameters name
Description
SIP QoS(0-63)
Defaults to 46
RTP QoS(0-63)
Defaults to 46
Web Configuration FIP16 User Manual
43
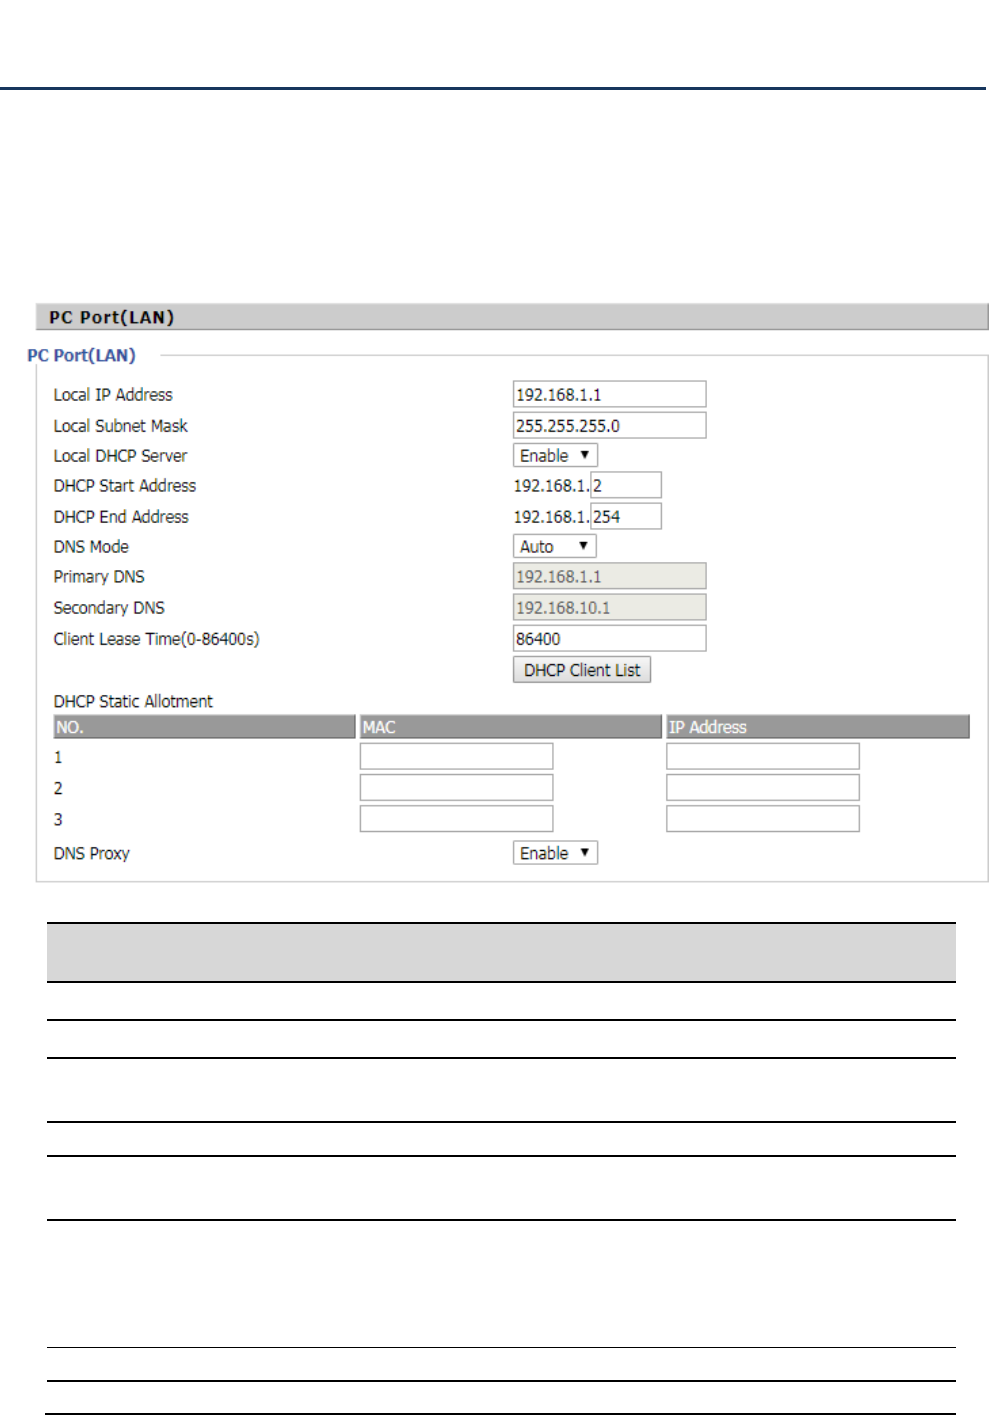
LAN
Network
Parameters name
Description
Local IP Address
Set the IP address of the PC port.
Local Subnet Mask
Set the subnet mask.
Local DHCP Server
Whether to enable the DHCP server. If the LAN port is not in NAT mode,
the user can not enable the DHCP server.
DHCP Start Address
Start IP address, assign the address of the address to the DHCP client.
DHCP End Address
End the IP address and assign the address of the address to the DHCP
client.
DNS Mode
The DNS type is specified: the user should manually set the preferred
DNS and alternate DNS.
The DNS type is Automatic: The IP phone will automatically obtain the
preferred DNS and alternate DNS from the DHCP server.
Primary DNS
The preferred DNS address for the Internet port.
Secondary DNS
Alternative DNS for Internet ports.
Web Configuration FIP16 User Manual
44
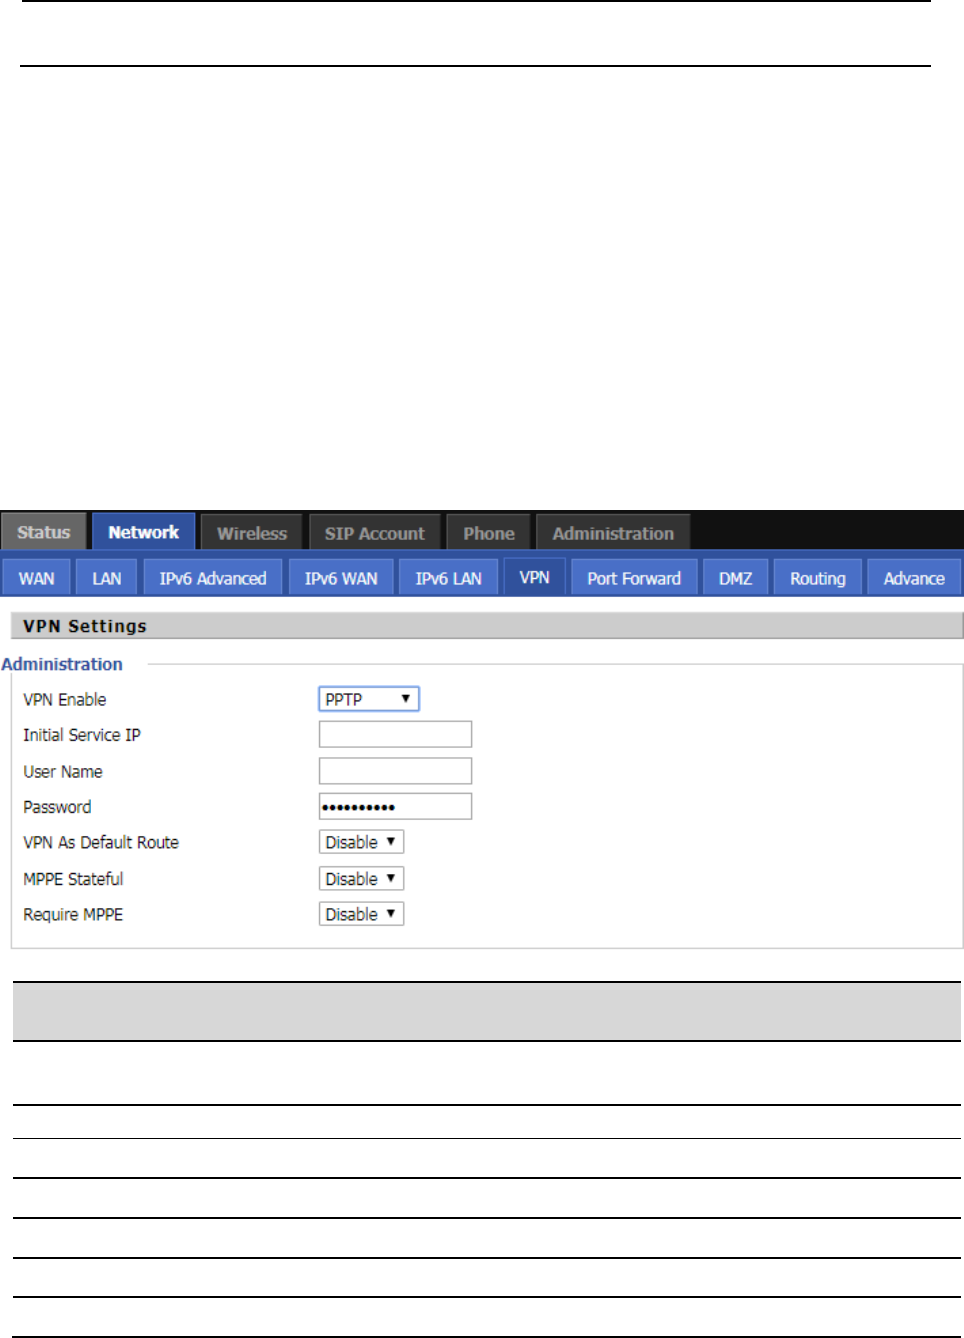
VPN
VPN is a technology that builds a private network on a public network. The connection between any two nodes
of the VPN network does not have the end-to-end physical link required by the traditional private network, but
rather the network platform provided by the public network service provider, and the user data is transmitted in
the logical link. With VPN technology, you can establish private connections and transfer data between any two
devices on the public network.
PPTP:
Client Lease
Time(0-86400s)
DHCP Client to obtain IP lease, in seconds, the default is 86400s.
Parameters name
Description
VPN Enable
Whether to enable VPN.
Select PPTP mode.
Initial Service IP
The IP address of the VPN server.
User Name
The user name required for authentication.
Password
The password required for authentication.
VPN As Default Route
Prohibited or open, the default is prohibited.
MPPE Stateful
Enable or disable the MPPE Stateful
Require MPPE
Enable or disable the Require MPPE
Web Configuration FIP16 User Manual
45
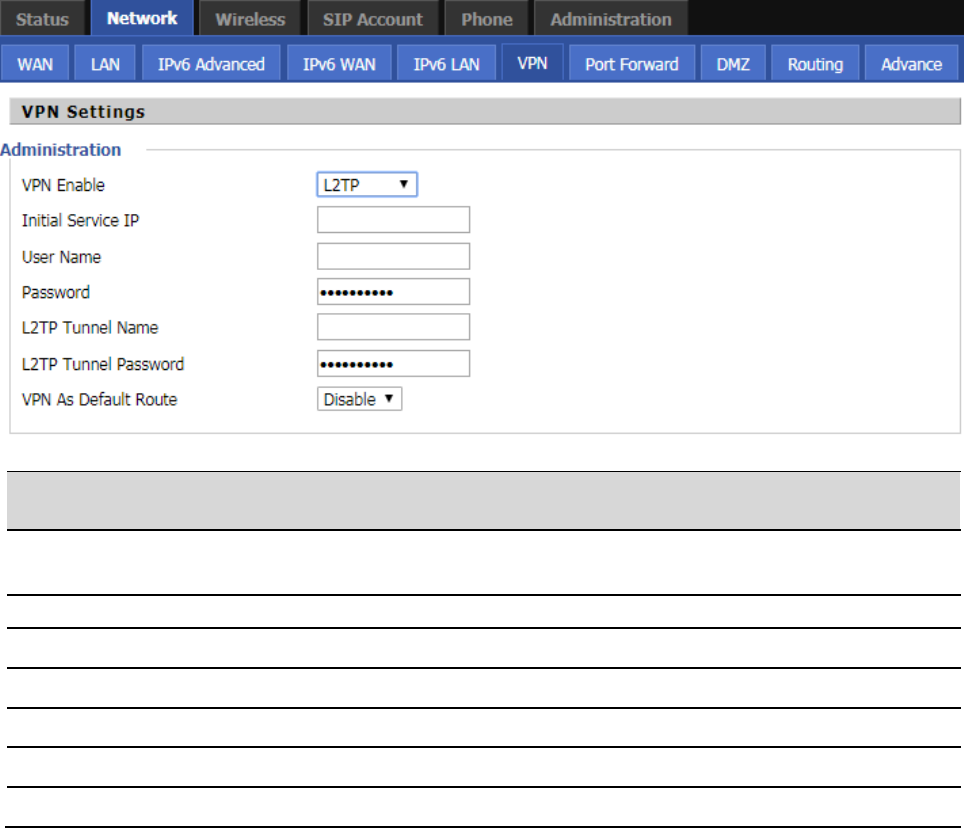
L2TP
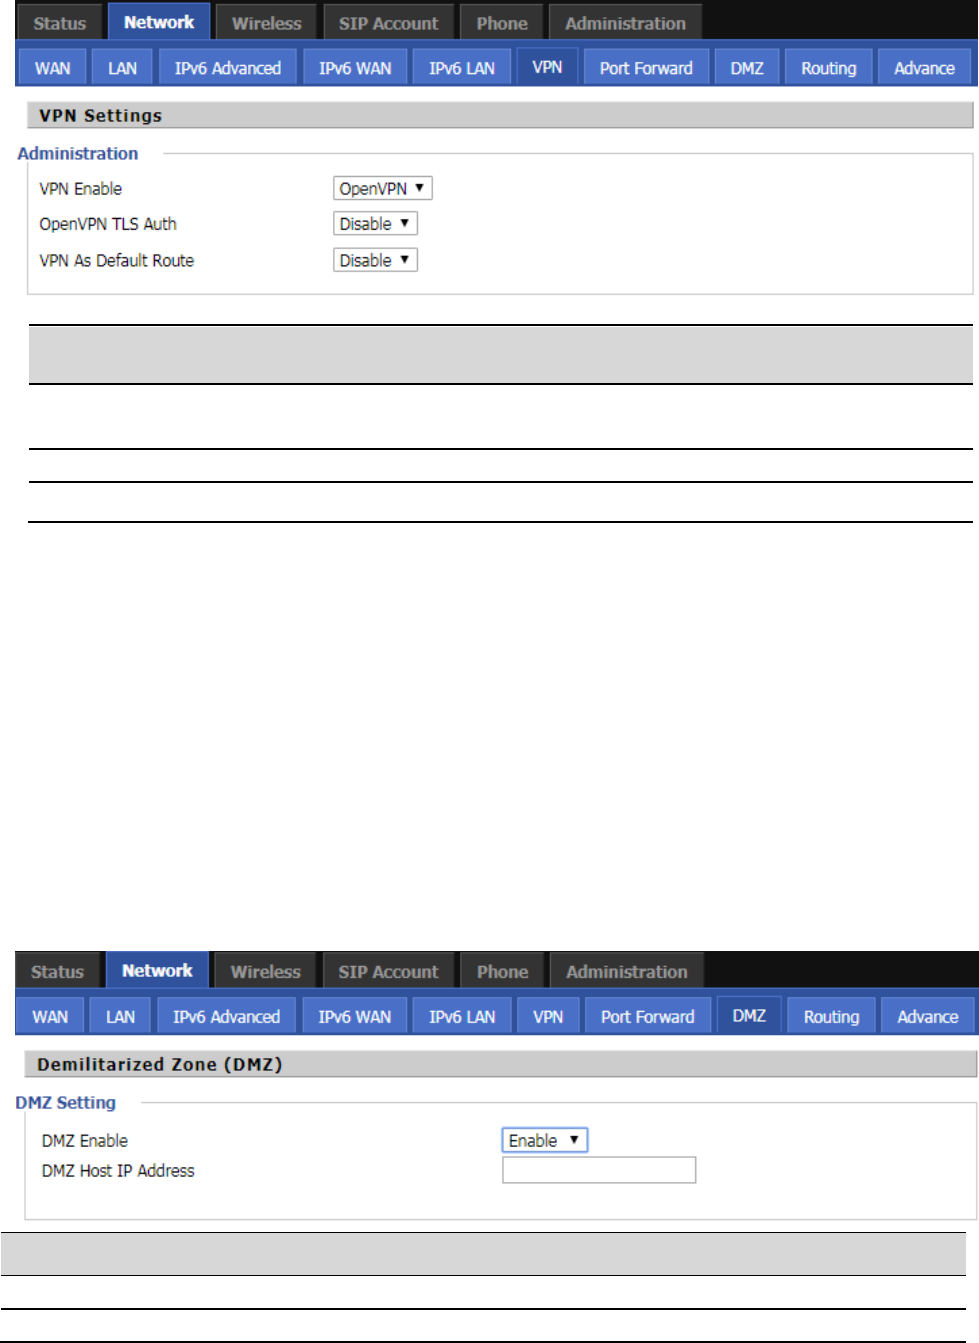
OpenVPN
Parameters name
Description
VPN Enable
Whether to enable VPN.
Select PPTP mode.
Initial Service IP
The IP address of the VPN server.
User Name
The user name required for authentication.
Password
The password required for authentication.
L2TP Tunnel Name
L2TP Tunnel Name
L2TP Tunnel Password
L2TP Tunnel Password
VPN As Default Route
Prohibited or open, the default is prohibited.
Web Configuration FIP16 User Manual
46
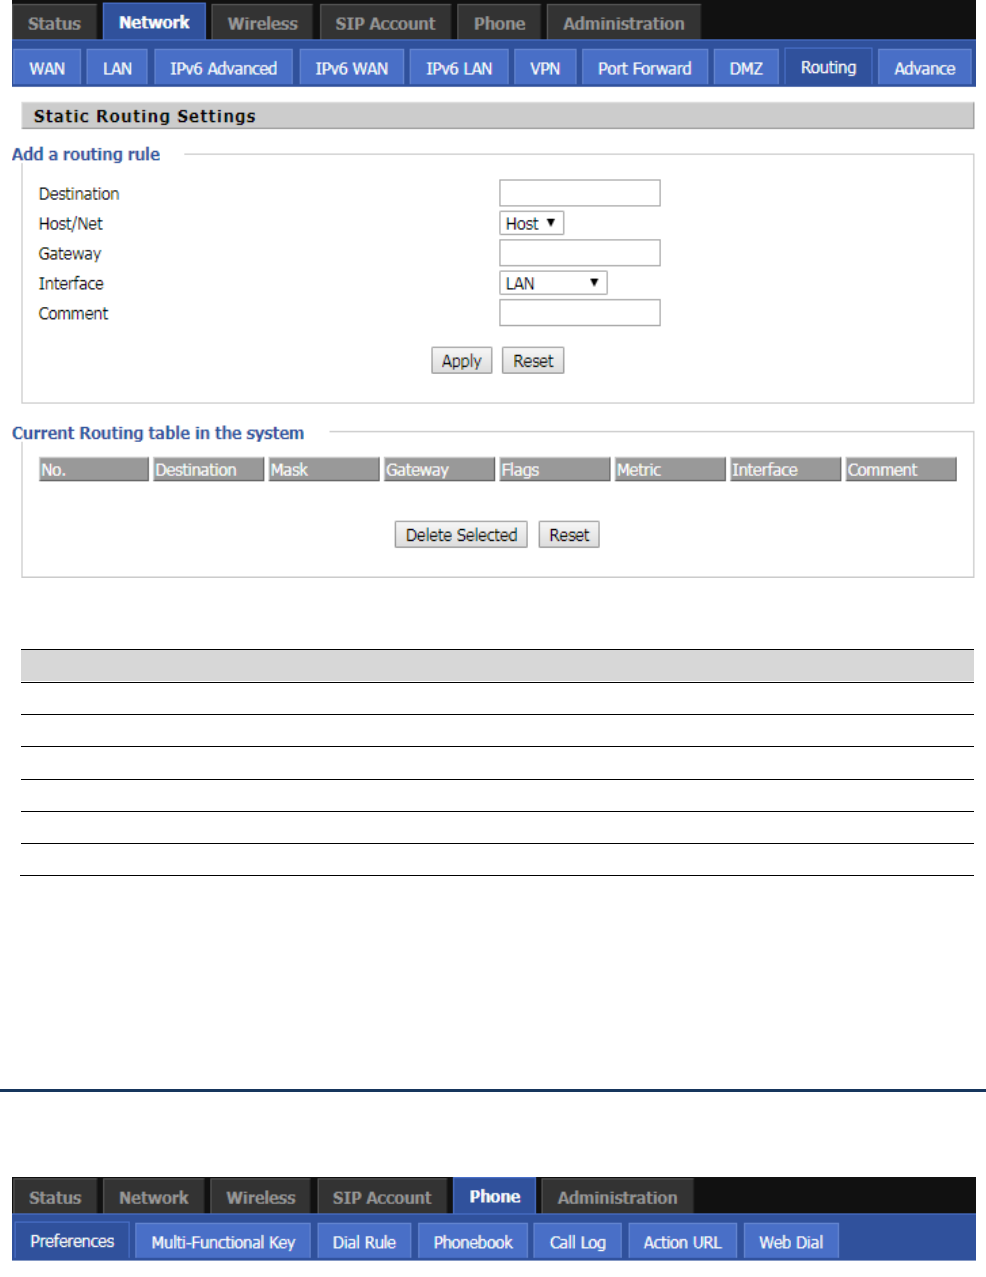
DMZ
DMZ can be understood as a different from the external network or within the network of special network area,
the role is to WEB, e-mail and other external access to the server alone in the area, so that the entire need to
protect the internal network connected to the port , Do not allow any access, to achieve internal and external
network separation, to meet user needs. The FIP16 / FIP16 / FIP16L / FIP16P provides such a DMS that can map
external data based on any protocol to a single host (DMZ host) of the LAN. Ordinary Internet operations and
other Internet activities of other clients will continue without undue disruption. The DMZ host allows the internal
host to be completely exposed to the Internet, which usually helps some special applications such as NetMeeting
or online games.
Parameters name
Description
DMZ Enable
Whether to enable DMZ.
DMZ Host IP Address
Fill in the DMZ host IP
Parameters name
Description
VPN Enable
Whether to enable VPN.
Select OpenVPN mode.
OpenVPN TLS Auth
Whether OpenVPN TLS authentication is enabled
VPN As Default Route
Prohibited or open, the default is prohibited.
Web Configuration FIP16 User Manual
47
Routing
Add a routing rule:
Phone
This page user can configure parameters such as volume, call forwarding, dial plan, phone book, and so on.
Parameters name
Description
Destination
The destination address of the routing rule to be added
Host/Net
Select the way you want to add
Gateway
The IP address of the gateway
Interface
Select whether the LAN port or other network interface
Comment
Fill in memo information
Current Routing table in the system
You can view the routing rules for the current device

Web Configuration FIP16 User Manual
48
Preferences
VolumeSettings
Parameters name
Description
Handset Input Gain
Adjust the volume of the handset MIC.
Handset Volume
Adjust the volume of the handset.
Speakerphone Input Gain
Adjust the volume of the speaker MIC.
Speaker Volume
Adjust the volume of the speaker.
Ringer Volume
Adjust the volume of the ringer.
Speakerphone Mic Boost
Whether boost the volume of the speaker MIC by 20db.
Regional
Parameters name
Description
Tone Type
Select the tone type.
Dial Tone
Dial tone
Busy Tone
Busy tone.
Off Hook Warning Tone
Hang up warning tone
Ring Back Tone
Ring back tone
Call Waiting Tone
Call waiting tone
Min Jitter Delay(0-600ms)
jitter delay the minimum value, the phone jitter using the adaptive
mechanism.
Max Jitter Delay(20-1000ms)
jitter delay the maximum value of the phone jitter using the adaptive
mechanism.
Ringing Time(10-300sec)
Ring time.
Web Configuration FIP16 User Manual
49
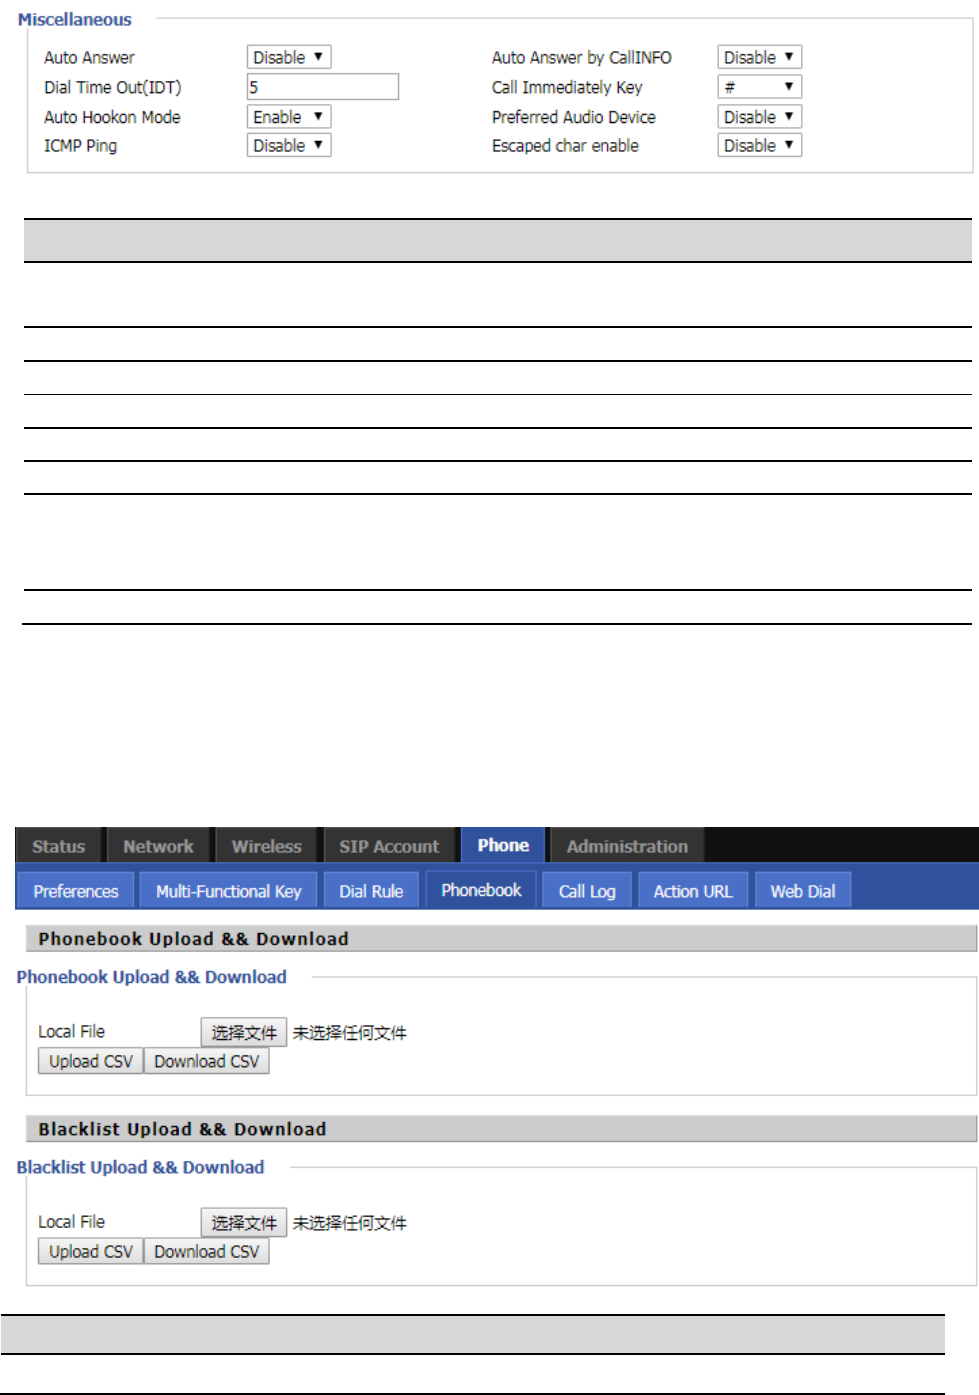
Miscellaneous
Phonebook
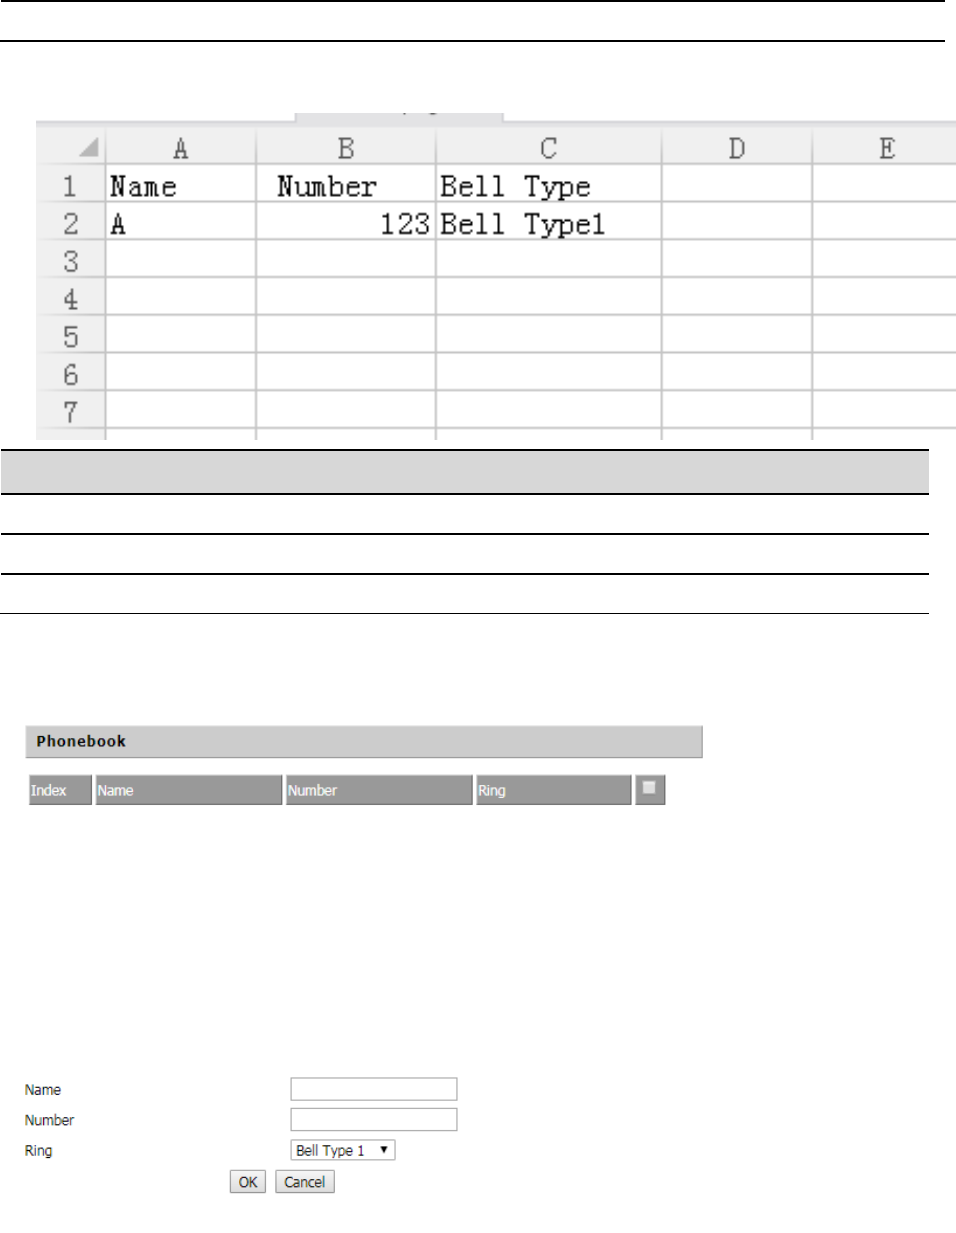
Currently supports two ways to upload phone books: bulk add, and a single way of adding.
bulk add
Parameters name
Description
Phonebook Upload &&
Download
Upload or download the phone file in CSV format
Parameters name
Description
Auto Answer
Whether to enable automatic answering, if the phone automatically
answer the phone.
Auto Answer by CallINFO
Whether to enable automatic answering under CallINFO.
Dial Time Out(IDT)
How long does the phone dial a dial tone?
Call Immediately Key
Use "#", "*" to do speed dialing, or disable.
Auto Hookon Mode
Enable or disable the Auto Hookon Mode .
Preferred Audio Device
Enable or disable the Preferred Audio Device.
ICMP Ping
Whether ICMP Ping is enabled.
If enabled, the phone will ping the SIP server every interval; otherwise it
will send "hello" empty packet to the SIP server.
Escaped char enable
Enable or disable, disabled by default.
Web Configuration FIP16 User Manual
50
Blacklist Upload &&
Download
Upload or download the blacklist file in CSV format
The format of the batch is:
Parameters name
Description
Name
Enter the name
Number
Enter the number
Ring
Select the ringtone type
Single add:
Steps:
Add a phone book:
Step 1. Click the Add button, and then the configuration table appears as shown.
Step 2. Fill in the value of the parameter.
Web Configuration FIP16 User Manual
51
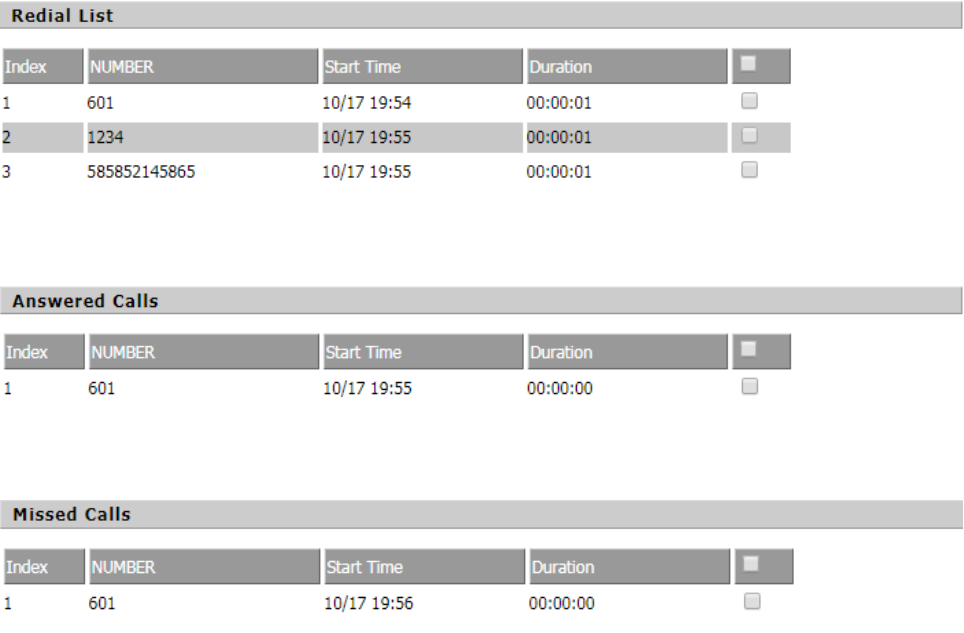
Call log
You can view phone call log information, such as dialed lists, received calls, and missed calls.。
Redial List
Answered Calls
Missed Calls
Step 3. Press the Ok button to end the configuration.
Step 4. Press the Save button to save your changes.
Edit Phonebook:
Step 1. Check a number.
Step 2. Click the Save button and the configuration table shown in Figure 2 appears.
Step 3. Change the value of the parameter.
Step 4. Press the OK button to end the configuration.
Step 5. Press the Save button to save your changes.
Delete a phone call:
Step 1. Check one or more numbers.
Step 2. Click the "Delete" button to delete the phone.
Move from phone book to blacklist:
Step 1. Check one or more numbers.
Step 2. Press the Move to Blacklist button to move the blacklist to the phonebook.
Web Configuration FIP16 User Manual
52
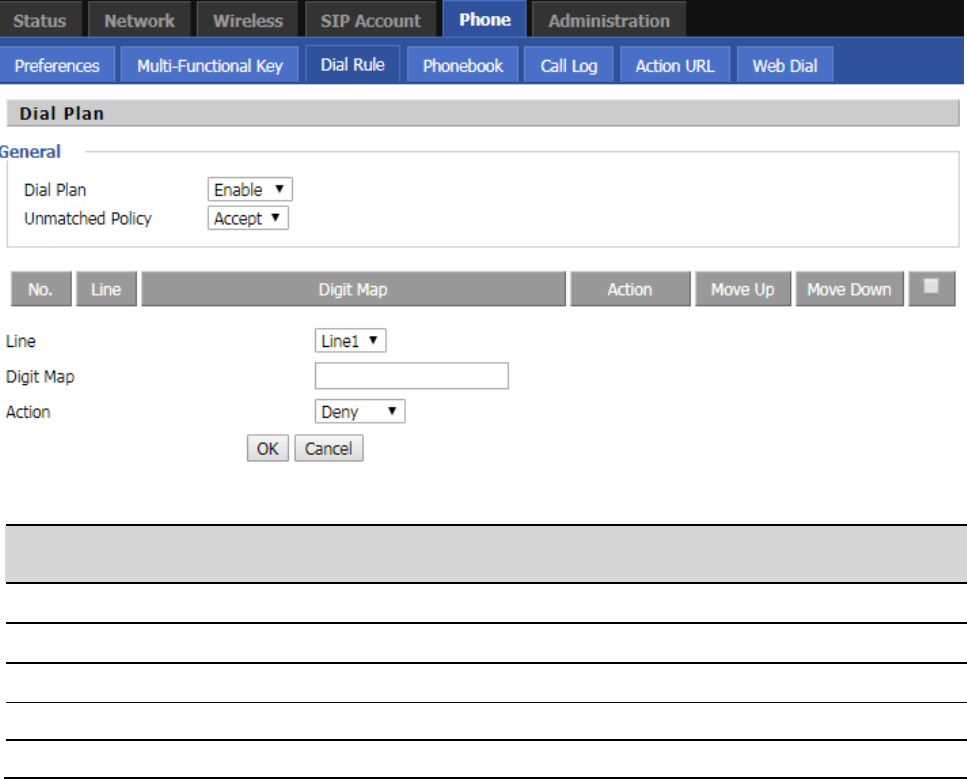
Dial Rule
Parameters name
Description
Dial Plan
Whether to enable dial plan
Unmatched Policy
Choose to accept or reject
Line
Select the account line
Digit Map
Fill in the expression for the dial plan
Action
Grammar, please refer to the dial plan for the grammar
step:
Add a dial plan:
Step 1. Enable the dial plan
Step 2. Click the "Add" button, will appear as shown in Figure 1 configuration table
Step 3. Fill in the value of the parameter
Step 4. Press the "Ok" button to end the configuration.
Step 5. Press the Save button to save your changes
Edit a dial plan:
Step 1. Enable the dial plan
Step 2. Select a dial plan
Step 3. Click the "Edit" button, will appear as shown in Figure 2 configuration table
Step 4. Change the value of the parameter
Step 5. Press the "Ok" button to end the configuration
Step 6. Press "Save" to save your changes
Delete a dial plan:
Step 1. Enable the dial plan
Step 2. Select a dial plan
Step 3. Click the "Delete" button to delete the dial plan
Web Configuration FIP16 User Manual
53
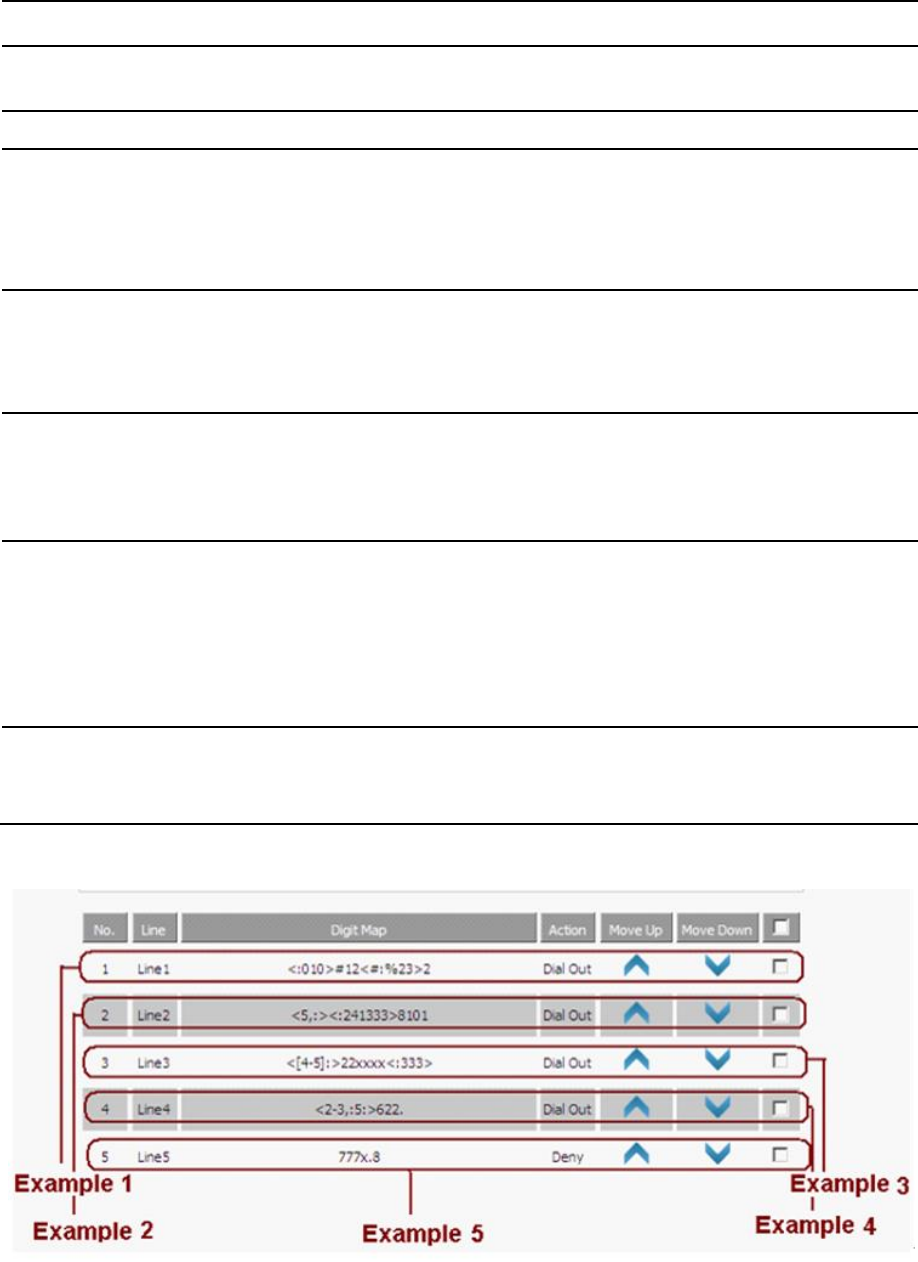
Dial Rule grammar
Character
Description
0 1 2 3 4 5 6 7 8
9 * #
Legal characters
x
The lowercase letter ‘x’ matches a legal character
[sequence]
Match a sequence
For example:
[0-9]: matches one of the numbers 0 to 9
[23-5*]: Match character 2 or 3 or 4 or 5 or *
x.
Matchx,xx,xxx,xxxx,xxxxx.....
For example:
“01. ”can match ”0”, “01”, “011”, ”0111”, ……. . , ”01111…”
<dialed:
substituted>
Replace
For example:
<8:1650>123456:input “85551212”, output“16505551212”
x,y
Enter "x" will have a dial tone, enter "y" after the dial tone stops
For example:
"9,1xxxxxxxxxx": telephone input "9" after the dial tone, enter "1" after the dial tone
stop
"9,8,010x": telephone input "9" after the dial tone, enter "0" after the dial tone stop
T
Set the delay time
For example:
"<9: 111> T2": the phone will broadcast a valid number "2"
Web Configuration FIP16 User Manual
54
Administration
In this page, the user can configure the time / date, password, system log and so on.
Management
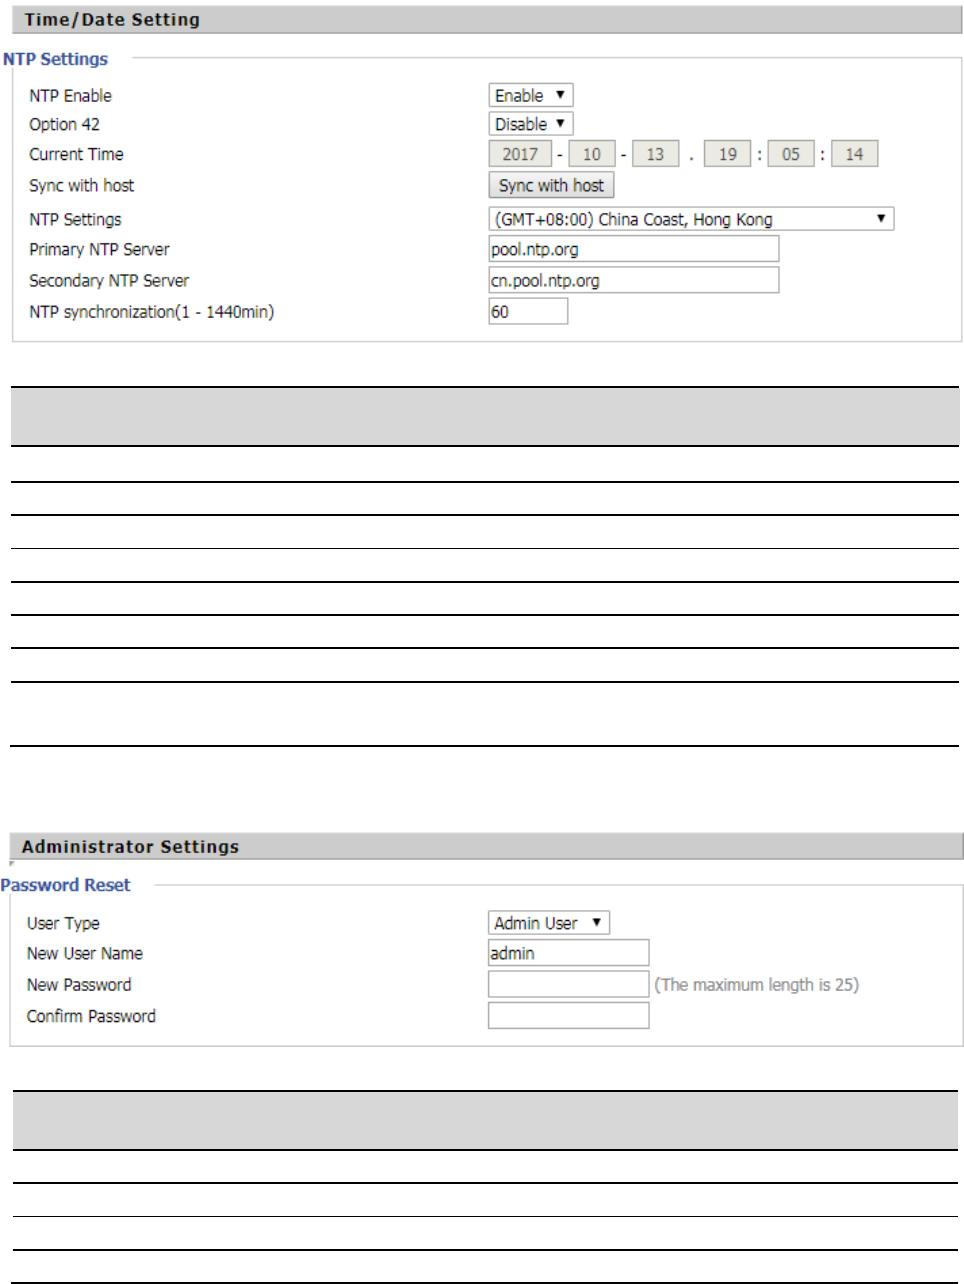
Time/Date Setting
Example 1
If the user dials # 12 # 2, the call will call 010 # 12% 232.
Example 2
If the user dials 58101, the phone will call 2413338101.
The phone will press after 5 will play the sound, press 8 after dial tone stop.
Example 3
If the user dials 422xxxx or 522xxxx, the phone will dial 22xxxx333.
Example 4
If the user dials 2622 or 26222 or 262222 or 362222.
The phone will dial 5622 or 56222 or 562222.
The phone will have a dial tone after pressing 2 or 3, and the dial tone will stop after pressing 6.
Example 5
If the user dials 777xxx ... x8, the phone rejects the number to dial out.
Web Configuration FIP16 User Manual
55
Password Reset
Admin Mode Change Password:
Step 1. Select the administrator from the drop-down list.
Step 2. Enter the new password twice in the new password and confirm the password field.
User mode change password:
Step 1. Select the user from the drop-down list.
Parameters name
Description
NTP Enable
Whether to enable NTP
Option 42
Whether to enable Option 42
Current Time
Show current time
Sync with host
Set the time zone
NTP Settings
Set the NTP settings
Primary NTP Server
Preferred IP address or domain name of the NTP server
Secondary NTP Server
The IP address or domain name of the alternate NTP server
NTP synchronization(1 -
1440min)
NTP synchronization cycle, the cycle time can be 1 to 1440 minutes of any
one, the default setting is 60 minutes
Parameters name
Description
User Type
Select an administrator or an ordinary user
New User Name
Enter a new username
New Password
Enter a new password
Confirm Password
Enter the new password again
Web Configuration FIP16 User Manual
56
Step 2. Enter the new password twice in the new password and confirm the password field.
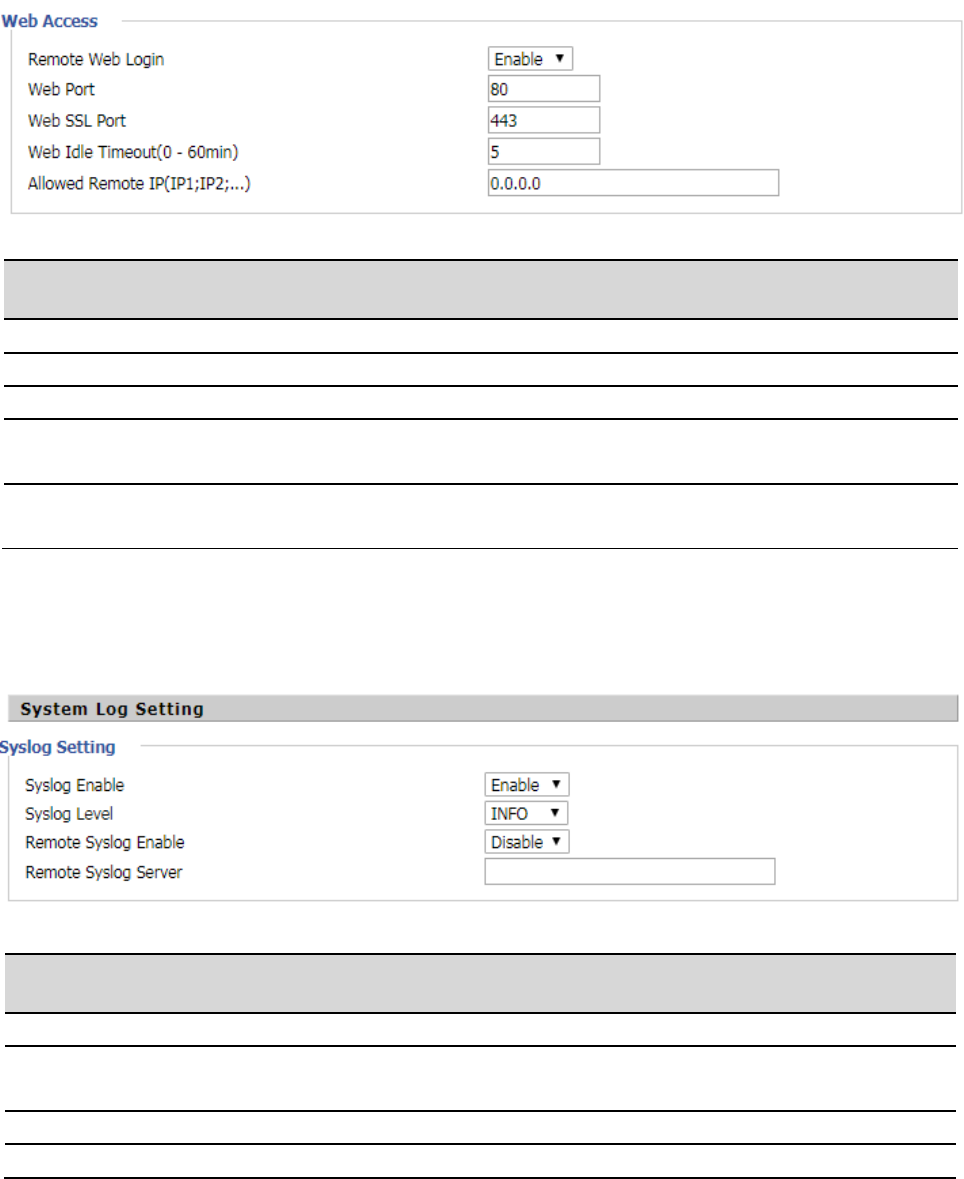
Web Access
System Log Setting
The phone supports local and remote system logs.
local:
Step 1. Disable the remote system log enable and select a log level, as shown in Figure 1.
Step 2. Press the Save Settings button to save and press the Restart button to apply the settings.
Step 3. The user can view the status / syslog page of the syslog.
Parameters name
Description
Remote Web Login
Whether to enable remote Web logon
Web Port
Set the port to log in through the Internet port and PC port. The default value is 80
Web SSL Port
You can set the web SSL port,default is 443
Web Idle Timeout(0 -
60min)
Set the network idle timeout in minutes. If the network idle timeout without any
operation, the page automatically log off
Allowed Remote
IP(IP1;IP2;...)
Allows remote connections to IP addresses
Parameters name
Description
Syslog Enable
Whether the system log is enabled
Syslog Level
Select the system day level, INFO and Debug, which Debug can get
more information than INFO
Remote Syslog Enable
Whether to enable remote log service
Remote Syslog Server
Remote Syslog Server IP Address
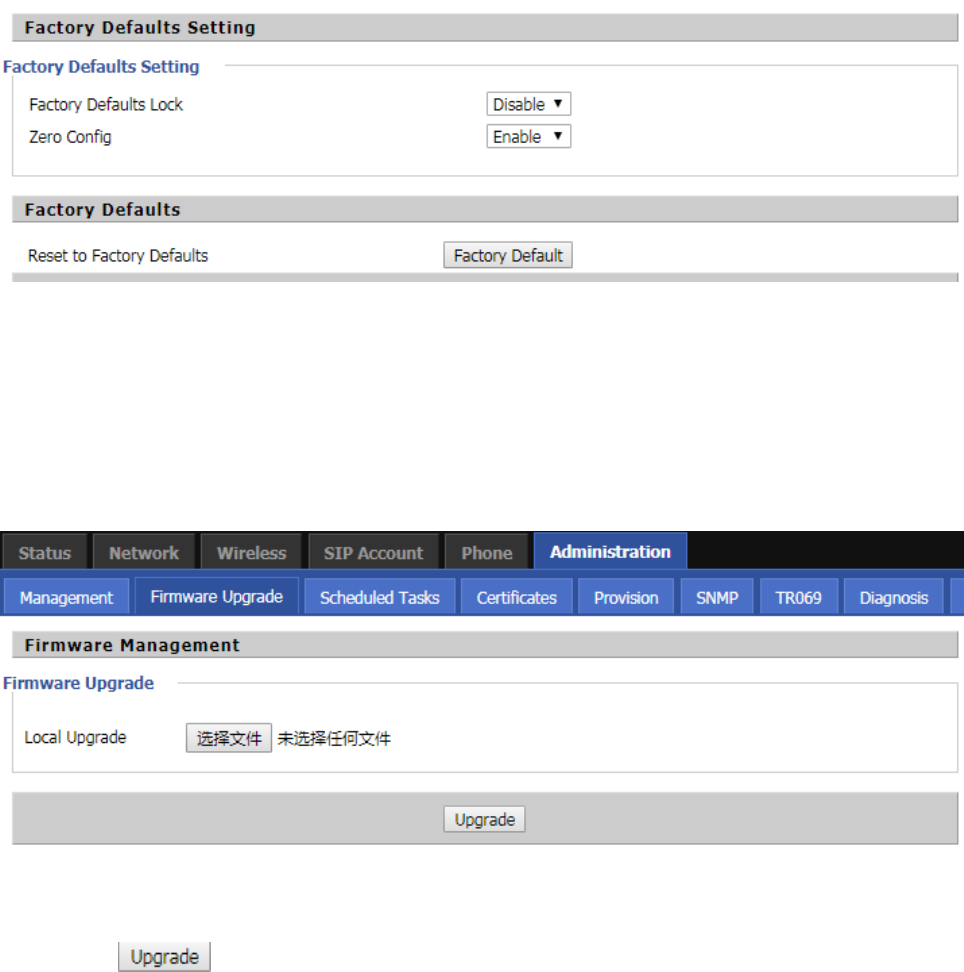
Web Configuration FIP16 User Manual
57
Remotely:
Step 1. Enable remote system log enable and enter the IP address in Remote Syslog Server, as shown in Figure 2.
Step 2. Select a log level.
Step 3. Press the Save Settings button to save and press the Restart button to apply the settings.
Step 4. The user can view the syslog server's system log and also view the records of the Status / Syslog web
pages.
Factory Defaults Setting
Click the Factory Default button to reset the phone to factory settings.
Firmware Management
Step 1. Select an upgrade file type for the upgrade software.
Step 2. Press Browse to select the upgrade file.
Step 3. Press to start the upgrade and the LCD will show the prompts that are being upgraded.
Step 4. Log in to the phone page by checking the status of the firmware in the firmware version of the firmware
upgrade to determine whether the upgrade is successful.
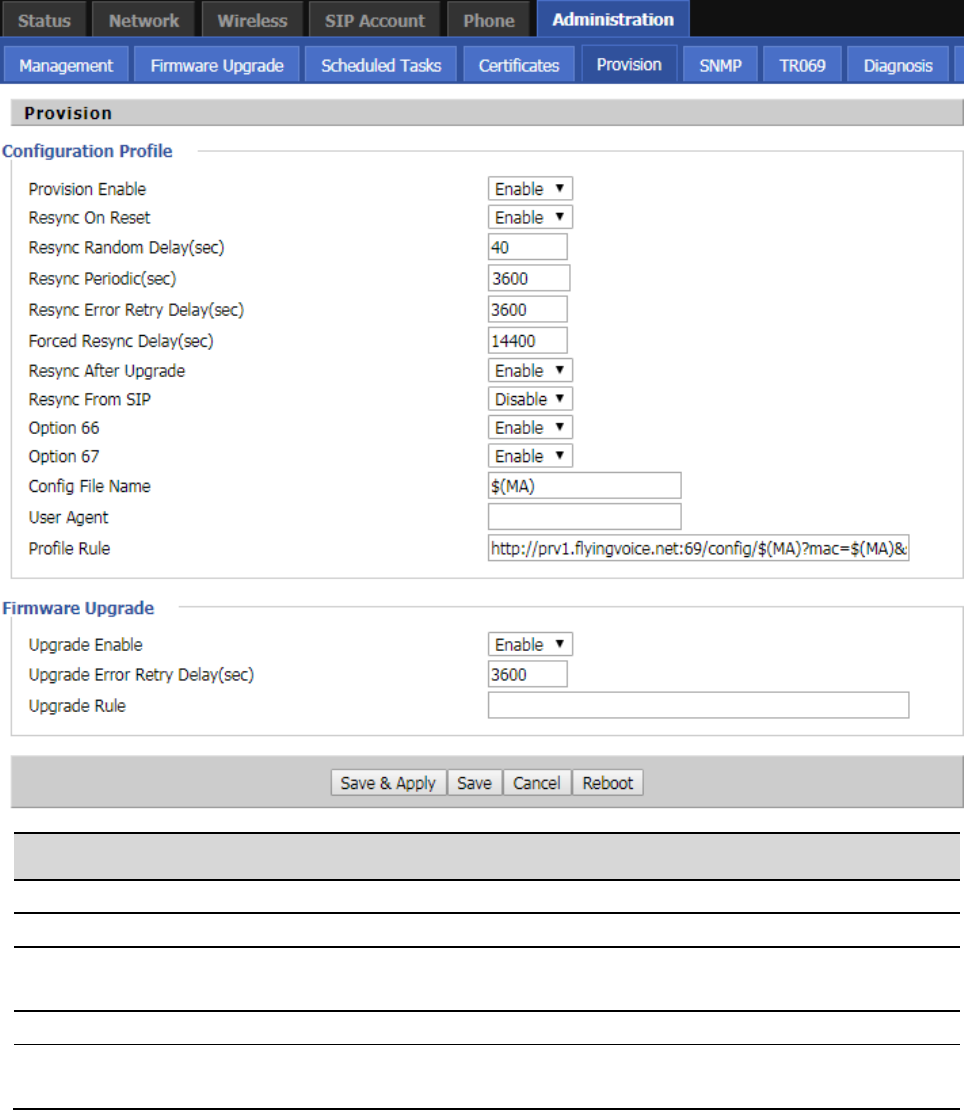
Web Configuration FIP16 User Manual
58
Provision
1) configuration allows the phone to automatically upgrade or automatically configure.
2) Phone support provides three ways: TFTP, HTTP and HTTPS.
Before testing or using TFTP, the user should have a TFTP server and upgrade files and configuration files.
Before testing or using HTTP, the user should have an HTTP server and upgrade files and configuration files.
Before testing or using HTTPS, the user should have HTTPS servers and upgrade files and configuration files and
CA certificate files (should be the same for the https server) and client certificate files and private key files.
3) The user can upload the CA certificate file and the client certificate file and the private key file management /
certificate management page of the device.
4) For details, please refer to the file Provision user manual.
Parameters name
Description
Provision Enable
Whether provisioning is enabled
Resync On Reset
Whether DIV378 is restarted after restarting
Resync Random Delay(sec)
Set the maximum delay for requesting a synchronization file, which
defaults to 40
Resync Periodic(sec)
Set the timing resynchronization, the default is 3600 seconds
Resync Error Retry Delay(sec)
If the last resynchronization is a failure, after the "Resync Error Retry
Delay" time, ATA will retry the resynchronization, defaulting to 3600
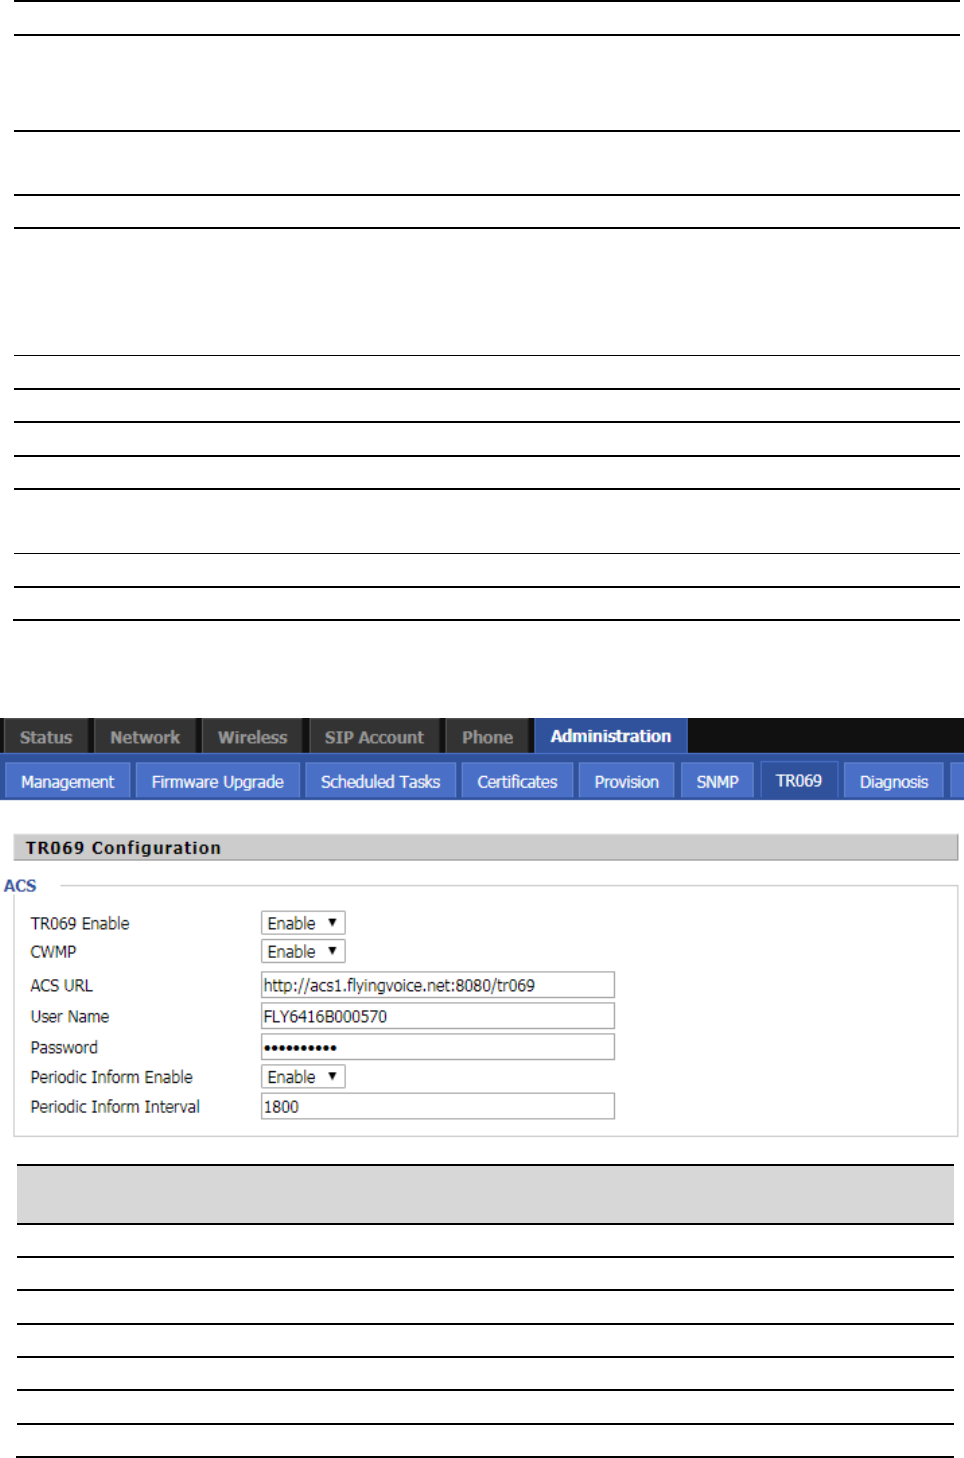
Web Configuration FIP16 User Manual
59
TR069
seconds
Forced Resync Delay(sec)
If the time to re-sync, but ATA is busy, in this case, ATA will wait for
some time, the longest is the "forced resynchronization delay", the
default is 14400s, after time, ATA will be forced to re-sync
Resync After Upgrade
After re-synchronization, whether to enable the firmware update
function, the default is enable
Resync From SIP
Whether to enable resynchronization from SIP
Option 66
It is only used in the company within the provisions of the model.
When using TFTP with option 66 to implement the configuration, the
user must enter the correct profile name on the ATA web page. When
option 66 is disabled, this parameter does not work
Option 67
Whether to enable Option 67
Config File Name
Configuration file name
User Agent
Set the user agent
Profile Rule
The URL of the configuration file
Upgrade Enable
Note that the specified file path is relative to the root directory of the
TFTP server
Upgrade Error Retry Delay(sec)
Turn on or off
Upgrade Rule
Set the upgrade error retry delay interval, the default 3600 seconds
Parameters name
Description
TR069 Enable
Whether TR069 is enabled
CWMP
Whether CWMP is enabled
ACS URL
TR069 the server's URL, the default for the Fahrenheit ACS server address
User Name
The user name for the TR069 server connection
Password
The password for the TR069 server connection
Periodic Inform Enable
Whether to enable periodic information
Periodic Inform Interval
TR069 The interval at which the server sends information

Web Configuration FIP16 User Manual
60
User Name
TR069 The user name of the server connected to the phone
Password
TR069 The password for the server to connect to the phone

Common Troubleshooting FIP16 User Manual
61
This section provides a solution to the problems that may arise during the installation and operation of IP
telephones.
· The power is not reflected
· No dial tone
· Can not make a call
· Can not receive phone calls
· no sound in the call
· can not log in
· forget password
Chapter 5 Common Troubleshooting
Common Troubleshooting FIP16 User Manual
62
The power is not reflected
solution:
Check that the the phone have enough .
No dial tone
solution:
Check that the telephone wiring and telephone line order are properly connected.
Can not make a call
solution:
Check if the server supports the current audio codec type, or contact your administrator, vendor, or ITSP for more
information or assistance.
Can not receive phone calls
solution:
Check if the server supports the current audio codec type, or contact your administrator, vendor, or ITSP for more
information or assistance.
No sound in the call
solution:
Check if the server supports the current audio codec type, or contact your administrator, vendor, or ITSP for more
information or assistance.
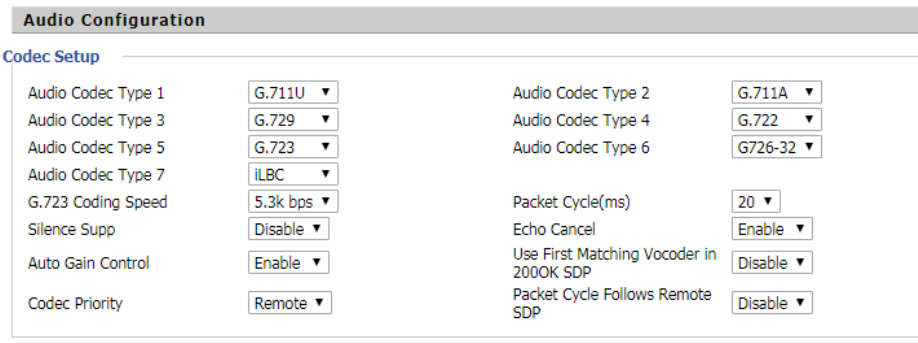
Common Troubleshooting FIP16 User Manual
63
Can’t login Web page
solution:
Check that the Ethernet cable is properly connected.
Check whether the URL is correct, URL format: http: // IP address.
Check if your firewall / NAT settings are correct.
If the IE version is checked by IE8, or use another browser such as Firefox or Mozilla, or contact your
administrator, vendor or ITSP for more information or assistance.
Forget password
The default password for the site and menu is admin.
If the user changes the password and then forget, you can not access the configuration site or menu item that
requires the password.
solution:
use “#*06#” to factory reset.(Press 23646 to confirm)
If you choose the factory default, you will return to the original factory settings for the phone and will delete all
current settings, including system logs and call records.

Common Troubleshooting FIP16 User Manual
64
FCC Statement
This device complies with Part 15 of the FCC rules. Operation is subject to the following two conditions: 1) this
device may not cause harmful interference, and 2) this device must accept any interference received, including
interference that may cause undesired operation.
Note: This equipment has been tested and found to comply with the limits for a Class B digital device, pursuant to
part 15 of the FCC Rules. These limits are designed to provide reasonable protection against harmful interference
in a residential installation. This equipment generates uses and can radiate radio frequency energy and, if not
installed and used in accordance with the instructions, may cause harmful interference to radio communications.
However, there is no guarantee that interference will not occur in particular installation. If this equipment does
cause harmful interference to radio or television reception, which can be determined by turning the equipment off
and on, the user is encouraged to try to correct the interference by one or more of the following measures:
--Reorient or relocate the receiving antenna.
--Increase the separation between the equipment and receiver.
--Connect the equipment into an outlet on a circuit different from that to which the receiver is connected.
--Consult the dealer or an experienced radio/TV technician for help.
Changes or modifications not expressly approved by the party responsible for compliance could void the user’s
authority to operate the equipment.
FCC Radiation Exposure Statement
This device complies with FCC RF radiation exposure limits set forth for an uncontrolled environment. This
transmitter must not be co-located or operating in conjunction with any other antenna or transmitter.