Foreign Trade Technocel T110 TYLT Vu Solo User Manual IC3603 TYLT VU Solo Guide ai
Foreign Trade Corporation dba. Technocel TYLT Vu Solo IC3603 TYLT VU Solo Guide ai
UserManual.wiki
>
Foreign Trade Technocel
>
T110 User Manual
User Manual
Navigation menu
Upload a User Manual
Namespaces
Wiki Guide
HTML
PDF
Info
Views
User Manual
Discussion / Help
Navigation
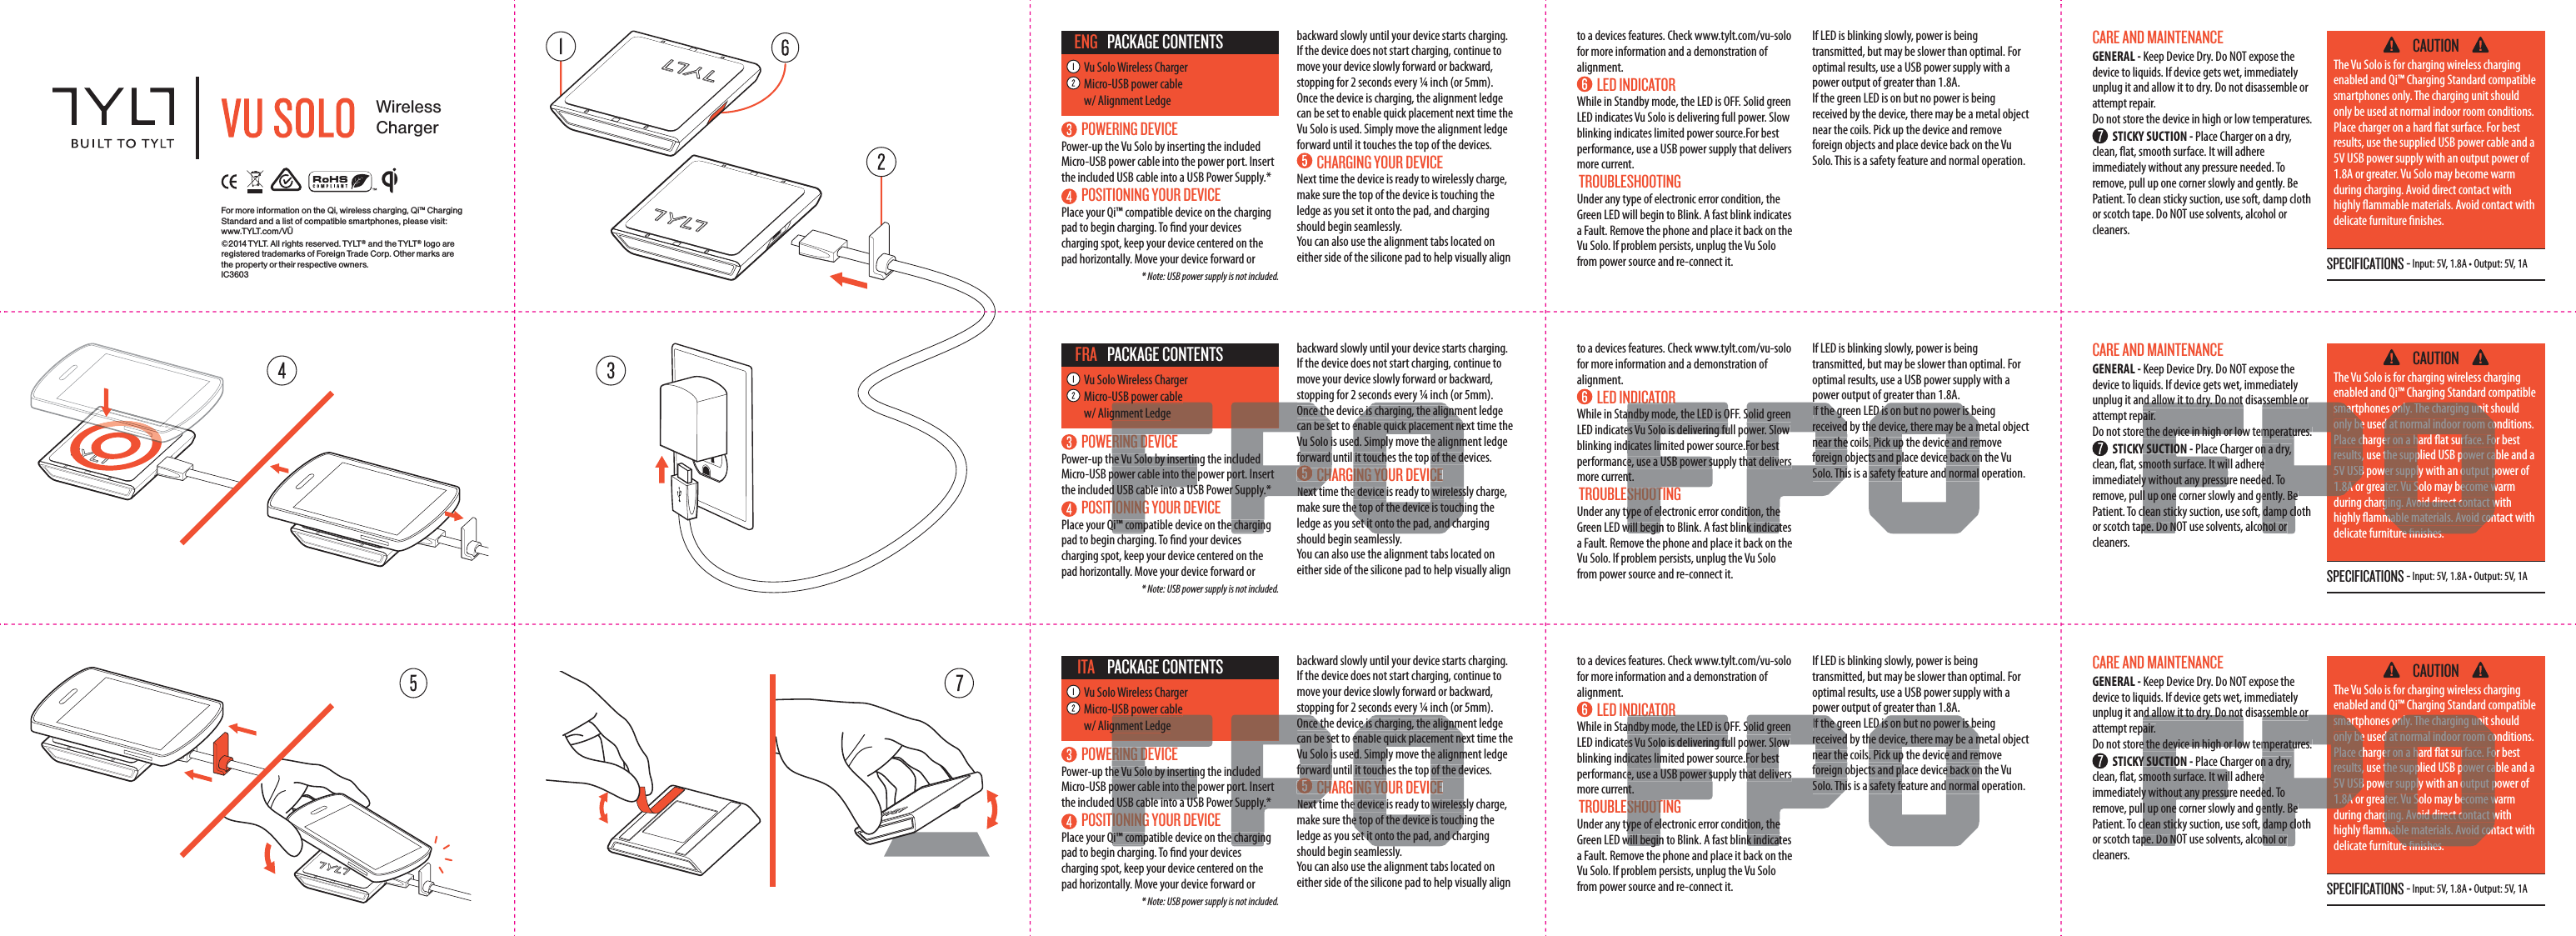
![FCC InformationThis equipment has been tested and found to comply with the limits for a Class B digital device, pursuant to Part 15 of the FCC Rules. These limits are designed to provide reasonable protection against harmful interference in a residential installation. This equipment generates, uses and can radiate radio frequency energy and, if not installed and used in accordance with the instructions, may cause harmful interference to radio communications. However, there is no guarantee that interference will not occur in a particular installation.If this equipment does cause harmful interference to radio or television reception, which can be determined by turning the equipment off and on, the user is encouraged to try to correct the interference by one or more of the following measures:• Reorient or relocate the receiving antenna.• Increase the separation between the equipment and receiver.• Connect the equipment into an outlet on a circuit different from that to which the receiver is connected.• Consult the dealer or an experienced radio/TV technician for help.This device complies with Part 15 of the FCC Rules [and with RSS-210 of Industry Canada].Operation is subject to the following two conditions:1. This device may not cause harmful interference.2. This device must accept any interference received, including interference that may cause undesired operation.To comply with FCC and other RF exposure requirements, please maintain a distance of 20cm between the charger and your body when in use.This transmitter must not be co-located or operating in conjunction with any other antenna or transmitter.Changes or modifications made to this equipment not expressly approved by the manufacturer may void the FCC authorization to operate this equipment.FCC ID: SZQ-T110 SPECIFICATIONS - Input: 5V, 1.8A • Output: 5V, 1A CAUTIONThe Vu Solo is for charging wireless charging enabled and Qi™ Charging Standard compatible smartphones only. The charging unit should only be used at normal indoor room conditions. Place charger on a hard at surface. For best results, use the supplied USB power cable and a 5V USB power supply with an output power of 1.8A or greater. Vu Solo may become warm during charging. Avoid direct contact with highly ammable materials. Avoid contact with delicate furniture nishes. CARE AND MAINTENANCE GENERAL - Keep Device Dry. Do NOT expose the device to liquids. If device gets wet, immediately unplug it and allow it to dry. Do not disassemble or attempt repair. Do not store the device in high or low temperatures. STICKY SUCTION - Place Charger on a dry, clean, at, smooth surface. It will adhere immediately without any pressure needed. To remove, pull up one corner slowly and gently. Be Patient. To clean sticky suction, use soft, damp cloth or scotch tape. Do NOT use solvents, alcohol or cleaners. POWERING DEVICEPower-up the Vu Solo by inserting the included Micro-USB power cable into the power port. Insert the included USB cable into a USB Power Supply.* POSITIONING YOUR DEVICEPlace your Qi™ compatible device on the charging pad to begin charging. To nd your devices charging spot, keep your device centered on the pad horizontally. Move your device forward or to a devices features. Check www.tylt.com/vu-solo for more information and a demonstration of alignment. LED INDICATORWhile in Standby mode, the LED is OFF. Solid green LED indicates Vu Solo is delivering full power. Slow blinking indicates limited power source.For best performance, use a USB power supply that delivers more current. TROUBLESHOOTINGUnder any type of electronic error condition, the Green LED will begin to Blink. A fast blink indicates a Fault. Remove the phone and place it back on the Vu Solo. If problem persists, unplug the Vu Solo from power source and re-connect it. If LED is blinking slowly, power is being transmitted, but may be slower than optimal. For optimal results, use a USB power supply with a power output of greater than 1.8A.If the green LED is on but no power is being received by the device, there may be a metal object near the coils. Pick up the device and remove foreign objects and place device back on the Vu Solo. This is a safety feature and normal operation. * Note: USB power supply is not included.Vu Solo Wireless ChargerMicro-USB power cable w/ Alignment LedgePACKAGE CONTENTSDEU backward slowly until your device starts charging.If the device does not start charging, continue to move your device slowly forward or backward, stopping for 2 seconds every ¼ inch (or 5mm).Once the device is charging, the alignment ledge can be set to enable quick placement next time the Vu Solo is used. Simply move the alignment ledge forward until it touches the top of the devices. CHARGING YOUR DEVICENext time the device is ready to wirelessly charge, make sure the top of the device is touching the ledge as you set it onto the pad, and charging should begin seamlessly. You can also use the alignment tabs located on either side of the silicone pad to help visually align SPECIFICATIONS - Input: 5V, 1.8A • Output: 5V, 1A CAUTIONThe Vu Solo is for charging wireless charging enabled and Qi™ Charging Standard compatible smartphones only. The charging unit should only be used at normal indoor room conditions. Place charger on a hard at surface. For best results, use the supplied USB power cable and a 5V USB power supply with an output power of 1.8A or greater. Vu Solo may become warm during charging. Avoid direct contact with highly ammable materials. Avoid contact with delicate furniture nishes. CARE AND MAINTENANCE GENERAL - Keep Device Dry. Do NOT expose the device to liquids. If device gets wet, immediately unplug it and allow it to dry. Do not disassemble or attempt repair. Do not store the device in high or low temperatures. STICKY SUCTION - Place Charger on a dry, clean, at, smooth surface. It will adhere immediately without any pressure needed. To remove, pull up one corner slowly and gently. Be Patient. To clean sticky suction, use soft, damp cloth or scotch tape. Do NOT use solvents, alcohol or cleaners. POWERING DEVICEPower-up the Vu Solo by inserting the included Micro-USB power cable into the power port. Insert the included USB cable into a USB Power Supply.* POSITIONING YOUR DEVICEPlace your Qi™ compatible device on the charging pad to begin charging. To nd your devices charging spot, keep your device centered on the pad horizontally. Move your device forward or to a devices features. Check www.tylt.com/vu-solo for more information and a demonstration of alignment. LED INDICATORWhile in Standby mode, the LED is OFF. Solid green LED indicates Vu Solo is delivering full power. Slow blinking indicates limited power source.For best performance, use a USB power supply that delivers more current. TROUBLESHOOTINGUnder any type of electronic error condition, the Green LED will begin to Blink. A fast blink indicates a Fault. Remove the phone and place it back on the Vu Solo. If problem persists, unplug the Vu Solo from power source and re-connect it. If LED is blinking slowly, power is being transmitted, but may be slower than optimal. For optimal results, use a USB power supply with a power output of greater than 1.8A.If the green LED is on but no power is being received by the device, there may be a metal object near the coils. Pick up the device and remove foreign objects and place device back on the Vu Solo. This is a safety feature and normal operation. * Note: USB power supply is not included.Vu Solo Wireless ChargerMicro-USB power cable w/ Alignment LedgePACKAGE CONTENTSESP backward slowly until your device starts charging.If the device does not start charging, continue to move your device slowly forward or backward, stopping for 2 seconds every ¼ inch (or 5mm).Once the device is charging, the alignment ledge can be set to enable quick placement next time the Vu Solo is used. Simply move the alignment ledge forward until it touches the top of the devices. CHARGING YOUR DEVICENext time the device is ready to wirelessly charge, make sure the top of the device is touching the ledge as you set it onto the pad, and charging should begin seamlessly. You can also use the alignment tabs located on either side of the silicone pad to help visually align SPECIFICATIONS - Input: 5V, 1.8A • Output: 5V, 1A CAUTIONThe Vu Solo is for charging wireless charging enabled and Qi™ Charging Standard compatible smartphones only. The charging unit should only be used at normal indoor room conditions. Place charger on a hard at surface. For best results, use the supplied USB power cable and a 5V USB power supply with an output power of 1.8A or greater. Vu Solo may become warm during charging. Avoid direct contact with highly ammable materials. Avoid contact with delicate furniture nishes. CARE AND MAINTENANCE GENERAL - Keep Device Dry. Do NOT expose the device to liquids. If device gets wet, immediately unplug it and allow it to dry. Do not disassemble or attempt repair. Do not store the device in high or low temperatures. STICKY SUCTION - Place Charger on a dry, clean, at, smooth surface. It will adhere immediately without any pressure needed. To remove, pull up one corner slowly and gently. Be Patient. To clean sticky suction, use soft, damp cloth or scotch tape. Do NOT use solvents, alcohol or cleaners. POWERING DEVICEPower-up the Vu Solo by inserting the included Micro-USB power cable into the power port. Insert the included USB cable into a USB Power Supply.* POSITIONING YOUR DEVICEPlace your Qi™ compatible device on the charging pad to begin charging. To nd your devices charging spot, keep your device centered on the pad horizontally. Move your device forward or to a devices features. Check www.tylt.com/vu-solo for more information and a demonstration of alignment. LED INDICATORWhile in Standby mode, the LED is OFF. Solid green LED indicates Vu Solo is delivering full power. Slow blinking indicates limited power source.For best performance, use a USB power supply that delivers more current. TROUBLESHOOTINGUnder any type of electronic error condition, the Green LED will begin to Blink. A fast blink indicates a Fault. Remove the phone and place it back on the Vu Solo. If problem persists, unplug the Vu Solo from power source and re-connect it. If LED is blinking slowly, power is being transmitted, but may be slower than optimal. For optimal results, use a USB power supply with a power output of greater than 1.8A.If the green LED is on but no power is being received by the device, there may be a metal object near the coils. Pick up the device and remove foreign objects and place device back on the Vu Solo. This is a safety feature and normal operation. * Note: USB power supply is not included.Vu Solo Wireless ChargerMicro-USB power cable w/ Alignment LedgePACKAGE CONTENTSPRT backward slowly until your device starts charging.If the device does not start charging, continue to move your device slowly forward or backward, stopping for 2 seconds every ¼ inch (or 5mm).Once the device is charging, the alignment ledge can be set to enable quick placement next time the Vu Solo is used. Simply move the alignment ledge forward until it touches the top of the devices. CHARGING YOUR DEVICENext time the device is ready to wirelessly charge, make sure the top of the device is touching the ledge as you set it onto the pad, and charging should begin seamlessly. You can also use the alignment tabs located on either side of the silicone pad to help visually align RING Dhe Vu Solo by insertinpower cable into the d USB cable into a USTIONINGQi™ comppgnment Ledgencluded port. Insertr Supply.* e charginOnce thcan be seVu Solo iforward CHNext tyce is charging, the alignmenable quick placement need. Simply move the alignmit touches the top of the dING YOUR DEVICEe device is ready to wirelesse top of the device is touchet it onto the pad, and chNDICATORndby mode, the LED is Oes Vu Solo is delivering fuicates lime, use a USB power snt. SHOOType of elwill beginSolid greenower. Slow For besthat deliverstion, thek indicatpIf the grreceivednear theforeign oSolo. ThiED is on but no power is bhe device, there may be a m. Pick up the device and remts and place device back onsafety feature and normalnd allow it to dry. Do not air.e the device in high or lowY SUCTIOmooth surface. It wiy without any pressul up onelean sticpe. Do Nsmartonly bePlace cresults,5V USB1.8A ossemble ormperatures. n a dry, e ed. Toently. Be damp clhol or only. The charging unitd at normal indoor room coer on a hard at surface. Fothe supplied USB power cawer supply with an output pater. Vu Solo may become wging. Avoid direct contact wmable materials. Avoid conre nishesRING Dhe Vu Solo by insertinpower cable into the d USB cable into a USTIONINGQi™ comppgnment Ledgencluded port. Insertr Supply.* e charginOnce thcan be seVu Solo iforward CHNext tyce is charging, the alignmenable quick placement need. Simply move the alignmit touches the top of the dING YOUR DEVICEe device is ready to wirelesse top of the device is touchet it onto the pad, and chNDICATORndby mode, the LED is Oes Vu Solo is delivering fuicates lime, use a USB power snt. SHOOType of elwill beginSolid greenower. Slow For besthat deliverstion, thek indicatpIf the grreceivednear theforeign oSolo. ThiED is on but no power is bhe device, there may be a m. Pick up the device and remts and place device back onsafety feature and normalnd allow it to dry. Do not air.e the device in high or lowY SUCTIOmooth surface. It wiy without any pressul up onelean sticpe. Do Nsmartonly bePlace cresults,5V USB1.8A ossemble ormperatures. n a dry, e ed. Toently. Be damp clhol or only. The charging unitd at normal indoor room coer on a hard at surface. Fothe supplied USB power cawer supply with an output pater. Vu Solo may become wging. Avoid direct contact wmable materials. Avoid conre nishesRING Dhe Vu Solo by insertinpower cable into the d USB cable into a USTIONINGQi™ comppgnment Ledgencluded port. Insertr Supply.* e charginOnce thcan be seVu Solo iforward CHNext tyce is charging, the alignmenable quick placement need. Simply move the alignmit touches the top of the dING YOUR DEVICEe device is ready to wirelesse top of the device is touchet it onto the pad, and chNDICATORndby mode, the LED is Oes Vu Solo is delivering fuicates lime, use a USB power snt. SHOOType of elwill beginSolid greenower. Slow For besthat deliverstion, thek indicatpIf the grreceivednear theforeign oSolo. ThiED is on but no power is bhe device, there may be a m. Pick up the device and remts and place device back onsafety feature and normalnd allow it to dry. Do not air.e the device in high or lowY SUCTIOmooth surface. It wiy without any pressul up onelean sticpe. Do Nsmartonly bePlace cresults,5V USB1.8A ossemble ormperatures. n a dry, e ed. Toently. Be damp clhol or only. The charging unitd at normal indoor room coer on a hard at surface. Fothe supplied USB power cawer supply with an output pater. Vu Solo may become wging. Avoid direct contact wmable materials. Avoid conre nishes](https://usermanual.wiki/Foreign-Trade-Technocel/T110/User-Guide-2397344-Page-2.png)