Fortinet 3045 FORTIWIFI-50B User Manual Part Two
Fortinet Inc. FORTIWIFI-50B Part Two
UserManual.wiki
>
Fortinet
>
3045 User Manual
>
User Manual Part Two
Contents
1.
User Manual Part One
2.
User Manual Part Two
User Manual Part Two
Navigation menu
Upload a User Manual
Namespaces
Wiki Guide
HTML
PDF
Info
Views
User Manual
Discussion / Help
Navigation


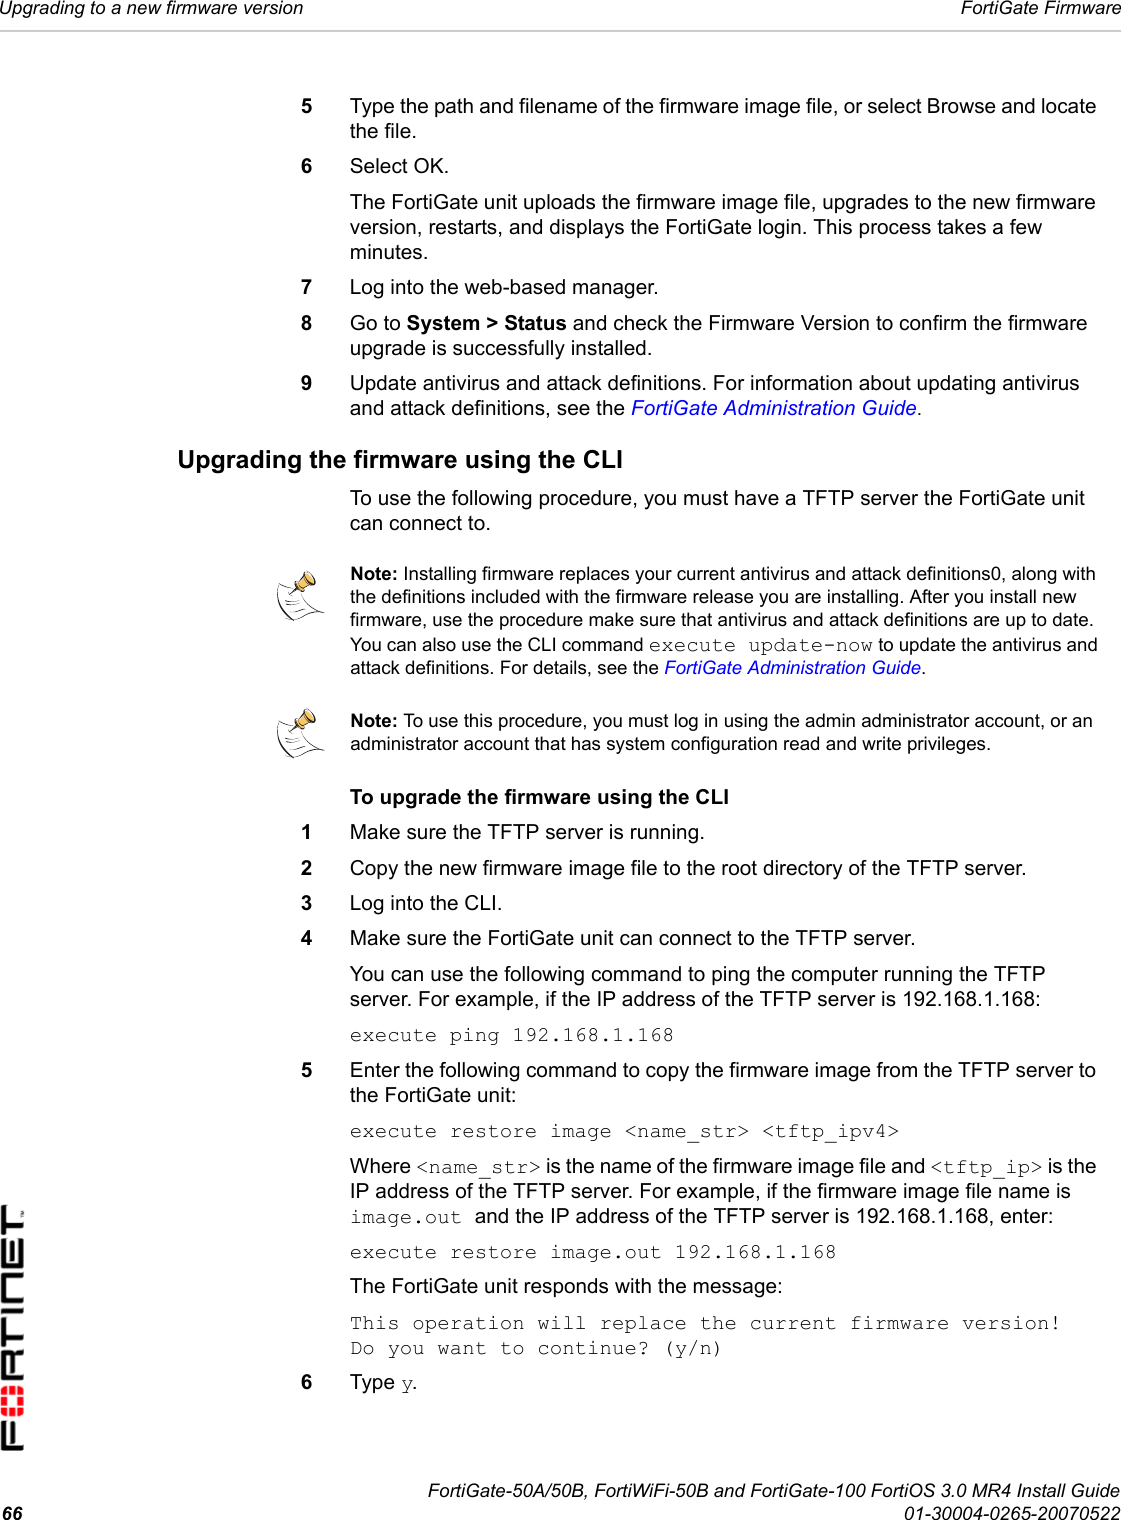
![FortiGate Firmware Installing firmware images from a system reboot using the CLIFortiGate-50A/50B, FortiWiFi-50B and FortiGate-100 FortiOS 3.0 MR4 Install Guide01-30004-0265-20070522 716Enter the following command to restart the FortiGate unit:execute rebootThe FortiGate unit responds with the following message:This operation will reboot the system !Do you want to continue? (y/n)7Type y.As the FortiGate units starts, a series of system startup messages is displayed.When one of the following messages appears:• FortiGate unit running v2.x BIOSPress Any Key To Download Boot Image. ...• FortiGate unit running v3.x BIOSPress any key to display configuration menu.......Immediately press any key to interrupt the system startup.If you successfully interrupt the startup process, one of the following messages appears:• FortiGate unit running v2.x BIOSEnter TFTP Server Address [192.168.1.168]:Go to step 9.• FortiGate unit running v3.x BIOS[G]: Get firmware image from TFTP server.[F]: Format boot device.[Q]: Quit menu and continue to boot with default firmware.[H]: Display this list of options.Enter G,F,Q,or H:8Type G to get the new firmware image from the TFTP server.The following message appears:Enter TFTP server address [192.168.1.168]:9Type the address of the TFTP server and press Enter.The following message appears:Enter Local Address [192.168.1.188]:10 Type an IP address that can be used by the FortiGate unit to connect to the FTP server.The IP address can be any IP address that is valid for the network the interface is connected to. Make sure you do not enter the IP address of another device on this network.The following message appears:Enter File Name [image.out]:Note: You have only 3 seconds to press any key. If you do not press a key soon enough, the FortiGate unit reboots and you must log in and repeat the execute reboot command.](https://usermanual.wiki/Fortinet/3045.User-Manual-Part-Two/User-Guide-803671-Page-31.png)
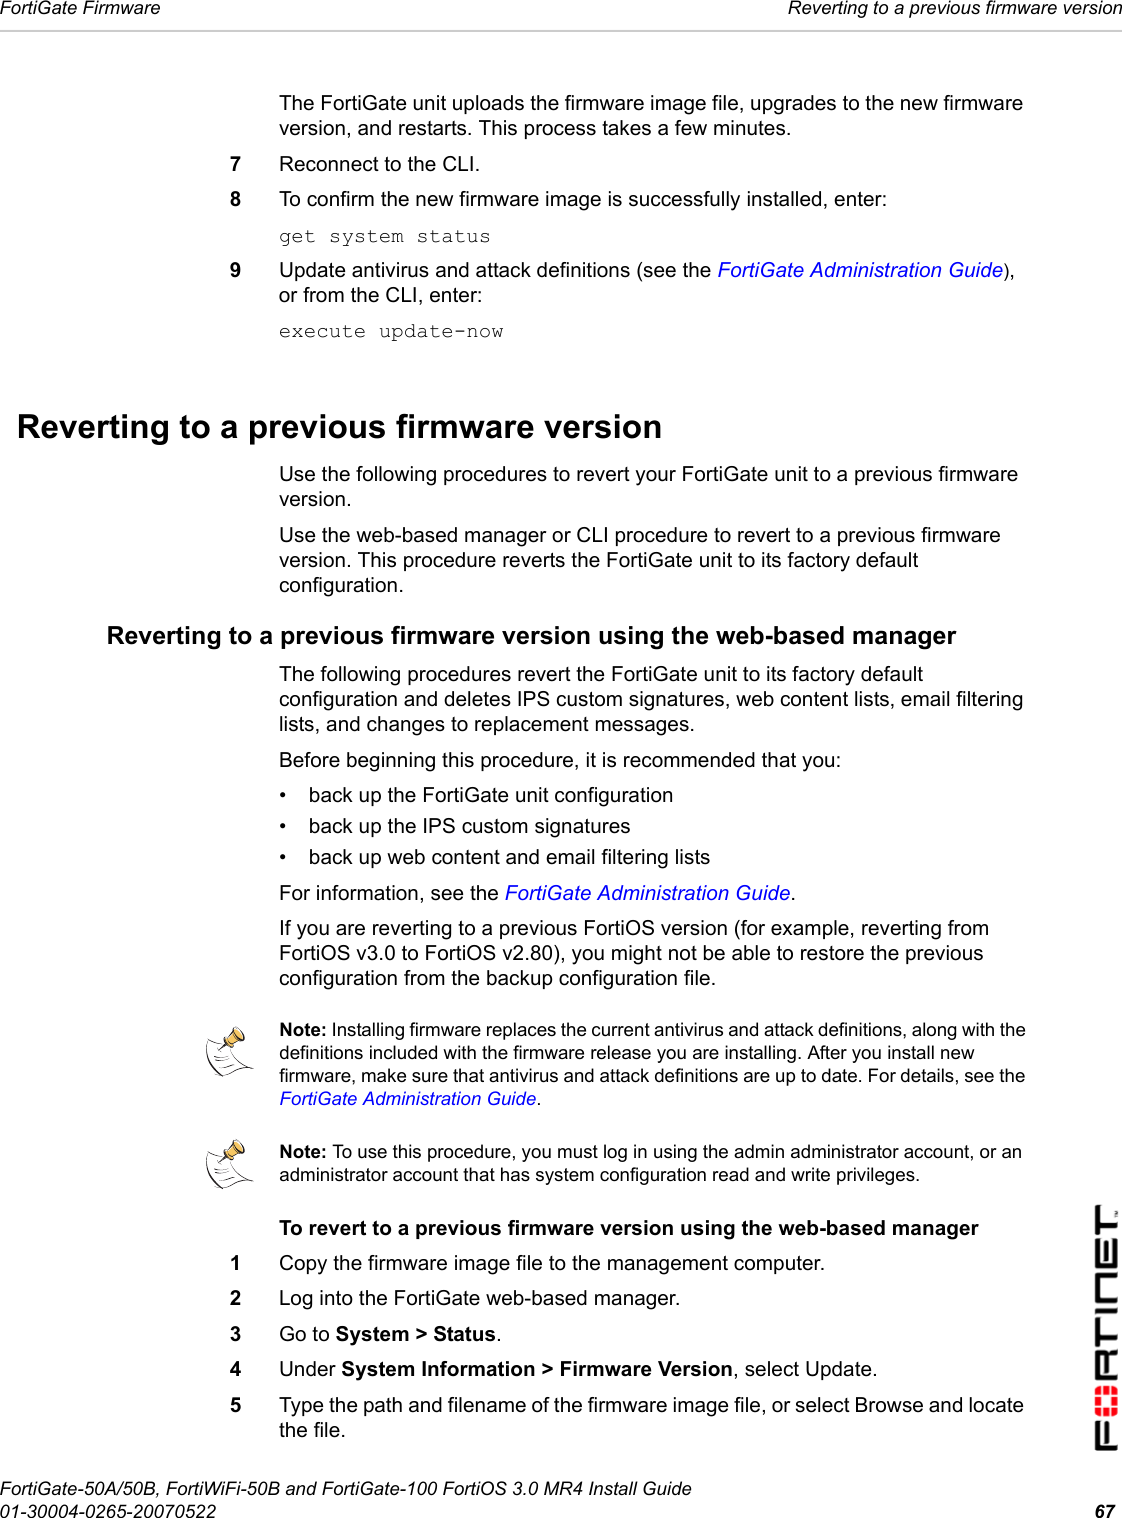
![FortiGate-50A/50B, FortiWiFi-50B and FortiGate-100 FortiOS 3.0 MR4 Install Guide72 01-30004-0265-20070522Installing firmware images from a system reboot using the CLI FortiGate Firmware11 Enter the firmware image filename and press Enter.The TFTP server uploads the firmware image file to the FortiGate unit and messages similar to the following are displayed:• FortiGate unit running v2.x BIOSDo You Want To Save The Image? [Y/n]Type Y.• FortiGate unit running v3.x BIOSSave as Default firmware/Run image without saving:[D/R]orSave as Default firmware/Backup firmware/Run image without saving:[D/B/R]12 Type D.The FortiGate unit installs the new firmware image and restarts. The installation might take a few minutes to complete.Restoring the previous configurationChange the internal interface address, if required. You can do this from the CLI using the following command:config system interfaceedit internalset ip <address_ipv4mask>set allowaccess {ping https ssh telnet http}endAfter changing the interface address, you can access the FortiGate unit from the web-based manager and restore the configuration.For more information, see the FortiGate Administration Guide.If you are reverting to a previous firmware version (for example, reverting from FortiOS v3.0 to FortiOS v2.80), you might not be able to restore your previous configuration from the backup up configuration file.](https://usermanual.wiki/Fortinet/3045.User-Manual-Part-Two/User-Guide-803671-Page-32.png)
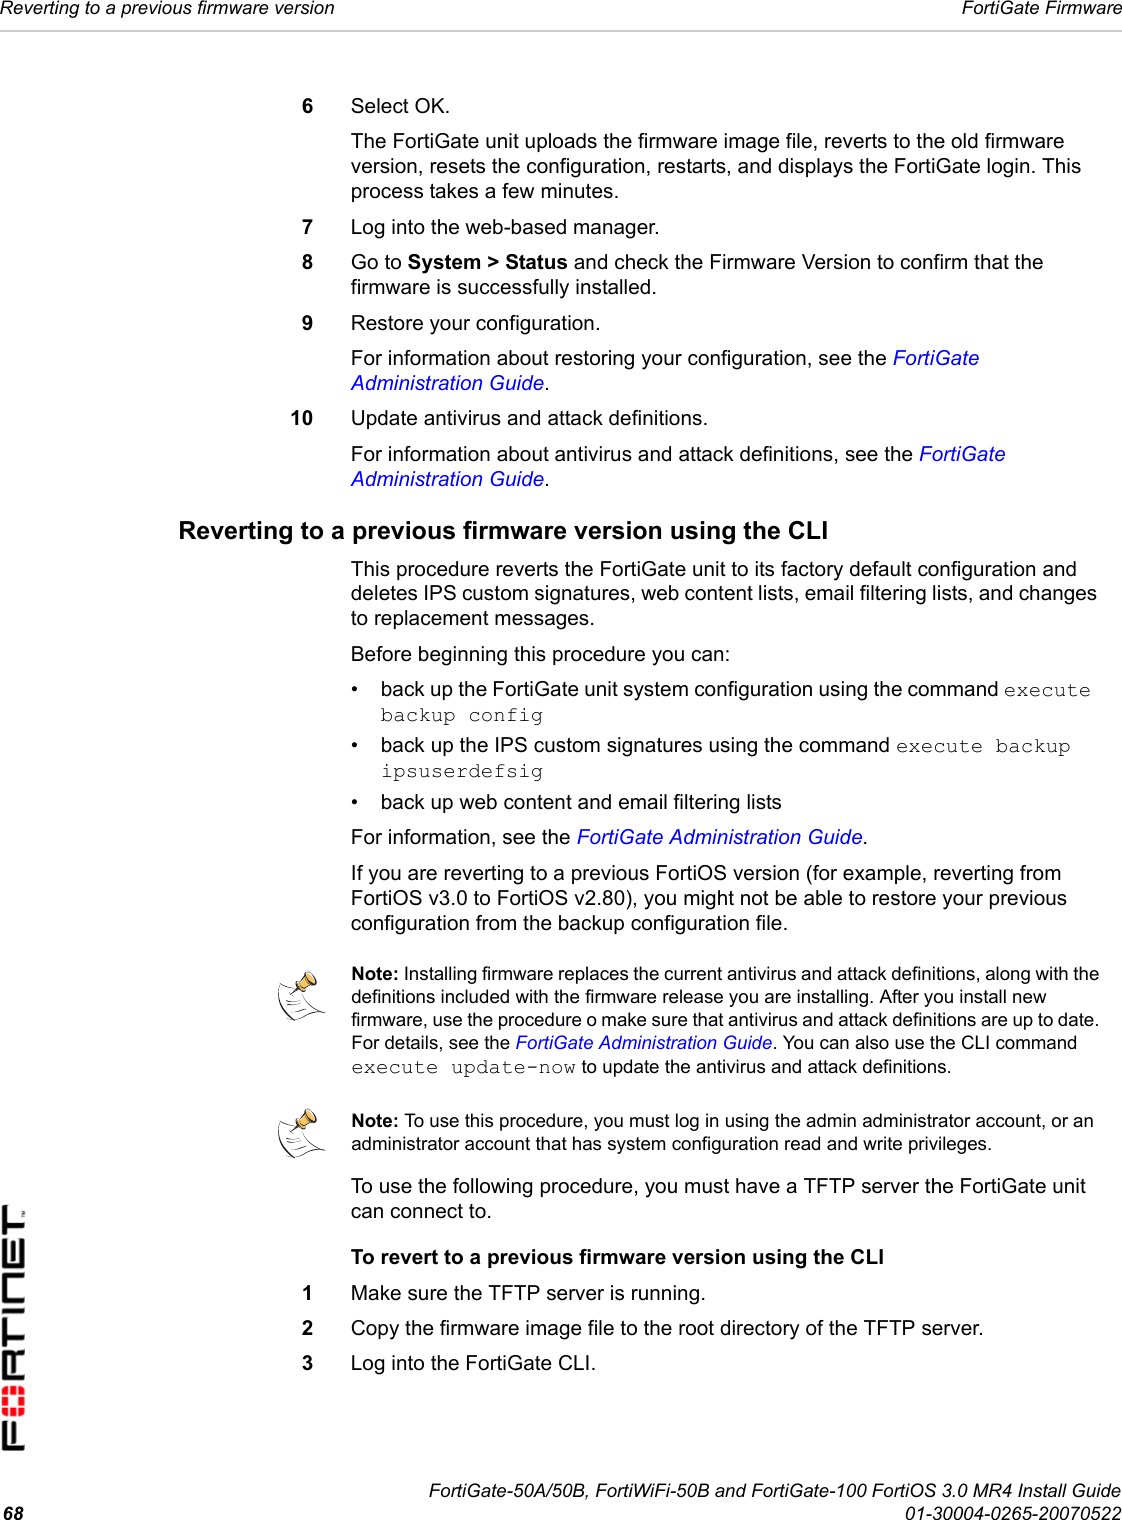
![FortiGate-50A/50B, FortiWiFi-50B and FortiGate-100 FortiOS 3.0 MR4 Install Guide76 01-30004-0265-20070522Testing a new firmware image before installing it FortiGate Firmware4Make sure the internal interface is connected to the same network as the TFTP server.You can use the following command to ping the computer running the TFTP server. For example, if the TFTP server's IP address is 192.168.1.168:execute ping 192.168.1.1685Enter the following command to restart the FortiGate unit:execute reboot6As the FortiGate unit reboots, press any key to interrupt the system startup.As the FortiGate units starts, a series of system startup messages are displayed.When one of the following messages appears:• FortiGate unit running v2.x BIOSPress Any Key To Download Boot Image. ...• FortiGate unit running v3.x BIOSPress any key to display configuration menu........7Immediately press any key to interrupt the system startup.If you successfully interrupt the startup process, one of the following messages appears:• FortiGate unit running v2.x BIOSEnter TFTP Server Address [192.168.1.168]:Go to step 9.• FortiGate unit running v3.x BIOS[G]: Get firmware image from TFTP server.[F]: Format boot device.[Q]: Quit menu and continue to boot with default firmware.[H]: Display this list of options.Enter G,F,Q,or H:8Type G to get the new firmware image from the TFTP server.The following message appears:Enter TFTP server address [192.168.1.168]:9Type the address of the TFTP server and press Enter.The following message appears:Enter Local Address [192.168.1.188]:Note: You have only 3 seconds to press any key. If you do not press a key soon enough, the FortiGate unit reboots and you must log in and repeat the execute reboot command.](https://usermanual.wiki/Fortinet/3045.User-Manual-Part-Two/User-Guide-803671-Page-36.png)
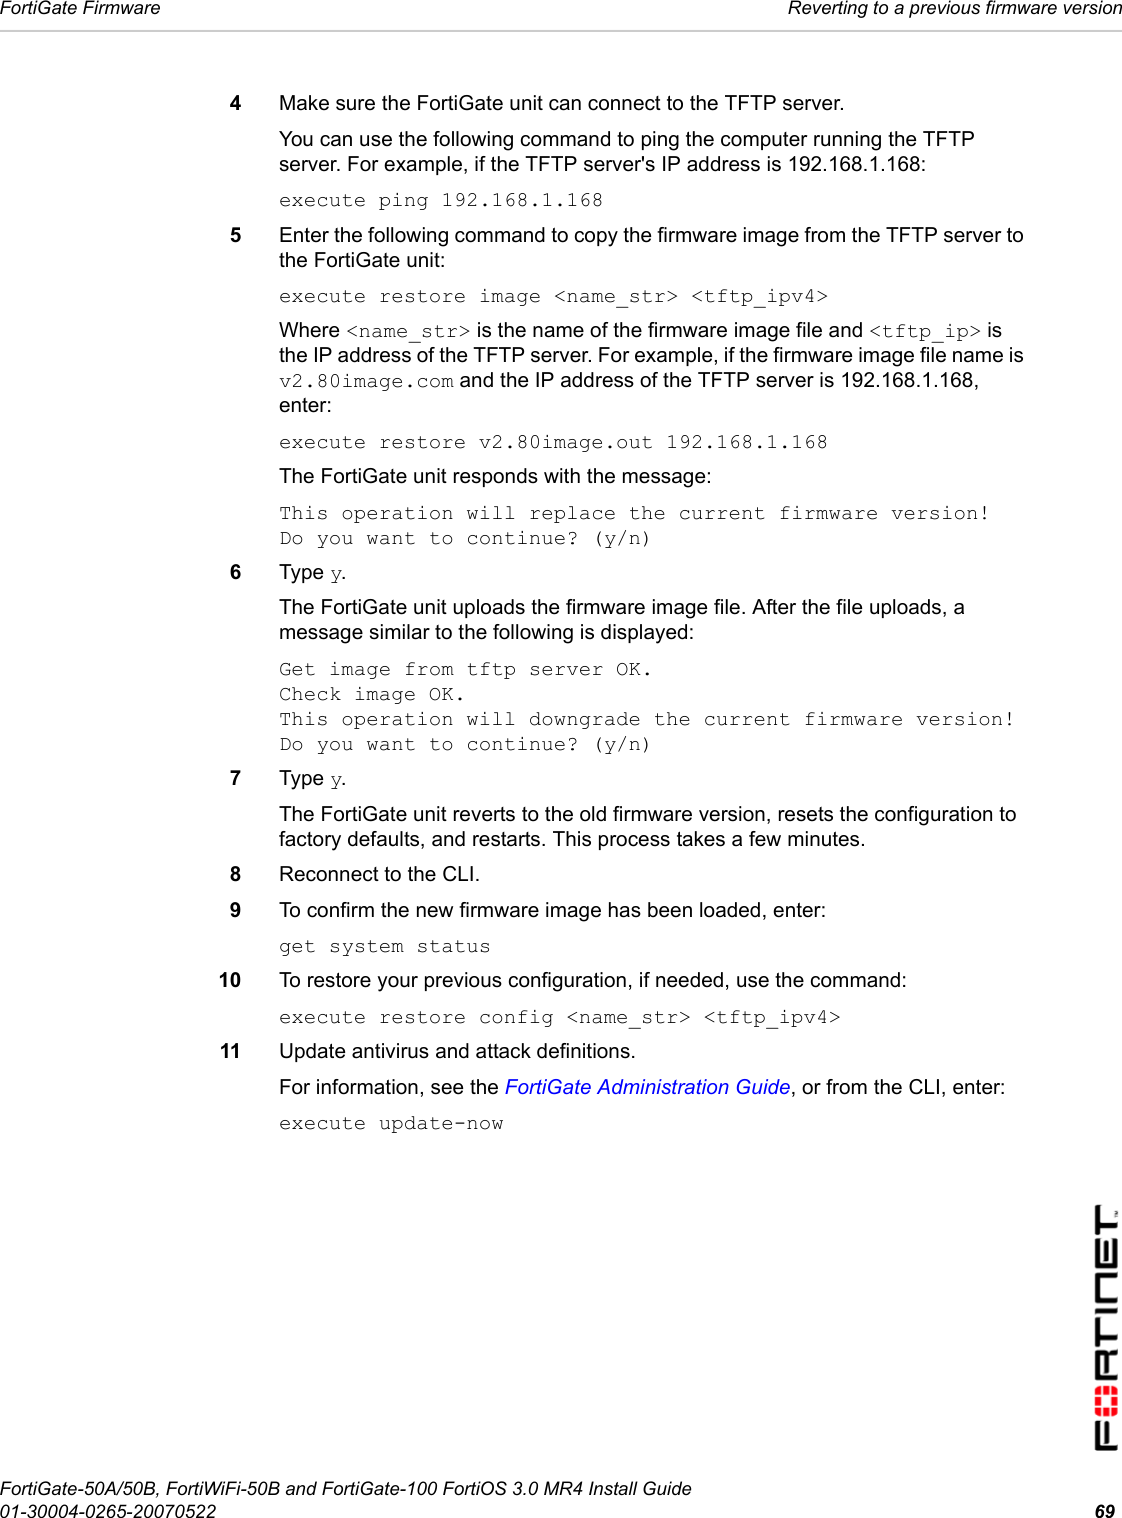
![FortiGate Firmware Installing and using a backup firmware imageFortiGate-50A/50B, FortiWiFi-50B and FortiGate-100 FortiOS 3.0 MR4 Install Guide01-30004-0265-20070522 7710 Type an IP address that can be used by the FortiGate unit to connect to the FTP server.The IP address can be any IP address that is valid for the network the interface is connected to. Make sure you do not enter the IP address of another device on this network.The following message appears:Enter File Name [image.out]:11 Enter the firmware image file name and press Enter.The TFTP server uploads the firmware image file to the FortiGate unit and messages similar to the following appear.• FortiGate unit running v2.x BIOSDo You Want To Save The Image? [Y/n]Type N.• FortiGate unit running v3.x BIOSSave as Default firmware/Run image without saving:[D/R]orSave as Default firmware/Backup firmware/Run image without saving:[D/B/R]12 Type R.The FortiGate image is installed to system memory and the FortiGate unit starts running the new firmware image but with its current configuration. 13 You can log into the CLI or the web-based manager using any administrative account.14 To confirm the new firmware image has been loaded, from the CLI enter:get system statusYou can test the new firmware image as required.Installing and using a backup firmware imageIf the FortiGate unit is running BIOS version v3.x, you can install a backup firmware image. Once the backup firmware image is installed you can switch to this backup image when required.Installing a backup firmware imageTo run this procedure you:The following procedures are specific to the FortiGate-100, FortiGate-50B and FortiWiFi-50B.10050BWiFi-50B](https://usermanual.wiki/Fortinet/3045.User-Manual-Part-Two/User-Guide-803671-Page-37.png)
![FortiGate-50A/50B, FortiWiFi-50B and FortiGate-100 FortiOS 3.0 MR4 Install Guide78 01-30004-0265-20070522Installing and using a backup firmware image FortiGate Firmware• Access the CLI by connecting to the FortiGate console port using a RJ-45 to DB-9 serial cable or null-modem cable.• Install a TFTP server that you can connect to from the FortiGate as described in the procedure “Installing firmware images from a system reboot using the CLI” on page 70.To install a backup firmware image1Connect to the CLI using a RJ-45 or DB-9 serial cable or a null-modem cable and FortiGate console port.2Make sure the TFTP server is running.3Copy the new firmware image file to the root directory of your TFTP server.4To confirm the FortiGate unit can connect to the TFTP server, use the following command to ping the computer running the TFTP server. For example, if the IP address of the TFTP server is 192.168.1.168:execute ping 192.168.1.1685Enter the following command to restart the FortiGate unit:execute rebootAs the FortiGate unit starts, a series of system startup messages are displayed.When of the following message appears:Press any key to enter configuration menu........6Immediately press any key to interrupt the system startup.If you successfully interrupt the startup process, the following message appears:[G]: Get firmware image from TFTP server.[F]: Format boot device.[Q]: Quit menu and continue to boot with default firmware.[H]: Display this list of options.Enter G,F,Q,or H:7Type G to get the new firmware image from the TFTP server.The following message appears:Enter TFTP server address [192.168.1.168]:8Type the address of the TFTP server and press Enter.The following message appears:Enter Local Address [192.168.1.188]:Note: You have only 3 seconds to press any key. If you do not press a key soon enough, the FortiGate unit reboots and you must log in and repeat the execute reboot command.](https://usermanual.wiki/Fortinet/3045.User-Manual-Part-Two/User-Guide-803671-Page-38.png)
![FortiGate Firmware Installing and using a backup firmware imageFortiGate-50A/50B, FortiWiFi-50B and FortiGate-100 FortiOS 3.0 MR4 Install Guide01-30004-0265-20070522 799Type an IP address that can be used by the FortiGate unit to connect to the FTP server.The IP address can be any IP address that is valid for the network the interface is connected to. Make sure you do not enter the IP address of another device on this network.The following message appears:Enter File Name [image.out]:10 Enter the firmware image file name and press Enter.The TFTP server uploads the firmware image file to the FortiGate unit and the following message is displayed.Save as Default firmware/Backup firmware/Run image without saving:[D/B/R]11 Type B.The FortiGate unit saves the backup firmware image and restarts. When the FortiGate unit restarts it is running the previously installed firmware version.](https://usermanual.wiki/Fortinet/3045.User-Manual-Part-Two/User-Guide-803671-Page-39.png)