Four Seas Global Link Network Technology COMFAST88 Wireless Adapter User Manual RNX MiniN1 User Manual
Shenzhen Four Seas Global Link Network Technology Co., Ltd Wireless Adapter RNX MiniN1 User Manual
user manual


Wireless Adapter
FCC STATEMENT
This equipment has been tested and found to comply with the limits for a Class B digital device, pursuant to part 15 of the FCC
Rules. These limits are designed to pro-vide reasonable protection against harmful interference in a residential installation. This
equipment generates, uses and can radiate radio frequency energy and, if not in-stalled and used in accordance with the
instructions, may cause harmful interference to radio communications. However, there is no guarantee that interference will not
occur in a particular installation. If this equipment does cause harmful interference to radio or television reception, which can be
determined by turning the equipment off and on, the user is encouraged to try to correct the interference by one or more of the
following measures:
• Reorient or relocate the receiving antenna.
• Increase the separation between the equipment and receiver.
• Connect the equipment into an outlet on a circuit different from that to which the receiver is connected.
• Consult the dealer or an experienced radio/ TV technician for help.
This device complies with part 15 of the FCC Rules. Operation is subject to the following two conditions:
1) This device may not cause harmful interference.
2) This device must accept any interference received, including interference that may cause undesired operation.
Any changes or modifications not expressly approved by the party responsible for compliance could void the user’s authority to
operate the equipment.
FCC RF Radiation Exposure Statement
The device has been evaluated to meet general RF exposure requirement. The device can be used in portable exposure condition without restriction.
CE Mark Warning
This is a class B product. In a domestic environment, this product may cause radio interference, in which case the user may be
required to take adequate measures.
National Restrictions
2400.0-2483.5 MHz
Country Restriction Reason/remark
Bulgaria General authorization required for outdoor use and public service
France Outdoor use limited to 10 mW EIRP.
within the band 2454-2483.5 MHz
Military Radiolocation use. Refarming of the 2.4 GHz band has
been ongoing in recent years to allow current relaxed regulation.
Full implementation planned 2012
2

Wireless Adapter
Italy If used outside of own premises, general authorization is
required
Luxembourg General authorization required for network and service
supply(not for spectrum)
Norway Implemented This subsection does not apply for the geographical area within a
radius of 20 km from the centre of Ny-Ålesund
Russian
Federation
Only for indoor applications
Note: Please don’t use the product outdoors in France.
3

Wireless Adapter
Table of Content
Chapter 1 Overview .......................................................................................................5
1.1 Package Content.........................................................................................5
1.2 Overview of the Product ............................................................................5
1.3 Features......................................................................................................5
1.4 Product Specification.................................................................................6
1.5 System Requirement ..................................................................................6
Chapter 2 Installation Guide ..........................................................................................7
2.1 Hardware Installation.................................................................................7
2.2 Installation using Driver CD:......................................................................8
Chapter 3 Wireless Connection Guide..........................................................................11
Chapter 4 Client Utility Configuration – Station Mode...............................................16
4.1 General........................................................................................................16
4.2 Profile..........................................................................................................17
4.2.1 Add..............................................................................................................18
4.2.2 Remove.......................................................................................................19
4.2.3 Edit..............................................................................................................19
4.2.4 Duplicate.....................................................................................................20
4.2.5 Set default...................................................................................................20
4.3 Available Network.......................................................................................21
4.4 Status...........................................................................................................22
4.5 Statistics.......................................................................................................22
4.6 Wi-Fi Protect Setup.....................................................................................23
4.6.1 Method 1 PIN Input Config (PIN)..............................................................23
4.6.2 Method 2 Push Button................................................................................24
4.7 Virtual Wifi Allowed – (Windows 7 only).................................................26
4.7.1 Enabling the Virtual WiFi..........................................................................26
Chapter 5 Configuration – Access Point Mode..........................................................30
5.1 General........................................................................................................30
5.2 Advanced....................................................................................................32
5.3 Statistics.......................................................................................................33
FAQ..............................................................................................................................36
4
5.4 ICS...............................................................................................................34

Wireless Adapter
Chapter 1 Overview
Thank you for choosing Comfast’s 802.11n Wireless USB adapter. This
chapter is to introduce you more about this Wireless Adapter.
1.1 Package Content
Before getting started, please verify that your package includes the following items:
1. 802.11n Wireless USB Adapter x 1
2. Quick Installation Guide x 1
3. CD Driver x 1
4. Warranty card
Note:
Make sure that the package contains the above items. If any of the listed items are damaged or missing, please contact
with your distributor.
1.2 Overview of the Product
The adapter is an 802.11n client device; it is designed to provide a high-speed and unrivaled
wireless performance for your computer or laptop. With a faster wireless connection, you
can get a better Internet experience, such as downloading, gaming, video streaming and so on.
With the 802.11n technology, the Comfast wireless adaptor allows high packet transfer rate of
up to 150Mbps for maximum download throughput. It can also interoperate with other wireless
(802.11b, 802.11g). The adapter supports WEP, WPA and WPA2 encryption to prevent
outside intrusion and protect your personal information from being exposed.
The adapter is easy to install and manage. The Quick Setup guides you step-by-step through
the installation process.
With unmatched wireless performance, reception, and security protection, the
is also designed to be one of the smallest size wireless adapter so you can use without any
interference. It is the best choice for easily adding or upgrading wireless connectivity to your
notebook and computer.
1.3 Features
zComply with IEEE 802.11b/g/n standards with up to 150Mbps data transfer speed.
zUltra-Nano size design with USB 2.0 interface.
zSupports QoS Enhancement (WMM) for multimedia applications’ smoothness
zHigh level of security with Wireless encryption of 64/128/152-bit WEP, WPA, WPA2, and
IEEE802.1x functions.
5

Wireless Adapter
zRuns under most popular operating systems: Windows XP/Vista/7 (32/64 bits), Mac OS
X and more.
zSupports Software WPS (WiFi Protected Setup) connection.
zGreen Energy Saving: supports auto transmit power adjustment and idle energy auto
control.
1.4 Product Specification
Chipset RALINK 5370
Bus Type USB 2.0 Type A
Frequency Band 2.4000~2.4835GHz (Industrial Scientific Medical Band)
Data Rate
Output Power 11b: 10.86dBm , 11g: 10.2dBm, 11n: 10.0dBm
Transmitting
Security WEP 64/128/152, WPA, WPA2
Antenna Internal Antenna (1T1R)
Temperature Operating: 32~104°F (0~40°C); Storage: -4~140°F (-20~60°C)
Humidity Operating: 10~90% (Non-Condensing);
1.5 System Requirement
You must have at least the following
zA laptop computer/desktop PC with an available USB port
zAt least a 300MHz processor and 32MB of memory
zWindows OS for Win98SE, ME, 2000, XP, Vista, 7 or Mac OS X 10.4~10.6
zA CD-ROM Drive
zUSB controller properly installed and working in the computer
z 802.11n ˣ802.11g or 802.11b Wireless Access Point/Router (for infrastructure Mode)
or another 802.11nˣ802.11g or 802.11b wireless adapter (for Ad-Hoc; Peer-to-Peer
networking mode).
6
Standard IEEE 802.11n˗IEEE 802.11g˗IEEE 802.11b
11b ˖
1/2/5.5/11Mbps
11g ˖
6/9/12/18/24/36/48/54Mbps
11n˖
Up to150Mbps
OS support Windows 2000/XP/XP64/Vista/Vista64˗
Windows 7/Windows7 x64
Max. 95%
(Non-Condensing)
Storage:
Channel 1-13 for CE and 1-11 for FCC, etc
Power
10.86dBm (Max)
Wireless Adapter
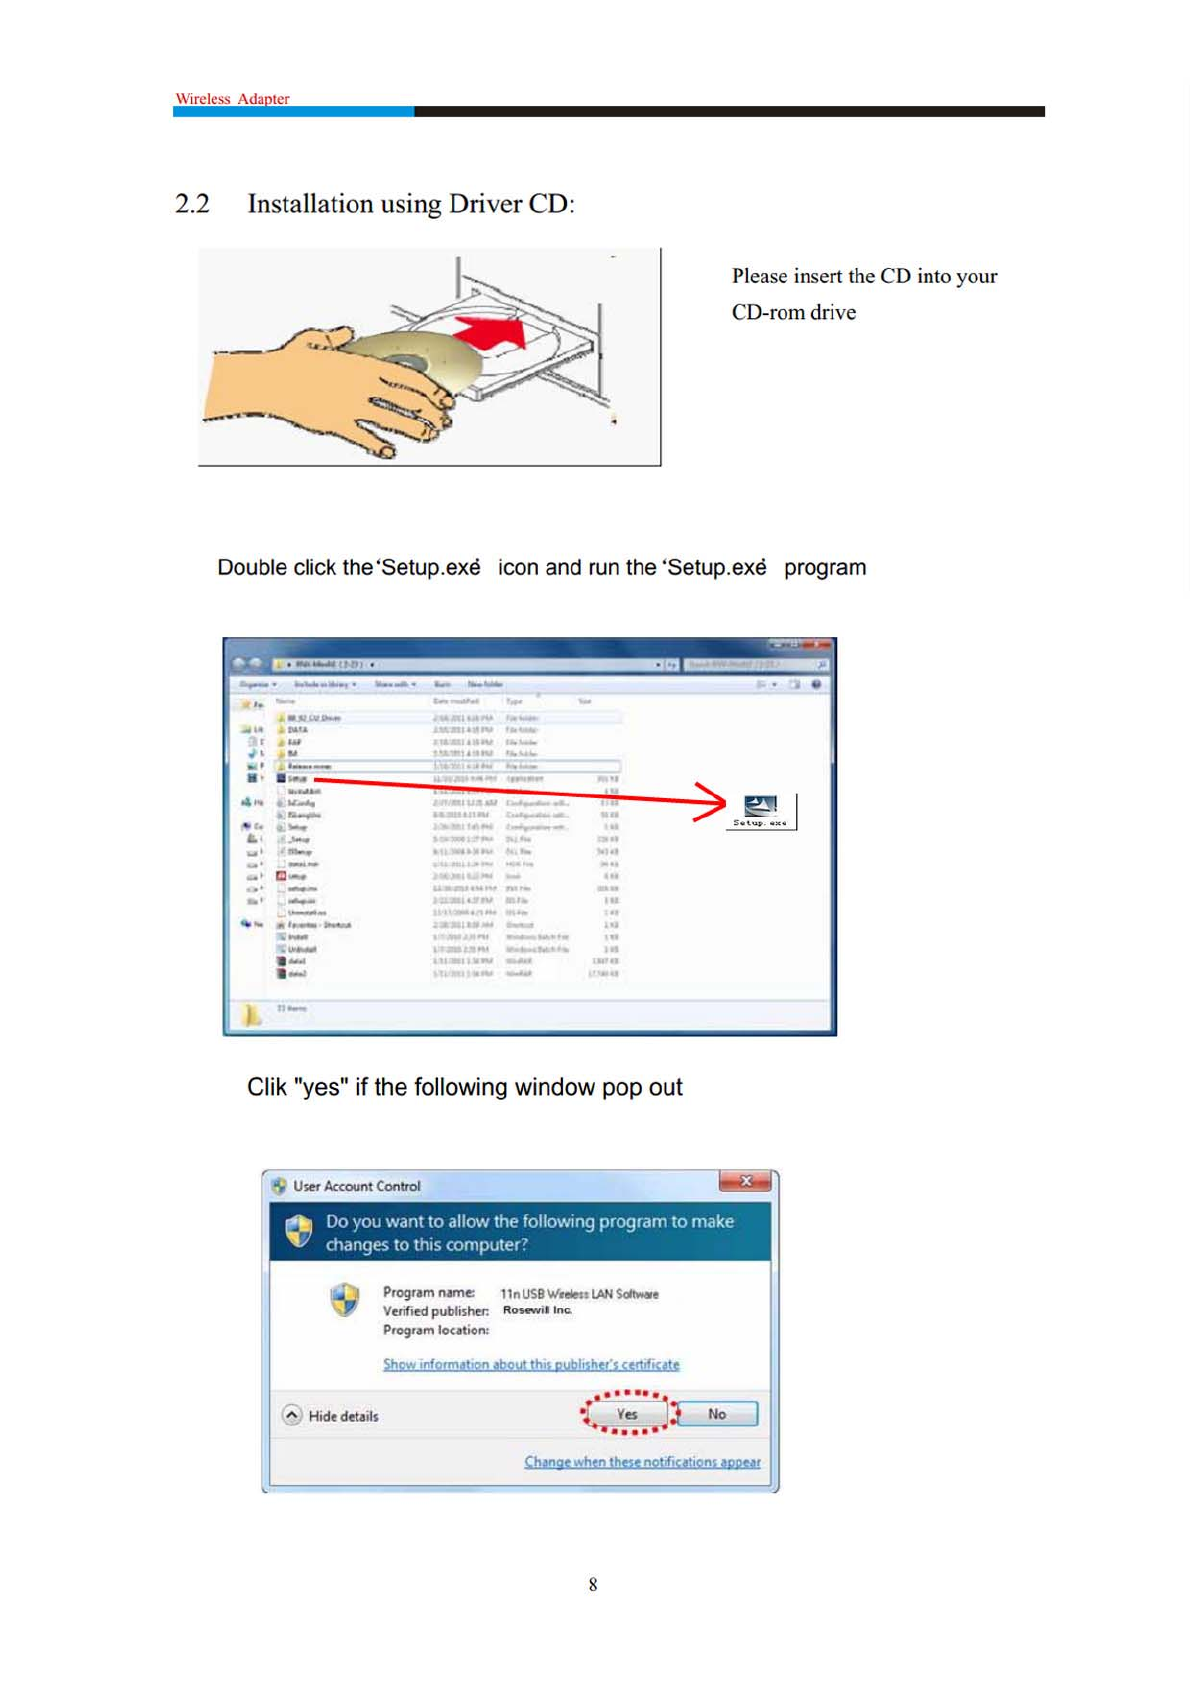
Chapter 2 Installation Guide
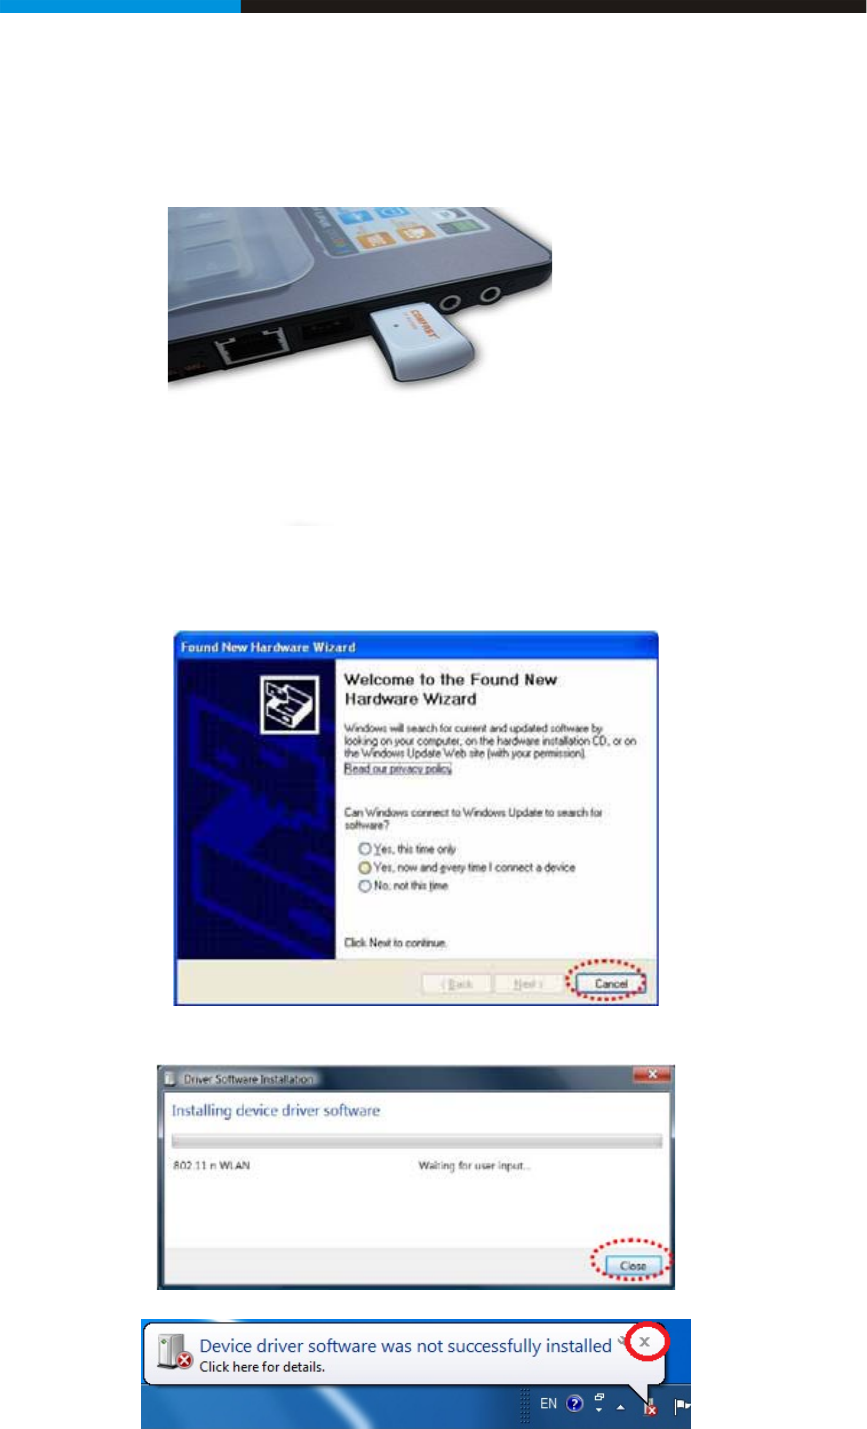
2.1 Hardware Installation
zPlease first insert the adaptor into your PC or NB USB slot.
zIf the following window popup, please click Cancel or Close:
Under Win XP
Under Windows Vista/Win7
7

Wireless Adapter
9
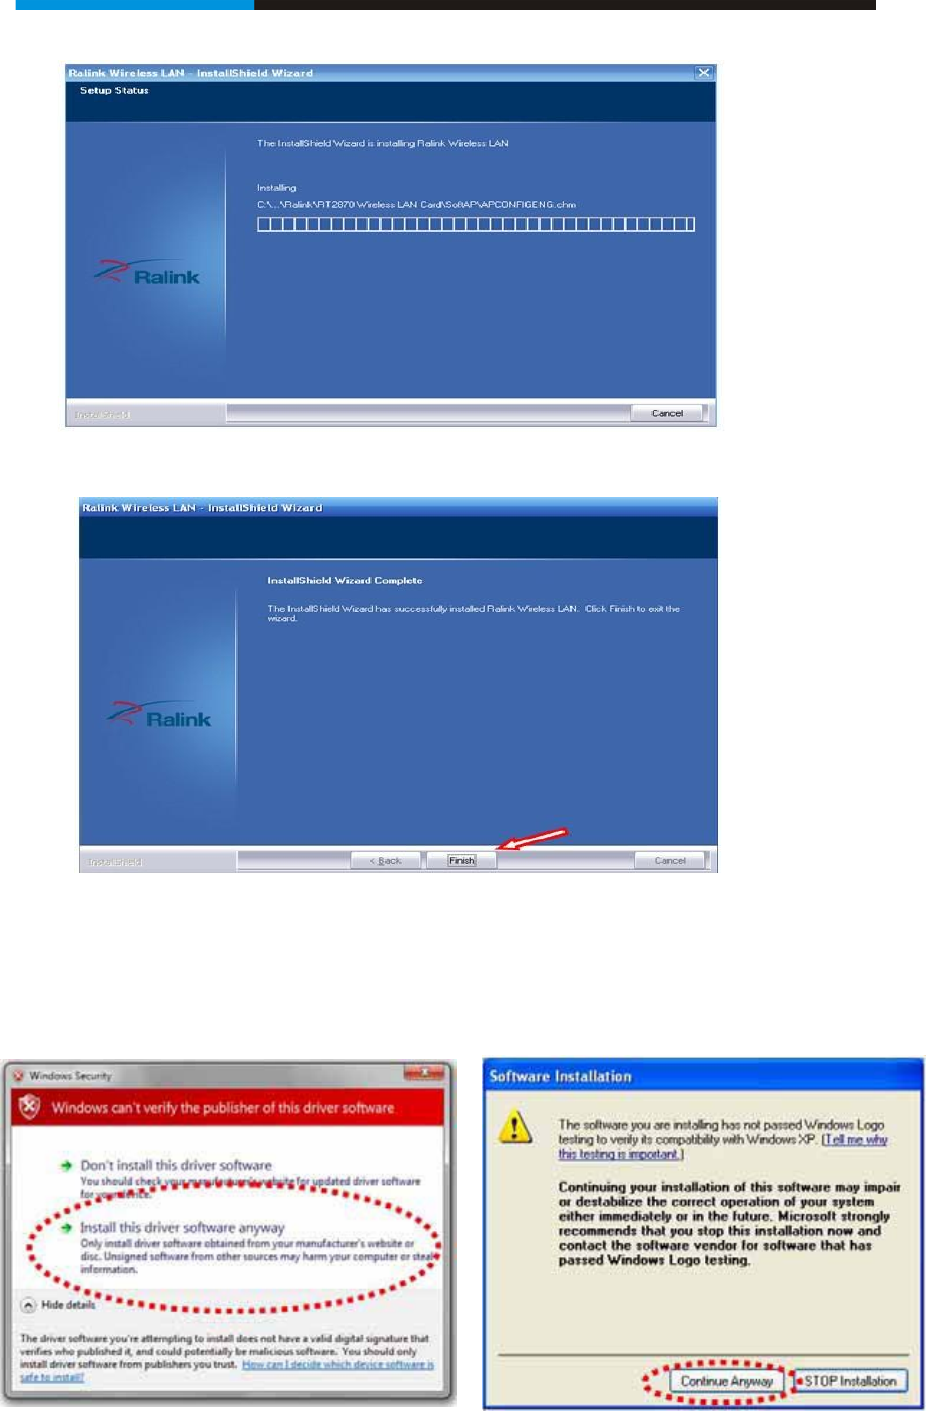
Select ‘I accept the terms of the license agreement’, and then click ‘Next’;
Select the setup type that best suits your needs, þInstall driver and Ralink WLAN Utilityÿ are recommended.
Click‘Next’ , show the ‘Select Configuration Tool’ dialogue, you can manage this
wireless adapter both by Ralink Configuration Tool and Microsoft Zero Configuration Tool;
REJECTED
Wireless Adapter
10
if you see below window popup,please select install this driver software anyway
.
Win7 Win XP
Click‘Next’, and the installation is in process.
Finally, click ‘Finish’ to finish the driver installation

Wireless Adapter
Chapter 3 Wireless Connection Guide
This chapter describes how to configure your Adapter for wireless connectivity on your
Wireless Local Area Network (WLAN) and use the data security encryption features.
After Installing the Adapter, the Adapter’s tray icon will appear in your system tray. It
appears at the bottom of the screen, and shows the signal strength using color and the received
signal strength indication (RSSI).
In the following instruction for making a network connection, we use the provided Utility to
configure your wireless network settings.
Note: You could use either the software we provide or Microsoft Zero Configuration tool to
configure this adapter.
To use wireless network, you have to connect to a wireless
access point first. You can either use Client utility (comes with
network card driver), or Windows Zero Config utility (comes with
Windows operating system).
1. Left-click the Client configuration utility icon located at
lower-right corner of computer desktop, and configuration menu
will appear:
HERE!
2. :LUHOHVVXWLOLW\ZLOODSSHDU&OLFNµAvailable Network¶PHQXWR
search for wireless access points nearby.
11
Wireless Adapter
12
3. Please wait for a while, and all wireless access points which can
be reached by this wireless network card will be displayed here.
If the wireless access point you wish to connect does not appear
KHUH\RXFDQFOLFNµRefresh¶EXWWRQWRVFDQIRUZLUHOHVVDFFHVV
points again; if the wireless access point \RX¶UHORRNLQJIRUVWLOOQRW
appear, try to move the computer closer.
:KHQWKHDFFHVVSRLQW\RX¶UHORRNLQJIRULVRQWKHOLVWOHIW-click it
DQGWKHQGRXEOHFOLFNLWRUFOLFNµAdd to Profile
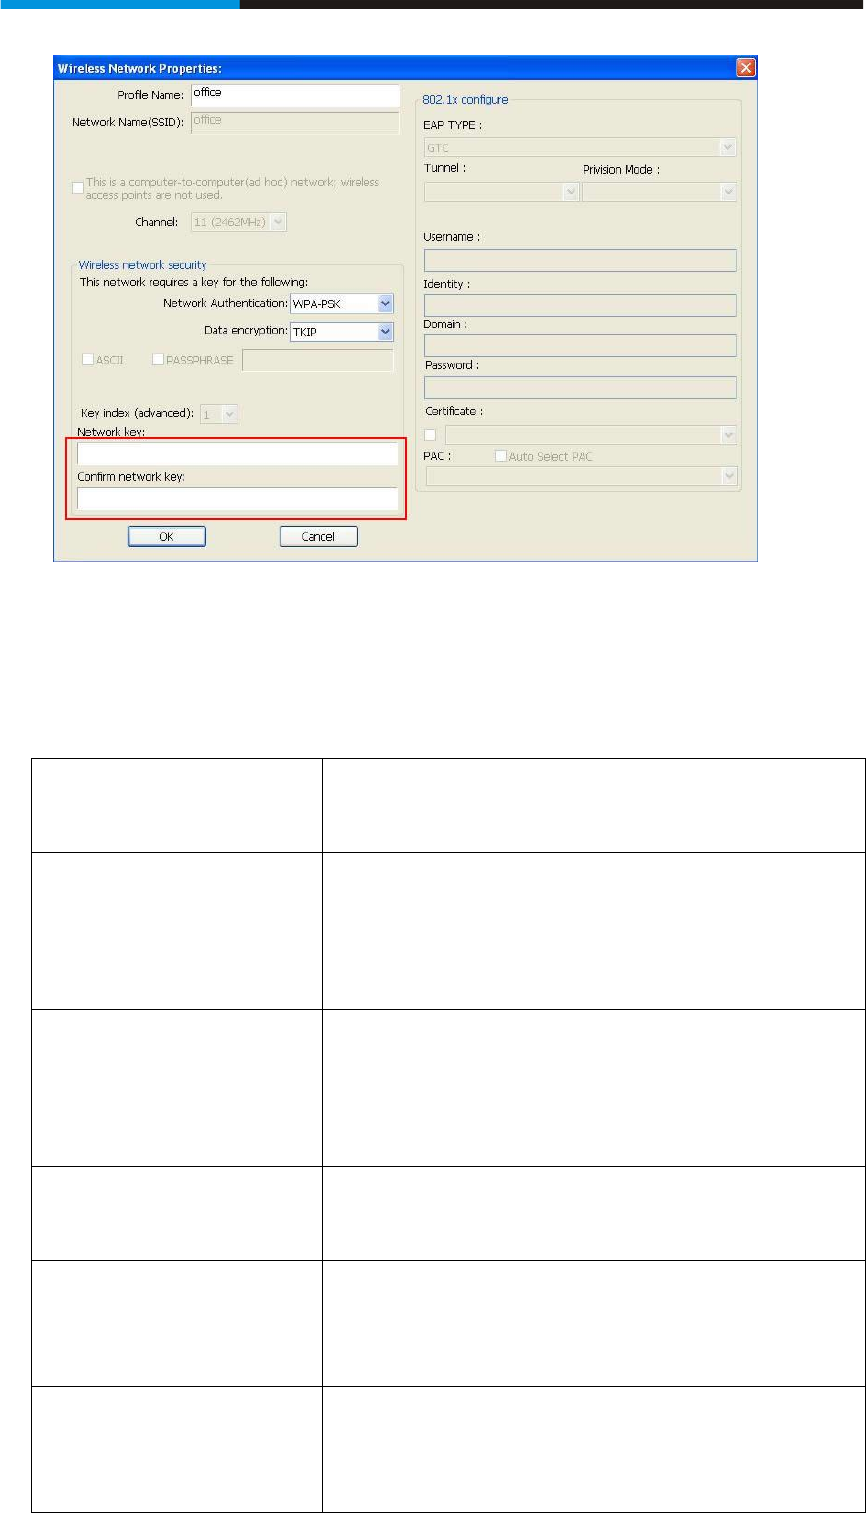
4. ,IDSDVVZRUGDNDµ1HWZRUN.H\¶LVUHTXLUHGWRDFFHVs the
ZLUHOHVVDFFHVVSRLQWSOHDVHLQSXWLWLQµNetwork key¶DQGLQSXW
LWDJDLQLQµConfirm network key¶IRUFRQILUPDWLRQ&OLFNµOK
when password is properly inputted.
NOTE1HWZRUNVHFXULW\W\SHµNetwork Authentication¶DQG
µData encryption¶ZLOO be selected automatically based on
ZLUHOHVVDFFHVVSRLQW¶VVHFXULW\VHWWLQJ,W¶VQRWUHTXLUHGWRFKDQJH
these settings by yourself.
Wireless Adapter
13
All options in this page will be filled automatically according to
the access point you wish to add to profile. However, you can still
modify any of them to meet your requirement.
Profile name You can give a name to this profile, so you
can remember its purpose easily. It can be
any phrase to help you remember.
Network Name (SSID) The SSID (Service Set IDentifier, i.e. access
SRLQW¶VQDPH7KLVILHOGZLOOEHILOOHGDVWKH
access point you selected when SSID is not
hidden and grayed out. If SSID is hidden,
you have to input correct SSID you yourself.
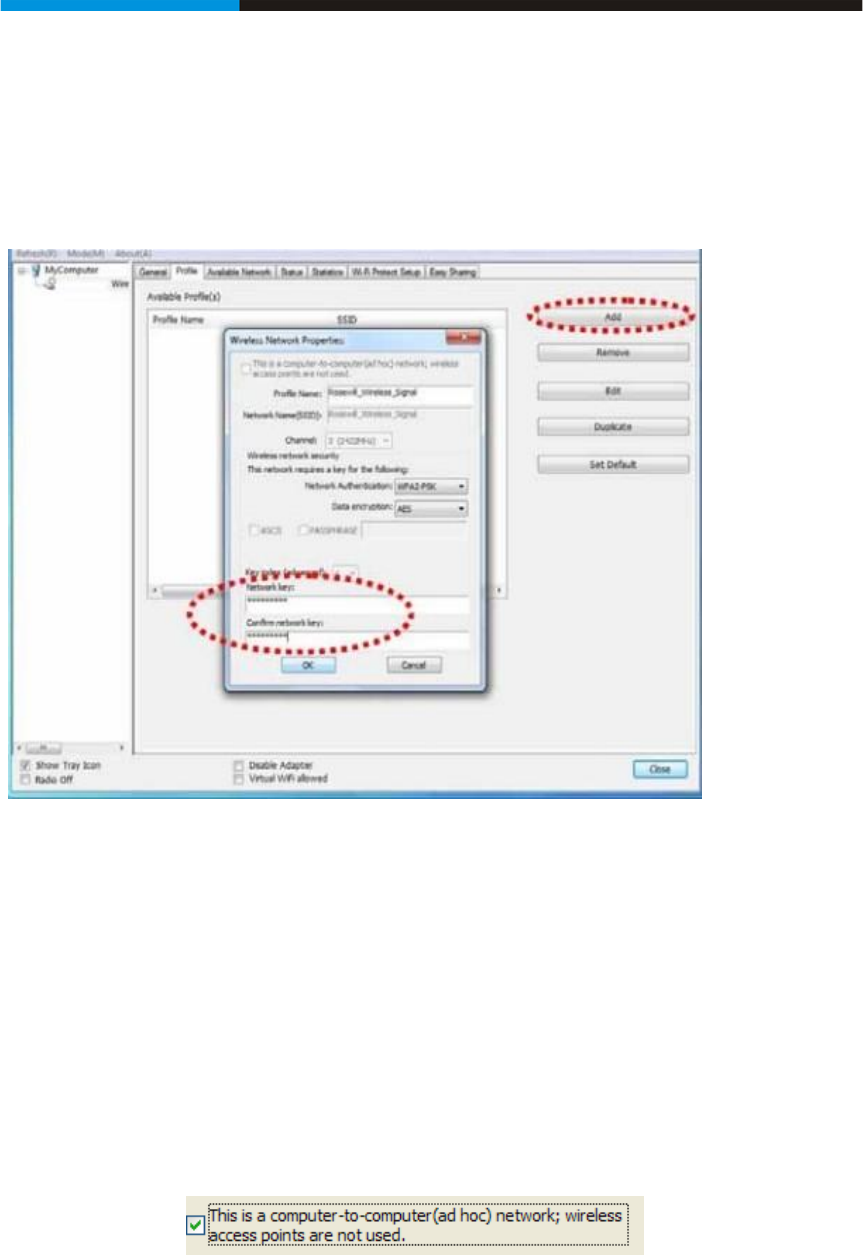
This is a
computer-to-computer
(ad hoc) network
Check this box if you wish to connect to
another computer / network device by ad
hoc method. When not accessing to
wireless access point, you have to check
this box.
Channel Select wireless channel for ad hoc
connection. This option only appears when
\RX¶UHXVLQJDGKRFFRQnection.
Network
Authentication
Select the network authentication type from
drop-down menu. This setting must be
identical with the setting of wireless access
point you with to connect.
Data encryption Select the data encryption type from
drop-down menu. This setting must be
identical with the setting of wireless access
point you with to connect.
13

Wireless Adapter
14
ASCII / PASSPHRASE :KHQWKHHQFU\SWLRQW\SHLVµ:(3¶LW¶V
UHTXLUHGWRLQSXWDVHWRIµSDVVSKUDVH¶WR
connect to wireless access point. Check
µ$6&,,¶RUµ3$663+5$6(¶GHSHQGVRQWKH
security setting of access point, and input it
LQWKHER[LI\RXVHOHFWµ3$663+5$6(¶\RX
also need to select the length of the key.
The passphrase must be identical with the
setting of wireless access point you with to
connect.
Key index Select WEP key index. For most of access
SRLQWV\RXFDQVHOHFWµ¶EXWSOHDVHUHIHUWR
the setting of the access point.
Network key / Confirm
network key
:KHQWKHHQFU\SWLRQW\SHLVµ:3$¶RU
µ:3$-36.¶LW¶VUHTXLUHGWRLQSXWDVHWRI
µSDVVSKUDVH¶WRFRQQHFWWRZLUHOHVVDFFHVV
point. Please input the same passphrase in
two boxes for confirmation.
EAP TYPE / Tunnel /
Provision Mode
When authentication type is any of 802.1X,
you have to select EAP type, tunnel, and
provision mode from dropdown menu. This
setting must be identical with your 802.1x
authentication server.
Username / Identity /
Domain / Password
Please input 802.1x related authentication
information here.
Certificate If certification is required to authenticate
with 802.1x authentication server, please
select a local certificate from dropdown list.
PAC Check this box and PAC (Privilege Access
Certificate) will be automatically selected.
3OHDVHFOLFNµOK¶ZKHQUHDG\
5. Network card will attempt to connect to access point now, this
may require few seconds to minutes, please be patient. When the
µStatus¶EHFRPHµAssociated¶, your computer is connected to
DFFHVVSRLQW\RXVHOHFWHG&OLFNµClose¶WRFORVHFRQILJXUDWLRQ
menu.
Wireless Adapter
15
NOTE: If you connected to an access point but the connection has
been dropped soon, please check security settings and re-check
password spelling.

Wireless Adapter
Chapter 4 Client Utility Configuration
Mode
The Wireless Adapter provides two modes: Station mode and Access Point mode, the
default is Station mode under Window XP and Windows 7.
You can select connect wirelessly to your Wireless router/AP to connect to Internet in station
mode. But in the Access Point mode, the wireless adapter act as a wireless access point
which can share Internet connection with others. (Access Point Mode requires Wired
Connection)
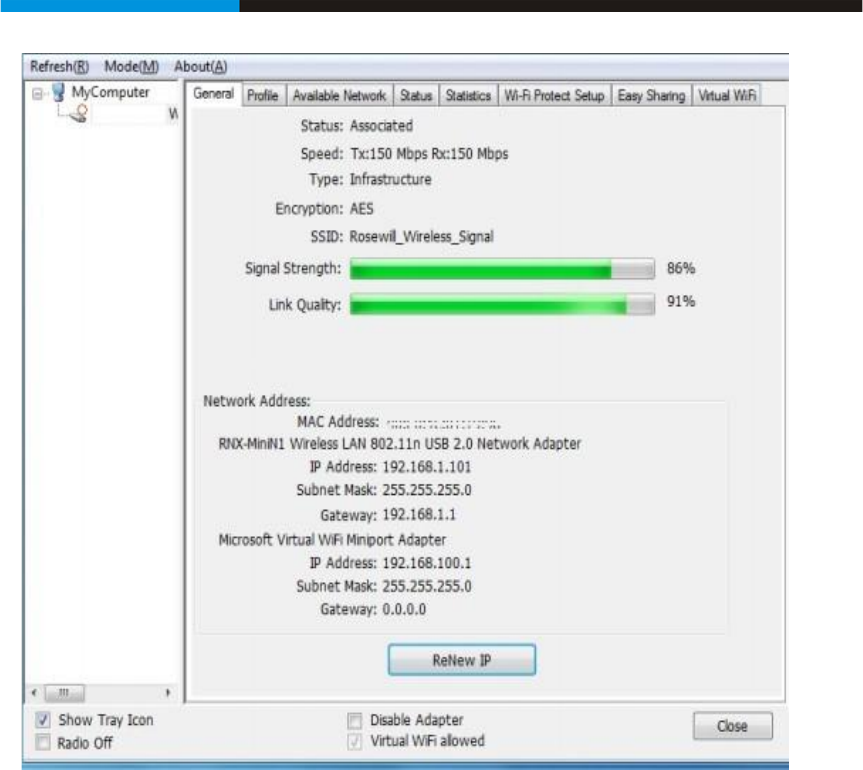
4.1 General
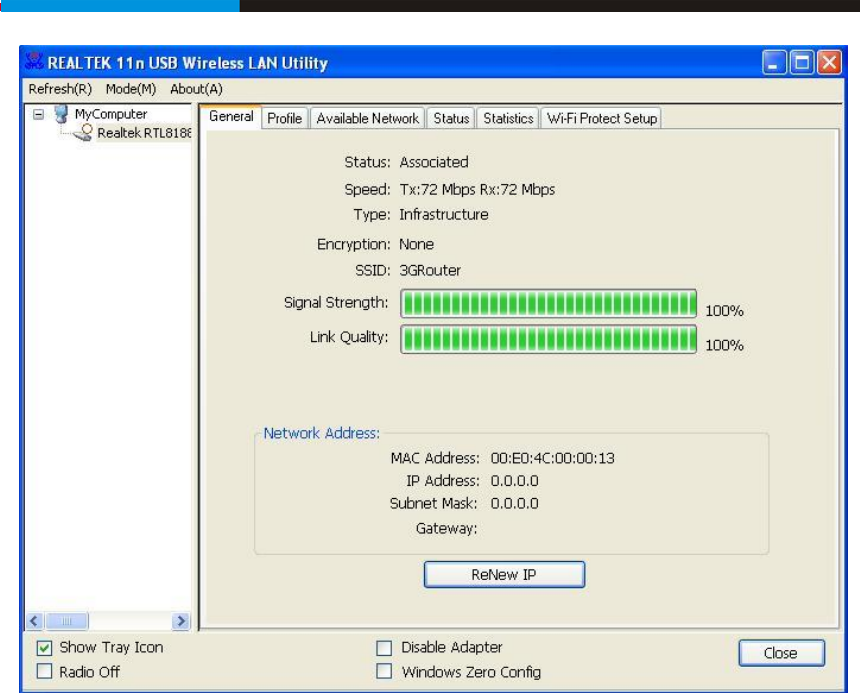
The General tab displays current basic wireless connection information.
General Information
16
– Station

Wireless Adapter
zStatus: Wireless network Associated, Ad-hoc Mode or Not Associated.
zSpeed: The data Tx rate and Rx rate of the current connection.
zType: The type of the current wireless connection , Infrastructures or ad hoc
zEncryption: Current encryption.
zSSID: The unique name of the wireless network to which the wireless adapter is
connecting.
zSignal Strength: The signal quality of the current connection.
zLink Quality: The link quality of the current wireless connection.
Network Address
zMAC Address: The MAC Address of the Adapter.
zIP Address: The IP Address of the Adapter. (This is assigned by the wireless router)
zSubnet Mask: The Subnet Mask of the Adapter.
zDefault Gateway: The Default Gateway address of the Adapter. (This is normally the IP
address of your wireless router)
Others
zShow Tray Icon: Show USB Wireless LAN Utility icon in the windows taskbar
notification area.
zDisable Adapter: Disable the wireless adapter.
zRadio off: Turn off the radio of the wireless adapter.
4.2 Profile
Using the Profile tab, you can Add, Remove, Edit, Duplicate, and Set Default a profile.
17
Wireless Adapter
4.2.1 Add
zCreate a new Infrastructure mode profile
If you want your wireless computers to communicate with other computers on your wired
network via a wireless access point. Click the Add button to create a new infrastructure
profile.
When the Network Info dialog box appears, enter a name for the new profile. Enter the
Network SSID.
The Network Authentication and Data Encryption can be auto-deteced. So you only need to
key-in the Network Key. Then click OK button.
zCreate a new ad-hoc mode profile
If you want your wireless computers communicate with each other directly, click the Add
button to create a new ad-hoc profile. Then, check on below option:
then select the correct operating channel for your network from the Channel drop-down menu.
18

Wireless Adapter
The Network Authentication and Data Encryption can be auto-deteced. So you only need to
key-in the Network Key. Then click OK button.
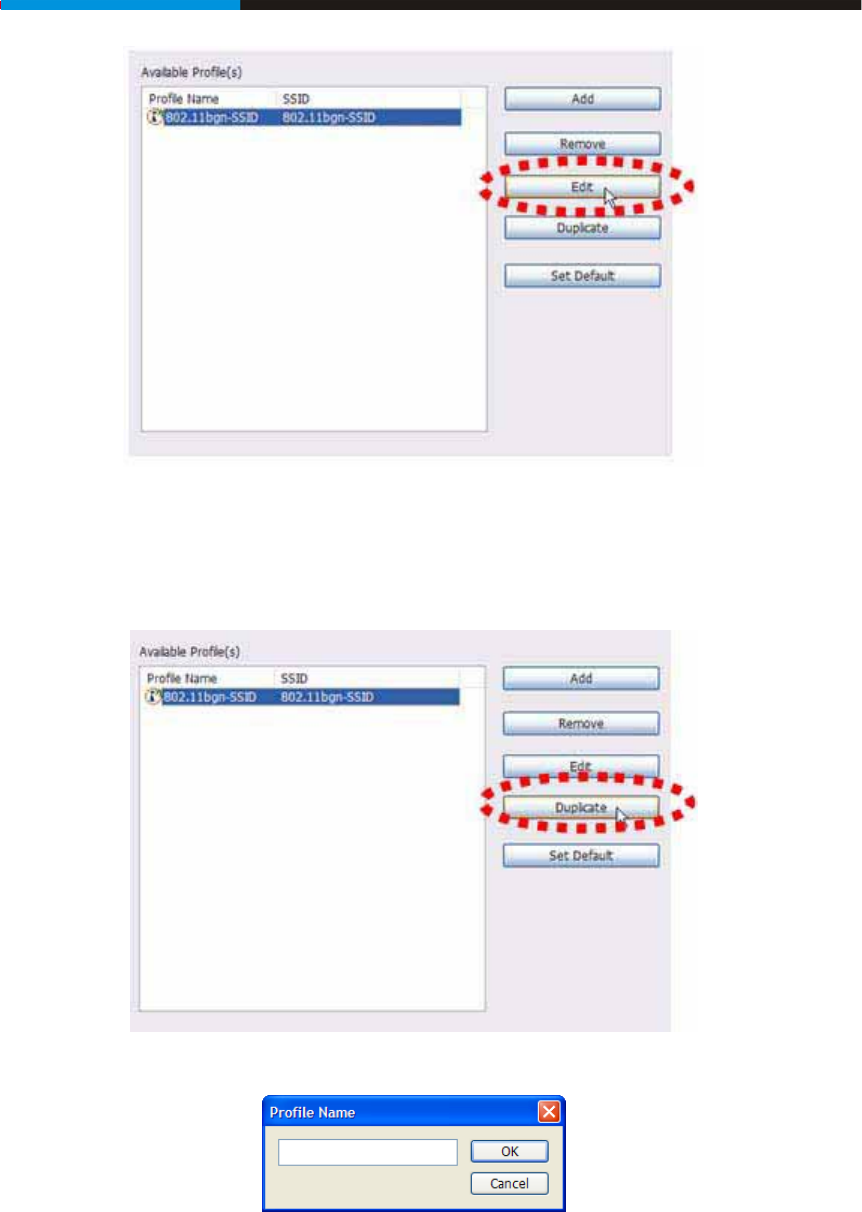
4.2.2 Remove
Select a profile and click Remove button to delete this profile.
4.2.3 Edit
Select a profile and click Edit button to edit this profile.
19
Wireless Adapter
Modify the profile information according to your demand.
4.2.4 Duplicate
Select a profile which you want to copy and then click Duplicate
Import the new profile name in the popup window blank
4.2.5 Set default
When you want to make one profile as a default wireless connection, you should select the
profile and click Set default button. The wireless adapter will use this profile to connect to
wireless network automatically when the utility running next time.
20

Wireless Adapter
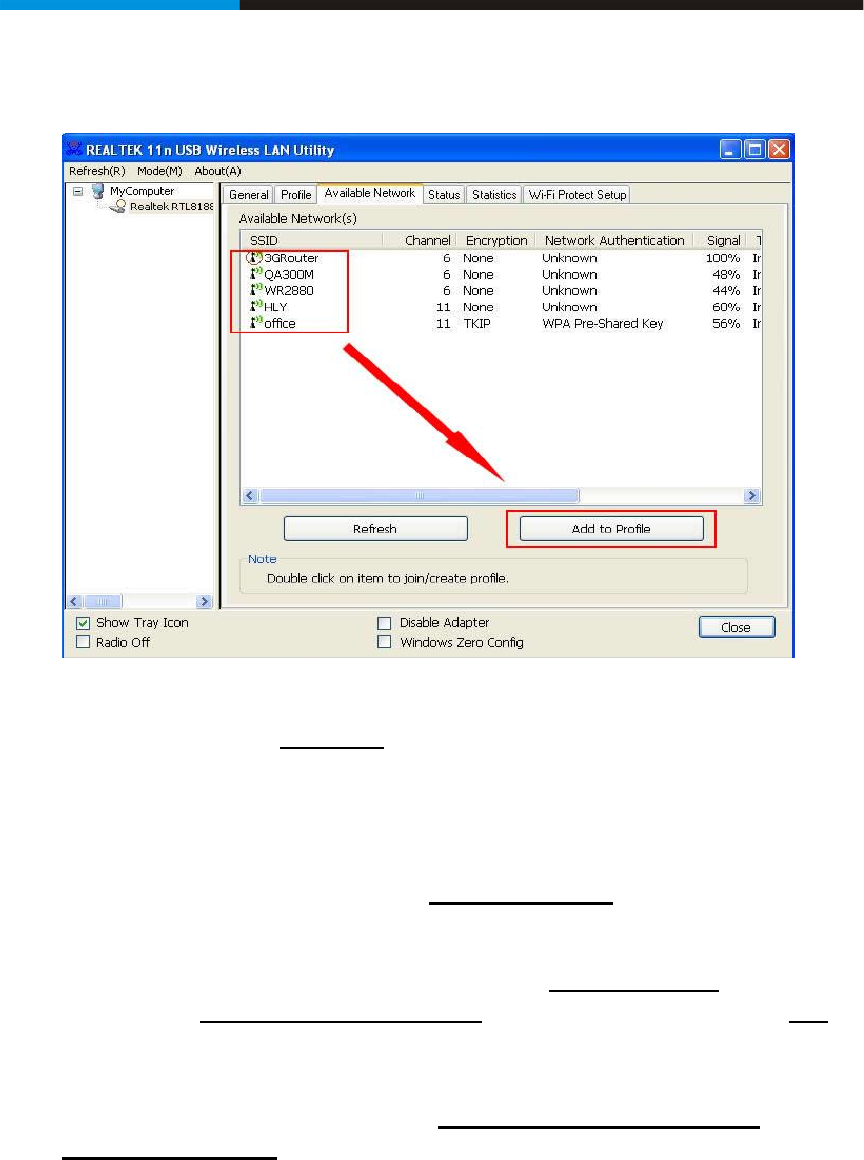
4.3 Available Network
The Available Network tab displays a list of networks for available wireless connection
Select the network to which you wish to connect. Then click ȾAdd to Profileȿ
21

Wireless Adapter
The Network need to
.4 Status
tatus tab displays the detailed information of current device and wireless connection.
Authentication and Data Encryption can be auto-deteced. So you only
key-in the Network Key. Then click OK button.
4
The S
4.5 Statistics
tatistics tab display the stat. value of current wireless connection Tx and Rx, you can The S
22

Wireless Adapter
click Reset button to reset value and restart to count.
4.6 Wi-Fi Protect Setup
4.6.1 Method 1 PIN Input Config (PIN)
to your wireless router and click Start PIN in1. Input the Wireless Adapter’s PIN Code in
23

Wireless Adapter
the Wireless-Router WPS configuration page
Click Pin Input Config(PIN) in your comput2. er.
3. Select one WPS AP which you want connect to and click Select button
4. Please wait when the PIN Method Window pop-up appear, the secure connection
between AP and wireless adapter will be founded automatically.
4.6.2 Method 2 Push Button
on your Wireless Router. 1. First, press the WPS buttom
24

Wireless Adapter
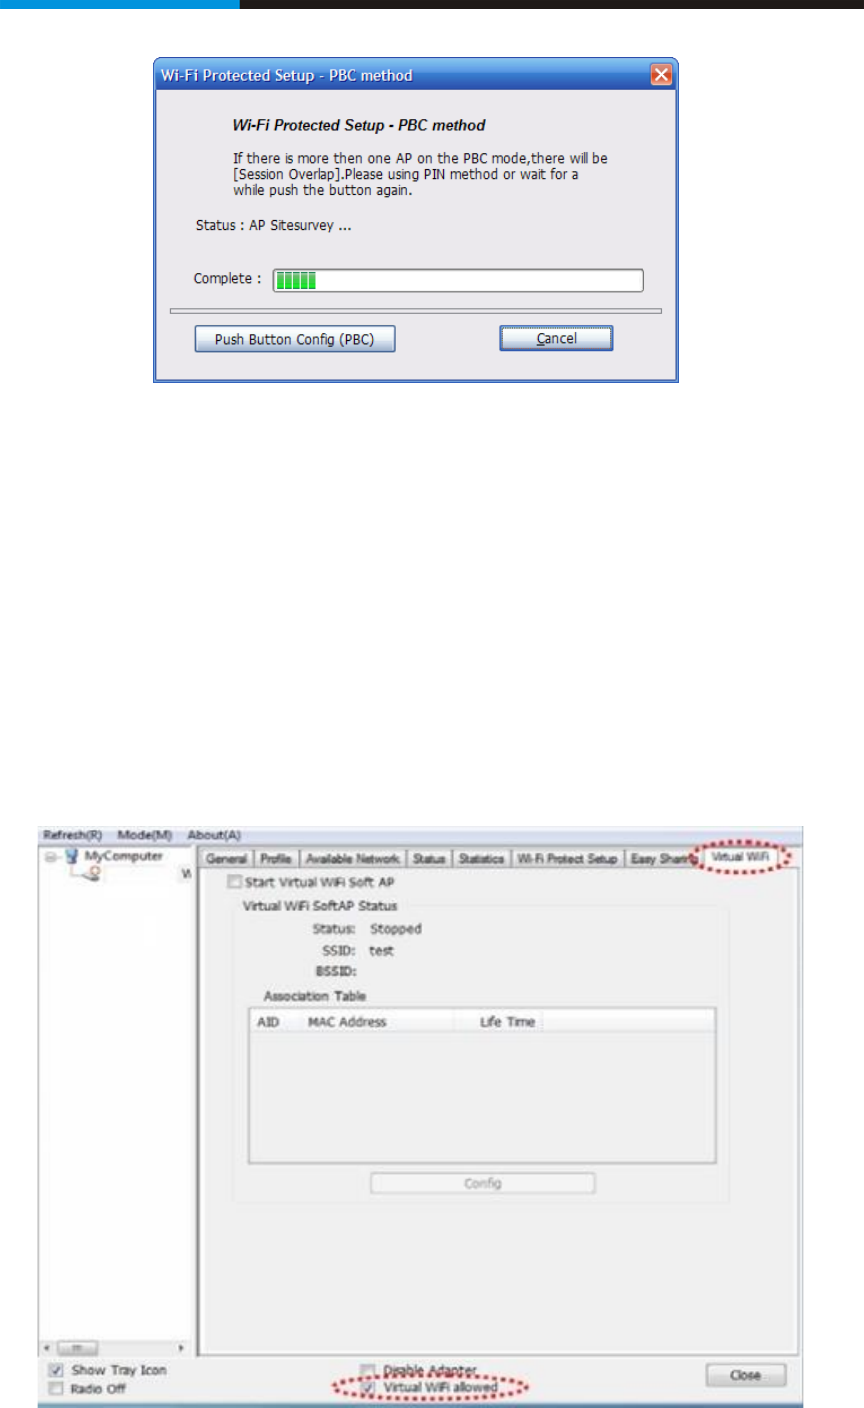
2. Click Push Button Config(PBC) on Wi-Fi Protect Setup page
3. Please wait when the PBC method window pop-up appear, the secure connection
between wireless router and Wireless Adapter will be founded automatically.
25
Wireless Adapter
Remark
If there is more than one AP on the PBC mode, there will be session overlap. Please using
method 1 PIN Input Config(PIN) or wait for a while push the button again.
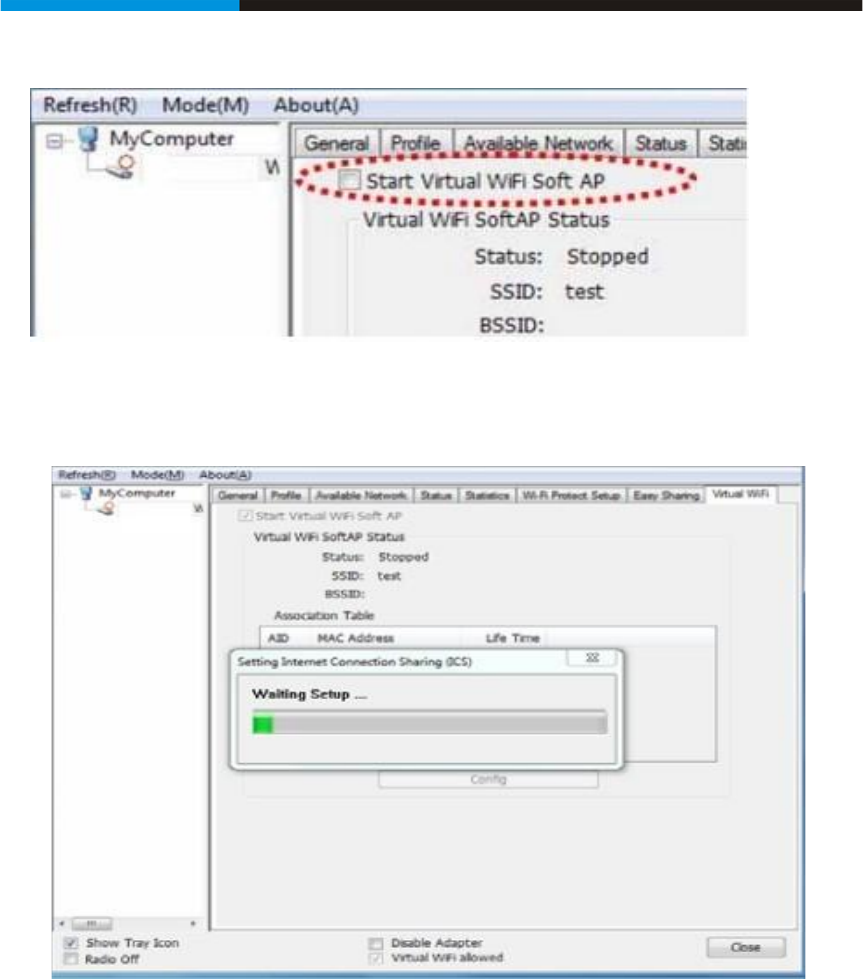
4.7 Virtual Wifi Allowed – (Windows 7 only)
Comfast wlan adaptor uses the Virtual Wifi technology and turns into a Wireless sharing
points. Selecting this function, Comfast wlan adaptor will release wireless signal for wireless
clients around it to connect.
4.7.1 Enabling the Virtual WiFi
1. First click on the option at the bottom of the utility “Virtual WiFi allowed” to
enable this function.
26
Wireless Adapter
2. Check “Start Virtual WiFi Soft AP” to enable the broadcast of the signal.
3. After checking this option, you will see an process window popup indicating the
enabling process is starting
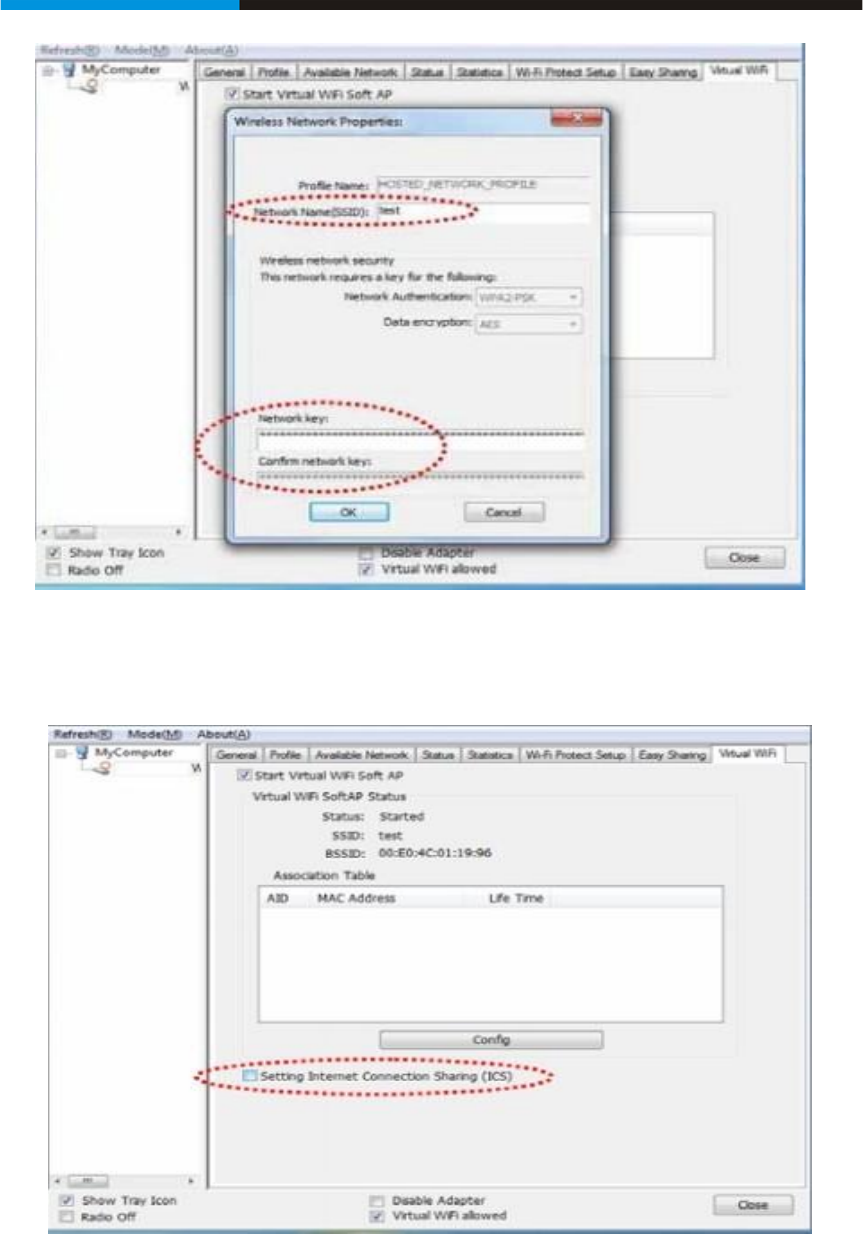
4. When complete, click on “Config” to set your desired SSID and password. Click
“OK” when complete.
27
Wireless Adapter
5. Click the “Setting Internet Connection Sharing (ICS)” to enable the WiFi
sharing.
6. When complete, you will see below status appear in the “General” shows that
your wireless adapter is currently also broadcasting signal for others to connect
to.
28
Wireless Adapter
Remark
Wireless adapter are broadcasting and receiving the signal at the same time, therefore, the
signal and the speed of the other Wireless Clients will be less that what Comfast wlan adaptor
connects.
29
Wireless Adapter
Chapter 5 Configuration – Access Point Mode
We can also use the wireless USB adapter as a Wireless signal provider. The other wireless
clients can connect to Comfast wlan adaptor if the wireless USB adapter is set to Access Point mode
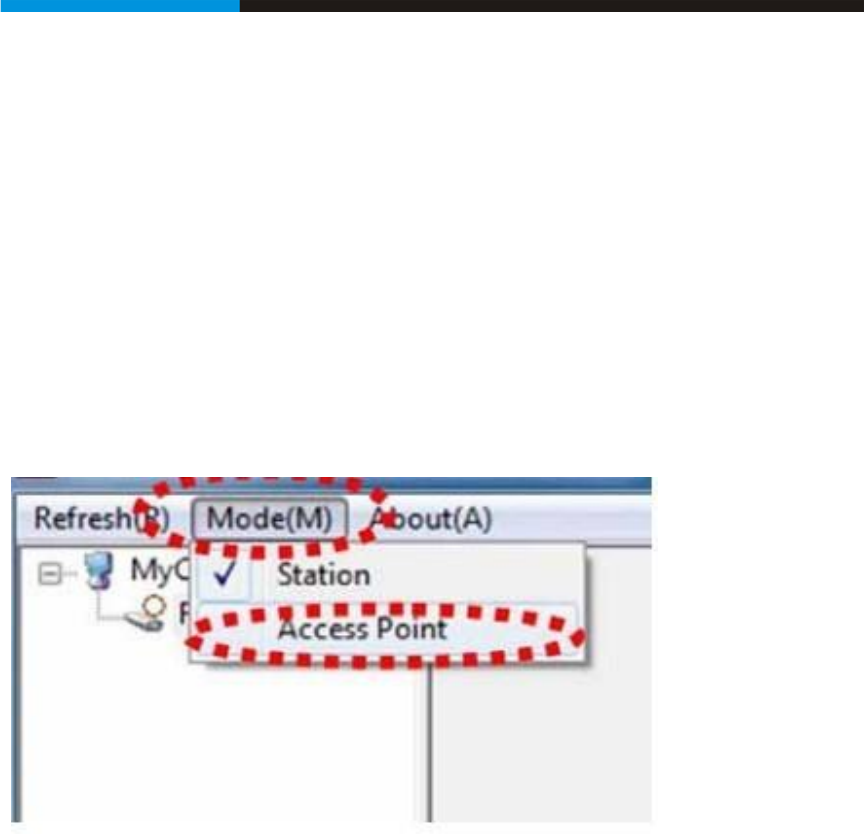
Click Mode in the menu bar and select Access Point, then it will change to Access Point
mode automatically
Remark
This works when your computer is currently connecting to the internet either via cable
connection (RJ45) or via another wireless adapter.
5.1 General
General displays the basic information of this AP
30

Wireless Adapter
zSSID:
The SSID of this AP (the SSID that your RNX-MiniN1 broadcasting)
zBSSID:
The MAC address of this AP
zAssociation Table:
It displays the PC’s MAC address and life time that connect to this AP
zConfig
Configure this AP. Click config, display the following picture
31

Wireless Adapter
zProfile name:
The default is Access Point Mode and can’t be modified
zNetwork name (SSID):
The name of this AP and can be modified
zChannel:
You can select channel 1 to 14, which provides a choice of avoiding interference
zNetwork authentication:
It contains open system, shared key, WPA-PSK and WPA2-PSK. You can configure safe
encryption mode for this AP. If you select encryption mode, then you will need to enter key
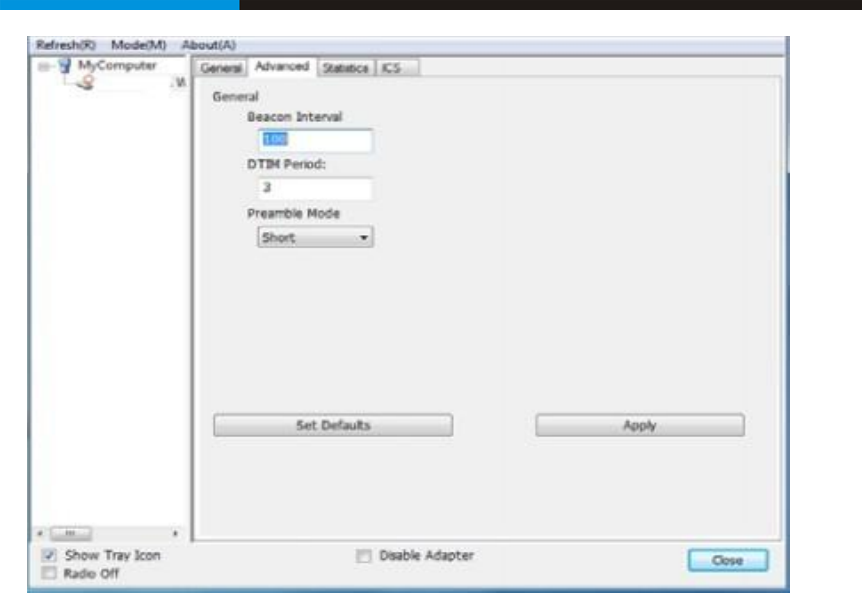
5.2 Advanced
32
Wireless Adapter
zBeacon Interval:
This represents the amount of time between beacon transmissions. Before a station enters
power save mode, the station needs the beacon interval to know when to wake up to receive
the beacon (and learn whether there are buffered frames at the access point)
zDTIM period:
The DTIM period is set on the TIM information element on the DTIM period field. This field
is one byte and represents the number of beacon intervals that must go by before a new DTIM
is sent.
zPreamble Mode:
"Short" is suitable for heavy traffic wireless network. "Long" provides much communication
reliability; the default setting is "Short”
zSet defaults:
Set the options in advanced to default
zApply:
Save the options
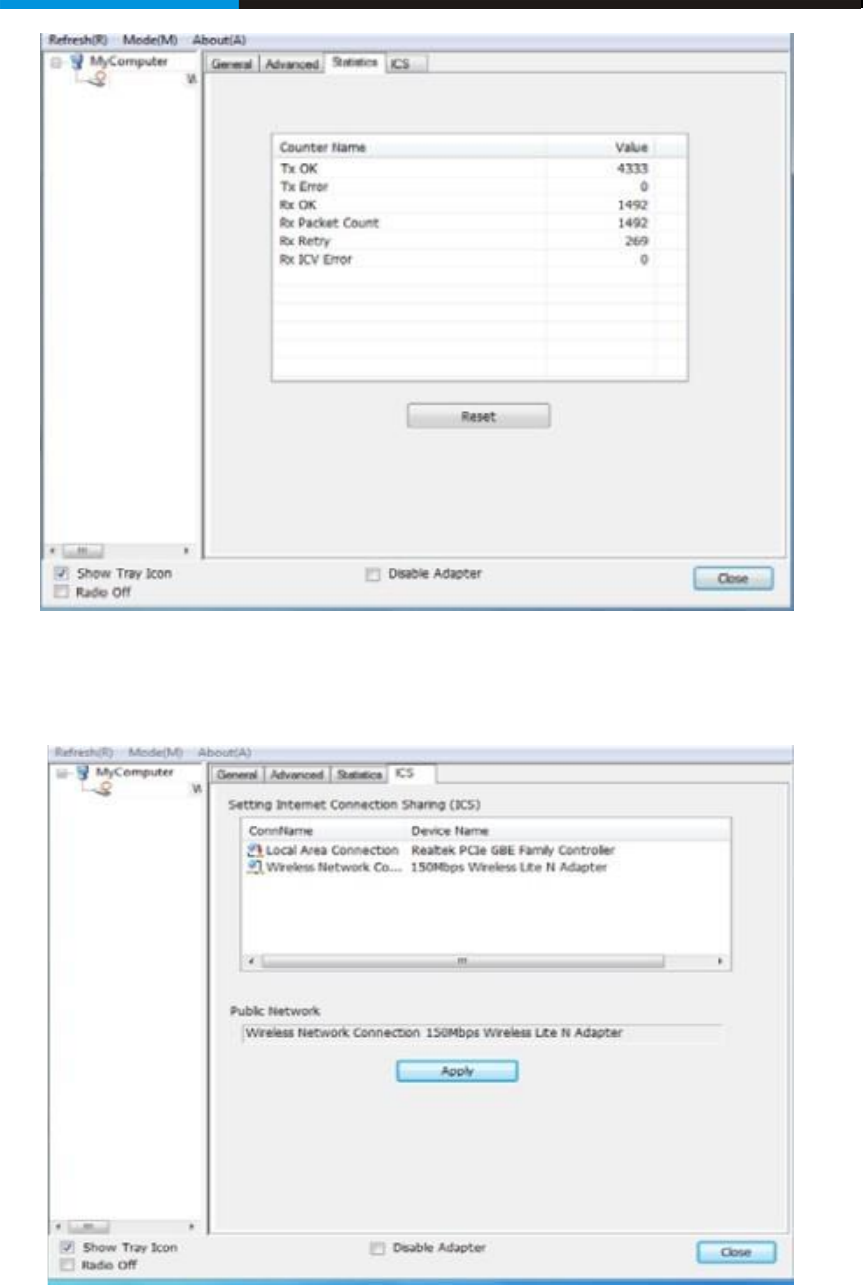
5.3 Statistics
33
Wireless Adapter
It display receive and transmit information
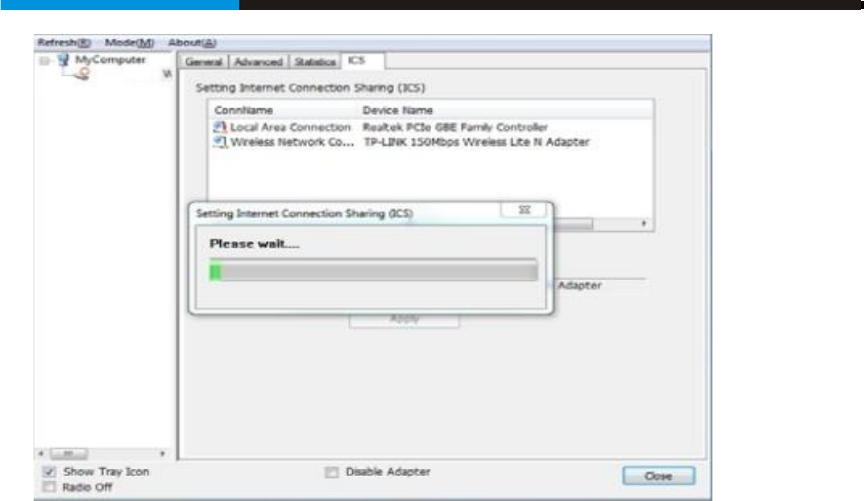
5.4 ICS
You can set internet connecting sharing (ICS), select the network you want to share in the list,
then click ‘apply’, the following picture appears.
34
Wireless Adapter
When you connect successfully, you can share network with others
35

Wireless Adapter
FAQ
This chapter provides solutions to problems that may occur during the installation and
operation of the Wireless USB Adapter. Read the descriptions below to solve your problems.
1. The Wireless USB Adapter does not work properly.
Reinsert the Wireless USB Adapter into your PC’s USB slot. Right click My Computer
and select Properties. Select the device manager and click on the Network Adapter. You
will find the Adapter if it is installed successfully. If you see the yellow exclamation
mark, the resources are conflicting. You will see the status of the Adapter. If there is a
yellow question mark, please check the following:
Make sure that you have inserted the right adapter and installed the proper driver. If the
Adapter does not function after attempting the above steps, remove the adapter and do
the following:
Uninstall the driver software from your PC through Control Panel’s “Add or Remove
Programs”.
Restart your PC and repeat the hardware and software installation as specified in this
User Guide.
2. I cannot communicate with the other computers linked via Ethernet in the
Infrastructure configuration.
Make sure that the PC to which the Adapter is associated is powered on.
Make sure that your Adapter is configured on the same channel and with the same
security options as with the other computers in the Infrastructure configuration.
3. What should I do when the computer with the Adapter installed is unable to
connect to the wireless network and/or the Internet?
Check that the LED indicators for the broadband modem are indicating normal activity.
36

Wireless Adapter
If not, there may be a problem with the broadband connection.
Check that the LED indicators on the wireless router are functioning properly. If not,
check that the AC power and Ethernet cables are firmly connected.
Check that the IP address, subnet mask, gateway, and DNS settings are correctly entered
for the network.
In Infrastructure mode, make sure the same Service Set Identifier (SSID) is specified on
the settings for the wireless clients and access points.
In Ad-Hoc mode, both wireless clients will need to have the same SSID. Please note that
it might be necessary to set up one client to establish a BSS (Basic Service Set) and wait
briefly before setting up other clients. This prevents several clients from trying to
establish a BSS at the same time, which can result in multiple singular BSSs being
established, rather than a single BSS with multiple clients associated to it.
Check that the Network Connection for the wireless client is configured properly.
If Security is enabled, make sure that the correct encryption keys are entered on both the
Adapter and the access point.
4. I can’t find any wireless access point / wireless device in ‘Site Survey’
function.
1. Click ‘Rescan’ for few more times and see if you can find any wireless access point
or wireless device.
2. Please move closer to any known wireless access point.
3. ‘Ad hoc’ function must be enabled for the wireless device you wish to establish a
direct wireless link.
4. Please adjust the position of network card (you may have to move your computer if
you’re using a notebook computer) and click ‘Rescan’ button for few more times. If
you can find the wireless access point or wireless device you want to connect by
doing this, try to move closer to the place where the wireless access point or wireless
37

Wireless Adapter
device is located.
5. Nothing happens when I click ‘Open Config Utility’
1. Please make sure the wireless network card is inserted into your computer’s USB
port.
2. Reboot the computer and try again.
3. Remove the card and insert it into another USB port.
4. Remove the driver and re-install.
5. Contact the dealer of purchase for help.
6. I can not establish connection with a certain wireless access point
1. Click ‘Add to Profile’ for few more times.
2. If the SSID of access point you wish to connect is hidden (nothing displayed in
3. ‘SSID’ field in ‘Site Survey’ function), you have to input correct SSID of the access
point you wish to connect. Please contact the owner of access point to ask for correct
SSID.
4. You have to input correct passphrase / security key to connect an access point with
encryption. Please contact the owner of access point to ask for correct passphrase /
security key.
5. The access point you wish to connect only allows network cards with specific MAC
address to establish connection. Please go to ‘Status’ menu and write the value of
‘MAC Address’ down, then present this value to the owner of access point so he / she
can add the MAC address of your network card to his / her access point’s list.
7. The network is slow / having problem when transferring large files
1. Move closer to the place where access point is located.
2. There could be too much people using the same radio channel. Ask the owner of the
access point to change the channel number.
38
Thank you for purchasing a quality Comfast Product.