Fuji Xerox H825CDW Color Multifunction Printer User Manual
Fuji Xerox Co., Ltd. Color Multifunction Printer
Contents
- 1. (Short-Term Confidential) User manual_1
- 2. (Short-Term Confidential) User manual_2
- 3. (Short-Term Confidential) User Manual-Important Info
- 4. (Short-Term Confidential) User Manual-Regulatory Info for USA
(Short-Term Confidential) User manual_2

300
| Using Digital Certificates
4Enter a password.
NOTE:
•The password is not necessary when importing a PKCS#7 format certificate, which has the
filename extension of p7b.
5Re-enter the password.
6Click Browse of File Name, and then select the file to be imported.
7Click Import.
Setting a Digital Certificate
NOTE:
•To manage digital certificates, you must set up HTTPS communication. See "Preparing to Use
HTTPS Communication."
1Start the Dell Printer Configuration Web Tool.
See "Starting the Dell Printer Configuration Web Tool."
2Click Print Server Settings the Security tab SSL/TLS Certificate
Management.
3Perform the following:
To set a Wireless LAN (Server) certificate, select Trusted Certificate Authorities
within Category.
To set a certificate of SSL Server, SSL Client, IPsec, or Wireless LAN (Client), select
Local Device.
4Select the purpose of use from the Certificate Purpose list.
5Click Display the List.
NOTE:
•If the list includes more than 20 certificates, click Next to display the next page.
6Select the certificate to associate. At this time, check that Validity of the certificate
selected is set to Valid.
7Click Certificate Details.
8Check the content, and then click Use This Certificate at the upper-right corner.
Confirming the Settings of a Digital Certificate
NOTE:
•To manage digital certificates, you must set up HTTPS communication. See "Preparing to Use
HTTPS Communication."
1Start the Dell Printer Configuration Web Tool.
See "Starting the Dell Printer Configuration Web Tool."
2Click Print Server Settings the Security tab SSL/TLS Certificate
Management.
3Click Certificate Management.
4Select the category from the Category list.

Using Digital Certificates |
301
5Select the purpose of use from the Certificate Purpose list.
6Click Display the List.
NOTE:
•If the list includes more than 20 certificates, click Next to display the next page.
The certificate displayed with an asterisk as "*Valid" in the Validity column is the
certificate associated with the purpose of use and currently used.
Deleting a Digital Certificate
NOTE:
•To manage digital certificates, you must set up HTTPS communication. See "Preparing to Use
HTTPS Communication."
1Start the Dell Printer Configuration Web Tool.
See "Starting the Dell Printer Configuration Web Tool."
2Click Print Server Settings the Security tab SSL/TLS Certificate
Management.
3Select the category from the Category list.
4Select the purpose of use from the Certificate Purpose list.
5Click Display the List.
NOTE:
•If the list includes more than 20 certificates, click Next to display the next page.
6Select the certificate to be deleted.
7Click Certificate Details.
8To delete the selected certificate, click Delete at the upper-right corner.
NOTE:
•When a certificate is deleted, the features associated with the deleted certificate are disabled.
To delete a certificate being used, either set the feature to OFF in advance or switch the
association to another certificate, and then switch to another operation mode if possible
before deleting the certificate.
•For an SSL Server, sets the HTTP-SSL/TLS and IPPS communication to OFF.
•For an SSL Client, set the LDAP-SSL/TLS, SMTP-SSL/TLS, and IEEE 802.1x
(EAP-TLS) setting to OFF.
•For IPsec, change the IKE setting to Pre-Shared Key or set the feature to OFF.
•For wireless LAN, change the wireless security setting to other than
WPA-Enterprise before deleting the certificate. Wireless network is available on
Dell H625cdw and Dell H825cdw.
Exporting a Digital Certificate
NOTE:
•To manage digital certificates, you must set up HTTPS communication. See "Preparing to Use
HTTPS Communication."
•Since the secret key is not exported, an imported PKCS#12 format certificate can be exported only
as a PKCS#7 certificate.
1Start the Dell Printer Configuration Web Tool.

302
| Using Digital Certificates
See "Starting the Dell Printer Configuration Web Tool."
2Select Print Server Settings the Security tab SSL/TLS Certificate
Management.
3Select the category from the Category list.
4Select the purpose of use from the Certificate Purpose list.
5Click Display the List.
NOTE:
•If the list includes more than 20 certificates, click Next to display the next page.
6Select the certificate to be exported.
7Click Certificate Details.
8Click Export This Certificate.
Setting the Features
You can set various security features using digital certificates.
•"Setting the Certificate in the IPsec Digital Signature Mode"
•"Setting the SSL-Use Server Certificate (HTTP/IPP)"
•"Setting SMTP-SSL/TLS Communication"
•"Setting LDAP-SSL/TLS Communication"
•"Setting for Wireless LAN WPA-Enterprise (EAP-TLS)"
•"Setting for Wireless LAN WPA-Enterprise (PEAPV0-MS-CHAPV2, EAP-TTLS PAP,
EAP-TTLS CHAP)"
•"Setting Client Certificate for IEEE 802.1x (EAP-TLS)"
Setting the Certificate in the IPsec Digital Signature Mode
NOTE:
•To manage digital certificates, you must set up HTTPS communication. See "Preparing to Use
HTTPS Communication."
1Import the certificate to be used with IPsec. See "Importing a Digital Certificate."
2Set the certificate to be used with IPsec. See "Setting a Digital Certificate."
3Make sure that the certificate is set correctly in IPsec. See "Confirming the Settings of
a Digital Certificate."
4Select Print Server Settings the Security tab IPsec.
5Select the Enable check box for Protocol.
6Click Digital Signature from the IKE list.
7Set each item, as necessary.
8Click Apply New Settings.
After restarting the printer, IPsec communication using digital signatures is enabled.
You can execute IPsec communication (Digital Signature Mode) between the printer

Using Digital Certificates |
303
and the network device such as PC on which the certificate and IPsec are set
identically as on the printer.
Setting the SSL-Use Server Certificate (HTTP/IPP)
NOTE:
•To manage digital certificates, you must set up HTTPS communication. See "Preparing to Use
HTTPS Communication."
1Import the certificate to be used with the SSL-use server. See "Importing a Digital
Certificate."
2Set the certificate to be used with the SSL-use server. See "Setting a Digital
Certificate."
3Make sure that the certificate is set correctly. See "Confirming the Settings of a
Digital Certificate."
NOTE:
•Check that the newly set certificate, not the self-signed certificate, is associated.
4After restarting the printer, the certificate set as described above is used as the server
certificate when executing communication with HTTP/IPP-SSL/TLS.
Setting SMTP-SSL/TLS Communication
1Start the Dell Printer Configuration Web Tool.
See "Starting the Dell Printer Configuration Web Tool."
2Click Print Server Settings the Security tab SSL/TLS.
3Select the Enable check box for SMTP-SSL/TLS Communication.
4Click Apply New Settings.
The printer is restarted and SMTP-SSL/TLS Communication is enabled.
Setting LDAP-SSL/TLS Communication
1Start the Dell Printer Configuration Web Tool.
See "Starting the Dell Printer Configuration Web Tool."
2Click Print Server Settings the Security tab SSL/TLS.
3Select the Enable check box for LDAP-SSL/TLS Communication.
4Click Apply New Settings.
The printer is restarted and LDAP-SSL/TLS Communication is enabled.

304
|Using Digital Certificates
Setting for Wireless LAN WPA-Enterprise (EAP-TLS)
NOTE:
•To manage digital certificates, you must set up HTTPS communication. See "Preparing to Use
HTTPS Communication."
•WPA-Enterprise is available only when Infrastructure is selected as Network Type.
•Make sure to import the certificate with Internet Explorer.
•After importing a PKCS#12 format certificate, the secret key is not exported even if you execute
exporting.
•Wireless network is available on Dell H625cdw and Dell H825cdw.
1Import the certificate to be used with Wireless LAN (server or root certificate). See
"Importing a Digital Certificate."
2Set the digital certificate for wireless LAN (server or root certificate).
aStart the Dell Printer Configuration Web Tool.
See "Starting the Dell Printer Configuration Web Tool."
bClick Print Server Settings the Security tab SSL/TLS Certificate
Management.
cClick Trusted Certificate Authorities within Category.
dSelect the Wireless LAN (Client) of use from the Certificate Purpose list.
eFrom Certificate Order, select how the certificates are sorted in Certificate List.
This setting is not necessary if you do not need to specify the order for the
certificates.
fClick Display the List.
gSelect the certificate to associate. At this time, check that Validity of the
certificate selected is set to Valid.
hClick Certificate Details.
iCheck the content, and then click Use This Certificate at the upper-right corner.
3Make sure that the certificate is set correctly. See "Confirming the Settings of a
Digital Certificate."
4Import the certificate to be used with Wireless LAN (client or client certificate). See
"Importing a Digital Certificate."
5Set the digital certificate for wireless LAN (client or client certificate).
aStart the Dell Printer Configuration Web Tool.
See "Starting the Dell Printer Configuration Web Tool."
bClick Print Server Settings the Security tab SSL/TLS Certificate
Management.
cClick Local Device within Category.
dSelect the Wireless LAN (Client) of use from the Certificate Purpose list.
eFrom Certificate Order, select how the certificates are sorted in Certificate List.
This setting is not necessary if you do not need to specify the order for the
certificates.
fSelect the certificate to associate. At this time, check that Validity of the
certificate selected is set to Valid.
gClick Certificate Details.
hCheck the content, and then click Use This Certificate at the upper-right corner.
Using Digital Certificates |
305
6Make sure that the certificate is set correctly. See "Confirming the Settings of a
Digital Certificate."
7Set WPA-Enterprise for EAP-TLS.
aStart the Dell Printer Configuration Web Tool.
See "Starting the Dell Printer Configuration Web Tool."
bClick Print Server Settings the Print Server Settings tab Wi-Fi.
cClick WPA-Enterprise-AES/WPA2-Enterprise-AES from the Encryption list of
Secure Settings.
NOTE:
• WPA-Enterprise-AES/WPA2-Enterprise-AES becomes available only when the following
steps are set correctly.
- Importing a Digital Certificate
- Setting a Digital Certificate
- Confirming the Settings of a Digital Certificate
dSet EAP-Identity of WPA-Enterprise.
eSelect EAP-TLS from the Authentication Method list of WPA-Enterprise.
fClick Apply New Settings.
Setting for Wireless LAN WPA-Enterprise (PEAPV0-MS-CHAPV2,
EAP-TTLS PAP, EAP-TTLS CHAP)
NOTE:
•To manage digital certificates, you must set up HTTPS communication. See "Preparing to Use
HTTPS Communication."
•WPA-Enterprise is available only when Infrastructure is selected as Network Type.
•Make sure to import the certificate with Internet Explorer.
•After importing a PKCS#12 format certificate, the secret key is not exported even if you execute
exporting.
•Wireless network is available on Dell H625cdw and Dell H825cdw.
1Import the certificate to be used with Wireless LAN (server or root certificate). See
"Importing a Digital Certificate."
2Set the digital certificate for wireless LAN (server or root certificate).
aStart the Dell Printer Configuration Web Tool.
See "Starting the Dell Printer Configuration Web Tool."
bClick Print Server Settings the Security tab SSL/TLS Certificate
Management.
cClick Trusted Certificate Authorities within Category.
dSelect the purpose of use from the Certificate Purpose list.
eClick Display the List.
fSelect the certificate to associate. At this time, check that Validity of the
certificate selected is set to Valid.
gClick Certificate Details.
hCheck the content, and then click Use This Certificate at the upper-right corner.
3Make sure that the certificate is set correctly.
aStart the Dell Printer Configuration Web Tool.
306
| Using Digital Certificates
See "Starting the Dell Printer Configuration Web Tool."
bClick Print Server Settings the Security tab SSL/TLS Certificate
Management.
cClick the category from the Category list.
dSelect the Wireless LAN (Server) of use from the Certificate Purpose list.
eFrom Certificate Order, select how the certificates are sorted in Certificate List.
This setting is not necessary if you do not need to specify the order for the
certificates.
fClick Display the List.
The certificate displayed with an asterisk as "*Valid" in the Validity column is the
certificate associated with the use purpose and actually used.
4Set WPA-Enterprise for PEAPV0-MS-CHAPV2, EAP-TTLS PAP, or EAP-TTLS CHAP.
aStart the Dell Printer Configuration Web Tool.
See "Starting the Dell Printer Configuration Web Tool."
bClick Print Server Settings the Print Server Settings tab Wi-Fi.
cClick WPA-Enterprise-AES/WPA2-Enterprise-AES from the Encryption list of
Secure Settings.
NOTE:
• WPA-Enterprise-AES/WPA2-Enterprise-AES becomes available only when the following
steps are set correctly:
- Importing a Digital Certificate
- Setting a Digital Certificate
- Confirming the Settings of a Digital Certificate
dSet EAP-Identity, Login Name, and Password of WPA-Enterprise.
eSelect either of the following from the Authentication Method list of
WPA-Enterprise:
• PEAPV0 MS-CHAPV2
•EAP-TTLS PAP
•EAP-TTLS CHAP
fClick Apply New Settings.
Setting Client Certificate for IEEE 802.1x (EAP-TLS)
NOTE:
•To manage digital certificates, you must set up HTTPS communication. See "Preparing to Use
HTTPS Communication."
•This feature is enabled only when Enable is set for IEEE 802.1x (EAP-TLS).
1Import a certificate to be used with SSL Client. See "Importing a Digital Certificate."
2Set a certificate to be used with SSL Client. See "Setting a Digital Certificate."
3Make sure that the certificate is set correctly. See "Confirming the Settings of a
Digital Certificate."
4After restarting the printer, the IEEE 802.1x (EAP-TLS) certificate is presented when
IEEE 802.1x communication with the RADIUS server starts. When the RADIUS server
is set to require a client certificate, the client certificate provided by the printer is
verified by the RADIUS server.
Understanding Printer Messages |
307
Understanding Printer Messages
The touch panel displays error messages describing the current state of the printer and
indicates possible printer problems you must resolve. This chapter provides a list of
status codes or error messages, and informs you what you can do to clear error
messages. When you contact customer support about an error, have the status codes
and messages ready.
CAUTION:
• When an error occurs, the print data remaining on the printer and the information accumulated
in the memory of the printer may be corrupted.
NOTE:
•A status code is listed in an error message.
•For status codes that are not listed in this chapter, refer to instructions in each error messages.
Status Codes
Status-Code What you can do
004-310 Turn off the printer. Make sure that the tray is correctly installed, and then
turn on the printer. Contact customer support if this failure is repeated.
005-121 Open the Duplex Automatic Document Feeder (DADF) cover and remove
the jammed documents.
009-340 Turn off the printer. Clean the Color Toner Density (CTD) sensor with a
clean dry cotton swab, and then turn on the printer. Contact customer
support if this failure is repeated. See "Cleaning the Color Toner Density
(CTD) Sensor."
009-360 Turn off the printer. Make sure that toner cartridge of the specified color is
correctly installed, and then turn on the printer. The status code differs
depending on the color of the toner cartridge. Contact customer support
if this failure is repeated. See "Replacing the Toner Cartridges."
009-361
009-362
009-363
009-367
009-368
009-369
009-370
010-377 Turn off the printer, and then turn it on again. Contact customer support if
this failure is repeated.
016-338 Turn off the printer, and then turn it on again. Contact your system
administrator if this failure is repeated.
016-404 Contact your system administrator. For details about digital certificate
problems, see "Digital Certificate Problems."
016-405 Security setting mismatch. Initialize the security setting, and then restart
the printer by turning off the printer and then on again. Contact your
system administrator for the security resetting.
016-503 Unable to resolve the e-mail SMTP server hostname. Tap Close, or wait
for 60 seconds for the printer to recover. Make sure that SMTP server and
DNS server are set correctly.
016-504 Unable to resolve the e-mail POP3 server hostname. Tap Close, or wait
for 60 seconds for the printer to recover. Make sure that user name and
password for POP3 server and DNS server are set correctly.

308
| Understanding Printer Messages
016-505 E-mail POP3 server login error. Tap Close, or wait for 60 seconds for the
printer to recover. Make sure that user name and password used for POP3
server are set correctly.
016-506 SMTP server is not configured. Tap Close, or wait for 60 seconds for the
printer to recover. Make sure that SMTP server or POP server is set.
016-507 E-mail SMTP server login error. Tap Close, or wait for 60 seconds for the
printer to recover. Make sure that user name and password used for SMTP
server are set correctly.
016-520 The certificate of the printer is invalid. Contact your system administrator.
Reset the certificate from other connectable clients with Dell™ Printer
Configuration Web Tool. If no device can be connected, disconnect
Ethernet cable, turn off the IPsec, and then reset the certificate with Dell
Printer Configuration Web Tool.
016-521 The certificate of the destination client is invalid. Contact your system
administrator. Check the certificate of the destination client and reset.
016-530 Authentication server access error. Turn off the printer, and then turn it on
again. Check the access settings for the authentication server and try
again. Contact customer support if this failure is repeated.
016-541 A wireless certificate of the server or client cannot be correctly referenced
while using Wireless LAN WPA-Enterprise or WPA2-Enterprise. Ask your
system administrator to connect the printer with a wired network, initialize
the wireless settings, import the wireless certificate, and then set
WPA-Enterprise or WPA2-Enterprise again.
016-542 A server certificate error has occurred when acquiring the certificate with
the operation of WPA-Enterprise or WPA2-Enterprise. This is a problem in
the server certificate, such as the validity period has expired for the server
certificate being used with the Radius server. Ask your system
administrator to check the server certificate being used with the Radius
server.
016-543 A wireless certificate of the server or client corruption error has occurred
while using the Wireless LAN WPA-Enterprise or WPA2-Enterprise. Ask
your system administrator to connect the printer with a wired network,
initialize the wireless settings, import the wireless certificate, and then set
WPA-Enterprise or WPA2-Enterprise again.
016-718 Error relating to USB Direct Print problems has occurred. While the USB
flash drive is still inserted, set Image Types to Photos (Standard
Quality) in Print Settings under the Print PDF/TIFF menu and
try printing again. See "Image Types."
016-720 Error relating to Page Description Language (PDL) emulation problems
has occurred. Change the Print Mode setting in the Graphics tab of the
print driver. Contact customer support if this failure is repeated.
016-756 Printing in the prohibited time. Contact your system administrator.
016-757 The account is not registered. Contact your system administrator.
016-758 The function cannot be used. Contact your system administrator.
016-759 Printable page limit is exceeded. Contact your system administrator.
016-764 An error occurs when the printer connected to the SMTP server. Tap
Close, or wait for 60 seconds for the printer to recover. Check the SMTP
server settings or contact the SMTP server administrator.
016-765 The capacity of the SMTP server is not enough. Tap Close, or wait for 60
seconds for the printer to recover. Contact the SMTP server administrator.
Status-Code What you can do
Understanding Printer Messages |
309
016-766 The e-mail exceeds the SMTP server size restriction. Tap Close, or wait
for 60 seconds for the printer to recover. Contact the SMTP server
administrator.
016-767 The e-mail address of the recipient is incorrect. Tap Close, or wait for 60
seconds for the printer to recover. Check e-mail address, and then try
scanning again.
016-768 The e-mail address of the sender is incorrect. Tap Close, or wait for 60
seconds for the printer to recover. Check e-mail address, and then try
scanning again.
016-786 A timeout error occurs when sending or receiving scanned data. Tap
Close, or wait for 60 seconds for the printer to recover. Check if the
Ethernet cable is connected properly. If there is no problem with the
Ethernet cable, contact server administrator.
016-790 Network connection error. IP address is not determined. Tap Close, or
wait for 60 seconds for the printer to recover. Check if the Ethernet cable
is connected properly. If there is no problem with the Ethernet cable,
contact server administrator.
016-799 Tap Close to clear the message and cancel the current print job. Check
the configuration of the printer on the print driver.
016-930 The device is not supported. Remove it from the front USB port.
016-931 The USB hub is not supported. Remove it from the front USB port.
016-985 Tap Close, or wait for 60 seconds for the printer to recover. Retry
scanning by lowering the resolution setting or changing the file format of
the scanned data.
016-986
024-965 Make sure that the size and type specified in the tray settings matches the
size and type of paper loaded in the tray.
024-966
024-969
026-721 Check your USB flash drive:
•If the file size or the number of files exceeds the limit of your USB flash
drive.
•If your USB flash drive is not write-protected.
027-446 Change the IPv6 address to avoid duplication. Turn off the printer, and
then turn it on again.
027-452 Change the IPv4 address to avoid duplication. Turn off the printer, and
then turn it on again.
031-521 SMB server login error. Tap Close, or wait for 60 seconds for the printer
to recover. Check login-able computer with your system administrator.
031-522 SMB server login error. Tap Close, or wait for 60 seconds for the printer
to recover. Check if login name (domain name and user name) and
password are correct.
031-523 Invalid SMB share name. Tap Close, or wait for 60 seconds for the printer
to recover. Check the share name you specified.
031-524 Exceeded the SMB server user account limit. Tap Close, or wait for 60
seconds for the printer to recover. Check the number of users who use
the server at the same time is not exceeding the upper limit.
031-525 SMB destination client permission error. Tap Close, or wait for 60
seconds for the printer to recover. Check if the specified user can read
and write file at the storage location.
031-526 Unable to resolve the SMB server hostname. Tap Close, or wait for 60
seconds for the printer to recover. Check DNS connection, or check if
forwarding destination server is registered with DNS.
Status-Code What you can do

310
| Understanding Printer Messages
031-527 Unable to resolve the SMB server hostname. Tap Close, or wait for 60
seconds for the printer to recover. Set DNS address, or set forwarding
destination server address as IP address.
031-528 Unable to connect to the SMB server. Tap Close, or wait for 60 seconds
for the printer to recover. Check if the printer can communicate via
network with the forwarding destination SMB server. For example, check
the following:
•Connection of an Ethernet cable
•TCP/IP setting
•Communication with Port 137 (UDP), 138 (UDP), and 139 (TCP).
For communication beyond the subnet, contact your system
administrator.
031-529 SMB server login error. Password is invalid. Tap Close, or wait for 60
seconds for the printer to recover. Check if password is correct.
031-530 The SMB share folder was not found on the specified SMB server. Tap
Close, or wait for 60 seconds for the printer to recover. Check the
following:
•Check if the storage location is correct.
•Check if the file name you specified can be used when creating a file on
the SMB server.
•Have your system administrator check the DFS setting, and then directly
specify the SMB server, share name, and storage location according to
the checked settings.
031-531 Unable to get a file or folder name on the SMB server. Tap Close, or wait
for 60 seconds for the printer to recover. Check access right of the folder
you specified.
031-532 SMB scan file or folder name limit exceeded. Tap Close, or wait for 60
seconds for the printer to recover. Change file name and forwarding
destination folder, or move or delete file in forwarding destination folder.
031-533 Unable to write a file in the SMB server. Tap Close, or wait for 60 seconds
for the printer to recover. Check the following:
•If the file name you specified is not used by other users.
•If file or folder that has the same name as the one you specified already
exists.
031-534 Unable to create a folder on the SMB server. Tap Close, or wait for 60
seconds for the printer to recover. Check the following:
•If the file name you specified is not used by other users.
•If file or folder that has the same name as the one you specified already
exists.
031-535 Unable to delete a file on the SMB server. Tap Close, or wait for 60
seconds for the printer to recover. Check if other user is not operating file
in storage location you specified.
031-536 Unable to delete a folder on the SMB server. Tap Close, or wait for 60
seconds for the printer to recover. Check if other user is not operating file
in storage location you specified.
031-537 SMB server capacity exceeded. Tap Close, or wait for 60 seconds for the
printer to recover. Check if the storage location has free space.
031-539 The specified SMB server is invalid. Tap Close, or wait for 60 seconds for
the printer to recover. Check if the server name is correct.
031-540 The specified domain name is invalid. Tap Close, or wait for 60 seconds
for the printer to recover. Check if the domain name is correct.
Status-Code What you can do

Understanding Printer Messages |
311
031-541 Invalid user name specified for SMB server. Tap Close, or wait for 60
seconds for the printer to recover. Check if login name (user name) is
correct.
031-542 TCP/IP not initialized. Tap Close, or wait for 60 seconds for the printer to
recover. Wait for a while and try the same operation again. Contact the
customer support if this failure is repeated.
031-543 SMB server login error. Tap Close, or wait for 60 seconds for the printer
to recover. Check login permitted time with your system administrator.
031-544 SMB server login error. Password is expired. Tap Close, or wait for 60
seconds for the printer to recover. Check the password valid period with
your system administrator.
031-545 SMB server login error. Password is to be changed. Tap Close, or wait for
60 seconds for the printer to recover. Check necessity of password
change with your system administrator.
031-546 SMB server login error. Invalid user is specified. Tap Close, or wait for 60
seconds for the printer to recover. Contact your system administrator for
the destination server settings.
031-547 SMB server login error. User restricted from accessing the SMB server is
specified. Tap Close, or wait for 60 seconds for the printer to recover.
Contact your system administrator for the destination server settings.
031-548 SMB server login error. Logon time of SMB destination is expired. Tap
Close, or wait for 60 seconds for the printer to recover. Contact your
system administrator for the destination server settings.
031-549 SMB server login error. Specified user is restricted, and a null password is
prohibited. Tap Close, or wait for 60 seconds for the printer to recover.
On server security settings, check access permission of null password
user.
031-550 Append command not supported by SMB server. Tap Close, or wait for
60 seconds for the printer to recover. Check if the printer has access
rights to append data to the SMB server. Check if server supports SMB
append command.
031-551 Rename command not supported by SMB server. Tap Close, or wait for
60 seconds for the printer to recover. Check if the printer has access
rights to rename data on the SMB server. Check if server supports SMB
append command.
031-552 Job canceled. Tap Close, or wait for 60 seconds for the printer to
recover. Change the file name that already exists on FTP server.
031-574 Unable to resolve the FTP server hostname. Tap Close, or wait for 60
seconds for the printer to recover. Check DNS connection, or check if
name of forwarding destination server is registered with DNS.
031-575 Unable to resolve the FTP server hostname. Tap Close, or wait for 60
seconds for the printer to recover. Set DNS address, or set forwarding
destination server address as IP address.
031-576 Unable to connect to the FTP server. Tap Close, or wait for 60 seconds
for the printer to recover. Check if the printer communicates with
forwarding destination FTP server. For example, check connection of
Ethernet cable and if the IP address of the server is correct.
031-578 FTP server login error. Tap Close, or wait for 60 seconds for the printer to
recover. Check if the login name (user name) and password are correct.
031-579 Invalid FTP subdirectory path. Tap Close, or wait for 60 seconds for the
printer to recover. Check if the storage location is correct.
Status-Code What you can do

312
| Understanding Printer Messages
031-580 Failed to obtain a file or folder name of the FTP server. Tap Close, or wait
for 60 seconds for the printer to recover. Check the server access right.
031-581 FTP scan file or folder name limit exceeded. Tap Close, or wait for 60
seconds for the printer to recover. Change the file name and forwarding
destination folder, or move or delete file in forwarding destination folder.
031-582 Unable to write a scan file to the FTP server location. Tap Close, or wait
for 60 seconds for the printer to recover. Check if the file name you
specified can be created in storage location. Check if the storage location
has free space.
031-584 Unable to create a scan folder on the FTP server. Tap Close, or wait for 60
seconds for the printer to recover. Check if the folder name you specified
can be created in storage location. Check if the folder that has the same
name as the one you specified already exists.
031-585 Unable to delete a file on the FTP server. DEL command failure. Tap
Close, or wait for 60 seconds for the printer to recover. Check server
access rights.
031-587 Unable to delete a folder on the FTP server. RMD command failure. Tap
Close, or wait for 60 seconds for the printer to recover. Check server
access rights.
031-588 Unable to write a file to the FTP server location. Tap Close, or wait for 60
seconds for the printer to recover. Check if storage location has free
space.
031-590 Job canceled. Tap Close, or wait for 60 seconds for the printer to
recover. Change the file name that already exists on FTP server.
031-594 FTP transfer type error. TYPE command failure. Tap Close, or wait for 60
seconds for the printer to recover. Try the same operation again. Contact
customer support if this failure is repeated.
031-595 FTP data port error. PORT command failure. Tap Close, or wait for 60
seconds for the printer to recover. Try the same operation again. Contact
customer support if this failure is repeated.
031-598 FTP append data error. APPE command failure. Tap Close, or wait for 60
seconds for the printer to recover. Check if the printer has access rights to
append data to the FTP server. Check if server supports FTP append
command.
031-599 FTP rename file error. RNFR command failure. Tap Close, or wait for 60
seconds for the printer to recover. Check if the printer has access rights to
rename data on the FTP server. Check if server supports FTP rename
command.
033-513 Tap Close, or wait for 60 seconds for the printer to recover. Try the
following:
•Print the received fax, or wait for a while until sending a fax is
completed.
•Print the fax job stored using the Secure Receive feature.
See "Receiving Faxes in the Secure Receiving Mode."
033-527 Tap Close, or wait for 60 seconds for the printer to recover. Wait for a
while until the printer is not busy, and then try again.
033-528 Tap Close, or wait for 60 seconds for the printer to recover. Check the
available time period for the FAX, and then try again.
033-762 Tap Close, or wait for 60 seconds for the printer to recover. The printer
rejects faxes sent from unwanted numbers. See "Junk Fax Setup."
Status-Code What you can do

Understanding Printer Messages |
313
033-776 The size of the fax document data is too large and may have exceeded the
space available in memory. Lower the scan resolution rate and then try
scanning again. See "Resolution."
033-788 Tap Close, or wait for 60 seconds for the printer to recover. Try the
following:
•Remove the received fax, or wait for a while until sending a fax is
completed.
•Print the fax job stored using the Secure Receive feature.
See "Receiving Faxes in the Secure Receiving Mode."
034-515 Tap Close, or wait for 60 seconds for the printer to recover. Try the
following:
•Try the same operation.
•Check the printer or remote machine if the memory is full.
034-791 Tap Close, or wait for 60 seconds for the printer to recover. Check if the
telephone line cord is connected properly. If the line connection is
correct, check the following:
•If Tone/Pulse setting is correct.
See "Tone / Pulse."
If Tone/Pulse setting is correct, check the following:
•If the remote machine can receive a fax.
035-701 Tap Close, or wait for 60 seconds for the printer to recover. Check the
following:
•Status of the remote machine
•Tone/Pulse setting
See "Tone / Pulse."
035-708 Tap Close, or wait for 60 seconds for the printer to recover. Try the
following:
•Try the same operation.
•Reduce the modem speed.
See "Modem Speed."
035-717 Tap Close, or wait for 60 seconds for the printer to recover. Reduce the
modem speed. See "Modem Speed."
035-718 Tap Close, or wait for 60 seconds for the printer to recover. Check the
status of the remote machine.
035-720 Tap Close, or wait for 60 seconds for the printer to recover. Check the
features of the remote machine.
035-781 Tap Close, or wait for 60 seconds for the printer to recover. Check if the
remote machine is busy.
042-700 Wait for a while until the printer cools down. Contact customer support if
this failure is repeated.
077-301 Close the right side cover.
077-302 Close the rear cover.
091-911 Remove the used waste toner box, and then install a new toner box. See
"Replacing the Waste Toner Box."
091-914 Reinsert the drum cartridge of the specified color. If the message remains,
replace the cartridge. See "Replacing the Drum Cartridges."
091-917
091-918
091-919
Status-Code What you can do
314
| Understanding Printer Messages
Error Messages
091-921 Make sure that the drum cartridge of the specified color is fully installed.
See "Replacing the Drum Cartridges."
091-922
091-923
091-924
091-931 Remove the used drum cartridge of the specified color, and then install a
new cartridge. See "Replacing the Drum Cartridges."
091-932
091-933
091-934
091-942 Reinsert the drum cartridge of the specified color. If the message remains,
replace the cartridge. See "Replacing the Drum Cartridges."
091-943
091-944
091-945
091-960 Remove the unsupported drum cartridge of the specified color, and then
install a supported drum cartridge. See "Replacing the Drum Cartridges."
091-961
091-962
091-963
093-930 Remove the used toner cartridge of the specified color, and then install a
new cartridge. See "Replacing the Drum Cartridges."
093-931
093-932
093-933
093-960 Remove the unsupported toner cartridge of the specified color, and then
install a supported toner cartridge. See "Replacing the Drum Cartridges."
093-961
093-962
093-963
093-970 Make sure that the toner cartridge of the specified color is fully installed.
See "Replacing the Drum Cartridges."
093-971
093-972
093-973
116-722 Tap Close for the printer to recover. Check the Web Services on Devices
(WSD) scan address and the destination computer, and then try scanning
again. Contact your system administrator.
193-700 When genuine toner cartridges are installed, change the Non-Dell Toner
setting to disable using the Dell Printer Configuration Web Tool.
Message Cause Action
Cannot access the LDAP
address book. Contact your
network administrator if this
error persists.
The printer fails to authenticate
against an authentication server.
Check the server settings. If the
error persists, contact your network
administrator.
An SSL authentication error on
connection to the LDAP server; an
SSL authentication internal error
occurs.
If the error persists, contact your
network administrator.
Status-Code What you can do

Understanding Printer Messages |
315
Cannot access the LDAP
address book. The LDAPS
server certificate is not
correct.
An SSL authentication error on
connection to the LDAP server; the
server certificate data is incorrect.
Check the root certificate of the
LDAP server SSL certificate on the
printer.
Cannot access the LDAP
address book. The LDAPS SSL
client certificate is not set.
An SSL authentication error on
connection to the LDAP server; the
LDAP server cannot acquire an SSL
client certificate.
Check that an SSL client certificate
is correctly imported into the
printer.
Cannot access the LDAP
address book. The server
names of LDAPS and the SSL
certificate do not match.
An SSL authentication error on
connection to the LDAP server; the
server certificate for the LDAP server
is not yet valid or has expired.
Change to a valid LDAP server SSL
certificate.
An SSL authentication error on
connection to the LDAP server; the
LDAP server name does not match
the certificate.
Set the LDAP server address on the
printer to match the address on the
LDAP server SSL certificate.
Cannot access the LDAP
address book. The time
settings of the printer and the
Kerberos server do not match.
The printer and the Kerberos server
clocks have a time difference that
exceeds the Kerberos server clock
skew value.
Check that the printer and the
Kerberos server clocks have the
correct time.
Cannot connect to server.
Check the server settings.
The specified server settings such as
IP address and realm/domain name
are incorrect.
Make sure that the correct IP
address/host name, port number,
realm/domain name, and search
directory root are specified in IP
Address / Host Name & Port,
Domain Name, and Search
Directory Root on the Dell Printer
Configuration Web Tool. See
"Kerberos Server" and "LDAP Server."
The LDAP or Kerberos version on the
server is not compatible with the
printer.
Contact your network administrator.
The server is down. Check that the server is functioning
normally.
Change the server settings
and check the server
connection.
The printer cannot search for
destinations within the specified
time.
Increase the time setting for Search
Time-Out on the Dell Printer
Configuration Web Tool. See
"Authentication System" and "LDAP
Server."
Check that the printer and the
server are properly connected with
an Ethernet cable. If there are not
any problems with the connection
and the error persists, the server
settings may have been changed.
Contact your network administrator.
Check the authentication
settings.
The login name and password for
access to an authentication server
are incorrect.
Make sure that the correct login
name and password are specified in
Login Name and Password on the
Dell Printer Configuration Web Tool.
See "Kerberos Server" and "LDAP
Server."
Message Cause Action

316
| Understanding Printer Messages
Invalid search characters or
LDAP User Mapping
incorrectly configured for
Configuration Web Tool.
The LDAP search filter fails to work
properly as special characters are
used in your search condition or on
the LDAP User Mapping page on the
Dell Printer Configuration Web Tool.
Remove special characters, and
then search again. See "LDAP User
Mapping."
Network connection is not
ready. Try again later.
You have started searching for
destinations before the IP address is
set for the printer.
Wait for a while, and then search
again.
No attribute or invalid name.
Check address info. on server.
The address information on the
server contain incorrect data or are
insufficient to get your search
request.
Check the address information
registered on the server or contact
your network administrator.
No Entries. The printer cannot find any
destinations that meet your search
condition.
Tap OK to return to the Search
Network Address Book screen, and
then specify a new condition to
search again.
Search Directory Root
incorrectly configured for
Configuration Web Tool.
The directories that do not exist in
the LDAP server are specified or an
invalid DN syntax is specified.
Make sure that valid values are
specified in Search Directory Root
on the Dell Printer Configuration
Web Tool. See "LDAP Server."
Specify the origin of the search with
the correct DN syntax, as shown in
the following example:
dc=w2008ad,dc=addressbook,dc=
net
Too many search results. Only
a maximum of 50 search scan
be displayed. Please refine
your search if needed.
The number of search results has
exceeded the maximum number the
printer can display.
Tap Close to display the search
results. If you cannot find your
desired destination on the result list,
specify a new condition to search
again.
Authentication server access
Error 016-530
Restart the printer.
Some other error occurs regarding
the LDAP server address book.
Turn off the printer, and then turn it
on again. If the error persists,
contact your network administrator.
Message Cause Action

Specifications |
317
Specifications
Operating System Compatibility
Power Supply
Dimensions
Supported Operating Systems Microsoft
®
Windows Vista
®
(32bit)
Microsoft
®
Windows Vista
®
(64bit)
Microsoft
®
Windows Server
®
2008 (32bit)
Microsoft
®
Windows Server
®
2008 (64bit)
Microsoft
®
Windows
®
7 (32bit)
Microsoft
®
Windows
®
7 (64bit)
Microsoft
®
Windows Server
®
2008 R2
Microsoft
®
Windows
®
8 (32bit)
Microsoft
®
Windows
®
8 (64bit)
Microsoft
®
Windows
®
RT
Microsoft
®
Windows Server
®
2012
Microsoft
®
Windows
®
8.1 (32bit)
Microsoft
®
Windows
®
8.1 (64bit)
Microsoft
®
Windows
®
RT 8.1
Microsoft
®
Windows Server
®
2012 R2
Microsoft
®
Windows
®
10 (32 bit)
Microsoft
®
Windows
®
10 (64 bit)
Mac OS X 10.7
OS X 10.8
OS X 10.9
OS X 10.10
Red Hat Enterprise
Linux
®
6 Desktop (64bit)
Red Hat Enterprise Linux 6 Desktop (32bit)
SUSE
®
Linux Enterprise Desktop 11 (64bit)
SUSE
®
Linux Enterprise Desktop 11 (32bit)
Ubuntu 12.04 LTS
Rated voltage 220 – 240 VAC 110 – 127 VAC
Frequency 50/60 Hz 50/60 Hz
Current 6 A or less 12 A or less
Power consumption 67.0 W (Ready)
15.0 W (Sleep)
1.0 W (Deep Sleep)
0 W (Offline)
67.0 W (Ready)
15.0 W (Sleep)
1.0 W (Deep Sleep)
0 W (Offline)
Height 500 mm (19.69 inches)

318
| Specifications
Weight
*
includes toner cartridges and drum cartridges.
Memory
Page Description Language (PDL)/Emulation,
Operating System, and Interface
*
Wireless network is available on Dell H625cdw and Dell H825cdw.
Width 420 mm (16.54 inches)
Depth 499 mm (19.65 inches)
Weight 30.7 kg (67.68 lb)
*
Memory 1 GB
Speed DDR3-1066MHz
PDL/Emulations PCL 6, PCL5e, PostScript Level3 Compatible, HBPL
Operating systems Microsoft
®
Windows Vista
®
(32bit)
Microsoft
®
Windows Vista
®
(64bit)
Microsoft
®
Windows Server
®
2008 (32bit)
Microsoft
®
Windows Server
®
2008 (64bit)
Microsoft
®
Windows
®
7 (32bit)
Microsoft
®
Windows
®
7 (64bit)
Microsoft
®
Windows Server
®
2008 R2
Microsoft
®
Windows
®
8 (32bit)
Microsoft
®
Windows
®
8 (64bit)
Microsoft
®
Windows Server
®
2012
Microsoft
®
Windows
®
8.1 (32bit)
Microsoft
®
Windows
®
8.1 (64bit)
Microsoft
®
Windows Server
®
2012 R2
Microsoft
®
Windows
®
10 (32 bit)
Microsoft
®
Windows
®
10 (64 bit)
Mac OS X 10.7
OS X 10.8
OS X 10.9
OS X 10.10
Red Hat Enterprise
Linux
®
6 Desktop (64bit)
Red Hat Enterprise Linux 6 Desktop (32bit)
SUSE
®
Linux Enterprise Desktop 11 (64bit)
SUSE
®
Linux Enterprise Desktop 11 (32bit)
Ubuntu 12.04 LTS
Interfaces Standard local: USB 2.0
Standard wired network: 10Base-T/100Base-TX/1000Base-T Ethernet
Standard wireless network
*
: IEEE 802.11b/802.11g/802.11n
Specifications |
319
Management Information Base (MIB) Compatibility
MIB is a database containing information about network devices such as adapters,
bridges, routers, or computers. This information helps network administrators manage
the network and analyze performance, traffic, errors, and so on. Your printer complies
with standard industry MIB specifications, allowing the printer to be recognized and
managed by various printer and network management software systems.
Environment
Operation
Print Quality Guarantee
Storage
Altitude
Cables
Your interconnection cable must meet the following requirements:
Print Specifications
Temperature 10 – 32°C (50 – 89.6°F)
Relative humidity 10 – 85% RH (no condensation)
Temperature 15 – 28°C (59 – 82.4°F)
Relative humidity 20 – 70% RH (no condensation)
Temperature -20 – 40°C (0 – 104°F)
Storage humidity 5 – 85% RH (no condensation)
Operating Up to 3,100 m (10,170 feet)
Storage Up to 3,100 m (10,170 feet)
Ethernet 10Base-T/100Base-TX/1000Base-T
USB USB 2.0
Phone connector RJ11
Wall jack connector RJ45
Print resolution 600 × 600 dpi

320
| Specifications
*
Width:
76.2 mm (3 inches) to 215.9 mm (8.5 inches)
Length:
127 mm (5 inches) to 355.6 mm (14 inches) for MPF
148 mm (5.8 inches) to 355.6 mm (14 inches) for Tray1
190.5 mm (7.5 inches) to 355.6 mm (14 inches) for the optional 550-sheet feeder
Copy Specifications
Print speed Simplex:
24 ppm (A4), 25ppm (Letter)
(Dell H625cdw)
29 ppm (A4), 30 ppm (Letter)
(Dell H825cdw/Dell S2825cdn)
Duplex:
18 ppm (A4), 17 ppm (Letter)
(Dell H625cdw)
19 ppm (A4), 20 ppm (Letter)
(Dell H825cdw/Dell S2825cdn)
Paper size A4, B5, A5, B6, A6, Letter, Executive, Folio (8.5 x 13"), Legal, Statement,
Envelope #10, Monarch, DL, C5, Custom
*
Copy resolution Optical: 600 × 600 dpi

Specifications |
321
*
Width:
76.2 mm (3 inches) to 215.9 mm (8.5 inches)
Length:
127 mm (5 inches) to 355.6 mm (14 inches) for MPF
Copy speed When using the document glass to make sequential copies of a
document with pages scanned one by one
Simplex (Dell H625cdw):
Color 14 cpm (A4)/25 cpm (Letter) or more
Black & White 24 cpm (A4)/25 cpm (Letter) or more
Simplex (Dell H825cdw/Dell S2825cdn):
Color 14 cpm (A4)/30 cpm (Letter) or more
Black & White 29 cpm (A4)/30 cpm (Letter) or more
Duplex (Dell H625cdw):
Color 14 cpm (A4)/17 cpm (Letter) or more
Black & White 24 cpm (A4)/17 cpm (Letter) or more
Duplex (Dell H825cdw/Dell S2825cdn):
Color 14 cpm (A4)/20 cpm (Letter) or more
Black & White 29 cpm (A4)/20 cpm (Letter) or more
When using the Duplex Automatic Document Feeder (DADF) to make
sequential copies of multiple documents
Simplex (Dell H625cdw):
Color 14 cpm (A4)/15 cpm (Letter) or more (400 dpi),
Black & White 24 cpm (A4)/25 cpm (Letter) or more (400 dpi)
Color 14 cpm (A4)/10 cpm (Letter) or more (600 dpi)
Black & White 24 cpm (A4)/24 cpm (Letter) or more (600 dpi)
Simplex (Dell H825cdw/Dell S2825cdn):
Color 14 cpm (A4)/15 cpm (Letter) or more (400 dpi)
Black & White 29 cpm (A4)/30 cpm (Letter) or more (400 dpi)
Color 14 cpm (A4)/10 cpm (Letter) or more (600 dpi)
Black & White 29 cpm (A4)/24 cpm (Letter) or more (600 dpi)
Duplex (Dell H625cdw):
Color 14 cpm (A4)/12 cpm (Letter) or more (400 dpi)
Black & White 24 cpm (A4)/25 cpm (Letter) or more (400 dpi)
Color 14 cpm (A4)/9 cpm (Letter) or more (600 dpi)
Black & White 24 cpm (A4)/18 cpm (Letter) or more (600 dpi)
Duplex (Dell H825cdw/Dell S2825cdn):
Color 14 cpm (A4)/12 cpm (Letter) or more (400 dpi)
Black & White 29 cpm (A4)/25 cpm (Letter) or more (400 dpi)
Color 14 cpm (A4)/9 cpm (Letter) or more (600 dpi)
Black & White 29 cpm (A4)/18 cpm (Letter) or more (600 dpi)
Paper Size A4, B5, A5, B6, A6, Letter, Executive, Folio (8.5 x 13"), Legal, Statement,
Envelope #10, Monarch, DL, C5, Custom
*
Zoom rate Document glass: 25 – 400%
DADF: 25 – 400%
Multiple copies 1 – 99
Copy mode (=Original type) Text, Text & Photo, Photo
Scanning method Document glass: Document-fixed flatbed scanning
DADF: Carriage-fixed, document-feeding scanning (2-side scanning)

322
| Specifications
148 mm (5.8 inches) to 355.6 mm (14 inches) for Tray1
190.5 mm (7.5 inches) to 355.6 mm (14 inches) for the optional 550-sheet feeder
Scanner Specifications
*1
Windows
®
operating system only
*2
Windows Vista
®
, Windows
®
7, Windows
®
8, and Windows
®
10 only
*3
WIA stands for Windows
®
Image Acquisition.
Fax Specifications
Compatibility TWAIN, TWAIN-Net, Windows
®
Image Acquisition (WIA)
*1
,
Scan Service for Web Services on Devices (WSD)
*2
Scan resolution Optical: 600 × 400 dpi, 600 × 600 dpi
Enhanced (Pull Scan):
•TWAIN – 50 × 50 to 9,600 × 9,600 dots/25.4 mm
•WIA
*3
– 75/100/150/200/300/400/600 dots/25.4 mm
Enhanced (Push Scan): 200/300 (Default)/400/600 dots/25.4 mm
Color bit depth 24 bit
Mono bit depth 1 bit for Line art
8 bit for Gray scale
Effective scanning length Document glass: 297 mm
DADF: 355.6 mm
Effective scanning width 215.9 mm
Scan speed (Text mode) Simplex:
Color 605 μS/line (600 dpi)
Black & White 282 μS/line (600 dpi)
Duplex:
Color 1210 μS/line (600 dpi)
Black & White 564 μS/line (600 dpi)
Compatibility ITU-T T.30
Applicable line Public Switched Telephone Network (PSTN), Private Branch Exchange
(PBX), Leased line (3.4 KHz/2-wire)
Data coding 1bit/JBIG/MMR/MR/MH
Max modem speed 33.6 Kbps
Transmission speed Approx. 3 seconds/page
*
Scanning speed Document glass: approx. 3 seconds/A4 (at standard fax resolution
mode)
DADF: approx. 5 seconds/Letter (at standard fax resolution mode),
7.5 seconds/Letter (at fine fax resolution mode)
Maximum document length Document glass: 297 mm
DADF: 355.6 mm
Paper size Letter, A4 (depending on a country)
Resolution Standard: R8 × 3.85 l/mm
Fine: R8 × 7.7 l/mm
Super Fine: 400 × 400 dpi
Photo: R8 × 7.7 l/mm
User memory 4 MB
Halftone 256 levels

Specifications |
323
*
Transmission time applies to memory transmission of text data scanned in Standard resolution with the Error
Correction Mode (ECM) using only ITU-T No.1 Chart.
Wireless Connection Specifications
NOTE:
•Wireless connection is available on Dell H625cdw and Dell H825cdw.
*1
EAP method supports PEAPv0, EAP-TLS, EAP-TTLS PAP, and EAP-TTLS CHAP.
*2
WPS 2.0 compliant.
Connectivity technology Wireless
Compliant standards IEEE 802.11b, 802.11g, and 802.11n
Bandwidth 2.4 GHz
Data transfer rate IEEE 802.11n: 65 Mbps
IEEE 802.11g: 54, 48, 36, 24, 18, 12, 9, and 6 Mbps
IEEE 802.11b: 11, 5.5, 2, and 1 Mbps
Security 64 (40-bit key)/128 (104-bit key) WEP, WPA-PSK (AES), WPA2-PSK
(AES), WPA-Enterprise (AES)
*1
, WPA2-Enterprise (AES)
*1
Wi-Fi Protected Setup (WPS)
*2
Push-Button Configuration (PBC),
Personal Identification Number (PIN)
Wireless mode Infrastructure, Ad-hoc, Wi-Fi Direct
324
|
6
Maintaining Your Printer
Maintaining Your Printer 325

Maintaining Your Printer |
325
Maintaining Your Printer
You need to complete certain tasks to maintain optimum print quality.
Checking the Status of Supplies
If the printer is connected to the network, the Dell™ Printer Configuration Web Tool can
provide instant feedback on remaining toner levels. Enter the printer's IP address in your
web browser to view this information. You can also set the printer to send you an e-mail
alert when the printer needs supplies.
On the touch panel, you can also check the following:
•Any supply or maintenance items that require attention replacing (However, the
printer can only display information about one item at a time).
•Amount of toner remaining in each toner cartridge.
E-mail Alert Setting
1Start the Dell Printer Configuration Web Tool.
See "Starting the Dell Printer Configuration Web Tool."
2Click Print Server Settings link.
3Under E-Mail Server Settings, enter the Primary SMTP Gateway, Reply Address.
4Under E-Mail Alert Settings, enter your e-mail address or an e-mail address of a key
operator.
5Click Apply New Settings.
NOTE:
• Connection pending until printer sends an alert is displayed on the SMTP server until an error
occurs.
Conserving Supplies
You can change several settings in the print driver to conserve toner cartridge and paper.
Ordering Supplies
You can order toner cartridges, drum cartridges, and waste toner box online or by phone
from Dell.
Using Dell Printer Configuration Web Tool
1Start the Dell Printer Configuration Web Tool.
See "Starting the Dell Printer Configuration Web Tool."
Supply Setting Function
Toner
cartridge
Toner Saver in the Others tab Select the check box to enable the print mode that uses
less toner. The image quality is lower when this feature is
used.
Print media Multiple Up in the Layout tab The printer prints two or more pages on one side of a
sheet.
Print media Duplex in the General tab The printer prints on both sides of a sheet of paper.
326
| Maintaining Your Printer
2Click the Order Supplies at:.
Using the Dell Supplies Management System
NOTE:
•For OS X, you can order consumables from the Status Monitor Widget. See "Using the Status
Monitor Widget for Macintosh."
•For Linux, you can order consumables from the Status Monitor Console. See "Using the Status
Monitor Console for Linux."
For Windows
®
:
The following procedure uses Windows
®
7/Windows
®
10 as an example.
1Click Start All Programs Dell Printers Dell Printer Hub or Dell Print
Management Tool.
For Windows
®
10: Click the Start button Dell Printer Hub or Dell Print
Management Tool.
2Select the printer from the Select Printer Model list.
3Order consumables either from the web or phone.
If ordering from the web:
aSelect a URL from the Select Reorder URL list.
bClick Visit Dell printer supplies ordering web site.
NOTE:
•When you cannot get information from the printer by two-way communication, a window
that prompts you to enter the Service Tag appears. Type your Dell printer Service Tag in the
field provided. See "Express Service Code and Service Tag."
If ordering by phone:
Call the number that appears under the Order by Phone heading.
To ensure that you get the best service, have your Dell printer's Service Tag ready.
See "Express Service Code and Service Tag."
Storing Print Media
To avoid potential paper feeding problems and uneven print quality, there are several
things you can do when storing print media:
•To achieve the best possible print quality, store print media in an environment where
the temperature is approximately 21°C (70°F) and the relative humidity is 40 %.
•Store cartons of print media on a pallet or shelf, rather than directly on the floor.
•If you store individual packages of print media out of the original carton, make sure
that they rest on a flat surface so the edges do not buckle or curl.
•Do not place anything on top of the print media packages.
Storing Consumables
Store consumables in their original package until you need to use them. Do not store
consumables in:
•Temperatures greater than 40°C (104°F)
•An environment with extreme changes in humidity or temperature

Maintaining Your Printer |
327
•Direct sunlight
•Dusty places
•A car for a long period of time
•An environment where corrosive gases are present
•A humid environment
Replacing the Toner Cartridges
WARNING:
• Before replacing the toner cartridges, read and follow the safety instructions in the Important
Information.
Dell toner cartridges are available only through Dell. You can order cartridges online at
www.dell.com/supplies or by phone. For details about how to order cartridges by
phone, see "Contacting Dell."
It is recommended to use Dell toner cartridges for the printer. Dell does not provide
warranty coverage for problems caused by using accessories, parts, or components not
supplied by Dell.
WARNING:
• Never throw a toner cartridge into an open flame. Remaining toner in the cartridge may catch
fire or explode, causing burns and injuries.
CAUTION:
• Do not shake the used toner cartridge. Shaking the cartridge may cause the toner to spill out.
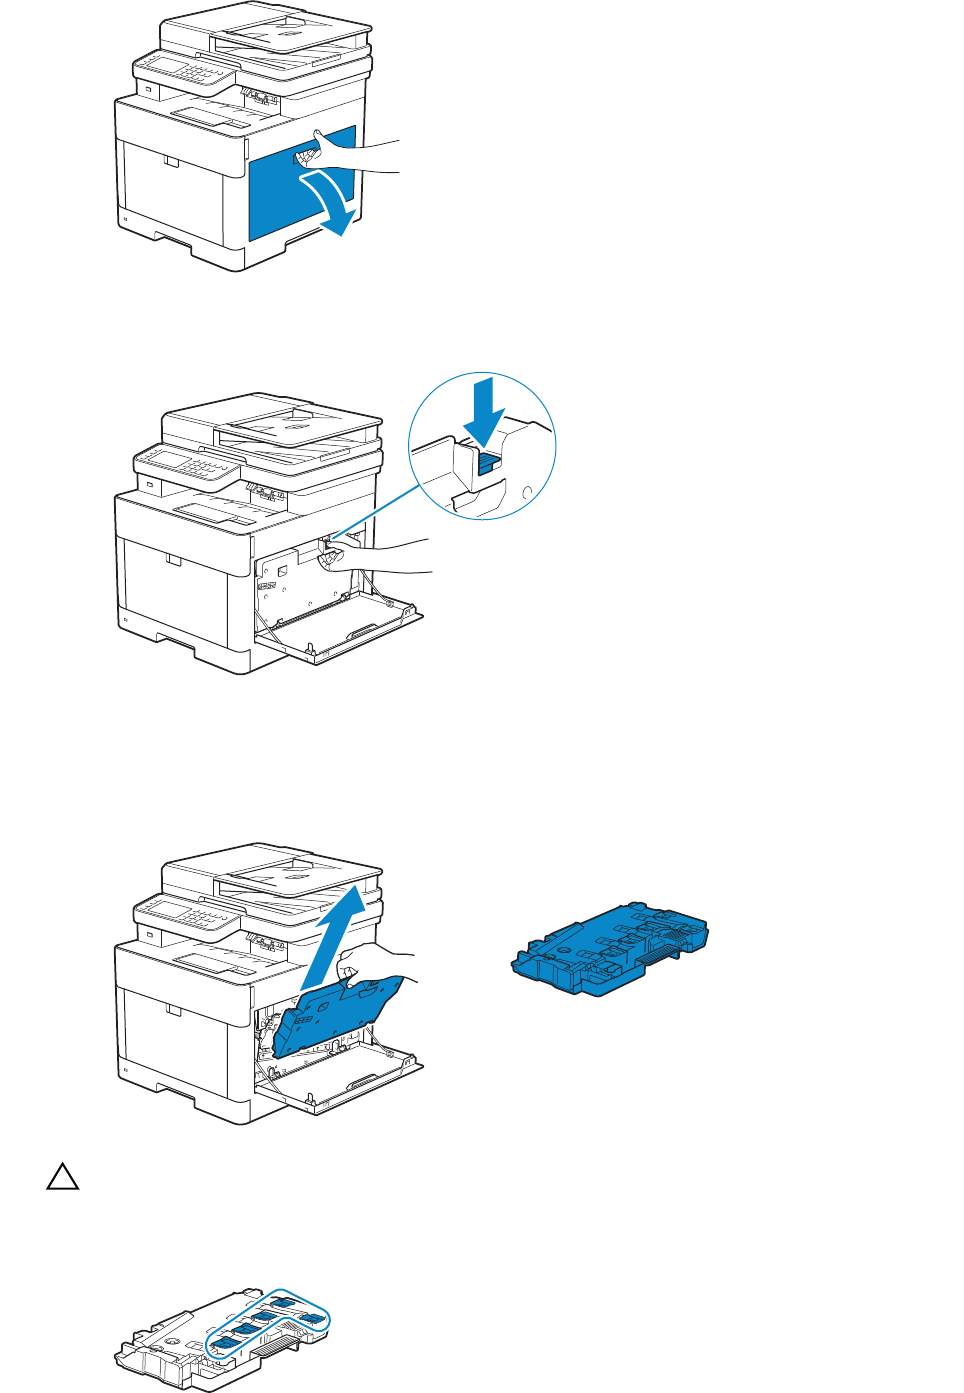
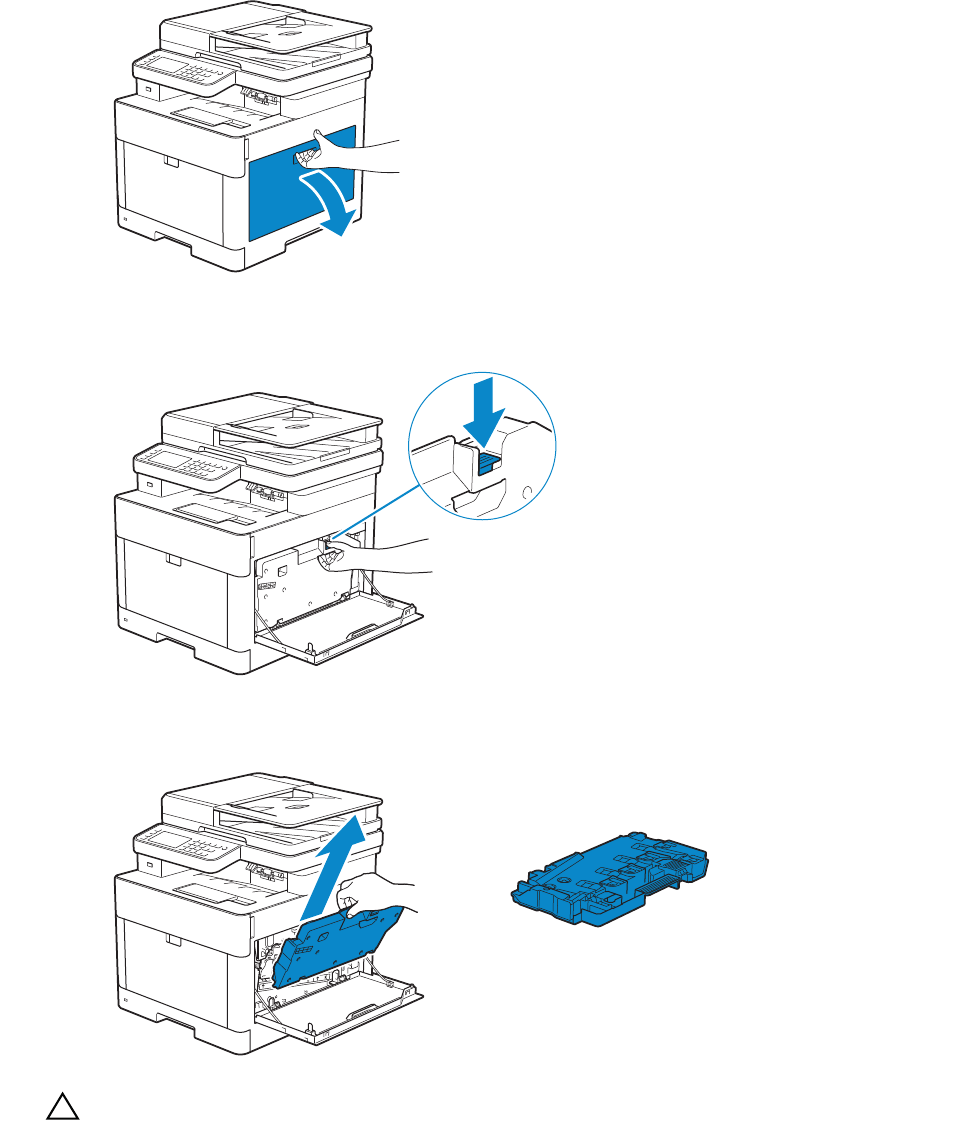
Removing the Toner Cartridge
NOTE:
•Make sure to remove all the paper from the Multipurpose Feeder (MPF) and close the MPF cover
before removing the toner cartridge.
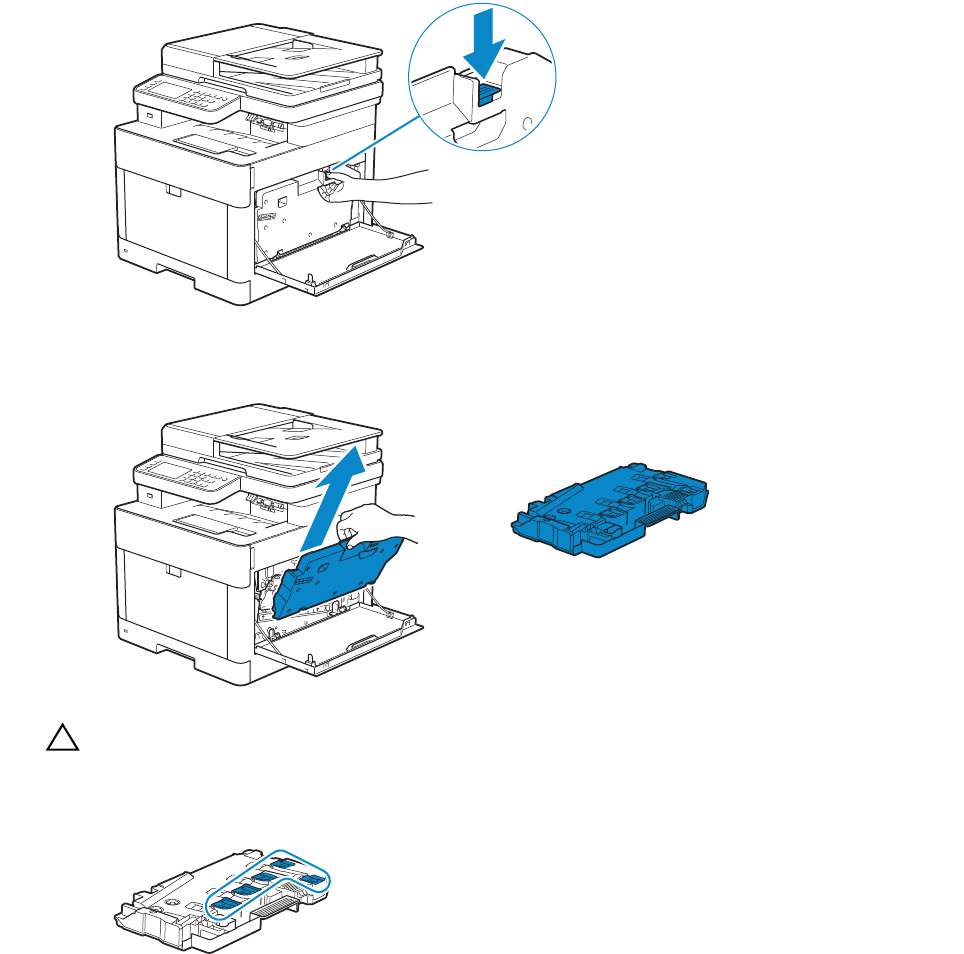
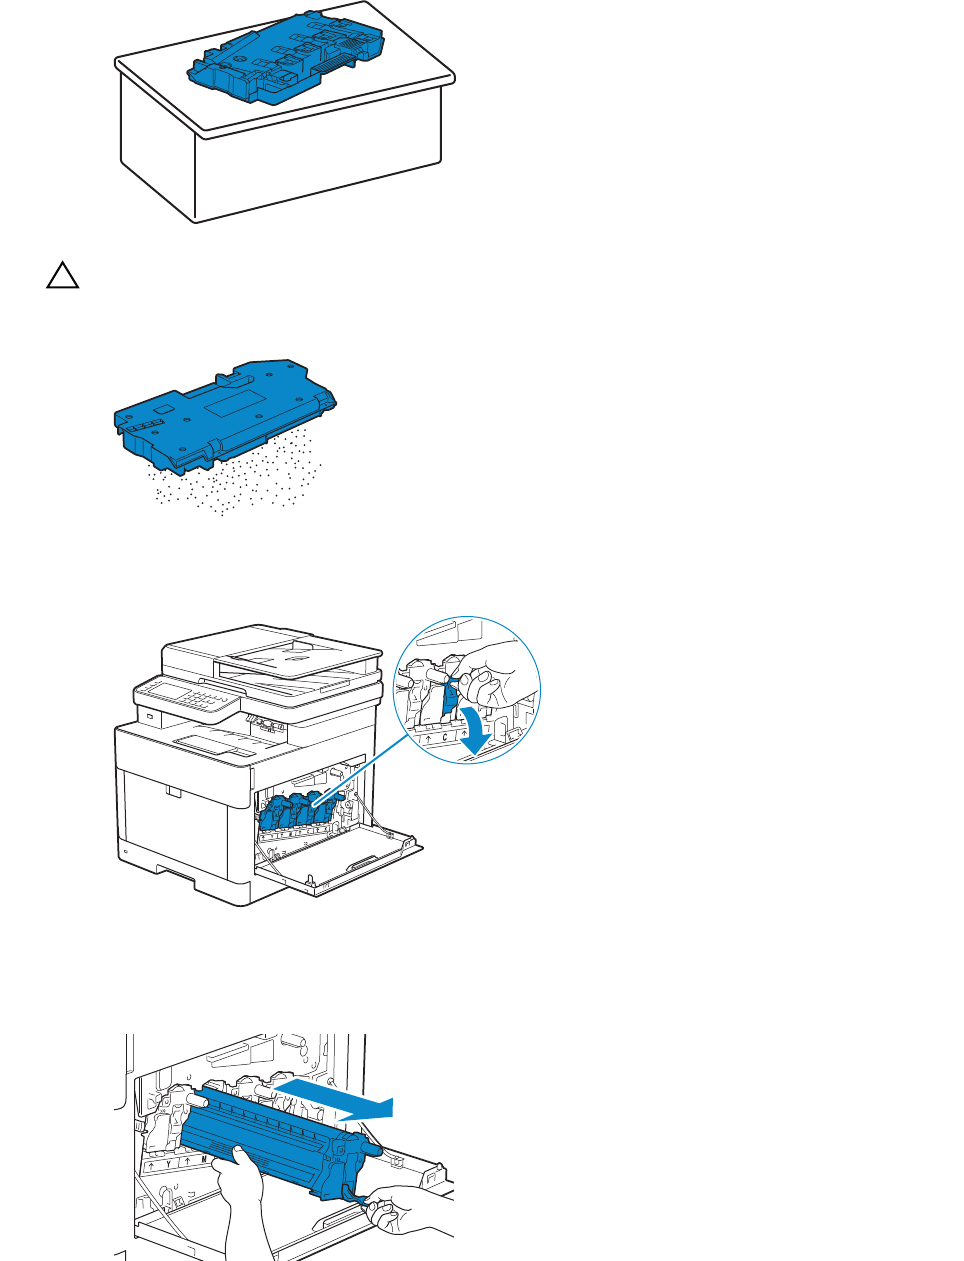
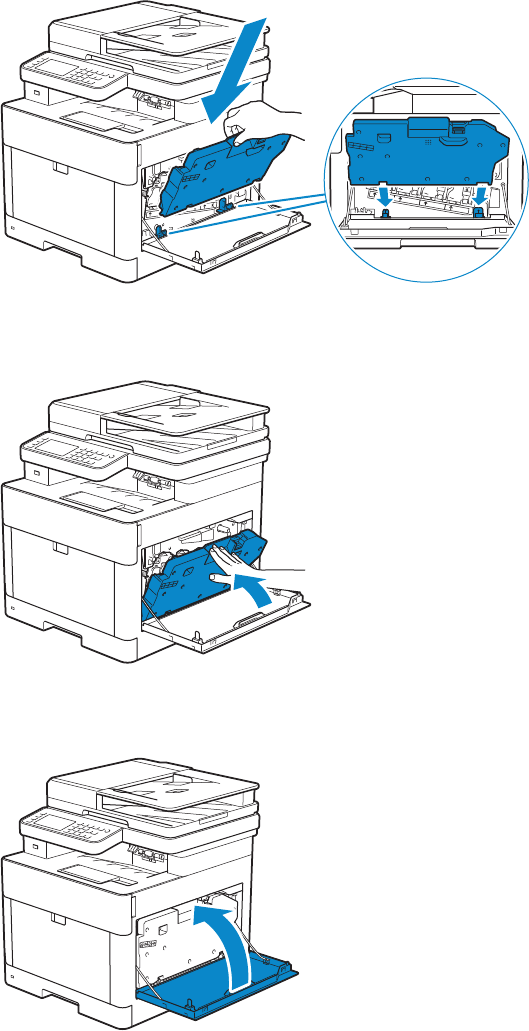
1Grasp the grips on both sides of the front cover, and then pull it down to open.
2Grasp the handle on the toner cartridge that you want to replace, and then pull it
out.
328
| Maintaining Your Printer
CAUTION:
• Do not shake the used toner cartridge. Shaking the cartridge may cause the toner to spill
out.
Installing a Toner Cartridge
1Unpack a new toner cartridge of the desired color.
2Shake the new toner cartridge six times to distribute the toner evenly.
3Align the toner cartridge to the notches on the associated cartridge slot, and then
insert the toner cartridge.
4Push the toner cartridge all the way in until you feel a click.
Maintaining Your Printer |
329
5Close the front cover.
Replacing the Drum Cartridges
You need to replace all drum cartridges (yellow, magenta, cyan, and black) at a time.
WARNING:
• Before replacing the drum cartridges, read and follow the safety instructions in the Important
Information.
CAUTION:
• Protect the drum cartridges against bright light. If the right side cover remains open for more
than 3 minutes, print quality may deteriorate.
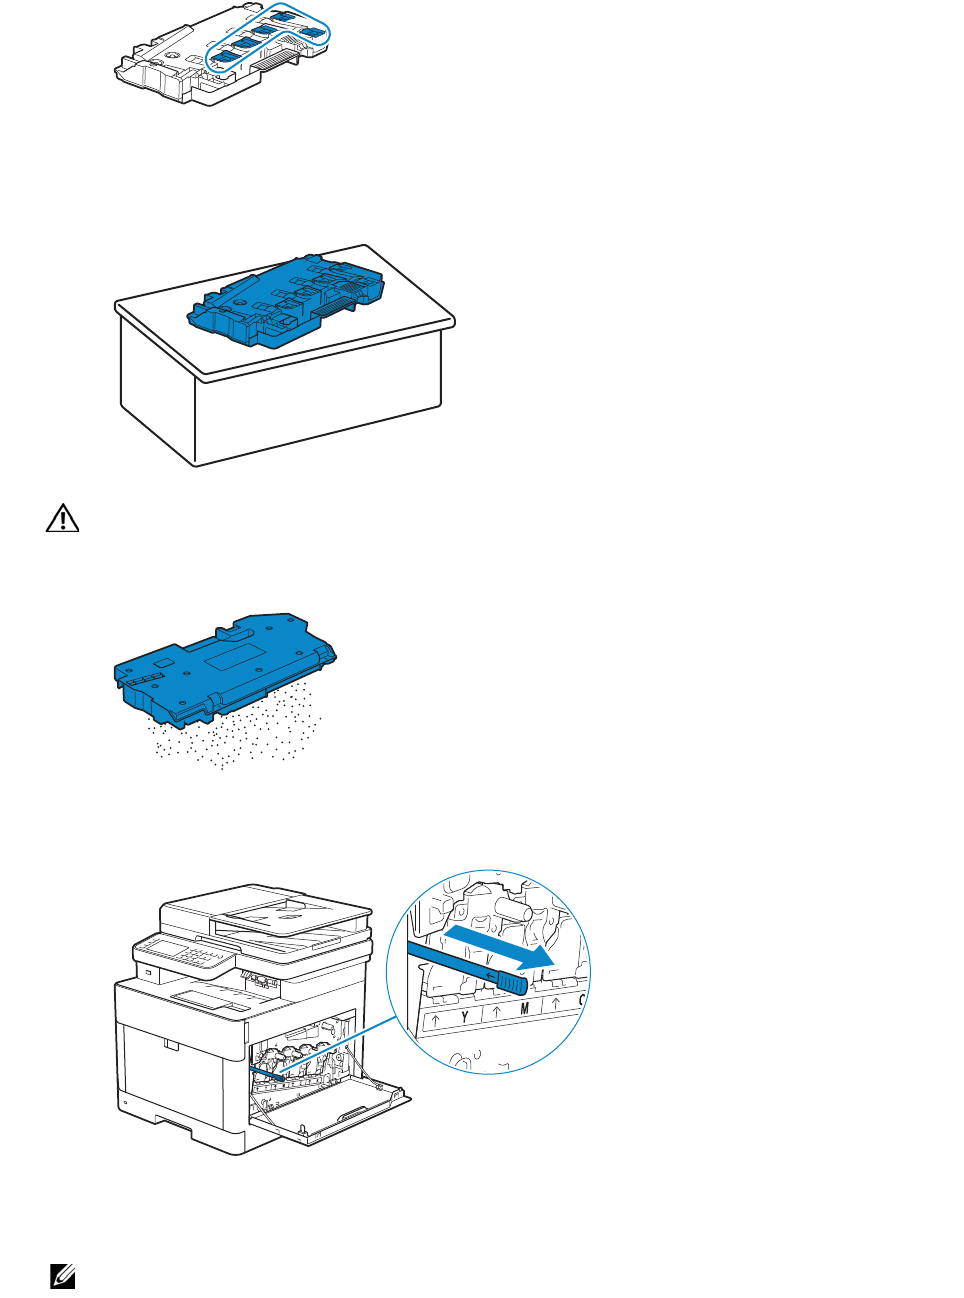
Removing the Drum Cartridge
1Open the right side cover.
2Push down the latch to release the waste toner box from the printer.
330
| Maintaining Your Printer
3Gently pull the waste toner box upwards.
CAUTION:
• Take care not to drop the waste toner box while you are removing it.
• After removing the waste toner box, do not touch the parts shown in the illustration. Your
hands may get dirty or stained with toner.
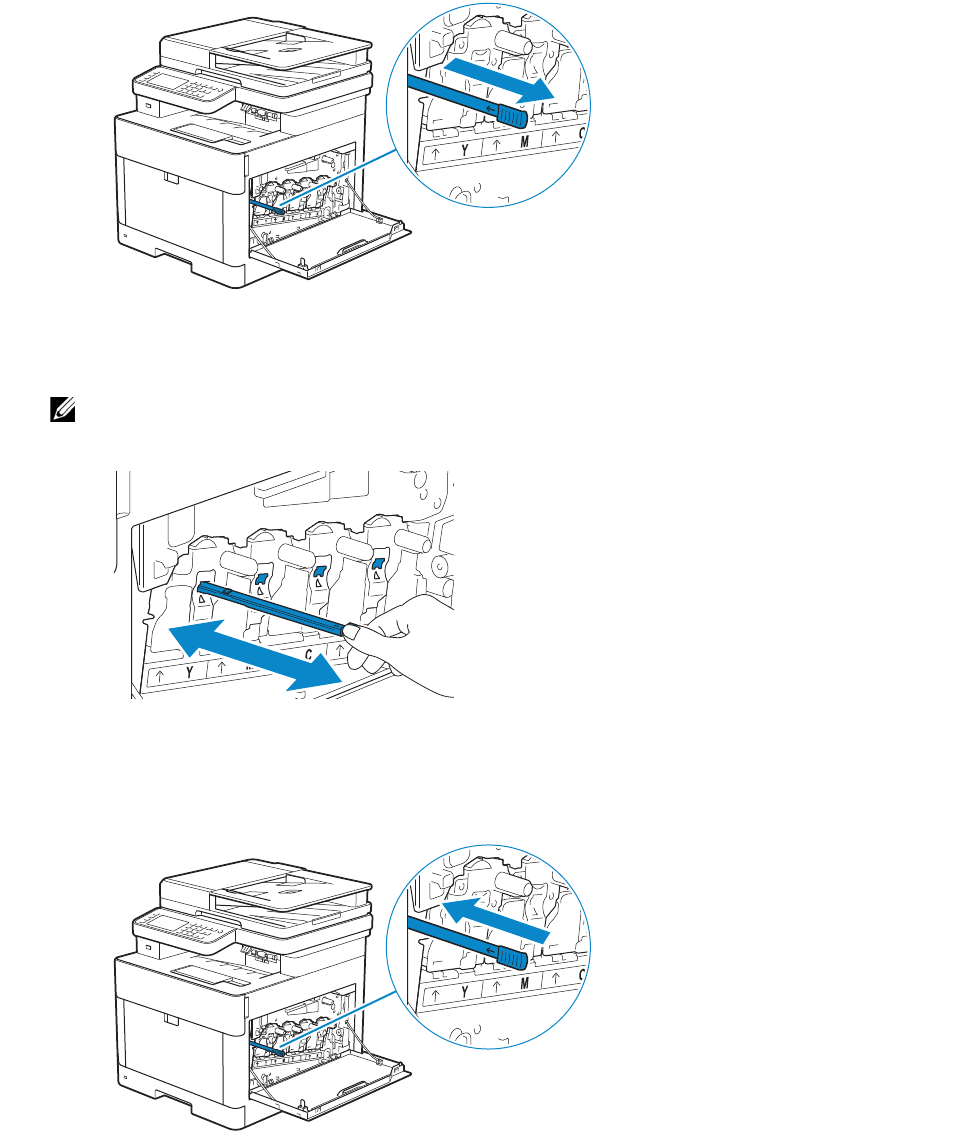
4Place the waste toner box on a level surface.
Always keep the side that was attached to the printer facing up.
Maintaining Your Printer |
331
CAUTION:
• Never let the side that was attached to the printer face down. This may cause the toner to
spill out.
5Pull down the tab on the drum cartridge that you want to replace.
6Pull the drum cartridge halfway out by pulling the tab, and then support the drum
cartridge from underneath with your other hand and pull it out completely.
7Repeat the steps 5 and 6 and remove the other three cartridges.

332
| Maintaining Your Printer
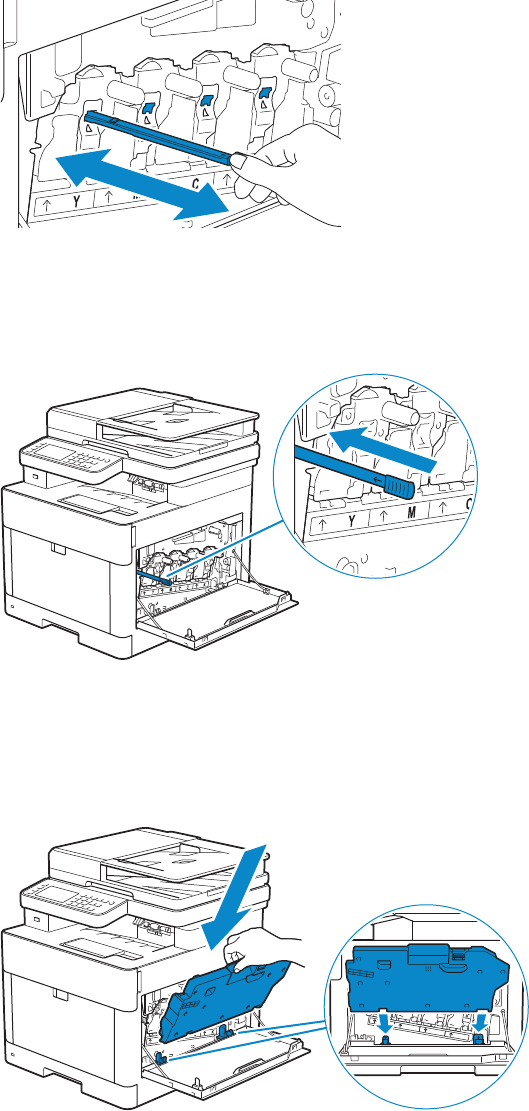
Installing a Drum Cartridge
1Unpack a new drum cartridge of the desired color.
2Remove the orange protective cover from the drum cartridge.
3Insert the drum cartridge into the associated cartridge slot, and then push until it
stops.
4Pull up the tab on the drum cartridge.
5Repeat the steps 1 to 4 to insert the other three cartridges.
6Pull out the cleaning rod from inside the printer.
Maintaining Your Printer |
333
7Insert the cleaning rod into one of the four holes of the tabs on the drum cartridges
until it stops, and then pull it out.
NOTE:
•It is not necessary to move the cleaning rod back and forth repeatedly.
8Repeat step 7 for the other three holes.
9Return the cleaning rod to its original location.
10 Reinsert the waste toner box.
Make sure that the two indented parts on the bottom go into the brackets on the
printer.

334
| Maintaining Your Printer
11 Push on the handle of the waste toner box until it clicks.
12 Close the right side cover.
Replacing the Waste Toner Box
WARNING:
• Before replacing the waste toner box, read and follow the safety instructions in the Important
Information.
Removing the Waste Toner Box
1Open the right side cover.
YMCK
Maintaining Your Printer |
335
2Push down the latch to release the waste toner box from the printer.
3Gently pull the waste toner box upwards.
Make sure that the side that was attached to the printer is facing up so that the waste
toner does not spill out.
CAUTION:
• Take care not to drop the waste toner box while you are removing it.
• After removing the waste toner box, do not touch the parts shown in the illustration. Toner
can soil or stain your hands.
336
| Maintaining Your Printer
4Insert the used waste toner box into the plastic bag that came with the new waste
toner box and seal the bag.
Installing a Waste Toner Box
1Unpack a new waste toner box.
2Insert the waste toner box.
Make sure that the two indented parts on the bottom go into the brackets on the
printer.
3Push on the handle of the waste toner box until it clicks.
4Close the right side cover.
YMCK
Maintaining Your Printer |
337
Cleaning Inside the Printer
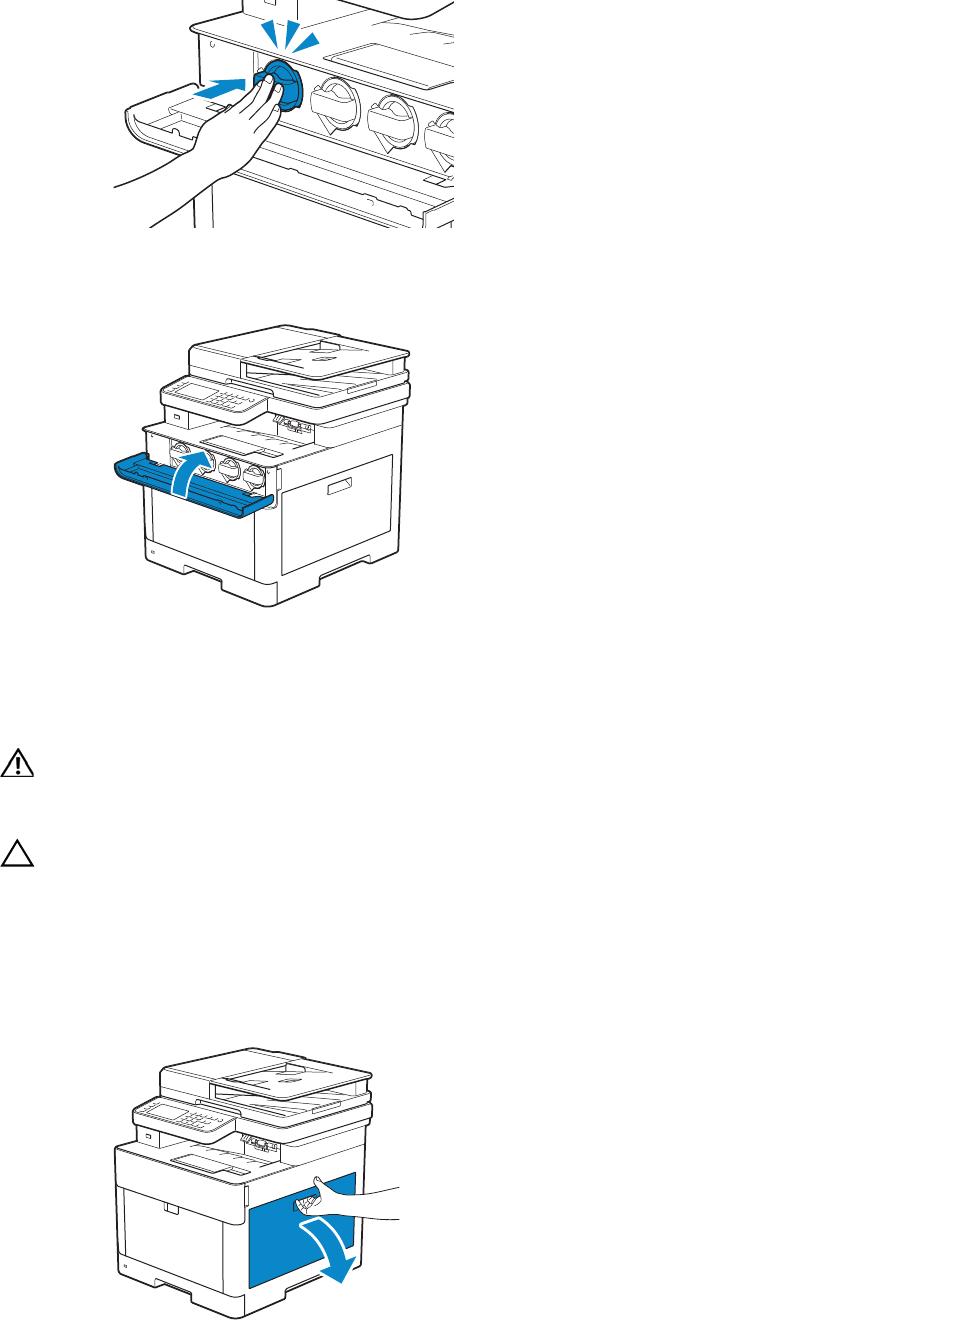
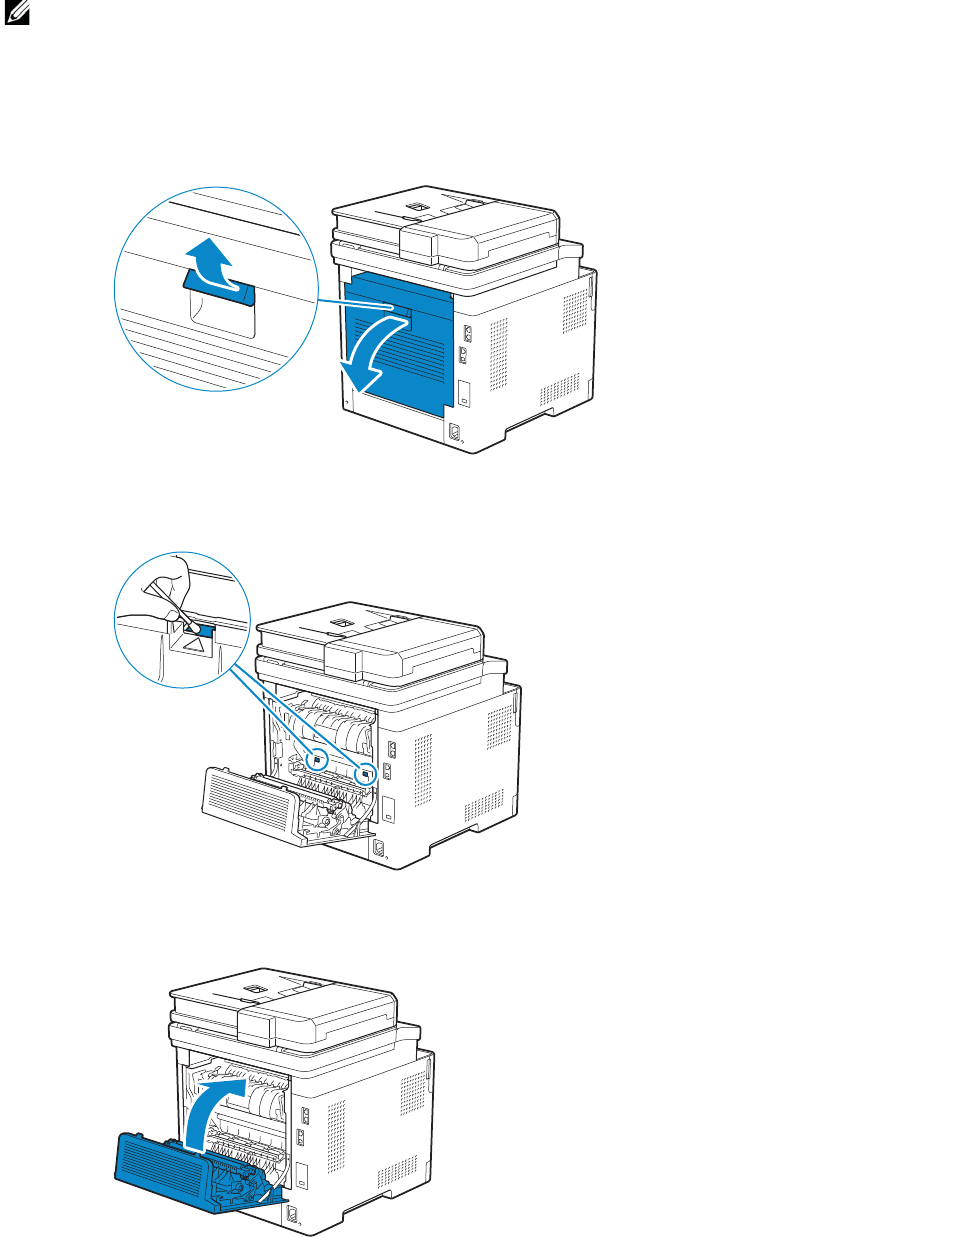
Cleaning the Color Toner Density (CTD) Sensor
NOTE:
•Clean the CTD sensor only when an alert for the CTD sensor is shown on the Status Monitor or
touch panel.
1Make sure that the printer is turned off.
2Pull up the handle lever of the rear cover, and open the rear cover.
3Clean the CTD sensor with a clean and dry cotton swab.
4Close the rear cover.
338
| Maintaining Your Printer
Cleaning the LED Print Head
To prevent deterioration of printing quality due to stains on the LED print head, clean the
LED print head regularly by using the cleaning rod or whenever you replace the drum
cartridges.
1Open the right side cover.
2Push down the latch to release the waste toner box from the printer.
3Gently pull the waste toner box upwards.
CAUTION:
• Take care not to drop the waste toner box while you are removing it.
• After removing the waste toner box, do not touch the parts shown in the illustration. Toner
can dirty or stain your hands.
Maintaining Your Printer |
339
4Place the waste toner box on a level surface.
Always keep the side that was attached to the printer facing up.
WARNING:
• Never let the side that was attached to the printer face down. This may cause the toner to
spill out.
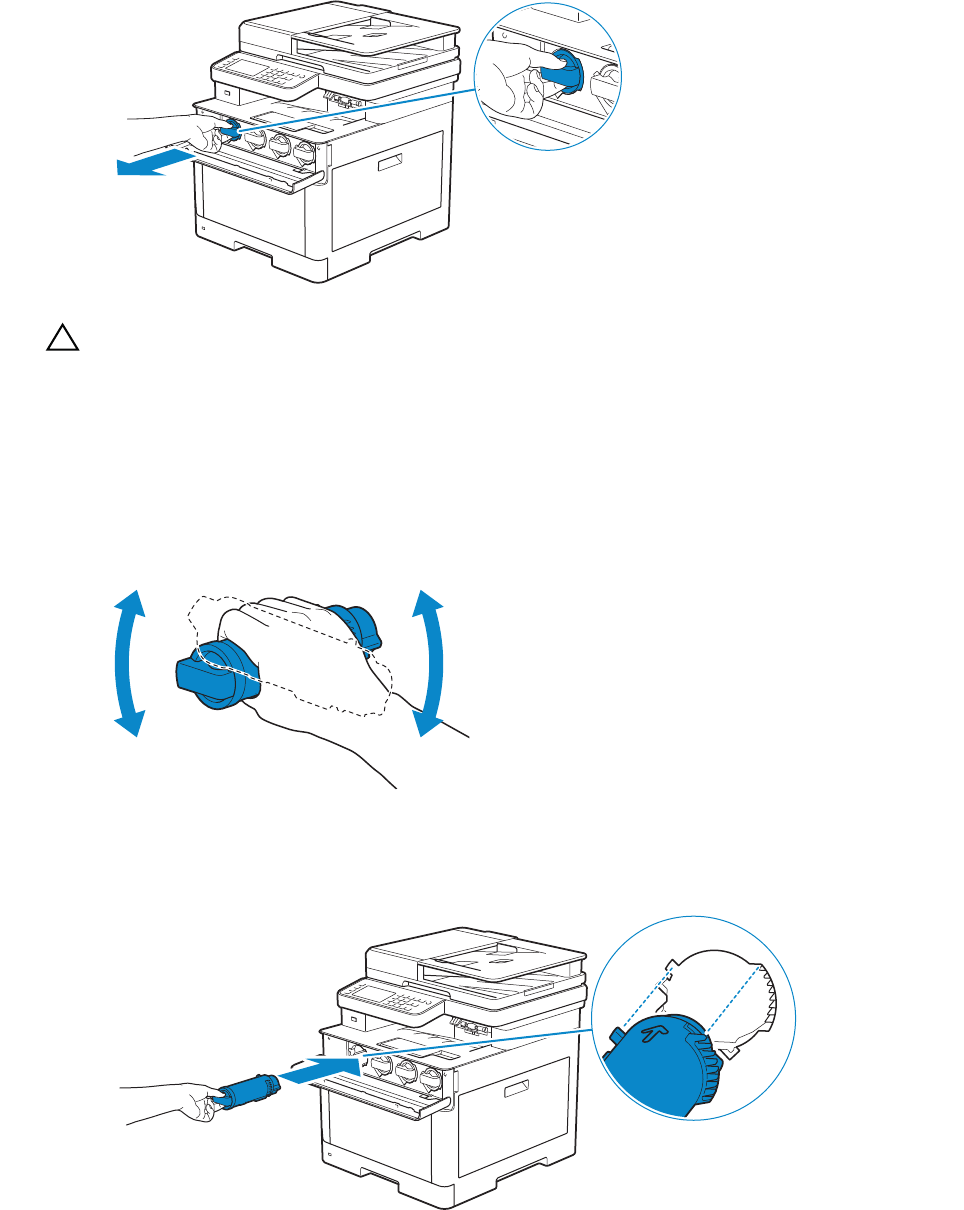
5Pull out the cleaning rod from inside the printer.
6Insert the cleaning rod into one of the four holes of the tabs on the drum cartridges
until it stops, and then pull it out.
NOTE:
•Insert the cleaning rod with the pad side up.
•It is not necessary to move the cleaning rod back and forth repeatedly.
340
| Maintaining Your Printer
7Repeat step 6 for the other three holes.
8Return the cleaning rod to its original location.
9Insert the waste toner box.
Make sure that the two indented parts on the bottom go into the brackets on the
printer.
10 Push on the handle of the waste toner box until it clicks.
YMCK
Maintaining Your Printer |
341
11 Close the right side cover.
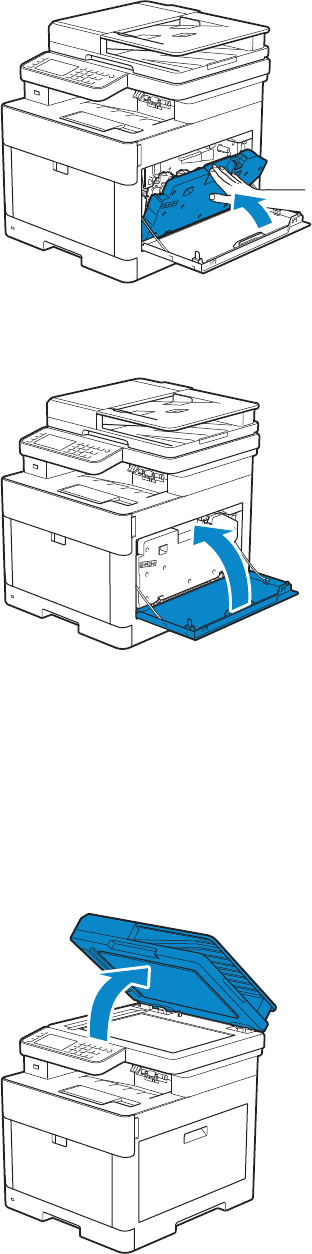
Cleaning the Scanner
Keeping the scanner clean helps ensure the best possible copies. It is recommended to
clean the scanner at the start of each day and during the day, as needed.
1Slightly dampen a soft lint-free cloth or paper towel with water.
2Open the document cover.
342
| Maintaining Your Printer
3Wipe the surface of the document glass, DADF glass, white strip, and white
document cover until it is clean, and then wipe with a dry cloth or paper towel until
it is completely dry.
NOTE:
•Handle the white strip with care.
4Pull the tab to open the DADF chute cover and hold it open.
5Wipe the surface of the duplex sensor glass and white strip until it is clean, and then
wipe with a dry cloth or paper towel until it is completely dry.
1White Strip
2White Document Cover
3Document Glass
4DADF Glass
4
3
1
2
1
2

Maintaining Your Printer |
343
6Gently close the DADF chute cover.
7Close the document cover.
Cleaning the DADF Feed Rollers
Keeping the DADF feed rollers clean helps ensure the best possible copies. It is
recommended to clean the DADF feed rollers at regular intervals.
1Open the DADF cover.
2Wipe the DADF feed rollers with a dry soft lint-free cloth or paper towel until they are
clean.
If the DADF feed rollers get stained with ink, documents that go through the DADF
can also become stained. In this case, slightly dampen a soft lint-free cloth or paper
towel with a neutral detergent or water, and then remove the ink stains from the
DADF feed rollers until they are clean and dry.
Moving the Printer
This section describes how to move the printer.
WARNING:
• Before performing any of the following procedures, read and follow the safety instructions in
the Important Information.
• If the optional 550-sheet feeder (Tray2) has been installed, uninstall the optional 550-sheet
feeder before moving the printer. If the optional 550-sheet feeder is not fixed securely to the
printer, it may fall to the ground and cause injuries. See "Removing the Optional 550-Sheet
Feeder."
1Turn off the printer, and then disconnect the power cord, interface cable, and any
other cables.
1Duplex Sensor Glass
2White Strip
344
| Maintaining Your Printer
2Remove any paper from the DADF, and then retract the document stopper.
3Remove any paper in the output tray, and then return the output tray extension.
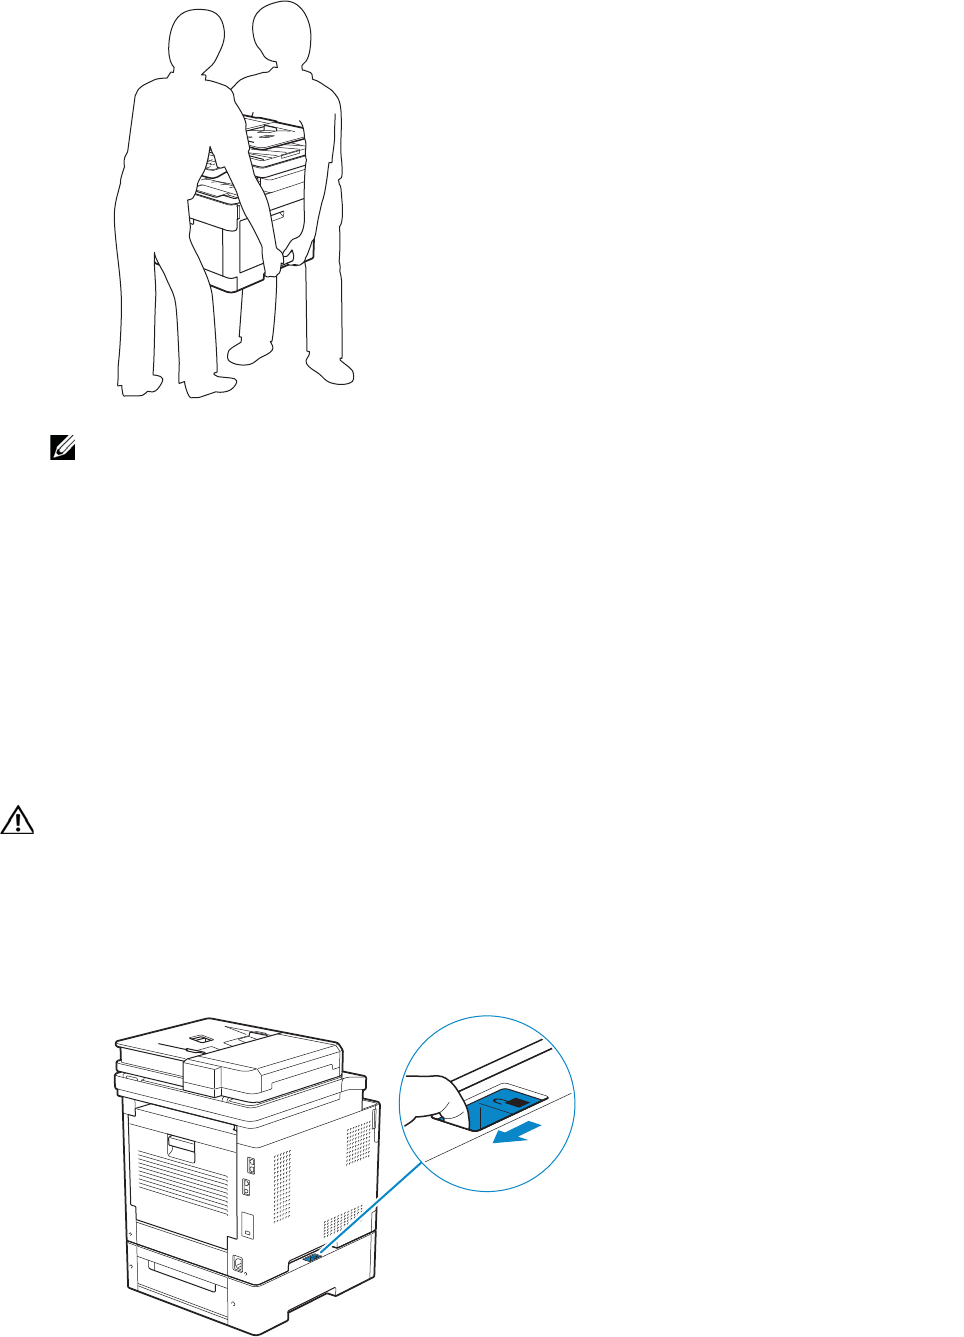
4Lift the printer and move it gently.
WARNING:
• Two people are required to lift the printer.
Maintaining Your Printer |
345
NOTE:
•If you move the printer over a long distance, remove the toner cartridges from the printer to
prevent toner from spilling, and then pack the printer into a box. See "Replacing the Toner
Cartridges."
Removing Options
If the printer location needs to change or the printer and the optional 550-sheet feeder
need to be shipped to a new location, the optional 550-sheet feeder must be removed
from the printer. For shipping, pack the printer and the optional 550-sheet feeder
securely to avoid damage.
Removing the Optional 550-Sheet Feeder
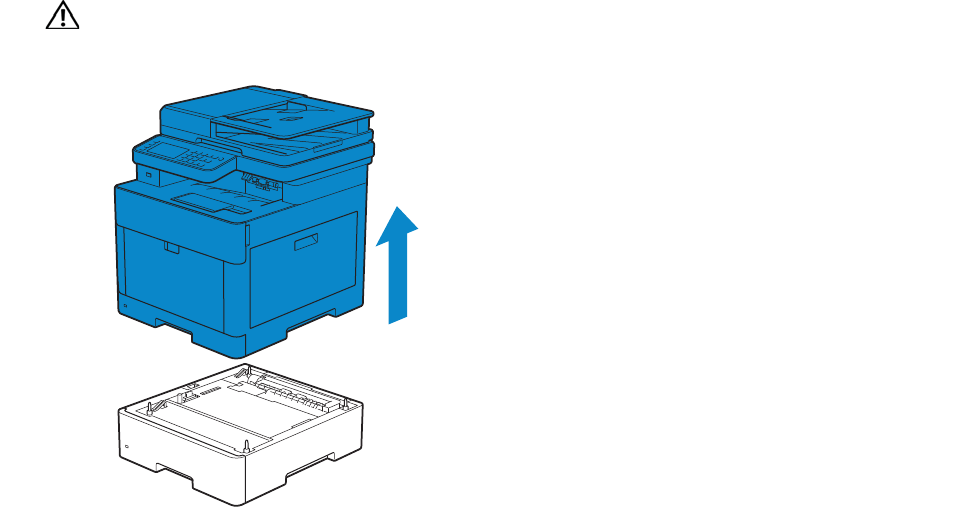
WARNING:
• Before removing the optional 550 sheet feeder (Tray2), make sure to turn off the printer, unplug
the power cord, and disconnect all cables from the rear of the printer.
1Make sure that the printer is turned off, and then disconnect all cables from the rear
of the printer.
2Slide the lock switch of the optional 550-sheet feeder to the unlock position.
346
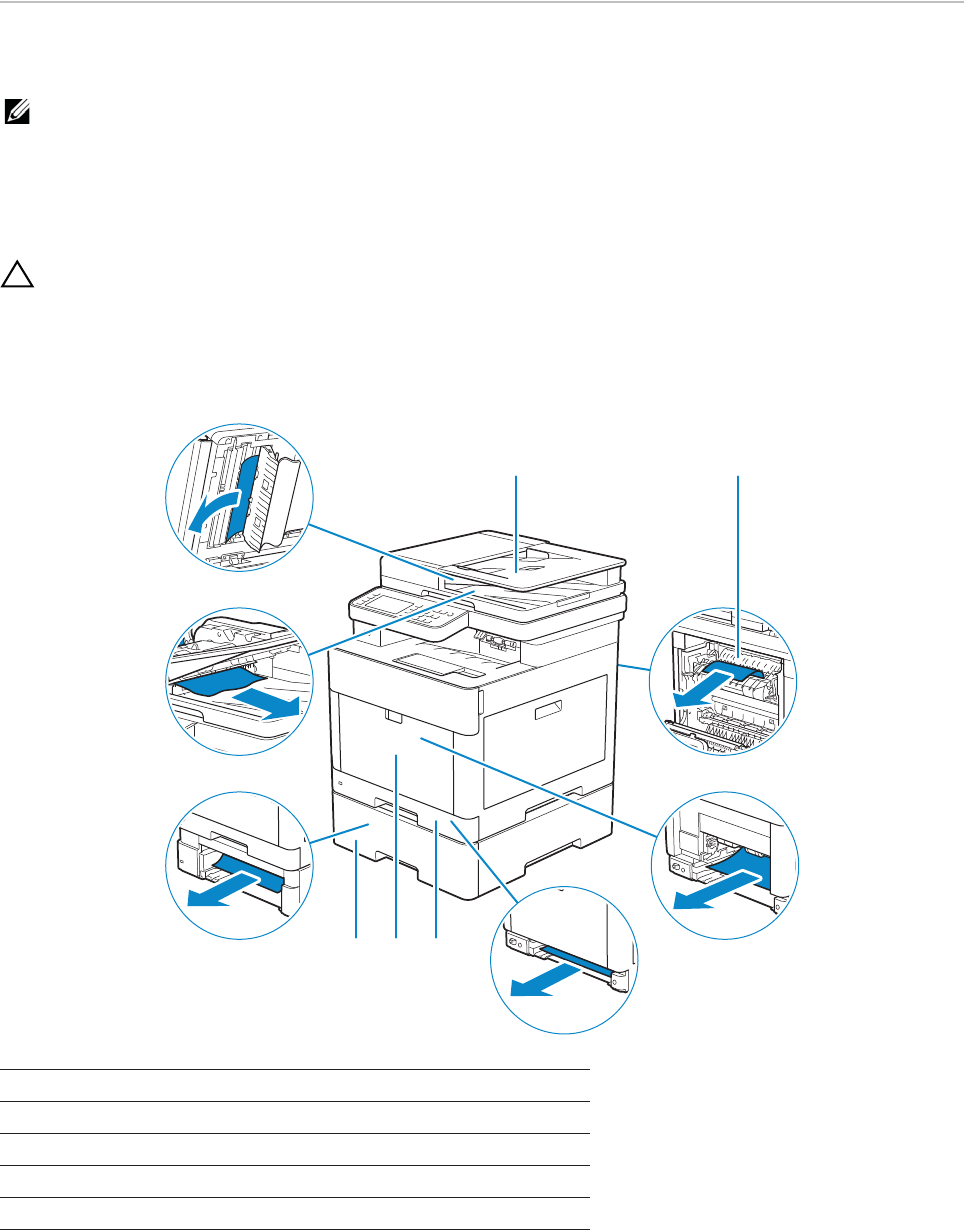
| Maintaining Your Printer
3Gently lift the printer off the optional 550-sheet feeder, and then place it on a level
surface.
WARNING:
• Two people are required to lift the printer.
4Connect all the cables into the rear of the printer, and then turn on the printer.
|
347
7
Troubleshooting
Troubleshooting 348
348
| Troubleshooting
Troubleshooting
Clearing Jams
NOTE:
•Careful selection of appropriate print media and proper loading allow you to avoid paper jams. See
"
Print Media Guidelines.
"
Identifying the Location of Paper Jams
CAUTION:
• Do not attempt to clear any jams using tools or instruments. This may permanently damage the
printer.
The following illustration shows where paper jams may occur along the print media
path.
Clearing Paper Jams From the DADF
When a document gets jammed inside the DADF, remove the jammed documents with
1 Duplex Automatic Document Feeder (DADF)
2 Fusing Unit
3Tray1
4 Multipurpose Feeder (MPF)
5 Optional 550-Sheet Feeder
1 2
5 4 3
Troubleshooting |
349
the following procedures.
NOTE:
•To prevent document jams, use the document glass for thick, thin, or mixed documents.
•To resolve the error displayed on the touch panel, you must clear all print media from the print
media path.
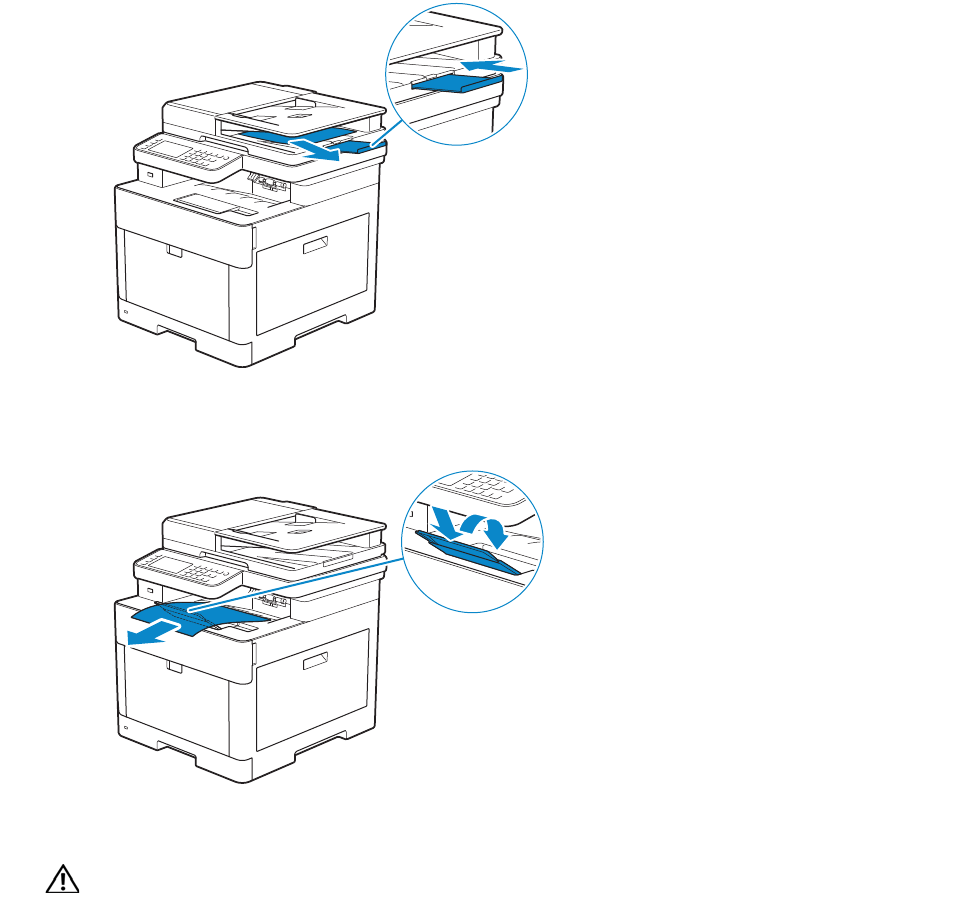
Clearing Documents From the Document Feed Area and Document Exit
Area
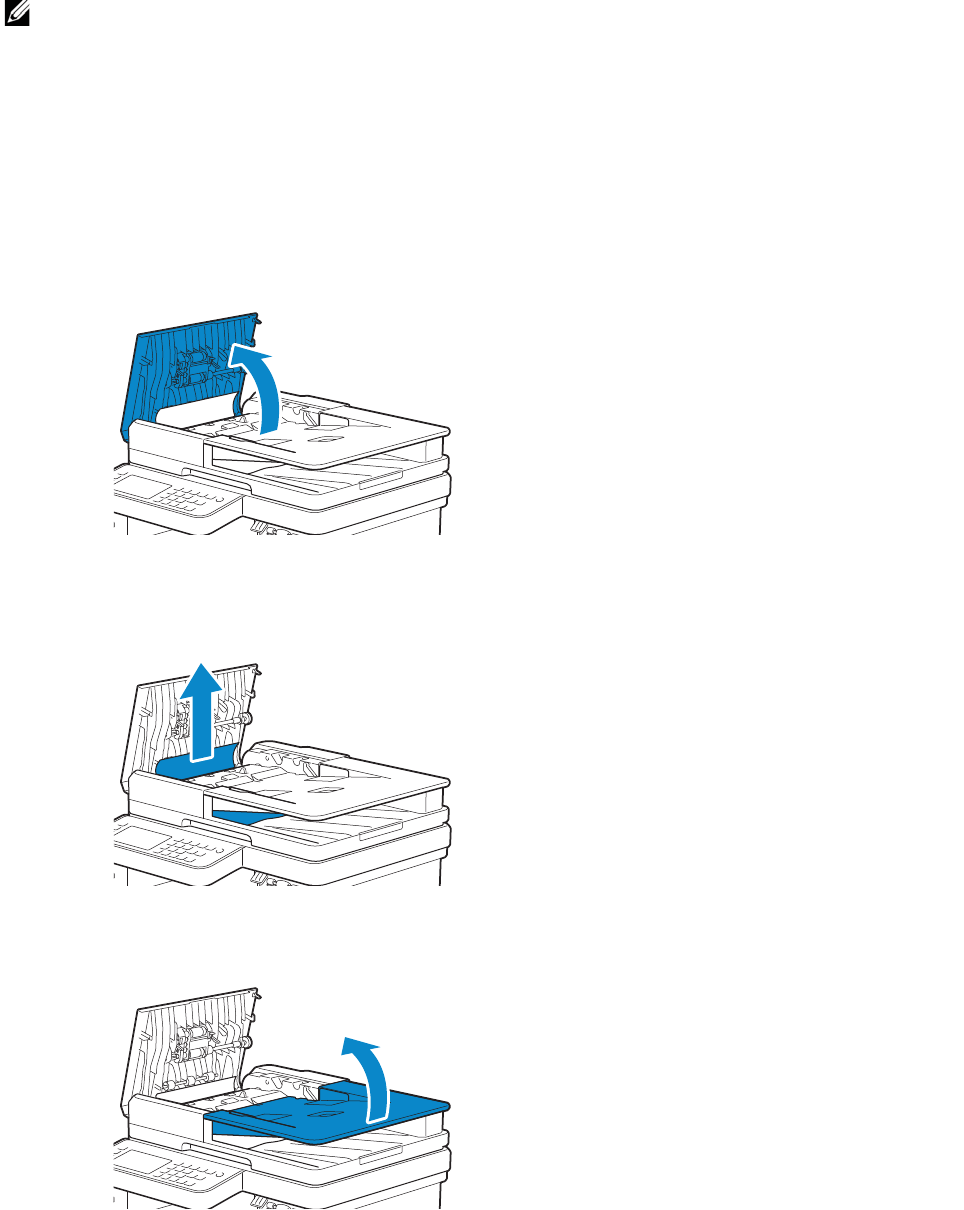
1Remove the remaining documents from the DADF.
2Open the DADF cover.
3Remove any jammed documents from inside the DADF cover by gently pulling the
document straight up.
4Lift the document feeder tray.
5Remove any jammed documents from the document output tray.
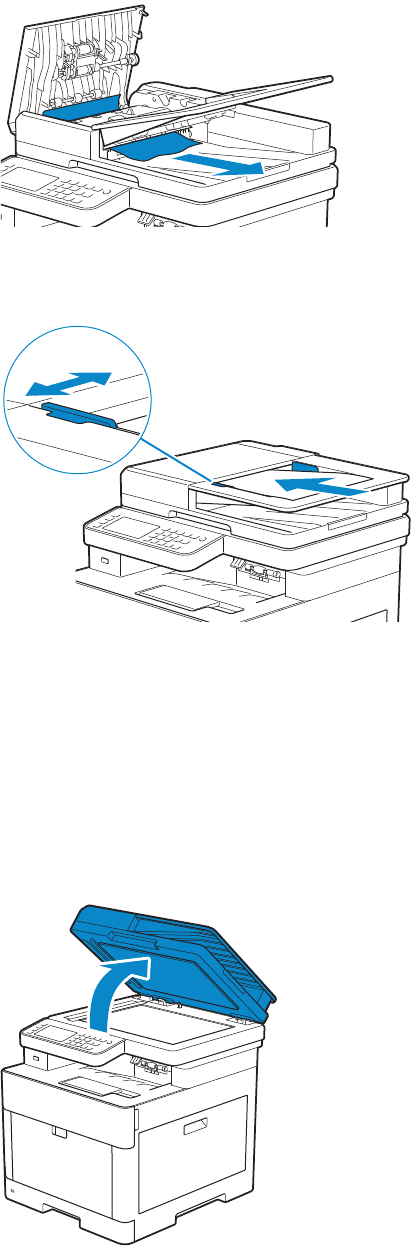
350
|Troubleshooting
6Close the DADF cover, and then load the documents back into the DADF.
7Tap Start.
Clearing Documents From Inside the DADF Chute Cover
If you cannot remove the jammed document from the document output tray or cannot
find any jammed documents, open the DADF chute cover and remove the jammed
documents from there.
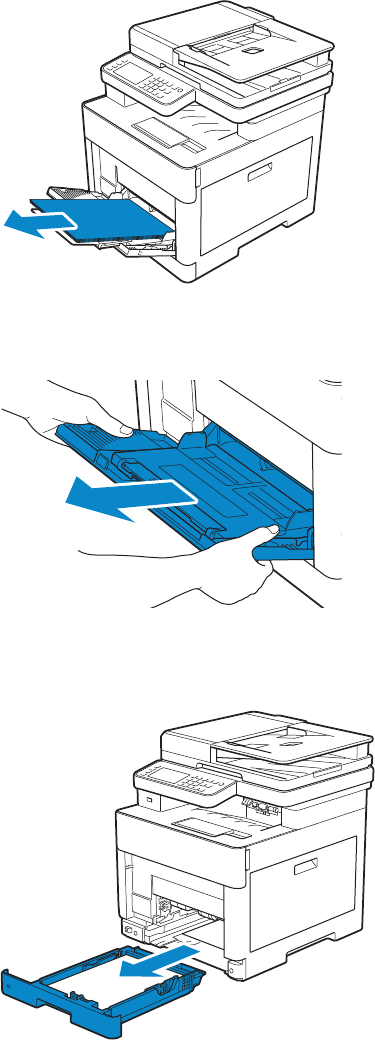
1Open the document cover.
2Pull the tab to open the DADF chute cover and hold it open.
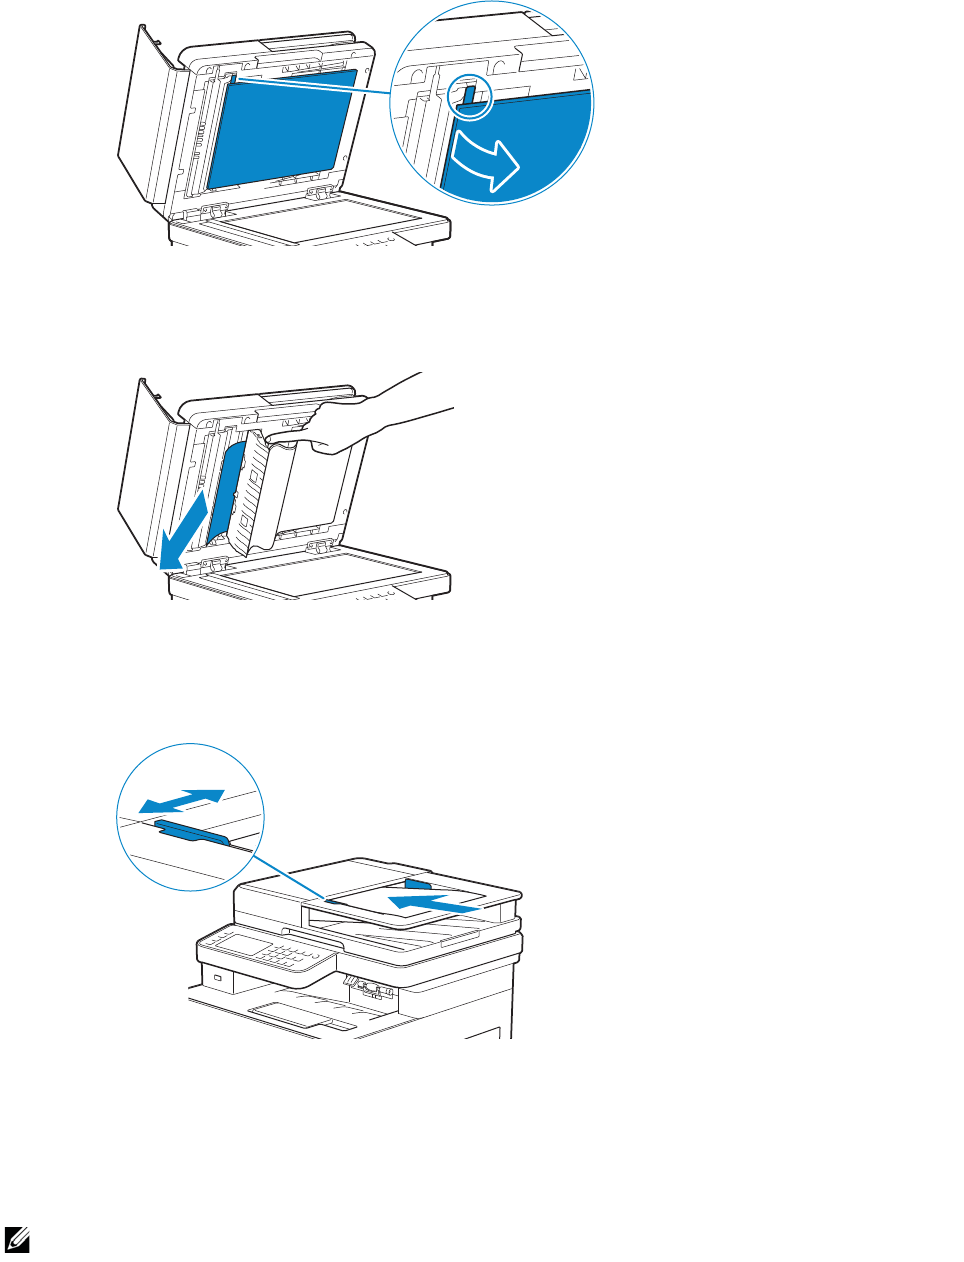
Troubleshooting |
351
3Remove the document from inside the DADF chute cover by carefully pulling it to
the left.
4Gently close the DADF chute cover.
5Close the document cover, and then load the documents back into the DADF.
6Tap Start.
Clearing Paper Jams From the Multipurpose Feeder (MPF) and
Tray1
NOTE:
•To resolve the error displayed on the touch panel, you must clear all print media from the print
media path.
1Gently pull and open the MPF. If the MPF is already open and is being used, remove
the remaining paper loaded on the MPF.
352
|Troubleshooting
2Grasp both sides of the MPF, and then pull it out of the printer.
3Pull tray1 out of the printer.
4Remove the jammed paper.

Tro u blesho oting |
353
5Insert tray1 into the printer, and then push until it stops.
6Insert the MPF into the printer, and then load the paper back on the MPF.
7Tap Start.
Clearing Paper Jams From Inside the Rear Cover
NOTE:
•To resolve the error displayed on the touch panel, you must clear all print media from the print
media path.
Clearing Paper Jams From the Fusing Unit
1Pull up the handle lever of the rear cover, and then open the rear cover.
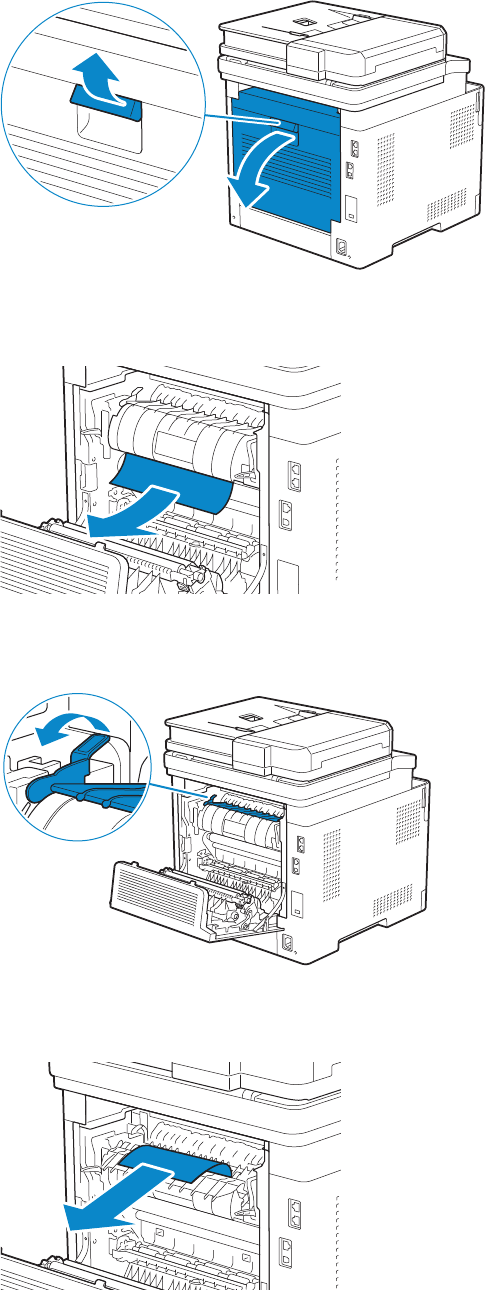
354
|Troubleshooting
2Remove the jammed paper from below the fusing unit.
3Pull the tab that is located above the fusing unit and hold the part open.
4Remove the jammed paper.
5Gently release the tab and close the part.
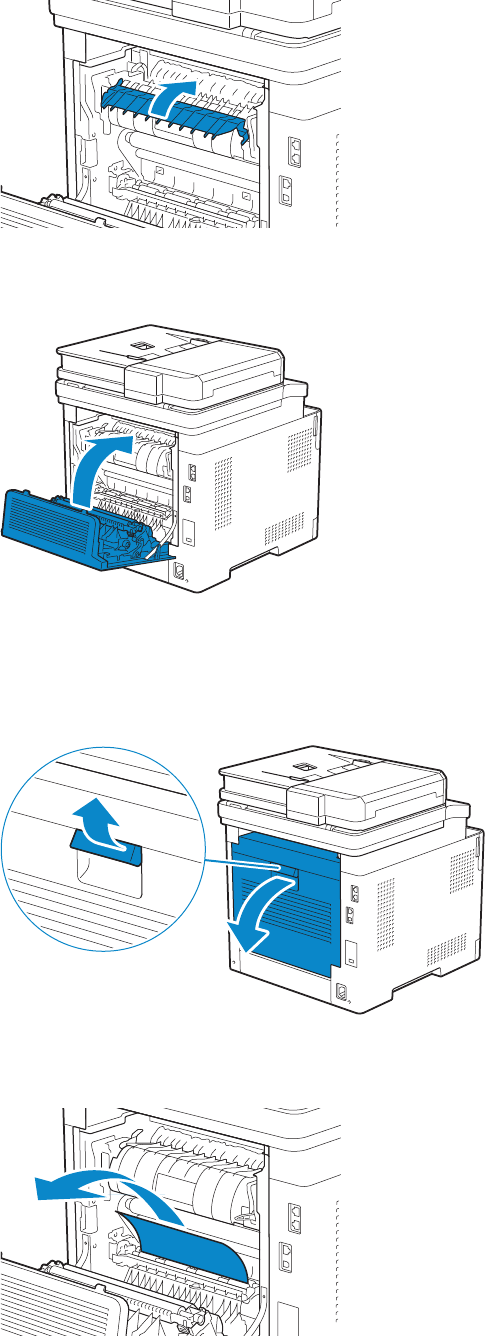
Troubleshooting |
355
6Close the rear cover.
Clearing Paper Jams From the Rear Cover
1Pull up the handle lever of the rear cover and open the rear cover.
2Remove the jammed paper.
3Close the rear cover.
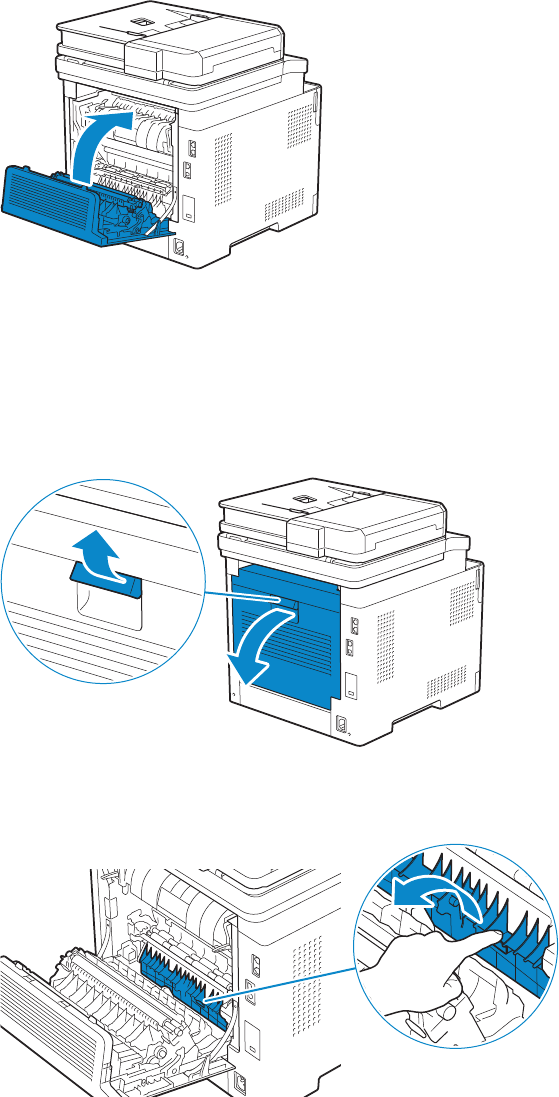
356
|Troubleshooting
Clearing Paper Jams From the Rear Chute
When a status code for a paper jam inside the rear cover appear but you cannot find the
jammed paper, check inside the rear chute.
1Pull up the handle lever of the rear cover, and then open the rear cover.
2Pull the tab to open the rear chute.
3Remove the jammed paper.
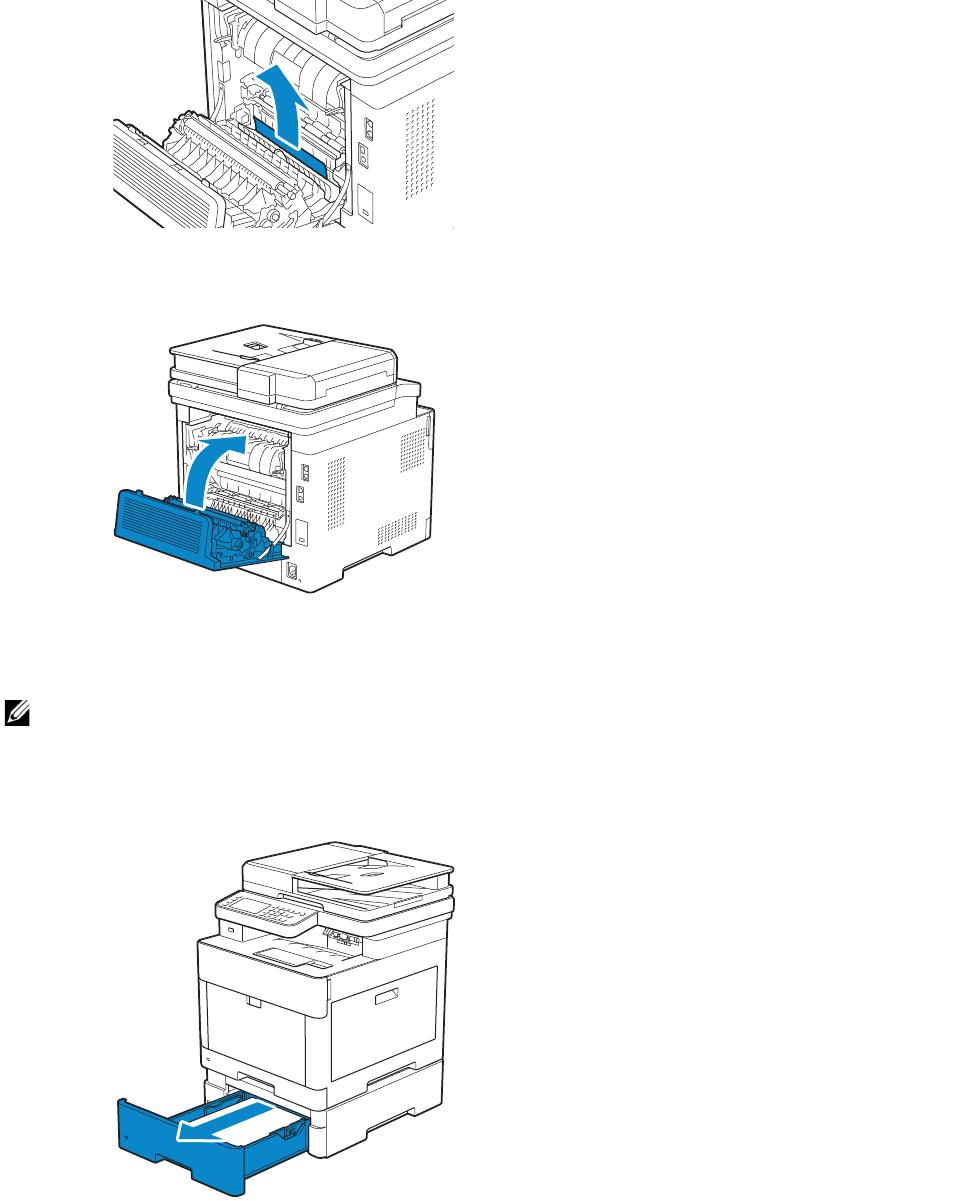
Trou bl eshooti n g |
357
4Close the rear cover.
Clearing Paper Jams From the Optional 550-Sheet Feeder
NOTE:
•To resolve the error displayed on the touch panel, you must clear all print media from the print
media path.
1Pull the optional 550-sheet feeder halfway out of the printer.
2Hold the optional 550-sheet feeder with both hands, and then remove it from the
printer.
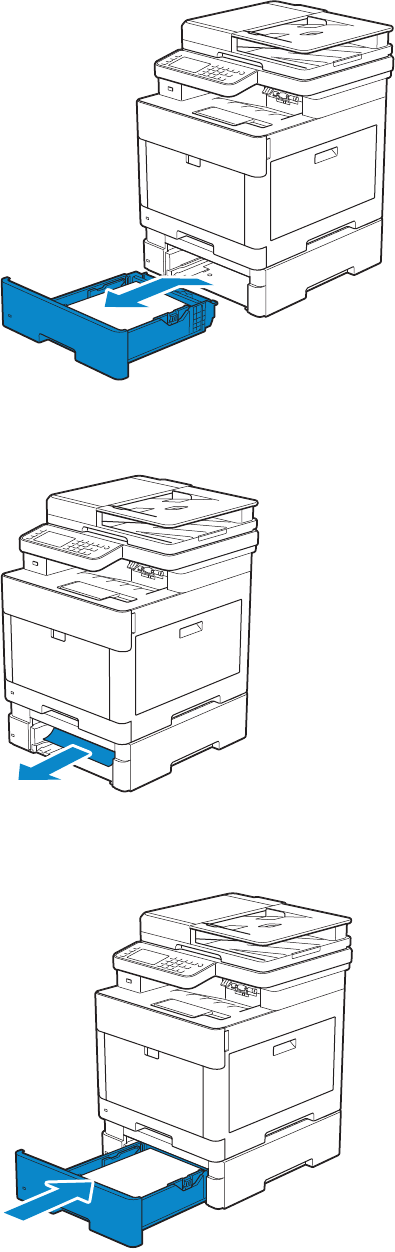
358
|Troubleshooting
3Remove the jammed paper.
4Insert the optional 550-sheet feeder into the printer, and then push until it stops.
Basic Printer Problems
Some printer problems can be easily resolved. If a problem occurs with the printer,
check each of the following:
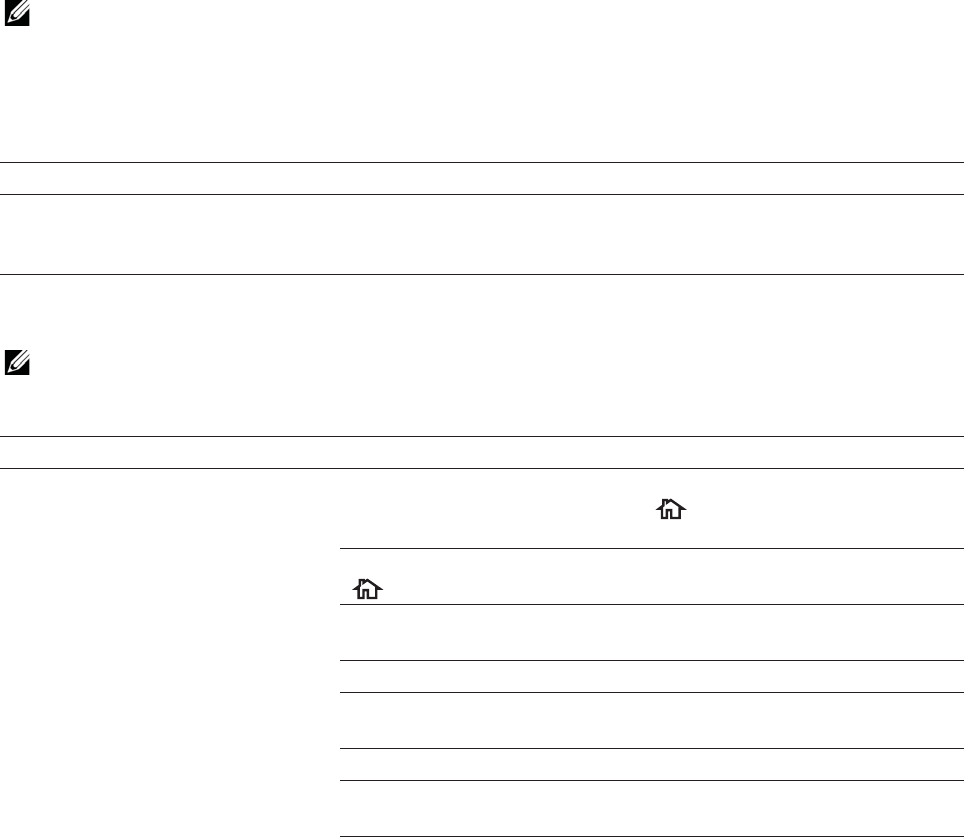
Trou bl eshooti n g |
359
•The power cord is plugged into the printer and a properly grounded electrical outlet.
•The printer is turned on.
•The electrical outlet is not turned off at any switch or breaker.
•Other electrical equipment plugged into the outlet is working.
•All options are properly installed.
If you have checked all of the above and still have a problem, turn off the printer, wait for
10 seconds, and then turn on the printer. This often fixes the problem.
NOTE:
•If error messages are displayed on the touch panel or on your computer screen, follow the
on-screen instructions to resolve the printer problems. See "Understanding Printer Messages."
Display Problems
Printing Problems
NOTE:
•If Panel Lock Control is set to Enable, you need to enter the four-digit password to enter the
Admin Settings menu.
Problem Action
Menu settings changed from the
operator panel have no effect.
Settings in the software program, the print driver, or the printer
utilities have precedence over the settings made on the operator
panel.
Problem Action
Job did not print or incorrect
characters printed.
Make sure that the top menu appears on the touch panel before
you send a job to print. Press the (Home) button to return to
the top menu.
Make sure that the print media is loaded in the printer. Press the
(Home) button to return to the top menu.
Verify that the printer is using the correct Page Description
Language (PDL).
Verify that you are using the correct print driver.
Make sure that the correct USB or Ethernet cable is securely
connected to the printer.
Verify that the correct print media size is selected.
If you are using a print spooler, verify that the spooler has not
stalled.
Check the printer's interface from the Admin Settings.
Determine the host interface you are using. Print a Panel Settings
page to verify that the current interface settings are correct.
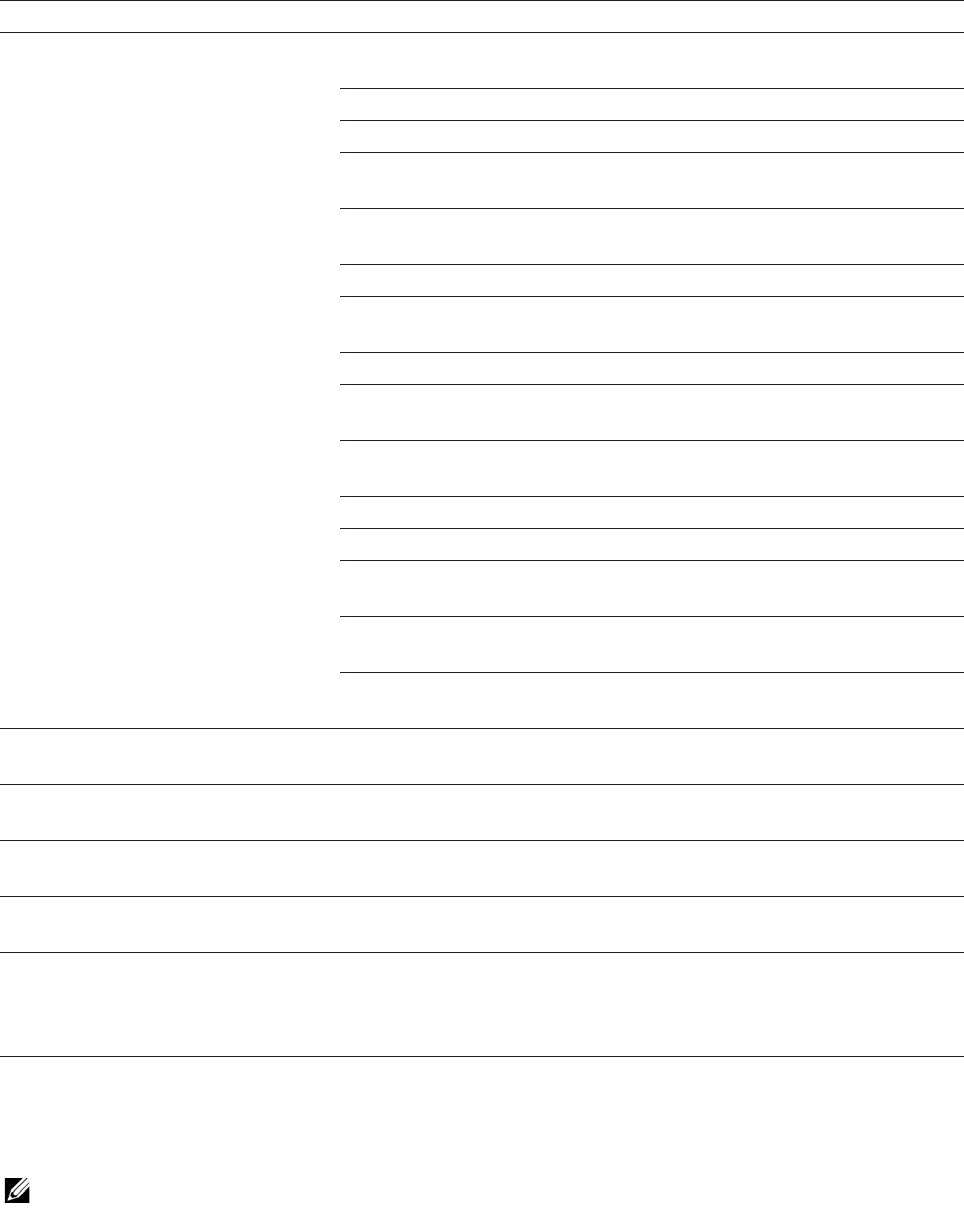
360
|Troubleshooting
*
Dell Document Hub is available on Dell H625cdw and Dell H825cdw.
Print Quality Problems
NOTE:
•Some of the following procedures that use the Tool Box on the Dell Printer Hub and Dell Print
Management Tool can be performed using the operator panel or Dell Printer Configuration Web
Tool. See "Tool Box," "Understanding the System Menus," and "Dell™ Printer Configuration Web
Tool."
Print media misfeeds or multiple
feeds occur.
Make sure that the print media you are using meets the
specifications for the printer. See "Supported Print Media."
Fan the print media before loading it.
Make sure that the print media is loaded correctly.
Make sure that the width and length guides of the print media
sources are adjusted correctly.
Make sure that tray1, the optional 550-sheet feeder (tray2), or the
Multipurpose Feeder (MPF) unit is securely inserted.
Do not overload tray1, the optional 550-sheet feeder, or the MPF.
Do not force print media into the MPF when you load it; otherwise,
it may skew or buckle.
Make sure that the print media is not curled.
Make sure that the recommended print side is facing up. See
"Loading Print Media in Tray1 and the Optional 550-Sheet Feeder."
Turn the print media over or around and print again to see if feeding
improves.
Do not mix print media types.
Do not mix reams of print media.
Remove the top and bottom curled sheets of a ream before loading
the print media.
Load print media only when tray1, the optional 550-sheet feeder, or
the MPF is empty.
Wipe the retard rollers in tray1, the optional 550-sheet feeder, or the
MPF with a cloth moistened with water.
The envelope is creased after
printed.
Make sure that the envelope is loaded in the MPF as instructed in
"Loading Envelopes in the MPF."
Page breaks in unexpected places. Increase the value for Time-Out using the operator panel, Tool Box,
or Dell™ Printer Configuration Web Tool.
Print media does not stack neatly in
the output tray.
Turn the print media stack over in tray1 or the MPF.
Printing takes time when printing
from the Dell Document Hub.
*
Set Print Mode to >High Speed in the printer menu. See "Print
Mode."
Cannot print from tray1 or the
optional 550-sheet feeder because
the print media in tray1 or the
optional 550-sheet feeder is curled.
Load the print media into the MPF.
Problem Action
Troubleshooting |
361
Light Printout
Problem Action
The printed result is too light. 1 The toner cartridges may be low or need to be replaced. Check the
amount of toner left in each toner cartridge.
aCheck the toner level in the Status tab in the Status Monitor.
bReplace the toner cartridges as necessary.
If the problem persists, proceed to step 2.
2 If you are using non-Dell brand toner cartridges, enable the Non-Dell
Toner option.
aStart the Tool Box, and then click Service Tools on the Printer
Maintenance tab.
bMake sure that the On check box under Non-Dell Toner is
selected.
If the problem persists, proceed to step 3.
3Disable the Toner Saver in the print driver.
aOn the Others tab, make sure that Off is selected in the Toner
Saver drop-down menu.
If the problem persists, proceed to step 4.
4 The print media surface may be uneven. Try changing the Paper Type
setting in the print driver. For example, change the plain paper to
thick.
aOn the General tab, change the Paper Type setting.
If the problem persists, proceed to step 5.
5 Make sure that the correct print media is being used. See "Supported
Print Media." If not, use the print media recommended for the printer.
If the problem persists, proceed to step 6.
6 Make sure that the transfer unit is correctly installed.
If the problem persists, proceed to step 7.
7 Stir the developer in the drum cartridge.
aStart the Tool Box, and then click the Service Tools on the Printer
Maintenance tab.
bMake sure that the On check box under Non-Dell Toner is
selected.
If the problem persists, proceed to step 8.
362
| Troubleshooting
Smearing Toner/Loose Toner
8 Clean the toner in the drum cartridge.
aAfter the cleaning is completed, press the (Information)
button on the operator panel, and then tap the Tools tab
Admin Settings Maintenance.
bTap Toner Refresh.
NOTE:
•The Toner Refresh feature uses the toner, and shorten
the life of the toner cartridge and the drum cartridge.
cAfter you refresh the toner in the drum cartridge, print a Color
Test Page from the Report / List menu.
If the problem persists, proceed to step 9.
9 Replace the drum cartridges. See "Replacing the Drum Cartridges."
aAfter you replace the drum cartridge, start the Tool Box, and then
click Reports on the Printer Setting Reports tab.
bClick Color Test Page.
The Color Test Page is printed.
If the problem persists, contact Dell.
Problem Action
Toner smears or toner comes
off.
1 The print media surface may be uneven. Try changing the Paper Type
setting in the print driver. For example, change the plain paper to
thick.
aOn the General tab, change the Paper Type setting.
If the problem persists, proceed to step 2.
2 Verify that the correct print media is being used. See "Supported Print
Media." If not, use the print media recommended for the printer.
If the problem persists, proceed to step 3.
3 Replace the drum cartridges.
aReplace the drum cartridges. See "Replacing the Drum
Cartridges."
bAfter you replace the drum cartridges, test print your document
again.
If the problem persists, contact Dell.
Problem Action
Troubleshooting |
363
Random Spots/Blurred Images
Blank Printout
Problem Action
The printout has random
spots or is blurred.
1 Make sure that the toner cartridges are installed correctly. See
"
Installing a Toner Cartridge."
If the problem persists, proceed to step 2.
2 Make sure that the drum cartridges are installed correctly.
See
"Replacing the Drum Cartridges" and "Installing a Drum Cartridge."
If the problem persists, proceed to step 3.
3 Replace the drum cartridges. See "Replacing the Drum Cartridges."
aAfter you replace the drum cartridges, click Chart Print on the
Diagnosis tab.
bClick Pitch Configuration Chart.
The Pitch Configuration Chart is printed.
If the problem persists, contact Dell.
Problem Action
The printout is entirely blank. 1 The toner cartridges may be low or need to be replaced. Check the
amount of toner left in each toner cartridge.
aCheck the toner level in the Status tab in the Status Monitor.
bReplace the toner cartridges as necessary.
If the problem persists, proceed to step 2.
2 If you are using non-Dell brand toner cartridges, enable the Non-Dell
Toner option.
aStart the Tool Box, and then click Service Tools on the Printer
Maintenance tab.
bMake sure that the On check box under Non-Dell Toner is
selected.
If the problem persists, proceed to step 3.
364
|Troubleshooting
Streaks
3Disable the Toner Saver in the print driver.
aOn the Others tab, check that Off is selected in the Toner Saver
drop-down menu.
If the problem persists, proceed to step 4.
4 The print media surface may be uneven. Try changing the Paper Type
setting in the print driver. For example, change the plain paper to
thick.
aOn the General tab, change the Paper Type setting.
If the problem persists, proceed to step 5.
5 Verify that the correct print media is being used. See "Supported Print
Media." If not, use the print media recommended for the printer.
If the problem persists, proceed to step 6.
6 Replace the drum cartridges. See "Replacing the Drum Cartridges."
aAfter you replace the drum cartridge, start the Tool Box, and then
click Reports on the Printer Setting Reports tab.
bClick Color Test Page.
The Color Test Page is printed.
If the problem persists, contact Dell.
Problem Action
Streaks appear on the
printout.
1 The toner cartridges may be low or need to be replaced. Check the
amount of toner left in each toner cartridge.
aCheck the toner level in the Status tab in the Status Monitor.
bReplace the toner cartridges as necessary.
If the problem persists, proceed to step 2.
2 If you are using non-Dell brand toner cartridges, enable the Non-Dell
Toner option.
aStart the Tool Box, and then click Service Tools on the Printer
Maintenance tab.
bMake sure that the On check box under Non-Dell Toner is
selected.
If the problem persists, proceed to step 3.
3 Replace the drum cartridges. See "Replacing the Drum Cartridges."
aAfter you replace the drum cartridge, start the Tool Box, and then
click Reports on the Printer Setting Reports tab.
bClick Color Test Page.
The Color Test Page is printed.
If the problem persists, contact Dell.
Problem Action
Trou bl eshooti n g |
365
Black Printout (Partial or Entire Page)
Equally Spaced Colored Dots
Problem Action
Part or the entire printout is
black.
1 Make sure that the drum cartridges are installed correctly. See
"Installing a Drum Cartridge."
If the problem persists, proceed to step 2.
2Check that Output Color is set to Color in the print driver.
aOn the Graphics tab, Make sure that Output Color is set to Color.
If the problem persists, proceed to step 3.
3 Replace the drum cartridges. See "Replacing the Drum Cartridges."
aAfter you replace the drum cartridges, click Chart Print on the
Diagnosis tab.
bClick 4 Colors Configuration Chart.
The 4 Colors Configuration Chart is printed.
If the problem persists, contact Dell.
Problem Action
The printout has equally
spaced colored dots
1 Locate the cause of the problem using the Pitch Configuration Chart.
aStart the Tool Box, and then click Chart Print on the Diagnosis
tab.
bClick Pitch Configuration Chart.
The Pitch Configuration Chart is printed.
cCompare the space between the color spots on your output with
that on the Pitch Configuration Chart, and then locate the cause
of the problem.
If the location of the problem is drum cartridge, proceed to step 2.
If the cause of the problem is not located, contact Dell.
366
| Troubleshooting
Vertical Blanks
2 Replace the drum cartridges. See "Replacing the Drum Cartridges."
aAfter you replace the drum cartridges, click Chart Print on the
Diagnosis tab.
bClick Pitch Configuration Chart.
The Pitch Configuration Chart is printed.
If the problem persists, contact Dell.
Problem Action
The printout has vertical
blanks.
1 Clean inside the printer by using the cleaning rod. See
"
Cleaning the
LED Print Head.
"
aAfter the cleaning is completed, start the Tool Box, and then click
Chart Print on the Diagnosis tab.
bClick Pitch Configuration Chart.
The Pitch Configuration Chart is printed.
If the problem persists, proceed to step 2.
2 Check if the light path is not covered.
aRemove the drum cartridges, and then keep them in the dark
place. See "Replacing the Drum Cartridges."
bCheck the light path, and then remove the shielding.
cRe-install the drum cartridges. See "Installing a Drum Cartridge."
dStart the Tool Box, and then click Chart Print on the Diagnosis
tab.
eClick Pitch Configuration Chart.
The Pitch Configuration Chart is printed.
If the problem persists, proceed to step 3.
3 Replace the drum cartridges. See "Replacing the Drum Cartridges."
aAfter you replace the drum cartridge, start the Tool Box, and then
click Reports on the Printer Setting Reports tab.
bClick Color Test Page.
The Color Test Page is printed.
If the problem persists, contact Dell.
Problem Action
Trou bl eshooti n g |
367
Mottle
Ghosting
Problem Action
The printout is mottled. 1 Verity that the correct print media is being used. See “Supported Print
Media.” If not, use the print media recommended for the printer.
If the problem persists, proceed to step 2.
2 Raise the transfer unit voltage.
aStart the Tool Box, and then click Adjust 2nd BTR on the Printer
Maintenance tab.
bIncrease the voltage. See “Printer Maintenance.”
3 Replace the drum cartridges. See "Replacing the Drum Cartridges."
aAfter you replace the drum cartridge, start the Tool Box, and then
click Reports on the Printer Setting Reports tab.
bClick Color Test Page.
The Color Test Page is printed.
If the problem persists, contact Dell.
Problem Action
The printout has ghosting. 1 Identify the type of ghosting.
If the type of ghosting is positive ghost, proceed to step 2a.
If the type of ghosting is negative ghost, proceed to step 2c.
If the type of ghosting is not identified, contact Dell.
ABC
DEF
A
A
A
B
A
A
A
A
A
A
A
A
A
A
B
B
B
B
B
B
B
B
B
B
B
B
B
B
B
C
C
C
C
C
C
C
C
C
C
C
C
C
C
C
C
C
C
C
C
C
C
C
D
D
D
E
D
D
D
D
D
D
D
D
D
D
D
D
E
E
E
E
E
E
E
E
E
E
E
E
D
E
F
F
F
F
F
E
F
E
F
F
F
F
D
F
F
E
E
F
F
B
D
E
F
F
F
F
ABC
ABC
Positive ghost Negative ghost
368
|Troubleshooting
Light-Induced Fatigue
2a Specify Decrease Ghosting to On.
aPress the (Information) button, and then tap the Tools tab
Admin Settings Maintenance Decrease
Ghosting.
bTap On.
cTap OK.
If the problem persists, proceed to step 2b.
2b Adjust the transfer bias.
aPress the (Information) button and tap the Tools tab
Admin Settings Maintenance Adjust Transfer
Belt Unit.
bTap K Offset or YMC Offset, and then decrease the value.
If the problem persists, proceed to step 3.
2c Adjust the transfer bias.
aPress the (Information) button and tap the Tools tab
Admin Settings Maintenance Adjust Transfer
Belt Unit.
bTap K Offset or YMC Offset, and then increase the value.
If the problem persists, proceed to step 3.
3 Make sure that the correct print media is being used. See "Supported
Print Media." If not, use the print media recommended for the printer.
If the problem persists, proceed to step 4.
4 Replace the drum cartridges. See "Replacing the Drum Cartridges."
aAfter you replace the drum cartridges, click Chart Print on the
Diagnosis tab.
bClick Ghost Configuration Chart.
The Ghost Configuration Chart is printed.
If the problem persists, contact Dell.
Problem Action
The printout has
light-induced fatigue pattern.
1 Check the light fatigue pattern using the Pitch Configuration Chart.
aStart the Tool Box, and then click Chart Print on the Diagnosis
tab.
bClick Pitch Configuration Chart.
The Pitch Configuration Chart is printed.
If the pattern on the output match with that on the Pitch
Configuration Chart, proceed to step 2.
If the problem persists, contact Dell.
Problem Action
Trou bl eshooti n g |
369
Fog
Bead-Carry-Out (BCO)
2 Replace the drum cartridges. See "Replacing the Drum Cartridges."
If the problem persists, contact Dell.
Problem Action
The printed result is foggy. 1a If you use a non-Dell brand toner cartridge, enable the Non-Dell
Toner option.
aStart the Tool Box, and then click the Service Tools on the Printer
Maintenance tab.
bMake sure that the On check box under Non-Dell Toner is
selected.
If the problem persists, proceed to step 2.
1b If you use a Dell toner, replace the drum cartridges. See "Replacing
the Drum Cartridges."
aAfter you replace the drum cartridge, start the Tool Box, and then
click Reports on the Printer Setting Reports tab.
bClick Color Test Page.
If the problem persists, contact Dell.
2 Replace the drum cartridge and the toner cartridge with a Dell toner.
See "Replacing the Drum Cartridges."
aAfter you replace the drum cartridge and toner cartridge, start the
Tool Box, and then click Reports on the Printer Setting Reports
tab.
bClick Color Test Page.
If the problem persists, contact Dell.
Problem Action
370
|Troubleshooting
Jagged Characters
Horizontal Bands
Problem Action
Bead-Carry-Out (BCO)
occurs.
1 If the printer is installed in a high altitude location, set the altitude of
the location.
aStart the Tool Box, and then click Service Tools on the Printer
Maintenance tab.
bUnder Adjust Altitude, select the value close to the altitude of the
location where the printer is installed.
If the problem persists, proceed to step 2.
2 Replace the drum cartridges. See "Replacing the Drum Cartridges."
If the problem persists, contact Dell.
Problem Action
The printout has jagged
characters.
1Set Screen to Fineness in the print driver.
aOn the Others tab, set Screen under Items: to Fineness.
If the problem persists, proceed to step 2.
2Set Print Mode to High Quality in the print driver.
aOn the Graphics tab, make sure that Output Color is set to Color.
bSelect High Quality from Print Mode.
If the problem persists, proceed to step 3.
3Enable Print Page Mode in the print driver.
aOn the Others tab, set Print Page Mode under Items: to On.
If the problem persists, proceed to step 4.
4 If using a downloaded font, make sure that the font is compatible for
the printer, operating system, and the program being used.
If the problem persists, contact Dell.
Troubleshooting |
371
Diagonal Lines
Wrinkled/Stained Printout
Problem Action
The printout has horizontal
bands.
1 Locate the cause of the problem using the Pitch Configuration Chart.
aStart the Tool Box, and then click Chart Print on the Diagnosis
tab.
bClick Pitch Configuration Chart.
The Pitch Configuration Chart is printed.
If the location of the problem is drum cartridge, proceed to step 2.
If the cause of the problem is not located, contact Dell.
2 Replace the drum cartridges. See "Replacing the Drum Cartridges."
aAfter you replace the drum cartridges, click Chart Print on the
Diagnosis tab.
bClick Pitch Configuration Chart.
The Pitch Configuration Chart is printed.
If the problem persists, contact Dell.
Problem Action
The printout has diagonal
lines.
1 Locate the cause of the problem using the Pitch Configuration Chart.
aStart the Tool Box, and then click Chart Print on the Diagnosis
tab.
bClick Pitch Configuration Chart.
The Pitch Configuration Chart is printed.
If the output matches with the pattern for diagonal lines, proceed to
step 2.
If the output does not match with the pattern for diagonal lines,
contact Dell.
2 Replace the drum cartridges. See "Replacing the Drum Cartridges."
If the problem persists, contact Dell.

372
| Troubleshooting
Damage on the Leading Edge of Printout
Jam/Alignment Problems
NOTE:
•Some of the following procedures that use the Tool Box on the Dell Printer Hub and Dell Print
Management Tool can be performed using the operator panel or Dell Printer Configuration Web
Tool. See "Tool Box," "Understanding the System Menus," and "Dell™ Printer Configuration Web
Tool."
Problem Action
The printout is wrinkled.
The printout is stained.
1 Verify that the correct print media is being used. See "Supported Print
Media." If not, use the print media recommended for the printer.
If the problem persists and printing on an envelope, proceed to step
2.
If the problem persists and printing on print media other than
envelopes, contact Dell.
2 Make sure that the wrinkle of the four edges of the envelope is within
30 mm.
3 Load the envelopes in the Multipurpose Feeder (MPF) properly. See
"Loading Envelopes in the MPF."
If the problem persists, contact Dell.
Problem Action
The printout is damaged on its
leading edge.
1 When using the Multipurpose Feeder (MPF), reverse the paper and
then try again.
If the problem persists, proceed to step 2a.
When using any of the trays, change the paper and then try again.
If the problem persists, proceed to step 2b.
2a Change the paper with another one and then try again.
If the problem persists, proceed to step 2b.
2b Use any of the trays in place of the MPF.
If the problem persists, contact Dell.
Troubleshooting |
373
Incorrect Margins on the Top and Side
Disorganized Color Registration
Skewed Images
Problem Action
The top and side margins are
incorrect.
1 Make sure that the margins are set correctly on the program being
used.
If the problem persists, contact Dell.
Problem Action
Color registration is out of
alignment.
1 Adjust the settings of the paper type on the print driver to those of the
tray or feeder.
If the problem persists, proceed to step 2.
2 Execute auto color registration adjustment.
aPress the (Information) button and tap the Tools tab
Admin Settings Maintenance Color Reg Adjust
Auto Correct Start.
If the problem persists, contact Dell.
Problem Action
The printout is skewed. 1 Adjust the paper guides properly.
If the problem persists, contact Dell.
374
|Troubleshooting
Tray1/Optional 550-Sheet Feeder Misfeed Jam
Multipurpose Feeder (MPF) Misfeed Jam
Problem Action
Print media misfeeds occur in
tray1 or the optional
550-sheet feeder.
1 Make sure that tray1 or the optional 550-sheet feeder is properly
inserted.
If the type of the print media being used is thick, proceed to 2a.
If the type of the print media being used is thin, proceed to 2b.
If the type of the print media being used is coated, proceed to 2c.
If using paper other than the above, proceed to steps 2d and 2e.
2a Use thick paper that is 216 g/m
2
or less.
If the problem persists, proceed to step 3a.
2b Use thin paper that is 60 g/m
2
or more.
If the problem persists, proceed to step 3a.
2c Load coated paper one sheet at a time.
If the problem persists, proceed to step 3b.
2d Make sure that the print media is not curled.
If the problem persists, proceed to step 3b.
2e Make sure that the print media is not damp.
If the print media is not damp, proceed to step 3a.
If the print media is damp, proceed to step 3c.
3a Fan the print media.
If the problem persists, proceed to step 3b.
3b Wipe the retard roller in tray1 or the optional 550-sheet feeder with a
cloth moistened with water.
If the problem persists, proceed to step 4b.
3c Turn over the print media.
If the problem persists, proceed to step 4a.
4a Use print media that is not damp.
If the problem persists, proceed to step 3a.
4b Replace the drum cartridges.
If the problem persists, contact Dell.
Problem Action
Print media misfeeds occur in
the MPF.
1 Make sure that the MPF is properly inserted.
If the type of the print media being used is thick, proceed to 2a.
If the type of the print media being used is thin, proceed to 2b.
If the type of the print media being used is coated, proceed to 2c.
If the type of the print media being used is envelope, proceed to 2d.
If using paper other than the above, proceed to step 2e.
2a Use thick paper that is 216 g/m
2
or less.
If the problem persists, proceed to step 3a.
2b Use thin paper that is 60 g/m
2
or more.
If the problem persists, proceed to step 3a.
2c Load coated paper one sheet at a time.
If the problem persists, proceed to step 3b.
Trou bl eshooti n g |
375
Regi Jam (Exit Sensor On JAM)
Tray1/Optional 550-Sheet Feeder Multi-feed Jam
2d Make sure that the envelope is properly loaded in the MPF as
instructed in "Loading Envelopes in the MPF."
If the problem persists, proceed to step 3c.
2e Make sure that the print media is not damp.
If the print media is not damp, proceed to step 3a.
If the print media is damp, proceed to step 3c.
3a Fan the print media.
If the problem persists, proceed to step 3b.
3b Wipe the retard roller in the MPF with a cloth moistened with water.
If the problem persists, proceed to step 4a.
3c If the envelope is deformed, correct it or use another envelope.
If the problem persists, proceed to step 3a.
3d Turn over the print media.
If the problem persists, proceed to step 4a.
4a Use print media that is not damp.
If the problem persists, proceed to step 4b.
4b Replace the drum cartridges.
If the problem persists, contact Dell.
Problem Action
Regi jam (Exit Sensor On JAM)
occurs.
1 Make sure that the drum cartridges are installed correctly.
If the problem persists, proceed to step 2.
2 Replace the drum cartridges. See "Replacing the Drum Cartridges."
If the problem persists, contact Dell.
Problem Action
Print media multiple-feeds
occur in tray1 or optional
550-sheet feeder.
1 Make sure that tray1 or the optional 550-sheet feeder is properly
inserted.
If using coated paper, proceed to step 2a.
If using other type of print media, proceed to step 2b.
2a Load coated paper one sheet at a time.
If the problem persists, proceed to step 3.
2b Use print media that is not damp.
If the problem persists, proceed to step 3.
3 Fan the print media.
If the problem persists, proceed to step 4.
4 Wipe the retard roller in tray1 or the optional 550-sheet feeder where
the multi-feed occurred with a cloth moistened with water.
If the problem persists, contact Dell.
Problem Action
376
| Troubleshooting
Multipurpose Feeder (MPF) Multi-feed Jam
Noise
Copy Problems
Problem Action
Print media multiple feeds
occur in the MPF.
1 Check the media type you are using.
If using coated paper, proceed to step 2a.
If using other type of print media, proceed to step 2b.
2a Load coated paper one sheet at a time.
If the problem persists, proceed to step 3.
2b Use print media that is not damp.
If the problem persists, proceed to step 3.
3 Fan the print media.
If the problem persists, proceed to step 4.
4 Wipe the retard roller in the MPF where the multi-feed occurred with
a cloth moistened with water.
If the problem persists, proceed to step 5.
5 Decrease the number of print media to be loaded to the MPF.
If the problem persists, contact Dell.
Problem Action
The printout has noise. 1 To specify the cause of the noise, perform the Auto Registration
Adjustment.
If the problem persists, proceed to step 2.
2 Replace the waste toner box. See "Replacing the Waste Toner Box."
If the problem persists, proceed to step 3.
3 Replace the drum cartridges. See "Replacing the Drum Cartridges."
If the problem persists, proceed to step 4.
4 Replace the toner cartridge (K). See "Replacing the Toner Cartridges."
If the problem persists, proceed to step 5.
5 Replace the toner cartridge (Y). See "Replacing the Toner Cartridges."
If the problem persists, proceed to step 6.
6 Replace the toner cartridge (M). See "Replacing the Toner Cartridges."
If the problem persists, proceed to step 7.
7 Replace the toner cartridge (C). See "Replacing the Toner Cartridges."
If the problem persists, contact Dell.
Problem Action
A document loaded in the DADF
cannot be copied.
Make sure that the DADF cover is firmly closed.
Make sure that the release lever is properly positioned.
Vertical blanks or streaks appear on
the output when scanned using the
DADF.
Clean the DADF glass. See "Cleaning the Scanner."
Clean inside the printer by using the cleaning rod. See
"
Cleaning the
LED Print Head.
"
Trou bl eshooti n g |
377
Fax Problems
NOTE:
•If Panel Lock Control is set to Enable, you need to enter the four-digit password to enter the
Admin Settings menu.
The copy is misaligned or skewed. Before loading the document(s) on the DADF, straighten the edges
of the stack of the document(s).
Load the document correctly, and align the document guides to the
document. See "Loading a Document in the Duplex Automatic
Document Feeder (DADF)."
Problem Action
The printer is not working, there is
no display and the buttons are not
working.
Unplug the power cord and plug it in again.
Make sure that there is power to the electrical receptacle.
No dial tone sounds. Make sure that the phone line is connected properly. See
"Connecting Your Printer to a Telephone Line."
Make sure that the phone socket in the wall is working by plugging
in another phone.
Diagnose the fax connection. See "Fax Line Test."
The numbers stored in the memory
do not dial correctly.
Make sure that the numbers are stored in the memory correctly.
Print a Phone Book list.
The document does not feed into
the printer.
Make sure that the document is not wrinkled and you are putting it
in correctly. Check that the document is of the right size, not too
thick or thin.
Make sure that the DADF cover is firmly closed.
Faxes are not received
automatically.
The FAX mode should be selected.
Make sure that there is paper in the paper tray.
Check if MPF Memory Full is displayed on the touch panel.
If the time interval specified for the following features is too long,
change the time interval shorter such as 30 seconds.
•Auto Rec Fax
•Auto Rec TEL/FAX
•Auto Rec Ans/FAX
Diagnose the fax connection. See "Fax Line Test."
The printer does not send faxes. Sending Fax should show up on the touch panel.
Check the other fax machine you are sending to, to see if it can
receive your fax.
Check the dialing type for Tone , Pulse(10PPS) or
Pulse(20PPS).
Make sure that the document is loaded in the DADF or on the
document glass.
Diagnose the fax connection. See "Fax Line Test."
The incoming fax has blank spaces
or is received in poor quality.
Check the printer by making a copy.
The toner cartridge may be empty. Replace the toner cartridge. See
"Replacing the Toner Cartridges."
A noisy phone line can cause line errors. Set the fax modem speed
to a slower speed.
The remote machine may be faulty.
Problem Action
378
|Troubleshooting
Scanning Problems
Some of the words on an incoming
fax are stretched.
The remote machine had a temporary document jam.
There are lines on the documents
you send.
Check the surface of the document glass and DADF glass for marks
and clean it. See "Cleaning the Scanner."
The printer dials a number, but the
connection with the remote
machine fails.
The remote machine may be turned off, out of paper, or cannot
answer incoming calls. Speak with the remote machine operator
and ask her/him to sort out the problem.
Documents are not stored in the
memory.
There may not be enough memory to store the document. If MPF
Memory Full is displayed on the touch panel, delete any
documents you no longer need from the memory. And then,
restore the document, or wait for the job in progress such as fax
transmission or reception to complete.
Blank areas appear at the bottom of
each page or on other pages, with a
small strip of text at the top.
You may have chosen the wrong paper settings in the user option
setting. See "Print Media Guidelines."
The printer does not send or receive
faxes.
Make sure that the country code is set correctly.
Press the (Information) button and tap the Tools tab
Admin Settings Fax Settings Fax Line Settings
Country.
Check the dialing type for Tone or Pulse.
Make sure that the cables are connected properly.
If the telephone line cord is connected to the printer via any device
such as an answering machine and a computer, remove the device
and directly connect the telephone line cord to the printer.
Make sure that Junk Fax Setup is set to off.
An error often occurs during a fax
transmission or reception.
Reduce the modem speed.
Press the (Information) button and tap the Tools tab
Admin Settings Fax Settings Transmission
Defaults Modem Speed.
The printer receive faxes, but it does
not print.
Check the toner level.
Make sure that there is paper in the paper tray.
Make sure that Received Fax Forward is set to Off.
Make sure that the printer is in the secure receiving mode. If this
mode is turned on, enter the correct password or turn off this mode
to print faxes in memory.
Problem Action
The scanner does not work. Make sure that you place the document to be scanned facing down
on the document glass, or facing up in the DADF.
There may not be enough available memory to hold the document
you want to scan. Lower the scan resolution rate and then try
scanning again.
Make sure that the USB or Ethernet cable is connected properly.
Make sure that the USB or Ethernet cable is not defective. Switch
the cable with a known good cable. If necessary, replace the cable.
If using the network TWAIN or Windows
®
Image Acquisition (WIA)
driver, check that the Ethernet cable is connected properly and the
IP address of the printer is set correctly. See "Verifying the IP
Settings."
Problem Action
Trou bl eshooti n g |
379
Make sure that the scanner is configured correctly. Check the
program you want to use to make certain that the scanner job is
being sent to the correct port.
Make sure that the scanner sharing feature of a Macintosh is
disabled before you scan documents via an ICA compatible
program such as Image Capture. The printer does not support the
scanner sharing feature of Mac OS X. Select a printer which is
directly connected to the computer via USB or wired/wireless LAN
and scan documents.
The printer scans very slowly. Graphics are scanned more slowly than text when using the Scan to
Email or Scan to Network Folder feature.
Communication speed becomes slow in scan mode because of the
large amount of memory required to analyze and reproduce the
scanned data.
Scanning images at a high resolution takes more time than scanning
at a low resolution.
Document misfeeds or multiple
feeds occur in the DADF.
Make sure that the DADF roller assembly is installed properly.
Make sure that the document’s paper type meets the specifications
for the printer. See "Supported Print Media."
Make sure that the document is properly loaded in the DADF.
Make sure that the document guides are adjusted properly.
Make sure that the number of document sheets does not exceed
the maximum capacity of the DADF.
Make sure that the document is not curled.
Fan the document well before loading it in the DADF.
Vertical blanks or streaks appear on
the output when scanned using the
DADF.
Clean the DADF glass. See "Cleaning the Scanner."
A smear appears at the same
location on the output when
scanned using the document glass.
Clean the document glass. See "Cleaning the Scanner."
Images are skewed. Make sure that the document is loaded straight in the DADF or on
the document glass.
Before loading the document(s) on the DADF, straighten the edges
of the stack of the document(s).
Diagonal lines appear jagged when
scanned using the DADF.
For documents of thick paper, use the document glass.
Message appears on your computer
screen:
•"Device can’t be set to the H/W
mode you want."
•"Port is being used by another
program."
•"Port is Disabled."
•"Scanner is busy receiving or
printing data. When the current
job is completed, try again."
•"Invalid handle."
•"Scanning has failed."
There may be a copy or print job in progress. When the current job
is complete, try the job again.
The selected port is currently being used. Restart your computer
and try again.
The cable may be improperly connected or the printer may be
turned off.
The scanner driver is not installed or an operating environment is
not set up properly.
Make sure that the port is properly connected and the printer is
turned on. Then restart your computer.
Make sure that the USB or Ethernet cable is connected properly.
Problem Action

380
|Troubleshooting
Digital Certificate Problems
The printer does not properly
transfer scan data to a specified
destination via the Scan to Email or
Scan to Network Folder feature.
Make sure that the following settings have been set correctly on the
Dell Printer Configuration Web Tool.
Scan to Network Folder:
Check the following settings under Address Book Server
Address.
• Server Address
•Share Name
• Server Path
•Login Name
•Login Password
Scan to Email:
Check the following setting under Address Book E-Mail Address.
• Address
Scanning using TWAIN or Windows
®
Image Acquisition (WIA) cannot be
performed on a Windows Server
®
2008 or Windows Server
®
2008 R2
computer.
Install Desktop Experience on the computer.
To install Desktop Experience:
1Click Start, point to Administrative Tools, and then click Server
Manager.
2Under Features Summary, click Add Features.
3Select the Desktop Experience check box, click Next, and then
click Install.
4Restart the computer.
Scanning using TWAIN or Windows
®
Image Acquisition (WIA) cannot be
performed on a Windows Server
®
2012 or Windows Server
®
2012 R2
computer.
Install Desktop Experience on the computer.
To install Desktop Experience:
1Click Server Manager from the Start screen.
The Server Manager screen appears.
2Under Manage, click Add Roles and Features.
Add Roles and Features Wizard appears.
3Click Next to skip the Before you begin page.
4Make sure that Role-based or feature-based installation is
selected, and then click Next.
5Make sure that Select a server from the server pool is selected,
select the server under Server Pool, and then click Next.
6Click Next to skip the Select server roles page.
7Select the Desktop Experience check box under User Interfaces
and Infrastructure, and then click Next.
8Click Confirmation from the list on the left.
9Select the Restart the destination server automatically if
required check box, and then click Install.
10Restart the computer.
Problem Action
The certificate import button is
disabled.
SSL communication may be disabled. Create a self-signed
certificate and enable SSL.
The certificate details button is
disabled.
Problem Action
Troubleshooting |
381
Wireless Problems
NOTE:
•Wireless network is available on Dell H625cdw and Dell H825cdw.
The certificate cannot be imported. The time setting may be incorrect. Check validity period of the
certificate as well as the time setting of the device.
The certificate file may be incorrect. Make sure that the password is
correct.
Make sure that the file type is PKCS#7/#12 or x509CACert.
Make sure that the attribute information such as key Usage or
Extended key usage of the certificate to be imported is set correctly.
The browser may be incorrect. Use Internet Explorer.
016-404 is displayed when trying to
use security settings that require
certificates.
The certificate data stored in internal memory may be either
deleted, corrupt, or may not be readable. Import the certificate and
enable the security settings again.
A certificate cannot be set with
"Certificate Details."
The validity period of the certificate may be expired. Make sure that
the time setting of the printer is correct, and whether the validity
period of the certificate has expired.
The certificate path is invalid. The certificate chain (path validation)
of the imported certificate may not be correctly validated. Make
sure that all of the high-level certificates (Trusted/Intermediate)
have been imported and are not deleted, and whether the validity
period has expired.
Although a certificate was imported,
it is not displayed when selecting
with "Local Device."
The type of the certificate is incorrect. To import a certificate for use
with the device (own device), import the secret key and a certificate
of the PKCS#12 (p12/pfx) format as a pair.
Server validation is not operating
correctly.
Although importing a root certificate (Trusted) to use for server
authentication, an Intermediate certificate may be required when
validating the path.
When executing a certificate file with the certification authority,
create the certificate with a format including all paths and then
import that certificate.
Digital Signature cannot be selected
with the IPsec setting.
Either the certificate has not been imported or the certificate has
not been associated for use with Digital Signature of IPsec. Refer to
"Setting the Certificate in the IPsec Digital Signature Mode" to set a
certificate of IPsec.
Problem Action
Cannot setup wireless connection. Ensure that the Ethernet cable is disconnected from the printer.
Ensure that Wi-Fi is set to On. See "Wi-Fi | WPS."
The firewall on your computer may be blocking communication
with your printer. Disable the firewall on your computer.
Ensure that your local wireless network is supported on 802.11b/g/n
at 2.4 GH.
Cannot setup wireless connection
with WPS (Wi-Fi Protected Setup).
Ensure that the security setting of the wireless LAN access point or
router is WPA or WPA2. (WEP is not supported on WPS.)
Cannot setup wireless connection
with the WPS-PBC (Wi-Fi Protected
Setup-Push Button Configuration).
Press the WPS button on the wireless LAN access point or router
within 2 minutes after starting the WPS operation on the printer. For
details about the wireless LAN access point or router, refer to the
manual supplied with the wireless LAN access point or router.
Problem Action
382
|Troubleshooting
Problems With Installed Optional 550-sheet feeder
If an optional 550-sheet feeder does not operate correctly following installation or stops
working, perform the following:
•Turn off the printer, wait for 10 seconds, and then turn it on again. If this does not fix
the problem, unplug the printer, and then check the connection between the
optional 550-sheet feeder and the printer.
•Print the system settings report to see if the optional 550-sheet feeder is listed in the
Installed Options list. If the optional 550-sheet feeder is not listed, re-install it. See
"Report / List."
•Make sure that the optional 550-sheet feeder is selected in the print driver you are
using.
The following table lists corrective actions for related problems. If the suggested
corrective action does not correct the problem, contact Dell.
Wi-Fi Direct Problems
NOTE:
•Wi-Fi Direct is available on Dell H625cdw and Dell H825cdw.
Cannot setup wireless connection
with WPS-PIN (Wi-Fi Protected
Setup-Personal Identification
Number).
Check if the PIN you have entered on the computer is correct.
Problem Action
The optional 550-sheet feeder does
not work correctly.
Make sure that the optional 550-sheet feeder is correctly installed
on the printer. Re-install the feeder. See "Removing the Optional
550-Sheet Feeder," and refer to the installation instruction that
comes with the optional 550-sheet feeder.
Make sure that the print media is loaded correctly. See "Loading
Print Media in Tray1 and the Optional 550-Sheet Feeder."
Problem Action
The mobile device cannot discover
the printer.
The printer may be connected to another mobile device via Wi-Fi
Direct. Disconnect the printer and the mobile device. See
"Disconnecting Wi-Fi Direct Network."
The printer cannot disconnect from
the mobile device even when the
procedure in "Disconnecting Wi-Fi
Direct Network" has been
performed.
The mobile device may be automatically reconnecting to the
printer. Reset the passphrase for Wi-Fi Direct and disconnect the
mobile device. See "Resetting the Passphrase."
The network mode of the printer
cannot be set to Ad-hoc mode.
Make sure that Wi-Fi Direct is set to Disable.
Wi-Fi Direct cannot be set to
Enable.
Make sure that the network mode is set to Infrastructure mode.
Problem Action
Trou bl eshooti n g |
383
Scanner Driver/Printer Utility Problems
Other Problems
*
Dell Document Hub is available on Dell H625cdw and Dell H825cdw.
Contacting Service
When you call for printer service, be prepared to describe the problem you are
experiencing or the error message that appears.
You need to know the model type and Service Tag number of your printer. See the label
located inside the front cover of your printer and write down the Service Tag number.
For details on the location of the Service Tag, see "Express Service Code and Service
Tag."
Problem Action
Unable to retrieve the Address Book
data from the printer on the Address
Book Editor.
Make sure that the USB or Ethernet cable is connected properly.
Make sure that the printer is turned on.
Make sure that the scanner driver is installed on your computer. The
Address Book Editor retrieves the Address Book data via the scanner
driver when the printer is connected using a USB cable.
The TWAIN driver cannot connect to
the printer.
Make sure that the USB or Ethernet cable is connected properly.
If using the network connection, check that IP address of the printer
is set correctly. See "Scanning Using the TWAIN Driver."
Check if the printer is turned on. If the printer is turned on, restart it
by turning off the printer and then on again.
If a scan program is running, close the program, restart the
program, and then try scanning again.
The scanner driver has not been
registered on your computer.
Install the scanner driver. If the scanner driver is installed, uninstall it
and then re-install it again.
Problem Action
Condensation has occurred inside
the printer.
This usually occurs within several hours after you heat the room in
winter. This also occurs when the printer is operating in a location
where relative humidity reaches 85% or more. Adjust the humidity
or relocate the printer to an appropriate environment.
A problem has occurred when using
Dell Document Hub.
*
Visit www.dell.com/dochub.
384
|
Appendix
Appendix 385

Appendix |
385
Appendix
Dell™ Technical Support Policy
Technician-assisted technical support requires the cooperation and participation of the
customer in the troubleshooting process and provides for restoration of the operating system,
software program and hardware drivers to the original default configuration as shipped from
Dell, as well as the verification of appropriate functionality of the printer and all Dell-installed
hardware. In addition to this technician assisted technical support, online technical support is
available at Dell Support. Additional technical support options may be available for purchase.
Dell provides limited technical support for the printer and any Dell-installed software and
peripherals. Support for third-party software and peripherals is provided by the original
manufacturer, including those purchased and/or installed through Software & Peripherals
(DellWare), ReadyWare, and Custom Factory Integration (CFI/DellPlus).
Online Services
You can access Dell Support through the following websites:
•Product support and manuals
www.dell.com/support
www.dell.com/support/manuals
www.dell.com/printer
Warranty and Return Policy
Dell Inc. ("Dell") manufactures its hardware products from parts and components that are new or
equivalent to new in accordance with industry-standard practices. For details about the Dell
warranty for the printer, visit www.dell.com/support.
Recycling Information
It is recommended that customers dispose of their used computer hardware, monitors, printers,
and other peripherals in an environmentally sound manner. Potential methods include reuse of
parts or whole products and recycling of products, components, and/or materials.
For specific information on Dell’s worldwide recycling programs, visit www.dell.com/recycle.
Contacting Dell
You can contact Dell electronically using the following addresses:
•World Wide Web
www.dell.com/contactdell