Fujian Newland Auto ID Tech NLS-PT80 Portable Data Collector User Manual
Fujian Newland Auto-ID Tech Co., Ltd. Portable Data Collector
Users Manual
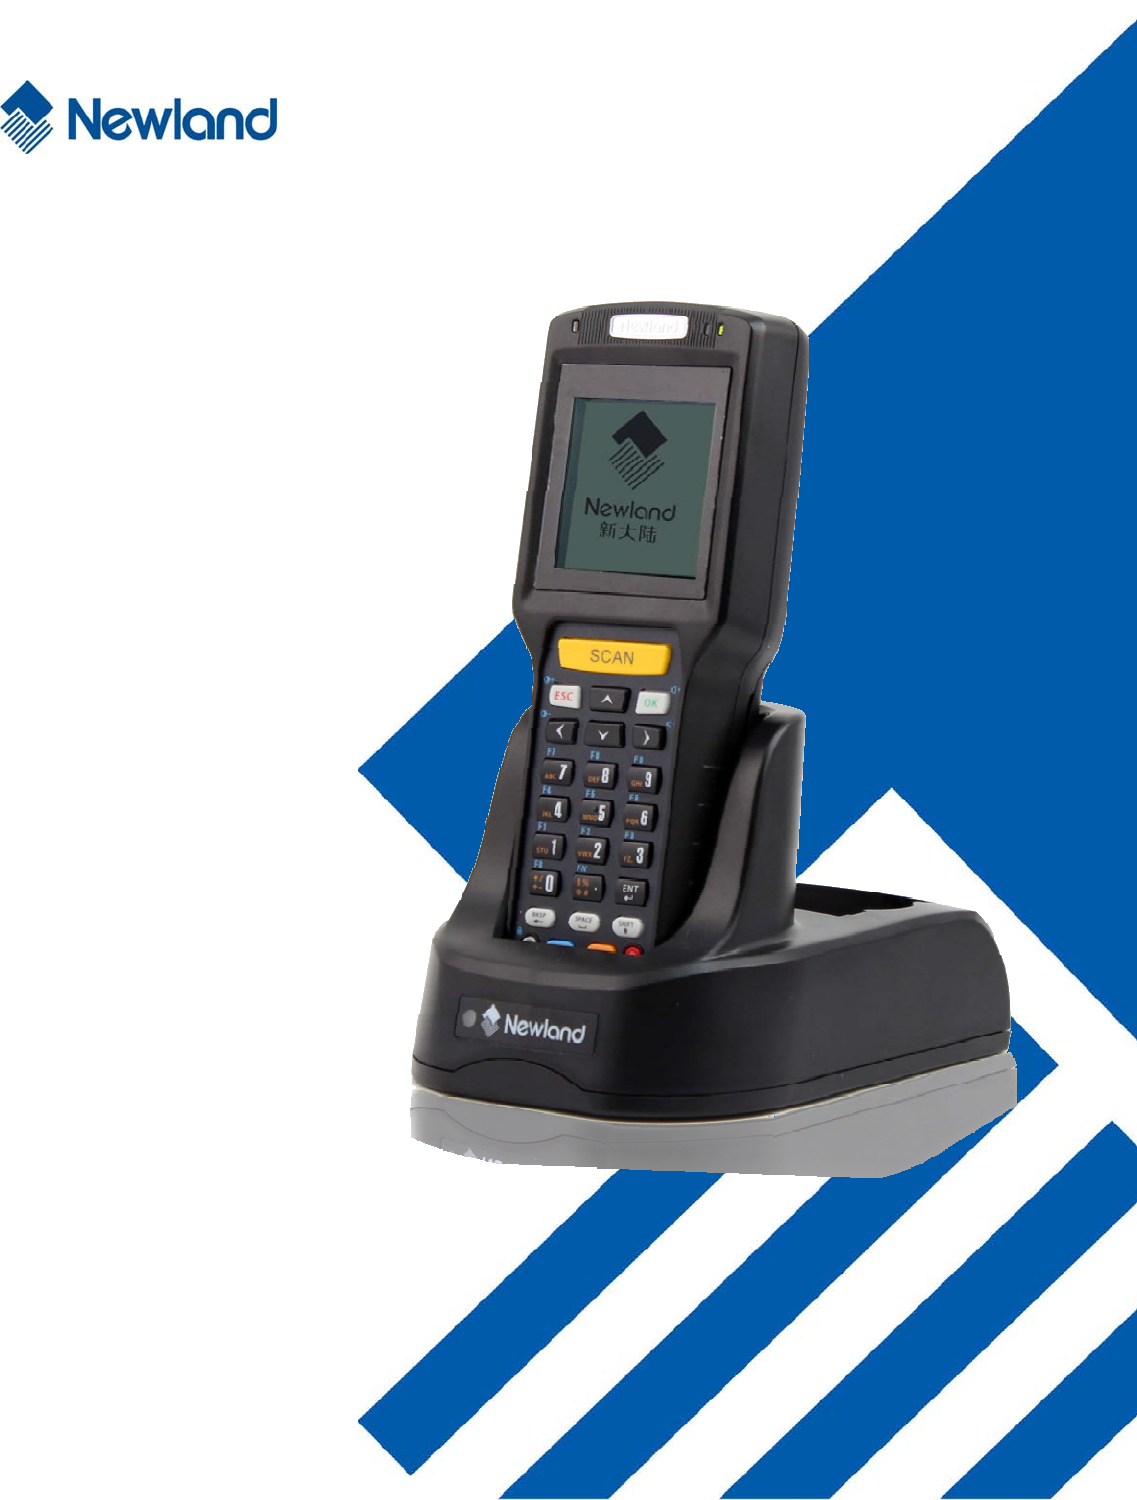
NLS-PT80
Portable Data Collector
User Guide

Disclaimer
Please carefully read the manual before use the product, and effectively to protect the safety of products operation. Please
keep this manual after reading properly and save for the next reading.
Do not disassemble the terminal or tearing the seal label on the terminal. Otherwise, Fujian Newland Auto-ID Tech Co., Ltd.
does not assume responsibility for the warranty or replacement.
The pictures in this manual are for reference only. If the individual picture from the actual product was different with this manual,
please refer to actual product. Regarding to the product modification and update, Fujian Newland Auto-ID Tech Co., Ltd.
reserves the right to make changes to any software or product to improve reliability, function, or design at any time without
notice.
This manual contains all the information is protected by copyright. Any Company and individuals should not in any way or
reason for any form of extract, copy, sell all or part of this document without written permission.
Fujian Newland Auto-ID Tech Co., Ltd.
Newland Science & Technology Park, No.1 Rujiang West Rd., Mawei district, Fuzhou, Fujian, China
Website: http://www.nlscan.com
Revision History
Changes to the original manual are listed below:
Reversion Description Changed Date
V 1.0 Initial release. 2012-05-28
Table of Contents
Chapter I About This Manual .......................................................................................................................................................................... 1
Introduction ................................................................................................................................................................................................ 1
Cautions ..................................................................................................................................................................................................... 1
Disassembly and Modifications ...................................................................................................................................................... 1
External Power Adapter ................................................................................................................................................................... 1
Unusual Conditions .......................................................................................................................................................................... 1
Drop Damage .................................................................................................................................................................................... 1
Laser Beam ....................................................................................................................................................................................... 1
Li-Polymer battery ............................................................................................................................................................................ 1
Screen ................................................................................................................................................................................................ 1
Placement .......................................................................................................................................................................................... 1
Application Occasions ..................................................................................................................................................................... 2
Specifications ............................................................................................................................................................................................ 2
Hardware & Software Version................................................................................................................................................................. 3
Chapter Description ................................................................................................................................................................................. 3
More Information ...................................................................................................................................................................................... 3
Service Information .................................................................................................................................................................................. 4
Chapter II Getting Started ............................................................................................................................................................................... 5
Introduction ................................................................................................................................................................................................ 5
Standard Package .................................................................................................................................................................................... 5
First Time to Operate NLS-PT80 ........................................................................................................................................................... 5
Install Battery ............................................................................................................................................................................................ 5
Remove Battery ........................................................................................................................................................................................ 6
Install Hand-strap ..................................................................................................................................................................................... 6
Turn On NLS-PT80 .................................................................................................................................................................................. 6
NLS-PT80 Sleeping Mode ...................................................................................................................................................................... 6
Turn Off NLS-PT80 .................................................................................................................................................................................. 7
Charging NLS-PT80 ................................................................................................................................................................................. 7
Indicators & Keyboard ............................................................................................................................................................................. 8
Chapter III How to Use NLS-PT80 ................................................................................................................................................................. 9
Introduction ................................................................................................................................................................................................ 9
System Menu ............................................................................................................................................................................................ 9
Start up App ............................................................................................................................................................................................... 9
System Setup .......................................................................................................................................................................................... 10
Assign Program ............................................................................................................................................................................... 11
Data & Time ...................................................................................................................................................................................... 11
Communication ............................................................................................................................................................................... 12
Bar Code Test ................................................................................................................................................................................. 19
Self Test ................................................................................................................................................................................................... 19
Self Test Menu ................................................................................................................................................................................ 19
Keypad test ...................................................................................................................................................................................... 20
LCD Test .......................................................................................................................................................................................... 20
Beep test .......................................................................................................................................................................................... 21
Vibrator test ..................................................................................................................................................................................... 21
Light sensor reading ....................................................................................................................................................................... 21
Battery Information ......................................................................................................................................................................... 22
USB Test .......................................................................................................................................................................................... 22
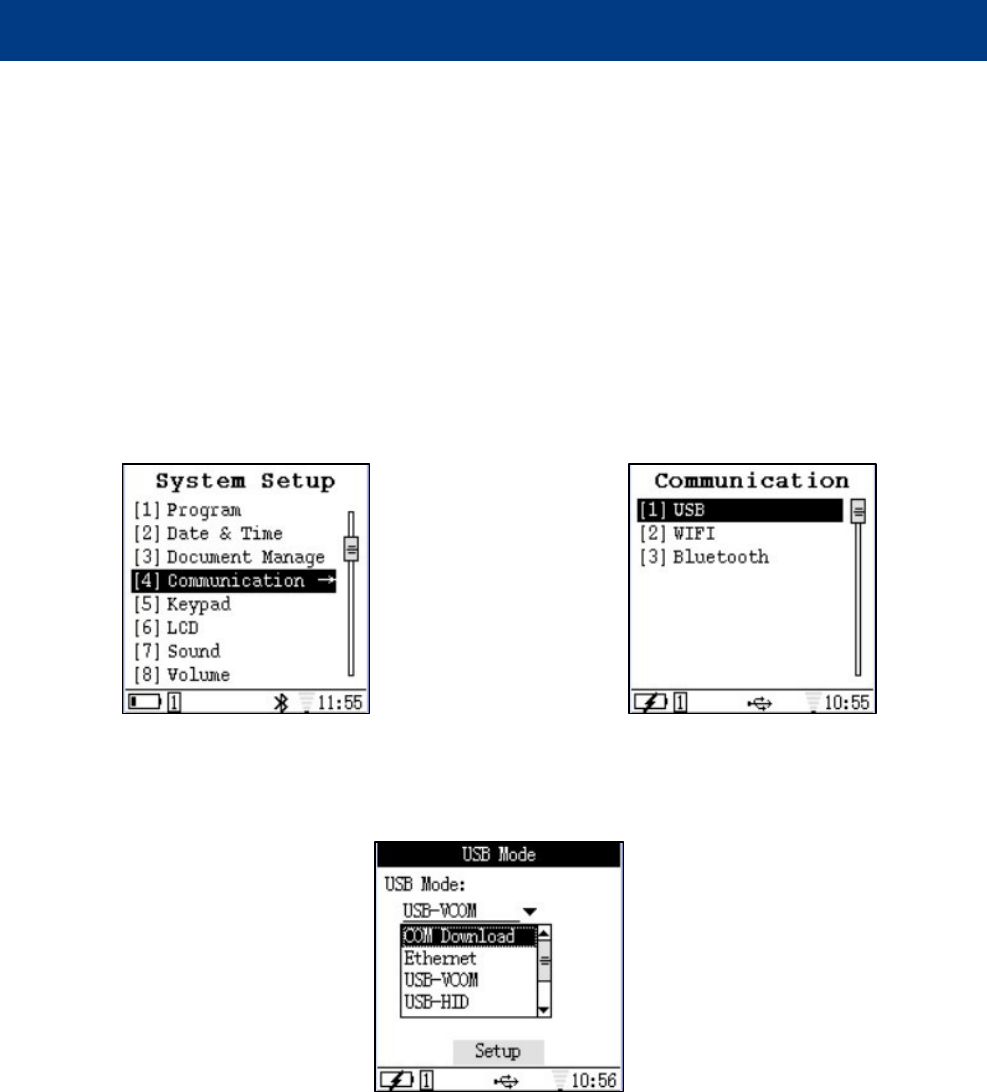
WIFI Test .......................................................................................................................................................................................... 23
System Info ..................................................................................................................................................................................... 23
Chapter IV Data Transmission...................................................................................................................................................................... 24
Introduction .............................................................................................................................................................................................. 24
Connect NLS-PT80 to a PC .................................................................................................................................................................. 24
Data Transmission .................................................................................................................................................................................. 24
USB Connection ............................................................................................................................................................................. 24
USB-HID .......................................................................................................................................................................................... 27
Flash Disk ........................................................................................................................................................................................ 28
Flash Disk (Read Only) .................................................................................................................................................................. 29
USB-VCOM ............................................................................................................................................................................................. 30
Installation of Virtual COM Driver ................................................................................................................................................. 30
Use of Virtual COM ........................................................................................................................................................................ 33
COM Download ...................................................................................................................................................................................... 35
WIFI Connection ............................................................................................................................................................................. 35
WIFI Communication ..................................................................................................................................................................... 37
Chapter V Troubleshooting ........................................................................................................................................................................... 38
Cannot Start .................................................................................................................................................................................... 38
No Display ....................................................................................................................................................................................... 38
Low Battery ..................................................................................................................................................................................... 38
NLS-PT80 Crash ............................................................................................................................................................................ 38
No LED Indicator ............................................................................................................................................................................ 38
USB Connection ............................................................................................................................................................................. 38
WIFI Connection ............................................................................................................................................................................. 38
Disable of Bar Code Reading ....................................................................................................................................................... 39

1
Chapter I About This Manual
Introduction
The user manual describes how to use NLS-PT80 Portable Data Collector (hereinafter referred to as “the terminal” or “the
NLS-PT80”) and its accessories.
Cautions
Disassembly and Modifications
Please do NOT disassemble or modify the terminal. As a company, we are not responsible of it if the terminal failure is
caused by user`s .arbitrary disassembly or modifications.
External Power Adapter
Please use the original external power adapter comes with the terminal, or it might damage the terminal.
Unusual Conditions
Please power off the terminal and pull the plug out immediately when you find any abnormal smell, overheat or any smoke.
There would be danger if you continue to use the terminal without any check or repair by Newland`s technicians.
Drop Damage
If the terminal drops to the floor and gets damaged, please power off the terminal and contact with your supplier or
Newland`s user service center as soon as possible.
Laser Beam
Do NOT look the laser beam in the eye so as to avoid damage on eyes.
Li-Polymer battery
Battery in fire might cause explosion!
Only use the chargers recommended by the manufacturer to charge battery.
Please do NOT use the damaged or abnormal battery or adaptor already.
Screen
Please do NOT press or strike the screen so as to avoid screen break.
If the screen is broken, do NOT touch the fluid exuded so as to avoid skin burn or infection.
Placement
Please do NOT place the terminal on an unstable or uneven surface as it might fall down and cause some unwanted
damage.

2
Please do NOT put the terminal in places that have too much damp or dust, nor leave the terminal in direct sunlight for a
long time.
Application Occasions
Since some electromagnetic wave may be radiated from wireless module of the terminal, the terminal is forbidden to be
used in some certain occasions like airplane and gas station. Neither charging nor communication is allowed in hazardous
sites.
The terminal should not be thrown, fallen down or hit; otherwise, the screen might be broken, program might be interrupted
and data might be lost.
Please do NOT use sharp-pointed item to touch keypad; otherwise the keys might be damaged or short circuit might
occur.
Please use a soft and dry cloth to wipe the terminal, and do not use a damp cloth, benzene, thinner or other volatile
chemicals to avoid the terminal keyboard and shell variant of aging.
Do not put the terminal face down in order to avoid the keyboard disoperation.
The battery should not be taken out when the terminal is still powered on, otherwise data in memory might be lost.
Condensation on the housing, which might caused by sharp change in temperature, will affect the terminal`s normal work.
Therefore, please do NOT operate the terminal until it gets dry.
Specifications
Performance
Processor ARM9 400MHz CPU
Operation System Linux compliance operation system
Memory 32MB SDRAM
128MB FLASH (80MB for user area)
Interface RS-232, USB 1.1, support USB charge
Physical
Dimensions (L x W x H) 168.5 x 65 x 39.5 mm / 6.6 x 2.5 x 1.5 inch
Weight 270g (Including battery)
Display 8 level gray monochrome screen, 160 x 160 resolutions
Keyboard 26 Keys Numeric with auto backlight
Notification Vibrator, Speaker and LED
Battery Main 3.7V, 2300mAh, Rechargeable Li-Polymer battery
Backup 3.7V, 150mAh, Rechargeable Li-Polymer battery
Power Adaptor Output: DC 5V/1.5 A; Input: AC 100~240V, 50~60Hz 0.4A
Environmental
Operation Temperature -20°C ~ 45°C
Storage Temperature -20°C ~ 60°C
Humidity 5% ~ 95% (Non-condensing)
3
Drop 1.2 m drop to concrete
Environmental Sealing IP54 sealing
Barcode
1D Laser (≥ 6 mil)
1D CCD (≥ 4 mil)
Code128, EAN-13, EAN-8, Code-39, UPC-A, UPC-E, Codabar, Interleaved 2 of 5,
ISBN/ISSN, Code 93… etc.
2D CMOS (≥ 5 mil) ALL 1D and PDF-417, QR Code, Data Matrix, Maxicode, Azte, etc.
Wireless
WLAN IEEE 802.11 b/g, security support EAP, WEP, WPA, WPA2, 802.1X
Application Tool Kits
Support Microsoft Virtual Studio 2005 Embedded add-on kits and Emulation tool
Certificates
FCC Part15 Class B, CE EMC Class B,
Accessories
Cradle, Battery, Adaptor, USB cable
Hardware & Software Version
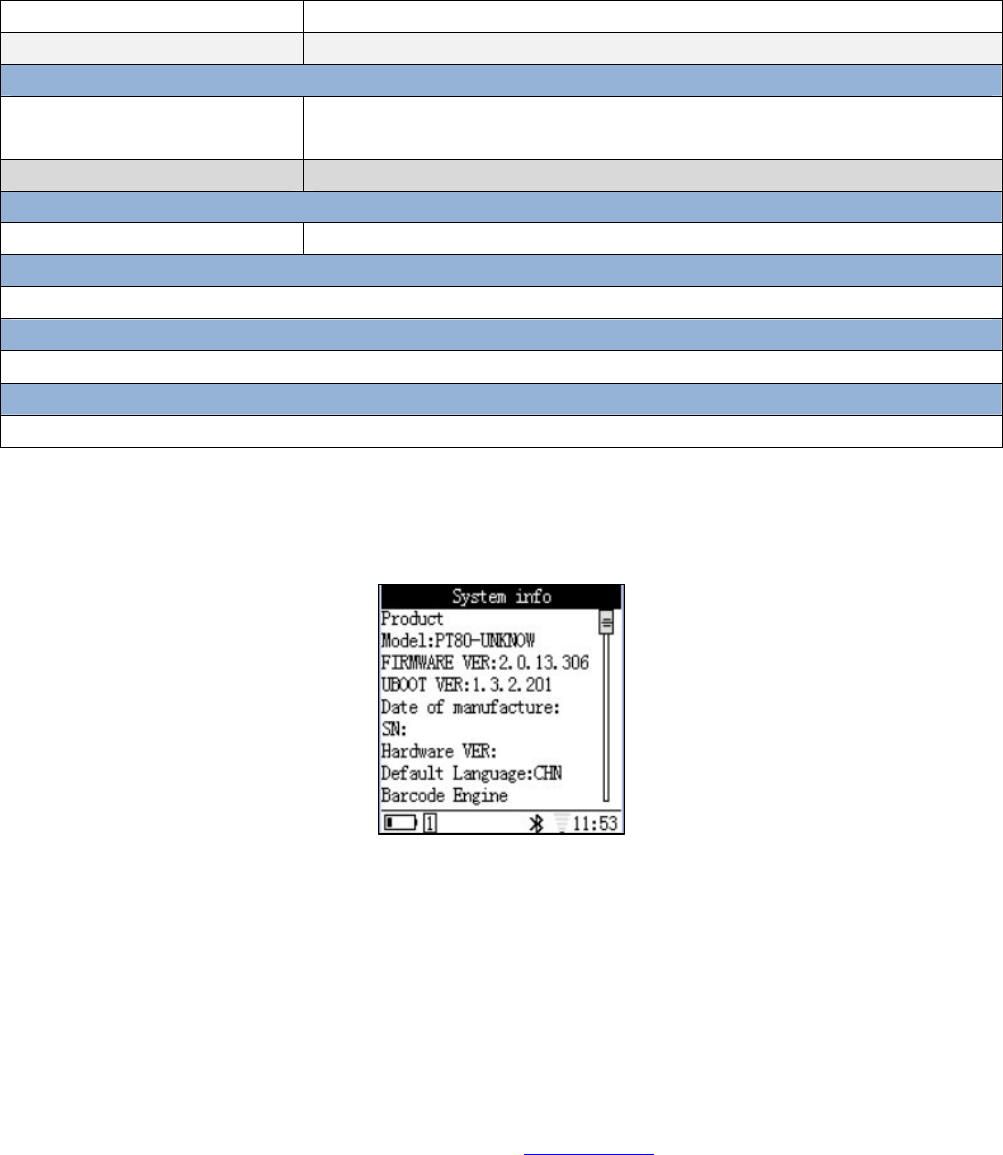
Click “System Message” under “System Menu”, check the terminal’s hardware and software version and other information, see
below
Chapter Description
Chapter I: Description of User Manual and related items
Chapter II: List NLS-PT80 terminal’s accessories, indicate how to install, move battery and use NLS-PT80
Chapter III: Introduce NLS-PT80 settings.
Chapter IV: Introduce how to connect NLS-PT80 and PC as well as how to realize data transmission.
Chapter V: Provides troubleshooting solutions for potential problems during NLS-PT80 Series operation.
More Information
For more product and support information, please visit our website www.nlscan.com .

4
Service Information
Newland China
Phone +86-400-608-0591
Email sales@nlscan.com
Newland Europe
Phone +31(0)-345-870-033
Email Info@newland-id.com
Newland Taiwan
Phone +886-2-7731-5388
Email Info@newland-id.com.tw
Newland North America
Phone +1-510-490-3888
Email Info@newlandna.com

5
Chapter II Getting Started
Introduction
List NLS-PT80 terminal’s accessories, indicate how to install, move battery and use NLS-PT80
Standard Package
Please ensure following items are in the package when you received it:
Standard Package
1 NLS-NLS-PT80 Mobile Data Terminal: 1pc
2 Li-Polymer: 1 pc
3 Hand-strap: 1 pc
4 User Manual: 1 pc
Optional Accessories
1 External Power Adapter: 1 pc
2 USB Cable: 1 pc
3 Cradle: 1 pc
Caution: Please check the package accessories when package is received. If there is any damage, please contact us
or the distribution we assigned. The actual product terminal might be different from the product photo. Actual product
terminal is the terminal to be considered with.
First Time to Operate NLS-PT80
For the first time to operate NLS-PT80 terminal:
1 Install battery
2 Press battery button, and turn on NLS-PT80
3 Configure NLS-PT80
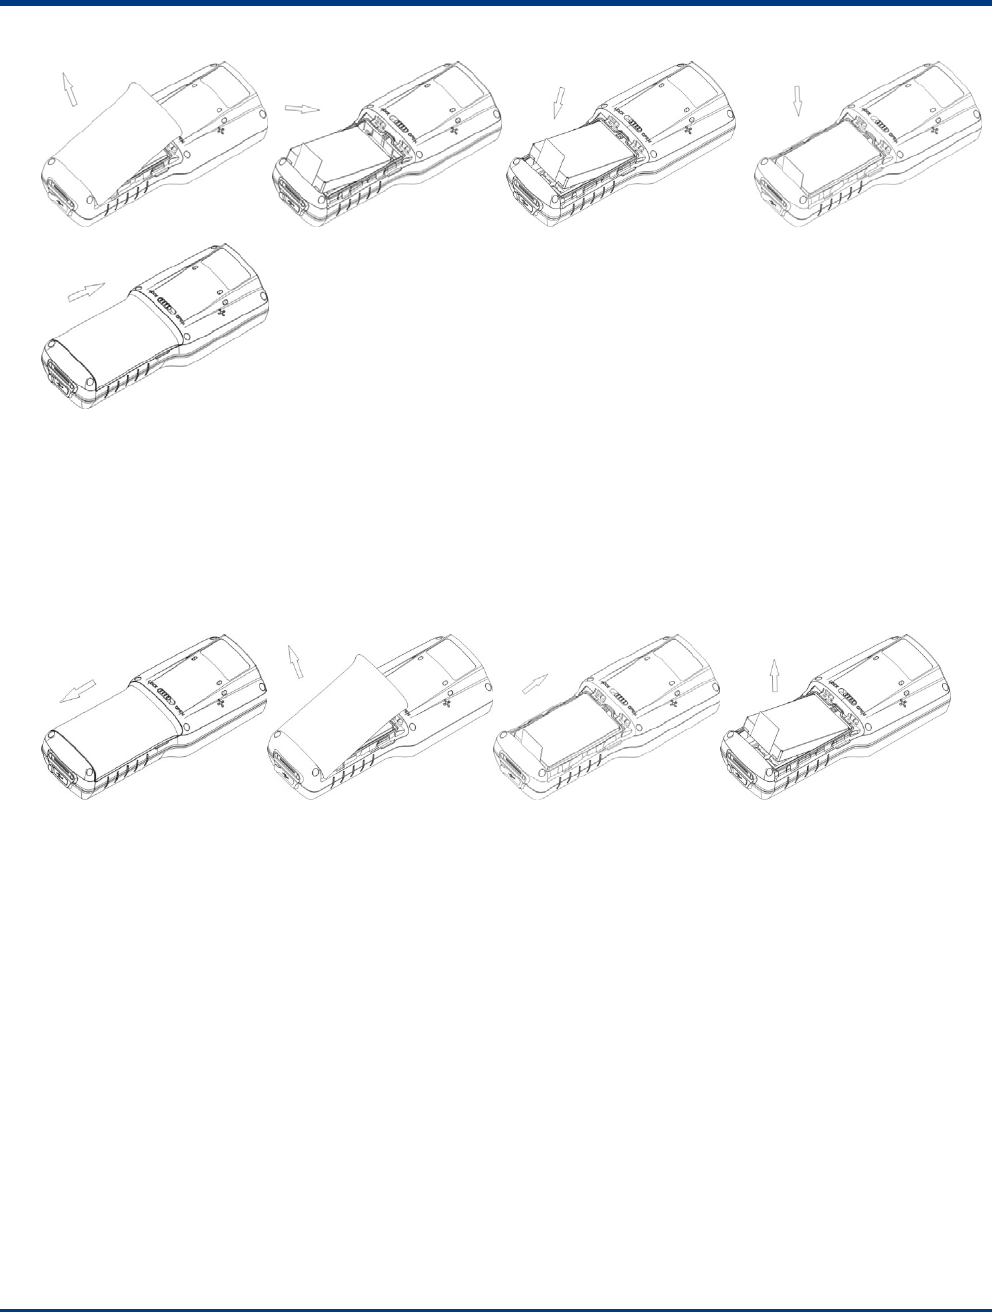
Install Battery
Please follow below steps:
1 Push the battery lock to “open” position;
2 Pull up and take out the battery cover;
3 Follow the arrow direction to place battery;
4 Close battery cover and push the battery lock to “lock” position
6
Remove Battery
Please follow steps below to remove battery:
1 Please “turn off” NLS-PT80;
2 Push the battery lock to “open” position
3 Pull up and take out the battery cover
4 Follow the arrow direction to remove battery
Install Hand-strap
Please follow steps below to install the hand-strap:
1 Draw the thin part of the hand-strap to pass through the axis
2 Pull tight the hand strap
Turn On NLS-PT80
Press power button to turn on NLS-PT80. The NLS-PT80 goes into initialization and a progress bar on the display. After 30-50
seconds, NLS-PT80 goes to “System Menu” as the main page.
NLS-PT80 Sleeping Mode
1 After terminal is on, press “power” button, NLS-PT80 goes to sleeping mode in the condition of sleeping mode function is
on.
2 Available to set automatically goes into sleeping mode after certain period.
3 Press “power” button again; the terminal is back to power mode.
1 2 3 4
5
1 2 3 4
7
Turn Off NLS-PT80
1 Press and hold the “power” button for 3 seconds at least
2 Display shows: “ Shutting Down….”, then release the power button
3 After message on the display is off, the terminal is power off.
* If NLS-PT80 is crash, press and hold the “power” button for 10 seconds to turn off system.
* If NLS-PT80 is connected with a USB cable, system will NOT be off.
Charging NLS-PT80
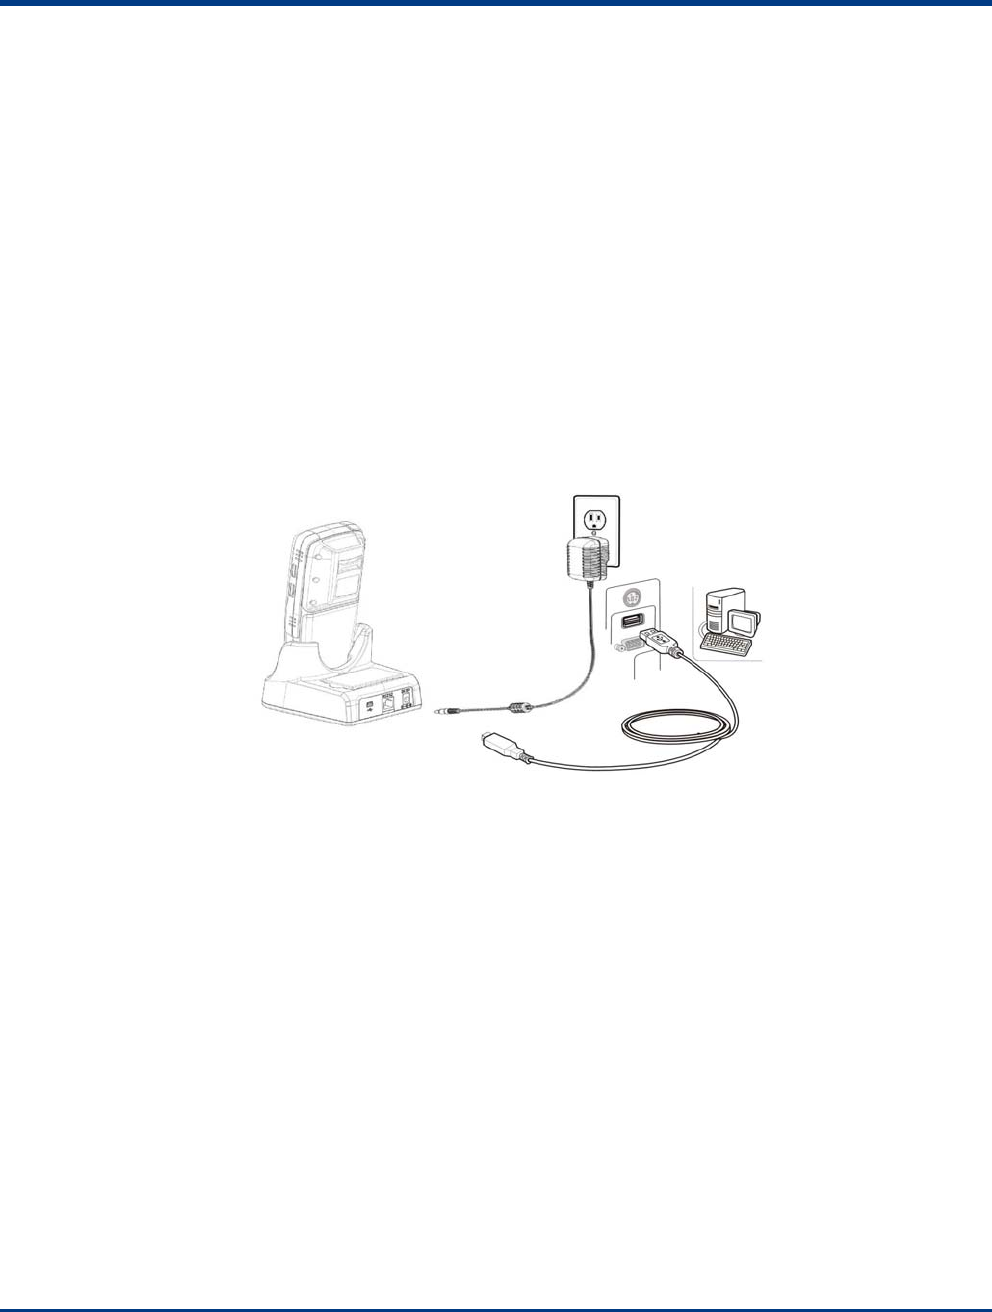
1 NLS-PT80 uses mini USB cable to charging power and it also support connection to a power adapter or PC via cradle.
2 During charging power process, the terminal indicator is blinking in red. To fully charge battery, time consuming is different
between power adapter and PC. When the green LED indication is on for a while, it means the terminal battery is fully
charged.
3 Charging via Cradle:
* During sleeping mode, connecting via USB cable would wake up the terminal.
8
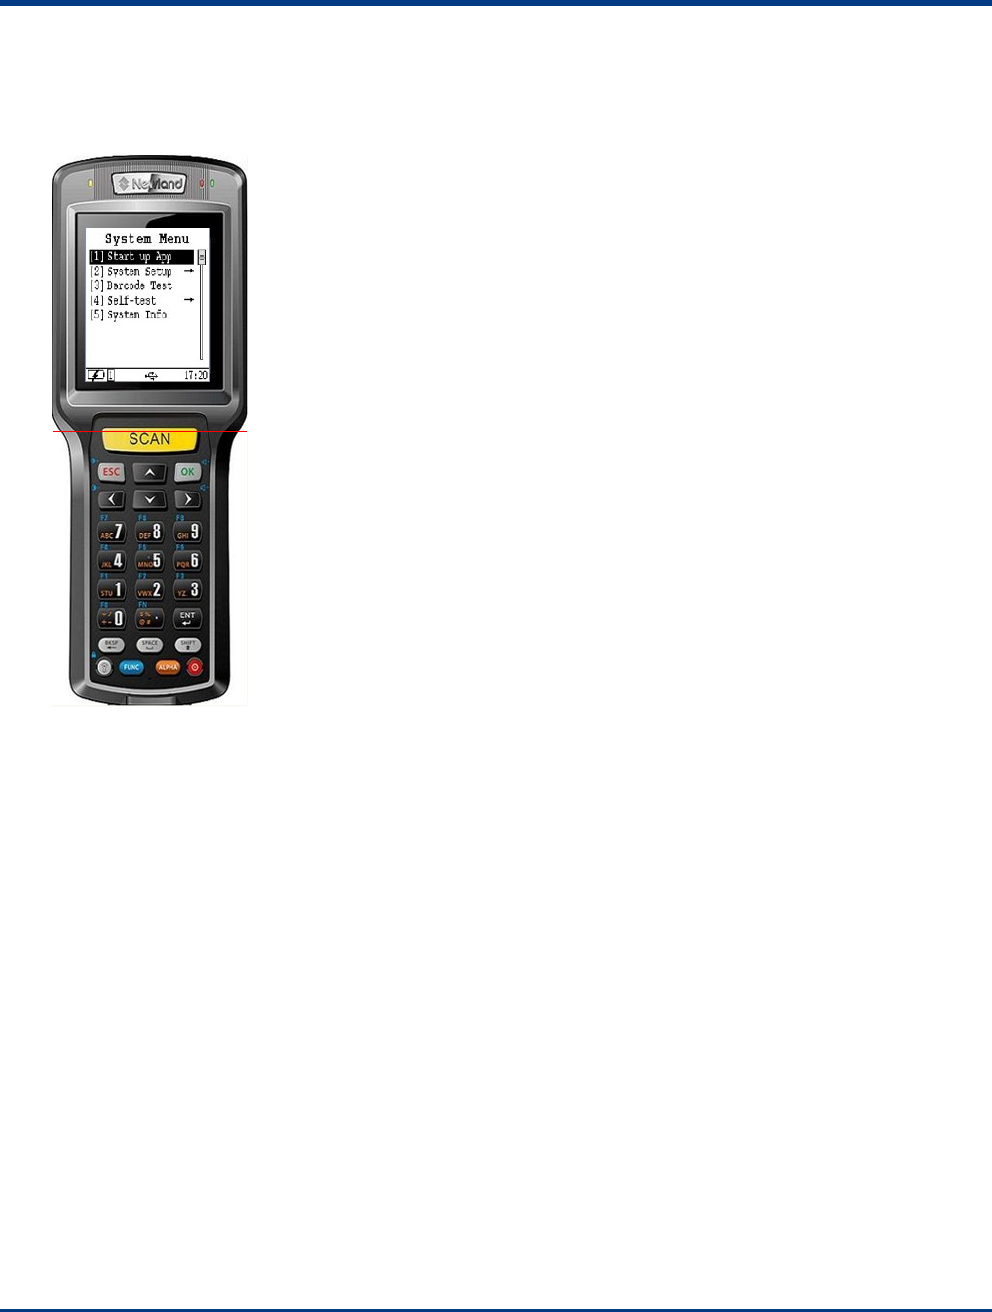
Indicators & Keyboard
1. Indicators
2 indicators on the right top of NLS-PT80
Red indicator: when terminal is charging power, the red indicator is on. When battery is
fully charged, the read indicator is slightly darker. Red indication is off when not
connecting to power adapter or cradle.
Green indicator: User can define it
Left side indicator: Light-sensor (for adjusting the display lightness)
2. Scanning Button
SCAN button: press the button to scan bar code
3. Confirm and Cancel Buttons
OK button: click on OK to confirm or go to the setting
ESC button: cancel the previous setting
4. Arrow Buttons
There are up, down, right and left arrow buttons which are used to move target
5. ENT Button
Enter Key
6. Function Button
ALPHA: ALPHA+ESC force the terminal to terminate running program
SPACE: space key
BASP: delete function – delete last character
Backlight: press backlight button to control the display backlight lightness
7. Power Button
Control terminal on, sleeping mode and off.
8. There are different colors on the keypads – please be aware blue color is corresponding to “FUNC” key and “orange
color is corresponding to “ALPHA” key.
9. Default setting is “numeric” keys – when press keypads, the default output is number. If the editing output is allowed for
numeric key only - “ALPHA” key is not applicable.
10. Press “ALPHA” key to switch numeric, English and Chinese- the status is on the bar which is at the bottom of display
screen.. Once getting into editing mode, press “ALPHA” key for once is English in low caps, twice is Chinese and 3 times is
numeric and then follow the circulation.
11. ALPHA+SHIFT: enter to editing mode, press “ALPHA” key for once – English in small caps, twice – Chinese, 3 times-
numeric and follow the circulation. It effects all the time once witch to SHIFT
12. The blue color functions are carried out when it is under “FUNC” – effective one time when it is pressed. For example,
if the data output is “F7F8”, need to press “FUNC” key - press 7 - press “FUNC” key –press 8, then get “F7F8”.
13. Press “ALPHA” to switch Numeric, English and Chinese. Enter to editing mode, press “ALPHA” to switch to English
small caps. Press “.”key, switch to symbols mode.
9
Chapter III How to Use NLS-PT80
Introduction
This chapter introduces how to operate NLS-PT80.
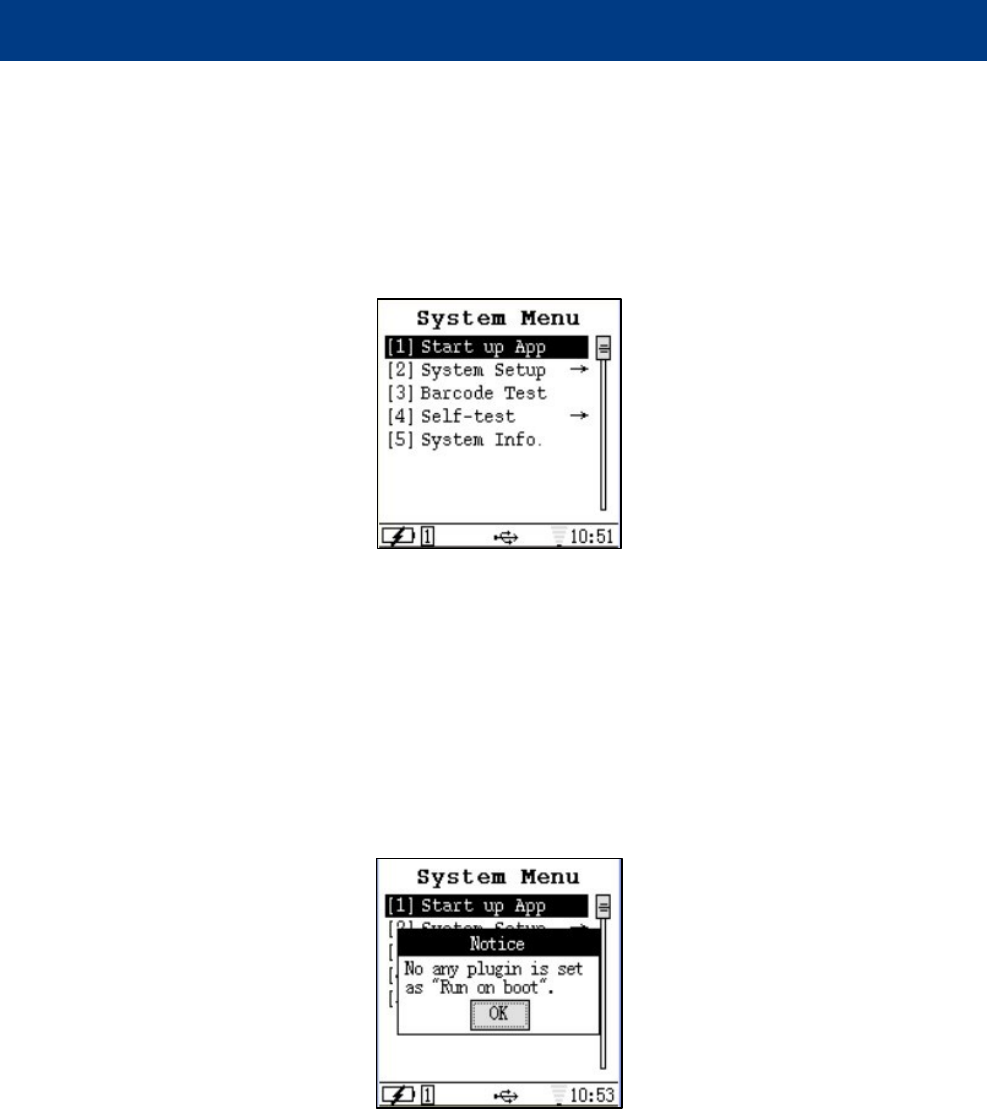
System Menu
1 Start up App: execute the current application program in terminal. Please check “System Setup” for application program
setting
2 System Setup: the system setting parameter includes system time, power management, bar code reading, and service
management.etc. which is similar function to control panel of PC’s.
3 Bar code Test: this is a bar code reading test application program
4 Self-test: test each function on the terminal
5 System Info: display terminal’s hardware and software information.
Start up App
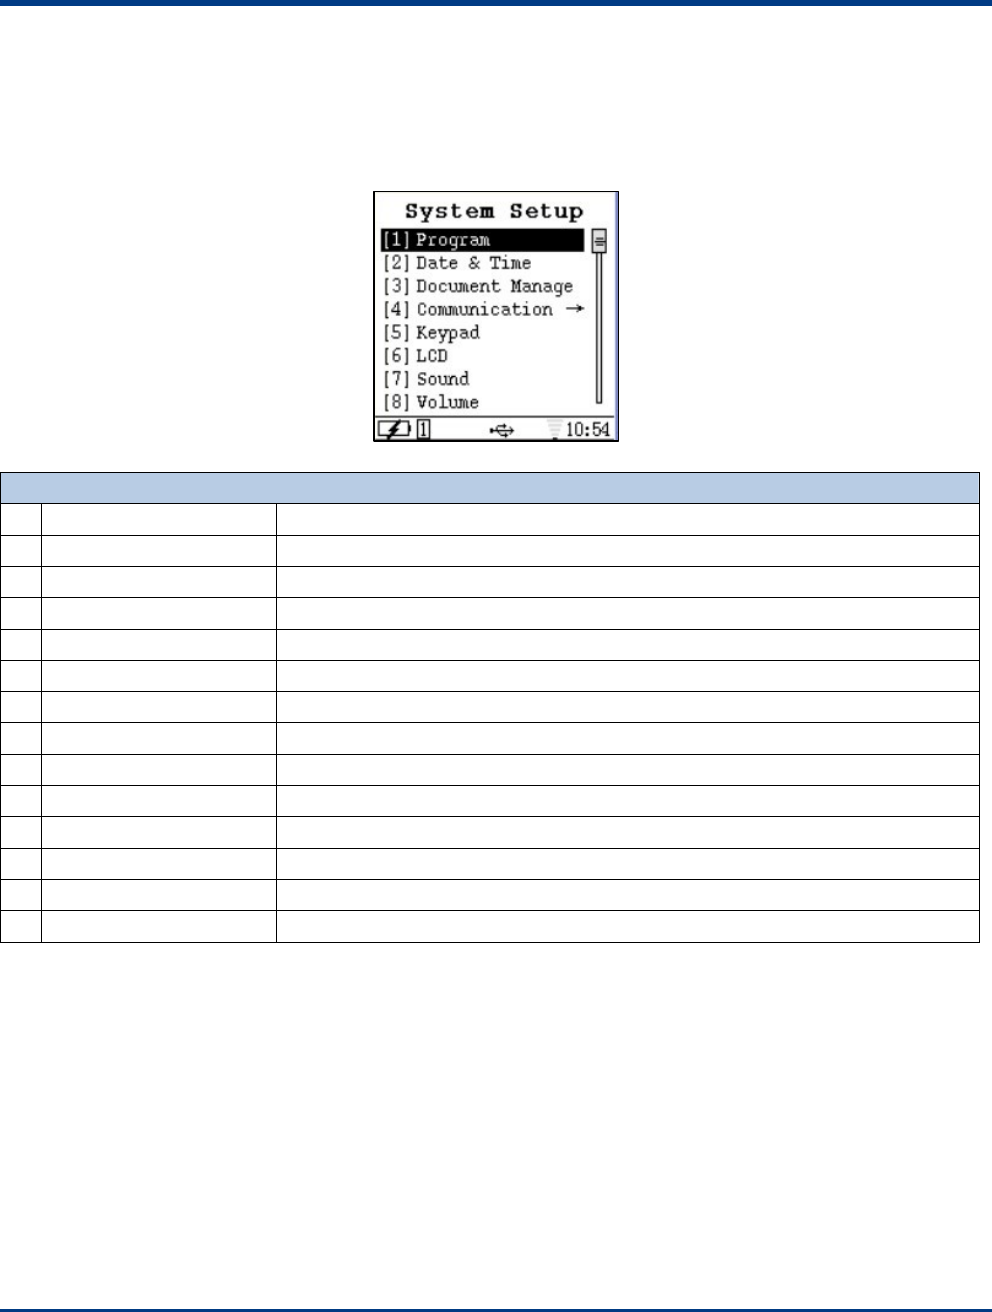
1 Enter into “Start up App” from “System Menu”on the main page
2 The terminal doesn’t include any default program under Start up App. If user has installed the application program, please
execute it.
10
Notice: If automatically run program is chose when terminal is on, after the terminal is restart, terminal will execute the
pre-set application program, the page of start up app will not appear again.
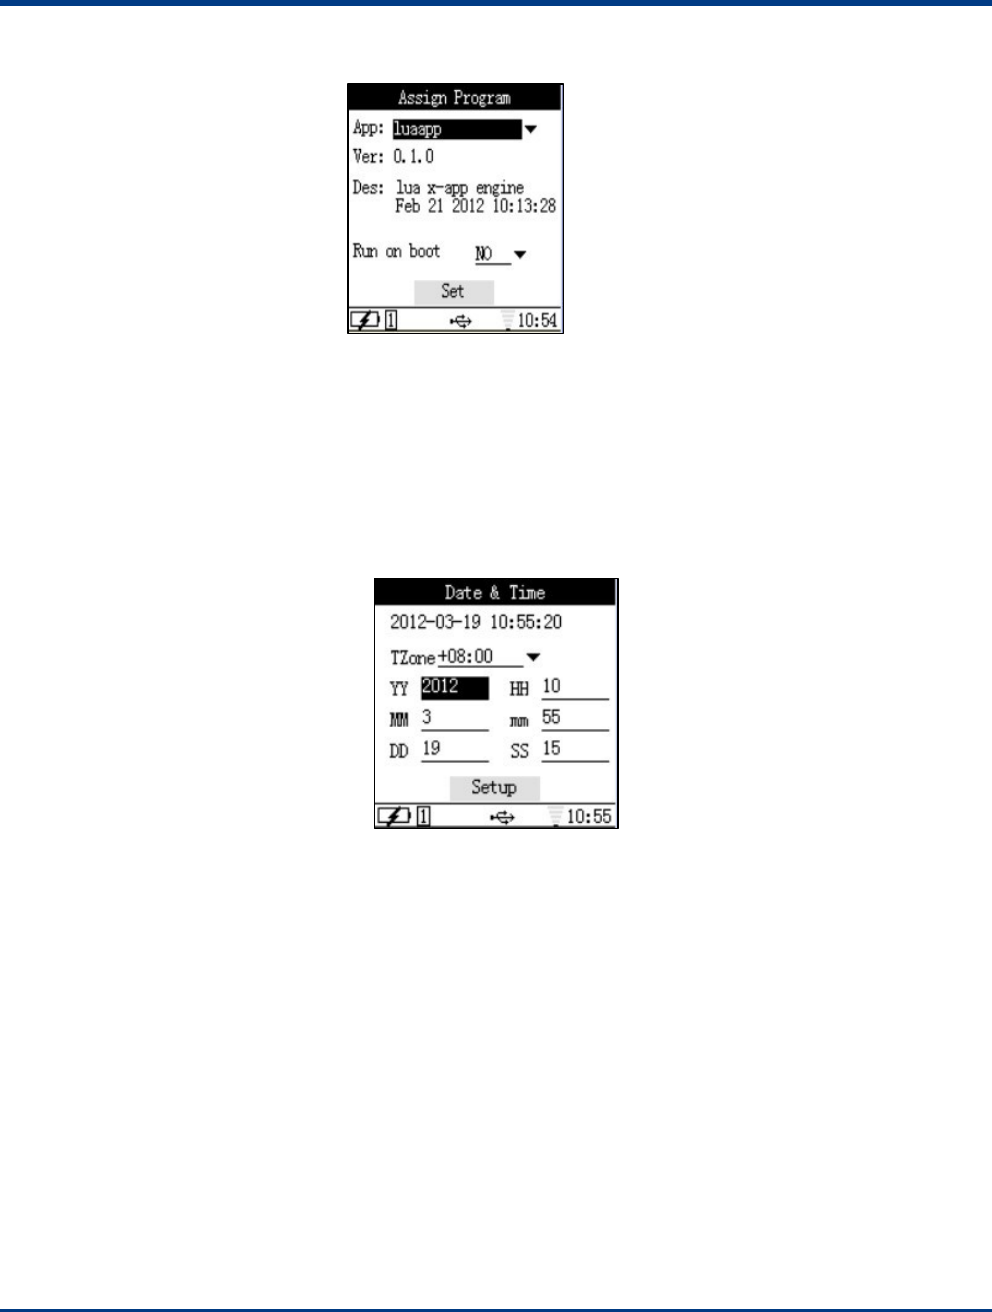
System Setup
Items Introductions
1 Program Custom made application program
2 Date & Time System clock
3 Document Manage Hard disk and program category manage
4 Communication USB, WiFi setting
5 Keypad Keypad with backlight and keypad lock
6 Screen LCD backlight and contrast setting
7 Sound Reminder volume setting
8 Volume Keypad and Scanning volume setting
9 Power Management Sleeping mode and terminal shut down setting
10 Service Manage Network setting
11 Change Password Modify system password
12 CHIN/EN Switch Multi language setting
13 Bar code Bar code scanner setting
14 Manufacturer Default Manufacturer default setting
11
Assign Program
1 Enter into program set up from “System Setup”
2 Click OK to open the program list, choose the program needed and click OK to confirm. It also indicates the program
information.
3 It is available option to set automatically run the application program when terminal is turned on
4 Move arrow to Set and click OK key to confirm the setting and quit from current page. Click on ESC key to cancel the
setting and eject from the setting page.
Data & Time
1 Enter into Date & Time setting from System Setup
2 Click OK to open the list of time zone. Choose the time zone needed and click OK to confirm. The time can be
modified as well by following same process.
3 Move arrow to Setup, click OK key to confirm the setting and quit from current page. Click on ESC key to cancel the
setting and eject from the setting page.
12
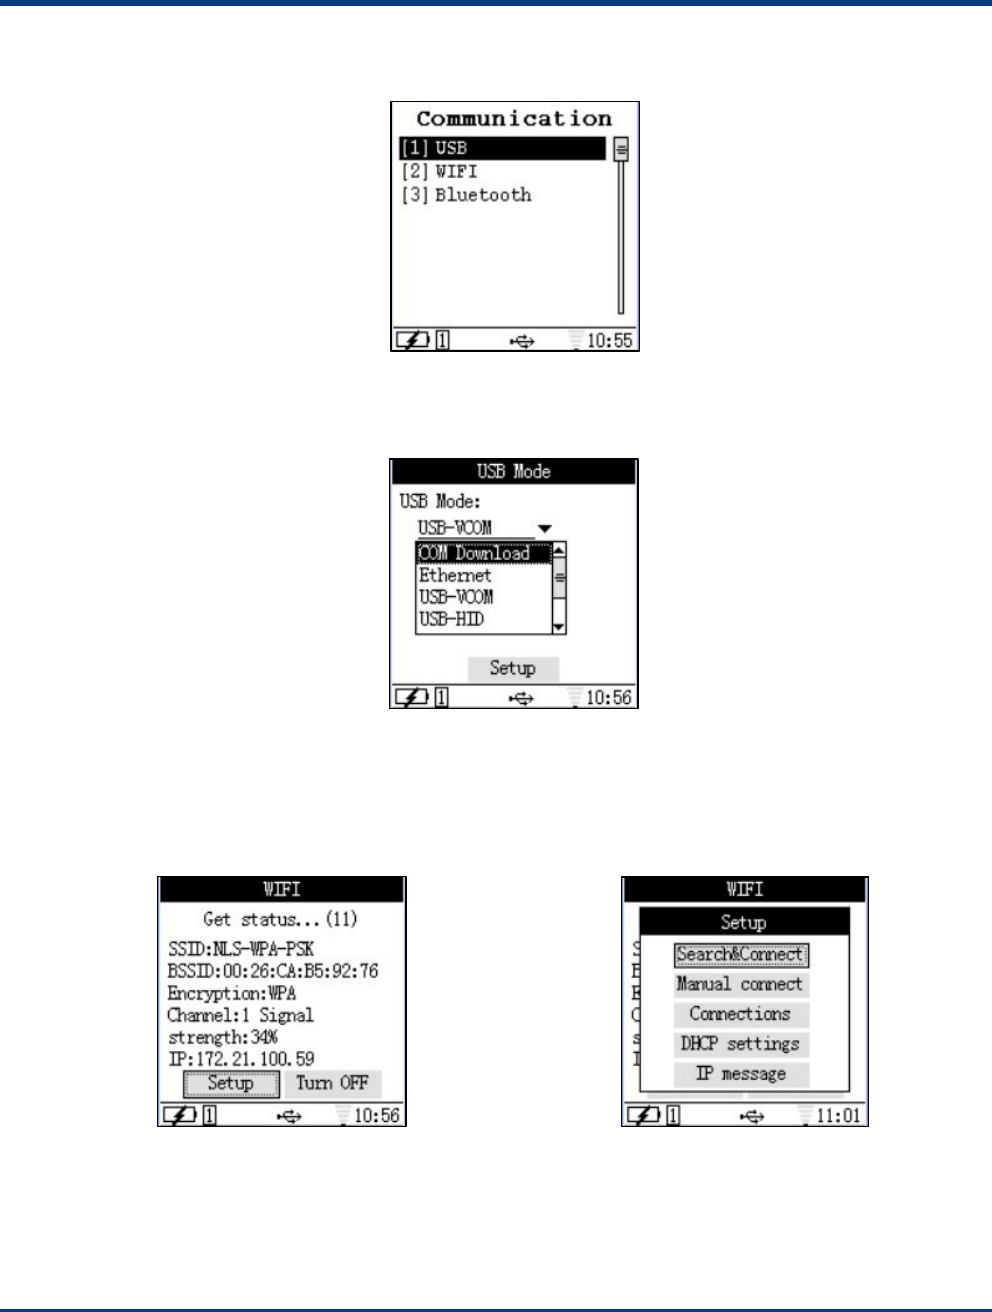
Communication
1 Enter into Communication page from System Setup
2 Choose the item from the list as shown below
USB Modes
1 Enter into USB Mode page from Communication
2 Click OK to open the list and choose the USB mode and click OK to confirm
3 Move arrow to Setup, click OK key to confirm the setting and quit from current page. Click on ESC key to cancel the
setting and eject from the setting page.
WIFI
1 Enter into WIFI page from Communication
2 The page indicates whether terminal is connected to WIFI and its information. If WIFI is off, please turn on WIFI
setting first
3 Once WIFI is on, please click on “Setup” button to start the setting.

13
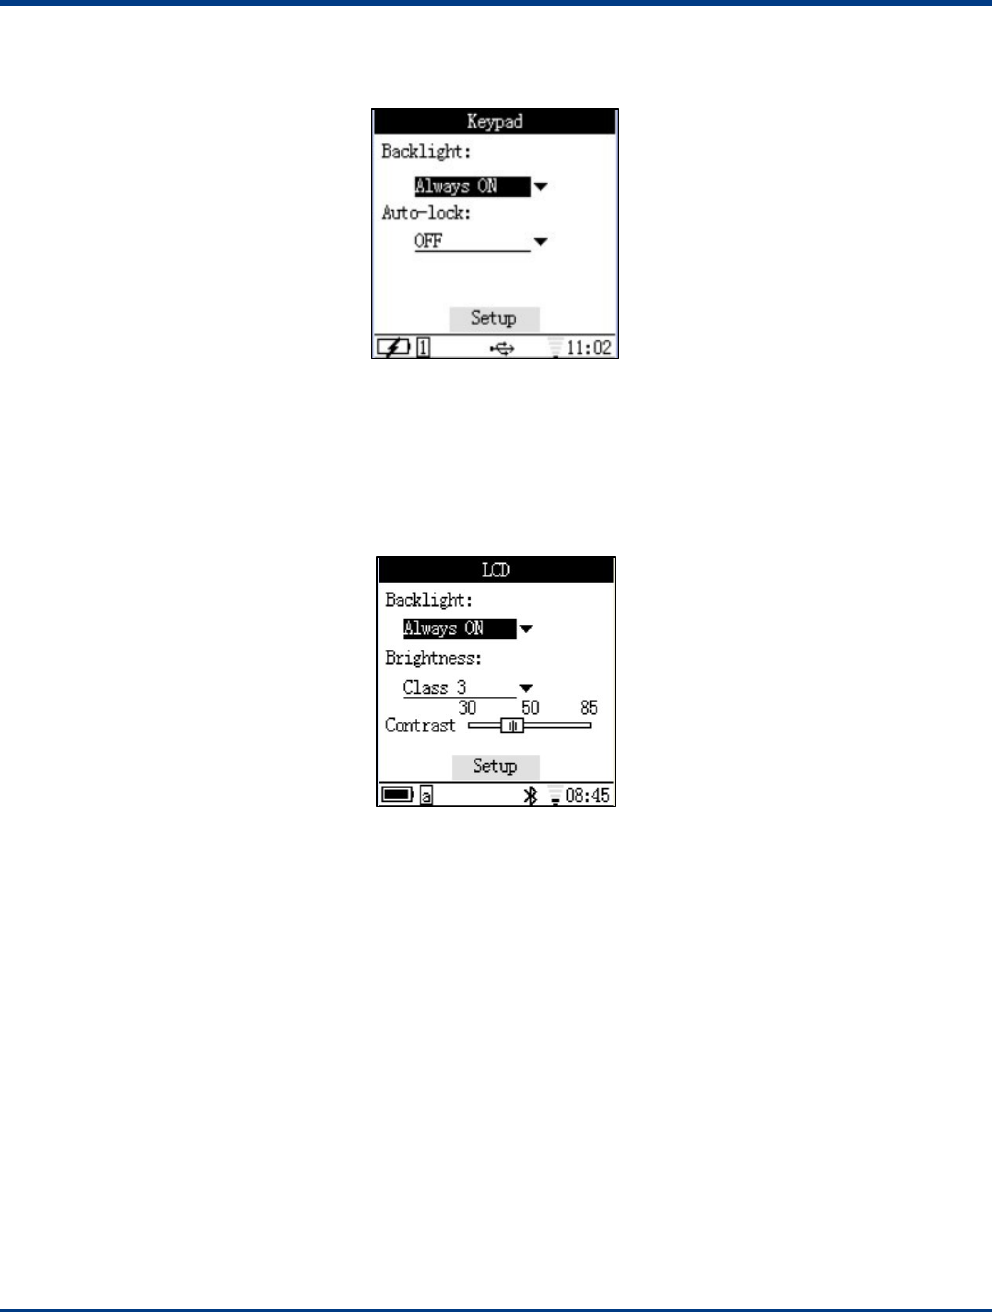
4 AP Search connect: search AP connection close by
5 AP Manual connect: connect to assigned AP
6 AP Connections: display all AP which are connected before
7 DHCP settings: set DHCP or manual set IP
8 IP message: display current connect IP message
14
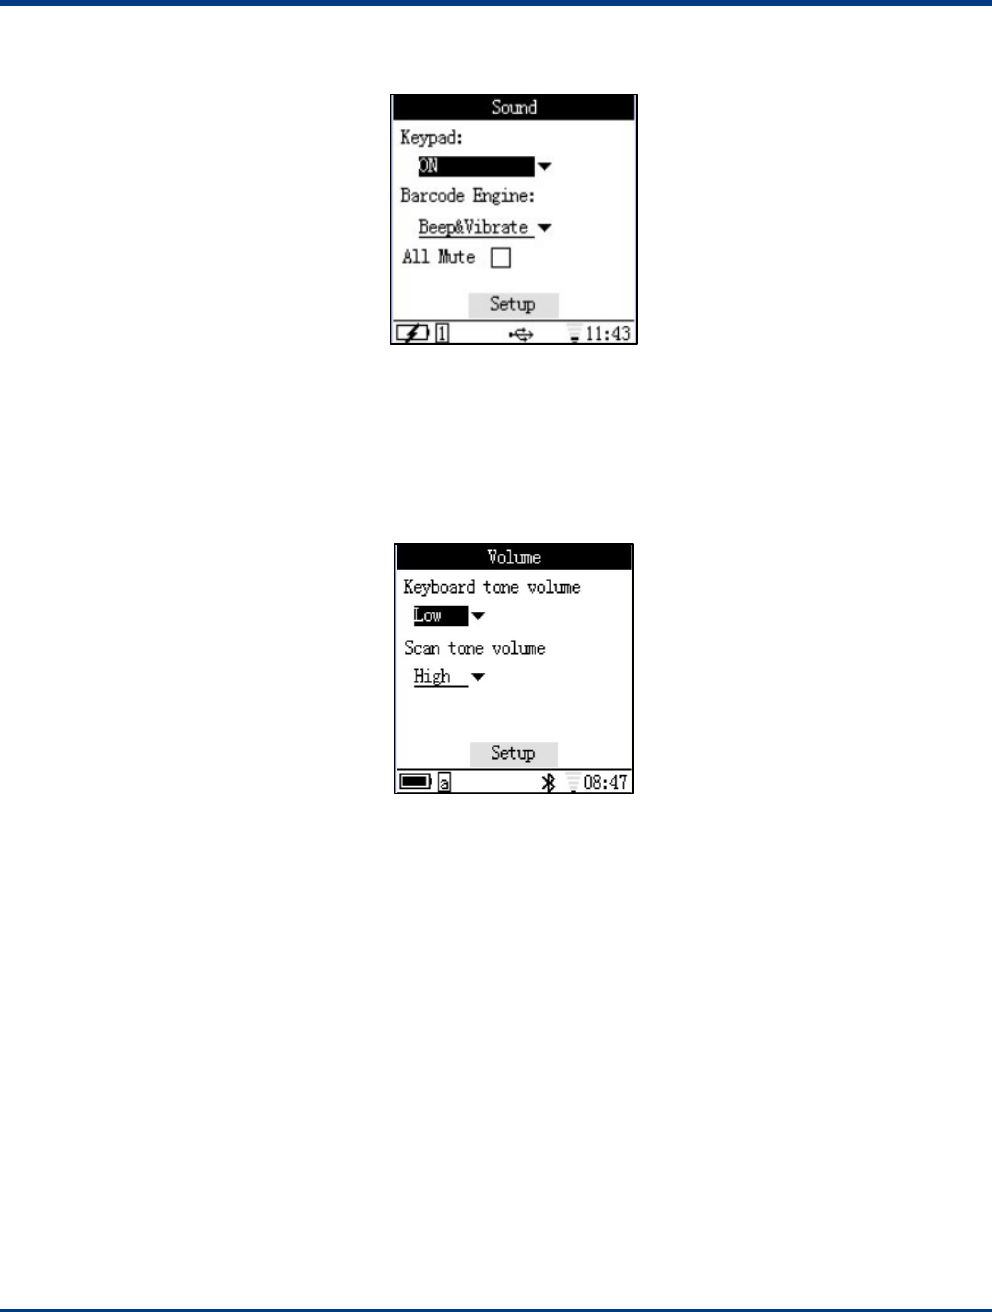
Keypad
1 Enter Keypad from System Setup
2 Set up the time frame of backlight last for
3 Choose ON or OFF for auto-lock the keypad
4 After setting, move arrow to Setup, click OK key to confirm the setting and quit from current page. Click on ESC key
to cancel the setting and eject from the setting page.
Screen
1 Enter Screen from System Setup
2 Select the options for the time to open backlight.
3 Select the brightness.
4 Select the contrast degree.
5 After setting, move arrow to Setup, click OK key to confirm the setting and quit from current page. Click on ESC key
to cancel the setting and eject from the setting page.
15
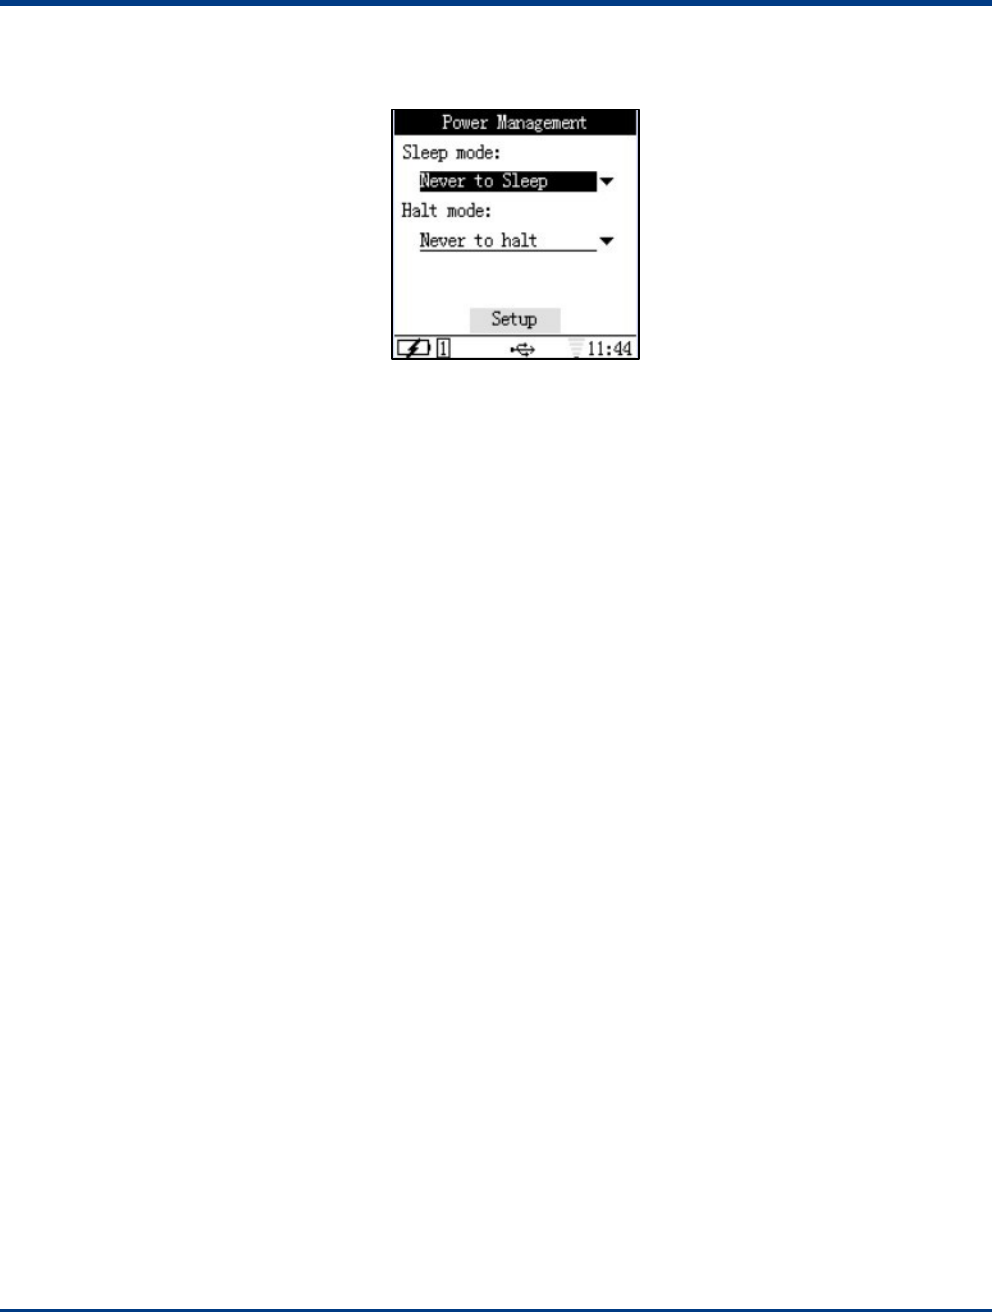
Sound
1 Enter into sound page from System Setup
2 Choose On or OFF for the keypad sound. Set up reminder sound when bar code engine scan the bar code. If choose
mute, that mean no reminder and no keypad sound when keypad pressed and bar code read.
3 After setting, move arrow to Setup, click OK key to confirm the setting and quit from current page. Click on ESC key
to cancel the setting and eject from the setting page.
Volume
1 Enter into volume page from System Setup
2 Choose the volume for the keypad sound.
3 Choose the volume for the scanning.
4 After setting, move arrow to Setup, click OK key to confirm the setting and quit from current page. Click on ESC key
to cancel the setting and eject from the setting page.
16
Power Management
1 Enter power management page from System Setup
2 Choose the sleep mode from the list. Choose terminal off time from Half mode.
Click Setup to confirm the setting and quit from current page. Click on ESC key to cancel the setting and quit
from the setting page.
17
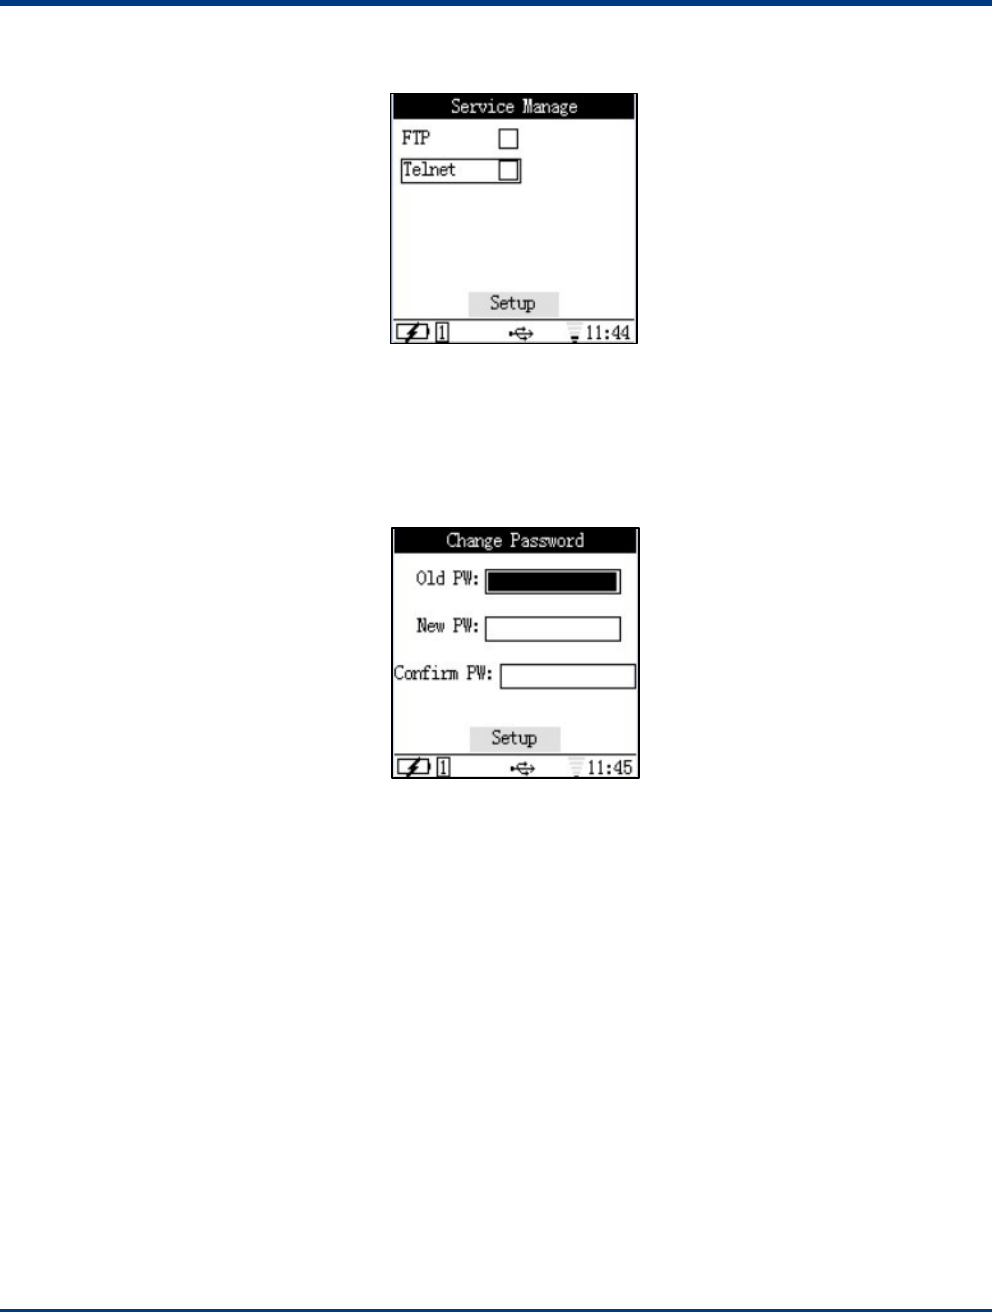
Service Manage
1 Enter into service manage page from System Setup
2 Click on arrow key(s) to choose network service. Click OK to turn on or off the service.
3 After setting, move arrow to Setup, click OK to confirm setting and quit from current page. Click ESC to cancel the
setting and quit from current page.
Change Password
1 Enter change password page from System Setup
2 Input old PW, New PW and Confirm PW.
3 After setting, move arrow to Setup, click on OK key to confirm setting and quit from current page. Press ESC key to
cancel the setting and quit from current page.
Note: default password is 159951
18
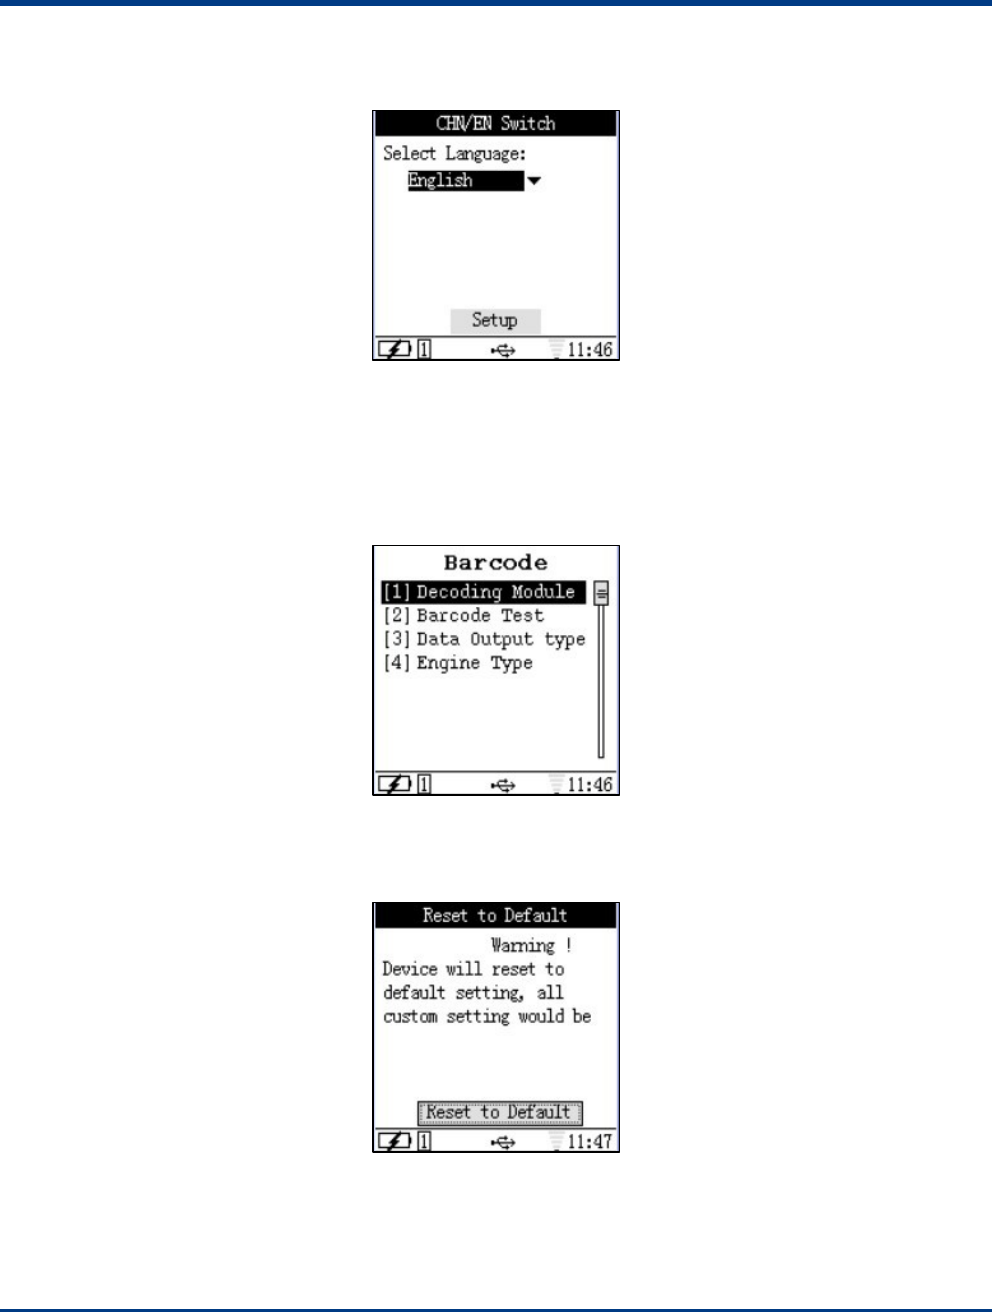
CHIN/EN Switch
1 Enter CHIN/EN Switch page from System Setup
2 set the language to Chinese or English
3 After setting, move arrow to Setup, click on OK key to confirm setting and quit from current page. Press ESC key to
cancel the setting and quit from current page.
Bar code
1 Enter into Bar code page from System Setup
2 Allow to set under USB Mode page
Reset to Default
1 Enter into Reset to Default page from System Setup
2 After setting, move arrow to Setup, click on OK key to confirm setting and quit from current page. Press ESC key to
cancel the setting and quit from current page.
19
3 Note: If the terminal is back to default, all the settings were set previously by user are cancelled.
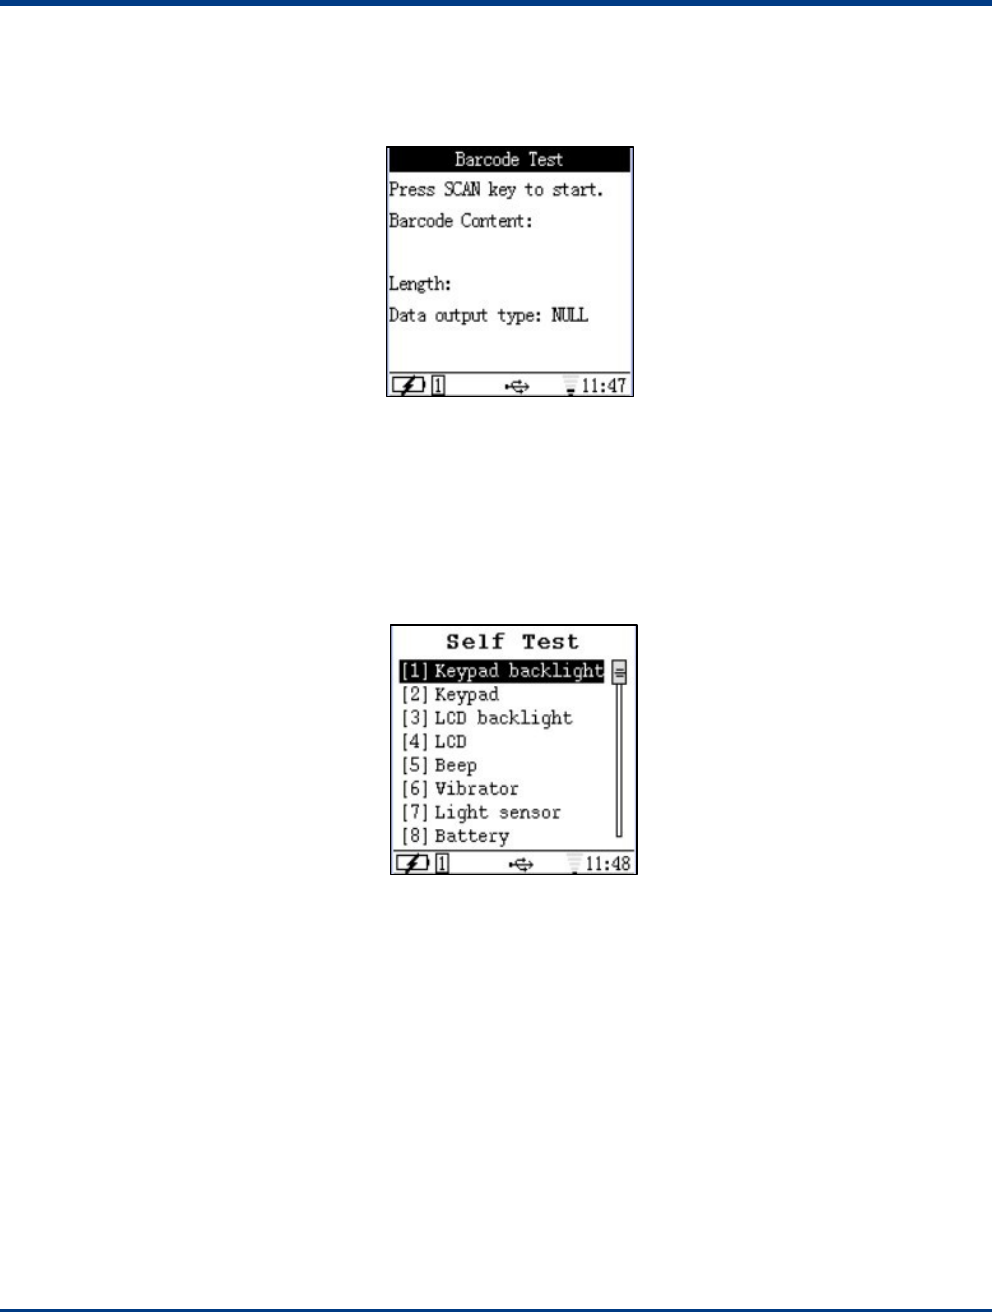
Bar Code Test
1 Enter into Bar code Test page from System Setup
2 Press SCAN key to scan the bar code and bar code data and length is displayed on this page.
3 Click on ESC key to cancel and quit from current page.
4 Note: Bar code output data transferring method is able to be set under Bar code setting menu.
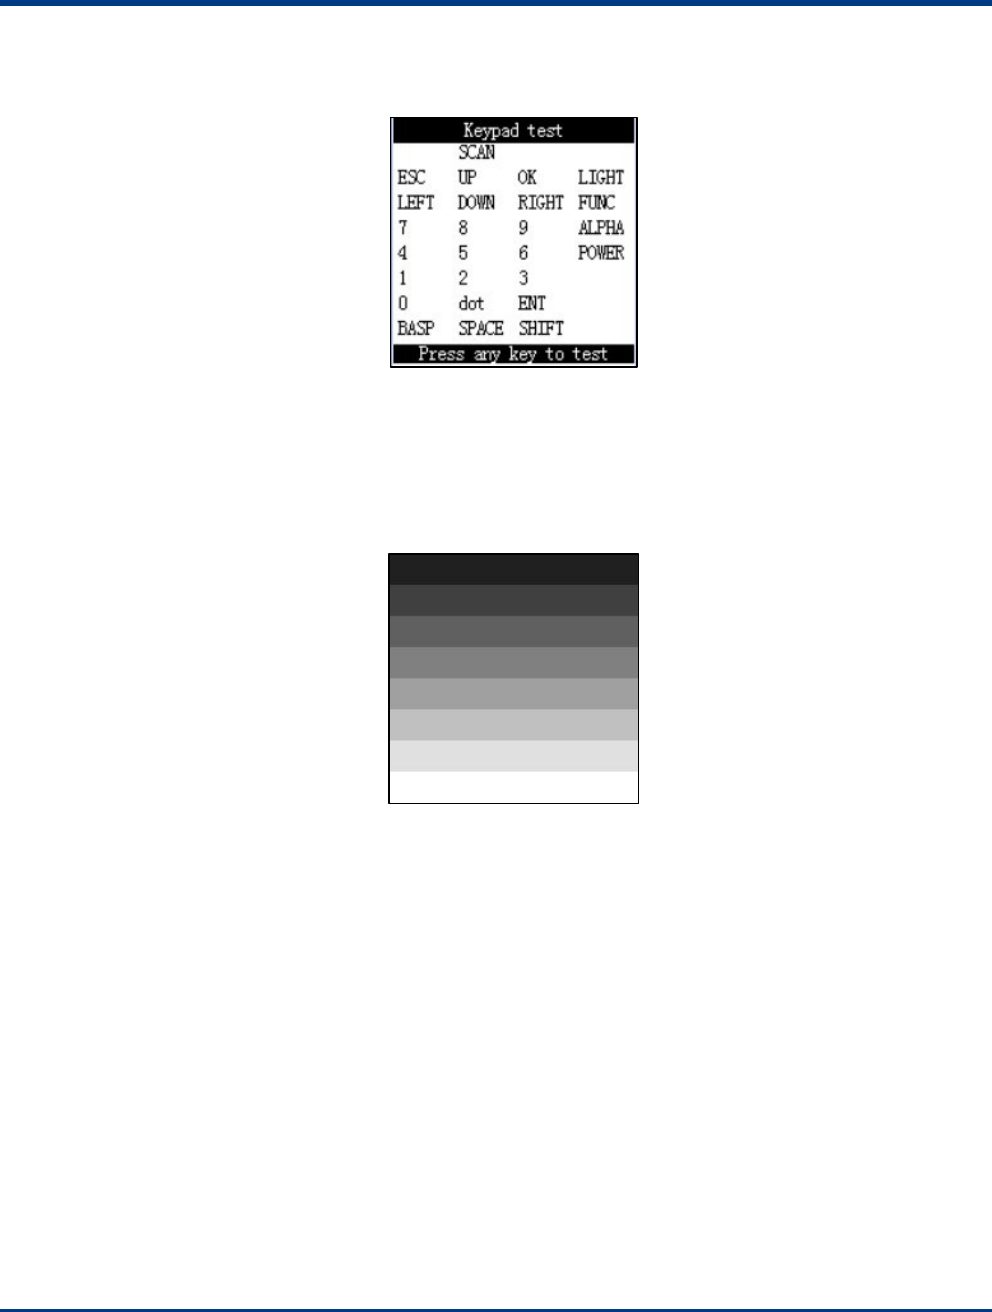
Self Test
Self Test Menu
Note: If terminal is out of order, please enter into Self Test page to re-align the terminal.
20
Keypad test
1 Enter into Keypad test page from Self Test
2 All keys show up on screen is corresponding to the actual keypad. When press certain key, if the keypad is working
properly, that particular key should be disappeared from screen. If not, that particular key is failure.
3 Press twice ESC key to leave from current Keypad test page.
LCD Test
1 Enter into LCD page from Self Test
2 System will automatically test the LCD. User can find whether there is a dot on the LCD screen via the test
3 Click on ENT key to leave from current page after testing.
21
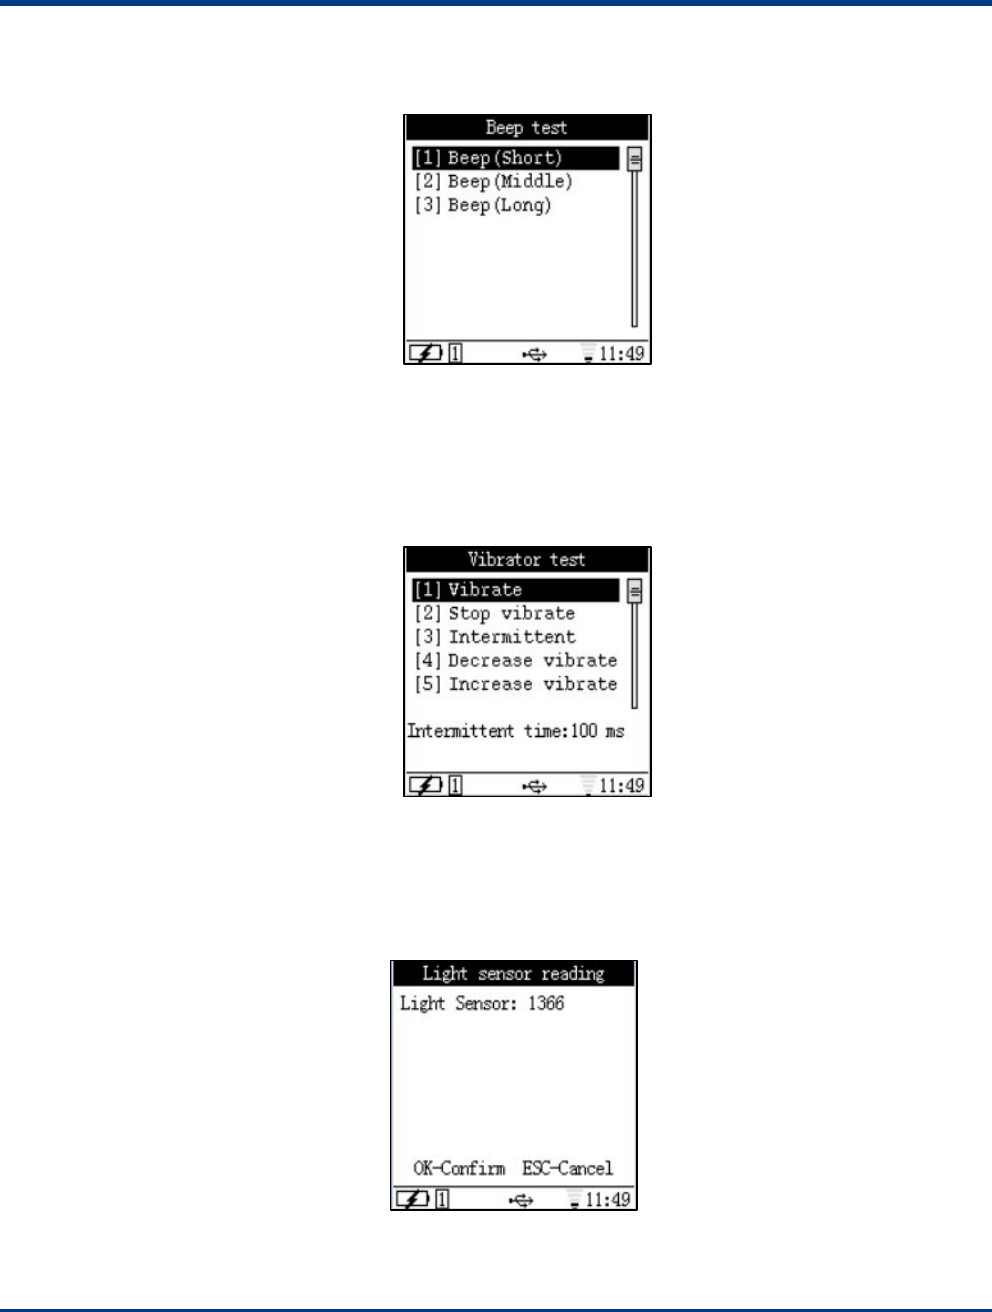
Beep test
1 Enter into Beep test page from Self Test
2 Choose short, middle and long beep to test the beep.
3 Click ESC key to leave from the current page
Note: the option of “All Mute” must be OFF under System Setup menu in order to proceed Beep test
Vibrator test
1 Enter into Vibrator test page from Self Test.
2 Choose the option from list to proceed test
3 Click ESC key to leave from current page.
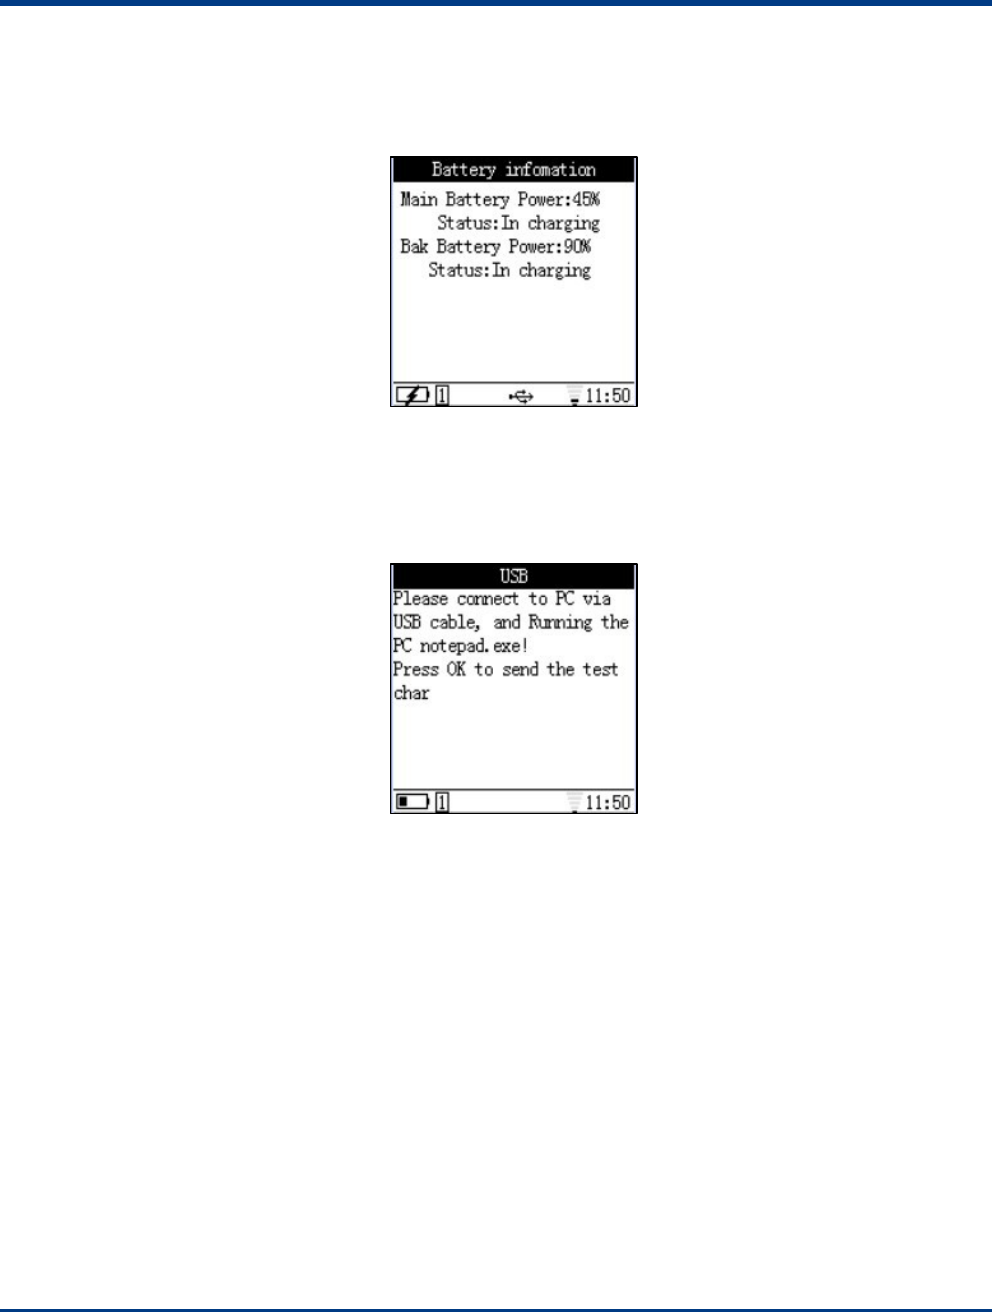
Light sensor reading
1 Enter into Light sensor reading page from Self Test.
22
2 System shows the brightness value from current environment. Click OK or ESC key to leave from current page.
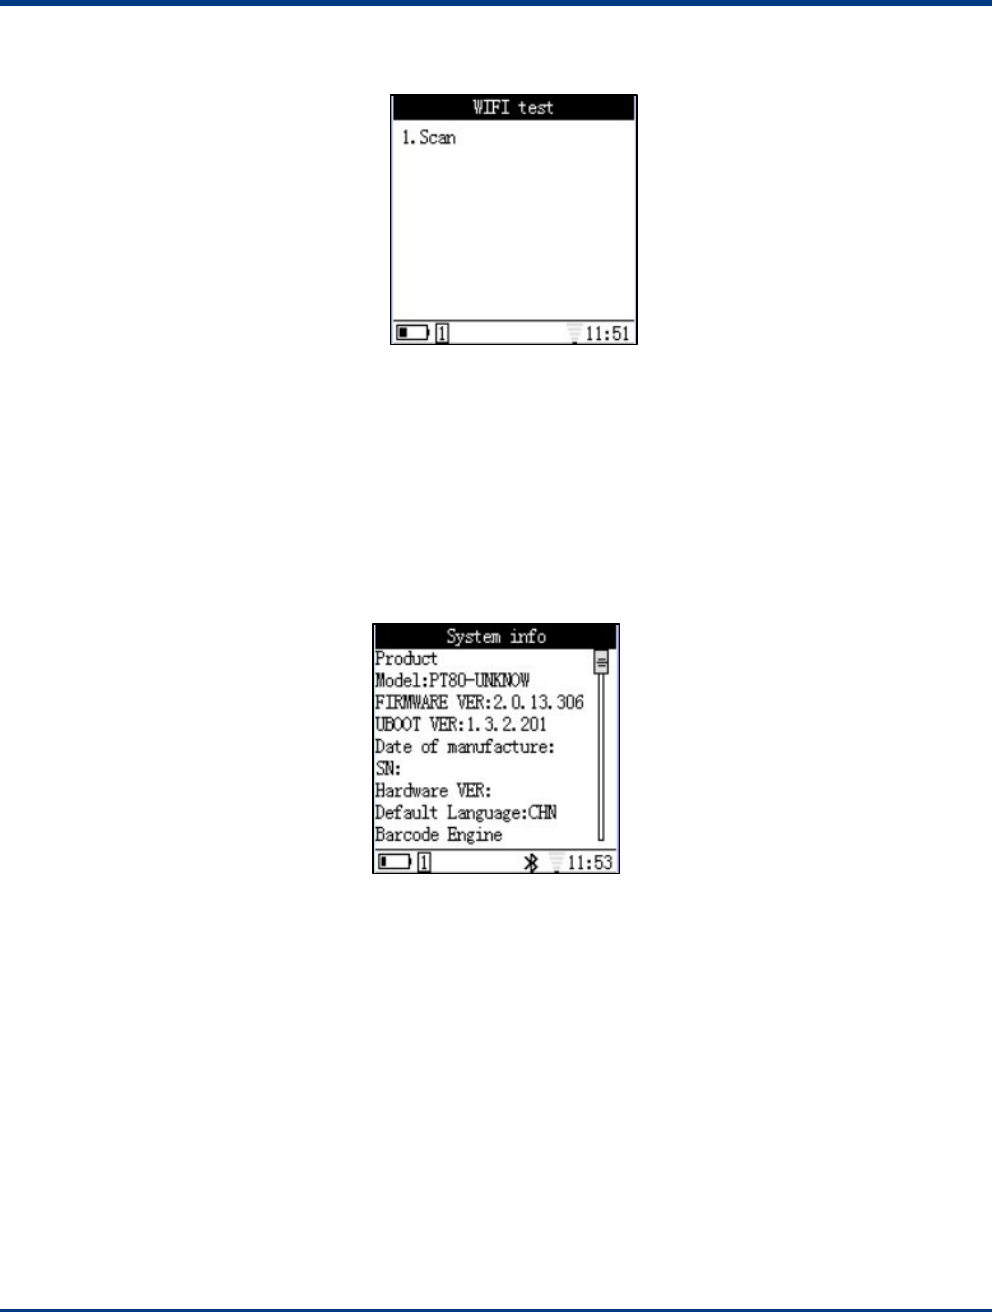
Battery Information
1 Enter into Battery information page from Self Test
2 The page shows main and back up battery information
3 Click ESC key to leave from current page
USB Test
1 Enter into USB page from Self Test
2 If terminal is not connected with a USB cable to PC, system will have warning message on the screen (see left)
3 Open the Notepad from PC, then click OK key on the terminal, the data will be sent to Notepad via HID
communication.
Note: under USB test, the USB working mode is set up HID as default. User is able to set to different communication
mode in Communication page which is under System Menu.
23
WIFI Test
1 Enter into WIFI page from Self Test.
2 Choose Scan to proceed test
3 Click ESC key to leave from current page.
Note: WIFI service MUST be ON when proceed WIFI test. Please turn on WIFI from Communication page which is under
System Menu.
System Info
It includes NLS-PT80 system information, such as hardware version, software version, manufacturing date, etc.
24
Chapter IV Data Transmission
Introduction
This chapter will illustrate how to connect NLS-PT80 to a PC and how to realize data transmission between them.
Connect NLS-PT80 to a PC
The bottom of NLS-PT80 has a rubber to protect USB port. Please open this rubber and connect NLS-PT80 to a PC via USB
cable.
Data Transmission
There are three ways for data transmission, i.e. USB, WIFI , which will be illustrated respectively as follows. Please setup in the
“Communication” of NLS-PT80 as shown below:
USB Connection
Select “[1] USB” in the “Communication” and then click “OK” to enter “USB Mode” configuration. There are 6 items under “USB
Mode”, including “COM Download”, “Ethernet”, “USB-VCOM”, “USB-HID”, “Flash Disk” and “ Flash Disk (Read Only)”:
Ethernet
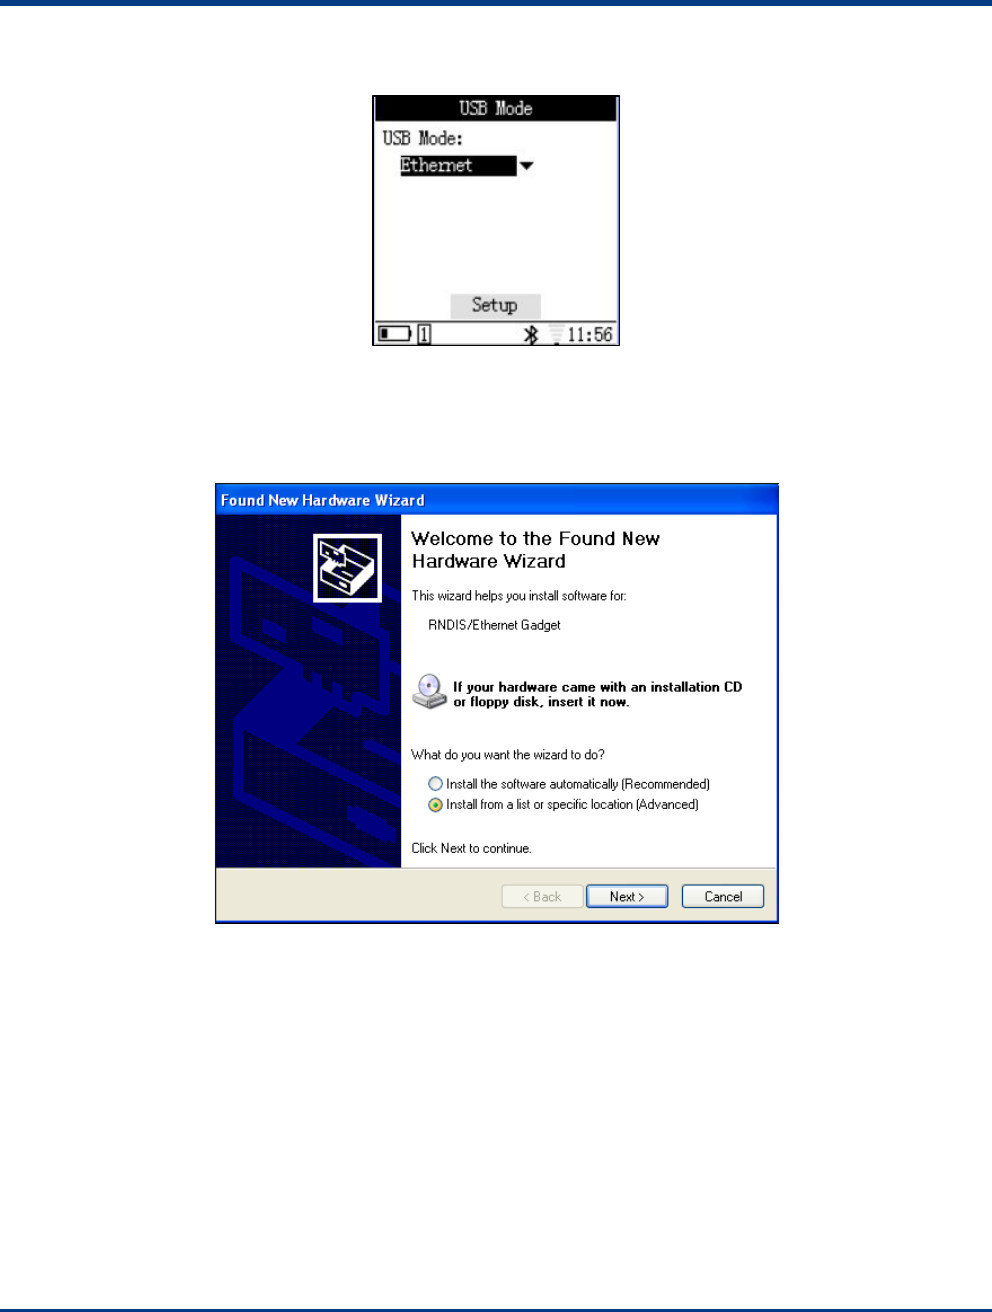
Select “System Setup”-> “Service Management”-> “FTP Service”, and then click “Setup”. Select the mode below:
25
Click “Setup” and then connect NLS-PT80 to the PC via USB cable.
Linux USB Ethernet /RNDIS Gadget
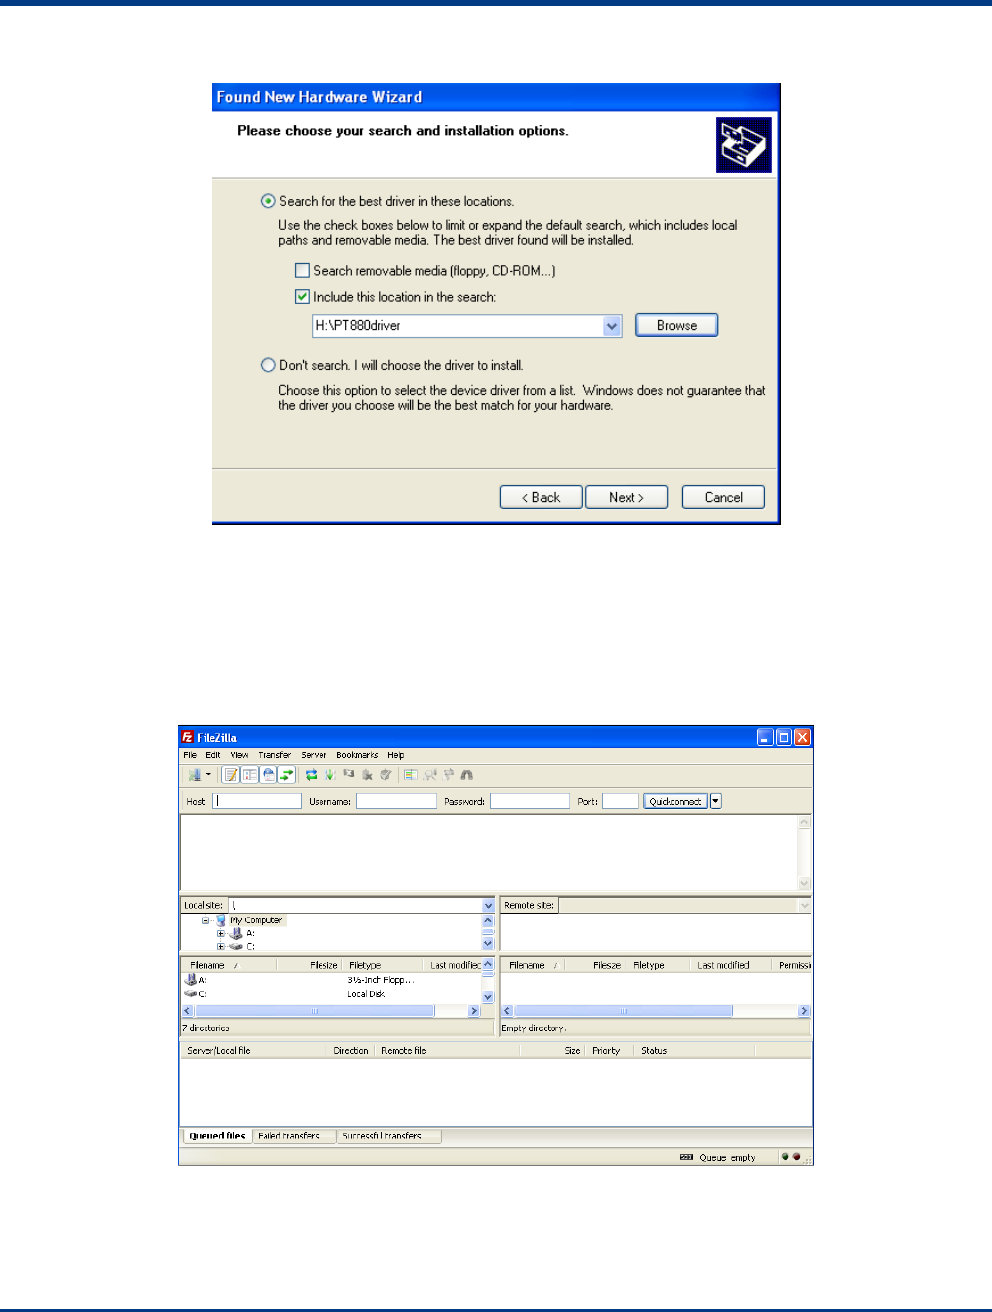
When the NLS-PT80 is connected via USB, there will come up a box on PC for installing “RNDIS/Ethernet Gadget”. Right click
“Linux USB Ethernet/RNDIS Gadget” and then select “Update the driver files (P)”. And thus the below page will appear. Please
select “Install from a list or specific location (Advanced)”:
26
Click “Next” and browse the location of “NLS-PT80 driver” as shown below:
Click “Next” and wait for the completion of the driver installation.
Data Transmission under Ethernet
After the completion of driver installation, NLS-PT80 will be assigned a fixed IP address: 192.168.0.1, which can be visited via
remote tools for managing files on NLS-PT80 (such as copy, paste and delete). NLS-PT80 can support various remote tools
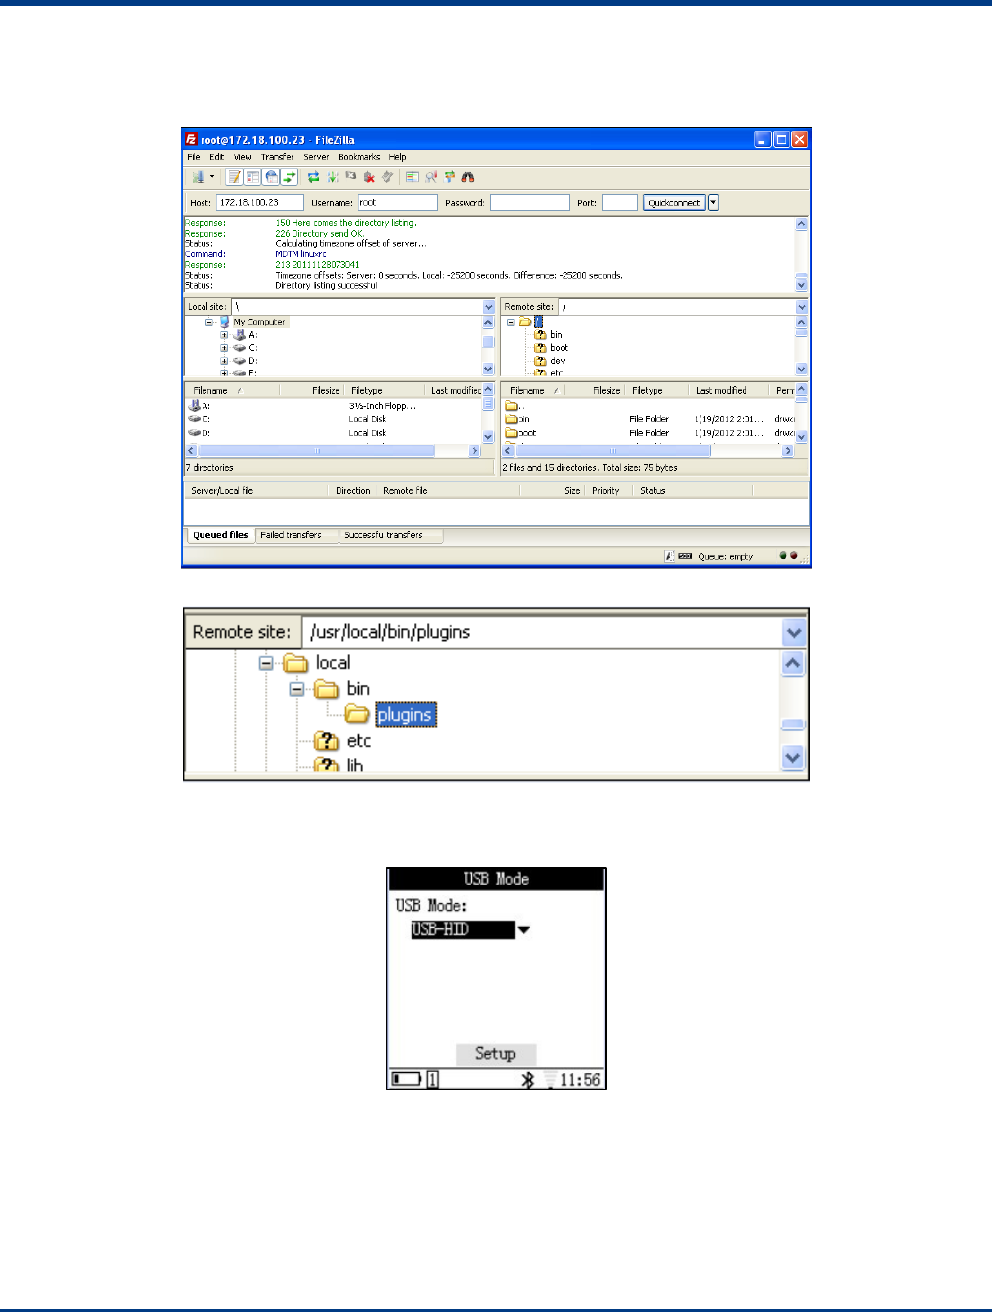
and this manual will use “FileZilla”. Open the remote tool and will come up a page like below:
27
Enter “192.168.0.1” in Host and “root” in Username. No password needed. Click “Quickconnect”. For successful connection, the
below page will appear:
Select “/usr/local/bin/plugins” from Remote site, which includes add-on kits for NLS-PT80 as shown below:
USB-HID
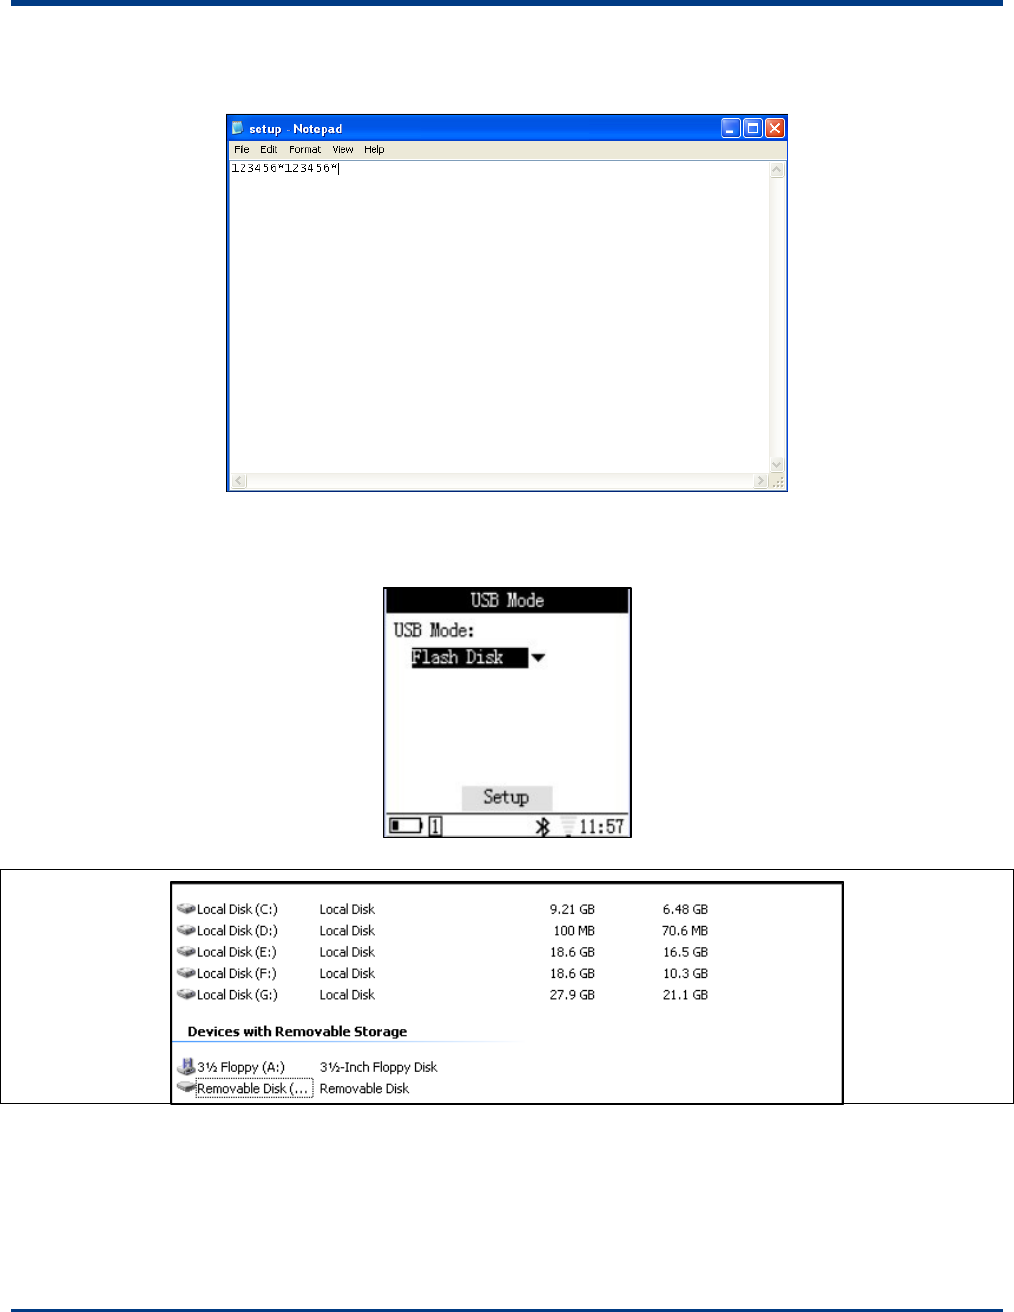
Select the USB-HID mode as shown below:
28
Click “Setup” and then connect NLS-PT80 to the PC via USB cable. In this mode, the bar codes read by NLS-PT80 can be
shown on PC in txt file, as shown in illustration below:
Flash Disk
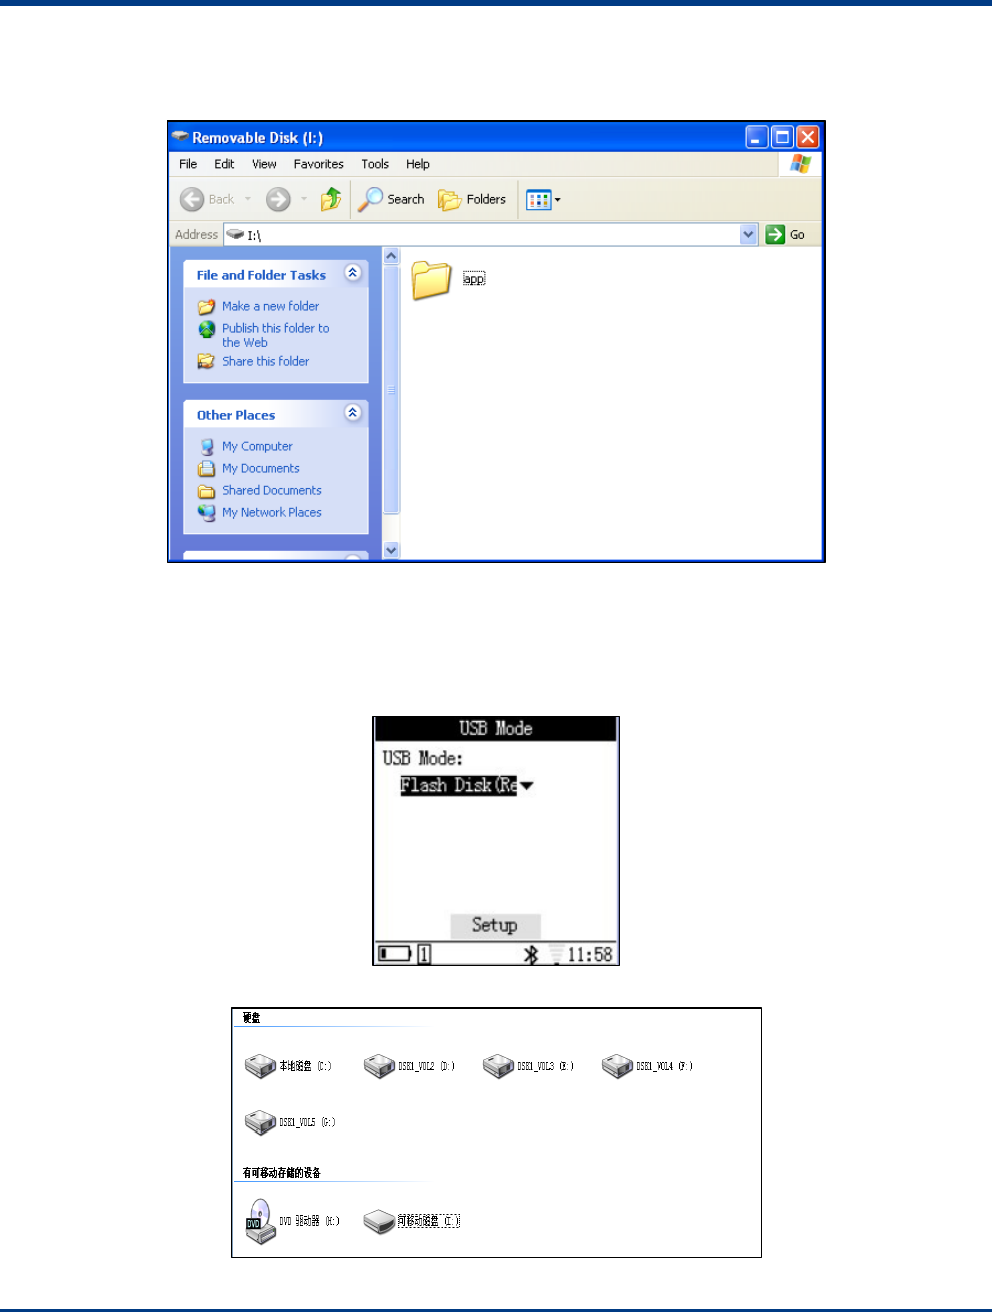
Select “Flash Disk” as shown in the illustration below:
Click“Setup” and then connect NLS-PT80 to the PC via USB cable.
29
In this mode, NLS-PT80 can be used as a flash disk under read-write state. Double-click the Flash Disk to open it, and an
interface as below will show up:
The app folder includes the plug-ins (i.e. programs) for NLS-PT80 and thus any program needed can be copied in this folder
and any program in this folder can be revised, deleted and so forth.
Flash Disk (Read Only)
Select the “Flash Disk (Read Only)” mode as shown below:
Click “Setup” and then connect NLS-PT80 to the PC via USB cable. A symbol of Flash Disk will appear in the “Computer” of PC:
30
In this mode, NLS-PT80 can be used as a Read-Only Flash Disk.
USB-VCOM
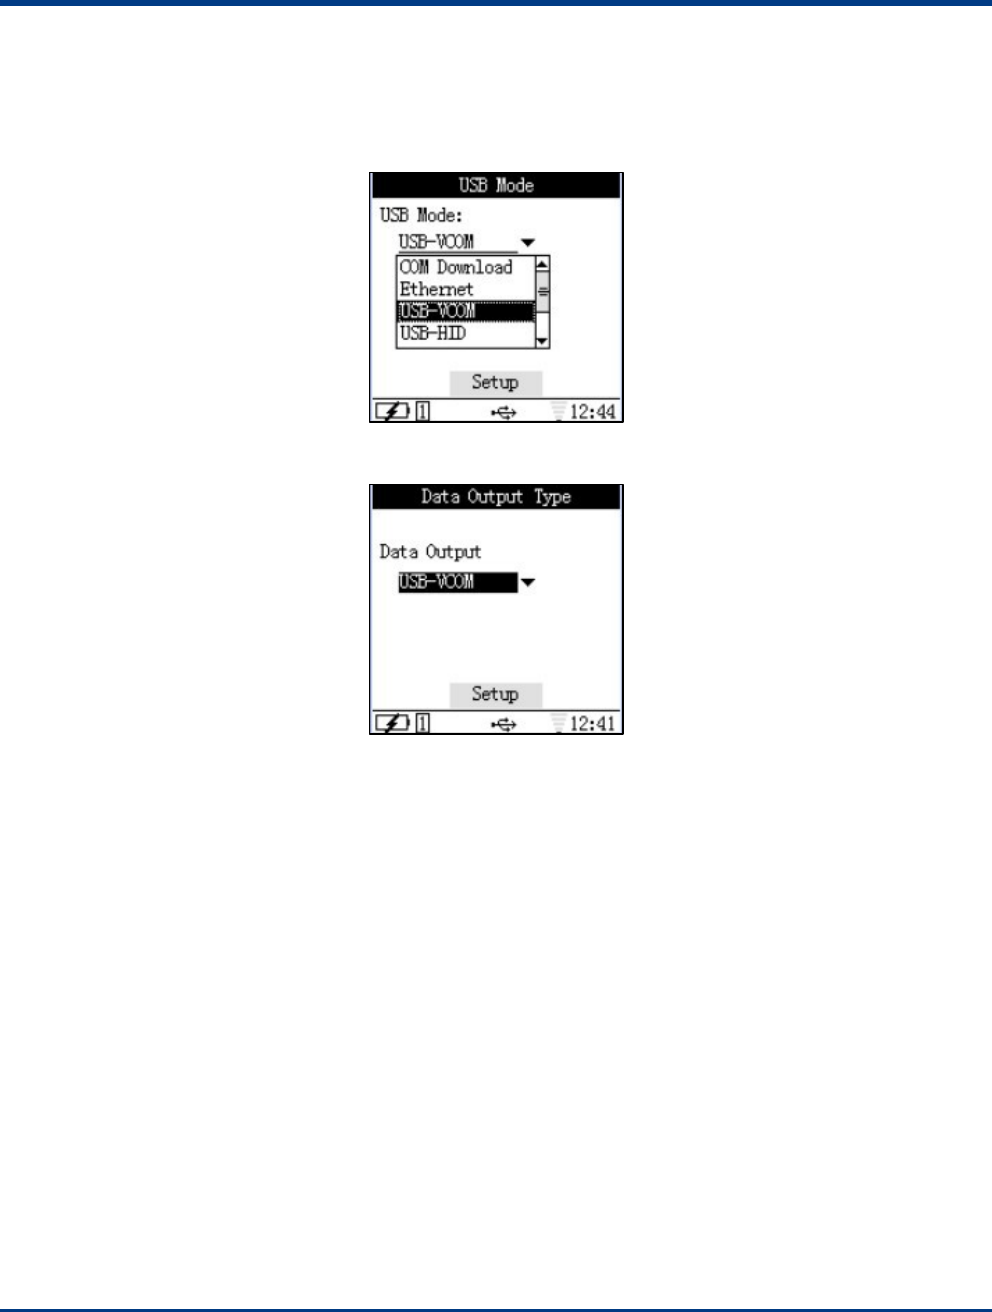
Select the “USB-VCOM” mode as shown below:
Click “Setup” and connect NLS-PT80 to the PC via USB cable. Then select “USB-VCOM” in the “Data Output Type” under “Bar
code Scanner” to program the data output mode.
Click “Setup” to finish the configuration.
Installation of Virtual COM Driver
After connection between PC and NLS-PT80 via USB cable, the Terminal Manger will have similar page as below:
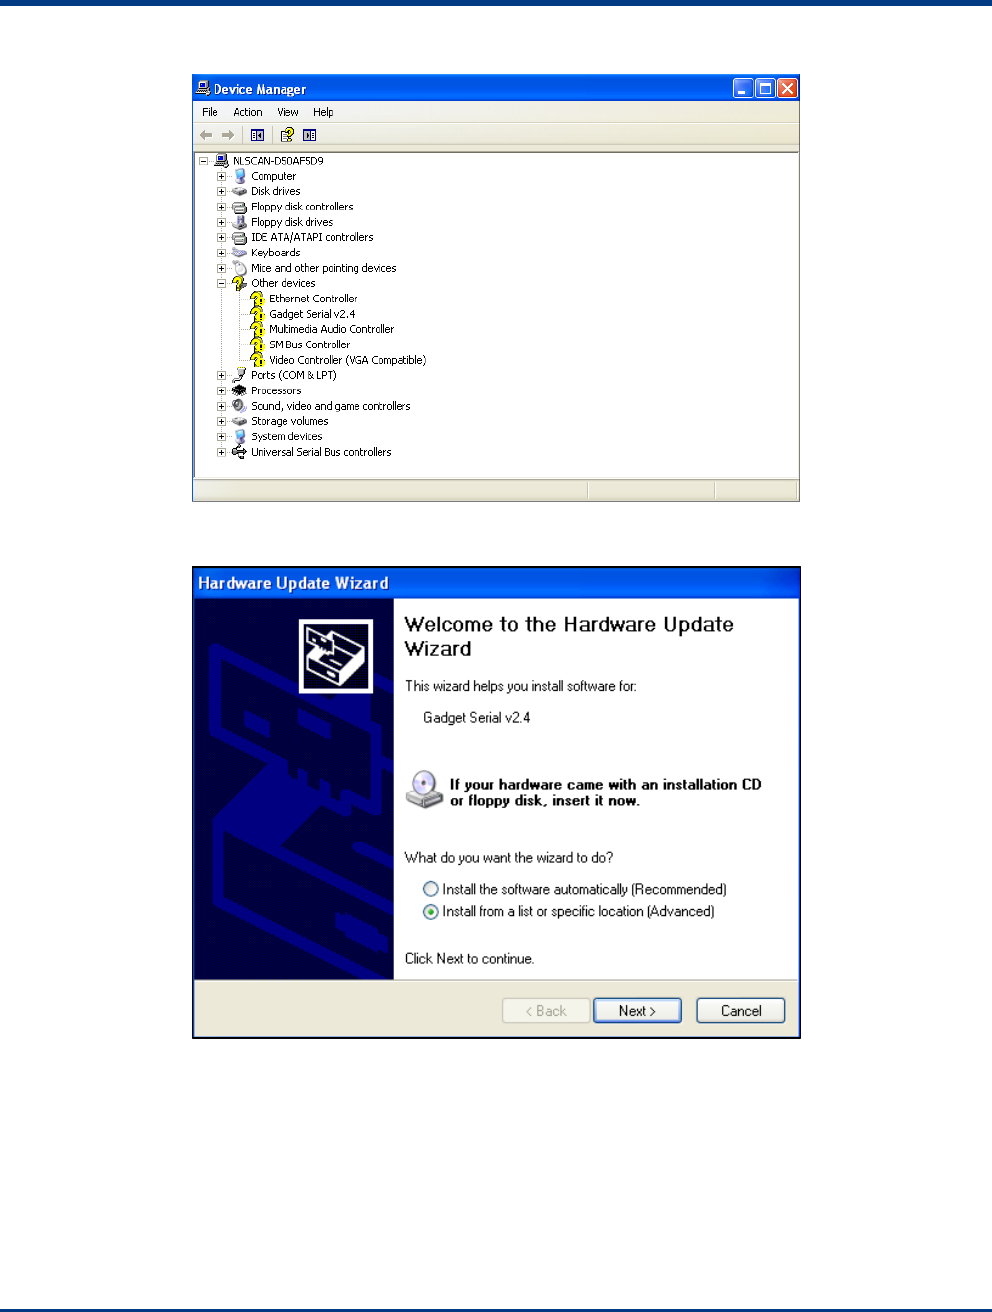
31
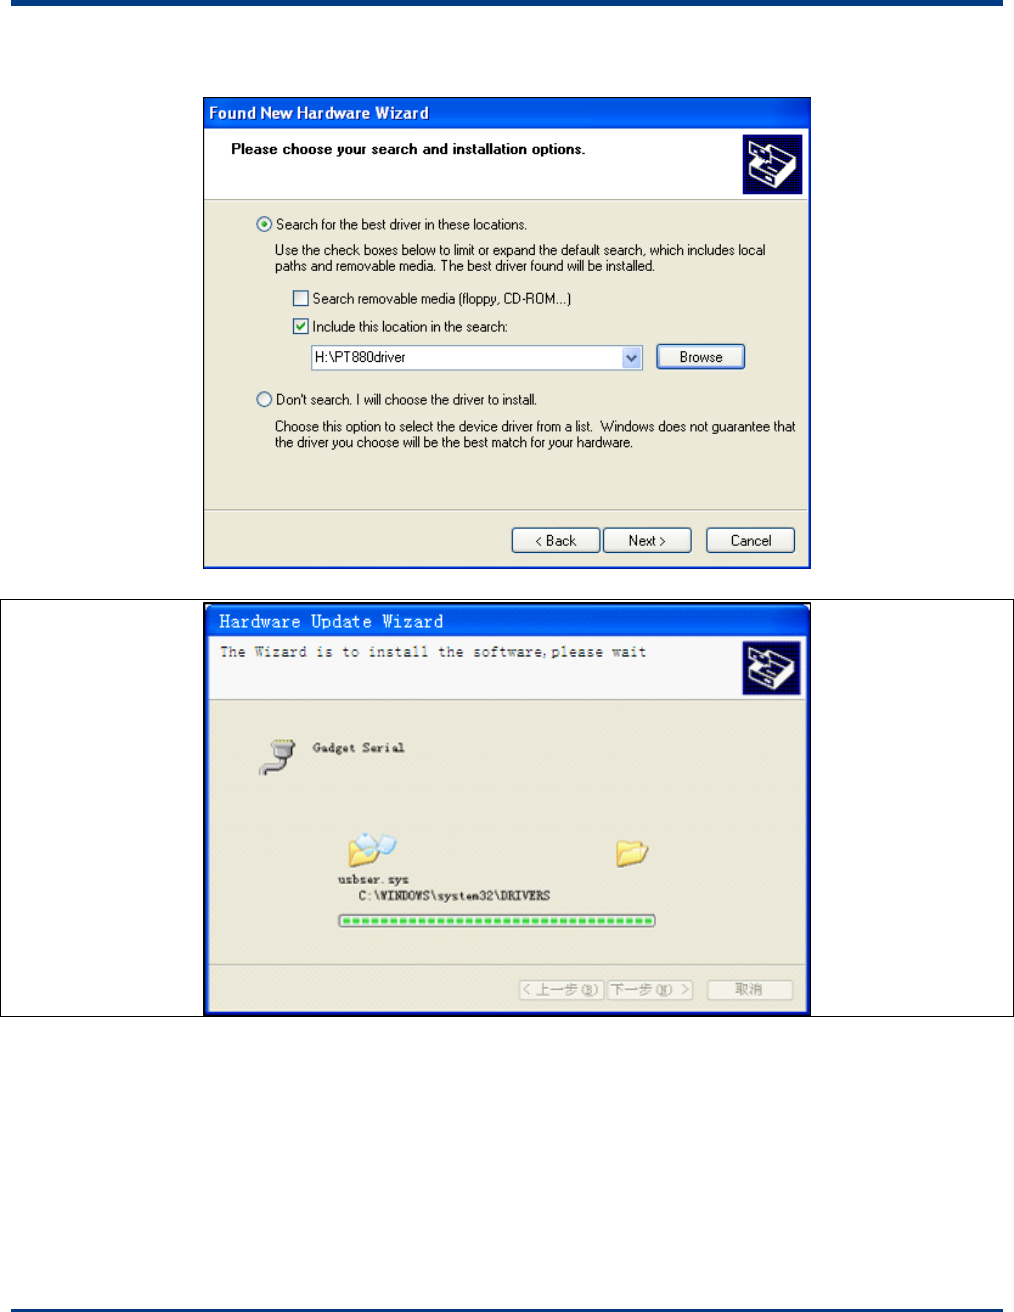
Right click “Gadget Serial v2.4”, and select “Update the driver files(P)” as shown below:
32
Click “Next” and browse the location of “NLS-PT80 driver” as shown below:
Click “Next” and the installation page will appear as shown below:
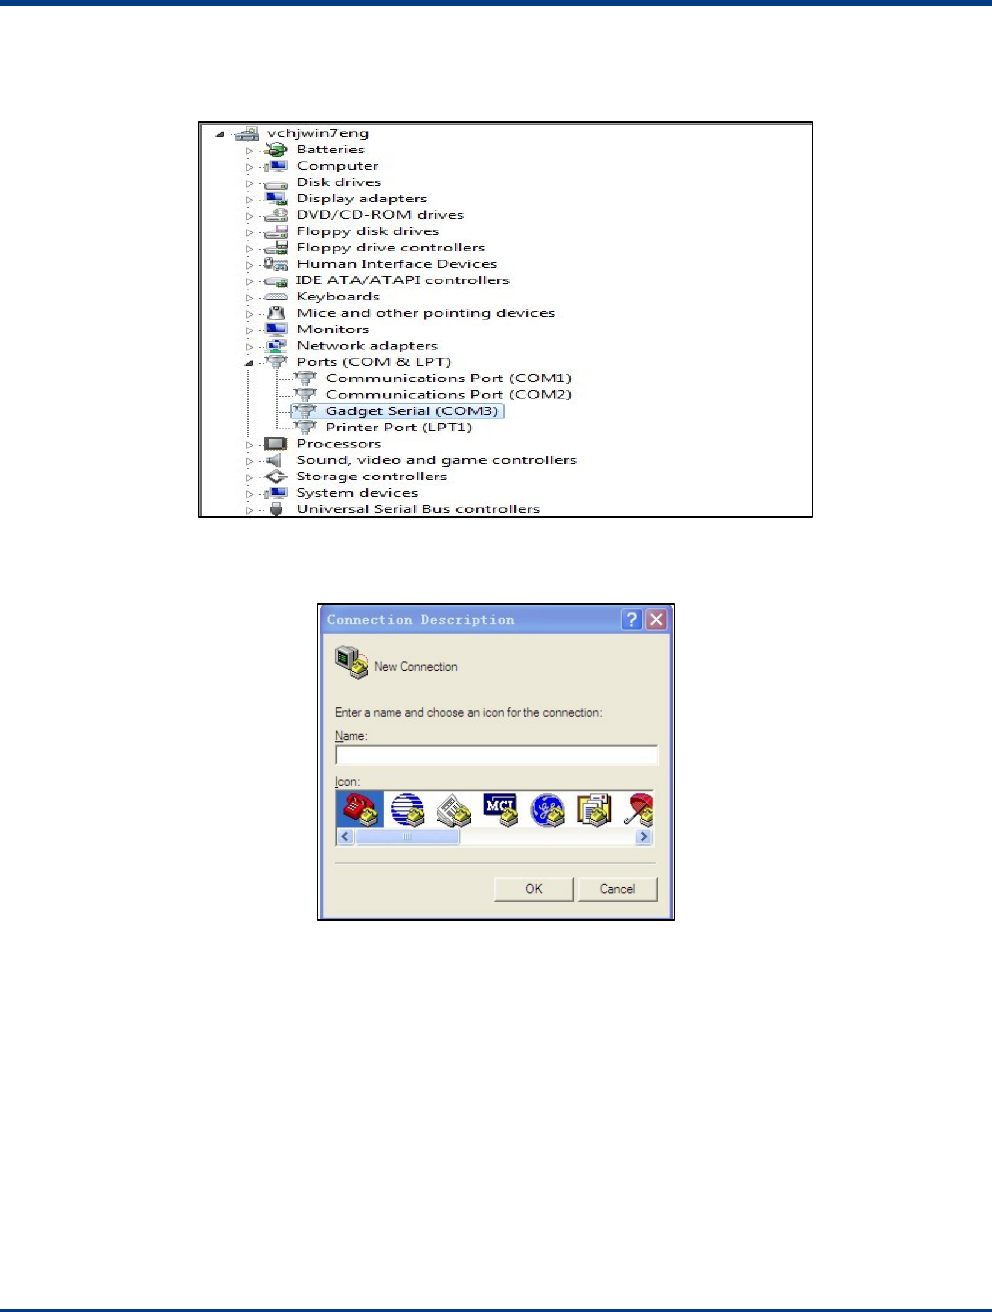
33
The Gadget Serial(COM3) is ready to use after installation. The Gadget Serial (COM3) can be found in Terminal Manager as
shown below:
Use of Virtual COM
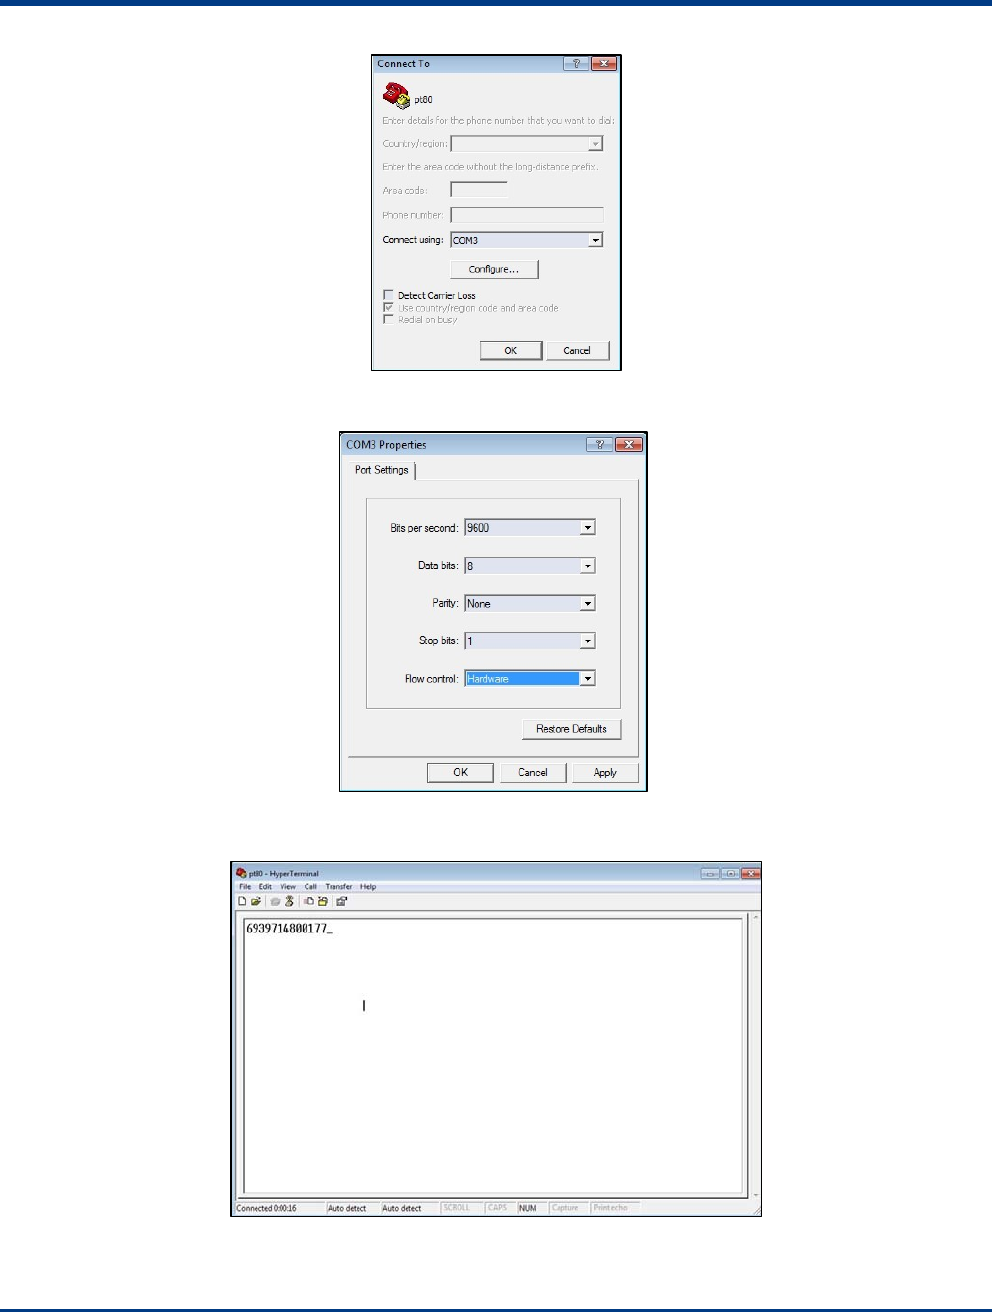
Open HyperTerminal via“Start”->“Programes”->“Accessories”->“Communication”->“HyperTerminal” as shown below:
Type the custom name in “Name” column, and click “OK”. Choose the port with “Gadget Serial” that the connected PC has
(COM3 in this example) in “Connect To” pop-box.
34
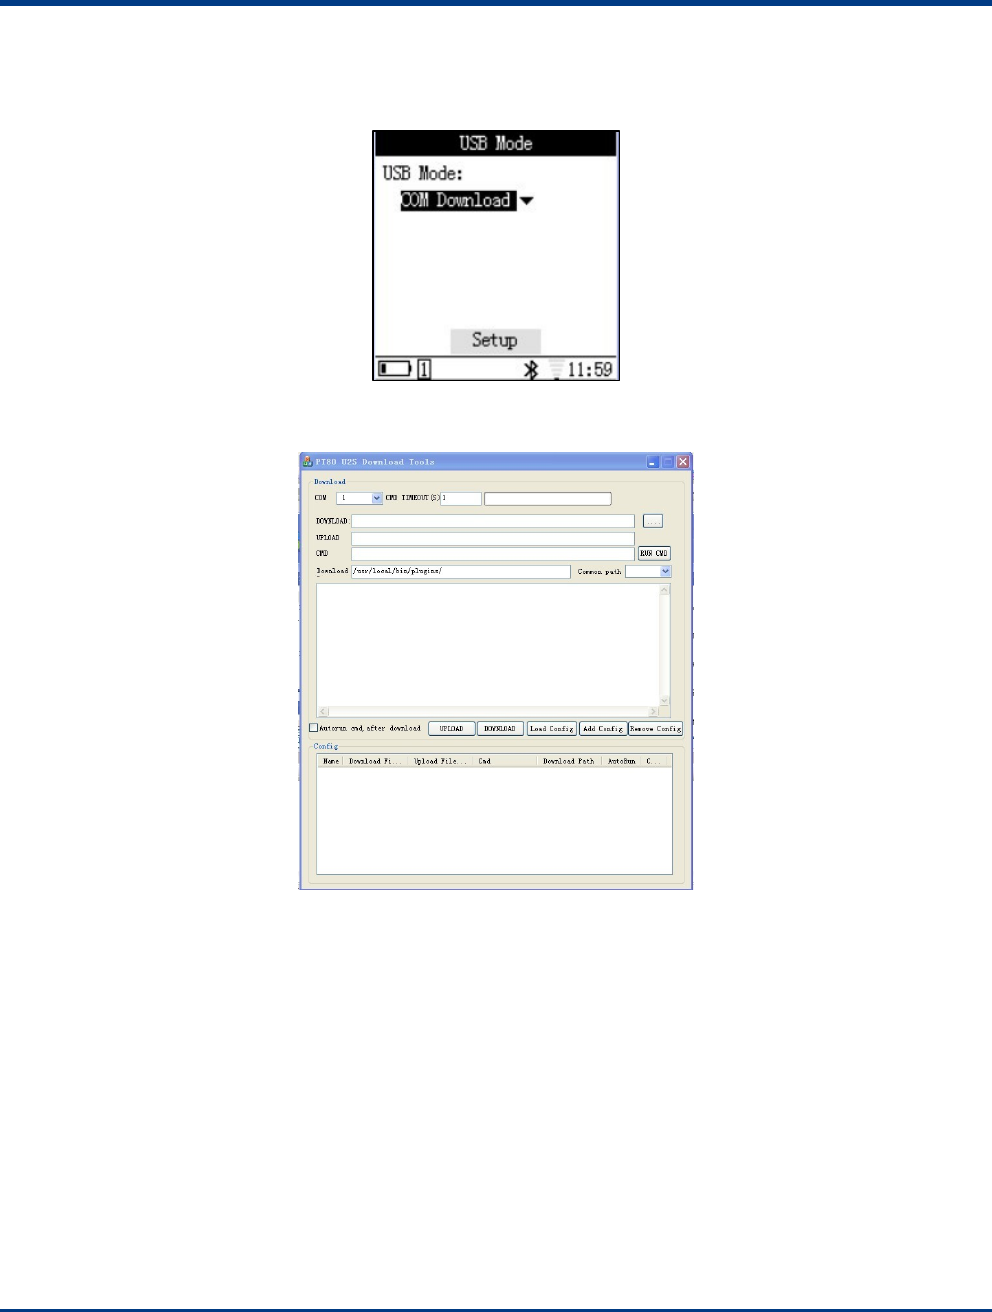
Click “OK” to enter into the port property setting, the default settings are shown below:
Then click “OK”. Use USB cable to connect PC and NLS-PT80, and then open the bar code test of NLS-PT80 (data output
mode should be “USB-VCOM”) and thus the bar code will show on the HyperTerminal on PC after being read.
35
COM Download
Select “COM Download” mode as shown below:
Click “Setup” and then connect NLS-PT80 to PC via USB cable after the completion of setup. This mode supports download
from PC to NLS-PT80. Open the “NLS-PT80 U2S Download Tools” as shown below:
Choose the port with “Gadget Serial” that the connected PC has (COM3 in this example);
Download the program you need to NLS-PT80 (Generally, the programs will have suffix of .so);
“Upload File” is reserved;
“AutoRun” is reserved;
The download path is default as “/usr/local/bin/plugins/”;
Click “UPLOAD” or “DOWNLOAD” after setup.
WIFI Connection
Turn On WIFI
Select “System Setup”-> “Service Management”-> “FTP Service”, and then click “Setup”.
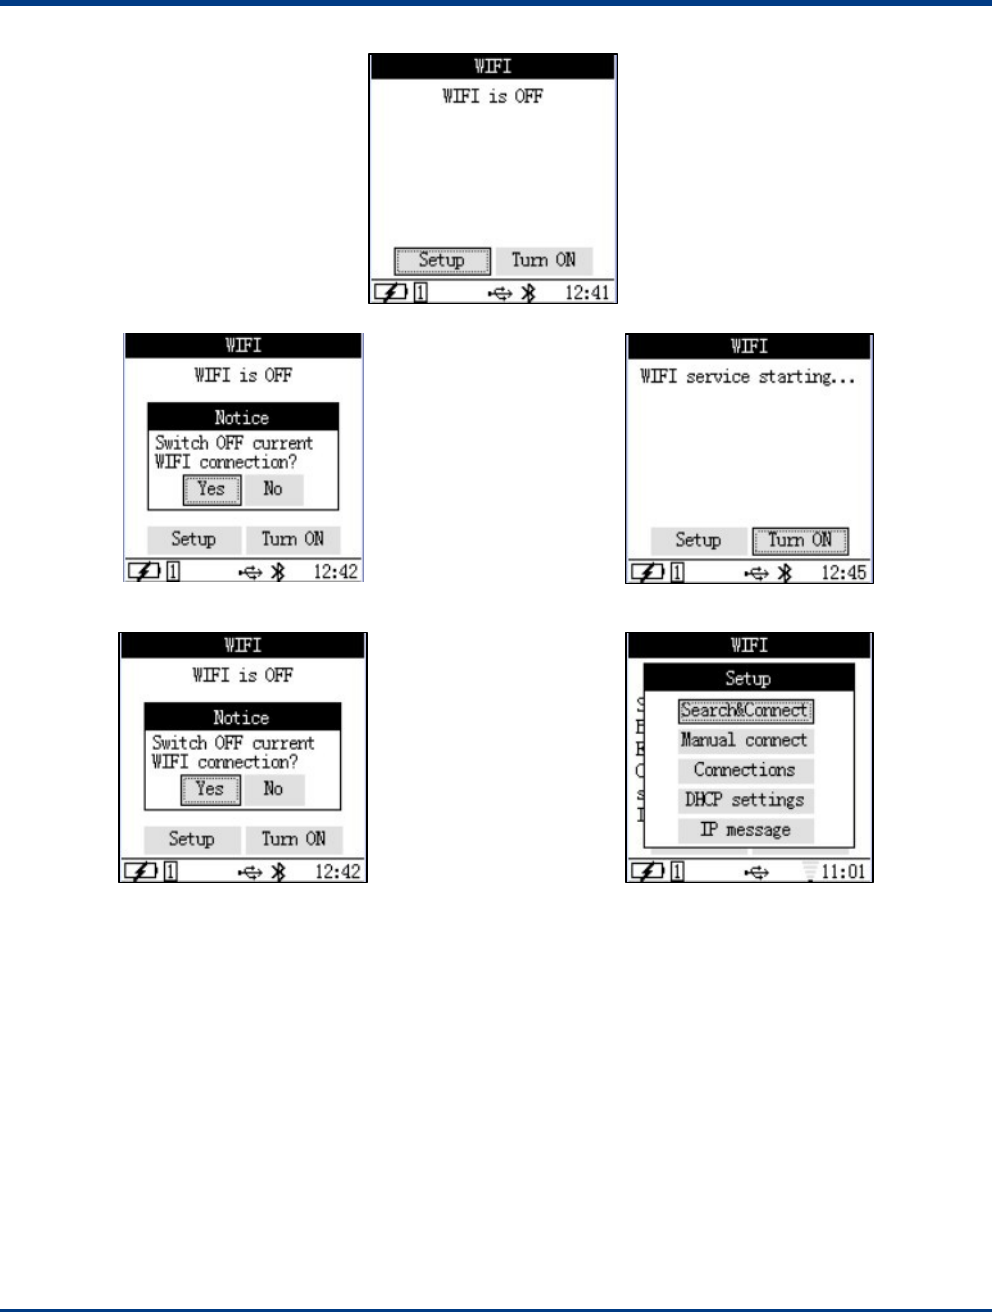
Next, select “WIFI” under “Communication” and then the illustration as below will show up:
36
Then select “Turn ON” and click “Yes” in the pop-up box as shown below:
If no WIFI connection is setup before, please click “Setup” to establish a WIFI connection as shown below:
When WIFI is connected successfully, WLAN will assign an IP address to NLS-PT80. The IP address can be checked in
“Setup”-> “IP Message”.
37
WIFI Communication
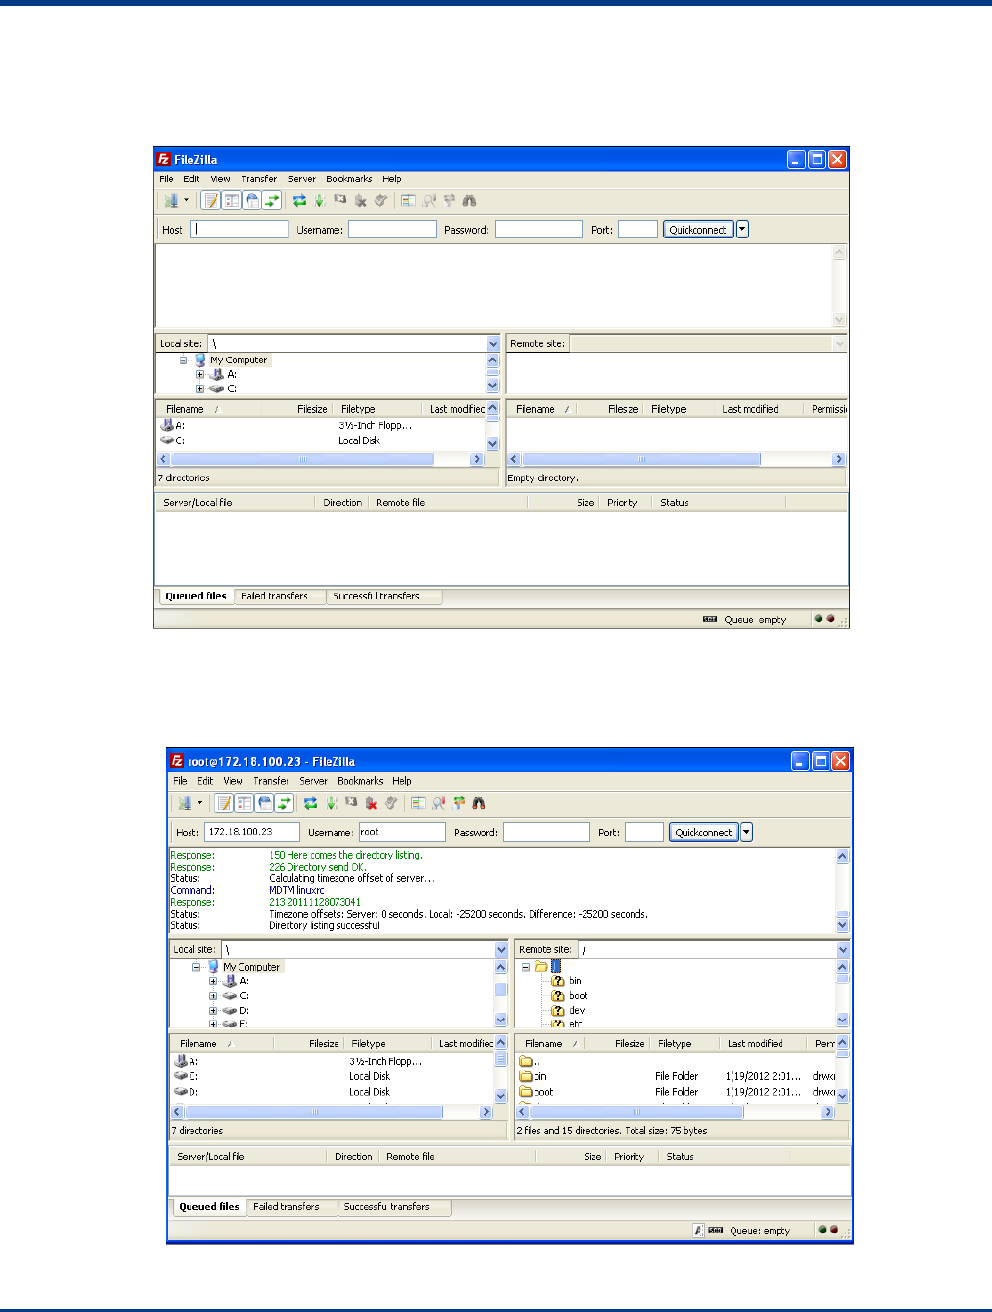
Suppose the IP address assigned for NLS-PT80 is 172.18.100.23, then files on NLS-PT80 can be managed by filezilla just like
Ethernet mode.
Input “172.18.100.23" in Host and “root” in Username; no password is needed; Click Quickconnect and then the below page will
appear:

38
Chapter V Troubleshooting
Cannot Start
If the NLS-PT80 cannot be turned on, please check that:
The battery is installed properly with enough electricity
The USB cable is pulled out
No Display
If the screen does not display, please check that:
The power is on and NLS-PT80 is not under hibernation
The battery is connected properly with enough electricity
The downloaded applications are compatible
Low Battery
If the battery is alarmed low level after just a short time of use, please check that:
The battery is fully charged
The battery is under good condition. If the battery fails to work, please replace one.
NLS-PT80 Crash
If the NLS-PT80 crashed, please:
Press the RESET button on the back of NLS-PT80 with a pin
No LED Indicator
If no LED is lighted on during charging:
Please ensure the power adapter of NLS-PT80 or cradle is connected correctly
USB Connection
If the USB communication cannot work:
The USB cable may not be connected correctly
Please check whether the USB configurations of NLS-PT80 is correct
WIFI Connection
If WIFI cannot be connected:
Please check whether the battery has enough electricity.
Please ensure the wireless network covers where you locate
Please rescan the network and reconnect the WIFI
Please check the configurations of network, including SSID (SSID with any Chinese symbol is not supported), encryption
and password

39
Disable of Bar Code Reading
If the NLS-PT80 is disable of reading a bar code:
Please ensure the bar code is read in a correct way
Please check whether this kind of bar code is programmed readable
The terminal might not be able to read this kind of bar codes.
Caution
If the terminal lost power or abnormal cause can not boot up, try a hardware reset to start it, the method is to press
the reset button with needles. The location of reset button, please refer to the related chapter.
Please do not throw or drop the terminal to avoid the LCD screen is damaged or cause the program interrupt
execution to make the memory data loss, or other consequences of affecting the normal operation.
Clean the reading window periodically. Do not touch the transparent glass of the scanning window to avoid scratch or
stain glass affecting reading performance.
Please do not use sharp objects to touch the screen, it may cause the screen is damaged or the internal short circuit.
Please use a soft and dry cloth to wipe the terminal, and do not use a damp cloth, benzene, thinner or other volatile
chemicals to avoid the terminal keyboard and shell variant of aging.
Do not let the terminal face down in order to avoid the keyboard disoperation.
The environment temperature great change will lead to the terminal surface condensation, please dry the terminal
before use.
Adapter shall be installed near the equipment and shall be easily accessible. The plug considered as disconnect
device of adapter. The power adapter shall be considered as safety approval by CE(Adapter AC input: 100-240V~,
50/60Hz 0.4A; Output: 5Vdc/1.5A
Manufacturer of Adapter: Kuantech (Beihai) Co.,Ltd Model No.: KSAS0120500150D5
Extreme Temperature: -20~+45
CAUTION : RISK OF EXPLOSION IF BATTERY IS REPLACED BY AN INCORRECT TYPE. DISPOSE OF USED
BATTERIES ACCORDING TO THE INSTRUCTIONS.

40
FCC Warning:
This equipment has been tested and found to comply with the limits for a Class B digital device, pursuant to part 15 of the FCC
Rules. These limits are designed to provide reasonable protection against harmful interference in a residential installation. This
equipment generates, uses and can radiate radio frequency energy and, if not installed and used in accordance with the
instructions, may cause harmful interference to radio communications. However, there is no guarantee that interference will not
occur in a particular installation. If this equipment does cause harmful interference to radio or television reception, which can be
determined by turning the equipment off and on, the user is encouraged to try to correct the interference by one or more of the
following measures:
• Reorient or relocate the receiving antenna.
• Increase the separation between the equipment and receiver.
• Connect the equipment into an outlet on a circuit different from that to which the receiver is connected.
• Consult the dealer or an experienced radio/TV technician for help.
Caution: Any changes or modifications to this device not explicitly approved by manufacturer could void your authority to
operate this equipment.
This device complies with part 15 of the FCC Rules. Operation is subject to the following two conditions: (1) This device may not
cause harmful interference, and (2) this device must accept any interference received, including interference that may cause
undesired operation.