Fujitsu Client Computing EM7355D CELLULAR/PCS/GSM/EDGE/CDMA/WCDMA/LTE MODEM User Manual Gobi 3000 WWAN GSG
Fujitsu Limited CELLULAR/PCS/GSM/EDGE/CDMA/WCDMA/LTE MODEM Gobi 3000 WWAN GSG
Contents
- 1. User Manual
- 2. User Install Guide
- 3. USERS MANUAL
- 4. Users Manual
User Install Guide
![1Congratulations on your purchase of a Fujitsu LIFEBOOK® Tablet PC in Wireless Wide Area Network (WWAN) or WWAN-ready configuration. This document first instructs you on how to determine whether there is a WWAN module already installed in your system. If you do not have a WWAN module installed (i.e., your system is “WWAN-ready”), you will learn how to order and install a module, and (for AT&T customers) how to install and activate a SIM card.Verifying whether you have a WWAN module installedLaunch the Fujitsu Bonus Apps icon on the desktop. If Fujitsu Bonus Apps include a WWAN driver in blue, it indicates that your system is WWAN-ready, but there is no WWAN module; if the WWAN driver is grayed out, it indicates that the WWAN module is already installed. In both cases, Sierra AirCard Watcher will need to be installed from Fujitsu Bonus Apps. For some models, the WWAN driver will not appear in Fujitsu Bonus Apps. If only Sierra AirCard Watcher appears, then your system has WWAN module installed already. Proceed to install Sierra AirCard Watcher.If you have a WWAN module installed in your system, it is not necessary for you to complete the rest of this procedure; please proceed to the “Installing Sierra AirCard Watcher” section on page 3 before connecting your device.If you don’t have a WWAN module installed in your system, please continue with the rest of this procedure.Obtaining a WWAN module for your systemTo obtain a WWAN module for your WWAN-ready system, go to the Fujitsu online store at:http://store.shopfujitsu.com/fpc/Ecommerce/accstore.jsp On this page choose Wireless WAN and then choose WWAN Module (Gobi3000).Installing a WWAN module in a WWAN-ready systemIf you have a WWAN-ready system, and you would like to install a WWAN module, there are two different things that could occur when you install the WWAN driver from Fujitsu Bonus Apps.If you don’t have a WWAN module installed yet: Fujitsu Bonus Apps will display a message telling you that the "WWAN Driver was not installed: Optional device is not detected”.If you want to install a WWAN module at a later date:Install the WWAN driver from Fujitsu Bonus Apps by launching the "Fujitsu Bonus Apps" desktop icon, select-ing WWAN driver (should be highlighted in blue), and pressing the [Install] button.Material and Tools requiredMaterial Required: WWAN Upgrade KitTools Required: Philips Screwdriver, #0Tools Recommended: Tweezers (for attaching cables to antenna posts)Wireless Wide Area Network (WWAN) Getting Started GuideSPECIFIC WWAN MODULE/S ARE TESTED WITH THIS COMPUTER FOR COMPLIANCE WITH FCC REGULATIONS. THESE WWAN MODULE/S ARE FUJITSU-SPECIFIC AND ONLY THE WWAN MODULE/S SHOWN IN THE FOLLOWING LINKS ARE AUTHENTICATED TO WORK IN THIS COMPUTER. WWAN MODULES OBTAINED FROM ANY OTHER SOURCE WILL NOT WORK IN THIS COM-PUTER. YOU ARE STRONGLY ADVISED TO ORDER YOUR WWAN MODULE FROM A FUJITSU-AUTHORIZED SOURCE. IN THE EVENT YOU INSTALL A WWAN MODULE THAT HAS NOT BEEN AUTHORIZED BY FUJITSU, FUJITSU ASSUMES NO RESPONSIBILITY FOR DAMAGES TO THE DEVICE OR YOUR COMPUTER THAT MAY RESULT FROM ITS INSTALLATION.Gobi 3000-WWAN GSG.fm Page 1 Saturday, September 15, 2012 1:10 PM](https://usermanual.wiki/Fujitsu-Client-Computing/EM7355D.User-Install-Guide/User-Guide-2073411-Page-1.png)
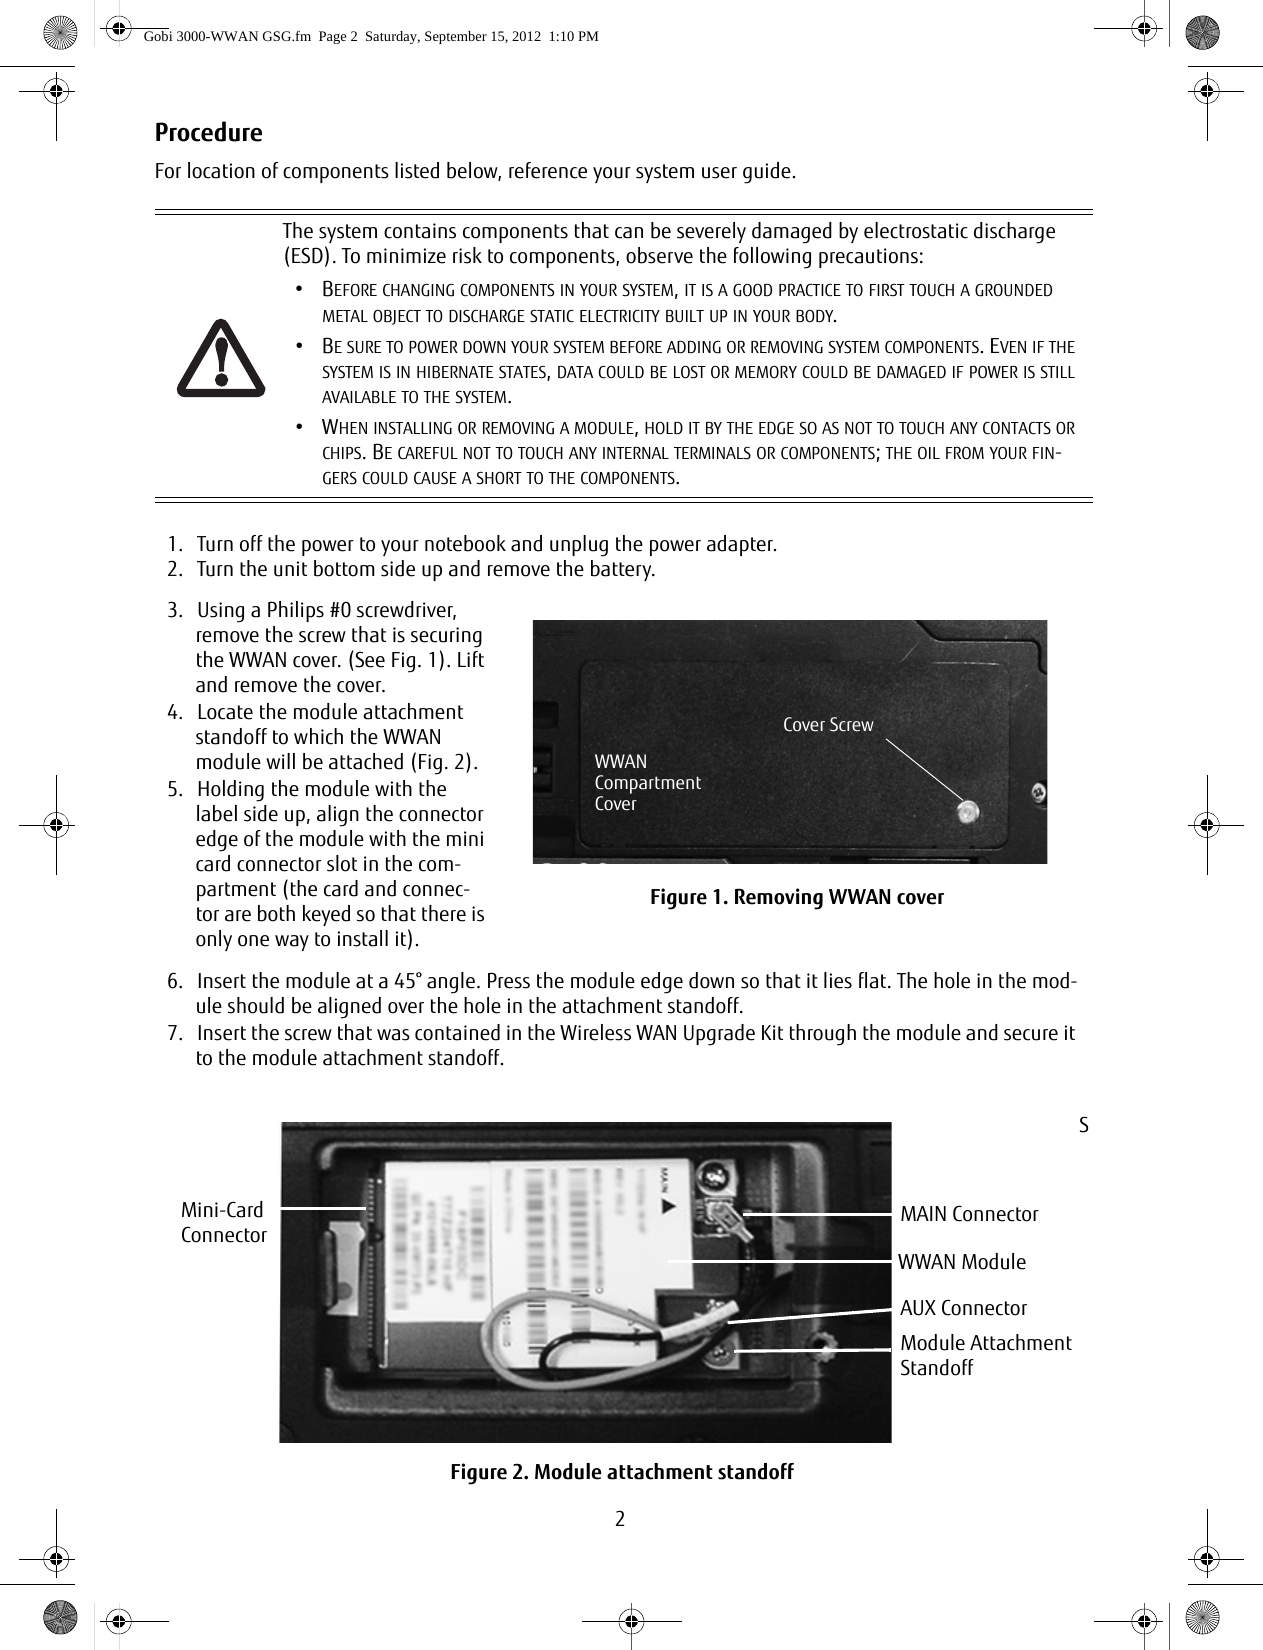
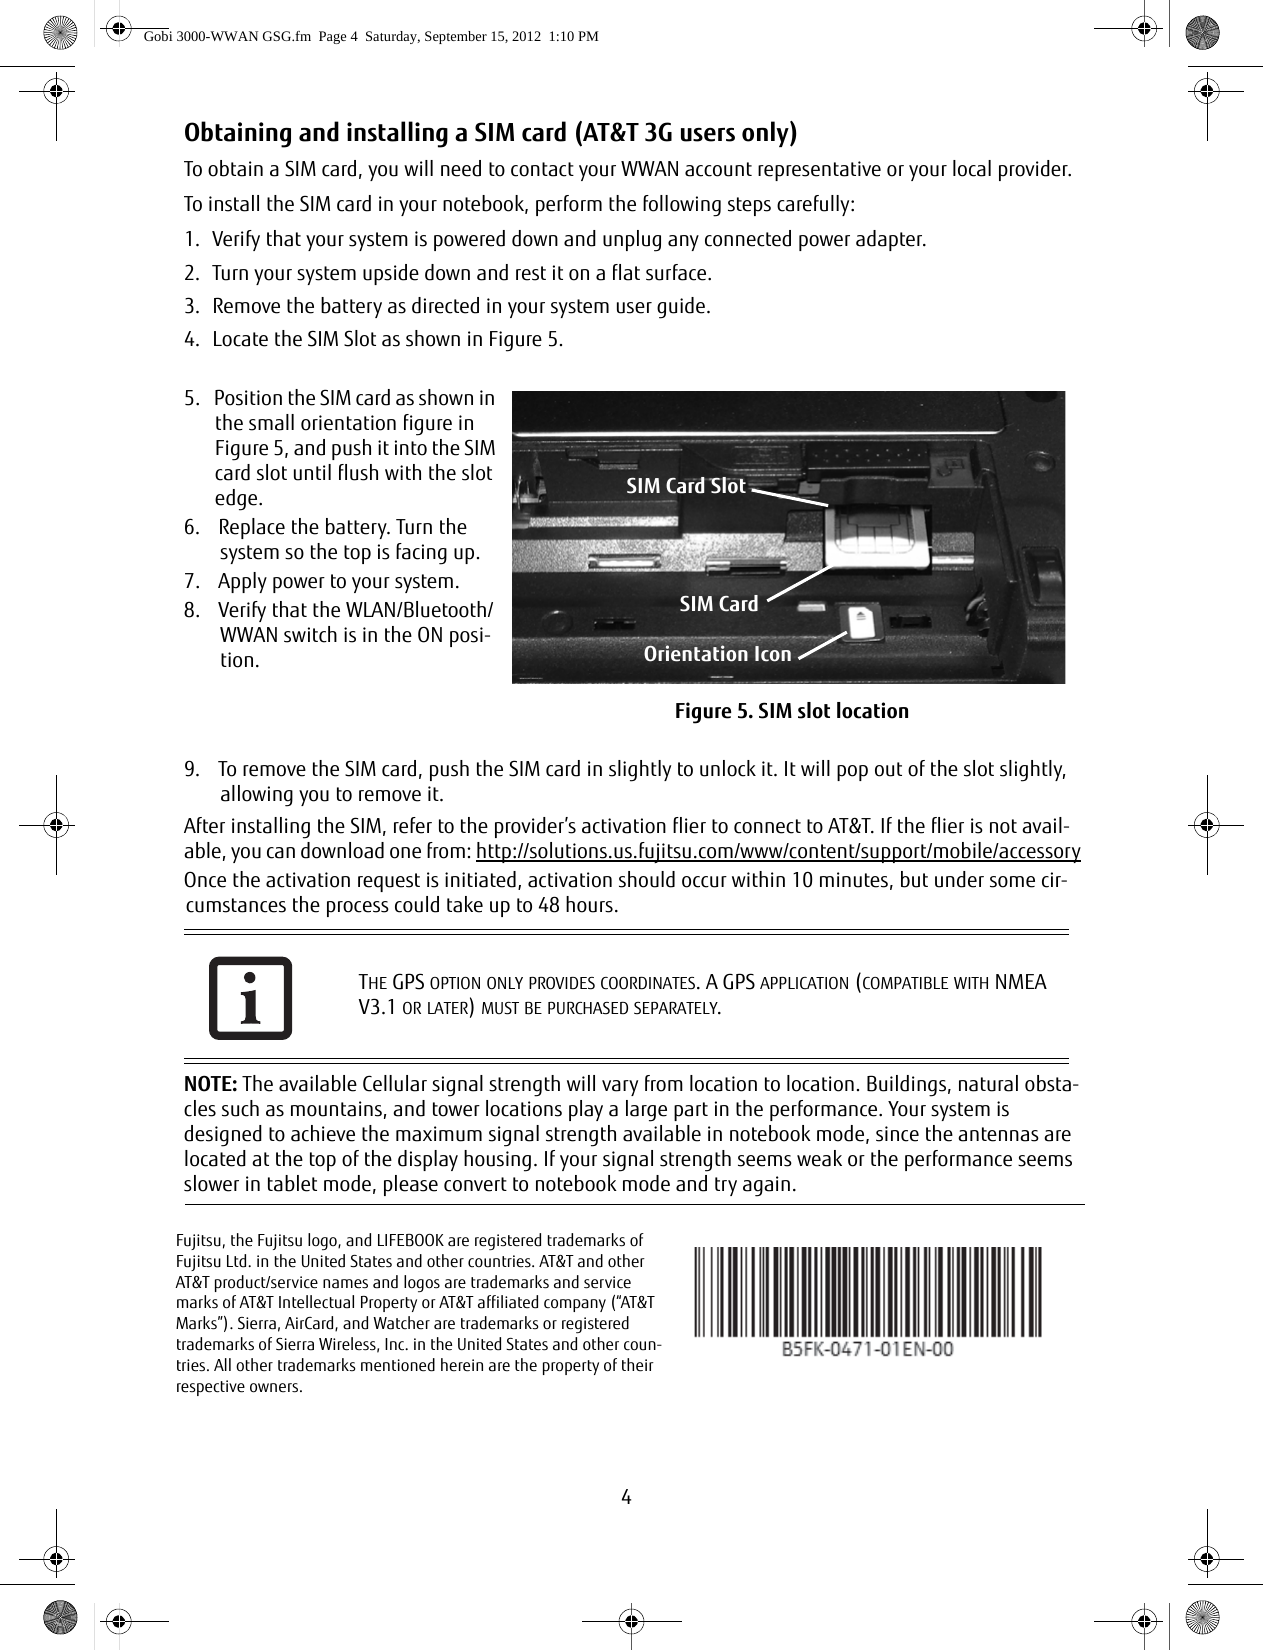
![38. The yellow cable should be attached to the MAIN antenna post on the module, and the salmon-colored cable to the AUX antenna post as shown in Figure 2. (Be very sure they are connected to the correct posts; “MAIN” and “AUX” are printed on the module circuit board adjacent to the posts.) Connect the two antenna cables by pressing the cap at the end of the cable over the post associated with each terminal. 9. Route the cables around the module such that they won’t be pinched between the module and the cover when it is replaced.* 10. Replace the cover and reinstall the screws removed in step 3.11. If you need or want to install an AT&T SIM card, proceed to “Obtaining and installing a SIM card (AT&T 3G users only)” .12. If you are not installing a SIM card, continue with the following steps13. Replace the battery and apply power to your system.14. Verify that the WLAN/Bluetooth/WWAN switch is in the ON position. 15. Proceed to the “Installing Sierra AirCard Watcher” section below before connecting your device.Installing Sierra AirCard WatcherWhether your WWAN module was pre-installed, or you installed it yourself, it is necessary for you to install the Sierra AirCard Watcher from Fujitsu Bonus Apps. To do so, launch the "Fujitsu Bonus Apps" desktop icon, select Sierra AirCard Watcher, and then press the [Install] button. After you complete the installation, the Sierra AirCard Watcher icon will appear on your desktop. Note: The first time you click the icon, you will be prompted to accept the license agreement. Click [Accept] to proceed. Proceed to the activation flier for your carrier. If it is not readily available, go to:http://solutions.us.fujitsu.com/www/content/support/mobile/accessory to download one.PERSONS WITH LARGER HANDS MAY HAVE DIFFICULTY CONNECTING THE CABLES TO THE POSTS MANUALLY. IF NECESSARY, USE A SET OF TWEEZERS, BUT TAKE CARE NOT TO CONTACT OTHER COMPONENTS WITHIN THE COMPARTMENT, AS FRAGILE COMPONENTS COULD BE DAMAGED BY THE TWEEZERS.* NOTE: When replacing the WWAN compartment cover, be sure the gasket that is located on the bottom of the cover is positioned so that when the cover is replaced, it does not come in contact with the MAIN or AUX cables. The approxi-mate location is shown in Fig-ure 3. If the gasket comes into contact with the metal con-nectors, that is permissible.Figure 3. Connecting to Antenna PostsGasketWWAN Compartment Cover (bottom)GasketContactAreaGobi 3000-WWAN GSG.fm Page 3 Saturday, September 15, 2012 1:10 PM](https://usermanual.wiki/Fujitsu-Client-Computing/EM7355D.User-Install-Guide/User-Guide-2073411-Page-3.png)