Fujitsu Client Computing WB0009 LifeBook T Series w/ WLAN Atheros & Bluetooth User Manual T Series
Fujitsu Limited LifeBook T Series w/ WLAN Atheros & Bluetooth T Series
UserManual.wiki
>
Fujitsu Client Computing
>
WB0009 User Manual
>
User Manual Part1
Contents
1.
User Manual Part1
2.
User Manual Part2
3.
User Manual Part3
4.
User Manual Pt1
5.
User Manual Pt2
6.
User Manual Pt3
User Manual Part1
Navigation menu
Upload a User Manual
Namespaces
Wiki Guide
HTML
PDF
Info
Views
User Manual
Discussion / Help
Navigation


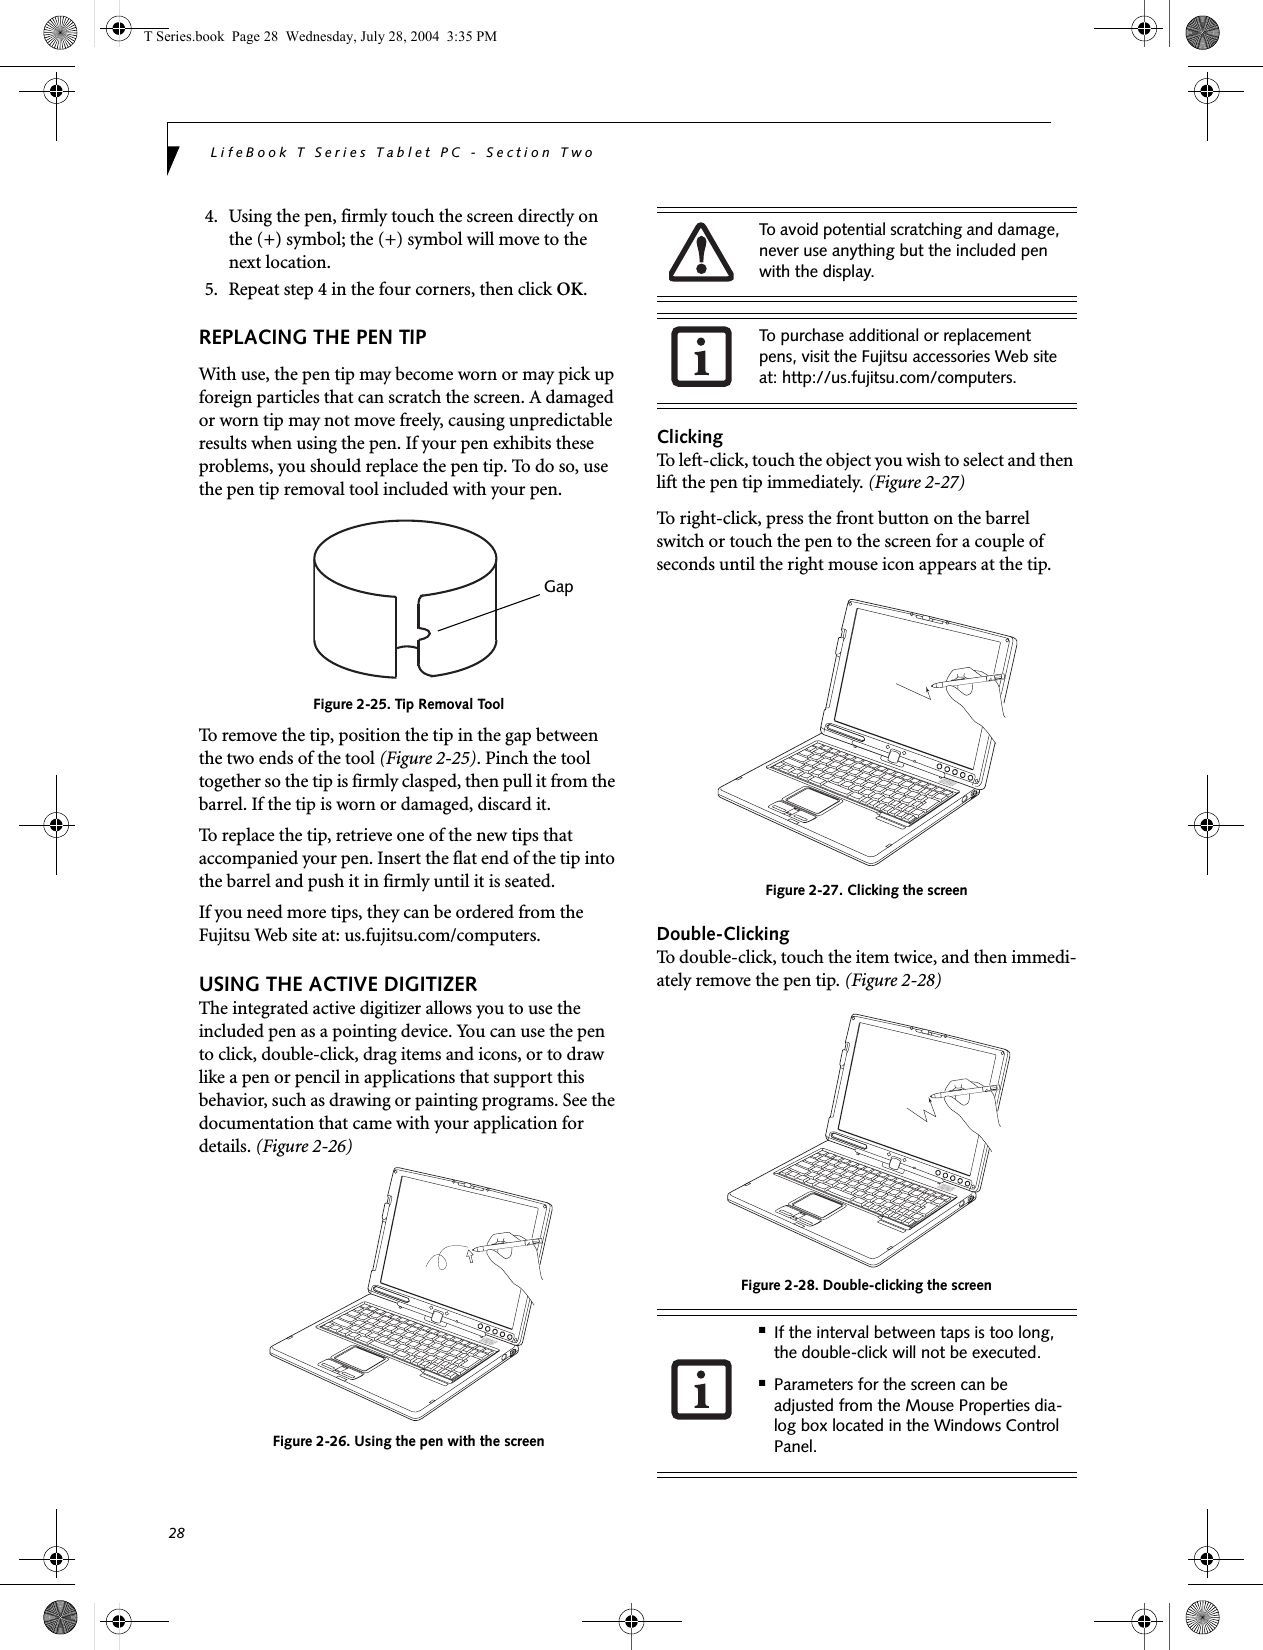
![3PrefacePrefaceABOUT THIS GUIDEThe LifeBook® T Series Tablet PC from Fujitsu Computer Systems Corporation is a powerful convert-ible computer. It can be used either as a standard note-book using keyboard input, or in tablet configuration using pen input. It is powered by an Intel® micropro-cessor, has a built-in color display with an active digi-tizer, and brings the computing power of desktop personal computers (PCs) to a portable and versatile environment.This manual explains how to operate your LifeBook T Series Tablet PC’s hardware and built-in system soft-ware. Your LifeBook T Series Tablet PC comes with Windows® XP Tablet Edition pre-installed.Your LifeBook T Series Tablet PC is a completely self-contained unit with an active-matrix (TFT) color LCD display. The display has a wide viewing angle and can be used indoors or outdoors. The tablet has a powerful interface that enables it to support a variety of optional features. Conventions Used in the GuideKeyboard keys appear in brackets. Example: [Fn], [F1], [Esc], [Enter] and [Ctrl].Pages with additional information about a specific topic are cross-referenced within the text.Example: (See page xx.)On screen buttons or menu items appear in bold.Example: Click OK to restart your Tablet PC.DOS commands you enter appear in Courier type. Example: Shutdown the computer?FUJITSU CONTACT INFORMATIONService and SupportYou can contact Fujitsu Computer Systems Service and Support the following ways:■Toll free: 1-800-8Fujitsu (1-800-838-5487)■Fax: 1-408-764-2724 ■E-mail: 8fujitsu@us.fujitsu.com ■Web site: http://us.fujitsu.com/computersBefore you place the call, you should have the following information ready so that the customer support representative can provide you with thefastest possible solution:■Product name■Product configuration number■Product serial number■Purchase date■Conditions under which the problem occurred■Any error messages that have occurred■Type of device connected, if anyFujitsu OnlineYou can go directly to the online Fujitsu Product catalog for your Tablet PC. Go to Start -> All Programs -> Service & Support Software, and click on Pen Accesso-ries Web site.You can also reach Fujitsu Service and Support online by going to Start -> All Programs -> Service & Support Software, and clicking on Fujitsu Service & Support Web site.WARRANTYYour LifeBook T Series Tablet PC is backed by an Inter-national Limited Warranty and includes toll-free tech-nical support. Check the service kit that came with yourTablet PC for warranty terms and conditions.The information icon highlights information that will enhance your understanding of the subject material.The caution icon highlights information that is important to the safe operation of your computer, or to the integrity of your files. Please read all caution information carefully.The warning icon highlights information that can be hazardous to either you, your system, or your files. Please read all warning information carefully.You must have an active internet connection to use the online URL links.T Series.book Page 3 Wednesday, July 28, 2004 3:35 PM](https://usermanual.wiki/Fujitsu-Client-Computing/WB0009.User-Manual-Part1/User-Guide-459276-Page-9.png)


![22LifeBook T Series Tablet PC - Section TwoPage Down / Application A ButtonWhen you press the Page Down button when the system is running, each press of the button will scroll the screen down one frame. This allows you to navigate quickly through large documents.When you press the Fn button while you press then release the Page Down/Application A button, you will automatically start whichever program is assigned to the button. The default application for this button is Calcu-lator.See “Changing Tablet PC Button Functions” on page 22 to select a different application for this button.Page Up / Application B ButtonWhen you press the Page Up button when the system is running, each press of the button will scroll the screen up one frame. This allows you to navigate quickly through large documents.When you press the Fn button while you press then release the Page Up/Application A button, you will auto-matically start whichever program is assigned to the button. The default application for this button is Microsoft Journal.See “Changing Tablet PC Button Functions” on page 22 to select a different application for this button.Screen Rotation / VGA-Out ButtonThe screen rotation feature would normally be used only when the system is configured as a tablet. When you would like to use the tablet as an eBook, for example, you would use the portrait orientation; when accessing spreadsheets or using the system as a notebook, you would more typically use landscape orientation.When the system is changed to tablet configuration, the orientation automatically changes to portrait mode by default. When you press the Screen Rotation / VGA-Out button, the system screen orientation changes from portrait (vertical) to landscape (horizontal) or from landscape to portrait. Function / Fujitsu Menu Utility ButtonThe Function button works in conjunction with the other application buttons to provide additional func-tionality for the buttons. Refer to specific details above.Pressing the Fn button twice in succession causes the Fujitsu Menu Utility to appear on your screen, allowing you to modify certain system settings.Ctl+Alt+Del ButtonPressing and holding the Ctl-Alt-Del button for up to 750 msecs launches the Logon screen or the Windows Task Manager (if the system hasn’t yet been configured).CHANGING TABLET PC BUTTON FUNCTIONSThe Application A and B buttons can be changed to launch a program or perform an action you select. By default, the Application A button launches the Calcu-lator, and the Application B button launches MS Journal.To launch different applications or cause the Application A or B buttons to perform a specific action:1. Double-click on the Tablet and Pen Settings icon in the Control Panel. 2. Select the Tablet Buttons tab and select the button you would like to change from the list.3. Click [Change] and open the drop down list in the Action: field.4. Select the action you would like the button to perform. If you want to launch a program, click on Launch an Application then browse to the location of the program.5. Click [OK], then click [OK] again. The buttons will now perform the actions you have assigned to them.SETTING UP LIFEBOOK SECURITY PANELWhen you receive your Tablet PC, the security panel application is pre-installed without any passwords. The following sections provide detailed information on your security panel, how to set, change or remove passwords.Numbered ButtonsUse these buttons to enter your password.(Figure 2-18)Enter ButtonAfter entering the button strokes, push this button to enter the password into the Tablet PC. (Figure 2-18)PASSWORDSThe user and supervisor password may be set on this Tablet PC. A supervisor password is typically the same for all Tablet PC’s and notebooks in a work group, office, or company to allow for system management. Individual computers in a group environment should not use a common password. A password consists of one to five button strokes plus the enter button. A valid stroke consists of pushing one or up to four buttons simulta-neously. The screen orientation default can be changed by going to the Control Panel and double-clicking on the Fujitsu Display Control icon and selecting the desired defaults from the Display Orientation section. After changing the defaults, click [OK]. T Series.book Page 22 Wednesday, July 28, 2004 3:35 PM](https://usermanual.wiki/Fujitsu-Client-Computing/WB0009.User-Manual-Part1/User-Guide-459276-Page-13.png)
![23Getting to Know Your Tablet PCThe following are valid button strokes: ■Pushing [4] by itself■Pushing [2] and [3] at the same time■Pushing [1], [2], and [4] at the same time■Pushing [1], [2], [3], and [4] at the same timeThe following are valid passwords. The numbers within braces ({ }) are button strokes using more than one button. ■{[2]+[3]}, [1], [Enter]■[4], [enter]■{[1]+[3]}, {[2]+[3]+[4]}, [1], [4], [2], [Enter]Setting PasswordsWhen shipped from the factory, no passwords are set. You have a choice of having no password or setting a supervisor and user password. You must set the super-visor password before the user password. Setting Supervisor PasswordYou must have set a supervisor password before setting any user passwords. The supervisor password can bypass the user password.1. Go to the Start menu.2. Click on Run.3. Type in:C:\Program Files\Fujitsu\Security Panel Application\Supervisor\ FJSECS.EXE, then press [Enter]4. Follow the on-screen instructions to set theSupervisor password.Setting User Password1 Go to the Start menu.2. Click on All Programs.3. Click on Security Panel Application -> Security Panel Application.4. Follow the on-screen instructions to set theuser password.USING YOUR LIFEBOOK SECURITY PANELThe security lock feature is in effect both when the system resumes from Off, Standby, or Hibernation state. You always need to push the Security Panel buttons to input the user password. Your system will not begin the boot sequence until you enter your supervisor/user password.From Off State1. Turn on your system.2. When the Security Indicator flashes, enter the pass-word and press Enter button.For example, if the password is 22222, first press Button 2 five times and press the Enter button. The Tablet PC will boot to normal operation.From Standby/Hibernation State1. Press your Suspend/Resume button.2. When the Security Indicator flashes, enter the pass-word and press Enter button.The Tablet PC should resume normal operation.Incorrect Password EntryIf an invalid supervisor or user password is entered three times in succession, the system will “beep” for about one minute. If a valid password is entered within a minute (while system beeps), the beeping will stop and the Tablet PC will resume normal operation. If no password is entered or an invalid password is entered while the system beeps, the system will return to its previous locked state (standby or off) and the Security Indicator will go off. To reactivate the Tablet PC after a password failure, you must press the Suspend/Resume button, then enter a correct password.PRECAUTIONSOpening and Closing the CoverBy default, closing the cover automatically places your system into Standby mode. (You can change the action the system takes when the cover is closed by opening the Power Options Properties icon in the Control Panel, and selecting the Advanced tab. Make a choice from the drop down menu for “When I close the lid of my portable computer:” and click the [OK] button.) Opening the cover does not automatically place the Tablet PC into normal operation. Instead, you must enter the proper security password after pushing the Suspend/Resume button.■The purpose of supervisor password is to be able to bypass the user password in case the user password is forgotten. The supervisor password alone will not lock the system.■You must set the supervisor and user passwords for the security panel to work.You may change or remove the supervisor or user password by repeating the steps defined above.Remember the user password you specified on the Security Panel Application. If you forget the password you will not be able to use your computer. The supervisor pass-word can override the user password.T Series.book Page 23 Wednesday, July 28, 2004 3:35 PM](https://usermanual.wiki/Fujitsu-Client-Computing/WB0009.User-Manual-Part1/User-Guide-459276-Page-14.png)
![29Getting to Know Your Tablet PCVolume ControlYour Fujitsu Tablet PC has multiple volume controls which interact with each other. CONTROLLING THE VOLUMEThe volume can be controlled in several different ways:■Volume can be set from within the Volume Control on the Taskbar.■Volume can be controlled with the [F8] and [F9] func-tions keys. Pressing [F8] repeatedly while holding [Fn] will decrease the volume of your Tablet PC. Pressing [F9] repeatedly while holding [Fn] will increase the volume of your Tablet PC.■Volume can be controlled by many volume controls that are set within individual applications.■Certain external audio devices you might connect to your system may have hardware volume controls.■Each source discussed above puts an upper limit on the volume level that must then be followed by the other sources. We recommend that you experiment with the various volume controls to discover the optimal sound level.Any software that contains audio files will also contain a volume control of its own. If you install an external audio device that has an independent volume control, the hardware volume control and the software volume control will interact with each other. It should be noted that if you set your software volume to Off, you will override the external volume control setting. There are twenty-six levels through which the function keys cycle. T Series.book Page 29 Wednesday, July 28, 2004 3:35 PM](https://usermanual.wiki/Fujitsu-Client-Computing/WB0009.User-Manual-Part1/User-Guide-459276-Page-18.png)

![27Getting to Know Your Tablet PCPen and Active DigitizerUSING THE PENYou can use the LifeBook T Series Tablet PC pen to generate and create electronic “ink”, to select items, and to navigate through programs on the Tablet PC. Programs that support handwriting recognition also allow you to write characters directly on the screen with the pen. You can also use the pen as a drawing tool.Figure 2-24. LifeBook T Series PenThe screen reacts when the pen tip is approximately 1/8 inch (3-5 mm) from the screen. The pen has three switches: a tip switch and a barrel button toggle switch with switches at both ends. By default, the tip switch corresponds to the left mouse button, and the front toggle (closest to the pen tip) barrel button switch corre-sponds to the right mouse button (when used in combi-nation with the tip switch). The rear toggle of the barrel button switch acts as an electronic ink "eraser".The functions of the rear toggle and the tip click pres-sure can be changed by clicking [Start] -> Control Panel, and double-clicking the Fujitsu Pen Settings icon. To change the rear toggle function, select the drop-down list to select a new function, then click [Apply]. If you don’t want the rear toggle to have any function, select Ignore from the list. Adjusting the click pressure determines how much pres-sure must be put on the pen tip in order for the screen to react. The softer it is set, less pressure is required; the harder it is set, more pressure is required. To change the click pressure, use the slider bar to make the click pres-sure harder or softer, then click [Apply]. Here are some hints that may help you use the pen more effectively:• To activate the tip switch, tap or hold the pen tip against the screen.• To activate the barrel button switch, press and hold the end of the button you wish to use (front toggle is the right mouse button switch; the rear toggle acts as an electronic “eraser”).• To move the cursor, hold the pen tip within 1/8 inch (3 - 5 mm) from the screen and move the pen.• To start a program, double-tap the pen tip (tap the pen tip twice rapidly) on the program icon as you would double-click a mouse.•To select an object, tap the pen tip on the object once. •To double-click an object, quickly tap the object twice.CALIBRATING THE PENIn order to ensure accurate tracking between the pen and cursor, you must run the Touch Screen Calibration Utility before you use the active digitizer for the first time, or after you change the display resolution.To run the calibration utility:1. Go to Start -> Control Panel and double-click on the Table t and Pen Setting s icon. 2. Click Calibrate.3. Adjust the display of your Tablet PC to a comfort-able angle.You are advised to use a screen protector on your system display to minimize the chance of its being scratched. Screen protectors are available from the Fujitsu Web site at us.fujitsu.com/computers. The LifeBook T Series Tablet PC pen is a high-quality electronic instrument that can be damaged if used improperly. Treat the pen as you would any precision device. Observe the following guidelines:• Do not gesture with the pen, use it as a pointer, or tap it on surfaces other than the Tablet PC screen.• Do not try to turn the thumb grip on the pen; it is designed for inserting and removing the pen from the pen holder.• Never store the pen with the tip bearing the weight of the pen (e.g., sitting tip down in a pencil cup). Storing the pen tip down could distort the internal mechanism over a period of time (especially in higher temperatures), causing the tip to act as if it is always depressed. The pen should be stored in the pen holder when not in use.Tip SwitchBarrel SwitchUse only the pen provided with your Tablet PC. Do not use substitutes that were not designed for the LifeBook T Series Tablet PC.T Series.book Page 27 Wednesday, July 28, 2004 3:35 PM](https://usermanual.wiki/Fujitsu-Client-Computing/WB0009.User-Manual-Part1/User-Guide-459276-Page-20.png)