Fujitsu Client Computing WB0011 LifeBook T Series w/ WLAN Calexico2 (11abg) & BT User Manual T Series
Fujitsu Limited LifeBook T Series w/ WLAN Calexico2 (11abg) & BT T Series
UserManual.wiki
>
Fujitsu Client Computing
>
WB0011 User Manual
>
User manual part4
Contents
1.
User Manual part1
2.
User manual part2
3.
User manual part3
4.
User manual part4
5.
User manual part5
6.
User manual part1
7.
user manual part2
8.
user manual part3
9.
user manual part4
10.
user manual part5
User manual part4
Navigation menu
Upload a User Manual
Namespaces
Wiki Guide
HTML
PDF
Info
Views
User Manual
Discussion / Help
Navigation

![34LifeBook T Series Tablet PC - Section ThreeStarting Your Tablet PCPOWER ONThe Suspend/Resume button is used to turn on your LifeBook T Series Tablet PC from its off state. Once you have connected your AC adapter or charged the internal Lithium ion battery, you can power on your Tablet PC. (See figure 2-4 on page 11 for location)Press the Suspend/Resume button to start your system. When you are done working you can either leave your Tablet PC in Standby mode, See “Standby Mode” on page 36, or you can turn it off. See “Power Off” on page 38When you Power On your Tablet PC, it will perform a Power On Self Test (POST) to check the internal parts and configuration for correct functionality. If a fault is found, your Tablet PC will emit an audio warning and/or an error message will be displayed. See “Power On Self Test Messages” on page 65 Depending on the nature of the problem, you may be able to continue by starting the operating system or by entering the BIOS setup utility and revising the settings.After satisfactory completion of the Power On Self Test (POST), your Tablet PC will load your operating system.BOOT SEQUENCEThe procedure for starting-up your Tablet PC is termed the Bootup sequence and involves your Tablet PC’s BIOS. When your Tablet PC is first turned on, the main system memory is empty, and it needs to find instruc-tions to start up your Tablet PC. This information is in the BIOS program. Each time you power up or restart your Tablet PC, it goes through a boot sequence which displays a Fujitsu logo until your operating system is loaded. During booting, your Tablet PC is performing a standard boot sequence including a Power On Self Test (POST). When the boot sequence is completed without a failure and without a request for the BIOS Setup Utility, the system displays the operating system’s opening screen.The boot sequence is executed when:■You turn on the power to your Tablet PC.■You restart your Tablet PC from the WindowsShut Down dialog box.■The software initiates a system restart. Example:When you install a new application.BIOS SETUP UTILITYThe BIOS Setup Utility is a program that sets up the operating environment for your Tablet PC. Your BIOSis set at the factory for normal operating conditions, therefore there is no need to set or change the BIOS’ environment to operate your Tablet PC.The BIOS Setup Utility configures:■Device control feature parameters, such as changingI/O addresses and boot devices.■System Data Security feature parameters, suchas passwords.Entering the BIOS Setup UtilityTo enter the BIOS Setup Utility do the following: 1. Turn on or restart your Tablet PC.2. Press the [F2] key once the Fujitsu logo appearson the screen. This will open the main menuof the BIOS Setup Utility with the currentsettings displayed.3. Press the [RIGHT ARROW] or [LEFT ARROW] key to scroll through the other setup menus to review or alter the current settings.BIOS GuideA guide to your Tablet PC’s BIOS is available online. Please visit our service and support Web site at us.fujitsu.com/computers. Once there, select Support, then select Tablet PCs under User’s Guides. Select Life-Book Tablet PC BIOS Guides from the pull-down menu for your Tablet PC series. If you are unsure of your Tablet PC’s BIOS number, refer to your packing slip.When you turn on your Tablet PC, be sure you have a power source. This means that a battery is installed and charged, or that the AC or Auto/Airline adapter is connected and has power.When the system display is closed, the Suspend/Resume button is disabled. This feature prevents the system from being accidentally powered up when not in use. Never turn off your Tablet PC during the Power On Self Test (POST) or it will cause an error message to be displayed when you turn your Tablet PC on the next time. See “Power On Self Test Messages” on page 65If your data security settings require it, you may be asked for a password before the BIOS main menu will appear.T Series.book Page 34 Wednesday, July 28, 2004 3:35 PM](https://usermanual.wiki/Fujitsu-Client-Computing/WB0011.User-manual-part4/User-Guide-465485-Page-3.png)


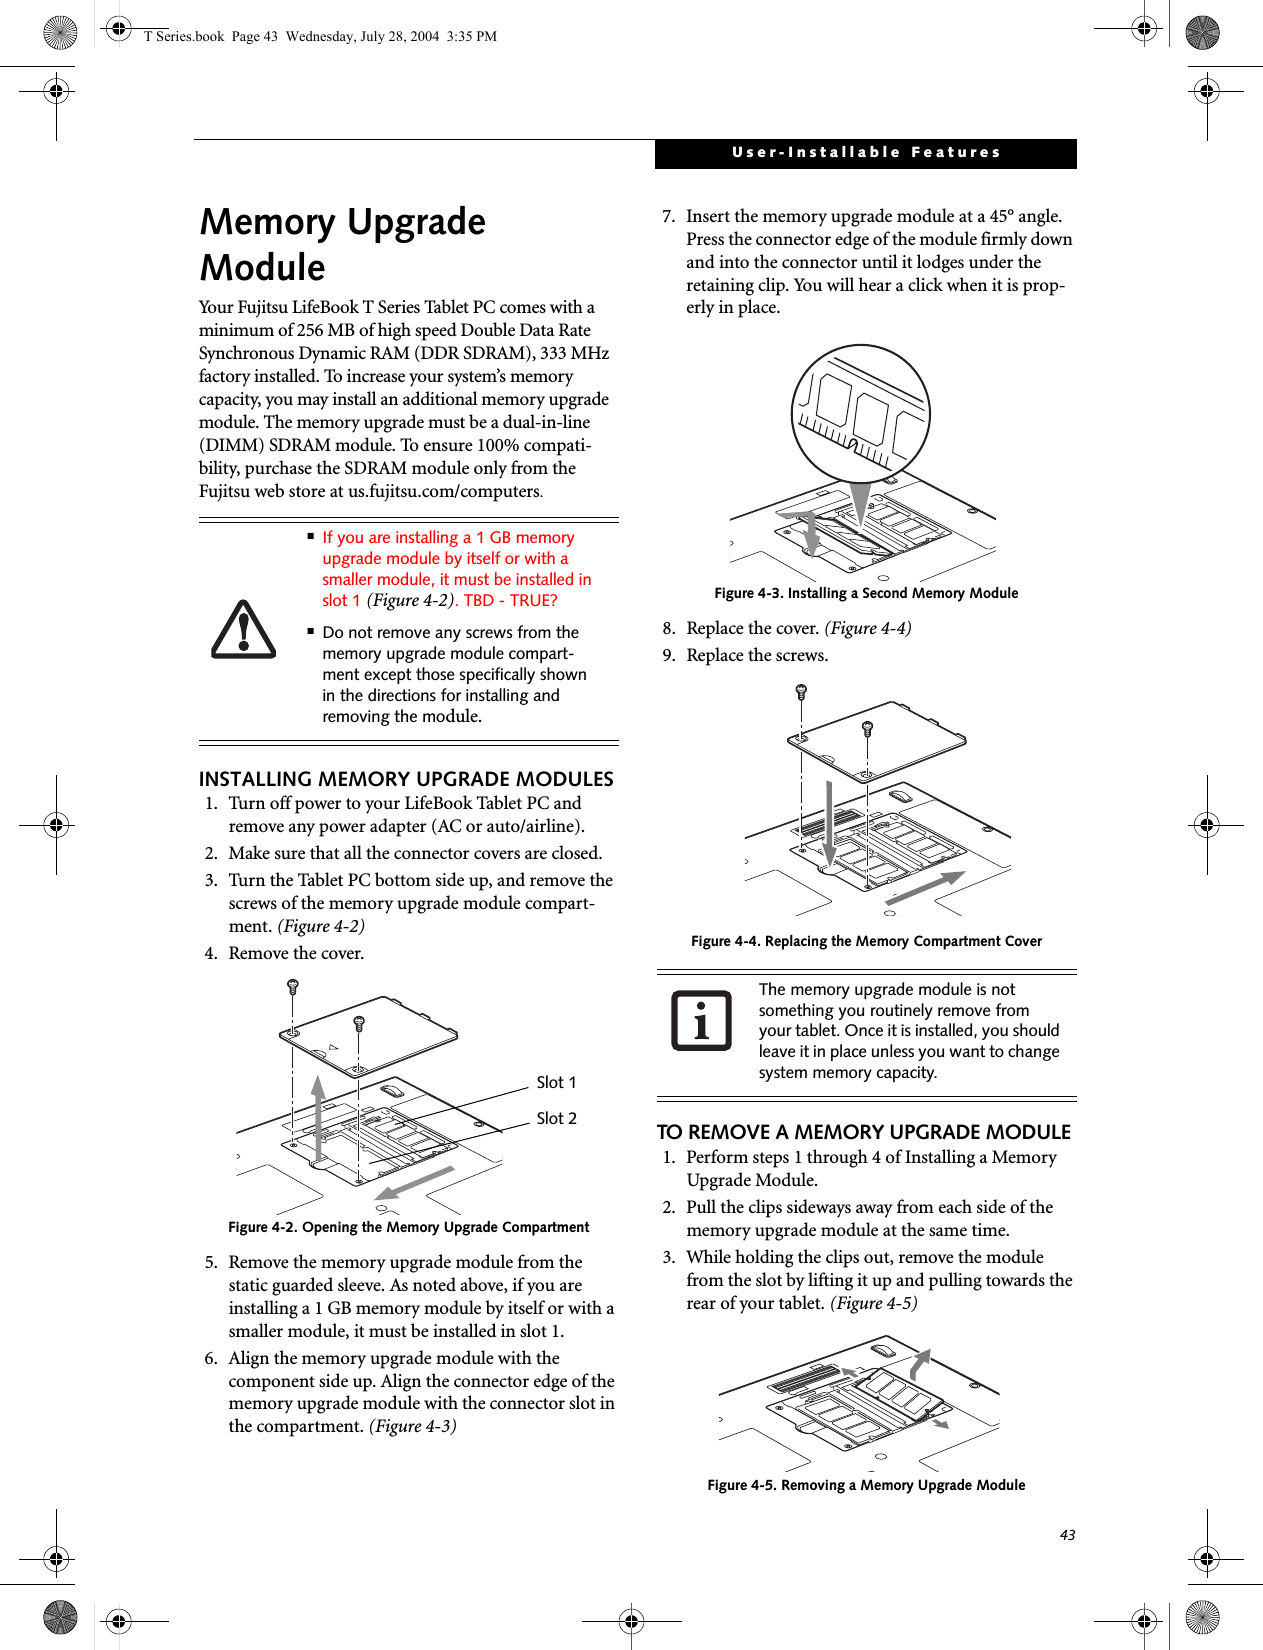
![44LifeBook T Series Tablet PC - Section Four4. Store the memory upgrade module in a static guarded sleeve.5. Replace the cover. (Figure 4-4)6. Replace the screws.CHECKING THE MEMORY CAPACITYOnce you have changed the system memory capacity by either adding or removing a memory upgrade module, be sure to check that your tablet has recognized the change.You can check the memory capacity by clicking [Start]-> Control Panel, then double-clicking the System icon. Select the General tab and check the amount of memory under “Computer.”The amount of memory displayed should be approxi-mately the total of all memory modules installed. There may be a discrepancy of 8 MB which is allocated for fixed video memory.Your Tablet PC uses Dynamic Video Memory Technology (DVMT), which allows the video driver to dynamically determine the amount of memory that is used. Your Tablet PC can use a maximum of 64 MB of system memory for video functions. If the total memory displayed is incorrect, check that your memory upgrade module is properly installed. (If the module is properly installed and the capacity is still not correctly recognized, see Troubleshooting on page 58.T Series.book Page 44 Wednesday, July 28, 2004 3:35 PM](https://usermanual.wiki/Fujitsu-Client-Computing/WB0011.User-manual-part4/User-Guide-465485-Page-13.png)
![53User-Installable FeaturesIt is important to keep in mind that while carrying out this form of communication, both devices must be placed so their infrared ports are directly facing each other without obstruction. The devices must also be separated by at least 6" but no more than 36" for maximum performance. The following conditions may interfere with infrared communications:■A television, radio remote control unit, or a wireless headphone is being used nearby.■Direct sunlight, fluorescent light, or incandescent light shines directly on the port.MICROPHONE JACKThe microphone jack allows you to connect an external mono microphone. Your microphone must be equipped with a 1/8"(3.5 mm) mono mini-plug in order to fit into the microphone jack of your Tablet PC. In order to connect a microphone follow these easy steps: (See Figure 2-5 on page 13 for location)1. Align the connector with the port opening.2. Push the connector into the port until it is seated.HEADPHONE JACKThe headphone jack allows you to connect headphones or powered external speakers to your Tablet PC. Your headphones or speakers must be equipped with a 1/8" (3.5 mm) stereo mini-plug. In order to connect head-phones or speakers follow these easy steps: (See Figure 2-5 on page 13 for location)1. Align the connector with the port opening.2. Push the connector into the port until it is seated.EXTERNAL VGA MONITOR PORTThe external VGA monitor port allows you to connect an external VGA or SVGA monitor. In order to connect an external monitor follow these easy steps: (See Figure 2-7 on page 15 for location). There is also an external VGA monitor on the port replicator (See Figure 4-7 on page 50 for location). 1. Remove the cover from the port opening, if present.2. Align the connector with the port opening.3. Push the connector into the port until it is seated.4. Tighten the two hold-down screws, located oneach side of the connector. EXTERNAL DVI PORTThe external Digital Video Interface (DVI) port on the optional port replicator allows you to connect an external digital monitor or projector. In order to connect a DVI monitor follow these easy steps: (See Figure 4-7 on page 50 for location). 1. Align the connector with the port opening.2. Push the connector into the port until it is seated.3. Tighten the two hold-down screws, located on each side of the connector.■Do not move either device while com-munication is active as it may interrupt data transmission.■Be careful not to scratch the infrared port lens. Scratches, dirt, or other sur-face marks can degrade operation.If you plug headphones into the headphone jack, the built-in stereo speakers will be disabled.When an external monitor is plugged in, pressing the [Fn] + [F10] keys allows you to change your selection of where to send your display video. Each time you press the key combination, you will step to the next choice, starting with the built-in display panel only, moving to the external monitor only, finally moving to both the built-in display panel and an external monitor.T Series.book Page 53 Wednesday, July 28, 2004 3:35 PM](https://usermanual.wiki/Fujitsu-Client-Computing/WB0011.User-manual-part4/User-Guide-465485-Page-20.png)


![58LifeBook T Series Tablet PC - Section FiveTROUBLESHOOTING TABLEProblem PageAudio Problems . . . . . . . . . . . . . . . . . . . . . . . . . . page 58Docking Problems . . . . . . . . . . . . . . . . . . . . . . . . page 58Hard Drive Problems . . . . . . . . . . . . . . . . . . . . . . page 58Keyboard or Mouse Problems. . . . . . . . . . . . . . . page 58Pen Input Problems . . . . . . . . . . . . . . . . . . . . . . . page 59Infrared Problems . . . . . . . . . . . . . . . . . . . . . . . . page 59Memory Problems . . . . . . . . . . . . . . . . . . . . . . . . page 59Problem PageModem Problems. . . . . . . . . . . . . . . . . . . . . . . . . page 59USB Device Problems . . . . . . . . . . . . . . . . . . . . . page 60PC Card Problems . . . . . . . . . . . . . . . . . . . . . . . . page 60Power Failures . . . . . . . . . . . . . . . . . . . . . . . . . . . page 60Shutdown and Startup Problems . . . . . . . . . . . . page 62Video Problems . . . . . . . . . . . . . . . . . . . . . . . . . . page 63Miscellaneous Problems . . . . . . . . . . . . . . . . . . . page 64Problem Possible Cause Possible SolutionsAudio ProblemsThere is no sound coming from the built-in speakers.The software volume control is set too low.Adjust the sound volume control settings in your software, operating system and applications.Headphones are plugged into your Tablet PC.Plugging in headphones disables the built-in speakers, remove the headphones.Software driver is not config-ured correctly.Refer to your application and operating system documentation for help.Sound could have been muted with function keys.Press [F3] while holding the [Fn] key to toggle the sound on and off.Port Replicator ProblemsTablet PC does not turn on when installed in optional Port ReplicatorPort Replicator AC adapter is not plugged in. Provide power to the Port Replicator.Tablet PC is not properly seated in the Port Replicator.Remove and re-dock your Tablet PC.Hard Drive ProblemsYou cannot access your hard drive.The setup utility is incorrectly set for your internal (Primary Master) hard drive.Revise BIOS settings to set the Primary Mastercorrectly. See “BIOS Setup Utility” on page 34.The wrong drive designator was used by an application when a bootable CD-ROM was used to start the Tablet PC.Verify drive designator used by application is inuse by the operating system. When the operating system is booted from a CD, drive designationsare automatically adjusted. Security is set so your oper-ating system cannot be started without a password.Verify your password and security settings.Keyboard or Mouse ProblemsThe built-in keyboard does not seem to work.The Tablet PC has gone into Standby mode.Push the Suspend/Resume button.Your application has locked out your keyboard.Try to use your integrated pointing device to restart your system. If this fails, turn your Tablet PC off by pressing the suspend/resume button for 10 seconds or more, and then turn it back on.T Series.book Page 58 Wednesday, July 28, 2004 3:35 PM](https://usermanual.wiki/Fujitsu-Client-Computing/WB0011.User-manual-part4/User-Guide-465485-Page-25.png)
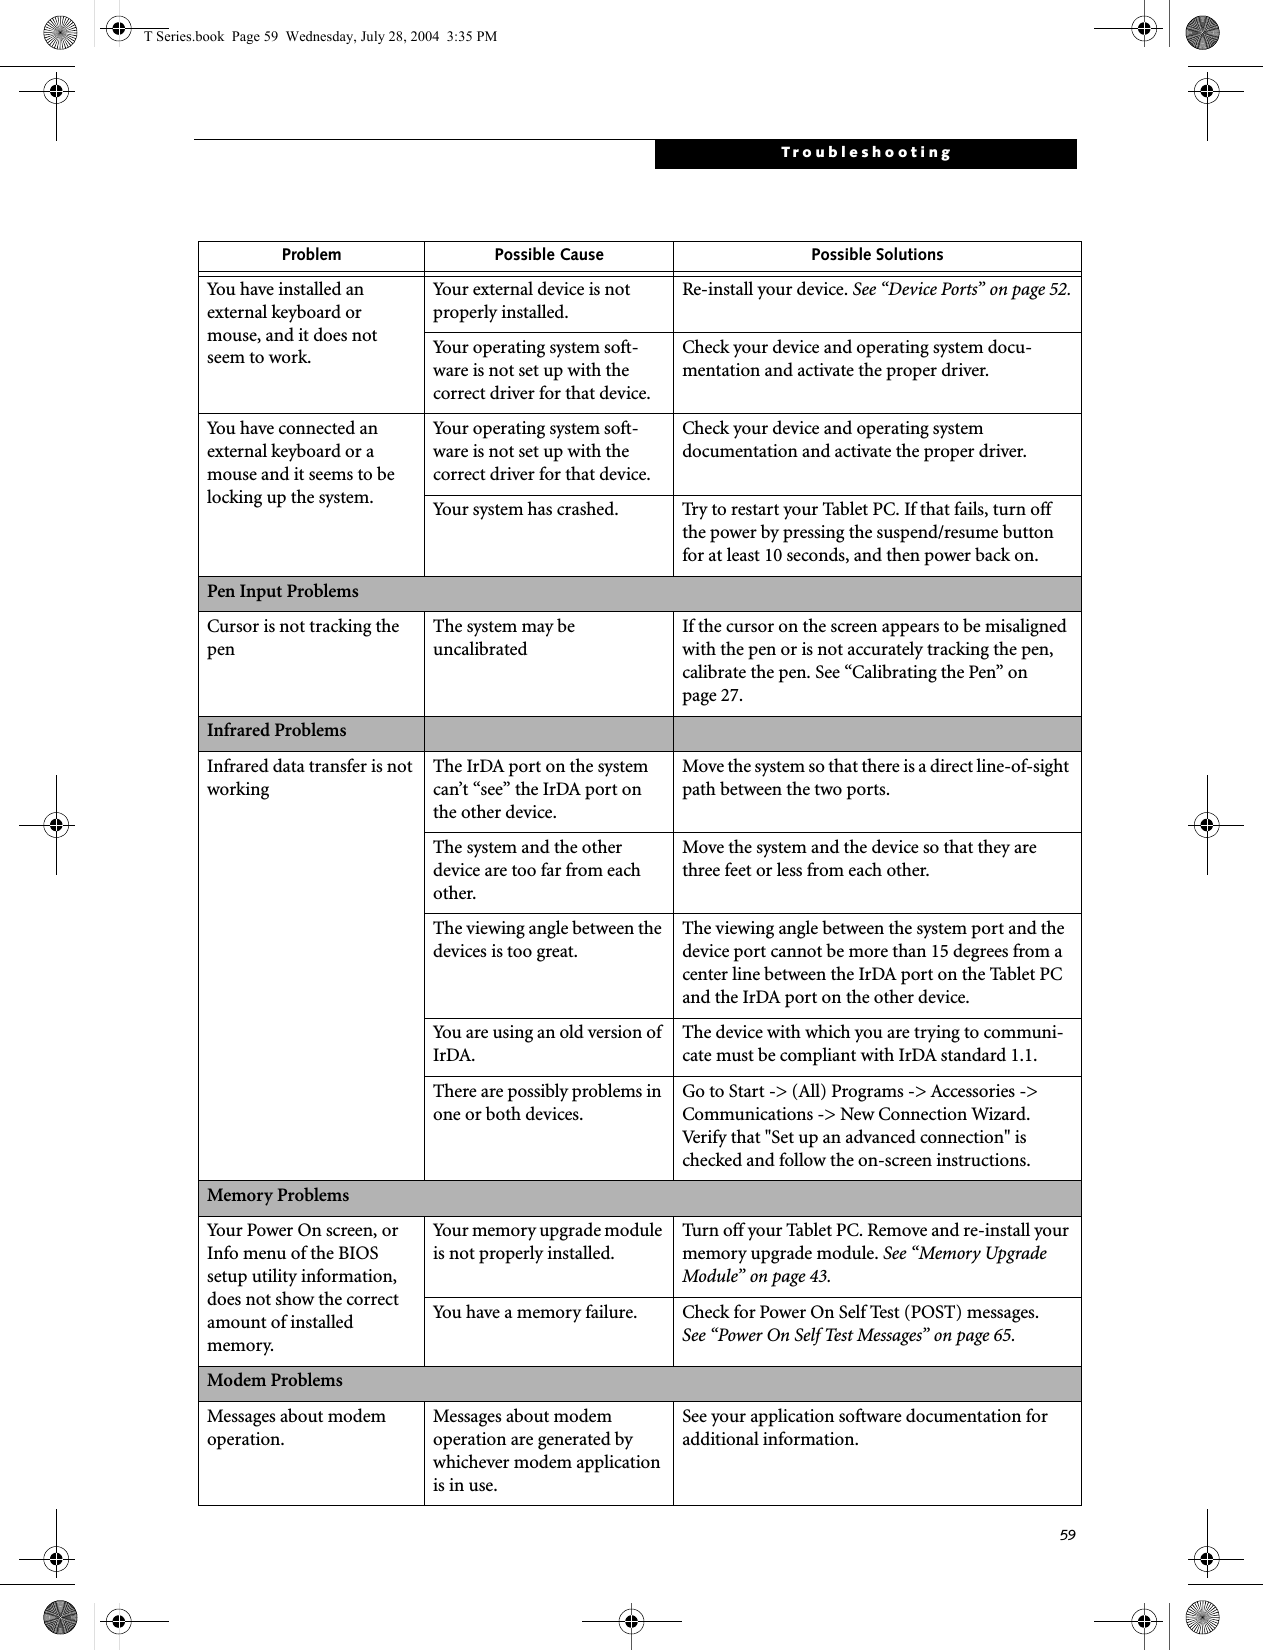
![60LifeBook T Series Tablet PC - Section FiveModem does not appear to work.Modem may not have been intialized.Verify that the modem has been initialized by the operating system. TO do so, right-click on My Computer and select the Hardware tab. Click [Device Manager] and click on the "+" symbol that appears next to Modems. Verify that your device is listed as installed.USB Device ProblemsYou have installed a USB device, but your Tablet PC does not recognize the device, or the device does not seem to work properly.The device is not properly installed.Remove and re-install the device. See “Device Ports” on page 52.The device may have been installed while an application was running, so your Tablet PC is not aware of its installation.Close the application and restart your Tablet PC.Your software may not have the correct software driver active.See your software documentation and activate the correct driver.Your device and another device are assigned the same I/O address.Check all I/O addresses located within the BIOS setup utility and any other installed hardware or software to make sure there are no duplications.PC Card ProblemsA card inserted in the PC Card slot does not work or is locking up the system.The card is not properly installed.Remove and re-install the card. See “PC Cards” on page 47.The card may have been installed while an application was running, so your Tablet PC is not aware of its installation.Close the application and restart your Tablet PC.Your software may not have the correct software driver active.See your software documentation and activate the correct driver.Your PC Card device and another device are assigned the same I/O address.Check all I/O addresses located within the BIOS setup utility and any other installed hardware or software to make sure there are no duplications.Power FailuresYou turn on your Tablet PC and nothing seems to happen.The installed battery is completely discharged or there is no power adapter (AC or Auto/Airline) installed.Check the Status Indicator Panel to determine the presence and condition of the battery. See “Status Indicator Panel” on page 15. Install a charged battery or a Power adapter.The battery is installed but is faulty.Use the Status Indicator Panel to verify the presence and condition of the battery. See “Status Indicator Panel” on page 15. If a battery is indicating a short, remove that battery and operate from another power source or replace that battery.Problem Possible Cause Possible SolutionsT Series.book Page 60 Wednesday, July 28, 2004 3:35 PM](https://usermanual.wiki/Fujitsu-Client-Computing/WB0011.User-manual-part4/User-Guide-465485-Page-27.png)
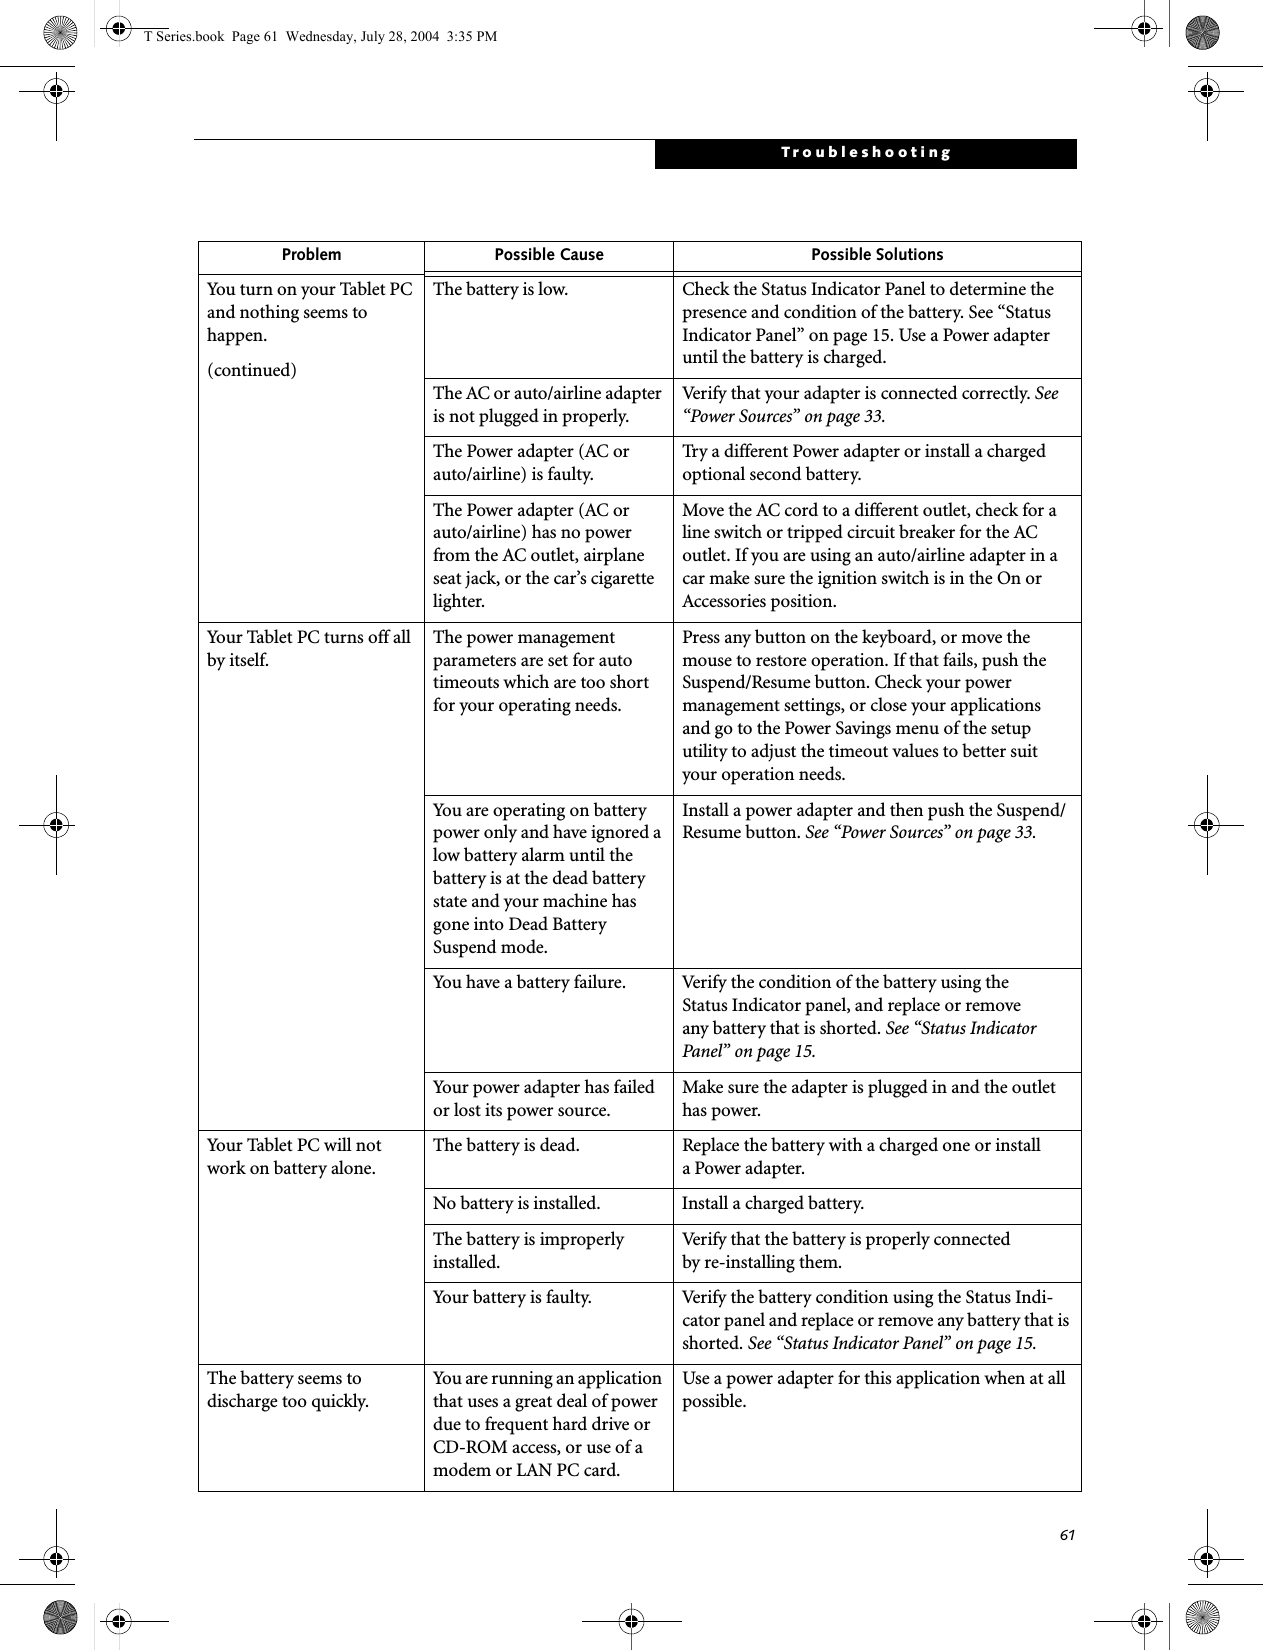
![62LifeBook T Series Tablet PC - Section FiveThe battery seems to discharge too quickly.(continued)The power savings features may be disabled.Check the power management and/or setup utility settings in the Power Savings menu and adjust according to your operating needs.The brightness is turned all the way up.Turn down the brightness adjustment. The higher the brightness the more power your display uses.The battery is very old. Replace the battery.The battery has been exposed to high temperatures.Replace the battery.The battery is too hot or too cold. Restore the Tablet PC to normal operating tempera-ture. The Charging icon on the Status Indicator panel will flash when the battery is outside itsoperating range.The AC Adapter is defective. Replace with another AC Adapter to see if the problem persists. Replace any defective AC Adapters.Shutdown and Startup ProblemsThe Suspend/Resume button does not work.The Suspend/Resume button is disabled from the Advanced submenu of the Power menu of the setup utility. Enable the button from the setup utility.You did not hold the button in long enough.Hold the button longer. This may need to be a few seconds if your application is preventing the CPU from checking for button pushes.There may be a conflict with the application software.Close all applications and try the button again.The system powers up, and displays power-on informa-tion, but fails to load the operating system.The boot sequence settings of the setup utility are not compatible with your configuration.Set the operating source by pressing the [F2] key while the Fujitsu logo is on screen, entering the setup utility and adjusting the source settings from the Boot menu. See “BIOS Setup Utility” on page 34.You have a secured system requiring a password to load your operating system.Make sure you have the right password. Enter the setup utility and verify the Security settings and modify them as accordingly. See “BIOS Setup Utility” on page 34.An error message is displayed on the screen during the Tablet PC boot sequence.Power On Self Test (POST) has detected a problem.See the Power On Self Test (POST) messages to determine the meaning and severity of the problem. Not all messages are errors; some are simply status indicators. See “Power On Self Test Messages” on page 65.Your system display won’t turn on when the system is turned on or when the system has resumed.The system may be password-protected.Check the status indicator panel to verify that the Security icon is blinking. If it is blinking, enter your password.Problem Possible Cause Possible SolutionsT Series.book Page 62 Wednesday, July 28, 2004 3:35 PM](https://usermanual.wiki/Fujitsu-Client-Computing/WB0011.User-manual-part4/User-Guide-465485-Page-29.png)
![63TroubleshootingYour Tablet PC appears to change setup parameters when you start it.BIOS setup changes were not saved when you made them and exited the BIOS setup utility returning it to previous settings.Make sure you select Save Changes And Exit when exiting the BIOS setup utility.The BIOS CMOS back-up battery has failed.Contact your support representative for repairs. This is not a user-serviceable part.Video ProblemsThe built-in display is blank when you turn on your Tablet PC.The angle of the display and the brightness settings are not adequate for your lighting conditions.Move the display and the brightness control until you have adequate visibility.The optional Port Replicator is attached, an external monitor is plugged in, and the Tablet PC is set for an external monitor only.Pressing [F10] while holding down the [Fn] key allows you to change your selection of where tosend your display video. Each time you press the combination of keys you will step to the nextchoice. The choices, in order are: built-in display only, external monitor only, both built-in display and external monitor.The power management timeouts may be set for very short intervals and you failed to notice the display come onand go off again.Press any button the keyboard, or move the mouse to restore operation. If that fails, push the Suspend/Resume button. (The display may be shut off by Standy mode, Auto Suspend or Video Timeout)The Tablet PC turned on with a series of beeps and your built-in display is blank.Power On Self Test (POST)has detected a failure which does not allow the displayto operate. Contact your support representative.Your system display won’t turn on when the system is turned on or when the system has resumed.The system may be password-protected.Check the status indicator panel to verify that the Security icon is blinking. If it is blinking, enter your password.The display goes blank by itself after you have been using it.The Tablet PC has gone into Video Timeout, Standby Mode, or Hibernate Mode because you have not used it for a period of time.Press a button on the keyboard, or move the mouse to restore operation. If that fails, push the Suspend/Resume button. Check your power management settings, or close your applications and go to the Power Savings menu of the setup utility to adjust the timeout values to better suit your operation needs. See “BIOS Setup Utility” on page 34.The power management time-outs may be set for very short intervals and you failed to notice the display come onand go off again.Press any button on the keyboard, or move the mouse to restore operation. If that fails, push the Suspend/Resume button. (The display may be shut off by Standby Mode, Auto Suspend or Video Timeout)The display does not close. A foreign object, such as a paper clip, is stuck between the display and the keyboard.Remove all foreign objects from the keyboard.Problem Possible Cause Possible SolutionsT Series.book Page 63 Wednesday, July 28, 2004 3:35 PM](https://usermanual.wiki/Fujitsu-Client-Computing/WB0011.User-manual-part4/User-Guide-465485-Page-30.png)
![64LifeBook T Series Tablet PC - Section FiveThe display has bright or dark spots.If the spots are very tiny and few in number, this is normal for a large LCD display.This is normal; do nothing.If the spots are numerous or large enough to interfere with your operation needs.The display needs technical diagnosis; contact your support representative.The application display uses only a portion of your screen and is surrounded by a dark frame.You are running an application that does not support 800 x 600/1024 x 768 pixel resolution display and display compres-sion is enabled.When compensation is disabled, a clearer but smaller display for applications that do not support 800 x 600/1024 x 768 pixel resolution will result. You can fill the screen but have less resolution by changing your compensation setting. (See the Video Features submenu, located within the Advanced menu of the BIOS. See “BIOS Setup Utility” on page 34.You have connected an external monitor and it does not display any information.Your BIOS setup is not set to enable your external monitor.Try toggling the video destination by pressing [Fn] and [F10] together, or check your BIOS setup and enable your external monitor. (See the Video Features submenu, located within the Advanced Menu of the BIOS. See “BIOS Setup Utility” on page 34.Your external monitor is not properly installed. Reinstall your device. See “External VGA Monitor Port” on page 53.Your operating system soft-ware is not set up with the correct software driver forthat device. Check your device and operating systemdocumentation and activate the proper driver.You have connected an external monitor and it does not come on.Your external monitor may not be compatible with your Tablet PC.See your monitor documentation and theExternal Monitor Support portions of theSpecifications section. See “Specifications” on page 77.Miscellaneous ProblemsAn error message is displayed on the screen during the operation ofan application.Application software often has its own set of error message displays. See your application manual and help displays screens for more information. Not all messages are errors some may simply be status.Problem Possible Cause Possible SolutionsT Series.book Page 64 Wednesday, July 28, 2004 3:35 PM](https://usermanual.wiki/Fujitsu-Client-Computing/WB0011.User-manual-part4/User-Guide-465485-Page-31.png)
![65TroubleshootingPOWER ON SELF TEST MESSAGESThe following is an alphabetic list of error-and-status messages that Phoenix BIOS and/or your operating system can generate and an explanation of each message. Error messages are marked with an *. If an error message is displayed that is not in this list, write it down and check your operating system documentation both on screen and in the manual. If you can find no reference to the message and its meaning is not clear, contact your support representative for assistance.nnnn Cache SRAM Passed Where nnnn is the amount of system cache in kilobytes successfully tested by the Power On Self Test. (This can only appear if you have an SRAM PC Card installed.)*Extended RAM Failed at offset: nnnn Extended memory not working or not configured prop-erly. If you have an installed memory upgrade module, verify that the module is properly installed. If it is prop-erly installed, you may want to check your Windows Setup to be sure it is not using unavailable memory until you can contact your support representative.nnnn Extended RAM Passed Where nnnn is the amount of memory in kilobytes successfully tested.*Failing Bits: nnnn The hex number nnnnThis is a map of the bits at the memory address (in System, Extended, or Shadow memory) which failed the memory test. Each 1 (one) in the map indicates a failed bit. This is a serious fault that may cause you to lose data if you continue. Contact your support representative.*Fixed Disk x Failure or Fixed Disk Controller Failure (where x = 1-4) The fixed disk is not working or not configured prop-erly. This may mean that the hard drive type identified in your setup utility does not agree with the type detected by the Power On Self Test. Run the setup utility to check for the hard drive type settings and correct them if necessary. If the settings are OK and the message appears when you restart the system, there may be a serious fault which might cause you to lose data if you continue. Contact your support representative.*Invalid NVRAM media typeProblem with NVRAM access. In the unlikely case that you see this message you may have some display prob-lems. You can continue operating but should contact your support representative for more information.*Keyboard controller error The keyboard controller test failed. You may have to replace your keyboard or keyboard controller but may be able to use an external keyboard until then. Contact your support representative.*Keyboard error Keyboard not working. You may have to replace your keyboard or keyboard controller but may be able touse an external keyboard until then. Contact your support representative.*Keyboard error nn BIOS discovered a stuck key and displays the scan code for the stuck key. You may have to replace your keyboard but may be able to use an external keyboard until then. Contact your support representative.*Operating system not found Operating system cannot be located on either drive A: or drive C: Enter the setup utility and see if both the fixed disk, and drive A: are properly identified and that the boot sequence is set correctly. Unless you have changed your installation greatly, the operating system should be on drive C:. If the setup utility is correctly set, your hard drive may be corrupted and your system may have to be re-installed from your back up media.*Parity Check 1 nnnn Parity error found in the system bus. BIOS attempts to locate the address and display it on the screen. If it cannot locate the address, it displays "????". This is apotentially data destroying failure. Contact yoursupport representative.*Parity Check 2 nnnn Parity error found in the I/O bus. BIOS attempts to locate the address and display it on the screen. If it cannot locate the address, it displays "????". This is apotentially data destroying failure. Contact yoursupport representative.*Press <F1> to resume, <F2> to SETUP Displayed after any recoverable error message. Pressthe [F1] key to continue the boot process or the [F2]key to enter Setup and change any settings.*Previous boot incomplete – Default configuration used Previous Power On Self Test did not complete success-fully. The Power On Self Test will load default values and offer to run Setup. If the previous failure was caused by incorrect values and they are not corrected, the next boot will likely fail also. If using the default settings does not allow you to complete a successful boot sequence, you should turn off the power and contact your support representative.T Series.book Page 65 Wednesday, July 28, 2004 3:35 PM](https://usermanual.wiki/Fujitsu-Client-Computing/WB0011.User-manual-part4/User-Guide-465485-Page-32.png)
![67TroubleshootingRestoring Your Pre-installed SoftwareThe Drivers and Applications Restore (DAR) DVD contains:■Sets of device drivers and Fujitsu utilities (in specific directories) that are unique to your Tablet PC configu-ration for use as documented below.■Read-me files that provide additional use information for items on this DVD-ROM.RE-INSTALLING INDIVIDUAL DRIVERS AND APPLICATIONS The Drivers and Application DVD can be used to selec-tively re-install drivers and/or applications that may have been un-installed or corrupted. To re-install drivers and/or applications:1. Boot up the system and insert the DAR DVD after Windows has started. A Fujitsu Welcome screen is displayed after the DVD is inserted.2. From the left frame of the Welcome screen, “System Components” and “3rd Party Applications” can be selected. System Components are those drivers and utilities that have been developed by Fujitsu; 3rd Party Applications are applications developed by other vendors.Installing System Components1. To install system components, click on “System Components” in the left frame of the Welcome screen. A list of utilities and drivers will be displayed. Select one or more items from the list, or click [Select All] to select all items in the list. (To de-select your choices, click the [Clear All] button.2. Click [Install Selected Subsystems] to install the selected items.Installing 3rd Party Applications1. To install 3rd party applications, click on “3rd Party Applications” in the left frame of the Welcome screen. A list of applications will be displayed. 2. Select one of the items from the list, and follow the instructions that appear on the screen. Note that only one application may be installed at a time.3. Repeat step 2 to install additional applications.RESTORING THE FACTORY IMAGEThe Restore Disc that came with your system contains two utilities:■The Recovery utility allows you to restore the original contents of the C: drive.■The Hard Disk Data Delete utility on this disc is used to delete all data on your hard disk and prevent it from being reused. Do not use the Hard Disk Data Delete utility unless you are absolutely certain that you want to erase your entire hard disk, including all partitions.BOOT Priority ChangeBefore restoring an image, you must first verify that your system is set up to boot from the DVD drive. To verify/change the boot-up priority (rather than booting-up from the hard drive or an external floppy disk drive), perform the following steps:1. Start your system and press the [F2] key when the Fujitsu logo appears. You will enter the BIOS Setup Utility.2. Using the arrow keys, go to the Boot menu.3. Arrow down to the Boot Device Priority submenu. Press [Enter].4. If “Optical Media Drive” or “CD-ROM Drive” is not at the top of the list, arrow down to the drive in the list, and press the space bar (or the + key) to move it to the top of the list. (The system attempts to boot from the devices in the order in which they are listed.). Note that the BIOS for some systems will indicate “CD-ROM Drive”, even when a DVD drive is connected.5. If you have an external DVD drive connected, proceed to the next step; otherwise, proceed to step 7.6. If you have an external DVD drive connected:• Select the Advanced menu in the BIOS window.In order to install applications and/or drivers from the DAR DVD, you will need to connect an external DVD drive to your system.If you have access to the internet, visit the Fujitsu Support web site at http://us.fujitsu.com/computers to check for the most current information, drivers and hints on how to perform recovery and system updates.• The use of this disc requires that you have a device capable of reading DVDs attached to your system. If you do not have a built-in DVD player, you will need to attach an external player. For more information on available external devices, visit our Web site at: us.fujitsu.com/computers. • This disc can only be used with the system with which it was purchased.T Series.book Page 67 Wednesday, July 28, 2004 3:35 PM](https://usermanual.wiki/Fujitsu-Client-Computing/WB0011.User-manual-part4/User-Guide-465485-Page-34.png)
![68LifeBook T Series Tablet PC - Section Four• Scroll down to the USB Features submenu and press the Enter key to open it.• If Legacy USB Support is disabled, press the space bar to enable it.• Scroll down to SCSI SubClass Support and press the space bar to enable it. 7. Press [F10], then click on [Yes] to exit the BIOS Setup Utility and return to the boot process.After you have changed the boot priority, you can restore a backup image when you are booting up.Procedure1. Turn on the power to your system.2. Ensure that you have a device that can read DVDs either installed in your system or attached exter-nally to it.3. Insert the Restore Disc into the drive tray.4. Reboot your system.5. After the system reboots, follow the instructions that appear to either restore your system image or erase all data from your hard disk.T Series.book Page 68 Wednesday, July 28, 2004 3:35 PM](https://usermanual.wiki/Fujitsu-Client-Computing/WB0011.User-manual-part4/User-Guide-465485-Page-35.png)