Fujitsu Client Computing WB0029 LIFEBOOK T SERIES W/ WLL4070 11ABG WLAN & BT User Manual Appendix I 1
Fujitsu Limited LIFEBOOK T SERIES W/ WLL4070 11ABG WLAN & BT Appendix I 1
Contents
- 1. User manual part 1
- 2. User manual part 2
- 3. User manual part 3
- 4. User Manual part 1
User manual part 2

![23Getting to Know Your Tablet PCThe following are valid button strokes: ■Pushing [4] by itself■Pushing [2] and [3] at the same time■Pushing [1], [2], and [4] at the same time■Pushing [1], [2], [3], and [4] at the same timeThe following are valid passwords. The numbers within braces ({ }) are button strokes using more than one button. ■{[2]+[3]}, [1], [Enter]■[4], [enter]■{[1]+[3]}, {[2]+[3]+[4]}, [1], [4], [2], [Enter]Setting PasswordsWhen shipped from the factory, no passwords are set. You have a choice of having no password or setting a supervisor and user password. You must set the super-visor password before the user password. Setting Supervisor PasswordYou must have set a supervisor password before setting any user passwords. The supervisor password can bypass the user password.1. Go to the Start menu.2. Click on Run.3. Type in:C:\Program Files\Fujitsu\Security Panel Application\Supervisor\ FJSECS.EXE, then press [Enter]4. Follow the on-screen instructions to set theSupervisor password.Setting User Password1 Go to the Start menu.2. Click on All Programs.3. Click on Security Panel Application -> Security Panel Application.4. Follow the on-screen instructions to set theuser password.USING YOUR LIFEBOOK SECURITY PANELThe security lock feature is in effect both when the system resumes from Off, Standby, or Hibernation state. You always need to push the Security Panel buttons to input the user password. Your system will not begin the boot sequence until you enter your supervisor/user password.From Off State1. Turn on your system.2. When the Security Indicator flashes, enter the pass-word and press Enter button.For example, if the password is 22222, first press Button 2 five times and press the Enter button. The Tablet PC will boot to normal operation.From Standby/Hibernation State1. Press your Suspend/Resume button.2. When the Security Indicator flashes, enter the pass-word and press Enter button.The Tablet PC should resume normal operation.Incorrect Password EntryIf an invalid supervisor or user password is entered three times in succession, the system will “beep” for about one minute. If a valid password is entered within a minute (while system beeps), the beeping will stop and the Tablet PC will resume normal operation. If no password is entered or an invalid password is entered while the system beeps, the system will return to its previous locked state (standby or off) and the Security Indicator will go off. To reactivate the Tablet PC after a password failure, you must press the Suspend/Resume button, then enter a correct password.PRECAUTIONSOpening and Closing the CoverBy default, closing the cover automatically places your system into Standby mode. (You can change the action the system takes when the cover is closed by opening the Power Options Properties icon in the Control Panel, and selecting the Advanced tab. Make a choice from the drop down menu for “When I close the lid of my portable computer:” and click the [OK] button.) Opening the cover does not automatically place the Tablet PC into normal operation. Instead, you must enter the proper security password after pushing the Suspend/Resume button.■The purpose of supervisor password is to be able to bypass the user password in case the user password is forgotten. The supervisor password alone will not lock the system.■You must set the supervisor and user passwords for the security panel to work.You may change or remove the supervisor or user password by repeating the steps defined above.Remember the user password you specified on the Security Panel Application. If you forget the password you will not be able to use your computer. The supervisor pass-word can override the user password.T Series.book Page 23 Wednesday, July 28, 2004 3:35 PM](https://usermanual.wiki/Fujitsu-Client-Computing/WB0029.User-manual-part-2/User-Guide-546103-Page-2.png)
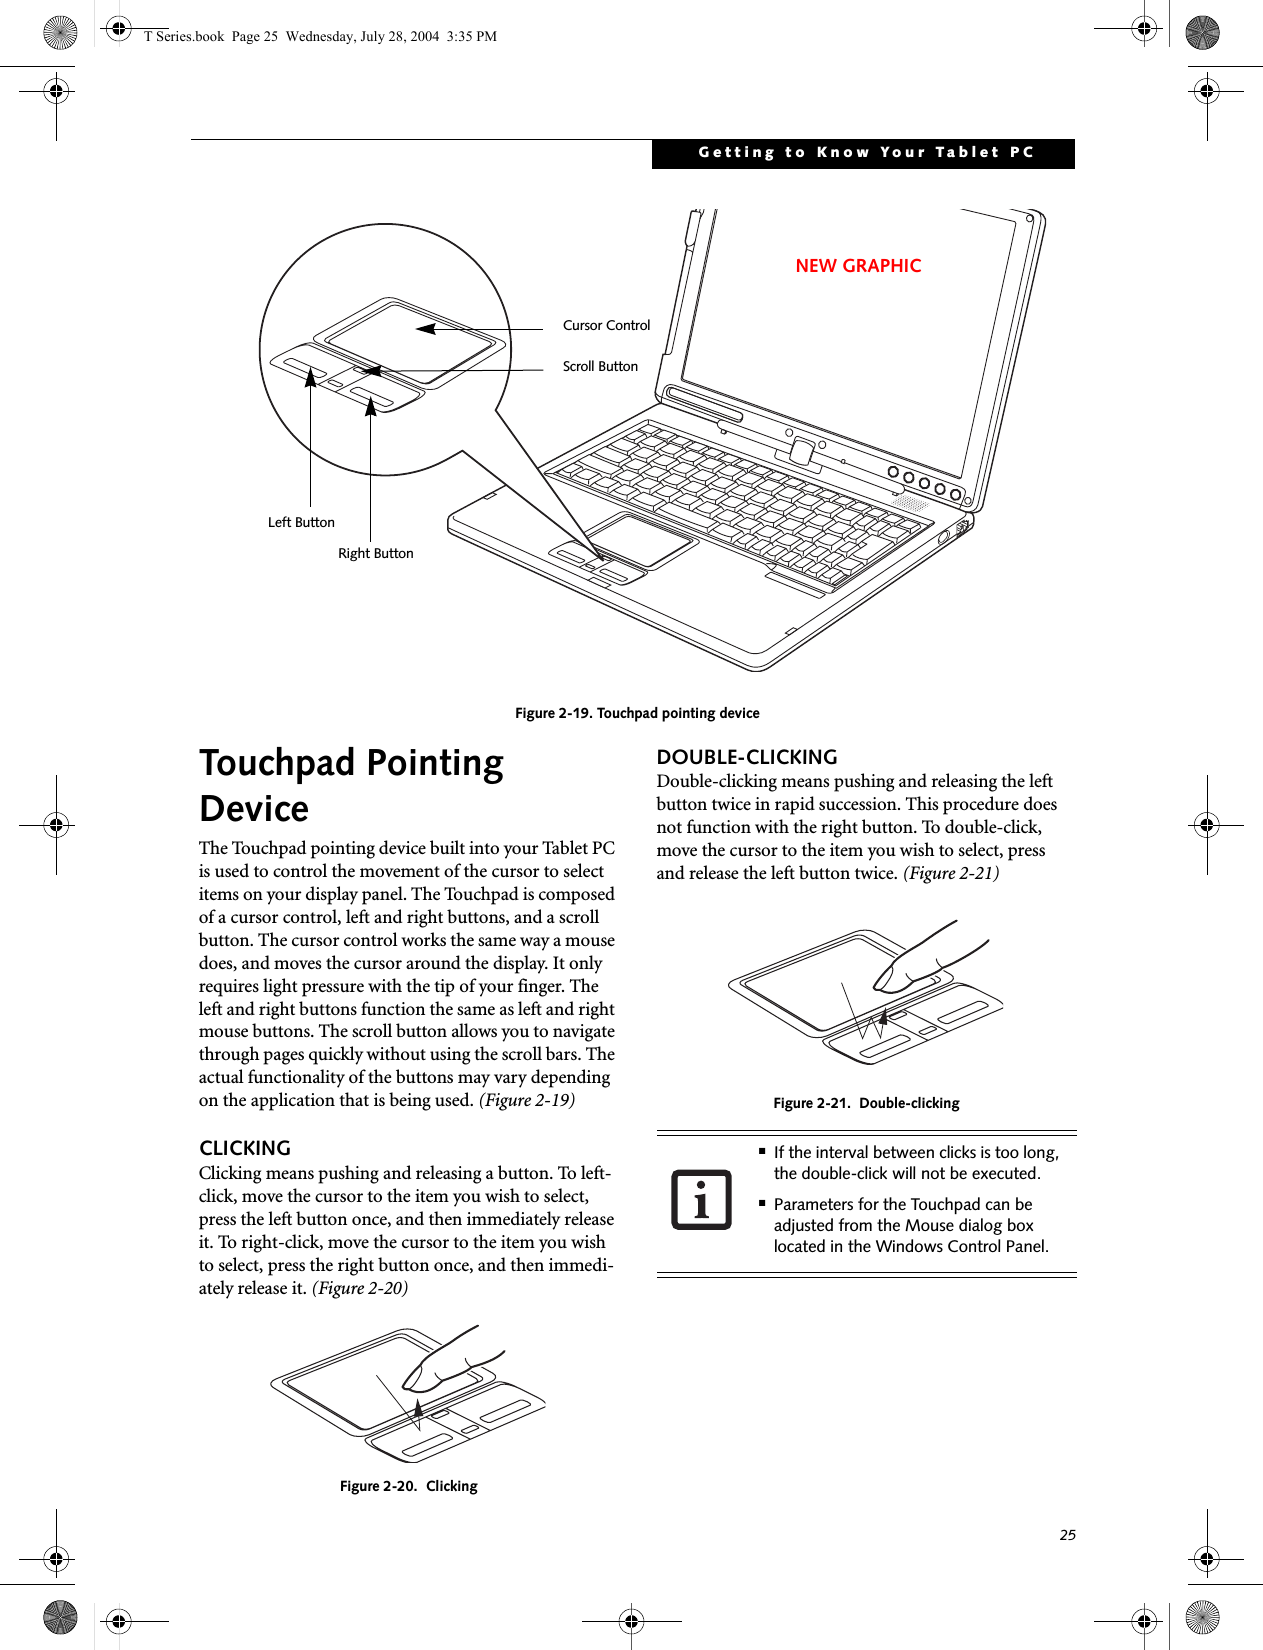
![29Getting to Know Your Tablet PCVolume ControlYour Fujitsu Tablet PC has multiple volume controls which interact with each other. CONTROLLING THE VOLUMEThe volume can be controlled in several different ways:■Volume can be set from within the Volume Control on the Taskbar.■Volume can be controlled with the [F8] and [F9] func-tions keys. Pressing [F8] repeatedly while holding [Fn] will decrease the volume of your Tablet PC. Pressing [F9] repeatedly while holding [Fn] will increase the volume of your Tablet PC.■Volume can be controlled by many volume controls that are set within individual applications.■Certain external audio devices you might connect to your system may have hardware volume controls.■Each source discussed above puts an upper limit on the volume level that must then be followed by the other sources. We recommend that you experiment with the various volume controls to discover the optimal sound level.Any software that contains audio files will also contain a volume control of its own. If you install an external audio device that has an independent volume control, the hardware volume control and the software volume control will interact with each other. It should be noted that if you set your software volume to Off, you will override the external volume control setting. There are twenty-six levels through which the function keys cycle. T Series.book Page 29 Wednesday, July 28, 2004 3:35 PM](https://usermanual.wiki/Fujitsu-Client-Computing/WB0029.User-manual-part-2/User-Guide-546103-Page-6.png)

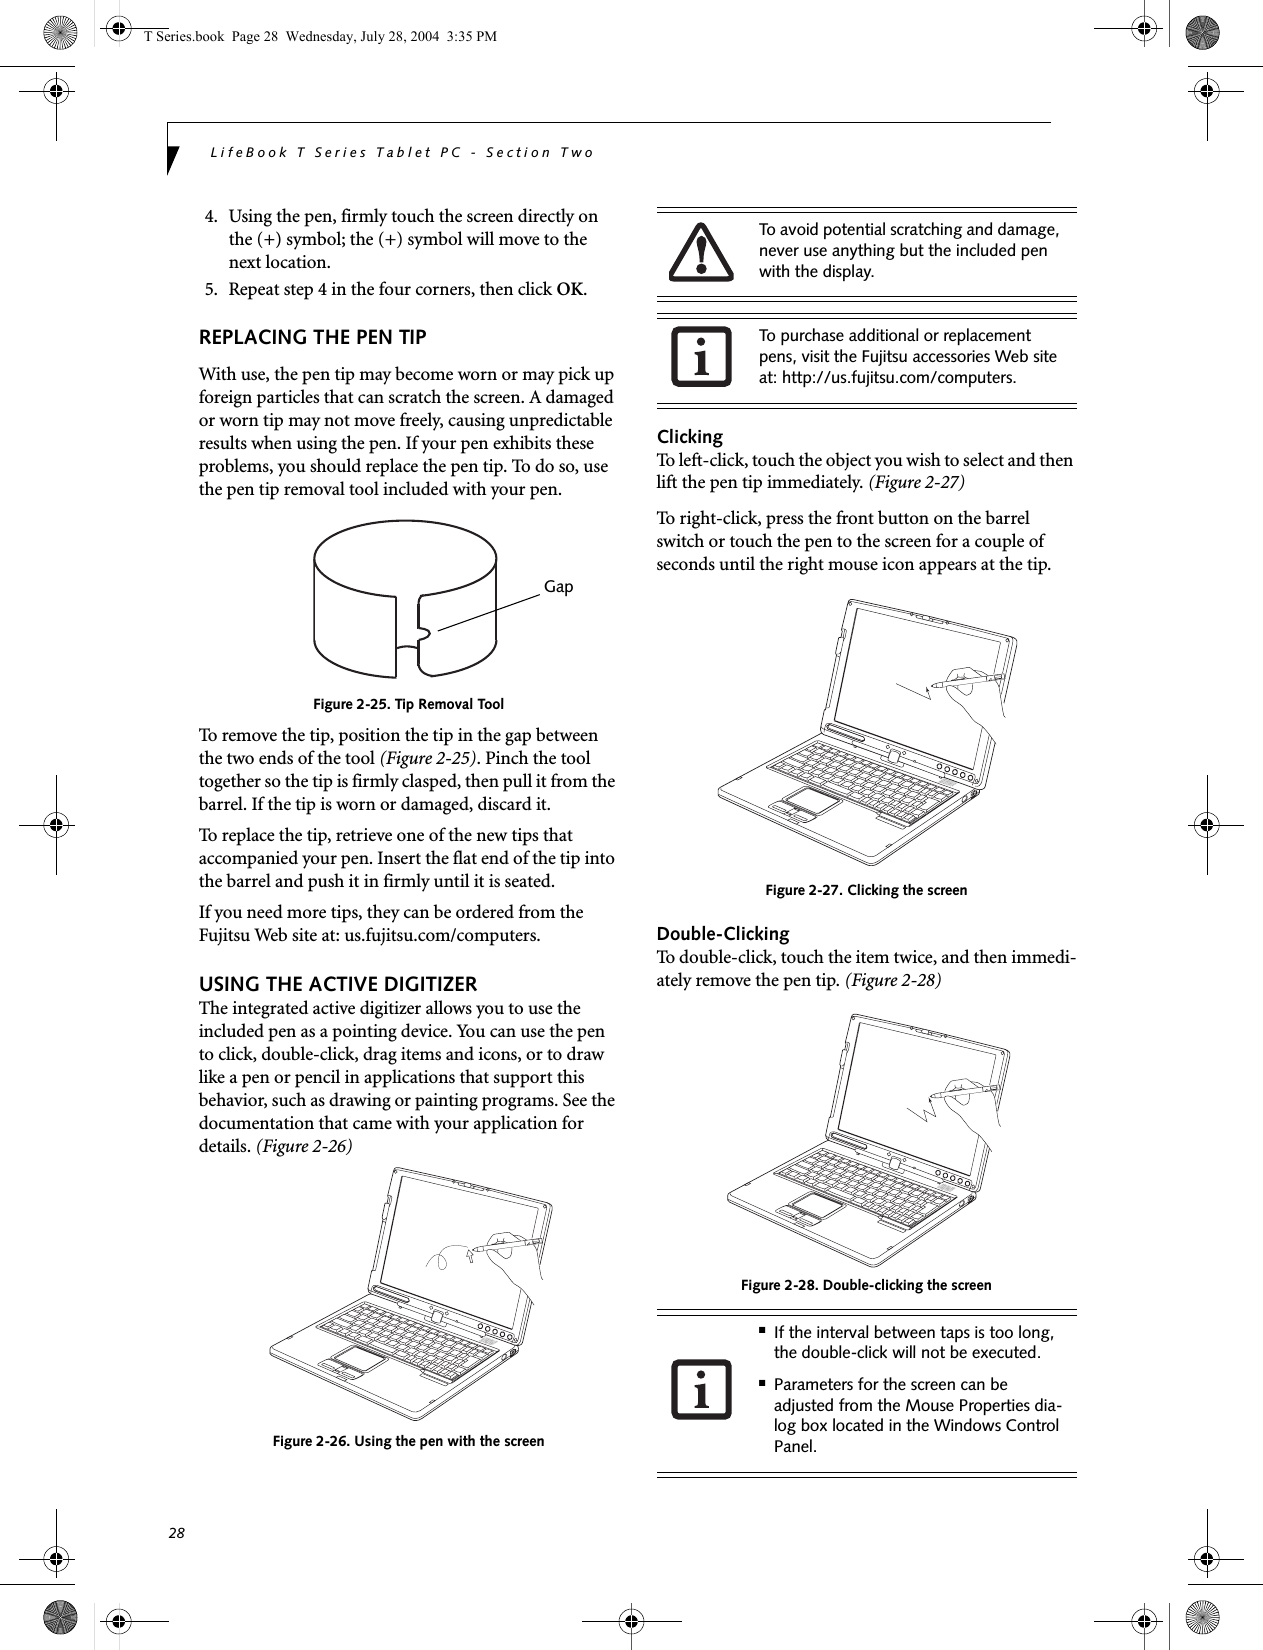
![27Getting to Know Your Tablet PCPen and Active DigitizerUSING THE PENYou can use the LifeBook T Series Tablet PC pen to generate and create electronic “ink”, to select items, and to navigate through programs on the Tablet PC. Programs that support handwriting recognition also allow you to write characters directly on the screen with the pen. You can also use the pen as a drawing tool.Figure 2-24. LifeBook T Series PenThe screen reacts when the pen tip is approximately 1/8 inch (3-5 mm) from the screen. The pen has three switches: a tip switch and a barrel button toggle switch with switches at both ends. By default, the tip switch corresponds to the left mouse button, and the front toggle (closest to the pen tip) barrel button switch corre-sponds to the right mouse button (when used in combi-nation with the tip switch). The rear toggle of the barrel button switch acts as an electronic ink "eraser".The functions of the rear toggle and the tip click pres-sure can be changed by clicking [Start] -> Control Panel, and double-clicking the Fujitsu Pen Settings icon. To change the rear toggle function, select the drop-down list to select a new function, then click [Apply]. If you don’t want the rear toggle to have any function, select Ignore from the list. Adjusting the click pressure determines how much pres-sure must be put on the pen tip in order for the screen to react. The softer it is set, less pressure is required; the harder it is set, more pressure is required. To change the click pressure, use the slider bar to make the click pres-sure harder or softer, then click [Apply]. Here are some hints that may help you use the pen more effectively:• To activate the tip switch, tap or hold the pen tip against the screen.• To activate the barrel button switch, press and hold the end of the button you wish to use (front toggle is the right mouse button switch; the rear toggle acts as an electronic “eraser”).• To move the cursor, hold the pen tip within 1/8 inch (3 - 5 mm) from the screen and move the pen.• To start a program, double-tap the pen tip (tap the pen tip twice rapidly) on the program icon as you would double-click a mouse.•To select an object, tap the pen tip on the object once. •To double-click an object, quickly tap the object twice.CALIBRATING THE PENIn order to ensure accurate tracking between the pen and cursor, you must run the Touch Screen Calibration Utility before you use the active digitizer for the first time, or after you change the display resolution.To run the calibration utility:1. Go to Start -> Control Panel and double-click on the Tablet and Pen Settings icon. 2. Click Calibrate.3. Adjust the display of your Tablet PC to a comfort-able angle.You are advised to use a screen protector on your system display to minimize the chance of its being scratched. Screen protectors are available from the Fujitsu Web site at us.fujitsu.com/computers. The LifeBook T Series Tablet PC pen is a high-quality electronic instrument that can be damaged if used improperly. Treat the pen as you would any precision device. Observe the following guidelines:• Do not gesture with the pen, use it as a pointer, or tap it on surfaces other than the Tablet PC screen.• Do not try to turn the thumb grip on the pen; it is designed for inserting and removing the pen from the pen holder.• Never store the pen with the tip bearing the weight of the pen (e.g., sitting tip down in a pencil cup). Storing the pen tip down could distort the internal mechanism over a period of time (especially in higher temperatures), causing the tip to act as if it is always depressed. The pen should be stored in the pen holder when not in use.Tip SwitchBarrel SwitchUse only the pen provided with your Tablet PC. Do not use substitutes that were not designed for the LifeBook T Series Tablet PC.T Series.book Page 27 Wednesday, July 28, 2004 3:35 PM](https://usermanual.wiki/Fujitsu-Client-Computing/WB0029.User-manual-part-2/User-Guide-546103-Page-8.png)
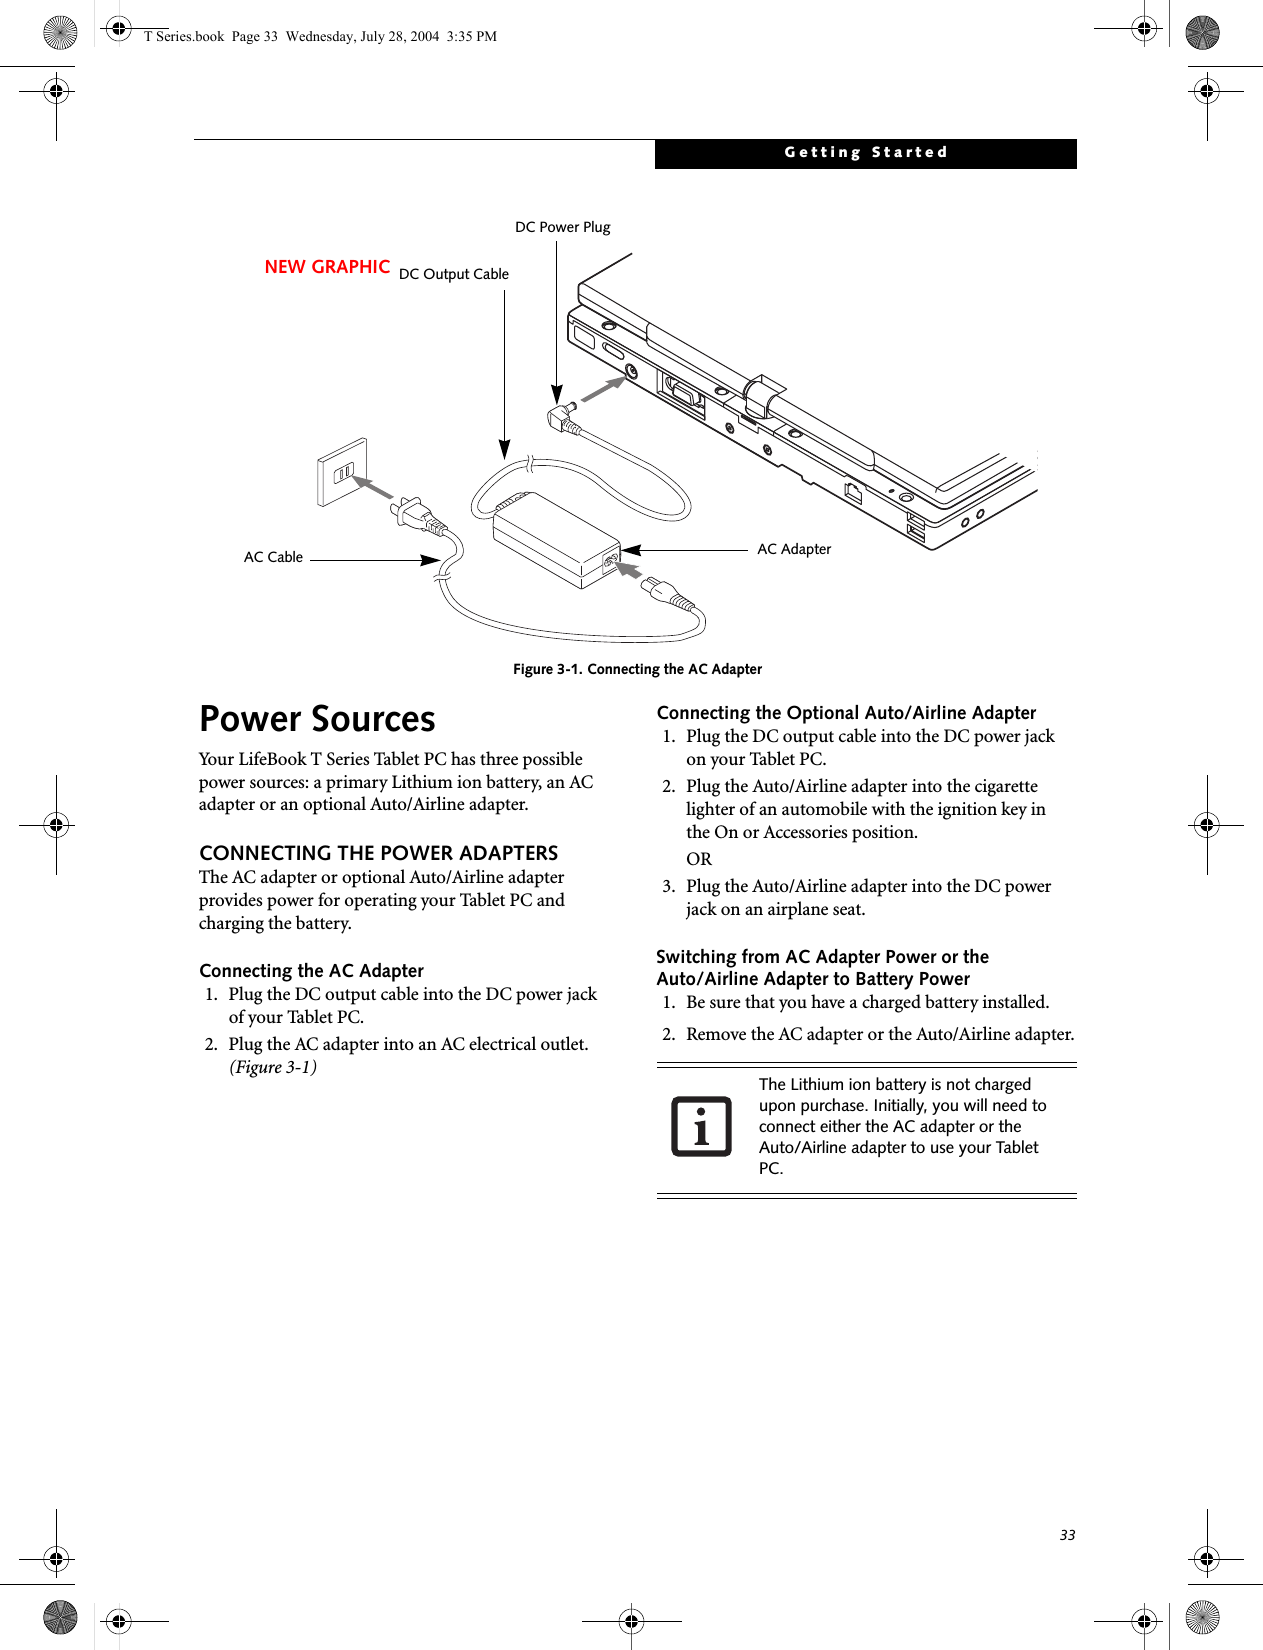

![34LifeBook T Series Tablet PC - Section ThreeStarting Your Tablet PCPOWER ONThe Suspend/Resume button is used to turn on your LifeBook T Series Tablet PC from its off state. Once you have connected your AC adapter or charged the internal Lithium ion battery, you can power on your Tablet PC. (See figure 2-4 on page 11 for location)Press the Suspend/Resume button to start your system. When you are done working you can either leave your Tablet PC in Standby mode, See “Standby Mode” on page 36, or you can turn it off. See “Power Off” on page 38When you Power On your Tablet PC, it will perform a Power On Self Test (POST) to check the internal parts and configuration for correct functionality. If a fault is found, your Tablet PC will emit an audio warning and/or an error message will be displayed. See “Power On Self Test Messages” on page 65 Depending on the nature of the problem, you may be able to continue by starting the operating system or by entering the BIOS setup utility and revising the settings.After satisfactory completion of the Power On Self Test (POST), your Tablet PC will load your operating system.BOOT SEQUENCEThe procedure for starting-up your Tablet PC is termed the Bootup sequence and involves your Tablet PC’s BIOS. When your Tablet PC is first turned on, the main system memory is empty, and it needs to find instruc-tions to start up your Tablet PC. This information is in the BIOS program. Each time you power up or restart your Tablet PC, it goes through a boot sequence which displays a Fujitsu logo until your operating system is loaded. During booting, your Tablet PC is performing a standard boot sequence including a Power On Self Test (POST). When the boot sequence is completed without a failure and without a request for the BIOS Setup Utility, the system displays the operating system’s opening screen.The boot sequence is executed when:■You turn on the power to your Tablet PC.■You restart your Tablet PC from the WindowsShut Down dialog box.■The software initiates a system restart. Example:When you install a new application.BIOS SETUP UTILITYThe BIOS Setup Utility is a program that sets up the operating environment for your Tablet PC. Your BIOSis set at the factory for normal operating conditions, therefore there is no need to set or change the BIOS’ environment to operate your Tablet PC.The BIOS Setup Utility configures:■Device control feature parameters, such as changingI/O addresses and boot devices.■System Data Security feature parameters, suchas passwords.Entering the BIOS Setup UtilityTo enter the BIOS Setup Utility do the following: 1. Turn on or restart your Tablet PC.2. Press the [F2] key once the Fujitsu logo appearson the screen. This will open the main menuof the BIOS Setup Utility with the currentsettings displayed.3. Press the [RIGHT ARROW] or [LEFT ARROW] key to scroll through the other setup menus to review or alter the current settings.BIOS GuideA guide to your Tablet PC’s BIOS is available online. Please visit our service and support Web site at us.fujitsu.com/computers. Once there, select Support, then select Tablet PCs under User’s Guides. Select Life-Book Tablet PC BIOS Guides from the pull-down menu for your Tablet PC series. If you are unsure of your Tablet PC’s BIOS number, refer to your packing slip.When you turn on your Tablet PC, be sure you have a power source. This means that a battery is installed and charged, or that the AC or Auto/Airline adapter is connected and has power.When the system display is closed, the Suspend/Resume button is disabled. This feature prevents the system from being accidentally powered up when not in use. Never turn off your Tablet PC during the Power On Self Test (POST) or it will cause an error message to be displayed when you turn your Tablet PC on the next time. See “Power On Self Test Messages” on page 65If your data security settings require it, you may be asked for a password before the BIOS main menu will appear.T Series.book Page 34 Wednesday, July 28, 2004 3:35 PM](https://usermanual.wiki/Fujitsu-Client-Computing/WB0029.User-manual-part-2/User-Guide-546103-Page-13.png)

![44LifeBook T Series Tablet PC - Section Four4. Store the memory upgrade module in a static guarded sleeve.5. Replace the cover. (Figure 4-4)6. Replace the screws.CHECKING THE MEMORY CAPACITYOnce you have changed the system memory capacity by either adding or removing a memory upgrade module, be sure to check that your tablet has recognized the change.You can check the memory capacity by clicking [Start]-> Control Panel, then double-clicking the System icon. Select the General tab and check the amount of memory under “Computer.”The amount of memory displayed should be approxi-mately the total of all memory modules installed. There may be a discrepancy of 8 MB which is allocated for fixed video memory.Your Tablet PC uses Dynamic Video Memory Technology (DVMT), which allows the video driver to dynamically determine the amount of memory that is used. Your Tablet PC can use a maximum of 64 MB of system memory for video functions. If the total memory displayed is incorrect, check that your memory upgrade module is properly installed. (If the module is properly installed and the capacity is still not correctly recognized, see Troubleshooting on page 58.T Series.book Page 44 Wednesday, July 28, 2004 3:35 PM](https://usermanual.wiki/Fujitsu-Client-Computing/WB0029.User-manual-part-2/User-Guide-546103-Page-23.png)


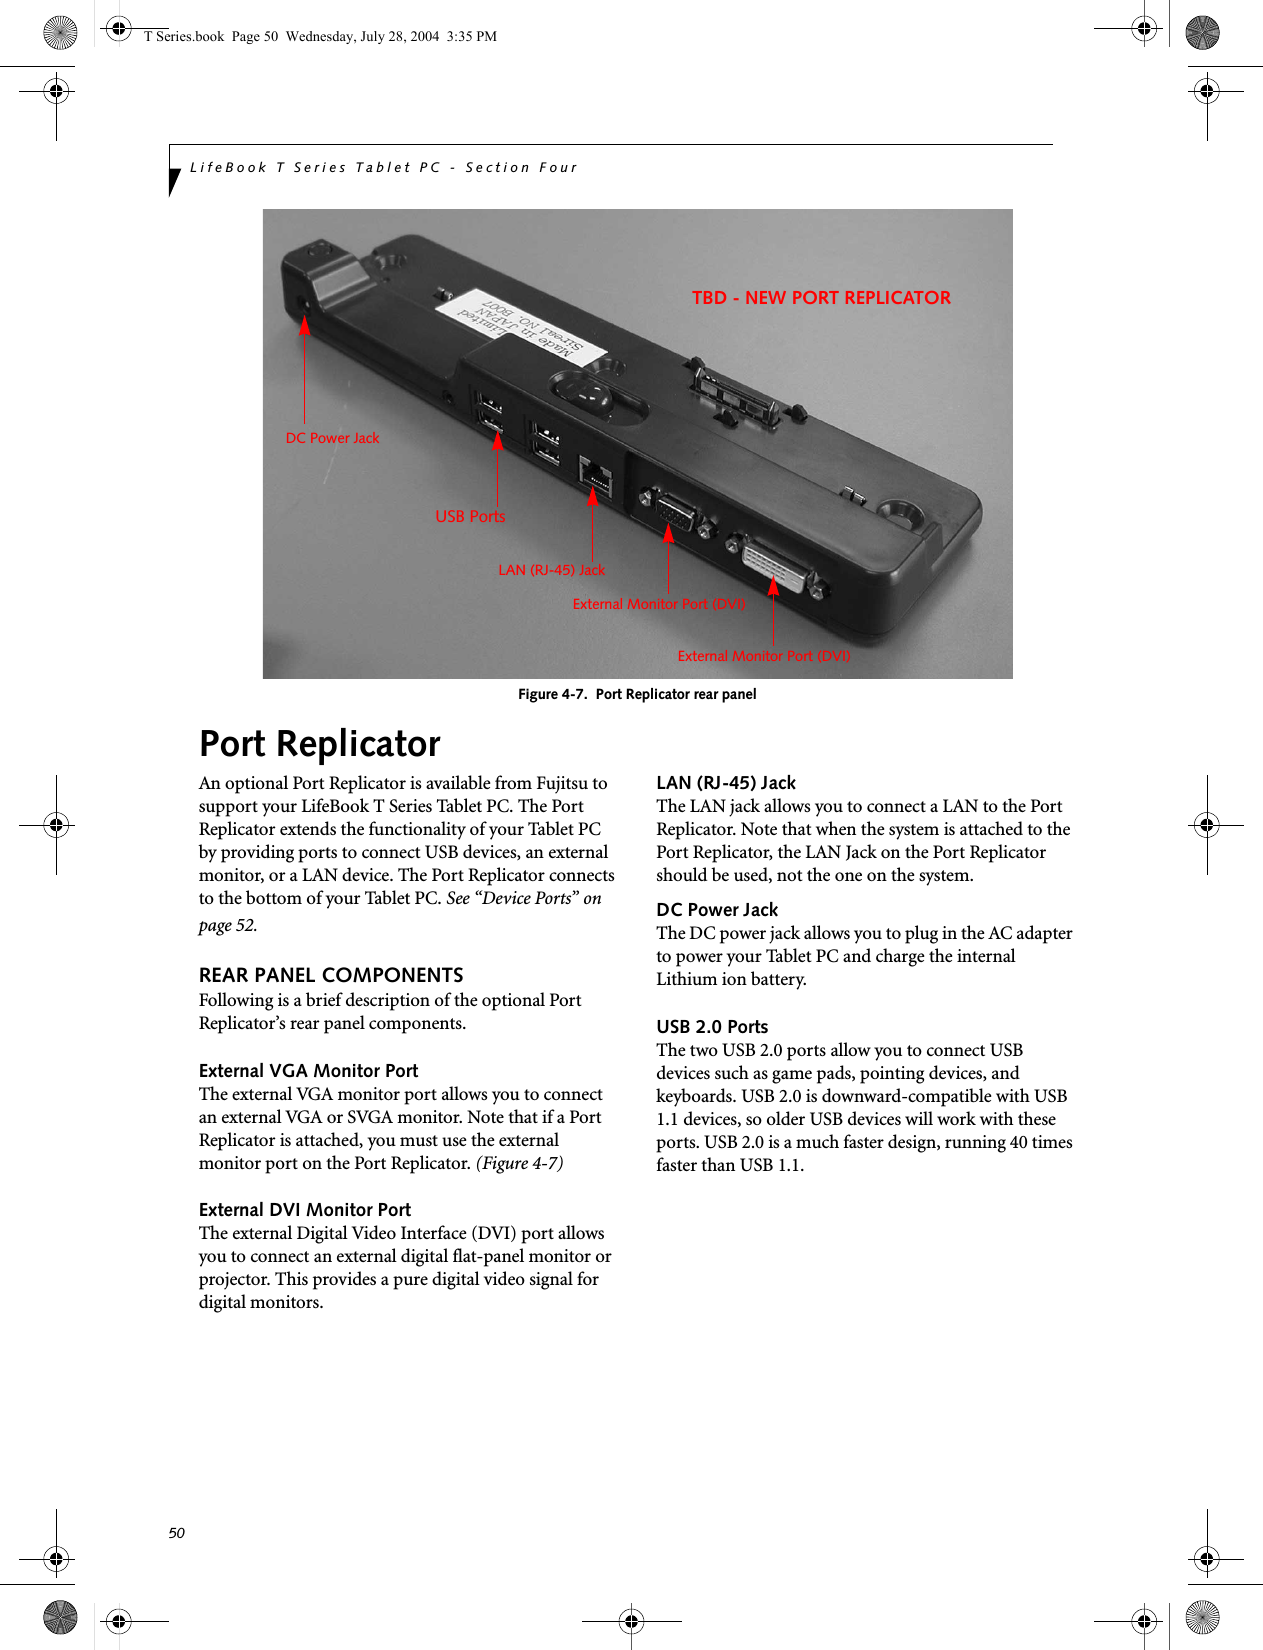
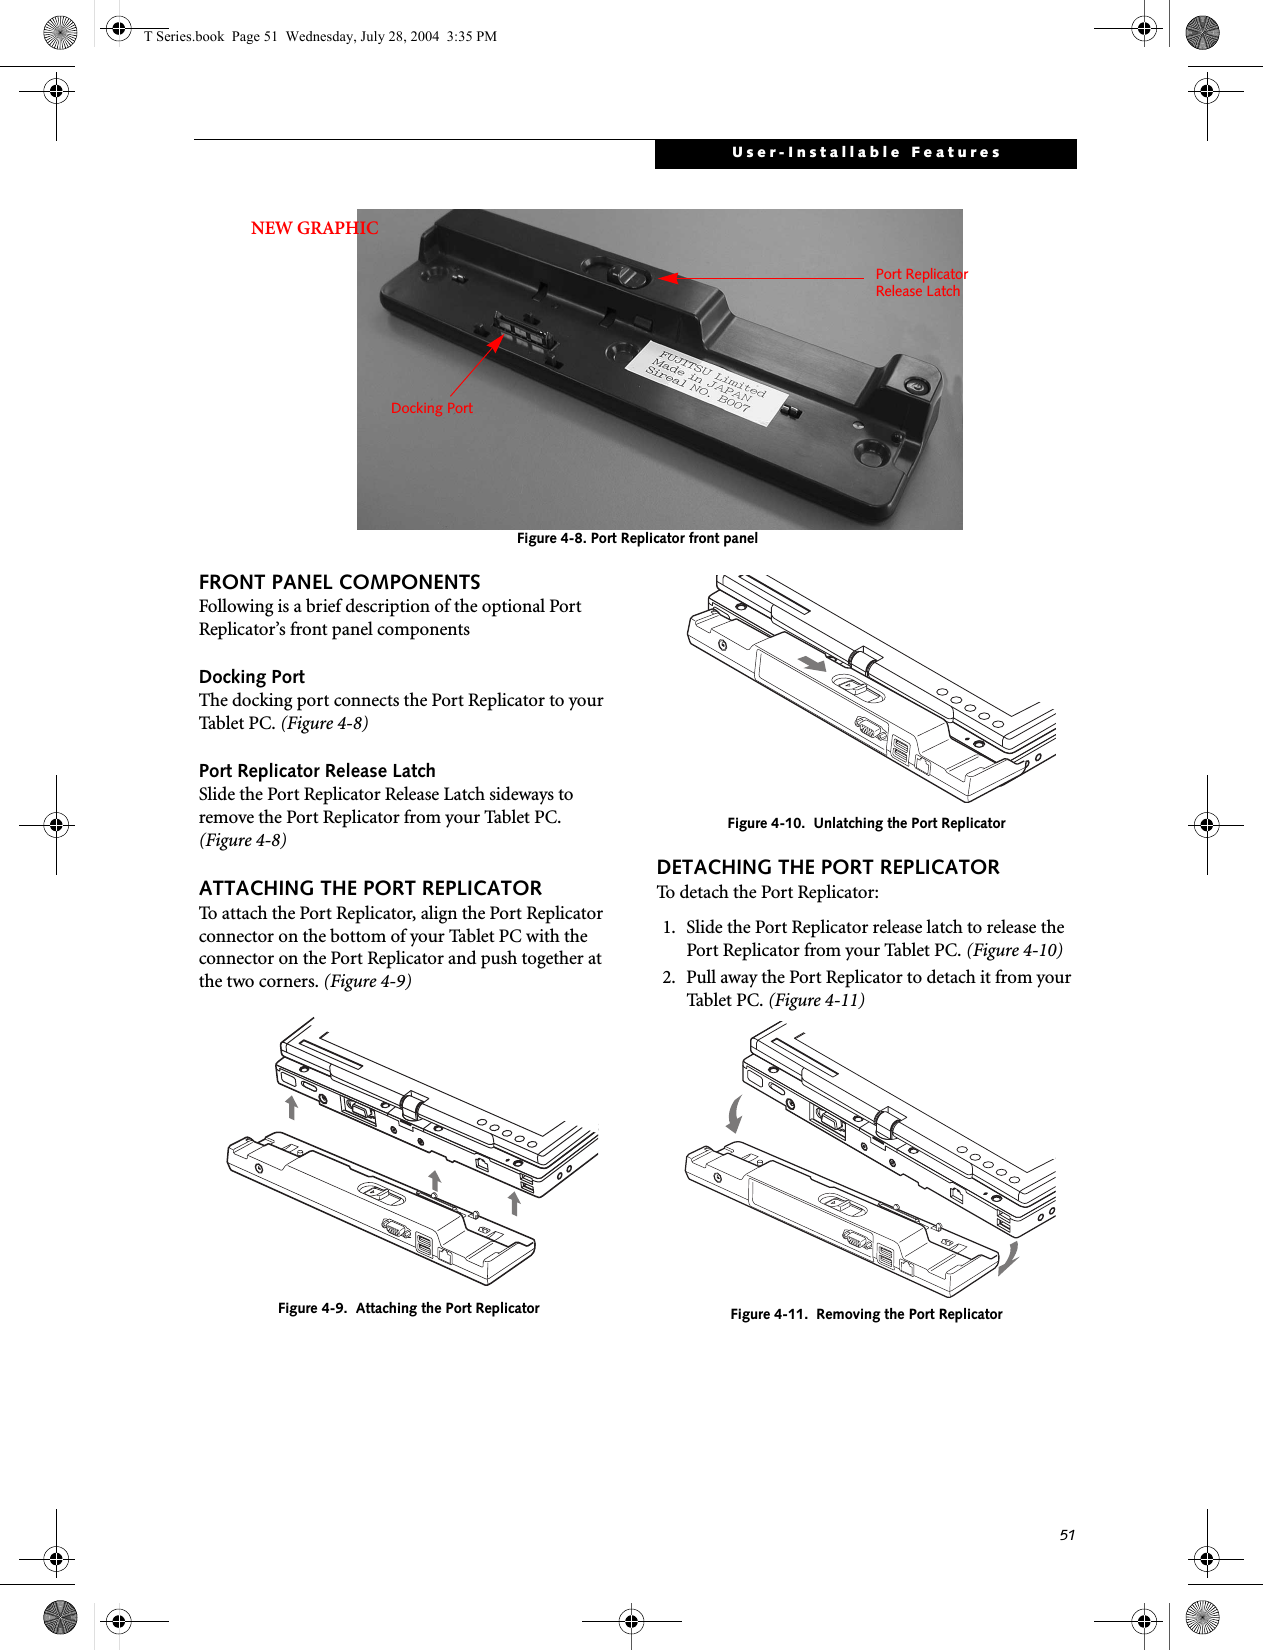
![53User-Installable FeaturesIt is important to keep in mind that while carrying out this form of communication, both devices must be placed so their infrared ports are directly facing each other without obstruction. The devices must also be separated by at least 6" but no more than 36" for maximum performance. The following conditions may interfere with infrared communications:■A television, radio remote control unit, or a wireless headphone is being used nearby.■Direct sunlight, fluorescent light, or incandescent light shines directly on the port.MICROPHONE JACKThe microphone jack allows you to connect an external mono microphone. Your microphone must be equipped with a 1/8"(3.5 mm) mono mini-plug in order to fit into the microphone jack of your Tablet PC. In order to connect a microphone follow these easy steps: (See Figure 2-5 on page 13 for location)1. Align the connector with the port opening.2. Push the connector into the port until it is seated.HEADPHONE JACKThe headphone jack allows you to connect headphones or powered external speakers to your Tablet PC. Your headphones or speakers must be equipped with a 1/8" (3.5 mm) stereo mini-plug. In order to connect head-phones or speakers follow these easy steps: (See Figure 2-5 on page 13 for location)1. Align the connector with the port opening.2. Push the connector into the port until it is seated.EXTERNAL VGA MONITOR PORTThe external VGA monitor port allows you to connect an external VGA or SVGA monitor. In order to connect an external monitor follow these easy steps: (See Figure 2-7 on page 15 for location). There is also an external VGA monitor on the port replicator (See Figure 4-7 on page 50 for location). 1. Remove the cover from the port opening, if present.2. Align the connector with the port opening.3. Push the connector into the port until it is seated.4. Tighten the two hold-down screws, located oneach side of the connector. EXTERNAL DVI PORTThe external Digital Video Interface (DVI) port on the optional port replicator allows you to connect an external digital monitor or projector. In order to connect a DVI monitor follow these easy steps: (See Figure 4-7 on page 50 for location). 1. Align the connector with the port opening.2. Push the connector into the port until it is seated.3. Tighten the two hold-down screws, located on each side of the connector.■Do not move either device while com-munication is active as it may interrupt data transmission.■Be careful not to scratch the infrared port lens. Scratches, dirt, or other sur-face marks can degrade operation.If you plug headphones into the headphone jack, the built-in stereo speakers will be disabled.When an external monitor is plugged in, pressing the [Fn] + [F10] keys allows you to change your selection of where to send your display video. Each time you press the key combination, you will step to the next choice, starting with the built-in display panel only, moving to the external monitor only, finally moving to both the built-in display panel and an external monitor.T Series.book Page 53 Wednesday, July 28, 2004 3:35 PM](https://usermanual.wiki/Fujitsu-Client-Computing/WB0029.User-manual-part-2/User-Guide-546103-Page-30.png)
