Fujitsu Client Computing WB0086 Fujitsu LifeBook T series T734/TH734 with Intel WP2 User Manual
Fujitsu Limited Fujitsu LifeBook T series T734/TH734 with Intel WP2
UserManual.wiki
>
Fujitsu Client Computing
>
WB0086 User Manual
User Manual
Navigation menu
Upload a User Manual
Namespaces
Wiki Guide
HTML
PDF
Info
Views
User Manual
Discussion / Help
Navigation


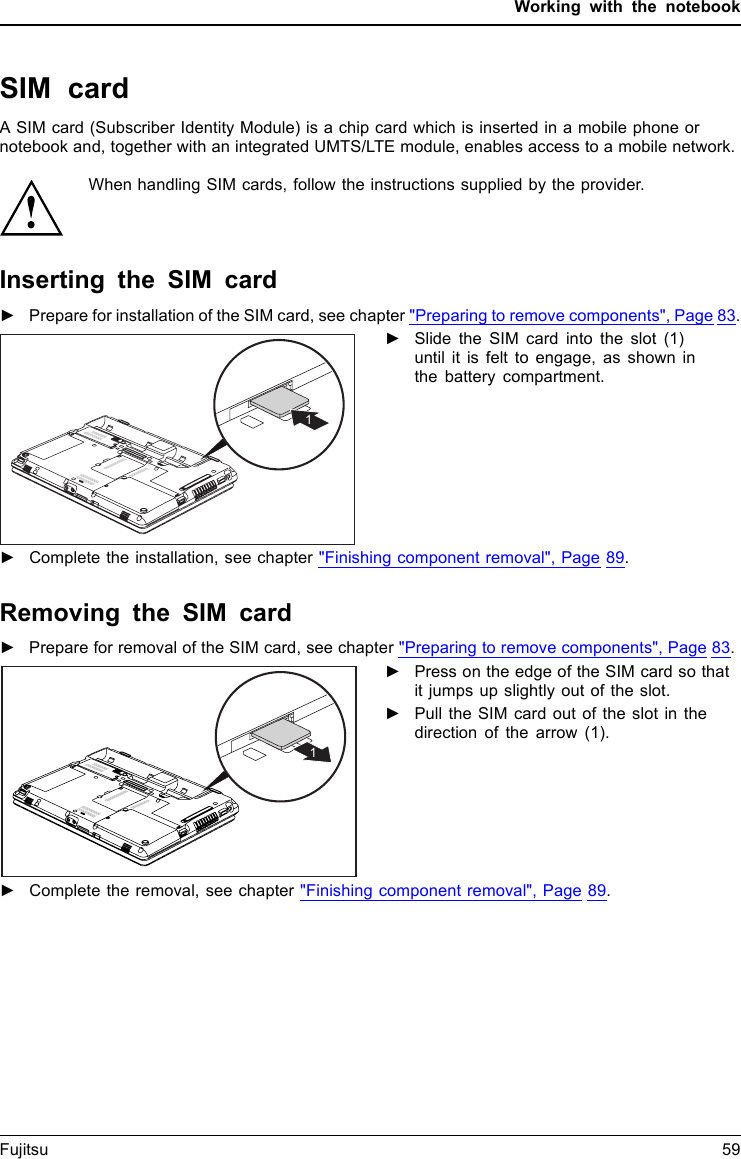


![6User EnrollmentBefore you can use any OmniPass features you must first enroll a user into OmniPass.Master Password ConceptComputer resources are often protected with passwords. Whether you are logging into your computer, accessing your email, e-banking, paying bills online, or accessing network resources, you often have to supply credentials to gain access. This can result in dozens of sets of credentials that you have to remember.During user enrollment a "master password” is created for the enrolled user. This master password “replaces” all other passwords for sites you register with OmniPass. Example: A user, John, installs OmniPass on his system (his home computer) and enrolls an OmniPass user with username “John_01” and password “freq14”. He then goes to his webmail site to log onto his account. He inputs his webmail credentials as usual (username “John_02” and password “lifebook”), but instead of clicking [Submit], he directs OmniPass to Remember Password. Now whenever he returns to that site, OmniPass will prompt him to supply access credentials. John enters his OmniPass user credentials (“John_01” and “freq14”) in the OmniPass authentication prompt, and is allowed into his webmail account. He can do this with as many sites or password-protected resources he likes, and he will gain access to all those sites with his OmniPass user credentials (“John_01” and “freq14”). This is assuming he is accessing those sites with the system onto which he enrolled his OmniPass user. OmniPass does not actually change the credentials of the password protected resource. If John were to go to another computer without he OmniPass account to access his webmail, he would need to enter his original webmail credentials (“John_02” and “lifebook”) to gain access. If he attempts his OmniPass user credentials on a system other than a system he’s enrolled on, he will not gain access.Appendix -T734.fm Page 6 Saturday, September 21, 2013 1:38 PM](https://usermanual.wiki/Fujitsu-Client-Computing/WB0086/User-Guide-2091405-Page-119.png)
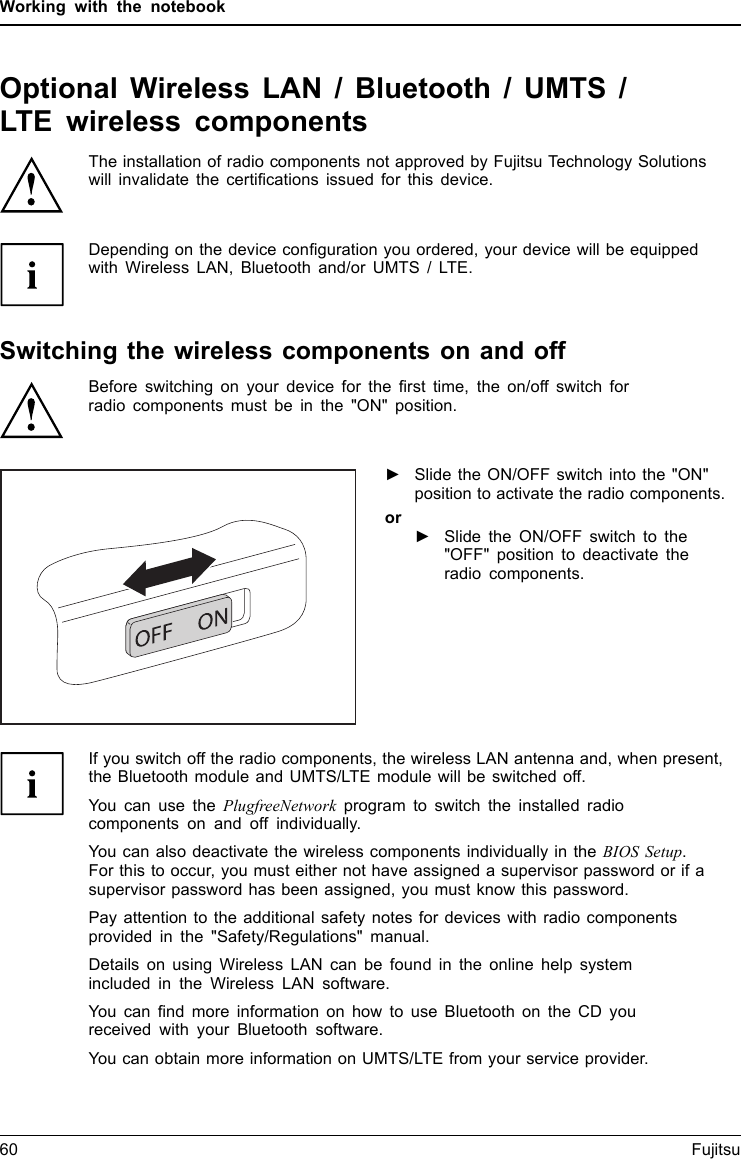
![7Basic EnrollmentThe Enrollment Wizard will guide you through the process of enrolling a user. Unless you specified otherwise, after OmniPass installation the Enrollment Wizard will launch on Windows login. If you do not see the Enrollment Wizard, you can bring it up by clicking Start on the Windows taskbar; select Programs; select Softex; click Enroll a new user.1Click [Enroll an existing Windows user] to proceed to username and password verification. By default, the OmniPass Enrollment Wizard enters the credentials of the currently logged in Windows user. (Note: Click [Create and Enroll a new Windows user] to create a new Windows user account and enroll that user into OmniPass.)2 Enter the password you use to log in to Windows. This will become the “master password” for this user. In most cases, the Domain: value will be your Windows computer name. In corporate environments, or when accessing corporate resources, the Domain: may not be your Windows computer name. Click [Next] to continue.3 In this step OmniPass captures your fingerprint. Refer to “Enrolling a Fingerprint” on page 8 for additional information.4 Next, choose how OmniPass notifies you of various events. We recommend you keep Taskbar Tips on Beginner mode taskbar tips and Audio Tips on at least Prompt with system beeps only until you get accustomed to how OmniPass operates. Click [Next] to proceed with user enrollment. You will then see a Congratulations screen indicating your completion of user enrollment.5Click [Done] to exit the OmniPass Enrollment Wizard. You will be asked if you’d like to log in to OmniPass with your newly enrolled user; click [Yes].Appendix -T734.fm Page 7 Saturday, September 21, 2013 1:38 PM](https://usermanual.wiki/Fujitsu-Client-Computing/WB0086/User-Guide-2091405-Page-120.png)
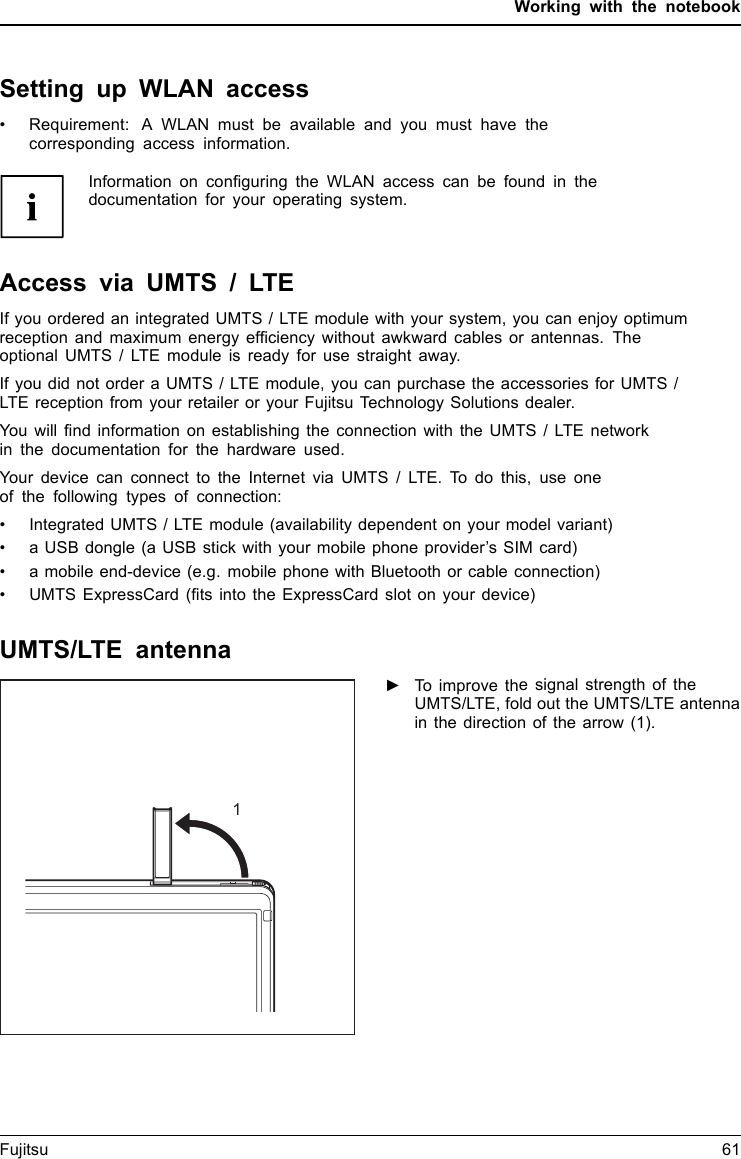
![8Enrolling a FingerprintEnrolling a fingerprint will increase the security of your system and streamline the authentication procedure. You enroll fingerprints in the OmniPass Control Center. With an OmniPass user logged in, double-click the system tray OmniPass icon. Select the User Settings tab and click Enrollment under the User Settings area. Click Enroll Authentication Device and authenticate at the authentication prompt to start device enrollment.1 During initial user enrollment, you will be prompted to select the finger you wish to enroll. Fingers that have already been enrolled will be marked by a green check. The finger you select to enroll at this time will be marked by a red arrow. OmniPass will allow you re-enroll a finger. If you choose a finger that has already been enrolled and continue enrollment, OmniPass will enroll the fingerprint, overwriting the old fingerprint. Select a finger to enroll and click [Next].2 It is now time for OmniPass to capture your selected fingerprint. It may take a several capture attempts before OmniPass acquires your fingerprint. Should OmniPass fail to acquire your fingerprint, or if the capture screen times out, click [Back] to restart the fingerprint enrollment process. Your system has a “swipe” fingerprint sensor. A swipe sensor is small and resembles a skinny elongated rectangle. To capture a fingerprint, gently swipe or pull your fingertip over the sensor (starting at the second knuckle) towards yourself. Swiping too fast or too slow will result in a failed capture. The Choose Finger screen has a [Practice] button; click it to practice capturing your fingerprint. When you are comfortable with how your fingerprint is captured, proceed to enroll a finger.Appendix -T734.fm Page 8 Saturday, September 21, 2013 1:38 PM](https://usermanual.wiki/Fujitsu-Client-Computing/WB0086/User-Guide-2091405-Page-121.png)
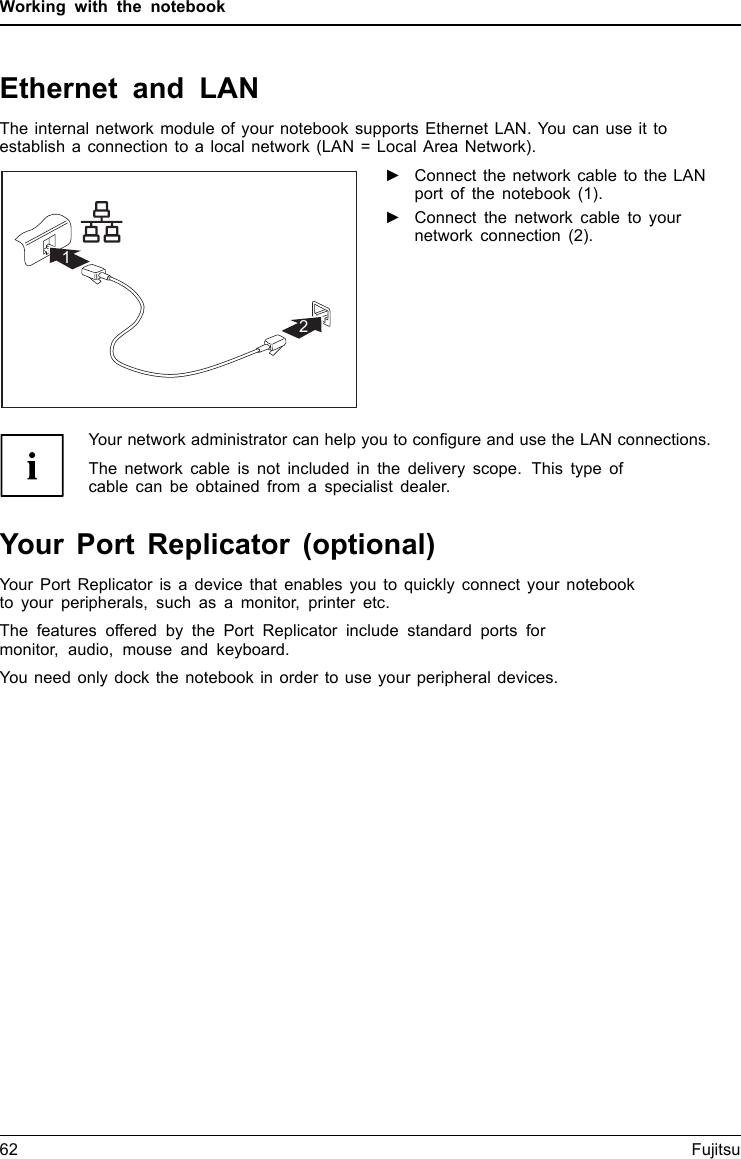
![10be invoked frequently: during Windows Logon, during OmniPass Logon, when unlocking your workstation, when resuming from sleep or hibernate, when unlocking a password-enabled screensaver, during password replacement for remembered site or application logins. When you see this toolbar, you are being prompted to authenticate.The Logon Authentication window indicates what OmniPass-restricted function you are attempting. Icons in the lower left (fingerprint and key) show what authentication methods are available to you. Selected methods are highlighted while unselected methods are not. When you click the icon for an unselected authentication method, the authentication prompt associated with that method is displayed.When prompted to authenticate, you must supply the appropriate credentials: an enrolled finger for the fingerprint capture window or your master password for the master password prompt (the key icon).Remembering a PasswordOmniPass can remember any application, GUI, or password protected resource that has a password prompt.Using the following procedure, you can store a set of credentials into OmniPass. These credentials will then be linked to your “master password” or fingerprint.Go to a site that requires a login (username and password), but do not log in yet. At the site login prompt, enter your username and password in the prompted fields, but do not enter the site (do not hit [Enter], [Submit], [OK], or Login). Right-click the OmniPass system tray icon and select Remember Password from the submenu. The Windows arrow cursor will change to a golden key OmniPass cursor. Click the OmniPass cursor in the login prompt area, but don’t click [Login] or [Submit].Appendix -T734.fm Page 10 Saturday, September 21, 2013 1:38 PM](https://usermanual.wiki/Fujitsu-Client-Computing/WB0086/User-Guide-2091405-Page-123.png)
![12your credentials will be filled in to the site login prompt, but you will have to click the website [OK], [Submit], or [Login] button to gain access to the site. Click Finish to complete the remember password procedure. The site location, the credentials to access the site, and the OmniPass authentication settings for the site are now stored in the OmniPass secure database. The OmniPass authentication settings (Settings for this Password Site) can always be changed in Vault Management.Logging in to a Remembered SiteWhether or not OmniPass prompts you to authenticate when you return to a remembered site is determined by Settings for this Password Site and can be changed in Vault Management. The following cases are applicable to using OmniPass to login to: Windows, remembered web sites, and all other password protected resources.With Master PasswordOnce you return to a site you have remembered with OmniPass, you may be presented with a master password prompt. Enter your master password and you will be allowed into the site.Logging into Windows with a Fingerprint DeviceWhen logging into Windows with a fingerprint device, the fingerprint capture window will now appear next to the Windows Login screen. Place your enrolled fingertip on the sensor to authenticate. You will be simultaneously logged into Windows and OmniPass. The capture window will also appear if you have used Ctrl-Alt-Del to lock a system, and the fingerprint device can be used to log back in as stated above.IF A MACHINE IS LOCKED AND OMNIPASS DETECTS A DIFFERENT USER LOGGING BACK IN WITH A FINGERPRINT, THE FIRST USER WILL BE LOGGED OUT AND THE SECOND USER LOGGED IN.Appendix -T734.fm Page 12 Saturday, September 21, 2013 1:38 PM](https://usermanual.wiki/Fujitsu-Client-Computing/WB0086/User-Guide-2091405-Page-125.png)
![14To create and manage identities, double-click the OmniPass key in the system tray. Click Vault Management; OmniPass will prompt you to authenticate. Once you gain access to Vault Management, click Manage Identities under Vault Settings. You can only manage the identities of the currently logged in OmniPass userTo add a new identity, click New Identity or double-click Click here to add a new identity. Name the new identity and click [OK], then click [Apply]. You can now switch to the new identity and start remembering passwords.To delete an identity, highlight the identity you want to delete and click [Delete Identity], then click [Apply].To set the default identity, highlight the identity you want as default and click [Set as Default]; click [Apply] to ensure the settings are saved. If you log in to OmniPass with a fingerprint device, you will automatically be logged in to the default identity for that OmniPass user. You can choose the identity with which you are logging in if you login using "master password".Choosing User Identity during LoginTo choose your identity during login, type your username in the User Name: field. Press [Tab] and see that the Domain: field self-populates. Click the Password: field to bring the cursor to it, and you will see the pull-down menu in the Identity: field. Select the identity to login as, then click OK.Switch User IdentityTo switch identities at any time, right-click the OmniPass system tray icon and click Switch User Identity from the submenu. The Switch Identity dialog will appear. Select the desired identity and then click OK.WHEN YOU DELETE AN IDENTITY, ALL OF ITS ASSOCIATED REMEMBERED SITES AND PASSWORD PROTECTED DIALOGS ARE LOST.Appendix -T734.fm Page 14 Saturday, September 21, 2013 1:38 PM](https://usermanual.wiki/Fujitsu-Client-Computing/WB0086/User-Guide-2091405-Page-127.png)
![18• Open the Windows Control Panel (accessible via [Start] > Settings > Control Panel) and double-click the Softex OmniPass icon.User ManagementThe User Management tab has two major interfaces: Add/Remove User and Import/Export User. Import/Export User functionality is documented in “Exporting and Importing Users” on page 15. Add/Remove User functionality is straightforward. If you click Adds a new user to OmniPass you will start the OmniPass Enrollment Wizard. The Enrollment Wizard is documented in “User Enrollment” on page 6. If you click Removes a user from OmniPass, OmniPass will prompt you to authenticate. Authenticate with the credentials (or enrolled fingerprint) of the user you wish to remove. OmniPass will prompt you to confirm user removal. Click OK to complete user removal.User SettingsThe User Settings tab has four interfaces: Audio Settings, Taskbar Tips, and Enrollment. User settings allow users to customize OmniPass to suit their individual preferences. Under User Settings (Audio Settings and Taskbar Tips) you can set how OmniPass notifies the user of OmniPass events (e.g., successful login, access denied, etc.). The details of each setting under the Audio Settings and Taskbar Tips interfaces are self-explanatory.The Enrollment interface allows you to enroll fingerprints. For the procedure to enroll and authentication device refer to Chapter 2.3. To enroll additional fingerprints, click Enroll Authentication Device, and authenticate with OmniPass. Select the fingerprint REMOVING A USER WILL AUTOMATICALLY DESTROY ALL OMNIPASS DATA ASSOCIATED WITH THAT USER. ALL IDENTITIES AND CREDENTIALS ASSOCIATED WITH THE USER WILL BE LOST.IF YOU’RE SURE YOU WANT TO REMOVE THE USER, WE RECOMMEND YOU EXPORT THE USER PROFILE.Appendix -T734.fm Page 18 Saturday, September 21, 2013 1:38 PM](https://usermanual.wiki/Fujitsu-Client-Computing/WB0086/User-Guide-2091405-Page-131.png)


![23Creating Backup Images of Factory Image and Discs1 On your desktop, there is a [My Recovery] icon that allows you to make a backup image of the Factory image for later use. Launch My Recovery from the desktop icon2 Select [Manage/Create]-> [Factory Image].The Backup Images menu displays a list from which you can choose which type of disc you want to burn: Bootable Disc, Applications Disc, or Recovery Disc.3 Select Recovery Disc, then click [Make DVD].4 Confirm that the # box has “2” (Note that in some cases the box may display a larger number for the factory image, depending upon its size.)5 The message “Recovery Disc #1 will be created. Enter your comments and the number of media on the DVD”. Click [YES] to burn the Factory Image.6 While the copy is being made, a “Writing to the media screen displays a progress bar. When the copy is complete, a dialog will appear informing you of the successful completion of the backup.7 Repeat the process for the remaining images on disc (Bootable Disc and Applications Disc). The number of images available may vary depending on your system model; some models do not have the applications loaded on the hard drive.•SOME CONFIGURATIONS OF CERTAIN STYLISTIC MODELS DO NOT HAVE APPLICATIONS LOADED ON THE HARD DRIVE; RATHER, THEY ARE AVAILABLE AT THE FUJITSU SUPPORT SITE FOR DOWNLOAD. PLEASE TAKE THAT INTO ACCOUNT WHEN READING THE FOLLOWING PROCEDURES.•ALL USER-CREATED DATA WILL BE DELETED FROM YOUR SYSTEM WHEN THE FACTORY IMAGE IS RESTORED.Appendix -T734.fm Page 23 Saturday, September 21, 2013 1:38 PM](https://usermanual.wiki/Fujitsu-Client-Computing/WB0086/User-Guide-2091405-Page-136.png)
![24Recovering Your Factory ImageIn the event you need to restore your original Factory Image, perform the following steps. Note that there may be some third-party applications that need to be installed from the application media bundled with your system.In order to recover your Factory Image, perform the steps outlined in See “Running Recovery and Utility from hard disk” on page 27. Creating a System Backup ImageOptional Step: Launch the Fujitsu Bonus Apps utility from your desktop, and select the components you wish to install.User-Configured System Backups: On your desktop, there is a [MyRecovery] icon that allows you to make backups of your current system image either to another location on your hard drive or on removable media. A system image is the configuration of your C: drive at a particular point of time. You may want to make system image backups occasionally in order to have points to which you can return without having to go all the way back to the Factory Image.By default, system images are saved in the MyRecovery folder (either on D:\ or external hard drive, depending on your hardware type).1 Click the [MyRecovery] icon on your desktop. The My Recovery screen will appear (See Figure 2). Note that the screen illustrated may vary, depending upon your system configuration.)2 Click the [Backup] button on the MyRecovery screen.ALL USER-CREATED DATA WILL BE DELETED FROM YOUR SYSTEM WHEN THE FACTORY IMAGE IS RESTORED.My RecoveryAppendix -T734.fm Page 24 Saturday, September 21, 2013 1:38 PM](https://usermanual.wiki/Fujitsu-Client-Computing/WB0086/User-Guide-2091405-Page-137.png)
![25Figure 2. MyRecovery screen3 On the next screen that appears, you can enter up to 200 characters of information about the backup file. This information will help you to identify the image at a later date.4 Click the [Next] button and the system will reboot.5 After rebooting, the “Create the image” window appears, in which you can either click [Create the image on D drive] or [Select the drive] if you want to save to an external hard disk drive. (Note that the [Create the image on D drive may not be available on all configurations.)6 An image appears showing you graphically how the image will be stored. Click the [Next] button.7 Click [Execute] to start the backup. Managing Your Backup ImagesWith the MyRecovery tool you can also make copies of backup images, archive them on DVD, or delete them from your hard drive.Create a backup image of the C: drive!A backup image will be created on D: drive (default).My Recovery immediately restores the computer to thepoint of time when the backup image is created. Thereis no need to go through the complicated settings andreinstallation of drivers and applications.System restoration becomes simple and easy usingMy Recovery!Appendix -T734.fm Page 25 Saturday, September 21, 2013 1:38 PM](https://usermanual.wiki/Fujitsu-Client-Computing/WB0086/User-Guide-2091405-Page-138.png)
![261 To begin, double-click the [MyRecovery] icon on your desktop.2 Click the [Manage/Create] button in the MyRecovery window.3 When the MyRecovery Manager window appears, click [Manage Backup Images].4 In the next window, a list of your backup images appears. Below the list are three buttons allowing you to [Make DVD], [Copy], or [Delete] your backup images.5 Select an image title from the list, then click the action button you would like to perform.6 Note that you need to have an external disk drive connected for the [Copy] button to be enabled. If you elect to copy the image, you will be prompted to enter the destination. If you are ready to copy, click [OK] to proceed. A progress screen appears while the backup copy is being made.7 Note that if you copy an image to an external hard drive, both the original and the copy will appear in the [Backup Images] window with identical names, dates, and file sizes, but with the different drive letter to distinguish them. Before you select [Make DVD], make sure you have a recordable DVD drive connected and blank DVDs available.Using the Recovery and Utility ToolsThe Recovery and Utility tools consist of a variety of tools that will help you recover your Factory Image, recover system images, and delete the data from your hard disk.Methods for accessing the utilitiesRecovery and Utility Tools are preinstalled in a hidden partition by the factory, or they can be accessed by using the bootable disc. Please note that you can delete Recovery and Utility tools from your hard disk drive if you modify the partitions. In this case you will not be able to use the hidden partition for booting to Recovery and Utility Tools, but you will still be able to boot from the Bootable Disc.Appendix -T734.fm Page 26 Saturday, September 21, 2013 1:38 PM](https://usermanual.wiki/Fujitsu-Client-Computing/WB0086/User-Guide-2091405-Page-139.png)
![27Determining whether Recovery and Utility is pre-loaded1 Turn on or reboot your system. When the Fujitsu logo appears, press [F12] key. The Boot Menu will appear.2 Press the Tab key to select Application menu. 3 Check whether the <Recovery and Utility> option is present. If it is not present, it means that the utility must be used from the disc. Proceed to “Running Recovery and Utility from the Bootable Disc” if <Recovery and Utility> is unavailable.Running Recovery and Utility from hard disk1 Turn on or reboot your system. When the Fujitsu logo appears, press [F12] key. The Boot Menu will appear.2 Press the Tab key to select Application menu.3 Cursor down to <Recovery and Utility> and press the [Enter] key.4 While the files are being loaded from the disc, a progress bar will appear at the bottom of the screen.5 When the System Recovery Options dialog opens, select a new keyboard layout, if necessary, then click [Next].6 When the Operating System dialog appears, select “Use recovery tools...”, then click [Next]. 7 If necessary, enter your password, then click [OK].8 When System Recovery Options window appears, click on Recovery and Utility.9 The Recovery and Utility screen appears on the screen with three tabs: Diagnostics, Recovery and Utility. Please note that Diagnostics tab is not supported on certain LIFEBOOK/STYLISTIC models when running Recovery and Utility from the hard disk. In order to restore the operating system, please use the middle icon “Restoring the Factory Image (only C:\drive)” under the Recovery tab. Appendix -T734.fm Page 27 Saturday, September 21, 2013 1:38 PM](https://usermanual.wiki/Fujitsu-Client-Computing/WB0086/User-Guide-2091405-Page-140.png)
![28Running Recovery and Utility from the Bootable discTo verify/change the boot-up priority (rather than booting-up from the hard drive or an external floppy disk drive), perform the following steps:1 Power on your system. When the Fujitsu logo appears on the screen. press the [F12] key to get to the Boot Menu. 2 Highlight the CD/DVD option.3 Insert the bootable disc into the drive tray.4 Click [OK]. While the files are being loaded from the disc, a progress bar will appear at the bottom of the screen.5 When the System Recovery Options dialog opens, select a new keyboard layout, if necessary, then click [Next].6 When the Operating System dialog appears, click [Next]. 7 If necessary, enter your password, then click [OK].8 When System Recovery Options window appears, click on Recovery and Utility.9 When the Recovery and Utility screen appears, three tabs will be present: Diagnostics, Recovery, and Utility.Recovery and Utility tabsDiagnostics tab: The Diagnostics tool is designed for use by IT professionals. It is not likely you will need to use this tool. When you select devices from the Diagnosis window then click [Execute], several tests are performed on the selected components.Recovery tab: The Recovery tab contains three tools: Recovering User-Configured System Backups, Restoring the Factory Image (only C: drive), and Restoring the Factory Image (full hard drive recovery). You can use these tools to restore the Factory Image from the hidden partition, restore backup image(s) created by you or images stored on DVD discs, and perform a full hard drive recovery. Please refer to instructions above for details on how to create Factory Image Recovery DVDs, user backup DVDs and system image backup. Appendix -T734.fm Page 28 Saturday, September 21, 2013 1:38 PM](https://usermanual.wiki/Fujitsu-Client-Computing/WB0086/User-Guide-2091405-Page-141.png)
![29Utility tab: The Utility tab contains three tools: Hard Disk Data Delete, Restore Recovery and Utility, and Windows Complete PC Restore.•The Hard Disk Data Delete utility is used to delete all data on the hard disk and prevent the data from being reused. NOTE: Do not use the Hard Disk Data Delete utility unless you are absolutely certain that you want to erase your entire hard disk, including all partitions.•Restore Recovery and Utility allows you to restore the first hidden partition.•Windows Complete PC Restore utility allows you to restore an image created with Windows Backup and Restore Center. Complete PC Restore will overwrite the data on your hard disk drive.Using Windows 7 Recovery DVD on Windows 8 64-bit system (downgrade option).When using the Windows 7 Recovery DVD on a system that was supplied with Windows 8 x64 pre-installed, you should first deactivate Secure Boot and activate CSM and Fast Boot using the following procedure:1 To access the BIOS Setup, press the [F2] key after switching on the system.2 Use right/left arrow keys to switch to the "Security" page.NOTE: If your system doesn't have Supervisor Password, you cannot change the Secure Boot Configurations. In this case you need to select Set Supervisor Password and set the password.3 Use up/down arrow keys to select Secure Boot Configurations.4 Select Secure Boot or Secure Boot Option and using [Enter] key set it to [Disabled], then the use [ESC] key to exit Secure Boot Configurations.5 Use arrow keys to switch to the "Advanced" page.6 Select CSM and set it to [Enabled].7 Select the Fast Boot and set it to [Disabled].Appendix -T734.fm Page 29 Saturday, September 21, 2013 1:38 PM](https://usermanual.wiki/Fujitsu-Client-Computing/WB0086/User-Guide-2091405-Page-142.png)
![308 Use the arrow keys to switch to the "Exit" page. 9 Exit the BIOS Setup via Exit Saving Changes. You can then start the system from Windows 7 Recovery DVD and install Windows 7 on the system.Recovering your Factory Image using Recovery and Utility (for new hard drive or non-bootable hard drive)If you have installed a new hard drive or your hard drive is not bootable, perform the following steps. Note that first you will need to create new partitions on the hard drive, then restore the Factory Image:1 Power on your system. When the Fujitsu logo appears on the screen. press the [F12] key. 2 Highlight the CD/DVD option.3 Insert the bootable disc in your DVD drive, then click [OK].4 When System Recovery Options window appears, click on <Recovery and Utility>.5 When the System Recovery Options dialog opens, select a new keyboard layout, if necessary, then click [Next].6 When the Operating System dialog appears, click [Next]. 7 If necessary, enter your password, then click [OK].8 When System Recovery Options window appears, click on Recovery and Utility.9 Click the Recovery tab in the Recovery and Utility window, then click Restoring the Factory Image icon.10 Click [Execute].11 Read the precautions, then select “I Agree”. 12 Click [Next], then click [Execute] to start the recovery process. 13 “1. Recovery Disc Check” will be in bold and the rest will be grayed out. Follow the instructions and “Insert the Recovery Disc #1”. In some cases, you may prompted to “Insert the Recovery Disc #2”, depending upon the size of the Recovery ImageAppendix -T734.fm Page 30 Saturday, September 21, 2013 1:38 PM](https://usermanual.wiki/Fujitsu-Client-Computing/WB0086/User-Guide-2091405-Page-143.png)
![3114 Click [Next] to begin the check. Click [Next] again when the check is complete.15 “2. Initializing hard disk drive” will be in bold with the message “Please insert the Bootable Disc into your optical drive”. Insert the bootable disc. Click [Next] to proceed. A dialog box appears, with a checking disc message.16 “Warning All DATA on the Hard Disk will be completely erased!!!” will appear. Select [OK]. The partition creation process will begin.17 “3. Restoring Factory Image to hidden partition” will be in bold with the message “Please insert the Recovery Disk#1 into the optical drive”. Click [Next] to proceed.After completion, the tool will automatically go back to "3.Restoring Factory Image to hidden partition" but will include the note “Please insert your Third Party Applications Disc or CyberLink DVD, then click [OK]. After installation of each disc, insert the next and continue until all have been installed. If you don't have your Third Party Applications Disc and/or CyberLink DVD, or you have already inserted these discs, please click [Skip] to continue. NOTE: In some cases (products without an optical drive) you will not have a CyberLink DVD". At this point, you can either:• Insert Application Disc(s) to restore back to hidden partition, or, • Click [Skip] to skip restoring Application disc(s) and continue with restore.18 If you select to insert Application Disc, after copying of application disc(s) to hidden partition is completed, the message will appear again. Repeat inserting application disc(s) until all discs have been copied, then click [Skip] to continue with Restore.Appendix -T734.fm Page 31 Saturday, September 21, 2013 1:38 PM](https://usermanual.wiki/Fujitsu-Client-Computing/WB0086/User-Guide-2091405-Page-144.png)
![3219 After clicking [Skip], a confirmation message will appear "If you want to skip copying or you have finished copying, click [OK]. Click [Cancel] to go back to Restoring Factory Image to hidden partition.” 20 Click [OK] and Restoring Factory Image will begin.21 When restoration is complete, you will see the message “Restoration has been completed. Click [OK] to reboot the computer.” Click [OK].Downloading Driver UpdatesThe Fujitsu Software Download Manager (FSDM) utility is available to allow you to download the latest drivers, utilities, and applications from the Fujitsu Support site. If you have a Windows 8 or Windows 7 operating system, you will need to go to the Support Site (http://support.fujitsupc.com/CS/Portal/support.do?srch=DOWNLOADS). Appendix -T734.fm Page 32 Saturday, September 21, 2013 1:38 PM](https://usermanual.wiki/Fujitsu-Client-Computing/WB0086/User-Guide-2091405-Page-145.png)
![34Saving your Factory ImageWhen you purchased your new system, a copy of the pre-installed Factory Image was loaded into a hidden partition on your hard disk drive. Having a copy of the original Factory Image available to you means that in the event of system failure, you will be able to restore it to its original state.To make a copy of the Factory Image to DVD discs, you will need four or five blank discs (DVD-R or DVD+R discs are recommended) to create the copy. After creating the copy, be sure to label the discs and keep them in a safe place to ensure they do not get damaged.Creating Backup Images of Factory Image and Bootable DiscUsing the [Manage/Change] button, you can create backup images of the Factory Image and/or Bootable Disc.1Launch System Backup and Restore from the desktop icon and click [Yes] on the User Account Control dialog.2 Click [Next] on the Backup Your Data screen.3 Select the [Create/Manage] tab, then click [Make Recovery Disc set] to burn your factory image to DVD.4 On “Step 1: Please select a media type for Recovery Disc” screen select Media Type from the drop down box, then click [Next]. (Note: This screen shows the number of discs required for backup.)5 On “Step 2: Confirm your Recovery Disc” both the Bootable Disc and Recovery disks are selected by default under “List of Recovery Discs”. When the backup is created for the first time, these options should stay selected. Click [Next].ALL USER-CREATED DATA WILL BE DELETED FROM YOUR SYSTEM WHEN THE FACTORY IMAGE IS RESTORED.Appendix -T734.fm Page 34 Saturday, September 21, 2013 1:38 PM](https://usermanual.wiki/Fujitsu-Client-Computing/WB0086/User-Guide-2091405-Page-147.png)
![356 Click [OK] on the “Attention about media” confirmation screen.7 Click [Start] on “Step 3: Making Recovery Disc” . 8 The process will prompt you to insert your discs.9 Once the process completes successfully, click [Finish] on “Step 4: Making Recovery Disc process has been completed” screen.Recovering Your Factory ImageIn the event you need to restore your original Factory Image, perform the following steps. In order to recover your Factory Image, perform the steps outlined in See “Running Recovery and Utility from hard disk” on page 39. Backing Up a System ImageOptional Step: Launch the Fujitsu Bonus Apps utility from your desktop, and select the components you wish to install.User-Configured System Backups: On your desktop, there is a [System Backup and Restore] icon that allows you to make backups of your current system image either to another location on your hard drive or on removable media. A system image is the configuration of your C: drive at a particular point of time. You may want to make system image backups occasionally in order to have points to which you can return without having to go all the way back to the Factory Image.DURING THE FOLLOWING PROCESS, YOU SHOULD CONNECT AN AC ADAPTER SINCE THE PROCESS MAY TAKE A LONG TIME.ALL USER-CREATED DATA WILL BE DELETED FROM YOUR SYSTEM WHEN THE FACTORY IMAGE IS RESTORED.Appendix -T734.fm Page 35 Saturday, September 21, 2013 1:38 PM](https://usermanual.wiki/Fujitsu-Client-Computing/WB0086/User-Guide-2091405-Page-148.png)
![36By default, system images are saved in the D: drive in the System Backup and Restore folder. You can also elect to save the image to an external hard drive.1Launch System Backup and Restore from the desktop icon and click [Yes] on User Account Control dialog2 Click [Next] on Backup Your Data screen3 Select the [Backup] tab on System Backup and Restore screen.4 Click the [Backup User System] button.5 On the “Step 1: Select a backup destination” screen select your destination drive. By default the Destination is set to D: drive. You can also select the [Other drive] option to back up to an external drive. Select whether you would like the system to [Shutdown] or [Restart] after the process is completed.6 On the “Step 2: Name your backup images” screen that appears, you can enter up to 300 characters of information about the backup file. This information will help you to identify the image at a later date.7 On “Step 3: Backup the entire C: drive image” verify your backup settings and click [Next].8 Click [OK] on “Step 4: Please confirm the following before starting your backup” to restart you computer and begin backup.9 Follow the instructions on the screen. If you chose the "Other drive" option, connect the drive to the notebook and click [Refresh] for the drive to appear for you to select.10 After backup completes and the system restarts, “Step 5: Backup Completed. Confirm the results” screen should appear on your desktop confirming that backup image has been created successfully. Click [Close] to close System Backup and Restore dialog.11 Click [OK] to quit the System Backup and Restore utility.Appendix -T734.fm Page 36 Saturday, September 21, 2013 1:38 PM](https://usermanual.wiki/Fujitsu-Client-Computing/WB0086/User-Guide-2091405-Page-149.png)
![37Managing Your Backup ImagesWith the System Backup and Restore tool you can also make copies of backup images, archive them on DVD, or delete them from your hard drive.1Launch System Backup and Restore from the desktop icon and click [Yes] on User Account Control dialog.2 Click [Next] on the Backup Your Data screen.3 Select the [Create/Manage] tab and click on [Manage User System Backup].4 In the next window there are three options allowing you to [Copy], [Delete], or [Add Comment] to your images. Click the action button you would like to perform:Selecting [Copy] option (Note that you must have an external disk drive connected for the [Copy] button to work, otherwise an attempt to copy will result in an error.)a. On “Step 1: Select a backup file that you wish to copy”, select the location of a backup file. A list of backup files will appear. Select the file you wish to copy from the list and click [Next].b. On “Step 2: Select a drive to copy a backup file”, select the destination drive and click [Next].c. On “Step 3: Start to copy the following information” confirm the information and click [Start].d. “Step 4: Processing backup data copying” screen displays the progress bar.e. Click [Finish] on “Step 5: Copy completed. Confirm the results” screen.Selecting “Delete” option a. On “Step 1: Please select your target data” screen select location of a backup file. A list of backup files willAppendix -T734.fm Page 37 Saturday, September 21, 2013 1:38 PM](https://usermanual.wiki/Fujitsu-Client-Computing/WB0086/User-Guide-2091405-Page-150.png)
![38appear. Select the file(s) you wish to delete and click [Next].b. Click [Start] on “Step 2: Delete backup data” screen.c. Click [OK] to the confirmation message.d. Click [Finish] on “Step 4: Delete process has been completed” screen.Selecting “Add Comment” optiona. On the “Step 1: Select target data” screen select location of a backup file. A list of backup files will appear. Select the file you wish to add comments to and click [Next].b. On the “Step 2: Add comment” screen, type in a maximum of 300 characters in “Comment” text area and click [Add].c. Click [Finish] on the “Step 3: Adding comment has been completed” screen.Restoring your backup images 1Launch System Backup and Restore from the desktop icon and click [Yes] on the User Account Control dialog2 Click [Next] on the Backup Your Data screen3 Select the Restore tab and click on “Restore User System Backup”4 On “Step 1: Please confirm the following before starting restore process”, confirm information and click [OK]. The system will restart to begin restoring your backup.5 After the system restarts, the “Explanation about Restore User System Backup” screen is shown. Once you read the EULA, select [Agree] choice and click [Next].6 Select an image to restore from the Backup data list and click [Next]Appendix -T734.fm Page 38 Saturday, September 21, 2013 1:38 PM](https://usermanual.wiki/Fujitsu-Client-Computing/WB0086/User-Guide-2091405-Page-151.png)
![397 Click [Start] on “Confirm before restoration” screen8 Once restoration finishes, click [Close] in “Finished restoration” screen, the computer will restart to Windows.Using the Recovery and Utility ToolsThe Recovery and Utility tools consist of a variety of tools that will help you recover your Factory Image, recover system images, and delete the data from your hard disk.Methods for accessing the utilitiesRecovery and Utility Tools are preinstalled in a hidden partition by the factory, or they can be accessed by using the bootable disc. Please note that you can delete Recovery and Utility tools from your hard disk drive if you modify the partitions. In this case you will not be able to use the hidden partition for booting to Recovery and Utility Tools, but you will still be able to boot from the Bootable Disc.Determining whether Recovery and Utility is pre-loaded 1 Turn on or reboot your system. When the Fujitsu logo appears, press [F12] key. 2 From the Boot Menu that appears, check whether the <Recovery and Utility> option is present. If it is not present, it means that the utility must be used from the disc. Proceed to “Running Recovery and Utility from the Bootable Disc” if <Recovery and Utility> is unavailable.Running Recovery and Utility from hard disk1 Turn on or reboot your system. When the Fujitsu logo appears, press the [F12] key.2 Cursor down to <Recovery and Utility> and press the [Enter] key.3 Choose your Language (English or French).4 Three tool options appear: Diagnostics, Recovery and Utility (Please see Recovery and Utility tools section below for instructions on how to use these tools).Appendix -T734.fm Page 39 Saturday, September 21, 2013 1:38 PM](https://usermanual.wiki/Fujitsu-Client-Computing/WB0086/User-Guide-2091405-Page-152.png)
![40Running Recovery and Utility from the Bootable discTo verify/change the boot-up priority (rather than booting-up from the hard drive or an external floppy disk drive), perform the following steps:1 Power on your system. When the Fujitsu logo appears on the screen. press the [F12] key.2 Highlight the CD/DVD option from the Boot menu, then press [Enter].3 Insert the bootable disc into the drive tray.4 Click [OK]. NOTE: In the following step, the Fujitsu logo screen may appear on the display for a couple of minutes before the progress bar appears.5 Select CD/DVD boot mode: UEFI Mode) and press [Enter]. While the files are being loaded from the disc, the Fujitsu logo screen will appear followed by a progress bar screen at the bottom of the screen.Recovery and Utility toolsDiagnostics tool: The Diagnostics tool is designed for use by IT professionals. It is not likely you will need to use this tool. If you should need to use this tool, perform the following steps:1 Press the “Diagnostics Tool” button to start the Diagnostics tool. A progress bar appears while the Diagnostics tool is starting up.2 Read the note, then click [OK].3 Choose one or more of the following options for diagnostics on the “Fujitsu Hardware Diagnostics Tool window”: CPU, Memory, Display, Hard Disk, CD/DVD/BD, Floppy Disk, Keyboard, and Mouse. Click the [Option] button to specify how many times the tool should run diagnostics on each selected component. Press [Execute] to start the Diagnostics tool.Appendix -T734.fm Page 40 Saturday, September 21, 2013 1:38 PM](https://usermanual.wiki/Fujitsu-Client-Computing/WB0086/User-Guide-2091405-Page-153.png)
![414 After the execution is completed, the selected components are circled in red to indicated that they have been diagnosed and the result dialog window is opened.5 Click [End] to close the Diagnostics tool, then click [Yes] to confirm the end of diagnostics session.Recovery tool: The Recovery tool contains three options. User System Backups: Recovering C: Drive from D: Drive or external storage device), Restore C: Drive: Restore factory image (only C: drive), and Restore Full Hard Drive: Restore factory image (full hard drive).You can use these tools to restore the Factory Image from the hidden partition, restore backup image(s) created by you or images stored on DVD discs, and perform a full hard drive recovery. Please refer to instructions above for details on how to create Factory Image Recovery DVDs, user backup DVDs and system image backup. To recover from D: drive or external storage device:1 Click [User System Backups] 2 The progress bar screen is followed by EULA screen. Click [Agree] to accept the EULA.3 On “Select an image to restore” screen select the image to restore from the list of images and click [Next].4 Click [Start] on the “Confirm before restoration” screen to begin the restoration process.5 Once restoration finishes, click [Close] in the “Finished restoration” screen; the computer will restart to Windows.To restore from the Factory Image (hidden partition):1 Click [Restore C: drive].2 The progress bar screen is followed by “Restore Factory Image (only C: drive) screen confirming that the Factory Image will be restored to the C: drive and D: drive data will remain. Click [Next].Appendix -T734.fm Page 41 Saturday, September 21, 2013 1:38 PM](https://usermanual.wiki/Fujitsu-Client-Computing/WB0086/User-Guide-2091405-Page-154.png)
![423 Read the instruction screen and select [Agree], then [Next].4 Click [OK] to the warning message to restore factory image to the C: drive.5 When the progress bar screen, wait for the process to complete.6 Click [Finish] when the process completes; the computer will restart to Windows.To restore full hard drive:Follow the steps in section “Recovering your Factory Image using Recovery and Utility (for new hard drive or non-bootable hard drive)”Utility tool: The Utility tool contains two options: Hard Disk Data Delete and Partition Creation.•The Hard Disk Data Delete utility is used to delete all data on the hard disk and prevent the data from being reused. NOTE: Do not use the Hard Disk Data Delete utility unless you are absolutely certain that you want to erase your entire hard disk, including all partitions. To delete hard disk data:a. Click the [Hard Disk Data Delete] buttonb. The progress bar appears, followed by the EULA screen.c. Agree to the EULA and click [Next].d. Choose the hard disk from which the data should be deleted in the list of hard disks and click [Next].•The Partition Creation utility is used to change the C: and D: drive partition sizes. To run this utility:a. Click the [Partition Creation] button.b. A progress bar screen appears, followed by the EULA screen. Agree to the EULA.c. On the Recovery Tool - Partition Creation screen move the slider to set disk size, then click [OK].d. Click YES in the Partition Creation confirmation dialog.Appendix -T734.fm Page 42 Saturday, September 21, 2013 1:38 PM](https://usermanual.wiki/Fujitsu-Client-Computing/WB0086/User-Guide-2091405-Page-155.png)
![43Recovering your Factory Image using Recovery and Utility (for new hard drive or non-bootable hard drive)If you have installed a new hard drive or your hard drive is not bootable, perform the following steps. 1 Power on your system. When the Fujitsu logo appears on the screen, press the [Enter] key.2 Highlight the CD/DVD option from the Boot Menu and press [Enter].3 Insert the bootable disc in your DVD drive, then click [OK].4 Select CD/DVD boot mode: UEFI Mode and press [Enter]. While the files are being loaded from the disc, Fujitsu logo screen will appear followed by a progress bar screen at the bottom of the screen.5 Choose your language ([English or French).6 Three tool options appear: Diagnostics, Recovery and Utility. Select [Recovery].7 Select [Restore full hard drive].8 Click [Next] to confirm full hard drive restoration. (All data on HDD will be deleted).9 Agree to EULA by selecting [Agree] option and clicking [Next].10 Click [Next] on the Recovery Disk Check screen to verify that bootable disk has been inserted into the optical drive.11 The Checking for Recovery Disk screen appears followed by the prompt to insert the first disk. Click [OK] to continue. Repeat this step for all disks. After all recovery disks have been checked and the check has been completed, click [Next]12 Reinsert the first recovery disk and click [Next]13 Click [OK] when you receive the final warning informing you that all data on drives C: and D: will be lost. This starts the recovery process.14 Follow the prompts to insert the next recovery disks and click [OK].Appendix -T734.fm Page 43 Saturday, September 21, 2013 1:38 PM](https://usermanual.wiki/Fujitsu-Client-Computing/WB0086/User-Guide-2091405-Page-156.png)
![4415 After the copying of the factory image to the HDD completes and the factory image is restored, follow the prompt to insert bootable disk.16 After the restore process is complete, click [Finish] to restart the system. The computer will restart automatically and then go through the first boot process.Changing BIOS settings between Windows 8 32-bit and Windows 8 64-bit In order to install a 32-bit version of Windows 8 and to be able to boot from 32-bit media, you must disable the Security Boot option in the BIOS settings. Switching back to the 64-bit version of Windows 8 from the 32-bit version of Windows 8 will require you to revert the above change and to re-enable Secure Boot. If you do not re-enable Secure Boot, the following product functionalities will not be enabled as it relies on native UEFI (Unified Extensible Firmware Interface) mode boot:1 Secure Boot2 Seamless Boot experience3 Network unlock for Bitlocker for systems with a Trusted Platform Module (TPM)4 eDrive supportWARNING: Reverting back to UEFI mode will require a hard drive reformat. All data and personal settings will be lost. It is highly recommended that you back up your data before you revert back to UEFI mode.For further information please refer to our support pages: http://www.fujitsu.com/us/support/1 To access the BIOS Setup, press the [F2] key after switching the system on.Appendix -T734.fm Page 44 Saturday, September 21, 2013 1:38 PM](https://usermanual.wiki/Fujitsu-Client-Computing/WB0086/User-Guide-2091405-Page-157.png)
![452 Use the right/left arrow keys to switch to the Security page.* If your system doesn't have Supervisor Password, you cannot change the Secure Boot Configurations. In this case you need to select Set Supervisor Password and set the password.3 Use the up/down arrow keys to select Secure Boot Configurations.4 Select Secure Boot or Secure Boot Option and using the [Enter] key set it to [Disabled] for 32-bit and to [Enabled] for 64-bit, then use the [ESC] key to exit Secure Boot Configurations.5 Use the arrow keys to switch to the Advanced page.6 Select CSM and set it to [Enabled] for 32-bit and [Disabled] for 64-bit.7 Select the Fast Boot and set it to [Enable] for 32-bit and [Disabled] for 64-bit.8 Use the arrow keys to switch to the Exit page.9 Exit the BIOS Setup via Exit Saving Changes. Downloading Driver UpdatesThe Fujitsu Software Download Manager (FSDM) utility is available to allow you to download the latest drivers, utilities, and applications from the Fujitsu Support site. If you have a Windows 8 or Windows 7 operating system, you will need to go to the Support Site (http://support.fujitsupc.com/CS/Portal/support.do?srch=DOWNLOADS). Appendix -T734.fm Page 45 Saturday, September 21, 2013 1:38 PM](https://usermanual.wiki/Fujitsu-Client-Computing/WB0086/User-Guide-2091405-Page-158.png)
![54Configuring the Wireless LANThe optional WLAN device can be configured to establish wireless network connectivity using the software that is built into Windows. Support for most industry standard security solutions is contained in this software.Pre-defined parameters will be required for this procedure. Please consult with your network administrator for these parameters:Configuring the WLAN Using Windows The WLAN device can be configured to establish wireless network connectivity using the software that is built into Windows Vista. Support for most industry standard security solutions is contained in this software.Pre-defined parameters are required for this procedure. Consult your network administrator for these parameters:1 From the Modern Start screen, press [Windows]+[X], then select Control Panel from the menu.2 If the Control Panel is not in Classic View, select Classic View from the left panel. Double-click the Network and Sharing Center icon.3 Select "Setup a new connection or network".4 Depending upon what type of connection you would like to make, make a selection. For an infrastructure network, select “Manually connect to a wireless network”.5 Enter the required information. It may be necessary to consult with your network administrator for some of the information.6 In the event you require assistance, go to the Network and Sharing Center window (Control Panel > Network and Sharing Center), and type in relevant keywords in the Search box. Connection to the networkAfter you have configured your computer, you can connect to an active network by performing the following steps:Appendix -T734.fm Page 54 Saturday, September 21, 2013 1:38 PM](https://usermanual.wiki/Fujitsu-Client-Computing/WB0086/User-Guide-2091405-Page-167.png)
![551 Click on the WLAN icon in the system tray.2 Select “Connect to a network”.3 Select a network from the list that appears, and click the [Connect] button.Troubleshooting the WLANCauses and countermeasures for troubles you may encounter while using your wireless LAN are described in the following table. Problem Possible Cause Possible SolutionUnavailable network connectionIncorrect network name (SSID) or network keyAd hoc connection: verify that the network names (SSID’s) and network keys (WEP) of all computers to be connected have been configured correctly. SSID’s and WEP key values must be identical on each machine.Access Point (Infrastructure) connection: set the network name (SSID) and network key to the same values as those of the access point. Set the Network Authentication value identically to that of the Access Point. Please consult your network administrator for this value, if necessary. Weak received signal strength and/or link qualityAd hoc connection: Retry connection after shortening the distance to the destination computer or removing any obstacles for better sight.Access Point (Infrastructure) connection: Retry connection after shortening the distance to the access point or removing any obstacles for better sight.Appendix -T734.fm Page 55 Saturday, September 21, 2013 1:38 PM](https://usermanual.wiki/Fujitsu-Client-Computing/WB0086/User-Guide-2091405-Page-168.png)
![56Unavailable network connection(continued)The WLAN device was deactivated or is disabledCheck if the wireless switch is turned On. Go to Start > Control Panel, and double-click on Windows Mobility Center. If the wireless network is off, click the [Turn wireless on] button.The computer to be connected is turned offCheck if the computer to be connected is turned ON.Incorrectly configured network settingsRecheck the configuration of your network settings.RF interference from Access Points or other wireless networksThe use of identical or overlapping RF channels can cause interference with the operation of the WLAN device. Change the channel of your Access Point to a channel that does not overlap with the interfering device.Wireless network authentication has failedRe-check your Network Authentication, Encryption, and Security settings. Incorrectly configured security settings such as an incorrectly typed WEP key, a mis-configured LEAP username, or an incorrectly chosen authentication method will cause the LAN device to associate but not authenticate to the wireless network.Incorrect IP address configurationThis only applies to networks using static IP addresses. Please contact your network administrator for the correct settings.Problem Possible Cause Possible SolutionAppendix -T734.fm Page 56 Saturday, September 21, 2013 1:38 PM](https://usermanual.wiki/Fujitsu-Client-Computing/WB0086/User-Guide-2091405-Page-169.png)