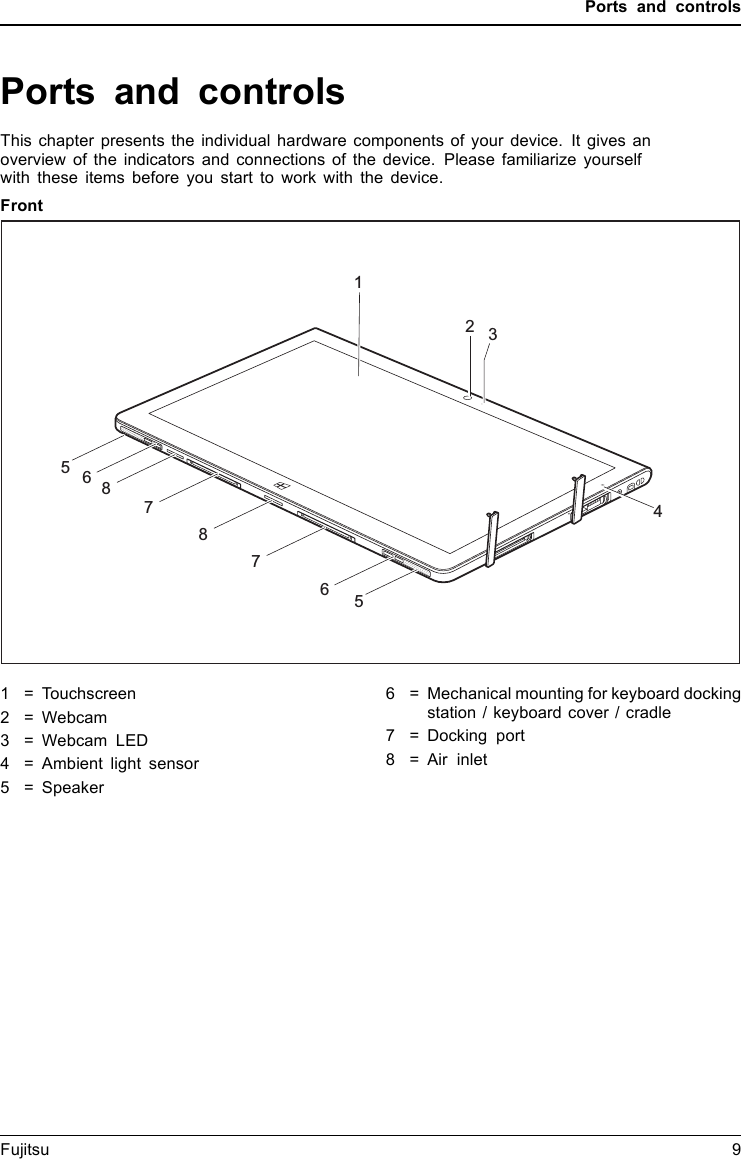
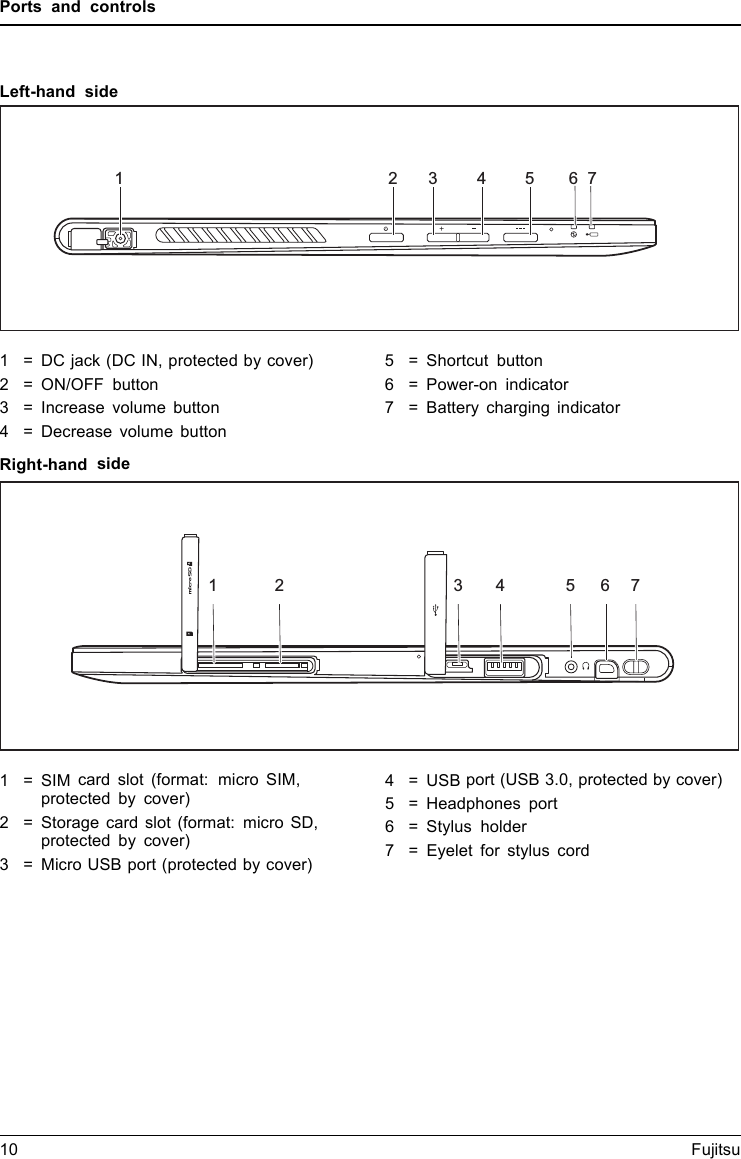
Fujitsu Client Computing WB0090 FUJITSU STYLISTIC Q775 User Manual

Fujitsu Limited FUJITSU STYLISTIC Q775

User Manual

SystemOperating ManualFUJITSU Tablet STYLISTIC Q775
Contact address in North AmericaFUJITSU AMERICA INC:1250 East Arques Avenue SunnyvaleCA 94085-3470, U.S.A.Telephone: 800 831 3183 or 408 746 6000"http://solutions.us.fujitsu.com""http://solutions.us.fujitsu.com/contact"Have a question? Email us at: "AskFujitsu@us.fujitsu.com"Copyright©2014Fujitsu America, Inc. All rights reserved. B5FK-5481-01ENZ0-00
FUJITSU Tablet STYLISTIC Q775Operating Manual94891217214361687275828898Declaration of conformityFujitsu Contact Information Notational conventionsPorts and controlsImportant notesFirst-time setup of your device Working with the Tablet PC Accessories for your Tablet PC (optional)Security functions Connecting external devices Settings in BIOS Setup Utility Troubleshooting and tips Technical dataManufacturer’s notes AppendixFCC and IC Regulatory Information Index 1132
Copyright and Trademark InformationFujitsu America, Incorporated has made every effort to ensure the accuracy and completenessof this document; however, as ongoing development efforts are continually improving thecapabilities of our products, we cannot guarantee the accuracy of the contents of thisdocument. We disclaim liability for errors, omissions, or future changes.Fujitsu, the Fujitsu logo and STYLISTIC are registered trademarks of Fujitsu Limitedor its subsidiaries in the United States and other countries.Intel and Intel Core are trademarks or registered trademarks of Intel Corporation orits subsidiaries in the United States and other countries.Microsoft and Windows are either registered trademarks or trademarks of MicrosoftCorporation in the United States and/or other countries.The ExpressCard word mark and logo are owned by the Personal ComputerMemory Card International Association (PCMCIA) and any use of such marks byFujitsu America, Incorporated is under license.Google is a trademark or registered trademark of Google Incorporated.Bluetooth is a trademark of Bluetooth SIG, Inc., USA.OmniPass is a trademark of Softex, Inc.Roxio is a trademark of Roxio, a division of Sonic Solutions.PowerDirector, PowerDVD, YouCam, and MakeDisc are trademarks of CyberLink Corp.Adobe, Acrobat, and Adobe Reader are either a reg istered trademarks or trademarks ofAdobe Systems Incorporated in the United States and/or other countries.All other trademarks specified here are the property of their respective owners.DECLARATION OF CONFORMITYaccording to FCC Part 15Responsible Party Name: Fujitsu America, Inc.Address: 1250 E. Arques AvenueSunnyvale, CA 94085Telephone: (408) 746-6000Declares that product: Base Model Configuration: LIFEBOOK Q775 NotebookComplies with Part 15 of the FCC Rules.This device complies with Part 15 of the FCC rules. Operations are subject to the following two conditions:(1) This device may not cause harmful interference, (2) This device must accept any interference received, including interference that may cause undesired operation.
ContentsContentsFujitsuContactInformation ............................................................ 7Notationalconventions ................................................................ 8Portsandcontrols ..................................................................... 9Importantnotes ........................................................................ 12Safetyinstructions ...................................................................... 12Additional safety notes for devices with wireless components . . ............................. 13Protecting the display screen ............................................................ 13Energy saving .......................................................................... 13Energy saving under Windows ....................................................... 13Traveling with your Tablet PC ............................................................ 13Beforeyoutravel ................................................................... 14Transporting the Tablet PC ........................................................... 15Storing your TabletPC .................................................................. 15Cleaning the TabletPC .................................................................. 16First-timesetupofyourdevice ......................................................... 17Unpacking and checking the device . . . ................................................... 17Choose a location . ...................................................................... 18Connecting the AC adapter . . . ........................................................... 18Switching on the device for the firsttime .................................................. 19Installing Bonus Apps . . . . . ........................................................... 20Working with theTabletPC ............................................................ 21Status indicators ........................................................................ 21Switching theTabletPC on .............................................................. 22Programing the ON/OFFbutton ...................................................... 22Switching theTabletPCoff .............................................................. 23Handwriting recognition .................................................................. 23Touchscreen ............................................................................ 24Select displayorientation(portraitorlandscapeformat) .................................... 25Using fingers ........................................................................... 25Calibrate the Dual Digitizer for finger-based operation of the device. ..................... 25Actions with one finger (Windows 8.1 Pro) . ............................................ 26Actions with one finger (Windows 7 / Windows 8.1 Desktop) . . . ......................... 28Actions with two fingers (Windows 7 / Windows 8.1 Desktop) . . ......................... 29Using thestylus ......................................................................... 31Stylus location ...................................................................... 32Adjustingthe stylus .................................................................. 32Calibratingthestylus ................................................................ 33Installingastylustether .............................................................. 33Tab l etbuttons .......................................................................... 34Webcam ............................................................................... 34Rechargeablebattery ................................................................... 35Charging and maintainingthebattery ................................................. 35Using the energy saving functions . ....................................................... 36Memory cards .......................................................................... 37Supportedformats .................................................................. 37Insertingthememorycard ........................................................... 37Removing the memorycard .......................................................... 38Fujitsu 3
ContentsSIMcard ............................................................................... 39InsertingaSIMcard ................................................................. 39Removing a SIMcard ............................................................... 40Wireless LAN/Bluetooth/4G/NFC wireless components . . . .................................. 40Switching the wireless components on and off ......................................... 40Furtherinformation on WLANandBluetooth ........................................... 41Access via WirelessWAN ............................................................ 41NFC ............................................................................... 41Ethernet and LAN (only with performance docking cradle or keyboard docking station) . . . . .... 41GPS ................................................................................... 42Accessories for your Tablet PC (optional) . ............................................. 43Your performance docking cradle (optional) . . ............................................. 44Cradle components . . ................................................................ 44Settingup the cradle ................................................................ 45Connecting the Tablet PC to the cradle . . ............................................. 45Disconnecting the Tablet PC from the cradle . ......................................... 47Keyboard cover (optional) . . . ............................................................ 48Keyboard cover components . ........................................................ 48Connecting the Tablet PC to the keyboard cover . . . . . .................................. 49Separating the Tablet PC from the keyboard cover . . .................................. 50Keyboard docking station (optional) . . . . . . ................................................. 51Ports on the keyboard docking station . . . ............................................. 51Connecting the Tablet PC to the keyboard docking station .............................. 53Separating the Tablet PC from the keyboard docking station . . .......................... 54VESA mounting attachment (optional) . . . ................................................. 55Hand strap (optional) . . . . ................................................................ 56Shoulder strap (optional) ................................................................ 57Folio case (optional) . . . . . ................................................................ 58MicroUSBadapters ..................................................................... 59Securityfunctions ..................................................................... 61Configuring the fingerprint sensor ........................................................ 62Configuring passwordprotectionin BIOS Setup Utility ...................................... 63Protecting BIOS Setup Utility (supervisor HDD password and user HDD password) . . . .... 63Password protection for booting the operating system .................................. 64Password protection forthehard disk ................................................. 65Smart Card reader (optional) . ............................................................ 66InsertingtheSmartCard ............................................................. 66Trusted Platform Module - TPM (device dependent) . . . . . . .................................. 67EnablingTPM ....................................................................... 67DisablingTPM ...................................................................... 67Connectingexternaldevices ........................................................... 68Connecting an external monitor . . ........................................................ 69HDMIport(onlyperformancedocking cradleandkeyboarddocking station) .............. 69External monitor port (VGA) (only performance docking cradle and keyboard dockingstation) ............................................................................. 69Connecting USB devices ................................................................ 70Howto remove USB devicescorrectly ................................................ 70Headphones port ....................................................................... 71Settings in BIOS Setup Utility . . ........................................................ 72StartingtheBIOSSetupUtility ........................................................... 724Fujitsu
ContentsBIOS SetupUtilityoperation ............................................................. 73ExitingBIOSSetup Utility ................................................................ 74Exit Saving Changes - save changes and exit BIOS Setup Utility . . ..................... 74Exit Discarding Changes - Reject changes and exit BIOS Setup Utility . . . . . .............. 74Load Setup Defaults – load default values . ............................................ 74Discard Changes - Discard Changes without exiting BIOS Setup Utility . . . . .............. 74Save Changes - save changes without exiting the BIOS Setup Utility . . . . . . .............. 74Save changes and power off ........................................................ 74Troubleshootingandtips .............................................................. 75Help ifproblemsoccur ................................................................... 75RecoveringyourFactory Image ...................................................... 75TheTabletPC’sdateortimeisincorrect .................................................. 76Battery indicator does not illuminate . . . ................................................... 76TheTabletPC’stouchscreenremainsdark ................................................ 76The display on the Tablet PC’s touchscreen is difficult to read. . ............................. 76Theexternalmonitorremainsblank ...................................................... 77Theexternalmonitorisblank or the image isunstable ..................................... 77The cursor does not correctly follow the stylus movements . . . . ............................. 77Stylus inputnotworking ................................................................. 78TheTabletPCdoesnotstartafterswitchon ............................................... 78TheTabletPCstops working ............................................................. 78The printer does not print . . . . . ........................................................... 79The wireless connection to a network does not work . . . .................................... 79Thebatterydischargestooquickly ........................................................ 79Smart Card reader is not recognized . . . ................................................... 80Acousticwarning ........................................................................ 80Errormessagesonthescreen ........................................................... 80Technical data ......................................................................... 82TabletPC .............................................................................. 82WLAN specifications .................................................................... 84Rechargeablebattery ................................................................... 84AC adapter (65 W) ...................................................................... 85Performance docking cradle (optional) . ................................................... 85Keyboard cover(optional) ............................................................... 86Keyboard docking station (optional) ....................................................... 86VESA mounting attachment (optional) . ................................................... 87Hand strap (optional) . . .................................................................. 87Shoulder strap (optional) . . . . . ........................................................... 87Micro USB adapters (optional) ........................................................... 87Manufacturer’snotes .................................................................. 88Disposal and recycling .................................................................. 88Recyclingyourbattery ............................................................... 88DOC(IndustryCANADA)Notices ........................................................ 88UL Notice ........................................................................... 89ENERGYSTARCompliance ............................................................. 90DeclarationsofConformity ............................................................... 90FCCandICRegulatoryInformation ...................................................... 90Regulatory Notes and Statements . ................................................... 91Appendix .............................................................................. 94Before Using the Optional Wireless LAN . . . . . . ............................................ 94Fujitsu 5
ContentsWirelessLAN DevicesCoveredbythisDocument ...................................... 94Characteristics oftheWLAN Device .................................................. 94Wireless LAN Modes Using this Device . . ............................................. 95Deactivating/Disconnecting theWLANDevice ......................................... 96Configuring the WirelessLAN ............................................................ 97Connection to the network . . . ........................................................ 97TroubleshootingtheWLAN ........................................................... 98Image Backup and Recovery Procedures ................................................. 100CreatingaBackupofBootableDiskandRecovery Image .............................. 100RECOVERYOURSYSTEM WHENTHEHARDDRIVEIS STILL ACCESSIBLE ............. 101UsingtheRecovery and UtilityTools .................................................. 101Restore the Recovery Image from Hidden Partition . . . .................................. 103RECOVERYOURSYSTEM WHENTHEHARDDRIVEIS NOT BOOTABLE ................ 104RestoretheRecoveryImageforFullHardDrive ....................................... 104Recovering Your Recovery Image Using Recovery and Utility (for new hard drive ornon-bootableharddrive) ............................................................. 105InstallingtheSoftware aftertheRecoveryImageisRestored ............................ 106Index .................................................................................. 1096Fujitsu
Fujitsu Contact InformationFujitsu Contact InformationService and SupportYou can contact Fujitsu Service and Support in the following ways:• Toll free phone: 1-800-Fujitsu (1-800-838-5487)• Website: "http://solutions.us.fujitsu.com/www/content/support/contact/index.php"Before you place the call, you should have the following information ready so that thecustomer support representative can provide you with the fastest possible solution:• Product name• Product configuration number• Product serial number• Purchase date• Conditions under which the problem occurred• Any error messages that have occurred• Type of device connected, if anyFujitsu Shopping OnlinePlease go to "http://www.shopfujitsu.com/store/ ".Maintaining Latest ConfigurationTo ensure that you always have the most current driver updates related to your system, you shouldoccasionally access the Fujitsu Software Download Manager (FSDM) utility. The FSDM utility isavailable from the Fujitsu Support site. FSDM will allow you to view a list of the most currentdrivers, utilities, and applications to determine whether you have the latest versions. If you have aWindows 7 or Windows 8/8.1 operating system, you will need to go to the Support Site to downloadthe FSDM Utility: "http://support.fujitsupc.com/CS/Portal/support.do?srch=DOWNLOADS".Limited WarrantyYour LIFEBOOK notebook is backed by a Fujitsu International Limited Warranty. Check the servicekit that came with your notebook for the Limited Warranty period and terms and conditions.Fujitsu 7
Notational conventionsNotational conventionsPay particular attention to text marked with this symbol. Failure to observethese warnings could pose a risk to health, damage the device, or leadto loss of data. The warranty will be invalidated if the device becomesdefective through failure to observe these warnings.Indicates important information for the proper use of the device.►Indicates an activity that must be performed.Indicates a result.This font Indicates data entered using the keyboard in a program dialog or at thecommand line, e.g. your password (Name123)oracommandusedtostarta program (start.exe)This font Indicates information that is displayed on the screen by a program, e.g.:Installation is complete.This font Indicates• terms and texts used in a software interface, e.g.: Click on Save• names of programsorfiles, e.g. Windows or setup.exe."This font" Indicates• cross-references to another section, e.g. "Safety information"• cross-references to an external source, e.g. a web address: For moreinformation, go to "http://solutions.us.fujitsu.com/"• names of CDs, DVDs and titles or designations for other materials, e.g.:"CD/DVD Drivers & Utilities" or "Safety/Regulations" manualKey Indicates a key on the keyboard, e.g: F10 .This font Indicates terms and texts that are emphasized or highlighted, e.g.: Donot switch off the device.8Fujitsu
Ports and controlsPorts and controlsThis chapter presents the individual hardware components of your device. It gives anoverview of the indicators and connections of the device. Please familiarize yourselfwith these items before you start to work with the device.Front1235647567881 = Touchscreen2 = Webcam3 = Webcam LED4 = Ambient light sensor5 = Speaker6 = Mechanical mounting for keyboard dockingstation / keyboard cover / cradle7 = Docking port8 = Air inletFujitsu 9
Ports and controlsLeft-hand side1 2 3 4 5 6 71 = DC jack (DC IN, protected by cover)2 = ON/OFF button3 = Increase volume button4 = Decrease volume button5 = Shortcut button6 = Power-on indicator7 = Battery charging indicatorRight-hand side12 34 5671=SIMcard slot (format: micro SIM,protected by cover)2 = Storage card slot (format: micro SD,protected by cover)3=Micro USB port (protected by cover)4=USBport (USB 3.0, protected by cover)5 = Headphones port6=Stylus holder7 = Eyelet for stylus cord10 Fujitsu
Ports and controlsBack (2 variants: standard shell and smart card shell)4321655554321771 = Fingerprint sensor2 = Camera light3 = Webcam4 = Webcam LED5 = Screw holes (device-dependent) forsecuring accessories6 = Smart Card reader (device dependent)7 = NFC (Near Field Communication)(device-dependent)Fujitsu 11
Important notesImportant notesImportantnotesNotesThis chapter contains essential safety information which must be followed when workingwith your Tablet PC. The other notes provide useful information about your Tablet PC.Safety instructionsSafetyinformationInform ation,Please follow the safety notes provided in the "Safety/Regulations" manualas well as the safety notes given below.Please pay special attention to the sections in the manual markedwith the symbol on the left.When connecting and disconnecting cables, observe the relevantnotes in this operating manual.Read the information on the ambient conditions in the "Technical data", Page 82 chapterand the information in the "First-time setup of your device", Page 17 chapter beforepreparing your Tablet PC for use and switching it on for the first time.When cleaning the device, please observe the relevant notes in the section .Pay attention to the additional safety notes for devices with wireless componentsprovided in the "Safety/Regulations" manual.When handling this device, you come into contact with lead, a chemical which inCalifornia is held to be a possible cause of birth defects and other damage to fertility.Wash your hands after using the device.This Tablet PC complies with the relevant safety regulations for data processing equipment. Ifyou have questions as to whether you can set up the Tablet PC in the intended environment,please contact your sales outlet or our hotline/service desk.12 Fujitsu
Important notesAdditional safety notes for devices withwireless componentswirelesscomponentsWirelessLANBluetooth,SafetynotesIf a wireless component (Wireless LAN, Bluetooth, 4G) is integrated in your Tablet PC, you mustbe sure to observe the following safety precautions when using your Tablet PC:• Switch off the wireless components when you are in an aircraft or driving in a car.• Switch off the wireless components when you are in a hospital, an operatingroom or near a medical electronics system. The transmitted radio wavescan impair the operation of medical devices.• Switch off the wireless components, when you let the device get near flammablegases or into hazardous environments (e.g. gas station, paint stores), as thetransmitted radio waves can cause an explosion or a fire.For further information on how to switch the wireless components on and off,refer to "Switching the wireless components on and off", Page 40.Protecting the display screenDepending on your device configuration, where applicable your device is not waterproof.In this event, do not pour liquids onto the device and do not wash it with a wet cloth.Do not place items on the top of the display, or damage may occur.During normal use of the device, small particles from the environmentcan become embedded in the stylus tip and scratch the screen. Thewarranty does not cover a scratched screen.Energy savingNotesEnergyEnergysavingIf you will not be using your Tablet PC, switch it off. Switch off any connected external devices whenthey are not in use. If you use the energy-saving functions, the Tablet PC uses less power. If you dothis, you will be able to work longer with the Tablet PC before having to recharge the battery.The energy efficiency is increased and environmental pollution is reduced.You save money and help protect the environment.Energy saving under Windows►Make use of the available energy saving functions as described in chapter"Using the energy saving functions", Page 36.Traveling with your Tablet PCMobileoperationNotesTranspo rtTabletPCPlease follow the instructions below when traveling with your Tablet PC.Fujitsu 13
Important notesBefore you travel►Back up important data stored on your hard disk.NotebookTraveling,notebo ok►Switch off the wireless component for data security reasons. With data traffic via a wirelessconnection, it is also possible for unauthorized third parties to receive data.Information on activating data encryption is provided in the documentationfor your wireless component.►If you want to use your Tablet PC during a flight, ask the flight attendants to see it is safe to use it.When traveling in other countries►If you are traveling abroad, check that the AC adapter can be operated with thelocal AC voltage. If this is not the case, obtain the appropriate AC adapter foryour Tablet PC. Do not use any other voltage converter!►Check whether the local AC voltage and the AC cable are compatible. If this is notthe case, buy an AC cable that suits the local conditions.►Enquire with the appropriate government office of the country you will be traveling in as towhether you may there operate the wireless component integrated in your Tablet PC.►Take the necessary travel adapters with you when traveling abroad. Check in the followingtable for which travel adapters you will need, or ask your travel organizer.Power connection Travel destinationUnited States, Canada, Mexico, parts of LatinAmerica, Japan, Korea, Philippines, TaiwanRussia and the Commonwealth of IndependentStates (CIS), much of Europe, parts of LatinAmerica, the Middle East, parts of Africa, HongKong, India, much of south-east AsiaUnited Kingdom, Ireland, Malaya, Singapore,parts of AfricaChina, Australia, New Zealand14 Fujitsu
Important notesTransporting the Tablet PCProtect the Tablet PC from severe shocks and extreme temperatures(e.g. direct sunlight in a car).• Do not transport your Tablet PC while it is turned on.• Carry your Tablet PC with you while traveling, rather than checking it in as baggage.• Never put your Tablet PC through a metal detector; have it hand-inspected bysecurity personnel. You can however, put your Tablet PC through a properlytuned X-ray machine. To avoid problems, place it close to the entrance ofthe machine and remove it as soon as possible or have it hand-inspectedby security personnel. Security officials may require you to turn your TabletPC on, so make sure you have a charged battery on hand.►Switch the Tablet PC off.►Unplug the AC plug of the AC adapter and all external devices from the power outlets.►Disconnect the AC adapter cable and the data cables for all external devices.►To protect against damaging jolts and bumps, use a suitable Tablet PCcarrying case to transport your Tablet PC.Storing your Tablet PC• If storing your Tablet PC for a month or longer, turn it off, fully charge the battery,then remove and store all Lithium Polymer batteries.• Store your Tablet PC in a cool, dry location. Temperatures should remainbetween 13ºF / -25ºC and 140ºF / 60ºC.• Store your Tablet PC and batteries separately. If you store your Tablet PC witha battery installed, the battery will discharge, and battery life will be reduced. Inaddition, a faulty battery might damage your Tablet PC.• Always power off the Tablet PC before transporting and/or packaging it.After shutting down the Tablet PC, wait until the status led panel indicatespower off condition (i.e., no lights are illuminated).• It is possible that the Tablet PC may not automatically go to power-off or hibernatemode when you close the lid. This situation may occur due to pre-operating systemboot password security settings or some other application running on the Tablet PC.• Attempting to transport the Tablet PC while power is on may damagethe Tablet PC due to shock or overheating.Fujitsu 15
Important notesCleaning the Tablet PC• Use of incorrect cleaners can result in optical impairment of the LCD and / ordamage to the computer. Always refer to the cleaner manufacturer’s guidelines andmaterial safety data sheets fo proper handling and use of the products.• Never use ammonia, acidic, or alkaline cleaners or organic chemicalssuch as paint thinner, acetone or kerosene. It may damage surfacefinishes and the coating of the LCD screen.• Never use compressed air for cleaning your computer.• If your Tablet PC has a Smart Card slot, be very careful to avoid anyliquid entering the slot as this can damage the unit.Cleaning guidelines using recommended off-the-shelf cleaners: Computer exteriorTo clean the exterior, use one of the following off-the-shelf products:•Office Depot® #154-616 b Cleaning Kit• Meridrew Enterprises Klear Screen® Wipes• 3M CL563 Cleaner WipesAfter cleaning with one of these products, gently polish with a dry, soft,lint-free cloth until the solution is no longer visible.Disinfecting STYLISTIC computersWipe the surface with a soft cloth wipe and a 50% ethanol solution or use another ethanol-basedgermicide which has been registered as a hospital disinfectant by the EPA.16 Fujitsu
First-time setup of your deviceFirst-time setup of your deviceFirst- timese tupGettingstartedPlease read the chapter "Important notes", Page 12.If your device is equipped with a Windows operating system, the necessaryhardware drivers and supplied software are already pre-installed.Before switching it on for the first time, connect the device to the AC voltage usingthe AC adapter, see "Connecting the AC adapter", Page 18. The AC adapter mustremain connected during the whole of the installation process.A system test is performed when your device is first switched on. Various messagescan appear. The display may remain dark for a short time or may flicker.Please follow the instructions on the screen.NEVER switch off your device during the first-time setup process.The battery must be charged if you want to operate your device using the battery.When used on the move, the built-in battery provides the device with the necessary power. Youcan increase the operating time by using the available energy-saving functions.For instructions on how to connect external devices (e.g. mouse, printer) to your TabletPC, please refer to the operating manual for your device.Unpacking and checking the deviceIf you find that damage has occurred during transport, please notifyyour local sales outlet immediately!►Unpack all the individual parts.PackagingTransport►Check your device for any visible damage which may have occurred during transportation.You may need to reuse the packaging in future, for example if youneed to transport your device.Fujitsu 17
First-time setup of your deviceChoose a locationChoosealocationSetupACadapterChoose a suitable location for the device before setting it up. In doingso, please follow these instructions:• Never place the device or the AC adapter on a heat-sensitive surface.The surface could be damaged as a result.• Never place the device on a soft surface (e.g. carpeting, upholstered furniture,bed). This can result in damage caused by overheating.• The underside of the device heats up during normal operation. Prolongedcontact with skin can become unpleasant or even result in burns.• Place the device on a stable, flat, non-slippery surface. Please note that therubber feet of the device may mark certain types of delicate surfaces.• Keep other objects at least 100 mm / 4 inches away from the deviceand its AC adapter to ensure adequate ventilation.• Do not expose the device to extreme environmental conditions. Protectthe device against dust, humidity and heat.Connecting the AC adapterMakingreadytouseACadapterObserve the safety notes in the enclosed "Safety/Regulations" manual.ThesuppliedACcable conforms to the requirements of the country in whichyou purchased your device. Make sure that the AC cable is approved foruse in the country in which you intend to use it.2►Open the cover of the DC jacksocket (DC IN).►Connect the AC cable (1) to the AC adapter.►Plug the AC cable (2) into a power outlet.►Connect the AC adapter cable (3) to theDC jack socket (DC IN) of the device.18 Fujitsu
First-time setup of your deviceSwitching on the device for the first timeSwitchingonforthefirstt imeTo make it easier to use your device for the first time, the operating systemis pre-installed on the hard disk.12►Press the ON/OFF button (1) for about one second to switch the device on.The power-on indicator (2) lights up whenever the system is switched on.►During the installation process, follow the on-screen instructions.You can find information and help on the Windows operating systemfunctions online at "http://windows.microsoft.com".If a Windows 8.1 operating system is installed on your Tablet PC, a tutorialis automatically started when a new user logs on for the firsttimetoshowyou how to use the new functions of Windows 8.1.Fujitsu 19
First-time setup of your deviceInstalling Bonus AppsAfter you have started your system the first time, you will see a Bonus Apps icon on your desktop.►Click on the icon to see which additional applications are available for you to install.Applications that are already installed appear in grey, those that areavailable for installation appear in blue.►Select the applications you wish to install by selecting the checkbox adjacent to your selection.or►Click Select All if you would like to install all available applications►To co n firm your selection click Install.Note that in some cases (depending upon which application was selected forinstallation) after installation completes, the system will prompt you to reboot.There are also cases in which if multiple applications are selected to installbut one of them needs a reboot, the system will reboot and continueinstalling the rest of the selected applications.20 Fujitsu
Working with the Tablet PCWorking with the Tablet PCTablet,operationTabletThis chapter describes the basics for operating your Tablet PC. You can find instructionson how to connect external devices (e.g. mouse, flash storage) to the Tablet PC inthe chapter "Connecting external devices", Page 68.Please refer to the notes in the chapter "Important notes", Page 12.Status indicatorsStatusindicatorsSymbolsThe status indicators (1,2) provide information about the status of the powersupply, the drives, and the keyboard functions etc.1 2Status indicator DescriptionPower-on indicator• Indicator lights up blue: The Tablet PC is switched on.• The indicator flashes: The Tablet PC is in sleep mode (Save-to-RAM).• The indicator lights up, alternating between blue and white: The TabletPC is in S3 mode and the wireless component (Wi-Fi or WWAN) isswitched on.• The indicator lights up white: The Tablet PC is in S4 or S5 mode and thewireless component (Wi-Fi or WWAN) is switched on.• The indicator is not lit up: The Tablet PC is switched off or in Save-to-Diskmode.Battery charging indicator• The indicator lights up red: The AC adapter is connected.• The indicator is flashing red: The battery has a charging error.• The indicator is not lit up: The AC adapter is not connected.Fujitsu 21
Working with the Tablet PCSwitching the Tablet PC onTablet:SwitchingonPower-onPower-onindicatorSuspend/Resume button12►Press the ON/OFF button (1) for about one second to switch the device on.The power-on indicator (2) lights up whenever the system is switched on.Programing the ON/OFF buttonYou can program the ON/OFF button:Operating system MenuWindows 7 Start - (Settings) - Control Panel - System andSecurity - Power OptionsWindows 8.1 Windows 8.1 Desktop - Control Panel - Hardwareand Sound - Power OptionsIf you have assigned a password, you must enter this when requested todo so in order to start the operating system. Detailed information can befound in the chapter "Security functions", Page 61.22 Fujitsu
Working with the Tablet PCSwitching the Tablet PC offBack up your data and close all applications before you switch off yourdevice. Otherwise data might be lost.►Shut down the operating system correctly.Notebook►If the Tablet PC does not switch itself off automatically, press the ON/OFFbutton for approx. five seconds.Handwriting recognitionFor detailed information on handwriting recognition, see the documentation for your operating system.At present, handwriting recognition under Windows 7 or Window 8.1 supports the following languages:English, German, French, Italian, Japanese, Korean, Chinese (traditional and simplified), Dutch,Portuguese, Spanish, Brazilian, Norwegian (Bokmål and Nynorsk), Swedish, Finnish, Danish,Polish, Rumanian, Serbian (Cyrillic and Latin script), Catalan, Russian, Czech and Croatian.Under Windows 8.1 you can set the required language under Control Panel –Time, Language and Region – Language.Fujitsu 23
Working with the Tablet PCTouchscreenTou ch s c re e nNotesHigh-quality LCD screens (TFT) are installed in Fujitsu Tablet PCs. For technical reasons,these screens are manufactured for a specific resolution. An optimal, clear picture canonly be ensured in the resolution intended for the particular screen. A screen resolutionwhich differs from the specification can result in an unclear picture.The screen resolution of your Tablet PC’s touchscreen is optimally set at the factory.Current production technology cannot guarantee an absolutely fault-free screen display. A fewisolated constantly lit or unlit pixels (picture elements) may be present. The maximum permittednumber of such faulty pixels is specified in the international standard ISO 9241-307 (Class II).Example:A screen with a resolution of 1280 x 800 has 1280 x 800 = 1024000 pixels. Each pixel consists ofthree subpixels (red, green and blue), so there are almost 3 million subpixels in total. According to ISO9241-307 (class II), a maximum of 2 light and 2 dark pixels and in addition 5 light or 10 dark subpixelsor an equivalent mix (1 light subpixel counts as 2 dark subpixels) are allowed to be defective.Pixel A pixel consists of 3 subpixels, normally red, green andblue. A pixel is the smallest element that can be generatedby complete functionality of the display.Subpixel A subpixel is a separately addressable internal structurewithin a pixel that enhances the pixel function.Cluster A cluster contains two or more defective pixels orsubpixels in a 5 x 5 pixel block.Background lightingLCD screens are operated with background lighting. The luminosity of the backgroundlighting can decrease over the period of use of the Tablet PC. However, you canadjust the brightness of your monitor yourself.Ambient light sensorIf your notebook was shipped with the Windows operating system,the screen brightness isregulated by the ambient light sensor and is dependent on the particular light conditions.This results in optimum readability and longer battery life at the same time.If your notebook was shipped with Windows 8.1, the adaptive brightness setting is deactivated. Tochange the ambient light sensor settings, select Control Panel - System and Security - Power Options -Change plan settings - Change advanced power settings - Display - Activate adaptive brightness setting..Select On to activate the adaptive brightness setting with the help of the ambient light sensor.Synchronizing the display on the touchscreen and an external monitorIn Windows 7, you can switch between touchscreen and external monitor, if you openControl Panel - Windows Mobility Center,sectionExternal Display.In Windows 8.1 wipe your finger over the screen from the right-hand edge. The settingCharms - Devices - Second monitor opens. Select the desired output type.You can also use the Fujitsu Display Manager in the Windows Mobility Center to set the output type.24 Fujitsu
Working with the Tablet PCSelect display orientation (portrait orlandscape format)Landscapeform atPortraitformatDisplayorientationYou can choose to use either portrait or landscape format for the display.Windows 7You can change these settings in the Fujitsu menu or under Start -(Settings -)Control Panel -Hardware and Sound -Display -Settings.Windows 8.1You can change these settings under Windows 8.1 Desktop - Control Panel -Hardware and Sound - Windows Mobility Center / Rotate screen.In the Fujitsu Tablet Controls settings, profiles are saved for operationwith different screen orientations. These profiles have preset standardconfigurations that can be modified as desired.These settings do not just affect the screen settings on the Tablet PC, butalso on external monitors that are connected.Using fingersYou can execute certain commands by using your finger tip on the touchscreen of your device.Alternatively, everything which you can select or activate using your fingertip can also be selected or activated using the stylus.Calibrate the Dual Digitizer for finger-basedoperation of the device.If Windows 8.1 is installed on your Tablet PC, your Tablet PC isalready calibrated at initial setup.If a different operating system is installed on your Tablet PC, you must calibrate it withyour fingers before first use, so that it recognizes your fingertips as accurately as possible.As soon as you notice that the accuracy is becoming worse, youmust recalibrate the device.Operating system MenuWindows 7 /Windows 8.1 DesktopTo calibrate, run the Hardware and Sound / Tablet PC Settings function in theControl Panel. You need to calibrate both portrait and landscape formats.Fujitsu 25
Working with the Tablet PCActions with one finger (Windows 8.1 Pro)Action DescriptionWipe your finger over the screen from theright-hand edge.►Open Charms with system commands(equivalent to pressing the Windows button +Cbutton).►Working with the mouse: Position the mousepointer at the bottom right-hand edge of thescreen.Wipe your finger over the screen from theleft-hand edge.►Switch between the most recently usedapplications (equivalent to pressing theWindows button + Ctrl +Space).►Working with the mouse: Position the mousepointer at the bottom left-hand edge of thescreen.Wipe your finger over the screen from the topor bottom edge.►Open the App commands (equivalent topressing the Windows button + Zbutton).Wipe from the top to the bottom of the screento dock or close the current App.►Working with the mouse: Right-click on theApptodisplay the App commands.26 Fujitsu
Working with the Tablet PCAction DescriptionPress and hold ►Keep your finger pressed on an object on thescreen to display a menu with further options.►Working with the mouse: Move the mousepointer over the object to display a menu withfurther options.Taponanobject ►Tap y our finger on an object on the screento open an App or a link or to execute acommand.►Working with the mouse: Left-click on theobject.Scroll / Move object / Swivel object ►Use this function to scroll through lists orwebsites or to swivel or move an object.►Working with the mouse: Left-click on theobject, keep the mouse button pressed andmove / swivel the object or scroll.Fujitsu 27
Working with the Tablet PCActions with one finger (Windows 7 / Windows 8.1 Desktop)Action DescriptionSelecting objects (click with the left mousebutton)►Tap once briefly with the finger on the object.Starting programs (double-click with the leftmouse button)►Use one finger to tap twice in quicksuccession on the program symbol.Moving objects/windows (while holding the leftmouse button pressed, drag & drop)►Place your finger on the object/window,keep your fingertip pressed againstthe touchscreen and move the desiredobject/window.Opening a context menu (click with the rightmouse button)►Tap your finger on the desired item.Keep your fingertip pressed against thetouchscreen.The context menu appears.Moving the cursor ►Position one finger on the touchscreen andmove your finger in the desired direction.28 Fujitsu
Working with the Tablet PCActions with two fingers (Windows 7 / Windows 8.1 Desktop)Action DescriptionScrolling►Place two fingers on the touchscreen.►Move the fingers up to scroll up.or►Move the fingers down to scroll down.Rotating►Position your thumb on the touchscreenand rotate the image clockwise orcounter-clockwise using your index finger.Fujitsu 29
Working with the Tablet PCAction DescriptionIncrease or decrease view►Put two fingers on the touch screen andmove them apart to increase the size of theview.or►Put two fingers on the touch screen andmove them together to decrease the sizeof the view.Lock context-sensitive menus ►Use two fingers to tap twice in quicksuccession on the touchscreen.30 Fujitsu
Working with the Tablet PCUsing the stylus1231 = stylus tip2 = stylus button (right mouse button)3 = eyelet for stylus cordYou can use the stylus on your Tablet PC as an electronic writing tool, to select menu items and tonavigate through the programs. Programs that support handwriting recognition also allow you towrite directly on the screen with the stylus. You can also use the stylus as a drawing tool.The Tablet PC is supplied with a stylus tether which you can attach to theeyelets on the stylus and on the Tablet PC.Use only the stylus that was provided with your Tablet PC. Do not use any other pointedobject as a substitute, that was not specially designed for your Tablet PC. Replacethe stylus tip if it is worn. The warranty does not cover a scratched screen.While writing, you should take care that you do not scratch the surface ofthe display (e.g. with a wristwatch or bracelet).The stylus of the Tablet PC is an electronic instrument that can be damagedif used improperly. Handle the stylus with care.Our recommendations for proper handling of the stylus are as follows:• Do not gesture with the stylus.• Do not use the stylus as a pointer.•Donotusethe stylus on surfaces other than the screen of the Tablet PC.• Do not try to turn the grip of the stylus. The grip is used to put thestylus into its slot and to take it out of its slot.• Never store the stylus with its weight on the tip (e.g. with the tip down in a styluscontainer). If the stylus is stored with the tip pointing down, this may have anadverse effect on the stylus mechanism (particularly under high temperatures). Inthis case the stylus tip may react as though it is constantly being pressed down. Toavoid damage, the stylus should be stored in the stylus slot when not in use.The stylus can be influenced by electromagnetic fields (cursor quivers orjumps). There may be a few areas on the screen where the cursor quiversslightly in spite of pressing the stylus down firmly.The screen responds to entries made with the tip of the finger or the stylus when thetip of the finger or the stylus directly touches the screen.You can use the stylus to perform all functions for which you would otherwise use a mouse.Fujitsu 31
Working with the Tablet PCDelete functions are not supported by the stylus.Action Mouse StylusSelecting menuitemsClick with the left mouse button. Tap on the menu entry with the tip ofthe stylus.Starting programs Double-click with the left mousebutton.Tap on the program symbol twice inrapid succession using the stylus tip.Moving an objector windowDrag with the left mouse buttonpressed.Place the stylus tip directly on theobject or window. Keep the stylus tipheld against the screen. Drag thedesired object or window.Opening a contextmenuClick with the right mouse button. Tap on the desired element with thestylus and keep the stylus pressedagainst the screen.Moving the cursor -Place the tip of the stylus directly onthe screen.Stylus locationOn delivery, the stylus is located in the stylusgarage:1Adjusting the stylusOperating system MenuWindows 7 Under HardwareandSound-PenandInputDevices,youcanmakevarioussettings for the stylus in the control panel (assignment and function ofthe stylus button).Windows 8.1 Under Windows 8.1 Desktop - Control Panel - Hardware and Sound - Pen andInput Devices you can make various settings for the stylus (assignmentand function of the stylus button).32 Fujitsu
Working with the Tablet PCCalibrating the stylusIf Windows 8.1 is installed on your Tablet PC, your Tablet PC is already calibrated at initial setup.If a different operating system is installed on your Tablet PC, you must calibrate it with thestylus before first use, so that it recognizes the stylus as accurately as possible.You should also always repeat the calibration if the coordination between thestylus and the cursor movement deteriorates.Operating system MenuWindows 7 /Windows 8.1 DesktopTo calibrate, run the Hardware and Sound / Tablet PC Settings function in theControl Panel. You need to calibrate both portrait and landscape formats.Installing a stylus tetherYou can attach the stylus with a stylus tether to prevent accidentally dropping it or losing it.►Fasten the stylus tether to the stylus eyelet and to the eyelet on the Tablet PC.Fujitsu 33
Working with the Tablet PCTablet buttonsYour Tablet PC is fitted with three tablet buttons.1 2 3No. Description Functions1 Increase volume button Increase the volume2 Decrease volume button Decrease volume3Shortcut button Start function manager or screen shot functionWebcamWebcamYour device has two webcams: one on the front of the device and one on the rear.The webcam has its own status indicator. The indicator lights up when the webcam is active.Depending on the software used, you can use your webcam to take pictures,record video clips or take part in web chats.• The picture quality depends on the lighting conditions and the software being used.• You can only operate the webcam with a particular application (e.g. an Internet telephonyprogram or a video conferencing program which supports a webcam).• When using the webcam the support of the Tablet PC must not wobble.• The webcam automatically adjusts itself to the current light level. For this reason,the touchscreen may flicker while the light level is adjusted.Further information on use of the webcam and additional settings for your webcamcanbefound in the help function of the program using the webcam.34 Fujitsu
Working with the Tablet PCRechargeable batteryBatteryBatteryServicelife,batteryRechargeablebatteryBatteryThe built-in battery provides the Tablet PC with the necessary power for use on the move.You can increase the service life of the battery by caring for the battery properly. Theaverage battery service life is around 500 charge/discharge cycles.You can extend the battery service life by taking advantage of the available energy-saving functions.Charging and maintaining the batteryBatteryBatteryThe Tablet PC battery can only be charged when the ambient temperature isbetween 5°C / 41 °F and max. 35°C / 95°F.You can charge the battery by connecting the Tablet PC to the AC adapter(see "Connecting the AC adapter", Page 18).If the battery is running low you will hear a warning alarm. If you do not connect the AC adapterwithin five minutes of hearing the warning alarm, your Tablet PC will switch off automatically.Monitoring the battery state of chargeBatterybatte rycha rge meterA battery symbol for monitoring the battery capacity is displayed in the system bar /status indicator. The battery symbol shows you the battery charge.Fujitsu 35
Working with the Tablet PCUsing the energy saving functionsEnergyEnergyBatteryThe Tablet PC uses less power when the energy saving features are enabled. You will thenbe able to work longer when using the battery before having to recharge it.The energy efficiency is increased and environmental pollution is reduced.By choosing the best power options, you can make significant savings andat the same time help protect the environment.We recommend the following settings:Function Operating on AC power Operating on battery powerTurn off monitor After 10 minutes After 5 minutesTurn off hard disk(s) After 15 minutes After 10 minutesEnergy saving (S3) After 20 minutes After 15 minutesHibernate mode (S4)After 1 hour After 30 minutes►Set the energy saving functions in your Control Panel.►Set the screen saver in your Control Panel.or►Keep a finger pressed on the desktop to display the context menu. Configure the screensaver under Change screen saver.If you need further information about an option, you can get help with most settings bypressing the ?symbol in the upper right of the screen to open Microsoft Help.When the Tablet PC is in a power-saving mode, you must remember the following:During power-saving mode, open data is held in main memory orin a swap file on the hard disk.Never switch off the Tablet PC while it is in a power-saving mode. If the built-in batteryis nearly flat, close all open files and do not go into power-saving mode.If you do not intend to use your Tablet PC for a long period of time:►Exit the power-saving mode if necessary by touching the screen or by switching the TabletPC on.►Close all opened programs and completely shut down the Tablet PC.36 Fujitsu
Working with the Tablet PCMemory cardsSlotYour Tablet PC is equipped with an integrated storage card reader. Use storagecards to enlarge the storage of your Tablet PC.Follow the manufacturer’s instructions when handling the memory cards.MemorycardSupported formatsThe following formats are supported:• Micro Secure Digital (Micro SDTM Card)•MicroSDHC•MicroSDXCInserting the memory card21►Open the slot cover (1).►Carefully slide the storage card into the slot (2). The label area must be facing upward. Donot apply any force, otherwise the delicate contact surfaces could be damaged.Memorycard►Close the slot cover.Fujitsu 37
Working with the Tablet PCRemoving the memory cardMemorycardTo avoid any loss of data, always follow the correct procedure for removing thecard (see the documentation for your operating system).►Open the slot cover.12►Pull the storage card out of the slot (1).►Close the slot cover (2).38 Fujitsu
Working with the Tablet PCSIM cardA SIM Card (Subscriber Identity Module) is a chip card which is inserted in a cellular phone or TabletPC and, together with an integrated 4G module, enables access to a cellular radio network.Follow the instructions supplied by the provider of the SIM card. If you do not feel thethe SIM card engage as you insert it, use a pointed object to insert the SIM card.Please note that the SIM card format must be micro-SIM (3FF). Other SIMcard formats, such as full-size (1FF), mini-SIM (2FF) or nano-SIM (4FF) donot fit in the SIM card slot of your Tablet PC.Please do not insert any other format of SIM card as they may becometwisted, they could even damage the system.Inserting a SIM card12►Open the slot cover (1).►Carefully push the SIM card into the slot (2) until the SIM card clicks into place.The label area must be facing upward. Do not apply any force, otherwise thedelicate contact surfaces could be damaged.►Close the slot cover.Fujitsu 39
Working with the Tablet PCRemoving a SIM card►Open the slot cover.21►Pull the SIM card out of the slot (1).►Close the slot cover (2).Wireless LAN/Bluetooth/4G/NFC wirelesscomponentsThe installation of wireless components not approved by Fujitsu willinvalidate the certifications issued for this device.Switching the wireless components on and offThe wireless components are switched on and off using the appropriatefunctions of the operating system.►To switch wireless components on and off individually, select Settings – ChangePC settings – Network – Airplane mode.40 Fujitsu
Working with the Tablet PCFurther information on WLAN and BluetoothFor further information about WLAN or Bluetooth, see "Appendix: Miscellaneous Information".For WLAN specifications, see chapter "WLAN specifications", Page 84.Access via Wireless WANYou can purchase the accessories for Wireless WAN reception from your Fujitsu dealer.If you have ordered a Wireless WAN module, your device will alreadybe prepared when you receive it.You will find information on establishing the connection with the Wireless WANnetwork in the documentation for the hardware you plan to use.NFCYour Tablet PC is optionally equipped with an integrated NFC chip. Near Field Communicationallows a contactless, wireless exchange of data at a short distance (a few centemetres).Ethernet and LAN (only with performance dockingcradle or keyboard docking station)EthernetLANThe internal network module of your Tablet PC supports Ethernet LAN. You can use it toestablish a connection to a local network (LAN = Local Area Network).21►Connect the network cable to the LANport of the cradle (1).or►Connect the network cable to the LANport of the keyboard docking station (1).►Connect the network cable to yournetwork connection (2).Your network administrator can help you to configure and use the LAN connections.The network cable is not included in the delivery scope. This type ofcable can be obtained from a specialist dealer.Fujitsu 41
Working with the Tablet PCGPSGPSWhether your device has this function depends on the chosen equipment level.42 Fujitsu
Accessories for your Tablet PC (optional)Accessories for your Tablet PC (optional)The following accessories are available for your Tablet PC:• Performance docking cradle for charging the Tablet PC and with additional ports• Keyboard cover• Keyboard docking station• VESA mounting attachment and hand strap• Shoulder strap• Folio case• Micro USB adaptersThe following sections provide more information on handling the accessories.Fujitsu 43
Accessories for your Tablet PC (optional)Your performance docking cradle (optional)As well as fast charging, your performance docking cradle is a device that also allows you toquickly connect your Tablet PC to your peripherals such as a monitor, keyboard, mouse, etc.You only need to dock the Tablet PC to be able to work with your peripheral devices.Cradle componentsPortsPortsCradle1233456721 = Connector on the cradle for the dockingport of the Tablet PC2 = USB port 3.03 = USB port 3.04 = External monitor port (VGA)5 = HDMI6 = LAN port7 = DC jack socket (DC IN)44 Fujitsu
Accessories for your Tablet PC (optional)SettingupthecradleSelect a suitable location for the cradle before setting it up. In doingso, please follow these instructions:• Placethecradleonaflat, stable, non-slippery surface.• Never place the cradle or the AC adapter on a heat-sensitive surface.• Do not expose the cradle to extreme environmental conditions.Protect the cradle from dust, moisture and heat.Connecting the Tablet PC to the cradleIt is possible to connect the Tablet PC to the cradle while it is running. To preventproblems, we recommend that you switch the Tablet PC off first.Disconnect the AC adapter from the Tablet PC before connectingthe Tablet PC to the cradle.When the Tablet PC is connected to the cradle, you must connectthe AC adapter to the cradle.Information for using the performance docking cradle:• If your Tablet PC is connected to the performance docking cradle, the micro USBport of the Tablet PC cannot be used. Use the alternative ports of the cradle.• The HDMI and VGA ports of the performance docking cradle cannotbe used at the same time. If devices are connected to both ports, onlythe device at the HDMI port can be used.• The maximum supported resolution for VGA/HDMI is 1920 x 1080 pixels.Cradle►Switch the Tablet PC off.►Remove the AC plug of the AC adapter from the power outlet.►Remove the AC adapter cable from the DC jack (DC IN) of the Tablet PC.Fujitsu 45
Accessories for your Tablet PC (optional)1243►Position the Tablet PC so that it aligns with the surface of the cradle.►Push the Tablet PC on to the cradle in the direction of the arrow (1) untilyou feel it engage on the connector.►Plug the AC adapter cable into the DC jack (DC IN) on the cradle (2).►Connect the AC cable to the AC adapter (3).►Plug the AC cable into the power outlet (4).46 Fujitsu
Accessories for your Tablet PC (optional)Disconnecting the Tablet PC from the cradle1►While holding down the lower part of the cradle, lift the Tablet PC fromthe cradle in the direction of the arrow (1).Fujitsu 47
Accessories for your Tablet PC (optional)Keyboard cover (optional)The keyboard cover is optimized for the convenient input of text. It only needsto be docked with the Tablet PC.Keyboard cover componentsKeyboardco verCom ponents24131 = Slide-out button2 = Extending stand (in extended state)3 = Docking connector for the Tablet PC4 = Status indicators (Num Lock, CapsLock, Scroll Lock)48 Fujitsu
Accessories for your Tablet PC (optional)Connecting the Tablet PC to the keyboard coverKeyboardco ver►Place the keyboard cover on a smooth and level surface. Make surethat the stand is fully extended.1132To prevent the Tablet PC from tipping over and becoming damaged, always makesure that the stand is fully extended when you use the keyboard cover.►Completely pull out the extending stand (1).►Press the slide-out button (2) until it firmly remains in pressed position (red marking visible).►Push the Tablet PC onto the keyboard cover in the direction of the arrowuntil you feel it engage on the connector (3).Fujitsu 49
Accessories for your Tablet PC (optional)Separating the Tablet PC from the keyboard cover12►Keep the slide-out button pressed (1).►Lift the Tablet PC away from the keyboard cover in the direction of the arrow (2).50 Fujitsu
Accessories for your Tablet PC (optional)Keyboard docking station (optional)The keyboard docking station is a device which has been optimized for convenient input of textsand allows external devices to be connected. It only needs to be docked with the Tablet PC.Ports on the keyboard docking stationkeyboardd ocking statio nPorts2316547 89101 = Slide-out button2 = Docking port for the Tablet PC3=Statusindicators (Num Lock, CapsLock, Scroll Lock)4 = External monitor port (VGA)5=USBport (USB 3.0)6 = LAN port7=HDMIport8 = USB port (USB 3.0)9 = Battery indicator10 = Battery charging indicatorFujitsu 51
Accessories for your Tablet PC (optional)Status indicatorsStatus indicator DescriptionBattery indicator The battery indicator shows the state of charge of the battery.• The indicator lights up white: The battery is between 50% and100% charged.• The indicator lights up orange: The battery is between 13 %and 49 % charged.• The indicator lights up red: The battery is between 0 % and12 % charged.Battery charging indicator The battery charging indicator shows whether the battery is beingcharged.• The indicator lights up red: The AC adapter is connected andthe battery is being charged.• The indicator lights up white: The AC adapter is connected andthe battery is fully charged / is not being charged.• The indicator is not lit up: The AC adapter is not connected.52 Fujitsu
Accessories for your Tablet PC (optional)Connecting the Tablet PC to the keyboard docking stationkeyboardd ocking statio n►Position the keyboard docking station as shown.►Push the Tablet PC onto the keyboard docking station in the direction of thearrow until you feel it engage on the connector.Fujitsu 53
Accessories for your Tablet PC (optional)Separating the Tablet PC from the keyboard docking station12►Keep the unlocking button pressed (1).►Lift the Tablet PC away from the keyboard docking station in the direction of the arrow (2).54 Fujitsu
Accessories for your Tablet PC (optional)VESA mounting attachment (optional)Use the VESA mounting attachment to secure the Tablet PC to a monitorwith the corresponding screw holes.• Use the appropriate tool of the correct size when securing the screws:Use a No. 0 cross slot screwdriver.• Keep the screws out of the reach of children.111123333►Remove the 4 screws (1).►Position the VESA mounting attachment on the Tablet PC (2). Make sure that the screw holes ofthe VESA mounting attachment and of the Tablet PC lie exactly on top of each other.►Secure the VESA mounting attachment using the screws (3).Fujitsu 55
Accessories for your Tablet PC (optional)Hand strap (optional)• Use the appropriate tool of the correct size when securing the screws.• Keep the screws out of the reach of children.• Do not shake the device too much when you are holding it on thehand strap, otherwise it may fall down.122►Position the hand strap on the Tablet PC (1). Make sure that the screw holes of thehand strap and of the Tablet PC lie exactly on top of each other.►Secure the hand strap with the screws (2).56 Fujitsu
Accessories for your Tablet PC (optional)Shoulder strap (optional)• Use the appropriate tool of the correct size when securing the screws.• Keep the screws and mountings out of the reach of children.• Do not use motorized screw driver so to not damage the screws113232►Remove the screws (1).►Position the fittings (2).►Secure the fittings using the screws (3).Fujitsu 57
Accessories for your Tablet PC (optional)►Secure the shoulder strap to the fittings.Folio case (optional)• The folio case contains magnets. Keep away from objects that may beeasily affected bytheinfluence of magnetism.• LCD may be accidently turned on if the cover is not properly closed.• Make sure the unit is firmly fitted into the folio case fasteners so it will not fall out.• This folio case is only designed to contain and carry this unit.Do not use it for any other purpose.• Do not put the folio case in a direct sunlight or expose to hightemperature and humidity.►Position the Tablet PC on the folio case as shown.►Engage the top edge and then press it down.The following illustration shows you the many ways in which the folio case can be used:58 Fujitsu
Accessories for your Tablet PC (optional)Micro USB adapters5 USB adapters are available for the device:Micro USB to USB adapterMicro USB to HDMI adapterFujitsu 59
Accessories for your Tablet PC (optional)Micro USB to VGA adapterMicro USB to Display Port adapterMicro USB to LAN adapterFor technical specifications, see chapter "Micro USB adapters (optional)", Page 87.60 Fujitsu
Security functionsSecurity functionsSecurityfunctionsYour Tablet PC has several security features that you can use to secure your systemand your personal data from unauthorized access.This chapter explains how to use these functions, and what the benefits are.Please remember that in some cases - for example, forgetting your password- you may be locked out of the system and unable to access your data.Therefore, please note the following information:• Back up your data on external data carriers at regular intervals.• Some security functions need you to choose passwords. Make a noteof the passwords and keeptheminasafeplace.If you forget your passwords you will need to contact our Service Desk.Deletion or resetting of passwords are not covered by your warrantyand a charge will be made for assistance.Fujitsu 61
Security functionsConfiguring the fingerprint sensorFingerprintsens orFinger printsensorThe fingerprint sensor can record the image of a fingerprint. With additional fingerprintsoftware, this image can be processed and used instead of a password.11►Install the fingerprint software to be able to use the fingerprint sensor (1).You can obtain further information on the fingerprint sensor in the"appendix: Miscellaneous Information".62 Fujitsu
Security functionsConfiguring password protection in BIOS Setup UtilityBefore using the various options for password protection in the BIOS SetupUtility, please proceed as follows to increase data security:Make a note of the passwords and keep them in a safe place. If you forget your supervisorHDD password you will not be able to access your Tablet PC. Deletion of passwords isnot covered by your warranty and a charge will therefore be made for assistance.Password prote ctionYourpasswordcanbeuptoeight characters long and can contain letters andnumbers. No distinction is made between uppercase and lowercase.Protecting BIOS Setup Utility (supervisor HDD passwordand user HDD password)If you have opened these operating instructions on the screen, we recommendthat you print them out. You cannot call up the instructions on the screenwhile you are setting up the password.BIOSSetupUtilityThe supervisor HDD password and the user HDD password both prevent unauthorized use of theBIOS Setup Utility. The supervisor HDD password allows you to access all of the functions of the BIOSSetup Utility, while the user HDD password will only give you access to some of the functions. Youcan only set a user HDD password when a supervisor HDD password has already been assigned.Calling and using the BIOS Setup Utility is described in the chapter"Settings in BIOS Setup Utility", Page 72.Assigning the supervisor and user passwords►Start the BIOS Setup Utility and go to the Security menu.►Select the Set Supervisor Password field and press the Enter key.With Enter new Password: you are asked to enter a password.►Enter the password and press the Enter key.Confirm new Password requires you to confirm the password.►Enter the password again and press the Enter key.Changes have been saved is displayed as a confirmation that the new password has been saved.►To set the user password, select Set User Password and proceed exactly aswhen configuring the supervisor password.If you do not want to change any other settings, you can exit BIOS Setup Utility.►In the Exit menu, select the option Save Changes & Exit.►SelectYes and press the Enter key.PasswordSupervisorpasswor dUserpasswordThe Tablet PC is rebooted and the new password is effective. It will now be necessary tofirst enter your supervisor or user password in order to open the BIOS Setup Utility. Pleasenote that the user password only provides access to a few of the BIOS settings.Fujitsu 63
Security functionsChanging the supervisor HDD password or user HDD passwordYou can only change the supervisor HDD password when you have logged into theBIOS Setup Utility with the supervisor HDD password.PasswordSupervisorHDDpasswordUserHDDpassword►Start the BIOS Setup Utility and go to the Security menu.►When changing the password, proceed exactly as when assigning a password.Removing passwordsTo remove a password (without setting a new password) perform the following steps:PasswordSupervisorpasswordUserpassword►Start the BIOS Setup Utility and go to the Security menu.►Highlight the Set Supervisor Password or Set User Password field and press the Enter key.You will be requested to enter the current password by the Enter Current Password prompt.Enter New Password will appear and you will be requested to enter a new password.►Press the Enter key twice at this request.►In the Exit menu, select the option Save Changes & Exit.►Select Yes and press the Enter key.The Tablet PC is rebooted and the password is removed.Removing the supervisor password simultaneously deactivates the user password.Password protection for booting the operating systemYou can also prevent booting of the operating system with the supervisorHDD password you have set in the BIOS Setup Utility (see section "Assigningthe supervisor and user passwords", Page 63).Operating systemActivating system protection►Start the BIOS Setup Utility and go to the Security menu.Operatingsystem►Select the Password on Boot option and press the Enter key.►Select the option you require (Disabled,First Boot or Every Boot) and press the enter key►Select the Save Changes & Exit option under Exit.The Tablet PC reboots. You will be prompted to enter your password (the supervisor password).Deactivating system protection►Start the BIOS Setup Utility and go to the Security menu.Operatingsystem►Select the Password on Boot option and press the Enter key.►Select the Disabled option and press the Enter key.If you do not want to change any other settings, you can exit BIOS Setup Utility.►Select the Save Changes & Exit option under Exit.The Tablet PC reboots. The system is no longer password protected.64 Fujitsu
Security functionsPassword protection for the hard diskPasswordprotect ionThe hard disk password prevents unauthorized access to the hard disk drivesand is checked internally each time the system is booted. The condition for thisis that you have assigned at least the supervisor HDD password.Activating hard disk protection►Call up the BIOS Setup and select the Security menu.If you have not assigned BIOS passwords yet, define the supervisor and the userpassword now, if desired (see "Security functions", Page 61).►Mark the Hard Disk Security field and press the Enter key.►In the area Drive0, mark the field Set Master Password and press the Enter key.Enter new Password then appears and you are asked to enter a password.►Enter the password and press the Enter key.Confirm new Password requires you to confirm the password.►Enter the password again and press the Enter key.With Setup Notice: Changes have been saved you receive confirmation thatthe new password has been saved.►If you wish to enter a password for a second hard disk (Drive1), in the areaDrive1 mark the field Set Master Password and proceed in exactly the same wayas for the set up of the first hard disk (Drive0).The field Password Entry on Boot is set to Enabled by default. You can exit the BIOSSetup once you have finished changing the settings.►From the Exit menu, choose the option Exit Saving Changes.►Press the Enter key and select Yes.The Tablet PC reboots and your hard disk is now protected with a password. Thepassword prompt is enabled as soon as the Tablet PC has rebooted.Deactivating hard disk protectionTo cancel a password (without setting a new password) proceed as follows:►Call up the BIOS Setup and select the Security menu.►Mark the Hard Disk Security field and press the Enter key.►In the area Drive0, mark the field Set Master Password and press the Enter key.With the prompt Enter current Password you are first asked to enter the old password again.With Enter new Password you are then prompted to enter a new password.►After the request, press the Enter key three times.►From the Exit menu, choose the option Exit Saving Changes.►Press the Enter key and select Yes.The Tablet PC reboots and there is no longer any password protection for this hard disk.►If you wish to remove a password for a second hard disk (Drive1), in the areaDrive1 mark the field Set Master Password and proceed in exactly the same wayas for the removal of the first hard disk (Drive0).Fujitsu 65
Security functionsSmart Card reader (optional)SecurityfunctionsSecurityfunctionsSmart Cards are not supplied as standard equipment. You can use all Smart Cards that comply withthe ISO standard 7816-1, -2 or -3. These Smart Cards are available from various manufacturers.With the appropriate software you can use your Smart Card as an alternative to passwordprotection, but also as a digital signature, for encrypting your e-mails or for home banking.We recommend that you always use two Smart Cards. Always keep one of the Smart CardsinasafeplaceifyouarecarryingtheotherSmartCardwithyou.In order to be able to take advantage of all the security features of your Tablet PC,you will need a CardOS Smart Card from Fujitsu.The Smart Card can only be used with a PIN, so maximum protection is maintainedeven when the Smart Card is lost. In order to maximize your security, the CardOSSmart Card is disabled if three incorrect attempts are made to enter the PIN.During first time use of your CardOS Smart Card, you must either enter the preset PIN"12345678" or the PIN which has been notified to you by your system administrator.Inserting the Smart CardDo not use force when inserting and removing the Smart Card.Make sure that foreign objects do not fall into the Smart Card reader.►Push the Smart Card into the Smart Card reader with the chip facing the rear of the Tablet PC.66 Fujitsu
Security functionsTrusted Platform Module - TPM (device dependent)TPMTrusted Platform ModuleTo use the TPM, you must enable the TPM in the BIOS Setup before the software isinstalled. The requirement for this is that you have assigned at least the supervisorHDD password (see "Security functions", Page 61).Enabling TPM• Requirement: You have assigned a supervisor HDD password (see "Security functions", Page 61).►Call BIOS Setup and select the Security menu.►Mark the TPM Security Chip Setting field and press the Enter key.►Select the entry Enabled to enable the TPMOnce you have enabled the TPM the Clear Security Chip menu item appears.You can clear the holder in the TPM using Clear Security Chip.WithEnabled,all secret keys (e.g. SRK - Storage Root Keys, AIK - Attestation Identity Keysetc.) generated by applications are deleted.Take note that you can then no longer access the data you haveencrypted on the holder-based keys!►Select the Exit Saving Changes option in the Exit menu.►Press the Enter key and select Yes.The Tablet PC restarts and the TPM is enabled after the reboot.Disabling TPM• Requirement: You have assigned a supervisor HDD password (see "Security functions", Page 61).►Call BIOS Setup and select the Security menu.►Mark the TPM Security Chip Setting field and press the Enter key.►Select the entry Disabled to disable the TPM.►From the Exit menu, choose the option Exit Saving Changes.►Press the Enter key and select Yes.The Tablet PC is rebooted and the TPM is disabled.Fujitsu 67
Connecting external devicesConnecting external devicesUnder all circumstances, please observe the safety notes provided in the"Important notes", Page 12 chapter before connecting or disconnectingany devices to or from your Tablet PC.Always read the documentation supplied with the device you wish to connect.Never connect or disconnect cables during a thunderstorm.Never pull at a cable when disconnecting it. Always grasp the plug.Follow the order described below when you connect external devices tothe Tablet PC or separate them from it:With some devices, such as USB devices, it is not necessary to switch offthe Tablet PC and the device before connecting/disconnecting. For moreinformation about whether or not devices need to be switched off, please referto the documentation supplied with your external device.Some of the external devices require special drivers (see the operatingsystem and external device documentation).Connecting devices to the Tablet PC (or to the cradle / keyboard docking station).1. Switch off the Tablet PC and all the external devices.2. Disconnect the AC plugs for the Tablet PC and all the affected devices from the power outlets.3. Connect the cables for all the external devices according to the instructions.4. Plug all the AC plugs into the power outlets.Devices,Peripherals,Disconnecting devices from the Tablet PC (or from the cradle / keyboard docking station)1. Switch off the Tablet PC and all the external devices.2. Disconnect the AC plugs for the Tablet PC and all the affected devices from the power outlets.3. Disconnect the cables for all the external devices following the instructions.Devices,Peripherals,68 Fujitsu
Connecting external devicesConnecting an external monitorHDMI port (only performance docking cradle andkeyboard docking station)HDMIportThe HDMI port can be used to connect an external amplifier, LCD TV or aplasma TV with an HDMI connection.►Connect the data cable to theexternal device.►Connect the data cable to the HDMI port.Some LCD televisions have only two speakers/speaker ports and thereforecannot reproduce Dolby Digital or DTS. To play back HDMI sound, youmust change the HDMI sound settings accordingly.You can find the settings under Control Panel - Hardware and Sound. Deactivate thesettings for DTS Audio and Dolby Digital to enable playback of HDMI sound.External monitor port (VGA) (only performance dockingcradle and keyboard docking station)An analog monitor is connected to the analog external monitor port (VGA). Screen outputis limited to a maximum of two screens at the same time.MonitorVGAportScreenc onnectionMonitorconnection►Switch off the Tablet PC and theexternal monitor.►Plug the data cable of the externalmonitor into the monitor port.►First switch on the external monitor andthen switch on the Tablet PC.You can also switch back and forth between the external monitor and the LCDscreen of the Tablet PC, see "Touchscreen", Page 24.You can display the same image on the external monitor and on the LCDscreen of the Tablet PC at the same time.Fujitsu 69
Connecting external devicesConnecting USB devicesUSBportsOn the USB ports you can connect external devices that also have a USB port(e.g. a DVD drive, a printer, a scanner or a modem).USB devices are hot-pluggable. This means you can connect and disconnect thecables of USB devices while the operating system is running.USB 1.x has a maximum data transfer rate of 12 Mbps.USB 2.0 has a data transfer rate of up to 480 Mbps.USB 3.0 has a data transfer rate of up to 5 Gbps.Additional information can be found in the documentation for the USB devices.+►Connect the data cable to the external device.►Connect the data cable to a USB port (Tablet PC, keyboard docking station orcradle) or micro USB port (only on Tablet PC).Device driversUSB devices will be automatically recognized and installed by your operating system.How to remove USB devices correctlyAlways correctly remove the device according to the rules described below,to ensure that none of your data is lost.►Tap the symbol for safe removal of the hardware.►Select the device you wish to shut down and remove.►Tap OK.Wait for the dialog box which tells you that it is now safe to remove the device.70 Fujitsu
Connecting external devicesHeadphones portConnectingaudio dev icesAudioconnectionsConnectinghe adphonesYou can connect either headphones or external speakers to your Tablet PC via the headphone port.►Connect the audio cable to theexternal device.►Connect the audio cable to the headphoneport of the Tablet PC.The internal speakers are disabled.If you buy a cable from a retailer, please note the following information:The headphone port on your Tablet PC is a "3.5 mm / 1/8" jack socket".If you want to connect headphones or speakers you will need a "3.5 mm / 1/8" jack plug".Fujitsu 71
Settings in BIOS Setup UtilitySettings in BIOS Setup UtilityBIOSSetupUtilitySystemsettings,BIOSSetupUtilityConfiguration,BIOSSetupUtilitySetupConfigurin gsystemConfiguringhardwareTo navigate more easily in the BIOS Setup Utility, you can use an external USB keyboard.The BIOS Setup Utility allows you to set the system functions and the hardwareconfiguration for the Tablet PC.When the Tablet PC is delivered, the default settings are effective. You can changethese settings in the menus of the BIOS Setup Utility. Any changes you make takeeffect as soon as you save and exit the BIOS Setup Utility.The BIOS Setup Utility program contains the following menus:About Displays information relating to the BIOS, processor and Tablet PCSystem Advanced system settingsAdvanced Configuration of various hardware components, such as mouse, keyboard,processorSecurity Password settings and security functionsBoot Configuration of the start-up sequenceExit Exits the BIOS Setup UtilityStarting the BIOS Setup Utility►Keep the "Lock screen orientation" tablet button pressed and switch the Tablet PC on.BIOSSetupUtility►If a password has been assigned, enter the password and press the Enter key.If you have forgotten the password, contact your system administratoror contact our customer service center.The BIOS Setup Utility starts.72 Fujitsu
Settings in BIOS Setup UtilityBIOS Setup Utility operationBIOSSetupUtilityPress the F1 key to display help about operation of the BIOS Setup Utility. The descriptionof the individual settings is shown in the right-hand window of the BIOS Setup Utility.With the F9 key you can load the default settings of the BIOS Setup Utility.►Use the cursor keys ←or →to select the menu you wish to access to make changes.The menu is displayed on the screen.►Select the option you want to change with the cursor keys ↑or ↓.►Press the "Enter" key.►Press the ESC key to exit the selected menu.►For future reference, make a note of the changes you have made.Fujitsu 73
Settings in BIOS Setup UtilityExiting BIOS Setup UtilityBIOSSetupUtilityYou need to select the desired option in the Exit menu and activate it by pressing the Enter key:Exit Saving Changes - save changes and exit BIOS Setup Utility►To save the current menu settings and exit the BIOS Setup Utility, select Exit Saving Changes and Yes.The Tablet PC is rebooted and the new settings come into effect.Exit Discarding Changes - Reject changes andexit BIOS Setup Utility►To discard the changes, select Exit Discarding Changes and Yes.The settings which were valid when BIOS Setup Utility was called remain effective.The BIOS Setup Utility ends and the Tablet PC is rebooted.Load Setup Defaults – load default values►To copy the standard entries for all menus of the BIOS Setup Utility,choose Load Setup Defaults and Yes.Discard Changes - Discard Changes withoutexiting BIOS Setup Utility►To discard the changes you have made, select Discard Changes and Yes.The settings in place when BIOS Setup Utility was called remain effective.You can now make additional settings in the BIOS Setup Utility.►IfyouwanttoexittheBIOS Setup Utility with these settings, select Exit Saving Changes and Yes.Save Changes - save changes without exitingthe BIOS Setup Utility►To save the changes, select Save Changes and Yes.The changes are saved. You can now make additional settings in the BIOS Setup Utility.►If you want to exit BIOS Setup Utility with these settings, choose Exit Saving Changes and Yes.Save changes and power off►To save the changes and switch off your device, select Save Changes and Power Off and Yes.The changes are saved. Your device is shut down.74 Fujitsu
Troubleshooting and tipsTroubleshooting and tipsTroubleshootingTipsFaultTroubleshootingIf a fault occurs, try to correct it as described. If you are unable to correctthe problem, proceed as follows:►Make a note of the steps and the circumstances that led to the fault. Alsomake a note of any error messages displayed.►Switch the notebook off.►Please contact the Hotline/Service Desk.You can contact Fujitsu Service and Support in the following ways:• Toll free number: 1-800-Fujitsu (1-800-838-5487)• Website: "http://solutions.us.fujitsu.com/www/content/support/contact/index.php"Please have the following information ready when you call:• The model name and serial number of the notebook. The serial number islocated on a sticker on the underside of the notebook.• Notes of any messages that appear on the screen and information on acoustic signals.• Any changes you have made to the hardware or software sincereceiving the notebook.• Any changes you have made to the BIOS Setup settings since receiving the notebook.• Your system configuration and all peripheral devices connected to your system.• Your sales contract.Our notebooks have been designed primarily with mobile applications in mind.This means that considerable effort has been made to optimize components andequipment in terms of weight, space and energy requirements. Depending on theparticular configuration you have purchased, it is possible that functionality may beslightly reduced compared to a desktop PC if you are running processor-intensivegaming software, e.g. games with intensive 3D graphics. Updating your hardware withdrivers which have not been approved by Fujitsu may result in performance losses,data losses or malfunction of the equipment. A list of approved drivers and currentBIOS versions can be downloaded from: "http://solutions.us.fujitsu.com"Help if problems occurShould you encounter a problem with your computer that you cannot resolve yourself:►Note the ID number of your device. The ID number is found on the type ratingplate on the back or underside of the casing.►For further clarification of the problem, contact the Fujitsu Service Desk. When you dothis, please have ready the ID number and serial number of your system.Recovering your Factory ImageHarddisk:Operatingsystem,recoveringFactoryImageIn the event you need to restore your original Factory Image refer to the stepsin "Appendix: Miscellaneous Information".Fujitsu 75
Troubleshooting and tipsTheTabletPC’sdateortimeisincorrectSummertimeWint ertimeIncorrect timeTimenot correctWrongdate/timeDatenotcorrectChargingb ack-up batte ryCause TroubleshootingTime and date are wrongly set. ►With the BIOS-Setup-Utility, you can set thedate and time in the Main menu.Date and time are still set incorrectly afterswitching on the Tablet PC.►Please contact your sales outlet or ourhotline/service desk.Battery indicator does not illuminateCause TroubleshootingThe battery is discharged. ►Charge the battery.or►Connect the Tablet PC to a power outletusing the AC adapter.The Tablet PC’s touchscreen remains darkTou ch s c re e ndark touchscreenCause TroubleshootingTouchscreen is switched off. ►Press a key (external keyboard) or tap onthe touchscreen.External monitor or television set connected. ►Check whether the graphics driver settingsare correct or whether an external monitorhas been detected in "Intel Graphics MediaAccelerator Driver for mobile."The display on the Tablet PC’s touchscreenis difficult to read.Tou ch s c re e nTo u ch s c re e nCause TroubleshootingReflected glare ►Move the Tablet PC into a different position.►Increase the brightness of the screen.76 Fujitsu
Troubleshooting and tipsThe external monitor remains blankMonitorCause TroubleshootingMonitor is switched off. ►Switch the external monitor on.Energy saving has been activated (monitor isblank).►Press a key (external keyboard) or tap onthe touchscreen.Brightness is set to dark. ►Adjust the brightness of the monitor.Screen output is set to the Tablet PCtouchscreen.►Check whether the graphics driver settingsare correct or whether an external monitorhas been detected in "Intel Graphics MediaAccelerator Driver for mobile."The external monitor’s AC cable or data cable isnot connected properly.►Switch off the Tablet PC and the externalmonitor.►Check whether the AC cable is pluggedproperly into the external monitor and intothe power outlet.►Check that the data cable is properlyconnected to the Tablet PC and the externalmonitor (if it is plugged in with a connector).►Switch on the external monitor and theTab l et P C .The external monitor is blank or the image is unstableMonitorMonitorCause TroubleshootingThe wrong external monitor has been selectedor the wrong screen resolution has been set forthe application program.►Terminate the application program inWindows. If the error persists afterterminating the program, use the keycombination for switching the screen outputin order to switch to the touchscreen of theTab l et P C . Change the following setting:►Set the screen resolution: Set the screenresolution as described in the documentationfor your operating system.►Select monitor: Select monitor 1 or 2 asdescribed in the documentation for youroperating system.The cursor does not correctly follow thestylus movementsCause TroubleshootingStylus incorrectly calibrated. ►Calibrate the stylus as described in chapters"Adjusting the stylus", Page 32 and"Calibrating the stylus", Page 33.Fujitsu 77
Troubleshooting and tipsStylus input not workingCause TroubleshootingIncorrect driver installed. ►If your device is one which can only beoperated using the stylus, install the driverfor the standard model.or►If your device is one which can beoperated using the stylus and by finger,install the driver for the "Dual Digitizer"model.The Tablet PC does not start after switch onTabletPCCause TroubleshootingThe battery is discharged. ►Charge the battery.or►Connect the AC adapter to the TabletPC.The AC adapter is not properly connected. ►Check whether the AC adapter is properlyconnected to the Tablet PC.►Switch the Tablet PC on.The Tablet PC stops workingTabletPCEndingCause TroubleshootingThe Tablet PC is in energy saving mode. ►End energy saving mode.An application program has caused themalfunction.►Close the application program or restartthe Tablet PC (by restarting the operatingsystem or switching the device off and backon again).The battery is discharged. ►Charge the battery.or►Connect the AC adapter to the TabletPC.78 Fujitsu
Troubleshooting and tipsThe printer does not printPrinterdoesnot printCause TroubleshootingThe printer is not switched on. ►Make sure that the printer is switchedon and ready for operation (refer to thedocumentation supplied with the printer).The printer is not connected correctly. ►Check that the data cable between the TabletPC and the printer is properly connected.The printer driver is faulty or not correctlyinstalled, or it is the wrong printer driver.►Check that the data cable between the TabletPC and the printer is properly connected.►Check whether the correct printer driver isloaded (refer to the printer documentation).The wireless connection to a network does not workThewireless connectionto anetwork doesnotwor kCause TroubleshootingThe wireless component is switched off. ►Switch the wireless component on (see"Switching the wireless components on andoff", Page 40).The wireless component is switched on. Despitethis, the wireless connection to a network doesnot work.►Check whether the wireless connection isenabled by the software.►Further information on using the wirelesscomponent can be found in the help files.The battery discharges too quicklyBatteryCause TroubleshootingThe battery is either too hot or too cold. In thiscase the battery indicator flashes.►Bring the Tablet PC up/down to a normaloperating temperature again.►If the operating time of the battery life isextremely short, the battery is probably tooold. Replace the battery if necessary.You may have an application running thatconsumes a great deal of power due to frequentaccessing of the hard disk or optical drive.►Use the AC adapter whenever possible.The maximum brightness may have been setfor the screen.►Reduce the brightness of the screen tolower energy consumption: You will find thesetting under Control Panel – Hardware andSounds – Windows Mobility Center.Fujitsu 79
Troubleshooting and tipsSmart Card reader is not recognizedCause TroubleshootingChip card inserted incorrectly. ►Make sure you have inserted your SmartCard into the Smart Card reader with thechip facing upwards.►Check whether the Smart Card you areusing is supported. Your Smart Card mustcomply with the ISO standard 7816-1, -2,-3 and -4.Acoustic warningAcous tic wa rnin gsErrorsCause TroubleshootingA beep sounds every few seconds.The battery is almost flat.►Charge the battery.Error messages on the screenErrormessagesonthe screenErrorsThis section describes the error messages generated by the BIOS Setup. Error messages displayedby the operating system or programs are described in the documentation for these programs.If the error message appears repeatedly despite troubleshooting measures,contact the place of purchase or our customer service center.80 Fujitsu
Troubleshooting and tipsError message/cause TroubleshootingCMOS Battery BadIf the error message occurs repeatedly, thebuffer battery in the Tablet PC is flat.►Contact your sales outlet or our customerservice center.System CMOS checksum bad - Default configurationusedThe system configuration information isincorrect.►Switch the Tablet PC off.►Switch the Tablet PC on.►In the BIOS Setup, select the Exit menu.►Select the entry Load Setup Defaults.►Select OK and press the Enter key.Extended memory failed at offset: xxxx Failing Bits:zzzz zzzzWhen testing the extended memory. an errorhas resulted at the address xxxx.►Contact your sales outlet or our customerservice center.Failure Fixed Disk nThe settings of the hard disk drive are incorrect.►Start the BIOS Setup (Primary Mastersubmenu) and select the correct settings.Keyboard controller error ►Switch your Tablet PC off with the ON/OFFbutton.►Wait 3 - 5 seconds and switch the Tablet PCon again.Keyboard error If you use an external keyboard:►Check the connection and reboot the TabletPC.nn Stuck key ►Make sure that no key is pressed.Operating system not found ►Check in the BIOS Setup whether your harddisk has been set correctly.►Make sure that the operating system isinstalled on the corresponding drive.Press <F1> to resume, <F2> to SETUPThis error message appears if an error occursduring the self-test before starting the operatingsystem.►Press theAlt tablet button to boot theoperating systemReal time clock error ►Contact your sales outlet or our customerservice center.nnnnK Shadow RAM failed at offset: xxxx FailingBits: zzzz►Contact your sales outlet or our customerservice center.System battery is dead - Replace and run SETUP ►Contact your sales outlet or our customerservice center.System cache error - Cache disabled ►Contact your sales outlet or our customerservice center.System timer error ►Contact your sales outlet or our customerservice center.Fujitsu 81
Technical dataTechnical dataTablet PCGeneralProcessor Core i5 or core i7 (dependent on configuration)Main memory (SO DIMM) • Core i5: 4 GB• Corei7:8GBElectrical dataSafety regulations complied with CEProtection class IIMaximum power consumption (when the TabletPC is switched on, connected to the keyboardcover and the battery is charged):65 WTouchscreenSize 12.5" Full HD Wide View IPSScreen resolution 1920 x 1080 / 16 million colorsPixel class IIBrightness control 12 levelsTechnology Wide-View High-Bright Display with LEDbackground lightingDigitizer and glass panel Dual digitizer with Glare touch screenCameras • Front: HD camera• Back: 8 megapixels, autofocus, mobile lightGraphics cardChip Intel® HD Graphics 4400Maximum resolution of external display: 1920 x 1080DimensionsWidth x Depth x Height Standard Shell tablet only: 12.19 x 7.85 x 0.47inches (309.6 x 199.3 x 11.9 mm)Standard Shell tablet w/keyboard cover: 12.19 x7.85 x 0.79 inches (309.6 x 199.3 x 20 mm)Standard Shell tablet w/keyboard dockingstation: 12.19 x 7.85 x 1.22 inches (309.6 x199.3 x 31.1 mm)Smart Card Shell tablet only: 12.19 x 7.85 x 0.74inches (309.6 x 199.3 x 18.8 mm)Smart Card Shell tablet w/keyboard cover: 12.19x 7.85 x 1.09 inches (309.6 x 199.3 x 27.8 mm)Smart Card Shell tablet w/keyboard dockingstation: 12.19 x 7.85 x 1.31 inches (309.6 x199.3 x 33.3 mm)82 Fujitsu
Technical dataWeight depending on configuration Standard Shell tablet only: 2.16 lbs (.98 kg)Standard Shell tablet w/keyboard cover: 3.68lbs (1.67 kg)Standard Shell tablet w/keyboard dockingstation: 4.72 lbs (2.14 kgs)Smart Card Shell tablet only: 2.38 lbs (1.08 kgs)Smart Card Shell tablet w/keyboard cover: 3.90lbs (1.77 kgs)Smart Card Shell tablet w/keyboard dockingstation: 4.94 lbs (2.24 kgs)Input devicesTablet buttons 3 keysStylus Active stylus with one press-buttonSlotsStorage card slot 1 x Micro SDSIM card slot 1 x Micro SIMPortsHeadphones port 3.5 mm / 1/8" stereo mini jackDocking port 1 xUSB (Universal Serial Bus) 1 x USB 3.0, 1 x micro USB 2.0Ambient conditionsEnvironment class DIN IEC 721 7K1Mechanism class DIN IEC 721 7M2Operating temperature 5 °C .... 35 °C / 41 °F .... 95 °FTransport temperature (2K2) –15 °C .... 60 °C / 5 °F .... 140 °FFujitsu 83
Technical dataWLAN specificationsType of network Intel® Dual Band Wireless 7265NGW (StonePeak – 11a/b/g/n/11ac), Wi-Fi based*Transfer rate (Automatic switching)  IEEE802.11  a  and  g:  54Mbps max. data rate; IEEE802.11n: 300 Mbpsmax. data rateActive frequencyTypical operating distances**Number of channelsSecurityMaximum recommended number of computersto be connected over wireless LAN (during adhoc connection)10 units or less****Rechargeable battery3-cell lithium polymer battery 4250 mAhRated voltage 10.8 VRated capacity 46 Wh84 Fujitsu• 802.11n: 2.4 GHz or 5 GHz• 802.11b/g: 2400~2473 MHz• 802.11a: 4900~5850 MHz• 802.11a: 40 f . (12 m8 @ 54 Mbp02 300 f . (91 m8 @ 6 Mbp0• 802.11ac: 40 f . (12 m8 @ 54 Mbp02 300 f .(91 m8 @ 6 Mbp0• 802.11b: 100 f . (30 m8 @ 11 Mbp02 300 f . (91 m8 @ 1 Mbp0• 802.11g: 100 f . (30 m8 @ 54 Mbp02 300 f . (91 m8 @ 1 Mbp0• 802.11n: E0 .1atn: doubln t4n opnrat.ng d.0 ancn of 802.11g   ---and 802.11a in t4n.r re0GnH .zn freornnc.n0• 802.11a: 8 indnGnndnnt c4anne50• 802.11b/g: 11 c4anne50• 3 non-ovnrlapG.ng   c4anne50• 802.11n: C4anne5 bond.ng takn0 tbo of 4n non ovnrlapG.ng 20MHz c4anne50 and Hombine0 i  into one 40MHz c4anne5. I  i0 ac ral5/ 12 non-ovnrlapG.ng c4anne50 w. 4 H4anne5 bond.ng and 24 w. 4ou . A50o i  i0 1 non ovnrlapG.ng c4anne5 in 2.4GHz w4nn 4anne5 bond.ng i0 u0n.EncryG .on t/Gn0: comGat.bln w. 4 Wg~• T73~•Mga999• W~M 1.0 and W~M 2.0EncryG .on kn/• lnngt40 srGGortn:: 64 bi 0 and128 bi 0* “Wi-Fi based” indicates that the interconnectivity test of the organization which guarantees the interconnectivity of wireless LANs (Wi-Fi ---Alliance) was passed.** The operating distances given above increase or decrease depending on factors such as the number of walls, reflecting material or ------   ----interference by external RF sources.*** Network key encryption (WEP) occurs with the number of bits given above, after deduction of the fixed length of 24 bits the user may            -----however also set 40 or 104 bits.**** Depending on the particular practical application, the number of computers which can be networked is reduced if necessary.
Technical dataAC adapter (65 W)TechnicaldataRated voltage 19 VMax. rated current 3.16 AAn additional AC adapter or AC cable can be ordered at any time.Performance docking cradle (optional)Electrical dataSafety regulations complied with CEProtection class IIDimensionsWidth x Depth x Height 9.89 x 4.24 x 2.48 in. / 251 x 108 x 63.1 mmWeight approx. 0.88 lbs / 400 gPortsUSB (Universal Serial Bus) 4 x USB 3.0Docking port 40-pinExternal monitor port (VGA) 1 x, max. resolution supported 1920 x 1080 (FullHD)LAN port 1 xHDMI port 1 x, max. resolution supported 1920 x 1080 (FullHD)Ambient conditionsEnvironment class DIN IEC 721 7K1Mechanism class DIN IEC 721 7M2Operating temperature 5 °C .... 35 °C / 41 °F .... 95 °FTemperature in transit –15 °C .... 60 °C / 5 °F .... 140 °FFujitsu 85
Technical dataKeyboard cover (optional)Electrical dataSafety regulations complied with CEProtection class IIDimensionsWidth x Depth x Height 12.19 x 8.37 x 0.78 in. / 309.6 x 212.7 x 20.0 mmWeight approx. 1.52 lbs. / 690 gPortsDocking port 40-pinAmbient conditionsEnvironment class DIN IEC 721 7K1Mechanism class DIN IEC 721 7M2Operating temperature 5 °C .... 35 °C / 41 °F .... 95 °FTemperature in transit –15 °C .... 60 °C / 5 °F .... 140 °FKeyboard docking station (optional)The battery of the keyboard docking station is not user-replaceable.Electrical dataSafety regulations complied with CEProtection class IIBattery 46 WhDimensionsWidth x Depth x Height 12.189 x 8.46 x 1.78 in. / 309.6 x 214.8 x 29.9mmWeight approx. 2.56 lbs. / 1.16 kgPortsDocking port 16-pinUSB (Universal Serial Bus) 2 x USB 3.0External monitor port (VGA) 1xLAN port 1 xHDMI port 1 xAmbient conditionsEnvironment class DIN IEC 721 7K1Mechanism class DIN IEC 721 7M2Operating temperature 5 °C .... 35 °C / 41 °F .... 95 °FTemperature in transit –15 °C .... 60 °C / 5 °F .... 140 °F86 Fujitsu
Technical dataVESA mounting attachment (optional)DimensionsWidth x Depth x Height approx. 218 mm x 103.5 mm x 13.5 mm / 8.58inx4.07inx0.53inWeight approx. 120 g / 0.26 lbsHand strap (optional)DimensionsWidth x Depth x Height approx. 480 mm x 77 mm x 13 mm / 18.89 in x3.03 in x 0.51 inWeight approx. 30 g / 0.066 lbsShoulder strap (optional)DimensionsLength x Depth x Height approx. 1270 mm x 25 mm x 5 mm / 50 in x0.98 in x 0,19 inWeight approx. 25 g / 0.055 lbsMicro USB adapters (optional)Adapter Length Max. resolutionMicro USB to USB adapter 6 inches N/AMicro USB to HDMI adapter 6 inches 1920 x 1080Micro USB to VGA adapter 6 inches 1920 x 1080Micro USB to Display Portadapter6 inches 1920 x 1080Micro USB to LAN adapter 6 inches N/AFujitsu 87
Manufacturer’s notesManufacturer’s notesDisposal and recyclingNotesYou can find information on this subject on your notebook or on our website("http://solutions.us.fujitsu.com/www/content/products/trade-in_program/").Recycling your batteryOver time, the batteries that run your mobile computer will begin to hold a charge for ashorter amount of time; this is a natural occurrence for all batteries. When this occurs,you may want to replace the battery with a fresh one*. If you replace it, it is importantthat you dispose of the old battery properly because batteries contain materials thatcould cause environmental damage if disposed of improperly.Fujitsu is very concerned with environmental protection, and has enlisted the services of theRechargeable Battery Recycling Corporation (RBRC)**, a nonprofit public service organizationdedicated to protecting our environment by recycling old batteries at no cost to you.RBRC has drop-off points at tens of thousands of locations throughout the United States andCanada. To find the location nearest you, go to "www.RBRC.org" or call 1-800-822-8837.If there are no convenient RBRC locations near you, you can also go to the EIA ConsumerEducation Initiative website "http://EIAE.org/ " and search for a convenient disposal location.Remember – protecting the environment is a cooperative effort, and you shouldmake every effort to protect it for current and future generations.* To order a new battery for your Fujitsu mobile computer, go to the Fujitsu shopping siteat "www.shopfujitsu.com" in the US or "www.fujitsu.ca/products/notebooks" in Canada.** RBRC is an independent third party to which Fujitsu provides funding forbattery recycling; RBRC is in no way affiliated with Fujitsu.DOC (Industry CANADA) NoticesDOC(INDUSTRYCANADA)NOTICESRadios and TelevisionThis Class B digital apparatus meets all requirements of Canadian Interference-Causing EquipmentRegulations.CET appareil numérique de la class B respecte toutes les exigence du Réglementsur le matérial brouilleur du Canada.88 Fujitsu
Manufacturer’s notesUL NoticeIMPORTANT SAFETY INSTRUCTIONSThis unit requires an AC adapter to operate. Only use UL Listed I.T.E. adapters with an output ratingof 19 VDC, with a minimum current of 3.42A (65W). The correct output rating is indicated on theAC adapter label. Refer to the illustration below for the correct AC Adapter output polarity:When using your notebook equipment, basic safety precautions should always be followed toreduce the risk of fire, electric shock and injury to persons, including the following:• Do not use this product near water for example, near a bathtub, washbowl, kitchensink or laundry tub, in a wet basement or near a swimming pool.• Use only the power cord and batteries indicated in this manual. Do not dispose of batteries in afire. They may explode. Check with local codes for possible special disposal instructions.SAVE THESE INSTRUCTIONSFor Authorized Repair Technicians OnlyCAUTION:For continued protection against risk of fire, replace only with thesame type and rating fuse.WARNING:Danger of explosion if Lithium (CMOS) battery is incorrectly replaced. Replace onlywith the same or equivalent type recommended by the manufacturer.Dispose of used batteries according to the manufacturer’s instruction.Fujitsu 89
Manufacturer’s notesENERGY STAR ComplianceYour Fujitsu system is an ENERGY STAR qualified mobile PC. By choosing a computer with thelatest energy-saving technology, you’re helping to preserve our environment for future generations.ENERGY STAR is a joint program of the U.S. Environmental Protection Agency, U.S. Departmentof Energy, Natural Resources Canada, and other governments around the world helping us savemoney while protecting the environment through energy efficient products and practices. Withenergy costs and global warming top-of-mind for consumers, Fujitsu is committed to offeringsolutions that help consumers conserve energy and improve the quality of our environment.Sleep Mode:You will notice that your computer is initially set so that the display turns off after 15 minutes ofuser inactivity, and the computer goes into Sleep mode after 20 minutes of user inactivity. Whengoing into Sleep mode, the computer also reduces the speed of any active Ethernet networklinks. To “wake” the computer from Sleep mode, press the Suspend/Resume Button.Energy saving benefits:Fujitsu ENERGY STAR qualified mobile PCs use about half as much electricity as standardequipment – saving half in utility costs. But more than that, ENERGY STAR also makes a differencefor the environment. Did you know that the average house can be responsible for twice thegreenhouse gas emissions as the average car? That’s because every time you flip on a lightswitch, run your dishwasher, or turn on your PC, you use energy, which means more greenhousegas emissions from power plants. So the more energy we can save through energy efficiency,the more we help to reduce greenhouse gases and the risks of global warming.To learn more about the important ENERGY STAR program, visit:"www.energystar.gov".To read about how Fujitsu is supporting Sustainable Management along withseveral other environmental activities, visit the Fujitsu Corporate Citizenship page at:"http://www.computers.us.fujitsu.com/www/content/aboutus/environmental/environment.php".Declarations of ConformityDeclarationof conformityThis device complies with Part 15 of the FCC rules. Operations are subject to the following twoconditions: (1) This device may not cause harmful interference, (2) This device must accept anyinterference received, including interference that may cause undesired operation.FCC and IC Regulatory InformationPlease note the following regulatory information related to the wireless LANdevice.90 Fujitsu
Manufacturer’s notesRegulatory Notes and StatementsWireless LAN, Health and Authorization for useRadio frequency electromagnetic energy is emitted from Wireless LAN devices. The energy levels ofthese emissions, however, are far much less than the electromagnetic energy emissions from wirelessdevices such as mobile phones. Wireless LAN devices are safe for use by consumers because theyoperate within the guidelines found in radio frequency safety standards and recommendations. Theuse of Wireless LAN devices may be restricted in some situations or environments, such as:• On board an airplane, or• In an explosive environment, or• In situations where the interference risk to other devices or services isperceived or identified as harmful.In cases in which the policy regarding use of Wireless LAN devices in specific environments isnot clear (e.g., airports, hospitals, chemical/oil/gas industrial plants, private buildings), obtainauthorization to use these devices prior to operating the equipment.Regulatory Information/DisclaimersInstallation and use of this Wireless LAN device must be in strict accordance with the instructionsincluded in the user documentation provided with the product. Any changes or modifications madeto this device that are not expressly approved by the manufacturer may void the user’s authority tooperate the equipment. The manufacturer is not responsible for any radio or television interferencecaused by unauthorized modification of this device, or the substitution or attachment of connectingcables and equipment other than those specified by the manufacturer. It is the responsibility of theuser to correct any interference caused by such unauthorized modification, substitution or attachment.The manufacturer and its authorized resellers or distributors will assume no liability for any damageor violation of government regulations arising from failure to comply with these guidelines.This device must not be co-located or operated in conjunction with any other antenna or transmitter.For IEEE 802.11a Wireless LAN: For operation within 5.15~5.25 GHz frequency range, it isrestricted to indoor environments, and the antenna of this device must be integral.Federal Communications Commission and Industry Canada statement:This device complies with Part 15 of FCC Rules and Industry Canada license exempt RSS standard(s).Operation is subject to the following two conditions: (1) This device may not causeinterference, and, (2) This device must accept any interference, including interferencethat may cause undesired operation of this device.Déclaration d’Industrie CanadaCet appareil est conforme à la Section 15 des Règles de la FC C et à la ( aux) norme(s)RSS concernant les appareils exempt s de licence par Industrie Canada. Son fonctionnementest soumis aux deux condition s suivantes : (1) cet appareil ne doit pas causer d’interférencenuisib le; (2) cet appareil doit accepter toutes les interférences reçues, y compris cellespouvan t causer un mauvais fonctionnement de l’appareil.Fujitsu 91
Manufacturer’s notesFCC Interference StatementThis equipment has been tested and found to comply with the limits for a Class B digitaldevice, pursuant to Part 15 of the FCC Rules. These limits are designed to provide reasonableprotection against harmful interference in a residential installation. This equipment generates,uses, and can radiate radio frequency energy. If not installed and used in accordance withthe instructions, it may cause harmful interference to radio communications. However, thereis no guarantee that interference will not occur in a particular installation.If this equipment does cause harmful interference to radio or television reception, whichcan be determined by turning the equipment off and on, the user is encouraged to try andcorrect the interference by one or more of the following measures:1. Reorient or relocate the receiving antenna.2. Increase the distance between the equipment and the receiver.3. Connect the equipment to an outlet on a circuit different from the one the receiver is connected to.4. Consult the dealer or an experienced radio/TV technician for help.FCC Radio Frequency Exposure statementThe available scientific evidence does not show that any health problems are associated withusing low power wireless devices. There is no proof, however, that these low power wirelessdevices are absolutely safe. Low power wireless devices emit low levels of radio frequencyenergy (RF) in the microwave range while being used. Whereas high levels of RF can producehealth effects (by heating tissue), exposure to low-level RF that does not produce heatingeffects causes no known adverse health effects. Many studies of low-level RF exposure havenot found any biological effects. Some studies have suggested that some biological effectsmight occur, but such findings have not been confirmed by additional research.The wireless LAN radio device has been tested and found to comply with FCC radiationexposure limits set forth for an uncontrolled equipment and meets the FCC radio frequency(RF) Exposure Guidelines in Supplement C to OET65.The exposure standard for wireless devices employs a unit of measurement known as the SpecificAbsorption Rate, or SAR. The SAR limit set by the FCC is 1.6W/kg, and 1.6W/kg by Industry Canada.This device is compliant with SAR for general population /uncontrolled exposure limits inANSI/IEEE C95.1-1992 and Canada RSS 102, and had been tested in accordance withthe measurement methods and procedures specified in OET Bulletin 65 Supplement C,and Canada RSS 102. This device has been tested, and meets the FCC, IC RF exposureguidelines when tested with the device operating conditions.Déclaration de la FCC/d’Industrie Canada sur l’expositionaux radiofréquencesLa norme régissant l’exposition des appareils sans fil aux radiofréquences emploie une unitéde mesure dénommée Taux d’absorption spécifique, ou TAS. La FCC et Industrie Canada ontdéfini la même limite de TAS : 1,6 W/kg. Cet appareil est conforme au TAS pour les limitesd’exposition générales de la population/non contrôlées définies par les règles C95.1-1992 del’ANSI/IEEE et RSS 102 d’Industrie Canada ; il a été testé en conformité avec les méthodeset procédures de mesure spécifiées dans le supplément C du bulletin 65 de l’OET (Officed’ingénierie et de technologie) et la règle RSS 102 d’Industrie Canada. Cet appareil a été testéselon les directives de la FCC et d’IC concernant l’exposition aux radiofréquences et s’est révéléconforme à ces dernières lorsqu’il a été testé en contact direct avec le corps.92 Fujitsu
Manufacturer’s notesExport restrictionsThis product or software contains encryption code which may not be exported or transferredfrom the US or Canada without an approved US Department of Commerce export license.This device complies with Part 15 of FCC Rules., as well as ICES 003 B / NMB 003 B.Operation is subject to the following two conditions: (1) this device may not cause harmfulinterference, and (2) this device must accept any interference received, including interferencethat may cause undesirable operation. Modifications not expressly authorized by FujitsuAmerica, Inc. may invalidate the user’s right to operate this equipment.Canadian NoticeThe device for the 5150 - 5250 MHz band is only for indoor usage to reduce the potentialfor harmful interference to co-channel mobile satellite systems.The maximum antenna gain of 6 dBi permitted (for devices in the 5250 - 5350 MHz, 5470 - 5725MHz and 5725 - 5825 MHz bands) to comply with the e.i.r.p. limit as stated in A9.2 of RSS210.In addition, users are cautioned to take note that high power radars are allocated as primaryusers (meaning they have priority) of 5250 - 5350 MHz and 5650 - 5850 MHz and theseradars could cause interference and/or damage to LE-LAN devices.Avis pour le CanadaLe matériel destiné à un usage sur la bande 5 150 - 5 250 MHz doit être utiliséuniquement à l’intérieur afin de réduire les risques de brouillage nuisible causé auxsystèmes mobiles par satellite fonctionnant sur un même canal.Un gain d’antenne de 6 dBi est autorisé (pour le matériel utilisant les bandes 5 250 - 5 350MHz, 5 470 - 5 725 MHz et 5 725 - 5 825 MHz), conformément à la limite p.i.r.e. maximalepermise selon l’annexe A9.2 afférent aux périphériques RSS210.En outre, les utilisateurs doivent prendre garde au fait que les radars de grande puissancesont considérés comme des utilisateurs principaux (ce qui signifie qu’ils sont prioritaires) desbandes 5 250 - 5 350 MHz et 5 650 - 5 850 MHz et qu’ils pourraient causer des interférenceset/ou des dommages aux appareils de réseau exempts de licence.Fujitsu 93
AppendixAppendixBefore Using the Optional Wireless LANThis manual describes the procedures required to properly set up and configure the optionalintegrated Wireless LAN Mini-PCI device (referred to as "WLAN device" in the rest of themanual). Before using the WLAN device, read this manual carefully to ensure its correctoperation. Keep this manual in a safe place for future reference.Wireless LAN Devices Covered by this DocumentThis document is applicable to systems containing the following device:• Intel® Dual Band Wireless-N 7260Characteristics of the WLAN Device• The WLAN devices are PCI Express Mini cards attached to the main board of the mobile computer.• The WLAN devices operate in license-free RF bands, eliminating the need to procurean FCC operating license. The WLAN operates in the 2.4GHz Industrial, Scientific,and Medical (ISM) RF band and the lower, middle, and upper bands of the 5GHzUnlicensed National Information Infrastructure (UNII) bands.• The WLAN devices are capable of four operating modes, IEEE802.11a,IEEE802.11b, IEEE802.11g, and IEEE802.11n.• The WLAN device is Wi-Fi certified and operates (as applicable) at the maximum datarate of 450 Mbps in IEEE802.11n mode (300 Mbps in this configuration); 54 Mbpsin IEEE802.11g mode; and 11 Mbps in IEEE802.11b mode.• The WLAN devices support the following encryption methods - WEP,TKIP, CKIP, and AES encryption.• The Wireless LAN devices are compliant with the following standards: WPA,WPA2, CCX1.0, CCX2.0, CCX3.0, and CCX4.0.94 Fujitsu
AppendixWireless LAN Modes Using this DeviceAd Hoc Mode"Ad Hoc Mode" refers to a wireless network architecture where wireless network connectivitybetween multiple computers is established without a central wireless network device, typicallyknown as Access Point(s). Connectivity is accomplished using only client devices in a peer-to-peerfashion. That is why Ad Hoc networks are also known as peer-to-peer networks. Ad Hocnetworks are an easy and inexpensive method for establishing network connectivity betweenmultiple computers. Ad Hoc mode requires that the SSID, network authentication, and encryptionkey settings are identically configured on all computers in the Ad Hoc network.Fujitsu 95
AppendixAccess Point (Infrastructure) ModeInfrastructure mode refers to a wireless network architecture in which devices communicate withwireless or wired network devices by communicating through an Access Point. In infrastructuremode, wireless devices can communicate with each other or with a wired network. Corporatewireless networks operate in infrastructure mode because they require access to the WLAN inorder to access services, devices, and computers (e.g., file servers, printers, databases).* = An optional hub for a wired LAN maybe required depending upon the typeof access point used.** = ADSL modem, cable modem, or similarHow to Handle This DeviceTheWLANdeviceisanoptional device that may come pre-installed in your mobile computer. Undernormal circumstances, it should not be necessary for you to remove or re-install it. The OperatingSystem that your mobile computer comes with has been pre-configured to support the WLAN device.• Integrated Intel Centrino wireless LAN devices support IEEE802.11a,IEEE802.11b, IEEE802.11g, and IEEE802.11n.• The WLAN device operates in the 2.4 GHz ISM band and the 5 GHzlower, middle, and upper UNII bands.• Microwave ovens may interfere with the operation of WLAN devices since they operate in thesame 2.4 GHz frequency range as IEEE802.11b/g/n devices. Interference by microwavesdoes not occur with IEEE802.11a radio which operates in the 5 GHz RF band.• Wireless devices that transmit in the 2.4 GHz range may interfere with operation of WLANdevices in IEEE802.11b/g/n modes. Symptoms of interference include reduced throughput,intermittent disconnects, and many frame errors. It is HIGHLY recommended that theseinterfering devices be powered off to ensure proper operation of the WLAN device.Deactivating/Disconnecting the WLAN DeviceDisconnecting the WLAN device may be desired in certain circumstances (to extend batterylife) or where certain environments require it (i.e. hospitals, clinics, airplanes, etc.). TheWLAN device can be disconnected in Windows using the WLAN icon in the system tray(Note that disconnecting via the icon in the system tray does not turn off the radio; itcontinues to transmit and receive even though it’s not connected.)The radio components are switched on and off using the appropriate functions of the operating system.►To switch radio components on and off individually, select Settings – ChangePC settings – Wireless – Wireless devices – Off.96 Fujitsu
AppendixConfiguring the Wireless LANThe optional WLAN device can be configured to establish wireless network connectivityusing the software that is built into Windows. Support for most industry standardsecurity solutions is contained in this software.Pre-defined parameters will be required for this procedure. Please consult withyour network administrator for these parameters:Connection to the networkAfter you have configured your computer, you can connect to an active networkby performing the following steps:1. Click on the WLAN icon in the system tray.2. Select Connect to a network.3. Select a network from the list that appears, and click the Connect button.Fujitsu 97
98 FCC and IC Regulatory InformationPlease note the following regulatory information related to the wireless LAN device.Regulatory Notes and StatementsWireless LAN, Health and Authorization for use Radio frequency electromagnetic energy is emitted from Wireless LAN devices. The energy levels of these emissions, however, are far much less than the elec-tromagnetic energy emissions from wireless devices such as mobile phones. Wireless LAN devices are safe for use by consumers because they operate within the guidelines found in radio frequency safety standards and recommendations. The use of Wireless LAN devices may be restricted in some situations or environ-ments, such as:• On board an airplane, or• In an explosive environment, or• In situations where the interference risk to other devices or services is per-ceived or identified as harmful.In cases in which the policy regarding use of Wireless LAN devices in specific environments is not clear (e.g., airports, hospitals, chemical/oil/gas industrial plants, private buildings), obtain authorization to use these devices prior to operating the equipment. Regulatory Information/Disclaimers Installation and use of this Wireless LAN device must be in strict accordance with the instructions included in the user documentation provided with the product. Any changes or modifications made to this device that are not expressly approved by the manufacturer may void the user’s authority to operate the equipment. The manufacturer is not responsible for any radio or television inter-ference caused by unauthorized modification of this device, or the substitution or attachment of connecting cables and equipment other than those specified by the manufacturer. It is the responsibility of the user to correct any interfer-ence caused by such unauthorized modification, substitution or attachment. The THE PRODUCT ID LABEL IS LOCATED IN THE BATTERY COMPARTMENT. THE LABEL CAN BE SEEN BY REMOVING THE BATTERY. L’ÉTIQUETTE D’IDENTIFICATION DU PRODUIT EST SITUÉE DANS LE COMPARTIMENT DE LA BATTERIE. POUR VOIR L’ÉTIQUETTE, RETIREZ LA BATTERIE CONFORMÉMENT.
99manufacturer and its authorized resellers or distributors will assume no liability for any damage or violation of government regulations arising from failure to comply with these guidelines. This device must not be co-located or operated in conjunction with any other antenna or transmitter.For IEEE 802.11a Wireless LAN: For operation within 5.15~5.25 GHz frequency range, it is restricted to indoor environments, and the antenna of this device must be integral.Federal Communications Commission and Industry Canada statement: This device complies with Part 15 of FCC Rules an d Industry Canada license exempt RSS standard(s). Operation is subject to the following two conditions: (1) This device may not cause interference, and, (2) This device must accept any interference, including interference that may cause undesired operation of this device. Déclaration d’Industrie Canada Cet appareil est conforme à la Section 15 des Règles de la FC C et à la ( aux) norme(s) RSS concernant les appareils exempt s de licence par Industrie Canada. Son fonctionnement est soumis aux deux condition s suivantes : (1) cet appareil ne doit pas causer d'interférence nuisib le; (2) cet appareil doit accepter toutes les interférences reçues, y compris celles pouvan t causer un mauvais fonc-tionnement de l'appareil . FCC Interference Statement This equipment has been tested and found to comply with the limits for a Class B digital device, pursuant to Part 15 of the FCC Rules. These limits are designed to provide reasonable protection against harmful interference in a residential installation. This equipment generates, uses, and can radiate radio frequency energy. If not installed and used in accordance with the instructions, it may cause harmful interference to radio communications. However, there is no guar-antee that interference will not occur in a particular installation.If this equipment does cause harmful interference to radio or television recep-tion, which can be determined by turning the equipment off and on, the user is encouraged to try and correct the interference by one or more of the following measures: 1. Reorient or relocate the receiving antenna.2. Increase the distance between the equipment and the receiver.
1003. Connect the equipment to an outlet on a circuit different from the one thereceiver is connected to.4. Consult the dealer or an experienced radio/TV technician for help.FCC Radio Frequency Exposure statementThe available scientific evidence does not show that any health problems are associated with using low power wireless devices. There is no proof, however, that these low power wireless devices are absolutely safe. Low power wireless devices emit low levels of radio frequency energy (RF) in the microwave range while being used. Whereas high levels of RF can produce health effects (by heat-ing tissue), exposure to low-level RF that does not produce heating effects causes no known adverse health effects. Many studies of low-level RF exposure have not found any biological effects. Some studies have suggested that some biological effects might occur, but such findings have not been confirmed by additional research. The wireless LAN radio device has been tested and found to comply with FCC radiation exposure limits set forth for an uncontrolled equipment and meets the FCC radio frequency (RF) Exposure Guidelines in Supplement C to OET65. The exposure standard for wireless devices employs a unit of measurement known as the Specific Absorption Rate, or SAR. The SAR limit set by the FCC is 1.6W/kg, and 1.6W/kg by Industry Canada. This device is compliant with SAR for general population /uncontrolled exposure limits in ANSI/IEEE C95.1-1992 and Canada RSS 102, and had been tested in accordance with the measurement methods and procedures specified in OET Bulletin 65 Supplement C, and Canada RSS 102. This device has been tested, and meets the FCC, IC RF exposure guidelines when tested with the device operating conditionsDéclaration de la FCC/d’Industrie Canada sur l’exposition aux radiofréquences La norme régissant l’exposition des appareils sans fil aux radiofréquences emploie une unité de mesure dénommée Taux d’absorption spécifique, ou TAS. La FCC et Industrie Canada ont défini la même limite de TAS : 1,6 W/kg.Cet appareil est conforme au TAS pour les limites d’exposition générales de la population/non contrôlées définies par les règles C95.1-1992 de l’ANSI/IEEE et RSS 102 d’Industrie Canada ; il a été testé en conformité avec les méthodes et procédures de mesure spécifiées dans le supplément C du bulletin 65 de l’OET (Office d’ingénierie et de technologie) et la règle RSS 102 d’Industrie Canada. Cet appareil a été testé selon les directives de la FCC et d’IC concernant l’exposi-tion aux radiofréquences et s’est révélé conforme à ces dernières lorsqu’il a été testé en contact direct avec le corps.
101Export restrictionsThis product or software contains encryption code which may not be exported or transferred from the US or Canada without an approved US Department of Commerce export license. This device complies with Part 15 of FCC Rules., as well as ICES 003 B / NMB 003 B. Operation is subject to the following two conditions: (1) this device may not cause harmful interference, and (2) this device must accept any interference received, including interference that may cause undesirable operation. Modifications not expressly authorized by Fujitsu America, Inc. may invalidate the user's right to operate this equipment.Canadian NoticeThe device for the 5150 - 5250 MHz band is only for indoor usage to reduce the potential for harmful interference to co-channel mobile satellite systems.The maximum antenna gain of 6 dBi permitted (for devices in the 5250 - 5350 MHz, 5470 - 5725 MHz and 5725 - 5825 MHz bands) to comply with the e.i.r.p. limit as stated in A9.2 of RSS210.In addition, users are cautioned to take note that high power radars are allocated as primary users (meaning they have priority) of 5250 - 5350 MHz and 5650 - 5850 MHz and these radars could cause interference and/or damage to LE-LAN devices.Avis pour le CanadaLe matériel destiné à un usage sur la bande 5 150 - 5 250 MHz doit être utilisé uniquement à l’intérieur afin de réduire les risques de brouillage nuisible causé aux systèmes mobiles par satellite fonctionnant sur un même canal.Un gain d’antenne de 6 dBi est autorisé (pour le matériel utilisant les bandes 5 250 - 5 350 MHz, 5 470 - 5 725 MHz et 5 725 - 5 825 MHz), conformément à la limite p.i.r.e. maximale permise selon l'annexe A9.2 afférent aux périphériques RSS210.En outre, les utilisateurs doivent prendre garde au fait que les radars de grande puissance sont considérés comme des utilisateurs principaux (ce qui signifie qu'ils sont prioritaires) des bandes 5 250 - 5 350 MHz et 5 650 - 5 850 MHz et qu'ils pourraient causer des interférences et/ou des dommages aux appareils de réseau exempts de licence.Restrictions concernant l’exportationCe produit ou logiciel contient du code de chiffrement qui ne peut être exporté ou transféré du Canada ou des États-Unis sans un permis d’exportation du département du commerce de États-Unis. Ce matériel est conforme à la Partie 15 des règlements de la FCC, ainsi qu’à la norme ICES 003 B/NMB 003 B. Son fonctionnement est soumis aux deux conditions suivantes: (1) cet appareil ne doit pas causer d’interférence nuisible; (2) cet appareil doit accepter toutes les interférences reçues, y compris celles pouvant causer un mauvais fonctionnement de l’appareil. Toute modification n’ayant pas été expressément approuvée par la société Fujitsu America Incorporated peut annuler le droit de l’utilisateur de se servir du matériel.
AppendixTroubleshooting the WLANCauses and countermeasures for troubles you may encounter while using yourwireless LAN are described in the following table.Problem Possible Cause Possible SolutionIncorrect network name (SSID)or network keyAd hoc connection: verify thatthe network names (SSID’s)and network keys (WEP) ofall computers to be connectedhave been configured correctly.SSID’s and WEP key valuesmust be identical on eachmachine.Access Point (Infrastructure)connection: set the networkname (SSID) and network keyto the same values as those ofthe access point.Set the Network Authenticationvalue identically to that of theAccess Point. Please consultyour network administrator forthis value, if necessary.Unavailable network connectionWeak received signal strengthand/or link qualityAd hoc connection: Retryconnection after shorteningthe distance to the destinationcomputer or removing anyobstacles for better sight.Access Point (Infrastructure)connection: Retry connectionafter shortening the distance tothe access point or removingany obstacles for better sight.102 Fujitsu
AppendixProblem Possible Cause Possible SolutionThe WLAN device wasdeactivated or is disabledCheck if the wireless switchis turned On. Go to Start >Control Panel, and doubleclickon Windows Mobility Center.Ifthe wireless network is off, clickthe Turn wireless on button.The computer to be connectedis turned offCheck if the computer to beconnected is turned ON.Incorrectly configured networksettingsRecheck the configuration ofyour network settings.RF interference from AccessPoints or other wirelessnetworksThe use of identical oroverlapping RF channelscancause interference with theoperation of the WLAN device.Change the channel of yourAccess Point to a channelthat does not overlapwiththeinterfering device.Wireless network authenticationhas failedRe-check your NetworkAuthentication, Encryption,and Security settings.Incorrectly configuredsecurity settings such asan incorrectly typed WEPkey, a mis-configured LEAPusername, or an incorrectlychosen authentication methodwill cause theLANdevicetoassociate but not authenticateto the wireless network.Unavailable network connection(continued)Incorrect IP addressconfigurationThis only applies to networksusing static IP addresses.Please contact your networkadministrator for the correctsettings.Fujitsu 103
AppendixImage Backup and Recovery ProceduresThank you for purchasing a Fujitsu computer. Fujitsu is committed to bringing youthe best computing experience with your new system.It is very important that you create DVD copies of your Recovery Image and Bootable Diskbefore beginning to use your system. To do so, follow the instructions in the “Creating aBackup of Bootable Disk and Recovery Image” section of this document.It is also important that you create a copy of the software that is essential for your system to access theinternet (hereafter called “essential access software”) to external writable media or an external drive.To do so, follow the instructions in the “Creating a Backup of the System-Specific Software Drivers”.Creating a Backup of Bootable Disk and Recovery ImageWhen you purchased your new system, a copy of the recovery image was loaded into ahidden partition on your hard disk drive. Having a copy of the recovery image available toyou means that in the event of system failure, you will be able to restore it and re-installthe essential access software using Fujitsu Software Auto Installer.To make a copy of the recovery image to DVD disks, you will need three or four blankdisks to create the copy. After creating the copy, be sure to label the disks and keepthem in a safe place to ensure they do not get damaged.Note: If your system does not have an internal writable DVD drive, connect yoursystem to an external drive* before beginning the following steps.1. Launch System Restore and Recovery from the desktop icon. It will allow you to createthe Bootable Disk and the Recovery Image Disk Set.2. On “Step 1: Select the Bootable Disk from the list”:a. Select a media type.b. Notice the number of disks that are needed for the set.c. Click Next to proceed.3. On “Step 2: Confirm your Recovery Disk”, click Next.4. On “Step 3:” follow the on-screen instructions to make the disk or disk set, then clickStart. It takes approximately 20 minutes to make one disk.5. On “Step 4”, when the disk creation is completed, a message appears.Click Finish to exit the program.6. Repeat Step 1: Select Recovery Disk from the list and repeat the abovesteps 2(a), 2(b), 2(c), 3, 4 and 5.* DEPENDING UPON YOUR OPTICAL DRIVE AND MEDIA FORMAT USED, SOME MEDIATYPES MAY BE INCOMPATIBLE FOR CREATING IMAGE BACKUPS.104Fujitsu
AppendixCreating a Backup of Essential Access SoftwareWhen you purchased your new system, a “Fujitsu Software Extractor” shortcut was loaded to“C:\Fujitsu\Drivers\AutoInstaller\”. This shortcut allows you to save the software driver packagesalong with the extracted Auto Installer software package to a selected location. It is recommendedthat you save these packages to writable media or an external drive. This ensures that in theevent of system failure you will be able to re-install the essential access software.1. Open the C:\Fujitsu\Drivers\AutoInstaller\ folder2. Run “Fujitsu Software Extractor” as an Administratora. Right-click on Fujitsu Software Extractor.b. Select the “Run as Administrator” option from the menu that is displayed.3. The default save location is C:\Fujitsu\ AutoInstaller\ Drivers\. You can change the locationby clicking on the Browse button and selecting your preferred location.Note: It is recommended that you change the default location and save thesoftware packages to the external writable media or drive.4. Click on the Save Packages button.5. Fujitsu Software Extractor copies the zipped software packages and Readme files,and extracts the Auto Installer folder to the selected location.Note: The extracted Auto Installer will later be used to install the softwareautomatically on the system in the event of generic image restoration whenthe software is not pre-installed in the image.RECOVERYOURSYSTEM WHEN THE HARDDRIVE IS STILL ACCESSIBLEUsing the Recovery and Utility ToolsThe Recovery and Utility tools consist of a variety of tools that will help you recover yourrecovery image and system images, and delete the data from your hard disk.Methods for accessing the utilitiesRecovery and Utility Tools are preinstalled in a hidden partition by the factory, orthey can be accessed by using the bootable disk.Note: The Recovery and Utility tools may be deleted from your hard diskdrive if you modify the partitions. If that occurs, you will not be able touse the hidden partition for booting to Recovery and Utility Tools, but youwill still be able to boot from the Bootable Disk.Fujitsu 105
AppendixDetermining whether Recovery and Utility is pre-loaded1. Turn on or reboot your system. When the Fujitsu logo appears, press the F12 key.2. Use the Ta b key to get to the Application Menu.3. Check whether the Recovery and Utility option is present. If it is not present, it meansthat the utility must be used from the Bootable Disk. Proceed to “Running Recovery andUtility from the Bootable Disk” if Recovery and Utility is unavailable.Running Recovery and Utility from hard disk1. Turn on or reboot your system. When the Fujitsu logo appears, press the F12 key.2. Use the Ta b key to get to the Application Menu.3. Cursor down to Recovery and Utility and press the Enter key.4. Choose your language, if necessary. Select Recovery and Utility to proceed.5. Three tool options appear: Diagnostics,Recovery,andUtility (refer to the Recovery andUtility tools section below for instructions on how to use these tools).6. If this was successful please skip the next step and go to “Recovery and Utility tools.”7. If this was NOT successful, please go to the next step.Running Recovery and Utility from the Bootable diskTo verify/change the boot-up priority (rather than booting-up from the hard drive oran external media drive), perform the following steps:1. Power on your system. When the Fujitsu logo appears on the screen, press the F12 key.2. Insert the bootable disk into the drive tray.3. Highlight the CD/DVD option from the Boot menu, then press Enter .4. Click OK.5. Select CD/DVD boot mode: UEFI Mode, if applicable, and then press Enter .While the files are being loaded from the disk, the Fujitsu logo screen will appearfollowed by a progress bar at the bottom of the screen.106Fujitsu
AppendixRecovery and Utility toolsNote: Recovery and Utility tools may not be available on your system dependingon the region from which the system was shipped.Diagnostics tool: The Diagnostics tool is designed for use by IT professionals. It is not likely youwill need to use this tool. If you should need to use this tool, perform the following steps:1. Press the Diagnostics Tool button to start the Diagnostics tool.2. Read the note, and then click OK.3. Choose one or more of the following options for diagnostics on the Fujitsu Hardware DiagnosticsTool window: CPU, Memory, Display, Hard Disk, CD/DVD/BD, Floppy Disk, Keyboard, and Mouse.4. Click the Option button in the Tool menu to specify how many times the toolshould run diagnostics on each selected component.5. Press Execute to start the Diagnostics tool.6. After the execution is completed, the selected components are circled in red to indicate that theyhave been diagnosed and the result dialog window opens. Click Close to close the window.7. Click End to close the Diagnostics tool, and then click Yes to confirm the end of diagnostics session.Recovery tool: The Recovery tool contains two options:• Restore C Drive: Restore recovery image (only C: drive)• Restore Full Hard Drive: Restore recovery image (full hard drive).You can use these tools to restore the Recovery Image from the hidden partition, and perform a fullhard drive recovery. Please refer to instructions above for details on how to create a Recovery Image.Restore the Recovery Image from Hidden Partition1. Click [Restore C: drive] from Recovery and Utility tools2. The progress bar is followed by “Restore Recovery image (only C: drive)” screenconfirming that the Image will be restored to the C: drive. Click Next.3. Read the instruction screen and select Agree,thenclickNext.4. Click OK to acknowledge the warning message to restore recovery image to the C: drive.5. When the progress bar appears, wait for the process to complete.6. Click Finish when the process completes; the computer will restart to Windows.7. Follow the steps listed in the “Auto Installation support for software packagesfrom hidden partition” section.8. Download FSDM (Fujitsu Software Download Manager) from the support site and downloadall the software applicable to the model and OS using FSDM.9. Follow the steps listed in “Auto Installation support for software packagesdownloaded from support website” section.Fujitsu 107
AppendixRECOVER YOUR SYSTEM WHEN THE HARDDRIVE IS NOT BOOTABLERestore the Recovery Image for Full Hard DriveFollow the steps in the “Recovering your Recovery Image using Recovery andUtility (for new hard drive or non-bootable hard drive)” section. You will need theBootable Disk and the Recovery Disk Set for this task.Utility tool: If applicable for your region, the Utility tool contains two options:Hard Disk Data Delete and Partition Creation.The Hard Disk Data Delete utility is used to delete all data on the hard diskand prevent the data from being reused.NOTE: Do not use the Hard Disk Data Delete utility unless you are absolutely certainthat you want to erase your entire hard disk, including all partitions.To delete hard disk data:1. Click the Hard Disk Data Delete button. The progress bar appears, followed by the EULA screen.2. Agree to the EULA and click Next.3. Choose the hard disk from which the data should be deleted in the list of hard disks and click Next.The Partition Creation utility is used to change the C: and D: drive partition sizes.To run this utility: (This is not an option when using Windows 7.)1. Click the Partition Creation button.2. A progress bar appears, followed by the EULA screen. Agree to the EULA.3. On the Recovery Tool - Partition Creation screen, move the slider to set disk size, and then click OK.4. Click Yes in the Partition Creation confirmation dialog.WARNING: It is highly recommended that you send your product to FujitsuService to replace a hard drive. A mistake could possibly destroy yourcomputer, your new hard drive or both.108Fujitsu
AppendixRecovering Your Recovery Image Using Recovery and Utility(for new hard drive or non-bootable hard drive)If you have installed a new hard drive or your hard drive is not bootable, perform the following steps.Note: You will need the Bootable disk and Recovery Image disk set for this recovery.1. Power on your system. When the Fujitsu logo appears on the screen, press the Enter key.2. Insert the bootable disk in your DVD drive, then click OK.3. Highlight the CD/DVD option from the Boot Menu and press Enter .4. Select CD/DVD boot mode: Select UEFI Mode, if applicable and press Enter .While the files are being loaded from the disk, the Fujitsu logo screen appearsfollowed by a progress bar at the bottom of the screen.5. Choose your language, if necessary.6. Three tool options appear: Diagnostics,Recovery and Utility. Select Recovery.• For Windows 8.1: Select Restore full hard drive• For Windows 7: Select Restoring the Factory Image (full hard drive recovery)7. Click Next to confirm full hard drive restoration. All data on HDD will be deleted.8. Agree to EULA by selecting Agree option and clicking Next.9. Click Next on the Recovery Disk Check screen to verify that the bootabledisk has been inserted into the optical drive.10. The Checking for Recovery Disk screen appears followed by the prompt to insert thefirst disk. Click OK to continue. Repeat this step for all disks. After all recovery diskshave been checked and the check has been completed, click Next.11. Follow the prompt to reinsert the first recovery disk and click Next.12. Click OK when you receive the final warning informing you that all data on driveC will be lost. This starts the recovery process.13. Follow the prompts to insert the next recovery disks and click OK.14. After the copying of the image to the HDD completes the restore process iscomplete, click Finish to restart the system. The computer will restart automaticallyand then go through the firstbootprocess.15. Follow the steps listed in “Auto Installation support for essential accesssoftware from backup location” section.16. Download FSDM (Fujitsu Software Download Manager) from support site and downloadall the software applicable to the model and OS using FSDM.17. Follow the steps listed in “Auto Installation support for essential accesssoftware downloaded from support website.Fujitsu 109
AppendixInstalling the Software after the Recovery Image is RestoredAuto-installation support for essential access softwarefrom hidden partitionThe below listed steps are applicable only in cases in which the recovery image restoreand hidden partition contents have not been wiped out.1. After the recovery image is restored, launch the desktop icon “Fujitsu Software Auto Installer”.2. Double-click on “Fujitsu Software Auto Installer” desktop icon.3. Click Yes on User Account Control Dialog box. This will take some time toprocess the software packages. A message will be displayed during this time,“Please wait while the content is being processed”.4. If EULA is displayed for Fujitsu Software Auto Installer, accept the EULA, otherwise continue.5. Then Fujitsu Software Auto Installer user interface will be launched providing abilityto auto-install the essential access software on the system.6. It is recommended that you install all the software in the listed order. You canSelect All, to install the software in the order listed.7. Click Install to start the installation.8. After installing all the selected drivers, Installation Results window will be displayed. Click OK.9. “You must restart the system for the settings to take effect. Do you wish toreboot now?” message appears. Select Ye s.10. The system will now reboot.11. You can now connect to the internet and download FSDM (Fujitsu Software DownloadManager) from the support site and download all the software applicable to themodel and OS using FSDM if they are not downloaded yet.110 Fujitsu
AppendixAuto-installation support for essential access softwarefrom backup locationThe below listed steps are applicable in cases in which a backup copy was created asmentioned in the section “Creating a Backup of essential access software”.1. It is important to have the extracted Auto installer software package folderand Readme file in the same location as other software folders. Otherwiseauto-installation of the software will not be supported.2. Inside the Auto Installer software package, launch FjAutoinstall.exe as an Administrator.3. Click Ye s on the User Account Control dialog box. This will take some time toprocess the software packages. A message will be displayed during this time stating,“Please wait while the content is being processed”.4. If EULA is displayed for Fujitsu Software Auto Installer, accept the EULA, otherwise continue.5. The Fujitsu Software Auto Installer user interface will be launched providing abilityto auto install the essential access software on the system.6. It is recommended that you install all the software in the listed order. You can“Select All”, to install the software in the order listed.7. Click the Install button to start the installation.8. After installing all the selected drivers, Installation Results window is be displayed. Click OK.9. “You must restart the system for the settings to take effect. Do you wish toreboot now?” message appears. Select Yes.10. The system will now reboot.Auto Installation support for the software downloaded from support website1. Download FSDM (Fujitsu Software Download Manager) from the support site and download allthe drivers applicable to the model and OS using FSDM if they are not downloaded yet.2. When the software packages are downloaded from web, it is important to downloadthe Auto Installer Software package and the model/language- specific Readmefile if you prefer to auto install the software.3. It is important to have the extracted Auto Installer software package folderand Readme file in the same location as other software folders. Otherwiseauto-installation of the software will not be supported.4. Inside the Auto Installer software package, launch FjAutoinstall.exe as administrator.5. Click Ye s on the User Account Control dialog box. This will take some time toprocess the software packages. A message will be displayed during this time stating“Please wait while the content is being processed”.6. If EULA is displayed for Fujitsu Software Auto Installer, accept the EULA, otherwise continue.7. The Fujitsu Software Auto Installer user interface will be launched providing the abilityto auto install the software downloaded from support site.8. It is recommended that you install all the software in the listed order. You canSelect All, to install the software in the order listed.9. Click the Install button to start the installation.10. After installing all the selected drivers, the Installation Results window is displayed. Click OK.11. “You must restart the system for the settings to take effect. Do you wish toreboot now?” message appears. Select Yes.12. The system will now reboot.Fujitsu 111
AppendixDownloading Driver UpdatesTo ensure that you always have the most current driver updates related to your system,occasionally access the Fujitsu Software Download Manager (FSDM) utility. The FSDMutility is available from the Fujitsu Support site. FSDM will allow you to view anddownload a list of the most current drivers, utilities, and applications to determine whetheryou have the latest versions. To download the FSDM Utility, go to the Support Site:"http://support.fujitsupc.com/CS/Portal/support.do?srch=DOWNLOADS".If you are planning on downgrading, upgrading or changing versions of your operating system duringthis process please see the User’s Guide for more information at "http://solutions.us.fujitsu.com".112 Fujitsu
IndexIndexAAC adapterconnecting 18Set up 18Acoustic warnings 80Audio connections 71BBattery 35battery charge 36Caring for and maintaining 35charge level 35Charging 35Discharges too quickly 79see Rechargeable battery 35Service life 35battery charge meter 35BIOS Setup Utility, protecting with password 63calling 72exiting 74operation 73Settings 72Bluetooth, Safety notes 13CCharging back-up battery 76Choose a location 18ComponentsKeyboard cover 48Configuration, BIOS Setup Utility 72Configuring hardware 72Configuring system 72Connecting audio devices 71Connecting headphones 71Cradle 44Connecting a Tablet PC 45Ddark touchscreen 76Date not correct 76Declaration of conformity 90Devices,connecting 68disconnecting 68Display orientationselect 25DOC (INDUSTRY CANADA) NOTICES 88EEndingenergy saving mode 78EnergyEnergy consumption 36Energy saving 13Energy saving functions 36Energy saving 13Error messages on the screen 80ErrorsAcoustic warnings 80Screen messages 80Ethernet LAN 41FFactory Image 75Faultcorrection 75Fingerprint sensor 62configuring 62First-time setup 17GGetting started 17GPS 42HHard disk:restoring the contents 75HDMI port 69IImportant notes 12Incorrect time 76Information,safety 12KKeyboard coverComponents 48Connecting a Tablet PC 49keyboard docking stationConnecting a Tablet PC 53Ports 51LLandscape formatdisplay 25Fujitsu 113
IndexMMaking ready to use 18Memory cardhandling 37inserting 37removing 38Mobile operation 13Monitorconnection 69no image 77remains blank 77unstable image 77Monitor connectionsee VGA port 69NNotebookbefore traveling 14switching off 23Notes 12disposal / recycling 88Energy saving 13touchscreen 24Transport 13OOperating systemactivating system protection 64cancel system protection 64Protecting with password 64Operating system, recovering 75PPackaging 17Passwordchanging 64entering 63removing 64Password protection 63hard disk 65Peripherals,connecting 68disconnecting 68Portrait formatdisplay 25Ports 44keyboard docking station 51Power-on Power-on indicator 22Printer does not print 79RRechargeable batterysee battery 35SSafety information 12Screen connectionsee VGA port 69Security functions 61Smart Card 66SystemLock 66Service life, battery 35Set upDevice 18Setupsee BIOS Setup Utility 72SlotMemory cards 37Status indicators 21Summer time 76Supervisor HDD passwordchanging 64Supervisor passwordentering 63removing 64Suspend/Resume button 22Switchingonforthefirst time 19SymbolsIndicators 21System settings, BIOS Setup Utility 72TTabletoperating 21Tablet PCcannot be started 78doesn’t work 78transporting 13Tablet, operation 21Tablet: Switching on 22Technical dataAC adapter 85The wireless connection to a networkdoes not work 79Time not correct 76Tips 75Touchscreendifficult to read 76notes 24reflected glare 76remains dark 76TPM 67114Fujitsu
IndexTransport 13Damage during transportation 17Traveling, notebook 14Troubleshooting 75Trusted Platform Module 67UUSB ports 70User HDD passwordchanging 64User passwordentering 63removing 64VVGA port 69WWebcam 34Winter time 76wireless componentsSafety notes 13Wireless LANSafety notes 13Wrong date/time 76Fujitsu 115

Navigation menu