Fujitsu Client Computing WL0007 LifeBook T Series Tablet PC w/WLAN WM3B2200BG User Manual Appendix O
Fujitsu Limited LifeBook T Series Tablet PC w/WLAN WM3B2200BG Appendix O
UserManual.wiki
>
Fujitsu Client Computing
>
WL0007 User Manual
>
Host PC User Manual
Contents
1.
Host PC User Manual
2.
WLAN User Manual
Host PC User Manual
Navigation menu
Upload a User Manual
Namespaces
Wiki Guide
HTML
PDF
Info
Views
User Manual
Discussion / Help
Navigation


![3PrefacePrefaceABOUT THIS GUIDEThe LifeBook® T Series Tablet PC from Fujitsu PC Corporation is a powerful convertible computer. It can be used either as a standard notebook using keyboard input, or in tablet configuration using pen input. It is powered by an Intel® microprocessor, has a built-in color display with an active digitizer, and brings the computing power of desktop personal computers (PCs) to a portable and versatile environment.This manual explains how to operate your LifeBook T Series Tablet PC’s hardware and built-in system soft-ware. Your LifeBook T Series Tablet PC is compatible with the IBM® PC AT, and it comes with Windows® XP Tablet Edition pre-installed.Your LifeBook T Series Tablet PC is a completely self-contained unit with an active-matrix (TFT) color LCD display. It has a powerful interface that enables it to support a variety of optional features. Conventions Used in the GuideKeyboard keys appear in brackets. Example: [Fn], [F1], [Esc], [Enter] and [Ctrl].Pages with additional information about a specific topic are cross-referenced within the text.Example: (See page xx.)On screen buttons or menu items appear in bold.Example: Click OK to restart your Tablet PC.DOS commands you enter appear in Courier type. Example: Shutdown the computer?FPC CONTACT INFORMATIONService and SupportYou can contact FPC Service and Support the following ways:■Toll free: 1-800-8Fujitsu (1-800-838-5487)■Fax: 1-408-764-2724 ■E-mail: 8fujitsu@fujitsupc.com ■Web site: http://www.fujitsupc.comBefore you place the call, you should have the following information ready so that the customer support representative can provide you with thefastest possible solution:■Product name■Product configuration number■Product serial number■Purchase date■Conditions under which the problem occurred■Any error messages that have occurred■Hardware configuration■Type of device connected, if anyFujitsu OnlineYou can go directly to the online Fujitsu Product catalog for your Tablet PC. Go to Start -> All Programs -> Service & Support Software, and click on Pen Accesso-ries Web site.You can also reach Fujitsu Service and Support online by going to Start -> All Programs -> Service & Support Software, and clicking on Fujitsu Service & Support Web site.WARRANTYYour LifeBook T Series Tablet PC is backed by an Inter-national Limited Warranty and includes toll-free tech-nical support. Check the service kit that came with yourTablet PC for warranty terms and conditions.The information icon highlights information that will enhance your understanding of the subject material.The caution icon highlights information that is important to the safe operation of your computer, or to the integrity of your files. Please read all caution information carefully.The warning icon highlights information that can be hazardous to either you, your LifeBook T Series Tablet PC, or your files. Please read all warning information carefully.You must have an active internet connection to use the online URL links.T Series.book Page 3 Thursday, July 31, 2003 10:49 AM](https://usermanual.wiki/Fujitsu-Client-Computing/WL0007.Host-PC-User-Manual/User-Guide-407389-Page-10.png)


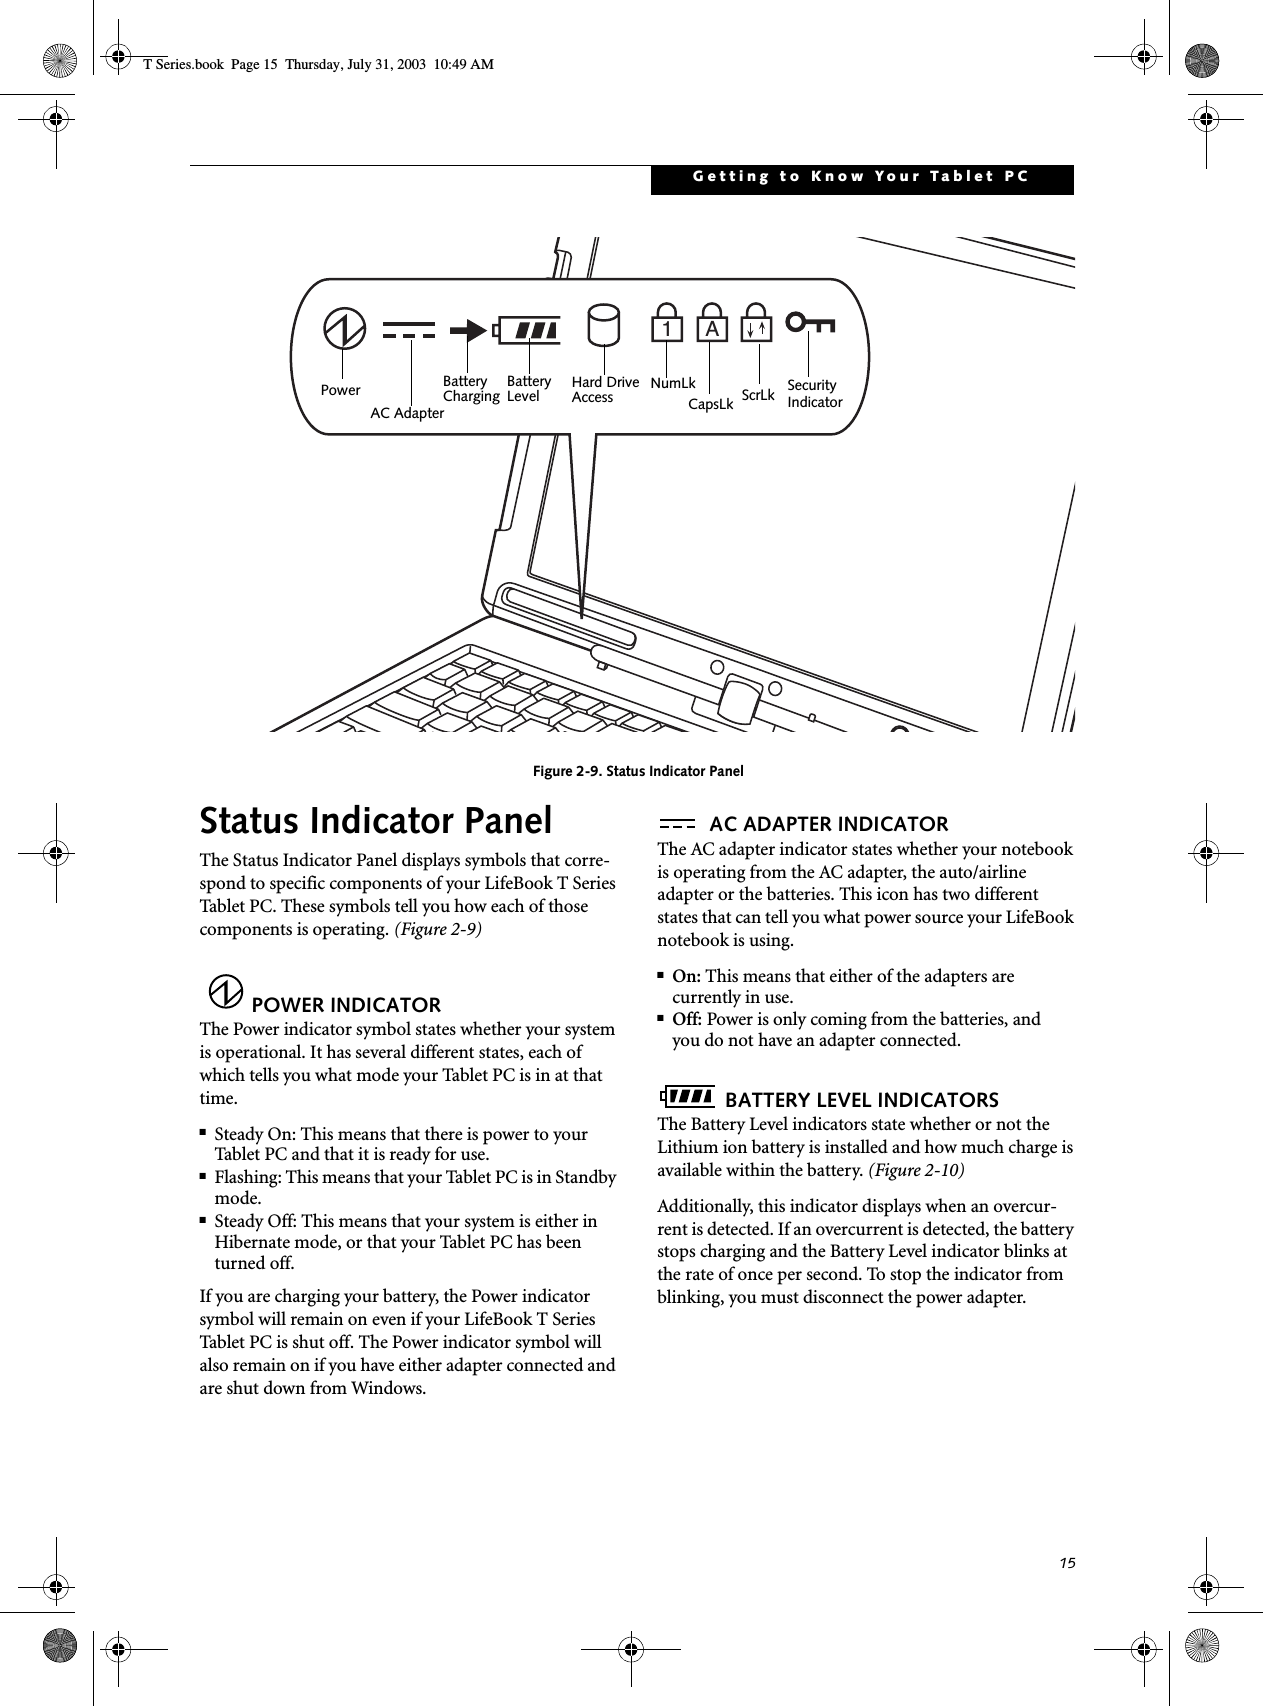
![16LifeBook T Series Tablet PC - Section TwoFigure 2-10. Battery Level IndicatorBATTERY CHARGING INDICATORLocated to the left of the Battery Level indicator is a small arrow symbol. This symbol states whether the battery is charging. This indicator will flash if the battery is too hot or cold to charge.HARD DRIVE ACCESS INDICATORThe Hard Drive Access indicator states whether your internal hard drive is being accessed.NUMLK INDICATORThe NumLk indicator states that the integral keyboard is set in ten-key numeric keypad mode. If there is no battery activity and the power adapters are not connected, the Battery Level indicators will also be off.CAPSLOCK INDICATORThe CapsLock indicator states that your keyboard is set to type in all capital letters. SCRLK INDICATORThe ScrLk indicator states that your scroll lock is active. SECURITY INDICATORThe Security Indicator flashes (if a password was set) when the system resumes from Off or Standby modes. You must enter the password that was set in the Security Panel before your system will resume operation.A shorted battery is damaged and must be replaced. (Figure 2-10) If there is no battery activity and the power adapters are not connected, the Battery Level indicators will also be off.Batteries subjected to shocks, vibration or extreme temperatures can be permanently damaged.76%–100% Charging76%–100%51%–75%26%–50%11%–25%Low Warning <11%Critical Low or Dead BatteryShorted BatteryIf you are using the optional external numerical keypad, pressing the [NumLk] key will activate the external keypad. The indicator will come on, however it will not change any of the functionality of your keyboard keys.T Series.book Page 16 Thursday, July 31, 2003 10:49 AM](https://usermanual.wiki/Fujitsu-Client-Computing/WL0007.Host-PC-User-Manual/User-Guide-407389-Page-23.png)
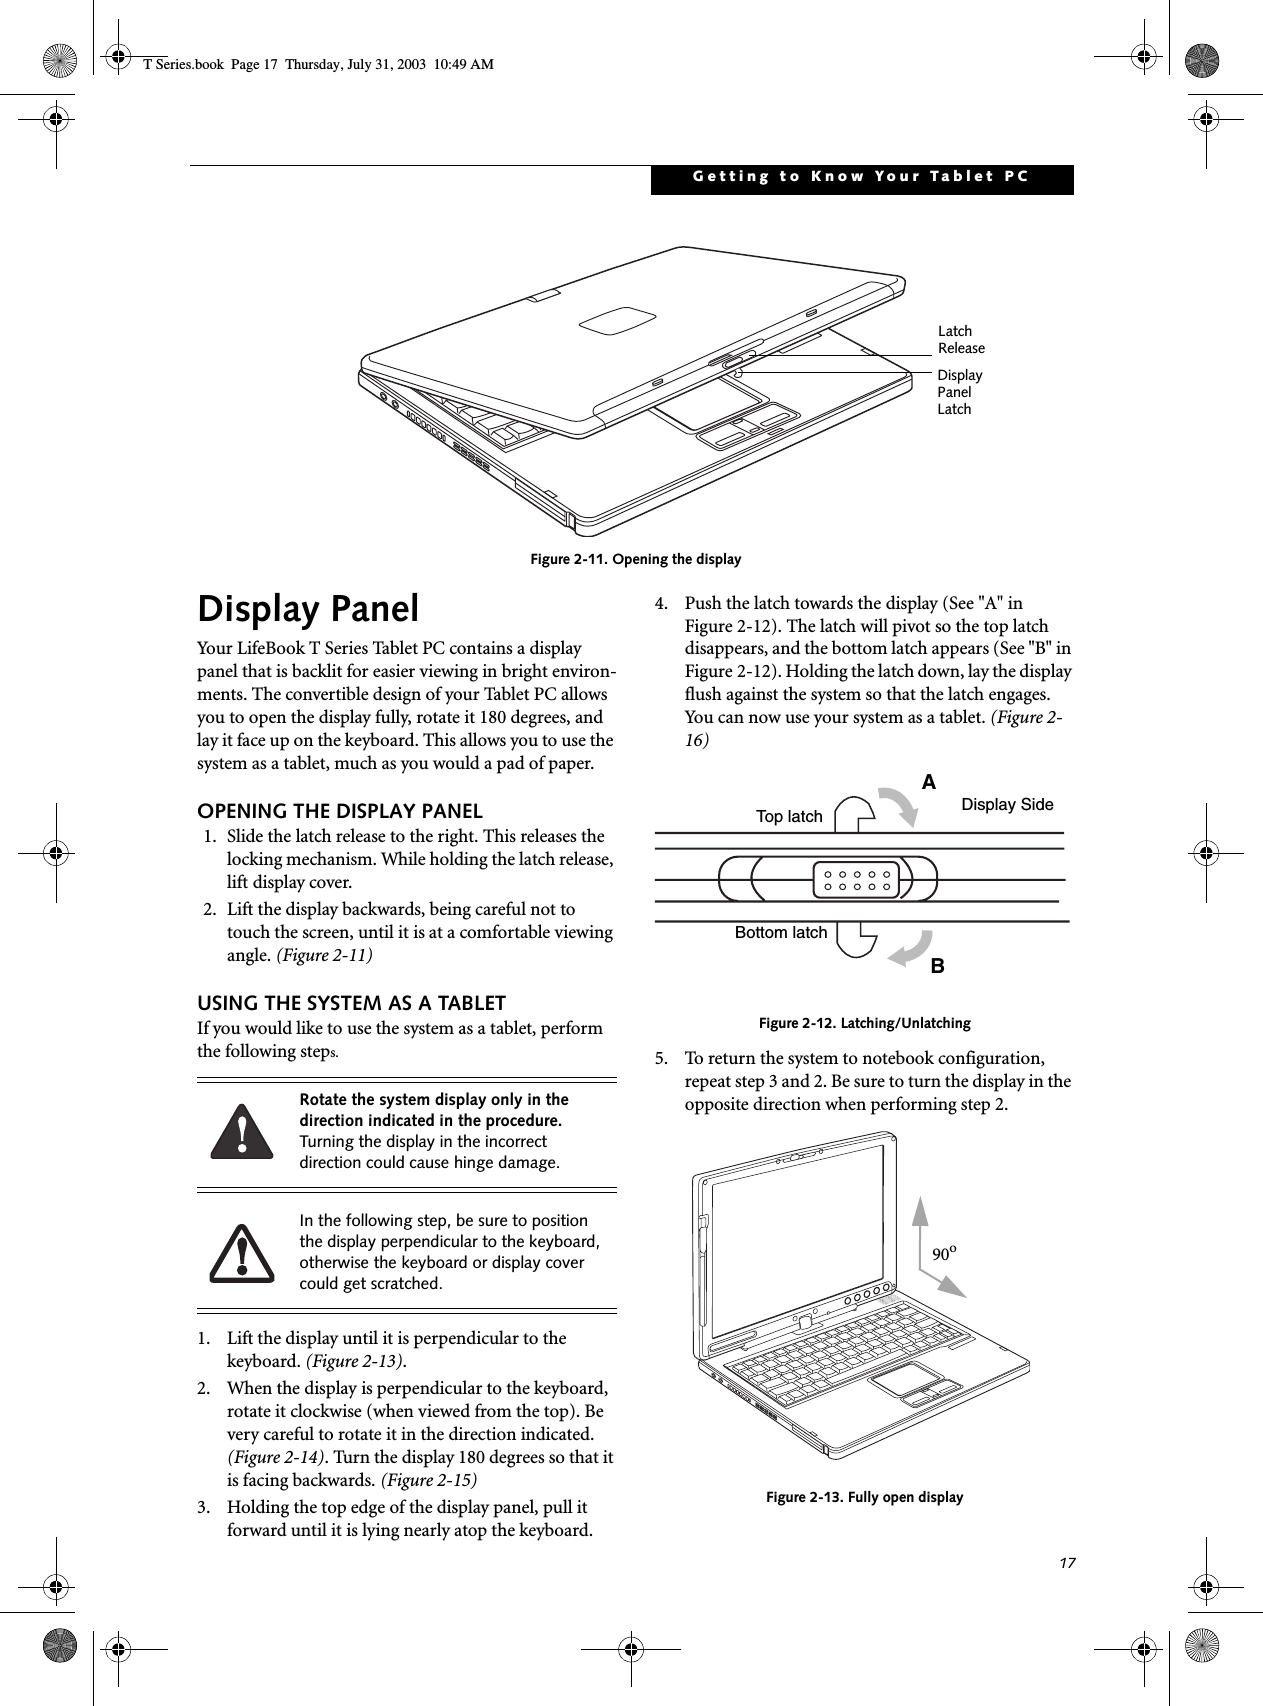
![18LifeBook T Series Tablet PC - Section TwoFigure 2-14. Rotating the displayFigure 2-15. Display rotated completelyFigure 2-16. System in tablet configurationADJUSTING DISPLAY PANEL BRIGHTNESSOnce you have turned on your Tablet PC, you may want to adjust the brightness level of the screen to a more comfortable viewing level. There are two ways to adjust the brightness, keyboard and power management utility. Using Keyboard to Adjust BrightnessAdjusting the brightness using the keyboard changes the system setting (i.e., the settings you make via the func-tion keys automatically changes the brightness settings in the system’s Pen and Tablet Settings). ■[Fn+F6]: Pressing repeatedly will lower the brightness of your display.■[Fn+F7]: Pressing repeatedly will increase thebrightness of the display.Using Power Management to Adjust BrightnessTo adjust brightness with the power management utility, click Start -> Control Panel -> Tablet and Pen Settings. Select the Display tab and set the screen brightness slider for battery and AC power scenarios.Using the Fujitsu Menu to Adjust BrightnessTo adjust brightness using the Fujitsu menu, click on the Fujitsu Menu icon in the system tray in the lower right corner of the screen. From the menu that appears, select Brightness Control. The Tablet and Pen Settings window will open. Select the Display tab and set the screen brightness slider for battery and AC power scenarios. If using AC power your brightness setting is set to its highest level by default. If using battery power your brightness settings is set to approximately mid-level by default.The higher the brightness level, the more power the LifeBook T Series Tablet PC will consume and the faster your batteries will discharge. For maximum battery life, make sure that the brightness is set as low as possible.T Series.book Page 18 Thursday, July 31, 2003 10:49 AM](https://usermanual.wiki/Fujitsu-Client-Computing/WL0007.Host-PC-User-Manual/User-Guide-407389-Page-25.png)
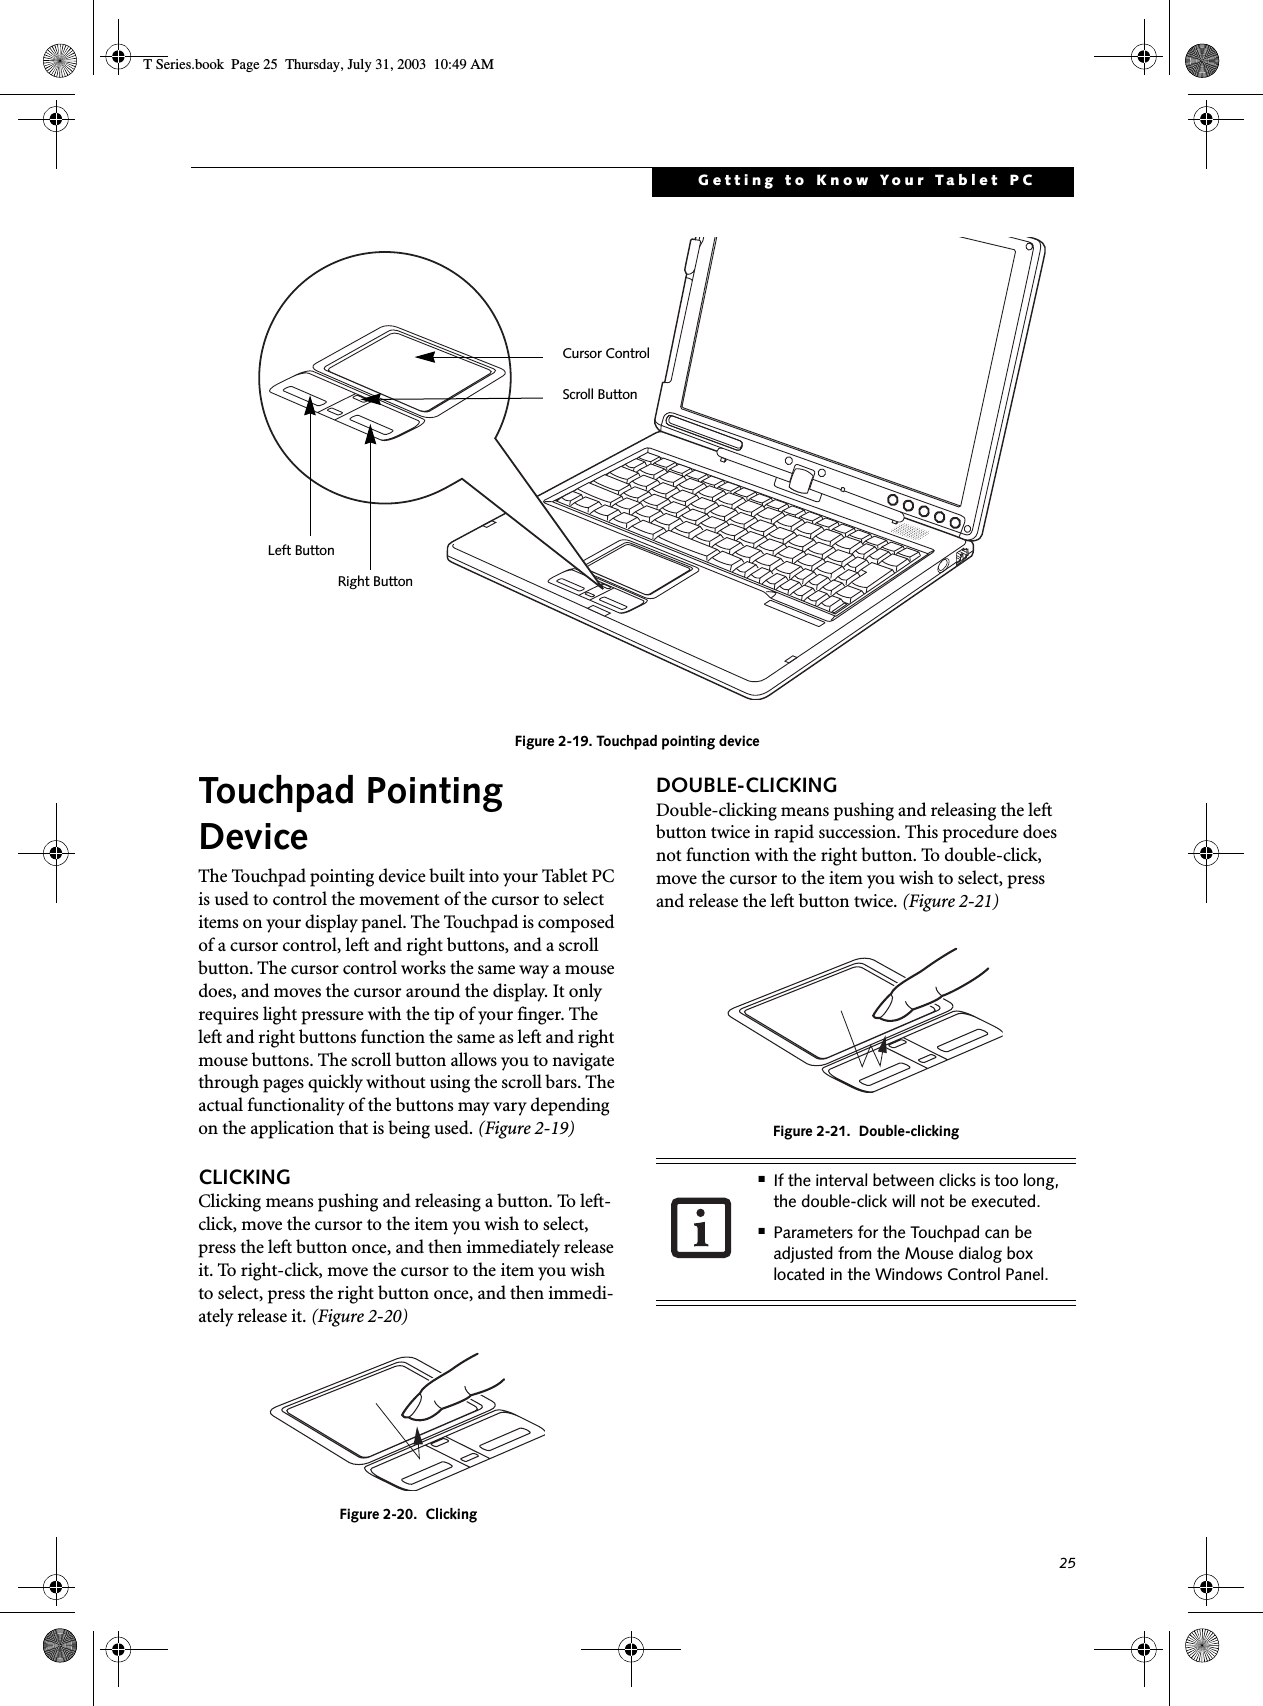
![19Getting to Know Your Tablet PCFigure 2-17. KeyboardKeyboardUSING THE KEYBOARDYour LifeBook T Series Tablet PC has an integral 83-key keyboard. The keys perform all the standard functions of a 101-key keyboard, including the Windows keys and other special function keys. This section describes the following keys. (Figure 2-17)■Numeric keypad: Your Tablet PC allows certain keys to serve dual purposes, both as standard characters and as numeric and mathematical keys. The ability to tog-gle between the standard character and numerical keys is controlled through the [NumLk] key.■Cursor keys: Your keyboard contains four arrowkeys for moving the cursor or insertion point to the right, left, up, or down within windows, applications and documents. ■Function keys: The keys labeled [F1] through [F12], are used in conjunction with the [Fn] key to produce special actions that vary depending on what program is running. ■Windows keys: These keys work with your Windows operating system and function the same as the onscreen Start menu button, or the right button on your pointing device.NUMERIC KEYPADCertain keys on the keyboard perform dual functions as both standard character keys and numeric keypad keys. NumLk can be activated by pressing the [NumLk] key. Turning off the NumLk feature is done the same way. Once this feature is activated you can enter numerals 0 through 9, perform addition ( + ), subtraction ( - ),multiplication ( * ), or division ( / ), and enter decimal points ( . ) using the keys designated as ten-key function keys. The keys in the numeric keypad are marked on the front edge of the key to indicate their secondary func-tions. (Figure 2-17) WINDOWS KEYSYour LifeBook T Series Tablet PC has two Windows keys: a Start key and an Application key. The Start key displays the Start menu. This button functions the same as your onscreen Start menu button. The Application key functions the same as your right mouse button and displays shortcut menus for the selected item. (Please refer to your Windows documentation for additional information regarding the Windows keys.) (Figure 2-17)Fn Key Start KeyFunction KeysNumeric KeypadApplication KeyCursor Keys(outlined with thickblack line)If you are using the optional external numerical keypad, pressing the [NumLk] key will activate the external keypad. The indicator will come on, however it will not change any of the functionality of your keyboard keys. T Series.book Page 19 Thursday, July 31, 2003 10:49 AM](https://usermanual.wiki/Fujitsu-Client-Computing/WL0007.Host-PC-User-Manual/User-Guide-407389-Page-26.png)
![20LifeBook T Series Tablet PC - Section TwoCURSOR KEYSThe cursor keys are the four arrow keys on the keyboard which allow you to move the cursor up, down, left, and right in applications. In programs such as Windows Explorer, it moves the “focus” (selects the next item up, down, left, or right). (Figure 2-17)FUNCTION KEYSYour Tablet PC has 12 function keys, F1 through F12. The functions assigned to these keys differ for each application. You should refer to your software documen-tation to find out how these keys are used. (Figure 2-17)[Fn] KeyThe [Fn] key provides extended functions for theTablet PC and is always used in conjunction with another key. ■[Fn+F3]: Pressing [F3] while holding [Fn] will toggle the Audio Mute on and off.■[Fn+F4]: Pressing [F4] while holding [Fn] will toggle the built-in pointing device on and off. Note that the [Fn+F4] combination only works if Manual Setting is selected in the BIOS. (See “Entering the BIOS Setup Utility” on page 34)■[Fn +F5]: Pressing [F5] while holding [Fn] allows you to toggle between video compensation and no compensation. (Video compensation controls spacing on the display. When it is enabled, displays with less than 1024 x 768 or 800 x 600 pixel resolution will still cover the entire screen.)■[Fn+F6]: Pressing [F6] repeatedly while holding [Fn] will lower the brightness of your display. Note that adjusting the brightness using the keyboard changes the system setting.■[Fn+F7]: Pressing [F7] repeatedly while holding [Fn] will increase the brightness of the display.■[Fn+F8]: Pressing [F8] repeatedly while holding [Fn] will decrease the volume of your Tablet PC.■[Fn+F9]: Pressing [F9] repeatedly while holding [Fn] will increase the volume of your Tablet PC.■[Fn+F10]: Pressing [F10] while holding [Fn] allows you to change your selection of where to send your display video. Each time you press the combination of keys you will step to the next choice. The choices, in order, are: built-in display panel only, both built-in display panel, and external monitor or external moni-tor only.T Series.book Page 20 Thursday, July 31, 2003 10:49 AM](https://usermanual.wiki/Fujitsu-Client-Computing/WL0007.Host-PC-User-Manual/User-Guide-407389-Page-27.png)
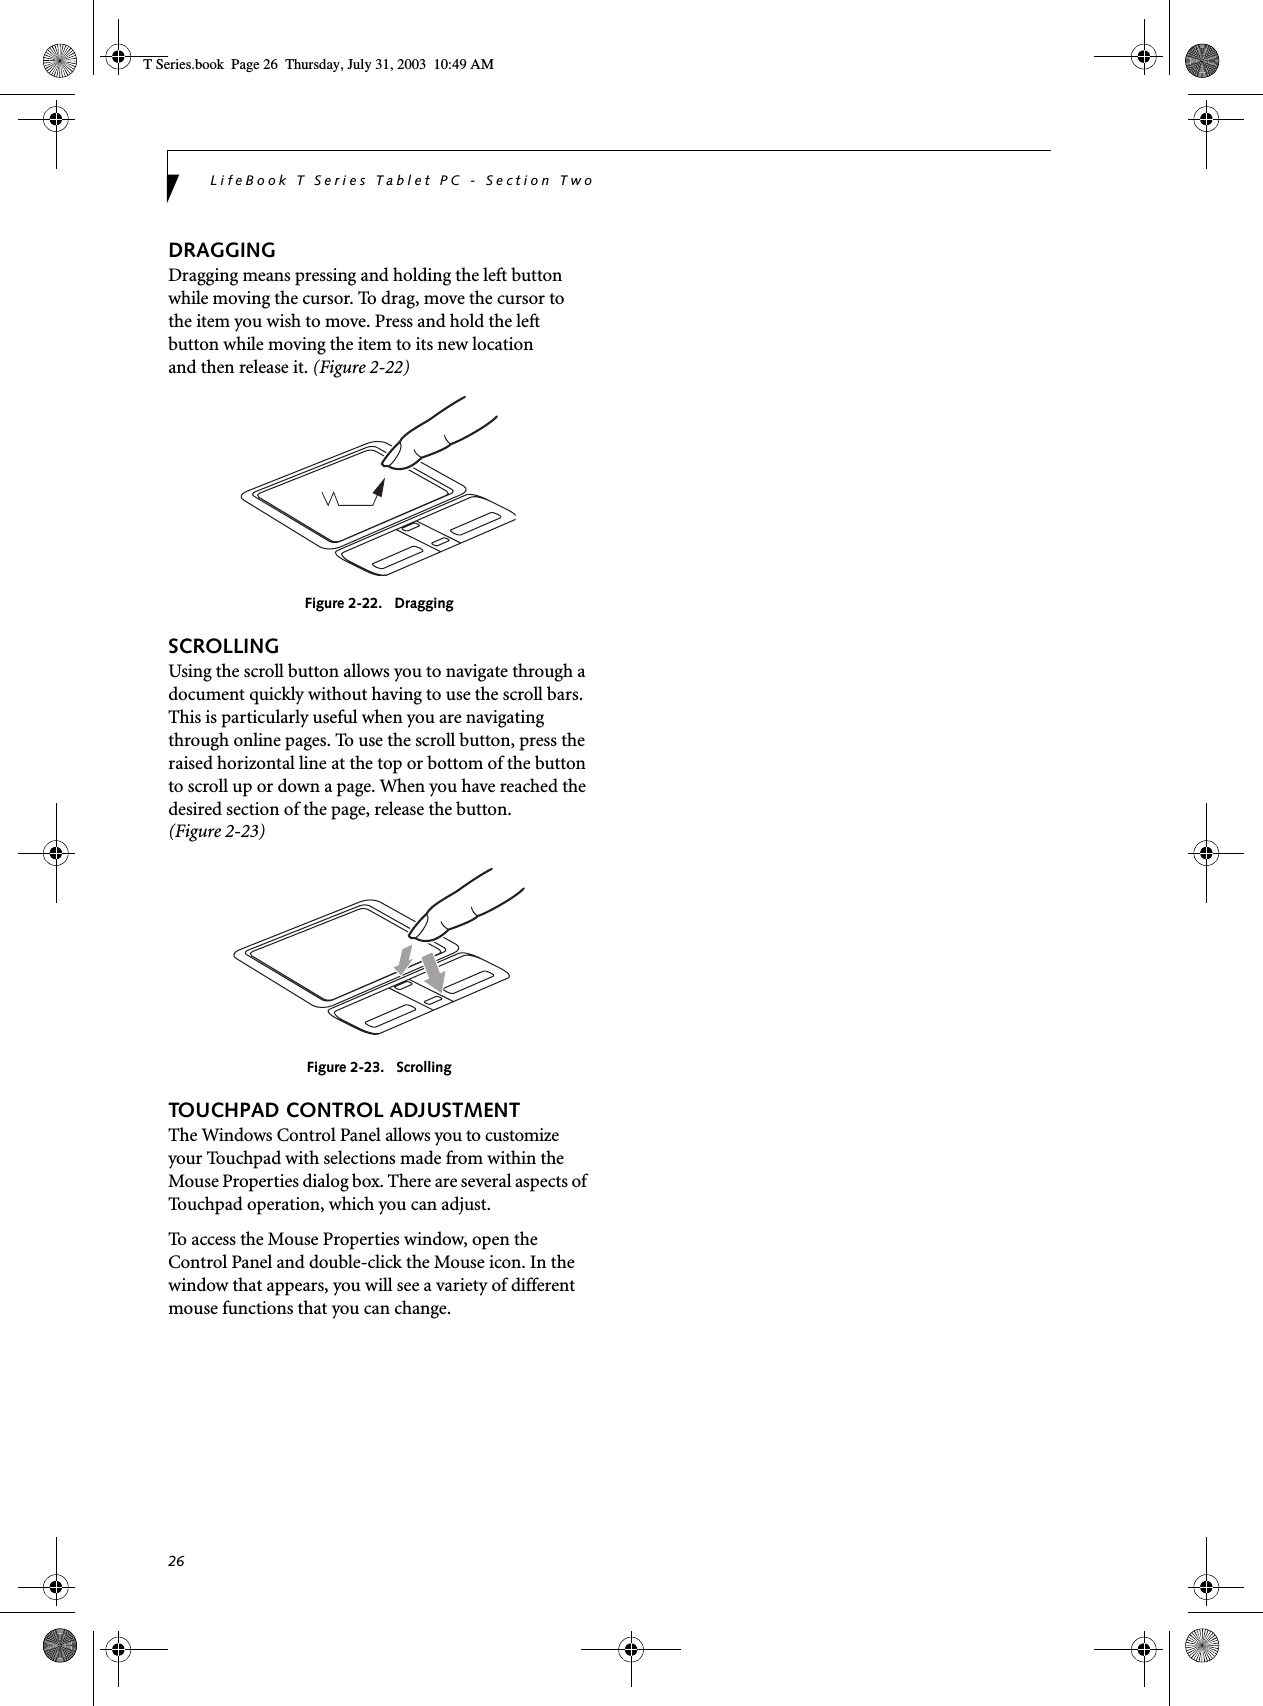
![21Getting to Know Your Tablet PCFigure 2-18. LifeBook T Series Tablet PC Security/Tablet PC Buttons LifeBook Security/Tablet PC ButtonsA unique feature of your LifeBook T Series Tablet PC is the array of Security and Tablet PC buttons. These buttons allow you to secure your Tablet PC from unauthorized use and to launch specific applications with the touch of a button. If the security system is activated, upon starting your Tablet PC or resuming from Standby, Hibernate, or shut-down mode the security system will require you to enter a password code using the security buttons. After you enter the correct password, your Tablet PC will resume operation. The five security/Tablet PC buttons are located on the bottom right-hand side of the display when it is config-ured to be used as a notebook. (Figure 2-18) Security functions: All five buttons are used when implementing security functions. Four of the buttons are used to enter the password, and the fifth is used as an Enter button. See the right-hand column of Table 2-3.Tablet PC funct io n s : All five of the buttons have primary functions. Four of the buttons have secondary functions when used as application buttons. The secondary functions are activated by pressing the Func-tion (Fn) button while pressing the application button. See Table 2-3 for specific functions. The secondary func-tions of the Application A and B buttons can be changed to launch any application. See “Changing Tablet PC Button Functions” on page 22 Table 2-3. Security/Tablet PC Button Functions(1) Application A Button(3) Button 3(2) Application B Button(4) Button 4Enter ButtonWhen the system is logging on or when it is locked (i.e., when you have the Logon or Computer Locked window showing on your desktop), the A and B buttons act as [Tab] and [Enter] keys, respectively. Button Icon Primary Function Secondary Function(Fn + Button)Security Panel Function(Pre-boot and resuming from suspend)Page Down User-defined Application A(Default = Calculator) Security Button 1Page Up User-Defined Application B(Default = MS Journal) Security Button 2Screen Rotation VGA-Out Security Button 3Secondary Function Selection Fujitsu Menu Utility Security Button 4Ctl+Alt+Del Button None Security Enter ButtonT Series.book Page 21 Thursday, July 31, 2003 10:49 AM](https://usermanual.wiki/Fujitsu-Client-Computing/WL0007.Host-PC-User-Manual/User-Guide-407389-Page-28.png)
![22LifeBook T Series Tablet PC - Section TwoPage Down / Application A ButtonWhen you press the Page Down button when the system is running, each press of the button will scroll the screen down one frame. This allows you to navigate quickly through large documents.When you press the Fn button while you press then release the Page Down/Application A button, you will automatically start whichever program is assigned to the button. The default application for this button is Calcu-lator.See “Changing Tablet PC Button Functions” on page 22 to select a different application for this button.Page Up / Application B ButtonWhen you press the Page Up button when the system is running, each press of the button will scroll the screen up one frame. This allows you to navigate quickly through large documents.When you press the Fn button while you press then release the Page Up/Application A button, you will auto-matically start whichever program is assigned to the button. The default application for this button is Microsoft Journal.See “Changing Tablet PC Button Functions” on page 22 to select a different application for this button.Screen Rotation / VGA-Out ButtonThe screen rotation feature would normally be used only when the system is configured as a tablet. When you would like to use the tablet as an eBook, for example, you would use the portrait orientation; when accessing spreadsheets or using the system as a notebook, you would more typically use landscape orientation.When the system is changed to tablet configuration, the orientation automatically changes to portrait mode by default. When you press the Screen Rotation / VGA-Out button, the system screen orientation changes from portrait (vertical) to landscape (horizontal) or from landscape to portrait. Function / Fujitsu Menu Utility ButtonThe Function button works in conjunction with the other application buttons to provide additional func-tionality for the buttons. Refer to specific details above.Pressing the Fn button twice in succession causes the Fujitsu Menu Utility to appear on your screen, allowing you to modify certain system settings.Ctl+Alt+Del ButtonPressing and holding the Ctl-Alt-Del button for up to 750 msecs launches the Logon screen or the Windows Task Manager (if the system hasn’t yet been configured).CHANGING TABLET PC BUTTON FUNCTIONSThe Application A and B buttons can be changed to launch a program or perform an action you select. By default, the Application A button launches the Calcu-lator, and the Application B button launches MS Journal.To launch different applications or cause the Application A or B buttons to perform a specific action:1. Double-click on the Tablet and Pen Settings icon in the Control Panel. 2. Select the Tablet Buttons tab and select the button you would like to change from the list.3. Click [Change] and open the drop down list in the Action: field.4. Select the action you would like the button to perform. If you want to launch a program, click on Launch an Application then browse to the location of the program.5. Click [OK], then click [OK] again. The buttons will now perform the actions you have assigned to them.SETTING UP LIFEBOOK SECURITY PANELWhen you receive your Tablet PC, the security panel application is pre-installed without any passwords. The following sections provide detailed information on your security panel, how to set, change or remove passwords.Numbered ButtonsUse these buttons to enter your password.(Figure 2-18)Enter ButtonAfter entering the button strokes, push this button to enter the password into the Tablet PC. (Figure 2-18)PASSWORDSThe user and supervisor password may be set on this Tablet PC. A supervisor password is typically the same for all Tablet PC’s and notebooks in a work group, office, or company to allow for system management. Individual computers in a group environment should not use a common password. A password consists of one to five button strokes plus the enter button. A valid stroke consists of pushing one or up to four buttons simulta-neously. The screen orientation default can be changed by going to the Control Panel and double-clicking on the Fujitsu Display Control icon and selecting the desired defaults from the Display Orientation section. After changing the defaults, click [OK]. T Series.book Page 22 Thursday, July 31, 2003 10:49 AM](https://usermanual.wiki/Fujitsu-Client-Computing/WL0007.Host-PC-User-Manual/User-Guide-407389-Page-29.png)
![23Getting to Know Your Tablet PCThe following are valid button strokes: ■Pushing [4] by itself■Pushing [2] and [3] at the same time■Pushing [1], [2], and [4] at the same time■Pushing [1], [2], [3], and [4] at the same timeThe following are valid passwords. The numbers within braces ({ }) are button strokes using more than one button. ■{[2]+[3]}, [1], [Enter]■[4], [enter]■{[1]+[3]}, {[2]+[3]+[4]}, [1], [4], [2], [Enter]Setting PasswordsWhen shipped from the factory, no passwords are set. You have a choice of having no password or setting a supervisor and user password. You must set the super-visor password before the user password. Setting Supervisor PasswordYou must have set a supervisor password before setting any user passwords. The supervisor password can bypass the user password.1. Go to the Start menu.2. Click on Run.3. Type in:C:\Program Files\Fujitsu\Security Panel Application\Supervisor\ FJSECS.EXE, then press [Enter]4. Follow the on-screen instructions to set theSupervisor password.Setting User Password1 Go to the Start menu.2. Click on All Programs.3. Click on Security Panel Application -> Security Panel Application.4. Follow the on-screen instructions to set theuser password.USING YOUR LIFEBOOK SECURITY PANELThe security lock feature is in effect both when the system resumes from Off, Standby, or Hibernation state. You always need to push the Security Panel buttons to input the user password. Your system will not begin the boot sequence until you enter your supervisor/user password.From Off State1. Turn on your system.2. When the Security Indicator flashes, enter the pass-word and press Enter button.For example, if the password is 22222, first press Button 2 five times and press the Enter button. The Tablet PC will boot to normal operation.From Standby/Hibernation State1. Press your Suspend/Resume button.2. When the Security Indicator flashes, enter the pass-word and press Enter button.The Tablet PC should resume normal operation.Incorrect Password EntryIf an invalid supervisor or user password is entered three times in succession, the system will “beep” for about one minute. If a valid password is entered within a minute (while system beeps), the beeping will stop and the Tablet PC will resume normal operation. If no password is entered or an invalid password is entered while the system beeps, the system will return to its previous locked state (standby or off) and the Security Indicator will go off. To reactivate the Tablet PC after a password failure, you must press the Suspend/Resume button, then enter a correct password.PRECAUTIONSOpening and Closing the CoverBy default, closing the cover automatically places your system into Standby mode. (You can change the action the system takes when the cover is closed by opening the Power Options Properties icon in the Control Panel, and selecting the Advanced tab. Make a choice from the drop down menu for “When I close the lid of my portable computer:” and click the [OK] button.) Opening the cover does not automatically place the Tablet PC into normal operation. Instead, you must enter the proper security password after pushing the Suspend/Resume button.■The purpose of supervisor password is to be able to bypass the user password in case the user password is forgotten. The supervisor password alone will not lock the system.■You must set the supervisor and user passwords for the security panel to work.You may change or remove the supervisor or user password by repeating the steps defined above.Remember the user password you specified on the Security Panel Application. If you forget the password you will not be able to use your computer. The supervisor pass-word can override the user password.T Series.book Page 23 Thursday, July 31, 2003 10:49 AM](https://usermanual.wiki/Fujitsu-Client-Computing/WL0007.Host-PC-User-Manual/User-Guide-407389-Page-30.png)
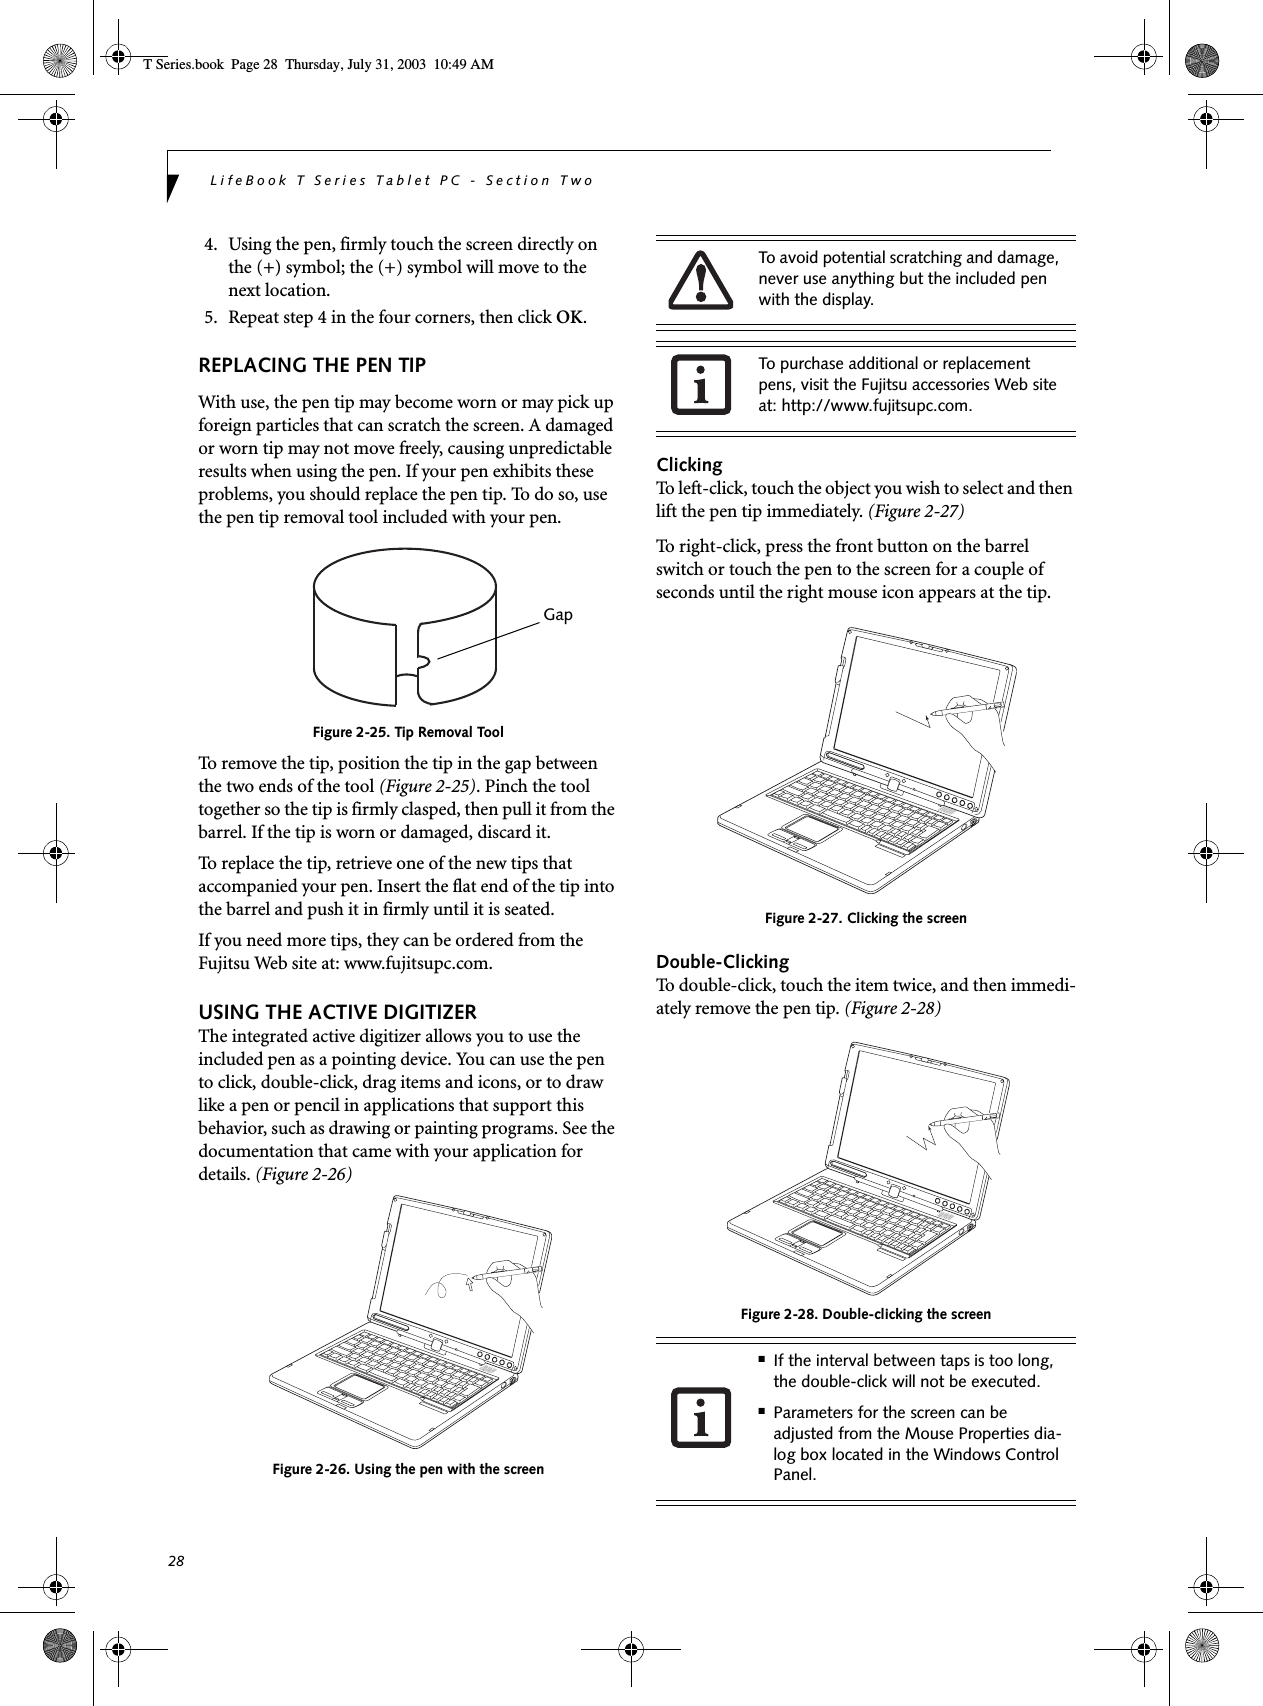
![27Getting to Know Your Tablet PCPen and Active DigitizerUSING THE PENYou can use the LifeBook T Series Tablet PC pen to generate and create electronic “ink”, to select items, and to navigate through programs on the Tablet PC. Programs that support handwriting recognition also allow you to write characters directly on the screen with the pen. You can also use the pen as a drawing tool.Figure 2-24. LifeBook T Series PenThe screen reacts when the pen tip is approximately 1/8 inch (3-5 mm) from the screen. The pen has three switches: a tip switch and a barrel button toggle switch with switches at both ends. By default, the tip switch corresponds to the left mouse button, and the front toggle (closest to the pen tip) barrel button switch corre-sponds to the right mouse button (when used in combi-nation with the tip switch). The rear toggle of the barrel button switch acts as an electronic ink "eraser".The functions of the rear toggle and the tip click pres-sure can be changed by clicking [Start] -> Control Pane, and double-clicking the Fujitsu Pen Settings icon. To change the rear toggle function, select the drop-down list to select a new function, then click [Apply]. If you don’t want the rear toggle to have any function, select Ignore from the list. Adjusting the click pressure determines how much pres-sure must be put on the pen tip in order for the screen to react. The softer it is set, less pressure is required; the harder it is set, more pressure is required. To change the click pressure, use the slider bar to make the click pres-sure harder or softer, then click [Apply]. Here are some hints that may help you use the pen more effectively:• To activate the tip switch, tap or hold the pen tip against the screen.• To activate the barrel button switch, press and hold the end of the button you wish to use (front toggle is the right mouse button switch; the rear toggle acts as an electronic “eraser”).• To move the cursor, hold the pen tip within 1/8 inch (3 - 5 mm) from the screen and move the pen.• To start a program, double-tap the pen tip (tap the pen tip twice rapidly) on the program icon as you would double-click a mouse.•To select an object, tap the pen tip on the object once. •To double-click an object, quickly tap the object twice.CALIBRATING THE PENIn order to ensure accurate tracking between the pen and cursor, you must run the Touch Screen Calibration Utility before you use the active digitizer for the first time, or after you change the display resolution.To run the calibration utility:1. Go to Start -> Control Panel and double-click on the Tabl et and Pen S ettin gs icon. 2. Click Calibrate.3. Adjust the display of your Tablet PC to a comfort-able angle.You are advised to use a screen protector on your system display to minimize the chance of its being scratched. Screen protectors are available from the Fujitsu Web site at www.fujitsupc.com. The LifeBook T Series Tablet PC pen is a high-quality electronic instrument that can be damaged if used improperly. Treat the pen as you would any precision device. Observe the following guidelines:• Do not gesture with the pen, use it as a pointer, or tap it on surfaces other than the Tablet PC screen.• Do not try to turn the thumb grip on the pen; it is designed for inserting and removing the pen from the pen holder.• Never store the pen with the tip bearing the weight of the pen (e.g., sitting tip down in a pencil cup). Storing the pen tip down could distort the internal mechanism over a period of time (especially in higher temperatures), causing the tip to act as if it is always depressed. The pen should be stored in the pen holder when not in use.Tip SwitchBarrel SwitchUse only the pen provided with your Tablet PC. Do not use substitutes that were not designed for the LifeBook T Series Tablet PC.T Series.book Page 27 Thursday, July 31, 2003 10:49 AM](https://usermanual.wiki/Fujitsu-Client-Computing/WL0007.Host-PC-User-Manual/User-Guide-407389-Page-34.png)
![29Getting to Know Your Tablet PCVolume ControlYour Fujitsu Tablet PC has multiple volume controls which interact with each other. CONTROLLING THE VOLUMEThe volume can be controlled in several different ways:■Volume can be set from within the Volume Control on the Taskbar.■Volume can be controlled with the [F8] and [F9] func-tions keys. Pressing [F8] repeatedly while holding [Fn] will decrease the volume of your Tablet PC. Pressing [F9] repeatedly while holding [Fn] will increase the volume of your Tablet PC.■Volume can be controlled by many volume controls that are set within individual applications.■Certain external audio devices you might connect to your system may have hardware volume controls.■Each source discussed above puts an upper limit on the volume level that must then be followed by the other sources. We recommend that you experiment with the various volume controls to discover the optimal sound level.Any software that contains audio files will also contain a volume control of its own. If you install an external audio device that has an independent volume control, the hardware volume control and the software volume control will interact with each other. It should be noted that if you set your software volume to Off, you will override the external volume control setting. There are twenty-six levels through which the function keys cycle. T Series.book Page 29 Thursday, July 31, 2003 10:49 AM](https://usermanual.wiki/Fujitsu-Client-Computing/WL0007.Host-PC-User-Manual/User-Guide-407389-Page-36.png)


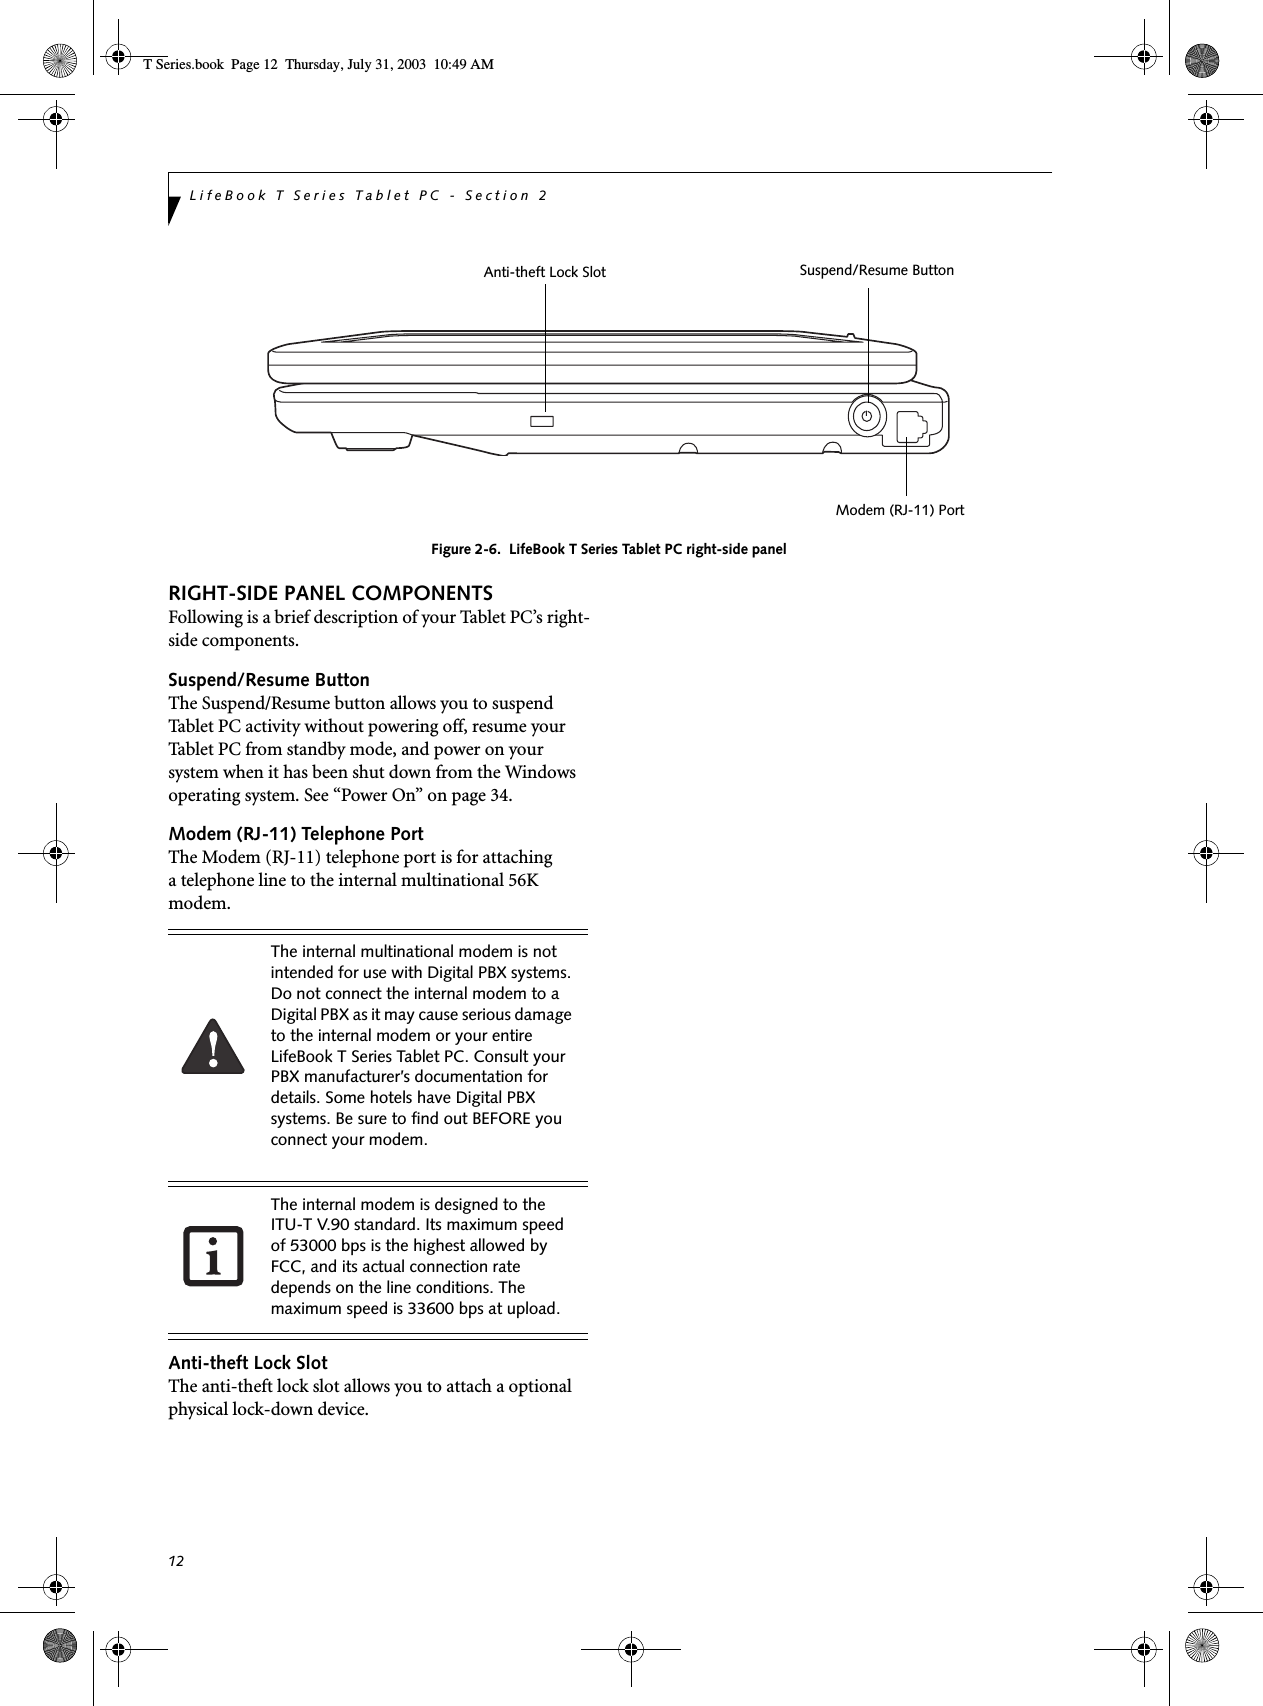
![34LifeBook T Series Tablet PC - Section ThreeStarting Your Tablet PCPOWER ONThe Suspend/Resume button is used to turn on your LifeBook T Series Tablet PC from its off state. Once you have connected your AC adapter or charged the internal Lithium ion battery, you can power on your Tablet PC. (See figure 2-6 on page 12 for location)Press the Suspend/Resume button to start your system. When you are done working you can either leave your Tablet PC in Standby mode, See “Standby Mode” on page 36, or you can turn it off. See “Power Off” on page 38When you Power On your Tablet PC, it will perform a Power On Self Test (POST) to check the internal parts and configuration for correct functionality. If a fault is found, your Tablet PC will emit an audio warning and/or an error message will be displayed. See “Power On Self Test Messages” on page 61 Depending on the nature of the problem, you may be able to continue by starting the operating system or by entering the BIOS setup utility and revising the settings.After satisfactory completion of the Power On Self Test (POST), your Tablet PC will load your operating system.BOOT SEQUENCEThe procedure for starting-up your Tablet PC is termed the Bootup sequence and involves your Tablet PC’s BIOS. When your Tablet PC is first turned on, the main system memory is empty, and it needs to find instruc-tions to start up your Tablet PC. This information is in the BIOS program. Each time you power up or restart your Tablet PC, it goes through a boot sequence which displays a Fujitsu logo until your operating system is loaded. During booting, your Tablet PC is performing a standard boot sequence including a Power On Self Test (POST). When the boot sequence is completed without a failure and without a request for the BIOS Setup Utility, the system displays the operating system’s opening screen.The boot sequence is executed when:■You turn on the power to your Tablet PC.■You restart your Tablet PC from the WindowsShut Down dialog box.■The software initiates a system restart. Example:When you install a new application.BIOS SETUP UTILITYThe BIOS Setup Utility is a program that sets up the operating environment for your Tablet PC. Your BIOSis set at the factory for normal operating conditions, therefore there is no need to set or change the BIOS’ environment to operate your Tablet PC.The BIOS Setup Utility configures:■Device control feature parameters, such as changingI/O addresses and boot devices.■System Data Security feature parameters, suchas passwords.Entering the BIOS Setup UtilityTo enter the BIOS Setup Utility do the following: 1. Turn on or restart your Tablet PC.2. Press the [F2] key once the Fujitsu logo appearson the screen. This will open the main menuof the BIOS Setup Utility with the currentsettings displayed.3. Press the [RIGHT ARROW] or [LEFT ARROW] key to scroll through the other setup menus to review or alter the current settings.BIOS GuideA guide to your Tablet PC’s BIOS is available online. Please visit our service and support Web site at www.fujitsupc.com. Once there, select Support, then select Tablet PCs under User’s Guides. Select LifeBook Tablet PC BIOS Guides from the pull-down menu for your Tablet PC series. If you are unsure of your Tablet PC’s BIOS number, refer to your packing slip.BOOTING THE SYSTEM We strongly recommend that you not attach any external devices until you have gone through the initial power-on sequence.When you turn on your LifeBook T Series Tablet PC for the first time, it will display a Fujitsu logo on the screen. When you turn on your Tablet PC be sure you have a power source. This means that a battery is installed and charged, or that the AC or Auto/Airline adapter is connected and has power.Never turn off your Tablet PC during the Power On Self Test (POST) or it will cause an error message to be displayed when you turn your Tablet PC on the next time. See “Power On Self Test Messages” on page 61If your data security settings require it, you may be asked for a password before the BIOS main menu will appear.T Series.book Page 34 Thursday, July 31, 2003 10:49 AM](https://usermanual.wiki/Fujitsu-Client-Computing/WL0007.Host-PC-User-Manual/User-Guide-407389-Page-41.png)


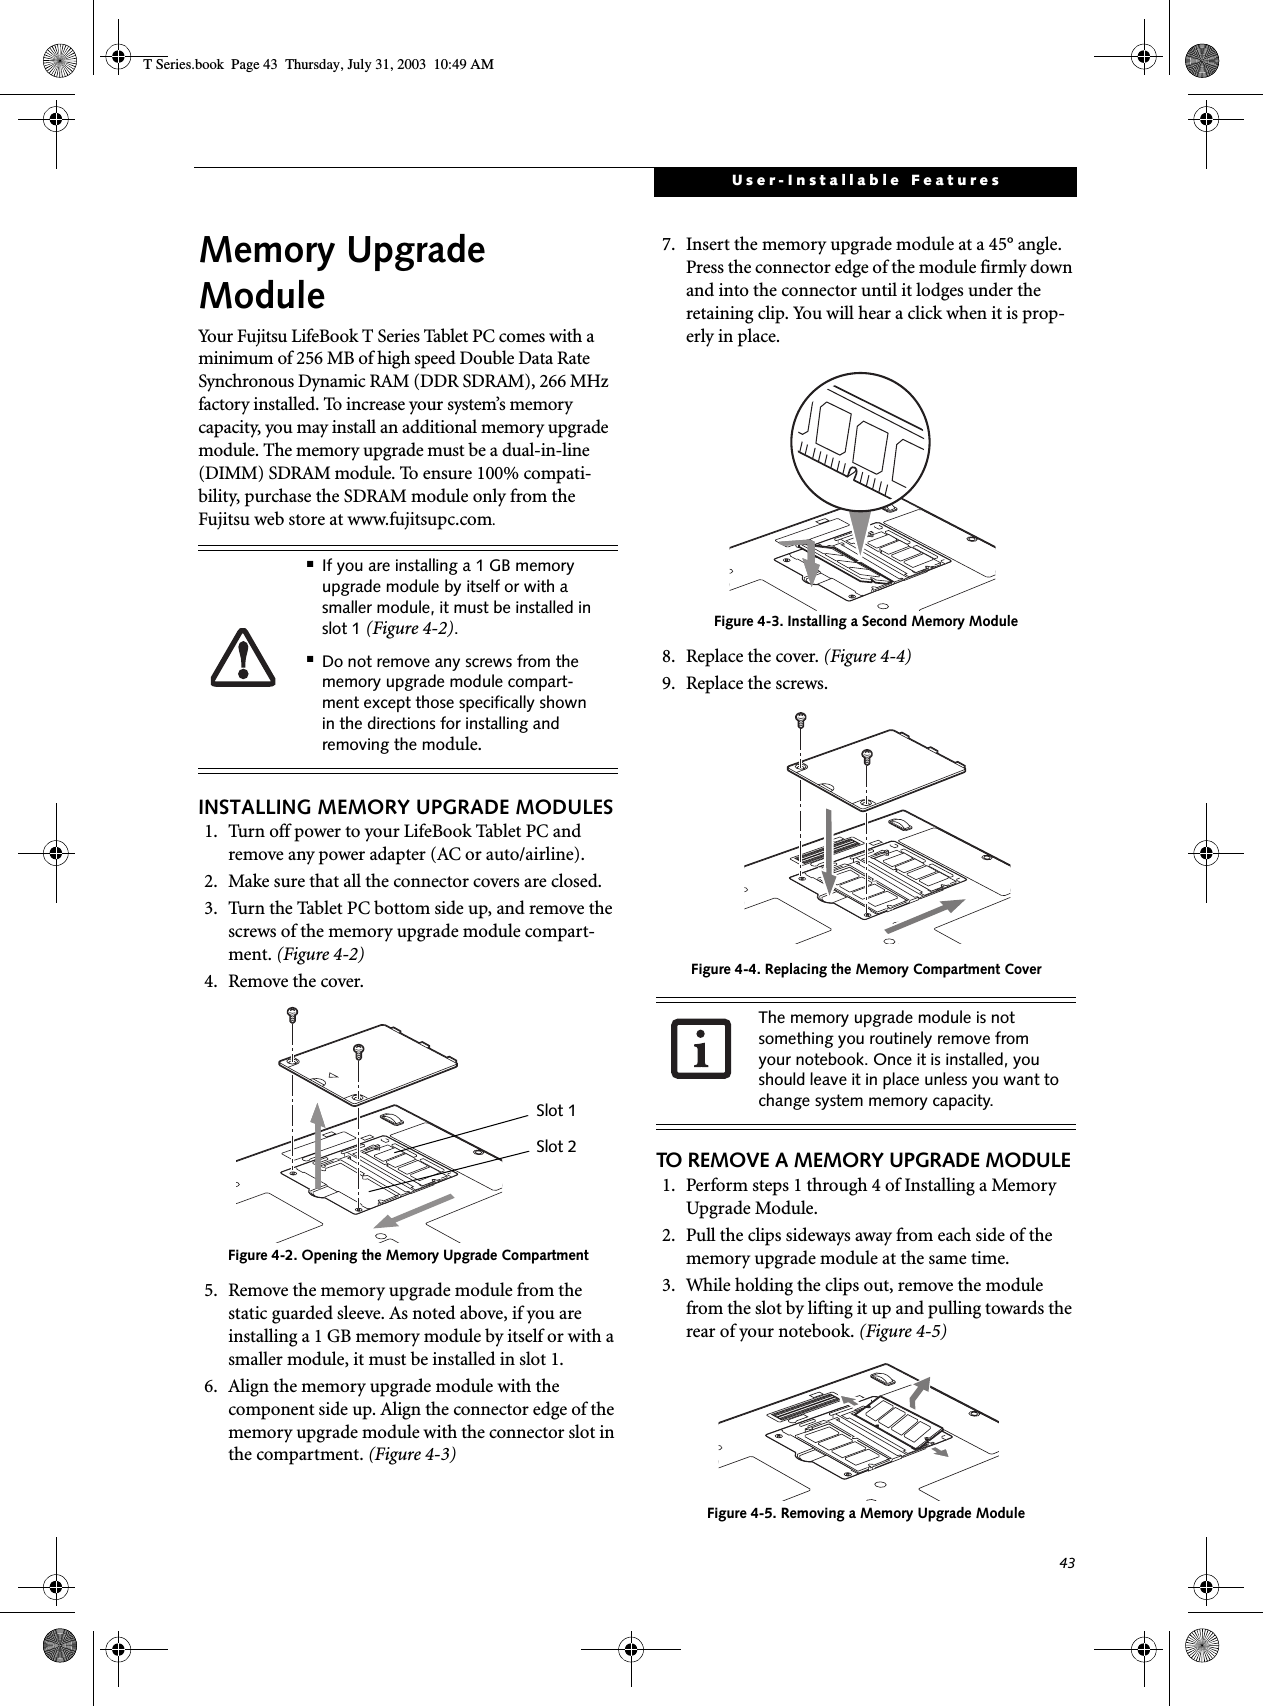
![44LifeBook T Series Tablet PC - Section Four4. Store the memory upgrade module in a static guarded sleeve.5. Replace the cover. (Figure 4-4)6. Replace the screws.CHECKING THE MEMORY CAPACITYOnce you have changed the system memory capacity by either adding or removing a memory upgrade module, be sure to check that your notebook has recognized the change.You can check the memory capacity by clicking [Start]-> Control Panel, then double-clicking the System icon. Select the General tab and check the amount of memory under “Computer.”The amount of memory displayed should be approxi-mately the total of all memory modules installed. There may be a discrepancy of 8 MB which is allocated for fixed video memory.Your Tablet PC uses Dynamic Video Memory Technology (DVMT), which allows the video driver to dynamically determine the amount of memory that is used. Your Tablet PC can use a maximum of 64 MB of system memory for video functions. If the total memory displayed is incorrect, check that your memory upgrade module is properly installed. (If the module is properly installed and the capacity is still not correctly recognized, see Troubleshooting on page 54.T Series.book Page 44 Thursday, July 31, 2003 10:49 AM](https://usermanual.wiki/Fujitsu-Client-Computing/WL0007.Host-PC-User-Manual/User-Guide-407389-Page-51.png)
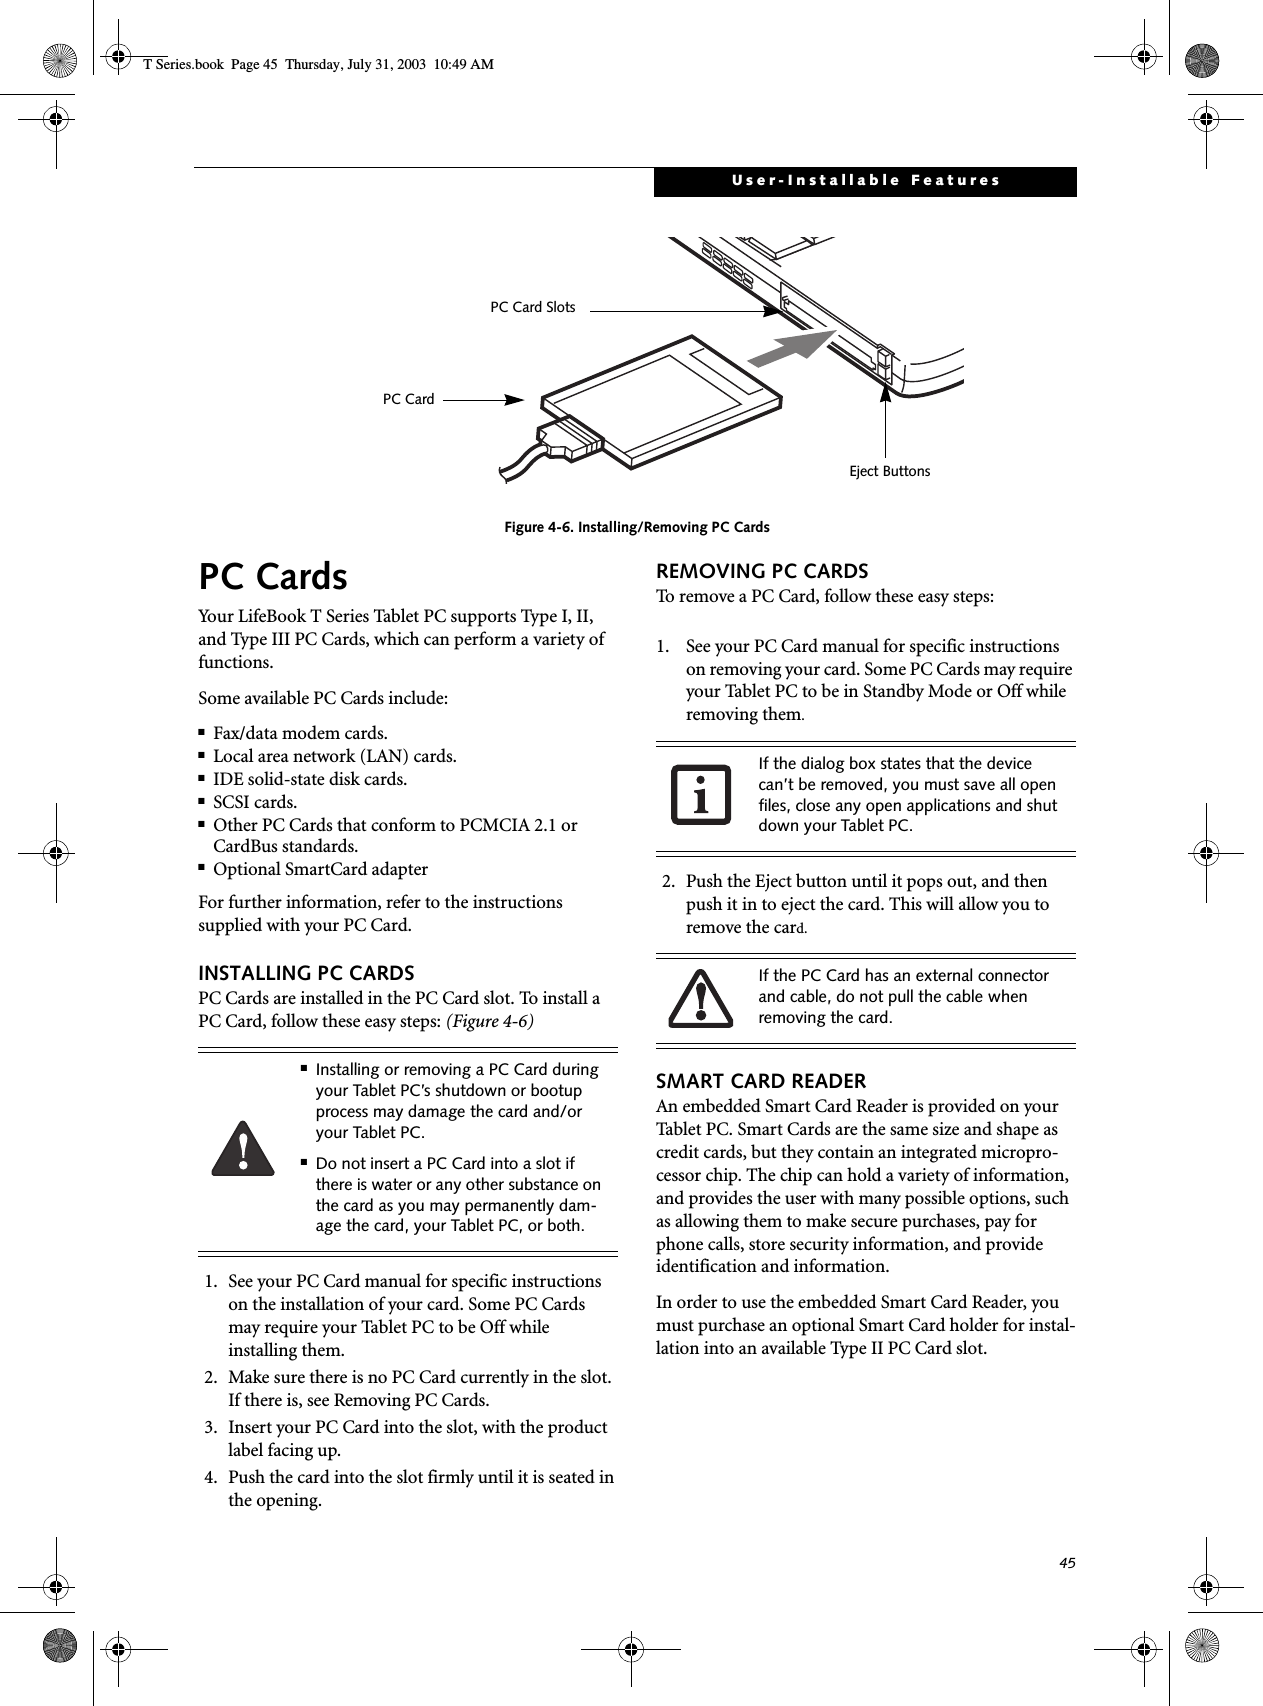
![49User-Installable FeaturesMICROPHONE JACKThe microphone jack allows you to connect an external mono microphone. Your microphone must be equipped with a 1/8"(3.5 mm) mono mini-plug in order to fit into the microphone jack of your Tablet PC. In order to connect a microphone follow these easy steps: (See Figure 2-5 on page 11 for location)1. Align the connector with the port opening.2. Push the connector into the port until it is seated.HEADPHONE JACKThe headphone jack allows you to connect headphones or powered external speakers to your Tablet PC. Your headphones or speakers must be equipped with a 1/8" (3.5 mm) stereo mini-plug. In order to connect head-phones or speakers follow these easy steps: (See Figure 2-5 on page 11 for location)1. Align the connector with the port opening.2. Push the connector into the port until it is seated.EXTERNAL MONITOR PORTThe external monitor port allows you to connect an external monitor. In order to connect an external monitor follow these easy steps: (See Figure 2-7 on page 13 for location)1. Remove the cover from the port opening, if present.2. Align the connector with the port opening.3. Push the connector into the port until it is seated.4. Tighten the two hold-down screws, located oneach end of the connector. ■Do not move either device while com-munication is active as it may interrupt data transmission.■Be careful not to scratch the infrared port lens. Scratches, dirt, or other sur-face marks can degrade operation.If you plug headphones into the headphone jack, the built-in stereo speakers will be disabled.When an external monitor is plugged in, pressing the [Fn] + [F10] keys allows you to change your selection of where to send your display video. Each time you press the key combination, you will step to the next choice, starting with the built-in display panel only, moving to the external monitor only, finally moving to both the built-in display panel and an external monitor.T Series.book Page 49 Thursday, July 31, 2003 10:49 AM](https://usermanual.wiki/Fujitsu-Client-Computing/WL0007.Host-PC-User-Manual/User-Guide-407389-Page-56.png)


![54LifeBook T Series Tablet PC - Section FiveTROUBLESHOOTING TABLEProblem PageAudio Problems . . . . . . . . . . . . . . . . . . . . . . . . . . page 54Docking Problems . . . . . . . . . . . . . . . . . . . . . . . . page 54Hard Drive Problems . . . . . . . . . . . . . . . . . . . . . . page 54Keyboard or Mouse Problems. . . . . . . . . . . . . . . page 54Pen Input Problems . . . . . . . . . . . . . . . . . . . . . . . page 55Infrared Problems . . . . . . . . . . . . . . . . . . . . . . . . page 55Memory Problems . . . . . . . . . . . . . . . . . . . . . . . . page 55Problem PageModem Problems. . . . . . . . . . . . . . . . . . . . . . . . . page 55USB Device Problems . . . . . . . . . . . . . . . . . . . . . page 56PC Card Problems . . . . . . . . . . . . . . . . . . . . . . . . page 56Power Failures . . . . . . . . . . . . . . . . . . . . . . . . . . . page 56Shutdown and Startup Problems . . . . . . . . . . . . page 58Video Problems . . . . . . . . . . . . . . . . . . . . . . . . . . page 59Miscellaneous Problems . . . . . . . . . . . . . . . . . . . page 60Problem Possible Cause Possible SolutionsAudio ProblemsThere is no sound coming from the built-in speakers.The software volume control is set too low.Adjust the sound volume control settings in your software, operating system and applications.Headphones are plugged into your Tablet PC.Plugging in headphones disables the built-in speakers, remove the headphones.Software driver is not config-ured correctly.Refer to your application and operating system documentation for help.Sound could have been muted with function keys.Press [F3] while holding the [Fn] key to toggle the sound on and off.Port Replicator ProblemsTablet PC does not turn on when installed in optional Port ReplicatorPort Replicator AC adapter is not plugged in. Provide power to the Port Replicator.Tablet PC is not properly seated in the Port Replicator.Remove and re-dock your Tablet PC.Hard Drive ProblemsYou cannot access your hard drive.The setup utility is incorrectly set for your internal (Primary Master) hard drive.Revise BIOS settings to set the Primary Mastercorrectly. See “BIOS Setup Utility” on page 34.The wrong drive designator was used by an application when a bootable CD-ROM was used to start the Tablet PC.Verify drive designator used by application is inuse by the operating system. When the operating system is booted from a CD, drive designationsare automatically adjusted. Security is set so your oper-ating system cannot be started without a password.Verify your password and security settings.Keyboard or Mouse ProblemsThe built-in keyboard does not seem to work.The Tablet PC has gone into Standby mode.Push the Suspend/Resume button.Your application has locked out your keyboard.Try to use your integrated pointing device to restart your system. If this fails, turn your Tablet PC off by pressing the suspend/resume button for 10 seconds or more, and then turn it back on.T Series.book Page 54 Thursday, July 31, 2003 10:49 AM](https://usermanual.wiki/Fujitsu-Client-Computing/WL0007.Host-PC-User-Manual/User-Guide-407389-Page-61.png)
![56LifeBook T Series Tablet PC - Section FiveModem does not appear to work.Modem may not have been intialized.Verify that the modem has been initialized by the operating system. TO do so, right-click on My Computer and select the Hardware tab. Click [Device Manager] and click on the "+" symbol that appears next to Modems. Verify that your device is listed as installed.USB Device ProblemsYou have installed a USB device, but your Tablet PC does not recognize the device, or the device does not seem to work properly.The device is not properly installed.Remove and re-install the device. See “Device Ports” on page 48.The device may have been installed while an application was running, so your Tablet PC is not aware of its installation.Close the application and restart your Tablet PC.Yo u r s of tw are m a y n o t h ave the correct software driver active.See your software documentation and activate the correct driver.Your device and another device are assigned the same I/O address.Check all I/O addresses located within the BIOS setup utility and any other installed hardware or software to make sure there are no duplications.PC Card ProblemsA card inserted in the PC Card slot does not work or is locking up the system.The card is not properly installed.Remove and re-install the card. See “PC Cards” on page 45.The card may have been installed while an application was running, so your Tablet PC is not aware of its installation.Close the application and restart your Tablet PC.Yo u r s of tw are m a y n o t h ave the correct software driver active.See your software documentation and activate the correct driver.Your PC Card device and another device are assigned the same I/O address.Check all I/O addresses located within the BIOS setup utility and any other installed hardware or software to make sure there are no duplications.Power FailuresYou turn on your Tablet PC and nothing seems to happen.The installed battery is completely discharged or there is no power adapter (AC or Auto/Airline) installed.Check the Status Indicator Panel to determine the presence and condition of the battery. See “Status Indicator Panel” on page 15. Install a charged battery or a Power adapter.The battery is installed but is faulty.Use the Status Indicator Panel to verify the presence and condition of the battery. See “Status Indicator Panel” on page 15. If a battery is indicating a short, remove that battery and operate from another power source or replace that battery.Problem Possible Cause Possible SolutionsT Series.book Page 56 Thursday, July 31, 2003 10:49 AM](https://usermanual.wiki/Fujitsu-Client-Computing/WL0007.Host-PC-User-Manual/User-Guide-407389-Page-63.png)
![58LifeBook T Series Tablet PC - Section FiveThe battery seems to discharge too quickly.(continued)The power savings features may be disabled.Check the power management and/or setup utility settings in the Power Savings menu and adjust according to your operating needs.The brightness is turned all the way up.Turn down the brightness adjustment. The higher the brightness the more power your display uses.The battery is very old. Replace the battery.The battery has been exposed to high temperatures.Replace the battery.The battery is too hot or too cold. Restore the Tablet PC to normal operating tempera-ture. The Charging icon on the Status Indicator panel will flash when the battery is outside itsoperating range.The AC Adapter is defective. Replace with another AC Adapter to see if the problem persists. Replace any defective AC Adapters.Shutdown and Startup ProblemsThe Suspend/Resume button does not work.The Suspend/Resume button is disabled from the Advanced submenu of the Power menu of the setup utility. Enable the button from the setup utility.You did not hold the button in long enough.Hold the button longer. This may need to be a few seconds if your application is preventing the CPU from checking for button pushes.There may be a conflict with the application software.Close all applications and try the button again.The system powers up, and displays power-on informa-tion, but fails to load the operating system.The boot sequence settings of the setup utility are not compatible with your configuration.Set the operating source by pressing the [F2] key while the Fujitsu logo is on screen, entering the setup utility and adjusting the source settings from the Boot menu. See “BIOS Setup Utility” on page 34.You have a secured system requiring a password to load your operating system.Make sure you have the right password. Enter the setup utility and verify the Security settings and modify them as accordingly. See “BIOS Setup Utility” on page 34.An error message is displayed on the screen during the Tablet PC boot sequence.Power On Self Test (POST) has detected a problem.See the Power On Self Test (POST) messages to determine the meaning and severity of the problem. Not all messages are errors; some are simply status indicators. See “Power On Self Test Messages” on page 61.Your system display won’t turn on when the system is turned on or when the system has resumed.The system may be password-protected.Check the status indicator panel to verify that the Security icon is blinking. If it is blinking, enter your password.Problem Possible Cause Possible SolutionsT Series.book Page 58 Thursday, July 31, 2003 10:49 AM](https://usermanual.wiki/Fujitsu-Client-Computing/WL0007.Host-PC-User-Manual/User-Guide-407389-Page-65.png)
![59TroubleshootingYour Tablet PC appears to change setup parameters when you start it.BIOS setup changes were not saved when you made them and exited the BIOS setup utility returning it to previous settings.Make sure you select Save Changes And Exit when exiting the BIOS setup utility.The BIOS CMOS back-up battery has failed.Contact your support representative for repairs. This is not a user-serviceable part.Video ProblemsThe built-in display is blank when you turn on your Tablet PC.The angle of the display and the brightness settings are not adequate for your lighting conditions.Move the display and the brightness control until you have adequate visibility.The optional Port Replicator is attached, an external monitor is plugged in, and the Tablet PC is set for an external monitor only.Pressing [F10] while holding down the [Fn] key allows you to change your selection of where tosend your display video. Each time you press the combination of keys you will step to the nextchoice. The choices, in order are: built-in display only, external monitor only, both built-in display and external monitor.The power management timeouts may be set for very short intervals and you failed to notice the display come onand go off again.Press any button the keyboard, or move the mouse to restore operation. If that fails, push the Suspend/Resume button. (The display may be shut off by Standy mode, Auto Suspend or Video Timeout)The Tablet PC turned on with a series of beeps and your built-in display is blank.Power On Self Test (POST)has detected a failure which does not allow the displayto operate. Contact your support representative.Your system display won’t turn on when the system is turned on or when the system has resumed.The system may be password-protected.Check the status indicator panel to verify that the Security icon is blinking. If it is blinking, enter your password.The display goes blank by itself after you have been using it.The Tablet PC has gone into Video Timeout, Standby Mode, or Hibernate Mode because you have not used it for a period of time.Press a button on the keyboard, or move the mouse to restore operation. If that fails, push the Suspend/Resume button. Check your power management settings, or close your applications and go to the Power Savings menu of the setup utility to adjust the timeout values to better suit your operation needs. See “BIOS Setup Utility” on page 34.The power management time-outs may be set for very short intervals and you failed to notice the display come onand go off again.Press any button on the keyboard, or move the mouse to restore operation. If that fails, push the Suspend/Resume button. (The display may be shut off by Standby Mode, Auto Suspend or Video Timeout)The display does not close. A foreign object, such as a paper clip, is stuck between the display and the keyboard.Remove all foreign objects from the keyboard.Problem Possible Cause Possible SolutionsT Series.book Page 59 Thursday, July 31, 2003 10:49 AM](https://usermanual.wiki/Fujitsu-Client-Computing/WL0007.Host-PC-User-Manual/User-Guide-407389-Page-66.png)
![60LifeBook T Series Tablet PC - Section FiveThe display has bright or dark spots.If the spots are very tiny and few in number, this is normal for a large LCD display.This is normal; do nothing.If the spots are numerous or large enough to interfere with your operation needs.The display needs technical diagnosis; contact your support representative.The application display uses only a portion of your screen and is surrounded by a dark frame.You are running an application that does not support 800 x 600/1024 x 768 pixel resolution display and display compres-sion is enabled.When compensation is disabled, a clearer but smaller display for applications that do not support 800 x 600/1024 x 768 pixel resolution will result. You can fill the screen but have less resolution by changing your compensation setting. (See the Video Features submenu, located within the Advanced menu of the BIOS. See “BIOS Setup Utility” on page 34.You have connected an external monitor and it does not display any information.Your BIOS setup is not set to enable your external monitor.Try toggling the video destination by pressing [Fn] and [F10] together, or check your BIOS setup and enable your external monitor. (See the Video Features submenu, located within the Advanced Menu of the BIOS. See “BIOS Setup Utility” on page 34.Your external monitor is not properly installed. Reinstall your device. See “External Monitor Port” on page 49.Your operating system soft-ware is not set up with the correct software driver forthat device. Check your device and operating systemdocumentation and activate the proper driver.You have connected an external monitor and it does not come on.Your external monitor may not be compatible with your Tablet PC.See your monitor documentation and theExternal Monitor Support portions of theSpecifications section. See “Specifications” on page 73.Miscellaneous ProblemsAn error message is displayed on the screen during the operation ofan application.Application software often has its own set of error message displays. See your application manual and help displays screens for more information. Not all messages are errors some may simply be status.Problem Possible Cause Possible SolutionsT Series.book Page 60 Thursday, July 31, 2003 10:49 AM](https://usermanual.wiki/Fujitsu-Client-Computing/WL0007.Host-PC-User-Manual/User-Guide-407389-Page-67.png)
![61TroubleshootingPOWER ON SELF TEST MESSAGESThe following is an alphabetic list of error-and-status messages that Phoenix BIOS and/or your operating system can generate and an explanation of each message. Error messages are marked with an *. If an error message is displayed that is not in this list, write it down and check your operating system documentation both on screen and in the manual. If you can find no reference to the message and its meaning is not clear, contact your support representative for assistance.nnnn Cache SRAM Passed Where nnnn is the amount of system cache in kilobytes successfully tested by the Power On Self Test. (This can only appear if you have an SRAM PC Card installed.)*Extended RAM Failed at offset: nnnn Extended memory not working or not configured prop-erly. If you have an installed memory upgrade module, verify that the module is properly installed. If it is prop-erly installed, you may want to check your Windows Setup to be sure it is not using unavailable memory until you can contact your support representative.nnnn Extended RAM Passed Where nnnn is the amount of memory in kilobytes successfully tested.*Failing Bits: nnnn The hex number nnnnThis is a map of the bits at the memory address (in System, Extended, or Shadow memory) which failed the memory test. Each 1 (one) in the map indicates a failed bit. This is a serious fault that may cause you to lose data if you continue. Contact your support representative.*Fixed Disk x Failure or Fixed Disk Controller Failure (where x = 1-4) The fixed disk is not working or not configured prop-erly. This may mean that the hard drive type identified in your setup utility does not agree with the type detected by the Power On Self Test. Run the setup utility to check for the hard drive type settings and correct them if necessary. If the settings are OK and the message appears when you restart the system, there may be a serious fault which might cause you to lose data if you continue. Contact your support representative.*Invalid NVRAM media typeProblem with NVRAM access. In the unlikely case that you see this message you may have some display prob-lems. You can continue operating but should contact your support representative for more information.*Keyboard controller error The keyboard controller test failed. You may have to replace your keyboard or keyboard controller but may be able to use an external keyboard until then. Contact your support representative.*Keyboard error Keyboard not working. You may have to replace your keyboard or keyboard controller but may be able touse an external keyboard until then. Contact your support representative.*Keyboard error nn BIOS discovered a stuck key and displays the scan code for the stuck key. You may have to replace your keyboard but may be able to use an external keyboard until then. Contact your support representative.*Operating system not found Operating system cannot be located on either drive A: or drive C: Enter the setup utility and see if both the fixed disk, and drive A: are properly identified and that the boot sequence is set correctly. Unless you have changed your installation greatly, the operating system should be on drive C:. If the setup utility is correctly set, your hard drive may be corrupted and your system may have to be re-installed from your back up media.*Parity Check 1 nnnn Parity error found in the system bus. BIOS attempts to locate the address and display it on the screen. If it cannot locate the address, it displays "????". This is apotentially data destroying failure. Contact yoursupport representative.*Parity Check 2 nnnn Parity error found in the I/O bus. BIOS attempts to locate the address and display it on the screen. If it cannot locate the address, it displays "????". This is apotentially data destroying failure. Contact yoursupport representative.*Press <F1> to resume, <F2> to SETUP Displayed after any recoverable error message. Pressthe [F1] key to continue the boot process or the [F2]key to enter Setup and change any settings.*Previous boot incomplete – Default configuration used Previous Power On Self Test did not complete success-fully. The Power On Self Test will load default values and offer to run Setup. If the previous failure was caused by incorrect values and they are not corrected, the next boot will likely fail also. If using the default settings does not allow you to complete a successful boot sequence, you should turn off the power and contact your support representative.T Series.book Page 61 Thursday, July 31, 2003 10:49 AM](https://usermanual.wiki/Fujitsu-Client-Computing/WL0007.Host-PC-User-Manual/User-Guide-407389-Page-68.png)
![63TroubleshootingRestoring Your Pre-installed SoftwareThe Drivers and Applications Restore (DAR) CD contains:■Sets of device drivers and Fujitsu utilities (in specific directories) that are unique to your LifeBook note-book configuration for use as documented below.■A link to the Drive Image Special Edition (DISE) utility on your hard disk drive.■Read-me files that provide additional use information for items on this CD-ROM.DRIVE IMAGE SPECIAL EDITION (DISE)PowerQuest Drive Image Special Edition (DISE) provides a way to restore your computer if you experi-ence a hard disk crash or other system failure. Fujitsu has used DISE to create an image of everything installed on the computer at the time you purchased it. The image is saved on a separate partition on the hard disk. You can use DISE to restore the factory image and return your computer to the state in which it was shipped from Fujitsu.Although it is not necessary, you can use DISE to store additional image files you create. For example, if you install several applications and save data files on your hard disk, you can create a new image that includes them and then save that image file on the hard disk. Then, in the event of a hard disk failure, you can restore the image that includes the applications and data files you use.Creating a Backup ImageYou can create a system backup image of your C:\ drive at any time. The C:\ partition must be a FAT, FAT32, or NTFS partition, and it must be directly before the backup partition on your hard disk.There are two ways to implement the DISE utility: when booting up the system, or from the desktop. Creating a backup image when booting upBefore creating an image at boot-up, you must first change the boot-up priority in the BIOS so that the system will go to the media drive first, rather than trying to boot-up from the hard drive or an external floppy disk drive.To c ha ng e th e b oo t - u p p r i or i t y :1. Start your system and press the [F2] key when the Fujitsu logo appears. You will enter the BIOS Setup Utility.2. Using the arrow keys, go to the Boot menu.3. Arrow down to the Boot Device Priority submenu and press [Enter].4. Arrow down to the CD-ROM drive in the list, and press the space bar (or the + key) to move the CD-ROM drive to the top of the list. (The system attempts to boot from the devices in the order in which they are listed.)5. Press [F10], then click on [Yes] to exit the BIOS Setup Utility and return to the boot process.After you have changed the boot priority, you can create a backup image when you are booting up:1. Install the DAR CD in the drive prior to booting up. When bootup begins, a message appears informing you that if you proceed, you will be able to: ■Create a new backup of drive C■Restore a previous backup, or,■Restore the original factory image. Note that creating a new backup will overwrite any previous backups, and restoring a backup or factory image will overwrite all information on the hard drive, including saved files. ■In order to install applications and/or drivers from the DAR CD, you will need to connect an external CD drive to your system.■If the DAR CD is in the drive when you boot up the system, and the Boot Sequence is set in the BIOS to boot from the CD drive first (see “Creating a backup image when booting up” on page 63), a message will appear informing you that if you proceed, you will have a choice of: creating a new backup of drive C:, restor-ing a previous backup, or restoring the original factory image. Note that creating a new backup will overwrite any previous backups, and restoring a backup or factory image will overwrite all information on the hard drive, including saved files. If you wish to install drivers or applications only from the CD, remove the disk from the drive, reboot the system, and insert the CD after Windows has started.If you have access to the internet, visit the Fujitsu Support web site at www.fujitsupc.com to check for the most current information, drivers and hints on how to perform recovery and system updates.Using the DISE feature will reduce the amount of usable disk space on your hard disk drive.T Series.book Page 63 Thursday, July 31, 2003 10:49 AM](https://usermanual.wiki/Fujitsu-Client-Computing/WL0007.Host-PC-User-Manual/User-Guide-407389-Page-70.png)
![64LifeBook T Series Tablet PC - Section Four2. After you click [Y]es. You will be presented with two options: [Create New Backup] and [Restore Backup].After you click [Create New Backup], follow the on-screen instructions. By selecting [Create New Backup], a new image will be written to your backup partition. This will overwrite any previously created image. Creating a backup image from the desktopTo create a backup image from the desktop, select Drive Image SE from the Program list. You will initially be prompted to create a backup diskette. It is not necessary to create the backup diskette, since the DAR CD performs the same function.1. At the Drive Image Special Edition main screen, click Options> Create New Backup. DISE displays a warning that it must go to DOS to create the image.2. Click Ye s .DISE creates an image file in the backup partition. If you created a backup image previously, the new image overwrites the old one.Enlarging the Backup PartitionIf there is not enough unused space in the backup parti-tion on your hard disk, DISE will resize the partition. DISE will display the minimum, maximum, and recom-mended sizes for the backup partition. You choose the size you want.DISE takes the space from the FAT, FAT32, or NTFS partition that you are backing up. If there is not enough unused space in that partition to take, you will not be able to resize the backup partition and create an image file. You can delete files from the FAT, FAT32, or NTFS partition to create more unused space on the hard disk.Restoring a Backup ImageYou can restore either a factory image or a backup image you created. Be aware that restoring a backup image will replace the contents of the C:\ partition with the image you restore.1. Disable virus protection software. If virus protection software is enabled, DISE will lock up.2. From the DISE main window, click Options > Restore Backup to restore an image you created, or click Options > Restore Factory Backup to restore the factory image.DISE shuts down to DOS and restores the image file.Re-Installing Individual Drivers and Applications The Drivers and Application CD can be used to selec-tively re-install drivers and/or applications that may have been un-installed or corrupted. To re-install drivers and/or applications:1. Boot up the system and insert the DAR CD after Windows has started. A Fujitsu Welcome screen is displayed after the CD is inserted.2. From the left frame of the Welcome screen, “System Components” and “3rd Party Applications” can be selected. System Components are those drivers and utilities that have been developed by Fujitsu; 3rd Party Applications are applications developed by other vendors.Installing System Components1. To install system components, click on “System Components” in the left frame of the Welcome screen. A list of utilities and drivers will be displayed. Select one or more items from the list, or click [Select All] to select all items in the list. (To de-select your choices, click the [Clear All] button.2. Click [Install Selected Subsystems] to install the selected items.Installing 3rd Party Applications1. To install 3rd party applications, click on “3rd Party Applications” in the left frame of the Welcome screen. A list of applications will be displayed. 2. Select one of the items from the list, and follow the instructions that appear on the screen. Note that only one application may be installed at a time.3. Repeat step 2 to install additional applications.T Series.book Page 64 Thursday, July 31, 2003 10:49 AM](https://usermanual.wiki/Fujitsu-Client-Computing/WL0007.Host-PC-User-Manual/User-Guide-407389-Page-71.png)