Fujitsu Client Computing WL0011 AR5B6 XB62 ATHEROS WLAN IN FUJITSU NOTEBOOKS User Manual USERS MANUAL 1
Fujitsu Limited AR5B6 XB62 ATHEROS WLAN IN FUJITSU NOTEBOOKS USERS MANUAL 1
UserManual.wiki
>
Fujitsu Client Computing
>
WL0011 User Manual
>
USERS MANUAL 1
Contents
1.
USERS MANUAL 1
2.
USERS MANUAL 2
USERS MANUAL 1
Navigation menu
Upload a User Manual
Namespaces
Wiki Guide
HTML
PDF
Info
Views
User Manual
Discussion / Help
Navigation


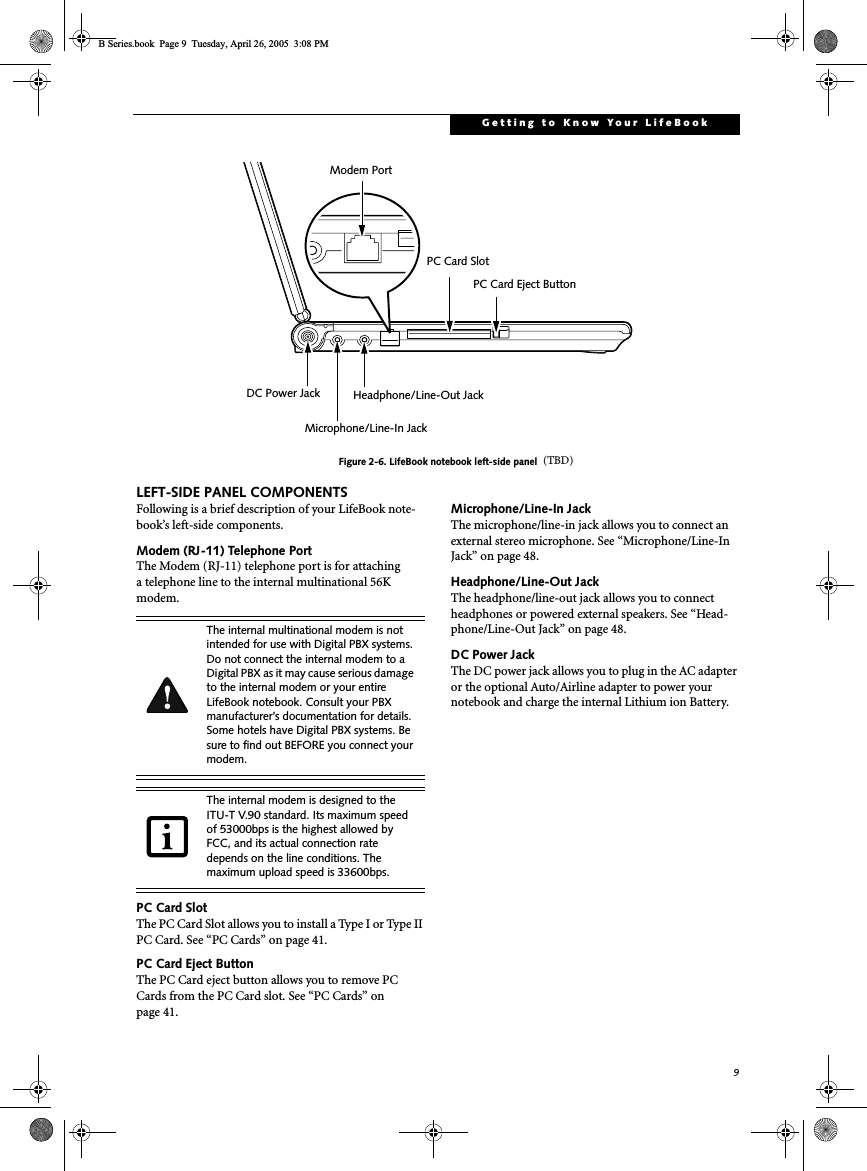
![3PrefacePrefaceABOUT THIS GUIDEThe LifeBook® B Series notebook from Fujitsu Computer Systems is a powerful notebook computer. It is powered by an Intel® Pentium® M microprocessor, has a built-in 12.1" color touch screen display, and brings the computing power of a desktop personal computer to a portable environment.This manual explains how to operate your LifeBook notebook’s hardware and built-in system software.Your computer comes with Microsoft Windows® XP Professional pre-installed.Your notebook is a completely self-contained unit with an active-matrix (TFT) color LCD touch screen display. It has a powerful interface that enables it to support a variety of optional features.Conventions Used in the GuideKeyboard keys appear in brackets. Example: [Fn], [F1], [Esc], [Enter] and [Ctrl].Pages with additional information about a specific topic are cross-referenced within the text.Example: (See page xx.)On screen buttons or menu items appear in boldExample: Click OK to restart your notebook.DOS commands you enter appear in Courier type. Example: Shutdown the computer?FUJITSU CONTACT INFORMATIONService and SupportYou can contact Fujitsu Computer Systems Service and Support the following ways:■Toll free: 1-800-8Fujitsu (1-800-838-5487)■Fax: 408-764-2724 ■E-mail: 8fujitsu@us.fujitsu.com ■Web site: http://www.computers.us.fujitsu.com/supportBefore you place the call, you should have the following information ready so that the customer support representative can provide you with the fastest possible solution:■Product name■Product configuration number■Product serial number■Purchase date■Conditions under which the problem occurred■Any error messages that have occurred■Type of device connected, if anyFujitsu OnlineYou can go directly to the online Fujitsu Product catalog for your notebook by clicking on the Fujitsu Weblinks -> LifeBook Accessories Web Site link, located in the Windows Start menu.You can also reach Fujitsu Service and Support online by clicking on the Fujitsu Weblinks -> Fujitsu Service and Support link, located in the Windows Start menu.WARRANTYYour LifeBook notebook is backed by an International Limited Warranty and includes toll-free technical support. Check the service kit that came with yournotebook for warranty terms and conditions.The point icon highlights information that will enhance your understanding of the subject material.The caution icon highlights information that is important to the safe operation of your computer, or to the integrity of your files. Please read all caution information carefully.The warning icon highlights information that can be hazardous to either you, your LifeBook notebook, or your files. Please read all warning information carefully.You must have an active internet connection to use the online URL links.B Series.book Page 3 Tuesday, April 26, 2005 3:08 PM](https://usermanual.wiki/Fujitsu-Client-Computing/WL0011.USERS-MANUAL-1/User-Guide-650346-Page-10.png)


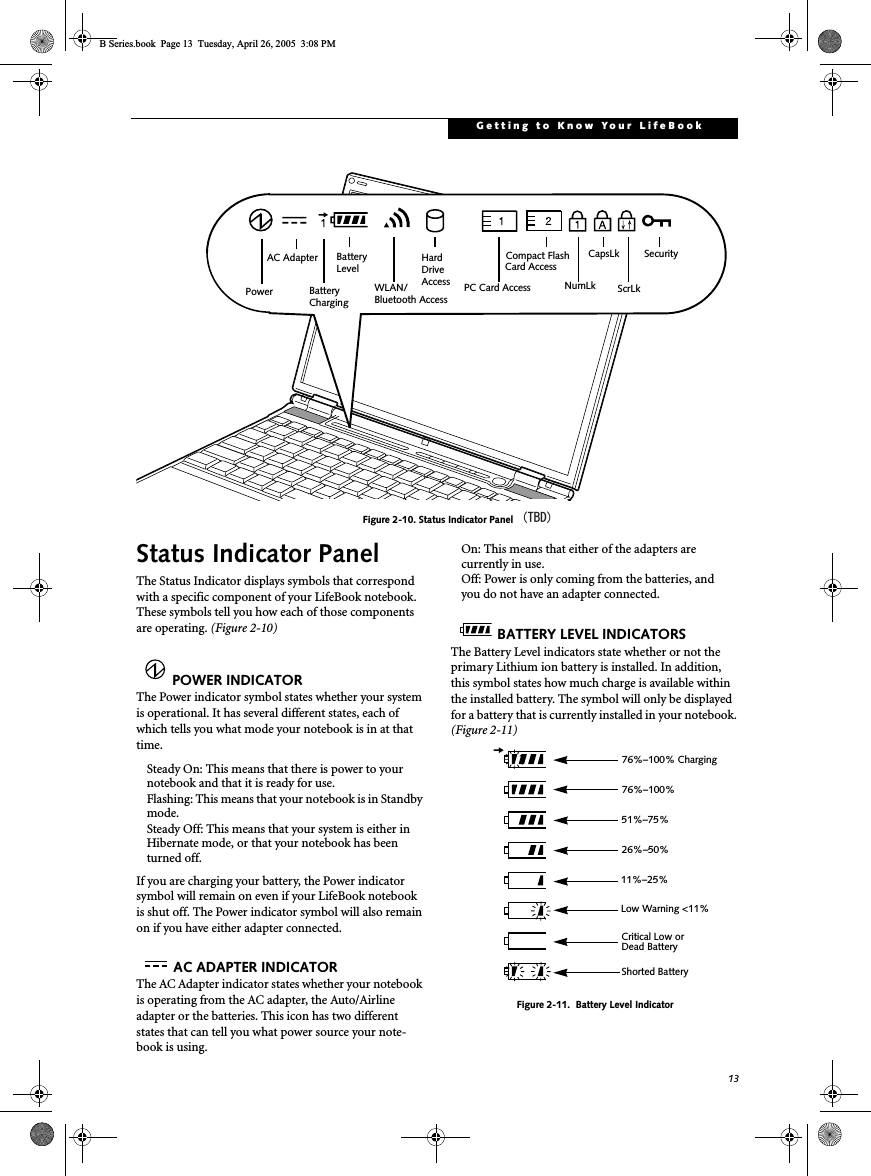
![15Getting to Know Your LifeBookFigure 2-12. KeyboardKeyboardUSING THE KEYBOARDYour LifeBook notebook has an integral 82-key keyboard. The keys perform all the standard functions of a 101-key keyboard, including the Windows keys and other special function keys. This section describes the following keys. (Figure 2-12)■Numeric keypad: Your notebook allows certain keys to serve dual purposes, both as standard characters and as numeric and mathematical keys. The ability to tog-gle between the standard character and numerical keys is controlled through the [NumLk] key.■Cursor keys: Your keyboard contains four arrowkeys for moving the cursor or insertion point to the right, left, up, or down within windows, applications and documents. ■Function keys: The keys labeled [F1] through [F12], are used in conjunction with the [Fn] key to produce special actions that vary depending on what program is running. ■Windows keys: These keys work with your Windows operating system and function the same as the onscreen Start menu button, or the right button on your pointing device.NUMERIC KEYPADCertain keys on the keyboard perform dual functions as both standard character keys and numeric keypad keys. NumLk can be activated by pressing the [NumLk] key. Turning off the NumLk feature is done the same way. Once this feature is activated you can enter numerals 0 through 9, perform addition ( + ), subtraction ( - ),multiplication ( * ), or division ( / ), and enter decimal points ( . ) using the keys designated as ten-key function keys. The keys in the numeric keypad are marked on the front edge of the key to indicate their secondary func-tions. (Figure 2-12)WINDOWS KEYSYour LifeBook notebook has two Windows keys: a Start key and an Application key. The Start key displays the Start menu. This button functions the same as your onscreen Start menu button. The Application key func-tions the same as your right mouse button and displays shortcut menus for the selected item. (Please refer to your Windows documentation for additional informa-tion regarding the Windows keys.) (Figure 2-12)CURSOR KEYSThe cursor keys are the four arrow keys on the keyboard which allow you to move the cursor up, down, left and right in applications. In programs such as Windows Explorer, it moves the “focus” (selects the next item up, down, left, or right). (Figure 2-12)FUNCTION KEYSYour LifeBook notebook has 12 function keys, F1 through F12. The functions assigned to these keys differ for each application. You should refer to your software documentation to find out how these keys are used. (Figure 2-12)[Fn] KeyThe [Fn] key provides extended functions for thenotebook and is always used in conjunction with another key. Fn KeyFunction KeysNumeric Keypad Application Key Cursor Start KeyKeys(outlined in black)B Series.book Page 15 Tuesday, April 26, 2005 3:08 PM](https://usermanual.wiki/Fujitsu-Client-Computing/WL0011.USERS-MANUAL-1/User-Guide-650346-Page-22.png)
![16■[Fn+F3]: Pressing [F3] while holding [Fn] will toggle the Audio Mute on and off.■[Fn+F4]: Pressing [F4] while holding [Fn] will toggle the touch pad on and off. Note that the [Fn+F4] com-bination only works if Manual Setting is selected in the BIOS. ■[Fn +F5]: Pressing [F5] while holding [Fn] allows you to toggle between video compensation and no compensation. (Video compensation controls spacing on the display. When it is enabled, displays with less than 1024 x 768 or 800 x 600 pixel resolution will still cover the entire screen.)■[Fn+F6]: Pressing [F6] repeatedly while holding [Fn] will lower the brightness of your display.■[Fn+F7]: Pressing [F7] repeatedly while holding [Fn] will increase the brightness of the display.■[Fn+F8]: Pressing [F8] repeatedly while holding [Fn] will decrease the volume of your LifeBook notebook.■[Fn+F9]: Pressing [F9] repeatedly while holding [Fn] will increase the volume of your LifeBook notebook.■[Fn+F10]: Pressing [F10] while holding [Fn] allows you to change your selection of where to send your display video. Each time you press the combination of keys you will step to the next choice. The choices, in order, are: built-in display panel only, both built-in display panel and external monitor or external moni-tor only.B Series.book Page 16 Tuesday, April 26, 2005 3:08 PM](https://usermanual.wiki/Fujitsu-Client-Computing/WL0011.USERS-MANUAL-1/User-Guide-650346-Page-23.png)
![19Getting to Know Your LifeBooktool by using the Touch Panel Configuration Control button prior to the desired right mouse click. It can be used two ways: by holding down the key or by pressing the key once.Figure 2-19. Clicking the Touch ScreenDouble-ClickingTo double-click, touch the item twice, and then immedi-ately remove the stylus tip. You also have the option to perform the double-click operation by tapping lightly with your finger on the touch screen twice. (Figure 2-20)Figure 2-20. Double-clicking the Touch ScreenDraggingDragging means touching the screen with the stylus, moving and then lifting the stylus. To drag, tap the touch screen twice with your stylus over the item you wish to move, making sure to leave the stylus on the screen after the final tap. Next, move the item to its new location by moving the stylus across the screen, and then lifting the stylus to release it. Dragging can also be done using your fingertip. (Figure 2-21)Figure 2-21. Dragging on the Touch ScreenRight-clickingIt is possible for you to perform right-click functions with the stylus.1. Click Start -> Control Panel -> Touch Panel.2. Select the Right button simulation tab. 3. Check the "Enable the right click simulation" box.4. Choose which key you prefer to enable the right-click function: Ctrl Key, Shift Key, or Alt Key.Calibrating the Touch ScreenIn order to ensure accurate tracking between the stylus and cursor, you should run the Touch Screen Calibra-tion Utility before you use the touch screen for the first time, or after you change the display resolution.To run the calibration utility:1. Go to [Start] -> Control Panel, and double-click on the Touch Panel icon. 2. Select the Calibration tab and click the [Calibrate Now] button. 3. Adjust the display of your notebook to a comfortable angle and find the red (+) symbol in the upper-left corner of the display.4. Using the stylus, touch the screen directly on the (+)symbol, then lift the stylus. When you lift the stylus tip, the (+) symbol will move to the next location.4. Repeat step 4 until you have selected a total of nine symbols. This is the minimum number of points necessary to calibrate your touch screen.5. Once you have selected the nine symbols, click the [Update] button to return to the Touch Panel Settings screen.If the interval between taps is too long, thedouble-click will not be executed.B Series.book Page 19 Tuesday, April 26, 2005 3:08 PM](https://usermanual.wiki/Fujitsu-Client-Computing/WL0011.USERS-MANUAL-1/User-Guide-650346-Page-26.png)
![20LifeBook B Series – Section TwoVolume ControlYour Fujitsu LifeBook notebook has multiple volume controls which interact with each other.CONTROLLING THE VOLUMEThe volume can be controlled in several different ways:■Volume can be set from within the Volume Control on the Taskbar.■Volume can be controlled from the Control Panel by selecting the Sounds and Audio Devices icon. Select the Volume tab and move the slider bar to the desired volume level.■Volume can be controlled with the F8 and F9 function keys. Pressing [F8] repeatedly while holding [Fn] will decrease the volume of your notebook. Pressing [F9] repeatedly while holding [Fn] will increase the volume of your notebook. Volume can be controlled by many volume controls that are set within individual applica-tions.■Certain external audio devices you might connect to your system may have hardware volume controls.Each source discussed above puts an upper limit on the volume level that must then be followed by the other sources. We recommend that you experiment with the various volume controls to discover the optimal sound level.Any software that contains audio files will also contain a volume control of its own. If you install an external audio device that has an independent volume control, the hardware volume control and the software volume control will interact with each other. It should be noted that if you set your software volume to Off, you will override the external volume control setting.There are twenty-six levels through which the volume function keys cycle. B Series.book Page 20 Tuesday, April 26, 2005 3:08 PM](https://usermanual.wiki/Fujitsu-Client-Computing/WL0011.USERS-MANUAL-1/User-Guide-650346-Page-27.png)
![21Getting to Know Your LifeBookFigure 2-22. LifeBook Security/Application Panel LifeBook Security/Application PanelA unique feature of your LifeBook notebook is the Secu-rity/Application Panel that allows you to secure your notebook from unauthorized use. The Security/Applica-tion Panel also allows you to launch applications with the touch of a button when your system is on.If the security system is activated, upon starting your notebook or resuming from Standby mode the security system requires you to enter a password code using the buttons on the Security/Application Panel. After entering a correct password, your notebook resumes system operation. (Figure 2-22)SETTING UP YOUR LIFEBOOK SECURITY PANELWhen you receive your LifeBook notebook, the security panel application is pre-installed without any pass-words. The following sections provide detailed informa-tion on your security panel, how to set, change or remove passwords.Numbered ButtonsUse these buttons to enter your password.Enter ButtonAfter entering the button strokes, push this button to enter the password into the LifeBook notebook. PASSWORDSThe user and supervisor password may be set on this notebook. A supervisor password is typically the same for all LifeBook notebooks in a working group, office, or company to allow for system management. Individual LifeBook notebooks in a group environment should not use a common password. A password consists of one to five button strokes plus the enter button. A valid stroke consists of pushing one or up to four buttons simulta-neously. The following are valid button strokes: ■Pushing [4] by itself■Pushing [2] and [3] at the same time■Pushing [1], [2], and [4] at the same time■Pushing [1], [2], [3], and [4] at the same timeThe following are valid passwords. The numberswithin braces ({ }) are button strokes using morethan one button. ■{[2]+[3]}, [1], [enter]■[4], [enter]■{[1]+[3]}, {[2]+[3]+[4]}, [1], [4], [2], [enter]Setting PasswordsWhen shipped from the factory, no passwords are set. You have a choice of having no password or setting a supervisor and user password. You must set the super-visor password before the user password.(1) Application A Button(3) Internet Button(2) Application B Button(4) E-Mail ButtonEnter ButtonB Series.book Page 21 Tuesday, April 26, 2005 3:08 PM](https://usermanual.wiki/Fujitsu-Client-Computing/WL0011.USERS-MANUAL-1/User-Guide-650346-Page-28.png)
![22LifeBook B Series – Section TwoSetting Supervisor PasswordYou must have set a supervisor password before setting any user passwords. The supervisor password can bypass the user password.1. Go to the Start menu.2. Click on Run.3. Type in:C:\Program Files\Fujitsu\Security Panel Application\Supervisor\FJSECS.EXE,then press [Enter]4. Follow the on-screen instructions to set theSupervisor password.Setting User Password1 Go to the Start menu.2. Click on Programs.3. Click on Security Panel Application andSet User Password.4. Follow the on-screen instructions to set theuser password.OPERATING YOUR LIFEBOOK SECURITY/ APPLICATION PANELThe security lock feature is in effect both when the system resumes from Off or Standby state. You always need to push the Suspend /Resume button to input the user pass-word. Your system will not begin the boot sequence without entering your supervisor/user password.From Off State1. Turn on your system.2. When the Security Indicator flashes, enter the pass-word and press Enter button.For example, if the password is 22222,Press Button Number 2 five times and press Enter button.The LifeBook notebook will boot to normal opera-tion.From Standby State1. Press your Suspend/Resume button.2. When the Security Indicator flashes, enter the pass-word and press Enter button.The notebook should resume normal operation.Incorrect Password EntryIf an invalid supervisor or user password is entered three times in succession, the system will “beep” for about one minute. If a valid password is entered within a minute (while system beeps), the beeping will stop and the note-book will resume normal operation. If no or an invalid password is entered while the system beeps, the system will return to its previous locked state (standby or off) and the Security Indicator will go off. To reactivate the notebook after a password failure, you must press the Suspend/Resume button, then enter a correct password.PRECAUTIONSOpening and Closing the CoverClosing the cover automatically places the notebook into Standby mode. Opening the cover does not automati-cally place the notebook into normal operation. Instead, you must enter the proper security password after pushing the Suspend/Resume button.Low Battery OperationsIf your LifeBook notebook has low battery, pushing the suspend/resume button only turns on the Security Indi-cator. Your notebook does not unlock, the Security Indi-cator turns off after one minute. To resume normal operation, first attach a power supply to the notebook. Then you may unlock the notebook.UNINSTALLING THE SECURITY PANEL APPLICATIONYou have two options when uninstalling the securitypanel application:■Uninstall the security panel application software.This will disable all security feature.■Uninstall the security panel application with password still active. This will not allow any changes to the password. Uninstalling the Security Panel Application SoftwareRemove passwords when User wants no password protection whatsoever and doesn’t want to give anybody the utility to set a password on their computer. In this ■The purpose of supervisor password is to be able to bypass the user password in case the user password is forgotten. The supervisor password alone will not lock the system.■You have to set both the supervisor and user passwords for the security panel to work.You may change or remove the supervisor or user password by repeating the steps defined above.Remember the user password you specified on the Security Panel Application. If you forget the password you will not be able to use your computer. The supervisor password can override the user password.B Series.book Page 22 Tuesday, April 26, 2005 3:08 PM](https://usermanual.wiki/Fujitsu-Client-Computing/WL0011.USERS-MANUAL-1/User-Guide-650346-Page-29.png)
![23Getting to Know Your LifeBookcase, if passwords (supervisor, user, or both) are set, the passwords must first be cleared before removing the application. To clear passwords, follow same procedure in setting the passwords, except this time, check the “Remove Supervisor (and/or) User Password” box, as appropriate. Click [Next]. Enter the password. When asked to confirm that you want to remove the password, click [OK], then click [Finish]. Removing Security Panel Application withPasswords Still ActiveUsing this feature will not allow any changes tothe password.User: 1. Go to Start Menu, Click on Control Panel.2. Open Add/Remove Programs Properties in the Control Panel. 3. Select the Security Panel Application in the list, and click Add/Remove.4. When the Confirm File Deletion box appears,click Ye s .Supervisor:1. Go to Start Menu, Click on Control Panel.2. Open Add/Remove Programs Properties in the Control Panel. 3. Select the Security Panel Application forSupervisor in the list, and click Add/Remove.4. When the Confirm File Deletion box appears,click Ye s .Reinstalling the Security/Application PanelTo reinstall supervisor or user security application, you will need your Drivers and Applications CD. The Utilities\Security Application Panel folder contains two separate folders: Supervisor and User. The setup files for supervisor and user security applications are contained in those folders. 1. Go to the Utilities\Security Application Panel\Supervisor folder on the CD and double-click the setups.exe file. The Installing Security Panel Application window will appear. Follow the instruc-tions on the screen.2. Go to the Utilities\Security Application Panel\Userfolder on the CD and double-click the setup.exe file. The Installing Security Panel Application window will appear. Follow the instructions on the screen.Supervisor and user passwords can be set via Windows software using the FJSECS.exe and FJSECU.exe files, respectively. FJSECU.exe for the user password cannot run without first setting a supervisor password. You need to run FJSECS.exe first to set the supervisor pass-word. Follow instructions under Setting Passwords on page 21.If you forget both passwords, please contact Fujitsu Computer Systems Service and Support at 1-800-8FUJITSU (1-800-838-5487). Fujitsu Computer Systems Corporation charges a service fee for unlocking a pass-word restricted LifeBook notebook. When calling please have a valid credit card and provide proof of ownership. You will then be given instructions on where to ship your notebook. LAUNCHING APPLICATIONS WITHTHE SECURITY/APPLICATION PANELThe security panel also enables you to launch applications with the touch of a button when your system is on. Pressing any of the buttons will launch a user-defined application. Your notebook is pre-installed with software utilities that let you operate and configure your LifeBook Security /Application Panel. These utilities are found under the Start menu, under Programs, then under Life-Book Application Panel. They include Application Panel Setup, Application Panel Guide, Activate Panel and Deac-tivate Panel. Configuring your LifeBook Application Panel When you start Windows, the LifeBook Application Panel is automatically activated. An icon resembling a finger pressing a button will appear in the system Control Panel. When you see this icon you will know that LifeBook Application Panel is active.As an application launcher, the LifeBook Application Panel is very flexible, giving you a variety of options. To set up the Panel to best suit your needs, we have provided the Application Panel Setup utility that quickly and easily helps you make the most of this valuable feature.To configure your LifeBook Application Panel with Application Panel Setup:1. Click on [Start].2. Click on Control Panel.3. Double-click on the Application Panel icon. The Application Panel setup utility will appear. There are tabs that correspond to the application buttons on the LifeBook Application Panel. When you receive your notebook, these buttons are pre-configured to launch specific programs, as referenced in Chapter 7 of this document.Removing the applications does not remove the password. It simply removes the utility to change/add/remove passwords. To change your password you must reinstall the application.B Series.book Page 23 Tuesday, April 26, 2005 3:08 PM](https://usermanual.wiki/Fujitsu-Client-Computing/WL0011.USERS-MANUAL-1/User-Guide-650346-Page-30.png)
![24LifeBook B Series – Section TwoTo change an application associated with the Application buttons, click on the tab for the button you would like to reconfigure – for example, Application A. Click on [Browse] or [Go to Start Menu...], scroll down the list of applications, click on the application you wish to launch with this button, and then click OK. The button will now launch the new application.The Internet tab is different. It comes set to launch your Windows default Internet browser (Internet Explorer), unless you have changed this in Windows. In order to reconfigure it to launch another program follow these easy steps:1. Select “Start Other Program” from the “Specify the button action:” box. 2. Click on [Browse] or [Go to Start Menu...].3. Scroll down the list of applications, and then click on the application you wish to launch with this button.4. Click [OK]. The button will now launch the new application. If you want to return to launching your Windows default Internet browser with this button, you need only click on “Default Internet Browser” from the Internet browser box. Be aware that you will erase the settings for the “other application”. If you wish to go back to launching the “other application” from this button, you will need to reconfigure it as described above.When you have finished with Application Panel Setup click OK, and the new settings will take effect. You can reconfigure your LifeBook Application Panel as often as you like.Deactivating and Activating the LifeBook Application PanelTo deactivate the LifeBook Application Panel, follow these easy steps:1. Click on [Start].2. Click on Programs.3. Click on LifeBook Application Panel.4. Click on Stop Application Panel.To reactivate, follow the same procedure, except forstep 4. Click on Restart Application Panel instead.The tabs in Application Panel Setup may not be in the same order as the buttons on your LifeBook notebook, please select the tab you wish to change carefully.If your system has dedicated one of the application launcher buttons to be an Internet launcher, the button can still be configured to launch any application you wish, not just an Internet browser.Every time you start Windows the LifeBook Application Panel is activated, even if you deactivated it before you shut down.B Series.book Page 24 Tuesday, April 26, 2005 3:08 PM](https://usermanual.wiki/Fujitsu-Client-Computing/WL0011.USERS-MANUAL-1/User-Guide-650346-Page-31.png)

![28LifeBook B Series – Section ThreeFigure 3-2. Opening the Display PanelDisplay PanelYour LifeBook notebook contains a display panel that is backlit for easier viewing in bright environments and maintains top resolution through the use of active-matrix technology. OPENING THE DISPLAY PANEL1. Press the Display Panel latch in. This releases the locking mechanism and raises the display slightly. 2. Lift the display backwards, being careful not to touch the screen, until it is at a comfortableviewing angle. ADJUSTING DISPLAY PANEL BRIGHTNESSOnce you have turned on your notebook, you may want to adjust the brightness level of the screen to a more comfortable viewing level. Adjusting the brightness using the keyboard changes the setting only temporarily. ■[Fn+F6]: Pressing repeatedly will lower thebrightness of your display.■[Fn+F7]: Pressing repeatedly will increase thebrightness of the display.CLOSING THE DISPLAY PANEL1. Holding the edge of your display panel, pull it forward until it is flush with the body of your note-book.2. Push down until you hear a click. This will engage the locking mechanism and prevent your display panel from opening unexpectedly.Display Panel LatchIf using AC power your brightness setting is set to its highest level by default. If using battery power your brightness setting is set to approximately mid-level by default.The higher the brightness level, the more power the LifeBook notebook will consume and the faster your batteries will discharge. For maximum battery life, make sure that the brightness is set as low as possible.B Series.book Page 28 Tuesday, April 26, 2005 3:08 PM](https://usermanual.wiki/Fujitsu-Client-Computing/WL0011.USERS-MANUAL-1/User-Guide-650346-Page-35.png)
![29Getting StartedStarting Your LifeBook NotebookPOWER ONSuspend/Resume On buttonThe Suspend/Resume button is used to turn on your LifeBook notebook from its off state. Once you have connected your AC adapter or charged the internal Lithium ion battery, you can power on your notebook.Figure 3-3. Pressing the Suspend/Resume ButtonPress the Suspend/Resume button (Figure 3-3). When you are done working you can either leave your Life-Book notebook in Suspend mode (See “Suspend/Resume Button” on page 32.), or you can turn it off (See “Power Off” on page 34.)When you turn on your LifeBook notebook, it will perform a Power On Self Test (POST) to check the internal parts and configuration for correct functionality. If a fault is found, your LifeBook notebook will emit an audio warning and/or an error message will be displayed. See “Power On Self Test Messages” on page 84. Depending on the nature of the problem, you may be able to continue by starting the operating system or by entering the BIOS setup utility and revising the settings.After satisfactory completion of the Power On Self Test (POST), your notebook will load your operating system.BOOT SEQUENCEThe procedure for starting-up your notebook is termed the Bootup sequence and involves your LifeBook note-book’s BIOS. When your notebook is first turned on, the main system memory is empty, and it needs to find instructions to start up your notebook. This informa-tion is in the BIOS program. Each time you power up or restart your notebook, it goes through a boot sequence which displays a Fujitsu logo until your operating system is loaded. During booting, your notebook is performing a standard boot sequence including a Power On Self Test (POST). When the boot sequence is completed without a failure and without a request for the BIOS Setup Utility, the system displays the operating system’s opening screen.The boot sequence is executed when:■You turn on the power to your notebook.■You restart your notebook from the WindowsShut Down dialog box.■The software initiates a system restart. Example:When you install a new application.■You reset the system by pressing the three keys [CTRL+ALT+DEL]. BIOS SETUP UTILITYThe BIOS Setup Utility is a program that sets up the operating environment for your notebook. Your BIOSis set at the factory for normal operating conditions, therefore there is no need to set or change the BIOS’ environment to operate your notebook.The BIOS Setup Utility configures:■Device control feature parameters, such as changingI/O addresses and boot devices.■System Data Security feature parameters, suchas passwords.Entering the BIOS Setup UtilityTo enter the BIOS Setup Utility do the following: 1. Turn on or restart your notebook.2. Press the [F2] key once the Fujitsu logo appearson the screen. This will open the main menuof the BIOS Setup Utility with the currentsettings displayed.3. Press the [RIGHT ARROW] or [LEFT ARROW] key to scroll through the other setup menus to review or alter the current settings.When you turn on your LifeBook note-book be sure you have a battery installed and charged, or that the AC or Auto/Air-line adapter is connected and has power.Do not carry your LifeBook notebook around with the power on or subject it to shocks or vibration, as you risk damaging your notebook.Suspend/Resume ButtonNever turn off your LifeBook notebook during the Power On Self Test (POST) or it will cause an error message to be displayed the next time you turn on your LifeBook notebook. See “Power On Self Test Mes-sages” on page 61.B Series.book Page 29 Tuesday, April 26, 2005 3:08 PM](https://usermanual.wiki/Fujitsu-Client-Computing/WL0011.USERS-MANUAL-1/User-Guide-650346-Page-36.png)
![30LifeBook B Series – Section ThreeBIOS GuideA guide to your notebook’s BIOS is available online. Please visit our service and support Web site at http://www.computers.us.fujitsu.com/support. Once there, select User’s Guides under Notebook/Tablet PC Support. Select your system model and click [Go]. Select the BIOS Guide from the menu for your LifeBook series. If you are unsure of your notebook’s BIOS number, refer to your packing slip.BOOTING THE SYSTEM We strongly recommend that you not attach any external devices until you have gone through the initial power-on sequence.When you turn on your LifeBook notebook for the first time, it will display a Fujitsu logo on the screen. If you do nothing the system will load the operating system, and then the Windows Welcome will begin.Designed to accommodate the needs of many users, in many different countries, Windows needs to be config-ured the first time you use them. Windows has three parts: ■Getting Started: You have the opportunity to enter custom information for your configuration file and setup your modem so that your LifeBook notebook will be prepared to dial out. ■Windows License Agreement and Final Settings:You have the opportunity to review the Windows License Agreement.Getting StartedRead the instructions on the screens carefully and fillin the information as directed. You will be asked for such items as the language you wish to use, the country in which you live, your first and last name, and abouthow you dial out from where you will be using your Life-Book notebook. For the modem settings, enter your current location information where you will be using your LifeBook notebook. If you are not connected to a phone line and plan to register at a later time, you may click the Skip button, and you will go directly to the condition of use page.Once you have set up your LifeBook notebook to dial out, Windows will make a free telephone call to test the settings. If the call is unsuccessful, you will be returned to the phone settings page where you may try to fix them. If you are unable to fix the settings, contact Fujitsu Service and Support. See “Fujitsu Contact Information” on page 3. If you would simply like to move on, and register at a later time, you may click the Skip button, and you will go directly to the Condition of Use page.RegistrationIf your connection is successful, you will go to the Registration Confirmation page. On this page simply enter the requested information, and then check the box at the bottom to register your copy of Windows with Microsoft. Once you have finished, click the Next button to continue.You will then go through the Fujitsu registration process. Follow the instructions on the screens, and enter all of the necessary information. Be as specific as possible so that if you need help the service and support team will be able to serve you better.Final SettingsThe first part of your final settings is the Windows End User License Agreement. Read the agreement carefully. When you finish reading you must accept or reject the terms of the agreement and then click on the Next button.ACTIVATING ADDITIONAL UTILITIESIn Windows XP systems, the Click Me! icon is in the Start menu. When you click the Click Me! icon, your system will automatically build the icon tray in the bottom right of the screen. These icons provide links to utilities that you will frequently access. Although the icon remains on the screen, you need invoke it only once.If your data security settings require it, you may be asked for a password before the BIOS main menu will appear.■If you reject the terms of the license agreement you will be asked to review the license agreement for information on returning Windows or to shut down your LifeBook notebook.■You cannot use your LifeBook notebook until you have accepted the License Agreement. If you stop the process your notebook will return to the beginning of the Windows Welcome Process.If you do not register at this time you can do it later simply by double-clicking on the LifeBook Registration icon on your desk-top and following the instructions.If you do not register at this time you can do it later simply by double-clicking on the LifeBook Registration icon on your desk-top and following the instructions.B Series.book Page 30 Tuesday, April 26, 2005 3:08 PM](https://usermanual.wiki/Fujitsu-Client-Computing/WL0011.USERS-MANUAL-1/User-Guide-650346-Page-37.png)
![33Getting Startedoperation(s) in progress. When you resume operation from Standby mode, your notebook will return to the point where it left off. To resume operation, you must use the Suspend/Resume button to resume operation, and there must be an adequate power source available, or your notebook will not resume.HIBERNATE MODEHibernate mode saves the contents of yournotebook’s system memory to the hard drive as a part of the Suspend/Resume mode. Your notebook is pre-configured to perform this function. The Hibernate mode can also be configured through the system BIOS to run in other ways depending on what you need to accomplish. See “BIOS Setup Utility” on page 29.Using Hibernate ModeTo enable or disable the Hibernation feature follow these easy steps:1. From the Start menu, select Settings, and then select Control Panel --> Power Options.2. Select the Hibernate tab, and then select the box to enable or disable this feature.3. Click [Apply].To use Hibernate mode:1. Click the Ctrl-Alt-Del keys.2. Select Shut Down from the top of the window.3. Select Hibernate from the drop down list that appears.DISPLAY TIMEOUT The display timeout is a power management feature. This feature saves power by turning off the display if there is no keyboard or pointer activity for the user selected timeout period. Any keyboard or pointer activity will cause the display to restart automatically. This feature is independent of the Suspend/Resume button and can be enabled and disabled in Windows Power Management and BIOS setup utility (APM only). See “BIOS Setup Utility” on page 29.HARD DISK TIMEOUTThe hard disk timeout is another one of the power management parameters. This feature saves power by turning off the hard drive if there is no hard drive activity for the user selected timeout period. Any attempt to access the hard drive will cause it to restart automatically. This feature is independent of the Suspend/Resume button and can be enabled and disabled in Windows and BIOS setup utility (APM only). See “BIOS Setup Utility” on page 29.WINDOWS POWER MANAGEMENT The Power Management icon located in the Windows Control Panel allows you to configure some of the power management settings. For example, you can use the Power Management to set the timeout values for turning off the display and hard disks whether you are running the notebook on battery power or one of the adapters. The settings may also be changed in the BIOS (APM only). See “BIOS Setup Utility” on page 29.RESTARTING THE SYSTEMIf your system is on and you need to restart it, be sure that you use the following procedure. 1. Click the Start button, and then click Turn Off Computer.2. Select the Restart option from within the Windows Turn Off Computer dialog box.If you are running your LifeBook notebook on battery power, be aware that the battery continues to discharge while your notebook is in Standby mode, though not as fast as when fully operational. ■The Standby or Hibernate modes should not be used with certain PC Cards. Check your PC Card documentation for more information.■Disabling the Suspend/Resume button prevents it from being used to put your notebook in Standby or Hibernate mode. The resume function of thebutton cannot be disabled.■If your notebook is actively accessing information when you enter the Standby or Hibernate mode, changes to open files are not lost. The files are left open and memory is kept active during Standby mode or the memory is trans-ferred to the internal hard drive during Hibernate mode.■When PC Cards or external devices are in use, Save-to-Disk mode cannot return to the exact state prior to suspension, because all of the peripheral devices will be re-initialized when the system restarts.■The main advantage of using the Hiber-nate function is that power is not required to maintain your data. This is particularly important if you will be leav-ing your notebook in a suspended state for a prolonged period of time. The drawback of using Hibernate mode is that it lengthens the power down and power up sequences and resets periph-eral devices.B Series.book Page 33 Tuesday, April 26, 2005 3:08 PM](https://usermanual.wiki/Fujitsu-Client-Computing/WL0011.USERS-MANUAL-1/User-Guide-650346-Page-40.png)

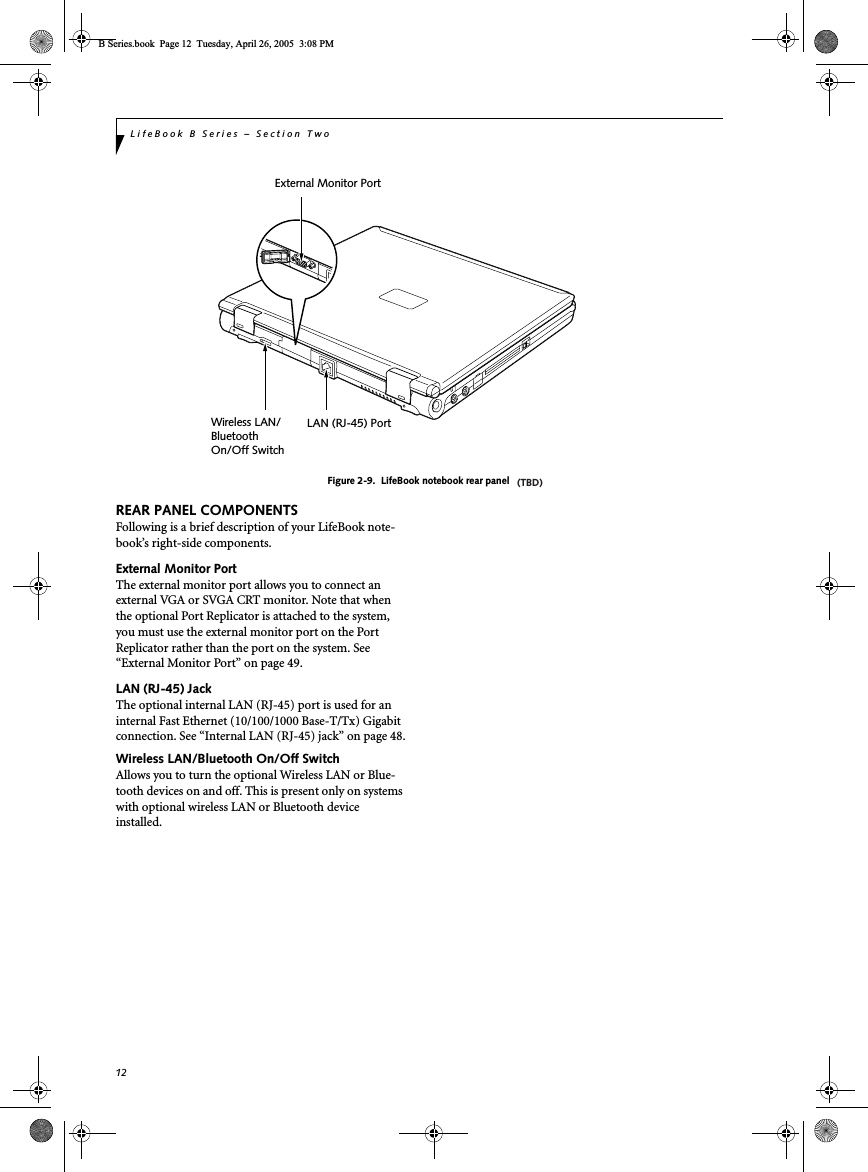
![49User Installable FeaturesEXTERNAL MONITOR PORTThe external monitor port allows you to connect an external monitor. In order to connect an external monitor follow these easy steps: See “LifeBook notebook rear panel” on page 12.1. Remove the cover from the port opening, if present.2. Align the connector with the port opening.3. Push the connector into the port until it is seated.4. Tighten the two hold-down screws, located oneach end of the connector.When a Port Replicator is attached and an external monitor is plugged in, pressing the [Fn] + [F10] keys allows you to change your selection of where to send your display video. Each time you press the key combination, you will step to the next choice, starting with the built-in display panel only, moving to the external monitor only, finally moving to both the built-in display panel and an external monitor.B Series.book Page 49 Tuesday, April 26, 2005 3:08 PM](https://usermanual.wiki/Fujitsu-Client-Computing/WL0011.USERS-MANUAL-1/User-Guide-650346-Page-56.png)