Fujitsu Client Computing WL0022 Notebook Computer User Manual
Fujitsu Limited Notebook Computer
User manual

Copyright
i
Copyright© 2009 Phoenix Technologies, Ltd., All
rights reserved.
Other product names are trademarks or registered
trademarks of their respective companies.
© Copyright 2010 Fujitsu. All rights reserved.
No part of this publication may be copied,
reproduced or translated, without the prior written
consent of Fujitsu. No part of this publication may
be stored or transmitted in any electronic form
without the written consent of Fujitsu.
This device complies with Part 15 of the FCC
rules. Operations are subject to the following
two conditions:
(1) This device may not be allowed to cause
harmful interference.
(2) This device must accept any interference
received, including interference that may
cause undesired operation.
Website: hk.fujitsu.com/pc
DECLARATION OF CONFORMITY
according to FCC Part 15
Copyright
Fujitsu has made every effort to ensure the
accuracy and completeness of this document.
However, as ongoing development efforts are
continually improving the capabilities of our
products, we cannot guarantee the accuracy
of the contents of this document. We disclaim
liability for errors, omissions or future changes.
LifeBook is a trademark of Fujitsu Limited.
Microsoft, Windows, MS, MS-DOS, Windows
NT, Windows XP, Windows Vista and Windows
7 are registered trademarks of the Microsoft
Corporation of the United States in the United
States and other countries.
Phoenix is a registered trademark of Phoenix
Technologies Corporation of the United States.
Copyright© 1981-1999 Microsoft Corporation,
All rights reserved.

ii
9. If an extension cord is used with this product,
make sure that the total ampere rating of the
equipment plugged into the extension cord
does not exceed the extension cord ampere
rating. Also, make sure that the total rating of
all products plugged into the wall outlet does
not exceed 15 amperes.
10. Never push objects of any kind into this
product through cabinet slots as they may
touch dangerous voltage points that could
result in a fire or electric shock. Never spill
liquid of any kind on the product.
11. Do not attempt to service this product
yourself, as opening or removing covers may
expose you to dangerous voltage points or
other risks. Refer all servicing to qualified
service personnel.
12. Unplug this product from the wall outlet and
refer servicing to qualified service personnel
under the following conditions:
a. When the power cord or plug is damaged
or frayed.
b. If liquid has been spilled into the product.
c. If the product has been exposed to rain or
water.
d. If the product does not operate normally
when the operating instructions are followed.
Adjust only those controls that are covered
by the operating instructions since improper
adjustment of other controls may result in
damage and will often require extensive
work by a qualified technician to restore the
product to normal condition.
e. If the product has been dropped or the
cabinet has been damaged.
f. If the product exhibits a distinct change in
performance, indicating a need for service.
IMPORTANT SAFETY
INSTRUCTIONS
1. Read these instructions carefully. Save these
instructions for future reference.
2. Follow all warnings and instructions marked
on the product.
3. Unplug this product from the wall outlet
before cleaning. Do not use liquid cleaners
or aerosol cleaners. Use a damp cloth for
cleaning.
4. Do not use this product near water.
5. Do not place this product on an unstable
cart, stand or table. The product may drop,
causing serious damage to the product.
6. Slots and openings in the cabinet and the
back or bottom are provided for ventilation;
to ensure reliable operation of the product
and to protect it from overheating, these
openings must not be blocked or covered.
The openings should never be blocked by
placing the product on a bed, sofa, rug or
other similar surface. This product should
never be placed near or over a radiator or
heat register or in a built-in installation unless
proper ventilation is provided.
7. This product should be operated from the
type of power indicated on the marking
label. If you are not sure of the type of power
available, consult your dealer or local power
company.
8. Do not allow anything to rest on the power
cord. Do not locate this product where
persons will walk on the cord.

ݱ°§®·¹¸¬
···
ïíò ÝßËÌ×ÑÒæ ɸ»² ®»°´¿½·²¹ ¬¸» ¾¿¬¬»®§ô
¾» -«®» ¬± ·²-¬¿´´ ·¬ ©·¬¸ ¬¸» °±´¿®·¬·»- ·²
¬¸» ½±®®»½¬ °±-·¬·±²ò ̸»®» ·- ¿ ¼¿²¹»® ±º
»¨°´±-·±² ·º ¬¸» ¾¿¬¬»®§ ·- ®»°´¿½»¼ ©·¬¸
¿² ·²½±®®»½¬ ¬§°» ±® ·- ³·-¬®»¿¬»¼ò ܱ
²±¬ ®»½¸¿®¹»ô ¼·-¿--»³¾´» ±® ¼·-°±-»
±® »¯«·ª¿´»²¬ ¬§°» ®»½±³³»²¼»¼ ¾§
¬¸» ³¿²«º¿½¬«®»®ò Ü·-°±-» ±º ¬¸» «-»¼
¾¿¬¬»®§ ¿½½±®¼·²¹ ¬± ¬¸» ³¿²«º¿½¬«®»®Ž-
·²-¬®«½¬·±²-ò
ïìòб©»® ½¿¾´» ©¸·½¸ ·- ¿°°®±ª»¼ ¾§ §±«® ´±½¿´
¿«¬¸±®·¦»- -¸±«´¼ ±²´§ ¾» «-»¼ò
This equipment has been tested and found to comply with the limits for a Class B digital
device,pursuant to Part 15 of the FCC Rules. These limits are designed to provide
reasonable protection against harmful interference in a residential installation. This
equipment generates, uses and can radiate radio frequency energy and, if not installed
andused in accordance with the instructions, may cause harmful interference to radio
communications. However, there is no guarantee that interferencewill not occur in a
particular installation. If this equipment does cause harmful interference to radio or
television reception, which can be determined by turning the equipment off and on, the
userisencouraged to try to correct the interference by one of the following measures:
Reorient or relocate the receiving antenna.
Increase the separation between the equipment and receiver.
Connect the equipment into an outlet on a circuit different from that to which the receiver
isconnected.
Consult the dealer or an experienced radio/TV technician for help.
FCC Caution: Any changes or modifications not expressly approved by the party
responsiblefor
compliance could void the user's authority to operate this equipment.
This EUT is compliance with SAR for general population/uncontrolled exposure limits
in ANSI/IEEE
C95.1-1999 and had been tested in accordance with the measurement
methods and proceduresspecified in OET Bulletin 65 Supplement C.
Operation is subject to the following two conduction(1) this device may notcause
interference,and(2) this device must accept anyinterference, includinginterferencethat
maycauseundesiredoperation of the device.
Cetappareilnumérique respecte les limites de bruits radioélectriques applicables
auxappareils numériques de Classe B prescrites dans lanorme sur le matérial
brouilleur: “Appareils Numériques,” NMB-003 édictée par l’Industrie.(1)this device
may not cause interference,and (2) this device must accept any interference,
including interference that may cause undesired operation of the device."

iv
The Load Number assigned to each telephone
terminal device denotes the percentage of the
total load to be connected to a telephone loop
or circuit which is used by the device to prevent
overloading. The termination on a loop may
consist of any combination of devices such that
the total of the load numbers of all devices does
not exceed 100.
For safety, users should ensure that the
electrical ground of the power utility, the
telephone lines and the metallic water
pipes are connected together. Users
should NOT attempt to make such
connections themselves but should
contact the appropriate electric inspection
authority or electrician. This may be
particularly important in rural areas.
For Authorized Repair Technicians Only
For continued protection against risk of
fire, replace only with the same type and
rating fuse.
Danger of explosion if Lithium (CMOS)
battery is incorrectly replaced. Replace
only with the same or equivalent type
recommended by the manufacturer.
Dispose of used batteries according to
the manufac-turer’s instruction.
Proper Disposal of Battery
Under federal, state or local law, it may be illegal
to dispose of batteries by putting them in the
rubbish bin or trash cans. Please take care of our
environment and dispose of batteries properly.
Check with your local government authority
for details regarding recycling or disposing of
unwanted batteries.

Copyright
v
NOTE ON BACKUP DATA
Please make a backup of the Operating System,
any software programs, and created files (and
update regularly).
If you send this product to Fujitsu, or any of its
affiliates, suppliers, service providers or resellers
for repair, Fujitsu does not guarantee the data
integrity. It is your responsibility to back data up
beforehand.
Fujitsu does not assume any obligation for
compensation for damages, data integrity, or
restoration, etc., if your data is lost for any reason,
except as written in the warranty.
NOTE ON USE REQUIRED HIGH
SAFETY
This product is designed and manufactured
for general use, including general office use,
personal use, household use and ordinary
industrial use.
This product is not designed for or intended for
use under dangerous (fatal) conditions, unless
extreme safety precautions are implemented.
Do not use this product without implementing
high-level safety precautions.
Failure to follow this warning may result in
death, personal injury, severe physical damage
or other loss, if used in or near any or more of
the following:
• nuclear reaction control system in a nuclear
facility
• automatic flight control system in an airplane
or other flight control system
• mass transport control system
• medical instruments for life support system
• missile launching control for weapon system

vi
• During installation and before operating
the device, observe the instructions on
environmental conditions in the manuals of
the device.
• Do not drop the device and protect it from
severe shocks.
• For mobile devices (e.g. notebook, pocket PC,
keyboard):
– Do not place any objects on the device.
– When the device is switched on, do not
store it in an environment with poor air
circulation
(e.g. in a carrier bag or a closed briefcase).
Otherwise the device may be damaged or
could even catch fire.
• Always transport the device with the battery
inserted. This will prevent any foreign objects
(e.g. paper clips) from entering the device
through openings.
• Do not store the device, batteries or mains
adapter near a heat source (e.g. a heater or
fireplace). Excessive heating up can cause the
device, batteries or mains adapter to catch fire
or explode.
• Do not transport the rechargeable battery
unprotected in your bag, briefcase or any
other container, as metal objects also carried
there (e.g. car keys) could short circuit the
battery terminals. This can result in damage
to the battery or in fire danger.
Power supply
• You may only operate the device, if the voltage
for the device is set to the local mains voltage.
For stationary devices check the rated voltage
of the device; for mobile devices check the
rated voltage of the mains adapter (see device
instructions).
• Ensure that the mains outlet is freely
accessible.
• The ON/OFF switch, the standby button, the
suspend/resume button and the main switch
do not disconnect the device from the line
voltage. To completely disconnect the mains
voltage, remove the power plug from the
socket.
Safety notes
Please read these safety
instructions before using the
device for the first time
Also refer to the safety
notes in the manuals
for the device and in the
additionally provided
documentation
Your device complies with the relevant safety
regulations for data processing equipment. Do
not operate the device if the ambient temperature
is above 35 °C or below 5 °C. If you have any
questions, contact your sales outlet or our
customer service centre.
• Keep these safety notes and other
documentation (e.g. brief guide, operating
manual and CD) together with the device. If you
pass on the device to third parties, you should
also pass on the whole documentation.
Cleaning
• If the battery’s terminals are dirty, clean them
with a dry, clean cloth.
Repair
• Components identified with a warning
sign (e.g. a lightning bolt) may only be
opened, removed or exchanged by authorised
specialists. (Danger of electric shock, power
hazard, fire hazard).
• Only qualified technicians should repair the
device. Unauthorised opening and improper
repairs can result in considerable danger to
the user (danger of electrical shock, high-
voltage danger, fire danger).
Transportation and Storage
• Use the original packaging or other suitable
packaging, which provides protection against
jolts, impacts, moisture and electrostatic
discharge for reshipping and other
transport.

Copyright
vii
• For devices with a batter y: improper
replacement of the device’s battery will result
in a danger of explosion. The battery may
only be replaced by an identical sort or by a
sort recommended by the manufacturer (see
device instructions).
• Do not use damaged cables (damaged
insulation, bare wires). A damaged cable
presents a danger of electrical shock or fire.
• If necessary, replace the original power cable
with a regular grounded 3-core mains lead.
• If no suitable power cable was supplied with
the device, purchase an approved power cable
in your country. The voltage and amperage for
which the cable is suited must be higher than
the voltage and amperage indicated on the
product.
Additional information on the power
supply for devices with external mains
adapter and/or battery
• Only the specified rechargeable battery
and the supplied mains adapter may be
used to power the device. You can find more
detailed information in the operating manual
of the device. Use only mains adapters and
rechargeable batteries approved by Fujitsu
for your device.
• The battery is not waterproof! Never immerse
the battery in water and always protect it from
splashes of water (rain, sea spray).
• If handled incorrectly, batteries may cause
hazards such as fire. Never therefore open,
pierce or compress a battery.
• Never throw a battery into a fire (danger of
explosion!).
• Take care not to drop the batteries or
otherwise damage their casing (fire risk). If
rechargeable batteries develop a fault please
stop using them immediately. Do not touch the
contacts of the batteries. Never interconnect
the positive and negative terminals of a
battery.
• If a battery is leaking, avoid contact between
the liquid and your skin, mucous membranes
(eyes, mouth) or foodstuffs and do not inhale
the vapours. Clean parts of the body that have
already come into contact with such liquids
with plenty of soap and water.
• Keep batteries out of reach of children.
• If a lithium battery (button cell) is installed in
the device for real-time buffering, please note
that: The lithium battery may only be replaced
by authorised, specially trained personnel.
• To disconnect the device from all power
sources, switch off the device, disconnect
the mains adapter from the electrical outlet
and remove all batteries from the battery
compartment and module slot.
• Make sure that the rated current of the mains
adapter is not higher than that of the power
system to which you connect the mains
adapter (see technical data of the mains
adapter).
Installation and Operation
• Ensure that the device is connected to a
mains socket with earthing contact and that
the device is close to the socket.
• We recommend that you place your device
on an insensitive, non-slip surface. In view
of the multitude of different finishes and
varnishes used on furniture, it is possible that
the rubber / plastic feet will mark the surface
they stand on.
• Never place the notebook and the mains
adapter on a heat-sensitive surface.
• If the device is brought from a cold environment
into the operating room, condensed water
can form. Before operating the device, wait
until it is absolutely dry and has reached
approximately the same temperature as the
installation site.
• Lay the cables in such a way that they do
not create a hazard (danger of tripping)
and cannot be damaged. When connecting
cables, follow the relevant instructions in the
device manuals.

viii
• In the event of a thunderstorm, all data
transfer cables (modem/LAN/PC card
modem, CF-LAN card, CF-WLAN card)
should be removed at the wall from the
telephone or LAN socket. No data transfer
cables should be connected or disconnected
during a thunderstorm.
• Make sure that no objects (e.g. jewellery
chains, paper clips, etc.) or liquids get inside
the device (danger of electric shock, short
circuit).
• In emergencies (e.g. damaged casing,
elements or cables, penetration of liquids
or foreign matter), switch off the device
immediately, remove the power connector,
remove the battery (if present), and contact
your sales outlet or our hotline/help desk.
• The device is not waterproof! Never immerse
the device in water and protect it from spray
water (rain, sea water).
• Therefore, check each CD for damage,
cracks, breakage etc. before inserting it in
the drive. Please note that any additional
labels applied may change the mechanical
properties of a CD and cause imbalance.
Damaged and imbalanced CDs can break at
high drive speeds (data loss). Under certain
conditions sharp-edged pieces of broken CDs
can penetrate the cover of the drive (damage
to the unit) and be thrown out of the unit
(danger of injury, particularly on uncovered
body parts such as the face or neck).
• Protect the contacts of all sockets and plugs
of the device against static electricity. Avoid
touching the contacts. Should touching
be unavoidable, take the following safety
measures: Touch an earthed object or
wear an earthing strap before touching the
contacts. This discharges static charges.
• Keep other objects 100 mm each away from
the device and its mains adapter to ensure
adequate ventilation.
• Do not install the device near heating
devices or other sources of heat (e.g. heater,
fireplace). Excessive heating up can cause
the device, batteries or mains adapter to
catch fire or explode.
• If the device is installed in a cabinet or a
drawer, sufficient ventilation must be provided.
Otherwise damage from overheating may
result.
• Never place the notebook/the Tablet PC on
a soft surface (e.g. carpeting, upholstered
furniture, bed). This can block the air vents
and cause overheating and damage. If, for
example, you place the notebook/Tablet PC
on your knees for a longer period, this can
become unpleasant or can even lead to
burns.
• Never cover the fan intake or exhaust openings
of the device and the mains adapter.
• Keep the device away from naked flames.
• Do not use the device in a damp environment,
e.g. near a bathtub, a wash basin or a
swimming pool.
• Do not use the accessories (e.g. mains
adapter, battery, cables and adapters)
included with the respective device or
component for other devices or components.
• To avoid injuries, be sure to keep the following
devices and objects out of the reach of small
children: personal computers, workstations,
servers, small parts of the device, batteries,
cables and packaging materials (e.g. plastic
bags).
• Except with headphones or headset: do not
hold the loudspeaker of your device directly
up to your ear.
• Headphones and headset: To prevent
damage to your hearing, check the configured
volume before putting on the headphones or
headset.
• To avoid damages on the fingerprint sensor,
don’t touch the fingerprint sensor with hard or
metallic objects (e.g. pens or rings).

Copyright
ix
Screen/touchscreen (for devices with
integrated screen)
• If the LCD panel or touchscreen is damaged
(e.g. glass broken), do not allow any escaping
liquid to come into contact with skin, mucous
membranes (eyes, mouth) or foodstuffs. Do
not inhale vapours. Clean parts of the body
and clothing that have already come into
contact with such liquids with plenty of soap
and water.
• You may set only those resolutions and
refresh rates specified in the operating
manual for the device or in the operating
manual for the monitor. Otherwise you may
damage your monitor. If you are in any doubt,
contact your sales outlet or our Hotline/Help
Desk.
• To prevent the device from overheating, the
LCD panel must be in its open position when
the device is on.
Connecting headphones
• Excessive volume from headphones can
damage your hearing.
• It is best for your hearing if the equalizer
settings are set to the mid-position. Settings
other than the mid-position can cause hearing
damage.
• There are other factors beyond the control
of the manufacturer which can change the
output voltage at the headphone connection
and thus increase the headphone volume
(including e.g. the operating software,
equalizer software, drivers etc.). In such a
case the risk of hearing damage cannot be
excluded.
• Only use headphones recommended by
Fujitsu. Otherwise there is a risk of hearing
damage due to excessive volume.
System expansions and accessories
• Install only system expansions that satisfy the
requirements and rules governing safety and
electromagnetic compatibility and relating to
telecommunications terminal equipment. If
you install other expansions, you may damage
the device or violate the safety regulations
and regulations governing RFI suppression.
Information on which system expansions
are suitable can be obtained from your sales
outlet or our hotline/help desk.
• Data cables for peripherals must be
adequately shielded to avoid interference.
• The devices are only designed for indoor
LANs. In the case of an external LAN feed, a
LAN switch must be used to connect the LAN
to the devices.
• The warranty is invalidated if the device
is damaged during the installation or
replacement of system expansions.
• PC cards can become quite warm during
operation. Proceed with caution when
removing PC cards.
Additional information on system
expansions and accessories for
stationary devices
• Before opening the device first switch it off
and then disconnect the power plug. Observe
the specifications in the device instructions.
• The components (e.g. power supply) marked
with a warning sign (e.g. lightning sign) may
only be opened, removed or exchanged by
authorised, qualified personnel.
• Make sure that you also switch off the
attached monitor and/or other peripherals
when you switch off the device.

x
• Connect the device and the attached
peripherals to the same circuit. Otherwise
data may be lost, for instance during a
power failure, if the fixed device continues
to operate but the peripheral device (e.g. a
memory subsystem) fails.
• When you connect the cables and install
additional components (e.g. hard disk, main
memory) watch the edges of the case or
components. These may be sharp or hot
while in operation (danger of injury).
• Please read the security and operating
information in the manual for the system
where you are installing the additional
components.
Additional safety notes for
devices with radio components
The following additional safety notes apply
for devices with radio components (e.g.
BLUETOOTH, Wireless LAN):
• Switch off the device, when you are in a
hospital, an operating room or near a medical
electronics system, as the radio waves
transmitted by the radio component can
impair the operation of the medical devices.
• Keep the device at least 20 cm from a
pacemaker, as otherwise the proper operation
of the pacemaker may be impaired by radio
waves.
• The radio waves transmitted by the radio
component can cause an unpleasant
humming in hearing aids.
• If the radio component cannot be switched
off, remove the battery or disconnect the
power supply.
• Switch off the radio component, when you let
the device get near flammable gases or into
hazardous environments (e.g. petrol station,
paintshops), as the transmitted radio waves
can cause an explosion or a fire.
• Deactivate the radio components in
blasting areas and in the vicinity of blasting
operations.
• It is not generally permitted to use radio
components on airplanes. To date, no case
of damage to the on-board electronics of an
aircraft has been proven, but interference
with the sensitive devices cannot be ruled
out. Please follow the crew’s instructions in
all cases.
• With data traffic via a wireless connection, it
is also possible for unauthorised third parties
to receive data.
• The company Fujitsu cannot be held
responsible for radio or television faults
arising from unauthorised changes made
to this device. Fujitsu is, furthermore, not
responsible for replacing and / or exchanging
connector cables and devices which have
not been specified by Fujitsu. The user is
solely responsible for repairing faults arising
from such unauthorised changes made to a
device and for replacing and / or exchanging
devices.
• Switch off the radio component for security
reasons when you cannot exclude that the
transmitted radio waves can negatively affect
electrical and electronic devices in your
surrounding area.

Table of Contents
xi
Table of Contents
GETTING TO KNOW YOUR
NOTEBOOK ....................................... 1
Names of the parts and their
functions ................................................. 1
Front features of the notebook ................. 1
Left features of the notebook ................... 2
Right features of the notebook ................. 3
Bottom features of the notebook .............. 4
Notebook: switching off .......................... 5
Status indicators ...................................... 6
Keyboard................................................... 8
Virtual numeric keypad ........................... 9
Key combinations ................................... 9
Country and keyboard settings ............. 10
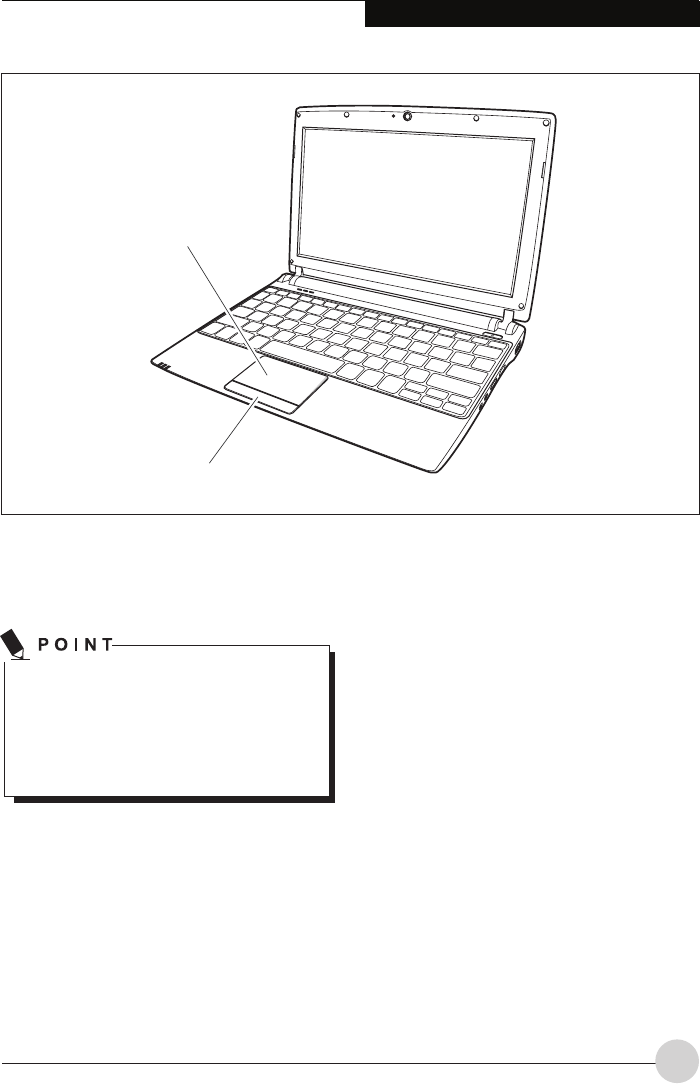
Touchpad and touchpad buttons .......... 11
Using touchpad buttons ......................... 11
LCD screen ............................................. 12
Screen settings ...................................... 12
Webcam .................................................. 12
Battery..................................................... 13
Charging, caring for and maintaining
the battery ........................................... 13
Removing and installing the battery ....... 13
Using the power-management
features ............................................... 15
Memory cards ......................................... 16
Inserting the memory card ..................... 16
Removing the memory card ................... 16
Hard Disk ................................................ 17
Loudspeakers and Microphones .......... 17
Switching the loudspeaker off and on .... 17
Adjusting the volume .............................. 17
Wireless LAN radio components .......... 17
Wireless LAN - switching on and off....... 17
Configure wireless Internet connection . . 17
Ethernet and LAN .................................... 18
SECURITY FUNCTIONS .................... 19
Configuring password protection in
BIOS Setup Utility ................................... 19
Protecting BIOS Setup Utility (supervisor
and user password) ............................ 20
Password protection for booting of the
operating system ................................. 21
CONNECTING EXTERNAL
DEVICES ............................................. 22
Connecting an external monitor ............. 22
Setting the refresh rate for your external
monitor. ............................................... 23
Connecting USB devices ....................... 23
How to remove USB devices correctly ... 24
Connecting external audio devices ........ 24
Microphone port / Line In ....................... 24
Headphone port ..................................... 24
TROUBLESHOOTING AND TIPS ....... 25

Table of Contents
xii

1
Getting To Know Your Notebook
Names of the parts and
their functions
Front features of the notebook
This chapter presents the individual hardware
components of your MH330. It gives an overview
of the displays and connections to the device.
Please familiarise yourself with these components
before you start to work with the device.
1. Built-In Microphone
2. 0.3 Mega Pixel Camera
3. Display Panel
4. Power / Suspend / Resume Button
5. Keyboard
6. Touch Pad
7. Status Indicator LED
4
5
3
2
1
7
6
7
2
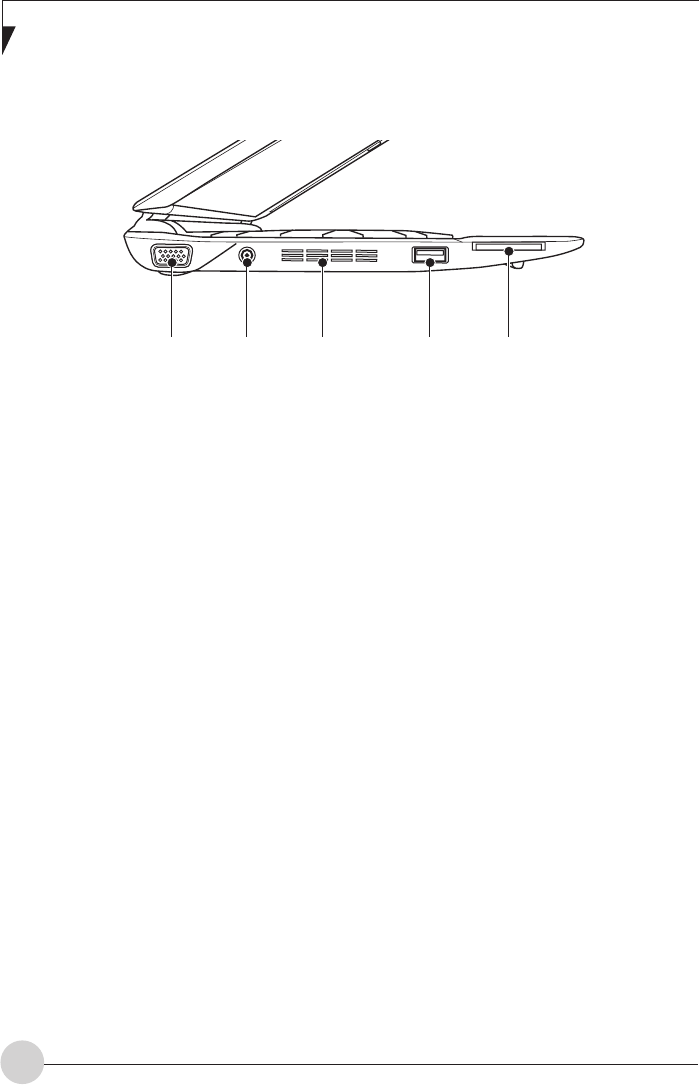
Left features of the notebook
1. External Video Port
2. DC Power Jack
3. Air Vents
4. USB 2.0 Port
5. MMC / SD / MS PRO Card Slot
4 52 31
3
Getting To Know Your Notebook
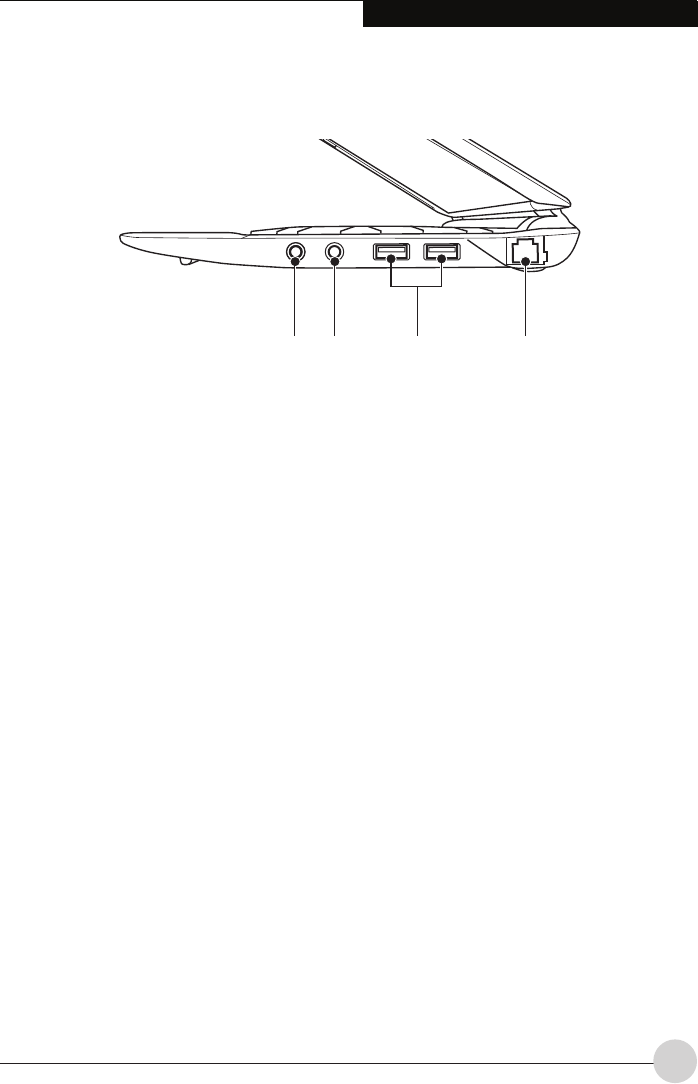
Right features of the
notebook
1. Microphone Jack
2. Headphone Jack
3. USB 2.0 Ports
4. LAN (RJ-45) Jack
421 3
4
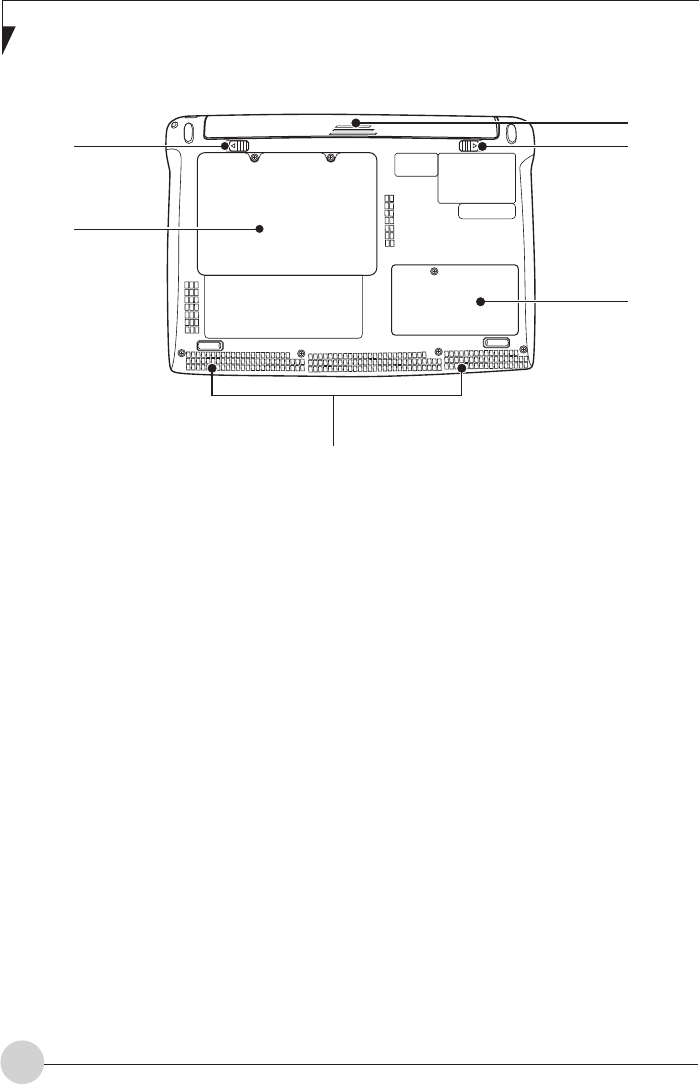
Bottom features of the
notebook
1. Lithium Ion Battery
2. Battery Latches
3. Memory Upgrade Compartment
4. Stereo Speakers
5. Internal Hard Disk Drive
2
3
1
2
5
4
5
Getting To Know Your Notebook
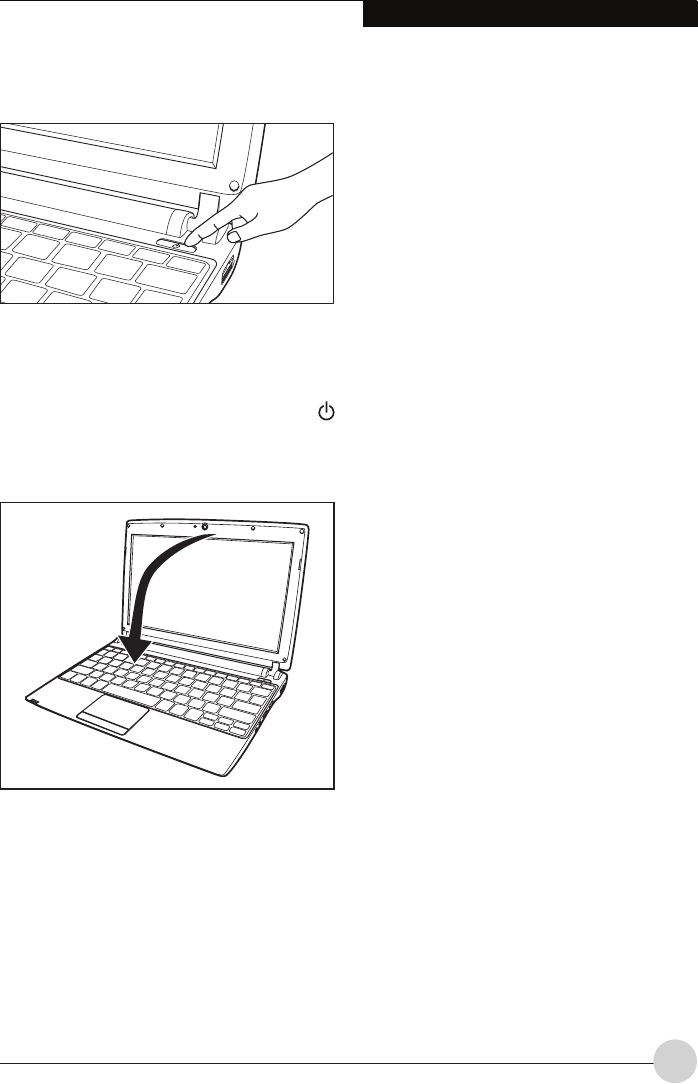
Notebook: switching off
•Shut down the operating system properly (in
Windows via the Start menu by clicking Start
Symbol – Shut Down – Shut Down – OK).
•If the notebook is not switched off
automatically, press the ON / OFF switch
for about five seconds.
•Close the LCD screen.
6
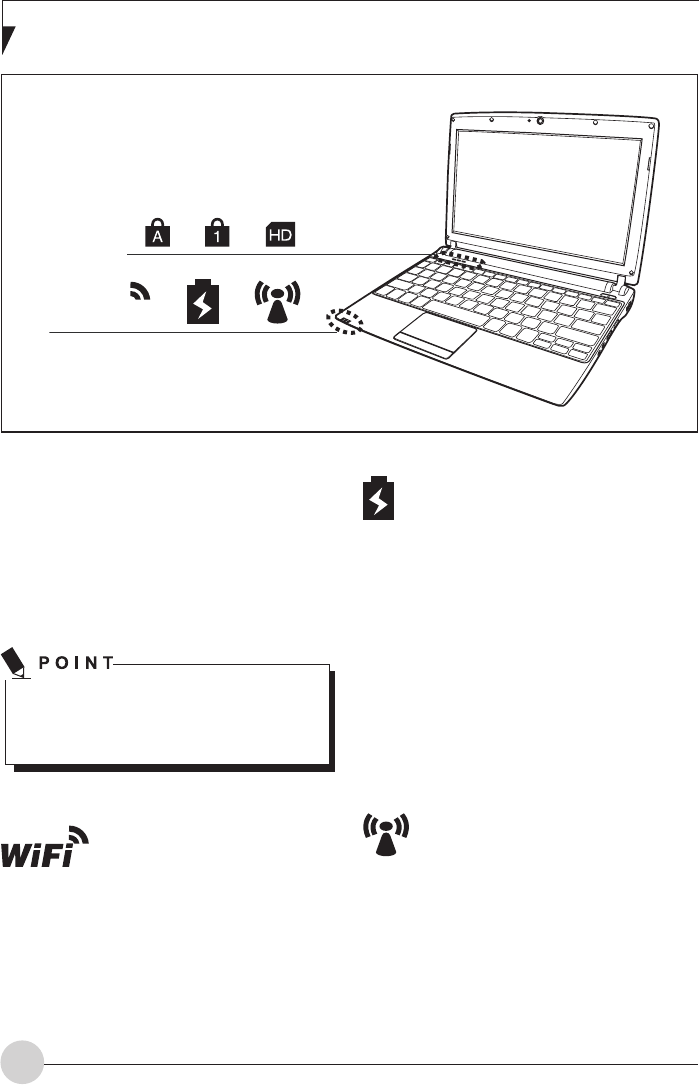
Battery Charge / DC IN indicator
• Purple, solid: AC adapter and
battery are available and system is
charging.
• Blue, solid: AC adapter and battery
are available and system is fully
charges.
• Red, solid: AC adapter and battery
are available and waiting to charge
battery.
• Purple, blinking: The battery is
abnormal status.
• Off: AC adapter is not plugged in.
3G* indicator
The 3G indicator appears when 3G is
emitting.
* Light-on applicable on 3G model
only
Wireless LAN Emission
indicator
The Wireless LAN Emission
indicator appears when the
Wireless LAN is emitting.
Status indicators
The status indicators provide information about
the status of the power supply, the drives and
the keyboard functions. Three indicators are
visible when the device is closed: 3G indicator,
battery indicator, wireless LAN indicator (device
dependent).
Depending on the model, the status
indicators on your device may be in a
different order to that shown below.
WiFi
7
Getting To Know Your Notebook
Caps Lock Indicator
The Caps Lock indicator states that
your keyboard is set to type in all capital
letters.
Num Lock Indicator
The Num Lock indicator states that
the integral keyboard is set in ten-key
numeric keypad mode.
If there is no battery activity and the
power adapters are not connected, the
Battery Level indicators will also be off.
If you are using the optional external
numerical keypad, pressing the [NumLk]
key will activate the external keypad. The
indicator will come on, however it will not
change any of the functionality of your
keyboard keys.
Disk/Optical Drive Access Indicator
This indicator turns on when an internal
hard disk drive or an optical drive device
or a removable disk drive is being
accessed.
Do not power off the notebook when the
disk drive access indicator is shown.

8
Keyboard
The keyboard of your notebook is subject
to continuous wear through normal use.
The key markings are especially prone to
wear. The key markings are liable to wear
away over the life of the notebook.
The keyboard has been designed to provide all
the functions of an enhanced keyboard. Some
enhanced keyboard functions are mapped with
key combinations.
The following description of keys refers to
Windows. Additional functions supported by
the keys are described in the relevant manuals
supplied with your application programs.
The figure below shows how to access the
different characters on keys with overlaid
functions. The example applies when the Caps
Lock key has not been activated.
Caps Lock key
The Caps Lock key activates
the Caps Lock mode, and
the corresponding icon is
displayed in the Windows
information area. In Caps
Lock mode, all of the
characters you type appear
in upper case. In the case of
overlay keys, the character
printed on the upper left
of the key will appear
when that key is pressed.
To cancel the Caps Lock
function, simply press the
Caps Lock key again.
Shift key
The Shift key causes
uppercase characters to
appear. In the case of
overlay keys, the character
printed on the upper left of
the key appears when that
key is pressed.
Fn button
The key enables the special
functions indicated on overlay keys
(see “Key combinations”, Page 9).
Cursor keys
The cursor keys move the
cursor in the direction of
the arrow, i.e. up, down,
left, or right.
Start key
The Start key opens the Windows
Start menu.
Menu key
The Menu key opens the menu for
the selected item.
Backspace key
The Backspace key deletes
the character to the left of the
cursor.
Tab key
The Tab key moves the cursor
to the next tab stop.
Enter key (return)
The Enter key terminates a
command line. The command you
have entered is executed when you
press this key.
9
Getting To Know Your Notebook
Illustration
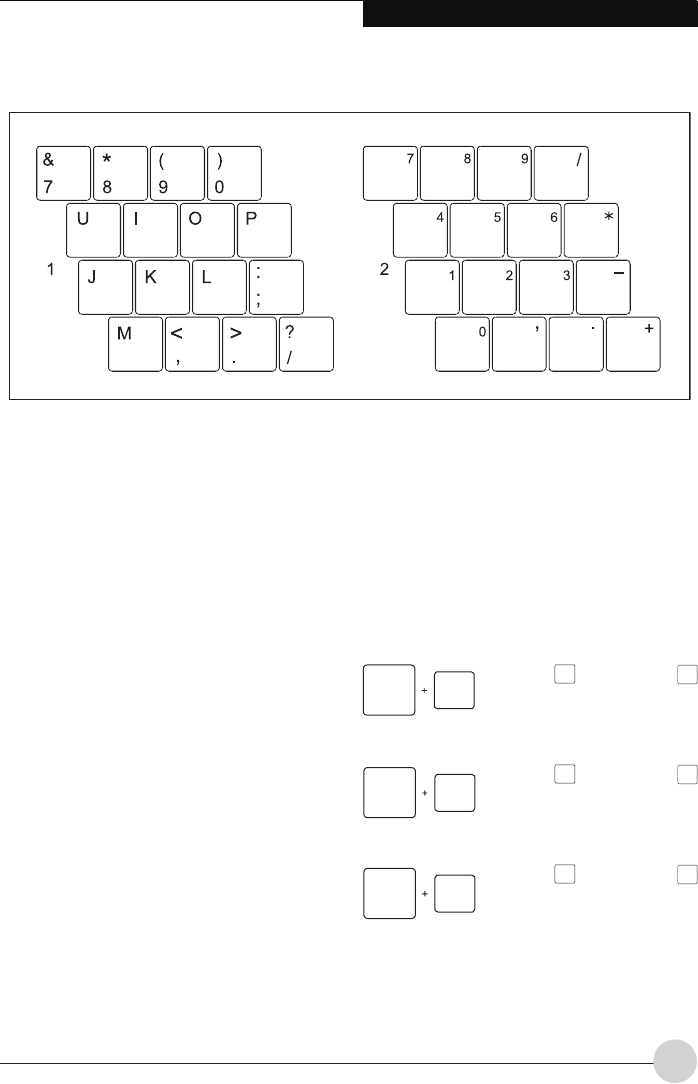
Virtual numeric keypad
To provide the convenience of a numeric keypad,
your keyboard is equipped with a virtual numeric
keypad. The special keys of the virtual numeric
keypad are recognisable by the numbers and
symbols printed in the upper right corner of
each key. If you have switched on the virtual
numeric keypad, you can output the characters
shown on the upper right of the keys.
1 = Character valid when the Num
2 = Character valid when the Num key
is active key is not active
Further information about the status indicators
can be found in chapter “Status indicators”,
Page 6.
Key combinations
The key combinations described below apply
when using Microsoft Windows operating
systems. Some of the following key combinations
may not function in other operating systems and
with some device drivers.
Other key combinations are described in the
relevant manuals supplied with your application
programs.
Key combinations are entered as follows:
• Press and hold the first key in the
combination.
• While holding the first key down, press the
other key or keys in the combination.
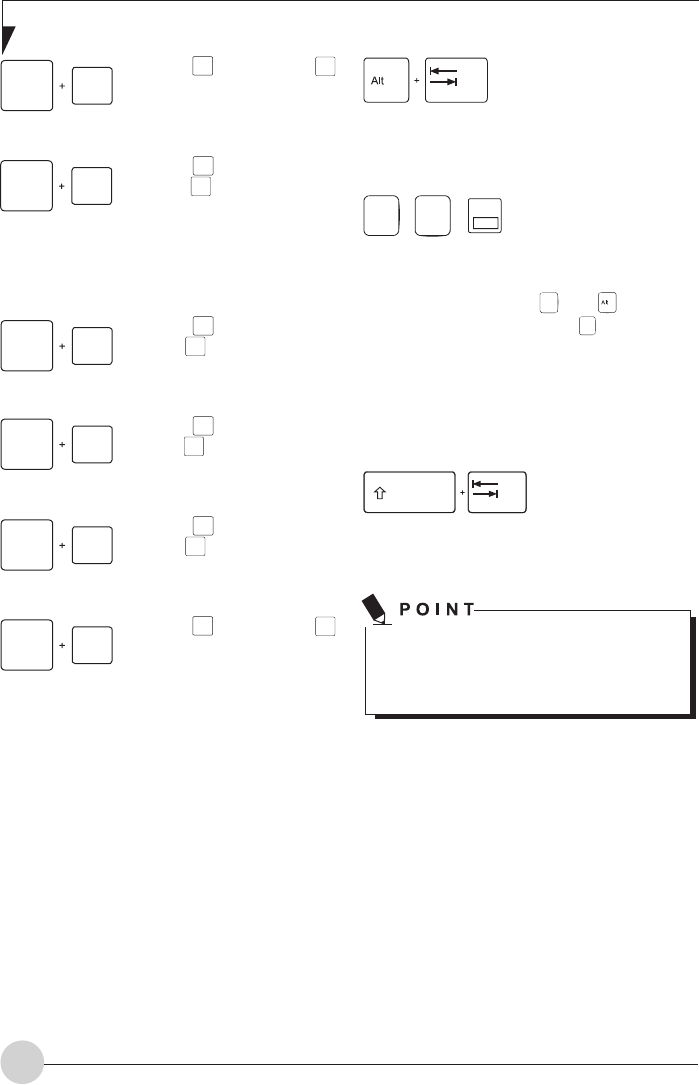
Pressing F8 while holding Fn
will toggle the Audio Mute on
and off.
Pressing F5 while holding Fn
will toggle the built-in pointing
device on and off.
Pressing F4 while holding Fn
will bring system into sleep
mode.
Fn F8
Fn F5
Fn F4
10
Switch between open
applications
Use this key combination
to switch between several
open applications.
Perform warm reboot
This key combination
restarts the notebook.
First, press and hold both
the Ctrl and keys, then
press the Del key. First of all
the Task Manager will be
displayed. You must then
press all three days again
to reboot.
Back tab
This key combination
moves the cursor back
to the previous tabular
stop.
Country and keyboard settings
If you want to change the country and keyboard
settings, proceed as follows:
• Enter the settings by clicking Start – (Settings)
– Control Panel – Time, Regional and Language
Options.
Key combinations using the Windows
keys are detailed in the manual for your
operating system.
AltCtrl Del
SysRq
++
Pressing F3 while holding Fn
allows you to switch ON and
OFF of the WLAN.
Pressing F6 repeatedly while
holding Fn will lower the
brightness of your display.
Note that adjusting the
brightness using the keyboard
changes the system setting.
Pressing F7 repeatedly while
holding Fn will increase the
brightness of the display.
Pressing F9 repeatedly while
holding Fn will decrease the
volume of your system.
Pressing F10 repeatedly while
holding Fn will increase the
volume of your system.
Pressing F11 while holding Fn
allows you to change your
selection of where to send
your display video. Each time
you press the combination of
keys you will step to the next
choice. The choices, in order,
are: built-in display panel only,
external monitor only, and
both built-in display panel and
external monitor.
Fn F3
Fn F6
Fn F7
Fn F9
Fn F10
Fn F11
11
Getting To Know Your Notebook
Using touchpad buttons
Moving the pointer
• Move your finger on the touchpad.
• The pointer will move accordingly.
Selecting an item
• Move the pointer to the item you wish to
select.
• Tap the touchpad once or press the left
button once.
• The item is selected.
Executing a command
• Move the pointer to the field you wish to
select.
• Tap the touchpad twice or press the left
button twice.
• The command is executed.
Dragging an item
• Select the desired item.
• Press and hold the left button and drag the
item to the desired position with the finger on
the touchpad.
• The item will be moved.
Touchpad and touchpad
buttons
Keep the touchpad clean. Protect it from
dirt, liquids, and grease. Do not use the
touchpad if your fingers are dirty. Do not
rest heavy objects (e.g. books) on the
touchpad or the touchpad buttons.
The touchpad enables you to move the mouse
pointer on the screen. The touchpad buttons
allow you to select and execute commands. They
correspond to the buttons on a conventional
mouse.
Button
Cursor Control
12
LCD Screen
Screen settings
Setting the resolution
The screen resolution of the LCD monitor of
your notebook is optimally set at the factory.
Synchronising the display on the LCD
screen and an external monitor
Your notebook supports simultaneous display
on the LCD screen and an external monitor.
Pressing the key combination + F 11 switches
between LCD only, external monitor and LCD
and external monitor only. The last setting is
useful if you would like a high resolution and a
high refresh rate on an external monitor.
Webcam
your notebook is equipped with a WebCam.
Depending on the software used, you can take
pictures, record video clips or take part in web
chats.
• The picture quality depends on the lighting
conditions and the software being used.
• You can only used the WebCam with a
particular application (e.g. an Internet
telephony program or a video conferencing
program which supports WebCams).
• When using the webcam the notebook
support must not wobble.
Further information on use of the WebCam
and additional settings can be found in the
Help function of the program which uses
the Webcam.
13
Getting To Know Your Notebook
Battery
The battery is one of the most important
components of your notebook. When not
plugged into a mains socket, the notebook runs
on its built-in battery. You can increase the life of
the battery by caring for the battery properly.
You can extend the battery life by taking
advantage of the available energy saving
functions.
Charging, caring for and
maintaining the battery
The notebook battery can only be charged,
when the ambient temperature is between 5°C
and max. 35°C.
You can charge the battery by connecting the
notebook to the mains adapter.
You can increase the life of your battery by
allowing it to fully discharge before recharging
it again. To do this, leave your notebook turned
on when it is operated with the battery. Once
the battery is running low you will hear a
warning alarm. If you do not connect the mains
adapter within five minutes of the warning
alarm described above, your notebook will
automatically switch off.
Monitoring the battery charging level
Windows also has a “Battery status meter” in
the taskbar for monitoring the battery capacity.
When you place the mouse pointer on the
battery symbol, the system displays the battery
status.
Battery storage
Keep the battery pack between 0°C and +30°C.
The lower the temperature at which the batteries
are stored, the lower the rate of self-discharge.
If you will be storing batteries for a longer
period (more than two months), the battery
charge level should be approx. 30 %. To prevent
exhaustive discharge, check the charging level
of the battery at regular intervals.
To be able to make use of the optimal charging
capacity of the batteries, the battery should
be completely discharged and then fully
recharged.
If you do not use the batteries for long
periods, remove them from the notebook.
Never store the batteries in the device.
Removing and installing the
battery
Only use batteries approved by Fujitsu for
your notebook.
Never use force when inserting or
removing a battery.
Make sure that no foreign bodies get into the
battery connections.
• Switch off your notebook and disconnect the
power plug from the mains socket.
• Close the LCD screen so that it fully locks
into place.
• Disconnect all cables connected to the
notebook.
• Turn your notebook over and place it on a
firm, flat and clean surface. If necessary, lay
an anti-slip cloth on this surface to prevent
the notebook from being scratched.
14
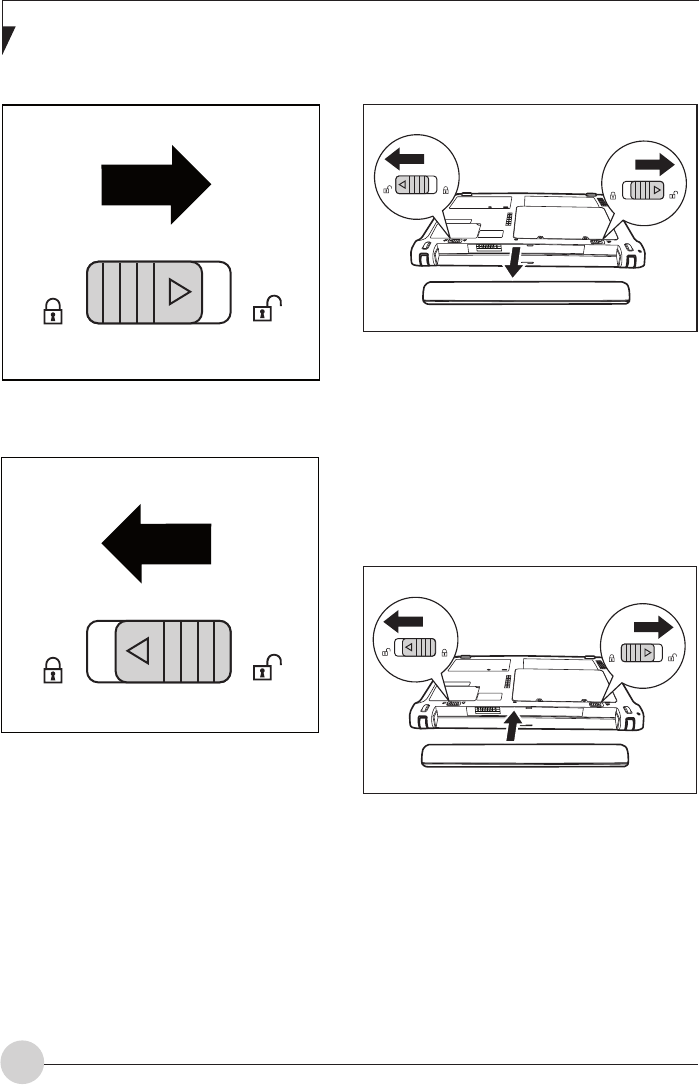
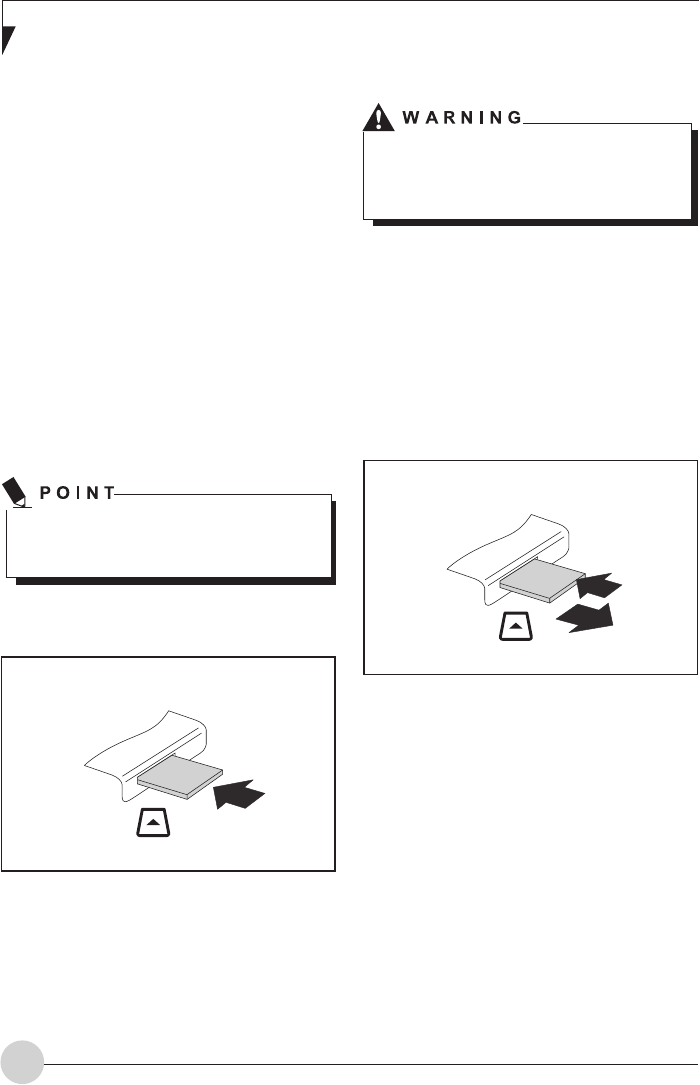
Battery lock positions:
The battery is released.
The battery is locked.
Battery removing
• Push the battery lock (1) in the direction of
the arrow.
• Slide the battery lock in the direction of the
arrow (2) and hold it in place.
• Remove the battery from the battery
compartment (3).
Installing the battery
• Insert the battery in the battery compartment
(1).
• Carefully push the battery into the battery
compartment until it is felt to engage.
• Push the battery lock (2) in the direction of
the arrow.
22
1
21
3
15
Getting To Know Your Notebook
Function
On external power
On battery power
Turn off monitor After 10 minutes After 5 minutes
Turn off hard disk(s)
After 15 minutes After 10 minutes
Energy saving (S3) After 20 minutes After 15 minutes
Hibernate mode (S4)
After 1 hour After 30 minutes
Start – (Settings) – Control Panel – Mobile PC
– Power Options.Start – (Settings) – Control
Panel – Appearance and Personalization –
Personalization – Change screen saver.
or
Personalization – Change screen saver.
Using the power-
management features
The notebook uses less power when the
available power-management features are
used. You will then be able to work longer when
using the battery before having to recharge it.
Power efficiency is increased and
environmental pollution reduced. By
choosing the best power options, you can
make significant savings and at the same
time help protect the environment.
When you fold down and close the LCD screen,
depending on the setting in Windows, the
notebook automatically enters a power saving
mode.
We recommend the following settings:
If you need further information about an
option, you can get help with most settings
by pressing to open the Microsoft Help.
If your notebook is in a power saving mode,
be sure to remember the following:
During power saving mode, open files are
held in the main memory or in a swap file
on the hard disk.
Never turn off your notebook while it is in
a power saving mode. If the built-in battery
is nearly flat, close the open files and do
not go into power saving mode.
If you do not intend to use your notebook for
a long period of time:
• Exit power saving mode if necessary via the
mouse or keyboard or by switching on the
notebook.
• Close all opened programs and completely
shut down the notebook.
16
Memory cards
Your notebook is equipped with an integrated
memory card reader. It supports the following
formats:
Without adapter:
• Secure Digital (SDTM card)
• SDHC
• MultiMediaCard (MMC)
• Memory Stick / Memory Stick pro (Sony®)
With adapter:
• RS-MMC
• MMC-Micro
• miniSD
• MicroSD
• MS-Duo
• MS-PRO Duo
• MS-PRO HG
• MS-PRO HG Duo
Observe the manufacturer’s instructions
when handling the memory cards.
Inserting the memory card
•
Carefully slide the memory card into the
slot. The label should be facing upward. Do
not apply excessive force, as otherwise the
delicate contacts surfaces could be damaged.
• Depending on the particular type used, the
memory card may protrude slightly from the
slot.
1
2
Removing the memory card
In order to protect your data, always follow
the correct procedure for removing the
card outlined below.
You can stop the memory card via the
corresponding icon in the task bar:
• Left-click on the icon.
•
Select the card you want to stop and
remove.
•
Press the Enter key.
• Wait for the dialogue box which tells you that
it is now safe to remove the memory card.
•On devices with card locking: Press on the
storage card (1).
• The storage card is released and can now be
removed.
• Pull the storage card out of the slot (2).
17
Getting To Know Your Notebook
Hard Disk
The hard disk is the most important storage
medium of your notebook. You can work
considerably faster and more efficiently if you
copy applications and files from external data
carriers, such as CDs/DVDs or USB storage
media, to your hard disk.
Loudspeakers and
Microphones
Stereo loudspeakers and two microphones are
built into your notebook.
For information on the exact position of the
loudspeakers and microphones, please refer to
the "Startup guide" manual for your Notebook.
If you attach an external microphone, the
built-in microphone is disabled.
If you connect headphones or external
loudspeakers, the built-in loudspeakers
are disabled.
Switching the loudspeaker off and on
• To switch the loudspeaker off and on, either
use the key combination or F8 use the
quick start buttons (device dependent).
Adjusting the volume
• Set the desired volume with the key
combination + F9 or + F10 .
or
• Double-click on the speaker symbol in the
taskbar and on Mixer.
or
• Select Start symbol – (Settings) – Control
Panel – Hardware and Sound – Sound: Adjust
system volume.
• Use the slide control to change the volume.
• To turn the speaker on or off, double-click on
the speaker symbol in the taskbar.
Wireless LAN radio
components
The installation of a wireless LAN/Bluetooth
module not approved by Fujitsu voids the
permits (CE!) issued for this device.
Wireless LAN - switching on and
off
Check whether the wireless LAN module
is activated/deactivated in the installed
wireless LAN software.
• Activate or deactivate the wireless LAN
module with the key combination + F3 .
Configure wireless Internet
connection
With just a few steps you can wirelessly connect
your MH330 to the Internet.
Using WLAN access
Requirement:
• You have a WLAN and the corresponding
access data.
• On the Taskbar (lower right hand corner)
click on icon.
• Under Wireless Network Connection,
select the desired WLAN and confirm with
Connect.
• If required, enter the corresponding access
data (e.g. network key, password).
• The connection to the WLAN is established.
18
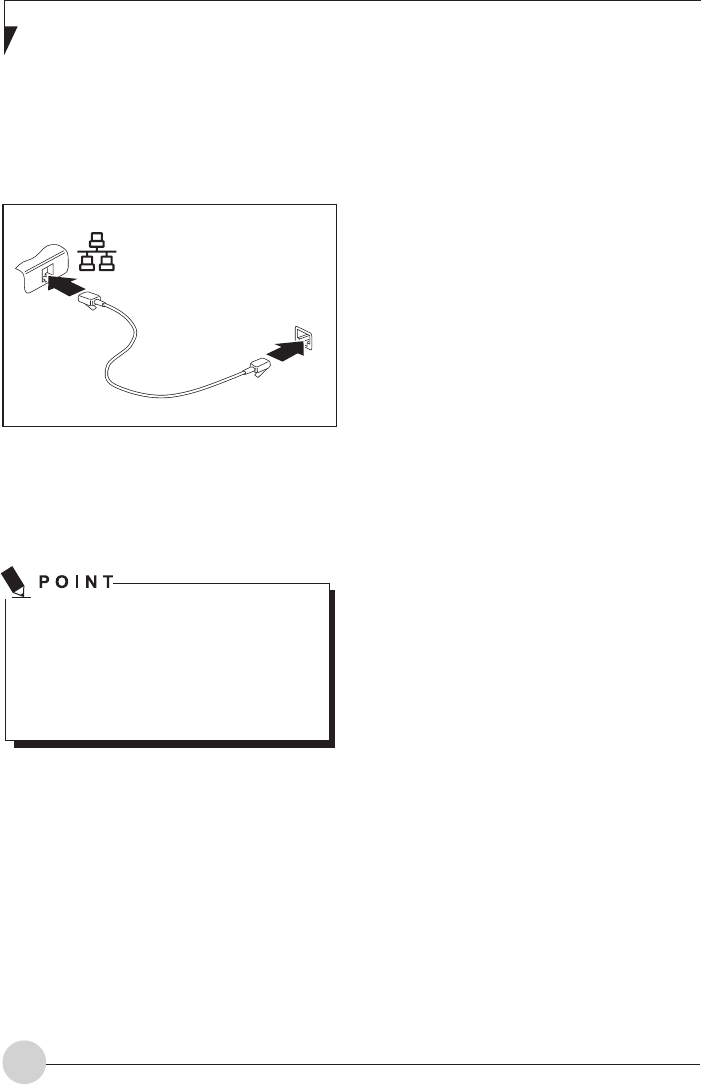
Ethernet and LAN
The internal network module of your notebook
supports Ethernet-LAN (10/100 Mbps). This
allows you to establish a connection to a local
network (LAN = Local Area Network).
• Connect the network cable to the LAN port of
the notebook (1).
• Connect the network cable to your network
connection (2).
Your network administrator can help you to
configure and use the LAN connections.
The network cable is not included in the
delivery scope. This type of cable can be
obtained from a specialist dealer.
2
1

19
Security Functions
Security functions
Your notebook has several security features
that you can use to secure your system from
unauthorised access.
This chapter explains how to use each function,
and what the benefits are.
Please remember that in some cases, for
example, forgetting your password, you
may be locked out and unable to access
your data. Therefore, please note the
following information:
• Make regular backups to external
storage devices such as external hard
drives, CD or DVD disks.
• Some security functions need you to
choose passwords. Make a note of the
passwords and keep them in a safe
place.
If you forget your passwords you will
need to contact the help desk. Deletion or
resetting of passwords are not covered by
your warranty and a charge will be made
for assistance.
Configuring password
protection in BIOS Setup
Utility
Before using the various options for
password protection in the BIOS Setup
utility to increase data security, please
observe the following:
Make a note of the passwords and keep
them in a safe place. If you forget your
supervisor password you will not be able
to access your notebook. Passwords are
not covered by your warranty and a charge
will be made for assistance.
Your password can be up to eight
characters long and contain letters and
numbers. No distinction is made between
uppercase and lowercase.

20
• In the Exit menu, select the option Save
Changes & Exit.
• Select Yes and press the Enter key.
• The notebook will be rebooted and the new
password will come into effect. It will now
be necessary to first enter your supervisor
or user password in order to open the BIOS
Setup Utility. Please note that the user
password only provides access to a few of
the BIOS settings.
Changing the supervisor or user password
You can only change the supervisor password
when you have logged into the BIOS Setup
Utility with the supervisor password.
• Call the BIOS Setup Utility and go to the
Security menu.
• When changing the password, proceed
exactly as for password assignment.
Removing passwords
To remove a password (without setting a new
password) perform the following steps:
• Start the BIOS Setup Utility and go to the
Security menu.
• Highlight the Set Supervisor Password or
Set User Password field and press the Enter
key.
• You will be requested to enter the current
password by the Enter Current Password
prompt. You will be requested to enter a
new password by the Enter New Password
prompt.
•
Press the Enter key twice.
•
In the Exit menu, select the option Save
Changes & Exit.
• Select Yes and press the Enter key.
• The notebook will now reboot with the
password removed. Removing the supervisor
password simultaneously deactivates the
user password.
Protecting BIOS Setup Utility
(supervisor and user password)
If you have opened these operating
instructions on the screen, we recommend
that you print out the following instructions.
Because you cannot call the instructions
onto the screen while you are setting up
the password.
You prevent unauthorised use of the BIOS Setup
Utility with both the supervisor and the user
password. The supervisor password gives you
access to all functions of the BIOS Setup Utility,
while the user password only provides some of
the functions. You can only set a user password
if a supervisor password has already been
assigned.
Setting supervisor and user
password
•Start the BIOS Setup Utility and go to the
Security menu.
•Select the Set Supervisor Password field and
press the Enter key.
• With Enter new Password: you are asked to
enter a password.
•Enter the password and press the Enter key.
• Confirm new Password requires you to
confirm the password.
•Enter the password again and press the
Enter key.
• Changes have been saved is a confirmation
that the new password has been saved.
• To set the user password, select Set User
Password and proceed exactly as when
configuring the supervisor password.
• If you do not want to change any other
settings, you can exit BIOS Setup Utility.

21
Security Functions
Password protection for booting of
the operating system
With the supervisor password you have
set in the BIOS Setup Utility (see section
"Setting supervisor and user password",
Page 20)
, you can also prevent booting of
the operating system.
Activating system protection
• Start the BIOS Setup Utility and go to the
Security menu.
• Select the Password on Boot option and
press the Enter key.
• Select Enabled and press the Enter key.
• Select the Save Changes & Exit option under
Exit.
• The notebook will reboot. You will be prompted
to enter our password (the supervisor
password).
Deactivating system protection
• Start the BIOS Setup Utility and go to the
Security menu.
• Select the Password on Boot option and
press the Enter key.
• Select the Disabled option and press the
Enter key.
• If you do not want to change any other
settings, you can exit BIOS Setup Utility.
• Select the Save Changes & Exit option under
Exit.
• The notebook will reboot. The system is no
longer password-protected.
22
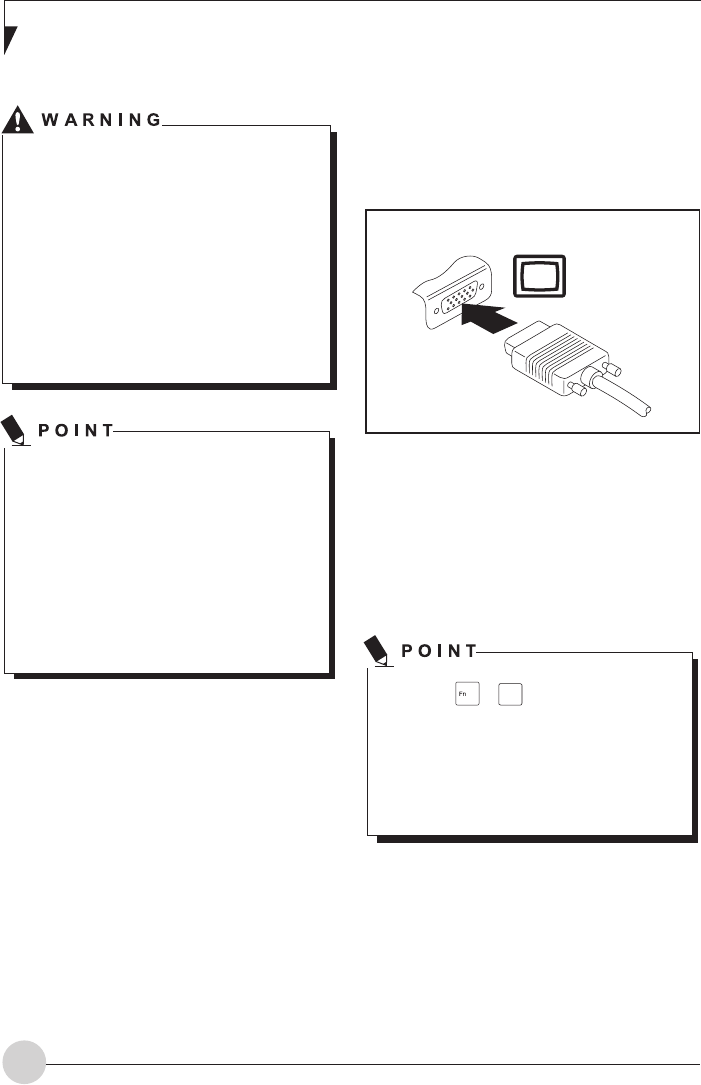
Connecting an external monitor
You can connect an external monitor to the
analogue VGA monitor connection of the
notebook. Screen output is limited to a maximum
of two screens at any one time.
Analogue VGA monitor connection socket
• Switch off the notebook and the external
monitor.
• Connect the data cable of the external
monitor to the monitor port of the notebook.
• First switch on the external monitor and then
the notebook.
Using the + F11 key combination, you
can toggle back and forth between the
external monitor and the notebook’s LCD
screen.
You can display the same picture on the
external monitor and the notebook LCD
screen simultaneously.
Connecting external devices
Always refer to the safety information
provided in
"Important Safety Instructions",
Page ii
before connecting or disconnecting
any devices to or from your notebook.
Always read the documentation supplied
with the device you wish to connect. Never
connect or disconnect cables during a
thunderstorm.
Never pull at a cable when disconnecting
it. Always grasp the plug. Follow the
steps below in order, when connecting or
disconnecting devices to your notebook.
With some devices such as USB
devices, it is not necessary to switch
off the notebook and the device before
connecting/disconnecting. For more
information about whether or not devices
need to be switched off, please refer to the
documentation supplied with the external
device.
Some of the external devices require
special drivers (see the operating system
and external device documentation).
Connecting devices to the notebook
1 Turn off your notebook and all external
devices.
2 Unplug your notebook and all devices from
the mains sockets.
3 Connect the cables for your external devices
following the instructions.
4 Plug all power cables into the mains
sockets.
Disconnecting devices from the notebook
1 Turn off your notebook and all external
devices.
2 Unplug your notebook and all devices from
the mains sockets.
3 Disconnect the cables for your external
devices following the instructions.
23
Connecting External Devices
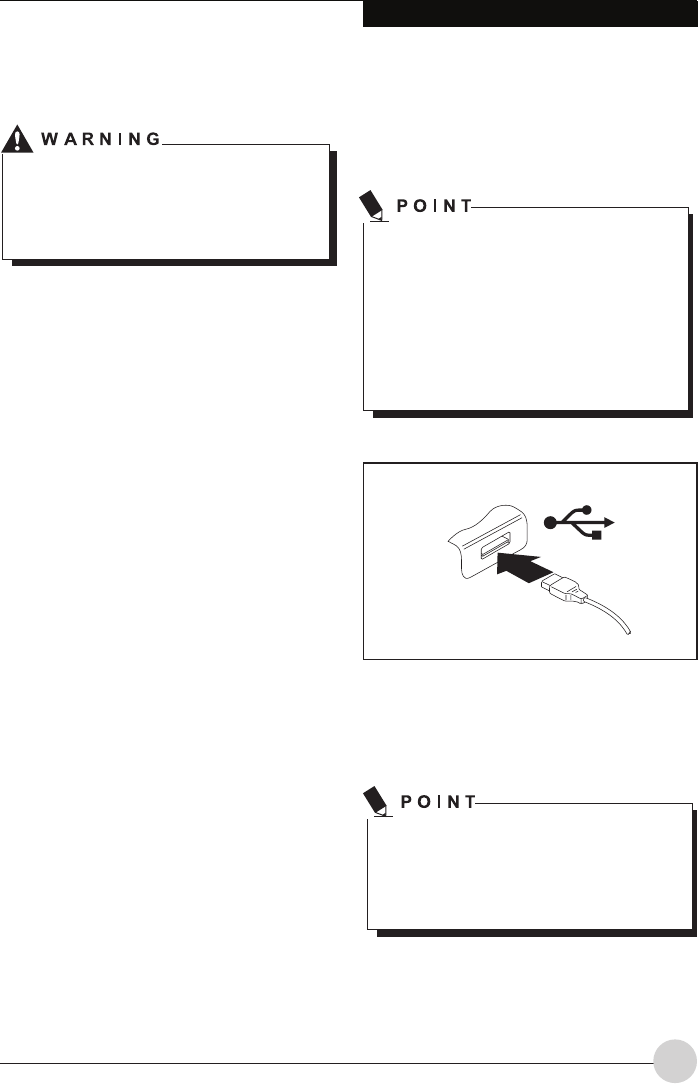
Connecting USB devices
On the USB ports you can connect external
devices that also have a USB port (e.g. a printer,
a scanner or a modem).
USB devices are hot-pluggable. This
means you can connect and disconnect
devices while your operating system is
running. USB 1.x has a maximum data
transfer rate of 12 Mbit/s. USB 2.x has a
data transfer rate of up to 480 Mbit/s.
Additional information can be found in the
documentation for the USB devices.
• Connect the data cable to the external
device.
• Connect the data cable to a USB port of the
notebook.
Device drivers
USB devices will be automatically
recognised and installed by your operating
system.
Setting the refresh rate for your
external monitor
If the refresh rate set is too high, the
monitor may be damaged. Please see the
documentation included with your monitor
for the maximum possible refresh rate.
By setting the optimum refresh rate you will
avoid screen flicker.
• Set the appropriate refresh rate for the type
of monitor connected.
• Select Startsymbol – (Settings) – Control
Panel – Appearance and Personalization –
Personalization: Adjust screen resolution.
or
•
Right-click on the desktop. Under
Personalization – Display Settings, choose
screentype 1 or 2.
•
Select Advanced Settings – Monitor.
•
Select Screen Refresh Rate to choose the
optimum refresh rate for the connected
monitor type.
•
Click Apply and OK.
24
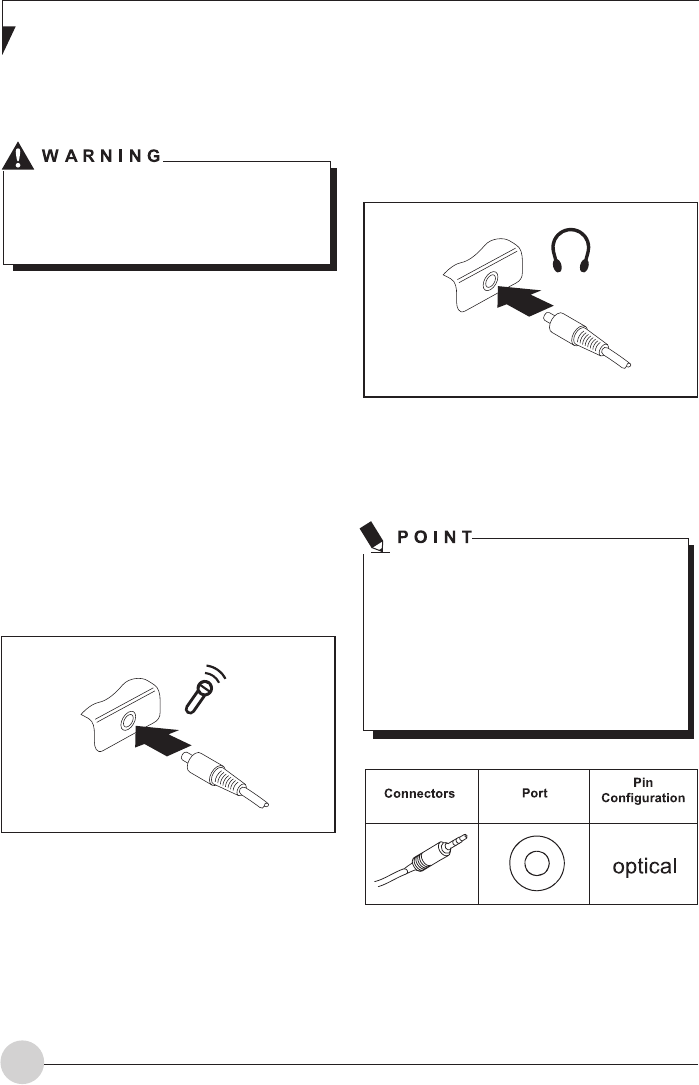
Headphone port
You can use the headphone port to connect
headphones, external loudspeakers or an
audio device with a digital optical input to your
notebook.
• Connect the data cable to the external
device.
• Connect the data cable to the headphone
port of the notebook.
If you connect headphones or external
loudspeakers, the built-in loudspeakers
are disabled. If you purchase a cable
from a retailer, please note the following
information: The headphone port on your
notebook is a "3.5 mm jack socket". If you
want to connect headphones or a speaker
you will need a "3.5 mm jack plug".
Adjusting the volume
• To set the desired volume, see "Adjusting the
volume", Page 17.
How to remove USB devices
correctly
Always correctly remove the device
according to the rules described below, to
ensure that none of your data is lost.
• Left-click on the taskbar symbol.
• Select the device which you want to shut
down and remove.
• Press the Enter key.
•Wait for the dialogue box which tells you that
it is now safe to remove the device.
Connecting external audio devices
Microphone port / Line In
The microphone port/Line In allows you to
connect an external microphone, a MiniDisc
player, MP3 player, CD player or a tape deck to
your notebook.
• Connect the data cable to the external
device.
• Connect the data cable to the microphone
port/Line In of the notebook.
25
Troubleshooting and tips
Problem Possible Cause Possible Solution
The notebook’s date
or time is incorrect
Time and date are
incorrect.
With the BIOS-Setup-Utility, you can set the
date and time in the main menu.
When certain
characters are
entered on the
keyboard, only
numerals are written
The virtual numeric
keypad of your device
is activated, see
“Virtual
numeric keypad”, Page 9
Press the key combination + .
A beep sounds at
a rate of one per
second
The battery is almost flat. Charge the battery.
The notebook’s
LCD screen
remains blank
Monitor is switched off. Press a key or touch the touchpad.
External monitor or
television set connected. Press the key combination + F11 (switch
screen output).
The LCD screen is
difficult to read
Reflected glare. Turn the notebook or alter the tilt of the LCD
screen.
The external
monitor remains
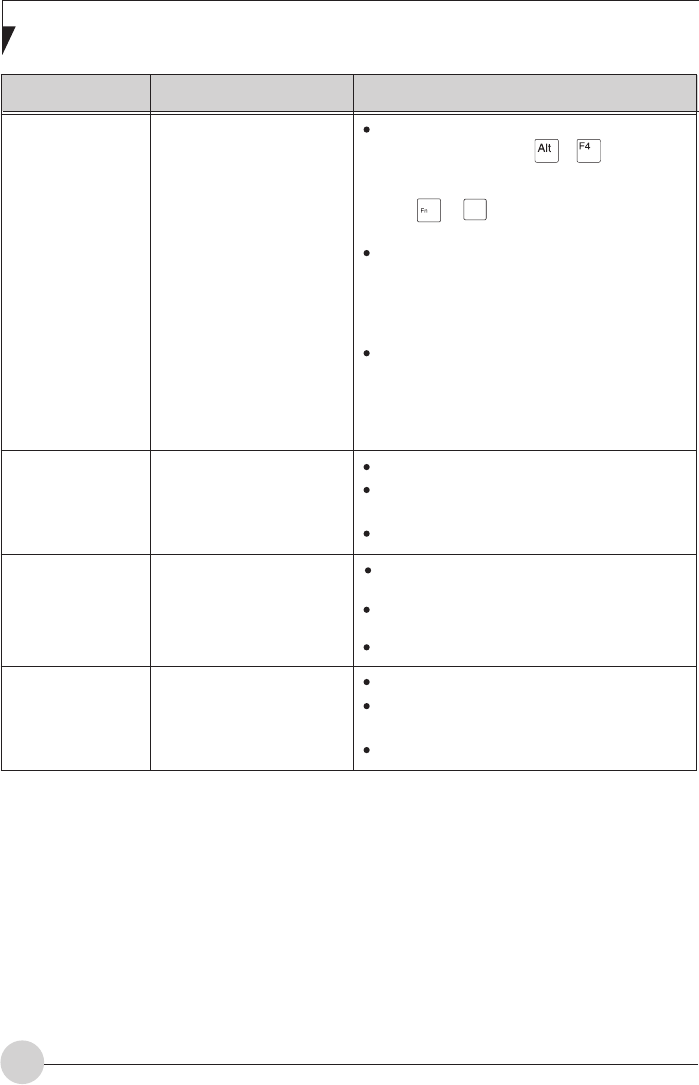
blank
Monitor is switched off. Switch the external monitor on.
Power saving has been
activated (monitor is blank).
Press any key to continue.
Brightness is set to dark. Adjust the brightness of the monitor.
Screen output is set to the
notebook’s LCD screen. Press the key combination + F11 (switch
screen output).
The external monitor’s
power cable or data cable
is not connected properly.
Switch off the external monitor and the
notebook.
Check whether the power cable is plugged
properly into the external monitor and into
the power socket.
Check whether the data cable is properly
connected to the notebook and the external
monitor (if it is plugged in with a connector).
Switch on the external monitor and the
notebook.
Troubleshooting and tips
If the date and time are repeatedly incorrect when you switch on the notebook, the built-in
battery that supplies the internal clock has failed. Please contact our Authorized Service Centre.
26
Problem Possible Cause Possible Solution
The external
monitor is blank
or the image is
unstable
The wrong external
monitor has been selected
or the wrong screen
resolution has been set for
the application program.
Terminate the application program in
Windows by pressing + . If the fault
persists after closing the program, switch
over to the notebook’s internal LCD screen
with + F11 . Change the following
setting:
Set the screen resolution: Select the
required resolution with Startsymbol –
(Settings) – Control Panel – Appearance and
Personalization – Personalization: Adjust the
screen resolution as required.
Select monitor: Right-click on the desktop.
Under Personalization – Display Settings
Choose monitor 1 or 2 and under Advanced
Settings – Monitor Choose the correct
monitor.
The notebook
is not installed
correctly
The battery is not installed
correctly.
Switch the notebook off.
Check whether the battery is installed
correctly in its compartment.
Switch the notebook on.
The battery is dead. Charge the battery.
or
Insert a charged battery.
or
Connect the mains adapter to the notebook.
The power adapter is not
connected correctly.
Switch the notebook off.
Check whether the mains adapter is
connected correctly to the notebook.
Switch the notebook on.
27
Troubleshooting and tips
Problem Possible Cause Possible Solution
The notebook
stops working
Notebook is in energy
saving mode.
Leave energy saving mode.
An application programme
has caused the
malfunction.
Close the application program or restart the
notebook (by restarting the operating system
or switching the device off and back on again).
The battery is dead. Charge the battery.
or
Insert a charged battery.
or
Connect the mains adapter to the notebook.
The printer does
not print
The printer is not switched
on.
Make sure that the printer is switched on and
is online (see the manuals supplied with the
printer).
The printer is not
connected correctly.
Check that the cable connecting the notebook
and the printer is connected properly.
The printer driver is faulty
or not correctly installed,
or it is the wrong printer
driver.
Check that the cable connecting the
notebook and the printer is connected
properly.
Check whether the correct printer driver is
loaded (see printer documentation).
The radio
connection to a
network does not
work
The wireless component
is disabled.
Switch the radio components on (
see
“Wireless LAN - switching on and off”, Page
17
).
The wireless component
is enabled. Despite this,
the wireless connection to
a network does not work.
Check whether the radio connection i s
switched on via the software.
Further information on using the wireless
component can be found in the help files
(see
“Information sources”, Page 17
).