Fujitsu Client Computing WL0026 62205ANHMW WLAN IN PORTABLE LIFEBOOK T SERIES User Manual Claw T731 UG
Fujitsu Limited 62205ANHMW WLAN IN PORTABLE LIFEBOOK T SERIES Claw T731 UG
Contents
- 1. User Manual 1
- 2. User Manual 2
- 3. User Manual 3
User Manual 1


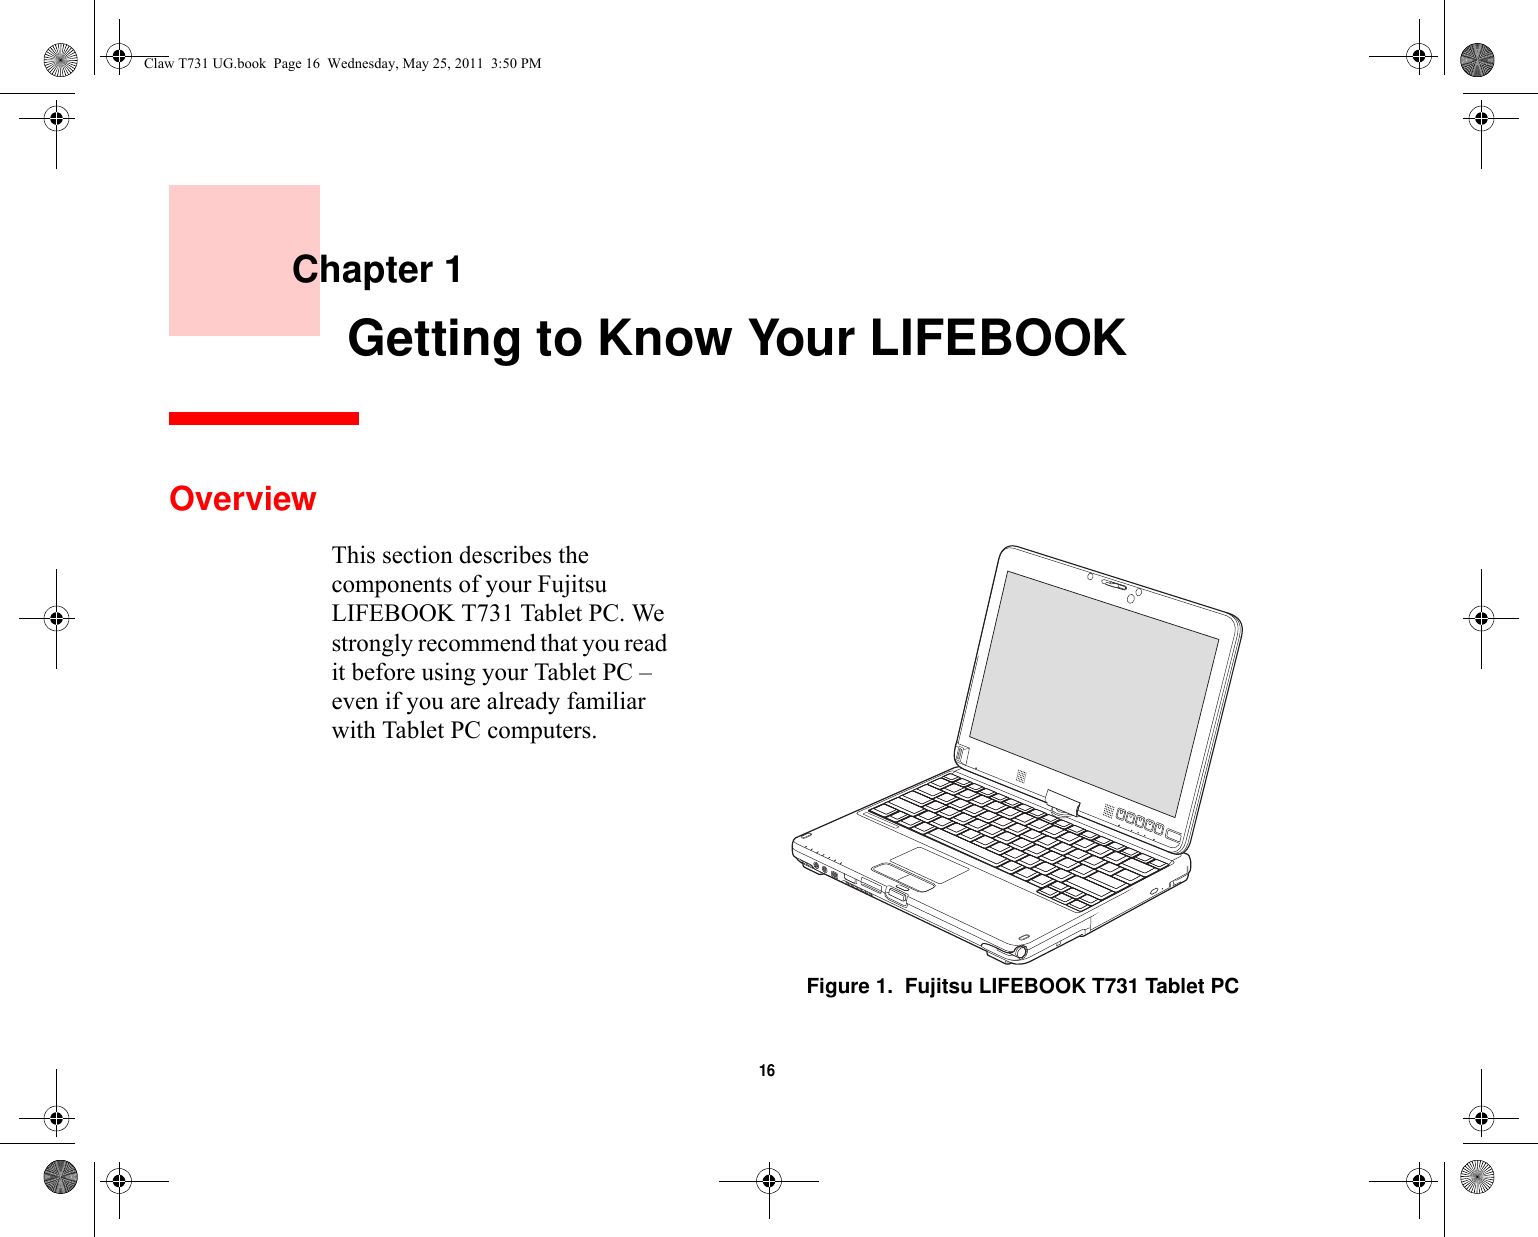
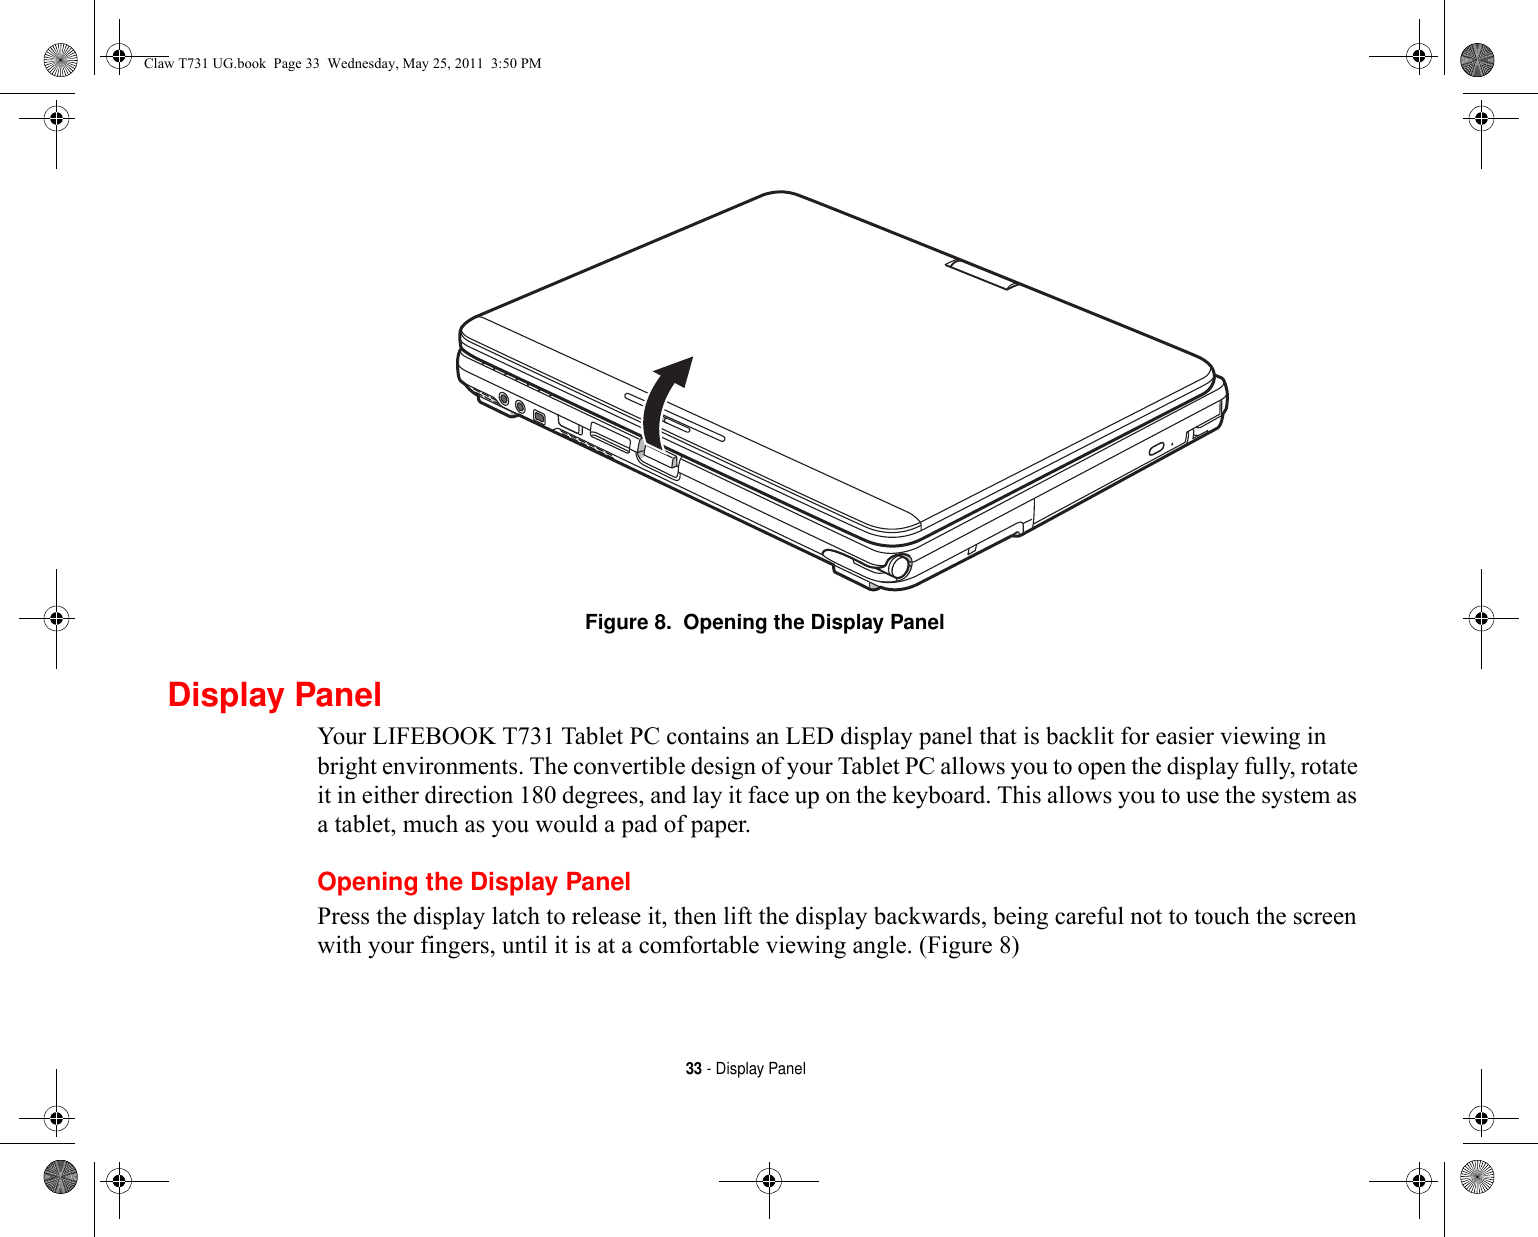
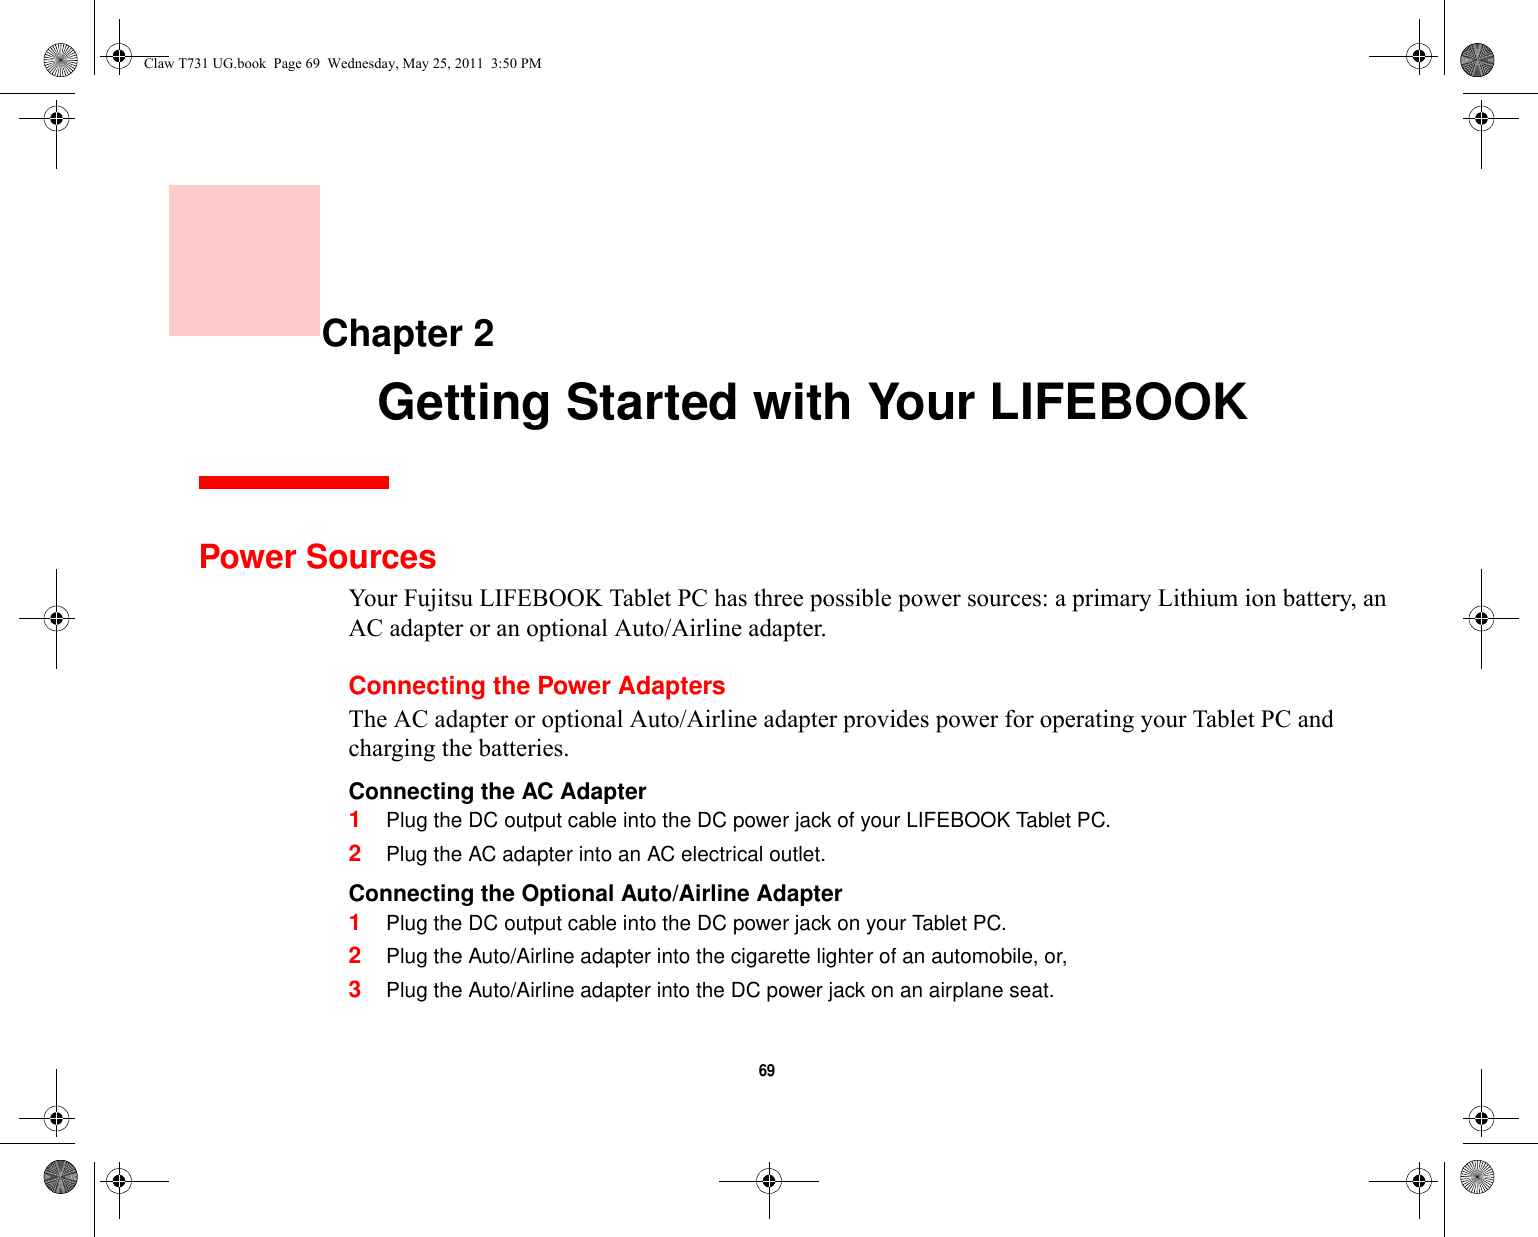
![13 PrefaceAbout This GuideThe LIFEBOOK T731 Tablet PC from Fujitsu America is a powerful convertible computer. It can be used either as a standard notebook using keyboard input, or in tablet configuration using pen input. It is powered by the new 2nd Generation Intel® Core™ Processor, has a built-in color display with either an active digitizer or optional dual digitizer, and brings the computing power of desktop personal computers to a portable and versatile environment.This manual explains how to operate your LIFEBOOK T731 Tablet PC’s hardware and pre-installed system software. Conventions Used in the GuideKeyboard and on-screen keys appear in brackets. Example: [Fn], [F1], [ESC], [ENTER] and [CTRL].Pages with additional information about a specific topic are cross-referenced within the text.For example: (“See Installation Procedure on page 43”.) Note that all cross-references are linked to the referenced items, so by clicking the link, you will automatically go to the referenced item or page.On-screen menu items appear in bold. Example: “Click Fujitsu Menu, and select your choice”.Claw T731 UG.book Page 13 Wednesday, May 25, 2011 3:50 PM](https://usermanual.wiki/Fujitsu-Client-Computing/WL0026.User-Manual-1/User-Guide-1477639-Page-14.png)


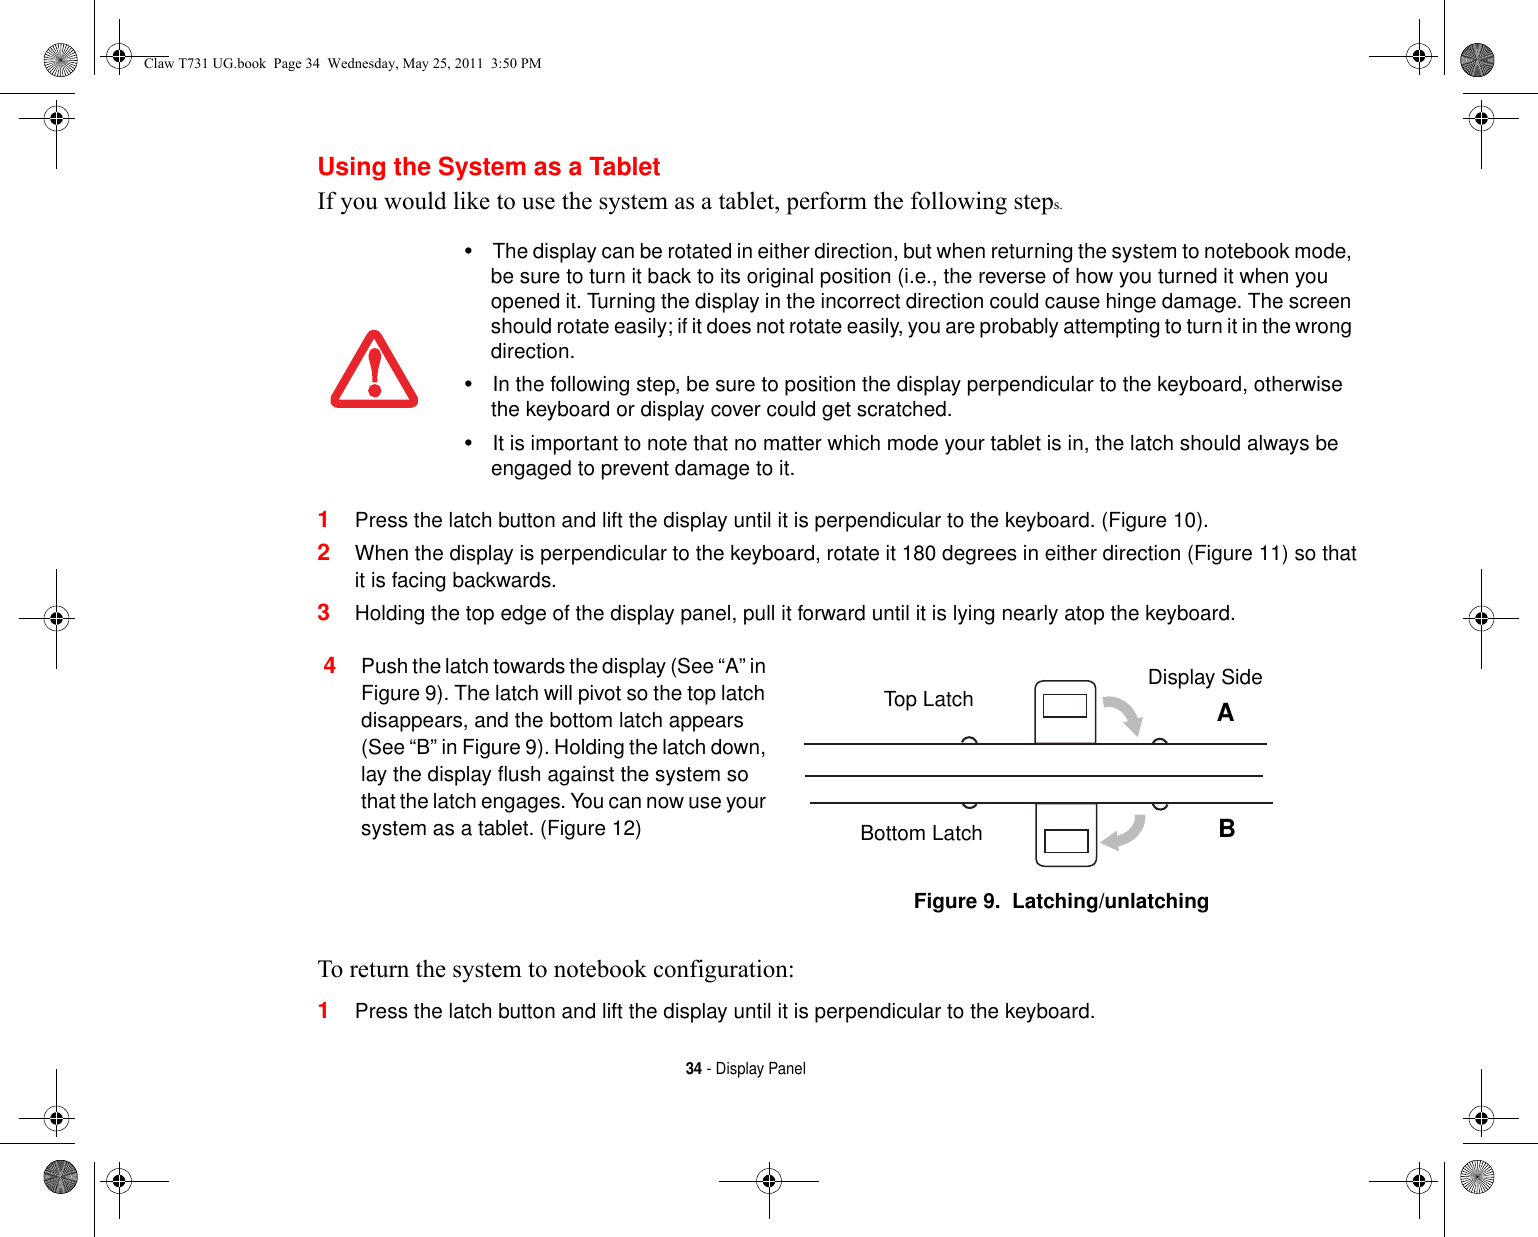
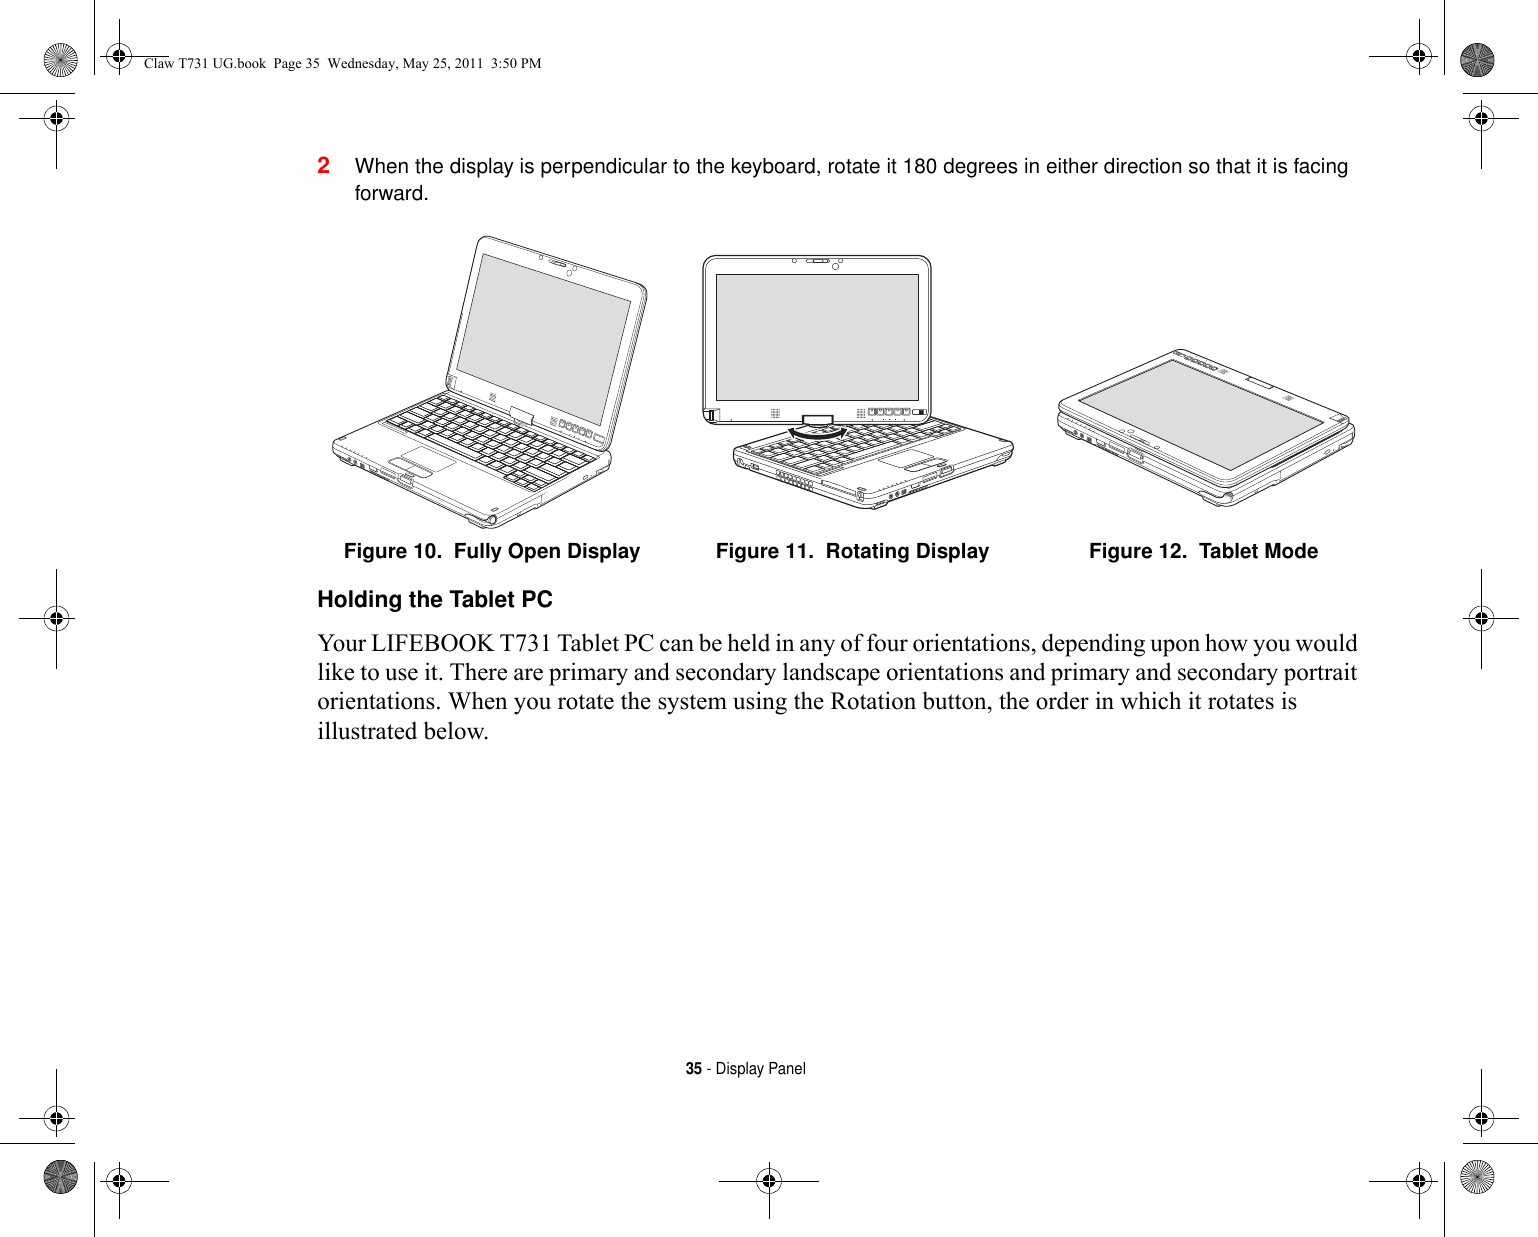
![36 - Display Panel.Figure 13. Orientations for Tablet PC in Tablet ModeAdjusting Display Panel BrightnessOnce you have turned on your Tablet PC, you may want to adjust the brightness level of the screen to a more comfortable viewing level. There are three ways to adjust the brightness: keyboard, power management utility, and Fujitsu Menu. Using Keyboard to Adjust Brightness Adjusting the brightness using the keyboard changes the system setting (i.e., the settings you make via the function keys automatically changes the brightness settings in the system’s Pen and Tablet Settings). •[Fn+F6]: Pressing repeatedly will lower the brightness of your display.•[Fn+F7]: Pressing repeatedly will increase the brightness of the display.Note that changing the brightness with the [Fn] key is temporary. When you resume or restart, you will need to reset them if you used this method.Primary Landscape OrientationPrimary Portrait Orientation Secondary Landscape Orientation Secondary Portrait OrientationClaw T731 UG.book Page 36 Wednesday, May 25, 2011 3:50 PM](https://usermanual.wiki/Fujitsu-Client-Computing/WL0026.User-Manual-1/User-Guide-1477639-Page-37.png)
![38 - Display Panel4For more information about the light sensor, click on Light Sensor icon in the Sensor column to the right of the light sensor icon to open the Sensor Properties window.5From the Sensor Properties window, you can change the sensor’s description, uninstall the sensor, or enable or disable selected users.•To change the sensor’s description, click the [Change description] button, enter the new description, and click the [OK] button.•To limit who can access the sensors, click Change who can access sensors, then check or uncheck the box adjacent to the individual you would like to grant or prohibit access.•To uninstall the sensor, click Uninstall this sensor.Claw T731 UG.book Page 38 Wednesday, May 25, 2011 3:50 PM](https://usermanual.wiki/Fujitsu-Client-Computing/WL0026.User-Manual-1/User-Guide-1477639-Page-39.png)
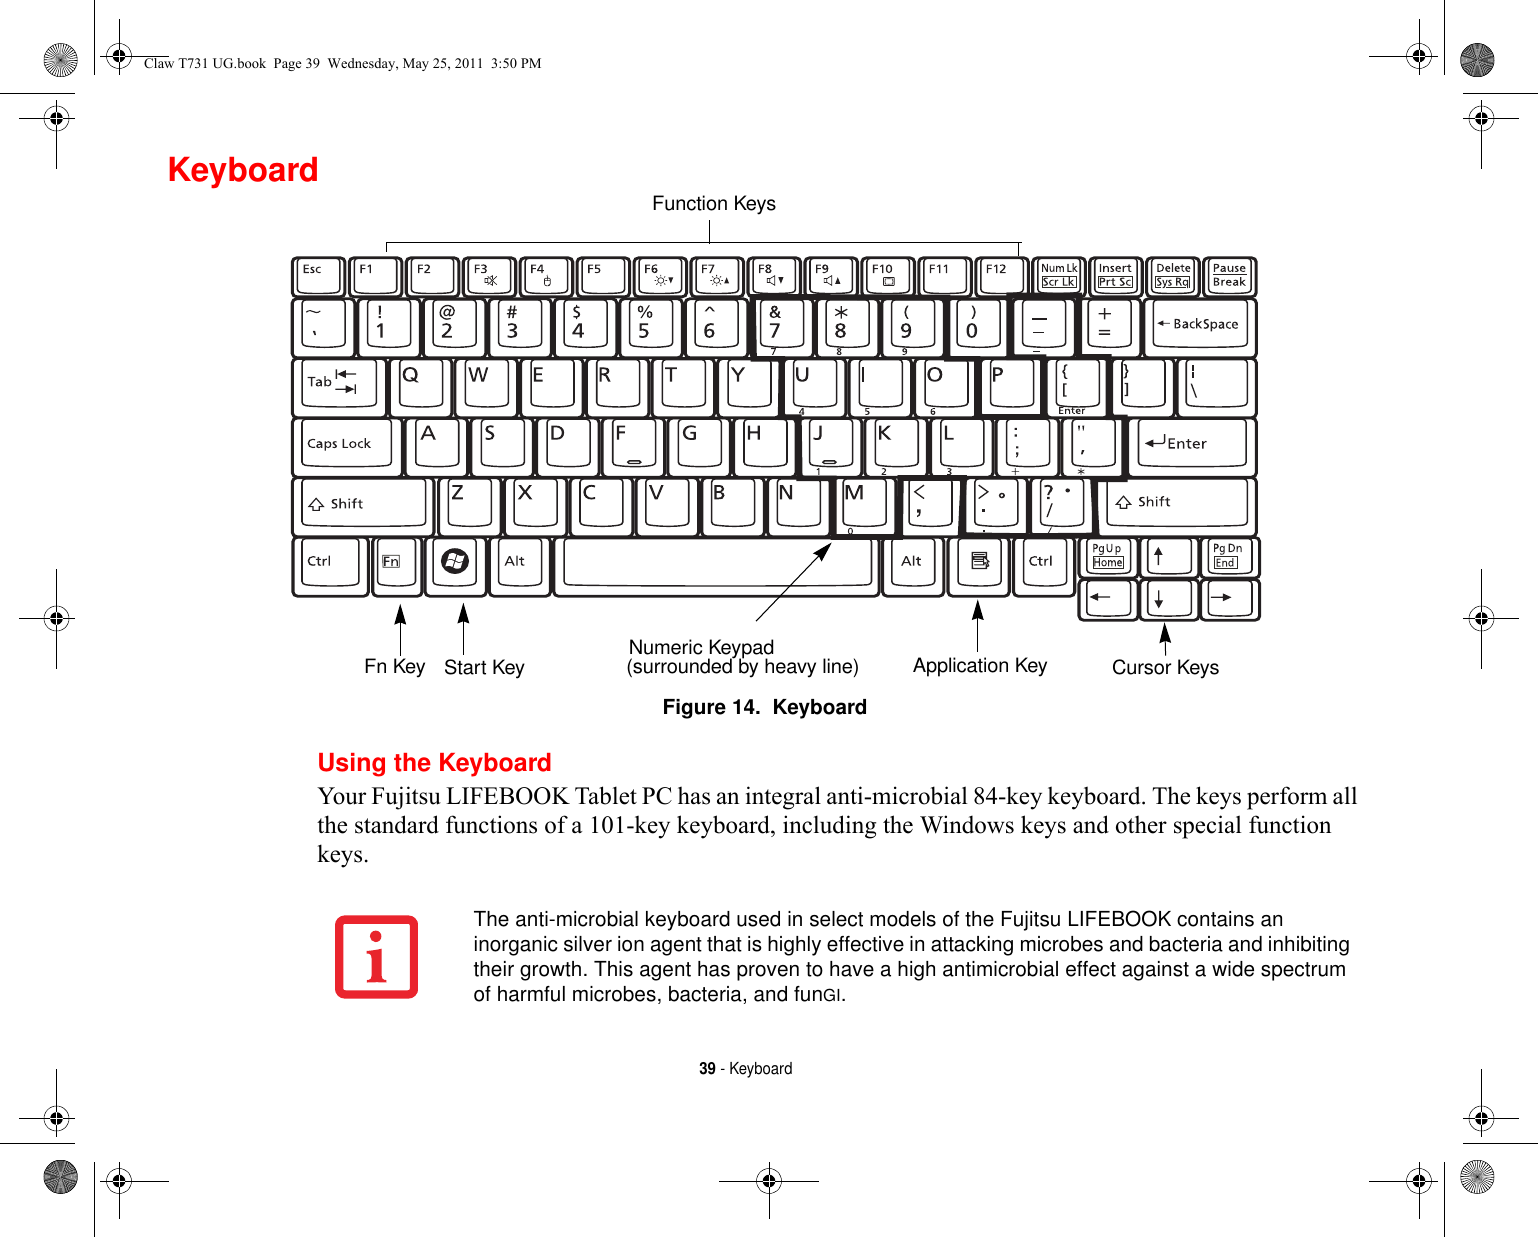
![40 - KeyboardThis section describes the following keys (Figure 14):•Numeric keypad: Your Tablet PC allows certain keys to serve dual purposes, both as standard characters and as numeric and mathematical keys. The ability to toggle between the standard character and numerical keys is controlled through the [NumLk] key.•Cursor keys: Your keyboard contains four arrow keys for moving the cursor or insertion point to the right, left, up, or down within windows, applications and documents. •Function keys: The keys labeled [F1] through [F12], are used in conjunction with the [Fn] key to produce special actions that vary depending on what program is running. •Windows keys: These keys work with your Windows operating system and function the same as the onscreen Start menu button, or the right button on your pointing device.Numeric Keypad Certain keys on the keyboard perform dual functions as both standard character keys and numeric keypad keys. NumLk can be activated by pressing the [NumLk] keys. Turning off the NumLk feature is done the same way. Once this feature is activated you can enter numerals 0 through 9, perform addition ( + ), subtraction ( - ), multiplication ( * ), or division ( / ), and enter decimal points ( . ) using the keys designated as ten-key function keys. The keys in the numeric keypad are marked on the front edge of the key to indicate their secondary functions. Windows Keys Your LIFEBOOK Tablet PC has two Windows keys, consisting of a Start key and an Application key. The Start key displays the Start menu. This button functions the same as your onscreen Start menu button. The Application key functions the same as your right mouse button and displays shortcut menus for the selected item. (Please refer to your Windows Help and Support documentation in the Start menu for additional information regarding the Windows keys.) Cursor Keys The cursor keys are the four arrow keys on the keyboard which allow you to move the cursor up, down, left and right in applications. In programs such as Windows Explorer, it moves the “focus” (selects the next item up, down, left, or right). Claw T731 UG.book Page 40 Wednesday, May 25, 2011 3:50 PM](https://usermanual.wiki/Fujitsu-Client-Computing/WL0026.User-Manual-1/User-Guide-1477639-Page-41.png)
![41 - KeyboardFunction Keys Your LIFEBOOK Tablet PC has 12 function keys, F1 through F12. Functions assigned to these keys differ for each application. You should refer to your software documentation to find out how these keys are used. •The [Fn] key provides extended functions for the Tablet PC and is always used in conjunction with another key. •[Fn+F3]: Pressing [F3] while holding [Fn] will toggle the Audio Mute on and off.•[Fn+F4]: Pressing [F4] while holding [Fn] will toggle the Quick Point feature on and off. Note that the [Fn+F4] combination only works if Manual Setting is selected in the BIOS. (See “BIOS Setup Utility” on page 73)•[Fn+F6]: Pressing [F6] repeatedly while holding [Fn] will lower the brightness of your display.•[Fn+F7]: Pressing [F7] repeatedly while holding [Fn] will increase the brightness of the display.•[Fn+F8]: Pressing [F8] repeatedly while holding [Fn] will decrease the volume of your Tablet PC.•[Fn+F9]: Pressing [F9] repeatedly while holding [Fn] will increase the volume of your Tablet PC.•[Fn+F10]: Pressing [F10] while holding [Fn] allows you to change your selection of where to send your display video. The order is determined by which type of external video device(s) is connected. Each time you press the key combination, you will step to the next choice.•If you only have an external CRT connected, the order is: internal display -> external CRT -> simultaneous display -> internal display.•If you only have an HDMI device connected, the order is: internal display -> HDMI display -> simultaneous display -> internal display.•If you have external CRT and HDMI devices connected, the order is: internal display -> external CRT -> simultaneous internal and external CRT -> HDMI display - simultaneous internal and HDMI display -> internal display.•If you have an external CRT and DVI devices connected to the port replicator, the order is: internal display -> external CRT -> simultaneous internal and external CRT -> DVI display -> simultaneous internal and DVI display. -> internal display.Claw T731 UG.book Page 41 Wednesday, May 25, 2011 3:50 PM](https://usermanual.wiki/Fujitsu-Client-Computing/WL0026.User-Manual-1/User-Guide-1477639-Page-42.png)
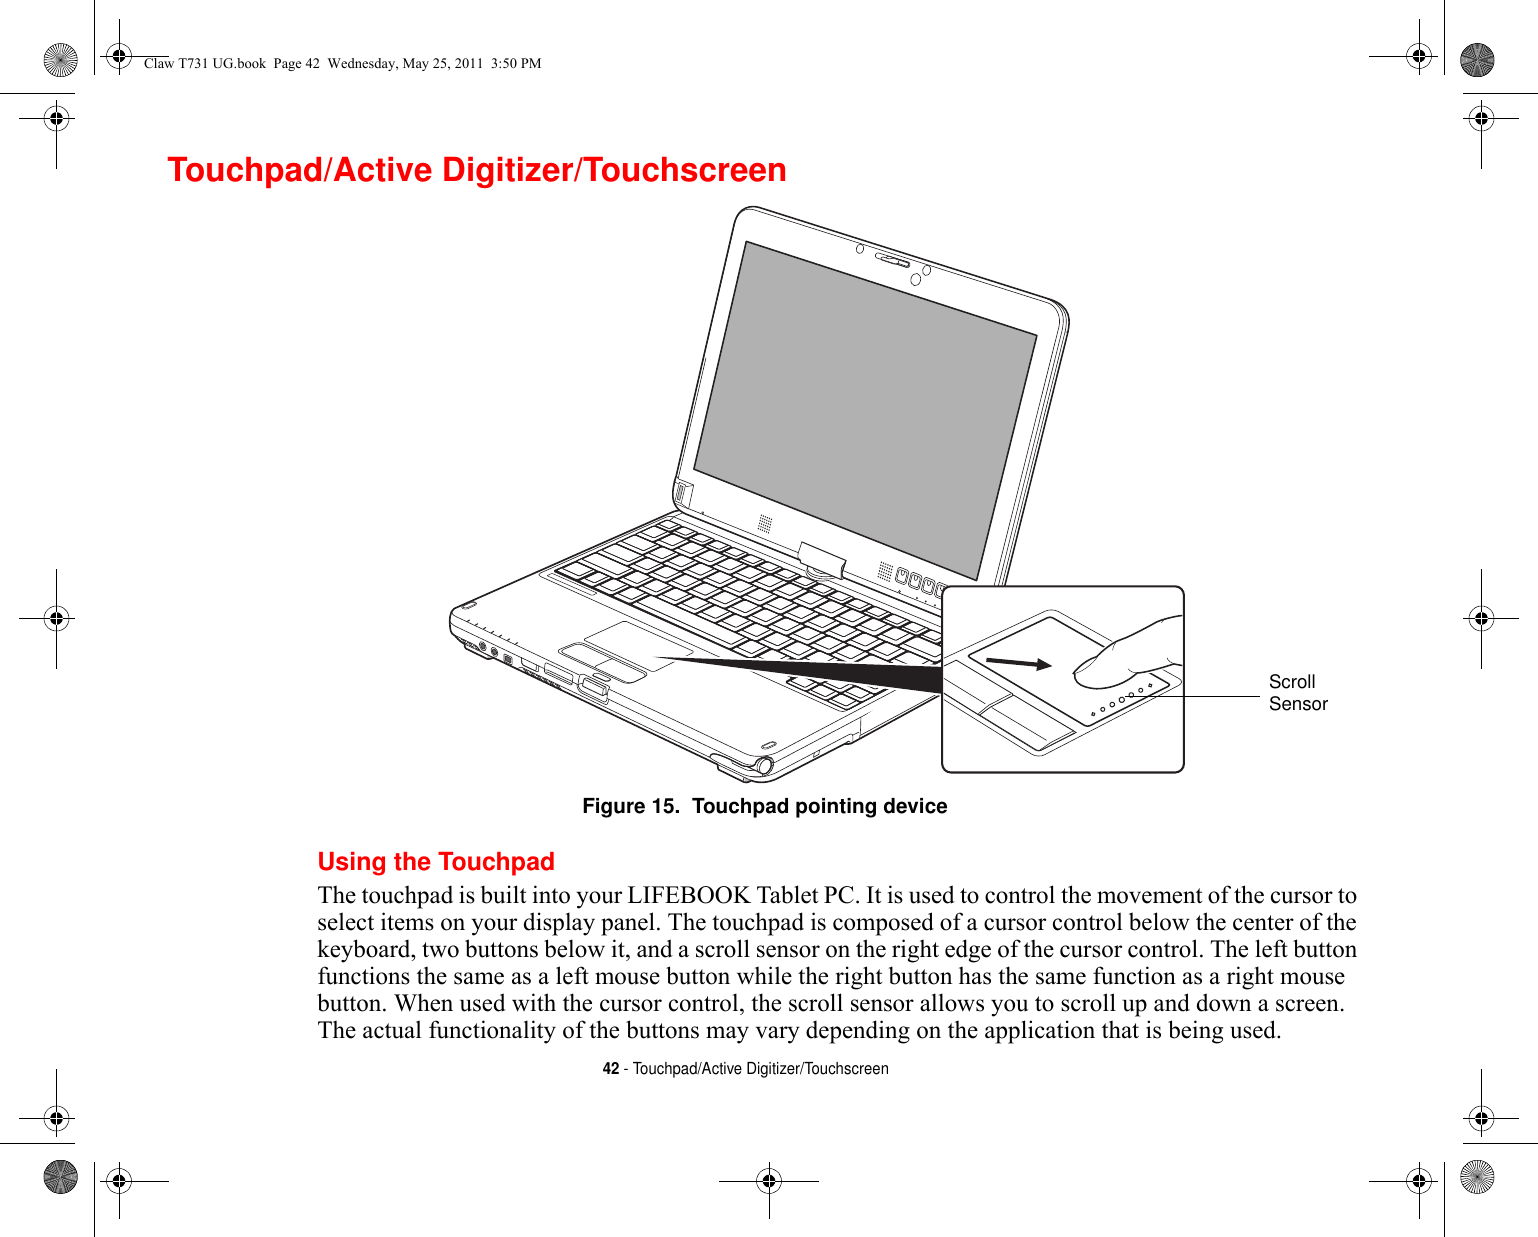
![48 - Touchpad/Active Digitizer/TouchscreenClicking on Active Digitizer Display To left-click, touch the object you wish to select and then lift the stylus tip immediately. Figure 25. Clicking on the Active Digitizer DisplayFigure 26. Right-clicking Active DigitizerRight-Clicking on Active Digitizer Right-click can be accomplished by holding the front of the toggle button down while tapping on the screen. To change the settings for the right-click feature, go to Start -> Control Panel -> Pen and Touch. In the Pen Options tab, select “Press and Hold” then click the [Settings] button.Claw T731 UG.book Page 48 Wednesday, May 25, 2011 3:50 PM](https://usermanual.wiki/Fujitsu-Client-Computing/WL0026.User-Manual-1/User-Guide-1477639-Page-49.png)
![50 - Touchpad/Active Digitizer/TouchscreenCalibrating the Active Digitizer Display In order to ensure accurate tracking between the stylus and cursor, you must run the Calibration Utility before you use the system for the first time, or after you change the display resolution.To run the calibration utility in Windows 7:1Go to Start -> Control Panel. 2Double-click the Tablet PC Settings icon and select the Display tab3Click the [Calibrate] button.4Adjust the display of your Tablet PC to a comfortable angle and find the (+) symbol in the upper-left corner of the display.5Using the stylus, firmly touch the screen directly on the (+) symbol. Lift the stylus from the screen and the target will move to a different location on the screen.6Repeat step 5 until you have selected all of the (+) symbols.7Once you have selected all the symbols, press the [OK] button. 8Touch the stylus to various points on the screen to verify that the screen is correctly calibrated. If you are not satisfied with the screen’s calibration, press the [Calibrate]) button to begin again.DO NOT USE EXCESSIVE FORCE WHEN TAPPING ON THE SCREEN DURING CALIBRATION. USE OF EXCESSIVE FORCE COULD RESULT IN DAMAGE TO THE LED AND/OR TOUCH PANEL.Claw T731 UG.book Page 50 Wednesday, May 25, 2011 3:50 PM](https://usermanual.wiki/Fujitsu-Client-Computing/WL0026.User-Manual-1/User-Guide-1477639-Page-51.png)
![53 - Volume ControlVolume ControlYour Fujitsu LIFEBOOK Tablet PC has multiple volume controls which interact with each other. Controlling the VolumeThe volume can be controlled in several different ways:•Volume can be changed or muted from within the Volume Control in the system tray.•Volume can be controlled with the F8 and F9 functions keys. Pressing [F8] repeatedly while holding [Fn] will decrease the volume of your Tablet PC. Pressing [F9] repeatedly while holding [Fn] will increase the volume of your Tablet PC.•Volume can be muted by pressing the [F3] key while holding down the [Fn] key. To restore audio, repeat the [Fn+F3] procedure.•Volume can be controlled by many volume controls that are set within individual applications.•Certain external audio devices you might connect to your system may have hardware volume controls.Each source discussed above puts an upper limit on the volume level that must then be followed by the other sources. We recommend that you experiment with the various volume controls to discover the optimal sound level.ANY SOFTWARE THAT CONTAINS AUDIO FILES WILL ALSO CONTAIN A VOLUME CONTROL OF ITS OWN. IF YOU INSTALL AN EXTERNAL AUDIO DEVICE THAT HAS AN INDEPENDENT VOLUME CONTROL, THE HARDWARE VOLUME CONTROL AND THE SOFTWARE VOLUME CONTROL WILL INTERACT WITH EACH OTHER. IT SHOULD BE NOTED THAT IF YOU SET YOUR SOFTWARE VOLUME TO OFF, YOU WILL OVERRIDE THE EXTERNAL VOLUME CONTROL SETTING. Claw T731 UG.book Page 53 Wednesday, May 25, 2011 3:50 PM](https://usermanual.wiki/Fujitsu-Client-Computing/WL0026.User-Manual-1/User-Guide-1477639-Page-54.png)
![58 - LIFEBOOK Security/Tablet PC ButtonsAll five buttons are used when implementing security functions. Four of the buttons are used to enter the password, and the fifth is used as an Enter button. See Table 1 for information about each of the buttons.Table 1. Security Panel Button FunctionsPre-logon button functionsAll five buttons can be used before logging on to Windows (i.e., when the Windows logon screen is displayed). Three of the buttons have secondary functions. See Table 2 for information about the pre-logon functions.<Tab>/<Shift><Tab> When you press the [Page Down] button when the system is pre-logon, each press of the button will act as if you had pressed the [Tab] key.When you press the [Fn] button then press and release the [Page Down] button, each press of the button will act as if you had pressed the [Shift]+[Tab] key combination.Button Icon System State Security Panel FunctionSystem is pre-boot or resuming from suspend Security Button 1Security Button 2Security Button 3Security Button 4Security Enter ButtonClaw T731 UG.book Page 58 Wednesday, May 25, 2011 3:50 PM](https://usermanual.wiki/Fujitsu-Client-Computing/WL0026.User-Manual-1/User-Guide-1477639-Page-59.png)
![59 - LIFEBOOK Security/Tablet PC Buttons<Enter>/<Escape> When you press the [Page Up] button when the system is pre-logon, each press of the button will act as if you had pressed the [Enter] key.Table 2. Pre-logon Tablet PC Button FunctionsWhen you press the [Fn] button then press and release the [Page Up] button, each press of the button will act as if you had pressed the [Escape] key.Screen Rotation The screen rotation feature would normally be used when the system is configured as a tablet. When you would like to use the tablet as an eBook, for example, you would use the portrait orientation; when accessing spreadsheets or using the system as a notebook, you would more typically use landscape orientation.When the system is changed to tablet configuration, the orientation automatically changes to portrait mode by default.Button Icon System State Tablet PC Function Secondary Functions(Fn + Button)System is pre-logon (Windows logon screen is displayed) <Tab> <Shift><Tab><Enter> <Escape>Rotate screen NoneUsed to invoke secondary function NoneCtl+Alt+Del Button NoneClaw T731 UG.book Page 59 Wednesday, May 25, 2011 3:50 PM](https://usermanual.wiki/Fujitsu-Client-Computing/WL0026.User-Manual-1/User-Guide-1477639-Page-60.png)
![60 - LIFEBOOK Security/Tablet PC ButtonsWhen you press the [Screen Rotation] button when the system is in pre-boot, the system screen orientation changes from portrait (vertical) to landscape (horizontal) or from landscape to portrait.Function / Fujitsu Menu Utility Button The [Function] button works in conjunction with the other application buttons to provide additional functionality for the buttons. Refer to specific details above.Post-logon button functionsAll five buttons can be used after logging on to Windows. Four of the buttons have secondary functions. See Table 3 for information about each of the post-logon functions.Page Down / Application A Button When you press the [Page Down] button when the system is running, each press of the button will scroll the screen down one frame. This allows you to navigate quickly through large documents.When you press the [Fn] button then press and release the [Page Down/Application A] button, you will automatically start whichever program is assigned to the button. The default application for this button is Calculator. See “Changing Tablet PC Button Functions” on page 62 to select a different application for this button.Page Up / Application B Button When you press the [Page Up] button when the system is running, each press of the button will scroll the screen up one frame. This allows you to navigate quickly through large documents.THE SCREEN ORIENTATION DEFAULT CAN BE CHANGED BY GOING TO THE CONTROL PANEL AND DOUBLE-CLICKING ON TABLET PC SETTINGS AND THEN CLICKING ON THE GO TO ORIENTATION ICON AND SELECTING THE DESIRED SETTINGS IN THE DISPLAY PROPERTIES. AFTER CHANGING THE SETTINGS, SAVE THEM IN FUJITSU TABLET CONTROLS.Claw T731 UG.book Page 60 Wednesday, May 25, 2011 3:50 PM](https://usermanual.wiki/Fujitsu-Client-Computing/WL0026.User-Manual-1/User-Guide-1477639-Page-61.png)
![61 - LIFEBOOK Security/Tablet PC ButtonsWhen you press the [Fn] button then press and release the [Page Up/Application B] button, you will automatically start whichever program is assigned to the button. The default application for this button is Microsoft Journal. See “Changing Tablet PC Button Functions” on page 62 to select a different application for this button.Table 3. Post-logon Tablet PC Button FunctionsScreen Rotation /Display Switching Button The screen rotation feature would normally be used only when the system is configured as a tablet. If you would like to use the tablet as an eBook, for example, you would use portrait orientation; when accessing spreadsheets or using the system as a notebook, you would more typically use landscape orientation.When the system is changed to tablet configuration, the orientation automatically changes to portrait mode by default. You can pause or resume the auto-rotate utility by going to Start > All Programs > Auto Rotation Utility and selecting the desired functionality.Button Icon System State Primary Tablet PC Function Secondary Functions(Fn + Button)System is post-logon (Windows desktop is displayed) Page Down User-defined Application A(Default = Calculator)Page Up User-Defined Application B(Default = MS Journal)Screen Rotation Display Switching:1. Internal Display only2. CRT only3. Dual DisplaySecondary Function Selection Fujitsu Menu UtilityCtl+Alt+Del Button NoneClaw T731 UG.book Page 61 Wednesday, May 25, 2011 3:50 PM](https://usermanual.wiki/Fujitsu-Client-Computing/WL0026.User-Manual-1/User-Guide-1477639-Page-62.png)
![62 - LIFEBOOK Security/Tablet PC ButtonsWhen you press the [Screen Rotation /Display Switching] button, the system screen orientation changes from portrait (vertical) to landscape (horizontal) or from landscape to portrait. Pressing the [Fn] button while pressing the [Screen Rotation] button will switch the display output in the following order: built-in display only, external display only, dual display.Function / Fujitsu Menu Utility Button The [Function] button works in conjunction with the other application buttons to provide additional functionality for the buttons. Refer to specific details above.Pressing the [Fn] button twice in succession causes the Fujitsu Menu Utility to appear on your screen, allowing you to modify certain system settings.Ctl+Alt+Del Button Pressing and holding the [Ctl-Alt-Del] button for up to 8 seconds launches the Logon screen or the Windows Task Manager.Changing Tablet PC Button FunctionsThe Application A and B buttons can be changed to launch a program or perform an action you select. By default, the Application A button launches the Calculator, and the Application B button launches MS Journal.To launch different applications or cause the Application A or B buttons to perform a specific action:1Click on the Tablet PC Settings icon in the Control Panel. THE SCREEN ORIENTATION DEFAULT CAN BE CHANGED BY GOING TO THE CONTROL PANEL AND DOUBLE-CLICKING ON TABLET PC SETTINGS AND THEN CLICKING ON THE GO TO ORIENTATION ICON AND SELECTING THE DESIRED SETTINGS IN THE DISPLAY TAB. AFTER CHANGING THE SETTINGS, SAVE THEM IN FUJITSU TABLET CONTROLS.Claw T731 UG.book Page 62 Wednesday, May 25, 2011 3:50 PM](https://usermanual.wiki/Fujitsu-Client-Computing/WL0026.User-Manual-1/User-Guide-1477639-Page-63.png)
![63 - LIFEBOOK Security/Tablet PC Buttons2Select the Buttons tab and select the button you would like to change from the list.3Click [Change] and open the drop down list in the Press: field.4Select the action you would like the button to perform. If you want to launch a program, click on Launch an Application then browse to the location of the program.5Click [OK], then click [OK] again. The buttons will now perform the actions you have assigned to them.Setting up LIFEBOOK Security PanelWhen you receive your Tablet PC, the security panel application is pre-installed without any passwords. The following sections provide detailed information on your security panel, how to set, change or remove passwords.Numbered Buttons Use these buttons to enter your password.Enter Button After entering the button strokes, push this button to enter the password into the Tablet PC. PasswordsThe user and supervisor password may be set on this Tablet PC. A supervisor password is typically the same for all tablets and notebooks in a work group, office, or company to allow for system management. Individual computers in a group environment should not use a common password. A password consists of one to five button strokes plus the enter button. A valid stroke consists of pushing one or up to four buttons simultaneously. The following are valid button strokes: •Pushing [4] by itself•Pushing [2] and [3] at the same time•Pushing [1], [2], and [4] at the same time•Pushing [1], [2], [3], and [4] at the same timeClaw T731 UG.book Page 63 Wednesday, May 25, 2011 3:50 PM](https://usermanual.wiki/Fujitsu-Client-Computing/WL0026.User-Manual-1/User-Guide-1477639-Page-64.png)
![64 - LIFEBOOK Security/Tablet PC ButtonsThe following are valid passwords. The numbers within braces ({ }) are button strokes using more than one button. •{[2]+[3]}, [1], [Enter]•[4], [enter]•{[1]+[3]}, {[2]+[3]+[4]}, [1], [4], [2], [Enter]Setting Passwords When shipped from the factory, no passwords are set. You have a choice of having no password or setting a supervisor and user password. You must set the supervisor password before the user password. Setting Supervisor Password You must have set a supervisor password before setting any user passwords. The supervisor password can bypass the user password.1Go to the Start menu.2Click on Run.3Type in: C:\Program Files\Fujitsu\Security Panel Application\Supervisor\ FJSECS.EXE, then press [Enter]4Follow the on-screen instructions to set the Supervisor password.Setting User Password 1Go to the Start menu.2Click on All Programs.3Click on Security Panel Application -> Security Panel Application.4Follow the on-screen instructions to set the user password.•THE PURPOSE OF SUPERVISOR PASSWORD IS TO BE ABLE TO BYPASS THE USER PASSWORD IN CASE THE USER PASSWORD IS FORGOTTEN. THE SUPERVISOR PASSWORD ALONE WILL NOT LOCK THE SYSTEM.•YOU MUST SET THE SUPERVISOR AND USER PASSWORDS FOR THE SECURITY PANEL TO WORK.Claw T731 UG.book Page 64 Wednesday, May 25, 2011 3:50 PM](https://usermanual.wiki/Fujitsu-Client-Computing/WL0026.User-Manual-1/User-Guide-1477639-Page-65.png)
![66 - LIFEBOOK Security/Tablet PC ButtonsPrecautionsOpening and Closing the Cover By default, closing the cover automatically places your system into Sleep mode. To change the default when the cover is closed:1Open the system Control Panel and select Power Options. 2Click Choose what closing the lid does in the left pane.3Select the desired action for When I close the lid, then click the [Save changes] or [Apply] button (depending upon your operating system).Low Battery Operations If your Tablet PC has a low battery, pushing the suspend/resume button only turns on the Security Indicator. Your Tablet PC does not unlock, the Security Indicator turns off after one minute. To resume normal operation, first attach a power supply to the Tablet PC. Then you may unlock the Tablet PC.Uninstalling/Re-installing the Security Panel ApplicationYou have two options when uninstalling the security panel application:•Remove passwords and uninstall the security panel application software. This will disable all security features.•Uninstall the security panel application with password still active. This will not allow any changes to the password. REMEMBER THE USER PASSWORD YOU SPECIFIED ON THE SECURITY PANEL APPLICATION. IF YOU FORGET THE PASSWORD YOU WILL NOT BE ABLE TO USE YOUR COMPUTER. THE SUPERVISOR PASSWORD CAN OVERRIDE THE USER PASSWORD.Claw T731 UG.book Page 66 Wednesday, May 25, 2011 3:50 PM](https://usermanual.wiki/Fujitsu-Client-Computing/WL0026.User-Manual-1/User-Guide-1477639-Page-67.png)

![73 - Starting Your LIFEBOOK Tablet PCThe boot sequence is executed when:•You turn on the power to your LIFEBOOK Tablet PC.•You restart your Tablet PC from the Windows Shut Down dialog box.•The software initiates a system restart. Example: When you install a new application.Hard Disk Drive PasswordsTo provide additional security for your data, you can assign passwords to your hard disk drive(s). This feature is managed in the system BIOS Setup Utility. See BIOS Setup Utility below for information about accessing the utility.BIOS Setup UtilityThe BIOS Setup Utility is a program that sets up the operating environment for your LIFEBOOK Tablet PC. Your BIOS is set at the factory for normal operating conditions, therefore there is no need to set or change the BIOS’ environment to operate your Tablet PC.The BIOS Setup Utility configures:•Device control feature parameters, such as changing I/O addresses and boot devices.•System Data Security feature parameters, such as passwords.Entering the BIOS Setup Utility To enter the setup utility, do the following:1Turn on or restart your LIFEBOOK Tablet PC.2To enter the BIOS Setup Utility, press the [F2] key once the Fujitsu logo appears on the screen. This will open the main menu of the BIOS Setup Utility with the current settings displayed.REMEMBER YOUR PASSWORDS. IF YOU SET AND FORGET YOUR USER AND MASTER HARD DISK PASSWORDS, FUJITSU WILL NOT BE ABLE TO RESET IT. YOU MAY LOSE DATA AND HAVE TO REPLACE YOUR SYSTEM BOARD OR HARD DISK DRIVE.Claw T731 UG.book Page 73 Wednesday, May 25, 2011 3:50 PM](https://usermanual.wiki/Fujitsu-Client-Computing/WL0026.User-Manual-1/User-Guide-1477639-Page-74.png)
![74 - Starting Your LIFEBOOK Tablet PC3Press the [RIGHT ARROW] or [LEFT ARROW] key to scroll through the other setup menus to review or alter the current settings.The Boot Menu can also be invoked by pressing the [F12] key when the Fujitsu logo appears on the screen.BIOS Guide A guide to your Tablet PC’s BIOS is available online. Please visit our service and support website at http://www.computers.us.fujitsu.com/support, then select User’s Guides under Online Support. Select your Product, Series, and Model, then click [Go]. Under the Manuals tab, select the BIOS Guide. Booting the SystemWe strongly recommend that you not attach any external devices until you have gone through the initial power on sequence.When you turn on your Tablet PC for the first time, it will display a Fujitsu logo on the screen. If you do nothing the system will load the operating system, and then the Windows Welcome will begin.Starting Windows the first timeIn order to ensure that you receive the most benefits from the Windows operating system, it should be registered the first time you use it. THE FIRST TIME YOU INITIALIZE YOUR WINDOWS SYSTEM, THE SCREEN WILL BE BLANK FOR APPROXIMATELY TWO MINUTES. THIS IS NORMAL. AFTER INITIALIZATION, A “SET UP WINDOWS” DIALOG BOX WILL APPEAR.IMPORTANT: DURING THE SETUP PROCEDURE, DO NOT DISCONNECT THE POWER SUPPLY, PRESS ANY BUTTONS, OR USE ANY PERIPHERAL DEVICES SUCH AS A MOUSE, KEYBOARD, OR REMOTE CONTROL.Claw T731 UG.book Page 74 Wednesday, May 25, 2011 3:50 PM](https://usermanual.wiki/Fujitsu-Client-Computing/WL0026.User-Manual-1/User-Guide-1477639-Page-75.png)
![76 - Starting Your LIFEBOOK Tablet PCRegistering Your LIFEBOOK Tablet PC with FujitsuYou can register your LIFEBOOK by going to our website at: http://solutions.us.fujitsu.com/. You will need to be set up with an Internet Service Provider (ISP) to register online. Installing ClickMe! The first time you boot up your system, you will see a “Primary Settings for the PC” window. This window explains the installations which will be performed by the Click Me! utility. If you click [Execute], ClickMe! will begin installing. If after clicking the button you receive a “User Account Control” window, you will be asked for your permission to continue. Click [Continue] to continue. If you cancel the operation, the ClickMe! icon will appear on your desktop for later installation. Fujitsu Driver Update Utility Your system has a tool called the Fujitsu Driver Update (FDU) utility. With FDU, you can choose to automatically or manually go to the Fujitsu site to check for new updates for your system. For more information about the FDU utility, refer to “Automatically Downloading Driver Updates” on page 128.BEFORE INSTALLING THE CLICKME! UTILITY, BE SURE THE WIRELESS LAN SWITCH IS TURNED ON.THERE MAY BE SOME THIRD-PARTY APPLICATIONS THAT DO NOT GET INSTALLED USING THE CLICKME! UTILITY. FOR MORE INFORMATION, REFER TO YOUR GETTING STARTED GUIDE.ClickMe!Claw T731 UG.book Page 76 Wednesday, May 25, 2011 3:50 PM](https://usermanual.wiki/Fujitsu-Client-Computing/WL0026.User-Manual-1/User-Guide-1477639-Page-77.png)
![78 - Power Management•Selecting “Sleep” after clicking [Start] then clicking the small arrow at the bottom right of the window.•Timing out from lack of activity.•Allowing the battery to reach the Dead Battery Warning condition.Your Tablet PC’s system memory typically stores the file on which you are working, open application information, and any other data required to support operations in progress. When you resume operation from Sleep mode, your Tablet PC will return to the point where it left off. You must use the Power/Suspend/Resume switch to resume operation, and there must be an adequate power source available, or your Tablet PC will not resume.■IF RUNNING YOUR TABLET PC ON BATTERY POWER, BE AWARE THAT THE BATTERY CONTINUES TO DISCHARGE WHILE YOUR TABLET PC IS IN SLEEP MODE, THOUGH NOT AS QUICKLY AS WHEN FULLY OPERATIONAL. ■DISABLING THE POWER/SUSPEND/RESUME SWITCH PREVENTS IT FROM BEING USED TO PUT THE TABLET PC INTO SLEEP OR HIBERNATION (SAVE-TO-DISK) MODE. THE BUTTON RESUME FUNCTION CANNOT BE DISABLED.■THE SLEEP OR HIBERNATION MODE SHOULD NOT BE USED WITH CERTAIN EXPRESSCARDS. CHECK YOUR EXPRESSCARD DOCUMENTATION FOR MORE INFORMATION. WHEN EXPRESSCARDS OR EXTERNAL DEVICES ARE IN USE, HIBERNATION MODE CANNOT RETURN TO THE EXACT STATE PRIOR TO SUSPENSION, BECAUSE ALL OF THE PERIPHERAL DEVICES WILL BE RE-INITIALIZED WHEN THE SYSTEM RESTARTS.■IF YOUR TABLET PC IS ACTIVELY ACCESSING INFORMATION WHEN YOU ENTER THE SLEEP OR HIBER-NATION MODE, CHANGES TO OPEN FILES ARE NOT LOST. THE FILES ARE LEFT OPEN AND MEMORY IS KEPT ACTIVE DURING SLEEP MODE OR THE MEMORY IS TRANSFERRED TO THE INTERNAL HARD DRIVE DURING HIBERNATION MODE.THE MAIN ADVANTAGE OF USING HIBERNATION IS THAT POWER IS NOT REQUIRED TO MAINTAIN YOUR DATA. THIS IS PARTICULARLY IMPORTANT IF YOU WILL BE LEAVING YOUR TABLET PC IN A SUSPENDED STATE FOR A PROLONGED PERIOD OF TIME. THE DRAWBACK OF USING HIBERNATION MODE IS THAT IT LENGTHENS THE POWER DOWN AND POWER UP SEQUENCES AND RESETS PERIPHERAL DEVICES.Claw T731 UG.book Page 78 Wednesday, May 25, 2011 3:50 PM](https://usermanual.wiki/Fujitsu-Client-Computing/WL0026.User-Manual-1/User-Guide-1477639-Page-79.png)
![79 - Power ManagementHibernation (Save-to-Disk) FeatureThe Hibernation feature saves the contents of your Tablet PC’s system memory to the hard drive as a part of the Suspend/Resume mode. You can enable or disable this feature. Enable or Disable the Hibernation Feature The default settings are not enabled. To enable or disable the Hibernation feature follow these steps:1From the Start menu, select Control Panel, then select the Power Options icon.2Select “Choose what the power button does” or “Choose what closing the lid does”, then make your selections (Do Nothing, Sleep, Hibernate, or Shut Down).Windows Power Management The Power Options icon located in the Windows Control Panel allows you to configure some of the power management settings. For example, you can use the Power Options to set the timeout values for turning off the display and hard disks whether you are running the Tablet PC on battery power or one of the adapters. Restarting the SystemIf your system is on and you need to restart it, be sure that you use the following procedure. 1Click the [Start] button, and then move the mouse over the small arrow at the bottom right of the right-hand pane.2Select Restart from the list.TURNING OFF YOUR LIFEBOOK TABLET PC WITHOUT EXITING WINDOWS OR TURNING ON YOUR TABLET PC WITHIN 10 SECONDS OF THE SYSTEM BEING SHUT OFF MAY CAUSE AN ERROR WHEN YOU START THE NEXT TIME. Claw T731 UG.book Page 79 Wednesday, May 25, 2011 3:50 PM](https://usermanual.wiki/Fujitsu-Client-Computing/WL0026.User-Manual-1/User-Guide-1477639-Page-80.png)
![80 - Power ManagementPowering OffBefore turning off the power, check that the hard drive/optical drive access indicator is off. If you turn off the power while accessing a disk there is a risk of data loss. To ensure that your Tablet PC shuts down without error, use the Windows shut down procedure.Using the correct procedure to shut down from Windows allows your Tablet PC to complete its operations and turn off power in the proper sequence to avoid errors. The proper sequence is:1Click the [Start] button, and then move the mouse over the small arrow at the bottom right of the right-hand pane.2Select Shut Down from the list.If you are going to store your Tablet PC for a month or more, see Care and Maintenance Section. ENERGY STAR® ComplianceYour Fujitsu system is an ENERGY STAR® qualified mobile PC. By choosing a computer with the latest energy-saving technology, you’re helping to preserve our environment for future generations.ENERGY STAR is a joint program of the U.S. Environmental Protection Agency, U.S. Department of Energy, Natural Resources Canada, and other governments around the world helping us save money while protecting the environment through energy efficient products and practices. With energy costs and global warming top-of-mind for consumers, Fujitsu is committed to offering solutions that help consumers conserve energy and improve the quality of our environment.BE SURE TO CLOSE ALL FILES, EXIT ALL APPLICATIONS, AND SHUT DOWN YOUR OPERATING SYSTEM PRIOR TO TURNING OFF THE POWER. IF FILES ARE OPEN WHEN YOU TURN THE POWER OFF, YOU WILL LOSE ANY CHANGES THAT HAVE NOT BEEN SAVED, AND MAY CAUSE DISK ERRORS.Claw T731 UG.book Page 80 Wednesday, May 25, 2011 3:50 PM](https://usermanual.wiki/Fujitsu-Client-Computing/WL0026.User-Manual-1/User-Guide-1477639-Page-81.png)

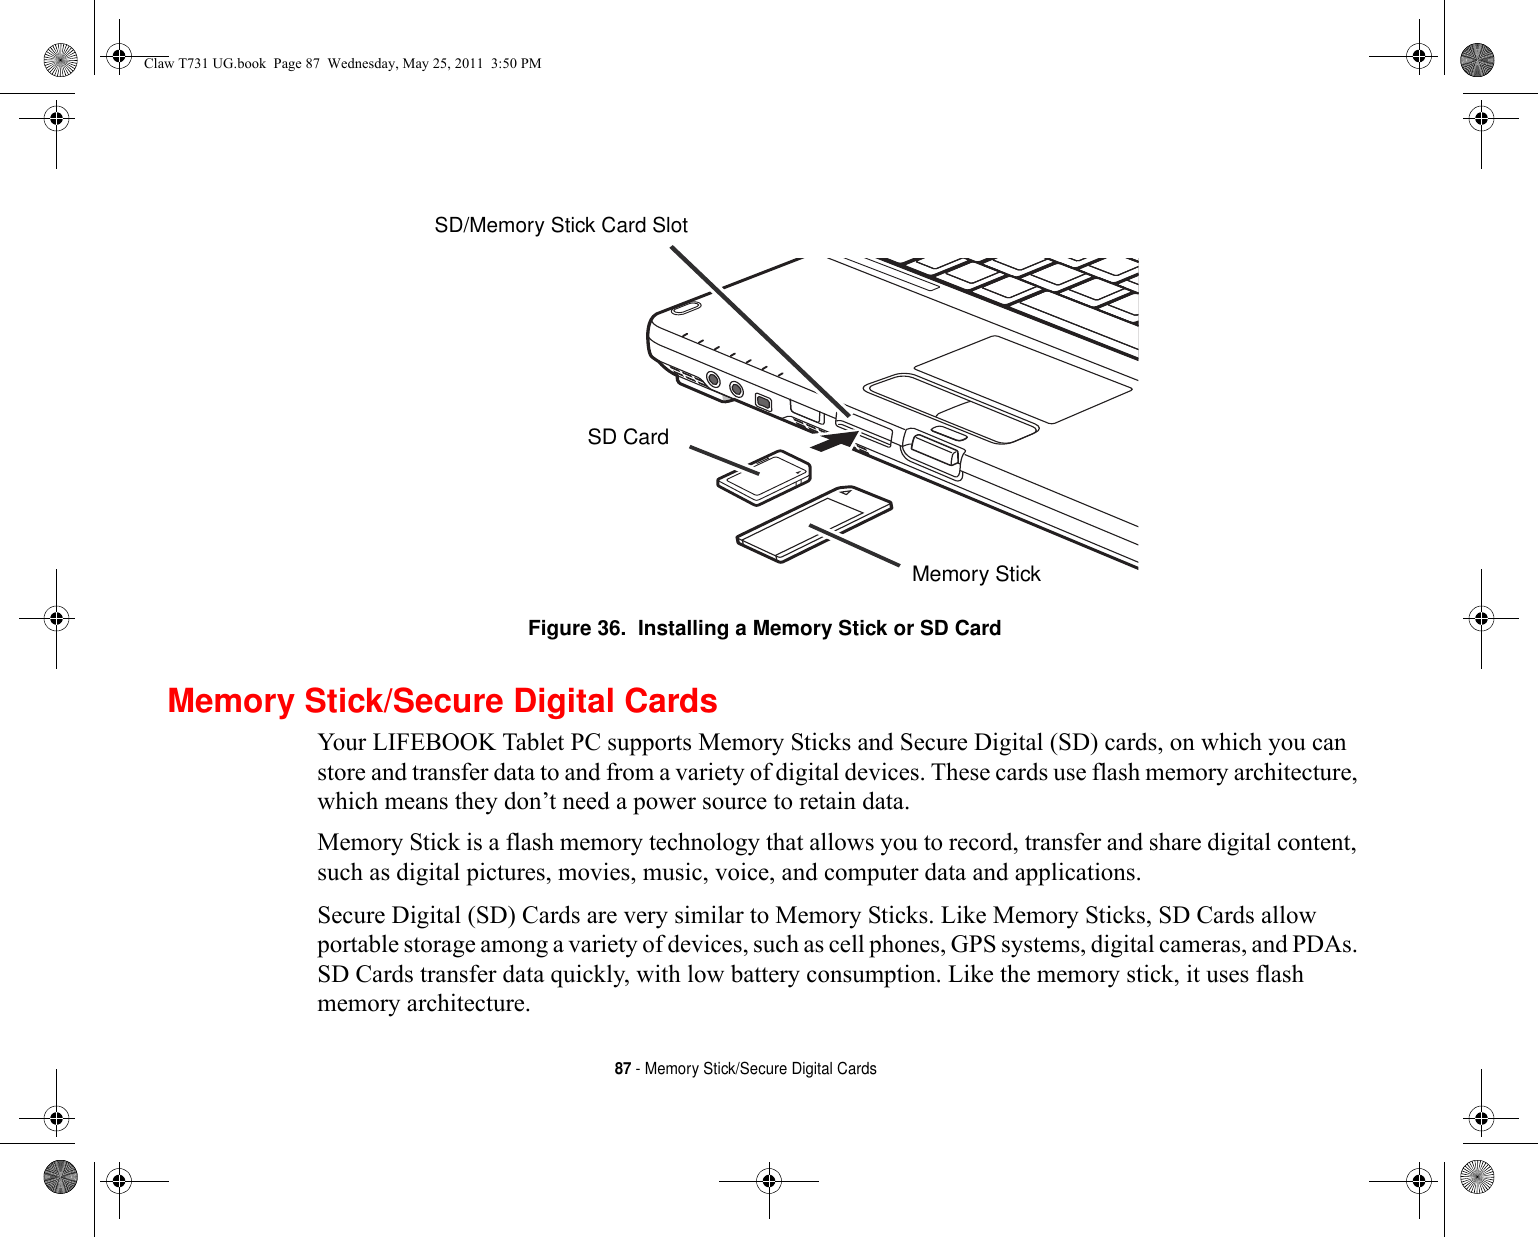
![88 - Memory Stick/Secure Digital CardsInstalling Memory Stick/SD CardsMemory Stick and SD Cards are installed in the Memory Stick/SD Card slot. To install a Memory Stick or SD Card, follow these steps:1See your specific card manual for instructions on the installation of your card. Some cards may require that your Tablet PC is off while installing them.2Make sure there is no card currently in the slot. If there is, see Removing a Memory Stick/SD Card.3Insert your card into the slot with the product label facing up.4Push the card firmly into the slot until it is seated in the connector. Removing A Memory Stick/SD CardTo remove a Memory Stick or SD Card, follow these easy steps:1Select Safely Remove Hardware from the System Tray. Highlight the card in the list, then click [Stop].2Push the Memory Stick or SD Card in until it unlatches. It will then eject from the slot for removal.INSTALLING OR REMOVING A MEMORY STICK OR SD CARD DURING YOUR LIFEBOOK TABLET PC’S SHUTDOWN OR BOOTUP PROCESS MAY DAMAGE THE CARD AND/OR YOUR LIFEBOOK TABLET PC.DO NOT INSERT A CARD INTO A SLOT IF THERE IS WATER OR ANY OTHER SUBSTANCE ON THE CARD AS YOU MAY PERMANENTLY DAMAGE THE CARD, YOUR LIFEBOOK TABLET PC, OR BOTH.SEE YOUR CARD MANUAL FOR SPECIFIC INSTRUCTIONS ON THE REMOVAL OF YOUR CARD. SOME CARDS MAY REQUIRE YOUR LIFEBOOK TABLET PC TO BE IN SLEEP MODE OR OFF WHILE REMOVING THEM.Claw T731 UG.book Page 88 Wednesday, May 25, 2011 3:50 PM](https://usermanual.wiki/Fujitsu-Client-Computing/WL0026.User-Manual-1/User-Guide-1477639-Page-89.png)

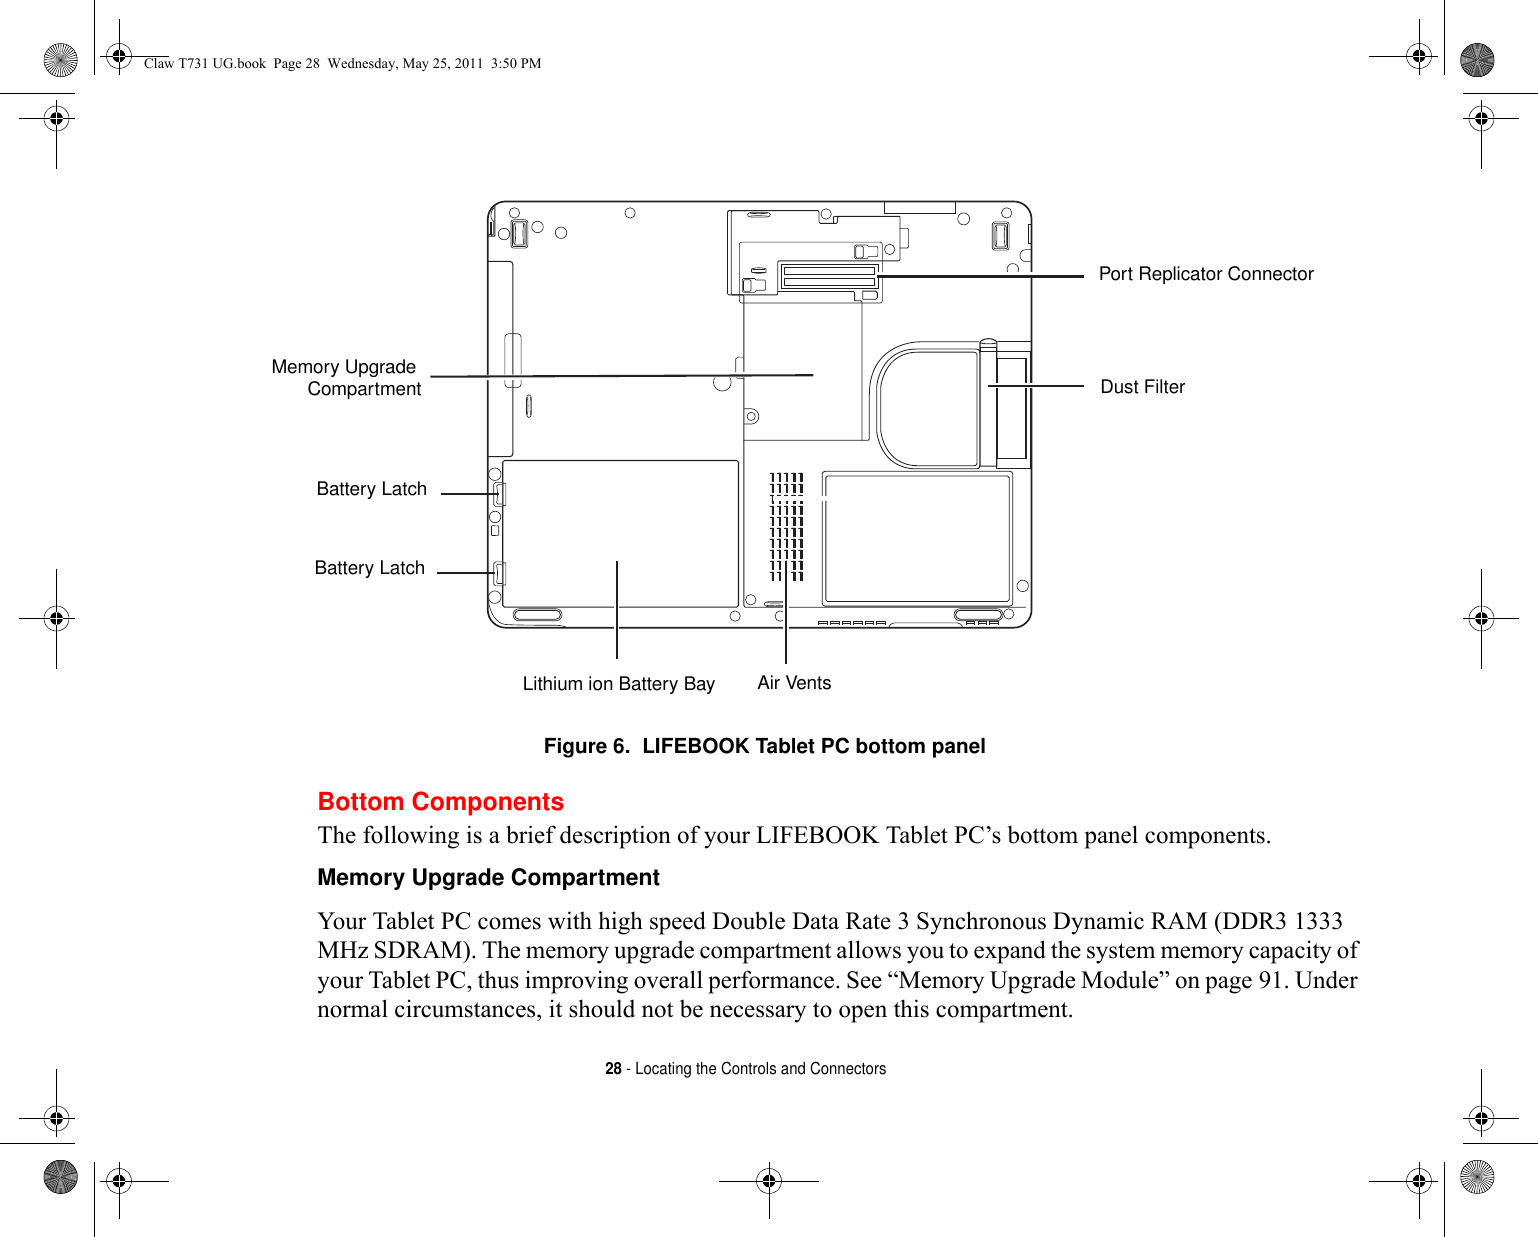
![93 - Memory Upgrade ModuleRemoving a Memory Upgrade Module1Perform steps 1 through 4 of Installing a Memory Upgrade Module.2Pull the clips sideways away from each side of the memory upgrade module at the same time. 3While holding the clips out, remove the module by lifting it up and pulling it away from your Tablet PC. 4Store the memory upgrade module in a static guarded sleeve.Replace the cover and reinstall the screws.Checking the Memory CapacityOnce you have changed the system memory capacity by replacing the installed module with a larger one, be sure to check that your Tablet PC has recognized the change.•If you are in Control Panel Category view, check the memory capacity by clicking [Start] -> Control Panel -> System and Security -> System -> View amount of RAM and processor speed. The amount of memory is displayed next to “Memory - RAM:” •If you are in one of the icon views, check the memory capacity by clicking [Start] -> Control Panel -> System. The amount of memory is displayed next to “Memory - RAM:”There may be a variation between the actual memory size and what is displayed. This is possible if your system is configured with an integrated Intel Graphics Media Accelerator which dynamically allocates system memory to accelerate graphics performance.IF THE TOTAL MEMORY DISPLAYED IS INCORRECT, CHECK THAT YOUR MEMORY UPGRADE MODULE IS PROPERLY INSTALLED. (IF THE MODULE IS PROPERLY INSTALLED AND THE CAPACITY IS STILL NOT CORRECTLY RECOGNIZED, SEE TROUBLESHOOTING ON PAGE 106.Claw T731 UG.book Page 93 Wednesday, May 25, 2011 3:50 PM](https://usermanual.wiki/Fujitsu-Client-Computing/WL0026.User-Manual-1/User-Guide-1477639-Page-94.png)

![105 - Device PortsPRESSING THE [FN] + [F10] KEYS ALLOWS YOU TO CHANGE YOUR SELECTION OF WHERE TO SEND YOUR DISPLAY VIDEO. THE ORDER IS DETERMINED BY WHICH TYPE OF EXTERNAL VIDEO DEVICE(S) IS CONNECTED. EACH TIME YOU PRESS THE KEY COMBINATION, YOU WILL STEP TO THE NEXT CHOICE.IF YOU ONLY HAVE AN EXTERNAL CRT CONNECTED, THE ORDER IS: INTERNAL DISPLAY -> EXTERNAL CRT -> SIMULTANEOUS DISPLAY -> INTERNAL DISPLAY.IF YOU ONLY HAVE AN HDMI DEVICE CONNECTED, THE ORDER IS: INTERNAL DISPLAY -> HDMI DISPLAY -> SIMULTANEOUS DISPLAY -> INTERNAL DISPLAY.IF YOU HAVE EXTERNAL CRT AND HDMI DEVICES CONNECTED, THE ORDER IS: INTERNAL DISPLAY -> EXTERNAL CRT -> SIMULTANEOUS INTERNAL AND EXTERNAL CRT -> HDMI DISPLAY - SIMULTANEOUS INTERNAL AND HDMI DISPLAY -> INTERNAL DISPLAY.IF YOU HAVE AN EXTERNAL CRT AND DVI DEVICES CONNECTED TO THE PORT REPLICATOR, THE ORDER IS: INTERNAL DISPLAY -> EXTERNAL CRT -> SIMULTANEOUS INTERNAL AND EXTERNAL CRT -> DVI DISPLAY -> SIMULTANEOUS INTERNAL AND DVI DISPLAY. -> INTERNAL DISPLAY.Figure 47. Connecting an External Video DeviceExternal Video PortExternal Video CableClaw T731 UG.book Page 105 Wednesday, May 25, 2011 3:50 PM](https://usermanual.wiki/Fujitsu-Client-Computing/WL0026.User-Manual-1/User-Guide-1477639-Page-106.png)
![109 - TroubleshootingProblem Possible Cause Possible SolutionsAudio ProblemsThere is no sound coming from the built-in speaker. The volume is turned too low. Adjust the volume control on your Tablet PC and operating system. Use the [Fn+F9] key combination on your keyboard. Pressing [F9] repeatedly while holding [Fn] will increase the volume of your Tablet PC.The software volume control is set too low. Manually adjusting the volume (i.e., keyboard "hot keys") should dynamically adjust the volume of the operating sys-tem (see above). If that doesn’t work, adjust the sound vol-ume control settings in your software or application.Headphones are plugged into your Tablet PC. Plugging in headphones disables the built-in speakers. Remove the headphones.BIOS audio settings are incor-rect. Set the BIOS setup utility to the default values within the Mul-timedia Device Configuration menu. See “BIOS Setup Utility” on page 73.Software driver is not configured correctly. The audio driver may be installed or reinstalled using the Drivers and Applications CD that came with your Fujitsu LIFEBOOK. Refer to your application and operating system documentation for help.The speakers have been muted using the Volume icon in the system tray.Click the Volume icon in the system tray on the bottom right of the screen. (It looks like a speaker). If the Mute box has a red circle on it, click on it to unselect it. You can also use the [Fn+F3] key combination to toggle the volume on and off. Pressing [F3] while holding [Fn] will toggle the audio mute.Optical Drive Problems (optional external device)LIFEBOOK Tablet PC fails to recognize DVD/CD-RW/CD-ROM’s.The disc is not pushed down onto raised center circle of the drive.Open optical drive tray and re-install the disc properly.Incorrect DVD Player or no DVD Player software is installed.Install DVD Player software. (See “Media Player Software” on page 95 for more information.)Claw T731 UG.book Page 109 Wednesday, May 25, 2011 3:50 PM](https://usermanual.wiki/Fujitsu-Client-Computing/WL0026.User-Manual-1/User-Guide-1477639-Page-110.png)
![115 - TroubleshootingThe system powers up, and displays power on information, but fails to load the operating system.(continued)The boot sequence settings of the setup utility are not compatible with your configu-ration.Set the operating source by pressing the [ESC] key while the Fujitsu logo is on screen or use the [F2] key and enter the setup utility and adjust the source settings from the Boot menu. See “BIOS Setup Utility” on page 73.Internal hard drive was not detected. Use the BIOS setup utility to try to auto detect the internal hard drive.An error message is dis-played on the screen dur-ing the boot sequence.Power On Self Test (POST) has detected a problem. See the Power On Self Test (POST) messages to determine the meaning and severity of the problem. Not all messages are errors; some are simply status indicators. See “Power On Self Test Messages” on page 118.Your Tablet PC appears to change setup parameters when you start it.BIOS setup changes were not saved when made and you exited the setup utility.Make sure you select Save Changes And Exit when exiting the BIOS setup utility.The BIOS CMOS hold-up bat-tery has failed. Contact your support representative for repairs. This is not a user serviceable part but has a normal life of 3 to 5 years.Your system display won’t turn on when the system is turned on or has resumed.You have installed the LIFE-BOOK/Security Application panel.Check the Status Indicator Panel for presence of the Security icon. If it is visible, enter your password See “Status Indicator Panel” on page 30.Video ProblemsThe built-in display is blank when you turn on your LIFEBOOK Tablet PC.Display angle and brightness settings are not adequate for your lighting conditions.Move the display and the brightness control until you have adequate visibility. Pressing either the [F6] or [F7] keys while holding down the [Fn] key also allows you to change the brightness level of the display.Power management timeouts are set for short intervals and you didn’t see the display go on and off again.Press a keyboard button or move the mouse to restore oper-ation. If that fails, push the Power/Suspend/Resume switch. (The display may be shut off by Sleep mode, Auto Suspend or Video Timeout)Problem Possible Cause Possible SolutionsClaw T731 UG.book Page 115 Wednesday, May 25, 2011 3:50 PM](https://usermanual.wiki/Fujitsu-Client-Computing/WL0026.User-Manual-1/User-Guide-1477639-Page-116.png)
![116 - TroubleshootingThe built-in display is blank when you turn on your LIFEBOOK Tablet PC.(continued)The Tablet PC is set for an external monitor only. Pressing [F10] while holding down the [Fn] key allows you to change your selection of where to send your display video. Each time you press the keys you will step to the next choice. The choices, in order are: built-in display only, external moni-tor only, both built-in display and external monitor.The Tablet PC turned on with a series of beeps and the built-in display is blank.Power On Self Test (POST) has detected a failure which does not allow the display to operate. Contact your support representative.The display goes blank by itself after you have been using it.The Tablet PC has gone into Video timeout, Sleep mode, or Save-to-Disk mode because you have not used it for a period of time.Press any button on the keyboard, or move the mouse to restore operation. If that fails, push the Power/Sus-pend/Resume switch. Check your power management set-tings, or close your applications and go to the Power Savings menu of the setup utility to adjust the timeout values to better suit your operation needs. See “BIOS Setup Utility” on page 73.The power management time-outs may be set for very short intervals and you failed to notice the display come on and go off again.Press any button on the keyboard, or move the mouse to restore operation. If that fails, push the Power/Sus-pend/Resume switch. (The display may be shut off by Sleep Mode, Auto Suspend or Video Timeout)Your display won’t turn on when the system is turned on or when it has resumed.The system may be pass-word-protected. Check the status indicator panel to verify that the Security icon is blinking. If it is blinking, enter your password.The display does not close. A foreign object, such as a paper clip, is stuck between the display and keyboard.Remove all foreign objects from the keyboard.Problem Possible Cause Possible SolutionsClaw T731 UG.book Page 116 Wednesday, May 25, 2011 3:50 PM](https://usermanual.wiki/Fujitsu-Client-Computing/WL0026.User-Manual-1/User-Guide-1477639-Page-117.png)
![117 - TroubleshootingThe display has bright or dark spots. If the spots are very tiny and few in number, this is normal for a large LCD display.This is normal; do nothing.If the spots are numerous or large enough to interfere with your operation needs.Display is faulty; contact your support representative.The Display is dark when on battery power. The Power Management util-ity default is set on low bright-ness to conserve power.Press [Fn] + [F7] to increase brightness or click the battery gauge, click on More power options, and select Adjust the display brightness.You have connected an external monitor and it does not display any infor-mation.Your BIOS setup is not set to enable your external monitor. Toggle the video destination by pressing [Fn]+ [F10] together, or check your BIOS setup and enable your external monitor. (See the Video Features submenu, located within the Advanced Menu of the BIOS. See “BIOS Setup Utility” on page 73.Your external monitor is not properly installed. Reinstall your device. See “External Video Port” on page 104.Your operating system is not setup with the correct soft-ware driver for that device. Check your device and operating system documentation and activate the proper driver.You have connected an external monitor and it does not come on.Your external monitor is not compatible with your LIFE-BOOK Tablet PC.See your monitor documentation and the External Monitor Support portions of the Specifications section. See “Specifi-cations” on page 137.Miscellaneous ProblemsError message is dis-played on the screen dur-ing the operation of an application.Application software often has its own set of error message displays. See your application manual and help displays screens for more information. Not all messages are errors some may simply be status.Problem Possible Cause Possible SolutionsClaw T731 UG.book Page 117 Wednesday, May 25, 2011 3:50 PM](https://usermanual.wiki/Fujitsu-Client-Computing/WL0026.User-Manual-1/User-Guide-1477639-Page-118.png)
![118 - TroubleshootingPower On Self Test MessagesThe following is a list of error-and-status messages that the Phoenix BIOS and/or your operating system can generate and an explanation of each message. Error messages are marked with an *. If an error message is displayed that is not in this list, write it down and check the operating system documentation on screen and in the manual. If you can find no reference to the message, contact a support representative.*Invalid NVRAM Data Problem with NVRAM access. In the unlikely case that you see this message you may have a display problem. You can continue operating but should contact your support representative for more information.*Keyboard controller error The keyboard controller test failed. You may have to replace your keyboard or keyboard controller but may be able to use an external keyboard until then. Contact your support representative.*Keyboard not detected Keyboard not working. You may have to replace your keyboard or keyboard controller but may be able to use an external keyboard until then. Contact your support representative.*Operating system not found Operating system cannot be located on either drive A: or drive C: Enter the setup utility and see if both the fixed disk, and drive A: are properly identified and that the boot sequence is set correctly. Unless you have changed your installation greatly, the operating system should be on drive C:. If the setup utility is correctly set, your hard drive may be corrupted.*Press <F1> to resume, <F2> to SETUP Displayed after any recoverable error message. Press [F1] key to Continue or [F2] key to Enter Setup.*Real time clock error - Check date and time settings Real-time clock fails BIOS test. May require board repair. Contact your support representative.*Fan error, system shutdown in 30s. Contact Fujitsu tech support Fan error occurred. Please contact your sales representative.*Fan error occurred during previous boot. Fan error occurred during previous boot. Please contact your sales representative.Claw T731 UG.book Page 118 Wednesday, May 25, 2011 3:50 PM](https://usermanual.wiki/Fujitsu-Client-Computing/WL0026.User-Manual-1/User-Guide-1477639-Page-119.png)
![120 - Restoring Your Pre-installed SoftwareAfter you launch the ClickMe! utility when you first start up your system, you should make a copy of the Factory Image to DVD discs. You will need several blank discs (DVD-R or DVD+R discs are recommended) in order to create the copy. After creating the copy, be sure to label the discs and keep them in a safe place to ensure they do not get damaged.Creating Backup Images of Factory Image, DAR, and DiscsUsing the [Manage/Change] button, you can create backup images of the Factory Image, DAR, Application Disc, or Bootable Disc.1Launch My Recovery from the desktop icon.2Select [Manage/Create] -> [Backup Images] The Backup Images menu displays a list from which you can choose which type of disc you want to burn: Bootable Disc, Drivers and Applications Restore Disc, Application Disc, or Recovery Disc.3Select Recovery Disc, then click [Make DVD]4Confirm that the # box has “2” (Note that in some cases the box may display a larger number for the factory image, depending upon its size.)5The message “Recovery Disc #1. will be created. Enter your comments and number of media on the DVD”. Click [YES] to burn the Factory Image.6While the copy is being made, a “Writing to the media” screen displays a progress bar. When the copy is complete, a dialog will appear informing you of the successful completion of the backup.SOME CONFIGURATIONS OF CERTAIN LIFEBOOK MODELS DO NOT HAVE APPLICATIONS LOADED ON THE HARD DRIVE; RATHER, THEY ARE LOADED ON THE DAR DISC. PLEASE TAKE THAT INTO ACCOUNT WHEN READING THE FOLLOWING PROCEDURES.IN THE FOLLOWING STEP, DO NOT USE THE SYSTEM UNTIL THE COPY IS COMPLETE.Claw T731 UG.book Page 120 Wednesday, May 25, 2011 3:50 PM](https://usermanual.wiki/Fujitsu-Client-Computing/WL0026.User-Manual-1/User-Guide-1477639-Page-121.png)
![121 - Restoring Your Pre-installed Software7Repeat the process for the remaining three images on disc (Bootable Disc, Drivers and Applications Restore Disc, and Application Disc). The number of images available may vary depending on your system model; some models do not have the applications loaded on the hard drive.Recovering Your Factory ImageIn the event you need to restore your original Factory Image, perform the following steps. Note that there may be some third-party applications that need to be installed from the application media bundled with your system.In order to recover your Factory Image, perform the steps outlined in “Running Recovery and Utility from hard disk” on page 3. Backing Up a System Image User-Configured System Backups: On your desktop, there is a [MyRecovery] icon that allows you to make backups of your current system image either to another location on your hard drive or on removable media. A system image is the configuration of your C: drive at a particular point of time. You may want to make system image backups occasionally in order to have points to which you can return without having to go all the way back to the Factory Image.By default, system images are saved in the D: drive in the MyRecovery folder. You can also elect to save the image to an external hard drive.1Click the [MyRecovery] icon on your desktop.2Click the [Backup] button on the MyRecovery screen.3On the next screen that appears, you can enter up to 200 characters of information about the backup file. This information will help you to identify the image at a later date.4Click the [OK] button and the system will reboot.ALL USER-CREATED DATA WILL BE DELETED FROM YOUR SYSTEM WHEN THE FACTORY IMAGE IS RESTORED.My RecoveryClaw T731 UG.book Page 121 Wednesday, May 25, 2011 3:50 PM](https://usermanual.wiki/Fujitsu-Client-Computing/WL0026.User-Manual-1/User-Guide-1477639-Page-122.png)
![122 - Restoring Your Pre-installed Software5After rebooting, the “Creating of the backup image” window appears, in which you can either click [Create the image on D drive] or [Select the drive] if you want to save to an external hard disk drive.6An image appears showing you graphically how the image will be stored. Click the [Next] button.7Click [Execute] to start the backup. Claw T731 UG.book Page 122 Wednesday, May 25, 2011 3:50 PM](https://usermanual.wiki/Fujitsu-Client-Computing/WL0026.User-Manual-1/User-Guide-1477639-Page-123.png)
![123 - Restoring Your Pre-installed SoftwareManaging Your Backup ImagesWith the MyRecovery tool you can also make copies of backup images, archive them on DVD, or delete them from your hard drive.1To begin, click the [MyRecovery] icon on your desktop.2Click the [Manage/Create] button in the MyRecovery window.3When the MyRecovery Manager window appears, click [Manage Backup Images].4In the next window, a list of your backup images appears. Below the list are three buttons allowing you to [Make DVD], [Copy], or [Delete] your backup images.5Select an image title from the list, then click the action button you would like to perform.6Note that you need to have an external disk drive connected for the [Copy] button to be enabled. If you elect to copy the image, you will be prompted to enter the destination. If you are ready to copy, click [OK] to proceed. A progress screen appears while the backup copy is being made.7Note that if you copy an image to an external hard drive, both the original and the copy will appear in the [Backup Images] window with identical names, dates, and file sizes, but with the different drive letter to distinguish them. Before you select [Make DVD], be sure you have a recordable DVD drive connected and blank DVDs available.Using the Recovery and Utility ToolsThe Recovery and Utility tools consist of a variety of tools that will help you recover your Factory Image, recover system images, and delete the data from your hard disk.Methods for accessing the utilities Recovery and Utility Tools are preinstalled in a hidden partition by the factory, or they can be accessed by using the bootable disc. Please note that you can delete Recovery and Utility tools from your hard disk drive if you modify the partitions. In this case you will not be able to use the hidden partition for booting to Recovery and Utility Tools, but you will still be able to boot from the disc.Determining whether Recovery and Utility is pre-loaded 1Turn on or reboot your system. When the Fujitsu logo appears, press [F12] key. Claw T731 UG.book Page 123 Wednesday, May 25, 2011 3:50 PM](https://usermanual.wiki/Fujitsu-Client-Computing/WL0026.User-Manual-1/User-Guide-1477639-Page-124.png)
![124 - Restoring Your Pre-installed Software2From the Boot Menu that appears, check whether the <Recovery and Utility> option is present. If it is not present, it means that the utility must be used from the disc. Proceed to “Running Recovery and Utility from the Bootable Disc” if <Recovery and Utility> is unavailable.Running Recovery and Utility from hard disk 1Turn on or reboot your system. When the Fujitsu logo appears, press [F12] key. 2Cursor down to <Recovery and Utility> and press the [Enter] key.3While the files are being loaded from the disc, a progress bar will appear at the bottom of the screen.4When the System Recovery Options dialog opens, select a new keyboard layout, if necessary, then click [Next].5When the Operating System dialog appears, select “Use recovery tools...”, then click [Next]. 6If necessary, enter your password, then click [OK].7When System Recovery Options window appears, click on Recovery and Utility.8The Recovery and Utility screen appears on the screen with three tabs: Diagnostics, Recovery and Utility. Please note that Diagnostics tab is not supported on certain LIFEBOOK/Stylistic models when running Recovery and Utility from the hard disk. In order to restore the operating system, please use the middle icon “Restoring the Factory Image (only C:\drive)” under the Recovery tab. Running Recovery and Utility from the Bootable disc To verify/change boot-up priority (rather than booting-up from a hard drive or external floppy drive), perform the following steps:1Power on your system. When the Fujitsu logo appears on the screen. press the [F12] key. 2Select the Boot Menu from the menu that appears.3Highlight the CD/DVD option and move it to the top of the list using the up arrow.4Insert the bootable disc into the drive tray.5Click [OK]. While the files are being loaded from the disc, a progress bar will appear at the bottom of the screen.THE BOOTABLE DISC CAN ONLY BE USED WITH THE SYSTEM WITH WHICH IT WAS PURCHASED.Claw T731 UG.book Page 124 Wednesday, May 25, 2011 3:50 PM](https://usermanual.wiki/Fujitsu-Client-Computing/WL0026.User-Manual-1/User-Guide-1477639-Page-125.png)
![125 - Restoring Your Pre-installed Software6When the System Recovery Options dialog opens, select a new keyboard layout, if necessary, then click [Next].7When the Operating System dialog appears, click [Next]. 8If necessary, enter your password, then click [OK].9When System Recovery Options window appears, click on Recovery and Utility.10 When the Recovery and Utility screen appears, three tabs will be present: Diagnostics, Recovery, and Utility.Recovery and Utility tabs Diagnostics tab: The Diagnostics tool is designed for use by IT professionals. It is not likely you will need to use this tool. When you select devices from the Diagnosis window then click [Execute], several tests are performed on the selected components.Recovery tab: The Recovery tab contains three tools: Recovering User-Configured System Backups, Restoring the Factory Image (only C: drive), and Restoring the Factory Image (full hard drive recovery). You can use these tools to restore the Factory Image from the hidden partition, restore backup image(s) you created or images stored on DVD discs, and perform a full hard drive recovery. Refer to instructions above for details on how to create Factory Image Recovery DVDs, user backup DVDs and system image backup. Utility tab: The Utility tab contains three tools: Hard Disk Data Delete, Restore Recovery and Utility, and Windows Complete PC Restore.•The Hard Disk Data Delete utility is used to delete all data on the hard disk and prevent the data from being reused. NOTE: Do not use the Hard Disk Data Delete utility unless you are absolutely certain that you want to erase your entire hard disk, including all partitions.•Restore Recovery and Utility allows you to restore the first hidden partition.•Windows Complete PC Restore utility allows you to restore an image created with Windows Backup and Restore Center. Windows Complete PC Restore will overwrite the data on your hard disk drive.Claw T731 UG.book Page 125 Wednesday, May 25, 2011 3:50 PM](https://usermanual.wiki/Fujitsu-Client-Computing/WL0026.User-Manual-1/User-Guide-1477639-Page-126.png)
![126 - Restoring Your Pre-installed SoftwareRecovering your Factory Image using Recovery and Utility(new or non-bootable hard drive)If you have installed a new hard drive or your hard drive is not bootable, perform the following steps. Note that first you will need to create new partitions on the hard drive, then restore the Factory Image:1Power on your system. When the Fujitsu logo appears on the screen. press the [F12] key. 2Select the Boot Menu from the menu that appears.3Highlight the CD/DVD option and move it to the top of the list using the up arrow..4Insert the bootable disc in your DVD drive, then click [OK].5When System Recovery Options window appears, click on <Recovery and Utility>.6When the System Recovery Options dialog opens, select a new keyboard layout, if necessary, then click [Next].7When the Operating System dialog appears, click [Next]. 8If necessary, enter your password, then click [OK].9When System Recovery Options window appears, click on <Recovery and Utility>.10 Click the Recovery tab in the Recovery and Utility window, then click <Restoring the Factory Image (full hard drive recovery> icon.11 Click [Execute].12 Read the precautions, then select “I Agree”. 13 Click [Next], then click [Next] to start the recovery process. 14 “1. Recovery Disc Check” will be in bold and the rest will be grayed out. Follow the instructions and “Insert the Recovery Disc #1”. In some cases, you may prompted to “Insert the Recovery Disc #2”, depending upon the size of the Recovery Image15 Click [Next] to begin the check. Click [Next] again when the check is complete.16 “2. Initializing hard disk drive” will be in bold with the message “Please insert the Bootable Disc into your optical drive”. Insert the bootable disc. Click [Next] to proceed. A dialog box appears, with a checking disc message.17 “Warning All DATA on the Hard Disk will be completely erased!!!” will appear. Select [OK]. The partition creation process will begin.Claw T731 UG.book Page 126 Wednesday, May 25, 2011 3:50 PM](https://usermanual.wiki/Fujitsu-Client-Computing/WL0026.User-Manual-1/User-Guide-1477639-Page-127.png)
![127 - Restoring Your Pre-installed Software18 “3. Restoring Factory Image to hidden partition” will be in bold with the message “Please insert the Recovery Disk#1 into the optical drive”. Click [Next] to proceed.19 After completion, the tool will automatically go back to "3.Restoring Factory Image to hidden partition" but will include the note "Please insert your Application Disc(s) starting with #1, then click [OK]. After installation of each disc, insert the next and continue until all have been installed. If you don't have your Application Disc(s) or you have inserted all your application discs. Please click [Cancel] to continue." At this point, you can either:•Insert Application Disc(s) to restore back to hidden partition, or, •Click [Cancel] to skip restoring Application disc(s) and continue with restore.20 If you select to insert Application Disc, after copying of application disc(s) to hidden partition is completed, the message will appear again. Repeat inserting application disc(s) until all discs have been copied, then click [Cancel] to continue with Restore.21 After clicking [Cancel], a confirmation message will appear "If you want to skip copying or copy has been finished, click [OK]. Click [Cancel] to return to Restoring Factory Image to hidden partition." 22 Click [OK] and Restoring Factory Image will begin.23 When restoration is complete, you will see the message “Restoration has been completed. Click [OK] to reboot the computer.” Click [OK].Claw T731 UG.book Page 127 Wednesday, May 25, 2011 3:50 PM](https://usermanual.wiki/Fujitsu-Client-Computing/WL0026.User-Manual-1/User-Guide-1477639-Page-128.png)
![128 - Restoring Your Pre-installed SoftwareAutomatically Downloading Driver UpdatesYour system has a convenient tool called the Fujitsu Driver Update (FDU) utility. With FDU, you can choose to automatically or manually go to the Fujitsu site to check for new updates for your system.The FDU icon should appear in the system tray at the bottom right of your screen (roll the cursor over the icons to find the correct one). If the icon does not appear in the system tray, go to [Start] -> All Programs, and click on Fujitsu Driver Update; this will create the icon automatically.To invoke the FDU menu, right-click on the FDU icon. The menu contains the following items:Check for updates now Allows for manual driver update search. The first time it is used, you are prompted to agree to a user agreement. After you click the icon, FDU automatically connects with the Fujitsu site to check for updates and downloads them. While downloading, the icon has a red bar through it, indicating that it cannot be used while the download is in process. When the update is complete, a message appears informing you.Enable Automatic Update Notifications Automatically searches for new updates on a regular basis (approximately every 3 days).Show update history Brings up a screen that displays a history of updates that have been made via the FDU.About Fujitsu Driver Update Displays the FDU version number and copyright information.Fujitsu Driver Update Readme Displays the FDU readme.Claw T731 UG.book Page 128 Wednesday, May 25, 2011 3:50 PM](https://usermanual.wiki/Fujitsu-Client-Computing/WL0026.User-Manual-1/User-Guide-1477639-Page-129.png)