Contents
- 1. Users Manual 1
- 2. Users Manual 2
- 3. User Manual1
- 4. User Manual2
- 5. Users Manual1
- 6. Users Manual2
Users Manual 2

F-01D_EN_ninshou.pdf
Before using the Xi terminal
20
Before using the Xi terminal
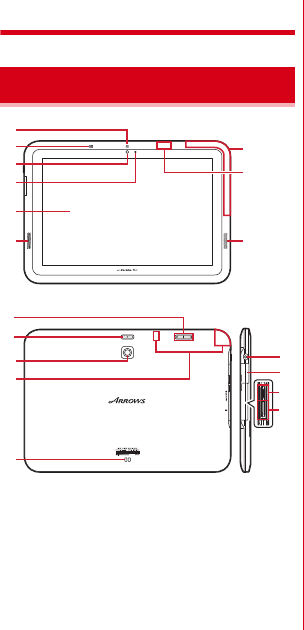
<Functions>
a
Notification LED
Red light : Charging (except when flashing green)
Flashing green : Incoming/unread mails, etc.
Green light once : Power ON
b
Microphone
c
In-camera
d
Light sensor
Sense ambient brightness and automatically adjust
brightness of the display backlight (may not be
adjusted correctly, if covered).
e
Display (Touch panel)
f
Speaker
g
1Seg antenna
*
h
GPS antenna
*
i
FOMA antenna
*
j
Out-camera
k
Charging jack
l
Earphone/Microphone jack (waterproof)
m
External connection jack
Connect the FOMA charging microUSB adapter T01 or
included USB Cable for PC connection T01.
n
microSD card slot
o
miniUIM card slot
→
P21
*
The antenna is built-in the Xi terminal. Covering around the
antenna by the hand may affect the quality.
<Key functions>
Key functions are as follows.
a
Power key
X
Press : Turn the power on, activate/deactivate the sleep
mode.
Press and hold : Turn the power off, activate/deactivate
manner mode, public mode or Airplane mode.
b
Volume button
ty
Press : Adjust volume.
Press and hold
y
for 1 second or more : Activate/
Deactivate the manner mode.
Part names and functions
b
a
a
b
c
d
e
f
i
j
k
g
f
h
l
m
n
o
F-01D_EN_ninshou.pdf
Before using the Xi terminal
21
The miniUIM is an IC card that stores user information.
・
If the miniUIM is not attached, you cannot use some
functions of the Xi terminal.
・
For details on miniUIM, refer to the miniUIM manual.
◆
Attaching/Removing miniUIM
・
Attach/Remove the miniUIM after turning OFF the
power.
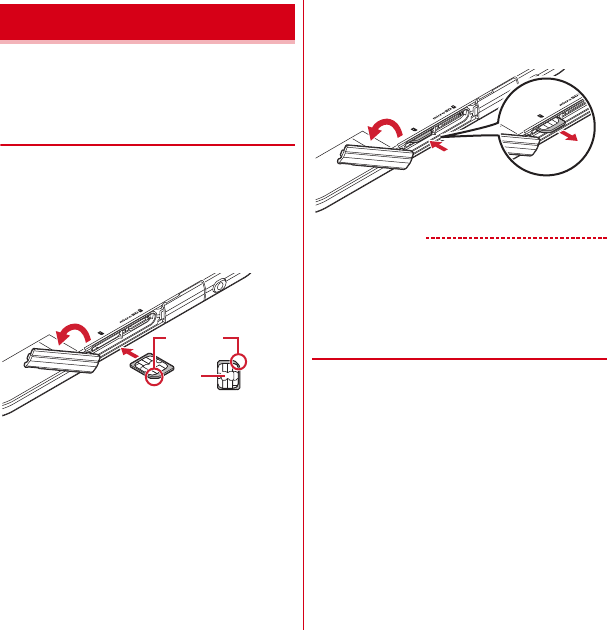
■
Attaching
Open the slot cap of the Xi terminal (
a
), align the miniUIM
with the UIM card mark on the back side of the Xi terminal
and insert it in the direction of
b
all the way until it clicks.
・
Check the orientation of UIM corner cut.
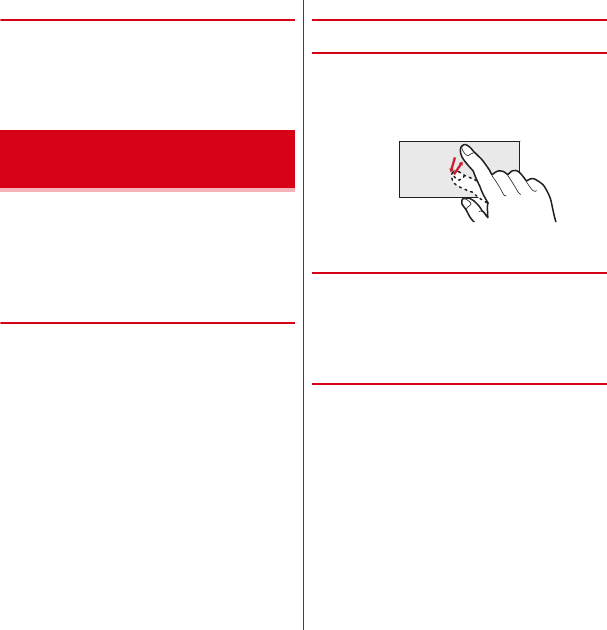
■
Removing
Open the slot cap of the Xi terminal (
a
), press the miniUIM
lightly toward
b
, pull out straight the popped out miniUIM
in the direction of
c
.
✔
INFORMATION
・
When handling miniUIM, take care not to touch or scratch
the IC part. Note that attaching or removing miniUIM
forcibly into the Xi terminal may damage miniUIM.
・
Note that the miniUIM card may pop out of the Xi
terminal when removing it.
◆
Security codes of miniUIM
A miniUIM has a security code named PIN code. The PIN
code is set to "0000" by default, which you can change by
yourself.
→
P45
miniUIM
IC
mini UIM card
Corner cut
b
a
b
c
a

F-01D_EN_ninshou.pdf
Before using the Xi terminal
22
❖
Precautions on charging
・
If you use the Xi terminal while charging, it may take
time to complete charging or charging may not
complete.
・
It is normal for the Xi terminal or AC adapter to become
warm while charging. When the Xi terminal becomes
warm, charging may stop temporarily for the safety.
When the Xi terminal becomes extremely hot, stop
using immediately.
・
The following conditions will lead to a charging error. In
the case of charging error, running functions are
stopped, the power is turned off, and the notification
LED lights red. Remove the charger.
- Charging voltage is high
- The internal battery is over-charged/over-discharged
- Charging is not complete after 5 hours or more
❖
Charging times (approximate)
The following is the time for charging an empty internal
battery with F-01D's power switched OFF. Charging with
the terminal ON or under low temperature requires longer
time.
❖
Operation time on full charge
(approximate)
The following time varies by the charging method and
operating environment.
→
P124
❖
Internal battery life
・
The internal battery is a consumable part. Each time it is
charged, time available with each charging reduces.
・
When a time available with each charging is reduced to
about a half from that of a new battery, replacement of
the internal battery is recommended because it is near
the end of life. For replacement of the internal battery,
contact "Repairs" on the last page of the instruction
manual (in Japanese only) or a DOCOMO-specified
repair office.
❖
Available charging adapter
For details, refer to the operation manual of AC adapter or
DC adapter.
FOMA AC Adapter 01 (optional) :
100V AC only
FOMA AC Adapter 02/FOMA AC Adapter 01 for Global use
(optional) :
Between 100V and 240V AC AC Adaptor has
a plug dedicated to 100V AC (for domestic use). When
using the AC adapter in the range of AC 100V and 240V
overseas, a conversion plug adapter applicable to the
country you are staying is required. Also, do not charge
the battery with a transformer for overseas travel.
FOMA DC Adapter 01/02 (optional) :
Use for charging in a
car.
Charging
AC adapter
FOMA charging microUSB adapter T01
: Approx.
●●
min.
Desktop holder : Approx.
●●
min.
DC adapter
FOMA charging microUSB adapter T01
: Approx.
●●
min.
Desktop holder : Approx.
●●
min.
Continuous
stand-by
time
FOMA/
3G
Stationary (Auto) : Approx.
●●
H
Moving (Auto) : Approx.
●●
H
Moving (3G static) : Approx.
●●
H
GSM
Stationary (Auto) : Approx.
●●
H

F-01D_EN_ninshou.pdf
Before using the Xi terminal
23
❖
Checking battery level
A battery icon is displayed on the status bar to show
estimated battery level.
→
P27
・
When the battery level is nearly empty, a warning
message appears, and power is turned off after a few
seconds.
・
From the Applications menu, tap [Settings]
→
[About
phone]
→
[Status] to check the remaining battery power
by percentage.
✔
INFORMATION
・
When charging starts with the battery empty, the Xi
terminal may not be immediately activated after turning
the power ON. In this case, charge the Xi terminal while
keeping it turned OFF, and turn it on after a while.
◆
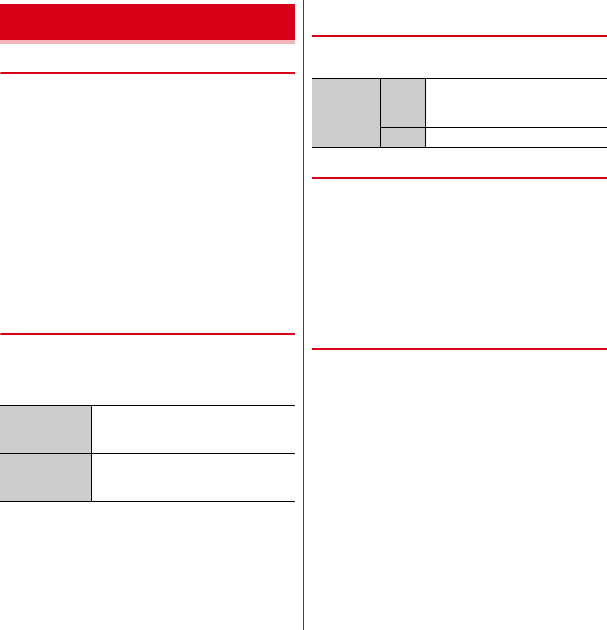
Charging with Desktop holder
Charge the Xi terminal with FOMA AC Adapter 01/02
(optional), the included FOMA charging microUSB adapter
T01 and desktop holder F34.
a
Insert the AC adapter connector to the external
connection jack of the FOMA charging microUSB
adapter
b
Insert the microUSB plug of the charging microUSB
adapter into the jack on the back side of the desktop
holder
c
Unfold the AC adapters power plug and insert it into a
100V AC outlet
d
Insert the Xi terminal into the desktop holder
・
Notification LED lights red while charging, and turns
off when charging is complete.
e
When charging is complete, remove the Xi terminal
from the desktop holder
f
Remove the micro USB plug of the charging microUSB
adapter from the desktop holder, and remove the AC
adapter connector from the external connection jack of
the charging microUSB adapter
・
Pull it straight while pressing the release button of
the connector.
g
Remove the AC adapter power plug from the wall outlet
To AC 100V
outlet
Light
Desktop
holder Jack on the back side
of desktop holder
Power plug
microUSB plug
AC Adapter F05
Power cable
USB cable

F-01D_EN_ninshou.pdf
Before using the Xi terminal
24
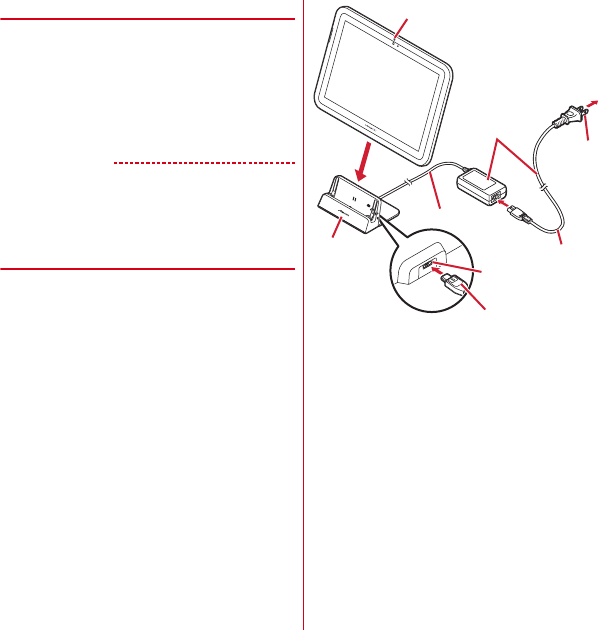
◆
Charging with AC adapter
Charge the Xi terminal with FOMA AC Adapter 01/02
(optional) and the included FOMA charging microUSB
adapter T01.
a
Insert the AC adapter connector to the external
connection jack of the FOMA charging microUSB
adapter
b
Open the jack cap (
a
) of the Xi terminal, insert the
microUSB plug of the charging microUSB adapter into
the jack (
b
)
c
Insert the AC adapter power plug into an outlet
・
Notification LED lights red while charging, and turns
off when charging is complete.
d
After charging is completed, remove the microUSB
plug from the Xi terminal, and close the connection jack
cap
e
Remove the AC adapter connector from the charging
microUSB adapter
・
Pull it straight while pressing the release button of
the connector.
f
Remove the AC adapter power plug from the wall outlet
✔
INFORMATION
・
FOMA charging microUSB adapter T01 is an adapter for
connecting the Xi terminal with the AC adapter. If you
connect the Xi terminal with a PC using the FOMA USB
Cable etc., you cannot send/receive data or charge the Xi
terminal. For connection to a PC, use the included FOMA
USB Cable for PC connection T01.
◆
Charging with FOMA USB Cable for
PC connection
If you connect the Xi terminal with a PC using the included
FOMA USB Cable for PC connection T01, you can charge
the Xi terminal.
・
When "
新しいハードウェアの検索ウィザードの開始
(New
hardware detection wizard)" appears on the PC, select "
キャンセル
(Cancel)".
◆
Turning power ON
1
Press and hold
X
(approx. 2 sec.) until
the notification LED lights in green
The lock screen appears following the startup screen.
・
Unlocking the screen
→
P46
❖
Turning power ON for the first time
When you turn power ON for the first time, tap [OK] on the
confirmation screen for software update to make initial
settings from "
はじめに
(Getting started)". The settings
made can be changed later.
→
P26
1
[Settings] on each item
→
Follow the screen
to set items
To AC 100V
outlet
microUSB
plug
External connection
jack
Jack cap
Power plug
Light
AC Adapter F05
Power cable
USB cable
Power ON/OFF
F-01D_EN_ninshou.pdf
Before using the Xi terminal
25
◆
Turning power OFF
1
Press and hold
X
until the phone
options menu appears
2
[Power off]
→
[OK]
After vibrating once, the terminal turns off.
The Xi terminal display is composed of a touch panel
designed for being touched directly with fingers. The Xi
terminal supports a motion sensor that senses the
orientation or motion of the terminal. You can switch the
display view by tilting the Xi terminal vertical or
horizontal.
◆
Notes for using the touch panel
The touch panel is designed for being touched lightly with
fingers. Do not push it forcibly with a finger or press it with
sharp objects (nail, ballpoint pen, pin, etc.).
・
Touching the touch panel may not work in the following
cases. Note that it may cause malfunction.
- Operation with gloved hands
- Operation with tip of fingernail
- Operation with a foreign object on the display
- Operation with protective sheet or seal on the display
- Operation with wet hand
- Operation under water
◆
Main operations
❖
Tap/Double-tap
Tap :
Touch the screen lightly and release. The operation
becomes effective when you release your finger from
the screen.
Double-tap :
Tap twice quickly. By double-tapping you can
zoom in/out the screen such as web page or still image.
❖
Touch and hold for 1 second or more
Touch and hold the screen for 1 second or more and
release. You may need to perform the subsequent action
with your finger kept touching the screen.
*
In this manual, the operation may be described as "(1 sec. or
more)".
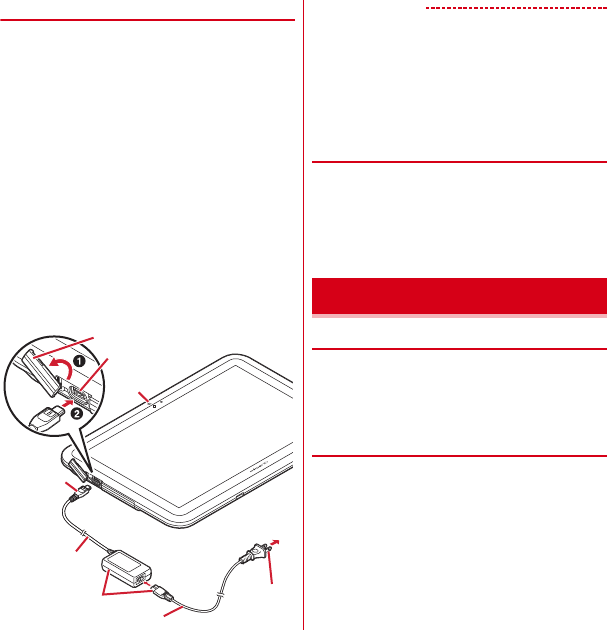
❖
Drag/Slide/Pan
Drag :
Touch an item or icon on the screen and move it to
the desired position.
Slide :
Touch the screen and crisscross.
Pan :
Drag the screen in any direction to view the desired
part.
・
The operation is used when displaying in a single view
is not available, such as viewing a web page, Office file,
or enlarged still image etc.
Basic operation (Using touch
panel)
Example : Tap

F-01D_EN_ninshou.pdf
Before using the Xi terminal
26
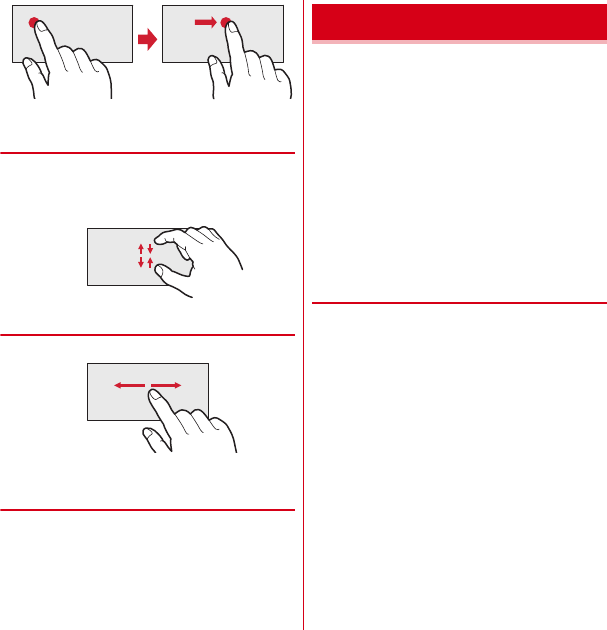
❖
Pinch
Touch the screen with two fingers and widen (pinch-out)
or narrow (pinch-in) the fingers' distance.
・
This operation is mainly for zooming in/out the screen
such as web page or still image.
❖
Flick
Touch the screen and flick away.
◆
Switching between landscape and
portrait view
You can switch between landscape and portrait view by
turning the Xi terminal sideways/upright.
・
Even when you change the orientation of the Xi
terminal, the screen may not change depending on the
screen displayed.
You can set necessary items collectively for the first time
to use the Xi terminal.
・
Each setting can be changed anytime.
1
From the Applications menu, [Settings]
→
[Initial settings]
2
Set each item
Screen lock :
Set screen lock.
→
P46
HOME screen wallpaper :
Set wallpaper on the Home
screen.
→
P30
Photo screen :
Set an image for lock screen.
PhoneBookCopy :
Copy phonebook.
→
P53
Google Account :
Set Google Account.
Charge with Desktop Holder :
TBD
❖
About other initial settings
Set the following items as required in addition to the initial
setting items.
・
Email account settings
→
P75
・
Wi-Fi functions settings
→
P57
・
Access point (ANP) settings
→
P55
Example : Drag
Initial setting
F-01D_EN_ninshou.pdf
Before using the Xi terminal
27
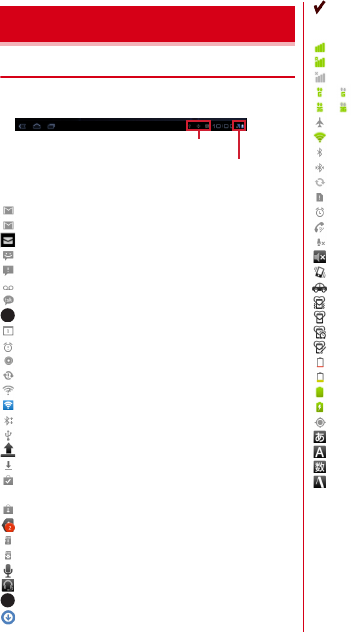
◆
Icons on the status bar
Various conditions can be checked with notification icons
and status icons appearing on the status bar.
■
Main notification icons
: New Gmail message
: New Email message
: New sp-mode mail
: New SMS message, Area mail
: Sending SMS is failed
:
Voice Mail message
: New instant message
: Refreshing Intelligent search (TBD) site
: Notifying calendar
:
During alarm snooze
: Playing a track
: Problem with synchronization
: Wi-Fi is on, and Wi-Fi network is available.
: Wi-Fi tethering is enabled.
: File received via Bluetooth
: USB is connected.
: Uploading data is completed.
: Downloading dada is completed.
: Installing applications from Android Market etc. is
completed.
: Updating Android Market applications is available.
: Hidden notification
: microSD card is not inserted.
: microSD card is unmounted.
: Earphone is connected (using terminal microphone).
: Earphone is connected (using earphone microphone).
: Receiving 1Seg radio wave
:
Notification icon (software update available)
:
Notification icon (software update completed)
■
Main status icons
: Signal strength
: During International roaming
: Out of service area
/ : GSM/GPRS is connected/used.
/ : Connecting/Using 3G (packet)
: Airplane mode
: Wi-Fi is connected.
: Bluetooth function is ON.
: Connecting to Bluetooth device
: During Data synchronization
: miniUIM is not inserted.
: Alarm is set.
: Speaker phone is on.
: Microphone is muted.
: Ringtone volume 0
: Vibration mode is on.
: Public mode (Drive mode)
: Manner mode
: Manner (silent)
: Manner mode (alarm)
: Personalized manner mode
: Charging is needed.
: Battery level is low.
: Battery level is enough.
: Charging
: Positioning with GPS
: ATOK kana input mode
: ATOK alphabet input mode
: ATOK number input mode
: Input ATOK pict/smiley/symbol, phrase, character
code.
Screen/Icon
Notification icon
Status icon

F-01D_EN_ninshou.pdf
Before using the Xi terminal
28
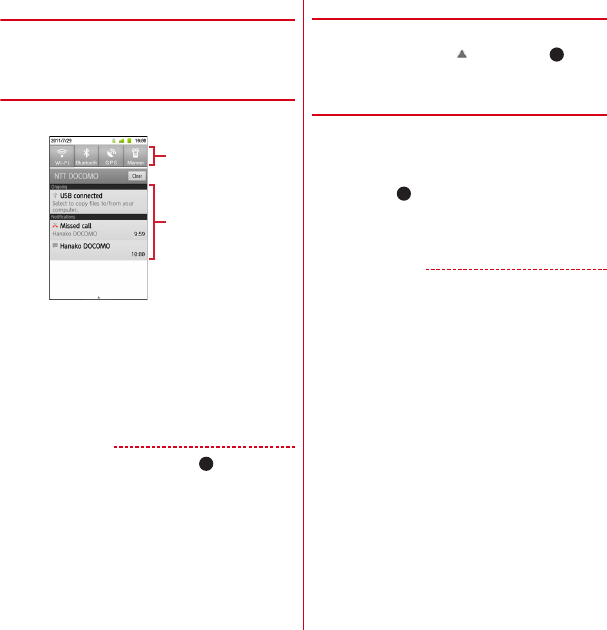
◆
Notification panel
When a notification icon appears, you can open the
Notification panel to check information on messages or
schedule etc.
❖
Opening the Notification panel
1
Drag the status bar downward
・
Tap each notification to check the detailed or make
necessary settings.
・
Tap [Clear] to delete on the notification panel. However,
some notification may be deleted depending on the
content.
・
Tap each setting button to turn ON/OFF Wi-Fi, Bluetooth,
GPS function, Wi-Fi hotspot, or USB access point. When
set to ON, the buttons turn to yellow green.
✔
INFORMATION
・
Alternatively, from the Home screen,
→
Tap
[Notifications] to open the notification panel.
❖
Closing the Notification panel
1
Drag the tab at the bottom of the
Notification panel ( ) upward, or
◆
When the screen display is turned
off
When no operation is performed in certain period of time,
the display is automatically turned off according to the
screen time out setting and the Xi terminal goes into sleep
mode.
1
X
or
The sleep mode is canceled.
・
When screen lock is activated, screen lock is
deactivated.
→
P46
✔
INFORMATION
・
When activating sleep mode manually, press
X
while in display mode.
・
When receiving a call or SMS message while in sleep
mode, sleep mode is deactivated.
Setting buttons
Notifications
F-01D_EN_ninshou.pdf
Before using the Xi terminal
29
Home screen is a start screen to use applications. You can
return to the Home screen anytime by pressing .
You can customize the home screen by locating
applications or widgets. Up to 5 home screens can be set.
You can switch the screens by sliding left and right.
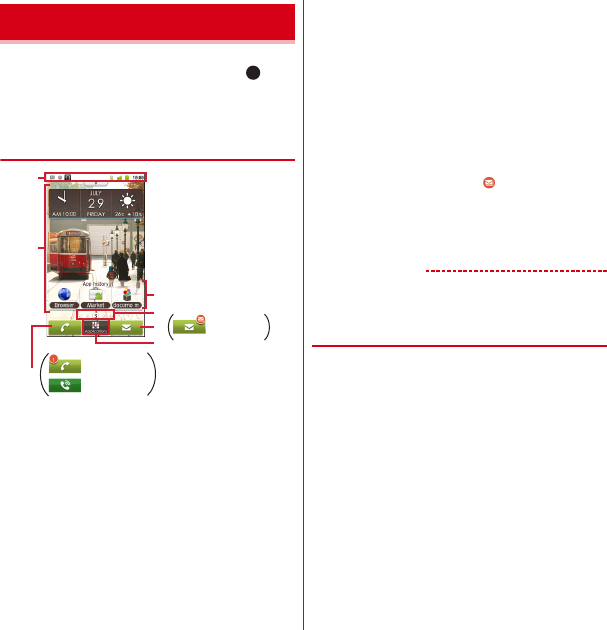
◆
Viewing home screen
a
Status bar
→
P27
Conditions on the Xi terminal, etc. are notified with
icons.
b
Customize area
→
P29
Part of the Home screen, which you can customize You
can locate shortcuts, widgets, folders, wallpaper and
App history. Yon can delete items displayed by default.
c
App history
The 3 most recently-used applications are displayed
among used applications which are activated from the
application menu. Tap to start the applications.
・
Applications displayed with customized shortcuts on
the Home screen are not included.
d
The position of the Home screen
Indicate which screen is currently displayed among the
5 Home screens .
e
Mail/new mail
Tap to activate any of sp-mode mail, Email, or SMS
according to the settings of new mail type. When new
mails arrive, it is notified with .
f
Activate an application
Tap to display the application list.
Touch and hold for 1 second or more to display 5
panels so that you can switch the Home screen.
✔
INFORMATION
・
From the Applications menu, tap [Settings] to display the
setting menu.
→
P55
◆
Customizing the Home screen
You can locate desired application shortcuts or widgets on
the Home screen.
Home screen
a
b
f
e
d
: Missed call
: Calling
: New mail
g
c

F-01D_EN_ninshou.pdf
Before using the Xi terminal
30
❖
Adding shortcuts or widgets
1
From the Home screen,
→
[Edit
Homescreen]
Switch to edit screen.
・
Slide left and right to switch the Home screen that
you want to customize.
2
[Add]
→
[Shortcuts]/[Widgets]/[Folders]/
[App history]
→
Select an item
You can paste a selected item on the Home screen.
・
When you tap [App history], items are not
selectable.
・
You can drag pasted items to change their positions
or put them into to delete.
・
From the Home screen, touch and hold the
customize area for 1 second or more to display the
menu.
3
[Done]
✔
INFORMATION
・
Even though 2 or more widgets for speed dials are
pasted, up to 4 items can be registered. All widgets for
speed dials are linked and their contents become the
same.
❖
Deleting shortcuts or widgets
1
→
Slide left and right to display the Home
screen that you want to customize
2
Select a shortcut or widget you want to
delete (1 sec. or mode)
→
Drag it to
◆
Changing Home screen wallpaper
1
From the Home screen,
→
[Wallpaper]
・
You can also customize by touching and holding the
customize area for 1 second or more and tapping
[Wallpapers].
2
[Gallery]/[Live wallpapers]/[Wallpaper]
→
Select an image
→
[Set wallpaper]
・
When you select an image by tapping [Gallery],
drag the inside of the trimming frame to specify the
position, and drag the corner of the trimming frame
to zoom in/out, and tap [Save] before setting is
complete.
・
When you tap [Live wallpapers]
→
[Photo Collage],
tap [Settings
・・・
]
→
[Select image folders]
→
[Select folders]
→
Mark a folder to specify so that
you specify an image folder in the microSD. Display
mode can also be set. Still images taken with the
camera are saved in the DCIM\Camera folder, and
downloaded images are saved in the download
folder.
You can also specify an image folder saved to a
microSD card from a PC. For details on saving still
images to a microSD card from a PC, see "Operating
data on a microSD card from a PC".
→
P89
◆
Switching to another home screen
1
From the Applications menu, [Homescreen
selector]
→
[OK]
2
Select another Home screen
・
If you mark [Use by default for this action], the
Home screen will not be displayed when pressing
.
✔
INFORMATION
・
To return to the Home screen, tap [Home] in Step 2.

F-01D_EN_ninshou.pdf
Settings
71
◆
Checking profile
1
From the Applications menu, [Settings]
→
[Profile]
Your phone number and information saved to [Profile]
can be displayed.
◆
Checking device information and
version
1
From the Applications menu, [Settings]
→
[About tablet]
2
Check items
Software updates :
Update software to latest one.
→
P123
Status :
Check battery status, phone number, network
name and address, IMEI (individual serial number),
etc.
Battery use :
Check battery usage for each application.
Legal information :
Check Open source license or the
Terms of use of Google.
Authenticate :
Display authenticate logo
Model numger :
Check the device number.
Android version/Baseband version/Kernel version,
Build number :
Check each version or number.
About phone
F-01D_EN_ninshou.pdf
Appendix/Index
126
The product "F-01D" is declared to conform with the
essential requirements of European Union Directive
1999/5/EC Radio and Telecommunications Terminal
Equipment Directive 3.1(a), 3.1(b) and 3.2. The
Declaration of Conformity can be found on http://
www.fmworld.net/product/phone/doc/.
This tablet PC complies with the EU requirements for
exposure to radio waves.
Your tablet PC is a radio transceiver, designed and
manufactured not to exceed the SAR
*
limits
**
for exposure
to radio-frequency(RF) energy, which SAR
*
value, when
tested for compliance against the standard was 0.637 W/
kg. While there may be differences between the SAR
*
levels of various positions, they all meet
***
the EU
requirements for RF exposure.
* The exposure standard for tablet PC employs a unit of
measurement known as the Specific Absorption Rate,
or SAR.
** The SAR limit for tablet PC used by the public is 2.0
watts/kilogram (W/Kg) averaged over ten grams of
tissue, recommended by The Council of the European
Union. The limit incorporates a substantial margin of
safety to give additional protection for the public and
to account for any variations in measurements.
*** Tests for SAR have been conducted using standard
operation positions with the device transmitting at its
highest certified power level in all tested frequency
bands. Although the SAR is determined at the highest
certified power level, the actual SAR level of the
device while operating can be well below the
maximum value. This is because the device is
designed to operate at multiple power levels so as to
use only the power required to reach the network. In
general, the closer you are to a base station antenna,
the lower the power output.
・
This device complies with part 15 of the FCC rules.
Operation is subject to the following two conditions :
a
this device may not cause harmful interference, and
b
this device must accept any interference received,
including interference that may cause undesired
operation.
・
Changes or modifications made in or to the radio phone,
not expressly approved by the manufacturer, will void
the user's authority to operate the equipment.
Declaration of Conformity Federal Communications
Commission (FCC) Notice

F-01D_EN_ninshou.pdf
Appendix/Index
127
This model device meets the U.S. Government's
requirements for exposure to radio waves.
This model device contains a radio transmitter and
receiver. This model device is designed and manufactured
not to exceed the emission limits for exposure to radio
frequency (RF) energy as set by the FCC of the U.S.
Government. These limits are part of comprehensive
guidelines and establish permitted levels of RF energy for
the general population. The guidelines are based on
standards that were developed by independent scientific
organizations through periodic and thorough evaluation of
scientific studies.
The exposure standard for wireless tablet PC employs a
unit of measurement known as the Specific Absorption
Rate (SAR). The SAR limit set by the FCC is 1.6 W/kg. Tests
for SAR are conducted using standard operating positions
as accepted by the FCC with the device transmitting at its
highest certified power level in all tested frequency bands.
Although the SAR is determined at the highest certified
power level, the actual SAR level of the device while
operating can be well below the maximum value. This is
because the device is designed to operate at multiple
power levels so as to use only the power required to reach
the network. In general, the closer you are to a wireless
base station antenna, the lower the power output level of
the device.
Before a tablet PC model is available for sale to the public,
it must be tested and certified to prove to the FCC that it
does not exceed the limit established by the U.S.
government-adopted requirement for safe exposure. The
tests are performed on position and locations (for
example, worn on the body) as required by FCC for each
model. The highest SAR value for this model device as
reported to the FCC, when worn on the body, is 1.330 W/
kg. (Body-worn measurements differ among phone
models, depending upon available accessories and FCC
requirements).
While there may be differences between the SAR levels at
various positions, they all meet the U.S. government
requirements.
The FCC has granted an Equipment Authorization for this
model device with all reported SAR levels evaluated as in
compliance with the FCC RF exposure guidelines. SAR
information on this model device is on file with the FCC
and can be found under the Equipment Authorization
Search section at http://www.fcc.gov/oet/ea/fccid/ (please
search on FCC ID VQK-F01D).
For body worn operation, this device has been tested and
meets the FCC RF exposure guidelines when used with an
accessory designated for this product or when used with
an accessory that contains no metal.
*
In the United States, the SAR limit for wireless tablet PC used by
the general public is 1.6 Watts/kg (W/kg), averaged over one
gram of tissue. SAR values may vary depending upon national
reporting requirements and the network band.
This equipment has been tested and found to comply with
the limits for a Class B digital device, pursuant to part 15 of
the FCC Rules.
These limits are designed to provide reasonable protection
against harmful interference in a residential installation.
This equipment generates, uses and can radiate radio
frequency energy and, if not installed and used in
accordance with the instructions, may cause harmful
interference to radio communications. However, there is
no guarantee that interference will not occur in a particular
installation.
If this equipment does cause harmful interference to radio
or television reception, which can be determined by
turning the equipment off and on, the user is encouraged
to try to correct the interference by one or more of the
following measures:
- Reorient or relocate the receiving antenna.
- Increase the separation between the equipment and
receiver.
- Connect the equipment into an outlet on a circuit
different from that to which the receiver is connected.
- Consult the dealer or an experienced radio/TV
technician for help.
FCC RF Exposure Information

F-01D_EN_ninshou.pdf
Appendix/Index
128
AIRCRAFT
Switch off your wireless device when boarding an aircraft
or whenever you are instructed to do so by airline staff. If
your device offers flight mode or similar feature consult
airline staff as to whether it can be used on board.
DRIVING
Full attention should be given to driving at all times and
local laws and regulations restricting the use of wireless
devices while driving must be observed.
HOSPITALS
Mobile phones should be switched off wherever you are
requested to do so in hospitals, clinics or health care
facilities. These requests are designed to prevent possible
interference with sensitive medical equipment.
PETROL STATIONS
Obey all posted signs with respect to the use of wireless
devices or other radio equipment in locations with
flammable material and chemicals. Switch off your
wireless device whenever you are instructed to do so by
authorized staff.
INTERFERENCE
Care must be taken when using the phone in close
proximity to personal medical devices, such as
pacemakers and hearing aids.
Pacemakers
Pacemaker manufacturers recommend that a minimum
separation of 15 cm be maintained between a mobile
phone and a pace maker to avoid potential interference
with the pacemaker. To achieve this use the phone on the
opposite ear to your pacemaker and does not carry it in a
breast pocket.
Hearing Aids
Some digital wireless phones may interfere with some
hearing aids. In the event of such interference, you may
want to consult your hearing aid manufacturer to discuss
alternatives.
For other Medical Devices :
Please consult your physician and the device manufacturer
to determine if operation of your phone may interfere with
the operation of your medical device.
This product and its accessories may be under coverage of
the Export Administration Regulations of Japan ("Foreign
Exchange and Foreign Trade Control Laws" and the
related laws and regulations). When exporting this
product and its accessories, take necessary procedures on
your responsibility and expense. For details, contact
Ministry of Economy, Trade and Industry of Japan.
Important Safety Information
Export Administration
Regulations
F-01D_EN_ninshou.pdf
Appendix/Index
129
◆
Copyrights and portrait rights
Except for the case protected by copyright laws such as
personal use, use of Xi terminal to reproduce, alter, or
publicly transmit recorded pictures or sounds, or
copyrighted text, images, music or software downloaded
from websites without the copyright holder's authorization
is prohibited.
Note that taking photos or recordings at some
demonstrations, performances or exhibitions may be
prohibited even when only for personal use.
Avoid taking pictures of others with Xi terminal without
their consent or disclosing recorded pictures of others
without their consent to general public through Internet
websites etc., because they may infringe on portrait rights.
◆
Trademarks
Company and product names mentioned in this manual
are trademarks or registered trademarks of their respective
holders.
・
"FOMA", "i-mode", "i-
α
ppli", "Deco-mail", "ToruCa",
"mopera", "mopera U", "WORLD CALL", "WORLD
WING", and logo of "Koe-no-Takuhaibin" are trademarks
or registered trademarks of NTT DOCOMO.
・
"Catch Phone (Call waiting service)" is a registered
trademark of Nippon Telegraph and Telephone
Corporation.
・
McAfee
®
is registered trademarks or trademarks of
McAfee, Inc. and/or its affiliates in the US and/or other
countries.
・
Rovi, G-GUIDE, G-GUIDE MOBILE and G-Guide
related logos are trademarks or registered
trademarks of Rovi Corporation and/or its subsidiaries in
Japan.
・
This product contains Adobe
®
Flash
®
Player and
Adobe
®
Flash
®
Lite
®
of Adobe Systems Incorporated.
Adobe Flash Player Copyright
©
1996-2011 Adobe
Systems Incorporated. All rights reserved.
Adobe Flash Lite Copyright
©
2003-2011 Adobe Systems
Incorporated. All rights reserved.
Adobe, Flash and Flash Lite are
either registered trademarks or
trademarks of Adobe Systems
Incorporated in the United States and/or other countries.
・
"ATOK" is registered trademark of
Justsystem Corporation. "ATOK" is a
copyrighted work of Justsystem
Corporation and other rights are those of
Justsystem Corporation and respective owners.
・
QR code is a registered trademark of Denso Wave Inc.
・
Twitter and Twitter logo are trademarks or registered
trademarks of Twitter, Inc.
・
Facebook and Facebook logo are trademarks or
registered trademarks of Facebook, Inc.
・
"mixi" and "mymixi" are registered trademarks of mixi,
Inc.
・
ThinkFree ia a registered trade mark of Hancom Inc.
・
microSDHC Logo is a trademark of SD-3C, LLC.
・
Microsoft
®
, Windows
®
, Windows Media
®
,
Windows Vista
®
and PowerPoint
®
are trademarks or
registered trademarks of "Microsoft Corporation" in the
US and other countries.
・
Microsoft Excel and Microsoft Word are product names
of Microsoft Corporation in the U.S.A. In this manual,
they may be described as Excel and Word.
・
The abbreviations of operating systems (Japanese
versions) below are used in this manual.
- Windows 7 stands for Microsoft
®
Windows
®
7
(Starter, Home Basic, Home Premium, Professional,
Enterprise and Ultimate).
- Windows Vista stands for Windows Vista
®
(Home
Basic, Home Premium, Business, Enterprise and
Ultimate).
- Windows XP indicates the Microsoft
®
Windows
®
XP
Professional operating system or Microsoft
®
Windows
®
XP Home Edition operating system.
Intellectual Property Right

F-01D_EN_ninshou.pdf
Appendix/Index
130
・
Google, Google logo, Android, Android logo, Android
Market, Android Market logo, Gmail, Gmail logo, Google
Latitude, YouTube, YouTube logo and Picasa are
registered trademarks of Google Inc.
・
The Bluetooth
®
word mark and logos are owned by the
Bluetooth SIG, INC. and any use of such marks by NTT
DOCOMO, INC. is under license. Other trademarks and
names are those of their respective owners.
・
"
モリサワ
UD
新丸ゴ
(MorisawaUD Shin Maru Go)" is
provided by Morisawa & Company, Ltd. and the
copyrights of its font data belong to them.
・
Wi-Fi
®
, Wi-Fi Alliance
®
, WMN
®
and logos of Wi-Fi and
Wi-Fi CERTIFIED are registered trademarks of Wi-Fi
Alliance.
・
Wi-Fi CERTIFIED
™
, WPA
™
, WPA2
™
and Wi-Fi Protected
Setup
™
are trademarks of Wi-Fi Alliance.
・
AOSS
™
is a trademark of BUFFALO INC.
・
OBEX
™
is a trademark of Infrared Data
Association
®
.
・
Other company and product names mentioned
in this manual are trademarks or registered trademarks
of their respective holders.
◆
Others
・
This product is licensed based on MPEG-4 Visual Patent
Portfolio License. The use of MPEG-4 Video Codec
function is allowed for personal and nonprofit use only
in the cases below.
- Recording moving pictures and i-motion that conform
to MPEG-4 Visual Standard (hereinafter referred to as
MPEG-4 Video)
- Playing MPEG-4 Videos recorded personally by
consumers not engaged in profit activities
- Playing MPEG-4 Video supplied from the provider
licensed from MPEG-LA
For further utilizing such as promotion, in-house use or
profit-making business, please contact MPEG LA, LLC
in U.S.
・
This product is licensed under the AVC patent portfolio
license for the personal and noncommercial use of a
consumer to (i) encode video in compliance with the
AVC standard (henceforth referred to as AVC video) and/
or (ii) decode AVC video that was encoded by a
consumer engaged in a personal and noncommercial
activity and/or was obtained from a video provider
licensed to provide AVC video. No license is granted or
shall be implied for any other use. Additional
information may be obtained from MPEG LA, L.L.C.
See http://www.mpegla.com
・
This product is licensed under the VC-1 Patent Portfolio
License for the personal and noncommercial use of a
consumer to (i) encode video in compliance with the VC-
1 standard (henceforth referred to as VC-1 video) and/or
(ii) decode VC-1 video that was encoded by a consumer
engaged in a personal and noncommercial activity and/
or was obtained from a video provider licensed to
provide VC-1 video. No license is granted or shall be
implied for any other use. Additional information may
be obtained from MPEG LA, L.L.C.
See http://www.mpegla.com

F-01D_EN_ninshou.pdf
Appendix/Index
131
◆
Adobe
®
Flash
®
Lite
®
End User
License Agreement
(i) a prohibition against distribution and copying, (ii) a
prohibition against modifications and derivative works,
(iii) a prohibition against decompiling, reverse
engineering, disassembling, and otherwise reducing the
software to a human-perceivable form, (iv) a provision
indicating ownership of software by this device
manufacturer and its suppliers, (v) a disclaimer of indirect,
special, incidental, punitive, and consequential damages,
and (vi) other industry standard disclaimers and
limitations, including, as applicable: a disclaimer of all
applicable statutory warranties, to the full extent allowed
by law, a limitation of liability not to exceed the price of
this product, and/or a provision that the end user's sole
remedy shall be a right of return and refund, if any, from
this device manufacturer.
◆
Open source software
This product contains Android software developed by
Google Inc. and the following open source software
complying with Apache License, Version 2.0 (http://
www.apache.org/licenses/).
・
httpmime-4.0.1.jar
・
httpmime-4.1-alpha2.jar
・
apache-mime4j-0.6.jar
・
signpost-commonshttp4-1.2.1.1.jar
・
signpost-core-1.2.1.1.jar
This product contains software complying with GNU
General Public License (GPL), GNU Lesser General Public
License (LGPL), etc. For more information, refer to the
following website.
http://www.fmworld.net/product/phone/sp/android/
develop/
International call access code
for the country you stay
Repairs
General Inquiries
<docomo Information Center>
Failures encountered overseas
<Network Support and Operation Center>
Loss or theft of Xi terminal or payment of cumulative cost overseas
<docomo Information Center>
* Service available in: English, Portuguese, Chinese, Spanish, Korean.
* Unavailable from part of IP phones.
(Business hours : 9:00 a.m. to 8:00 p.m. (open all year round))
0120-005-250 (toll free)
(Business hours : 9:00 a.m. to 8:00 p.m.)
* Unavailable from part of IP phones.
■
From land-line phones (In Japanese only)
0120-800-000 (toll free)
* Unavailable from land-line phones, etc.
(No prefix) 151 (toll free)
■
From DOCOMO mobile phones (In Japanese only)
●
Please confirm the phone number before you dial.
●
For Applications or Repairs and After-Sales Service, please contact the above-mentioned information center or the docomo
shop etc. near you on the NTT DOCOMO website or the i-mode site.
(available 24 hours a day)
* You are charged a call fee to Japan when calling from a land-line phone, etc.
※
If you use F-01D, you should dial the number 㧗81-3-6832-6600
(to enter '㧗', press and hold the '0' key for at least one second).
* You are charged a call fee to Japan when calling from a land-line phone, etc.
※
If you use F-01D, you should dial the number 㧗81-3-6718-1414
(to enter '㧗', press and hold the '0' key for at least one second).
■
From land-line phones <Universal number>
●
If you lose your Xi terminal or have it stolen, immediately take the steps necessary for suspending the use of the Xi terminal.
●
If the Xi terminal you purchased is damaged, bring your Xi terminal to a repair counter specified by DOCOMO after returning to Japan.
* You might be charged a domestic call fee according to the call rate for the country
you stay.
※
For international call access codes for major countries and universal number
international prefix, refer to DOCOMO International Services website.
Universal number
international prefix -8000120-0151
*
CA92002-XXXX
2011.9 (1st Edition)
To prevent damage to the environment, bring
used battery packs to a docomo service counter,
a docomo agent or a recycle center.
-81-3-6832-6600
*
(toll free)
(Business hours : 24 hours (open all year round))
* Unavailable from part of IP phones.
■
From land-line phones (In Japanese only)
0120-800-000 (toll free)
* Unavailable from land-line phones, etc.
(No prefix) 113 (toll free)
■
From DOCOMO mobile phones (In Japanese only)
■
From land-line phones <Universal number>
* You might be charged a domestic call fee according to the call rate for the country
you stay.
※
For international call access codes for major countries and universal number
international prefix, refer to DOCOMO International Services website.
Universal number
international prefix -8005931-8600
*
NTT DOCOMO website http://www.nttdocomo.co.jp/english/
■
From DOCOMO mobile phones
International call access code
for the country you stay
(available 24 hours a day)
-81-3-6718-1414
*
(toll free)
■
From DOCOMO mobile phones
Don't forget your mobile phone ・・・ or your manners!
When using your mobile phone in a public place, don't forget to
show common courtesy and consideration for others around you.
Users Manual2
F-01D_EN_ninshou.pdf
Before using the Xi terminal
20
Before using the Xi terminal
<Functions>
a
Notification LED
Red light : Charging (except when flashing green)
Flashing green : Incoming/unread mails, etc.
Green light once : Power ON
b
Microphone
c
In-camera
d
Light sensor
Sense ambient brightness and automatically adjust
brightness of the display backlight (may not be
adjusted correctly, if covered).
e
Display (Touch panel)
f
Speaker
g
1Seg antenna
*
h
GPS antenna
*
i
FOMA antenna
*
j
Out-camera
k
Charging jack
l
Earphone/Microphone jack (waterproof)
m
External connection jack
Connect the FOMA charging microUSB adapter T01 or
included USB Cable for PC connection T01.
n
microSD card slot
o
miniUIM card slot
→
P21
*
The antenna is built-in the Xi terminal. Covering around the
antenna by the hand may affect the quality.
<Key functions>
Key functions are as follows.
a
Power key
X
Press : Turn the power on, activate/deactivate the sleep
mode.
Press and hold : Turn the power off, activate/deactivate
manner mode, public mode or Airplane mode.
b
Volume button
ty
Press : Adjust volume.
Press and hold
y
for 1 second or more : Activate/
Deactivate the manner mode.
Part names and functions
b
a
a
b
c
d
e
f
i
j
k
g
f
h
l
m
n
o

F-01D_EN_ninshou.pdf
Before using the Xi terminal
21
The miniUIM is an IC card that stores user information.
・
If the miniUIM is not attached, you cannot use some
functions of the Xi terminal.
・
For details on miniUIM, refer to the miniUIM manual.
◆
Attaching/Removing miniUIM
・
Attach/Remove the miniUIM after turning OFF the
power.
■
Attaching
Open the slot cap of the Xi terminal (
a
), align the miniUIM
with the UIM card mark on the back side of the Xi terminal
and insert it in the direction of
b
all the way until it clicks.
・
Check the orientation of UIM corner cut.
■
Removing
Open the slot cap of the Xi terminal (
a
), press the miniUIM
lightly toward
b
, pull out straight the popped out miniUIM
in the direction of
c
.
✔
INFORMATION
・
When handling miniUIM, take care not to touch or scratch
the IC part. Note that attaching or removing miniUIM
forcibly into the Xi terminal may damage miniUIM.
・
Note that the miniUIM card may pop out of the Xi
terminal when removing it.
◆
Security codes of miniUIM
A miniUIM has a security code named PIN code. The PIN
code is set to "0000" by default, which you can change by
yourself.
→
P45
miniUIM
IC
mini UIM card
Corner cut
b
a
b
c
a
F-01D_EN_ninshou.pdf
Before using the Xi terminal
22
❖
Precautions on charging
・
If you use the Xi terminal while charging, it may take
time to complete charging or charging may not
complete.
・
It is normal for the Xi terminal or AC adapter to become
warm while charging. When the Xi terminal becomes
warm, charging may stop temporarily for the safety.
When the Xi terminal becomes extremely hot, stop
using immediately.
・
The following conditions will lead to a charging error. In
the case of charging error, running functions are
stopped, the power is turned off, and the notification
LED lights red. Remove the charger.
- Charging voltage is high
- The internal battery is over-charged/over-discharged
- Charging is not complete after 5 hours or more
❖
Charging times (approximate)
The following is the time for charging an empty internal
battery with F-01D's power switched OFF. Charging with
the terminal ON or under low temperature requires longer
time.
❖
Operation time on full charge
(approximate)
The following time varies by the charging method and
operating environment.
→
P124
❖
Internal battery life
・
The internal battery is a consumable part. Each time it is
charged, time available with each charging reduces.
・
When a time available with each charging is reduced to
about a half from that of a new battery, replacement of
the internal battery is recommended because it is near
the end of life. For replacement of the internal battery,
contact "Repairs" on the last page of the instruction
manual (in Japanese only) or a DOCOMO-specified
repair office.
❖
Available charging adapter
For details, refer to the operation manual of AC adapter or
DC adapter.
FOMA AC Adapter 01 (optional) :
100V AC only
FOMA AC Adapter 02/FOMA AC Adapter 01 for Global use
(optional) :
Between 100V and 240V AC AC Adaptor has
a plug dedicated to 100V AC (for domestic use). When
using the AC adapter in the range of AC 100V and 240V
overseas, a conversion plug adapter applicable to the
country you are staying is required. Also, do not charge
the battery with a transformer for overseas travel.
FOMA DC Adapter 01/02 (optional) :
Use for charging in a
car.
Charging
AC adapter
FOMA charging microUSB adapter T01
: Approx.
●●
min.
Desktop holder : Approx.
●●
min.
DC adapter
FOMA charging microUSB adapter T01
: Approx.
●●
min.
Desktop holder : Approx.
●●
min.
Continuous
stand-by
time
FOMA/
3G
Stationary (Auto) : Approx.
●●
H
Moving (Auto) : Approx.
●●
H
Moving (3G static) : Approx.
●●
H
GSM
Stationary (Auto) : Approx.
●●
H
F-01D_EN_ninshou.pdf
Before using the Xi terminal
23
❖
Checking battery level
A battery icon is displayed on the status bar to show
estimated battery level.
→
P27
・
When the battery level is nearly empty, a warning
message appears, and power is turned off after a few
seconds.
・
From the Applications menu, tap [Settings]
→
[About
phone]
→
[Status] to check the remaining battery power
by percentage.
✔
INFORMATION
・
When charging starts with the battery empty, the Xi
terminal may not be immediately activated after turning
the power ON. In this case, charge the Xi terminal while
keeping it turned OFF, and turn it on after a while.
◆
Charging with Desktop holder
Charge the Xi terminal with FOMA AC Adapter 01/02
(optional), the included FOMA charging microUSB adapter
T01 and desktop holder F34.
a
Insert the AC adapter connector to the external
connection jack of the FOMA charging microUSB
adapter
b
Insert the microUSB plug of the charging microUSB
adapter into the jack on the back side of the desktop
holder
c
Unfold the AC adapters power plug and insert it into a
100V AC outlet
d
Insert the Xi terminal into the desktop holder
・
Notification LED lights red while charging, and turns
off when charging is complete.
e
When charging is complete, remove the Xi terminal
from the desktop holder
f
Remove the micro USB plug of the charging microUSB
adapter from the desktop holder, and remove the AC
adapter connector from the external connection jack of
the charging microUSB adapter
・
Pull it straight while pressing the release button of
the connector.
g
Remove the AC adapter power plug from the wall outlet
To AC 100V
outlet
Light
Desktop
holder Jack on the back side
of desktop holder
Power plug
microUSB plug
AC Adapter F05
Power cable
USB cable
F-01D_EN_ninshou.pdf
Before using the Xi terminal
24
◆
Charging with AC adapter
Charge the Xi terminal with FOMA AC Adapter 01/02
(optional) and the included FOMA charging microUSB
adapter T01.
a
Insert the AC adapter connector to the external
connection jack of the FOMA charging microUSB
adapter
b
Open the jack cap (
a
) of the Xi terminal, insert the
microUSB plug of the charging microUSB adapter into
the jack (
b
)
c
Insert the AC adapter power plug into an outlet
・
Notification LED lights red while charging, and turns
off when charging is complete.
d
After charging is completed, remove the microUSB
plug from the Xi terminal, and close the connection jack
cap
e
Remove the AC adapter connector from the charging
microUSB adapter
・
Pull it straight while pressing the release button of
the connector.
f
Remove the AC adapter power plug from the wall outlet
✔
INFORMATION
・
FOMA charging microUSB adapter T01 is an adapter for
connecting the Xi terminal with the AC adapter. If you
connect the Xi terminal with a PC using the FOMA USB
Cable etc., you cannot send/receive data or charge the Xi
terminal. For connection to a PC, use the included FOMA
USB Cable for PC connection T01.
◆
Charging with FOMA USB Cable for
PC connection
If you connect the Xi terminal with a PC using the included
FOMA USB Cable for PC connection T01, you can charge
the Xi terminal.
・
When "
新しいハードウェアの検索ウィザードの開始
(New
hardware detection wizard)" appears on the PC, select "
キャンセル
(Cancel)".
◆
Turning power ON
1
Press and hold
X
(approx. 2 sec.) until
the notification LED lights in green
The lock screen appears following the startup screen.
・
Unlocking the screen
→
P46
❖
Turning power ON for the first time
When you turn power ON for the first time, tap [OK] on the
confirmation screen for software update to make initial
settings from "
はじめに
(Getting started)". The settings
made can be changed later.
→
P26
1
[Settings] on each item
→
Follow the screen
to set items
To AC 100V
outlet
microUSB
plug
External connection
jack
Jack cap
Power plug
Light
AC Adapter F05
Power cable
USB cable
Power ON/OFF

F-01D_EN_ninshou.pdf
Before using the Xi terminal
25
◆
Turning power OFF
1
Press and hold
X
until the phone
options menu appears
2
[Power off]
→
[OK]
After vibrating once, the terminal turns off.
The Xi terminal display is composed of a touch panel
designed for being touched directly with fingers. The Xi
terminal supports a motion sensor that senses the
orientation or motion of the terminal. You can switch the
display view by tilting the Xi terminal vertical or
horizontal.
◆
Notes for using the touch panel
The touch panel is designed for being touched lightly with
fingers. Do not push it forcibly with a finger or press it with
sharp objects (nail, ballpoint pen, pin, etc.).
・
Touching the touch panel may not work in the following
cases. Note that it may cause malfunction.
- Operation with gloved hands
- Operation with tip of fingernail
- Operation with a foreign object on the display
- Operation with protective sheet or seal on the display
- Operation with wet hand
- Operation under water
◆
Main operations
❖
Tap/Double-tap
Tap :
Touch the screen lightly and release. The operation
becomes effective when you release your finger from
the screen.
Double-tap :
Tap twice quickly. By double-tapping you can
zoom in/out the screen such as web page or still image.
❖
Touch and hold for 1 second or more
Touch and hold the screen for 1 second or more and
release. You may need to perform the subsequent action
with your finger kept touching the screen.
*
In this manual, the operation may be described as "(1 sec. or
more)".
❖
Drag/Slide/Pan
Drag :
Touch an item or icon on the screen and move it to
the desired position.
Slide :
Touch the screen and crisscross.
Pan :
Drag the screen in any direction to view the desired
part.
・
The operation is used when displaying in a single view
is not available, such as viewing a web page, Office file,
or enlarged still image etc.
Basic operation (Using touch
panel)
Example : Tap
F-01D_EN_ninshou.pdf
Before using the Xi terminal
26
❖
Pinch
Touch the screen with two fingers and widen (pinch-out)
or narrow (pinch-in) the fingers' distance.
・
This operation is mainly for zooming in/out the screen
such as web page or still image.
❖
Flick
Touch the screen and flick away.
◆
Switching between landscape and
portrait view
You can switch between landscape and portrait view by
turning the Xi terminal sideways/upright.
・
Even when you change the orientation of the Xi
terminal, the screen may not change depending on the
screen displayed.
You can set necessary items collectively for the first time
to use the Xi terminal.
・
Each setting can be changed anytime.
1
From the Applications menu, [Settings]
→
[Initial settings]
2
Set each item
Screen lock :
Set screen lock.
→
P46
HOME screen wallpaper :
Set wallpaper on the Home
screen.
→
P30
Photo screen :
Set an image for lock screen.
PhoneBookCopy :
Copy phonebook.
→
P53
Google Account :
Set Google Account.
Charge with Desktop Holder :
TBD
❖
About other initial settings
Set the following items as required in addition to the initial
setting items.
・
Email account settings
→
P75
・
Wi-Fi functions settings
→
P57
・
Access point (ANP) settings
→
P55
Example : Drag
Initial setting

F-01D_EN_ninshou.pdf
Before using the Xi terminal
27
◆
Icons on the status bar
Various conditions can be checked with notification icons
and status icons appearing on the status bar.
■
Main notification icons
: New Gmail message
: New Email message
: New sp-mode mail
: New SMS message, Area mail
: Sending SMS is failed
:
Voice Mail message
: New instant message
: Refreshing Intelligent search (TBD) site
: Notifying calendar
:
During alarm snooze
: Playing a track
: Problem with synchronization
: Wi-Fi is on, and Wi-Fi network is available.
: Wi-Fi tethering is enabled.
: File received via Bluetooth
: USB is connected.
: Uploading data is completed.
: Downloading dada is completed.
: Installing applications from Android Market etc. is
completed.
: Updating Android Market applications is available.
: Hidden notification
: microSD card is not inserted.
: microSD card is unmounted.
: Earphone is connected (using terminal microphone).
: Earphone is connected (using earphone microphone).
: Receiving 1Seg radio wave
:
Notification icon (software update available)
:
Notification icon (software update completed)
■
Main status icons
: Signal strength
: During International roaming
: Out of service area
/ : GSM/GPRS is connected/used.
/ : Connecting/Using 3G (packet)
: Airplane mode
: Wi-Fi is connected.
: Bluetooth function is ON.
: Connecting to Bluetooth device
: During Data synchronization
: miniUIM is not inserted.
: Alarm is set.
: Speaker phone is on.
: Microphone is muted.
: Ringtone volume 0
: Vibration mode is on.
: Public mode (Drive mode)
: Manner mode
: Manner (silent)
: Manner mode (alarm)
: Personalized manner mode
: Charging is needed.
: Battery level is low.
: Battery level is enough.
: Charging
: Positioning with GPS
: ATOK kana input mode
: ATOK alphabet input mode
: ATOK number input mode
: Input ATOK pict/smiley/symbol, phrase, character
code.
Screen/Icon
Notification icon
Status icon
F-01D_EN_ninshou.pdf
Before using the Xi terminal
28
◆
Notification panel
When a notification icon appears, you can open the
Notification panel to check information on messages or
schedule etc.
❖
Opening the Notification panel
1
Drag the status bar downward
・
Tap each notification to check the detailed or make
necessary settings.
・
Tap [Clear] to delete on the notification panel. However,
some notification may be deleted depending on the
content.
・
Tap each setting button to turn ON/OFF Wi-Fi, Bluetooth,
GPS function, Wi-Fi hotspot, or USB access point. When
set to ON, the buttons turn to yellow green.
✔
INFORMATION
・
Alternatively, from the Home screen,
→
Tap
[Notifications] to open the notification panel.
❖
Closing the Notification panel
1
Drag the tab at the bottom of the
Notification panel ( ) upward, or
◆
When the screen display is turned
off
When no operation is performed in certain period of time,
the display is automatically turned off according to the
screen time out setting and the Xi terminal goes into sleep
mode.
1
X
or
The sleep mode is canceled.
・
When screen lock is activated, screen lock is
deactivated.
→
P46
✔
INFORMATION
・
When activating sleep mode manually, press
X
while in display mode.
・
When receiving a call or SMS message while in sleep
mode, sleep mode is deactivated.
Setting buttons
Notifications

F-01D_EN_ninshou.pdf
Before using the Xi terminal
29
Home screen is a start screen to use applications. You can
return to the Home screen anytime by pressing .
You can customize the home screen by locating
applications or widgets. Up to 5 home screens can be set.
You can switch the screens by sliding left and right.
◆
Viewing home screen
a
Status bar
→
P27
Conditions on the Xi terminal, etc. are notified with
icons.
b
Customize area
→
P29
Part of the Home screen, which you can customize You
can locate shortcuts, widgets, folders, wallpaper and
App history. Yon can delete items displayed by default.
c
App history
The 3 most recently-used applications are displayed
among used applications which are activated from the
application menu. Tap to start the applications.
・
Applications displayed with customized shortcuts on
the Home screen are not included.
d
The position of the Home screen
Indicate which screen is currently displayed among the
5 Home screens .
e
Mail/new mail
Tap to activate any of sp-mode mail, Email, or SMS
according to the settings of new mail type. When new
mails arrive, it is notified with .
f
Activate an application
Tap to display the application list.
Touch and hold for 1 second or more to display 5
panels so that you can switch the Home screen.
✔
INFORMATION
・
From the Applications menu, tap [Settings] to display the
setting menu.
→
P55
◆
Customizing the Home screen
You can locate desired application shortcuts or widgets on
the Home screen.
Home screen
a
b
f
e
d
: Missed call
: Calling
: New mail
g
c
F-01D_EN_ninshou.pdf
Before using the Xi terminal
30
❖
Adding shortcuts or widgets
1
From the Home screen,
→
[Edit
Homescreen]
Switch to edit screen.
・
Slide left and right to switch the Home screen that
you want to customize.
2
[Add]
→
[Shortcuts]/[Widgets]/[Folders]/
[App history]
→
Select an item
You can paste a selected item on the Home screen.
・
When you tap [App history], items are not
selectable.
・
You can drag pasted items to change their positions
or put them into to delete.
・
From the Home screen, touch and hold the
customize area for 1 second or more to display the
menu.
3
[Done]
✔
INFORMATION
・
Even though 2 or more widgets for speed dials are
pasted, up to 4 items can be registered. All widgets for
speed dials are linked and their contents become the
same.
❖
Deleting shortcuts or widgets
1
→
Slide left and right to display the Home
screen that you want to customize
2
Select a shortcut or widget you want to
delete (1 sec. or mode)
→
Drag it to
◆
Changing Home screen wallpaper
1
From the Home screen,
→
[Wallpaper]
・
You can also customize by touching and holding the
customize area for 1 second or more and tapping
[Wallpapers].
2
[Gallery]/[Live wallpapers]/[Wallpaper]
→
Select an image
→
[Set wallpaper]
・
When you select an image by tapping [Gallery],
drag the inside of the trimming frame to specify the
position, and drag the corner of the trimming frame
to zoom in/out, and tap [Save] before setting is
complete.
・
When you tap [Live wallpapers]
→
[Photo Collage],
tap [Settings
・・・
]
→
[Select image folders]
→
[Select folders]
→
Mark a folder to specify so that
you specify an image folder in the microSD. Display
mode can also be set. Still images taken with the
camera are saved in the DCIM\Camera folder, and
downloaded images are saved in the download
folder.
You can also specify an image folder saved to a
microSD card from a PC. For details on saving still
images to a microSD card from a PC, see "Operating
data on a microSD card from a PC".
→
P89
◆
Switching to another home screen
1
From the Applications menu, [Homescreen
selector]
→
[OK]
2
Select another Home screen
・
If you mark [Use by default for this action], the
Home screen will not be displayed when pressing
.
✔
INFORMATION
・
To return to the Home screen, tap [Home] in Step 2.

F-01D_EN_ninshou.pdf
Settings
71
◆
Checking profile
1
From the Applications menu, [Settings]
→
[Profile]
Your phone number and information saved to [Profile]
can be displayed.
◆
Checking device information and
version
1
From the Applications menu, [Settings]
→
[About tablet]
2
Check items
Software updates :
Update software to latest one.
→
P123
Status :
Check battery status, phone number, network
name and address, IMEI (individual serial number),
etc.
Battery use :
Check battery usage for each application.
Legal information :
Check Open source license or the
Terms of use of Google.
Authenticate :
Display authenticate logo
Model numger :
Check the device number.
Android version/Baseband version/Kernel version,
Build number :
Check each version or number.
About phone

F-01D_EN_ninshou.pdf
Appendix/Index
126
The product "F-01D" is declared to conform with the
essential requirements of European Union Directive
1999/5/EC Radio and Telecommunications Terminal
Equipment Directive 3.1(a), 3.1(b) and 3.2. The
Declaration of Conformity can be found on http://
www.fmworld.net/product/phone/doc/.
This tablet PC complies with the EU requirements for
exposure to radio waves.
Your tablet PC is a radio transceiver, designed and
manufactured not to exceed the SAR
*
limits
**
for exposure
to radio-frequency(RF) energy, which SAR
*
value, when
tested for compliance against the standard was 0.637 W/
kg. While there may be differences between the SAR
*
levels of various positions, they all meet
***
the EU
requirements for RF exposure.
* The exposure standard for tablet PC employs a unit of
measurement known as the Specific Absorption Rate,
or SAR.
** The SAR limit for tablet PC used by the public is 2.0
watts/kilogram (W/Kg) averaged over ten grams of
tissue, recommended by The Council of the European
Union. The limit incorporates a substantial margin of
safety to give additional protection for the public and
to account for any variations in measurements.
*** Tests for SAR have been conducted using standard
operation positions with the device transmitting at its
highest certified power level in all tested frequency
bands. Although the SAR is determined at the highest
certified power level, the actual SAR level of the
device while operating can be well below the
maximum value. This is because the device is
designed to operate at multiple power levels so as to
use only the power required to reach the network. In
general, the closer you are to a base station antenna,
the lower the power output.
・
This device complies with part 15 of the FCC rules.
Operation is subject to the following two conditions :
a
this device may not cause harmful interference, and
b
this device must accept any interference received,
including interference that may cause undesired
operation.
・
Changes or modifications made in or to the radio phone,
not expressly approved by the manufacturer, will void
the user's authority to operate the equipment.
Declaration of Conformity Federal Communications
Commission (FCC) Notice

F-01D_EN_ninshou.pdf
Appendix/Index
127
This model device meets the U.S. Government's
requirements for exposure to radio waves.
This model device contains a radio transmitter and
receiver. This model device is designed and manufactured
not to exceed the emission limits for exposure to radio
frequency (RF) energy as set by the FCC of the U.S.
Government. These limits are part of comprehensive
guidelines and establish permitted levels of RF energy for
the general population. The guidelines are based on
standards that were developed by independent scientific
organizations through periodic and thorough evaluation of
scientific studies.
The exposure standard for wireless tablet PC employs a
unit of measurement known as the Specific Absorption
Rate (SAR). The SAR limit set by the FCC is 1.6 W/kg. Tests
for SAR are conducted using standard operating positions
as accepted by the FCC with the device transmitting at its
highest certified power level in all tested frequency bands.
Although the SAR is determined at the highest certified
power level, the actual SAR level of the device while
operating can be well below the maximum value. This is
because the device is designed to operate at multiple
power levels so as to use only the power required to reach
the network. In general, the closer you are to a wireless
base station antenna, the lower the power output level of
the device.
Before a tablet PC model is available for sale to the public,
it must be tested and certified to prove to the FCC that it
does not exceed the limit established by the U.S.
government-adopted requirement for safe exposure. The
tests are performed on position and locations (for
example, worn on the body) as required by FCC for each
model. The highest SAR value for this model device as
reported to the FCC, when worn on the body, is 1.330 W/
kg. (Body-worn measurements differ among phone
models, depending upon available accessories and FCC
requirements).
While there may be differences between the SAR levels at
various positions, they all meet the U.S. government
requirements.
The FCC has granted an Equipment Authorization for this
model device with all reported SAR levels evaluated as in
compliance with the FCC RF exposure guidelines. SAR
information on this model device is on file with the FCC
and can be found under the Equipment Authorization
Search section at http://www.fcc.gov/oet/ea/fccid/ (please
search on FCC ID VQK-F01D).
For body worn operation, this device has been tested and
meets the FCC RF exposure guidelines when used with an
accessory designated for this product or when used with
an accessory that contains no metal.
*
In the United States, the SAR limit for wireless tablet PC used by
the general public is 1.6 Watts/kg (W/kg), averaged over one
gram of tissue. SAR values may vary depending upon national
reporting requirements and the network band.
This equipment has been tested and found to comply with
the limits for a Class B digital device, pursuant to part 15 of
the FCC Rules.
These limits are designed to provide reasonable protection
against harmful interference in a residential installation.
This equipment generates, uses and can radiate radio
frequency energy and, if not installed and used in
accordance with the instructions, may cause harmful
interference to radio communications. However, there is
no guarantee that interference will not occur in a particular
installation.
If this equipment does cause harmful interference to radio
or television reception, which can be determined by
turning the equipment off and on, the user is encouraged
to try to correct the interference by one or more of the
following measures:
- Reorient or relocate the receiving antenna.
- Increase the separation between the equipment and
receiver.
- Connect the equipment into an outlet on a circuit
different from that to which the receiver is connected.
- Consult the dealer or an experienced radio/TV
technician for help.
FCC RF Exposure Information

F-01D_EN_ninshou.pdf
Appendix/Index
128
AIRCRAFT
Switch off your wireless device when boarding an aircraft
or whenever you are instructed to do so by airline staff. If
your device offers flight mode or similar feature consult
airline staff as to whether it can be used on board.
DRIVING
Full attention should be given to driving at all times and
local laws and regulations restricting the use of wireless
devices while driving must be observed.
HOSPITALS
Mobile phones should be switched off wherever you are
requested to do so in hospitals, clinics or health care
facilities. These requests are designed to prevent possible
interference with sensitive medical equipment.
PETROL STATIONS
Obey all posted signs with respect to the use of wireless
devices or other radio equipment in locations with
flammable material and chemicals. Switch off your
wireless device whenever you are instructed to do so by
authorized staff.
INTERFERENCE
Care must be taken when using the phone in close
proximity to personal medical devices, such as
pacemakers and hearing aids.
Pacemakers
Pacemaker manufacturers recommend that a minimum
separation of 15 cm be maintained between a mobile
phone and a pace maker to avoid potential interference
with the pacemaker. To achieve this use the phone on the
opposite ear to your pacemaker and does not carry it in a
breast pocket.
Hearing Aids
Some digital wireless phones may interfere with some
hearing aids. In the event of such interference, you may
want to consult your hearing aid manufacturer to discuss
alternatives.
For other Medical Devices :
Please consult your physician and the device manufacturer
to determine if operation of your phone may interfere with
the operation of your medical device.
This product and its accessories may be under coverage of
the Export Administration Regulations of Japan ("Foreign
Exchange and Foreign Trade Control Laws" and the
related laws and regulations). When exporting this
product and its accessories, take necessary procedures on
your responsibility and expense. For details, contact
Ministry of Economy, Trade and Industry of Japan.
Important Safety Information
Export Administration
Regulations

F-01D_EN_ninshou.pdf
Appendix/Index
129
◆
Copyrights and portrait rights
Except for the case protected by copyright laws such as
personal use, use of Xi terminal to reproduce, alter, or
publicly transmit recorded pictures or sounds, or
copyrighted text, images, music or software downloaded
from websites without the copyright holder's authorization
is prohibited.
Note that taking photos or recordings at some
demonstrations, performances or exhibitions may be
prohibited even when only for personal use.
Avoid taking pictures of others with Xi terminal without
their consent or disclosing recorded pictures of others
without their consent to general public through Internet
websites etc., because they may infringe on portrait rights.
◆
Trademarks
Company and product names mentioned in this manual
are trademarks or registered trademarks of their respective
holders.
・
"FOMA", "i-mode", "i-
α
ppli", "Deco-mail", "ToruCa",
"mopera", "mopera U", "WORLD CALL", "WORLD
WING", and logo of "Koe-no-Takuhaibin" are trademarks
or registered trademarks of NTT DOCOMO.
・
"Catch Phone (Call waiting service)" is a registered
trademark of Nippon Telegraph and Telephone
Corporation.
・
McAfee
®
is registered trademarks or trademarks of
McAfee, Inc. and/or its affiliates in the US and/or other
countries.
・
Rovi, G-GUIDE, G-GUIDE MOBILE and G-Guide
related logos are trademarks or registered
trademarks of Rovi Corporation and/or its subsidiaries in
Japan.
・
This product contains Adobe
®
Flash
®
Player and
Adobe
®
Flash
®
Lite
®
of Adobe Systems Incorporated.
Adobe Flash Player Copyright
©
1996-2011 Adobe
Systems Incorporated. All rights reserved.
Adobe Flash Lite Copyright
©
2003-2011 Adobe Systems
Incorporated. All rights reserved.
Adobe, Flash and Flash Lite are
either registered trademarks or
trademarks of Adobe Systems
Incorporated in the United States and/or other countries.
・
"ATOK" is registered trademark of
Justsystem Corporation. "ATOK" is a
copyrighted work of Justsystem
Corporation and other rights are those of
Justsystem Corporation and respective owners.
・
QR code is a registered trademark of Denso Wave Inc.
・
Twitter and Twitter logo are trademarks or registered
trademarks of Twitter, Inc.
・
Facebook and Facebook logo are trademarks or
registered trademarks of Facebook, Inc.
・
"mixi" and "mymixi" are registered trademarks of mixi,
Inc.
・
ThinkFree ia a registered trade mark of Hancom Inc.
・
microSDHC Logo is a trademark of SD-3C, LLC.
・
Microsoft
®
, Windows
®
, Windows Media
®
,
Windows Vista
®
and PowerPoint
®
are trademarks or
registered trademarks of "Microsoft Corporation" in the
US and other countries.
・
Microsoft Excel and Microsoft Word are product names
of Microsoft Corporation in the U.S.A. In this manual,
they may be described as Excel and Word.
・
The abbreviations of operating systems (Japanese
versions) below are used in this manual.
- Windows 7 stands for Microsoft
®
Windows
®
7
(Starter, Home Basic, Home Premium, Professional,
Enterprise and Ultimate).
- Windows Vista stands for Windows Vista
®
(Home
Basic, Home Premium, Business, Enterprise and
Ultimate).
- Windows XP indicates the Microsoft
®
Windows
®
XP
Professional operating system or Microsoft
®
Windows
®
XP Home Edition operating system.
Intellectual Property Right

F-01D_EN_ninshou.pdf
Appendix/Index
130
・
Google, Google logo, Android, Android logo, Android
Market, Android Market logo, Gmail, Gmail logo, Google
Latitude, YouTube, YouTube logo and Picasa are
registered trademarks of Google Inc.
・
The Bluetooth
®
word mark and logos are owned by the
Bluetooth SIG, INC. and any use of such marks by NTT
DOCOMO, INC. is under license. Other trademarks and
names are those of their respective owners.
・
"
モリサワ
UD
新丸ゴ
(MorisawaUD Shin Maru Go)" is
provided by Morisawa & Company, Ltd. and the
copyrights of its font data belong to them.
・
Wi-Fi
®
, Wi-Fi Alliance
®
, WMN
®
and logos of Wi-Fi and
Wi-Fi CERTIFIED are registered trademarks of Wi-Fi
Alliance.
・
Wi-Fi CERTIFIED
™
, WPA
™
, WPA2
™
and Wi-Fi Protected
Setup
™
are trademarks of Wi-Fi Alliance.
・
AOSS
™
is a trademark of BUFFALO INC.
・
OBEX
™
is a trademark of Infrared Data
Association
®
.
・
Other company and product names mentioned
in this manual are trademarks or registered trademarks
of their respective holders.
◆
Others
・
This product is licensed based on MPEG-4 Visual Patent
Portfolio License. The use of MPEG-4 Video Codec
function is allowed for personal and nonprofit use only
in the cases below.
- Recording moving pictures and i-motion that conform
to MPEG-4 Visual Standard (hereinafter referred to as
MPEG-4 Video)
- Playing MPEG-4 Videos recorded personally by
consumers not engaged in profit activities
- Playing MPEG-4 Video supplied from the provider
licensed from MPEG-LA
For further utilizing such as promotion, in-house use or
profit-making business, please contact MPEG LA, LLC
in U.S.
・
This product is licensed under the AVC patent portfolio
license for the personal and noncommercial use of a
consumer to (i) encode video in compliance with the
AVC standard (henceforth referred to as AVC video) and/
or (ii) decode AVC video that was encoded by a
consumer engaged in a personal and noncommercial
activity and/or was obtained from a video provider
licensed to provide AVC video. No license is granted or
shall be implied for any other use. Additional
information may be obtained from MPEG LA, L.L.C.
See http://www.mpegla.com
・
This product is licensed under the VC-1 Patent Portfolio
License for the personal and noncommercial use of a
consumer to (i) encode video in compliance with the VC-
1 standard (henceforth referred to as VC-1 video) and/or
(ii) decode VC-1 video that was encoded by a consumer
engaged in a personal and noncommercial activity and/
or was obtained from a video provider licensed to
provide VC-1 video. No license is granted or shall be
implied for any other use. Additional information may
be obtained from MPEG LA, L.L.C.
See http://www.mpegla.com

F-01D_EN_ninshou.pdf
Appendix/Index
131
◆
Adobe
®
Flash
®
Lite
®
End User
License Agreement
(i) a prohibition against distribution and copying, (ii) a
prohibition against modifications and derivative works,
(iii) a prohibition against decompiling, reverse
engineering, disassembling, and otherwise reducing the
software to a human-perceivable form, (iv) a provision
indicating ownership of software by this device
manufacturer and its suppliers, (v) a disclaimer of indirect,
special, incidental, punitive, and consequential damages,
and (vi) other industry standard disclaimers and
limitations, including, as applicable: a disclaimer of all
applicable statutory warranties, to the full extent allowed
by law, a limitation of liability not to exceed the price of
this product, and/or a provision that the end user's sole
remedy shall be a right of return and refund, if any, from
this device manufacturer.
◆
Open source software
This product contains Android software developed by
Google Inc. and the following open source software
complying with Apache License, Version 2.0 (http://
www.apache.org/licenses/).
・
httpmime-4.0.1.jar
・
httpmime-4.1-alpha2.jar
・
apache-mime4j-0.6.jar
・
signpost-commonshttp4-1.2.1.1.jar
・
signpost-core-1.2.1.1.jar
This product contains software complying with GNU
General Public License (GPL), GNU Lesser General Public
License (LGPL), etc. For more information, refer to the
following website.
http://www.fmworld.net/product/phone/sp/android/
develop/

International call access code
for the country you stay
Repairs
General Inquiries
<docomo Information Center>
Failures encountered overseas
<Network Support and Operation Center>
Loss or theft of Xi terminal or payment of cumulative cost overseas
<docomo Information Center>
* Service available in: English, Portuguese, Chinese, Spanish, Korean.
* Unavailable from part of IP phones.
(Business hours : 9:00 a.m. to 8:00 p.m. (open all year round))
0120-005-250 (toll free)
(Business hours : 9:00 a.m. to 8:00 p.m.)
* Unavailable from part of IP phones.
■
From land-line phones (In Japanese only)
0120-800-000 (toll free)
* Unavailable from land-line phones, etc.
(No prefix) 151 (toll free)
■
From DOCOMO mobile phones (In Japanese only)
●
Please confirm the phone number before you dial.
●
For Applications or Repairs and After-Sales Service, please contact the above-mentioned information center or the docomo
shop etc. near you on the NTT DOCOMO website or the i-mode site.
(available 24 hours a day)
* You are charged a call fee to Japan when calling from a land-line phone, etc.
※
If you use F-01D, you should dial the number 㧗81-3-6832-6600
(to enter '㧗', press and hold the '0' key for at least one second).
* You are charged a call fee to Japan when calling from a land-line phone, etc.
※
If you use F-01D, you should dial the number 㧗81-3-6718-1414
(to enter '㧗', press and hold the '0' key for at least one second).
■
From land-line phones <Universal number>
●
If you lose your Xi terminal or have it stolen, immediately take the steps necessary for suspending the use of the Xi terminal.
●
If the Xi terminal you purchased is damaged, bring your Xi terminal to a repair counter specified by DOCOMO after returning to Japan.
* You might be charged a domestic call fee according to the call rate for the country
you stay.
※
For international call access codes for major countries and universal number
international prefix, refer to DOCOMO International Services website.
Universal number
international prefix -8000120-0151
*
CA92002-XXXX
2011.9 (1st Edition)
To prevent damage to the environment, bring
used battery packs to a docomo service counter,
a docomo agent or a recycle center.
-81-3-6832-6600
*
(toll free)
(Business hours : 24 hours (open all year round))
* Unavailable from part of IP phones.
■
From land-line phones (In Japanese only)
0120-800-000 (toll free)
* Unavailable from land-line phones, etc.
(No prefix) 113 (toll free)
■
From DOCOMO mobile phones (In Japanese only)
■
From land-line phones <Universal number>
* You might be charged a domestic call fee according to the call rate for the country
you stay.
※
For international call access codes for major countries and universal number
international prefix, refer to DOCOMO International Services website.
Universal number
international prefix -8005931-8600
*
NTT DOCOMO website http://www.nttdocomo.co.jp/english/
■
From DOCOMO mobile phones
International call access code
for the country you stay
(available 24 hours a day)
-81-3-6718-1414
*
(toll free)
■
From DOCOMO mobile phones
Don't forget your mobile phone ・・・ or your manners!
When using your mobile phone in a public place, don't forget to
show common courtesy and consideration for others around you.