Users Manual
Rakuraku smartphone 4
QUICK INSTRUCTION MANUAL F-04J
ISSUE DATE:
NAME:
PHONE NUMBER:
MAIL ADDRESS:
‘16.12
Introduction
Thank you for purchasing "F-04J" mobile terminal.
Before using your terminal, or when necessary, read
this manual to ensure safe use and handling.
Manuals
Viewing this manual
・
"F-04J" mobile terminal is usually referred to as "the
terminal".
・
The images or illustration used in this manual are
examples. They may differ from the actual displays.
・
Explanations and screen images for "
標準メニュー
(Standard menu)" that is set by default are provided.
If there are differences between "
標準メニュー
(Standard menu)" and "
シンプルメニュー
(Simple
menu)" in operation, they are distinguished by mark
or .
・
Menu items for "
シンプルメニュー
(Simple menu)" are
described when [
リスト
(List)] is set. When [
タイル
(Tile)] is set, some names of menu items are different
from the description in this manual.
・
Descriptions when setting of
らくらくタッチ
(Raku
raku touch) is enabled are provided.
・
"Authenticate" indicates the operating procedure for
entering security code or password depending on
functions.
・
In some step descriptions, pressing button is shown
by illustration (
→
p.14).
・
Main operations are provided. A part of operation
steps is simplified in the descriptions.
・
Unauthorized copying of parts of or this entire manual
is prohibited.
・
The contents in this manual, URL and contents are
subject to change without prior notice.
"
かんたん操作ガイド
(Kantan operation guide)" (booklet)
This manual provides main functions and operations for
the terminal. Operate according to the explanation to use
basic function of F-04J.
"
らくらくスマートフォン
4
を
お使いになる前に
(Before using Raku raku smartphone 4)"
(booklet)
This manual provides important information for using the
terminal. For attaching docomo nano UIM card, microSD
card, battery pack or charging, refer to this booklet.
"
使いかたガイド
(User's guide)" (installed in the terminal)
This manual provides detailed information and operations
of the functions.
<Step>
: From the Home screen, [
使いかたガイド
(User's
guide)]
e
Search method
: On the Standby screen,
[使い方
(How to use)
]
e
[使いかたガイドを読む
(Read User's guide)
]
e
Search
method
"Instruction manual" (PDF file)
This manual provides detailed information and operations
of the functions.
<From a PC>
https://www.nttdocomo.co.jp/support/trouble/manual/
download/index.html
*You can download the latest information.
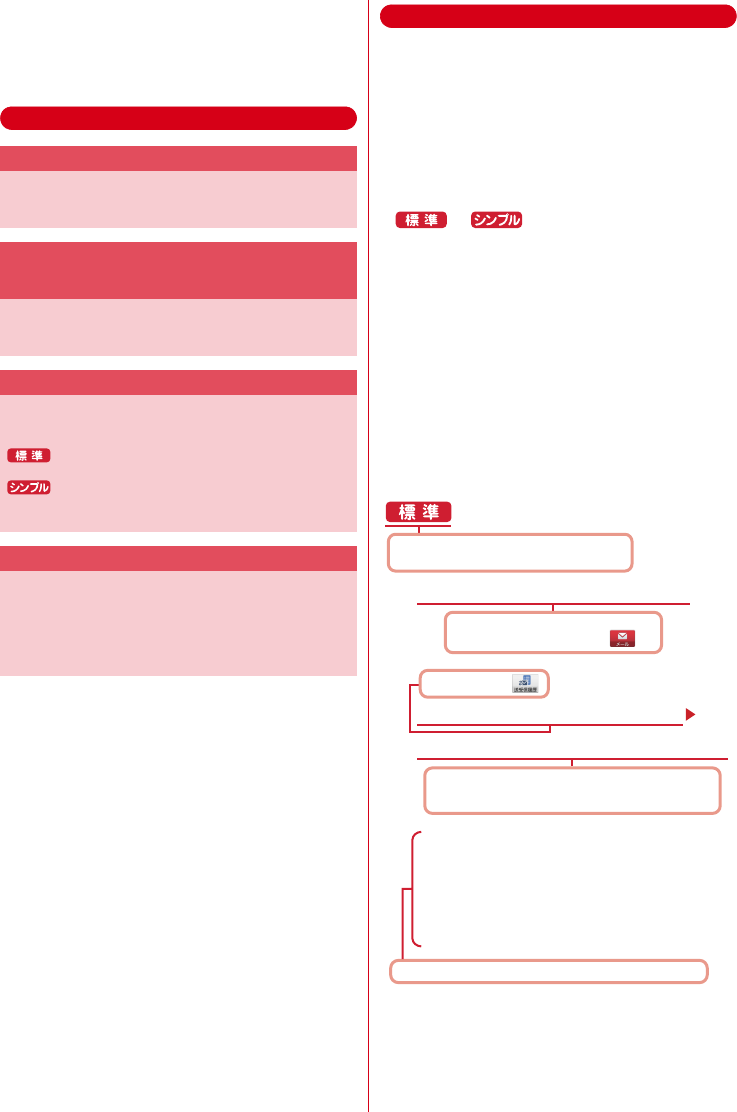
Indicates that the operation in
標準メニュー
(Standard menu) is described.
On the
標準メニュー
(Standard menu)
Home screen, touch and push .
Describes operation result and complemental explanation.
1
From the Home screen, [
メール
(Mail)]
Touch and push .
[
送受信履歴
(Sent and received logs)]
2
Touch and push [
送信した人
(Sender)] or [
受信した人
(Recipient)] according to your purpose.
[
受信した人
(Recipient)]/[
送信した人
(Sender)]
A log list appears.
・
To delete all logs, touch and push [
受信履歴を削
除する
(Delete received log)]/[
送信履歴を削除す
る
(Delete Sent log)].
・
Select a log to create mail, register/add to
phonebook or delete.
Contents/Precautions
1
Contents
■
Before using the terminal ................................2
■
Precautions (Always follow these directions)
..................................................................................
3
■
Handling precautions .......................................8
■
Waterproofness/Dustproofness ....................12
Before using the terminal ............14
Part names and functions.......................................14
docomo nano UIM card..........................................15
microSD card...........................................................15
Battery pack .............................................................16
Charging ..................................................................16
Turning power ON/OFF ..........................................18
Basic operation........................................................18
Initial settings ..........................................................20
Home screen............................................................20
Home screen/Icons..................................................21
Calling ..........................................24
Making a call/video call ..........................................24
Receiving a call/video call ......................................25
One-touch dial.........................................................25
Phonebook...............................................................26
Appendix ......................................28
Specific Absorption Rate (SAR) of Mobile Phones
..................................................................................28
Export Administration Regulations .......................31
Intellectual Property Right......................................31
SIM unlock ...............................................................33

Contents/Precautions
2
・
This terminal supports LTE, W-CDMA, GSM/GPRS,
Wireless LAN System.
・
Because your terminal uses wireless transmission, it
may not function in locations where it is difficult for
radio waves to penetrate, such as tunnels,
underground passages and some buildings, in areas
where radio waves are weak, or out of Xi and FOMA
service area. Even when you are high up in a tall
building or condominium and nothing blocks your
view outside, your terminal may not be able to receive
or transmit signals. Also, communication may be
interrupted even when there are strong radio waves
with 4 signal status icons on the terminal and you are
not moving (traveling).
・
Because your terminal uses radio waves to
communicate, it is possible that a third party may
attempt to tap your calls. However, the LTE, W-CDMA,
GSM/GPRS automatically applies a confidential
communication function to all calls, so even if a third
party could somehow tap a call, they only hear noise.
・
Your terminal encodes voice communication as
digital data. When you are operating your terminal
while moving to a location subject to weaker radio
wave conditions, the transmitted digital data may not
be correctly decoded and as a result the decoded
voice may differ somewhat from the actual voice.
・
Maintain a separate record of the data you saved in
the terminal. Note that DOCOMO assumes no
responsibility for any loss of saved contents of data
resulting from malfunction, repair, changing of the
model or other handling of the terminal.
・
In the terminal, as it is for a PC, some applications that
you install may give instability of the operation, or
may send your location information or personal
information registered to the terminal to outside via
the Internet and the information may be used
improperly. Please thoroughly check a provider and
operation status of the application etc. which you
want to use beforehand and then use it.
・
You are recommended to save important data to
microSD card. or a PC.
・
This terminal supports FOMA Plus-Area and FOMA
HIGH-SPEED Area.
・
The terminal does not support i-mode sites
(programs) or i-
α
ppli.
・
You can use the terminal only with docomo nano UIM
card. If you have a UIM or FOMA card, bring it to a
docomo Shop to replace.
・
Even in Manner mode, shutter sound, auto focus lock
sound for camera shooting, and count down sound for
self timer are emitted.
・
To check your own phone number, touch and push
[
自分の電話番号
(My own phone number)] on the
Home screen.
・
The terminal automatically performs communication
for some functions, for example, to synchronize data,
check the latest software or maintain connection with
the server. If you transmit a large amount of data such
as downloading applications or watching video, a
packet communication charge becomes high.
Subscription of packet flat-rate service is highly
recommended.
・
Depending on the applications or service you use,
packet communication charge may be applied even in
Wi-Fi communication.
・
The software on the terminal can be updated with the
latest information.
・
Improving the terminals quality may be included in
the software update.
・
Display is manufactured by taking advantage of highly
advanced technology but some dots may be always or
never lit. Note that, this shows characteristics of liquid
crystal displays and not defects in the terminals.
・
When the memory of the microSD card or the terminal
is almost full, running application may not operate
normally. In this case, delete saved data.
・
In the terminal, only specified applications such as sp-
mode mail, i-channel, etc. are available. Downloading
applications from Google Play and using them are not
available.
・
If your terminal is lost, change your password or
disable your PC mail accounts using a PC to prevent
other persons from using them.
・
Set the screen lock to ensure the security of your
terminal for its loss.
・
The terminal supports only sp-mode, mopera U and
Business mopera Internet. Other providers are not
supported.
・
For details on usage fee, refer to https://
www.nttdocomo.co.jp/english/.
Before using the terminal
Contents/Precautions
3
・
Before using your terminal, or when necessary, read
the precautions below to ensure safe use and
handling. After reading this manual, keep it carefully.
・
These precautions are intended to protect you and
others around you. Read and follow them carefully to
avoid injury, damage to the product or damage to
property.
・
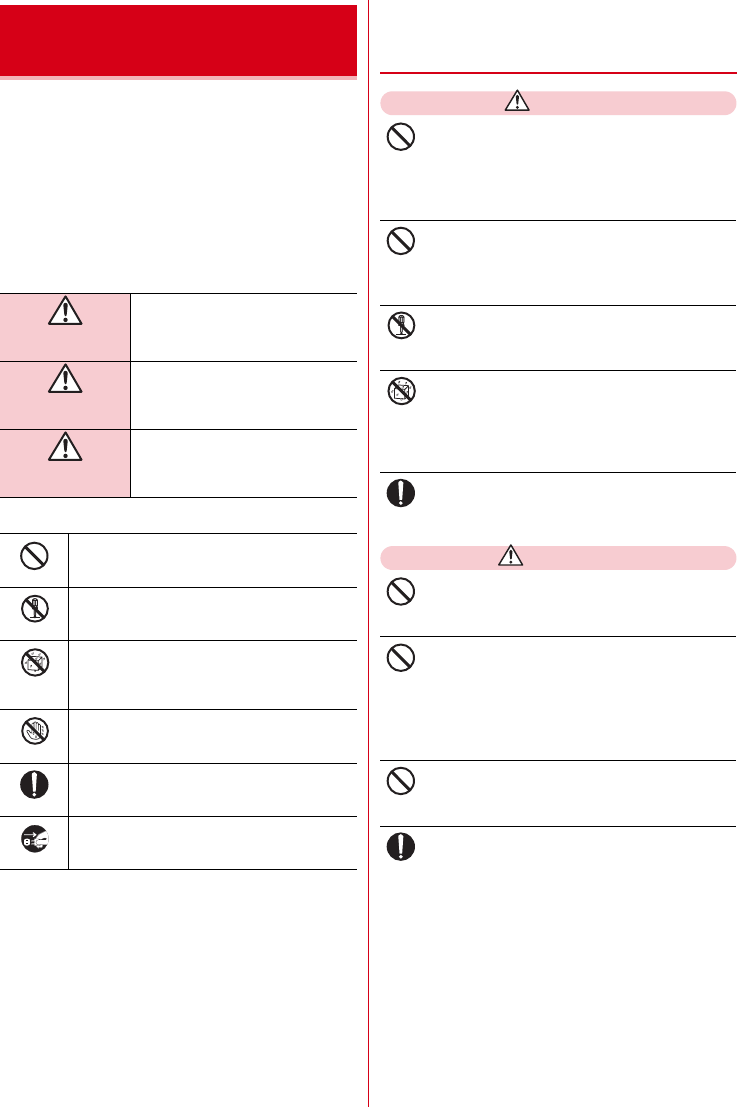
The signs below differentiate between the levels of
danger that can occur if the product is not used within
the specified guidelines.
・
The symbols below show specific directions.
■
Precautions contain the description below.
Handling the terminal, battery pack, adapter, desktop holder
and docomo nano UIM card (common)............................ 3
Handling the terminal ............................................................. 4
Handling battery pack............................................................. 5
Handling adapter and desktop holder.................................... 6
Handling docomo nano UIM card .......................................... 7
Handling mobile phones near electronic medical equipment
............................................................................................... 7
Material list .............................................................................. 7
◆
Handling the terminal, battery
pack, adapter, desktop holder and
docomo nano UIM card (common)
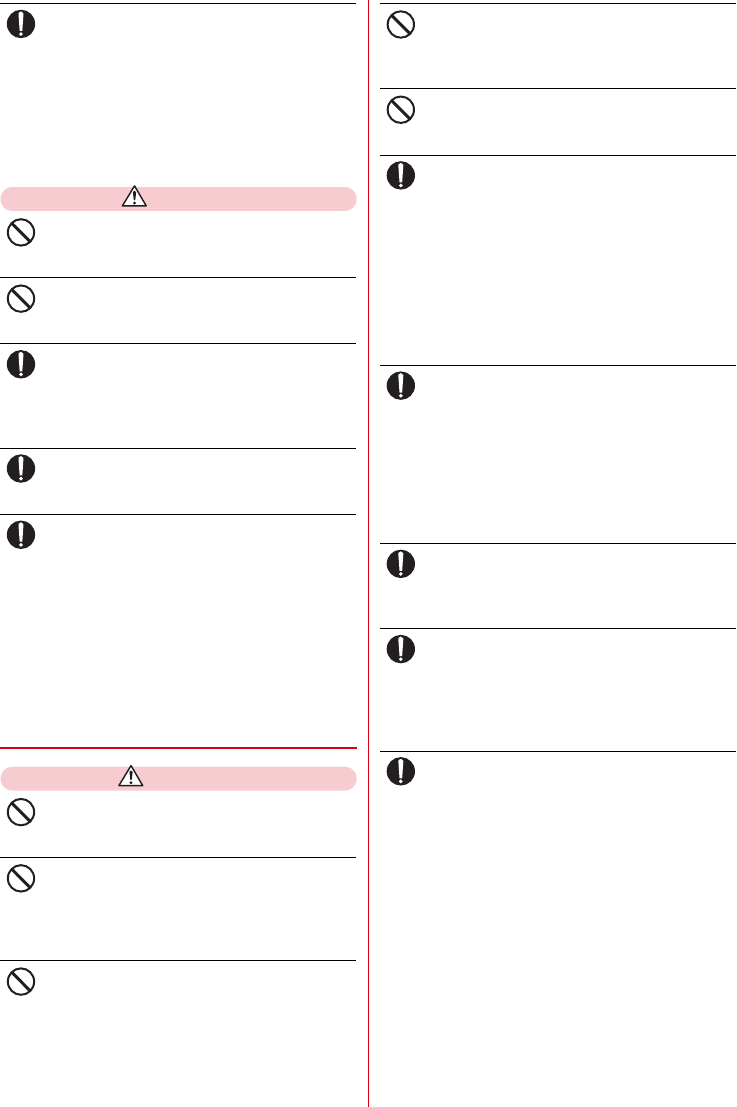
DANGER
Do not use, store or leave the terminal in hot
places (e.g. by the fire, near a heater, under a
kotatsu, in direct sunlight, in a car in the hot
sun).
May cause fire, burns or injuries.
Do not put the terminal into heating cooking
device such as microwave oven or high-pressure
container.
May cause fire, burns, injuries, electric shock.
Do not disassemble or remodel the equipment.
May cause fire, burns, injuries, electric shock.
Do not let the terminal get wet with water,
drinking water, urine of pet animals, etc.
May cause fire, burns, injuries, electric shock.
For waterproofness, refer to "Waterproofness/
Dustproofness"
Use the battery pack and adapter specified by
NTT DOCOMO for your terminal.
May cause fire, burns, injuries, electric shock.
WARNING
Do not throw the equipment or give a strong
force or hard shock to it.
May cause fire, burns, injuries, electric shock.
Keep conductive materials (metal pieces, pencil
lead, etc.) from coming in contact with the
charging jack, external connection jack, or stereo
earphone jack. Do not put those materials inside
the terminal.
May cause fire, burns, injuries, electric shock.
Do not cover or wrap the terminal with a
blanket, etc while using or charging.
May cause fire or burns.
Turn the terminal OFF and stop charging before
entering a place such as a gas station where
flammable gases are generated.
The gas may catch fire.
When using Osaifu-Keitai in a place as a gas station,
turn OFF the terminal before using it.
(When Osaifu-Keitai lock is activated, deactivate it
before turning OFF the terminal.)
Precautions (Always follow
these directions)
DANGER
This sign denotes that death or
serious injury may directly result
from improper use.
WARNING
This sign denotes that death or
serious injury may result from
improper use.
CAUTION
This sign denotes that minor injury
or damage to property may result
from improper use.
This symbol denotes that the action is
prohibited.
This symbol denotes that disassembling the
phone or its components is not allowed.
This symbol denotes that using the phone or
its components in a bathroom or other highly
humid area is not allowed.
This symbol denotes that using the phone or
its components with wet hands is not allowed.
This symbol denotes that an instruction must
be obeyed at all times.
This symbol denotes that the equipment
should be unplugged.
Don’t
No disassembly
No liquids
No wet hands
Do
Unplug
Don’t
Don’t
No disassembly
No liquids
Do
Don’t
Don’t
Don’t
Do
Contents/Precautions
4
If the equipment starts giving off a strange smell,
overheats, becomes discolored or deformed
during use, charging or in storage, immediately
perform the following operations.
・
Remove the power plug from the wall outlet or
cigarette lighter socket.
・
Turn the terminal OFF.
・
Remove the battery pack from the terminal.
May cause fire, burns, injuries, electric shock.
CAUTION
Do not leave the equipment on unstable or
sloping surfaces.
May cause injuries.
Do not store the equipment in extremely humid,
dusty or hot areas.
May cause fire, burns, electric shock.
Children using the equipment should be
instructed in proper operation by an adult. Do
not allow them to use the equipment without
adult supervision.
May cause injuries.
Store the equipment out of reach of small
children.
May be accidentally swallowed or cause injuries.
Be careful especially when using the terminal
connected to the adapter continuously for a long
time.
If you use applications, call or watch 1Seg while
charging the battery for a long time, the terminal,
battery pack and adapter may be heated.
Directly touching a hot part for a long time, you may
have redness, itching or rash on your skin, or it may
result in low-temperature burns depending on your
constitution and/or health condition.
◆
Handling the terminal
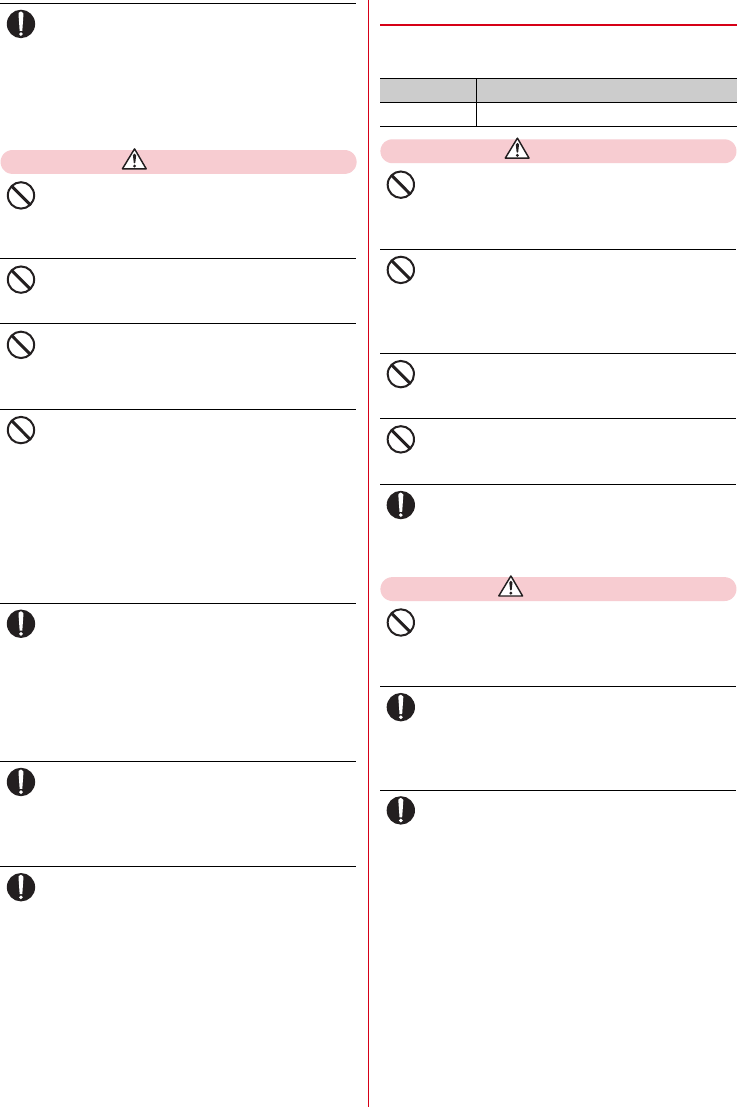
WARNING
Do not direct the infrared data port toward your
eye and transmit signals.
May cause harmful effect on eyes.
Do not direct the infrared data port toward home
electric appliances etc. equipped with infrared
device when using infrared communication.
May cause an accident because of malfunction of
infrared device.
Do not turn on the light by getting the lighting
part closer to other person's eyes. When
shooting infants, keep at least 1 m away from the
object.
May impair eyesight. And may cause accidents like
injury etc., by dazzling or astounding other people.
Do not put foreign objects such as liquid like
water, metal pieces or burnable things into
docomo nano UIM card slot or microSD card slot.
May cause fire, burns, injuries, electric shock.
Do not turn on the light aiming directly at the
driver of the car etc.
May disturb driving and cause an accident.
Turn the terminal OFF in areas where use is
prohibited, such as in airplanes and hospitals.
May cause electronic equipment or electronic
medical equipment to fail or malfunction.
When using the phone in a medical facility, be sure
to observe the regulations of the facility.
If you do prohibited act such as using the phone in
an airplane, you will be punished according to law.
If usage of the terminal in an aircraft is admitted by
setting airplane mode, etc., use the terminal under
the direction of the airline.
When you talk by setting handsfree or ring alert
is sounding, keep the terminal away from your
ear.
And, when connecting the earphone/
microphone etc. to the terminal and play a game
or music, adjust the volume moderately.
Too loud volume may cause a hearing loss.
And, if you cannot hear the sound around you
clearly, it may cause an accident.
If you have weak heart, be careful when setting
the Vibrate alert (vibration) or alert volume
setting.
May cause harmful effect on heart.
When you use electronic medical equipment,
check with the equipment manufacturer to
determine how the device is affected by radio
waves before using.
May cause harmful effect on electronic medical
equipment etc.
Turn the terminal OFF near high-precision
electronic control equipment or electronic
equipment using low-power signals.
May cause the equipment to fail or malfunction.
* Examples of electronic equipment to avoid.
Hearing aids, implanted pacemakers or defibrillators,
other electronic medical equipment, fire alarms,
automatic doors and other automatic control
equipment.
Users wearing implanted pacemakers or defibrillators
or other electronic medical equipment should check
with the manufacturer or sales outlet about the effect
of radio frequencies on the equipment.
Do
Don’t
Don’t
Do
Do
Do
Don’t
Don’t
Don’t
Don’t
Don’t
Do
Do
Do
Do
Do
Contents/Precautions
5
When the display or camera lens is accidentally
broken, be careful of fragments of broken glass
or exposed internal parts of the terminal.
Surface of display and camera lens are made of
plastic panel so as not to be shattered, however, if
you mistakenly touch broken or exposed parts, you
may be injured.
CAUTION
Do not swing the terminal by the antenna, strap,
etc.
May cause accident such as injury to yourself or
others by hitting.
Do not use the damaged terminal.
May cause fire, burns, injuries, electric shock.
When using the motion sensor, check the safety
around you, hold the terminal firmly, and do not
shake it unnecessarily.
May cause accident such as injuries.
If the display part is accidentally broken and the
liquid crystal leaks out, do not make the
substance contact with your skin of face or
hands.
May cause loss of sight or skin problems.
If the liquid crystal gets into your eyes or mouth,
rinse it with clean water and see a doctor
immediately.
And, if the liquid adheres to skin or clothing, use
alcohol etc. to wipe it off, then wash with soap.
To use the terminal in car, check with
automobile manufacturer or dealer to determine
how the device is affected by radio waves before
using.
In rare cases, using the phone in some vehicle
models can cause the vehicle's electronic equipment
to malfunction. In that case, stop using the terminal
immediately.
The use of the terminal may cause itching,
rashes, eczema, or other symptoms depending
on the user's physical condition. If you develop
skin problems, immediately stop using the
phone, and see a doctor.
When watching the display, take a certain
distance from the display in a fully bright place.
May reduce visual acuity.
◆
Handling battery pack
■
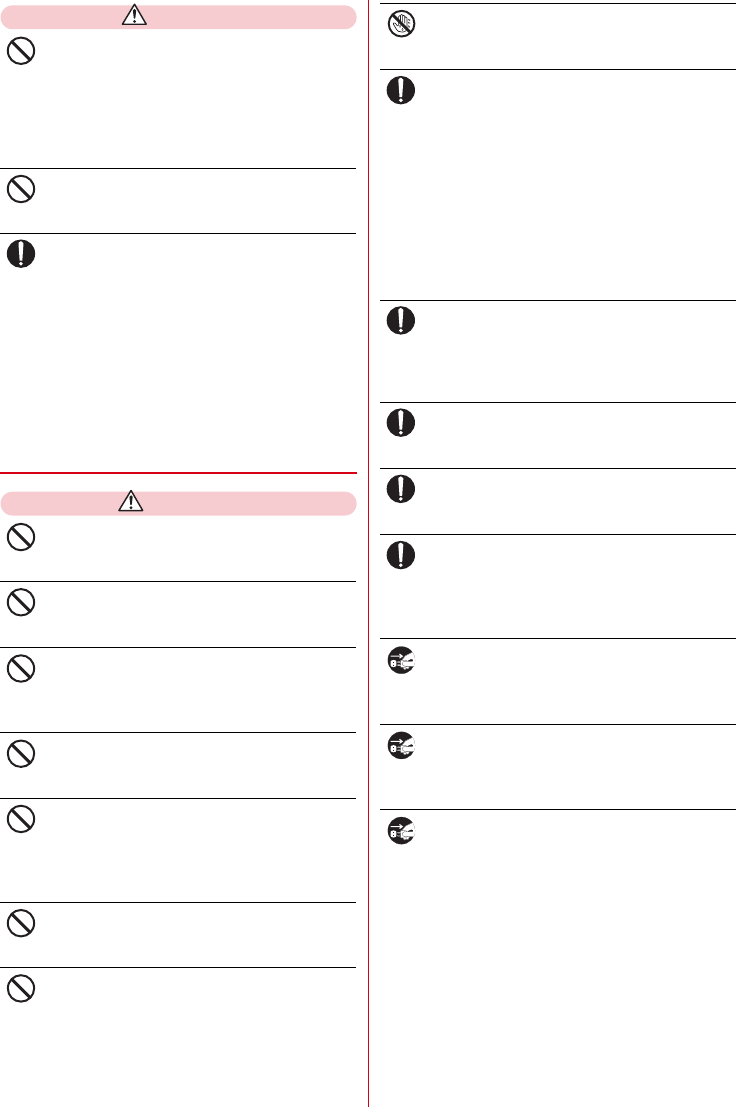
Check that the battery type matches the type
displayed on the battery pack label.
DANGER
Do not connect a wire or other metal objects to
the jack. And, do not carry or store the terminal
with objects like a metal necklace.
May cause battery pack to ignite, burst, heat or leak.
Check the orientation of the battery pack to
attach to the terminal, and do not try to force the
battery pack onto the terminal if you are having
trouble attaching it.
May cause battery pack to ignite, burst, heat or leak.
Do not throw the battery pack into the fire.
May cause battery pack to ignite, burst, heat or leak.
Do not nail the battery pack, hit with a hammer
or step on it.
May cause battery pack to ignite, burst, heat or leak.
If the battery pack's fluid etc. contacts eyes,
immediately flush the eyes with clean water and
see a doctor right away. Do not rub the eyes.
May cause loss of sight.
WARNING
If the battery pack seems to have abnormalities
such as deformation or scratches due to falling,
never use it.
May cause battery pack to ignite, burst, heat or leak.
If the battery pack leaks or gives off a strange
smell, immediately remove it from the vicinity of
open flames.
The vapors from leaking battery pack fluid may
ignite or explode.
Be careful not to let your pet bite the battery
pack.
May cause battery pack to ignite, burst, heat or leak.
Do
Don’t
Don’t
Don’t
Don’t
Do
Do
Do
Display Battery type
Li-ion 00 Li-ion battery
Don’t
Don’t
Don’t
Don’t
Do
Don’t
Do
Do
Contents/Precautions
6
CAUTION
Do not discard old battery packs together with
other garbage.
May cause ignition or or environmental destruction.
Tape the terminals of old battery packs to insulate
them, and then bring them into a sales outlet such as
docomo Shop. If your local municipality has a battery
recycling program, dispose of them as provided for.
Do not use or charge a wet battery pack.
May cause battery pack to ignite, burst, heat or leak.
If fluid etc. leaks out from the battery pack, do
not make the fluid contact with your skin of face
or hands.
May cause loss of sight or skin problems.
If the fluid etc. put into your eyes or mouth, or
contacts skin or clothes, immediately flush the
contacted area with clean water.
If the fluid etc. put into the eyes or mouth,
immediately see a doctor after flushing.
◆
Handling adapter and desktop
holder
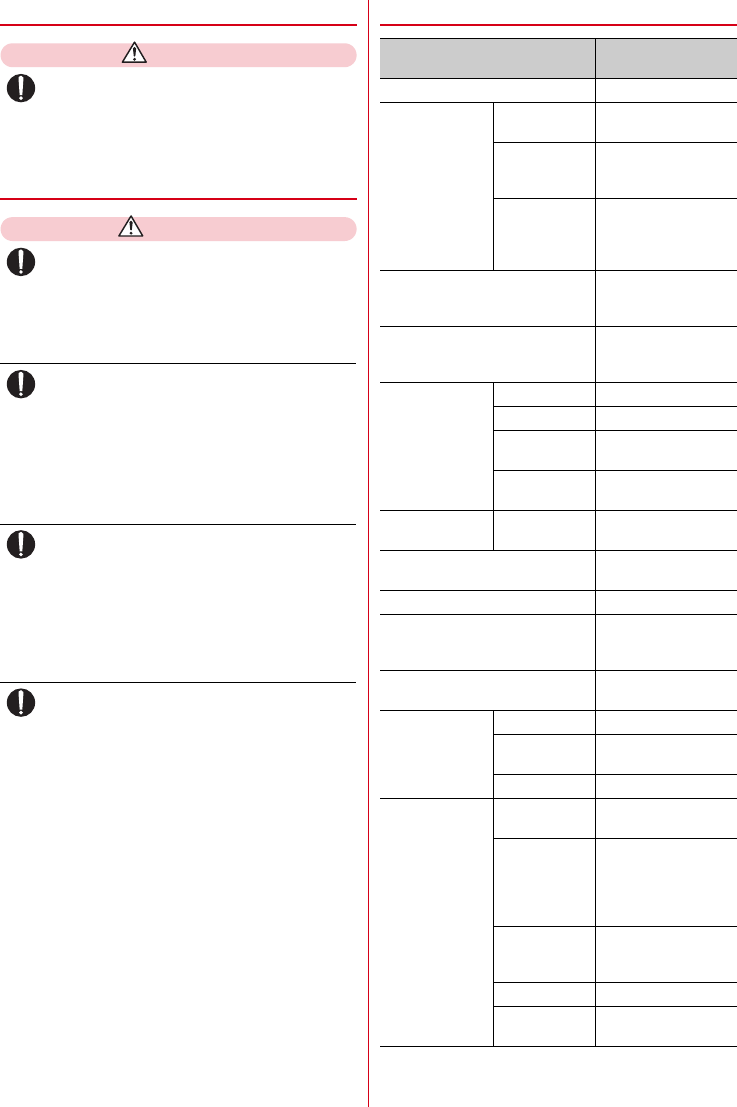
WARNING
Do not use the adapter cord if it gets damaged.
May cause fire, burns, electric shock.
Do not use the AC adapter or desktop holder in
a bathroom or other highly humid area.
May cause fire, burns, electric shock.
Always use the DC adapter with a negative-
ground vehicle. Do not plug it into a positive-
ground vehicle.
May cause fire, burns, electric shock.
When it starts to thunder, do not touch adapter.
May cause electric shock.
Do not short the charging jack while it is
connected to the outlet or cigarette lighter
socket. Do not touch the charging jack with a
part of your body such as your hand or finger.
May cause fire, burns, electric shock.
Do not place heavy objects on the adapter cord.
May cause fire, burns, electric shock.
When you insert and remove the AC adapter
from power outlet, do not contact a metal strap
or other metal objects with the jack.
May cause fire, burns, electric shock.
Do not touch the adapter cord, desktop holder or
outlet with wet hands.
May cause fire, burns, electric shock.
Always use with the specified power source and
voltage.
When charging the terminal overseas, use AC
adapter for global use.
If incorrect voltage is used, this may cause fire, burns
or electric shock.
AC adapter : AC100V
DC adapter : 12 or 24V DC (specific for negative
ground vehicle)
AC adapter for global use : Between 100V and 240V
AC (Connect to the AC outlet for internal
household use)
If the DC adapter's fuse blows, replace it only
with the specified fuse.
May cause fire, burns, electric shock. For the
specified fuse, see the instructions that come with
the DC adapter.
Wipe off any dust that accumulates on the
power plug.
May cause fire, burns, electric shock.
When you connect the AC adapter to an outlet,
firmly connect to the outlet.
May cause fire, burns, electric shock.
When you disconnect the power plug from the
outlet or cigarette lighter socket, do not pull the
adapter cord with excessive force. Instead, hold
the adapter to disconnect.
May cause fire, burns, electric shock.
Always remove the power plug from the outlet
or cigarette lighter when not using the adapter
for an extended period.
May cause fire, burns, electric shock.
Immediately remove the power plug from the
outlet or cigarette lighter socket if water or other
fluids get into the adapter.
May cause fire, burns, electric shock.
Always remove the power plug from the
cigarette lighter socket when cleaning the
equipment.
May cause fire, burns, electric shock.
Don’t
Don’t
Do
Don’t
Don’t
Don’t
Don’t
Don’t
Don’t
Don’t
No wet hands
Do
Do
Do
Do
Do
Unplug
Unplug
Unplug
Contents/Precautions
7
◆
Handling docomo nano UIM card
CAUTION
Be careful of the cut surface when removing
docomo nano UIM card.
May cause injuries.
◆
Handling mobile phones near
electronic medical equipment
WARNING
Wearers of medical equipment such as
implanted pacemakers or defibrillators must
carry and use the terminal at least 15 cm away
from the implanted device.
The terminal's signals may affect the performance of
electronic medical equipment.
When electronic medical equipment other than
implanted pacemakers or defibrillators are in use
outside of medical facilities (such as in home care
settings), check with the device manufacturer to
determine how the device is affected by
electrical signals.
The terminal's signals may affect the performance of
electronic medical equipment.
When you are in a crowd etc. and you have
difficulties to keep a distance of 15 cm or more
from others, turn the airplane mode on or power
off the terminal not to transmit signals.
There may be wearers of medical equipment such as
implanted pacemakers or defibrillators around you.
The terminal's signals may affect the performance of
electronic medical equipment.
When using the terminal in a medical facility, be
sure to observe the regulations of the facility.
◆
Material list
Do
Do
Do
Do
Do
Part Material/Surface
treatment
Display panel Hardened glass
Exterior case Front case PA-GF resin/Acrylic
UV curable coating
Back case PC+ABS-GF resin/
Acrylic UV curable
coating
Back cover PC-GF resin
+
polyester elastomer
resin/Acrylic UV
curable coating
Receiver panel ABS resin/
Discontinuous
evaporated
Home key PC resin/
Discontinuous
evaporated+Serigraph
1Seg antenna Top section PC+ABS resin
Pipe section Stainless steel
Root flexure
section
Nickel titanium alloy
Root rotating
section
Stainless steel/Nickel
plating
Out-camera/
Infrared data port
Panel Acrylate resin
Power key, Volume key Aluminum alloy/
Alumite coating
One-touch buzzer switch POM resin
External connection jack cap PC resin
+
polyester
elastomer resin/Acrylic
UV curable coating
Charging jack PC resin
+
ABS resin/
Gold plating
Battery Pack F35 Body PC resin
Contacts Beryllium copper/
Gold plating
Label PET/Black print letter
Desktop Holder
F46
Upper and
lower case
ABS resin
Spacer (L/R),
Front hook,
Side lever,
Charging
terminal (lever)
POM resin
Charging
terminal
(Contacts)
Phosphor/Gold
plating
Rubber part Polyurethane
External
connection jack
Stainless steel/Tin
plating

Contents/Precautions
8
◆
General
・
F-04J is waterproof/dustproof, however, do not allow
water or dust to seep into the terminal and do not
allow accessories or optional devices to get wet or
attached with dust.
- Battery pack, adapter, desktop holder, docomo nano
UIM card are not waterproof/dustproof. Do not use in
a bathroom or other highly humid area or do not let
rain touch. Or putting the terminal on your body,
humidity of sweat may cause internal corrosion and
malfunction. Note that malfunctions, which are
determined to be caused by water as result of
inspections, are not covered by the warranty. Since
these conditions are outside the scope of the
warranty, a repair, if at all possible, is charged.
・
Clean the terminal with a dry soft cloth (such as a
cloth for eyeglasses).
- Rubbing it roughly with a dry cloth may scratch the
display.
- Drops of water or dirt left on the display may cause
stains.
- If the terminal is wiped with alcohol, paint thinner,
benzine or detergent, the printing may disappear or
color may fade.
・
Clean the jack occasionally with a dry cotton swab
etc.
- If the jack is soiled, connection gets worse and it may
cause power to be turned off or insufficient battery
charge, so clean the jack with a dry cotton swab etc.
Also, be careful never to damage the jack when
cleaning it.
・
Do not place the terminal near an air-conditioner
outlet.
- The rapid change in temperature may cause
condensation, causing internal corrosion and
malfunction.
・
When using, be careful not to subject excessive force
to the terminal or the battery.
- If the terminal is crammed into a brimming bag or
placed in a pocket and sat on, display, internal PCBs
or battery pack may be damaged or malfunction.
And, if external devices are plugged into the external
connection jack or the stereo earphone jack, the
breakage of the connector or malfunction may result.
・
Do not rub or scrape the display with a metal piece
etc.
- May scratch the display, causing malfunction or
damage.
・
Carefully read the separate instructions that come
with optional devices.
◆
The terminal
・
Do not press the surface of the touch panel strongly or
operate it with sharp objects such as a nail, a
ballpoint pen and a pin.
- It may damage the touch panel.
・
Avoid extreme temperature.
- Use the terminal where the temperature ranges are
between 5 and 40
℃
(limited to the temporary use in
a bathroom etc. when temperature is above 36
℃
)
and humidity ranges between 45 and 85%.
・
The terminal may affect land-line phones, TVs or
radios in use nearby, so use it as far as possible from
these appliances.
・
Maintain a separate record of the data you saved in
the terminal.
- If the data is deleted, DOCOMO assumes no
responsibility for the loss of any data.
・
Do not drop the terminal or subject it to shocks.
- May cause malfunction or damage.
・
Do not plug external devices into the external
connection jack or stereo earphone jack at a slant, or
do not pull it forcibly while it is plugged.
- May cause malfunction or damage.
・
It is normal for the terminal to become warm during
use or charging. Continue to use it.
・
Do not leave the terminal with the camera in areas
under strong direct sunlight.
- May cause discoloring or burn-in of elements.
・
Use the terminal with the external connection jack
cap closed.
- Dust and/or water brought into the terminal cause
troubles.
・
Do not use the terminal with the back cover removed.
- May cause removal of battery pack, malfunction or
damage.
・
While microSD card is being used, do not take the card
out and do not turn off the terminal.
- May cause data loss or malfunction.
・
Do not bring magnetic cards etc. close to the terminal.
- Magnetic data in cash cards, credit cards, telephone
cards, floppy disks, etc. may be erased.
・
Do not bring magnetized objects close to the terminal.
- Bringing strong magnetism close may cause a
malfunction.
Handling precautions

Contents/Precautions
9
◆
Battery pack
・
The battery pack is a consumable part.
- Replace the battery pack if the terminal has
extremely short operation time on a full charge,
though it may vary by operating conditions. Purchase
a new battery pack of the specified type.
・
Charge the battery in an area within the proper
ambient temperature range (5-35
℃
).
・
The operation time provided by the battery pack
varies by the operating environment and battery
pack's deterioration.
・
The battery pack may swell out as it comes to near the
end of its lifetime depending on the usage conditions,
but it is not a problem.
・
Be careful especially about the following points when
preserving the battery pack.
- Keeping under the state of the full charge (right after
charging ends)
- Keeping under the state of the empty charge (too
exhausted to turn on the terminal)
They may cause the battery pack performance to be
degraded or its lifetime to be shortened.
A recommended battery level when keeping the
battery pack is approximately 40 % of remaining
battery level as a guide.
◆
Adapter
・
Charge the battery in an area within the proper
ambient temperature range (5-35
℃
).
・
Do not charge the battery in the areas below.
- In areas of excessive humidity, dust or vibrations
- Near land-line phones or TVs/radios
・
It is normal for the adapter to become hot while
charging. Continue to use it.
・
When using the DC adapter for charging, keep the
vehicle engine running.
- The vehicle's battery could become flat.
・
When using an outlet with a mechanism preventing
unplugging, follow the handling instructions for that
outlet.
・
Do not give strong shock. Do not deform the charging
jack.
- May cause malfunction.
◆
docomo nano UIM card
・
Do not use excessive force to install/remove docomo
nano UIM card.
・
Note that DOCOMO assumes no responsibility for
malfunctions occurring as the result of inserting and
using docomo nano UIM card with another IC card
reader/writer.
・
Always keep UIM ICs clean.
・
Clean UIM with a soft, dry cloth (such as a cloth for
eyeglasses).
・
Maintain a separate record of the data you saved in
docomo nano UIM card.
- If the data is deleted, DOCOMO assumes no
responsibility for the loss of any data.
・
To preserve the environment, bring the old docomo
nano UIM card to a sales outlet such as docomo Shop.
・
Take care not to scratch, touch accidentally or short
IC.
- May cause data loss or malfunction.
・
Do not drop docomo nano UIM card or subject it to
shocks.
- May cause malfunction.
・
Do not bend docomo nano UIM card or place heavy
objects on it.
- May cause malfunction.
・
Do not install docomo nano UIM card into the
terminal with a label or sticker put on.
- May cause malfunction.
Contents/Precautions
10
◆
Using Bluetooth function
・
This terminal is equipped with the security features
that are compliant with Bluetooth standards for
communication via Bluetooth. However, depending
on the settings, there may not be enough security. Be
aware of security risks when using Bluetooth.
・
DOCOMO assumes no responsibility for any
information which may be leaked during
communication via Bluetooth.
・
Frequency bands
Frequency bands used by the terminal Bluetooth
function are as below.
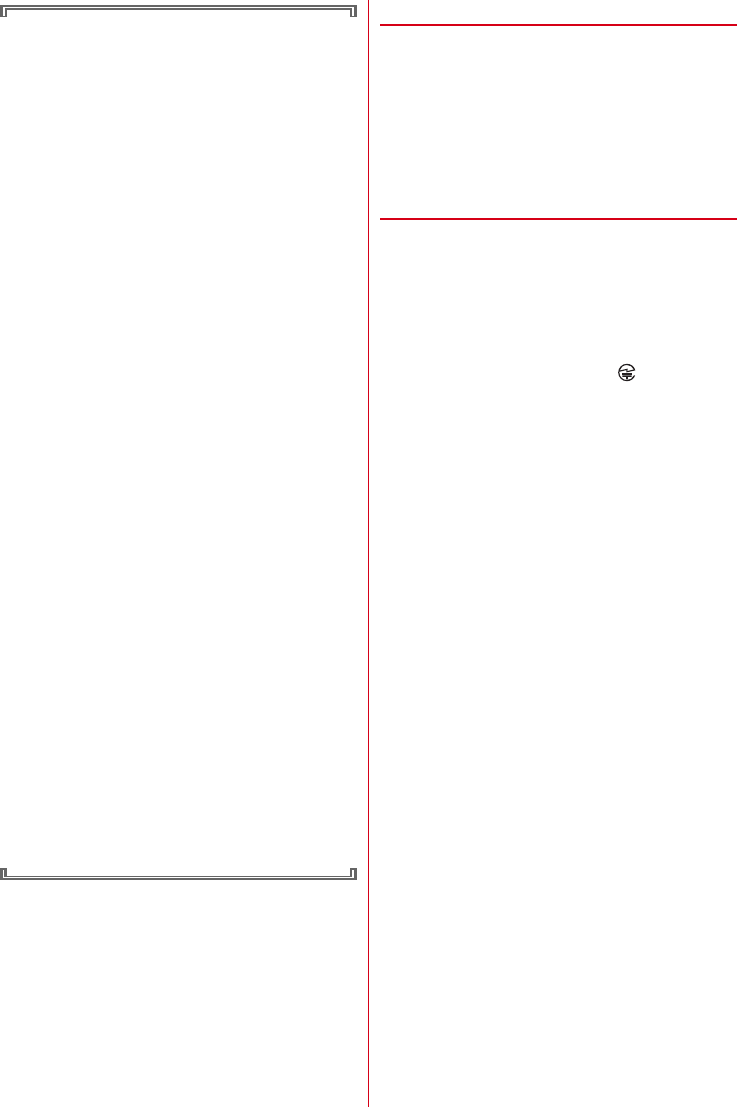
a
2.4 : Radio equipment that uses the 2400 MHz
band.
b
FH : The modulation is the FH-SS method.
c
1 : The expected interference distance is 10 m or
shorter.
d
: All bandwidths between 2400
MHz and 2483.5 MHz are used, and the bandwidth
used by mobile object identification devices
cannot be avoided.
Cautions on using Bluetooth devices
In the bandwidth used by this terminal, in addition to
home electric appliances such as a microwave oven
and industrial/scientific/medical devices, in-plant
radio stations used to identify mobile objects used in
production lines of a factory that require a license,
specified low power radio stations, or amateur radio
stations that do not require a license (hereafter
"other radio stations") can be in operation.
1. Before using this terminal, check whether other
radio stations are in operation in your
neighborhood.
2. If radio wave interference occurs between the
terminal and "other radio stations", use the
terminal in a different location or "Turn the power
OFF" to avoid the radio wave interference.
3. For details, contact "General Inquiries" on the last
page of this manual.
◆
Wireless LAN (WLAN)
・
Wireless LAN (WLAN) exchanges information using
radio waves, and allows you to freely establish LAN
connection if you are within an area where radio
wave reaches. On the other side, if you communicate
without appropriate security settings,
communications may be intercepted or hacked by
malicious parties. It is recommended to make
necessary security settings on your judgement and
responsibility.
・
Wireless LAN
Do not use Wireless LAN in a place where magnetized
by electric products, AV, OA equipment, etc. or where
electromagnetic wave is generated.
- If magnetism or electrostatic noise affects the
terminal, noise may be increased or communication
may not be available (especially when using
microwave oven, it may affect the terminal).
- Using near TV or radio may cause poor reception or
TV screen may be blurred.
- When multiple wireless LAN access points exist near
the terminal and they use the same channel, search
may not be performed correctly.
・
Frequency bands
Frequency bands for Wireless LAN function of the
terminal are written on battery pack insert section of
the terminal. Label description are as follows.
a
2.4 : Radio equipment that uses the 2400 MHz
band.
b
DS : The modulation is the DS-SS method.
c
OF : The modulation is the OFDM method.
d
4 : The expected interference distance is 40 m or
shorter.
e
: All bandwidths between 2400 MHz
and 2483.5 MHz are used, and the bandwidth used
by mobile object identification devices can be
avoided.
Using wireless LAN built-into the terminal in 5.2/5.3
GHz outside is prohibited by the Radio Law.
Available channels vary by countries. To use WLAN
overseas, check the conditions such as available
frequency, regulation, etc. for the country.
To use in airplane, confirm with airline company in
advance.
When docomo nano UIM card is not inserted or when
you are out of service area, channels 12, 13 of 2.4 GHz
band and 5 GHz band are not available regardless of
whether you are in Japan or abroad.
ab
d
c
2.4FH1
2.4DS/OF4
abc
e
d
Contents/Precautions
11
Cautions on using 2.4 GHz devices
In the frequency band used by WLAN devices, in
addition to home electric appliances such as a
microwave oven and industrial/scientific/medical
devices, in-plant radio stations for identification of
mobile objects used in production lines of a factory
(a license is required), specified low power radio
stations (a license is not required), or amateur radio
stations (a license is required) can be in operation.
1. Before using this device, confirm that in-plant
radio stations for identification of mobile objects,
specified low power radio stations or amateur
radio stations are not in operation in your
neighborhood.
2. If this device generates harmful radio wave
interference against in-plant radio stations for
identification of mobile objects, change the using
frequency promptly or stop using wireless LAN
function, and contact "General Inquiries" on the
last page of this manual, then consult about
treatment for prevention of the interference (for
example, installation of partitions etc.).
3. If this device generates harmful radio wave
interference against in-plant radio stations for
identification of mobile objects or amateur radio
stations, or if any trouble, contact "General
Inquiries" on the last page of this manual.
Cautions on using 5 GHz devices
Channel numbers and frequency bands available in
Japan are as follows.
・
5.2 GHz band : 5,180 to 5,240 MHz (36, 38, 40, 42
*
,
44, 46, 48 Ch)
・
5.3 GHz band : 5,260 to 5,320 MHz (52, 54, 56, 58
*
,
60, 62, 64 Ch)
・
5.6 GHz band : 5,500 to 5,700 MHz (100, 102, 104,
106
*
, 108, 110, 112, 116, 118, 120, 122
*
, 124, 126,
128, 132, 134, 136, 140 Ch)
* Compatible with IEEE802.11ac draft version. The
terminal may not be able to communicate with
official-version-compatible devices to be launched in
future or draft-version-compatible devices from other
companies. For compatible products, refer to the
following website.
http://www.fmworld.net/product/phone/wifi/
◆
FeliCa reader/writer
・
FeliCa reader/writer function of the terminal uses
weak waves requiring no licenses for radio stations.
・
It uses 13.56 MHz frequency band. When using other
reader/writers in your surroundings, keep the
terminal away sufficiently from them. Before using
the FeliCa reader/writer, confirm that there are no
radio stations using the same frequency band nearby.
◆
CAUTION
・
Do not use a remodeled terminal. Using a remodeled
terminal violates the Radio Law/Telecommunications
Business Act.
The terminal is certified according to technical
standard conformance of specified wireless
equipment based on the Radio Law/
Telecommunications Business Act, and as a proof of
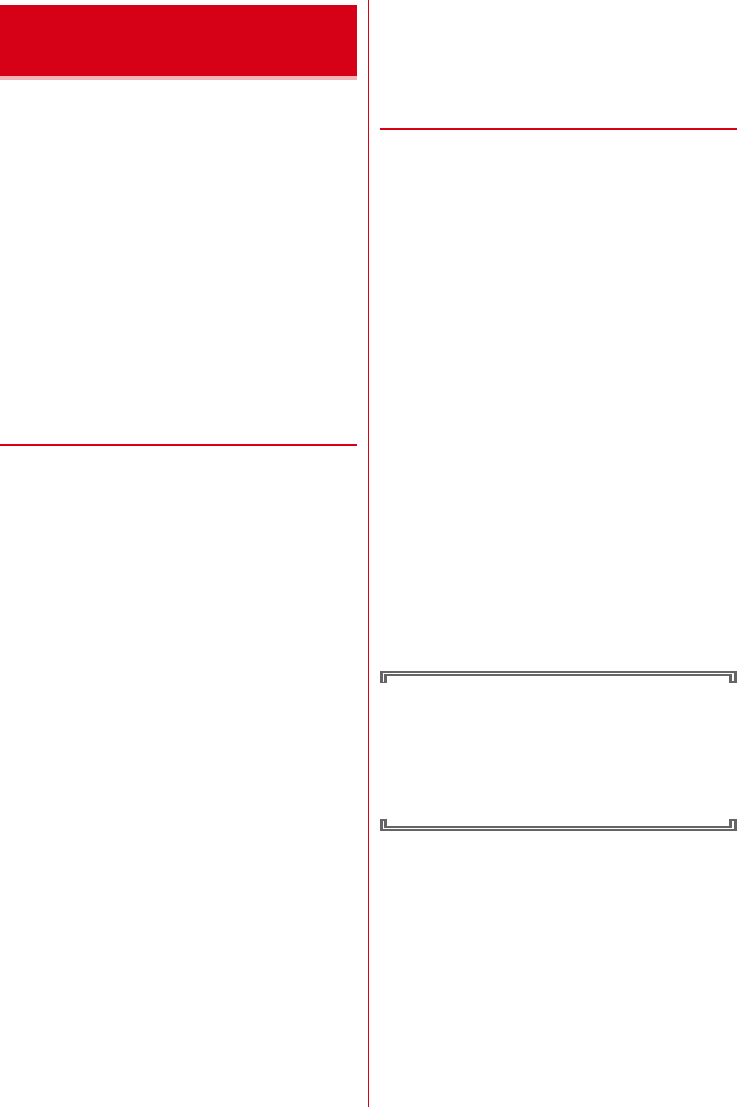
it, the "Technical Compliance Mark " is depicted on
the electronic nameplate of the terminal.
If you remodel the terminal by removing its screws,
your certification of technical standard conformance
becomes invalid.
Do not use the terminal with its certification of
technical standard conformance invalid as it violates
the Radio Law/Telecommunications Business Act.
・
Be careful when you use the terminal while driving a
car etc.
Using a mobile phone while driving is subject to penal
regulations.
However, absolutely necessary cases such as rescue
of a sick person or maintaining public's safety are
exempted.
・
Use the Bluetooth function only in Japan.
The Bluetooth function of the terminal is compliant
with wireless standards and is authorized for use only
in Japan.
If you use this function overseas, you may be
punished.
・
Use FeliCa reader/writer function only in Japan.
FeliCa reader/writer function of the terminal conforms
to Japanese radio standards.
If you use this function overseas, you may be
punished.
・
Do not alter the basic software.
Repairs may be refused as a modification of software.
Contents/Precautions
12
F-04J provides waterproofness of IPX5
*1
, IPX8
*2
and
dustproofness of IP5X
*3
with firmly closing the external
connection jack and steadily installing the back cover.
*1 IPX5 means that a phone keeps functioning after
applying a jet flow of 12.5 L/min. from every direction
from a distance of approximately 3 m for at least 3
minutes using water nozzle in 6.3 mm inner diameter.
*2 For F-04J, IPX8 means that a phone keeps functioning
after F-04J is slowly submerged to depth of 1.5 m in
static tap water at room temperature, left there for 30
minutes and then taken out. (Camera function cannot
be used under water.)
*3 IP5X means a protection degree that a phone keeps
functioning and safety after it is placed in a device
with dust in diameter 75
μ
or less for 8 hours, agitated
and then taken out.
❖
What you can do with waterproofness
of F-04J
・
You can talk and watch 1Seg without an umbrella in
the rain (for rainfall of 20 mm or less per hour).
- When your hands or the terminal are wet, avoid
installing/removing the back cover or opening/
closing the external connection jack.
・
The terminal can be washed with tap water at room
temperature.
- With pressing and holding the external connection
jack cap not to open, wash the terminal with tap
water without rubbing hard.
- Do not apply water flow stronger than allowed.
- Do not use brush, sponge, soap, detergent, etc.
- If mud or soil is adhered to the terminal, eliminate
the dirt first by shaking several times in tap water of
wash-basin and then wash the terminal with running
water.
- Drain water in the specified steps after washing.
・
You can use the terminal in a bathroom.
- Do not immerse the terminal into a bathtub. Also, do
not use the terminal in hot water. May cause
malfunction. If you should fall the terminal into the
bathtub, immediately pick it up to drain water in
specified procedure.
- Never put the terminal in hot spring water or water
containing soap, detergent or bath powder. In case
the terminal gets wet with water other than tap
water, wash it in the procedure above.
- You can use the terminal within 2 hours in a
bathroom where the temperature ranges between 5
and 45
℃
and humidity ranges between 45 and 99%.
- Rapid temperature change may cause condensation.
If you bring the terminal from a cold place to warm
place such as a bathroom, wait until the terminal
reaches the room temperature.
- Do not put hot water from a faucet or shower.
◆
To ensure waterproofness/
dustproofness
To avoid water/dust ingress, be sure to observe the
following points.
・
When using external connection jack, pull the cap with
your fingertip by the groove to open. Then push the
tab down and ensure that there are no gaps between
the cap and the terminal.
・
For installing the back cover, see the description in "
■
Attaching" of "Attaching/Removing battery pack".
→
p.16
・
Steadily attach the back cover without any space
between and firmly close the external connection jack.
Even a fine obstacle (one hair, one grain of sand, tiny
fiber, etc.) put between contact surfaces may allow
water to enter.
・
Do not poke the stereo earphone jack, microphone,
earpiece, speaker or rear microphone with a sharp
object.
・
Do not let the terminal fall. It may become scratched
causing the waterproof/dustproof performance to
degrade.
・
The external connection jack cap and the rubber
packing of the rear side of the back cover play
important roles for keeping waterproof/dustproof
performance. Do not deform the back cover by
twisting etc. or peel off or damage the rubber packing.
Also, prevent dust from adhering to it.
To keep the terminal waterproofness/dustproofness,
replacement of parts is required every 2 years
regardless of whether the terminal appears normal
or abnormal. DOCOMO takes the terminal to replace
the parts as a chargeable service. Bring the terminal
to a sales outlet such as a DOCOMO-specified repair
office.
Waterproofness/
Dustproofness
Contents/Precautions
13
◆
Important precautions
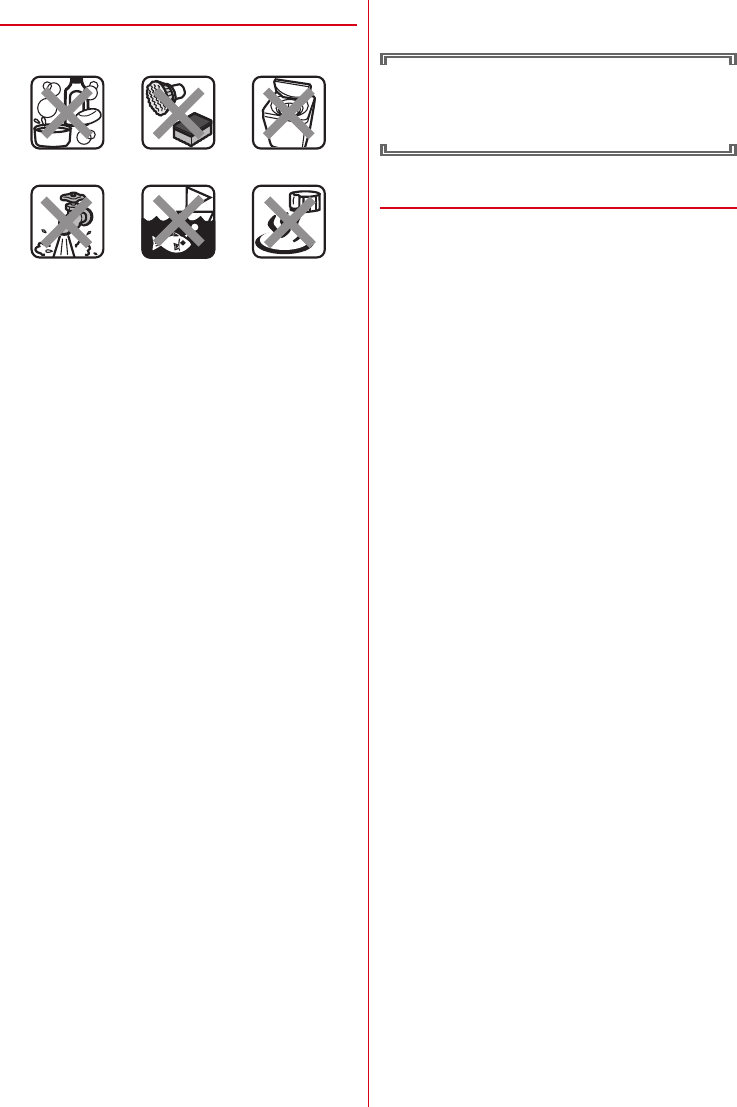
Do not perform actions shown in the illustrations below.
Observe the following precautions to use the terminal
properly.
・
Accessories and optional devices are not waterproof/
dustproof. When watching 1Seg, etc. with the
terminal installed in the included desktop holder, do
not use it in a bathroom, shower room, kitchen or
lavatory even if it is not connected to the AC adapter.
・
Do not apply water flow stronger than allowed. Even
if the F-04J is waterproof in IPX5 waterproof, water
may enter inside from a damaged section and cause
troubles such as electric shocks or corrosion of the
battery.
・
If the terminal gets wet with salt water, sea water,
refreshing beverage or mud or soil adhered, wash it
immediately. If they dry out, it is hard to remove the
dirt and it may cause damage or malfunction.
・
Do not put the terminal in hot water, use it in a sauna
or apply hot airflow (from a hair dryer etc.) to it.
・
Do not move the terminal in water or slam the
terminal against the surface of water.
・
When you use the terminal in swimming pool, obey
rules of the facility.
・
The terminal does not float on water.
・
Do not leave water on the terminal. May short-circuit
the power jacks, or in a cold region, water may freeze
causing malfunction.
・
Do not leave water on the stereo earphone jack,
microphone, earpiece or speaker. Such water may
interfere with talking.
・
If the back cover is damaged, replace it. Water may
enter inside from a damaged section causing troubles
such as electric shocks or corrosion of the battery.
・
If the terminal gets wet with water or other liquids
with the external connection jack cap or the back cover
open, the liquid may get inside the terminal causing
electric shocks or malfunction. Stop using the
terminal, turn the power OFF, remove the battery pack
and contact a DOCOMO-specified repair office.
・
If the external connection jack cap, or the rubber
gasket on the rear side of the back cover is damaged
or deformed, replace it at DOCOMO-specified repair
office.
DOCOMO does not guarantee actual operations
under all states. Malfunctions deemed to be caused
by inappropriate operation by the customer are not
covered by the warranty.
◆
Charging
Check the following before and after charging.
・
Never try to charge the battery pack when the terminal
is wet.
・
When charging the battery after the terminal is wet,
adequately drain it and wipe off water with a dry,
clean cloth etc., before connecting the accessory
desktop holder or opening the external connection
jack cap.
・
When the external connection jack cap is opened for
charging, close the cap firmly after charging. It is
recommended to use the desktop holder for charging
to prevent water or dust from seeping inside from the
external connection jack.
・
Do not use the AC adapter or desktop holder in a
bathroom, shower room, kitchen, lavatory or other
highly humid area. May cause fire or electric shock.
・
Do not touch the AC adapter or desktop holder with
wet hands. May cause electric shock.
<Example>
Using Soap/
Detergent/Bath powder
Soaking in
ocean water
Using in
hot spring
Applying strong
water flow
Washing with
brush/sponge
Machine-washing
Before using the terminal
14
Before using the
terminal
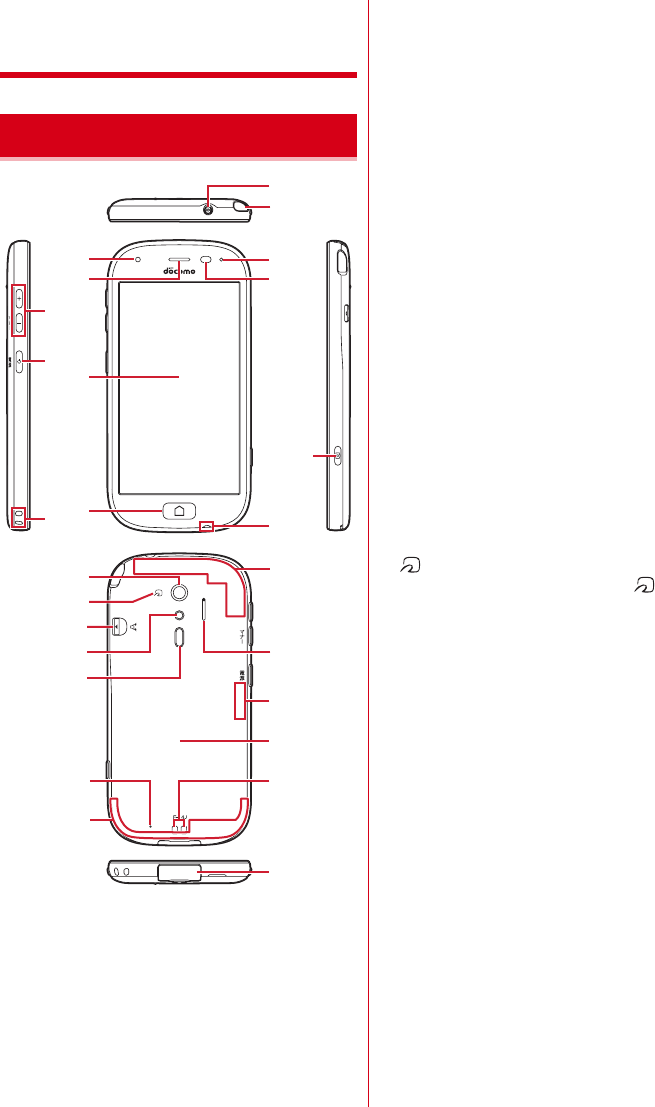
a
Stereo earphone jack (waterproof)
b
1Seg antenna
Extend when watching TV.
c
Volume key (
+-
key)
Adjust volume for functions. Press and hold
-
for 1
second or more to activate/deactivate manner mode.
d
Power key (
P
key)
Turn display on/off (switch sleep mode). Press and
hold to turn power ON/OFF, restart and activate/
deactivate Manner mode, Public mode and Airplane
mode.
e
Strap hole
f
In-camera
g
Receiver/Speaker
h
Display (Touch panel)
i
Home key (
H
key)
Exit from the application and return to the Home
screen.
Some applications such as Media Player and radio
can be kept active in the background.
j
Indicator light
k
Proximity sensor/RGB sensor
Proximity sensor prevents the erroneous operation of
the touch panel during a call. RGB sensor senses
ambient light and brightness and automatically
adjusts the display backlight. Putting a protective
sheet or seal on the sensors or covering the sensors
with your finger may cause erroneous operation or
erroneous detection.
l
Microphone
m
Camera key (
C
key)
Touch and hold on the Home screen or Standby
screen to activate the camera.
n
Out-camera
o
mark
You can use the terminal by holding mark over
the card reader as an Osaifu-Keitai.
p
One-touch buzzer switch (
o
switch)
Slide switch to beep sound (change settings after
purchasing).
q
Flash/Light
r
Infrared port
s
Back microphone
Use to reduce noise during a call. Do not cover it.
t
Xi/FOMA antenna
*
u
GPS/Xi antenna
*
v
Speaker
w
Bluetooth/Wi-Fi antenna
*
x
Back cover
To access docomo nano UIM card slot and the
microSD card slot, remove the back cover and the
battery pack.
Rubber gasket is attached on the rear side of the back
cover to resist water.
y
Charging terminals
z
External connection jack
* The antennas are built into the terminal. Covering
around the antenna by the hand may affect the
quality.
Part names and functions
a
b
c
d
g
h
i
s
t
n
o
p
q
r
m
w
x
z
y
fj
k
v
el
u
Before using the terminal
15
The docomo nano UIM card is an IC card in which user
information such as your phone number etc. is saved.
・
You can use the terminal only with docomo nano UIM
card. If you have a UIM or FOMA card, bring it to a
docomo Shop to replace.
・
When docomo nano UIM card is not inserted to the
terminal, some functions such as making/receiving
calls and sending/receiving SMS are not available.
・
For details on docomo nano UIM card, refer to the
docomo nano UIM card manual.
◆
Installing/Removing docomo nano
UIM card
・
Turn the terminal OFF, remove the back cover and the
battery pack before installing/removing.
■
Attaching
a
Insert docomo nano UIM card into the docomo nano
UIM card slot with the IC side facing up
・
Check the orientation of docomo nano UIM card
corner cut.
■
Removing
a
Put your fingertip on the tab of the tray and pull it
straight out
b
Lightly press docomo nano UIM card and pull out in
the direction of the arrow
・
Do not press docomo nano UIM card downward
forcefully.
✔
INFORMATION
・
When handling docomo nano UIM card, take care not to
touch or scratch the IC part. Note that inserting docomo
nano UIM card forcibly into the terminal may damage
docomo nano UIM card.
・
The tray is designed not to be removed. When pulling the
tray out, stop pulling out at the pullout limit. Do not pull out
with excessive force. Doing so may damage or destroy the
tray.
◆
Security codes of docomo nano
UIM card
Security code called PIN code can be set for docomo
nano UIM card. "0000" is set at the subscription but it can
be changed yourself.
◆
microSD card
・
The terminal supports microSD card of up to 2 GB,
microSDHC card and microSDHC UHS-I card of up to
32 GB, and microSDXC card and microSDXC UHS-I
card up to 64 GB (as of June, 2014).
・
DOCOMO does not guarantee actual operations of all
microSD cards. For information on compatible
microSD cards, contact manufacturers of microSD
cards.
・
Do not turn the power OFF or give shock while
accessing data on the microSD card. The data may
corrupt.
・
Class 10 is supported as speed class rate of microSD
card.
docomo nano UIM card microSD card
Before using the terminal
16
◆
Attaching/Removing battery pack
・
Attach/Remove the battery pack after turning OFF the
power.
・
When you attach/remove the back cover, hold the
terminal in your hand so that you will not scratch the
display etc.
・
If the terminal gets wet, wipe off water before
removing the back cover.
・
Use Battery back F35 dedicated to the terminal.
■
Attaching
a
Put your fingertip at the back cover removing part,
remove tabs on the back side of the back cover in the
order of
a
and
b
and lift the back cover in the
direction of the arrow to remove
b
With the arrow side of the battery pack label facing
up, align the metal contacts of the battery pack with
those of the terminal, insert in the direction of the
a
to attach in the direction of
b
c
Check the orientation of the back cover, and attach it
fitting to the terminal
d
Fit the tabs on the reverse side of the back cover with
the grooves on the terminal, press firmly to close
・
Check if there is no gap at all in order to maintain
waterproofness/dustproofness, and attach
securely.
■
Removing
a
Perform Step
a
in Attaching the battery pack
b
Pinch the tab of battery pack and pick it up in the
direction of the arrow to remove
❖
Precautions on charging
・
If you use applications while charging, it may take time
to complete charging or charging may not complete
because applications use battery power. It is not a
defect of the terminal.
・
It is normal for the terminal or AC adapter to become
warm while charging. When the terminal becomes
warm, charging may stop temporarily for the safety.
When the terminal becomes extremely hot, stop using
immediately.
・
The following conditions will lead to a charging error
and the indicator light turns off. Charging restarts
when the charging becomes possible.
- When the power voltage of the battery pack becomes
out of chargeable range
- When temperature of the battery pack or the terminal
becomes out of chargeable range
・
If charging takes for very long time, a charging error is
notified and the indicator light turns off. Remove the
terminal from the charger and then recharge it.
・
When power voltage of the battery pack is abnormal,
charging error occurs and the indicator light flashes.
Remove the terminal from the charger or remove the
battery pack and then recharge it.
・
When charging starts with the battery empty, the
terminal may not be immediately activated after
turning the power ON. In this case, charge the terminal
while keeping it turned OFF, and turn it on after a
while.
・
Right after the battery pack is removed and reattached,
the correct battery level may not be shown. While
using, the battery level indicator is corrected.
・
For charging time., see "Main specification".
❖
Battery pack life
・
The battery pack is a consumable part. Each time it is
charged, time available with each charging reduces.
Talking on the phone for a long time while charging
may reduce the battery pack lifetime.
・
When a time available with each charging is reduced
to about a half from that of a new battery, replacement
of the battery is recommended because it is near the
end of life. The battery pack may swell out as it comes
to near the end of its lifetime depending on the usage
conditions, but it is not a problem.
Battery pack Charging

Before using the terminal
17
❖
Available charging adapter
For details, refer to the operation manual of AC adapter
or DC adapter.
AC Adapter 03 (optional)/AC Adapter 04 (optional)/AC
Adapter F05 (optional)/AC Adapter F06 (optional) :
Between 100V and 240V AC. AC Adaptor has a plug
dedicated to 100V AC (for domestic use). When using
the AC adapter in the range of AC 100V and 240V
overseas, a conversion plug adapter applicable to the
country you are staying is required. Also, do not
charge the battery with a transformer for overseas
travel.
DC Adapter 03 (optional) :
Use for charging in a car.
◆
Charging with desktop holder
Charging with supplied Desktop Holder F46 and optional
AC Adapter 04 is described.
a
Insert a microUSB plug of AC adapter into the
external connection jack on the back side of the
desktop holder horizontally with engraved side
facing up
b
Insert the terminal into the Desktop Holder
・
Make sure the orientation and connect correctly. If
you force to connect, damage may occur.
c
Insert the AC adapter's power plug into an outlet
・
Indicator light lights red while charging. If the
indicator light does not turn on, push the terminal
into the desktop holder until it turns on.
・
Indicator light turns off when charging is complete.
d
When charging is complete, unplug the AC adapter's
power plug from the wall outlet and remove the
terminal from the desktop holder
e
Remove microUSB plug from the desktop holder
✔
INFORMATION
・
Do not hold a strap etc. between the terminal and desktop
holder.
・
In-put specification of Desktop Holder F46 is 5.0V 1.5A.
However you can use it combining with AC Adapter 04 (Out
put 5.0V 1.8A).
・
Connect specified AC adapter to the desktop holder.
◆
Charging with AC adapter
Charging with the optional AC Adapter 04 is described.
a
Open the external connection jack cap of the
terminal, insert the microUSB plug of the microUSB
cable horizontally into the external connection jack
with engraved side facing up
b
Insert the AC adapter's power plug into an outlet
・
Indication light lights red while charging, and turns
off when charging is complete.
c
When charging is complete, remove the AC adapter's
power plug from the wall outlet
d
Remove the microUSB plug from the terminal and
close the external connection jack cap of the terminal
◆
Charging with a PC
If you connect the terminal with a PC using a USB Cable
for PC connection T01 (optional), you can charge the
terminal with a PC.
・
When a screen of new hardware detection or
operation selection appears on the PC, select "
キャンセ
ル
(Cancel)".
Before using the terminal
18
◆
Turning power ON
1
Press and hold
P
(2 sec. or more) until the
indication light lights in green and the
terminal vibrates.
The top screen appears following the startup
screen.
2
On the Top screen, slide from bottom to top
・
When a confirmation screen for sending terminal
error information appears, touch and push [OK].
■
Turning power ON for the first time
Make initial setting for DOCOMO services after making
the initial setting for the terminal (setup the terminal).
Follow the onscreen instructions.
■
Changing the Home screen
[
標準メニュー
(Standard menu)] is set in Home screen for
the first activation. To change to "
シンプルメニュー
(Simple menu)", operate from [
メニュー切替
(Switch
menu)] in the Settings menu.
❖
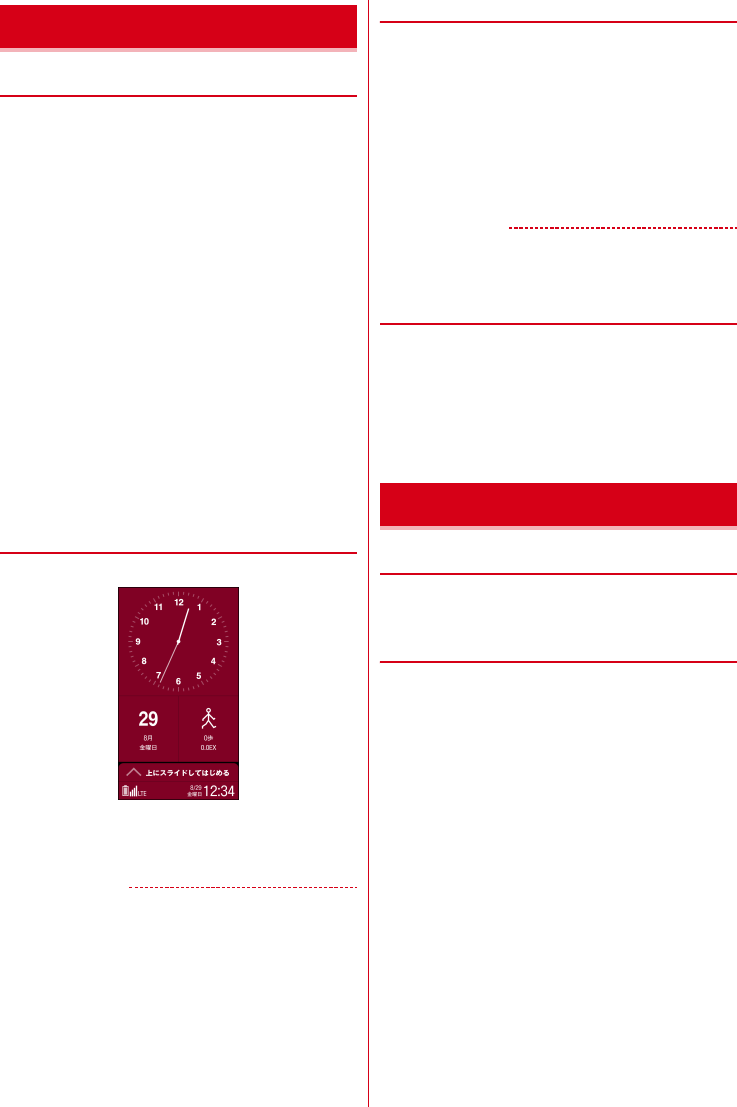
Top screen
Top screen is a screen for preventing misoperation.
1
On the Top screen, slide from bottom to top
Home screen/Standby screen appears.
✔
INFORMATION
・
On the top screen, the display is automatically turned off
according to the screen time out setting and the terminal
goes into sleep mode.
❖
When the screen display is turned off
When no operation is performed in certain period of
time, the display is automatically turned off according to
the screen time out setting and the terminal turns into
sleep mode.
1
P
key
Sleep mode is deactivated, and the top screen
appears.
Setting sleep mode manually :
P
key
✔
INFORMATION
・
When receiving a call while in sleep mode, sleep mode is
deactivated.
◆
Turning power OFF
1
Press and hold
P
until the phone options
menu appears
2
[
電源を切る
(Power off)]
e
[OK]
The terminal vibrates and turns OFF.
Restarting : [
再起動
(Restart)]
e
[OK]
◆
Using touch panel
You can operate the terminal by directly touching with
your finger.
❖
Notes for using the touch panel
Touch panel is designed to be operated with your
fingertip. Do not apply excessive force on the touch
panel or use sharp objects (nail, ball point pen, pin, etc.).
・
Touching the touch panel may not work in the
following cases. Note that it may cause malfunction.
- Operation with gloved hands
- Operation with tip of fingernail
- Operation with a foreign object on the display
- Operation with protective sheet or seal on the display
- Operation with the touch panel wet
- Operation with finger wet by sweat or water
- Operation under water
Turning power ON/OFF
Basic operation
Before using the terminal
19
❖
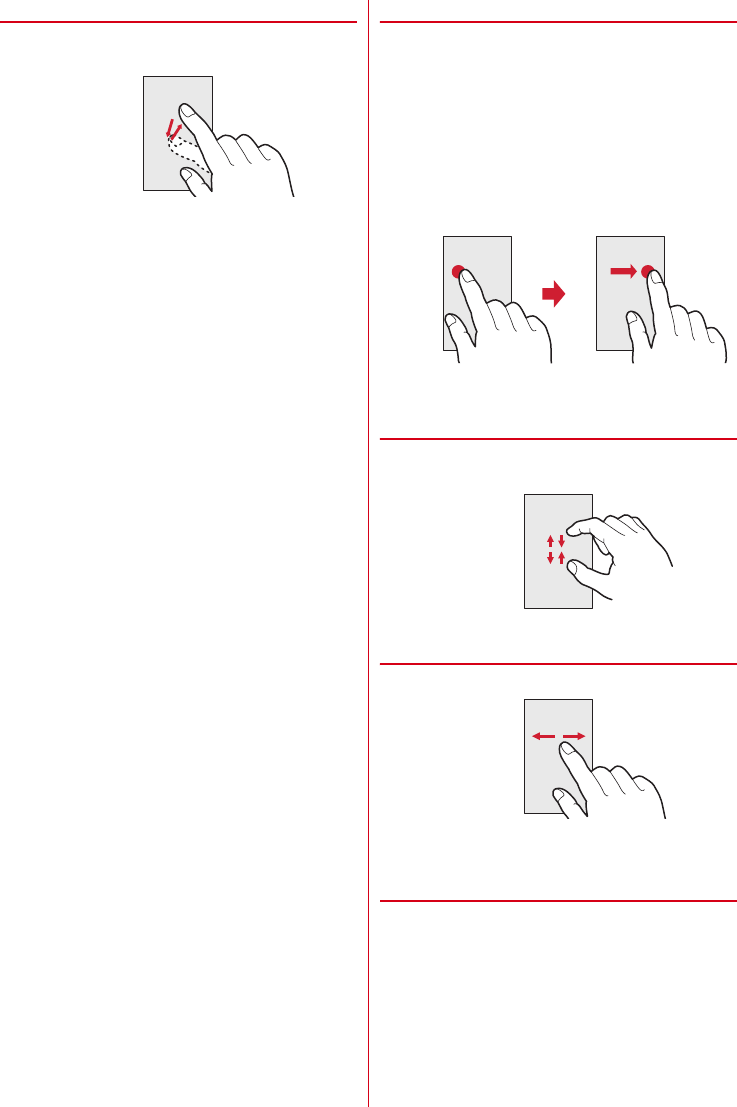
Touch and push
Touch lightly and push, then release the finger.
Operation is performed at the instant of pushing.
・
For some applications, touch and long-push on the
screen.
・
Lightly touch the screen to change the color or frame
of available icons or menu options by default. When
you touch and push it, you can feel vibration on your
finger. You can change operations in Rakuraku touch
setting.
・
When Rakuraku touch setting is disabled, touch the
screen lightly and release the finger (touch). Operation
can be valid at the instant of releasing the finger from
the screen.
・
In some applications or when browsing web sites, etc.,
the following operations may take place in spite of
Rakuraku touch setting.
- Even if Rakuraku touch setting is enabled, touch and
push operation is not accepted
- Even if Rakuraku touch setting is enabled, the
terminal does not vibrate
- Touching and pushing does not change color and
frame
- When an icon or menu option is touched and pushed,
its color or frame does not change but the terminal
vibrates
・
Tapping free area other than displayed screen may be
cancel operation.
❖
Slide (Swipe)/Drag/Pan
Slide (Swipe) :
Touch the screen with your finger and
drag to the desired position.
・
For some screens, keeping touching the same point for
0.5 seconds or more fixes the scroll operation by slide
operation. Release your finger from the screen to
cancel the fix status.
Drag :
Touch an item etc. on the screen and move it to the
desired position.
Pan :
Drag the screen in some direction to view the
desired part.
❖
Pinch
Touch the screen with two fingers and widen (pinch-out)
or narrow (pinch-in) the fingers' distance.
❖
Flick
Touch the screen and sweep the finger quickly.
◆
Switching the portrait/landscape
view
The terminal supports a motion sensor that senses
orientation or motion of the terminal. You can switch
screen view by tilting the terminal vertically or
horizontally.
・
Even when you change the orientation of the terminal,
the screen may not change depending on the screen
displayed.
Example : Drag
Before using the terminal
20
For the first time you turn the power ON, a screen for
preparation before using the terminal (initial settings)
appears.
・
The settings can be changed later.
・
If you turn the power OFF with some settings not made
in the initial settings, unset items appear again when
you turn the power ON next time.
・
If you turn on the power without docomo nano UIM
card inserted, "
日付と時刻
(Day & time)" setting
appears. The initial setting screen for DOCOMO
services does not appear.
1
On the "
初期設定
(Initial settings)" screen, [
次
へ
(Next)]
2
Following the onscreen instructions, set
Text-to-speech
e
Setting my body
e
Security
code
e
One-touch buzzer
音声読み上げ設定
(Text-to-speech)
:
Set whether to
enable Text-to-speech function which lets the
terminal read information on the screen or
operation.
自分からだ設定
(Setting my body) :
Set basic
information for
自分からだ設定
(Setting my
body).
暗証番号
(Security code) :
Set security code for
using the security lock.
・
By default, "0000" is set. To change, enter "0000"
on the security code entry screen, then enter a
new security code.
ワンタッチブザー
(One-touch buzzer) :
Set whether
to enable one-touch buzzer.
3
On the "
ソフトウェア更新
(software update)"
screen, [
次へ
(Next)]
4
Follow the onscreen instructions to make
initial settings for DOCOMO services
アプリ一括インストール
(Install apps all at once) :
Install applications for subscribed DOCOMO
services all at once.
おサイフケータイの利用
(Use Osaifu-Keitai) :
Make
settings for using Osaifu-Keitai.
ドコモアプリパスワードの設定
(Set docomo apps
password) :
Set a password for DOCOMO
applications.
・
By default, "0000" is set for docomo apps
password.
位置提供設定
(Location information setting) :
Set
location information function settings.
Home screen is a start screen to use applications. The
terminal has two types home screens; "
標準メニュー
(Standard menu)" and "
シンプルメニュー
(Simple
menu)".
・
To switch the home screen, operate from "
メニュー切
替
(Switch menu)" in the Settings menu.
◆
Learning the Home screen
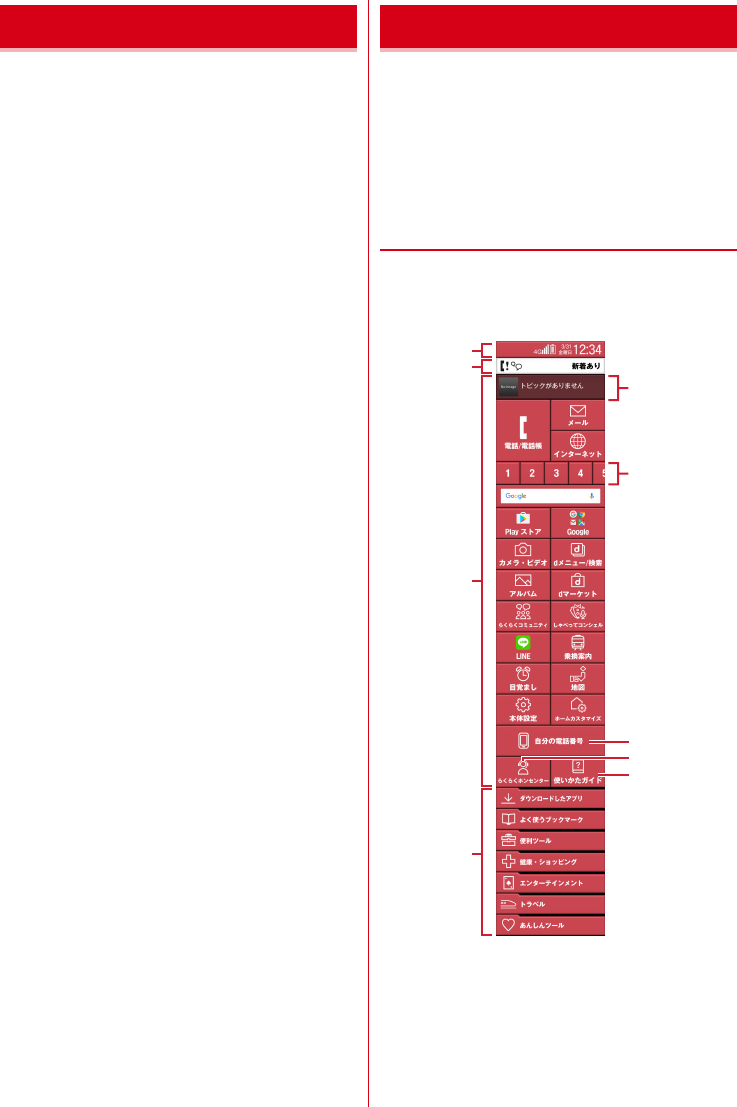
【標準
(Standard)
】
On the Home screen in "
標準メニュー
(Standard menu)",
slide the screen up and down.
・
Press
H
key to return to the top position of the Home
screen.
a
Status area
→
p.22
Status icons, notification icons and date & time are
displayed. They are displayed at the bottom of the top
screen.
・
Touch and push the status area on the Home
screen, the notification panel (
→
p.22) appears.
Initial settings Home screen
g
h
i
c
d
a
f
e
b
Before using the terminal
21
b
Incoming notification
Appears when missed calls, phone memo, received
mail, etc. They are displayed at the bottom of the top
screen.
c
Basic applications
Activate frequently-used application directly from
here.
d
Applications by category
Display a list of applications other than basic
applications to activate.
e
iチャネル
(i-channel)
A widget of information delivery service "
iチャネル
(i-channel)". It does not appear if you do not subscribe
i-channel.
f
One-touch dial
Register parties you contact frequently to make a
phone call or create mail easily.
g
自分の電話番号
(Own phone number)
You can check your own phone number.
h
らくらくホンセンター
(Rakuraku phone center)
Call to Rakuraku phone center.
i
使いかたガイド
(guide)
Activate Guide.
✔
INFORMATION
・
You can change the settings of i-channel or one-touch dial
to be displayed/not to be displayed.
◆
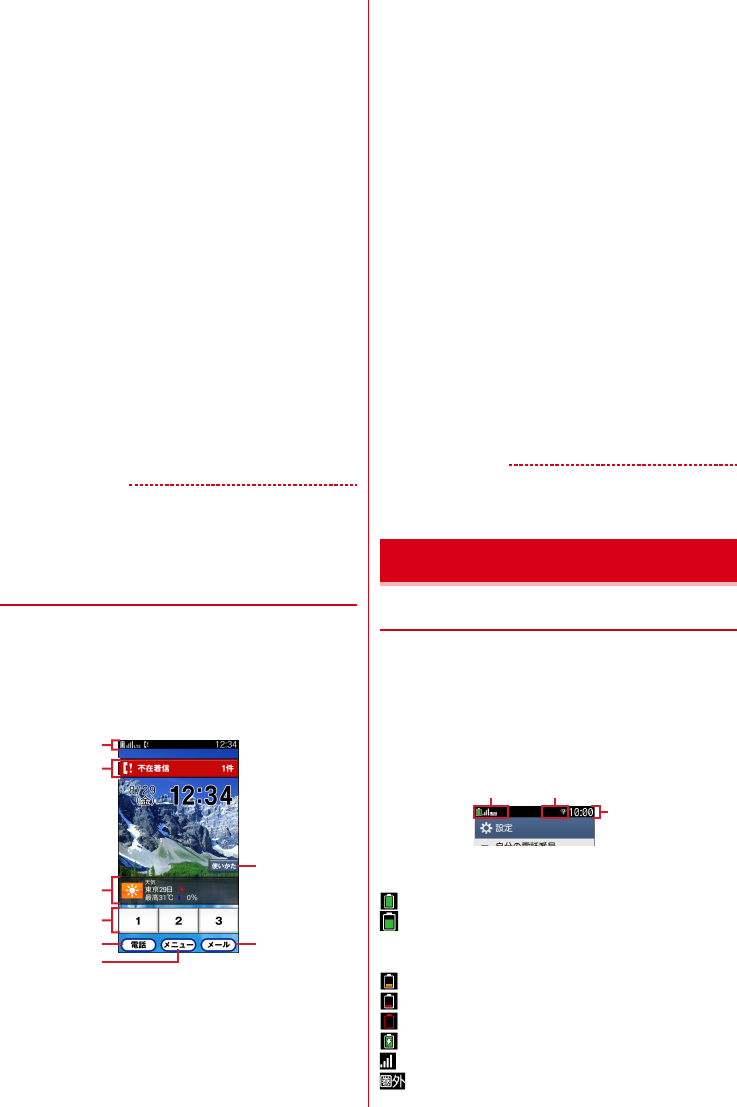
Learning the Standby screen
【シン
プル
(Simple)
】
On the "
シンプルメニュー
(Simple menu)" Standby
screen (Home screen), you can operate from menu items
from the Standby screen just like the Standby screen of
existing Rakuraku phone.
・
In Simple menu, Home screen is called "Standby
screen".
a
Status bar
→
p.21
Status icons, notification icons appear.
・
Touch and push the status bar on the Standby
screen to display notification panel.
→
p.22
b
Incoming notification
→
p.23
Appears when missed calls, received mail, etc. Touch
and push to check the notification. They are displayed
at the bottom of the top screen.
c
Help
See
使いかたガイド
or call to Rakuraku phone center.
d
iチャネル
(i-channel)
A widget of information delivery service "
iチャネル
(i-channel)". It does not appear if you do not subscribe
i-channel.
e
One-touch dial
Register parties you contact frequently to make a
phone call or create mail easily.
f
Phone/Menu/Mail activating icons
Touch and push to display "
電話帳・伝言メモ・音声メ
モを使う
(Use phonebook/Phone memo/Voice
memo)" menu of the Menu list to operate.
g
Menu icons
Touch and push to display Menu list.
h
Mail menu icon
Touch and push to display "
メールを使う
(Use Mail)"
menu of the Menu list to operate.
✔
INFORMATION
・
You can change the settings of Help, i-channel, one-touch
dial and clock to be displayed/not to be displayed.
◆
Learning the status bar
On the status bar, status icons which indicate current
status of the terminal and notification icons which shows
notifications from the terminal are displayed.
・
The status bar is displayed on the Simple menu
screens and screens when applications or functions
are activated in the Standard menu.
・
For some applications, the status bar may not appear.
■
Main status icons
*
: Battery level 80-100% (enough)
*
: Battery level 31-79%
・
Indicator (green area) changes according to the battery
level of from 31 to 79%.
*
: Battery level 16-30% (low)
*
: Battery level 5-15% (nearly empty)
*
: Battery level 0-4% (charge battery)
*
: Battery level (charging)
*
: Signal strength
*
: Out of service area
a
b
g
h
c
d
e
f
Home screen/Icons
Notification icon
Status icon
Status bar
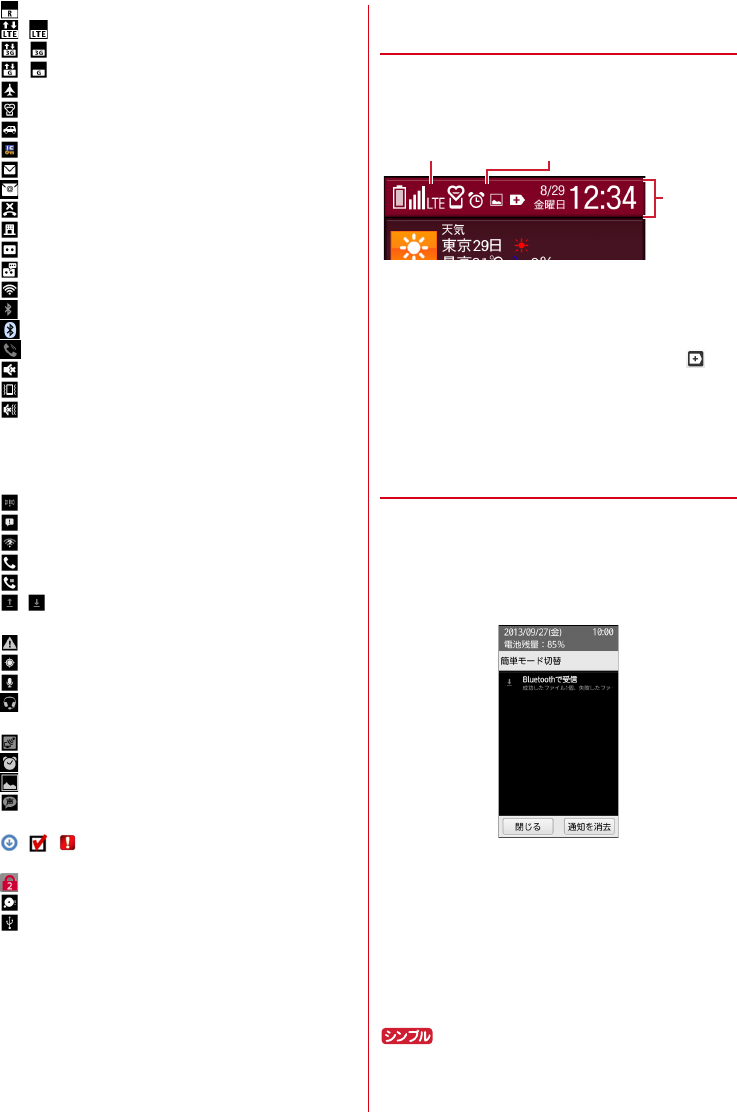
Before using the terminal
22
: Roaming
/ : Communicating in LTE/LTE available
/ : Communicating in 3G/3G available
/ : Communicating in GSM/GSM available
*
: Airplane mode
*
: Manner mode
*
: Public mode (Drive mode)
*
: Osaifu-Keitai lock is set
: New mail (sp-mode mail, MessageR, SMS)
: New mail (PC mail)
: Missed call
: Message in Voice mail Service
: Phone memo ON
: Unread Phone memo exists
: Wi-Fi is connected.
: Bluetooth function is ON
: Bluetooth device is connected
: Speaker phone is on
: Ringtone volume 0
: Enable vibrate for reception
: Ringtone off and enable vibrate for reception
* Icons are also displayed in the status area on the Home
screen.
■
Main notification icons
: New Area Mail
: Sending SMS is failed
: Wi-Fi is on, and Wi-Fi network is available
: Calling
: Call on hold
/ : Uploading data completed/Downloading data is
complete
: Error message exists
: Positioning with GPS
: Earphone is connected (terminal microphone input)
: Earphone is connected (earphone microphone
input)
: Receiving 1Seg
*
: Alarm is set
: Screenshot image is saved
: Koe-no-Takuhaibin (message received, playback
completion notification)
/ / : Software update available/completed/
unable to continue
: Omakase Lock is set
: Available memory on the terminal is low
: USB is connected (appears only in the status area)
* Icons are also displayed in the status area on the Home
screen.
◆
Learning Status area
【標準
(Standard)
】
Status area appears at the bottom of the Home screen
and top screen in the Standard menu. Status icons to be
displayed on the status bar and a part of the notification
icons.
・
The same icons on the status bar are displayed. Some
icons may not be displayed or may be displayed
highlighted.
・
Up to 2 notification icons are displayed in the status
area. When 3 or more notification icons exist,
(Hidden icons) appears.
・
Touch and push the status area to display notification
panel. The details of notification icons can be checked
on the notification panel.
◆
Notification panel
Display the notification panel to set [
簡単モード切替
(Easy mode switch)] or check the details of notification
icons.
1
Touch and push the status area on the Home
screen
・
Touch and push each notification to check the detail of
the notification.
・
Touch and push [
通知を消去
(Clear notification)] to
clear the notifications. [
通知を消去
(Clear notification)]
may not be displayed depending on the content of the
notification.
・
When all the notifications are not displayed, scroll the
screen.
・
Tap [
閉じる
(Close)] to close the notification window.
: Touch and push the status bar on the Standby
screen
Status
display
area
Notification icon
Status icon

Before using the terminal
23
✔
INFORMATION
・
Even if you touch and push the status area on the top
screen or status bar other than one on the Standby screen,
the notification panel does not appear.
◆
Incoming notification
Only when there are missed calls or incoming mails,
incoming notification appears on the Home screen, the
Standby screen, or the top screen. You can check the
details of notifications from the incoming notifications
on the Home screen and the Standby screen.
・
Missed calls, incoming calls, incoming mails,
incoming SMS, phone memos and voicemail
messages, incoming notifications form Rakuraku
community (comments for posted messages, friend
requests etc.) are displayed as incoming notifications.
1
On the Home screen, touch and push an
incoming notification
A related application activates.
: Touch and push the incoming
notification on the Standby screen
■
When different types of incoming
notifications exist
[
新着あり
(New arrival)] appears. Touch and push the
notification to display a list of incoming notifications.
Touch and push each notification to activate a related
application.
Press new
arrival
notification
Calling
24
Calling
Enter a phone number of the other party to make a call/
video call. You can also make a call/video call from the
phonebook.
◆
Making a call/video call
【標準
(Standard)
】
1
On the Home screen, [
電話/電話帳
(Phone/
Phonebook)]
The dialpad screen appears.
・
When the call history screen is displayed, touch
and push [
ダイヤル
(Dial)].
2
Enter a phone number
・
To correct a wrong number, touch and push
.
・
Touch and push [
メニュー
(Menu)] to register a
phonebook entry, show/hide caller ID, make an
international call.
3
[
電話をかける
(Call)]
Making a video call : [
メニュー
(Menu)]
▲
[
ビデオ
コールをかける
(Make a video call)]
4
When a call is ended, [
電話を切る
(End call)]
・
Alternatively, Press
H
key, then touch and
push [
はい
(Yes)] to end a call.
❖
Making a call/video call from the
phonebook
1
On the Home screen, [
電話/電話帳
(Phone/
Phonebook)]
▲
[
電話帳
(Phonebook)]
▲
[
電話
をかける
(Call)]
Making a video call : [
ビデオコールをかける
(Make
a video call)]
◆
Making a call/video call
【シンプル
(Simple)
】
1
On the Standby screen, [
電話
(Phone)]
▲
[
電話
をかける
(Call)]
The dialpad screen appears.
2
Enter a phone number
・
To correct a wrong number, touch and push
.
・
Touch and push [
メニュー
(Menu)] to register/
add a phonebook entry, show/hide caller ID,
make an international call.
3
[
電話をかける
(Call)]
Making a video call : [
メニュー
(Menu)]
▲
[
ビデオ
コールをかける
(Make a video call)]
4
When a call is ended, [
電話を切る
(End call)]
・
Alternatively, Press
H
key, then touch and
push [
はい
(Yes)] to end a call.
❖
Making a call/video call from the
phonebook
1
On the Standby screen, [
電話
(Phone)]
▲
[
電話
帳の内容を見る
(View phonebook entries)]
▲
Select a phonebook entry
▲
[
電話をかける
(Call)]
Making a video call : [
メニュー
(Menu)]
▲
[
ビデオ
コールをかける
(Make a video call)]
◆
International call (WORLD CALL)
Enter "+" to make an international call. Touch and hold
"0" to enter "+".
・
For details on WORLD CALL, contact "
総合お問い合わ
せ先
(General Inquiries)" on the last page of this
manual.
1
On the Home screen, [
電話/電話帳
(Phone/
Phonebook)]
: On the Standby screen, [
電話
(Phone)]
▲
[
電話をかける
(Call)]
2
+ (Touch and hold "0")
▲
Enter "Country
code-Area code (City code) omitted prefix 0"
and phone number
3
[
電話をかける
(Call)]
・
If [
自動変換機能
(Automatic conversion function)]
of [
国際ダイヤルアシスト
(International dial
assist)] is ON, "International dial assist" screen
appears when dialing. Touch and push [
元の番号
で発信
(Original number)] or [
変換後の番号で発信
(Converted number)].
・
In some countries and areas such as Italy,
entering "0" is required.
・
To enter "+ Country code" by selecting the
country list, enter the area code (city code) and a
phone number, then [
メニュー
(Menu)]
▲
[
国際電
話をかける
(Make an international call)]
▲
Select a
country.
Making a call/video call
Calling
25
Answer an incoming call/video call. You can reject a call,
hold answering, or record a phone memo (only for voice
call) while a call is incoming.
・
Video calls cannot be answered as voice calls. To
switch to voice call during a video call, on the video
call screen, [
メニュー
(Menu)]
▲
Touch and push [
音声
通話に切替
(Switch to voice call)].
◆
Receiving a call/video call
【標準
(Standard)
】
1
A call/video call is received.
・
To stop ringtone or vibration, touch and push [
着
信音を消す
(Mute ringtone)], or press
+
or
-
key.
2
[
電話に出る
(Answer a call)]
Receiving a video call : [
映像で通話する
(Call with
image)].
・
When Rakuraku touch is OFF, slide the incoming
call screen up, then touch [
電話に出る
(Answer a
call)]/[
映像で通話する
(Call with image)].
Declining a call : [
メニュー
(Menu)]
▲
[
拒否
(Decline)]
Recording a phone memo : [
メニュー
(Menu)]
▲
[
伝
言メモ
(Phone memo)]
・
Available only for voice calls.
3
When a call is ended, [
電話を切る
(End call)]
◆
Receiving a call/video call
【シンプル
(Simple)
】
1
A call/video call is received.
・
To stop ringtone or vibration, press
+
or
-
key.
2
[
電話に出る
(Answer a call)]
Receiving a video call : [
映像で通話する
(Call with
image)].
・
When Rakuraku touch is OFF, slide the incoming
call screen up, then touch [
電話に出る
(Answer a
call)]/[
映像で通話する
(Call with image)].
Recording a phone memo : [
メニュー
(Menu)]
▲
[
伝
言メモ
(Phone memo)]
・
Available only for voice calls.
Declining a call : [
メニュー
(Menu)]
▲
[
着信拒否
(Decline a call)]
3
When a call is ended, [
電話を切る
(End call)]
Register frequently dialed parties to the one-touch dial
to call or send email easily.
◆
Registering to the one touch dial
1
On the Home screen, touch and push any key
from to
2
[
新規電話帳作成して登録
(Add a new
phonebook entry)]
▲
Set each item
▲
Check
the phone number/email address, then [OK]
Registering from the phonebook : [
電話帳から選ぶ
(Select from the phonebook)]
▲
Select a party
you want to register
▲
Check the phone number/
email address, then [OK]
3
[
アイコンを選択
(Select icon)]/[
設定しない
(Do not set)]
▲
[OK]
・
If you touch and push [
アイコンを選択
(Select
icon)], select an icon.
1
On the Standby screen, touch and push any
key of -
2
[
新規電話帳作成して登録
(Add a new
phonebook entry)]
▲
Set each item
▲
[OK]
Registering from the phonebook : [
電話帳から選ぶ
(Select from the phonebook)]
▲
Select a party
you want to register
▲
Check the phone number,
then [
次へ
(Next)]
▲
Check the email address,
then [
決定
(OK)]
▲
[OK]
◆
Using the one touch dial
1
On the Home screen, touch and push any key
of - , or or
・
When you lightly touch a registered key such as
- , or or with your finger, the name
of registered party appears.
: On the Standby screen, touch and push
any key of -
Receiving a call/video call One-touch dial
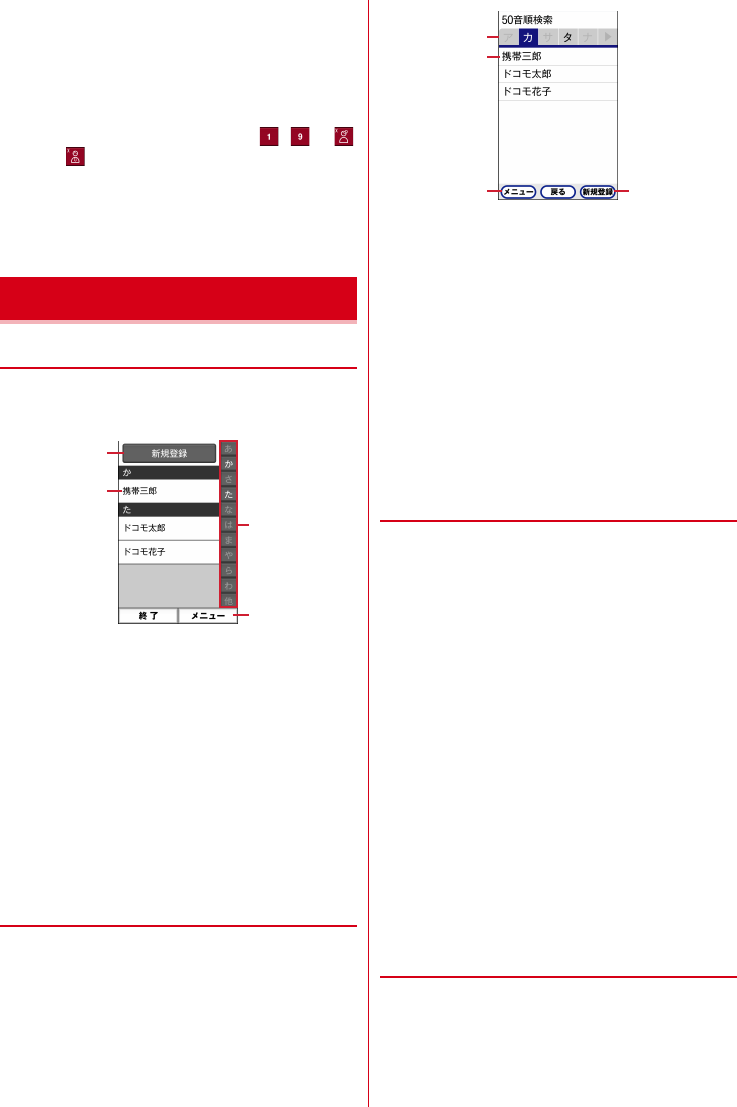
Calling
26
2
[
電話をかける
(Call)]/[
ビデオコールをかける
(Make a video call)]/[
メールを送る
(Send
email)]
・
For the standard menu, you can change the
registered parties or the icons, whether to show
the names when lightly touching the registered
keys on the Home screen such as - , or
or , correct the phonebook entries, or cancel
the one-touch dial by touching and pushing [
メ
ニュー
(Menu)]. For the simple menu, you can
change the registered parties, correct the
phonebook, or cancel the one-touch dial by
touching and pushing [
修正する
(Correct)].
◆
Phonebook
【標準
(Standard)
】
1
On the Home screen, [
電話/電話帳
(Phone/
Phonebook)]
▲
[
電話帳
(Phonebook)]
a
New entry
Add new phonebook entry.
b
Name
Touch and push to display the entry detail. From the
entry detail screen, you can make voice calls or video
calls, use send email or SMS, correct the contents, set
ringtone, send via infrared communication, etc.
c
Index
Display the index.
d
Menu
Display groups, search phonebook entry, log into
cloud, etc.
◆
Phonebook
【シンプル
(Simple)
】
1
On the Standby screen, [
電話
(Phone)]
▲
[
電話
帳の内容を見る
(View phonebook entries)]
a
Index
Display the index.
b
Name
Touch and push to display the detail screen. From the
entry detail screen, you can make voice calls or video
calls, send email or SMS, correct the contents, set
ringtone, send via infrared communication, etc.
c
Menu
Change the search method, log into cloud, make
overseas use settings, etc.
d
New entry
Add new phonebook entry.
◆
Registering a phonebook entry
【標
準
(Standard)
】
Add phonebook entry.
1
On the Home screen, [
電話/電話帳
(Phone/
Phonebook)]
▲
[
電話帳
(Phonebook)]
2
[
新規登録
(New entry)]
3
Enter a name
▲
[
次へ
(Next)]
4
Enter a reading
▲
[
次へ
(Next)]
・
The reading corresponding to entered name is
entered in advance. If it is not necessary to
correct, touch and push [
次へ
(Next)].
5
Enter a phone number
▲
[
次へ
(Next)]
6
Enter an email address
▲
[
次へ
(Next)]
7
[
この内容で登録する
(Register this content)]
▲
[OK]
・
To register memo, address, etc., touch and push
[
追加
(Add)] on each item.
◆
Phonebook
【シンプル
(Simple)
】
1
On the Standby screen, [
電話
(Phone)]
2
[
電話帳に登録する
(Register to the
phonebook)]
▲
Enter a name
▲
[
次へ
(Next)]
Phonebook
d
c
a
b
d
a
b
c
Calling
27
3
Enter a reading
▲
[
次へ
(Next)]
・
The reading corresponding to entered name is
entered in advance. If it is not necessary to
correct, touch and push [
次へ
(Next)].
4
Select the entry method
▲
Enter a phone
number
▲
[
次へ
(Next)]
・
You can select from direct input or call history for
entry method.
5
Select the entry method
▲
Enter an email
address
▲
[
次へ
(Next)]
6
[
入力する
(Enter)]
▲
Enter a postal code and
the address
▲
[
次へ
(Next)]
7
[
入力する
(Enter)]
▲
Enter a memo
▲
[
次へ
(Next)]
8
[
入力する
(Enter)]
▲
Select the entry method
▲
Enter a birthday
▲
[OK]
・
You can select from
明治
(Meiji),
大正
(Taisho),
昭
和
(Showa),
平成
(Heisei),
西暦
(Christian year) for
the entry method.
・
If you register a group, the group settings screen
appears.
・
If you enter with Christian year, [
次へ
(Next)]
appears when a group is registered, or [
決定
(Done)] appears when a group is not registered.
9
[
終了する
(End)]
Registering the one-touch-dial : [
登録する
(Register)]
▲
Select a unregistered one-touch
dial
▲
[
決定
(Done)]
▲
[OK]
・
Registered phonebook entry is registered to the
one-touch dial.
◆
Editing the phonebook entries
Correct contents of registered phonebook entries.
1
Select a phonebook entry you want to edit
▲
[
修正する
(Correct)]
2
Set each item
・
You can edit a name, phonebook, etc.
3
[
この内容で登録する
(Register this content)]
▲
[OK]
1
Select a phonebook entry you want to edit
▲
[
メニュー
(Menu)]
▲
[
修正する
(Correct)]
2
Set each item
・
You can edit a name, phonebook, etc.
3
[
上書きする
(Overwrite)]/[
新規登録する
(Register new entry)]
▲
[
終了する
(End)]
Registering the one-touch-dial : [
登録する
(Register)]
▲
Select a unregistered one-touch
dial
・
Edited phonebook entry is registered to the one-
touch dial.
◆
Deleting the phonebook entries
Delete the registered phonebook entries.
1
Select a phonebook entry you want to delete
2
[
メニュー
(Menu)]
▲
[
削除する
(Delete)]
▲
[
削
除する
(Delete)]
▲
[OK]
: [
メニュー
(Menu)]
▲
[
電話帳から削除
(Delete from the phonebook)]
▲
[
削除する
(Delete)]
▲
[OK]
◆
Searching the phonebook entries
Search the phonebook entries.
1
In the phonebook list, [
メニュー
(Menu)]
▲
[
検
索する
(Search)]
2
Enter a search word
▲
[
検索する
(Search)]
1
On the Standby screen, [
電話
(Phone)]
▲
[
電話
帳を検索する
(Search the phonebook)]
・
For search by Japanese alphabet, [
メニュー
(Menu)]
▲
Touch and push [
検索方法を変更
(Change search method)] to change the search
method. If you select the search by group or
search by text, the search method can be
changed by touching and pushing [
検索方法
(Search method)]. You can select the search
method from 50
音順検索
(Search by Japanese
alphabet),
グループ検索
(Search by group),
文字
列検索
(Search by text).
・
To use temporary selected search method, on
the selection screen for search method, touch
and push the item name of the search method.
Touch and push for the search method item
to turn to to preferentially search by the
search method when you operate from the
Standby screen, [
電話
(Phone)]
▲
[
電話帳を検索す
る
(Search the phonebook)].
Appendix
28
Appendix
This model F-04J mobile phone complies with Japanese
technical regulations and international guidelines
regarding exposure to radio waves.
This mobile phone was designed in observance of
Japanese technical regulations regarding exposure to
radio waves
*1
and limits to exposure to radio waves
recommended by a set of equivalent international
guidelines. This set of international guidelines was set
out by the International Commission on Non-Ionizing
Radiation Protection (ICNIRP), which is in collaboration
with the World Health Organization (WHO), and the
permissible limits include a substantial safety margin
designed to assure the safety of all persons, regardless
of age and health condition.
The technical regulations and international guidelines
set out limits for radio waves as the Specific Absorption
Rate, or SAR, which is the value of absorbed energy in
any 10 grams of tissue over a 6-minute period. The SAR
limit for mobile phones is 2.0 W/kg. The highest SAR
value for this mobile phone when tested for use near the
head is 0.783 W/kg
*2
and when worn on the body is 0.426
W/kg
*3
.
There may be slight differences between the SAR levels
for each product, but they all satisfy the limit.
The actual SAR of this mobile phone while operating can
be well below that indicated above. This is due to
automatic changes to the power level of the device to
ensure it only uses the minimum required to reach the
network. Therefore in general, the closer you are to a
base station, the lower the power output of the device.
This mobile phone can be used in positions other than
against your head. Please keep the mobile phone farther
than 1.5 cm away from your body by using such as a
carrying case or a wearable accessory without including
any metals. This mobile phone satisfies the technical
regulations and international guidelines.
The World Health Organization has stated that "a large
number of studies have been performed over the last
two decades to assess whether mobile phones pose a
potential health risk. To date, no adverse health effects
have been established as being caused by mobile phone
use."
Please refer to the WHO website if you would like more
detailed information.
http://www.who.int/docstore/peh-emf/publications/
facts_press/fact_english.htm
Please refer to the websites listed below if you would like
more detailed information regarding SAR.
Ministry of Internal Affairs and Communications
Website:
http://www.tele.soumu.go.jp/e/sys/ele/index.htm
Association of Radio Industries and Businesses Website:
http://www.arib-emf.org/01denpa/denpa02-02.html (in
Japanese only)
NTT DOCOMO, INC. Website:
https://www.nttdocomo.co.jp/english/product/sar/
FUJITSU LIMITED Website:
http://www.fmworld.net/product/phone/sar/
(in Japanese only)
*1 Technical regulations are defined by the Ministerial
Ordinance Related to Radio Law (Article 14-2 of Radio
Equipment Regulations).
*2 Including other radio systems that can be
simultaneously used with LTE/FOMA.
*3 Including other radio systems that can be
simultaneously used with LTE/FOMA.
◆
Declaration of Conformity
Trade Mark: Fujitsu
Model Name: F-04J
Hereby, Fujitsu Connected Technologies Ltd.
declares that the RE product of "F-04J" is in
compliance with RED 2014/53/EU.
The full text of the EU DoC is available at the
following internet address:
https://www.fmworld.net/product/phone/doc/
This mobile phone complies with the EU requirements
for exposure to radio waves. Your mobile phone is a
radio transceiver, designed and manufactured not to
exceed the SAR
*1
limits
*2
for exposure to radio-
frequency (RF) energy, which SAR
*1
value, when tested
for compliance against the standard was 0.704 W/kg
*3
for HEAD and 1.271 W/kg
*3
for BODY. While there may
be differences between the SAR
*1
levels of various
phones and at various positions, they all meet
*4
the EU
requirements for RF exposure.
*1 The exposure standard for mobile phones employs a
unit of measurement known as the Specific Absorption
Rate, or SAR.
*2 The SAR limit for mobile phones used by the public is
2.0 watts/kilogram (W/kg) averaged over ten grams of
tissue, recommended by The Council of the European
Union. The limit incorporates a substantial margin of
safety to give additional protection for the public and
to account for any variations in measurements.
*3 Including other radio systems that can be
simultaneously used with cellular radio wave.
Specific Absorption Rate
(SAR) of Mobile Phones
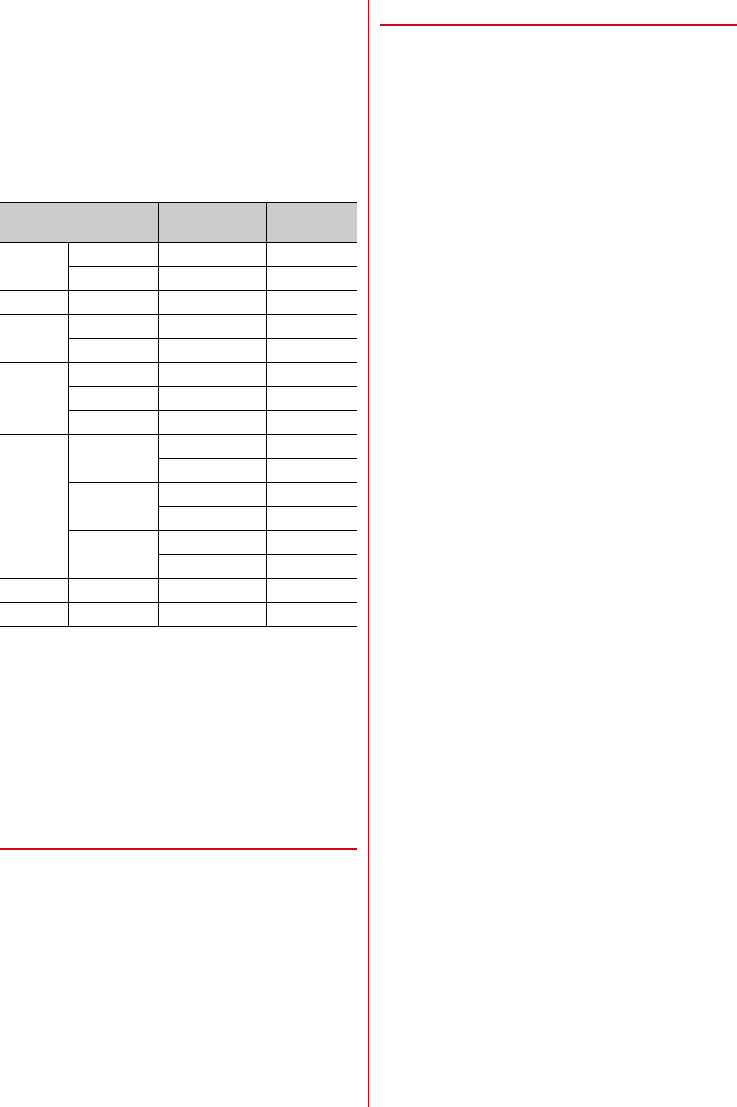
Appendix
29
*4 Tests for SAR have been conducted using standard
operation positions with the phone transmitting at its
highest certified power level in all tested frequency
bands. Although the SAR is determined at the highest
certified power level, the actual SAR level of the phone
while operating can be well below the maximum
value. This is because the phone is designed to operate
at multiple power levels so as to use only the power
required to reach the network. In general, the closer
you are to a base station antenna, the lower the power
output.
The manufacturer of this product is Fujitsu Connected
Technologies Ltd. with its registered place of business at
1-1, Kamikodanaka 4-chome, Nakahara-ku, Kawasaki,
Kanagawa 211-8588, Japan.
The Authorized Representative for RED is Fujitsu
Services Ltd. with its registered place of business at 22
Baker Street, London, U.K, W1U3BW.
◆
Federal Communications
Commission (FCC) Notice
・
This device complies with part 15 of the FCC rules.
Operation is subject to the following two conditions :
a
this device may not cause harmful interference,
and
b
this device must accept any interference received,
including interference that may cause undesired
operation.
・
Changes or modifications made in or to the radio
phone, not expressly approved by the manufacturer,
will void the user's authority to operate the equipment.
・
The device complies with 15.205 of the FCC Rules.
◆
FCC RF Exposure Information
This model phone meets the U.S. Government's
requirements for exposure to radio waves.
This model phone contains a radio transmitter and
receiver. This model phone is designed and
manufactured not to exceed the emission limits for
exposure to radio frequency (RF) energy as set by the
FCC of the U.S. Government. These limits are part of
comprehensive guidelines and establish permitted
levels of RF energy for the general population. The
guidelines are based on standards that were developed
by independent scientific organizations through periodic
and thorough evaluation of scientific studies.
The exposure standard for wireless mobile phones
employs a unit of measurement known as the Specific
Absorption Rate (SAR). The SAR limit set by the FCC is
1.6 W/kg. Tests for SAR are conducted using standard
operating positions as accepted by the FCC with the
phone transmitting at its highest certified power level in
all tested frequency bands. Although the SAR is
determined at the highest certified power level, the
actual SAR level of the phone while operating can be well
below the maximum value. This is because the phone is
designed to operate at multiple power levels so as to use
only the power required to reach the network. In general,
the closer you are to a wireless base station antenna, the
lower the power output level of the phone.
Before a phone model is available for sale to the public,
it must be tested and certified to prove to the FCC that it
does not exceed the limit established by the U.S.
government-adopted requirement for safe exposure.
The tests are performed on position and locations (for
example, at the ear and worn on the body) as required by
FCC for each model. The highest SAR value for this
model phone as reported to the FCC, when tested for use
at the ear, is 0.529 W/kg
*
, and when worn on the body, is
0.984 W/kg
*
. (Body-worn measurements differ among
phone models, depending upon available accessories
and FCC requirements).
While there may be differences between the SAR levels
of various phones and at various positions, they all meet
the U.S. government requirements.
The FCC has granted an Equipment Authorization for this
model phone with all reported SAR levels evaluated as in
compliance with the FCC RF exposure guidelines. SAR
information on this model phone is on file with the FCC
and can be found under the Equipment Authorization
Search section at http://www.fcc.gov/oet/ea/fccid/
(please search on FCC ID VQK-F04J).
For body worn operation, this phone has been tested and
meets the FCC RF exposure guidelines. Please use an
accessory designated for this product or an accessory
which contains no metal and which positions the
handset a minimum of 1.0 cm from the body.
Radio type / Description Transmitter
Frequency
Maximum
Output Power
GSM GSM900
880-915MHz 33.5dBm
DCS1800
1710-1785MHz 30.5dBm
UMTS FDD I
1920-1980MHz 24.5dBm
LTE FDD 1
1920-1980MHz 23.5dBm
FDD 3
1710-1785MHz 23.5dBm
WLAN
2.4GHz
IEEE 802.11b
2400-2483.5MHz 13.5dBm
IEEE 802.11g
2400-2483.5MHz 13dBm
IEEE 802.11n
2400-2483.5MHz 13dBm
WLAN
5GHz
IEEE 802.11a
5150-5350MHz 13dBm
5470-5725MHz 12.5dBm
IEEE 802.11n
5150-5350MHz 13dBm
5470-5725MHz 12.5dBm
IEEE 802.11ac
5150-5350MHz 13dBm
5470-5725MHz 12.5dBm
Bluetooth Bluetooth
2400-2483.5MHz 10dBm
RFID NFC
13.56MHz 10dB
μ
A/m

Appendix
30
・
In the United States, the SAR limit for wireless mobile
phones used by the general public is 1.6 Watts/kg (W/
kg), averaged over one gram of tissue. SAR values
may vary depending upon national reporting
requirements and the network band.
* Including other radio systems that can be simultaneously
used with cellular radio wave. This equipment has been
tested and found to comply with the limits for a Class B
digital device, pursuant to part 15 of the FCC Rules.
These limits are designed to provide reasonable
protection against harmful interference in a residential
installation. This equipment generates, uses and can
radiate radio frequency energy and, if not installed and
used in accordance with the instructions, may cause
harmful interference to radio communications. However,
there is no guarantee that interference will not occur in a
particular installation.
If this equipment does cause harmful interference to
radio or television reception, which can be determined
by turning the equipment off and on, the user is
encouraged to try to correct the interference by one or
more of the following measures:
- Reorient or relocate the receiving antenna.
- Increase the separation between the equipment and
receiver.
- Connect the equipment into an outlet on a circuit
different from that to which the receiver is connected.
- Consult the dealer or an experienced radio/TV
technician for help.
◆
Important Safety Information
AIRCRAFT
Switch off your wireless device when boarding an
aircraft or whenever you are instructed to do so by airline
staff. If your device offers flight mode or similar feature
consult airline staff as to whether it can be used on
board.
DRIVING
Full attention should be given to driving at all times and
local laws and regulations restricting the use of wireless
devices while driving must be observed.
HOSPITALS
Mobile phones should be switched off wherever you are
requested to do so in hospitals, clinics or health care
facilities. These requests are designed to prevent
possible interference with sensitive medical equipment.
PETROL STATIONS
Obey all posted signs with respect to the use of wireless
devices or other radio equipment in locations with
flammable material and chemicals. Switch off your
wireless device whenever you are instructed to do so by
authorized staff.
INTERFERENCE
Care must be taken when using the phone in close
proximity to personal medical devices, such as
pacemakers and hearing aids.
Pacemakers
Pacemaker manufacturers recommend that a minimum
separation of 15 cm be maintained between a mobile
phone and a pace maker to avoid potential interference
with the pacemaker. To achieve this use the phone on the
opposite ear to your pacemaker and does not carry it in
a breast pocket.
Hearing Aids
Some digital wireless phones may interfere with some
hearing aids. In the event of such interference, you may
want to consult your hearing aid manufacturer to discuss
alternatives.
For other Medical Devices :
Please consult your physician and the device
manufacturer to determine if operation of your phone
may interfere with the operation of your medical device.
Warning
This device have been tested to comply with the Sound
Pressure Level requirement laid down in the applicable
EN 50332-1 and/or EN 50332-2 standards. Permanent
hearing loss may occur if earphones or headphones are
used at high volume for prolonged periods of time.
<Prevention of Hearing Loss>
Warning statement requirement under EN 60950-1:A12.
Warning: To prevent possible hearing damage, do not
listen to high volume levels for long periods.
Appendix
31
This product and its accessories may be under coverage
of the Export Administration Regulations of Japan
("Foreign Exchange and Foreign Trade Control Laws"
and the related laws and regulations). And, they are also
under coverage of Export Administration Regulations of
the U.S. When exporting and reexporting this product
and its accessories, take necessary procedures on your
responsibility and expense. For details, contact Ministry
of Economy, Trade and Industry of Japan or US
Department of Commerce.
◆
Copyrights and portrait rights
Except for the case protected by copyright laws such as
personal use, use of terminal to reproduce, alter, or
publicly transmit recorded pictures or sounds, or
copyrighted text, images, music or software downloaded
from websites without the copyright holder's
authorization is prohibited.
Note that taking photos or recordings at some
demonstrations, performances or exhibitions may be
prohibited even when only for personal use.
Avoid taking pictures of others with the terminal without
their consent or disclosing recorded pictures of others
without their consent to general public through Internet
websites etc., because they may infringe on portrait
rights.
◆
Trademarks
Company and product names mentioned in this manual
are trademarks or registered trademarks of their
respective holders.
・
"FOMA", "i-mode", "i-
α
ppli", "i-motion", "Deco-mail",
"ToruCa", "mopera", "mopera U", "WORLD CALL", "iD",
"WORLD WING" and "sp-mode", are trademarks or
registered trademarks of NTT DOCOMO, INC.
・
"Catch Phone (Call waiting service)" is a registered
trademark of Nippon Telegraph and Telephone
Corporation.
・
This product contains NetFront Browser and NetFront
Document Viewer of ACCESS CO., LTD.
ACCESS, the ACCESS logo, and NetFront are
registered trademarks or trademarks of ACCESS CO.,
LTD. in the United States, Japan and/or other
countries.
Copyright
©
2014 ACCESS
CO., LTD. All rights
reserved.
・
"ATOK" is a registered trademark of
JustSystems Corporation in Japan and other
countries. "ATOK" is a copyrighted work of
JustSystems Corporation and other rights are those of
JustSystems Corporation and respective owners.
・
is a registered trademark of FeliCa Networks, Inc.
・
FeliCa is a registered trademark of Sony Corporation.
・
QR code is a registered trademark of Denso Wave Inc.
・
StationMobile
®
is
trademark of PIXELA
CORPORATION.
・
microSDHC Logo and microSDXC logo
are trademarks of SD-3C, LLC.
Export Administration
Regulations
Intellectual Property Right

Appendix
32
・
Microsoft
®
, Windows
®
, Windows Vista
®
and
Hotmail
®
are trademarks or registered trademarks of
"Microsoft Corporation" in the US and other countries.
・
The abbreviations of operating systems (Japanese
versions) below are used in this manual.
- Windows 8 indicates the Microsoft
®
Windows
®
8
operating system and Microsoft
®
Windows
®
8 Pro
operating system.
- Windows 7 stands for Microsoft
®
Windows
®
7
(Starter, Home Basic, Home Premium, Professional,
Enterprise and Ultimate).
- Windows Vista stands for Windows Vista
®
(Home
Basic, Home Premium, Business, Enterprise and
Ultimate).
- Windows XP indicates the Microsoft
®
Windows
®
XP
Professional operating system or Microsoft
®
Windows
®
XP Home Edition operating system.
・
Google, Android, Google Play and Gmail are
registered trademarks of Google Inc.
・
The Bluetooth
®
smart ready word mark and logos are
owned by the Bluetooth SIG, INC. and any use of such
marks by NTT DOCOMO, INC. is under license. Other
trademarks and names are those of their respective
owners.
・
Fonts installed to the terminal are provided by
Morisawa Inc. and the copyrights of the font data
belong to them. "
丸ゴシック体
" and "
明朝体
" are
registered trademarks or trademark of the company.
・
Wi-Fi, logo of Wi-Fi, Wi-Fi Alliance, WMM,
Wi-Fi CERTIFIED, log of Wi-Fi CERTIFIED,
WPA, WPA2, Wi-Fi Protected Setup are trademarks or
registered trademarks of Wi-Fi Alliance.
・
AOSS
™
is a trademark of BUFFALO INC.
・
OBEX
™
is a trademark of Infrared Data
Association
®
.
・
Other company and product names mentioned in this
manual are trademarks or registered trademarks of
their respective holders.
◆
Others
・
Part of this product includes module developed by
Independent JPEG Group.
・
FeliCa is a contactless IC card technology developed
by Sony Corporation.
・
This product is licensed based on MPEG-4 Visual
Patent Portfolio License. The use of MPEG-4 Video
Codec function is allowed for personal and nonprofit
use only in the cases below.
- Recording moving pictures and i-motion that
conform to MPEG-4 Visual Standard (hereinafter
referred to as MPEG-4 Video)
- Playing MPEG-4 Videos recorded personally by
consumers not engaged in profit activities
- Playing MPEG-4 Video supplied from the provider
licensed from MPEG-LA
For further utilizing such as promotion, in-house use
or profit-making business, please contact MPEG LA,
LLC in U.S.
・
This product is licensed under the AVC patent portfolio
license for the personal and noncommercial use of a
consumer to (i) encode video in compliance with the
AVC standard (henceforth referred to as AVC video)
and/or (ii) decode AVC video that was encoded by a
consumer engaged in a personal and noncommercial
activity and/or was obtained from a video provider
licensed to provide AVC video. No license is granted or
shall be implied for any other use. Additional
information may be obtained from MPEG LA, L.L.C.
See http://www.mpegla.com
・
This product is licensed under the VC-1 Patent
Portfolio License for the personal and noncommercial
use of a consumer to (i) encode video in compliance
with the VC-1 standard (henceforth referred to as VC-1
video) and/or (ii) decode VC-1 video that was encoded
by a consumer engaged in a personal and
noncommercial activity and/or was obtained from a
video provider licensed to provide VC-1 video. No
license is granted or shall be implied for any other use.
Additional information may be obtained from MPEG
LA, L.L.C.
See http://www.mpegla.com

Appendix
33
・
The following dictionary data is installed in the built-in
storage.
<Iwanami Shoten>
広辞苑
第六版
DVD-ROM
版(内蔵版)(新村出編)
<Sanseido>
デイリーコンサイス和英辞典(内蔵版)(三省堂編修所
編)
デイリーコンサイス英和辞典(内蔵版)(三省堂編修所
編)
◆
Open source software
・
Software licensed under Apache License V2.0 and
necessarily modified by us is used for this product.
・
This product contains open source software
complying with GNU General Public License (GPL),
GNU Lesser General Public License (LGPL), etc.
For details on the software license, refer to the
following.
: From the Home screen,
[設定
(Settings)
]
e
[
その他
(More)]
e
[端末情報
(About phone)]
e
[法的
情報
(Legal information)
]
e
[オープンソースライセン
ス
(Open source licenses)]
: On the stand-by screen,
[メニュー
(Menu)]
e
[設定を行う
(Make settings)
]
e
[その他の
設定を行う
(Make other settings)
]
e
[端末情報を見る
(View phone information)
]
e
[法的情報を確認する
(Check legal information)
]
e
[オープンソースライセ
ンス
(Open source licenses)
]
For software source codes disclosed based on the
open source licenses, refer to the following website.
For details, refer to the website below.
http://spf.fmworld.net/fujitsu/c/develop/sp/android/
This terminal supports SIM unlock. If you release SIM
lock, you can use SIM by a carrier other than NTT
DOCOMO.
・
The SIM unlock service is provided at a docomo Shop.
・
A SIM unlock charge is separately required.
・
With UIM other than by DOCOMO, using the terminal
in LTE system is unavailable. And available services
and functions will be limited. DOCOMO is not liable to
any failures or malfunctions.
・
For details of SIM unlock, refer to NTT DOCOMO
website.
SIM unlock
* Unavailable from land-line phones, etc.
■
From DOCOMO mobile phones (In Japanese only)
Repairs
■
From land-line phones (In Japanese only)
* Unavailable from part of IP phones.
For loss, theft, malfunction, and inquiries while overseas (
24
-hour reception)
(Business hours : 24 hours (open all year round))
0120
-
800
-
000
(toll free)
General Inquiries
<Rakuraku phone center>
(Business hours : 9:00 a.m. to 8:00 p.m. (open all year round))
■
Mobile phone/land-line phone (In Japanese only)
* Unavailable from part of IP phones.
0120
-
6969
-
37
(No prefix)
113
(toll free)
●
Please confirm the phone number before you dial.
●
For Applications or Repairs and After-Sales Service, please contact the above-mentioned information center or the docomo shop etc. near you on the NTT
DOCOMO website.
NTT DOCOMO website https://www.nttdocomo.co.jp/english/
2016.12 (1st Edition)
-8000120-0151
*
-81-3-6832-6600
*
(toll free)
International call access code
for the country you stay
* You are charged a call fee to Japan when calling from a land-line phone, etc.
※
If you use F-04J, you should dial the number +81-3-6832-6600 (to enter '+', Touch and long-push the '0' key).
●
From land-line phones <Universal number>
●
If you lose your terminal or have it stolen, immediately take the steps necessary for suspending the use of the terminal.
●
If the terminal you purchased is damaged, bring your terminal to a repair counter specified by DOCOMO after returning to Japan.
* You might be charged a domestic call fee according to the call rate for the country you stay.
※
For international call access codes for major countries and universal number international prefix, refer to DOCOMO International Services website.
Universal number
international prefix
●
From DOCOMO mobile phones
docomo "Anshin" Mission
"Safe and secure world for all with mobile"
FUJITSU CONNECTED TECHNOLOGIES LIMITED