Fujitsu F08A Fujitsu F-08A Cellular Phone User Manual L01
Fujitsu Limited Fujitsu F-08A Cellular Phone L01
UserManual.wiki
>
Fujitsu
>
F08A User Manual
>
Manual Part 4
Contents
1.
Manual Part 1
2.
Manual Part 2
3.
Manual Part 3
4.
Manual Part 4
5.
Manual Part 5
Manual Part 4
Navigation menu
Upload a User Manual
Namespaces
Wiki Guide
HTML
PDF
Info
Views
User Manual
Discussion / Help
Navigation
![Before Using the Handset48F-08A_E1kou✔INFORMATION・Insertion or removal of the AC and DC adapter connectors should be done slowly and carefully so that they are not given excessive force. When disconnecting the connector, pull it straight while pressing the release button. Applying an excessive force to disconnect the connector may give damage to it.❖Operations and precautions for chargingWhen charging starts, a charge start alert sounds, the light turns on and the battery icon on the display blinks. When charging is over, a charge completion alert sounds, the light turns off and the battery icon stops blinking.・When starting the battery charging, the light turns on in red. In some environments, the light may not light immediately when charging starts; this is normal and not a malfunction. However, if the light does not turn on after a while, disconnect FOMA terminal from the AC adapter, desktop holder or DC adapter then connect it again to start charging. Contact the sales outlet such as docomo Shop if the light does not turn on for a while after charging starts.・If you receive mail or shoot an image while charging, the light turns on temporarily in a different color, but it is not a failure. It turns on in red after a while.・When installing the fully charged battery pack to FOMA terminal and connecting it to the AC adapter, desktop holder or DC adapter, the light may turn on for a moment and turn off. This is normal and not a malfunction.・During a call or communication, in Silent mode or Public mode (Drive mode) or when Charge alert is "OFF", the charge alert does not sound at the start or completion of charge.Remaining battery levelChecking battery levelA battery icon appearing on the top of the display shows an approximate remaining battery level.(Battery level 3) : Ample charge.(Battery level 2) : Low charge.(Battery level 1) : Almost exhausted. Charge the battery.・The battery icon set by default varies by the color of FOMA terminal.・When FOMA terminal is closed, you can check the battery level on the sub-display.❖When battery is almost exhaustedA message indicating the battery is almost exhausted appears. Pressing any one of g, c, f keys with FOMA terminal opened deletes the message temporarily. After a while, a battery alarm sounds from the speaker and all icons on the top of the display blink. The power is turned off in approximately 1 minute. Although these operations stop when charging starts, press f to immediately stop the battery alarm.・During a call, a message appears and a battery alarm sounds from the earpiece. After approximately 20 seconds, the call ends, the battery alarm sounds from the speaker and all icons on the top of the display blink.・When FOMA terminal is closed, a message indicating the battery is almost exhausted appears.◆Checking battery level with sound and display <Battery level>1m [Settings & NW services] 7441The battery level is displayed and the sound set for Keypad sound (→P86) is emitted according to the level. After a while, the screen returns to the menu list.Battery level 3 : 3 short beep soundBattery level 2 : 2 short beep soundBattery level 1 : 1 short beep soundL03.fm Page 48 Friday, March 27, 2009 4:15 PM](https://usermanual.wiki/Fujitsu/F08A.Manual-Part-4/User-Guide-1093727-Page-8.png)
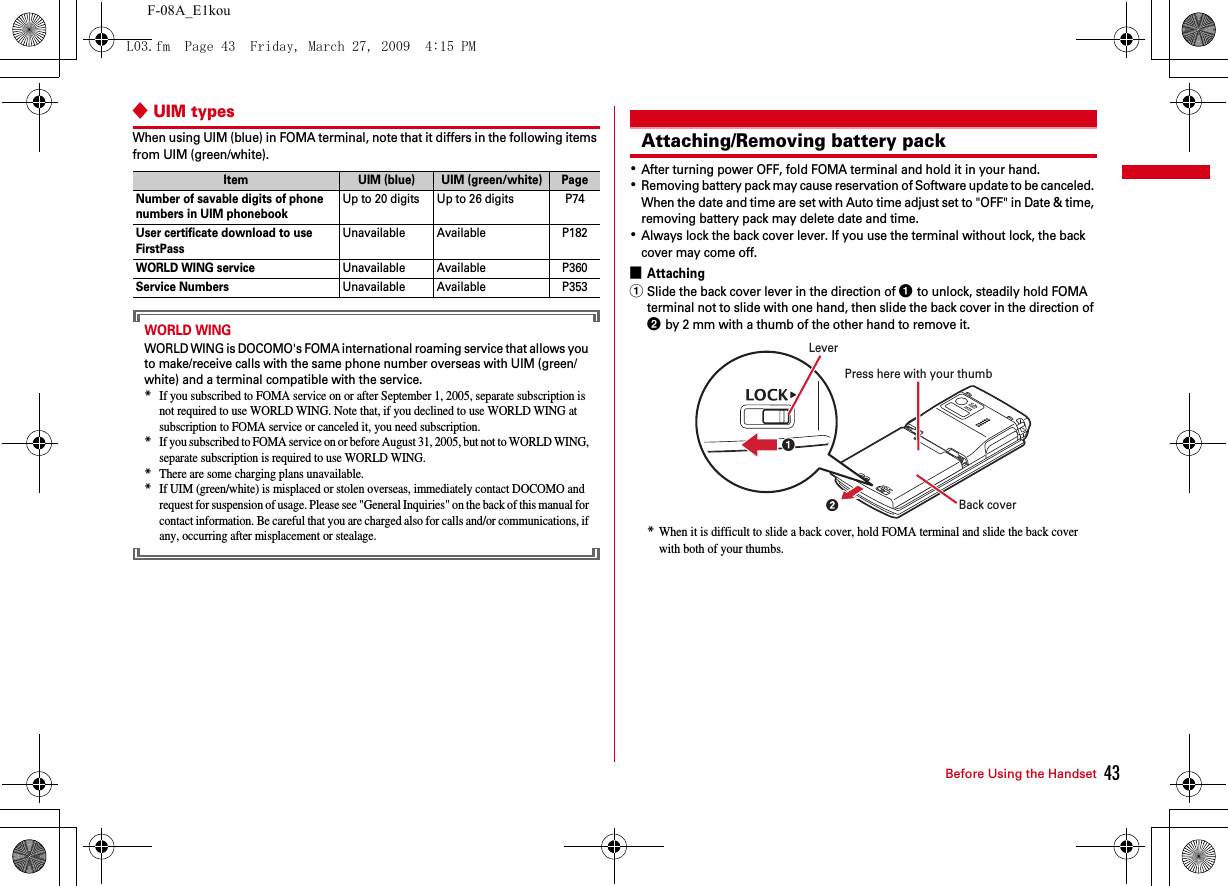
![49Before Using the HandsetF-08A_E1kouPower ON/OFFTurning power ON/OFF❖Turning power ON1f (2 sec. or more)The wake-up screen appears and the stand-by display appears. appears at the bottom of the display while reading UIM.・An antenna icon appearing at the top of the display shows the approximate received signal level.・The battery icon set by default varies by the color of FOMA terminal.・When you turn the power ON after installing the battery pack, a message indicating it appears.・When FOMA terminal is closed, you can check the received signal level on the sub-display.❖Turning power OFF1f (2 sec. or more)◆Operations to perform after turning the power ON at the first timeWhen turning the power ON for the first time, operate in the order of "拡大メニューの設定 (enlarged menu setting)"→"Initial setting". The settings made can be changed later.・When initialization is finished, a confirmation screen of software update function appears. Press g to display the stand-by screen.❖Enlarged menu setting1"Yes" or "No" on the confirmation screen・When selecting "Yes", "拡大メニュー (enlarged menu)" of Kisekae Tool is set.If you cancel the confirmation screen by pressing c or f, the confirmation screen reappears when the power is turned ON the next time.❖Default setting・Always set Password. When C or c, f is pressed before setting terminal security code, a confirmation screen for exiting appears. If you exit by selecting "Yes", the initial setting screen reappears when the power is turned on next time.・You can also display the initial setting screen by pressing m [Settings & NW services] 748 on the stand-by display.1Set required items on Initial setting screeneCDate & time : Set the date and time.→P50Password : Change the terminal security code after performing authentication.→P105Keypad sound : Set the confirmation sound when a key is pressed.→P86Text size : Set size of characters for phonebook, mail, etc.→P101Stand-by displayAntenna iconReceived signal levelIconStrong WeakOut of service area or where radio waves do not reachL03.fm Page 49 Friday, March 27, 2009 4:15 PM](https://usermanual.wiki/Fujitsu/F08A.Manual-Part-4/User-Guide-1093727-Page-9.png)
![Before Using the Handset50F-08A_E1kou❖Checking Welcome mail"オススメBEST (Recommendation)", "緊急速報「エリアメール」のご案内 (Early warning "Area Mail" information)", "Welcomeデコメアニメ (Decome-Anime)" mail messages are saved by default. appears on the stand-by display, and the light (blink) indicates that there is unread mail.1gegThe next procedures→P142 Step 2 and the following steps in "Displaying mail in inbox/outbox/unsent mailbox"✔INFORMATION・When UIM is replaced, authentication is required after turning ON FOMA terminal. When authentication is succeeded, the stand-by display appears. If an incorrect terminal security code is entered 5 times consecutively, the power is turned off (the power can be turned on again).・If no operation is performed with something displayed on the screen, the display light is turned off automatically according to the settings in Light time-out or Power saving mode. It also applies while making a call. The display light turns on again if there is any operation or incoming call.Select languageChanging screen display to English1m [設定/NWサービス (Settings & NW services)] 263e1 or 2 ✔INFORMATION・This setting is also saved to UIM.・Even if setting to "English", the displayed menu is not switched to English in some Kisekae Tool. Note that, when Kisekae Tool in "Preinstalled" folder is set, a menu dedicated to "English" is displayed.・Even if changing this setting, the title of Shortcut icon is not changed from the language set when the shortcut icon was pasted.Date & timeSetting date and timeYou can set so that the time or time difference is automatically corrected or directly enter the date and time. With automatic correction set, the time is corrected when receiving the time information from DOCOMO's network in Japan or the time difference correction information from the telecommunications carrier used overseas.1m [Settings & NW services] 711eSet required itemseCAuto time adjust : Set whether time is corrected automatically.・When "ON", Offset can be set.・When "OFF", set the date and time. Time zone and Summer time may also be set.Offset : When "+", the displayed time is always set forward the specified period of time from the corrected time. When "-", the displayed time is always set back the specified period of time from the corrected time.Date : The date can be entered up between January 1, 2000 and December 31, 2050.Time : Enter the time in the 24-hour format.Time zone : When moving to a place with time difference, set the time zone without changing the date and time settings.・Time difference from the previously set time zone is calculated and displayed.・Set "GMT+09:00" in Japan.Summer time : When "ON", the displayed time is set forward one hour from the specified time.✔INFORMATION<When setting Auto time adjust to "ON">・Time or time difference is corrected when FOMA terminal is turned ON. If not corrected for a while after turning FOMA terminal ON, once turn FOMA terminal OFF and then turn it ON again. Note that, when no UIM is installed or in some radio wave conditions, time is not corrected even if FOMA terminal is once turned OFF and turned ON again.・When time difference is corrected, a message indicating it appears.・After time or time difference is corrected overseas, the time displayed for call histories and sent mails is local time.・Time difference is not corrected in some networks overseas.・The corrected time or time difference may have an error of several seconds.L03.fm Page 50 Friday, March 27, 2009 4:15 PM](https://usermanual.wiki/Fujitsu/F08A.Manual-Part-4/User-Guide-1093727-Page-10.png)
![51Before Using the HandsetF-08A_E1kou<When the correction has never been performed and date and time are displayed with "--" or "?">・Flash graphics, Machi-chara, etc. that use clock or date/time are not displayed correctly. Also, functions requiring date/time information such as Auto start, Reserve, downloading or playing data with Replay Restriction, operating a user certificate, etc., cannot be activated.・Date and time of each data are not recorded and displayed as "----/--/--" or "----------------". A segmental number furthermore (number to segmentalize) may be appended.<When setting date/time with Auto time adjust set to "OFF">・When the date/time are deleted because of removing of the battery pack or leaving the battery for a long time after the battery exhausted, set the date/time again after charging the battery.Caller ID notificationNotifying the other party of your phone numberYou can notify your phone number (caller ID) to the other party's terminal when making a voice call or videophone call.・For details, refer to "Mobile Phone User's Guide [Network Services]".・Caller ID is your important information. Carefully consider whether you want to include caller ID information when making a call.・The caller ID is displayed only when the phone of the other party can display the caller ID.・Setting operations for this function is disabled from a location out of service area.1m [Settings & NW services] 8411e1 or 2・Press m [Settings & NW services] 8412 and select "Yes" to check the current settings.❖Priority of Caller ID notificationThere are multiple methods to notify your phone number to the other party. If you set or perform these methods simultaneously, the caller ID operations are performed with the following priorities. The displayed setting and actual Notify/Not notify may differ.aWhen setting a caller ID notification method in Call option for dialing→P61bWhen "186" or "184" is prefixed to phone number to dial→P61cCaller ID settings of phonebook→P78dActivate/Deactivate of Caller ID notification✔INFORMATION・If an announcement of requesting caller ID is heard when making a call, make a call again after setting your caller ID to be notified.User informationChecking your own phone numberYou can check your phone number (My phone number), Name, Mail address, etc.1m [User information]Checking during a call etc. : s0✔INFORMATION・For details of how to check i-mode mail address, see "Mobile Phone User's Guide [i-mode] FOMA version".・When 2in1 is in Dual mode, you can press a to switch User information between Number A and B.・With 2in1 ON, if replacing UIM (2in1 subscriber→2in1 subscriber), set 2in1 to OFF then set it to ON again to obtain the correct Number B, or obtain Number B from User information.→P328Also, if replacing UIM (2in1 subscriber→2in1 non-subscriber), set 2in1 to OFF to update to the correct user information.→P355L03.fm Page 51 Friday, March 27, 2009 4:15 PM](https://usermanual.wiki/Fujitsu/F08A.Manual-Part-4/User-Guide-1093727-Page-11.png)