Contents
- 1. user manual1
- 2. user manual2
- 3. user manual
user manual2

F-09B_EN_ninshou
31
Before Using the Handset
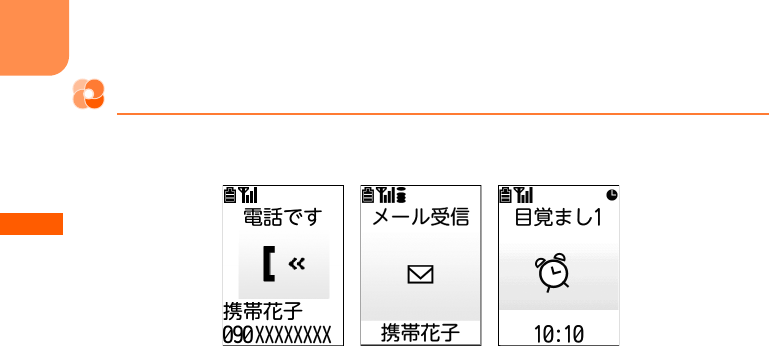
h
: Alarm clock ON
→
p.423
: 1Seg watching reservation or schedule notification is set
→
p.426
: Alarm clock, 1Seg watching reservation or schedule notification is set
→
p.423, p.426
i
Notify you of mail, messageR/F, missed calls, recorded messages, messages in Voice Mail service or
Information of i-concier as newly arrived information.
* Only one item that is in high priority appears. Above are described in order of priority.
Information displayed on the standby screen
You can display various information other than a clock, newly arrived information, steps on the standby
screen of the sub-display.
■
Clock/Calendar
Clock type can be set in "
背面画面の時計表示を設定する
(Set clock display of the sub-display)" of sub-
display setting.
→
p.130
・
Calendar is displayed when
カレンダー
(Calendar) is set to "
表示する
(Yes)" in "
背面ディスプレイの情
報表示を設定
(Set information display of the sub-display)" of sub-display setting.p.132
■
Newly arrived information
Notify you of mails, messageR/F, missed calls, recorded messages, voice messages in Voice Mail
service, information of i-concier.
■
Birthday and holiday/almanac
A screen informs you of a birthday or holiday/almanac.
・
It is displayed when
誕生日・祝日・暦
(Birthday/holiday/almanac) is set to "
表示する
(Yes)" in "
背面ディ
スプレイの情報表示を設定
(Set information display of the sub-display)" of sub-display setting.p.132
・
Information of birthday is displayed when the birthday is saved to the phonebook.
■
i-Channel ticker
It is displayed when a ticker is set to be displayed in i-Channel display setting.
■
i-concier screen/weather information
Contents of information is displayed when
iコンシェル受信設定
(i-concier reception setting) is set to "
受信する
(Yes)". If weather information is included in the information, a weather information screen is
displayed.
・
Weather information screen is displayed when
天気情報
(Weather information) is set to "
表示する
(Yes)" in "
背面ディスプレイの情報表示を設定
(Set information display of the sub-display) of sub-
display setting.p.132
L03.fm Page 31 Thursday, May 27, 2010 3:44 PM
F-09B_EN_ninshou
32
Before Using the Handset
Status display for incoming calls or received mails
If there is any change from stand-by status such as receiving a call or mail when FOMA terminal is
folded, it is notified by displaying the status. Contents that are mainly displayed are as follows.
■
Voice/videophone calls
The status such as receiving call, talking, respond holding or disconnecting is displayed.
* When "
背面画面の着信表示を設定する
(Display reception on the sub-display)" of sub-display setting is
set to "
表示しない
(No)", a caller's phone number or name is not displayed even if you receive a call.
→
p.132
■
Recorded messages
Appear during answering or recording.
・
Recorded messages
→
p.85
■
i-mode mail or SMS, MessageR/F
Appear when mail or SMS, or MessageR/F is received.
* When "
背面画面の着信表示を設定する
(Display reception on the sub-display)" of sub-display setting is
set to "
表示しない
(No)", a sender's mail address or name is not displayed even if you receive mail.
→
p.132
・
Receiving i-mode mail
→
p.194
・
Receiving SMS
→
p.225
・
Receiving MessageR/F
→
p.213
■
Auto-send mail or auto-send pedometer/activity monitor
Appear when Auto-send mail or auto-send pedometer/activity monitor is failed.
・
Auto-send mail
→
p.179
・
Auto-send mail of pedometer/activity monitor
→
p.407
■
GPS
The status such as position location, notify location or sending location are displayed.
・
GPS
→
p.340
■
Alarm clock, 1Seg watching reservation or schedule
Appear when the date and time of the alarm clock, 1Seg watching reservation or schedule comes.
・
Alarm clock
→
p.423
・
Schedule
→
p.425
Receiving voice call Receiving mailAlarm clock
L03.fm Page 32 Thursday, May 27, 2010 3:44 PM

F-09B_EN_ninshou
33
Before Using the Handset
■
Timer or one-touch buzzer
Appear during Timer countdown, when the time set in Timer arrives, or during operation of one-touch
buzzer.
・
One-touch buzzer
→
p.435
* In addition, when the battery is almost exhausted, in All lock or Omakase Lock, or when starting Lock
on close, setting countdown timer, checking new messages or SMS, accessing to Data Center for Data
Security Service, recording sound, playing album, playing melody, or performing infrared or data
communication, the status is displayed.
When FOMA terminal is closed, the light of sub-display turns on. If you do not perform any operations
for about 15 seconds, it turns off. Press any of
SD(
to turn it on again.
→
p.132
・
When "
背面画面の点灯を設定する
(Set sub-display light)" is set to "
点灯する
(Yes)", holding and tilting
FOMA terminal turns the light on.
→
p.132
When eco mode is set to "
設定する
(Yes)", after turning off the light of sub-display, any information is
not displayed on the sub-display.
→
p.134
・
The display format of standard clock and large clock can be set to either 24-hour or 12-hour format.
→
p.136
・
If there is multiple information for the sub-display, each time you press
(
, the display switches in
order of "
誕生日・祝日
(Birthday/holiday)"
→
"
新着情報
(Newly arrived information)"
→
"
iコンシェルの
インフォメーション
(i-concier information)"
→
"
時計表示のみ
(only clock)"
→
"
iチャネルのテロップ
(i-
Channel ticker)"
→
"
歩数・活動量
(Steps/activity amount)"
→
"
天気予報
(Weather forecast)"
→
"
カレン
ダー
(Calendar)". When there is no information to display, only clock is displayed.
INFORMATION
・
If you opening FOMA terminal with information displayed on the sub-display, the display disappears.
・
When the sub-display is switched by an incoming call or mail, etc., with FOMA terminal folded, the light
automatically turns on.
・
When information for incoming call or receiving mail or title on playing album or melody exceeds the number of
characters available for one line, they are displayed by scrolling. To display by scrolling again, press
(
.
Switching the sub-display view
L03.fm Page 33 Thursday, May 27, 2010 3:44 PM
F-09B_EN_ninshou
34
Before Using the Handset
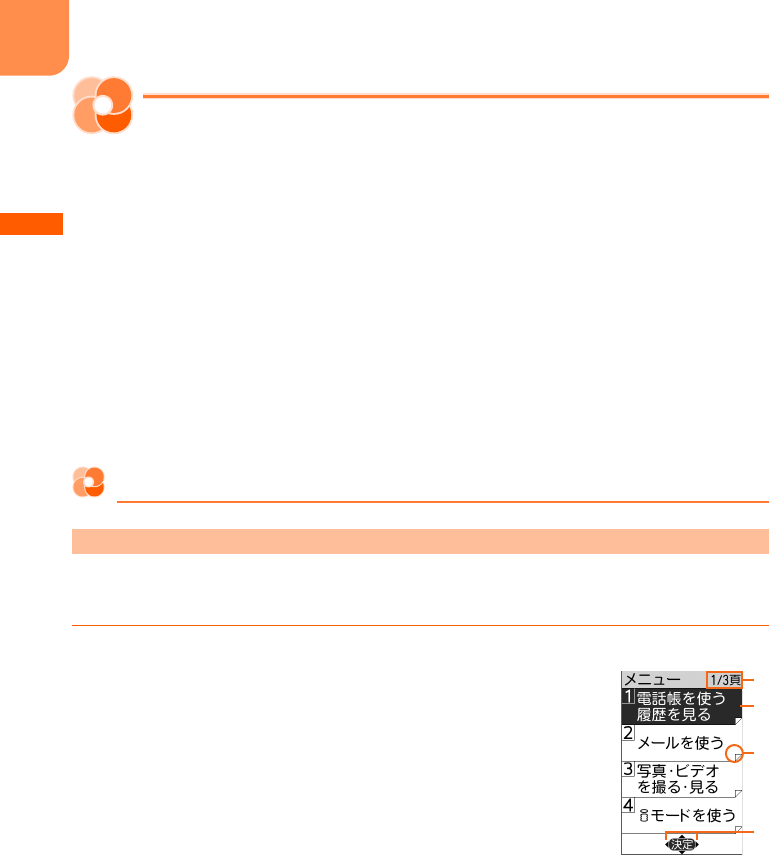
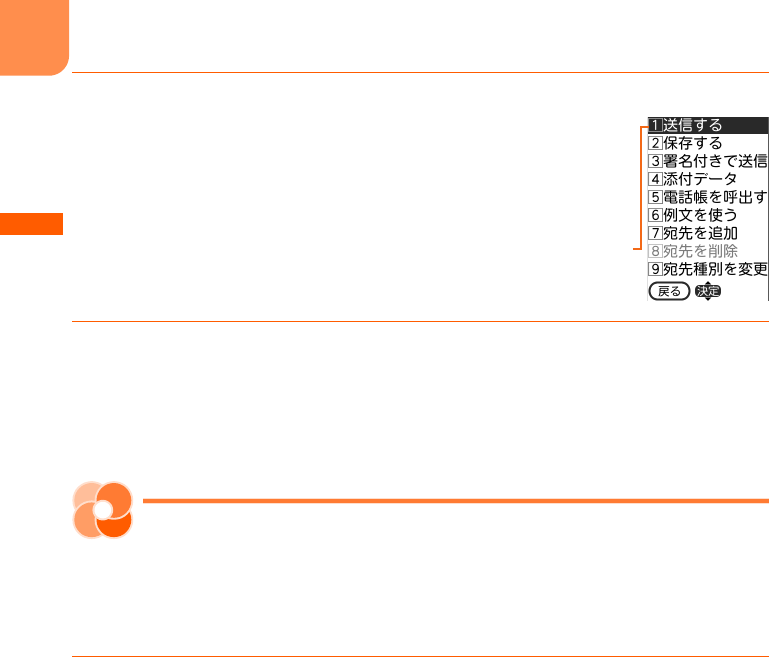
Operating menu
Select and execute the functions from the menu screen displayed by pressing
m
on the stand-by
display or from the mail menu screen displayed by pressing
u
. To select a function, you can either
press multi-cursor button (cross button) or dial button. In this manual, the operation methods are
explained mainly by the way of pressing dial button (short-cut operation).
・
For available functions, see "Menu list".
→
p.490
・
If you select the function when any locking function is set or UIM is not installed, the reason why the
function cannot be performed is displayed. For submenu, functions that cannot be performed are
grayed out and they cannot be selected.
・
When setting the menu design of menu format selection to "
タイル
(Tile)", the item names displayed
by pressing
m
on the stand-by display differs from the ones shown in this manual. And, the selection
method of multi-cursor button (cross button) also differs.
・
Selection of menu format and menu item name
→
p.133
Selecting function with multi-cursor button (cross button)
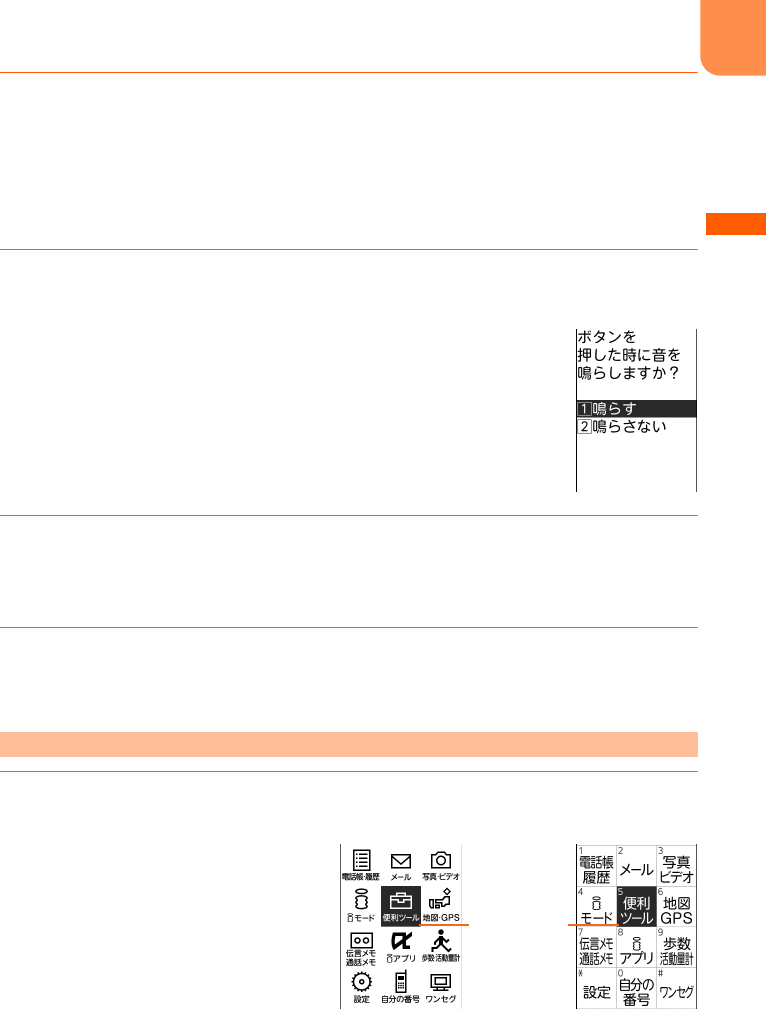
<Example>
Performing "
ボタンを押した時の音を設定する
(Setting the sound emitted when a
button is pressed)"
1
Press
m
on the stand-by display
The menu screen appears.
a
Page
A number of the displayed page and total pages are displayed.
b
Cursor
The color of the selected function changes.
c
Indicates that the menu of lower layer exists.
d
Appears when there is a continued part of the displayed menu
screen.
To display the continued part, press
ud
several times to move
the cursor, or press
lr
to switch the screen.
When selecting a function from a list-format menu
b
a
c
d
L03.fm Page 34 Thursday, May 27, 2010 3:44 PM
F-09B_EN_ninshou
35
Before Using the Handset
2
Press
d
and select "
*
設定を行う
(Set)"
e
Press
g
The menu screen of "
*
設定を行う
(Set)" appears.
・
u
: Cursor moves to the function above.
・
d
: Cursor moves to the function below.
・
l
: Display the previous page.
・
r
: Display the following page.
3
Press
d
and select "
f
ボタンを押した時の音を設定する
(Set the sound
emitted when a button is pressed)"
e
Press
g
4
Press
u
or
d
and select "
a
鳴らす
(Sound)" or "
b
鳴らさない
(Not
sound)"
e
Press
g
A message appears indicating that the keypad sound is set.
5
Press
g
The menu screen reappears.
・
Press
f
to return to the stand-by display.
1
Press
m
on the stand-by display
The menu screen appears.
When selecting a function from a tile-format menu
Cursor : The color
of the selected
function changes
Tile (Icon) Tile (Character)
L03.fm Page 35 Thursday, May 27, 2010 3:44 PM

F-09B_EN_ninshou
36
Before Using the Handset
2
Press
d
or
l
and select "
設定
(Set)"
e
Press
g
・
u
: Cursor moves to the function above.
・
d
: Cursor moves to the function below.
・
l
: Cursor moves to the function on the left.
・
r
: Cursor moves to the function on the right.
Selecting function by dial button <Shortcut operation>
When numbers are assigned to menus or items, press corresponding dial buttons (
1
-
9
,
0
) or
*
,
#
to select them. This is called shortcut operation.
・
When the menu format is "
タイル(アイコン)
(Tile (Icon))", menu numbers or symbols are not
displayed, but the same shortcut operations as those of "
タイル(文字)
(Tile (Character))" can be
performed.
<Example>
Performing "
ボタンを押した時の音を設定する
(Setting the sound emitted when a
button is pressed)"
1
On the stand-by display, press
m
e
"
*
設定を行う
(Set)"
e
Press "
f
ボタンを
押した時の音を設定する
(Set the sound emitted when a button is pressed)"
2
Press "
a
鳴らす
(Sound)" or "
b
鳴らさない
(Not sound)"
A message appears indicating that the keypad sound is set.
・
Press
1
or
2
to select.
3
Press
g
The menu screen reappears.
・
Press
f
to return to the stand-by display.
5
m
*
L03.fm Page 36 Thursday, May 27, 2010 3:44 PM
F-09B_EN_ninshou
37
Before Using the Handset
Returning to the stand-by display or the previous screen
After selecting a function, you can return to the previous screen or stand-by display by pressing the
buttons below :
c
: Return to the previous screen.
f
: Return to the stand-by display.
Displaying the previous/next page or item
When menu or selecting items extend to multiple pages, display the previous/next page or item by the
operations below according to display on the guide line.
・
When is displayed on the guide line, it indicates that other items exist above or below the menu
or the item at the cursor position. Press
ud
to move the cursor. When pressing
d
at the last
item on the page, the next page or the first page is displayed, and when pressing
u
at the first item
on the page, the previous page or the last page is displayed.
・
When is displayed on the guide line, it indicates that other items exist in the previous or next page
or on the left or right of the item at the cursor position. Press
lr
to move the cursor. When there
is the previous or next page, press
l
to display the previous or last page, and press
r
to display
the next page or first page.
Depending on the screen, you can display the previous page by
m
or the next page by
p
.
Function selection from the submenu
When "
メニュー
(Menu)" is displayed on the left of the guide line, you can display the submenu by
pressing
m
and perform various operations.
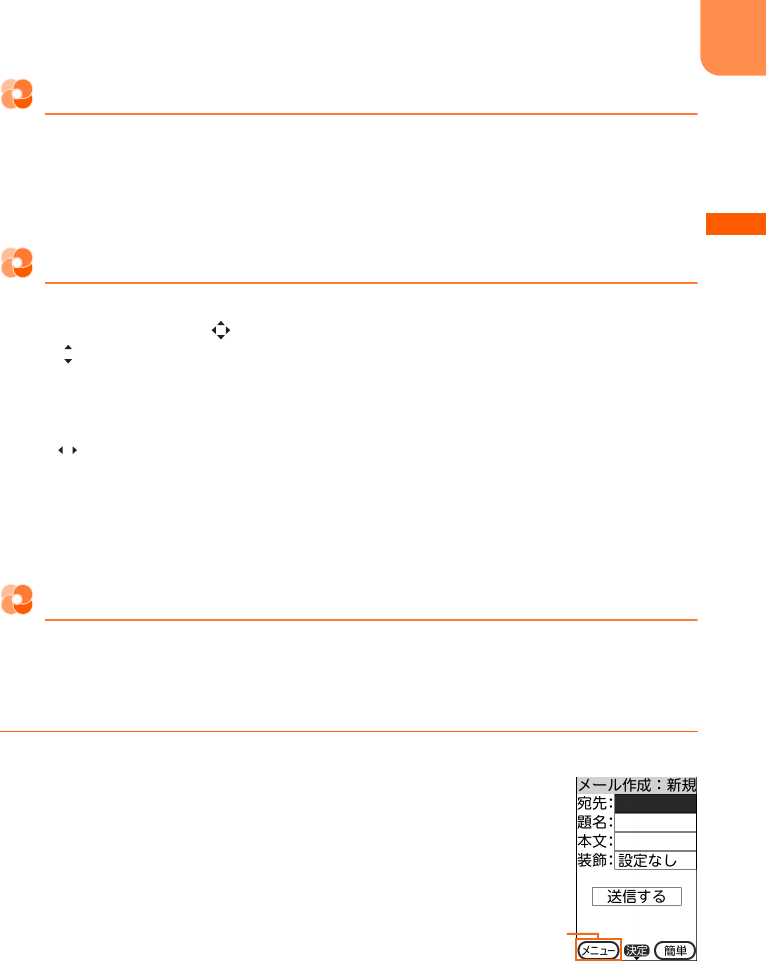
<Example>
Displaying the submenu on the mail creation screen
1
Press
u
for 1 second or more on the stand-by display
The mail creation screen appears.
・
When Simple mail creation screen appears, press
p
e
"
a
切替える
(Switch)".
Displayed on the left
of the guide line
L03.fm Page 37 Thursday, May 27, 2010 3:44 PM
F-09B_EN_ninshou
38
Before Using the Handset
2
Press
m
The submenu appears.
・
The submenu differs by the operating screen.
3
Press the dial button
The function is performed.
・
Press the dial button corresponding to the number displayed on the left of the function to use.
・
If you press
m
while the submenu is displayed, the submenu closes.
・
You can press
ud
to select the function to use and press
g
to execute the function.
Selecting the way of closing notification
screen
You can set if a notification screen for completion of settings or operations is closed automatically or
manually.
1
On the stand-by display,
m
e
"
*
設定を行う
(Set)"
e
"
a
画面の設定を行う
(Screen settings)"
e
"
i
通知画面の閉じ方を選ぶ
(Select notification screen
closing method)"
e
Press "
a
自動で閉じる
(Automatically)" or "
b
手動で閉じ
る
(Manually)"
a
自動で閉じる (Automatically) :
If you do not press
g
, after the elapse of about 5 minutes,
a notification screen is closed automatically.
b
手動で閉じる (Manually) :
Press
g
to close a notification screen.
Cursor : The color
of the selected
function changes
L03.fm Page 38 Thursday, May 27, 2010 3:44 PM
F-09B_EN_ninshou
39
Before Using the Handset
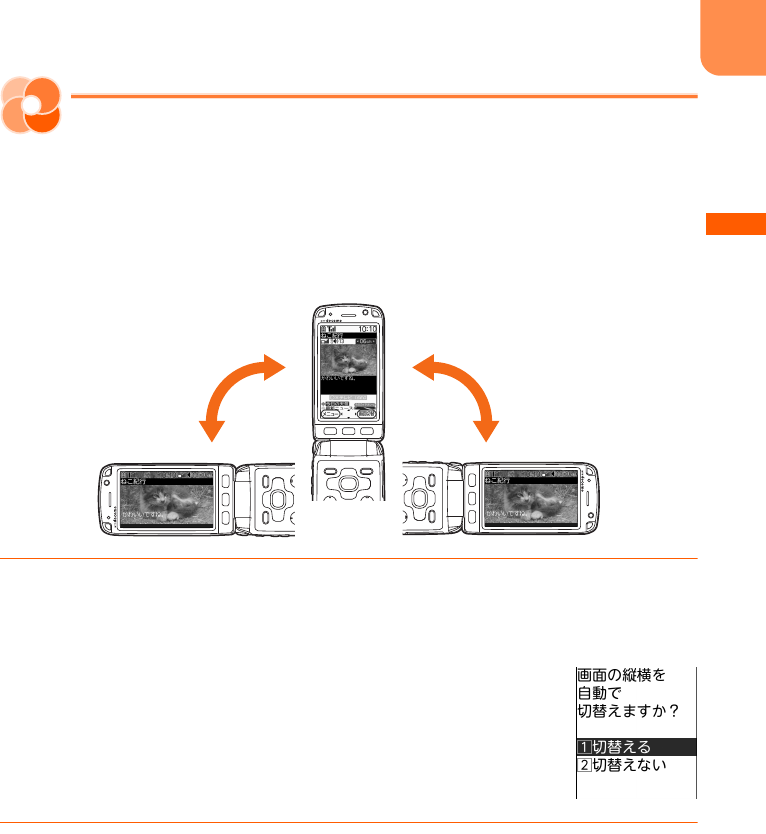
Auto rotation setting
Switching vertical and horizontal view
automatically
You can set the screen to automatically switch screen to the horizontal/vertical or the view size when
FOMA terminal is tilted 90 degrees clockwise or counterclockwise while watching 1Seg or playing a
moving picture/i-motion. <
オートローテーション設定
(Auto rotation setting)>
・
The screen view cannot be switched for playing album or playing set ring alert or mail attachment.
1
On the stand-by display,
m
e
"
*
設定を行う
(Set)"
e
"
#
その他の設定を行う
(Other settings)"
e
Press "
0
画面の縦横を自動で切替える
(Switch vertical and
horizontal view automatically)"
2
Press "
a
切替える
(Switch)" or "
b
切替えない
(Not switch)"
A message indicating that the setting to switch/not to switch the orientation of the screen is
complete appears. Press
g
to return to the menu screen.
L03.fm Page 39 Thursday, May 27, 2010 3:44 PM

F-09B_EN_ninshou
40
Before Using the Handset
使いかたガイド
(Operation guide)
Using
使いかたガイド
(Operation guide)
You can search operations of mobile phone, troubleshooting, etc. from contents, index or key word and
perform searched function.
1
On the stand-by display,
m
e
"
e
便利なツールを使う
(Use convenient
tool)"
e
Press "
0
使いかたガイドを使う
(Use operation guide)"
An operation guide screen appears.
Search from contents, index or key word.
1
On the operation guide screen, "
a
使いかた検索
(Operation search)"
e
Press
any of "
a
目次から検索
(Search from contents)" - "
d
しゃべって検索
(Speak
and search)"
■
Searching from contents : "
a
目次から検索
(Search from contents)"
e
Select a content
item
e
Press
g
■
Searching from index : "
b
索引から検索
(Search from index)"
e
Select a index item
e
Press
g
■
Searching by entering key word : "
c
入力して検索
(Search by entry)"
e
Enter a word or phrase
to search
e
g
■
Searching by speaking key word : "
d
しゃべって検索
(Speak and search)"
e
g
e
Speak a
word or phrase to search
e
Select an item from the search result
e
Press
g
Search by selecting from a list of search history.
1
On the operation guide screen, "
b
検索履歴
(Search history)"
e
Select a title
of the history
e
Press
g
Searching by "
使いかた検索
(operation search)"
Searching from "
検索履歴
(Search history)"
L03.fm Page 40 Thursday, May 27, 2010 3:44 PM

F-09B_EN_ninshou
41
Before Using the Handset
Search from phenomenon or error message or search contact information.
1
On the operation guide screen, "
c
困った時には
(Troubleshooting)"
e
Press
any of "
a
故障かな?と思ったら
(Troubleshooting)" - "
c
問い合わせ先
(Contact information)"
e
Select a title or message
e
Press
g
Search convenient usage of mobile phone.
1
On the operation guide screen, "
d
便利な使いかた
(Convenient
usage)"
e
Select a title
e
Press
g
Viewing operation guide screen and basic operations are explained here.
<Image to be inserted>
a
Function outline : Outline of function is displayed.
b
Operation steps : Operation steps of function are displayed. For some functions, you can execute
function by pressing [
この機能を使う
(Use this function)].
c
"
→参照
(
→
Reference)" : Select and press
g
to jump to a relevant explanation screen.
d
Relevant function : Select a content relevant to current function from the list and press
g
to jump
to an explanation screen.
e
[
この機能を使う
(Use this function)] : Select and press
g
to execute a searched function. When the
function is executed, the operation guide ends.
f
[
→お知らせ
(Information)] : Select and press
g
to display information relevant to the function.
・
When "
大きく
(Large)" or "
小さく
(Small)" appears in the guide line, press
m
to change the character
size to display. When "
タイトル
(Title)" appears, press
p
to check a title.
Searching from "
困った時には
(Troubleshooting)"
Searching by "
便利な使いかた
(Convenient usage)"
Guide screen explanation and operations
L03.fm Page 41 Thursday, May 27, 2010 3:44 PM
F-09B_EN_ninshou
42
Before Using the Handset
Using UIM (FOMA card)
UIM (FOMA card) is a card that stores user information such as a phone number. Insert it in FOMA
terminal.
・
If UIM is not inserted correctly or if there is a problem with UIM, you cannot make/receive a call or
send/receive a mail.
・
For details on handling UIM, see the UIM manual.
Installing/Removing
・
Perform this operation after turning the power OFF, folding FOMA terminal and holding it with your
hand. If you do it with FOMA terminal placed, the out camera or the sub-display may be damaged.
・
Be careful not to touch or scratch the IC portion of UIM.
・
Installing/Removing back cover and battery pack
→
p.44
■
Installing
a
Pull the tab and pull out the tray until it clicks.
b
Face IC side down, place UIM onto the tray in the
direction shown in the illustration.
c
Push the tray back.
Tray
Tab
IC
Corner cut
L03.fm Page 42 Thursday, May 27, 2010 3:44 PM

F-09B_EN_ninshou
43
Before Using the Handset
■
Removing
a
Pull the tab, pull out the tray until it clicks and remove UIM.
INFORMATION
・
Be careful that UIM or tray may be broken by forcible installing/removing of UIM, or by installing battery pack with
the tray inserted at a slant.
・
If you pull the tray too strongly and it is removed, press it straight along the guide rail inside the UIM slot. At this
time, perform this operation with UIM detached.
・
The FOMA terminal is unavailable for UIM (blue). If you have a UIM (blue), replace it at docomo Shop.
Security code
There are 2 kinds of security codes for UIM, the PIN code and PIN2 code.
→
p.138
Both of the default security codes are "0000", which you can change by yourself.
→
p.140
UIM operation restriction
FOMA terminal is provided with the UIM operation restriction for protecting user's data or file, or
protecting the data or file whose copyrights are held by the third party.
・
When data or files are downloaded from websites or data attached to mails are obtained to your
FOMA terminal with UIM equipped, the UIM operation restriction is automatically set to these data or
files.
・
With UIM replaced or no UIM installed, data or files with the UIM operation restriction set cannot be
displayed or played.
・
Data or files with the UIM operation restriction set cannot be transferred over infrared communication
transmission and copied/moved to microSD card.
・
The data that UIM operation restriction is enabled for are as follows.
- Recorded message of videophone call
- Screen memos
- Attached data of i-mode mail, images attached in mail message
- MessageR/F
- Images (including GIF animations, Flash graphics and images downloaded from Data Center), i-
motion or melodies
-i-
α
ppli (including i-
α
ppli stand-by display)
- Chaku-uta
Tab
UIM card slot
L03.fm Page 43 Thursday, May 27, 2010 3:44 PM
F-09B_EN_ninshou
44
Before Using the Handset
INFORMATION
・
When i-
α
ppli of "
健康生活日記
(Health life diary)", "
地図アプリ
for
らくらくホン
(Map appli for Rakuraku phone)", "
メ
モ
(Memo)", "G
ガイド番組表
(G-guide program guide)" stored by default are updated to the latest, UIM operation
restriction cannot be set.
・
When data that is subject to the UIM operation restriction is set as the stand-by display or ring alert, replacing the
UIM with another one or using FOMA terminal without the UIM attached causes the sound, image and other settings
to be reset to the default values. When attaching the UIM that UIM operation restriction was set, the setting is
restored as before.
・
The UIM operation restriction is not enabled for data obtained via infrared communication, microSD card, DOCOMO
keitai datalink or for still images/moving pictures taken with the built-in camera.
・
Some settings in the following menu are saved in UIM. When UIM is replaced, the settings saved in the installed UIM
are displayed. For details, see "Menu List".
→
p.490
- Viewing your own phone number
- Setting SMS
- Setting the display and use of certification
- Setting PIN code of UIM
-PLMN setting
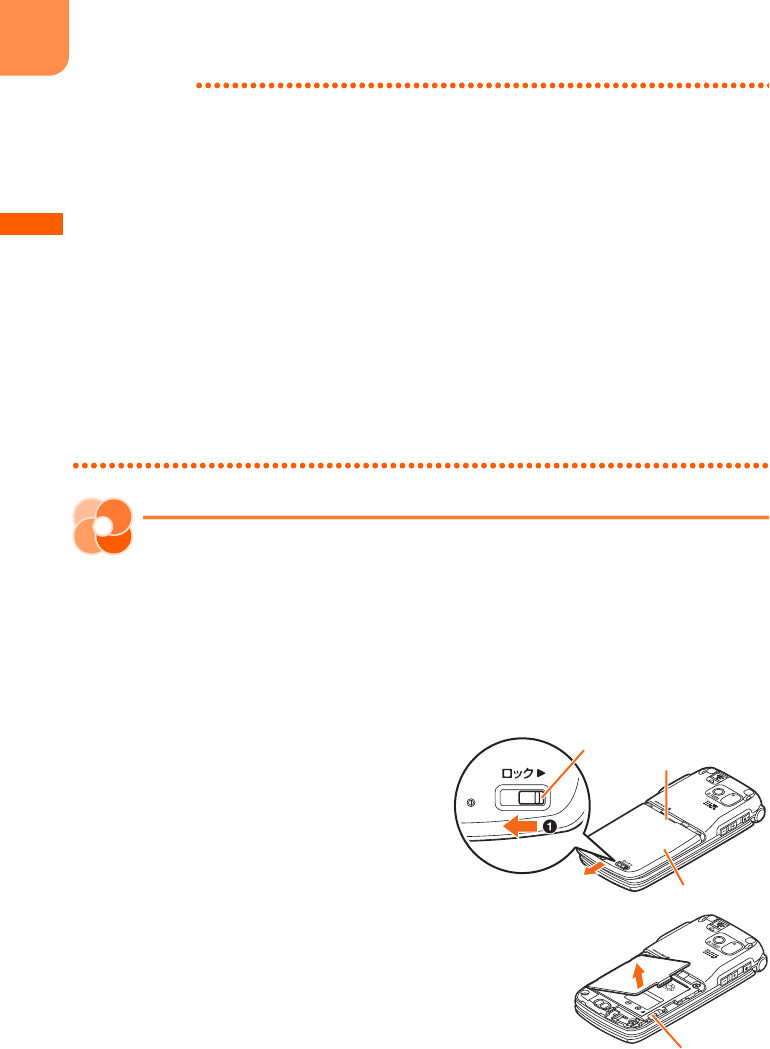
Installing/Removing battery pack
・
Perform this operation after turning the power OFF, folding FOMA terminal and holding it with your
hand. If you do it with FOMA terminal placed, the out camera or the sub-display may be damaged.
・
Removing the battery pack may cause reservation of Software update to be canceled. And, when
日付
時刻設定
(Date & time setting) is set to "
手動で設定する
(Set manually)", removing the battery pack
may delete the date and time.
■
Installing
a
Slide the back cover lever in the direction of
a
to
unlock, press the back cover with your thumb and
slide in the direction of
b
about 2 mm to remove
it.
* When the back cover does not slide smoothly, hold
FOMA terminal and slide the back cover with your both
thumbs.
b
Pick the concave part with your finger and hold the
inner lid up in the arrow direction until it stops.
* The inner cover is designed to be closed firmly to
maintain waterproofness/dustproofness. Note that
forcibly opening may hurt your nail or finger.
Press here with your
thumb
Lever
b
Back cover
Concave part
L03.fm Page 44 Thursday, May 27, 2010 3:44 PM

F-09B_EN_ninshou
45
Before Using the Handset
c
With the label side of the battery pack upward,
align convex parts of the battery pack with
concave parts of FOMA terminal and slide the
battery pack in the direction of
a
, press the
battery pack in the direction of
b
to set it in and
close the inner lid.
d
Fit 8 tabs of the back cover with concaves of FOMA
terminal. While pressing the back cover in the
direction of
a
so that there is no gap between
FOMA terminal and back cover, slide the back
cover in the direction of
b
to install, then slide the
back cover lever in the direction of
c
to lock.
■
Removing
a
Perform installing steps
a
-
b
.
b
Pinch the tab of the battery pack and hold it up in
the arrow direction to remove.
b
Concave
parts
Convex parts
Battery pack
Lever
Back cover
Tab
To prevent damage due to excessive force or
forcible opening, the inner cover is designed to be
removed.
If it is removed, align the metal of the inner cover
with groove of FOMA terminal vertically and push it
until it clicks.
When the inner cover of back cover is removed
L03.fm Page 45 Thursday, May 27, 2010 3:44 PM
F-09B_EN_ninshou
46
Before Using the Handset
INFORMATION
・
Forcing the battery pack into FOMA terminal may damage the FOMA terminal jack.
・
FOMA terminal or back cover may be damaged if you install or remove the battery pack by a method except the
procedures above or if you press too hard.
・
Firmly install the back cover and lock it with the lever to avoid water seepage or dust.
・
The rubber gasket of the inner lid play an important role for maintaining waterproof/dustproof performance. Do not
remove or scratch it. Also, prevent dust from adhering to it.
Charging
The battery pack does not have a full charge at time of purchase. Use AC/DC adapter for FOMA terminal
to charge the battery before using FOMA terminal.
・
To get the maximum performance from F-09B, use battery pack F09.
The following is the estimated charging time to charge the empty battery to full charge with the power
off. If a battery is charged with the power on, it takes more time.
Also, charging may take more time when FOMA terminal is opened, during a call or communication. To
finish charging quickly, it is recommended to end the current operation, fold FOMA terminal, then
charge the battery.
The operation times vary by the charging method or operating environment.
Continuous stand-by time and continuous call time
→
p.562
・
Continuous stand-by time is the estimated time when F-09B is folded and able to receive radio waves
normally.
・
Continuous call time is the estimated time when radio waves can be normally sent/received.
・
1Seg watching time is the estimated watching time when FOMA terminal can receive radio waves
normally and Stereo Earphone Set 01 (optional) is used.
Charging time (approximate)
AC adapter Approx.
●●●
min. DC adapter Approx.
●●●
min.
Operations to be performed when set to stand-by display
Continuous stand-by time FOMA/3G
Stationary : Approx.
●●●
H
Moving : Approx.
●●●
H
Moving (3G static) : Approx.
●●●
H
GSM
Stationary (Auto): Approx.
●●●
H
Continuous call time FOMA/3G
Voice call : Approx.
●●●
min.
Videophone call : Approx.
●●●
min.
GSM
Approx.
●●●
min.
1Seg watching time
Approx.
●●●
min. (in eco mode : approx.
●●●
min.)
L03.fm Page 46 Thursday, May 27, 2010 3:44 PM

F-09B_EN_ninshou
47
Before Using the Handset
・
Call, communication or stand-by time may be reduced to about half, or 1Seg watching time may be
reduced due to battery pack charging condition, function settings, operating environment such as
ambient temperature, radio wave conditions in the area of use (the radio waves are weak, absent, etc.).
Also, call, communication or stand-by time is reduced by using i-mode communication. Even when a
call or i-mode communication is not used, call, communication or stand-by time is reduced by creating
i-mode mail, voice reading, playing moving picture/i-motion, activating downloaded i-
α
ppli or i-
α
ppli
stand-by display, using a camera, watching 1Seg, using pedometer/activity monitor, performing
multiaccess or date communication, etc.
・
The battery pack is a consumable part. By repeating the charging, the time available with each
charging reduces.
・
When a time available with each charging is reduced to about a half from that of a new battery,
replacement of the battery is recommended because it is near the end of life. The battery pack may
swell out as it comes to near the end of its lifetime depending on the usage conditions, but it is not a
problem.
・
The battery packs life may be reduced by using i-
α
ppli, a videophone call, 1Seg watching, etc. for a
long time while charging.
・
For details, see the operation manuals for FOMA AC Adapter 01/02 (optional), FOMA AC Adapter 01
for Global use (optional) or FOMA DC Adapter01/02 (optional).
・
FOMA AC Adapter 01 is applicable only to 100V AC. And, FOMA AC Adapter 02 and FOMA AC Adapter
01 for Global use is applicable to 100-240V AC.
・
The plug type of AC Adapter is applicable only to 100V AC. When using the AC adapter in the range
of AC 100V and 240V overseas, a conversion plug adapter applicable to the country you are staying is
required. Do not charge the battery using a transformer for overseas travel.
・
Do not charge the battery for an extended period (several days) with FOMA terminal
turned ON.
After charging has completed with FOMA terminal turned ON, the power is supplied to the terminal
from the battery pack. If FOMA terminal is left in that state for a long time, the battery pack may run
out causing the low battery alert to sound after using only a short period of time. In such cases,
disconnect FOMA terminal from the AC adapter, desktop holder or DC adapter then connect it again
to start charging.
・
To preserve the environment, return unnecessary batteries to NTT DOCOMO,
agencies, recycle-cooperating shops, etc.
Battery pack life
Battery charge
For better battery pack performance
L03.fm Page 47 Thursday, May 27, 2010 3:44 PM

F-09B_EN_ninshou
48
Before Using the Handset
・
When charging starts, the light turns on in red. In some environments, the light may not turn on
immediately when charging starts; but this is normal and not a malfunction. However, if the light does
not turn on after a while, disconnect FOMA terminal from the AC adapter or desktop holder then
connect it again to start charging. Contact the sales outlet such as docomo Shop if the light does not
turn on for a while after charging starts.
・
It is normal for FOMA terminal, battery pack, AC adapter or DC adapter to become warm while
charging. However, if you use a call or communication or operate other functions for a long time while
charging a battery, the temperature in FOMA terminal rises and the charging may not finish normally.
In that case, wait until the temperature falls down and try again.
・
If you use a camera while charging, the light turns off or blinks, but it is not a failure. When you stop
using a camera, the light turns on.
・
When installing the fully charged battery pack to FOMA terminal and connecting it to the AC adapter,
desktop holder or DC adapter, the light may turn on for a moment and turn off. This is normal and not
a malfunction.
・
While FOMA terminal is turned OFF, during a call, communication, in Silent mode or Public mode
(Drive mode) or with Charge alert set to "
知らせない
(OFF)", the charge alert does not sound when
starting or completing the charging.
Charging method in combination with the desktop holder
You can charge a battery by using FOMA AC Adapter 01/02 (optional) connected with Desktop Holder
F30.
・
Place the desktop holder on the flat surface.
・
To install correctly, connect FOMA terminal in the folded state with the desktop holder. Be careful not
to put the strap, etc., between FOMA terminal.
a
Insert the connector of the AC adapter to the desktop holder with the arrow on the AC adapter's
connector facing upward (
a
).
b
Unfold the AC adapter's power plug and insert it into a 100V AC outlet (
b
).
c
Install FOMA terminal with battery pack attached to the desktop holder firmly (
c
).
d
The charging start sound is emitted, the light turns on and the battery icon on the sub-display blinks.
e
When charging is over, a charge completion alert sounds, the light turns off and the battery icon on
the sub-display stops blinking.
f
Remove FOMA terminal from the desktop holder.
Points of concern when charging the battery
L03.fm Page 48 Thursday, May 27, 2010 3:44 PM
F-09B_EN_ninshou
49
Before Using the Handset
INFORMATION
・
When inserting or removing the AC adapter connector, do it slowly and securely so that excessive force is not given.
When disconnecting the connector, pull it out straight while pressing the release button. Applying an excessive force
to disconnect the connector may damage it.
・
When FOMA terminal is charged in closed state, the switching images by 30 seconds appear on the sub-display for
about 20 minutes.
c
b
Power plug
AC adapter
Removing
Lift FOMA terminal while holding the
desktop holder, and remove it by pulling in
the direction of the arrow.
・
Always remove the AC adapter from the
outlet when not using the adapter for an
extended period.
Light
Desktop holder
Release buttons
Connector
100V AC outlet
Insert at the back side
a
L03.fm Page 49 Thursday, May 27, 2010 3:44 PM
F-09B_EN_ninshou
50
Before Using the Handset
Charging using AC adapter/DC adapter
・
Be sure to see the operation manuals for FOMA AC Adapter 01/02 (optional) or FOMA DC Adapter01/
02 (optional).
a
Install the battery pack to FOMA terminal.
b
With facing the back cover side of FOMA terminal upward, open the jack cap of the external
connection jack of FOMA terminal in the direction of arrow
a
, and hold the connector horizontally
with the arrow facing upward and insert it to FOMA terminal (
b
).
c
Unfold the AC adapter's power plug and insert it into a 100V AC outlet. Insert the DC adapter
cigarette lighter plug into the vehicle's cigarette lighter socket.
d
The charging start sound is emitted, the light turns on and the battery icon blinks.
e
When charging is over, a charge completion alert sounds, the light turns off and the battery icon
stops blinking.
f
For the case of AC adapter, remove the power plug from the outlet. For the case of DC adapter,
remove the cigarette lighter plug from the cigarette lighter socket.
g
Press the release buttons on both sides of the connector to flatly remove the connector from FOMA
terminal and close the jack cap.
INFORMATION
・
When inserting or removing the AC or DC adapter connectors, do it slowly and securely so that excessive force is
not given. When disconnecting the connector, pull it out straight while pressing the release button. Applying an
excessive force to disconnect the connector may damage it.
・
When FOMA terminal is not used or you are leaving the car, disconnect the cigarette lighter plug of the DC adapter
from the cigarette lighter socket and disconnect the DC adapter connector from FOMA terminal.
・
The fuse (2A) of the DC adapter is a consumable part. Contact your nearest automotive supply store for a
replacement.
<DC adapter>
Cigarette lighter socket
DC
adapter
Cigarette
lighter
plug
Power plug
100V AC
outlet
ConnectorLight
Light Connector
Release
buttons
Release
buttons
External
connection
jack
External
connection
jack
Jack cap
Jack cap
AC
adapter
<AC adapter>
L03.fm Page 50 Thursday, May 27, 2010 3:44 PM
F-09B_EN_ninshou
51
Before Using the Handset
Battery level
Checking remaining battery level
A battery icon appearing on the top of the display shows an approximate remaining battery level. <
電
池残量
(Battery level)>
・
When FOMA terminal is folded, the remaining battery level appears on the sub-display.
Checking battery level by sound and display
You can check the battery level by sound and display.
1
On the stand-by display,
m
e
"
*
設定を行う
(Set)"
e
"
#
その他の設定を行う
(Other settings)"
e
"
g
情報の表示やリセットを行う
(Display information or
reset)"
e
Press "
e
電池残量を確認する
(Check remaining battery)"
The remaining battery level and the menu screen reappears after a while.
・
Press
f
to return to the stand-by display.
Battery mark
(Battery level 2)
Low charge
(Battery level 1)(Battery level 3)
Ample charge Battery level very low.
Charge the battery
The sound is emitted 3 times
(Battery level 3)
The sound is emitted twice
(Battery level 2)
The sound is emitted once
(Battery level 1)
L03.fm Page 51 Thursday, May 27, 2010 3:44 PM
F-09B_EN_ninshou
52
Before Using the Handset
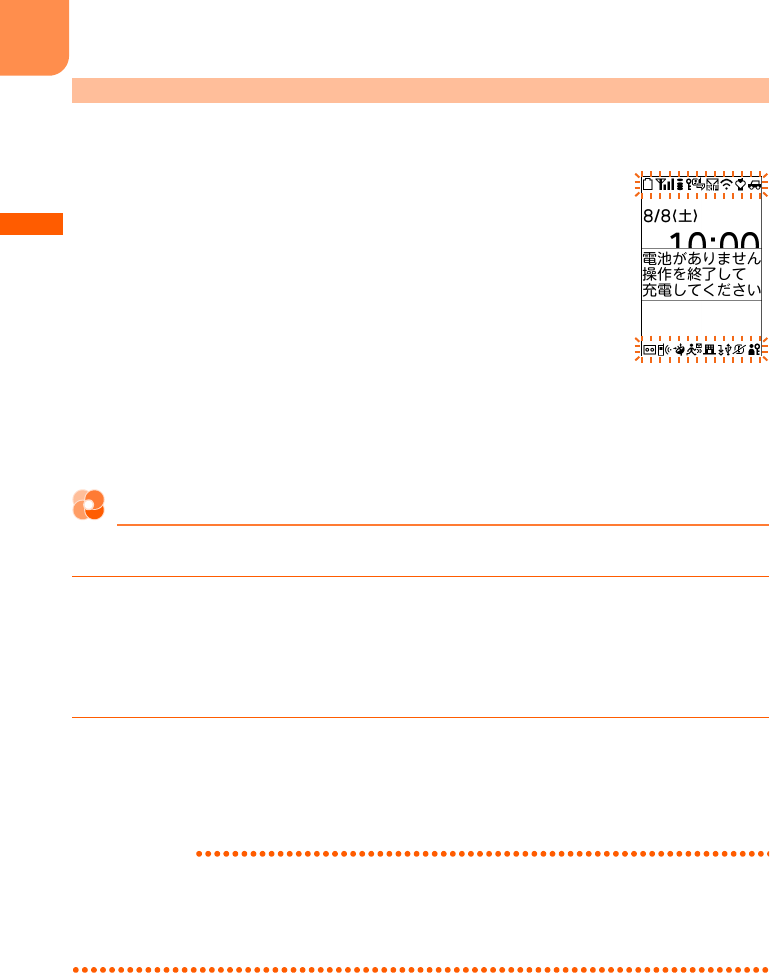
You are notified of it by a message or low battery alert. These operations stop when charging starts;
press
f
to immediately stop the low battery alert.
■
During a voice call
The low battery alarm is heard from the earpiece, and a message indicating
low battery appears on the display. This message disappears by pressing any
of
gcf
. The low battery alert is heard, and after approximately 20
seconds from that the call is disconnected and the screen shown on the right
appears. The power is turned off after approximately 1 minute automatically.
■
During stand-by
A message indicating low battery appears on the display. This message
disappears by pressing any of
gcf
, but the low battery alert sounds after a while, the screen
shown on the right appears and all the icons blink. The power is turned off after approximately 1
minute automatically.
・
When FOMA terminal is folded, the sub-display shows "
電池残量なし
(No battery)".
Stopping the low battery alert
Set whether to sound the alert for exhausting the remaining battery.
1
On the stand-by display,
m
e
"
*
設定を行う
(Set)"
e
"
#
その他の設定を行う
(Other settings)"
e
"
e
音を設定する
(Set sound)"
e
Press "
b
電池残量の警告を
音で通知する
(Notify low battery alert with sound)"
A confirmation screen appears asking if you sound the low battery alert.
2
Press "
b
鳴らさない
(Not sound)"
A message appears indicating that the low battery alert was canceled. Press
g
to return to the
menu screen.
・
"
a
鳴らす
(Sound)" : Sound the low battery alert.
INFORMATION
・
Even if you set this function to "
鳴らさない
(Not sound)", the low battery alert sounds from the earpiece when the
battery is almost empty.
・
Even if you set this function to "
鳴らす
(Sound)", the low battery alert does not sound when FOMA terminal is turned
OFF or in Silent mode or Public mode (Drive mode).
When battery is almost exhausted
L03.fm Page 52 Thursday, May 27, 2010 3:44 PM
F-09B_EN_ninshou
53
Before Using the Handset
Power ON/OFF
Turning power ON/OFF
Turning power of FOMA terminal ON/OFF is explained here. <
電源
ON
/
OFF (Power ON/OFF)>
・
When turning power ON, a confirmation screen may appear asking if you perform Software update.
→
p.549
1
Press
f
for 2 seconds or more
Vibrator operates once and after a while, a message of confirmation of waterproofness appears,
then the following stand-by display appears.
・
Even when not pressing
f
for 2 seconds or more or pressing the button several times, FOMA
terminal may turn ON.
・
When turning the power ON for the first time
→
p.54
・
You can check the approximate received signal level.
・
When FOMA terminal is folded, the reception level appears on the sub-display.
1
Press
f
for 2 seconds or more
Vibrator operates twice and a message indicating the termination appears, then the power is
turned OFF.
INFORMATION
・
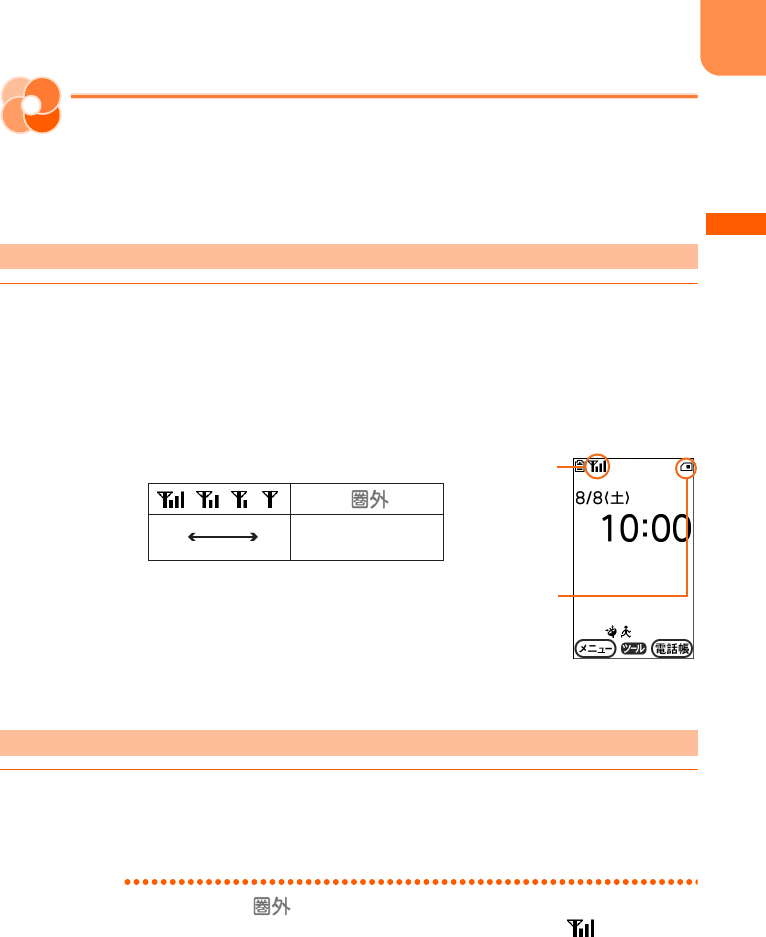
To make a call or communication while is displayed out of service area or where the radio wave does not
reach, move to where the display disappears. However, the call may be disconnected even if is displayed and
you are talking without moving.
・
When UIM is not installed, a message that prompts you to insert UIM appears. Turn the power OFF, install UIM, then
turn the power ON again.
→
p.42
・
When the UIM is replaced, the terminal security code needs to be entered after turning on FOMA terminal. If the
correct terminal security code is entered, the stand-by display appears. If a wrong terminal security code is entered
5 times consecutively, the power is turned OFF (You can turn the power ON again).
・
When PIN code is set, you need to enter the PIN code.
→
p.139
Turning power ON
Turning power OFF
Appears while UIM is being read, and
disappears when reading is finished
Reception level
Strong
WeakOut of service area or where
radio waves do not reach
L03.fm Page 53 Thursday, May 27, 2010 3:44 PM
F-09B_EN_ninshou
54
Before Using the Handset
・
When the date and time are not set, a message appears indicating that the date and time should be set.
→
p.57
・
If no operation is made with FOMA terminal open, the display darkens in approximately 1 minute and darkens more
in approximately 4 minutes (except when the light setting of display is "
さらに暗く設定
(darker)"). If approximately
30 minutes pass, nothing appears on the display (Power saving). When the eco mode is set to "
設定する
(On)",
nothing is displayed on the display in approximately 1 minute.
→
p.134
When nothing appears on the display,
g
blinks and indicates that FOMA terminal is in power saving mode. Also
during a voice call, FOMA terminal becomes power saving mode. By pressing any button or if there is an incoming
call, the display appears again.
When turning the power ON for the first time
As a confirmation screen appears, make settings or operations as required. The settings made here can
be changed later.
・
Even after deleting all data, the setting screen appears in the same way.
1
Press
g
on the confirmation screen indicating to make preparation for
using the mobile phone
2
On the screen of Voice reading, press any of "
a
自動で読み上げ
(Auto voice
reading)" to "
d
後で設定する
(Set up later)"
・
Voice reading setting
→
p.163
・
If you press "
d
後で設定する
(Set up later)", and if no settings are made till
the power is turned ON next time, the setting screen appears again.
3
On the menu format selection screen, press any of "
a
リスト
(List)" to "
c
タ
イル(文字)
(Tile (character))"
・
Menu format selection
→
p.133
・
If you do not set until the power is turned ON next time, the confirmation
screen appears again.
L03.fm Page 54 Thursday, May 27, 2010 3:44 PM
F-09B_EN_ninshou
55
Before Using the Handset
4
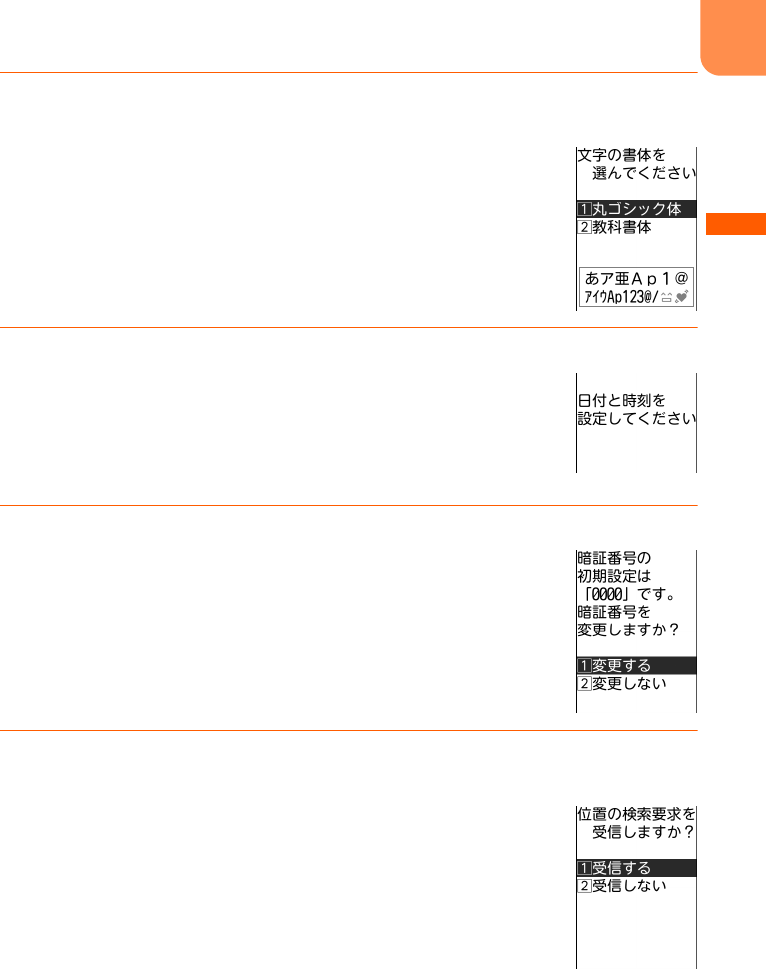
On the font selection screen, press "
a
丸ゴシック体
(Maru Gothic)" or "
b
教
科書体
(Textbook font)"
・
Selecting font
→
p.135
・
Not displayed when restarting of deleting all data.
5
Press
g
on the date and time setting screen
・
Overview and settings of date and time setting
→
p.57
・
Displayed when time information cannot be obtained from DOCOMO
network and the date and time are not set because of out of service area
etc.
6
Press "
a
変更する
(Change)" on the terminal security code changing screen
・
Terminal security code change
→
p.139
・
If you do not set until the power is turned ON next time, the confirmation
screen appears again.
7g
on the location request setting screen
e
Enter terminal security code
e
g
e
Press "
a
受信する
(Receive)" or "
b
受信しない
(Not receive)"
・
Location request of GPS
→
p.349
・
If the terminal security code is changed in Step 6, the terminal security
code entry screen does not appear.
・
If you do not set until the power is turned ON next time, the confirmation
screen appears again.
L03.fm Page 55 Thursday, May 27, 2010 3:44 PM
F-09B_EN_ninshou
56
Before Using the Handset
8
Press
g
on the pedometer/activity monitor setting screen
・
Overview and settings of pedometer/activity monitor
→
p.404
・
If you do not set until the power is turned ON next time, the confirmation
screen appears again.
9
On the watching area selection screen, press "
a
一覧から選ぶ
(Select from
list)" or "
b
地域指定で検索
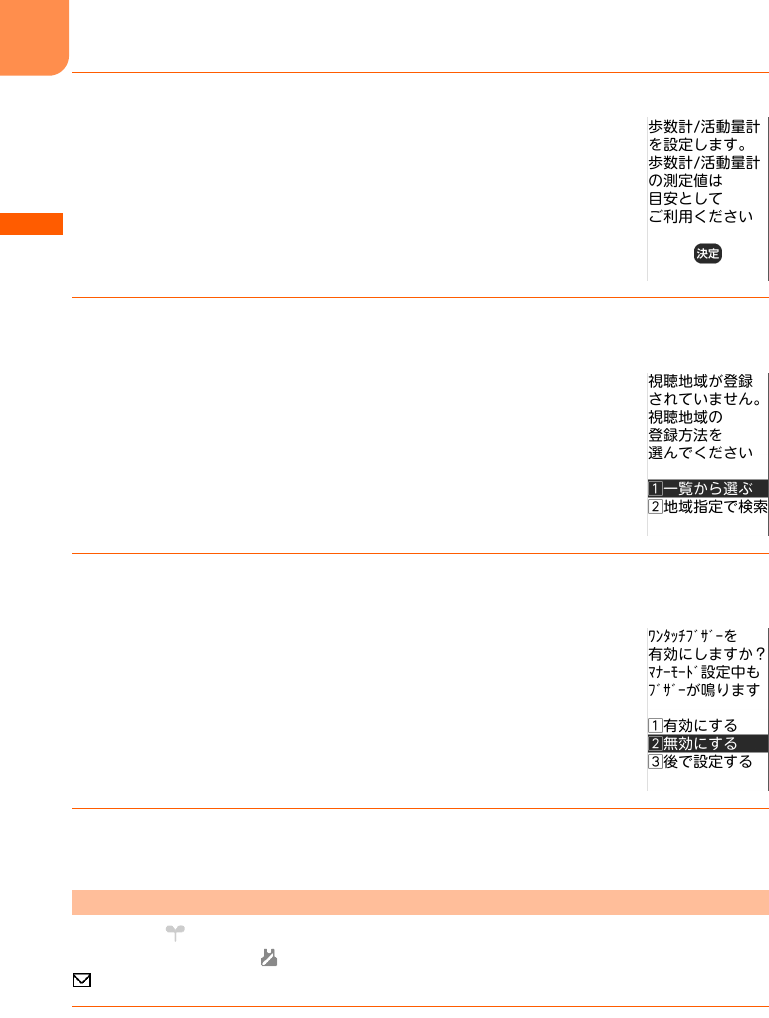
(Select area and search)"
・
Registering watching area
→
p.299
・
If you do not set until the power is turned ON next time, the confirmation
screen appears again.
10
On the confirmation screen asking if you enable one-touch buzzer, press any
of "
a
有効にする
(Enable)" to "
c
後で設定する
(Set up later)"
・
Setting one-touch buzzer
→
p.435
・
Press "
c
後で設定する
(Set up later)", and if no settings are made till the
power is turned ON next time, the setting screen appears again.
11
On the software update confirmation screen, press
g
・
Overview and settings of Software update
→
p.549, p.554
"
はじめまして
(Welcome)", "
緊急速報「エリアメール」のご案内
(Early warning "Area Mail"
information)" and "
活動量計 のご紹介
(Introducing activity amount meter)" mail messages are saved.
is displayed on the stand-by display, and arrival information notifies you of existence of unread mail.
1
Press
u
on the stand-by display
The folder list of received mail is displayed.
・
Displaying received mails
→
p.198
Checking Welcome mail
L03.fm Page 56 Thursday, May 27, 2010 3:44 PM
F-09B_EN_ninshou
57
Before Using the Handset
Date & time setting
Setting date and time
You can set so that time can be adjusted automatically based on the time information from DOCOMO
network, you can adjust date and time manually (usually, you do not need to adjust time and date
manually). <
日付時刻設定
(Date & time setting)>
・
When selecting "
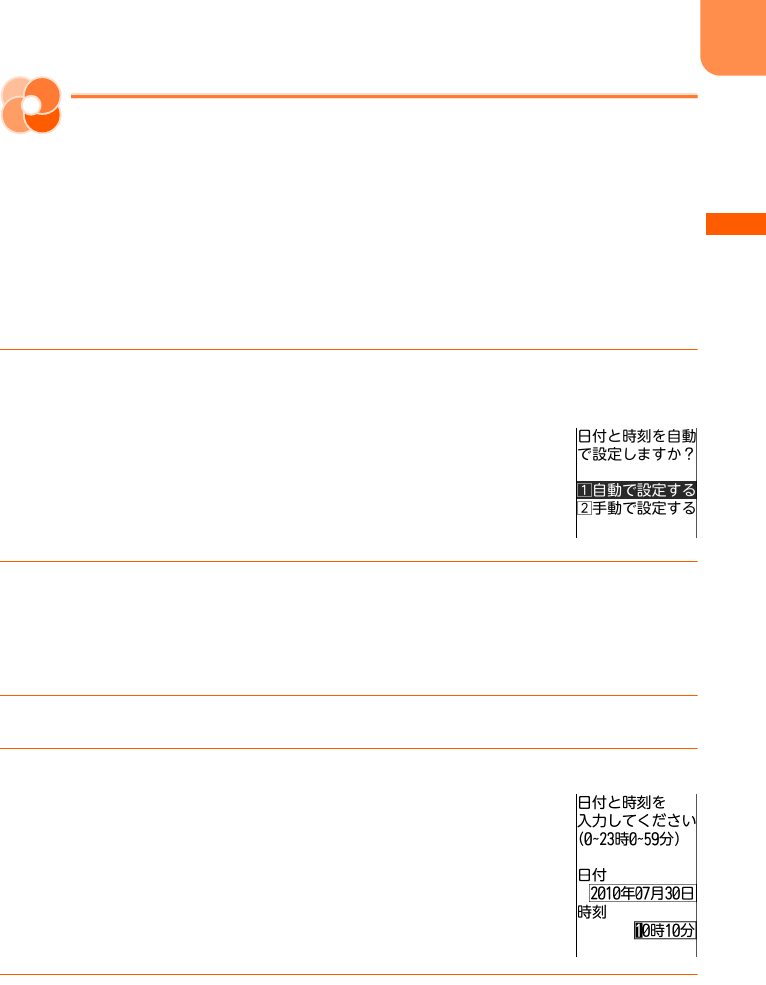
自動で設定する
(Set automatically)", date and time are adjusted when time
adjustment information is received from the network of a carrier in use. And, when using overseas,
you can adjust the time differences manually, or adjust to daylight saving time.
→
p.478
<Example>
Setting date and time manually
1
On the stand-by display,
m
e
"
*
設定を行う
(Set)"
e
"
i
時計を設定する
(Set
time)"
e
Press "
a
日付と時刻を設定する
(Set date and time)"
2
Press "
b
手動で設定する
(Set manually)"
■
Adjusting time automatically : Press "
a
自動で設定する
(Set automatically)"
A message appears indicating that date and time are adjusted automatically. Press
g
to
return to the menu screen.
3
Press "
a
日時
(Date and time)"
4
Enter date
・
Enter lowest 2 digits for Christian year. If the number of month or day is 1
digit, put 0 before the number.
・
You can set from 2000/1/1 to 2050/12/31.
・
lr
: Change selection position.
・
ud
: Switch entry of date and time.
5
Enter time
・
Set time in 24 hours (00:00-23:59). If the number of hour or minute is 1 digit, put 0 before the
number.
・
lr
: Change selection position.
・
ud
: Switch entry of date and time.
L03.fm Page 57 Monday, May 31, 2010 4:46 PM

F-09B_EN_ninshou
58
Before Using the Handset
6
Press
g
e
p
A message appears indicating that date and time is set. Press
g
to return to the menu screen.
INFORMATION
・
If you set "
自動で設定する
(Set automatically)", time or time difference is corrected automatically when turning the
power ON. When time is not corrected for a while after turning the power ON, try to turn the power OFF then turn it
ON again. With no UIM inserted or for some signal conditions, time is not corrected even if the power is once turned
OFF and then turned ON again. While performing certain i-
α
ppli, time correction may be disabled.
・
Even when setting "
自動で設定する
(Set automatically)", the corrected time may have an error of several seconds.
・
When time difference is corrected, a message indicating it appears.
・
After time or time difference is corrected overseas, the time displayed for call histories, sent mails, etc. is based on
local time.
・
Time difference is not corrected in some networks of overseas telecommunication carriers. In this case, set the time
zone manually.
→
p.478
・
After setting "
手動で設定する
(Set manually)", removing the battery pack or leaving it exhausted for a long time may
cause the date and time to be deleted. In such a case, set date and time again.
・
When trying to set date and time while i-
α
ppli is activated, a message appears indicating that the i-
α
ppli is ended
and the date and time is set. If you press "
終了する
(End)", i-
α
ppli ends, and date and time are set.
・
If automatic correction of date and time has never been performed and date and time are displayed with "--", clock
or Flash graphics are not displayed correctly. And, the following functions are unavailable.
- Certificate download
- Obtaining/playing i-motion with replay expiration or replay period restrictions set
- Auto-start of i-
α
ppli DX, i-
α
ppli with restriction by time setting
- Auto power ON, Auto power OFF
- Notified time auto power ON
- Alarm clock, scheduler
- Sending/receiving schedule by infrared communication
- Software update
- Update of scanning function
- 1Seg watching reservation
- Recording logs of pedometer/activity monitor
・
If automatic correction of date and time has never been performed and date and time are displayed with "--", the
following functions do not record the date and time, display them instead as "----/--/--", etc.
-Redial
- Received calls
- Recorded messages
- Saving date and time of still images and moving pictures taken with the camera (data name)
- Date and time of sent/unsent mails
- Location history of GPS
- Voice memo
L03.fm Page 58 Thursday, May 27, 2010 3:44 PM

F-09B_EN_ninshou
59
Before Using the Handset
Caller ID notification
Notifying your phone number to the
other party
You can set FOMA terminal to display your number (Caller ID) on the other party's terminal when
making a call. <
発信者番号通知
(Caller ID notification)>
・
For details, see "Mobile Phone User's Guide [Network Services]".
・
Caller ID is your important information. Carefully consider if you want to include caller ID information
when making a call.
・
It is displayed when other party's phone supports Caller ID display.
・
Caller ID notification is unavailable outside the service area or where radio waves are hard to reach.
Do it in locations with good radio wave conditions.
・
Each time you make a call, you can set either to notify/not notify caller ID.
→
p.69
1
On the stand-by display,
m
e
"
*
設定を行う
(Set)"
e
"
#
その他の設定を行う
(Other settings)"
e
"
a
発信者番号通知を使う
(Use caller ID notification)"
e
Press "
a
発信者番号通知を設定する
(Set caller ID notification)"
2
Press "
a
通知する
(Notify)"
The terminal is connected to the network, and a message appears indicating that the Caller ID
notification is set. Press
g
to return to the menu screen.
Checking the settings
1
On the stand-by display,
m
e
"
*
設定を行う
(Set)"
e
"
#
その他の設定を行う
(Other settings)"
e
"
a
発信者番号通知を使う
(Use caller ID notification)"
e
Press "
b
発信者番号通知設定を確認する
(Check caller ID notification setting)"
2
Press "
a
確認する
(Check)"
The terminal is connected to the network, and the settings are displayed. Press
g
to return to
the menu screen.
If you set or operate multiple Caller ID notification methods simultaneously, the caller ID notification
operations are performed in the following priorities. Note that the displayed contents and the actual
dialing method of notifying/not notifying may differ.
a
When "186"/"184" is prefixed to the phone number of the other party
→
p.69
b
When notifying/not notifying of Caller ID is selected from the submenu when dialing
→
p.70
c
When setting Caller ID notification
→
p.59
Priority of Caller ID notification
L03.fm Page 59 Thursday, May 27, 2010 3:44 PM
F-09B_EN_ninshou
60
Before Using the Handset
User information display
Checking your own phone number
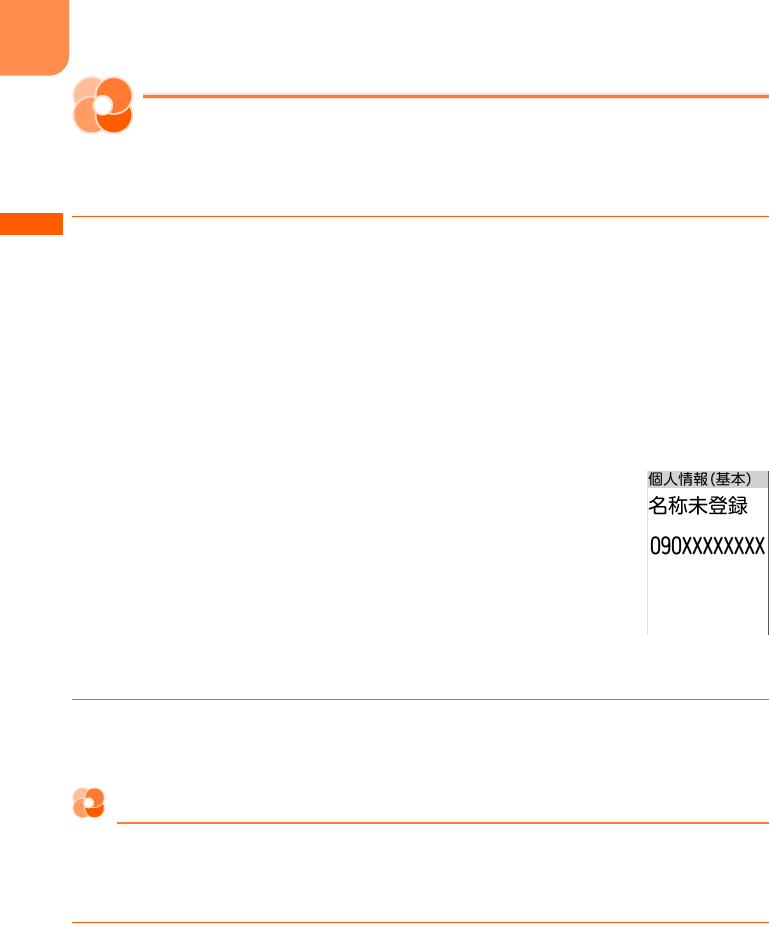
You can check your phone number (My phone number) or registered user information. <
個人情報表示
(Personal information)>
1
On the stand-by display, press
m
e
"
0
自分の電話番号を見る
(View your
own phone number)"
■
When a confirmation screen of automatic acquisition of mail address appears : "
a
登録する
(Register)"
e
Enter terminal security code
e
Press
g
A message indicating that the mail address is acquired and registered appears. Press
g
to
display the user information (basic) screen.
・
If selecting "
b
登録しない
(Not register)", the user information (basic) screen appears. A
confirmation screen of automatic acquisition does not appear after this even if mail address
is not registered.
■
Checking detail information :
g
on the user information (basic)
screen
e
Enter terminal security code
e
Press
g
User information (details) screen appears.
・
If the mail address is automatically acquired in the last minute, the
terminal security code entry screen is not displayed.
・
lr
: Switch registered information when there is multiple
registered information.
・
g
: Switch user information (basic) screen and user information
(details) screen.
2
Press
c
The menu screen reappears.
Registering/Editing user information
Your name, phone number, mail address, address, note, birthday, etc. can be registered.
・
Up to 2 phone numbers and up to 3 mail addresses can be registered.
・
Checking method of your mail address
→
p.174
1
On the stand-by display, press
m
e
"
0
自分の電話番号を見る
(View your
own phone number)"
・
Acquire mail address automatically
→
p.60 "
■
When the confirmation screen of automatic
acquisition of mail address appears"
L03.fm Page 60 Thursday, May 27, 2010 3:44 PM
F-09B_EN_ninshou
61
Before Using the Handset
2p
e
Enter terminal security code
e
Press
g
・
If the mail address is automatically acquired in Step 1, the terminal security
code entry screen is not displayed.
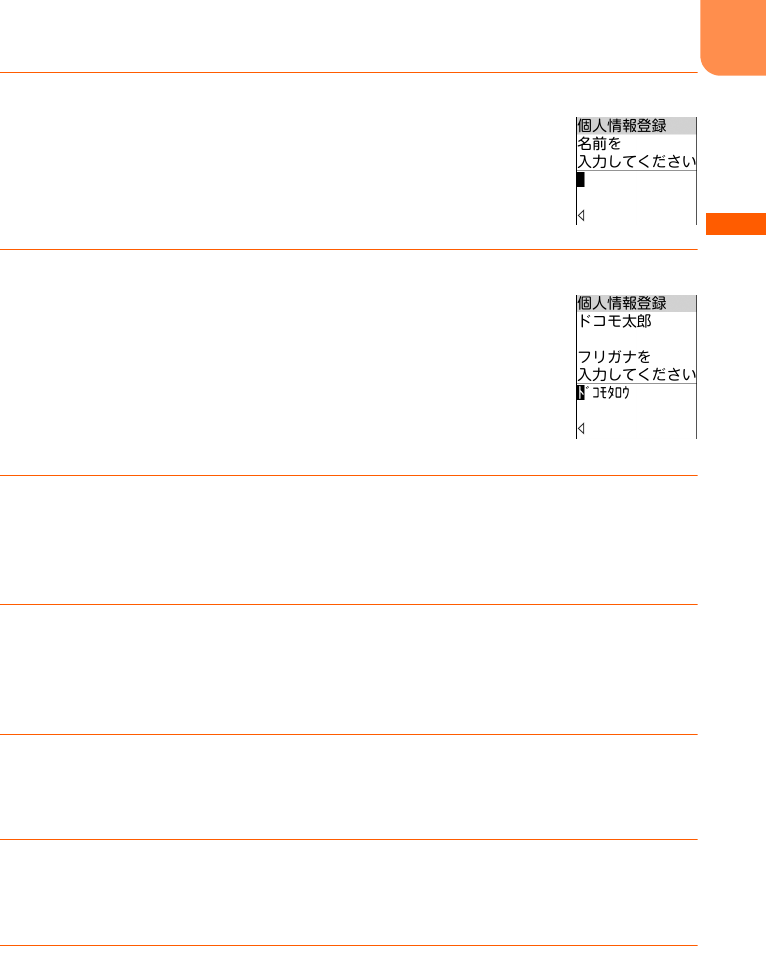
3
Enter a name
e
Press
g
Reading of the entered name is automatically entered.
・
Up to 16 two-byte or 32 one-byte characters can be entered. Kanji,
Hiragana, Katakana, alphabets, numbers, symbols and pictograms can be
entered.
4
Check or edit the reading
e
Press
g
A confirmation screen appears asking if you enter the second phone number.
・
Up to 32 one-byte characters can be entered. One-byte katakana, one-byte alphabetic, one-byte
numeric and one-byte symbol can be entered.
5
Press "
a
入力する
(Enter)" or "
b
入力しない
(Not enter)"
・
"
a
入力する
(Enter)" : Register a phone number other than your own phone number.
・
"
b
入力しない
(Not enter)" : Not register a phone number other than your own phone number.
Go to Step 8.
6
Enter a phone number
e
Press
g
A confirmation screen appears asking whether you enter the third phone number.
・
Up to 26 digits can be entered.
7
Press "
a
入力する
(Enter)" or "
b
入力しない
(Not enter)"
・
"
a
入力する
(Enter)" : Register other phone number. Go to Step 8 after Step 6.
・
"
b
入力しない
(Not enter)" : Not register other phone number.
8
Press any of "
a
自動で取得する
(Acquire automatically)" to "
c
入力しない
(Not enter)"
・
"
a
自動で取得する
(Acquire automatically)" : Acquire mail address automatically. Press
g
when a message indicating the acquisition of mail address appears. Go to Step 10.
・
"
b
直接入力する
(Direct input)" : Register mail address by direct input.
・
"
c
入力しない
(Not enter)" : Not register mail address. Go to Step 11.
L03.fm Page 61 Thursday, May 27, 2010 3:44 PM

F-09B_EN_ninshou
62
Before Using the Handset
9
Enter a mail address
e
Press
g
A confirmation screen asking if you enter the 2nd (or 3rd) mail address appears.
・
Up to 50 one-byte characters can be entered. One-byte alphabetic, one-byte numeric and one-
byte symbol can be entered.
・
In alphabetic entry mode,
1
: Symbols frequently used for mails such as ".", "@" or "-" can
be entered.
・
In alphabetic entry mode,
*
: "@docomo.ne.jp", ".com", "or.jp", etc. can be entered.
・
If you press
g
with no entry, a mail address is not registered. Go to Step 11.
10
Press "
a
入力する
(Enter)" or "
b
入力しない
(Not enter)"
・
"
a
入力する
(Enter)" : Register other mail address. Go to Step 11 after Step 9.
・
"
b
入力しない
(Not enter)" : Not register other mail address.
11
Press "
a
入力する
(Enter)" or "
b
入力しない
(Not enter)"
・
"
a
入力する
(Enter)" : Register postal code and address.
・
"
b
入力しない
(Not enter)" : Not register postal code and address. Go to Step 13.
12
Enter a postal code
e
g
e
Enter an address
e
Press
g
・
Up to 7 digits can be entered for a postal code.
・
Up to 100 two-byte or 200 one-byte characters can be entered for an address. Kanji, Hiragana,
Katakana, alphabets, numbers, symbols and pictograms can be entered.
13
Press "
a
入力する
(Enter)" or "
b
入力しない
(Not enter)"
・
"
a
入力する
(Enter)" : Register a note.
・
"
b
入力しない
(Not enter)" : Not register a note. Go to Step 15.
14
Enter a note
e
Press
g
・
Up to 100 two-byte or 200 one-byte characters can be entered. Kanji, Hiragana, Katakana,
alphabets, numbers, symbols and pictograms can be entered.
15
Press "
a
入力する
(Enter)" or "
b
入力しない
(Not enter)"
・
"
a
入力する
(Enter)" : A birthday is registered.
・
"
b
入力しない
(Not enter)" : A birthday is not registered. Go to Step 17.
16
Enter a birthday
e
Press
g
A message appears indicating that the user information is registered.
17
Press
g
Return to the user information (basic) screen.
L03.fm Page 62 Thursday, May 27, 2010 3:44 PM

F-09B_EN_ninshou
63
Before Using the Handset
INFORMATION
・
The phone number of your FOMA terminal (My phone number) cannot be changed as it is registered in UIM. The
other items are recorded in FOMA terminal.
・
Changing the mail address in the user information does not change your i-mode mail address. Also, changing your
i-mode mail address does not automatically change the mail address in the user information.
→
p.174
・
You can register/edit user information also by pressing
p
on the user information (details) screen. And, you can
use user information from the submenu of user information (details) screen, or you can register location information
by using GPS function.
・
Using infrared communication, you can send user information to a mobile phone or a PC that infrared
communication function is equipped.
→
p.396
L03.fm Page 63 Thursday, May 27, 2010 3:44 PM

F-09B_EN_ninshou
566
Appendix/Troubleshooting
Declaration of Conformity
The product “FOMA F-09B” is declared to conform with the essential requirements of European
Union Directive 1999/5/EC Radio and Telecommunications Terminal Equipment Directive 3.1(a),
3.1(b) and 3.2. The Declaration of Conformity can be found on http://www.fmworld.net/product/
phone/doc/.
This mobile phone complies with the EU requirements for exposure to radio waves.
Your mobile phone is a radio transceiver, designed and manufactured not to exceed the SAR* limits**
for exposure to radio-frequency (RF) energy, which SAR* value, when tested for compliance against the
standard was 1.740W/Kg. While there may be differences between the SAR* levels of various phones
and at various positions, they all meet*** the EU requirements for RF exposure.
* The exposure standard for mobile phones employs a unit of measurement known as the Specific
Absorption Rate, or SAR.
** The SAR limit for mobile phones used by the public is 2.0 watts/kilogram (W/Kg) averaged over ten
grams of tissue, recommended by The Council of the European Union. The limit incorporates a
substantial margin of safety to give additional protection for the public and to account for any
variations in measurements.
*** Tests for SAR have been conducted using standard operation positions with the phone
transmitting at its highest certified power level in all tested frequency bands. Although the SAR is
determined at the highest certified power level, the actual SAR level of the phone while operating
can be well below the maximum value. This is because the phone is designed to operate at
multiple power levels so as to use only the power required to reach the network. In general, the
closer you are to a base station antenna, the lower the power output.
Federal Communications Commission (FCC) Notice
・
This device complies with part 15 of the FCC rules.
Operation is subject to the following two conditions :
a
this device may not cause harmful interference, and
b
this device must accept any interference received, including interference that may cause
undesired operation.
・
Changes or modifications made in or to the radio phone, not expressly approved by the manufacturer,
will void the user's authority to operate the equipment.
L023.fm Page 566 Wednesday, June 2, 2010 10:17 AM

F-09B_EN_ninshou
567
Appendix/Troubleshooting
FCC RF Exposure Information
This model phone meets the U.S. Government's requirements for exposure to radio waves.
This model phone contains a radio transmitter and receiver. This model phone is designed and
manufactured not to exceed the emission limits for exposure to radio frequency (RF) energy as set by
the FCC of the U.S. Government. These limits are part of comprehensive guidelines and establish
permitted levels of RF energy for the general population. The guidelines are based on standards that
were developed by independent scientific organizations through periodic and thorough evaluation of
scientific studies.
The exposure standard for wireless mobile phones employs a unit of measurement known as the
Specific Absorption Rate (SAR). The SAR limit set by the FCC is 1.6 W/kg. Tests for SAR are conducted
using standard operating positions as accepted by the FCC with the phone transmitting at its highest
certified power level in all tested frequency bands. Although the SAR is determined at the highest
certified power level, the actual SAR level of the phone while operating can be well below the maximum
value. This is because the phone is designed to operate at multiple power levels so as to use only the
power required to reach the network. In general, the closer you are to a wireless base station antenna,
the lower the power output level of the phone.
Before a phone model is available for sale to the public, it must be tested and certified to prove to the
FCC that it does not exceed the limit established by the U.S. government-adopted requirement for safe
exposure. The tests are performed on position and locations (for example, at the ear and worn on the
body) as required by FCC for each model. The highest SAR value for this model phone as reported to
the FCC, when tested for use at the ear, is 1.52W/kg, and when worn on the body, is 0.534W/kg. (Body-
worn measurements differ among phone models, depending upon available accessories and FCC
requirements).
While there may be differences between the SAR levels of various phones and at various positions, they
all meet the U.S. government requirements.
The FCC has granted an Equipment Authorization for this model phone with all reported SAR levels
evaluated as in compliance with the FCC RF exposure guidelines. SAR information on this model phone
is on file with the FCC and can be found under the Equipment Authorization Search section at http://
www.fcc.gov/oet/ea/fccid/ (please search on FCC ID VQK-F09B).
For body worn operation, this phone has been tested and meets the FCC RF exposure guidelines when
used with an accessory designated for this product or when used with an accessory that contains no
metal and which positions the handset at a minimum distance of 1.5 cm from the body.
* In the United States, the SAR limit for wireless mobile phones used by the general public is 1.6 Watts/
kg (W/kg), averaged over one gram of tissue. SAR values may vary depending upon national
reporting requirements and the network band.
L023.fm Page 567 Wednesday, June 2, 2010 10:17 AM
F-09B_EN_ninshou
568
Appendix/Troubleshooting
This equipment has been tested and found to comply with the limits for a Class B digital device, pursuant
to part 15 of the FCC Rules. These limits are designed to provide reasonable protection against harmful
interference in a residential installation. This equipment generates, uses and can radiate radio frequency
energy and, if not installed and used in accordance with the instructions, may cause harmful
interference to radio communications. However, there is no guarantee that interference will not occur in
a particular installation.
If this equipment does cause harmful interference to radio or television reception, which can be
determined by turning the equipment off and on, the user is encouraged to try to correct the interference
by one or more of the following measures:
- Reorient or relocate the receiving antenna.
- Increase the separation between the equipment and receiver.
- Connect the equipment into an outlet on a circuit different from that to which the receiver is connected.
- Consult the dealer or an experienced radio/TV technician for help.
Important Safety Information
AIRCRAFT
Switch off your wireless device when boarding an aircraft or whenever you are instructed to do so by
airline staff. If your device offers flight mode or similar feature consult airline staff as to whether it can
be used on board.
DRIVING
Full attention should be given to driving at all times and local laws and regulations restricting the use of
wireless devices while driving must be observed.
HOSPITALS
Mobile phones should be switched off wherever you are requested to do so in hospitals, clinics or health
care facilities. These requests are designed to prevent possible interference with sensitive medical
equipment.
PETROL STATIONS
Obey all posted signs with respect to the use of wireless devices or other radio equipment in locations
with flammable material and chemicals. Switch off your wireless device whenever you are instructed to
do so by authorized staff.
INTERFERENCE
Care must be taken when using the phone in close proximity to personal medical devices, such as
pacemakers and hearing aids.
Pacemakers
Pacemaker manufacturers recommend that a minimum separation of 15 cm be maintained between a
mobile phone and a pace maker to avoid potential interference with the pacemaker. To achieve this use
the phone on the opposite ear to your pacemaker and does not carry it in a breast pocket.
Hearing Aids
Some digital wireless phones may interfere with some hearing aids. the event of such interference, you
may want to consult your hearing aid manufacturer to discuss alternatives.
For other Medical Devices :
Please consult your physician and the device manufacturer to determine if operation of your phone may
interfere with the operation of your medical device.
L023.fm Page 568 Wednesday, April 28, 2010 8:44 PM
F-09B_EN_ninshou
569
Appendix/Troubleshooting
Intellectual property rights
Copyrights and portrait rights
Except for the case protected by copyright laws such as personal use, use of FOMA terminal to
reproduce, alter, or publicly transmit recorded pictures or sounds, or copyrighted text, images, music or
software downloaded from websites without the copyright holder's authorization is prohibited.
Note that taking photos or recordings at some demonstrations, performances or exhibitions may be
prohibited even when only for personal use.
Avoid taking pictures of others with FOMA terminal without their consent or disclosing recorded
pictures of others without their consent to general public through Internet websites, etc., because they
may infringe on portrait rights.
Trademarks
Company and product names mentioned in this manual are trademarks or registered trademarks of their
respective holders.
・
"FOMA", "mova", "i-mode", "i-
α
ppli", "i-
α
ppliDX", "i-motion", "Deco-mail", "Chaku-motion", "ToruCa",
"mopera", "mopera U", "WORLD CALL", "FirstPass", "visualnet", "i-shot", "i-area", "WORLD WING",
"DoPa", "sigmarion" and logos of "FOMA", "i-mode", "i-
α
ppli" are trademarks or registered trademarks
of NTT DOCOMO.
・
"Catch Phone (Call waiting service)" is a registered trademark of Nippon Telegraph and Telephone
Corporation.
・
Free Dial logo mark is a registered trademark of NTT Communications Corporation.
・
McAfee
®
is registered trademarks or trademarks of McAfee, Inc. and/or its affiliates in the US and/or
other countries.
・
G-GUIDE, G-GUIDE MOBILE and their logos are registered trademarks in Japan of U.S.
Gemstar-TV Guide International, Inc. and/or its affiliates.
L023.fm Page 569 Wednesday, April 28, 2010 8:44 PM
F-09B_EN_ninshou
570
Appendix/Troubleshooting
・
Contains Adobe
®
Flash
®
Lite
™
technology by Adobe Systems Incorporated.
Adobe Flash Lite Copyright
©
2003-2010 Adobe Systems Incorporated. All rights reserved.
Adobe, Flash and Flash Lite are either registered trademarks or trademarks of Adobe
Systems Incorporated in the United States and/or other countries.
・
Adobe and Adobe Reader are registered trademarks or trademarks of Adobe Systems Incorporated in
the United States and other countries.
・
This product contains NetFrontBrowser and NetFront Sync Client of ACCESS
CO., LTD.
ACCESS, logo of ACCESS and NetFront are trademarks or registered trademarks of ACCESS CO., LTD.
in Japan, US and other countries.
Copyright
©
2010 ACCESS CO., LTD. All rights reserved.
・
Powered by JBlend
™
Copyright 2002-2009 Aplix Corporation. All rights reserved.
JBlend and JBlend-related trademarks are trademarks or registered trademarks of Aplix
Corporation in Japan and other countries.
・
QR code is a registered trademark of Denso Wave Inc.
・
microSDHC Logo is a trademark of SD-3C, LLC.
・
QuickTime is a registered trademark of Apple Inc. in the US and other countries.
・
Microsoft
®
, Windows
®
and Windows Vista
®
are trademarks or registered trademarks of "Microsoft
Corporation" in the US and other countries.
・
The abbreviations of operating systems (Japanese versions) below are used in this manual :
- Windows Vista stands for Windows Vista
®
(Home Basic, Home Premium, Business, Enterprise and
Ultimate).
- Windows XP indicates the Microsoft
®
Windows
®
XP Professional operating system or Microsoft
®
Windows
®
XP Home Edition operating system.
- Windows 2000 indicates the Microsoft
®
Windows
®
2000 Professional operating system.
・
ATOK + APOT of Justsystem Corporation is installed in this product as Japanese character conversion
function.
"ATOK" "APOT (Advanced Prediction Optimization Technology)" are registered trademarks of
Justsystem Corporation.
・
This product contains software licensed by Symbian Foundation Limited.
Symbian is a registered trademark of Symbian Foundation Limited.
・
Other company and product names mentioned in this manual are trademarks or registered
trademarks of their respective holders.
L023.fm Page 570 Wednesday, April 28, 2010 8:44 PM

F-09B_EN_ninshou
571
Appendix/Troubleshooting
Other
・
This product contains a module developed by the Independent JPEG Group.
・
This product is licensed based on MPEG-4 Visual Patent Portfolio License. The use of MPEG-4 Video
Codec function is allowed for personal and nonprofit use only in the cases below :
- Recording moving pictures and i-motion that conform to MPEG-4 Visual Standard (hereinafter
referred to as MPEG-4 Video)
- Playing MPEG-4 Videos recorded personally by consumers not engaged in profit activities
- Playing MPEG-4 Video supplied from the provider licensed from MPEG-LA
For further utilizing such as promotion, in-house use or profit-making business, please contact
MPEG LA, LLC in U.S.
L023.fm Page 571 Wednesday, April 28, 2010 8:44 PM