15_DV3010 UserMan,r1
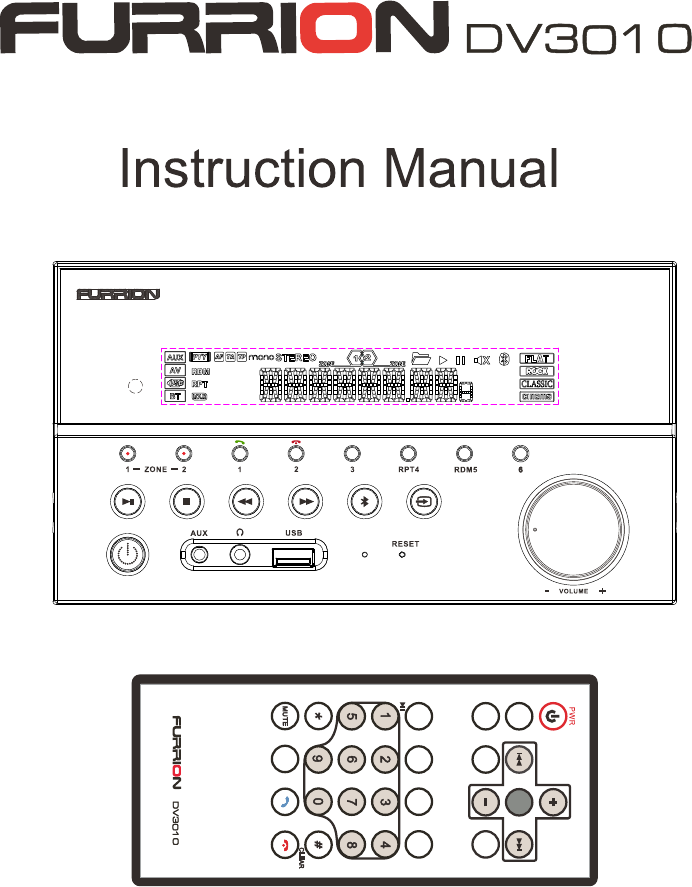
Entertainment System
TOP I NT RPT RDM
MODE
APS
SCAN CLOCK AF
SEL
BAND PTY TA
CALL
LOG
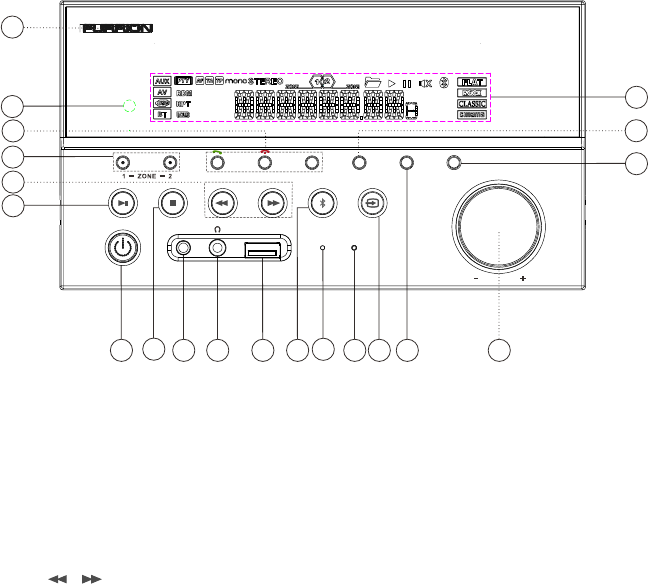
Locations and Names of the Controls
9.AUX IN SOCKET
10.HEADPHONE SOCKET
11. USB SOCKET
12.BT MODE BUTTON/EQ BUTTON
13.MICROPHONE IN
14.RESET BUTTON
15.INPUT MODE BUTTON/BAND BUTTON
16.5/RANDOM BUTTON
17.VOL KNOB/SEL BUTTON
18.6 BUTTON
19.4/REPEAT BUTTON
20.LCD DISPLAY
78910 11 14 15 16 17
18
2
4
3
5
19
RESET
1 2 3RPT4 RDM5 6
VOLUM E
AUX USB
12 13
1
20
6
1. NFC DETECTION AREA
2. IR REMOTE CONTROL SENSOR
3. 1/2/3 BUTTON
1 TEL /REDIAL BUTTON
2 HANG UP BUTTON
4.ZONE 1/2 BUTTON
5.
6.PLAY/PAUSE BUTTON
RADIO REGION SELECT BUTTON
7.POWER BUTTON
8.STOP BUTTON
AS/PS BUTTON
/ BUTTON
PAGE 1
1
TOP I NT RP T RDM
MODE
APS
SCAN CL OCK AF
SEL
BAND PT Y TA
CALL
LOG
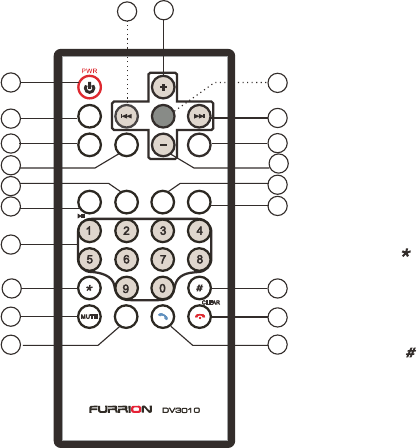
The remote control description
1.Power button
2.APS button
3.SCAN button
4.CLOCK button
5.BAND button
6.MODE button
7.NUMBER buttons(0~9)
1/PAUSE/PLAY button
2/ INT button
3/RPT button
4/RDM button
8. button
9. MUTE button
10. T-M button
11.TEL button
12. HANG UP/CLEAR button
13. button
14.TA button
15.PTY button
16.- button
17.AF button
18.UP button
19.SEL button
20.+ button
21.DOWN button
Common operation:
1. To turn the unit on/off .
When the unit is power Off, it may be switched On by pressing POWER button.When
the unit is switched On, press and hold POWER button for more than 1 second to
switch the power off.
2. To select function mode
Press INPUT MODE button on the front panel repeatedly to select Tuner,USB(After
inserting a USB storage),BT, F AUX,AV and R AUX mode.
3. To adjust the volume level
Rotate the VOL KNOB on the front panel or press the + or - button on the remote control
to adjust volume level during playback.
4. Volume Adjust
Rotate VOL KNOB clockwise to increase to increase volume,rotate anticlockwise to
reduce volume. PAGE 2
21 20
2
3
4
5
6
7
8
912
13
14
15
17
16
18
19
10 11
5. To mute or resume sound
Press MUTE button on the remote control to eliminate or resume sound immediately
during playback.
6. To select and adjust the mode of the sound and menu
Press SEL button repeatedly to select the mode of AF ON/AF OFF mode ,TA ON/TA OFF
PTY NEWS/PTY MUSICS,NEWS/POP M,BASS,TRE(treble), LIR(balance),
LOUD OFF/LOUD ON, VOL LAST/VOL DEFA, BEEP ON/BEEP OFF,DX/LOCAL
(in RADIO mode),STEREO/MONO(in RADIO mode),SUBW ON
/SUBW OFF,CLK XX XX, in the sequence and circulation.
In each item, rotate the VOL KNOB to select your desired mode.
1) VOL LAST/VOL DEFA
VOL LAST: The volume level when switching off will be restored with power On.
VOL DEFA: The volume level of the main unit after power on is a constant value.
When selecting VOL DEFA item, press SEL button to display AVOL , then you can pre-set
the constant volume level after power on with VOL control.
2) BEEP ON/BEEP OFF
BEEP ON mode: The beep is generated when any key is pressed.
BEEP OFF mode: The beep sound is disabled.
3) DX/LOCAL
Radio station search mode is divided by this DX/LOCAL switch, which can be used to
control an attenuator in the tuner during search. The detecting level of seek, scan,
auto-memory will be reduced as much as the attenuated level of the tuner. In radio mode,
press the LOC button to change local reception or distance reception. (Note: This button
is only for FM reception. In AM mode, LOC is invalid.)
4) CLK XX XX
When select CLK XX XX mode, Rotate the VOL KNOB to adjust HOUR, press SEL button
for confirmation. With the same means to adjust MINUTE.
7.To select a preset EQ mode
Press and hold BT button on the front panel to select the preset music equalizer curves:
FLAT,CLASSIC,ROCK,CINEMA,EQ OFF. The sound effect will be changed.
8..ZONE 1/2 Button
Pressing ZONE 1 or 2 button will turn on or off the audio source in each of the different
areas which your speakers are connected. “ZONE <1>” or “ZONE <2>” will display on
the LCD once it is selected.
9. To reset unit
When the display is incorrect, or the function buttons are not effective or
sound is distorted, then use a sharp point to press RESET button, that
will make the unit be reset to factory default and re-instate the correct functions.
PAGE 3
Radio Operation
1. FREQUENCY SELECT
In RADIO mode. Press and hold PLAY/PAUSE button for about 5 seconds to
select your desired frequency EUROPE,USA1,USA2 or AUSTRALIA.
2. AM/FM BUTTON
In RADIO mode, press and hold INPUT MODE button on the front panel or briefly press
BND button on the remote control to select your desired radio band of FM1, FM2, FM3,
AM1, AM2 , and the selected band will be displayed on the LCD of the front panel.
3. TUNE/SEEK UP/DOWN
In RADIO mode:
1) Press and hold or button on the front panel or Press and hold
/ button on the remote control to automatically search down/up for a available
station from the current frequency.
2) Press or button on the front panel or press / button on
the remote control to manually search up or down with step by step for your desired station
from the current frequency.
4. APS BUTTON & SCAN BUTTON
In RADIO mode:
1) When pressing and holding APS button on the remote control or press and hold button on
the front panel, the radio searches from the lowest frequency and checks the signal strength level
until 1 cycle search is finished.And then the 6 strongest stations are preset to the corresponding preset
number memory bank. The AS operation is implemented in each bank of the selected band.
When the AS operation is finished, it will resume broadcasting
on the M1.(It can store 3x6 stations for FM and 2x6 stations for AM in all)
2) When briefly pressing APS button on the remote control or press button on the front panel,
the radio searches for each preset station from the M1. When the field strength level is more than
the threshold level of the stop level, the radio holds at that preset number for a few seconds with
releasing mute, and then searches again.
After finishing a circle of searching, it will stop searching on the M1.
NOTE: In FM band, FM1,FM2,FM3 is checked one at a time.
In AM band, AM1, AM2 is checked one at a time.
3)Press the SCAN button on the remote control to scan the radio frequency. If a valid signal has detected,
the current frequency will be hold and blinking for 5 seconds, then press SCAN again to stop and remain
the current frequency;otherwise, the radio will go on to scan the other radio frequency 5 seconds later.
5. PRESET STATION [ 1-6 ] BUTTONS
In RADIO mode:
1) To memorize the current frequency on the current band, press and hold any one of the six preset
buttons (1-6) .
2) To recall the preset memory on the current band, press one of the preset buttons [1-6] .
6. STEREO/MONO BUTTON
Press ST button on the remote control to select the STEREO or MONO sound mode for
FM band.
PAGE 4
7. LOC BUTTON
1) In RADIO mode, when the signal of the distance radio station are very weak and the receiving
effect is bad during tuning, press LOC button on the remote control to turn off the LOC function,
then tune again for the distance radio station;
2) In RADIO mode, when the signals from the local radio stations are too strong, this could lead
to interference. press LOC button on the remote control to turn on the LOC function,
Re-tune for the local station required.
8. To search for stations with a PTY (PROGRAM TYPE) program
Press and hold button on the front panel or press button on the remote controlSEL PTY
to select one of PTY programs:
PTY MUSIC------------------------ PTY NEWS
1. POP M, ROCK M 1. NEWS, AFFAIRS, INFO
2. EASY M, LIGHT M 2. SPORT, EDUCATE, DRAMA
3. CLASSICS, OTHER M 3. CULTURE, SCIENCE, VARIED
4. JAZZ, COUNTRY 4. WEATHER, FINANCE, CHILDREN
5. NATION M, OLDIES 5. SOCIAL, RELIGION, PHONE IN
6. FOLK M 6. TRAVEL, LEISURE, DOCUMENT
When turning on a PTY program, the PTY program and PTY word is flashed on LCD.
After selecting a desired PTY program and no operation for 5 seconds, it will search
for the station of the PTY program. During 1 loop, if the desired station of the PTY
program is not found,it returns to previous normal radio and PTY icon disappears.
9. AF [ALTERNATIVE FREQUENCIES] BUTTON
When pressed briefly, AF switching mode is selected and the state of AF switching
mode is displayed by AF segment in display.
Segment off: AF switching mode off.
Segment on: AF switching mode on, and has RDS information.
Segment flashing: AF switching mode on, but RDS information is not received yet.
When AF switching mode is selected, the radio checks the signal strength of AF all the
time. The interval of checking time of each AFs depends on the signal strength of the
current station, from a few minutes for strong station to a few seconds for weak station.
Every time that new AF is stronger than current station, it switches over to that frequency
for a very short time, and the NEW FREQUENCY is displayed for 1-2 seconds.
Because the mute time of AF switching or checking time is very short, it is almost
inaudible in case of normal program.
During FM mode, when AF is on, SEEK, (SCAN), AUTO-MEMORY function can only
receive and save RDS program.
10. TA [TRAFFIC ANNOUNCEMENT] BUTTON
When TA mode is on(TA is displayed on LCD), it will begin to seek TA station and TA
SEEK will be displayed on LCD for a while.
When traffic announcement is transmitted:
1). If the unit is in SD, USB mode, it will switch to radio mode temporarily.
2). If volume level is below 20, volume level is raised to 20, and returns to its previous
mode and volume level when the traffic announcement is over.
If volume is adjusted during traffic announcement, only the traffic announcement
volume is valid
PAGE 5

USB Operation
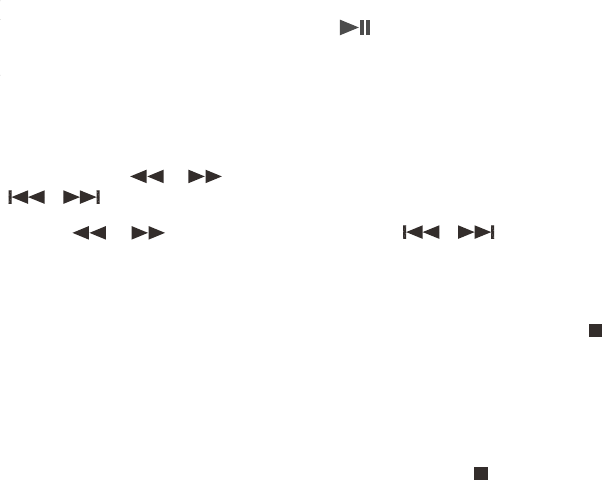
1. Pause Playback
During playback, press PLAY/PAUSE button on the front panel or remote
control to pause the playback, press PLAY/PAUSE button again to resume
normal playback.
2. Stop Playback
During playback, press STOP button once to pause the playback, then press the
PLAY/PAUSE button to resume the normal playback;
press STOP button twice to stop the playback, then press PLAY/PAUSE
button to start playback from the beginning of the first chapter/track.
3. Select Chapter with the or button or / Button
Press or button on the front panel or / Button
on the remote control during playback to select the previous or next chapter
to playback.
Note: Press or button or press / Button
multiple times to advance multiple chapters/tracks backward or forward .
4. To scan tracks
During playback, press INT button on the front panel briefly to play the first 10
seconds of each track.
Press INT button again to cancel INT function and retain playing the track
currently selected.
5. To repeat track(s)
During playback, press RPT button briefly to play the current track repeatedly,
and the LCD will display RPT ONE.
Press RPT button twice to play the tracks in the Album repeatedly, and the LCD
will display RPT DIR.
Press RPT button thrice to play the tracks of the albums, and the LCD will display
RPT ALL.
Press RPT button again to cancel RPT function, and the LCD will display RPT OFF.
6. To play tracks in random
During playback, press RDM button briefly to play all tracks in random. Press it
again to cancel RDM function.
7. Tracks search
Press APS button on the remote control, it will activate TRK SEARCH mode.
The LCD will display TRK 0/00/000(deside on the total number of tracks in the
USB stick) and flash the 0 on the biggest digit position. Then press + or - button
on the remote control to select number on the flashing digit position from 0 ~ 9,
Press APS button to change the position and with the same means to select
numbers in the other position. After finishing selecting the numbers on all digits
position, press PLAY/PAUSE button to play the track of the selected serial
number. PAGE 6
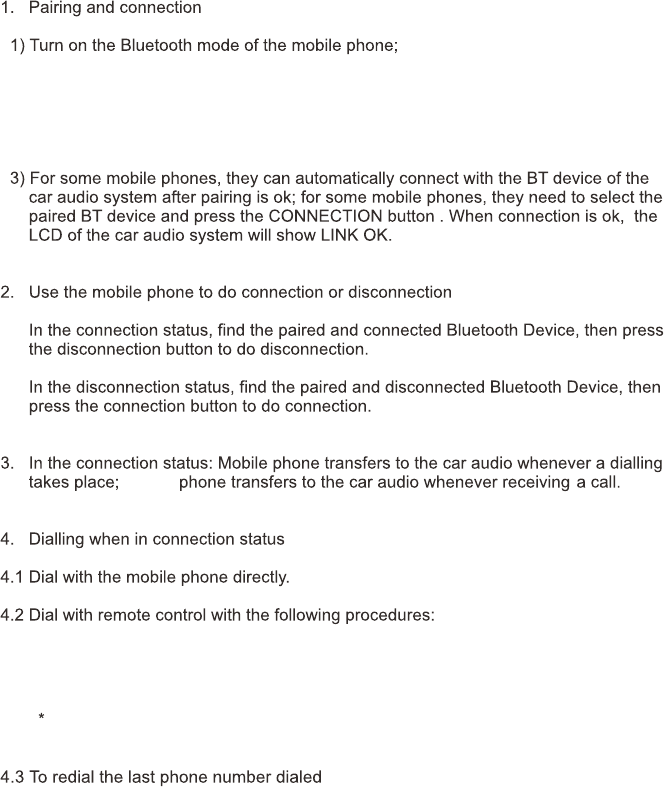
mobile
Short press CLEAR button to cancel the wrongly input number if necessary
(3)Short press TEL button to execute the dialing.
(1)Press TEL button to CALL mode, the LCD will display CALL
(2)Input telephone number with number button 0~9.
2)Select the item of Finding the Bluetooth Device and enter it. After finishing the
finding,it will show the name of the Bluetooth Device FURRION DV3010-XXXX
(where X can be any character A-Z or number 0-9 ) .Select it and enter it, then it will
show an interface that ask you to input a password, input the password 0000 and
enter it. Then it will tell you pair OK.
Bluetooth Handsfree System
Short press TEL /1 button on the front panel,it will show CALL OUT on
the LCD, then it will execute the dialing.

7. To play an audio file from an external Bluetooth device(mobile phone) of the DV3010
6. In BT mode, press CALL LOG button to check the LAST DIAL,LAST IN,LAST MISS phone
numbers(press + or - button to rotate)
8.To setup your Stereo using NFC(only support mobile phone with NFC function)
(1) Turn on the NFC function of your mobile phone and make sure the screen is active
and unlocked.
(2) With the NFC detection area of your phone touch with the NFC detection area
of the Stereo, you can connect or disconnect your mobile phone with the Stereo
conveniently.
Note: For the first time pair and connect, it will ask you to input a password.
The password is “0000”.
5.1 Incoming call ringing, short press TEL button on the remote control or 1 button on
the front panel to accept the call.
5.2 To reject Incoming call ringing, short press HANG UP button on the remote control
or 2 button on the front panel to REJECT the call.
5.3 During a phone call, short press HANG UP button on the remote control
or 2 button on the front panel to end the call.
Note: During other modes(execpt Bluetooth conversation), press BT MODE button on the
front panel to switch the mode with others.
Note: When an incoming call is present the LCD of the DV3010 will display CALL IN.
After the device has been paired successfully and the DV3010 screen displays
LINK OK
If your mobile device supports A2DP you will then be able to stream music from
your Bluetooth device so it can be played by stereo speaker.
You must select on your mobile Bluetooth device to play the audio through Bluetooth.
If your mobile device supports AVRCP then you will be able to control the basic phone
audio output functions by the Wall mount Stereo controls. Eg.Play Pause.
PAGE 8

SCREW
SCREW
Installing the unit
* Before finally installing the unit, connect the wiring temporarily and make sure
the unit and the system work properly.
*Fix the unit with screw according to following diagram.
1. Remove plastic shell of the front panel from the unit.
2. Fix the unit with 4 pieces #8 pan head self tapping screw.
3. Put back plastic shell of the front panel to the unit.
PLASTIC SHELL
OF THE FRONT PANEL
PAGE 9
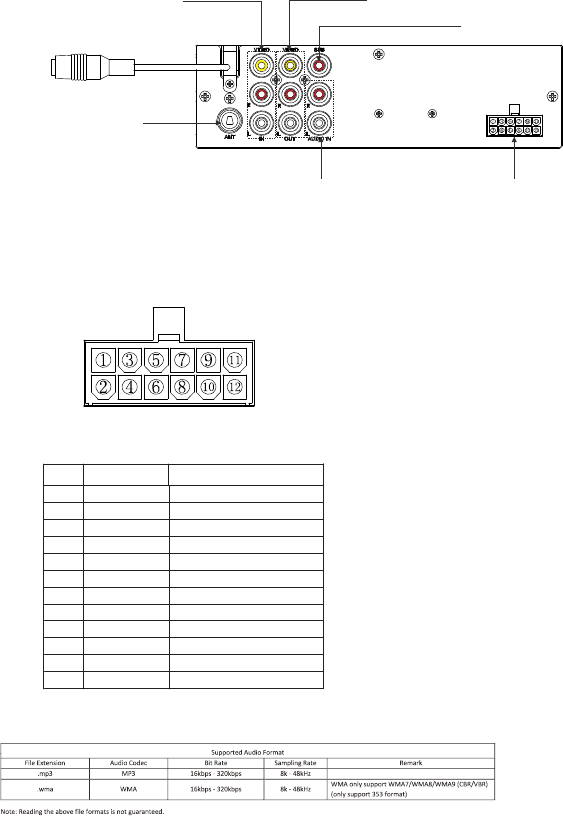
Wiring Diagram
IR REMOTE JACK
ANTENNA
WIRING CONNECTING SOCKET
AV IN AV OUT
SUBWOOFER OUT
AUDIO IN
Wiring connecting socket view
GREY
WHITE
WHITE/BLACK
GREE
PURPLE
BLUE
NONE
MEMORY B+
RED
BLACK GROUND
AUTO ANTENNA
GREE/BLACK
PURPLE/BLACK
GREY/BLACK
FRONT RIGHT SPEAKER (+)
REAR RIGHT SPEAKER (+)
FRONT LEFT SPEAKER (+)
REAR LEFT SPEAKER (+)
FRONT RIGHT SPEAKER (-)
REAR RIGHT SPEAKER (-)
FRONT LEFT SPEAKER (-)
REAR LEFT SPEAKER (-)
PIN NO COLOR FUNCTION
1
2
3
4
5
6
7
8
9
10
11
12
PAGE 10
Specification
GENERAL
Supply Voltage DC 12V
Current Consumption Max.10A
Power Output 4x 25W RMS
Number of channels 2 STEREO channels.
Unit Dimensions (L X W X H): 200x110.5x105(mm)
FM SECTION
Frequency range 87.5Mhz - 108Mhz (Europe)
87.5 Mhz - 107.9Mhz(U.S.A.)
87.5 Mhz - 108Mhz(Australia)
Effective sensitivity 3uV.
I.F Frequency 10.7MHz.
AM SECTION
Frequency range 522Khz - 1620Khz(Europe)
530khz - 1710Khz(U.S.A.)
522 Khz - 1710Khz(Australia)
Effective sensitivity 40dB
I.F Frequency 450KHz
Preamp Output 2 V Output
USB PLAYBACK
System MP3 audio system
<=5
Frequency characteristics 20Hz -100Hz dB
<=5
10KHz-20KHz dB
Signal to noise (USB) 50dB [1KHz]
FCC Notice:
NOTE: This equipment has been tested and found to comply with the limits for a Class B
digital device, pursuant to Part 15 of the FCC Rules. These limits are designed to provide
reasonable protection against harmful interference in a residential installation.
This equipment generates uses and can radiate radio frequency energy and, if not
installed and used in accordance with the instructions, may cause harmful interference
to radio communications. However, there is no guarantee that interference will not occur
in a particular installation. If this equipment does cause harmful interference to radio or
television reception, which can be determined by turning the equipment off and on, the
user is encouraged to try to correct the interference by one or more of the following
measures:
---Reorient or relocate the receiving antenna.
---Increase the separation between the equipment and receiver.
---Connect the equipment into an outlet on a circuit different from that to which the receiver
is connected.
---Consult the dealer or an experienced radio/TV technician for help.
WARNING: Changes or modifications not expressly approved by the party responsible
for compliance could void the user's authority to operate the equipment.
This equipment complied with FCC radiation exposure limits set forth for an uncontrolled
environment. This equipment should be installed and operated with minimum distance 20cm
between the radiator & your body.
Note: It must not be collocated or operated in conjunction with any other antenna or transmitter.