Furrion DV5XXX Car DVD Audio with Bluetooth User Manual 15 DV5700 UserMan
Furrion Ltd. Car DVD Audio with Bluetooth 15 DV5700 UserMan
Furrion >
15_DV5700 UserMan
DVD Stereo
180W/CD/DVD/Radio/MP3
USB/AUX-IN
Subwoofer Out/Bluetooth
DV5700
INSTRUCTION MANUAL
MIC
153 RPT
2 INT 64 RDM
/MUTE
BAND/LOUDAS/PSMODESEL
MIC
153 RPT2 INT 64 RDM
/MUTE
BAND/LOUDAS/PSMODESEL
13 12
22
114 15 16 17 238 9
1110 3 2 6 7 20 519 21
(1-6)
4
18

IM-DV5700-Rev1.0 - PAGE 2
BEFORE YOU BEGIN
PRECAUTIONS:
CAUTION:
USE OF CONTROLS OR ADJUSTMENT OR PERFORMANCE OF PROCEDURES OTHER
THAN THOSE SPECIFIED HEREIN MAY RESULT IN HAZARDOUS RADIATION EXPOSURE.
THE USE OF OPTICAL INSTRUMENTS WITH THIS PRODUCT WILL INCREASE EYE HAZARD.
• Keepthismanualhandyasareferenceforoperatingproceduresandprecautions.
• Alwayskeepthevolumelowenoughsoyoucanhearsoundsoutsideofthecar.
• Protectthisproductfrommoisture.
• Ifthebatteryisdisconnectedordischarged,thepresetmemorywillbeerasedandmustbe
reprogrammed.
FEATURES:
DVD
SupportedDVD-video,DVD+/-R,DVD+/-RWandDVD+/-DL.
VCD
SupportedVCDfeaturingPBC(playbackcontrol).
CD
SupportedCD,CD-RandCD-RW.
TV System
ThisunitisPAL/NTSCsystemcompatible.Whenconnectingothercomponentstothisunit,be
surecomponentsarecompatiblewiththesamevideosystemorelseimageswillnotbecorrectly
reproduced.
Aspect Ratio Selection
Switchingbetweenwidescreen,letterboxandpanscandisplayispossible.
Audio Selection
YoucanswitchbetweenmultipleaudiosystemsrecordedonaDVDasdesired.
Subtitle Selection
YoucanswitchbetweenmultiplesubtitlelanguagesrecordedonaDVDasdesired.
When an operation is prohibited
WhenyouarewatchingaDVDandattempttoperformanoperation,itmaynotbesupportedby
theprogrammingonthedisc.Whenthishappens,thisunitindicatesonthescreen.

IM-DV5700-Rev1.0 - PAGE 3
21
43
182.6mm
51mm
194.6mm
32.7mm
9.15mm
231
54
182.6mm
51mm
194.6mm
32.7mm
9.15mm
INSTALLATION GUIDE
Location
• Chooseamountinglocationawayfromhumidareas,watersources,appliancesoranyequipment
thatcanradiateheat.
• Selectanareaonawallorcabinetwhichisfreefromcable,fuelorbrakelinesandensurethatarea
behindthewallmountstereohasaventholeorifitisanenclosedboxandhasadequateroom
aroundtherearoftheunitforcooling.
• Ensurewhenthestereoismountedinthecutoutthatthewiresattherearoftheunitarenotpressed
againsttheheatsink.
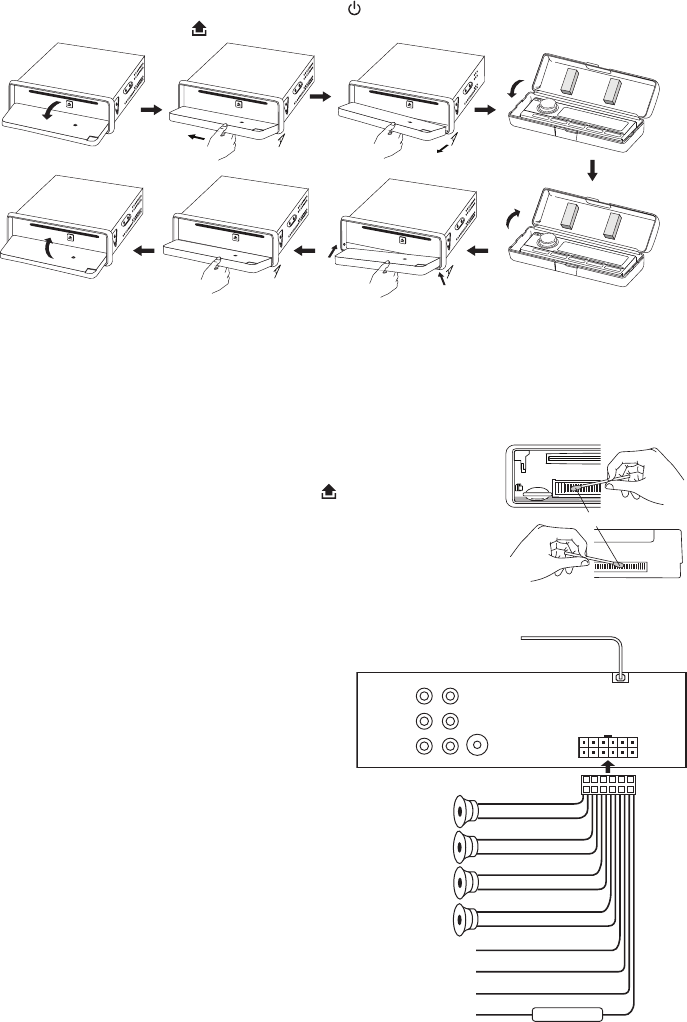
Installing the unit
• Beforenallyinstallingtheunit,connectthewiringtemporarilyandmakesuretheunitandtheunit
andthesystemworkproperly.
• Fixtheunitwithscrewaccordingtofollowingdiagram.
TO SUPPORT THE UNIT
Detaching and attaching the front panel
Thefrontpanelofthisunitcanbedetachedinordertopreventtheunitfrombeingstolen.
Releasescrew
Recommended
cutout
4
1
5
7
9
6
8
7
8
9
10
8
9
2
3
4
2
1.UNIT(included)
2.MOUNTINGBRACKET(included)
3.MOUNTINGSCREWCM5X8mmx4PCS
(included)
4.MOUNTINGSCREWPA5X16mmx4PCS
(included)
5.TRIMCOVER(included)
6.REARSUPPORTSTRAP(included)
7.HEXNUT(included)
8.LOCKWASHER(included)
9.PLAINWASHER(included)
10.TAPPINGSCREWPA5X16mm
(included)
IM-DV5700-Rev1.0-PAGE4
FOLDING DOWN AND DETACHING/ATTACHING THE FRONT PANEL
Beforedetachingthefrontpanel,besuretopressthe buttontoturnOFFtheunitrst.
ThenpresstheReleasebutton detachthepanelbypullingittowardsyouasillustrated.
Notes:
• Donotpressthefrontpanelhardagainsttheunitwhenattachingit.Itcanbeeasilyattachedby
pressingitlightlyagainsttheunit.
• Whenyoucarrythefrontpanelwithyou,putitinthesuppliedfrontpanelcase.
• DonotpresshardorgiveexcessivepressuretotheLCDdisplayofthefrontpanelwhenattaching
ittotheunit.
CLEANING THE CONNECTOR
Theunitmaynotfunctionproperlyiftheconnectorsbetweentheunitand
the front panel are contaminated with dirt. In order to prevent this from
happening,detachthefrontpanelbypressingthe buttonandcleanthe
connectorfromtimetotime.
Cleantheconnectorwithacottonswabtogetherwithcontactcleaner(not
included.)asillustrated.Besuretocleanthemcarefullypinbypinandmake
surenottodamagetheconnectingpoints.
WIRE CONNECTION GUIDE
Audio Output:
Left(White)andRight(Red)
Audio Input:
Left(White)andRight(Red)
Subwoofer Output: Green
Video Output: Yellow
ConnecttoexternalA/Vsystemtodisplay
Bluetooth Antenna: Black
Note: RedWiremustbeconnected
bycarignitionkeyinordertoavoid
thatcarbatterybeingdrainedwhen
thecarwillbenotusedforlong
period.
Maintenance
FUSE REPLACEMENT
Ifthefuseblows,checkthepowerconnectionand
replacethefuse.Ifthefuseblowsagainafterthe
replacement,theremaybeaninternalmalfunction.
Inthiscase,consultyournearestrepaircenter.
Warning
Usethespeciedfuseamperesforeachlead.Useofahigherfuseamperesmaycauseseriousdamage.
CottonSwab
Rearoffrontpanel
Mainunit
15° 15°
15°
15°
R(RED)
AUDIO OUTPUTAUDIO INPUT
L(WHITE)
VIDEO OUTPUT (YELLOW)
SUBWOOFER OUTPUT
(GREEN)
ANTENNA
CONNECTOR
FUSE 10A
MEMORY B+
GROUND
AUTO ANTENNA
IGNITION SWITCH
YELLOW
BLACK
BLUE
RED
PURPLE(+)
PURPLE/BLACK(-)
GREEN(+)
GREEN/BLACK(-)
WHITE(+)
WHITE/BLACK(-)
GREY(+)
GREY/BLACK(-)
REAR RIGHT
SPEAKER
REAR LEFT
SPEAKER
FRONT LEFT
SPEAKER
FRONT RIGHT
SPEAKER
BLUETOOTH ANTENNA
IM-DV5700-Rev1.0 - PAGE 5
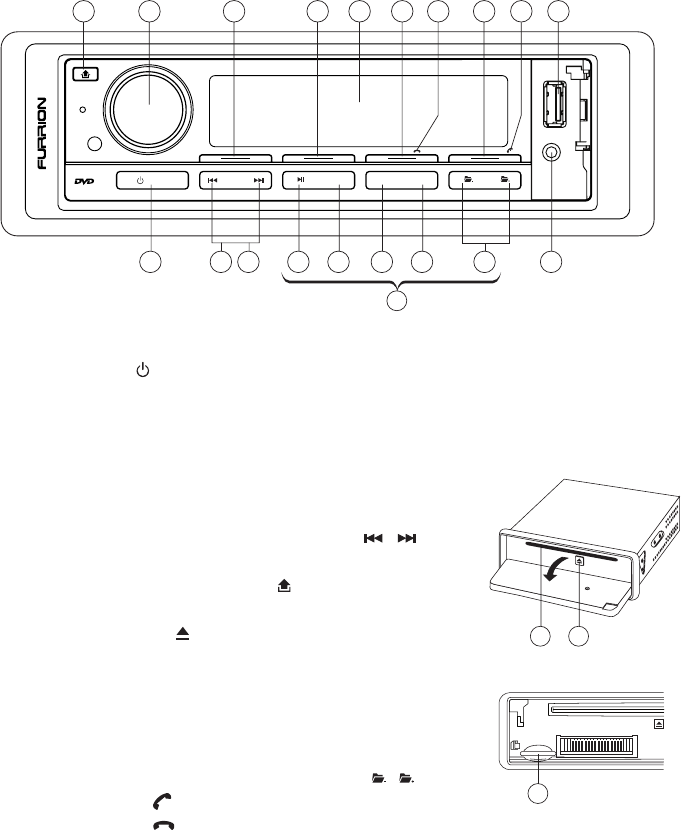
1. POWERON/OFF( )/MUTEBUTTON
2. SELECTFUNCTIONBUTTON(SEL)
3. VOLUMEKNOB
4. PRESETSTATIONS(1,2,3,4,5,6)BUTTON
5. BAND/LOUDNESSBUTTON
6. MODE/SUBWOOFERBUTTON(MODE)
7. AUTOSEEK/PRESETSCANBUTTON(AS/PS)
8. PREVIOUS/NEXTTRACK/CHAPTERBUTTON( /)
9. AUTOSEEKTUNINGBUTTON
10.FRONTPANELRELEASEBUTTON( )
11.LCDDISPLAY
12.DISCEJECTBUTTON( )
13.DISCSLOT
14.PLAY/PAUSEBUTTON
15.INTROBUTTON(INT)
16.REPEATBUTTON(RPT)
17.RANDOMBUTTON(RDM)
18.SEARCHPREVIOUS/NEXTFOLDERBUTTON( /)
19.ANSWERBUTTON( )
20.HANGUPBUTTON( )
21. USB PORT
22.MEMORYCARDSLOT(SD/MMC)
23. AUX IN
Locations of Parts (Main unit)
MIC
153 RPT
2 INT 64 RDM
/MUTE
BAND/LOUDAS/PSMODESEL
MIC
153 RPT2 INT 64 RDM
/MUTE
BAND/LOUDAS/PSMODESEL
13 12
22
114 15 16 17 238 9
1110 3 2 6 7 20 519 21
(1-6)
4
18
MIC
153 RPT2 INT 64 RDM
/MUTE
BAND/LOUDAS/PSMODESEL
MIC
153 RPT2 INT 64 RDM
/MUTE
BAND/LOUDAS/PSMODESEL
13 12
22
114 15 16 17 238 9
1110 3 2 6 7 20 519 21
(1-6)
4
18
MIC
153 RPT
2 INT 64 RDM
/MUTE
BAND/LOUDAS/PSMODESEL
MIC
153 RPT2 INT 64 RDM
/MUTE
BAND/LOUDAS/PSMODESEL
13 12
22
114 15 16 17 238 9
1110 3 2 6 7 20 519 21
(1-6)
4
18
IM-DV5700-Rev1.0-PAGE6
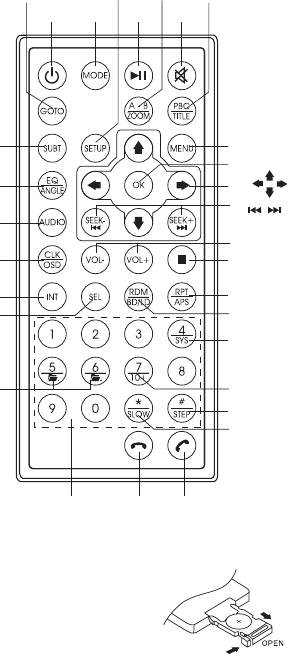
Locations of Parts (Remote Control)
1. POWERON/OFF
2. MODE
3. PLAY/PAUSE
4. TITLE/PLAYBACKCONTROL(PBC)
5. SELECT(SEL)
6. SEEK+/SEEK-/PREVIOUS/NEXTTRACK/CHAPTER
7. VOL+/VOL-
8. GOTO
9. AUDIO
10.OK
11.UP/DOWN/LEFT/RIGHT
12.REPEAT/AUTOSEEK/PRESETSCAN
13.RANDOM/BAND/LOUDNESS
14.INTRO
15.SYSTEM(PAL/NTSC)
16.SUBTITLE
17. SETUP
18.EQUALIZER/ANGLE
19.SLOWMOTION
20.A-BREPEAT/ZOOM
21. STOP
22.CLOCK/ONSCREENDISPLAY
23. MUTE
24.MAINMENU
25.STEP(FRAMEBYFRAMEPLAYBACK)
26.PREVIOUS/NEXTFOLDER
27.TWODIGITTRACKSSEARCHS
28. PHONE NUMBER
29. ANSWER
30. HANG UP
Use and care of the remote control
Installing the battery
Slidethetrayoutonthebackoftheremotecontrolandinsertthebatterywith
the(+)andminus(-)polespointingintheproperdirection.
• Whenusingforthersttime,pulloutthelmprotrudingfromthetray.
CAUTIONS
• Removethebatteryiftheremotecontrolisnotusedforamonthorlonger.
• Donotrecharge,disassemble,heatordisposeofthebatteryinare.
• Donotstorethebatterywithmetallicmaterials.
• Inthe eventof batteryleakage, wipetheremotecontrolcompletely cleanand installa new
battery
• Whendisposingofusedbatteries,pleasecomplywithgovernmentregulationsorenvironmental
publicinstitution’srulethatapplyinyourcountry/area.
• Alwayscheckcarefullythatyouareloadingthebatterywithplus(+)andminus(-)polesfacing
theproperdirections.
Using the remote control
Pointtheremotecontrolinthedirectionofthefrontpaneltooperate.
IMPORTANT
• Donotstoretheremotecontrolinhightemperaturesordirectsunlight.
• Donotlettheremotecontrolfallontotheoor,whereitmaybecomejammedunderthebrake
oracceleratorpedal.
1
82017 4
2 3 23
3028 29
24
VOL+/-
10
11
21
12
13
25
19
15
26
7
6
18
16
9
22
14
5
27
IM-DV5700-Rev1.0 - PAGE 7
GENERAL OPERATIONS
Turning the unit ON/OFF ( )
Press“ ”buttontoturnonunit.Toturnoff,pressandholdthisbuttonfor2seconds.
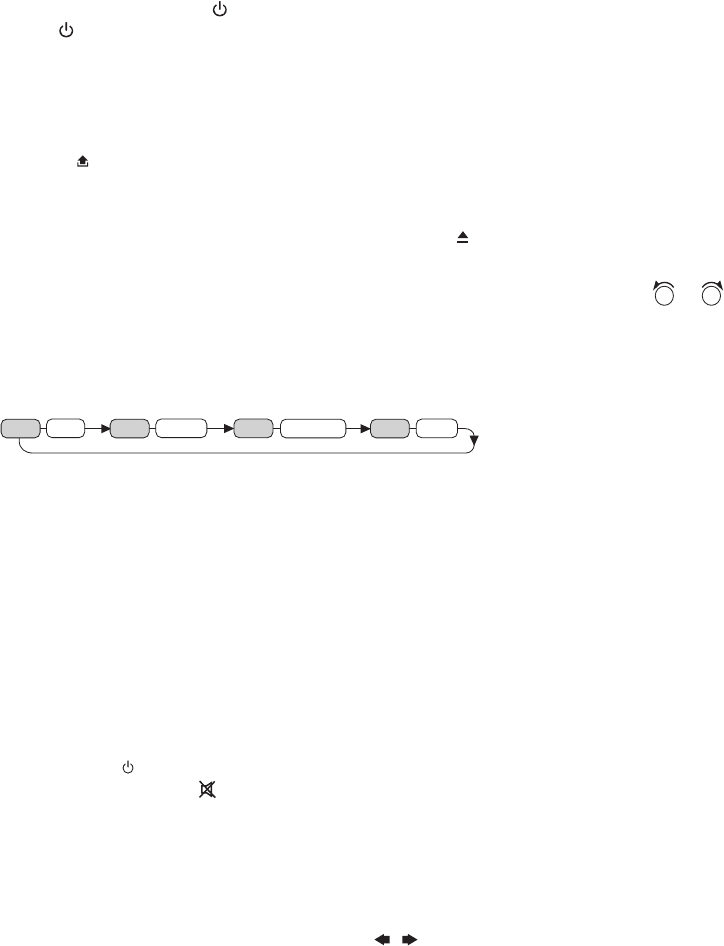
Selecting a source (MODE)
PressMODE repeatedlytoswitchbetweenTUNER,DISC,USB,SD,BluetoothandAVINmode.
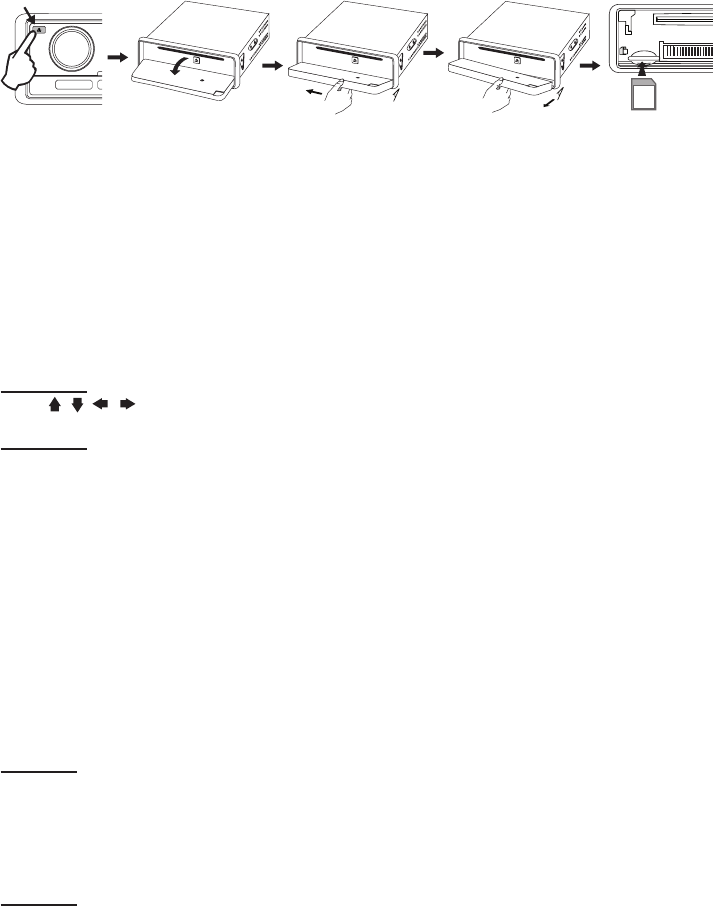
Loading a disc
MakesurepoweristurnedONbeforeinsertingadisc.
1.Press toopenthefrontpanel
2.Insertadiscintothediscslot
Ejecting a disc
MakesurepoweristurnedONbeforeejectingadisc.Press buttontoejectdisc.
Adjusting Volume/Bass/Treble/Balance/Fader
• Unit:TurningtheVOLknobRightorLeft.Increaseordecreasethevolumebyturning
VOLVOL
or
VOLVOL
.PresstheSELbuttonbrieyuntiltheBASS,TREBLE,BALANCEandFADERfunction.
• RemoteControl:PressVOL+ or VOL- toincreaseordecreasevolume.
Further settings via the Select Function Button (SEL)
PressandholdSELbuttontoadjustEQ/LOUD/STEREO/LOCAL:
2 sec.
SEL LOC
SEL STEREO
LOUD
SEL
EQ
SEL
EQ CONTROLS
TurnVOLknobtoselectFLAT/CLASS/ROCK/CINEMA.
LOUDNESS
TurnVOLknobtoselectLOUDON/OFF.
STEREO/MONO
TurnVOLknobtoselectSTEREO/MONO.
WhenreceptionofanFMstationisweak,listeningquality
canbeimprovedbyswitchingtomonosound
.
LOCAL/DX
TurnVOLknobtoselectLOCAL/DX.AtLOCALtheLCDDisplayshowsLOCON,atDX(Distant)
theLCDDisplayshowsLOCOFF.“Local”positioninareaswithstrongsignalstoletradiostopat
onlystrongstationsduringmanualtuning(LOCappears).PresstoDistantpositioninareaswith
weaksignalstolistentoallstations.
Mute
• Unit:Press“ /MUTE”buttononcetomutethesound,pressagaintoresume.
• RemoteControl:Press buttontomutethesoundatonce.Pressagaintoreturntoprevious
volumelevel.
Loudness
• Unit:PressandholdBAND/LOUDbuttontoturnon/offLOUDNESSfeature.
• RemoteControl:PressandholdLDbuttononremotecontroltoturnon/offLOUDNESSfeature.
Equalizer
Remote: Press EQ button. Press EQ again or ( /) button to select between Flat/Classic/
Cinema/Rock/EQOffequalizemodes.
Subwoofer
• Unit:PressandholdMODEbuttontoturnon/offsubwoofer.
IM-DV5700-Rev1.0 - PAGE 8
Clock Setting
1. PressCLKbuttononremotecontrol.
2. PressandholdCLKbuttonagain.
3. TurnVOLknobonunittoadjusthours.PressCLKbuttonandTurnVOLbuttononunittoadjust
minutes.
4. PressOKbuttononremotecontrol.
LISTENING TO RADIO
Band
PressBANDbuttononunitorBDbuttononremotecontrolrepeatedlywilltogglecyclicallybetween
eachband.FM1--FM2--FM3--AM1--AM2.
Automatic or Manual tuning ( / )
MANUAL TUNING:Pressandhold /button2sec.untilMANUALshowonthedisplay.
Press /buttontoadjustbychannelstepfrequency.
AUTOMATIC TUNING:Press /buttonareoperatedasautoseektuning.
Auto Seek/Preset scan (AS/PS)
Preset Scan -BypressingAS/PSbuttonshortly,theradioplayseachpresetstationfor5seconds.
Auto Seek -BypressingAS/PSbuttonlongerthan1sec,autoseekisactivated.Thestrongstations
arepresetandstoredinthecorrespondingpresetnumber.WhenAutoSeekoperationisnished,
theradioexecutesthepresetscan.
Storing and Recalling Frequencies
IfyoupressanyoftheNUMBER(1-6)youcaneasilystoreuptosixbroadcastfrequenciesfor
laterrecallwiththetouchofabutton.
1.ChooseadesiredBAND.
2.Whenyoundafrequencythatyouwanttostoreinmemory,pressaNUMBER(1-6)andhold
untilthepresetnumbershowsandlitinthedisplay.
3.Theselectedradiostationfrequencyhasbeenstoredinmemory.Thenexttimeyoupressthe
sameNUMBER(1-6)theradiostationfrequencyisrecalledfrommemory.
Note: Up to 6 stations can be stored in each band.
PHOTO Viewing:
Unit:
Filessearchforstopmode:
1.PressAS/PSbuttontostopanyplayback.
2.Press /buttontoselect“photo”lelisted.
3.Rotatevolumeknobtoselect*.JPGletoviewingorpressSELbuttontostartplayfromrst
photo.
4.Press fornextphoto.
5.Press forpreviousphoto.
6.Press3 RPTbuttonrepeatedlytoselectRep-1/Rep DIR/Rep ALLrepeatedlyplaybackuntil
press[A/PS]button.
Remote control:
Filessearchforstopmode:
1.PressSTOPbuttontostopanyplayback.
2.Press( )buttonrepeatedlytoselect“photo”lelisted.
3.Press( , )buttontoselectdesiredfolderthenpressOKbuttontoconrm.
4.Press( , )buttontoselectdesiredJPGlethenpressOKbuttontostartplaybackphoto.
5.PressSEEK+ fornextphoto.
6.PressSEEK- forpreviousphoto.
7.Press RPT button repeatedly to select Rep-1/Rep DIR/Rep ALL repeatedly playback until
pressSTOPbutton.

IM-DV5700-Rev1.0 - PAGE 9
CD/MP3/WMA Music listening:
Unit:
Filessearchforstopmode:
1. Press AS/PSbuttontomediaseletion.
2. Press /buttontoselect“MUSIC”lelisted.
3. Rotatevolumeknobtoselectdesiredfolder.
4. RotatevolumeknobtoselectmusicleandpressSELbuttontoplaybackorpressSELbutton
tostartplayfromrstle.
5. Press fornextle.
6. Press forpreviousle.
7. Press1buttonforpause,pressagainforresumeplayback.
8. CD playback only:PressINTbuttontoselectINTROorSEQplay,youcanselectINTRO to
introducingplayeachle10sec.
9. Press3 RPTbuttonrepeatedlytoselectRep-1/Rep DIR(MP3/WMA only)/Rep ALL/Rep OFF
torepeatedlyplayback.
10.Press4 RDMbuttontoselectRANDOM ON/OFFtorandomplayback.
Remote control:
Filessearchforstopmode:
1. PressSTOPbuttontostopanyplayback.
2. Press( )buttonrepeatedlytoselect“MUSIC”lelisted.
3. Press( , )buttontoselectdesiredfolderthenpressOKbuttontoconrm.
4. Press( , )buttontoselectdesiredlethenpressOKbuttontostartplaybackmusic.
5. PressSEEK+ fornextle.
6. PressSEEK- forpreviousle.
7. Press buttonforpause,pressagainforresumeplayback.
8. CD playback only:PressINTbuttontoselectINTROorSEQplay,youcanselectINTRO to
introducingplayeachle10sec.
9. PressRPTbuttonrepeatedlytoselectRep-1/ Rep DIR(MP3/WMA only)/Rep ALL/Rep OFF
repeatedlyplayback.
10.PressRDMbuttontoselectRANDOM ON/OFFtorandomplayback.
Movie Playback:
Unit
Filessearchforstopmode:
1. PressAS/PSbuttontostopanyplayback.
2. Press /buttontoselect“Video”listed.
3. RotatevolumeknobtoselectmovieletoplaybackorpressSELbuttontostartplayfromrst
le.
4. Press fornextle.
5. Press forpreviousle.
6. Press 3 RPT button repeatedly to select Rep-1/Rep DIR/Rep ALL/Rep OFF repeatedly
playbackuntilpressAS/PSbutton.
Remote control:
Filessearchforstopmode:
1. PressStopbuttontostopanyplayback.
2. Press( )buttonrepeatedlytoselect“Video”lelisted.
3. Press( , )buttontoselectdesiredfolderthenpressOKtoconrm.
4. Press( , )buttontoselectdesiredmovielethenpressOKbuttontostartplayback.
5. PressSEEK+ fornextle.
6. PressSEEK- forpreviousle.
7. PressRPTbuttonrepeatedlytoselectRep-1/Rep DIR/Rep ALL/Rep OFFrepeatedlyplayback
untilpressSTOPbutton.

IM-DV5700-Rev1.0 - PAGE 10
Stopping Playback
1. PressSTOPon remote control during playback to stop playback. That position is stored in
memory.
2. Press tocontinue.Playbackstartsfromthetrackatwhichitwasstopped.
Fast Forward / Fast Reverse
1.Duringplayback,pressandhold or . Unitscansatthespeedofx2-x4-x8-x16-x20.
2.Toresumenormalplaybackatadesiredpoint,press .
Note: No sound is come out during fast forward/fast reverse at over x2 high speed search.
Finding the Beginning of Tracks
Duringplayback,press or .
:Presstostartplaybackfromthebeginningofthepreviouschapterortrack.
:Presstostartplaybackfromthebeginningofthefollowingchapterortrack.
Pause Playback
Duringplayback,press .Pressagaintoresumeplayback.
A-B Repeat Playback
Thisfeatureallowsyoutoloopplaybackasectionofthemovie/audiostartingfromPointAtoB.
1.Pressthe buttontoplaythemovie/audio.
2. Once you have located the section you wish to playback on loop repeat, press and hold
Remote’sA-B button.Youwillsee“REPEAT A-” onthescreen.
3.Letthemovie/audioplayonuntilyouhavereachedtheendofthesectionyouwishtowatchon
continuousloop.Onceyouhavereachedthispoint,pressandholdremote’sA-B buttonagain.
“REPEAT A-B” willappearonyourscreen.PlaybackwillnowstartfromPointA–B.
4.TostopA-Brepeatplayback,pressandholdremote’sA-B buttononcemoreuntil“A-B CANCEL”
disappearsandnormalplaybackresumes.
Displaying information (OSD) - video les only
Duringplayback,youcanseeallinformationandcurrentplaysettings.Displaywillshowrelated,
elapsetime,titlenumber,chapternumberandotherinformation.
PressOSD ontheremotecontrolonce.Unitwilldisplaythediscelapsetime.
USB / MEMORY CARD (SD/MMC) / AUX-IN PLAYBACK
AUX IN
AnexternalAVsource(e.g.portableMP3player)canbeconnectedtotheAUXIN
sockettobeplayedbackbythevehicleloudspeakers.
1.ConnecttheAUX-INsocketwiththeAVoutputoftheexternaldevice.
USB/Memory Card (SD/MMC)
ThedeviceisequippedwithaUSBinterfaceandamemorycardreaderforSD/
MMCcards.MP3/WMA/AVIlesstoredonthesemediacanbeplayed.
Note:
-
Due to the great variety of devices with USB and SD/MMC card interfaces that sometimes have
manufacturer-specic functions, we cannot guarantee that all media will be recognized and that
all operational functions will be available with this device.
- You cannot operate USB hard drives on the device.
-
It maybe necessary to turn the ash memory ON so that it can be read.
1. PlugyourUSBstoragemediumintotheUSBport.
2. Ifyouuseamemorycard,insertitintothememorycardreader.
3.
Theplayerautomaticallyswitchestotheinputusedandstartsplayback.
4. Seethesectiononoperationscommonforaudio/videolesonhowtocontrolUSBormemory
cardplayback.
AUX IN
USB PORT
IM-DV5700-Rev1.0 - PAGE 11
15° 15°
DVD/VCD PLAYBACK
Playback
1.Insertadisc.Whenthediscoffersamenu,themenuisdisplayed.Whenadiscalreadyinserted,
pressMODEtoswitchtodiscmode.
2.OnDVDandVCDwithplaybackcontrol(PBC),menuscreensmayappearautomatically.Ifthis
happens,performtheoperationdescribedbelowtostartplayback.
CAUTION: MakesurethattheTVsystemsettingsissetcorrectlyaccording tothedisc thatis
playing.Ifyouarenotsure,leaveitsetto“Auto”.ImpropersetupofTVsystemmightcausethe
videotostop/skip/pauseplayingalthoughaudiomightcontinuetoplay.YoucansetupTVsettings
using the SETUP feature of the remote control. Refer to “SETTING UP THE DVD PLAYER”
section.
DVD menu
Press , , , toselectthedesireditem,thenpressOK.
VCD menu
Usethenumberkeys(“0”to“9”)toselectthedesirednumber.Themenuscreendoesnotappear
whenthePBCfunctionisturnedoff.Inthiscase,pressandholdbuttontoturnonPBCfeature.
Turning PBC ON/OFF (VCD only)
PBC(PlaybackControl)isafeaturefoundonVCD2.0andSVCD1.0.PBCallowscontrolofthe
playbackofplayitemsandthepossibilityofinteractionwiththeuserthroughtheremotecontrol
orsomeotherinputdeviceavailable.Ifit’son,theplayerwon’tautostartafterinsertingthedisc
because it will take time to select program on disc; if it’s off, the player will auto playback the
programondisconebyone.
1.ToturnONPBCfunction,pressPBC ontheremotecontrol.ToturnOFF,pressthebuttonagain.
Note:
• Not all VCD/SVCD disc have PBC functions.
• While playing VCD and PBC function is turned ON, Repeat / Intro / Random function will not
work.
Repeat Playback
FOR VCD
1.PressRPT ontheremotecontrolduringplayback.
2.Everytimeyoupressthisbutton,theunitswitchestothefollowingsettings:
Repeat 1 –Repeatthecurrentplaybacktrack.
Repeat Off –TurnOFFrepeatfunction.
Note: PBC feature in VCD disc needs to be STOP in order to use Repeat playback.
FOR DVD
Youcanchoosebetweenrepeatplaybackofatitleorchapter.
1.PressRPT ontheremotecontrolduringplayback.
2.Everytimeyoupressthisbutton,theunitswitchestothefollowingsettings:
Repeat Title –Repeatthecurrentplaybacktitle.
Repeat Chapter –Repeatthecurrentplaybackchapter.
Repeat Off –TurnOFFrepeatfunction.

IM-DV5700-Rev1.0 - PAGE 12
Searching for particular track using GOTO
YoucanusetheGOTOfunctiontosearchforadesiredtracknumberorparticularpointofatracktoplay.
1.PressGOTObuttonontheremotecontrolduringplayback.Press or buttontoselectTitle/
Chapter,Timeserachappears.
2.
EnterTitle/Chapterforcurrentlyplaybackdisc.pressentertoconrm.
3.Ifyouwanttosearchbytime,enterthetime,minuteandsecondthenpressentertoconrm.
Changing audio language during playback (Multi-audio)
Some DVD can provide audio playback with different languages and different systems (Dolby
Digital...etc.).With DVD featuring multi-audio recordings, you can switch between languages/
audiosystemsduringplayback.
VCDcanprovidedifferentaudiolanguagesusuallydividedintoleftandrightchannels.
1.Tochoosedifferentaudio,simplypressAUDIO buttonontheremotecontrolrepeatedlyduring
playback.
Note:
• With some DVD, switching between languages/audio systems may only be possible using a
menu display.
• You can also switch between languages/audio systems using SET-UP MENU or tap the screen
then press Audio
Changing the subtitle language during playback (Multi-subtitle)
WithDVDfeaturingmulti-subtitlerecordings,youcanswitchbetweensubtitlelanguagesduring
playback.
1.PressSUBT buttonontheremotecontrolduringplayback.Pressrepeatedlyuntilthesupported
desiredsubtitleappears.
Note:
• With some DVD, switching between subtitles may only be possible using a menu display.
• You can also switch between subtitles using SET-UP MENU or tap the screen then press
Subtitle.
Changing the viewing angle during playback (Multi-angle) – (DVD only)
WithDVDfeaturing multi-angle (scenes shot from multiple angles) recordings, you can switch
amongviewinganglesduringplay-back.
1. PressandholdANGLEbutton ontheremotecontrolduringplaybackofascene.PressANGLE
buttonrepeatedlytoselectthedesiredangletoplay.
Title (DVD only)
DuringDVDplayback,PressTITLEbuttononremotecontroltoreturntoFIRSTtitle.
Return to Root Menu (DVD only)
DuringDVDplayback,pressMENUbuttontoreturntorootmenu.
Note: Some DVD may not contain root menu.
Slow motion playback
Thisfeatureletsyouslowdownplayback.
1.PressSLOWbutton ontheremotecontrolduringplayback.
2.Pressingitrepeatedlywillswitchyoutothefollowingsteps:1/2-1/3-1/4-1/5-1/6-1/7.
Note:
• To resume normal playback, press PLAY/PAUSE ( ).
• There is no sound during slow motion playback.
• With some disc, slow motion may be unclear during slow motion playback.
Zooming in During Playback
Youcanzoominintothepictureduringplayback.
1.PressZOOMbuttonontheremotecontrolduringplayback.
2.Everytimeyoupressthisbutton,theunitwillzoom2-3-4-1/2-1/3-1/4timesandOFF.
IM-DV5700-Rev1.0 - PAGE 13
STEP (Frame by frame playback)
Thisletsyoumoveaheadoneframeatatimeduringplayback.
Eachtimeyoupressstepbuttononremotecontrol,youmoveaheadonframe.Toreturntonormal
playback,press button.
PAL / NTSC
PressandholdSYS buttontoswitchbetweenPAL,NTSCsystem.
Return / Go Back
PressMENUbuttononremotecontroltogobackonelevelorreturntopreviousmenu.
CUSTOMIZING SOUND SETTINGS
1. PressSELbuttontoenterAUDIOsetup.Selecteditemwillbehighlighted.YoucansetBASS,
TREBLE,BALANCE,FADER.
2. Rotate VOLknobtomakeadjustments.
3. PressSELbuttontoselectBASS,TREBLE,BALANCE,FADERandexitsettings.
SETTING THE DVD PLAYER
Youcanexiblycustomizetheunittosuityourpreference.Youcansetthelanguageandother
videoandaudiosettingssowhenplaybackstartsitwillalwaysuseyourpreferredsettings.
Important:
1.Playanyvideolebeforeyoucanaccessthesetup.
2.PressSETUPbutton ontheremotecontrol.
3.Used , , , toselectDVDtoreturn/entersetupcategory.
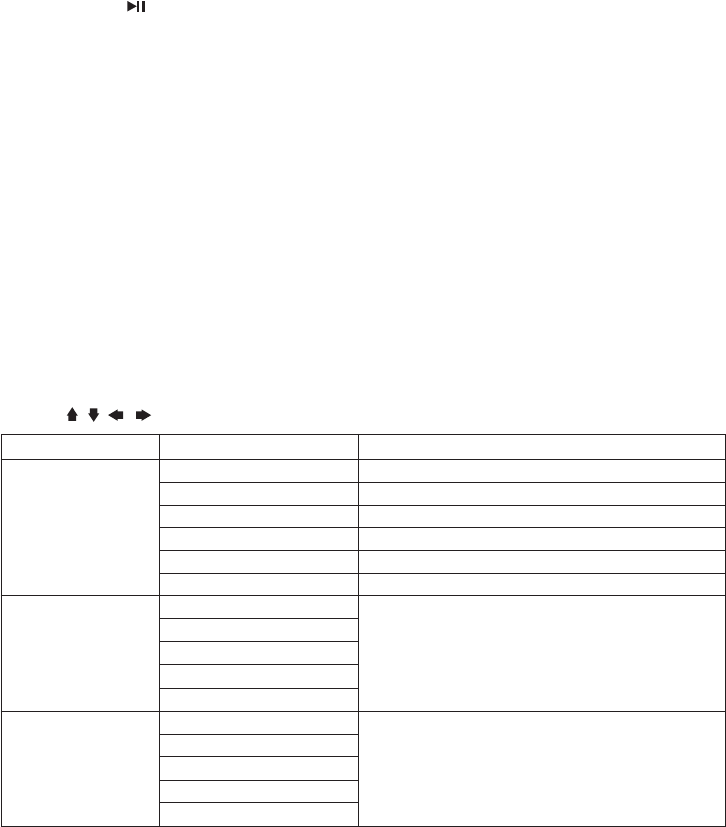
Settings
SYSTEM SETUP
LANGUAGESETUP
VIDEO SETUP
Category
TV SYSTEM
AUTOPLAY
TV TYPE
PASSWORD
RATING
DEFAULT
OSDLanguage
AUDIOLanguage
SUBTITLELanguage
MENULanguage
MPEG4Language
BRIGHTNESS
CONTRAST
HUE
SATURATION
SHARPNESS
Options
NTSC,PAL,AUTO
ON/OFF
4:3PS,4:3LB,16:9
Setuppassword
Setupratinglevel
Restoretofactorysettings
Selectpreferredoptionsappearonscreen
Selectpreferredoptionsappearonscreen
Setting Rating Password
1. PressSETUPbuttonontheremotecontrol.
2. UsingNavigationkeysselectSystem Setup > Password andpressOKbutton.
3. Enterthedefaultpassword‘0000’andpressOKbuttontounlockrstandthenenternew4
digitpasswordandpressOKbutton.Theunlocklogowillswitchtolockindicatingpassword
hasbeenset.

IM-DV5700-Rev1.0-PAGE14
File
Extension
.avi
.divx
.mpg
.dat
.vob
FileExtension
.mp3
.wma
Container
AVI
MPG
DAT
VOB
VideoCodec
DivX3.xx
DivX4.xx
DivX5.xx
DivX6.xx
XviD
MPEG-1
MPEG-1
MPEG-2
MPEG-1
MPEG-2
MPEG-1
MPEG-2
AudioCodec
MP3
WMA
AudioCodec
DolbyDigital(AC3)
WMA/PCM/LPCM
MPEG-Audio
(MP1/MP2/MP3)
LPCM
MPEG-Audio
(MP1/MP2/MP3)
LPCM
MPEG-Audio
(MP1/MP2/MP3)
DolbyDigital(AC3)
Bit Rate
16kbps-320kbps
16kbps-320kbps
Resolution
720x480(30fps)
720x576(30fps)
352x240(30fps)
720x480(30fps)
SamplingRate
8k-48kHz
8k-48kHz
Remark
Remark
WMAonly
supportWMA7/
WMA8/WMA9
(CBR/VBR)
(Onlysupport
353format)
Supported Video Format
Supported Audio Format
Note: Reading the above le formats is not guaranteed.
Note:
- The default password is ‘0000’.
- In case you forgot your password, you can use the master password ‘8888’ to unlock and reset
the password.
- Master password will only work while SETUP button is press during playback.

IM-DV5700-Rev1.0 - PAGE 15
HOW TO USE BLUETOOTH IN YOUR STEREO
Pairing
Beforeyourmobilephonecancommunicatewiththestereo,youmustrstcompletethepairing
proceduretoconnectthemtogether.
1. PressMODEbuttononmainunit/remotecontroluntil“BT”or“BTAUDIO”isshownonLCD
Display.
2. TurnonBluetoothfunctionofyourmobilephone,thenselect“addBluetoothdevice”fromyour
mobile phone; the mobile phone will search any activated Bluetooth devices nearby, select
“Furrion DV5700”andenterPasskey“0000”toconnect(refertomanualofyourmobilephone
fordetailifneeded).
3. Afterthispairingprocessissuccessfullycompleted,connectyourmobilephonewiththestereo,
aBluetoothlogowillappearonmobilephone’snoticationbar.
Note: “Furrion DV5700” is the Bluetooth device name of this stereo.
Audio Streaming
IfyourmobilephonesupportsA2DPprole,themusicplaybackcanbestreamedtothestereo.
1. Makesureyourmobilephoneandstereoisproperlypairedandconnected.
2. Playmusiconyourmobilephone.
3. “BT AUDIO”willbeshownonLCDDisplayofstereo,musicisstreamedtothestereo.
4. Youcan press or button on mainunit toselectprevious ornext track/leinmobile
phone.
Making Call
Important: Before you make a call, make sure your mobile phone and stereo are properly paired
and connected.
1. PressMODEbuttononmainunit/remotecontroluntilBTorBTAUDIOisshownonLCDDisplay.
2. PressandholdINTbuttononmainunit/remotecontroltogotopreviousmenu,then“BT”will
beshownonLCDDisplay.
3. Press buttononmainunittoselect“DIAL”,pressandholdSELbuttononmainunit/remote
controltoenter“KEYPAD”.
4. Tomakeacallviaremotecontrol,tapnumberbuttonsandpress“ ”buttononmainunit/
remotecontroltodial.
5. Press“ ”buttononmainunit/remotecontroltohangup.
Answering/Rejecting/Hanging Up Call
1. Toansweranincomingcall,press“ ”buttononmainunit/remotecontrol.Torejectanincoming
call,justpress“ ”buttononmainunit/remotecontrol.
2. Afteryouhavenishedtheconversation,press“ ”buttononmainunit/remotecontroltohang
up.
History
Historycontainsthelistsofdialed,receivedandmissedcalls.
1. PressMODEbuttononmainunit/remotecontroluntil“BT”or“BTAUDIO”isshownonLCD
Display.
2. PressandholdINTbuttononmainunit/remotecontroltogotopreviousmenu,then“BT”will
beshownonLCDDisplay.
3. Press buttononmainunittoselect“HISTORY”,pressandholdSELbuttononmainunit/
remotecontroltoenter“CALLLOG”.
4.Press or buttononmainunittoselectthenumber,thenpress“ ”buttononmain
unit/remotecontroltodial.
IM-DV5700-Rev1.0-PAGE16
TECHNICAL SPECIFICATIONS
DVD PLAYER SYSTEM
SignaltoNoiseRatio >60dB
ChannelSeparation >50dB(1kHz)
FrequencyResponse 20Hz-20kHz
FM RADIO
FrequencyRange 87.5-107.9MHz
ChannelStep 200kHz
Sensitivity 2.8µV
StereoSeparation 30dB
SignaltoNoiseRatio 50dB
AM RADIO
FrequencyRange 530-1710KHz
UsableSensitivity 32dB
AUDIO/VIDEO OUTPUT
Output 750mV
Impedance 10kOhm
GENERAL
PowerSupply 12VDC(10.8-15.6Vallowable)
SpeakerImpedance 4or8ohm
Outputpower 45Wx4CH
Fuse 10A
Note: Specicationandthedesignaresubjecttopossiblemodicationwithoutnoticedueto
improvements.
Note:ThisequipmenthasbeentestedandfoundtocomplywiththelimitsforaClassBdigital
device,pursuanttopart15oftheFCCRules.Theselimitsaredesignedtoprovidereasonable
protectionagainstharmfulinterferenceinaresidentialinstallation.Thisequipmentgenerates
usesandcanradiateradiofrequencyenergyand,ifnotinstalledandusedinaccordancewith
theinstructions,maycauseharmfulinterferencetoradiocommunications.However,there
isnoguaranteethatinterferencewillnotoccurinaparticularinstallation.Ifthisequipment
doescauseharmfulinterferencetoradioortelevisionreception,whichcanbedetermined
byturningtheequipmentoffandon,theuserisencouragedtotrytocorrecttheinterference
byoneormoreofthefollowingmeasures:
-Reorientorrelocatethereceivingantenna.
-Increasetheseparationbetweentheequipmentandreceiver.
-Connecttheequipmentintoanoutletonacircuitdifferentfromthattowhichthereceiveris
connected.
-Consultthedealeroranexperiencedradio/TVtechnicianforhelp.
Changesormodicationsnotexpresslyapprovedbythepartyresponsibleforcompliance
couldvoidtheuser’sauthoritytooperatetheequipment.ThisdevicecomplieswithPart
15oftheFCCRules.Operationissubjecttothefollowingtwoconditions:
(1)thisdevicemaynotcauseharmfulinterference,and
(2)thisdevicemustacceptanyinterferencereceived,includinginterferencethatmaycause
undesiredoperation.