Furrion NV2200 Navigation System User Manual
Furrion Ltd. Navigation System
UserManual.wiki
>
Furrion
>
NV2200 User Manual
User Manual
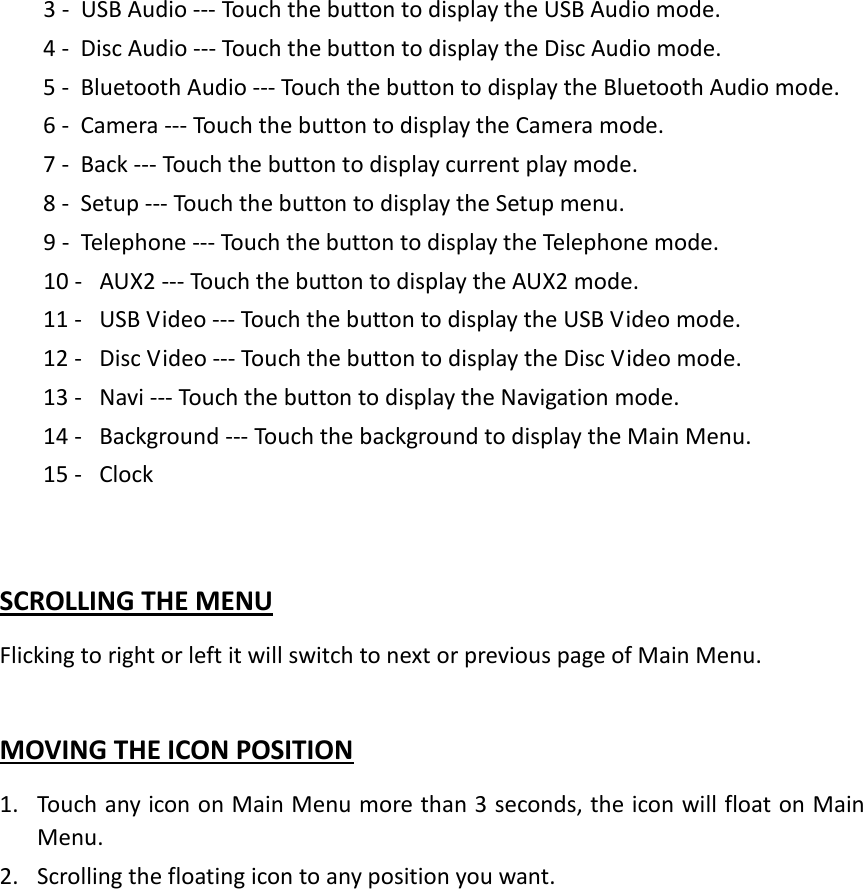
Navigation menu
Upload a User Manual
Namespaces
Wiki Guide
HTML
PDF
Info
Views
User Manual
Discussion / Help
Navigation

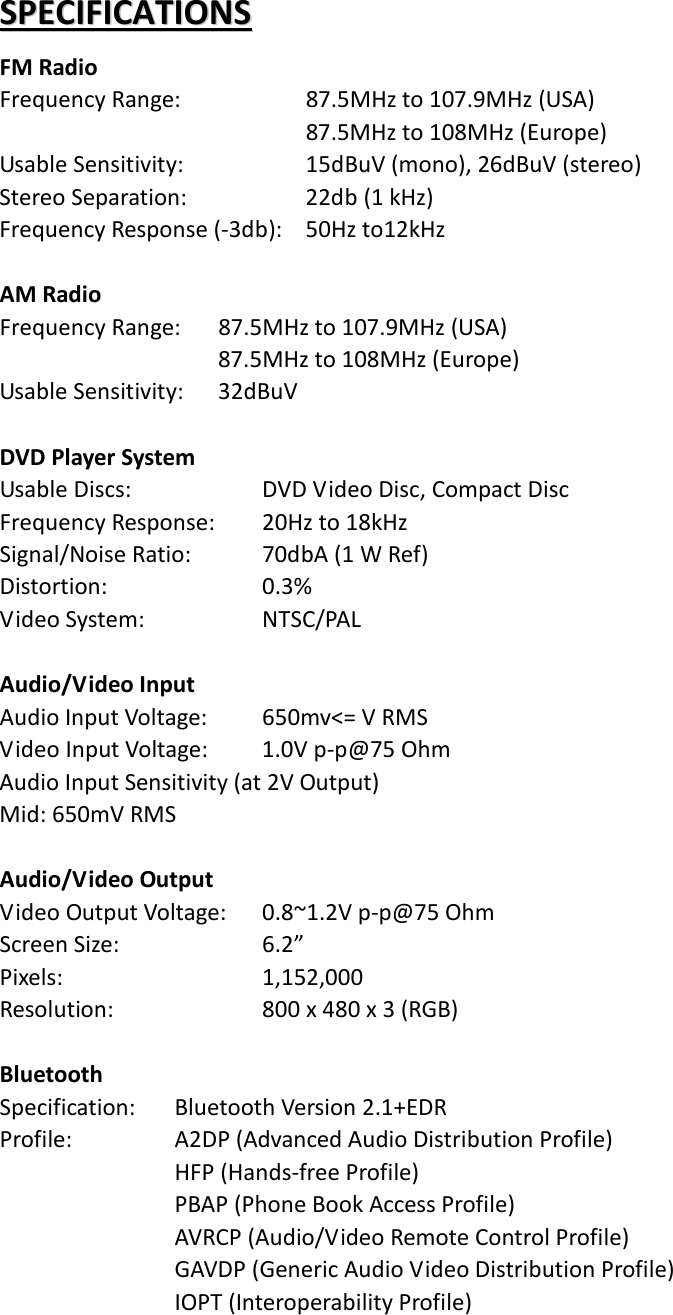
![OOPPEERRAATTIIOONNAALL PPAANNEELL FUNCTIONS OF BUTTONS [MICROPHONE] This is used for Bluetooth phone. [IR] SENSOR Receiver for the remote control unit [MICRO SD SLOT] Note – The micro SD card is only for navigation purpose, please do not insert micro SD card for other purposes. When the navigation function is activated, do not remote micro SD card. [POWER / VOL] KNOB Press this knob to turn on the power. Press this knob for more than 2 seconds to turn off the power. Turn this knob clockwise or counter-clockwise to increase or decrease the volume of the system. [NAVI] BUTTON Press this button to activate navigation function, press again to return to current source. [NAVI] [USB] [ ] [RESET] [MICRO SD SLOT] [COVER] [POWER/VOL]](https://usermanual.wiki/Furrion/NV2200/User-Guide-2465643-Page-7.png)
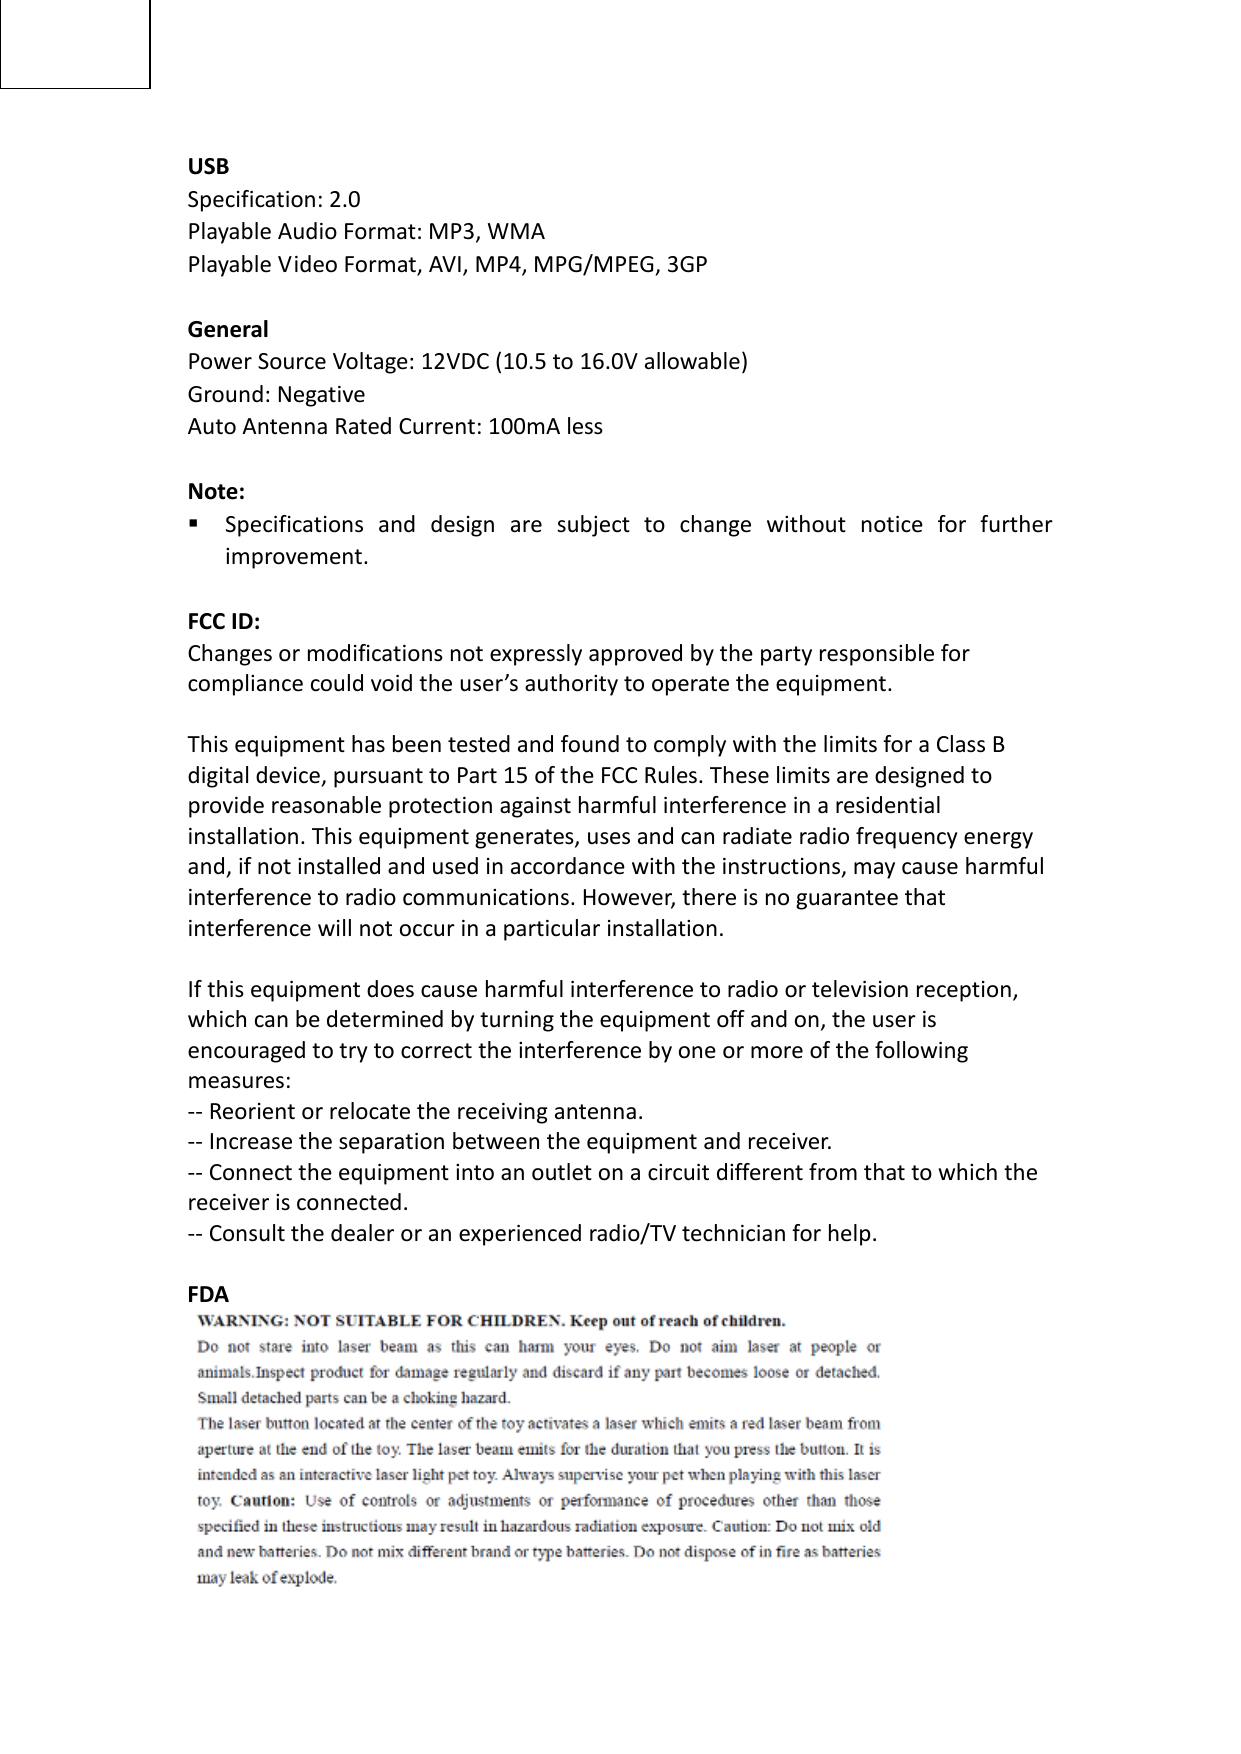
![[] EJECT Press to eject the disc from the unit. [AUX IN] AUX connector on front panel. [USB] PORT USB connector [RESET] BUTTON Press this button to reset the unit in hardware.](https://usermanual.wiki/Furrion/NV2200/User-Guide-2465643-Page-8.png)
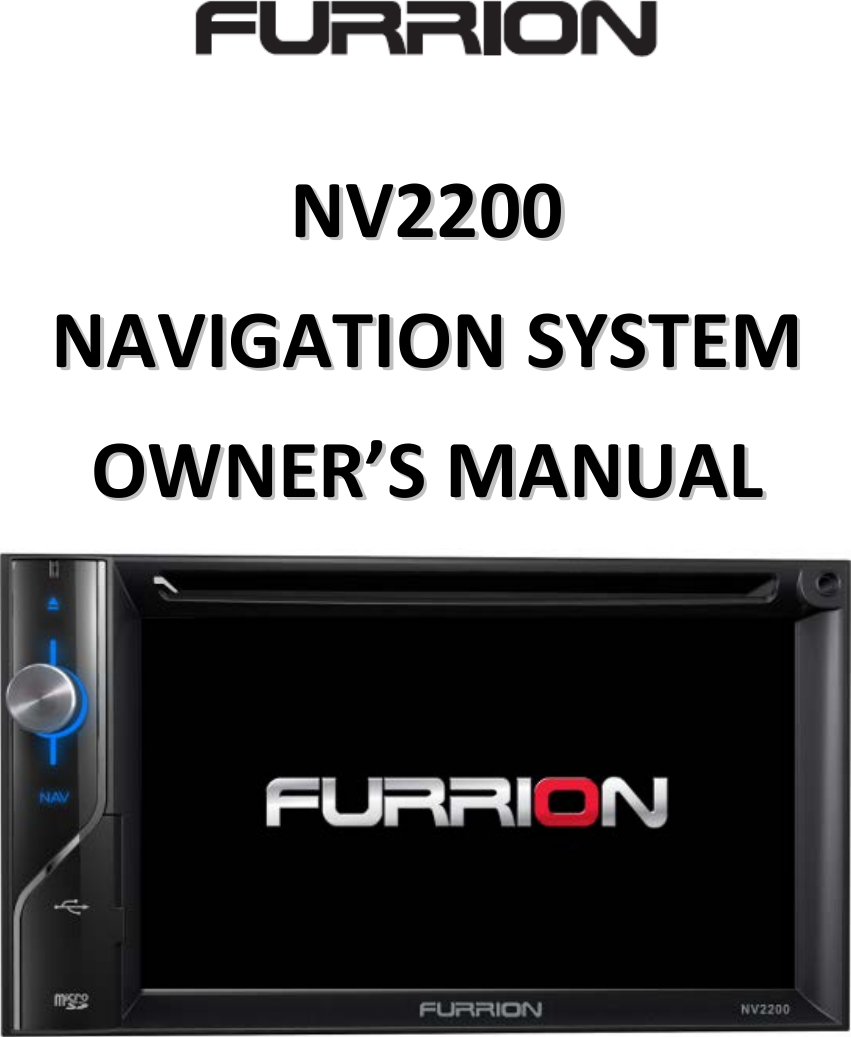
![RREEMMOOTTEE CCOONNTTRROOLL REMOTE CONTROL FUNCTIONS 1 - [POWER] Button • Press this button to power on when the unit is power off. • Press this button more than 1 second to power off when the unit is power on. 2 - [EJECT] Button • Press to eject disc from the unit. 3 - [MUTE] Button • Mute or unmute the speaker. 2 1 3 4 6 7 8 11 10 9 14 15 12 16 13 18 17 19 22 23 21 20 25 24 26 27 5](https://usermanual.wiki/Furrion/NV2200/User-Guide-2465643-Page-9.png)
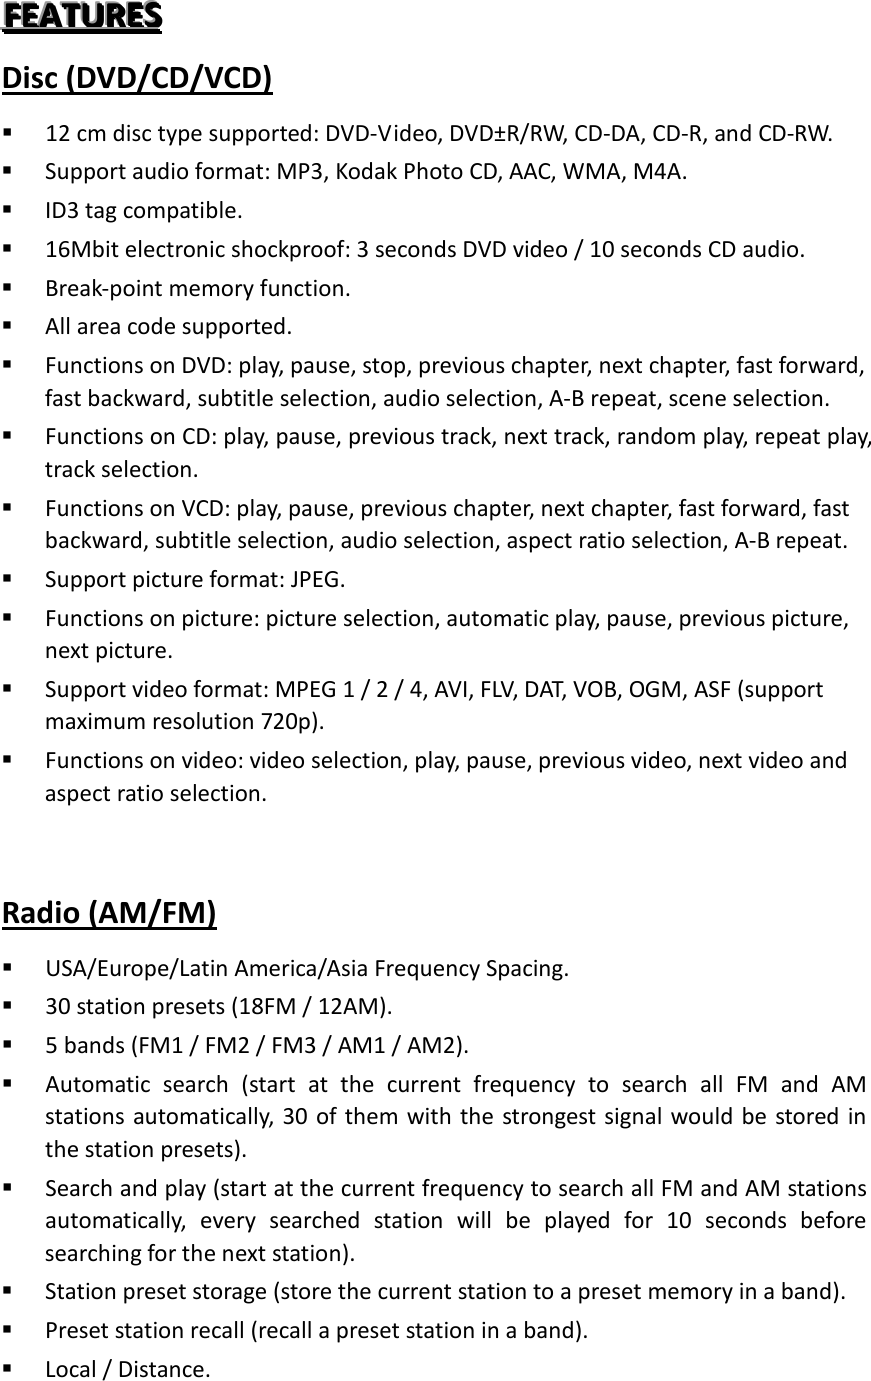
![4 - [MODE] Button • Press this button to switch between sources. 5 - [0 – 9] Buttons • Use in the key pad screen to select the radio. • Use to select the track in the track list screen. • Press to enter DVD video chapters/titles in the key pad screen. 6 - [VOL+] Button • Increase volume. 7 - [VOL-] Button • Decrease volume. 8 - [OSD] Button • Press to enter on screen display on DVD mode. 9 - [SEL] Button • Press to enter audio setting. 10 - [STOP/BAND] Button • Short Press to stop video and audio media. • Long press to switch to next band alternately. 11 - [SEARCH] Button • Press this button to open chapter or title search window while playing DVD and USB. 12 - [BACK] Button • Press this button to quit main menu if current screen is main menu. 13 - [UP/DOWN/LEFT/RIGHT/OK] Buttons • Press UP/DOWN/LEFT/RIGHT for cursor movement in main menu or setting mode. • From the main menu, you can select your desired source or change your settings. • Press OK to fix the entered data in the key pad screen or enter the item the cursor is on. 14 - [SETUP] Button • Press this button to enter the main setting menu or return current resource. 15 - [PIC] Button • Press this button to enter monitor brightness setting. 16 - [A-B] Button • Press to start demo playback from A to B. 17 - [RPT] Button • Press to perform chapter repeat / title repeat / repeat off while playing DVD mode. • Press to perform repeat track / repeat all while playing CD. • Press to perform repeat track / repeat folder / repeat all while playing audio or video files on disc. • Press to perform repeat track / repeat folder / repeat all while playing audio or video files in USB memory.](https://usermanual.wiki/Furrion/NV2200/User-Guide-2465643-Page-10.png)
![18 - [ROOT] Button • Press to go to the root menu on the DVD. 19 - [TITLE] • Press to go to the title menu on the DVD. 20 - [PREVIOUS] Button • Press to seek the next available lower station in Tuner mode. • Press to select the next lower chapter number in DVD video mode. • Press to select the next lower track in CD, USB Video, USB Audio mode. 21 - [NEXT] Button • Press to seek the next available higher station in Tuner mode. • Press to select the next higher chapter number in DVD video mode. • Press to select the next higher track in CD, USB Video, USB Audio mode. 22 - [FAST BACKWARD] Button • Press to manually select the next lower station in Tuner mode. • Press to perform fast-backward searching. Press again to change the speed to 2X, 4X, 8X or 16X. 23 - [FAST FORWARD] Button • Press to manually select the next higher station in Tuner mode. • Press to perform fast-forward searching. Press again to change the speed to 2X, 4X, 8X or 16X. 24 - [SUB-T] Button • Press to switch next available subtitle while playing DVD. 25 - [ANGLE] Button • Press to switch the different angle while playing DVD. (Not all DVD disc support this function). 26 - [AUDIO] Button • Press to switch the audio channel of the disc while playing DVD. 27 - [ZOOM] Button • Press to turn on and zoom in while playing DVD. You can zoom in up to 3X (Not all DVD disc support this function).](https://usermanual.wiki/Furrion/NV2200/User-Guide-2465643-Page-11.png)
![WWHHEEEELL KKEEYY SSTTUUDDYY 1. Touch the [setup] button on the Main Menu. 2. Touch the [Others] button. The below menu is displayed. 3. Touch the [Wheel Key Study] button. The below menu will be displayed. 1 - Restudy 2 - Mode 1 3 - Mode 2 4 - Source 5 - Previous 6 - Volume + 7 - End a call 8 - Mute 9 - Next 10 - Volume - 11 - Call 2 3 1 5 9 8 10 11 4 6 7](https://usermanual.wiki/Furrion/NV2200/User-Guide-2465643-Page-12.png)
![DDIISSCC VVIIDDEEOO PPLLAAYYEERR OOPPEERRAATTIIOONNSS DVD SYSTEM SETUP Note: If the setup operation is made in the middle of DVD video play, the disc will re-start from the beginning. WATCH A DISC 1. To read a disc: Insert the disc into the center of the disc insertion slot with label side facing up. CAUTION – For your safety, the driver should not insert or eject a disc, opening operation panel while driving. Note: Do not insert foreign objects into the disc insertion slot. If there is difficulty inserting the disc, there may be another disc in the system, or the system may require service. 8cm discs are not allowed. 2. Disc starts playing automatically. EJECT A DISC 1. To eject a disc press eject [] button to eject the disc. The play mode then switches to the Radio mode. If the disc is left in the ejected position for 15 seconds, the disc is automatically reloaded. In this case, the play mode will remain in the Radio mode. Note: If you force a disc into the system before automatic reload, it may damage a disc. DVD PLAYER MODE SCREEN Touch any place of the screen to display DVD Video menu, touch the screen again to return the playback. The display will return to the playback screen, if you do not touch the screen for 7 seconds.](https://usermanual.wiki/Furrion/NV2200/User-Guide-2465643-Page-15.png)
![1 - Previous Chapter / Fast Backward button 2 - Play / Pause 3 - Next Chapter / Fast Forward button 4 - Subtitle switching button 5 - Repeat switching button 6 - Direct chapter or title searching button 7 - Audio Channel switching button 8 - Menu List button 9 - Total time 10 - DVD playback information 11 - Seek bar 12 - Elapsed playing time 13 - Return button (to Main Menu) 14 - System time 15 - Title information 16 - Chapter information DVD PLAYER MENU OPERATION Select the buttons displayed in the DVD Player Menu by direct touching it. Play/Pause Playback 1. Touch [ ] button to pause during playback. 10 16 14 15 6 5 3 4 2 7 11 1 8 12 9 13](https://usermanual.wiki/Furrion/NV2200/User-Guide-2465643-Page-16.png)
![2. Touch [ ] button again to resume playback. Skip a Chapter 1. Touch [ ] or [ ] button during playback. Chapters are skipped down or up from current location, as many times as the button is touched, and playback starts. Skip by Seek Bar Touch [ ] on seek bar and drag it to any position where you want to start playback. Fast Forward / Fast Backward 1. Touch [ ] or [ ] button and hold 2 seconds to start fast backward or fast forward during playback. The playback speed starts at 2x, then will increase to 4x, 8x and 16x. Release the button will continue playing with normal speed. Note: During fast forward and fast backward operation, there is no audio reproduced. The fast forward and fast backward speed may differ depending on the disc. Search 1. In the DVD Video menu, touch [ ] button. The keypad screen appears with the chapter/title number input mode. Touch [Chapter] button turns the keypad to the chapter number input mode. Touch [Title] button turns the keypad to the title number input mode. Title: A large segment to divide the data area of the disc. Chapter: A small segment to divide the data area of the disc. 2. Input the number of the chapter/title that you want to play with the [0] to [9] key.](https://usermanual.wiki/Furrion/NV2200/User-Guide-2465643-Page-17.png)
![3. Touch [] button. Playback starts from the scene of the input chapter number or title number. Note: If the input chapter/title number does not exist or searching with a chapter/title is not allowed, the screen image will not change. 4. Touch [] button to close the keypad. Repeat Playback 1. In the DVD Video menu, touch [] button. 2. Touch [ ] button once for Repeat Chapter, again for Repeat Title. 3. Touch [ ] button again to turn off the repeat playback. Title Menu](https://usermanual.wiki/Furrion/NV2200/User-Guide-2465643-Page-18.png)
![1. In the DVD Video menu, touch [] button during playback. Depending on the disc, the title menu may not be called. 2. Touch [ ] on the title menu screen. 3. Select the items in the title menu screen by directional buttons. Depending on the disc, items may not be selected with the directional buttons. 4. Touch [] button to fix on the selected item. 5. Touch [ ] button.. 6. Touch [ ] button to close the title menu screen.](https://usermanual.wiki/Furrion/NV2200/User-Guide-2465643-Page-19.png)
![Audio Switch For discs with two or more audio languages recorded, you can switch among the audio languages during playback. 1. In the DVD Video menu, touch [ ] button during playback. Each time you touch the button, you can switch among audio languages. It may take time to switch among audio languages. Depending on the disc, up to 8 kinds of audio languages may be recorded. For detail, see the mark of the disc: ( indicates that8 audio languages have been recorded). When the power is turned on and when the disc is changed to a new one, the audio language set as factory default is selected. If that audio language has not been recorded on disc, the audio language is specified on the disc. Depending on the disc, audio switch may be completely impossible or impossible on some scenes. Subtitle Switch For discs with two or more subtitle languages recorded, you can switch among the subtitle languages during playback. 1. In the DVD Video menu, touch [ ] button to select a subtitle during playback. Each time you touch the button, you can switch among subtitles. It may take time to switch among subtitles. Depending on the disc, up to 32 kinds of subtitles may be recorded. For detail, see the mark of the disc: ( indicates that 8 kinds of subtitles have been recorded). When the power is turned on and when the disc is changed to a new one, the subtitle set as factory default is selected. If that subtitle has not been recorded on disc, the subtitle is specified on the disc. Depending on the disc, subtitle switch may be completely impossible or impossible on some scenes. 2. To turn off subtitles, repeat touching [ ] until subtitles are turned off.](https://usermanual.wiki/Furrion/NV2200/User-Guide-2465643-Page-20.png)
![Display Playback Status Touch [] button on DVD Player mode screen, playback status is displayed on screen. VIDEO FILES PLAYBACK This system can play video files (AVI/MP4…etc.) stored on disc VIDEO FILES PLAYER MODE SCREEN 1. After disc with video files is loaded, touch [Disc Video] button on Main Menu to show video files player mode screen. 2. Touch the screen of the playing video file to display Video Files Player menu, touch the screen again to return the playback screen. The display will return to the playback screen, if you do not touch the screen for 7 seconds.](https://usermanual.wiki/Furrion/NV2200/User-Guide-2465643-Page-21.png)
![1 - Elapsed playing time 2 - Previous Track / Fast Backward button 3 - Play/Pause button 4 - Next Track / Fast Forward button 5 - Repeat button 6 - Direct chapter or title searching button 7 - Audio button 8 - List Mode button 9 - Total time 10 - System time 11 - Bluetooth status indicator 12 - Playback file information 13 - Current play mode 14 - Return button (to Main Menu) 15 - Seek bar VIDEO FILES PLAYER MENU OPERATION You can select the button displayed in the Video Files Player menu by direct touching it. Play/Pause Playback 1. Touch [ ] button to pause during playback. 2. Touch [ ] button again to resume playback. 13 11 12 14 1 10 6 4 2 8 5 3 7 9 15](https://usermanual.wiki/Furrion/NV2200/User-Guide-2465643-Page-22.png)
![Switch to Previous/Next File 1. Touch [ ] or [ ] button during playback to play previous/next file. Skip by Seek Bar Touch [ ] on seek bar and drag it to any position where you want to start playback. Fast Forward / Fast Backward 1. Touch [ ] or [ ] button and hold 2 seconds to start fast backward or fast forward during playback. The playback speed starts at 2x, then will increase to 4x, 8x and 16x. Release the button will continue playback with normal speed. Note: During fast forward and fast backward operation, there is no audio reproduced. The fast forward and fast backward speed may differ depending on the disc. Repeat Playback The repeat set as the factory default is Repeat All. 1. In the Video Files Player menu, touch [ ] button. 2. Touch [ ] button once for Repeat Track, again for Repeat Folder. 3. Touch [ ] button again for Repeat All.. Audio Switch For video files with two or more audio channels, you can switch among the audio channels during playback. 1. Touch [] button during playback. Each time you touch the button, you can switch among audio languages. It may take time to switch among audios. Depending on the video files, switching may be impossible.](https://usermanual.wiki/Furrion/NV2200/User-Guide-2465643-Page-23.png)
![Subtitle Switch For video files with two or more subtitles, you can switch among the subtitles during playback. 1. Touch the [ ] button to select a subtitle during playback. Each time you touch the button, you can switch among subtitles. It may take time to switch among subtitles. Depending on the video files, switching may be impossible. Video Files List In the Video Files Player menu, touch the [] button to display video files list screen. Video files list operations is almost same as Disc Audio Player mode. Please refer to CD Player Operations.](https://usermanual.wiki/Furrion/NV2200/User-Guide-2465643-Page-24.png)
![DDIISSCC AAUUDDIIOO PPLLAAYYEERR OOPPEERRAATTIIOONN WATCH A DISC / EJECT A DISC Please refer to DISC VIDEO PLAYER OPERATIONS – WATCH A DISC and EJECT A DISC. CD PLAYER MODE SCREEN 1. After disc is loaded, the play mode is automatically engaged. 2. If disc has been loaded, you can touch [Disc Audio] button on Main Menu to display CD Player Mode screen. 16 17 15 8 9 5 7 6 12 3 10 13 2 1 11 4](https://usermanual.wiki/Furrion/NV2200/User-Guide-2465643-Page-25.png)
![1 - Previous Track / Fast Backward button 2 - Play / Pause button 3 - Next Track / Fast Forward button 4 - Song Title 5 - System time 6 - Total time 7 - Shuffle button 8 - Current play mode 9 - Return button (to Main Menu) 10 - Repeat button 11 - Playback track information 12 - Album information 13 - Elapsed playing time 14 - Option button 15 - Scan Start / Stop button 16 - Direct searching button 17 - Close option menu button CD PLAYER MENU OPERATION You can select the button displayed in the CD Player menu by direct touching it. Play/Pause Playback 1. Touch [ ] button to pause during playback. 2. Touch [ ] button again to resume playback. Switch to Previous/Next File or Track Touch [ ]/[ ] button during playback to play previous/next file. Touch [ ] button starts playback from the beginning of the next track. Touch [ ] button starts playback from the beginning of the current track. When this button is touched again within 5 seconds, playback starts from the beginning of previous track.](https://usermanual.wiki/Furrion/NV2200/User-Guide-2465643-Page-26.png)
![Fast Forward / Fast Backward 1. Touch [] or [ ] button and hold more than 2 seconds to start fast backward or fast forward during playback. The playback speed starts at 2x, then will increase to 4x, 8x and 16x. Release the button will continue playback with normal speed. Note: The fast forward and fast backward speed may differ depending on the disc. Repeat Playback The repeat set as the factory default is Repeat All. Touch [] button to switch between Repeat Folder, Repeat All and Repeat Track. Shuffle Playback 1. Touch [] button to shuffle the tracks during playback. 2. Touch this button again to turn off shuffle playback. Track Selection on Track List Screen 1. Touch the track title on the display list. The selected track will start playing. 2. When the desired track is not displayed, touch and flick the track list up or down. 3. Touch the desired track title button. The corresponding track is started playback. Tracks Scan 1. Touch [ ] button to show [] button. 2. Touch [] button during playback. It will play from the next track, and each track will display for 10 seconds. 3. Touch [ ] button. It will continue playback from the current track. [ ] button will switch to [ ] button. The function will scan all tracks orderly in current folder once. After scan](https://usermanual.wiki/Furrion/NV2200/User-Guide-2465643-Page-27.png)
![stopped playback will continue. Track Number Search This operation allows searching using the track numbers recorded on the CDs. 1. Touch [ ] button to show [ ] button. 2. Touch [ ] button. The numerical keypad will appear on the screen. 3. Input the track number that you want to playback with [0] to [9] key and touch [ ] button. Playback starts from the track of the input track number. If the input track number does not exist or searching with track number is not allowed, the screen image will not change. Touch the [] button will close the numerical keypad. Touch [] button will close the option window and display playback screen. Compressed Audio Playback This system can play audio files stored on disc. MP3 / WMA Tag Display Function This unit is an ID3 Tag compatible model This unit supports ID3 Tags of the version 2.4, 2.3, 1.1 and 1.0. In displaying, this unit gives priority to the version 2.4 and 2.3 Tags.](https://usermanual.wiki/Furrion/NV2200/User-Guide-2465643-Page-28.png)
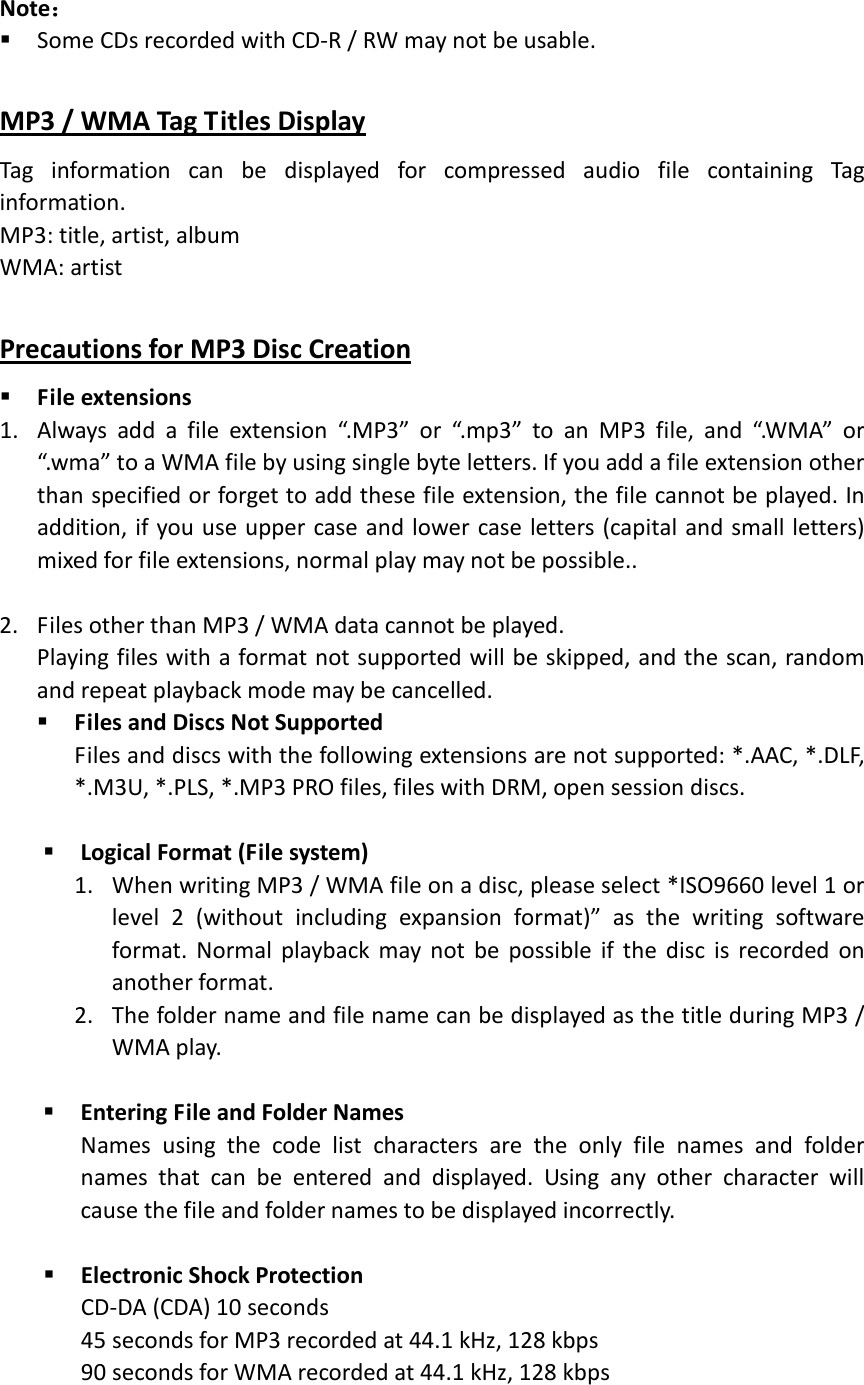
![ Folder Structure A disc with a folder having more than 8 hierarchical levels will conflict with the ISO9660 and playback will be impossible. Number of Files and Folders 1. The maximum allowable number of folders is 255 (including root directory); the maximum allowable number of files is 512 (max. 255 per folder). This represents the maximum number of tracks that can be played back. 2. Tracks are played in the order that they were recorded onto a disc. (Tracks might not always be played in the order displayed on the PC). o Some noise may occur depending on the type of encoder software used while recording. o In case of a track recorded at VBR (variable bit rate), the display for the play time of the track may be slightly different from the actual play time. Also, the recommended value of VBR ranges from 32kbps to 320kbps. MP3 / WMA Playback Menu 1. Repeat Playback While playing MP3 / WMA touch [ ] button can switch between Repeat Folder, Repeat All and Repeat Track. 2. Folder Touch the title of folder, play list will show files and folders in the selected folder. 3. Current Folder Showing title of current folder. The number on the folder symbol is the number of files and folders number in current folder. 3 2 1](https://usermanual.wiki/Furrion/NV2200/User-Guide-2465643-Page-30.png)
![ Touch [ ] button, play list will show files and folders in upper folder. Other operations about playing MP3 / WMA are almost same as CD Player mode.](https://usermanual.wiki/Furrion/NV2200/User-Guide-2465643-Page-31.png)
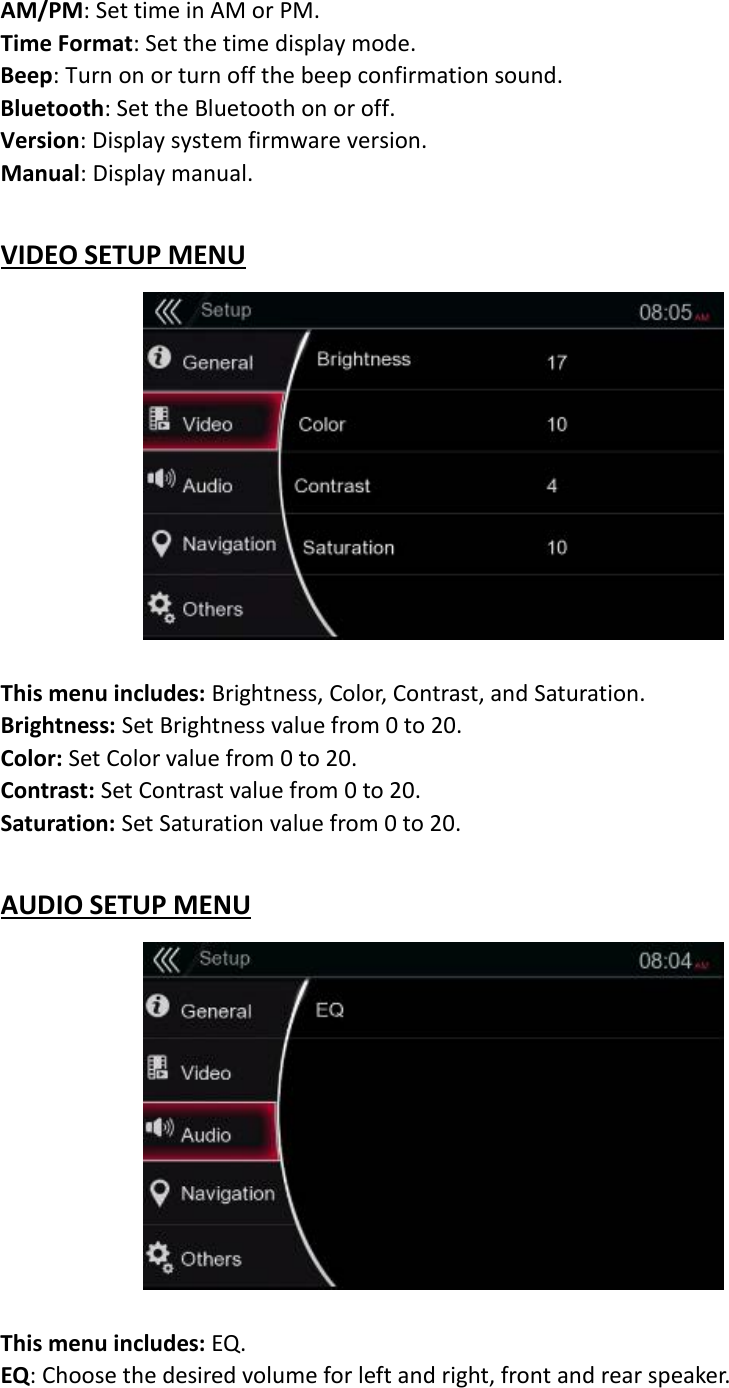
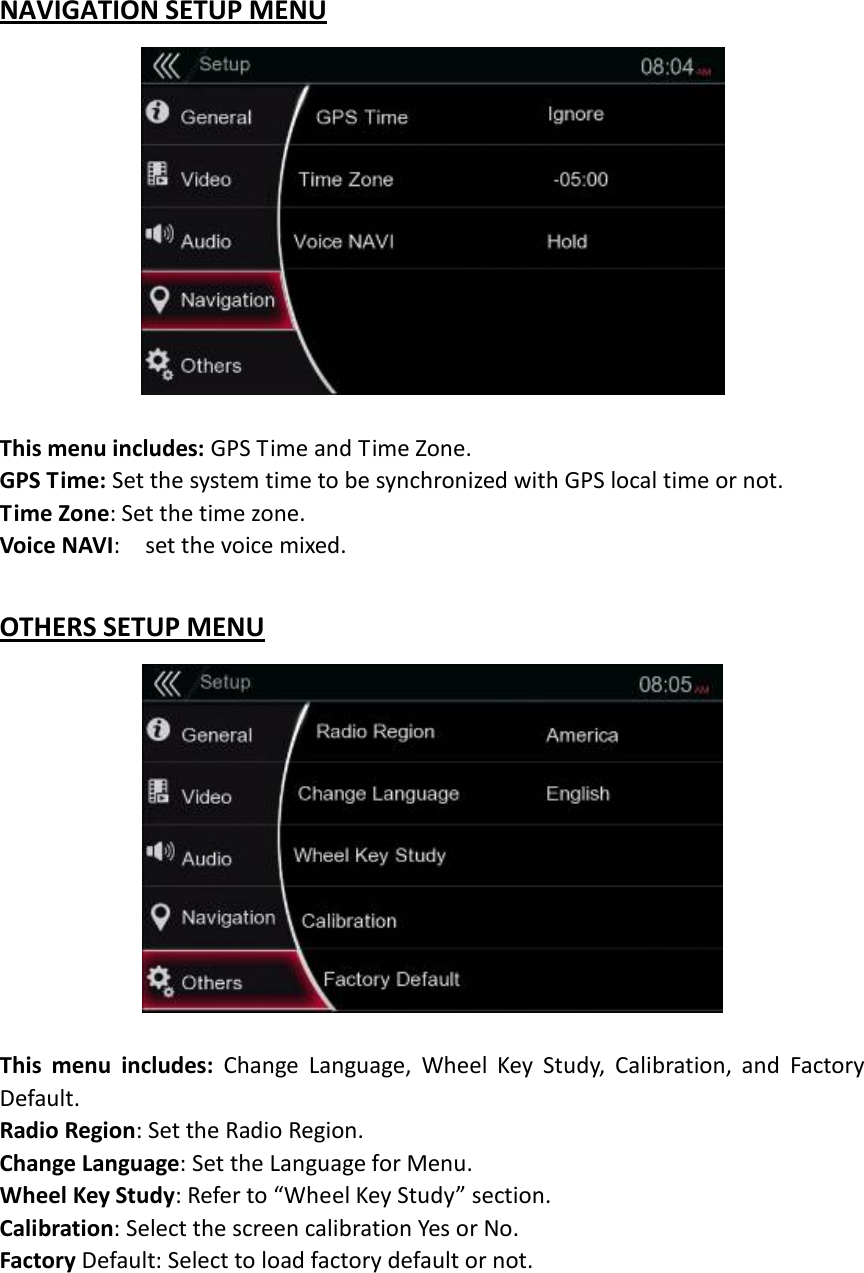
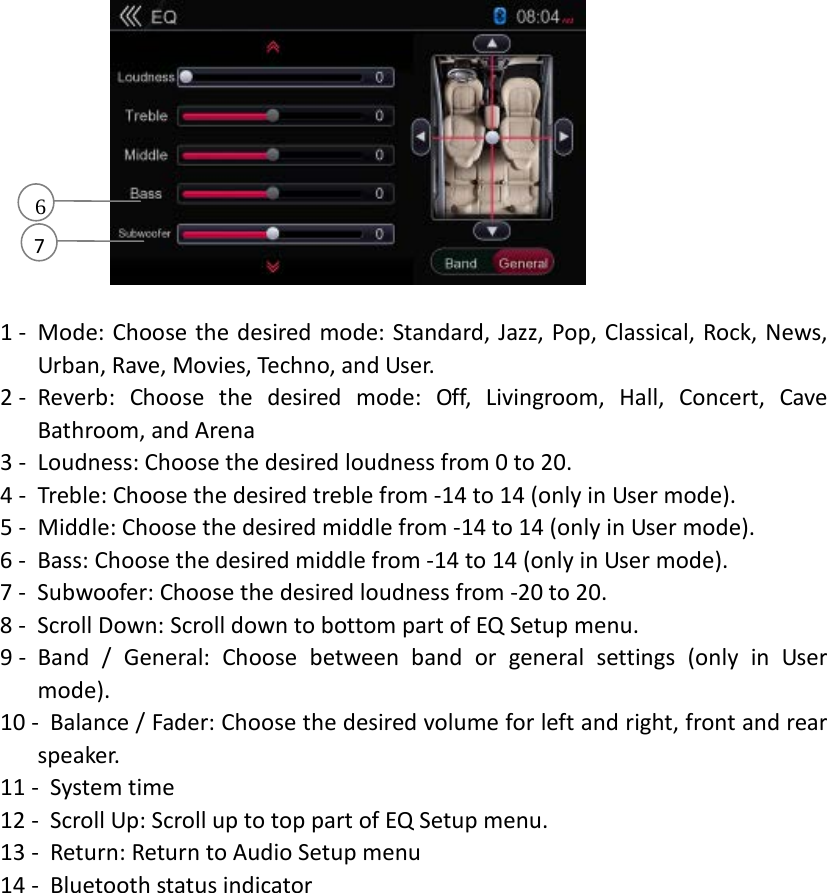
![AAUUDDIIOO SSEETTUUPP 1. Touch [Setup] button on the Main Menu screen. The Setup Menu screen will be displayed. 2. Touch [Audio] button. 3. Touch [EQ] button. EQ SETUP MENU This menu includes Mode, Reverb, Loudness, Treble, Middle Bass and Subwoofer. 2 3 1 5 10 4 9 11 8 13 12](https://usermanual.wiki/Furrion/NV2200/User-Guide-2465643-Page-32.png)
![UUSSBB AAUUDDIIOO OOPPEERRAATTIIOONNSS Notes on Using USB Memory Device General notes When no support files, the file list display nothing. Notes on the Audio files This system can play the MP3 / WMA files stored in the USB memory. MP3 files Format: MPEG1 / 2 Audio Layer 3 Bit Rate: 16 – 320kbps (VBR) Sampling Frequency: 8 / 12 / 16 / 24 / 32 / 44.1 / 48kHz File Extension: .MP3 or .mp3 Notes on the Folder Structure The folder hierarchy must be within 8 hierarchical levels. Otherwise, playback may be impossible. The maximum allowable number of folders is 512 (including root directory and folders with no MP3 files, WMA files). The maximum allowable number of files in a folder is 255. You can store the MP3 files, WMA files together in a folder. The system may become slow if the files or folders exceed the limitable above. Notes on the Tag Titles The limitations on the Tag Titles are same as those in Disc Audio Player mode. SELECT USB AUDIO MODE Connect your USB memory with video files to the USB connector. The system will automatically detect the connected device, and the [USB Audio] button on Main Menu will be enabled. When an USB memory is already connected Touch [USB Audio] button to select the USB Audio mode. The system changes to the USB Audio mode and starts playback from the previous position or from the beginning. Note: This system has two USB connectors and can connect two USB. You can select the desired USB by touching the list of USB root menu. This system indicate the USB as “HCD0 USB Hard Disk”, “HCD1 USB Hard Disk” on the](https://usermanual.wiki/Furrion/NV2200/User-Guide-2465643-Page-34.png)
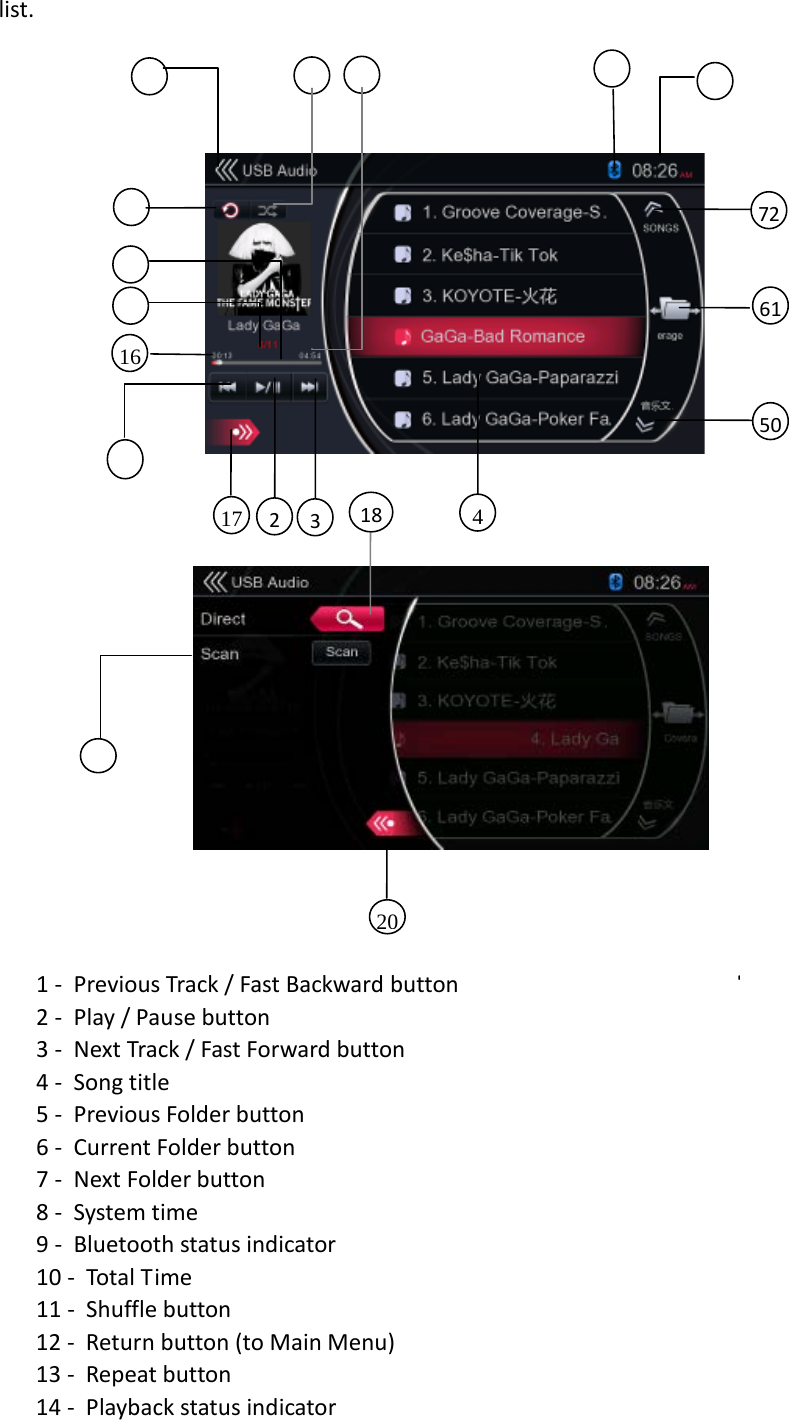
![15 - Album information 16 - Elapsed playing time 17 - Option button 18 - Direct button 19 - Scan button 20 - Close option menu PLAY AUDIO FILES IN USB MEMORY Play / Pause Playback 1. Touch [ ] button to pause during playback. 2. Touch [ ] button again to resume playback. Previous / Next File Switch Touch [] or [] button during playback to play previous / next file. Touch [] button to start playback from the beginning of the next track. Touch [] button to start playback from the beginning of the current track; when this button is touched again within about 5 seconds, playback starts from the beginning of previous track. Fast Forward / Fast Backward Touch [] or [] button and hold more than 2 seconds to start fast backward or fast forward during playback. The playback speed starts at 2x, then will increase to 4x, 8x, and 16x. Release the button will continue playback with normal speed. Note: The fast forward and fast backward speed may differ depending on the audio files. Repeat Playback](https://usermanual.wiki/Furrion/NV2200/User-Guide-2465643-Page-36.png)
![ The repeat set as the factory default is Repeat All. Touch the [ ] button once for Repeat Track, again for Repeat Folder, Repeat All. Shuffle Playback 1. Touch [] button to shuffle the tracks in playing folder during playback. 2. Touch this button again to turn off the feature. Album Art If the current audio file contains album art image in ID3, the picture will be displayed in this area. ID3 Information Area This area display ID3 information of playing file: song title, artist information, album information, number of current file / total number in current folder, elapsed playing time / total time of current file. Skip by Seek Bar Touch [ ] on seek bar and drag it to any position where you want to start playback. Select a Folder on Display List Touch the folder title on the display list, the display list will display files and folders in selected folder. Select a Track on Display List This function allows you to select tracks from a displayed list. 1. Touch the track title on the display list. The selected track will start playing. 2. When the desired track is not displayed, touch and flick the track list up or down. 3. Touch the desired track title button. The corresponding track is started playback. Scan the Tracks 1. Touch [ ] button show [ ] button.](https://usermanual.wiki/Furrion/NV2200/User-Guide-2465643-Page-37.png)
![2. Touch [ ] button during playback. It will play from next track, and each track will display for 10 seconds. The [ ] button will switch to [] button. 3. Touch [] button. It will continue playback from current track. [ ] button will switch to [] button. The function will scan all tracks orderly in current folder once. After scan stopped, playback will continue. Track Number Search This operation allows searching to use the track numbers in playing folder. 1. Touch [ ] button to show [] button. 2. Touch [ ] button. The numerical keypad will appear on screen. 3. Input the track number that you want to playback with [0] to [9] key and touch [ ] button. If the input track number does not exist or searching with a track number is not allowed, the screen image will not change. Touch [] button will close the numerical keypad. Touch [] button will close the option window and display playback screen.](https://usermanual.wiki/Furrion/NV2200/User-Guide-2465643-Page-38.png)
![UUSSBB VVIIDDEEOO OOPPEERRAATTIIOONNSS This system can play USB video files (MP4, 3GP…etc.) stored in an USB memory which is recognized as “USB Mass Storage Class device”. You can use your USB memory as a video device by simply copying desired video files into it. Note: This system will not operate or may operate improperly with some USB memory. Files protected cannot be played. NOTES ON USING USB MEMORIES General Note When there is no support files, the file list display nothing. Note on the Folder Structure The limitations on the folder structure are same as those in USB Audio Player mode. Note on the Folder Structure The limitations on the folder structure are same as those in USB Audio Player mode. Note on the Tag Titles The limitations on the Tag Titles are same as those in CD Player mode. SELECT USB VIDEO MODE Connect your USB memory with video files to the USB connector. The system will automatically detect the connected device, and the [USB Video] button on Main Menu will be enabled. When a USB Memory is already connected Touch [USB Video] button on the Main Menu to select the USB Video mode. The system changes to the USB Video mode and starts playback from the previous position or from the beginning. Note: This system has two USB connectors and can connect two USB. You can select the desired USB by touching the list of USB root menu. This system indicate the USB as “HCD0 USB Hard Disk”, “HCD1 USB Hard Disk” on the list PLAY VIDEO FILES IN USB MEMORY If the video is playing, touch the screen of the playing video to display Operation](https://usermanual.wiki/Furrion/NV2200/User-Guide-2465643-Page-39.png)
![buttons. The display will return to the playback screen, if you do not touch the screen for 10 seconds. 1 - Repeat button 2 - Previous Track / Fast Backward button 3 - Play / Pause button 4 - Next Track / Fast Forward button 5 - Menu List 6 - System time 7 - Playing file information 8 - Return button (to Main Menu) 9 - Elapse playing time indicator / Seek bar Play / Pause Playback 1. Touch [ ] button to pause playback. 2. Touch [ ] button to resume playback. 4 1 2 3 5 9 6 8 7](https://usermanual.wiki/Furrion/NV2200/User-Guide-2465643-Page-40.png)
![Previous / Next File Switch Touch [] or [ ] button during playback to play previous/next file. Touch [ ] button to start playback from the beginning of the next file Touch [ ] button to start playback from the beginning of the current file, when this button is touched again within about 5 seconds, playback starts from the beginning of previous file. Repeat Playback The repeat set as the factory default is Repeat All. Touch the [ ] button once for Repeat File, again for Repeat Folder, again for Repeat All. Skip by Seek Bar Touch the [ ] on seek bar and drag it to any position where you want to start playback.](https://usermanual.wiki/Furrion/NV2200/User-Guide-2465643-Page-41.png)
![Switch USB Video Menu Touch [] button playback will be paused, and the screen will switch to USB Video List. 1 - Previous File / Fast Backward button 2 - Play / Pause button 3 - Next File / Fast Forward button 4 - Video files in list 5 - Next Folder button 6 - Current Folder button 7 - Previous Folder button 8 - System time 9 - Current file information area 16 11 8 12 10 61 3 1 15 5 49 14 2 71 9 13 17 18 19 20](https://usermanual.wiki/Furrion/NV2200/User-Guide-2465643-Page-42.png)
![10 - Total time 11 - Shuffle button 12 - Return button (to Main Menu) 13 - Repeat button 14 - Playback status information 15 - Album information 16 - Elapsed playing time 17 - Option button 18 - Direct button 19 - Scan button 20 - Close option menu button Play / Pause Playback On USB Video menu screen, playback status is paused. Touch [ ] button to resume playback. The screen will go to video screen automatically. Previous / Next File Switch Touch [ ] or [ ] button during playback to play previous/next file. Touch [ ] button to start playback from the beginning of the next file. Touch [ ] button to start playback from the beginning of the current file, when this button is touched again within about 5 seconds, playback starts from the beginning of previous file. Repeat Playback The repeat set as the factory default is Repeat All. Touch the [ ] button once for Repeat File, again for Repeat Folder, again for Repeat All. Shuffle Playback 1. Touch [] button to shuffle the tracks in playing folder during playback. 2. Touch this button again to turn off the feature.](https://usermanual.wiki/Furrion/NV2200/User-Guide-2465643-Page-43.png)
![Current File Information Area This area displays information of current video file: file name, number of current file/total number in current folder, elapsed playing time/total time of current file. Skip by Seek Bar Touch [ ] on seek bar and drag it to any position where you want to start playback. Select a Folder on Display List This operation is same as USB Audio mode. Select a File on the Display List This operation is same as USB Audio mode. Scan the Files This operation is same as USB Audio mode. Search with the File Number This operation is same as USB Audio mode. This system can play USB picture files (JPG, BMP…etc.) stored in an USB memory](https://usermanual.wiki/Furrion/NV2200/User-Guide-2465643-Page-44.png)
![which is recognized as “USB Mass Storage Class device”. You can use your USB memory as a picture device by simply copying desired picture files into it. PLAY PICTURE FILES IN USB MEMORY In USB Video mode touch the folder with picture files, for example [ ] in below case. Current File Information Area This area displays information of current picture file: file name, number of current file/total number in current folder.](https://usermanual.wiki/Furrion/NV2200/User-Guide-2465643-Page-45.png)
![1 - Magnify button 2 - Previous Picture button 3 - Menu List 4 - Next Picture button 5 - Minify button Previous / Next Picture Switch Touch [] or [ ] button during playback to play previous/next picture. Touch [ ] button to start playback of the next picture. Touch [ ] button to start playback of previous picture. Magnify / Minify Picture Touch [] or [ ] button during playback to magnify or minify current picture. Touch [ ] button to magnify the picture. Touch [ ] button to minify the picture. 1 2 3 4 5](https://usermanual.wiki/Furrion/NV2200/User-Guide-2465643-Page-46.png)
![BBLLUUEETTOOOOTTHH AAUUDDIIOO PPLLAAYYEERR OOPPEERRAATTIIOONNSS Some Bluetooth-enabled phones have audio features, and some portable audio players support the Bluetooth feature. These devices will be called as “Bluetooth Audio Players” in this manual. This system can play audio data stored in a Bluetooth Audio Player. Note: This system will not operate or may operate improperly with some Bluetooth Audio Players. SELECT THE BLUETOOTH AUDIO MODE 1. Touch the [Bluetooth Audio] button to select the Bluetooth Audio mode. The system changes to the Bluetooth mode. If the connection with a Bluetooth Audio Player has already been established, you may select the Music function. When the connection with blue icon a Bluetooth Audio Player has been established, the [ ] icon is displayed at the top of the screen.](https://usermanual.wiki/Furrion/NV2200/User-Guide-2465643-Page-47.png)
![BLUETOOTH AUDIO PLAYER SETTINGS You can confirm various information concerning about the Bluetooth interface features. 1. Touch the [ ] button to display the information on the screen. 2. When you finish confirming the Bluetooth information, touch the [ ] button to return to the previous screen. If you want to change the Pin Code setting of this unit, perform the following steps. The factory default setting is “0000”. 3. Touch the text box of the Pin Code item to display the numerical keypad screen.](https://usermanual.wiki/Furrion/NV2200/User-Guide-2465643-Page-48.png)
![4. Enter your desired 4-digit Pin Code, and then touch the [ ] button. REGISTER THE BLUETOOTH AUDIO PLAYER (PAIRING) You can register up to 5 Bluetooth Audio Players. 1. Turn on the power of the Bluetooth Audio Player you wish to register. 2. Touch the device button [ ] to display the Device Select screen. 3. Touch the [] button to display the Inquiring Device screen.](https://usermanual.wiki/Furrion/NV2200/User-Guide-2465643-Page-49.png)
![4. Touch your desired device button and touch [ ] button to register for the Bluetooth Audio Player. When the pairing operation completes, the registered Bluetooth Audio Player is set as the current device, the display will return to the Bluetooth Audio mode screen.](https://usermanual.wiki/Furrion/NV2200/User-Guide-2465643-Page-50.png)
![ To delete the Bluetooth Audio Player registration 1. Touch the [] button to delete the device. A confirmation screen is displayed. 2. Touch the [ ] button to confirm delete. SELECT BLUETOOTH AUDIO PLAYER To change the current Bluetooth Audio Player to the other device which is already registered, perform the following operation. 1. Touch the device button [ ] to display the Device Select screen. 2. Touch the currently connected device button, then touch the [ ] button to disconnect the active device. 3. Touch the desired device button you wish to use. Touch the [ ] button to select it as your active device.](https://usermanual.wiki/Furrion/NV2200/User-Guide-2465643-Page-51.png)
![4. Touch the [ ] button to return to the previous screen. CONTROL THE BLUETOOTH AUDIO PLAYER Note: Occasionally, depending on the environment, playback sounds may be fragmented, or switch noises may be generated. Play Music After the connection with a Bluetooth Audio Player is established, the play mode is automatically engaged. When playback is not started for some devices, touch the [ ] button manually. Pause Playback 1. Touch the [ ] button during playback. 2. To resume playback, touch the [ ] button. Playback resumes. Skip a Track (Search) 3. Touch the [] or [] button during playback. Stop Playback 4. Touch the [ ] button during playback. Tracks are stopped, touch the [] button to playback the first track.](https://usermanual.wiki/Furrion/NV2200/User-Guide-2465643-Page-52.png)
![BBLLUUEETTOOOOTTHH TTEELLEEPPHHOONNEE OOPPEERRAATTIIOONNSS When the connection with your Bluetooth-enabled cellular phone is established, the following functions are available on this system. Listen to your telephone calls on the car speakers. Answer to an incoming call. Make a call using the numerical keypad screen. Make a call using the Phone Book data in the selected cellular phone. Make a call using the history data of the dialed/received calls. Note: Some cellular phones may not be able to transfer the phone book data to system. The phone book data transmission may take a long time. The operations of sending calls are disabled during the data transmission. SELECT THE BLUETOOTH PHONE MODE 1. Touch the [Telephone] button to select the Bluetooth Telephone mode. The Telephone screen is displayed. When no Bluetooth Telephone is connected, the [ ] icon is not displayed at the top of the screen. When the connection with a Bluetooth Telephone has been established, the icon [] is displayed at the top of the screen.](https://usermanual.wiki/Furrion/NV2200/User-Guide-2465643-Page-53.png)
![BLUETOOTH TELEPHONE SETTING You can confirm various information concerning about the Bluetooth interface features. 1. Touch the [ ] button to display the information on the screen. 2. Perform setting for the desired item. See the following sections for detail. 3. When you finish confirming the Bluetooth information, touch the [ ] button to return to previous screen.](https://usermanual.wiki/Furrion/NV2200/User-Guide-2465643-Page-54.png)
![Automatic Connection Setting The system automatically reconnects the cellular phone after the connection is lost or the system is restarted. The factory default setting is “ON”. Touch the [] or [] button of the Automatic Connection item to set the function ON or OFF. Automatic Answer Setting If a call comes in, answer automatically after 5 seconds. The factory default setting is “OFF”. Touch the [] or [] button of the Automatic Answer item to set the function ON or OFF. REGISTER THE CELLULAR PHONE (PAIRING) You can register up to 5 cellular phones. The register method is same as “Register The Bluetooth Audio Player”. 1. Turn on the power of the cellular phone you wish to register. 2. Touch the device button [ ] to display the Device Select screen.](https://usermanual.wiki/Furrion/NV2200/User-Guide-2465643-Page-55.png)
![3. Touch the [ ] button to display the Inquiring Device screen.](https://usermanual.wiki/Furrion/NV2200/User-Guide-2465643-Page-56.png)
![4. Touch your desired cellular button to select the button for the cellular phone to be registered, and touch [ ] button to register for the Bluetooth cellular phone. When the pairing operation completes, the registered cellular phone is set as the current telephone, and the display returns to the Telephone screen. To delete the Bluetooth Audio Player registration 1. Touch the [] button to delete the device. A confirmation screen is displayed.](https://usermanual.wiki/Furrion/NV2200/User-Guide-2465643-Page-57.png)
![2. Touch the [ ] button to confirm delete. SELECT THE CELLULAR PHONE To change the current cellular phone to the other device which is already registered, perform the following operation. 1. Touch the [ ] button to display the Device Select screen. 2. Touch the currently connected device, then touch [ ] button to disconnect the active device. 3. Touch the desired device button you wish to use. Touch [ ] button to select it as your active device. 4. Touch the [] button to return to the previous screen. OBTAIN PHONE BOOK DATA Sending the phone book data from the cellular phone enables you to make a call using the phone book function from this system. TELEPHONE OPERATIONS Make a call using the numerical keypad 1. Touch the [] button to display the numerical keypad screen. 2. Enter the telephone number by using the numerical keypad displayed on screen.](https://usermanual.wiki/Furrion/NV2200/User-Guide-2465643-Page-58.png)
![3. Touch the [ ] button to call the entered number. The following Telephone Interrupt screen is displayed during phone call. Touch the [ ] button to talk by using the cellular phone and cancelling the hands-free function (Private mode). Touch the [ ] button to mute the microphone. Now you can hear the other side, but the other side cannot hear you. 4. When the call is finished, touch [ ] button to hang up. Note: Depending on some special cellular phone, the Telephone Interrupt screen may be closed and the connection with this system may be disconnected when entering the Private mode.](https://usermanual.wiki/Furrion/NV2200/User-Guide-2465643-Page-59.png)
![Make a call using the Phone Book You can use the phone book data obtained from the cellular phone to make a call from this system. Note: Before using this function, the phone book data must be sent from the cellular phone. Only the phone book items with at least one telephone number registered in the captured phone book data are displayed on the Phone Book screen. 1. Touch the [ ] button to display the Phone Book screen. 2. Touch the desired name button you wish to dial. Flick the list up and down to scroll the list. 3. Touch the [ ] button to call the specified number. The Telephone Interrupt screen is displayed, and calling starts. When the call is finished, touch the [] button to hang up. Make a Call using History The system will memorize the dialed/received calls record data in the memory. You can confirm it and use it to make a call from this system. 1. Touch the [ ] or [ ] or [ ] button. The Dialed, Received or Missed Calls List screen is displayed. Flick the list up and down to scroll the list. 2. Touch the desired item key you wish to dial. 3. Touch the [] button to call the specified number. The Telephone Interrupt screen is displayed, and calling starts. When the call is finished, touch the [ ] button to hang up. Answer an Incoming Call When a call comes in, the following Telephone Interrupt screen appears.](https://usermanual.wiki/Furrion/NV2200/User-Guide-2465643-Page-60.png)
![You can answer to the incoming call on this system by the following operation. 1. Touch the [ ] button to answer the call. 2. When the call is finished, touch the [ ] button to hang up. RRAADDIIOO OOPPEERRAATTIIOONNSS Listen to the Radio 1. Touch the [Radio] button on the Main Menu display. The Radio mode screen is displayed. 2. Touch the [FM1/FM2/FM3/AM1/AM2] button to select the radio band. Each time the button is touched, the radio reception band changes in the following order: FM1 -> FM2 -> FM3 -> AM1 -> AM2 -> FM1….](https://usermanual.wiki/Furrion/NV2200/User-Guide-2465643-Page-61.png)
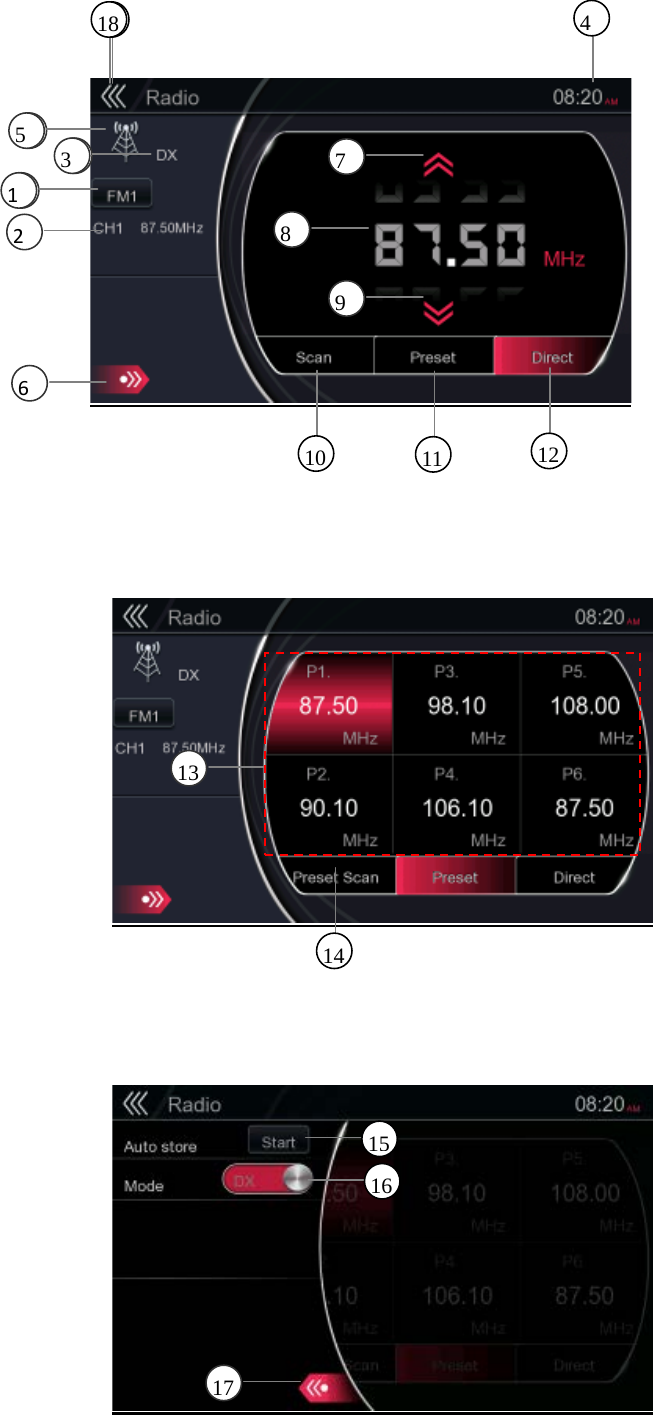
![1 - Band button 2 - Current Channel indicator 3 - DX/Local indicator 4 - System time 5 - Signal Strength indicator 6 - Option button 7 - Seek Up button 8 - Current Frequency display 9 - Seek Down button 10 - Radio station scanning,click this button to search station starting with the current frequency and the station researching work would go on after 10 seconds. 11 - [ ]-preset button. If the current page is in the preset station store mode (This button shows in highlighted red color), the click of the button would show nothing,if the current page is the direct mode (The button shows in red color), the click of the button will switch the page into preset station store state. 12 - [ ]-If the current page is in the direct state(This button shows in red color), the click of the button would show nothing,if the current page is in the preset station state,the click of the button will switch the page into direct state. 13 - Frequencies display 14 - Preset Scan button 15 - Auto Store setting 16 - DX/Local Setting 17 - Close option menu button 18 - Return button (to Main Menu) Seek Tuning 1. Touch the [FM1 / FM2 / FM3 / AM1 / AM2] button to select the radio band (FM or AM). 2. Touch the [ ] or [ ] button. When touch the [ ] button, the station is searched in the direction of higher frequency. When touch the [ ] button, the station is searched in the direction of lower frequency.](https://usermanual.wiki/Furrion/NV2200/User-Guide-2465643-Page-63.png)
![Recall a Preset Station 1. Touch the [FM1 / FM2 / FM3 / AM1 / AM2] button to select the desired band (FM or AM) on the radio. 2. Touch [] button to display the preset list, touch the preset station (1 to 6). Manual Memory 1. Touch the desired band button to select the band you wish to store. 2. Tune to a station you want to store using the step tuning or preset tuning. 3. Touch and hold the desired Preset button you want to store for about 2 seconds. Auto Store The Auto Store is a function for storing up to 6 stations that are automatically searched in sequentially. If the number of receivable stations cannot reach to 6, the previous stored station remains. 1. Touch the [FM1 / FM2 / FM3 / AM1 / AM2] button to select the desired band (AM or FM). 2. Touch the [ ] button, and then touch the [ ] button to start the Auto Store. A beep sounds and the stations with good reception are stored automatically to the preset list. Note: After Auto Store, the previous stored stations will be overwritten. Preset Scan The Preset Scan receives the stations stored in the preset memory in order. This function is useful when searching for the desired station in memory. 1. Touch the [FM1 / FM2 / FM3 / AM1 / AM2] button to select the desired band. (FM or AM)](https://usermanual.wiki/Furrion/NV2200/User-Guide-2465643-Page-64.png)
![2. Touch the [Preset Scan] button to start the Preset Scan. The system starts scanning each station for 10 seconds sequentially. But the station stored is not a valid station, the scanning time is only 2 seconds. 3. When the desired station is tuned in, touch the [Preset Scan] button again to stay in that station. DX/Local Setting The DX/Local setting changes the radio sensitivity in order to separate closely spaced stations. This feature is useful in areas that have many radio stations in close proximity.](https://usermanual.wiki/Furrion/NV2200/User-Guide-2465643-Page-65.png)
![AAUUXX External audio/video devices, including a game console, camcorder, navigation unit…etc. can be connected to the AUX connector on the front or back of this system using the A/V media cables. Switch to AUX IN Touch [AUX1] or [AUX2] button on the Main Menu to select desired mode. If the external device connected to AUX input have audio signal, the system will broadcast audio of external device. You cannot directly control external devices connected to AUX input.](https://usermanual.wiki/Furrion/NV2200/User-Guide-2465643-Page-66.png)
![CCAAMMEERRAA IINNPPUUTT OOPPEERRAATTIIOONNSS Switch to Camera mode Touch [Camera] button on Main Menu. The screen will display the external camera video. The screen will display “NO VIDEO SIGNAL” message, if a valid camera is not connected to this system. Note: If the reverse cable is connected correctly to the vehicle or Furrion Multiplexer, the system goes to camera mode automatically when the reverse signal or left/right signal (only for Furrion Multiplexer) is turned on.](https://usermanual.wiki/Furrion/NV2200/User-Guide-2465643-Page-67.png)
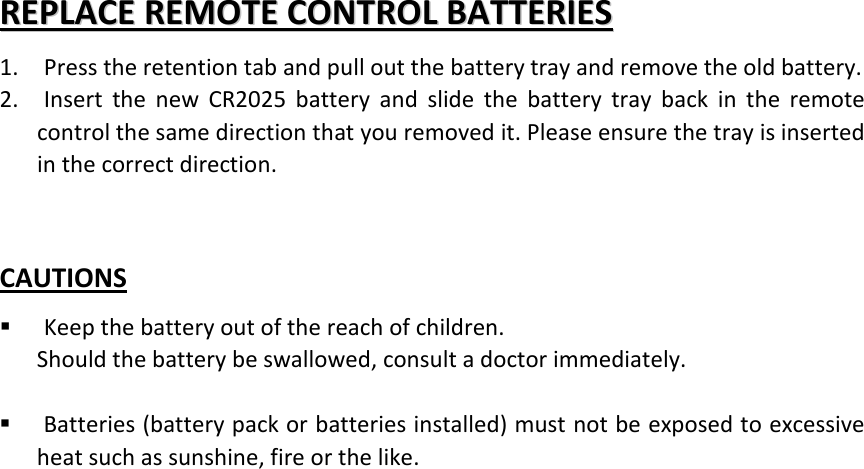
![SSEETTUUPP OOPPEERRAATTIIOONNSS Touch the [Setup] button on the Main Menu screen. The Setup menu screen will be displayed. GENERAL SETUP MENU Time Clock: Set system clock.](https://usermanual.wiki/Furrion/NV2200/User-Guide-2465643-Page-68.png)