User Manual
N
NV
V2
22
20
00
0
N
NA
AV
VI
IG
GA
AT
TI
IO
ON
N
S
SY
YS
ST
TE
EM
M
O
OW
WN
NE
ER
R’
’S
S
M
MA
AN
NU
UA
AL
L

P
P
PR
R
RE
E
EC
C
CA
A
AU
U
UT
T
TI
I
IO
O
ON
N
NS
S
S
1. Read these instructions entirely.
2. Keep these instructions. Whoever uses the unit should have access to this manual.
3. Heed all warnings. Follow all instructions.
4. This unit is designed to be used in a vehicle with 12V DC battery and negative
ground.
5. Do not operate the unit in any other way than described in this manual. Failure to
follow the instructions within this manual may void your warranty.
6. Do not disassemble or alter the unit in any way, because it will void your warranty.
Do not attempt to repair or to service the unit yourself.
7. Use only original accessories which are designed and manufactured for the unit
otherwise you will risk damage. Install the unit according to the mounting manual by
using the supplied mounting accessories. The forces of acceleration for accidents are
sometimes huge. Incorrect mounted units are a big risk for the driver and the car
passengers, during an accident.
8. Protect the unit from water and other liquids, which can enter the casing. A short
circuit or even fire could be the result.
9. To prevent a short circuit, never insert or stick any metallic objects (such as coins
or metal tools) into the unit.
10. Before you replace a defective fuse, try to find the cause for the short circuit.
Please pay attention to the cables of the power supply! If the short circuit doesn't
result from a failure of the power supply or wiring, you can replace the defective fuse
with a new one (same values).
11. When connecting to any other device, read its user's guide for detailed safety
instructions. Do not connect incompatible products.
12. Be careful not to drain the vehicle battery while using the unit when the vehicle
engine is turned off. Because the unit uses a considerable amount of energy and the
battery will be charged only while the engine is running, it might happen that the
battery will discharge to a point where it's no longer possible to start the engine.
13. According to the law in different countries, driving with monitors which are
showing movies in the viewing range of the driver is not allowed, because the driver
might be distracted from the traffic. Please respect the traffic regulations of your
country, or you might face penalties in case of an accident or even lose your
insurance coverage. Please pay attention to the volume inside your vehicle, because
you are obliged to notice exterior sounds like ground.
14. Don't expose the unit to hard impacts. A mechanical or electrical malfunction of
the unit could be the result.
15. This unit utilizes a laser class 1. During usage the control or adjust other than
those specified herein may result in hazardous exposure to coherent light. Do not
open covers and do not repair yourself. Refer servicing to qualified personnel.

F
F
FE
E
EA
A
AT
T
TU
U
UR
R
RE
E
ES
S
S
Disc (DVD/CD/VCD)
12 cm disc type supported: DVD-Video, DVD±R/RW, CD-DA, CD-R, and CD-RW.
Support audio format: MP3, Kodak Photo CD, AAC, WMA, M4A.
ID3 tag compatible.
16Mbit electronic shockproof: 3 seconds DVD video / 10 seconds CD audio.
Break-point memory function.
All area code supported.
Functions on DVD: play, pause, stop, previous chapter, next chapter, fast forward,
fast backward, subtitle selection, audio selection, A-B repeat, scene selection.
Functions on CD: play, pause, previous track, next track, random play, repeat play,
track selection.
Functions on VCD: play, pause, previous chapter, next chapter, fast forward, fast
backward, subtitle selection, audio selection, aspect ratio selection, A-B repeat.
Support picture format: JPEG.
Functions on picture: picture selection, automatic play, pause, previous picture,
next picture.
Support video format: MPEG 1 / 2 / 4, AVI, FLV, DAT, VOB, OGM, ASF (support
maximum resolution 720p).
Functions on video: video selection, play, pause, previous video, next video and
aspect ratio selection.
Radio (AM/FM)
USA/Europe/Latin America/Asia Frequency Spacing.
30 station presets (18FM / 12AM).
5 bands (FM1 / FM2 / FM3 / AM1 / AM2).
Automatic search (start at the current frequency to search all FM and AM
stations automatically, 30 of them with the strongest signal would be stored in
the station presets).
Search and play (start at the current frequency to search all FM and AM stations
automatically, every searched station will be played for 10 seconds before
searching for the next station).
Station preset storage (store the current station to a preset memory in a band).
Preset station recall (recall a preset station in a band).
Local / Distance.

Bluetooth
Support HFP, A2DP and AVRCP.
Support external microphone.
Main functions:
• Direct dial (on screen keypad)
• Missed call list
• Received call list
• Dialed call list
• Phone book
• Bluetooth audio (play, pause, previous track, next track)
Functions during phone conversation
• End call
• Transfer to phone (transfer a call back to mobile phone)
• Mute
• Keypad
• Redial
When a call is received, the unit will mute audio output and pause disc play, and
switch to Bluetooth conversation screen.
USB
Support maximum capacity: 32GB.
USB 1.0 and USB 2.0 compatible.
Support audio format: MP3, WAV, AAC, FLAC, WMA, APE.
Functions on audio: play, pause, previous track, next track, random play, repeat
play, track selection.
Support picture format: JPEG, JPG, GIF, PNG, BMP.
Functions on picture: play, pause, previous picture, next picture, picture
selection.
Support video format: MPEG 1 / 2 / 4, XivD, MP4, MOV, AVI, WMV, ASF, FLV, MKV,
VOB, DAT, MP G OGM, RM, RMVB (support maximum resolution 720p).
Functions on video: play, pause, previous video, next video, aspect ratio selection,
video selection.

CHASSIS
Double DIN (mountable).
Fixed front panel.
6.2” high definition TFT LCD.
800 x 3 (RGB) x 480 resolution.
GENERAL
Front / Rear USB input.
Front A/V aux input for portable media.
Front micro SD reader.
Rear composite video and audio output.
Rear subwoofer output.
Rear composite video and audio input.
Rear camera video and audio input.
Touch screen calibration mode.
Steering wheel key controls.
Built-in Bluetooth with microphone, providing Hands-Free operation (dial /
answer / phone book / call list synchronization), and A2DP for streaming audio
from your smartphone or other Bluetooth compatible devices.
Built-in 4 x 25Watt RMS output amplifier.
Automatic antenna control.
Pre Amplifier Control.
NAVIGATION
Only insert the Furrion map SD to use navigation function. For more information
or to purchase maps, please visit: www.furrion.com/maps.
Latest map guarantee (limited time only – within 30 days of initial activation).
CAMERA
When camera and signal wire is connected and operated properly, CAMERA
mode will be activated automatically when there is signal.
Image Display of Automatic Car Reversing Function in Shutdown Mode

I
IN
NS
ST
TA
AL
LL
LA
AT
TI
IO
ON
N
A
AN
ND
D
U
US
SA
AG
GE
E
R
RE
EQ
QU
UI
IR
RE
EM
ME
EN
NT
TS
S
Operation temperature: -20 to +70 degree Celsius.
Operation humidity: 45 to 80% relative humidity.
Storage temperature: -30 to +80 degree Celsius.
Storage humidity: 30 to 90% relative humidity.
Atmospheric pressure: 860 to 1,060 mbar.
Operation voltage: 10.5 – 16.0V DC, negative ground.
Fuse: 15-amps.
Standby current: ACC OFF ≤5mA.
DIN chassis dimensions: 178mm x 153mm x 100mm.
O
OP
PE
ER
RA
AT
TI
IO
ON
NA
AL
L
P
PA
AN
NE
EL
L
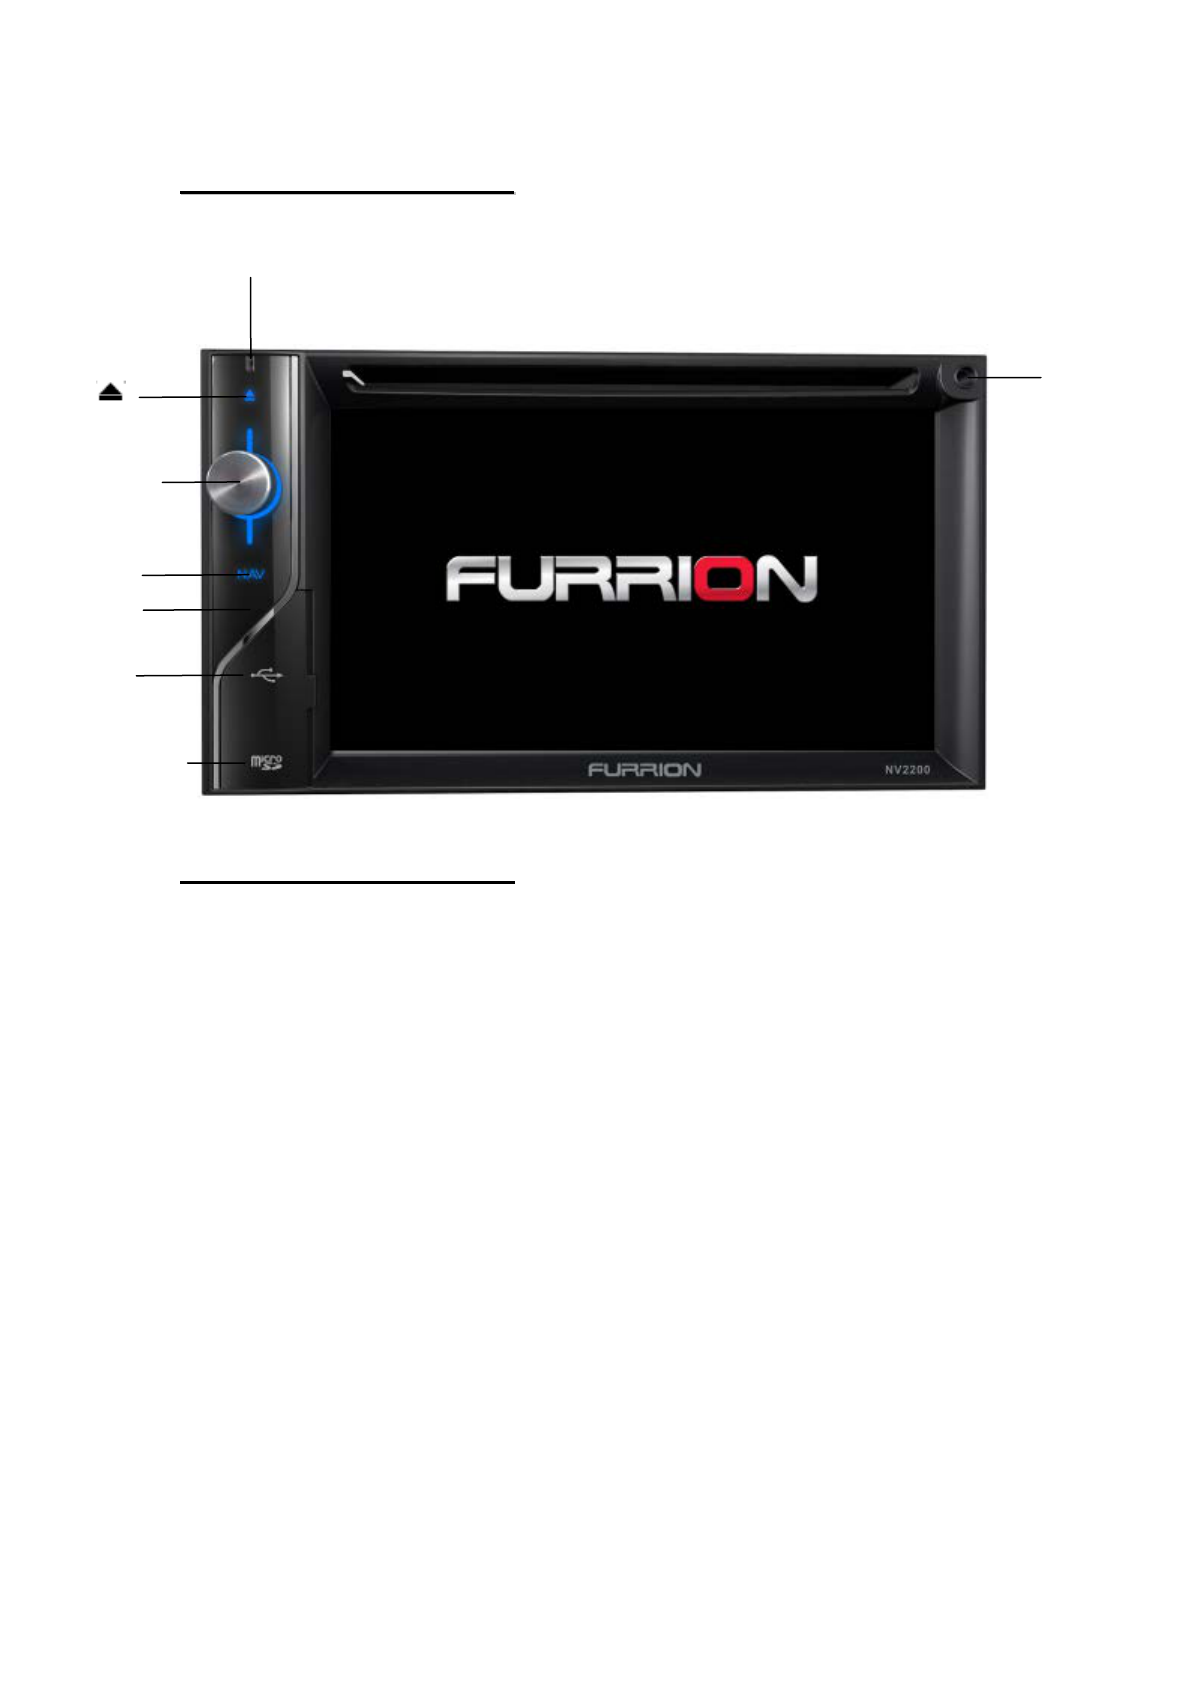
FUNCTIONS OF BUTTONS
[MICROPHONE]
This is used for Bluetooth phone.
[IR] SENSOR
Receiver for the remote control unit
[MICRO SD SLOT]
Note – The micro SD card is only for navigation purpose, please do not insert
micro SD card for other purposes. When the navigation function is activated,
do not remote micro SD card.
[POWER / VOL] KNOB
Press this knob to turn on the power.
Press this knob for more than 2 seconds to turn off the power.
Turn this knob clockwise or counter-clockwise to increase or decrease the
volume of the system.
[NAVI] BUTTON
Press this button to activate navigation function, press again to return to
current source.
[NAVI]
[USB]
[ ]
[RESET]
[MICRO SD SLOT]
[COVER]
[POWER/VOL]

[] EJECT
Press to eject the disc from the unit.
[AUX IN]
AUX connector on front panel.
[USB] PORT
USB connector
[RESET] BUTTON
Press this button to reset the unit in hardware.
R
RE
EM
MO
OT
TE
E
C
CO
ON
NT
TR
RO
OL
L
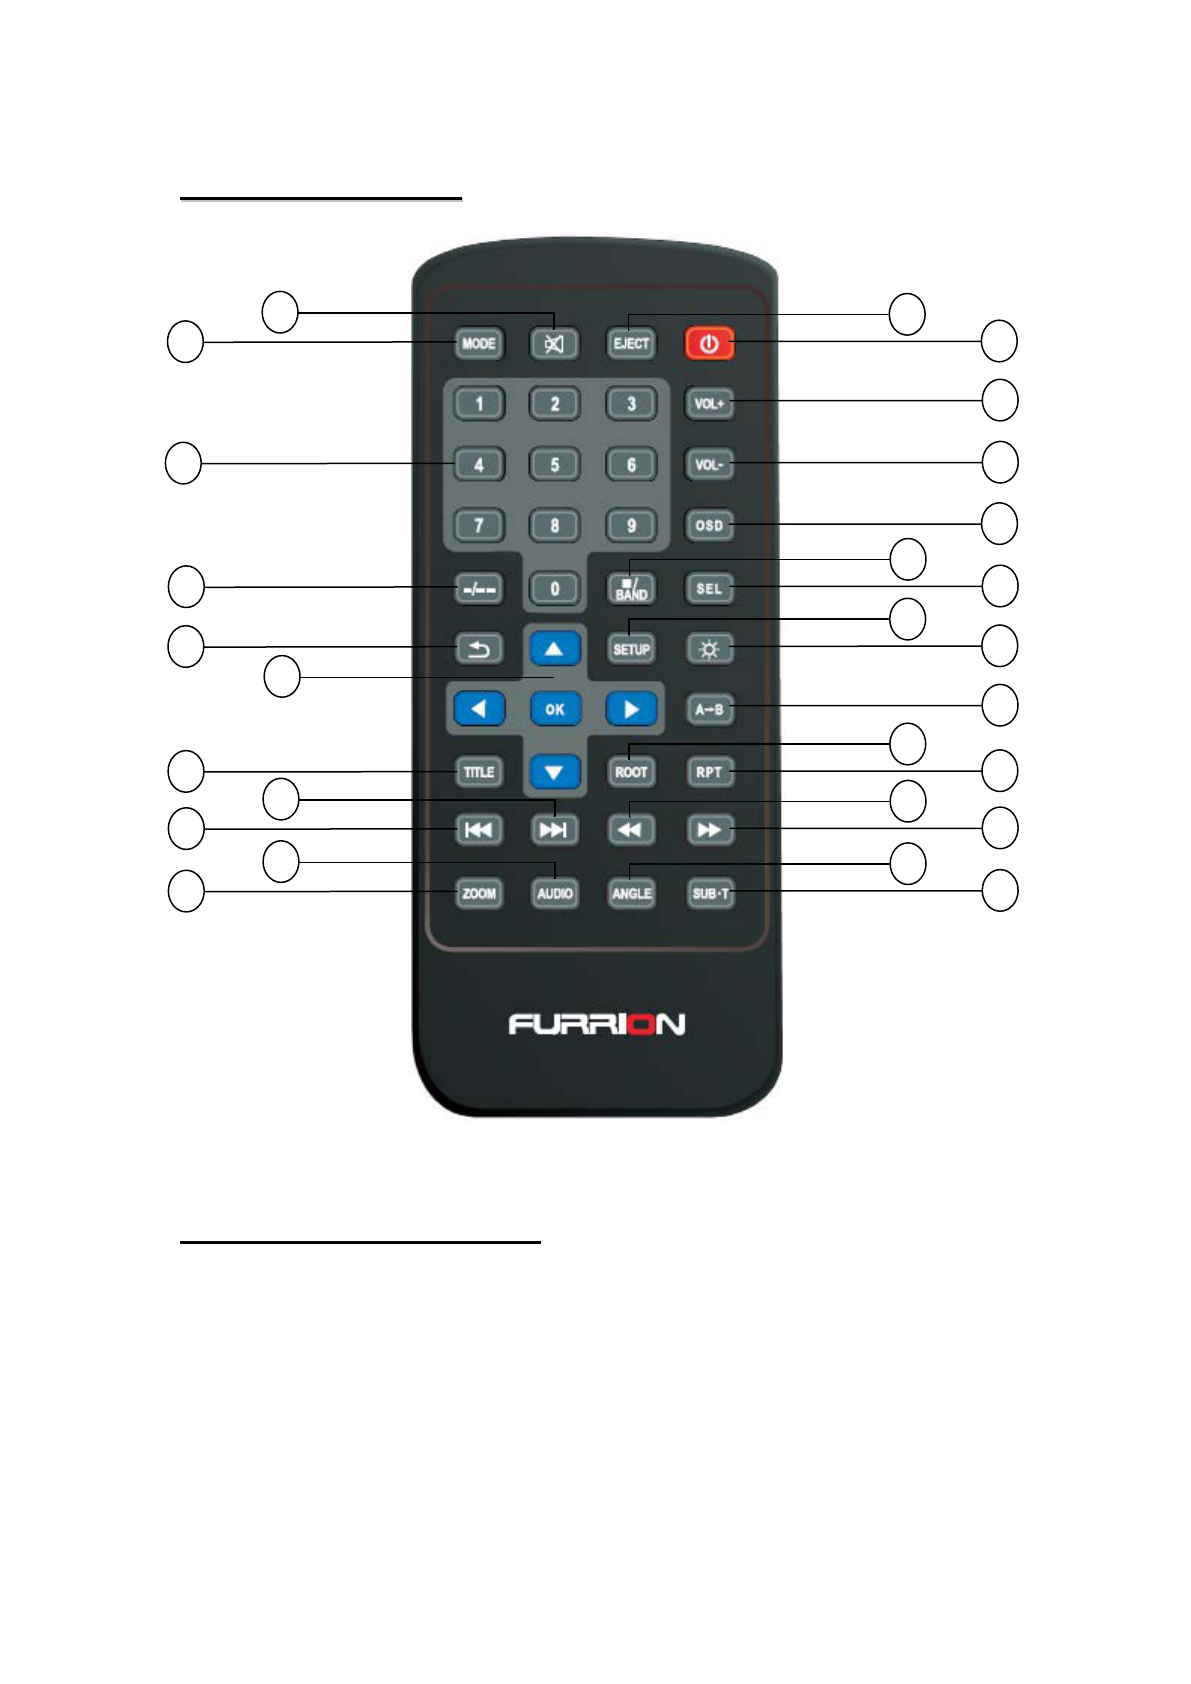
REMOTE CONTROL FUNCTIONS
1 - [POWER] Button
• Press this button to power on when the unit is power off.
• Press this button more than 1 second to power off when the unit is
power on.
2 - [EJECT] Button
• Press to eject disc from the unit.
3 - [MUTE] Button
• Mute or unmute the speaker.
2
1
3
4
6
7
8
11
10
9
14
15
12
16
13
18
17
19
22
23
21
20
25
24
26
27
5

4 - [MODE] Button
• Press this button to switch between sources.
5 - [0 – 9] Buttons
• Use in the key pad screen to select the radio.
• Use to select the track in the track list screen.
• Press to enter DVD video chapters/titles in the key pad screen.
6 - [VOL+] Button
• Increase volume.
7 - [VOL-] Button
• Decrease volume.
8 - [OSD] Button
• Press to enter on screen display on DVD mode.
9 - [SEL] Button
• Press to enter audio setting.
10 - [STOP/BAND] Button
• Short Press to stop video and audio media.
• Long press to switch to next band alternately.
11 - [SEARCH] Button
• Press this button to open chapter or title search window while playing
DVD and USB.
12 - [BACK] Button
• Press this button to quit main menu if current screen is main menu.
13 - [UP/DOWN/LEFT/RIGHT/OK] Buttons
• Press UP/DOWN/LEFT/RIGHT for cursor movement in main menu or
setting mode.
• From the main menu, you can select your desired source or change your
settings.
• Press OK to fix the entered data in the key pad screen or enter the item
the cursor is on.
14 - [SETUP] Button
• Press this button to enter the main setting menu or return current
resource.
15 - [PIC] Button
• Press this button to enter monitor brightness setting.
16 - [A-B] Button
• Press to start demo playback from A to B.
17 - [RPT] Button
• Press to perform chapter repeat / title repeat / repeat off while playing
DVD mode.
• Press to perform repeat track / repeat all while playing CD.
• Press to perform repeat track / repeat folder / repeat all while playing
audio or video files on disc.
• Press to perform repeat track / repeat folder / repeat all while playing
audio or video files in USB memory.

18 - [ROOT] Button
• Press to go to the root menu on the DVD.
19 - [TITLE]
• Press to go to the title menu on the DVD.
20 - [PREVIOUS] Button
• Press to seek the next available lower station in Tuner mode.
• Press to select the next lower chapter number in DVD video mode.
• Press to select the next lower track in CD, USB Video, USB Audio mode.
21 - [NEXT] Button
• Press to seek the next available higher station in Tuner mode.
• Press to select the next higher chapter number in DVD video mode.
• Press to select the next higher track in CD, USB Video, USB Audio mode.
22 - [FAST BACKWARD] Button
• Press to manually select the next lower station in Tuner mode.
• Press to perform fast-backward searching. Press again to change the
speed to 2X, 4X, 8X or 16X.
23 - [FAST FORWARD] Button
• Press to manually select the next higher station in Tuner mode.
• Press to perform fast-forward searching. Press again to change the
speed to 2X, 4X, 8X or 16X.
24 - [SUB-T] Button
• Press to switch next available subtitle while playing DVD.
25 - [ANGLE] Button
• Press to switch the different angle while playing DVD. (Not all DVD disc
support this function).
26 - [AUDIO] Button
• Press to switch the audio channel of the disc while playing DVD.
27 - [ZOOM] Button
• Press to turn on and zoom in while playing DVD. You can zoom in up to
3X (Not all DVD disc support this function).
W
WH
HE
EE
EL
L
K
KE
EY
Y
S
ST
TU
UD
DY
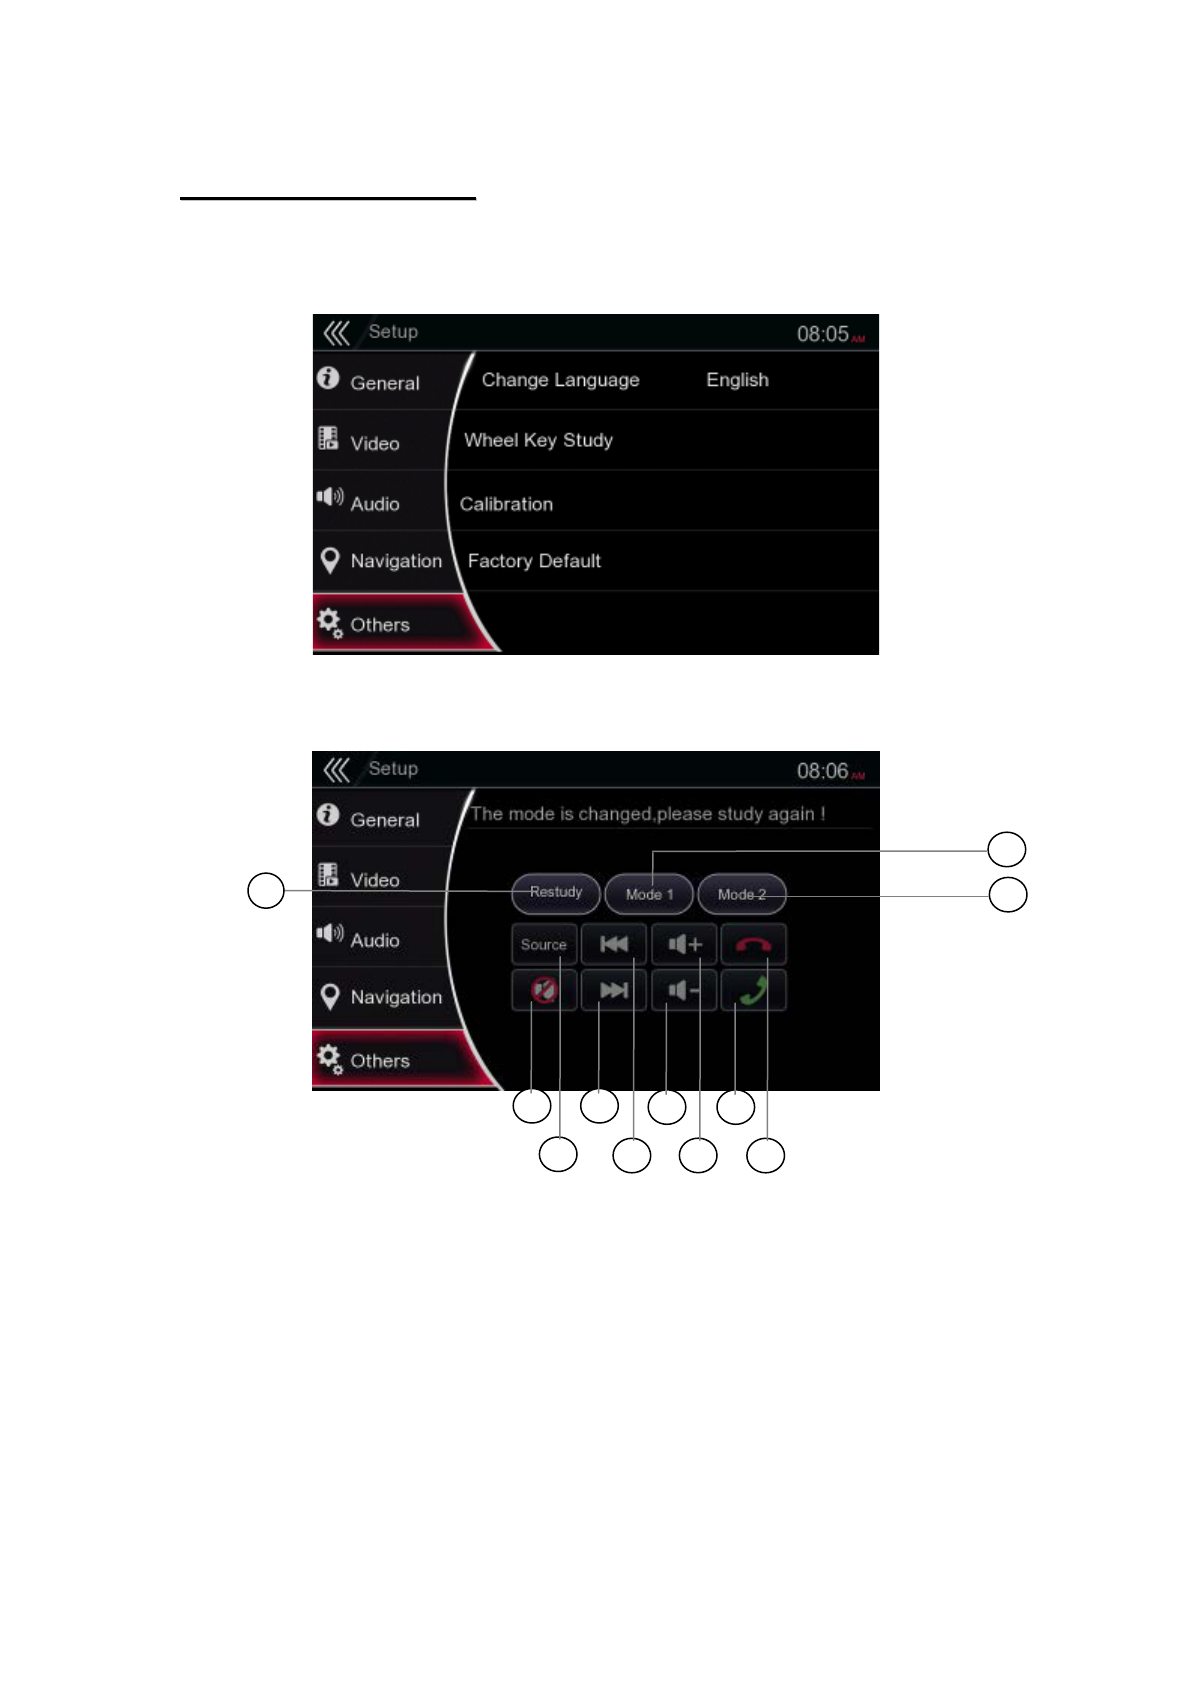
Y
1. Touch the [setup] button on the Main Menu.
2. Touch the [Others] button. The below menu is displayed.
3. Touch the [Wheel Key Study] button. The below menu will be displayed.
1 - Restudy
2 - Mode 1
3 - Mode 2
4 - Source
5 - Previous
6 - Volume +
7 - End a call
8 - Mute
9 - Next
10 - Volume -
11 - Call
2
3
1
5
9
8
10
11
4
6
7
M
MA
AI
IN
N
M
ME
EN
NU
U
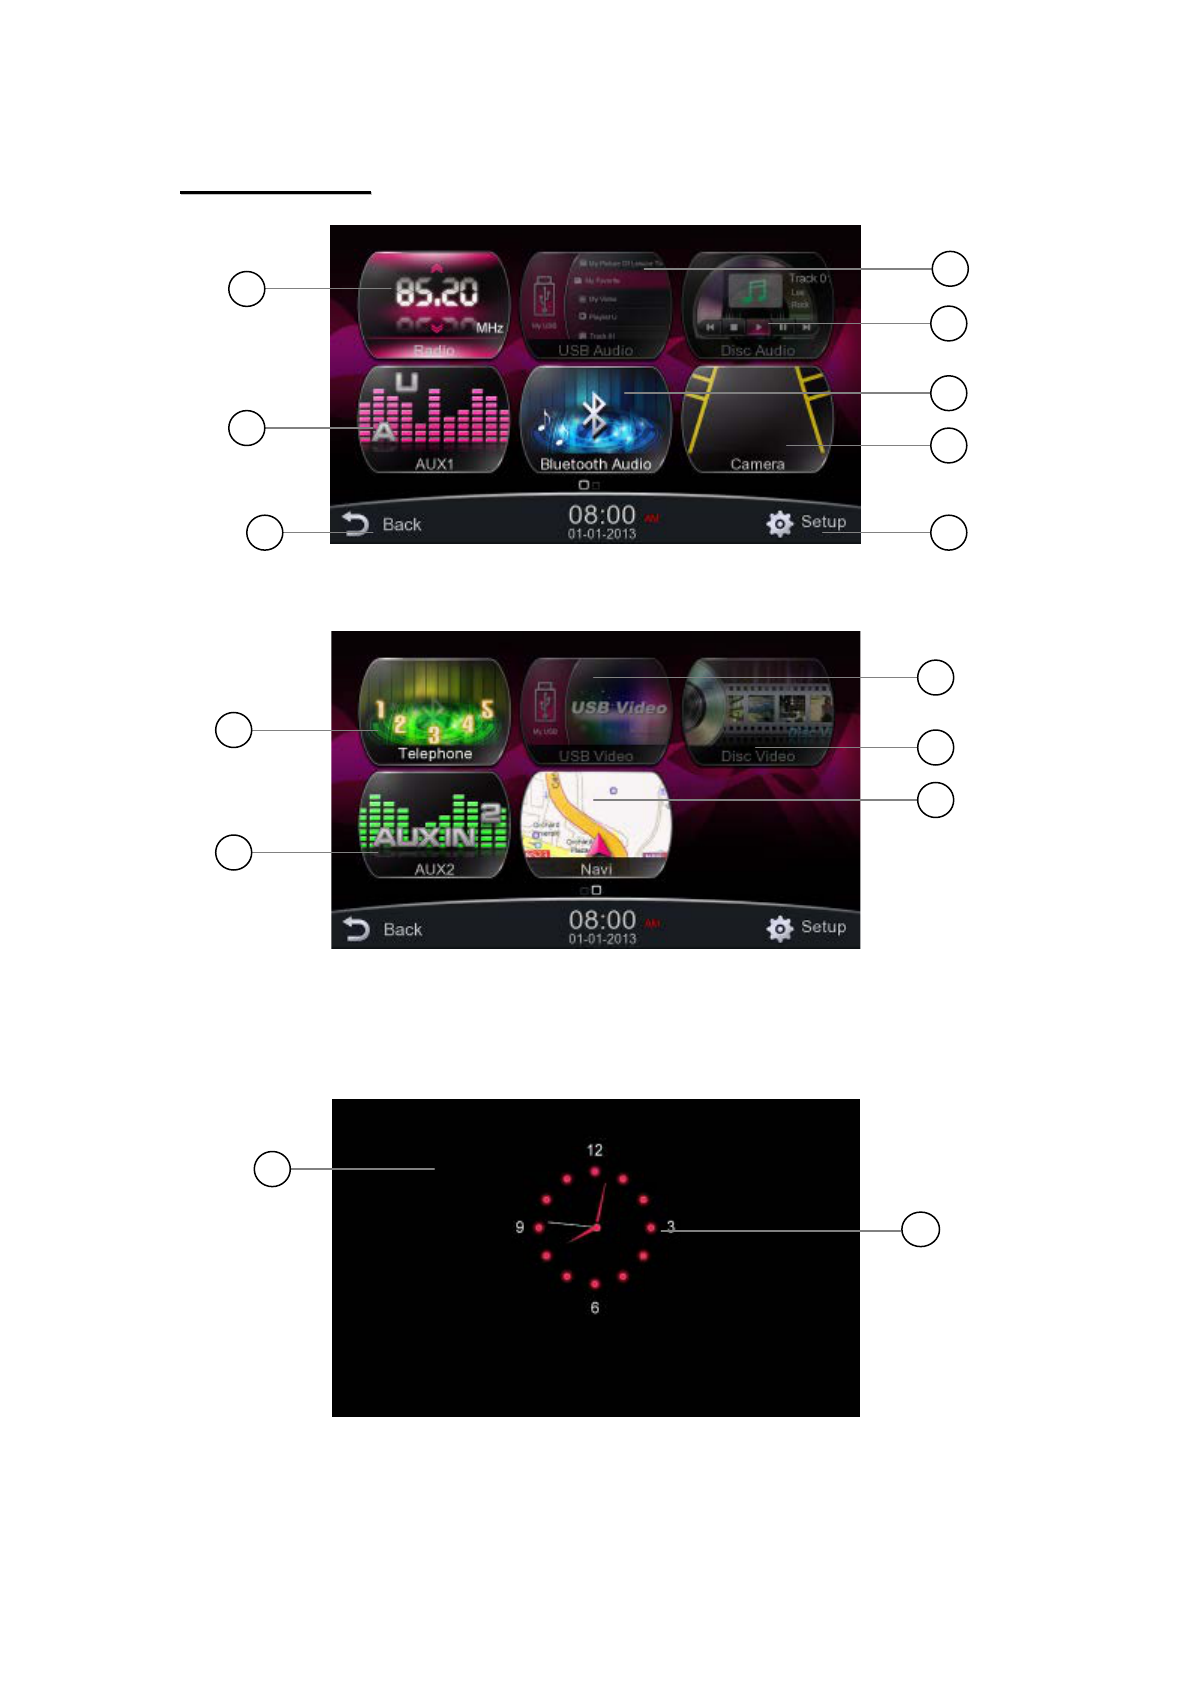
1 - Radio --- Touch the button to display the Radio mode.
2 - AUX1 --- Touch the button to display the AUX1 mode.
14
15
1
2
7
3
4
5
6
8
9
11
13
12
10

3 - USB Audio --- Touch the button to display the USB Audio mode.
4 - Disc Audio --- Touch the button to display the Disc Audio mode.
5 - Bluetooth Audio --- Touch the button to display the Bluetooth Audio mode.
6 - Camera --- Touch the button to display the Camera mode.
7 - Back --- Touch the button to display current play mode.
8 - Setup --- Touch the button to display the Setup menu.
9 - Telephone --- Touch the button to display the Telephone mode.
10 - AUX2 --- Touch the button to display the AUX2 mode.
11 - USB Video --- Touch the button to display the USB Video mode.
12 - Disc Video --- Touch the button to display the Disc Video mode.
13 - Navi --- Touch the button to display the Navigation mode.
14 - Background --- Touch the background to display the Main Menu.
15 - Clock
SCROLLING THE MENU
Flicking to right or left it will switch to next or previous page of Main Menu.
MOVING THE ICON POSITION
1. Touch any icon on Main Menu more than 3 seconds, the icon will float on Main
Menu.
2. Scrolling the floating icon to any position you want.

D
DI
IS
SC
C
V
VI
ID
DE
EO
O
P
PL
LA
AY
YE
ER
R
O
OP
PE
ER
RA
AT
TI
IO
ON
NS
S
DVD SYSTEM SETUP
Note: If the setup operation is made in the middle of DVD video play, the disc will
re-start from the beginning.
WATCH A DISC
1. To read a disc:
Insert the disc into the center of the disc insertion slot with label side facing up.
CAUTION – For your safety, the driver should not insert or eject a disc, opening
operation panel while driving.
Note:
Do not insert foreign objects into the disc insertion slot.
If there is difficulty inserting the disc, there may be another disc in the system, or
the system may require service.
8cm discs are not allowed.
2. Disc starts playing automatically.
EJECT A DISC
1. To eject a disc press eject [] button to eject the disc. The play mode then
switches to the Radio mode.
If the disc is left in the ejected position for 15 seconds, the disc is automatically
reloaded. In this case, the play mode will remain in the Radio mode.
Note: If you force a disc into the system before automatic reload, it may damage a
disc.
DVD PLAYER MODE SCREEN
Touch any place of the screen to display DVD Video menu, touch the screen again to
return the playback. The display will return to the playback screen, if you do not
touch the screen for 7 seconds.
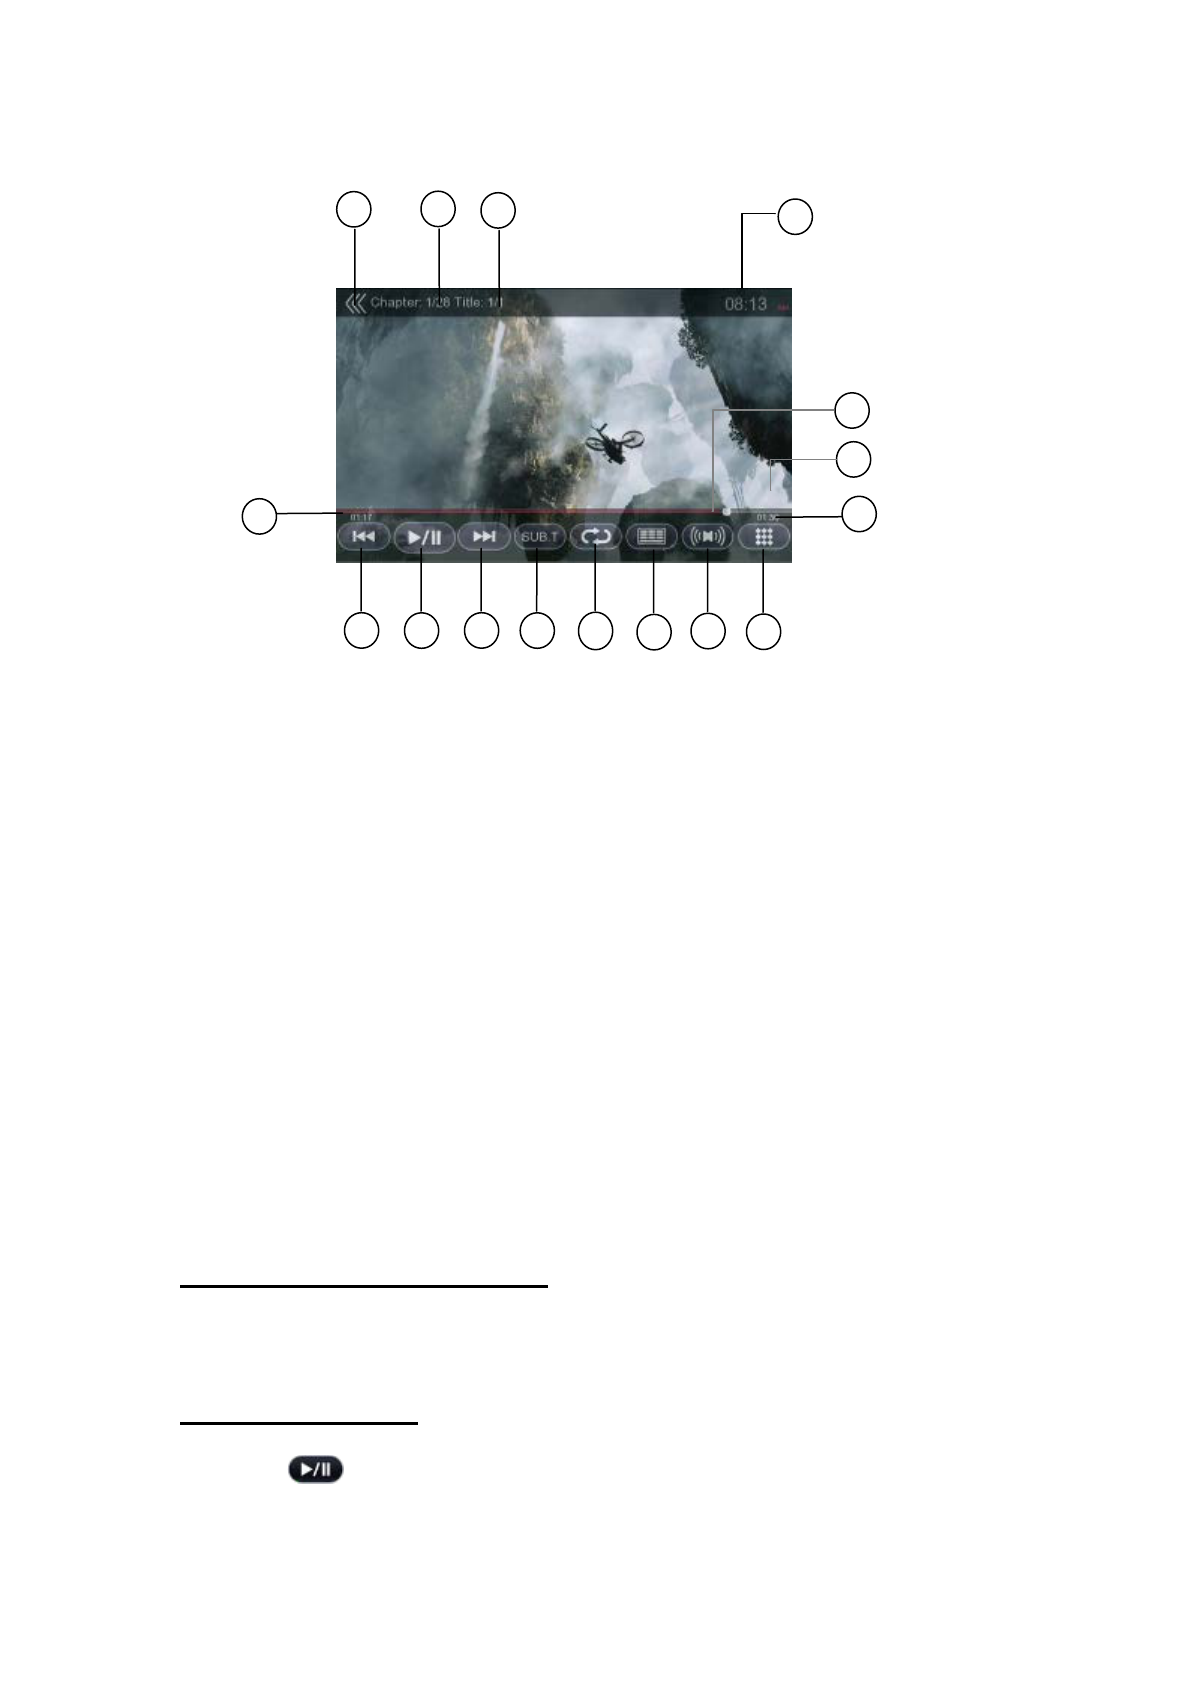
1 - Previous Chapter / Fast Backward button
2 - Play / Pause
3 - Next Chapter / Fast Forward button
4 - Subtitle switching button
5 - Repeat switching button
6 - Direct chapter or title searching button
7 - Audio Channel switching button
8 - Menu List button
9 - Total time
10 - DVD playback information
11 - Seek bar
12 - Elapsed playing time
13 - Return button (to Main Menu)
14 - System time
15 - Title information
16 - Chapter information
DVD PLAYER MENU OPERATION
Select the buttons displayed in the DVD Player Menu by direct touching it.
Play/Pause Playback
1. Touch [ ] button to pause during playback.
10
16
14
15
6
5
3
4
2
7
11
1
8
12
9
13
2. Touch [ ] button again to resume playback.
Skip a Chapter
1. Touch [ ] or [ ] button during playback.
Chapters are skipped down or up from current location, as many times as the button
is touched, and playback starts.
Skip by Seek Bar
Touch [ ] on seek bar and drag it to any position where you want to start playback.
Fast Forward / Fast Backward
1. Touch [ ] or [ ] button and hold 2 seconds to start fast backward or fast
forward during playback. The playback speed starts at 2x, then will increase to 4x,
8x and 16x. Release the button will continue playing with normal speed.
Note:
During fast forward and fast backward operation, there is no audio
reproduced.
The fast forward and fast backward speed may differ depending on the disc.
Search
1. In the DVD Video menu, touch [ ] button. The keypad screen appears with
the chapter/title number input mode.
Touch [Chapter] button turns the keypad to the chapter number input mode.
Touch [Title] button turns the keypad to the title number input mode.
Title: A large segment to divide the data area of the disc.
Chapter: A small segment to divide the data area of the disc.
2. Input the number of the chapter/title that you want to play with the [0] to [9]
key.

3. Touch [] button.
Playback starts from the scene of the input chapter number or title number.
Note:
If the input chapter/title number does not exist or searching with a
chapter/title is not allowed, the screen image will not change.
4. Touch [] button to close the keypad.
Repeat Playback
1. In the DVD Video menu, touch [] button.
2. Touch [ ] button once for Repeat Chapter, again for Repeat Title.
3. Touch [ ] button again to turn off the repeat playback.
Title Menu
1. In the DVD Video menu, touch [] button during playback.
Depending on the disc, the title menu may not be called.
2. Touch [ ] on the title menu screen.
3. Select the items in the title menu screen by directional buttons.
Depending on the disc, items may not be selected with the directional
buttons.
4. Touch [] button to fix on the selected item.
5. Touch [ ] button..
6. Touch [ ] button to close the title menu screen.
Audio Switch
For discs with two or more audio languages recorded, you can switch among the
audio languages during playback.
1. In the DVD Video menu, touch [ ] button during playback.
Each time you touch the button, you can switch among audio languages.
It may take time to switch among audio languages.
Depending on the disc, up to 8 kinds of audio languages may be recorded. For
detail, see the mark of the disc: ( indicates that8 audio languages
have been recorded).
When the power is turned on and when the disc is changed to a new one, the
audio language set as factory default is selected. If that audio language has
not been recorded on disc, the audio language is specified on the disc.
Depending on the disc, audio switch may be completely impossible or
impossible on some scenes.
Subtitle Switch
For discs with two or more subtitle languages recorded, you can switch among the
subtitle languages during playback.
1. In the DVD Video menu, touch [ ] button to select a subtitle during playback.
Each time you touch the button, you can switch among subtitles.
It may take time to switch among subtitles.
Depending on the disc, up to 32 kinds of subtitles may be recorded. For detail,
see the mark of the disc: ( indicates that 8 kinds of subtitles have been
recorded).
When the power is turned on and when the disc is changed to a new one, the
subtitle set as factory default is selected. If that subtitle has not been
recorded on disc, the subtitle is specified on the disc.
Depending on the disc, subtitle switch may be completely impossible or
impossible on some scenes.
2. To turn off subtitles, repeat touching [ ] until subtitles are turned off.
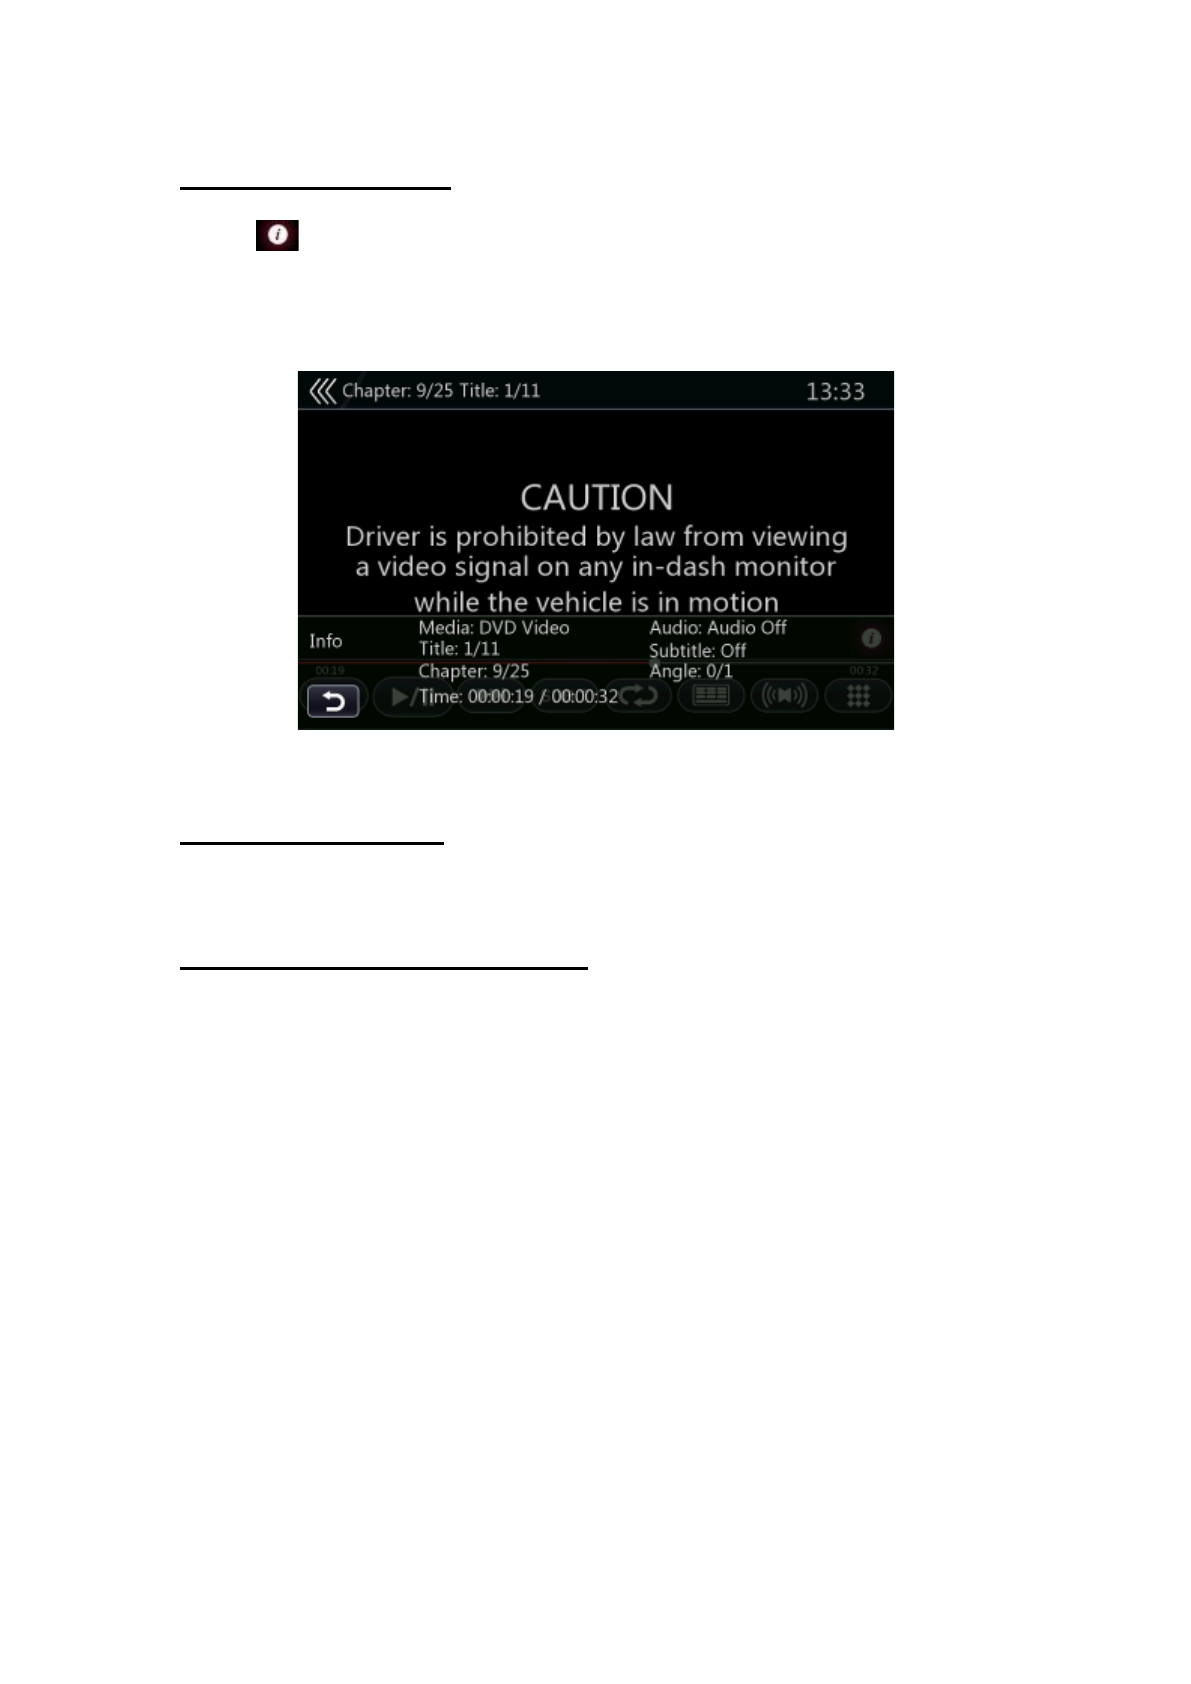
Display Playback Status
Touch [] button on DVD Player mode screen, playback status is displayed on
screen.
VIDEO FILES PLAYBACK
This system can play video files (AVI/MP4…etc.) stored on disc
VIDEO FILES PLAYER MODE SCREEN
1. After disc with video files is loaded, touch [Disc Video] button on Main Menu to
show video files player mode screen.
2. Touch the screen of the playing video file to display Video Files Player menu,
touch the screen again to return the playback screen. The display will return to
the playback screen, if you do not touch the screen for 7 seconds.
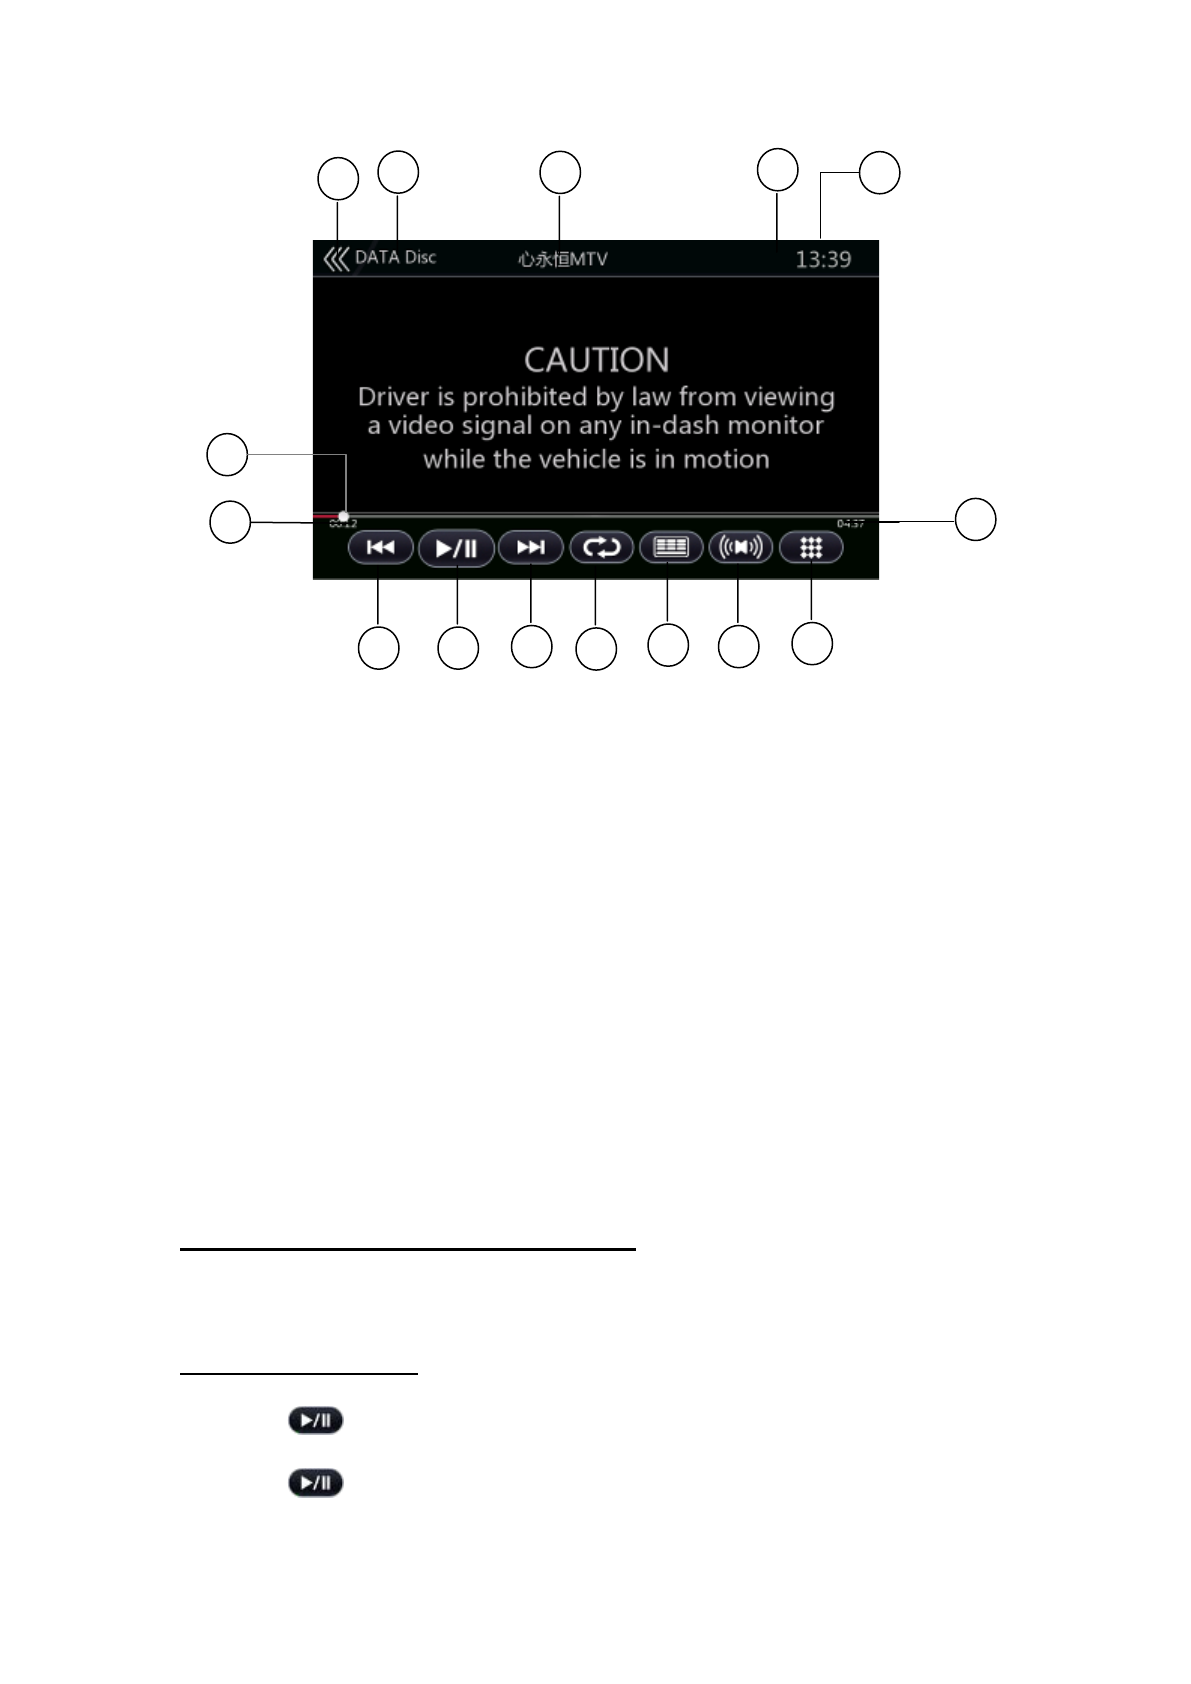
1 - Elapsed playing time
2 - Previous Track / Fast Backward button
3 - Play/Pause button
4 - Next Track / Fast Forward button
5 - Repeat button
6 - Direct chapter or title searching button
7 - Audio button
8 - List Mode button
9 - Total time
10 - System time
11 - Bluetooth status indicator
12 - Playback file information
13 - Current play mode
14 - Return button (to Main Menu)
15 - Seek bar
VIDEO FILES PLAYER MENU OPERATION
You can select the button displayed in the Video Files Player menu by direct touching
it.
Play/Pause Playback
1. Touch [ ] button to pause during playback.
2. Touch [ ] button again to resume playback.
13
11
12
14
1
10
6
4
2
8
5
3
7
9
15
Switch to Previous/Next File
1. Touch [ ] or [ ] button during playback to play previous/next file.
Skip by Seek Bar
Touch [ ] on seek bar and drag it to any position where you want to start playback.
Fast Forward / Fast Backward
1. Touch [ ] or [ ] button and hold 2 seconds to start fast backward or fast
forward during playback. The playback speed starts at 2x, then will increase to 4x,
8x and 16x. Release the button will continue playback with normal speed.
Note:
During fast forward and fast backward operation, there is no audio
reproduced.
The fast forward and fast backward speed may differ depending on the disc.
Repeat Playback
The repeat set as the factory default is Repeat All.
1. In the Video Files Player menu, touch [ ] button.
2. Touch [ ] button once for Repeat Track, again for Repeat Folder.
3. Touch [ ] button again for Repeat All..
Audio Switch
For video files with two or more audio channels, you can switch among the audio
channels during playback.
1. Touch [] button during playback.
Each time you touch the button, you can switch among audio languages.
It may take time to switch among audios.
Depending on the video files, switching may be impossible.

Subtitle Switch
For video files with two or more subtitles, you can switch among the subtitles during
playback.
1. Touch the [ ] button to select a subtitle during playback.
Each time you touch the button, you can switch among subtitles.
It may take time to switch among subtitles.
Depending on the video files, switching may be impossible.
Video Files List
In the Video Files Player menu, touch the [] button to display video files list
screen. Video files list operations is almost same as Disc Audio Player mode. Please
refer to CD Player Operations.
D
DI
IS
SC
C
A
AU
UD
DI
IO
O
P
PL
LA
AY
YE
ER
R
O
OP
PE
ER
RA
AT
TI
IO
ON
N
WATCH A DISC / EJECT A DISC
Please refer to DISC VIDEO PLAYER OPERATIONS – WATCH A DISC and EJECT A DISC.
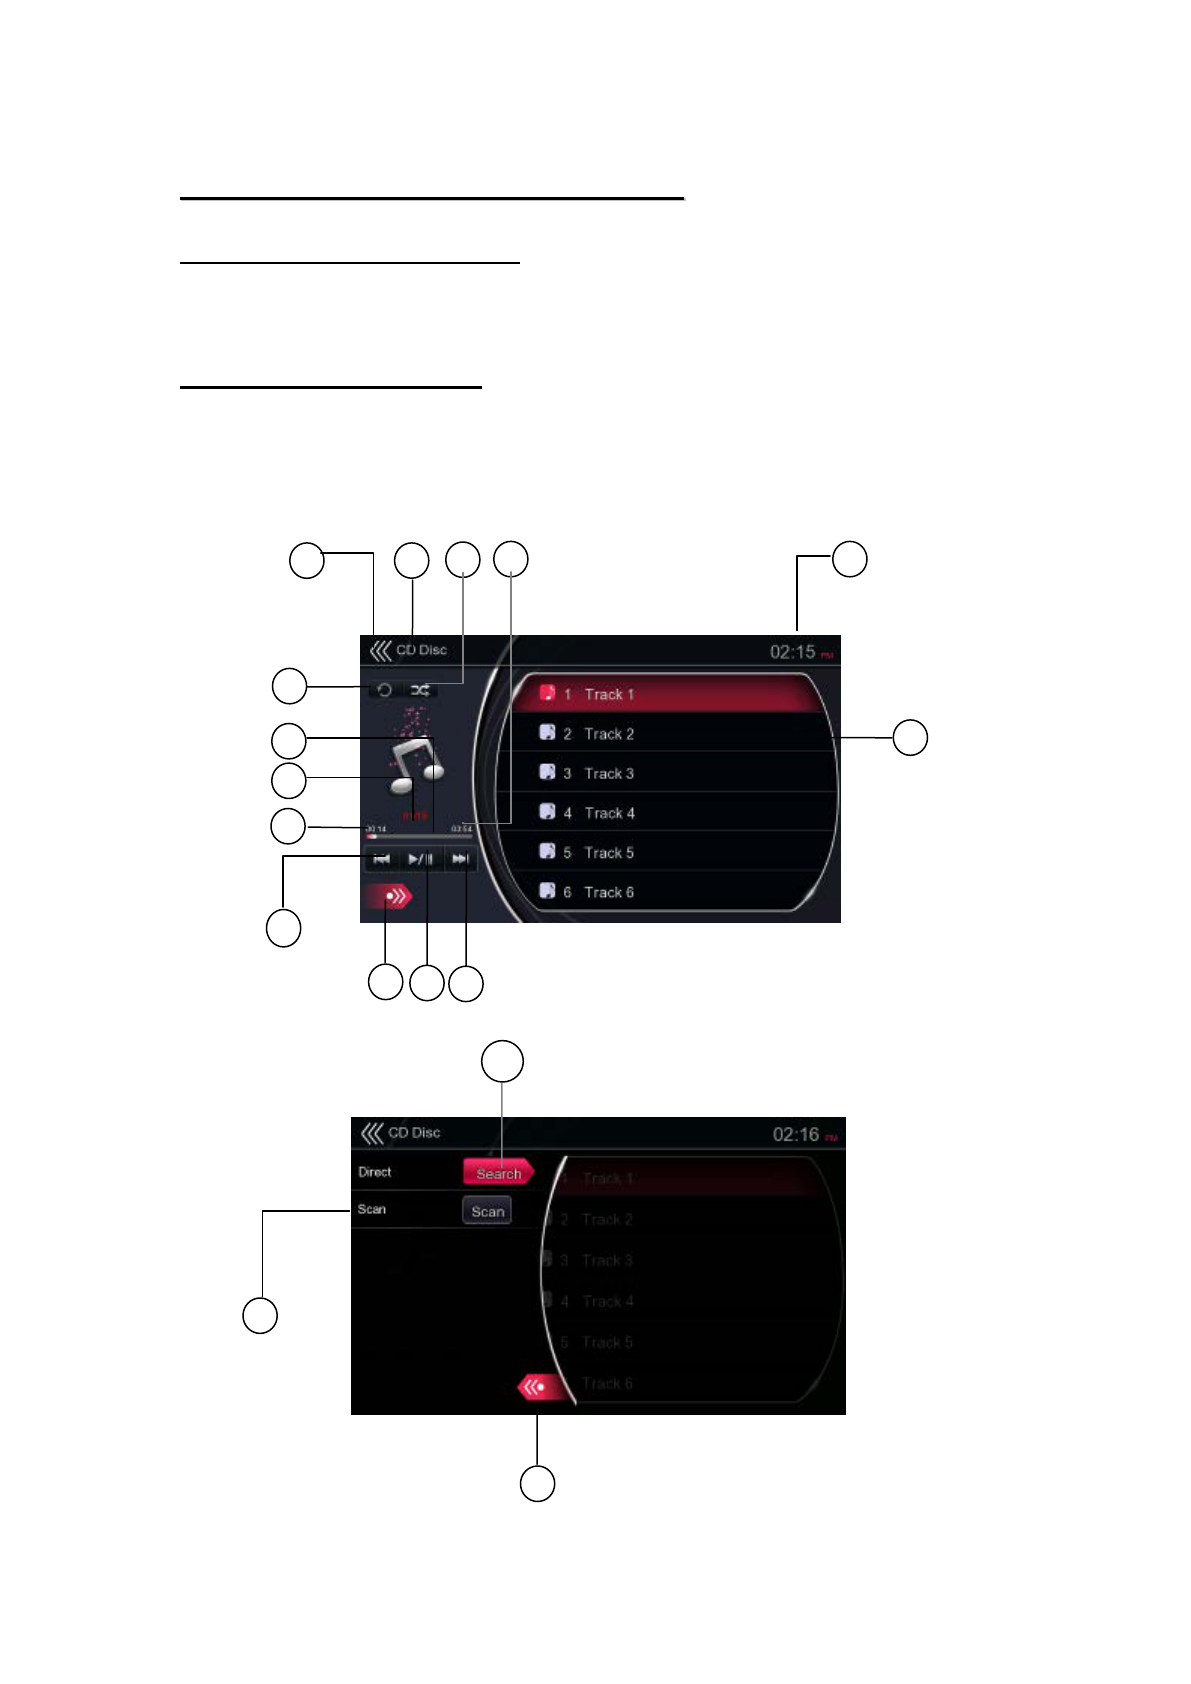
CD PLAYER MODE SCREEN
1. After disc is loaded, the play mode is automatically engaged.
2. If disc has been loaded, you can touch [Disc Audio] button on Main Menu to
display CD Player Mode screen.
16
17
15
8
9
5
7
6
12
3
10
13
2
1
11
4
1 - Previous Track / Fast Backward button
2 - Play / Pause button
3 - Next Track / Fast Forward button
4 - Song Title
5 - System time
6 - Total time
7 - Shuffle button
8 - Current play mode
9 - Return button (to Main Menu)
10 - Repeat button
11 - Playback track information
12 - Album information
13 - Elapsed playing time
14 - Option button
15 - Scan Start / Stop button
16 - Direct searching button
17 - Close option menu button
CD PLAYER MENU OPERATION
You can select the button displayed in the CD Player menu by direct touching it.
Play/Pause Playback
1. Touch [ ] button to pause during playback.
2. Touch [ ] button again to resume playback.
Switch to Previous/Next File or Track
Touch [ ]/[ ] button during playback to play previous/next file.
Touch [ ] button starts playback from the beginning of the next track.
Touch [ ] button starts playback from the beginning of the current track. When
this button is touched again within 5 seconds, playback starts from the beginning
of previous track.
Fast Forward / Fast Backward
1. Touch [] or [ ] button and hold more than 2 seconds to start fast backward
or fast forward during playback. The playback speed starts at 2x, then will
increase to 4x, 8x and 16x. Release the button will continue playback with normal
speed.
Note:
The fast forward and fast backward speed may differ depending on the disc.
Repeat Playback
The repeat set as the factory default is Repeat All.
Touch [] button to switch between Repeat Folder, Repeat All and Repeat Track.
Shuffle Playback
1. Touch [] button to shuffle the tracks during playback.
2. Touch this button again to turn off shuffle playback.
Track Selection on Track List Screen
1. Touch the track title on the display list. The selected track will start playing.
2. When the desired track is not displayed, touch and flick the track list up or down.
3. Touch the desired track title button. The corresponding track is started playback.
Tracks Scan
1. Touch [ ] button to show [] button.
2. Touch [] button during playback.
It will play from the next track, and each track will display for 10 seconds.
3. Touch [ ] button.
It will continue playback from the current track.
[ ] button will switch to [ ] button.
The function will scan all tracks orderly in current folder once. After scan
stopped playback will continue.
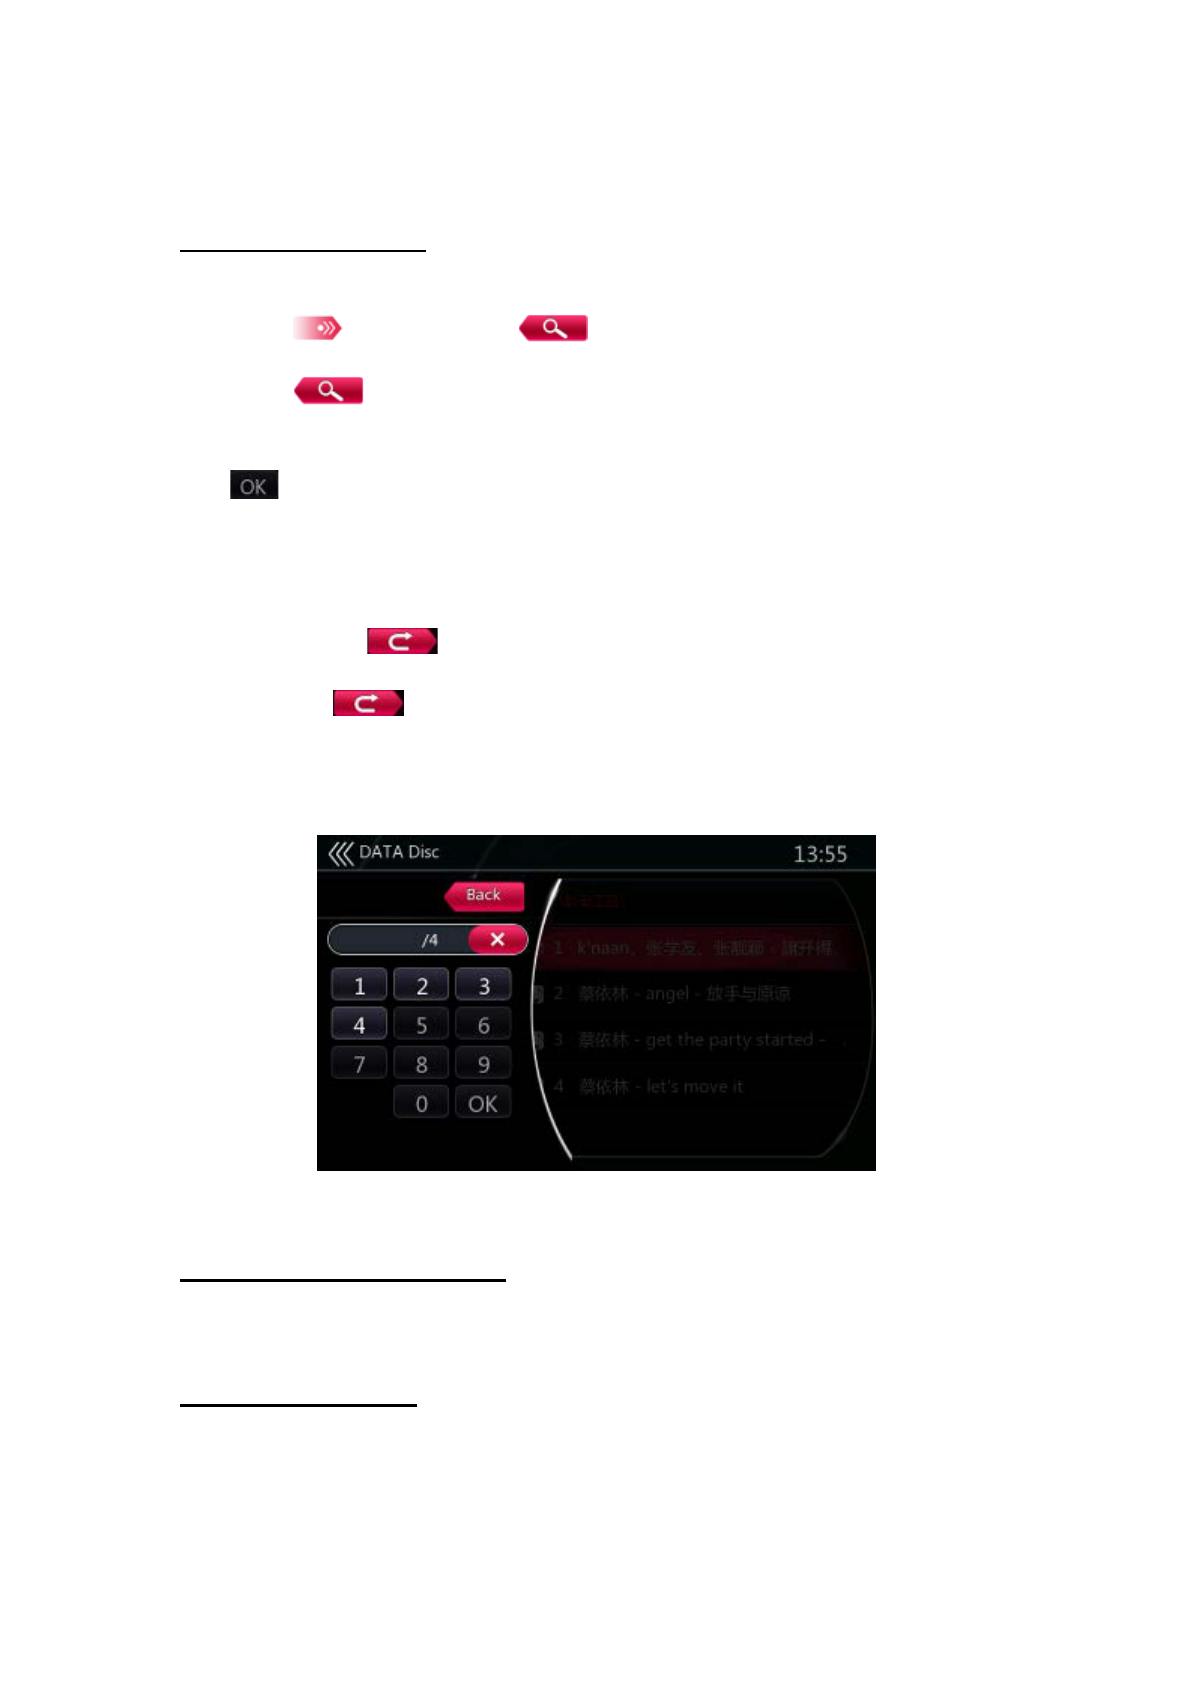
Track Number Search
This operation allows searching using the track numbers recorded on the CDs.
1. Touch [ ] button to show [ ] button.
2. Touch [ ] button. The numerical keypad will appear on the screen.
3. Input the track number that you want to playback with [0] to [9] key and touch
[ ] button.
Playback starts from the track of the input track number.
If the input track number does not exist or searching with track number is
not allowed, the screen image will not change.
Touch the [] button will close the numerical keypad.
Touch [] button will close the option window and display playback
screen.
Compressed Audio Playback
This system can play audio files stored on disc. MP3 / WMA
Tag Display Function
This unit is an ID3 Tag compatible model
This unit supports ID3 Tags of the version 2.4, 2.3, 1.1 and 1.0.
In displaying, this unit gives priority to the version 2.4 and 2.3 Tags.

Note:
Some CDs recorded with CD-R / RW may not be usable.
MP3 / WMA Tag Titles Display
Tag information can be displayed for compressed audio file containing Tag
information.
MP3: title, artist, album
WMA: artist
Precautions for MP3 Disc Creation
File extensions
1. Always add a file extension “.MP3” or “.mp3” to an MP3 file, and “.WMA” or
“.wma” to a WMA file by using single byte letters. If you add a file extension other
than specified or forget to add these file extension, the file cannot be played. In
addition, if you use upper case and lower case letters (capital and small letters)
mixed for file extensions, normal play may not be possible..
2. Files other than MP3 / WMA data cannot be played.
Playing files with a format not supported will be skipped, and the scan, random
and repeat playback mode may be cancelled.
Files and Discs Not Supported
Files and discs with the following extensions are not supported: *.AAC, *.DLF,
*.M3U, *.PLS, *.MP3 PRO files, files with DRM, open session discs.
Logical Format (File system)
1. When writing MP3 / WMA file on a disc, please select *ISO9660 level 1 or
level 2 (without including expansion format)” as the writing software
format. Normal playback may not be possible if the disc is recorded on
another format.
2. The folder name and file name can be displayed as the title during MP3 /
WMA play.
Entering File and Folder Names
Names using the code list characters are the only file names and folder
names that can be entered and displayed. Using any other character will
cause the file and folder names to be displayed incorrectly.
Electronic Shock Protection
CD-DA (CDA) 10 seconds
45 seconds for MP3 recorded at 44.1 kHz, 128 kbps
90 seconds for WMA recorded at 44.1 kHz, 128 kbps
Folder Structure
A disc with a folder having more than 8 hierarchical levels will conflict with
the ISO9660 and playback will be impossible.
Number of Files and Folders
1. The maximum allowable number of folders is 255 (including root
directory); the maximum allowable number of files is 512 (max. 255 per
folder). This represents the maximum number of tracks that can be played
back.
2. Tracks are played in the order that they were recorded onto a disc. (Tracks
might not always be played in the order displayed on the PC).
o Some noise may occur depending on the type of encoder software
used while recording.
o In case of a track recorded at VBR (variable bit rate), the display for
the play time of the track may be slightly different from the actual
play time. Also, the recommended value of VBR ranges from 32kbps
to 320kbps.
MP3 / WMA Playback Menu
1. Repeat Playback
While playing MP3 / WMA touch [ ] button can switch between Repeat
Folder, Repeat All and Repeat Track.
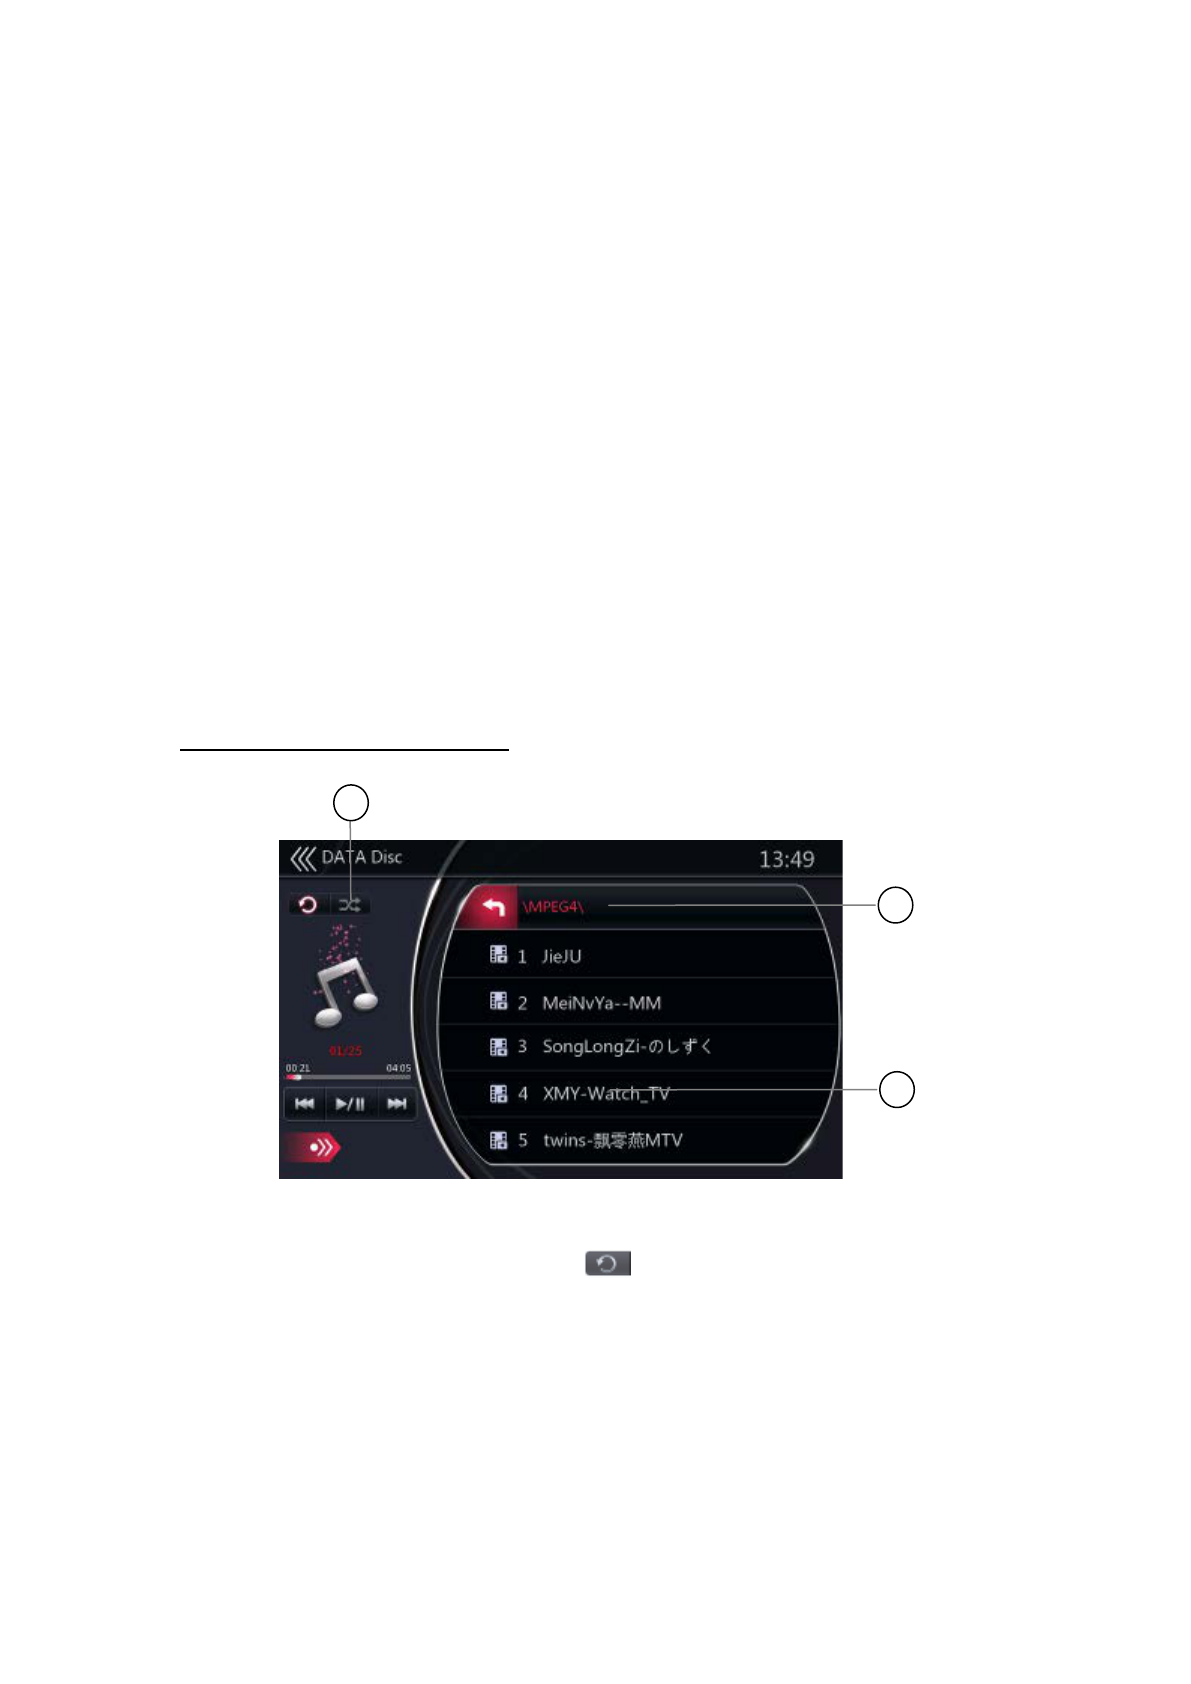
2. Folder
Touch the title of folder, play list will show files and folders in the selected folder.
3. Current Folder
Showing title of current folder.
The number on the folder symbol is the number of files and folders number in
current folder.
3
2
1

Touch [ ] button, play list will show files and folders in upper folder.
Other operations about playing MP3 / WMA are almost same as CD Player
mode.
A
AU
UD
DI
IO
O
S
SE
ET
TU
UP
P
1. Touch [Setup] button on the Main Menu screen. The Setup Menu screen will be
displayed.
2. Touch [Audio] button.
3. Touch [EQ] button.
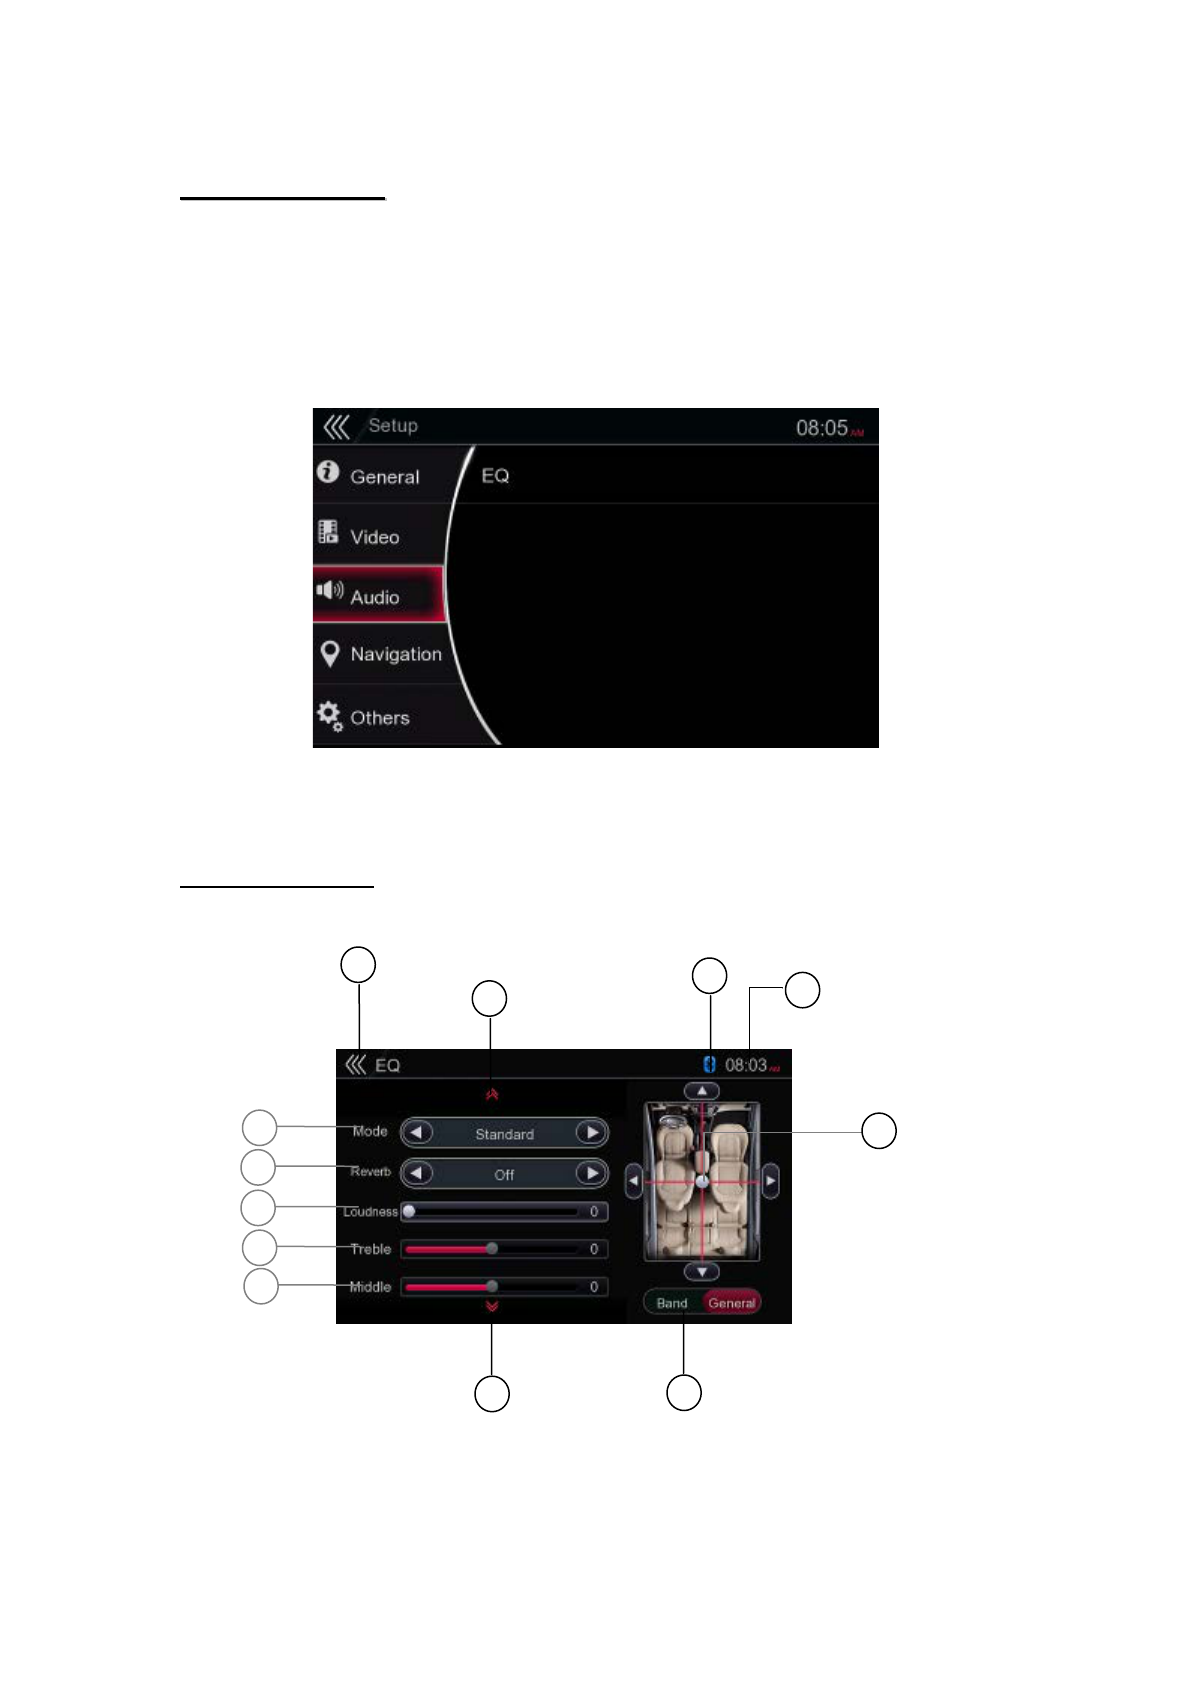
EQ SETUP MENU
This menu includes Mode, Reverb, Loudness, Treble, Middle Bass and Subwoofer.
2
3
1
5
10
4
9
11
8
13
12

1 - Mode: Choose the desired mode: Standard, Jazz, Pop, Classical, Rock, News,
Urban, Rave, Movies, Techno, and User.
2 - Reverb: Choose the desired mode: Off, Livingroom, Hall, Concert, Cave
Bathroom, and Arena
3 - Loudness: Choose the desired loudness from 0 to 20.
4 - Treble: Choose the desired treble from -14 to 14 (only in User mode).
5 - Middle: Choose the desired middle from -14 to 14 (only in User mode).
6 - Bass: Choose the desired middle from -14 to 14 (only in User mode).
7 - Subwoofer: Choose the desired loudness from -20 to 20.
8 - Scroll Down: Scroll down to bottom part of EQ Setup menu.
9 - Band / General: Choose between band or general settings (only in User
mode).
10 - Balance / Fader: Choose the desired volume for left and right, front and rear
sp eaker.
11 - System time
12 - Scroll Up: Scroll up to top part of EQ Setup menu.
13 - Return: Return to Audio Setup menu
14 - Bluetooth status indicator
7
6

U
US
SB
B
A
AU
UD
DI
IO
O
O
OP
PE
ER
RA
AT
TI
IO
ON
NS
S
Notes on Using USB Memory Device
General notes
When no support files, the file list display nothing.
Notes on the Audio files
This system can play the MP3 / WMA files stored in the USB memory.
MP3 files
Format: MPEG1 / 2 Audio Layer 3
Bit Rate: 16 – 320kbps (VBR)
Sampling Frequency: 8 / 12 / 16 / 24 / 32 / 44.1 / 48kHz
File Extension: .MP3 or .mp3
Notes on the Folder Structure
The folder hierarchy must be within 8 hierarchical levels. Otherwise, playback
may be impossible.
The maximum allowable number of folders is 512 (including root directory
and folders with no MP3 files, WMA files).
The maximum allowable number of files in a folder is 255.
You can store the MP3 files, WMA files together in a folder.
The system may become slow if the files or folders exceed the limitable
above.
Notes on the Tag Titles
The limitations on the Tag Titles are same as those in Disc Audio Player mode.
SELECT USB AUDIO MODE
Connect your USB memory with video files to the USB connector. The system will
automatically detect the connected device, and the [USB Audio] button on Main
Menu will be enabled.
When an USB memory is already connected
Touch [USB Audio] button to select the USB Audio mode.
The system changes to the USB Audio mode and starts playback from the previous
position or from the beginning.
Note:
This system has two USB connectors and can connect two USB.
You can select the desired USB by touching the list of USB root menu.
This system indicate the USB as “HCD0 USB Hard Disk”, “HCD1 USB Hard Disk” on the
list.
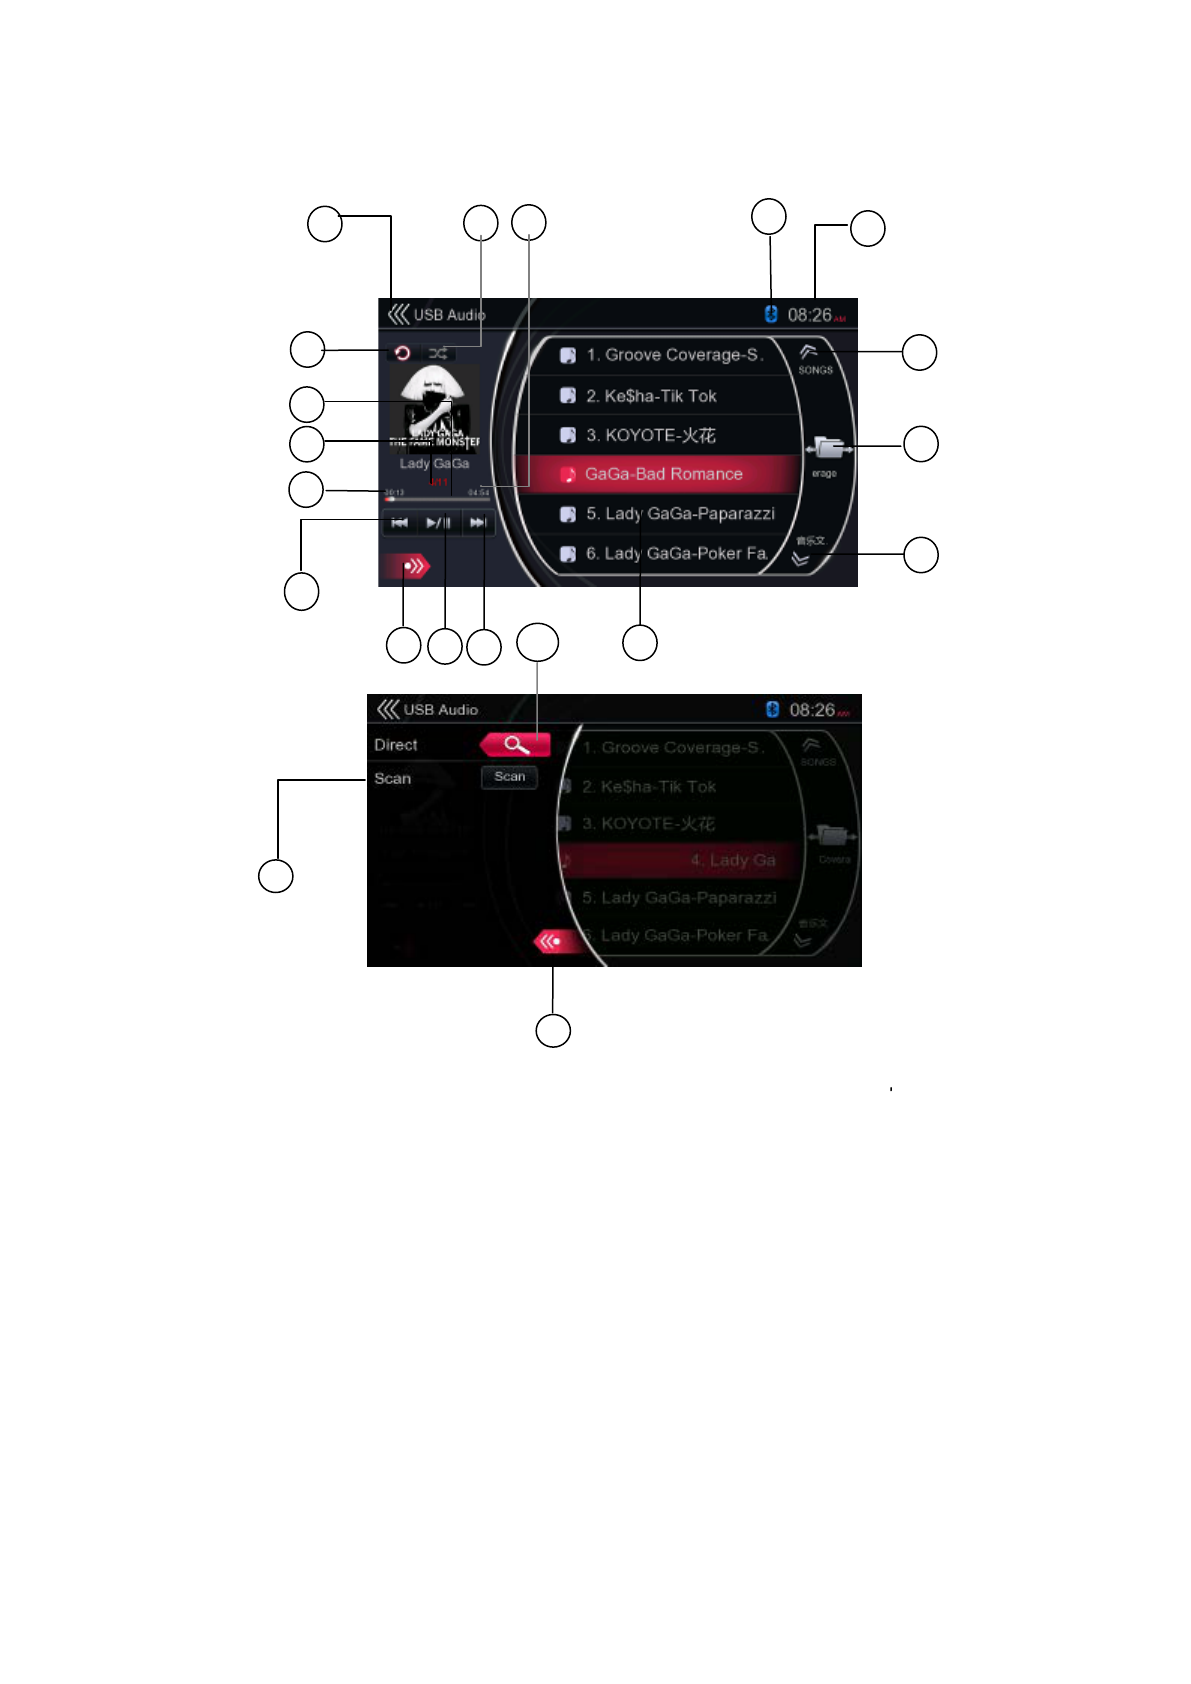
1 - Previous Track / Fast Backward button
2 - Play / Pause button
3 - Next Track / Fast Forward button
4 - Song title
5 - Previous Folder button
6 - Current Folder button
7 - Next Folder button
8 - System time
9 - Bluetooth status indicator
10 - Total Time
11 - Shuffle button
12 - Return button (to Main Menu)
13 - Repeat button
14 - Playback status indicator
61
16
3
50
72
4
2
17
18
20
15 - Album information
16 - Elapsed playing time
17 - Option button
18 - Direct button
19 - Scan button
20 - Close option menu
PLAY AUDIO FILES IN USB MEMORY
Play / Pause Playback
1. Touch [ ] button to pause during playback.
2. Touch [ ] button again to resume playback.
Previous / Next File Switch
Touch [] or [] button during playback to play previous / next file.
Touch [] button to start playback from the beginning of the next track.
Touch [] button to start playback from the beginning of the current track;
when this button is touched again within about 5 seconds, playback starts from
the beginning of previous track.
Fast Forward / Fast Backward
Touch [] or [] button and hold more than 2 seconds to start fast backward or
fast forward during playback. The playback speed starts at 2x, then will increase to 4x,
8x, and 16x. Release the button will continue playback with normal speed.
Note:
The fast forward and fast backward speed may differ depending on the audio
files.
Repeat Playback

The repeat set as the factory default is Repeat All.
Touch the [ ] button once for Repeat Track, again for Repeat Folder, Repeat All.
Shuffle Playback
1. Touch [] button to shuffle the tracks in playing folder during playback.
2. Touch this button again to turn off the feature.
Album Art
If the current audio file contains album art image in ID3, the picture will be displayed
in this area.
ID3 Information Area
This area display ID3 information of playing file: song title, artist information, album
information, number of current file / total number in current folder, elapsed playing
time / total time of current file.
Skip by Seek Bar
Touch [ ] on seek bar and drag it to any position where you want to start
playback.
Select a Folder on Display List
Touch the folder title on the display list, the display list will display files and folders in
selected folder.
Select a Track on Display List
This function allows you to select tracks from a displayed list.
1. Touch the track title on the display list. The selected track will start playing.
2. When the desired track is not displayed, touch and flick the track list up or down.
3. Touch the desired track title button. The corresponding track is started playback.
Scan the Tracks
1. Touch [ ] button show [ ] button.
2. Touch [ ] button during playback.
It will play from next track, and each track will display for 10 seconds.
The [ ] button will switch to [] button.
3. Touch [] button.
It will continue playback from current track.
[ ] button will switch to [] button.
The function will scan all tracks orderly in current folder once. After scan
stopped, playback will continue.
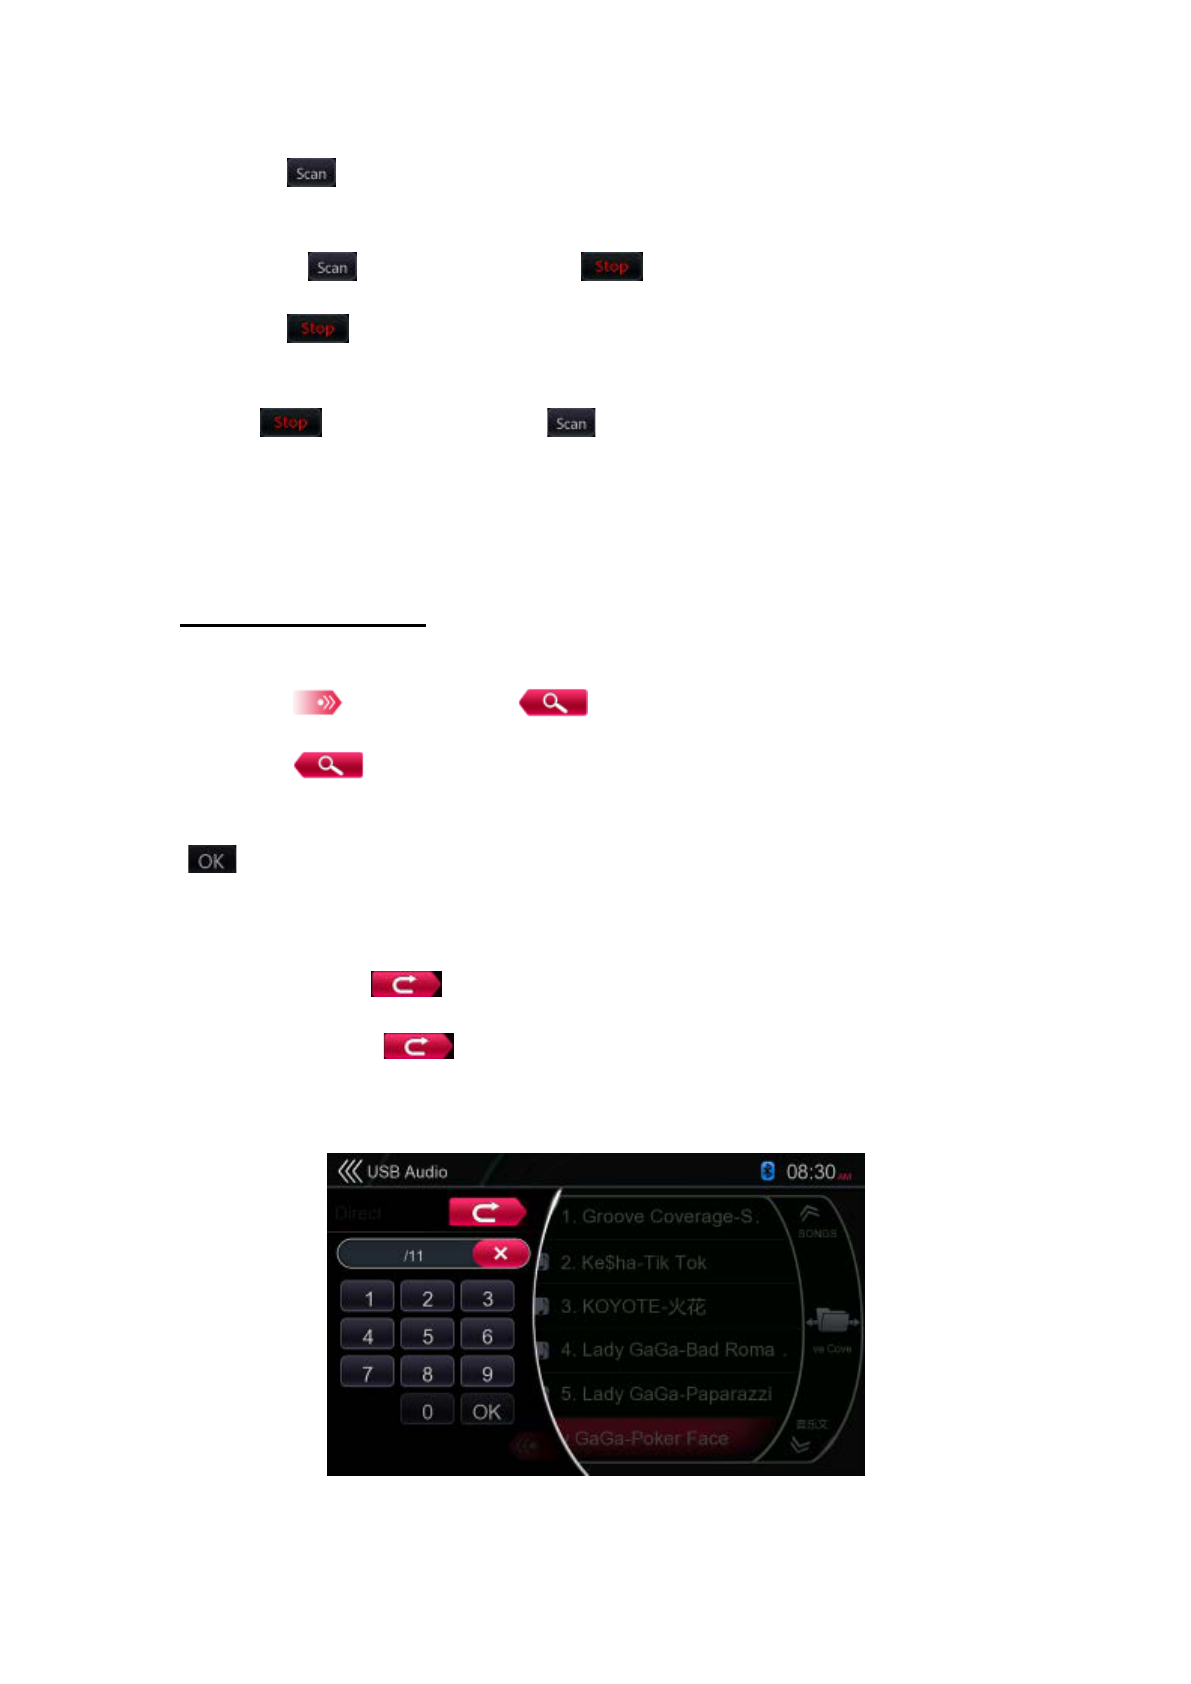
Track Number Search
This operation allows searching to use the track numbers in playing folder.
1. Touch [ ] button to show [] button.
2. Touch [ ] button. The numerical keypad will appear on screen.
3. Input the track number that you want to playback with [0] to [9] key and touch
[ ] button.
If the input track number does not exist or searching with a track
number is not allowed, the screen image will not change.
Touch [] button will close the numerical keypad.
Touch [] button will close the option window and display
playback screen.

U
US
SB
B
V
VI
ID
DE
EO
O
O
OP
PE
ER
RA
AT
TI
IO
ON
NS
S
This system can play USB video files (MP4, 3GP…etc.) stored in an USB memory
which is recognized as “USB Mass Storage Class device”. You can use your USB
memory as a video device by simply copying desired video files into it.
Note:
This system will not operate or may operate improperly with some USB memory.
Files protected cannot be played.
NOTES ON USING USB MEMORIES
General Note
When there is no support files, the file list display nothing.
Note on the Folder Structure
The limitations on the folder structure are same as those in USB Audio Player mode.
Note on the Folder Structure
The limitations on the folder structure are same as those in USB Audio Player mode.
Note on the Tag Titles
The limitations on the Tag Titles are same as those in CD Player mode.
SELECT USB VIDEO MODE
Connect your USB memory with video files to the USB connector. The system will
automatically detect the connected device, and the [USB Video] button on Main
Menu will be enabled.
When a USB Memory is already connected
Touch [USB Video] button on the Main Menu to select the USB Video mode.
The system changes to the USB Video mode and starts playback from the previous
position or from the beginning.
Note:
This system has two USB connectors and can connect two USB.
You can select the desired USB by touching the list of USB root menu.
This system indicate the USB as “HCD0 USB Hard Disk”, “HCD1 USB Hard Disk” on the
list
PLAY VIDEO FILES IN USB MEMORY
If the video is playing, touch the screen of the playing video to display Operation
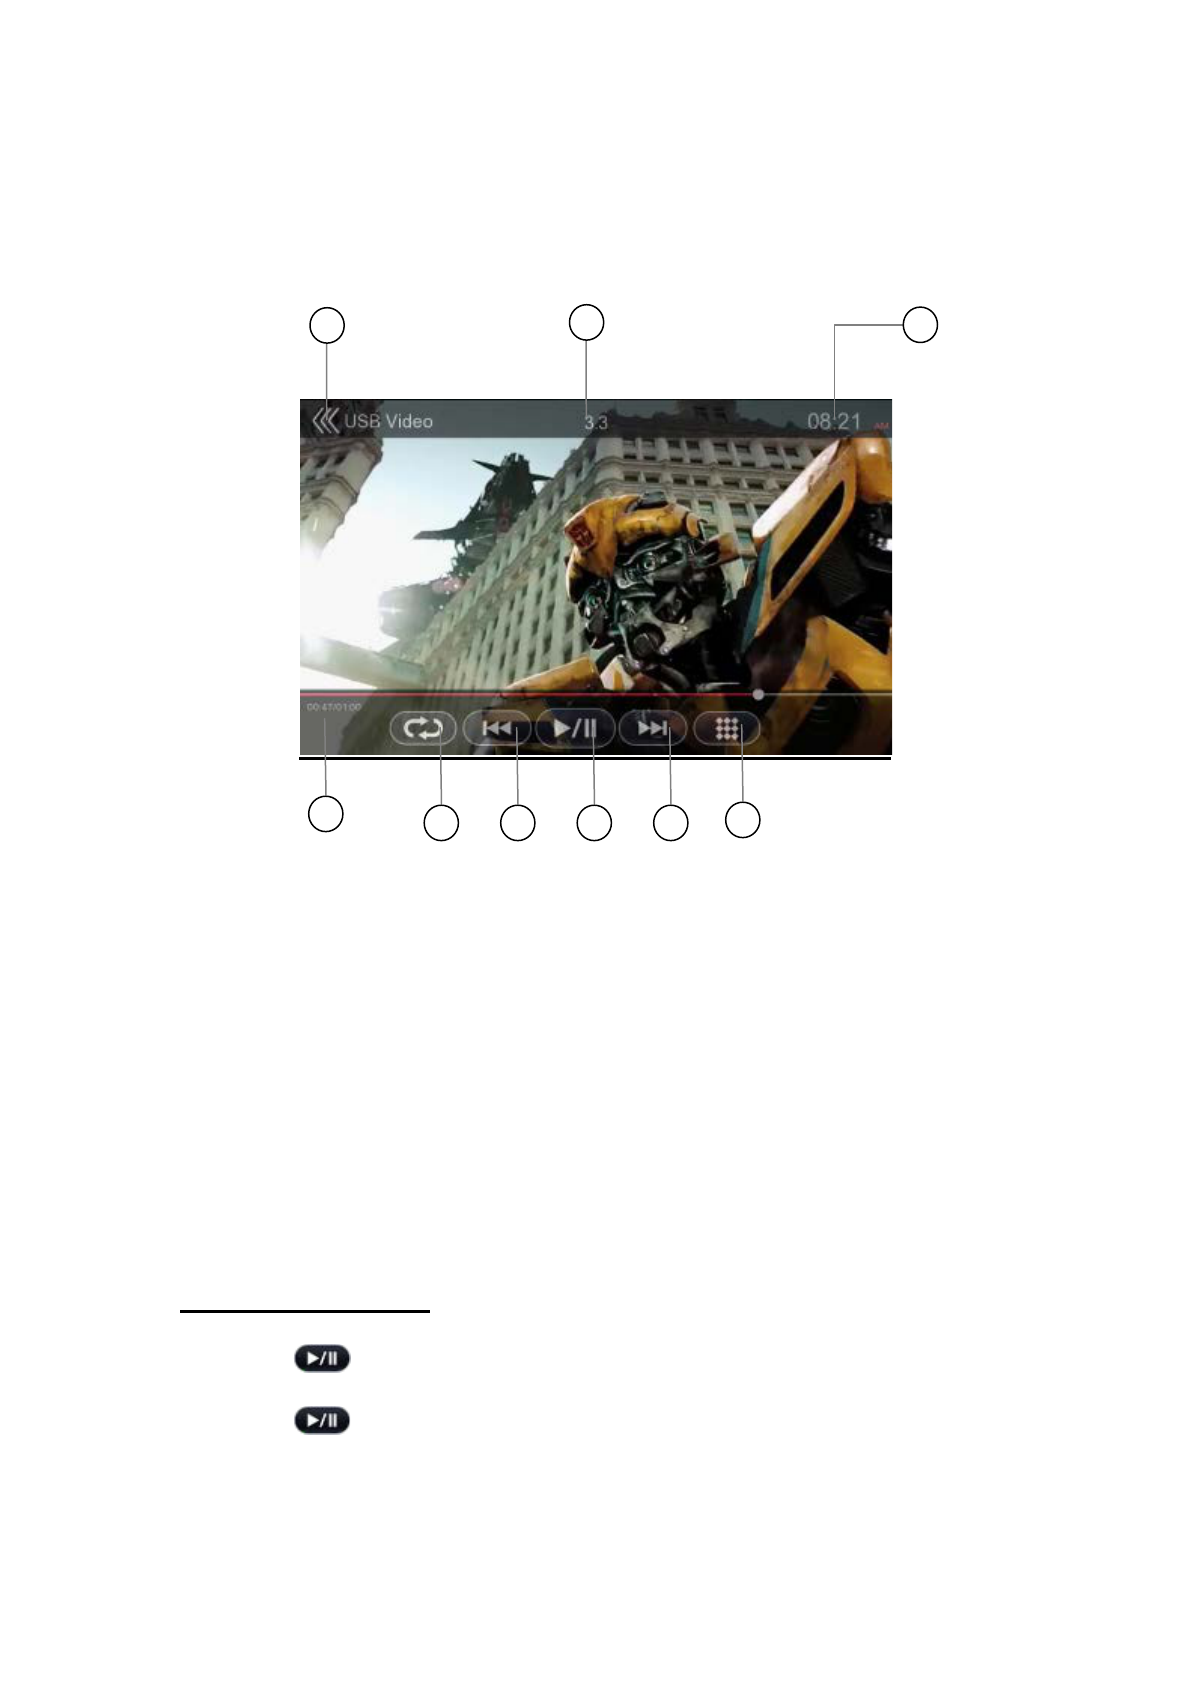
buttons.
The display will return to the playback screen, if you do not touch the screen
for 10 seconds.
1 - Repeat button
2 - Previous Track / Fast Backward button
3 - Play / Pause button
4 - Next Track / Fast Forward button
5 - Menu List
6 - System time
7 - Playing file information
8 - Return button (to Main Menu)
9 - Elapse playing time indicator / Seek bar
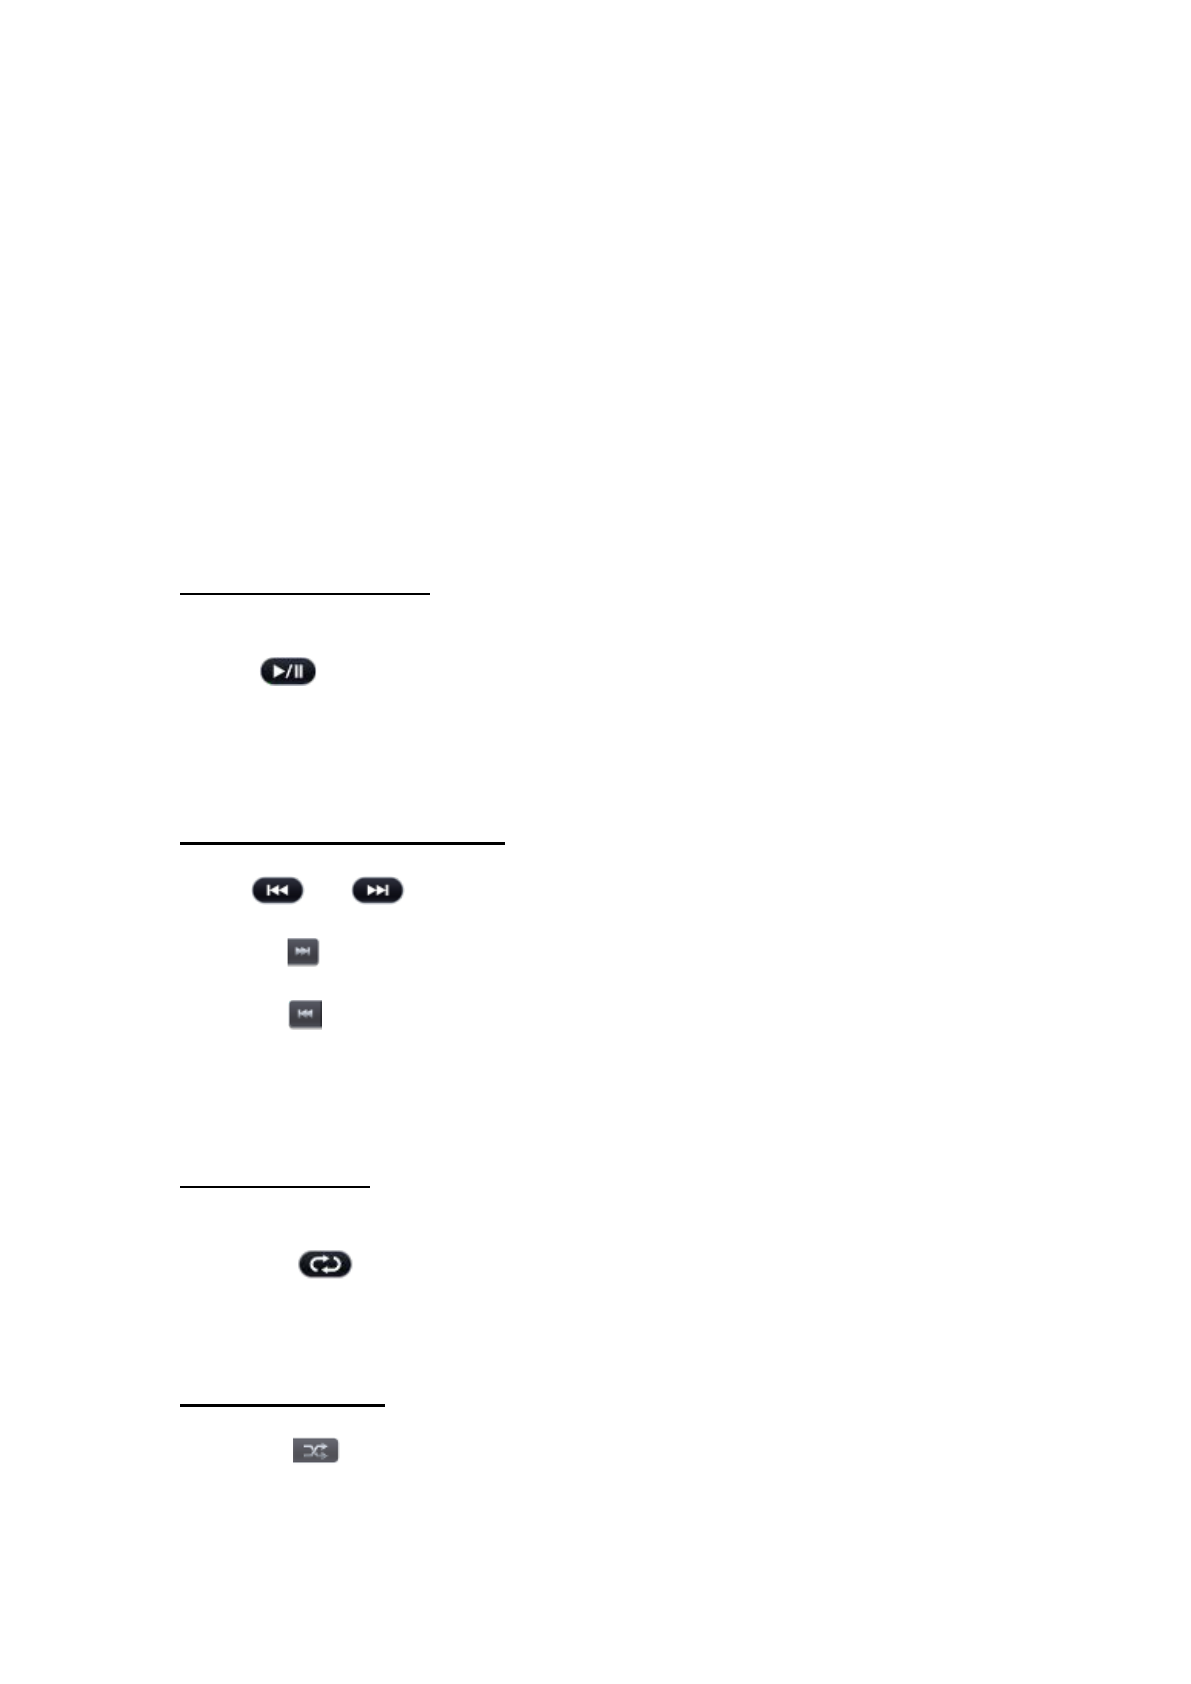
Play / Pause Playback
1. Touch [ ] button to pause playback.
2. Touch [ ] button to resume playback.
4
1
2
3
5
9
6
8
7
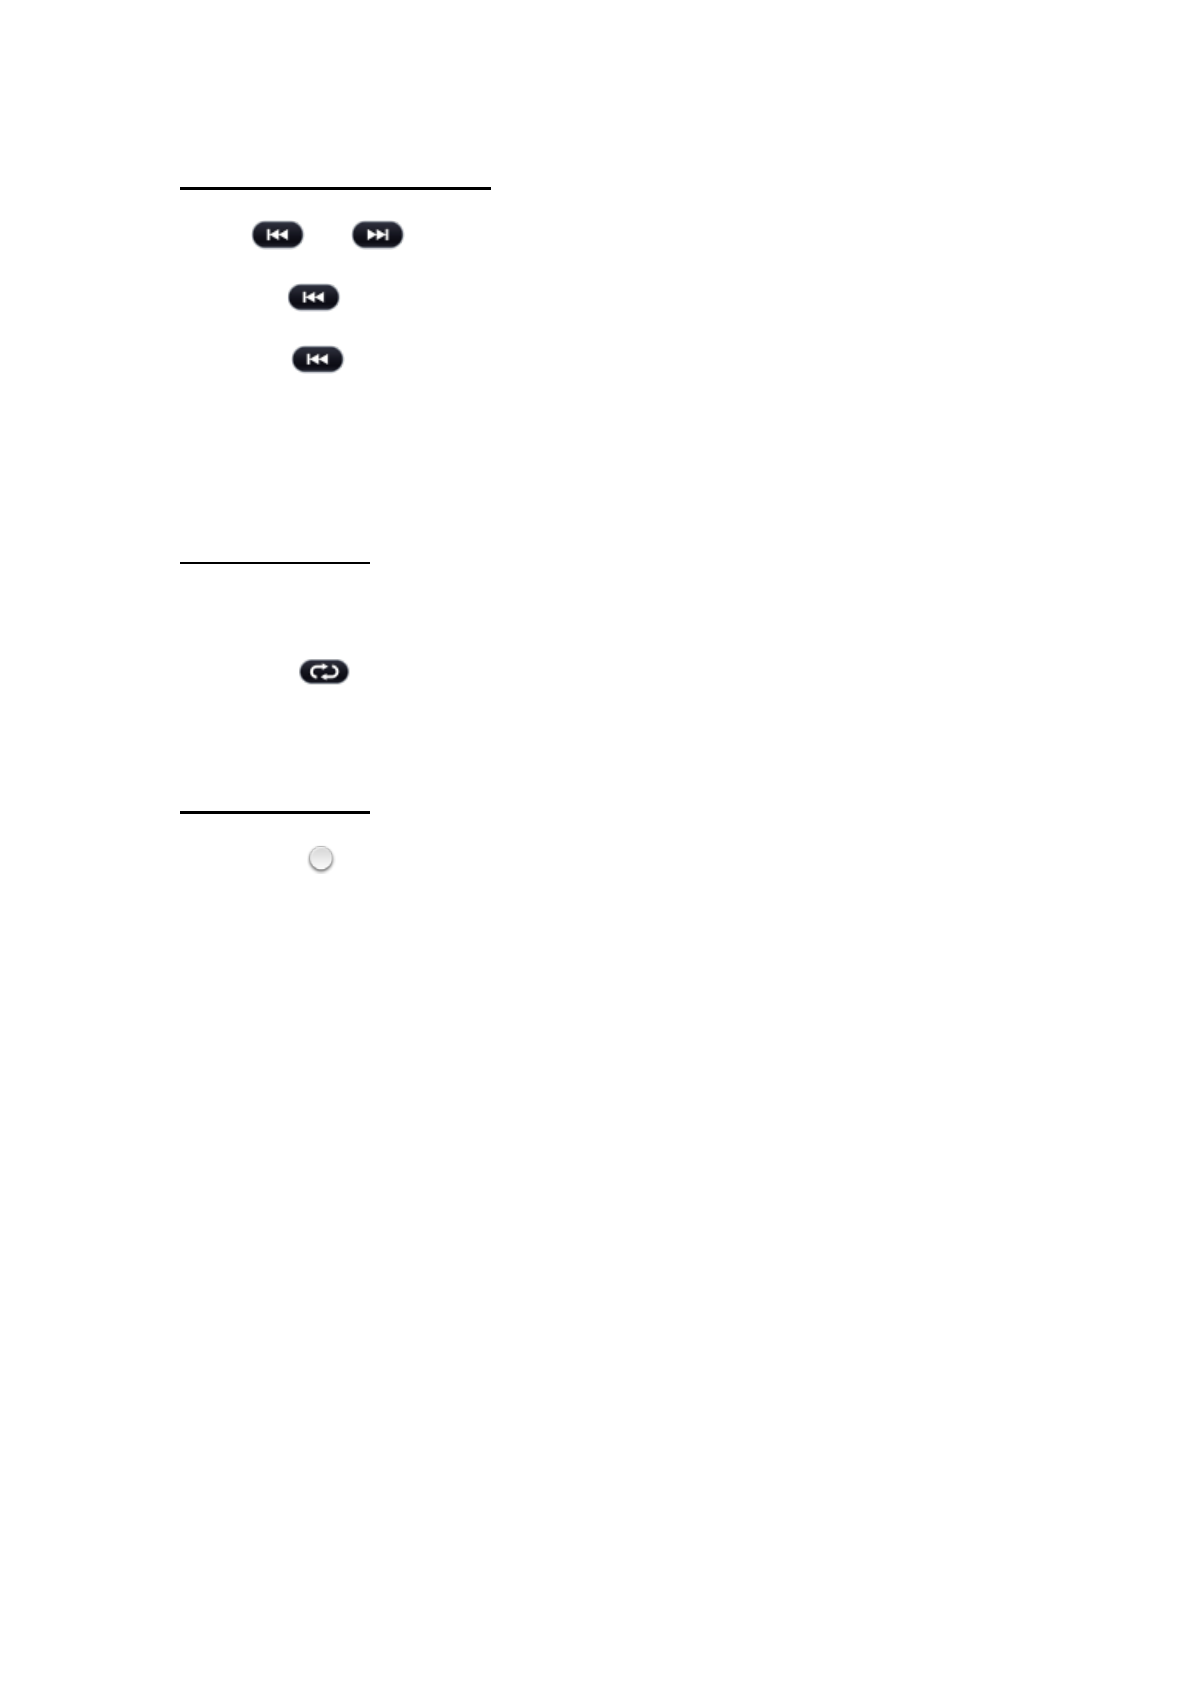
Previous / Next File Switch
Touch [] or [ ] button during playback to play previous/next file.
Touch [ ] button to start playback from the beginning of the next file
Touch [ ] button to start playback from the beginning of the current file,
when this button is touched again within about 5 seconds, playback starts from
the beginning of previous file.
Repeat Playback
The repeat set as the factory default is Repeat All.
Touch the [ ] button once for Repeat File, again for Repeat Folder, again for
Repeat All.
Skip by Seek Bar
Touch the [ ] on seek bar and drag it to any position where you want to start
playback.
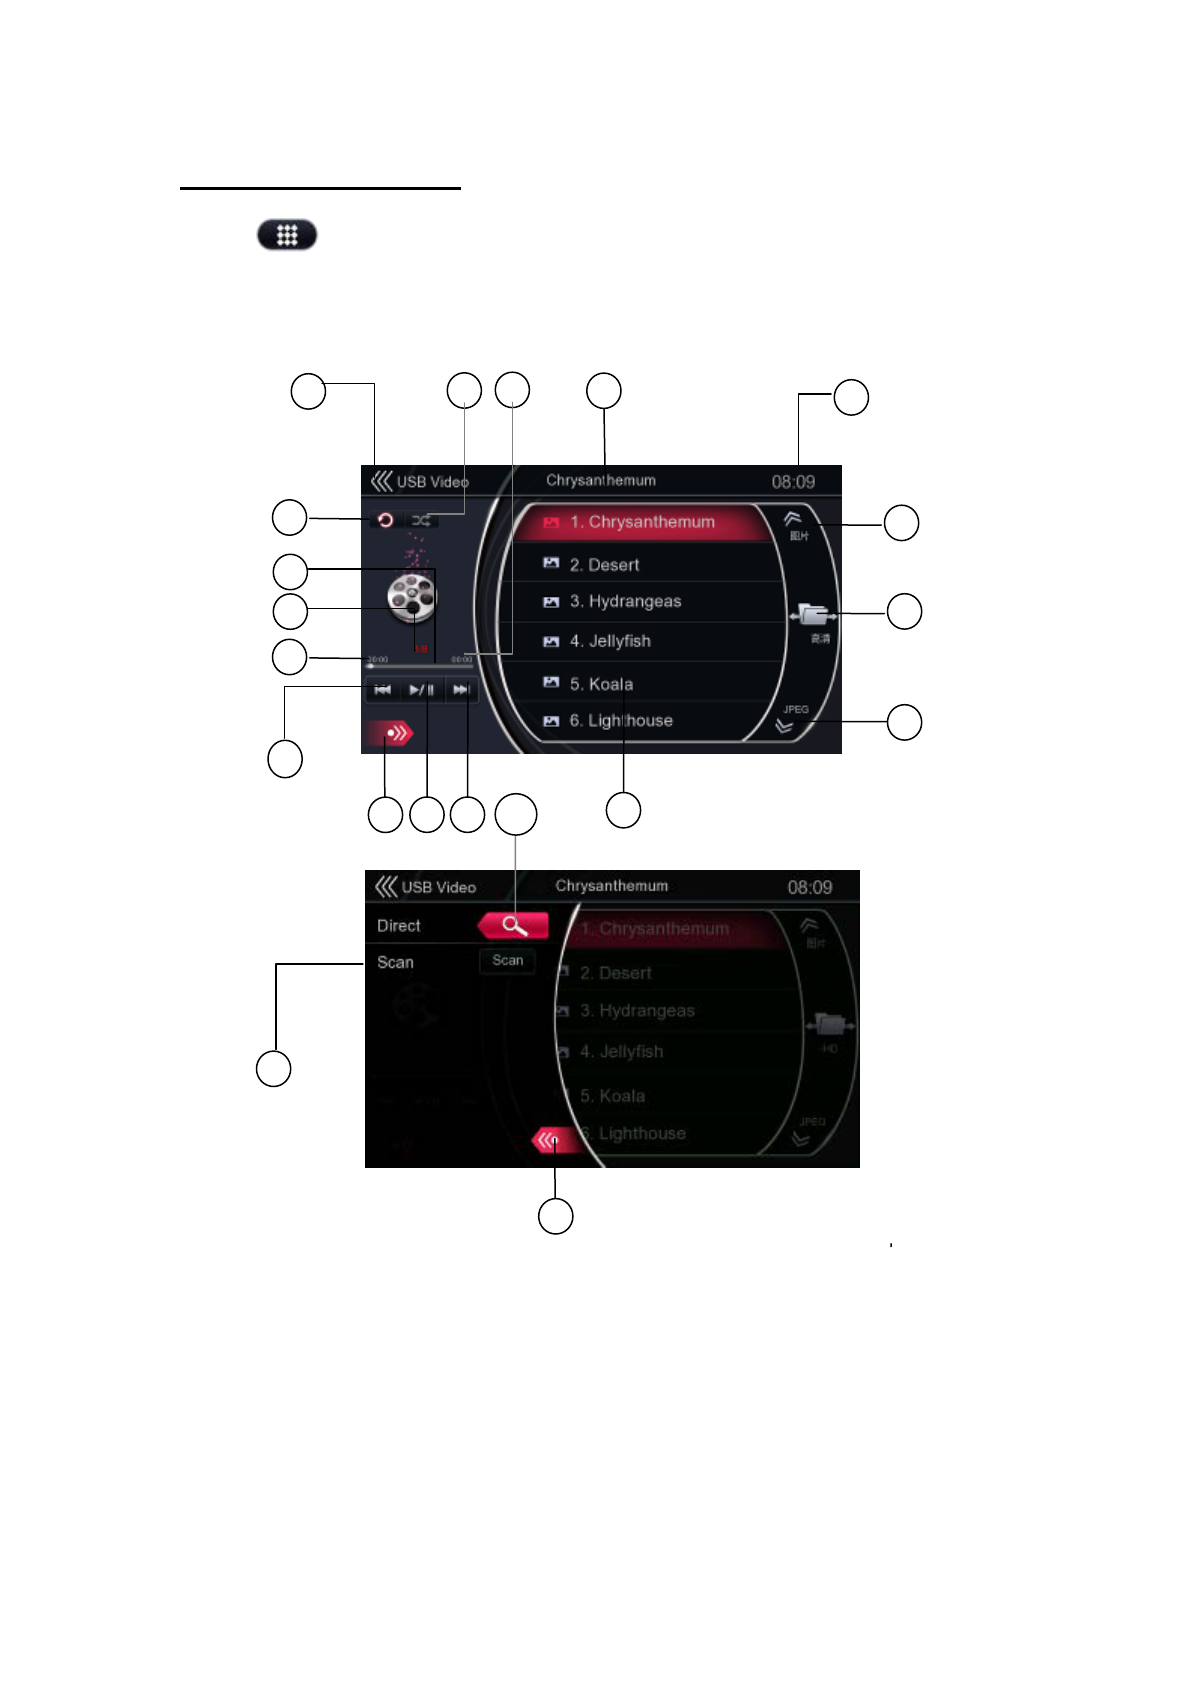
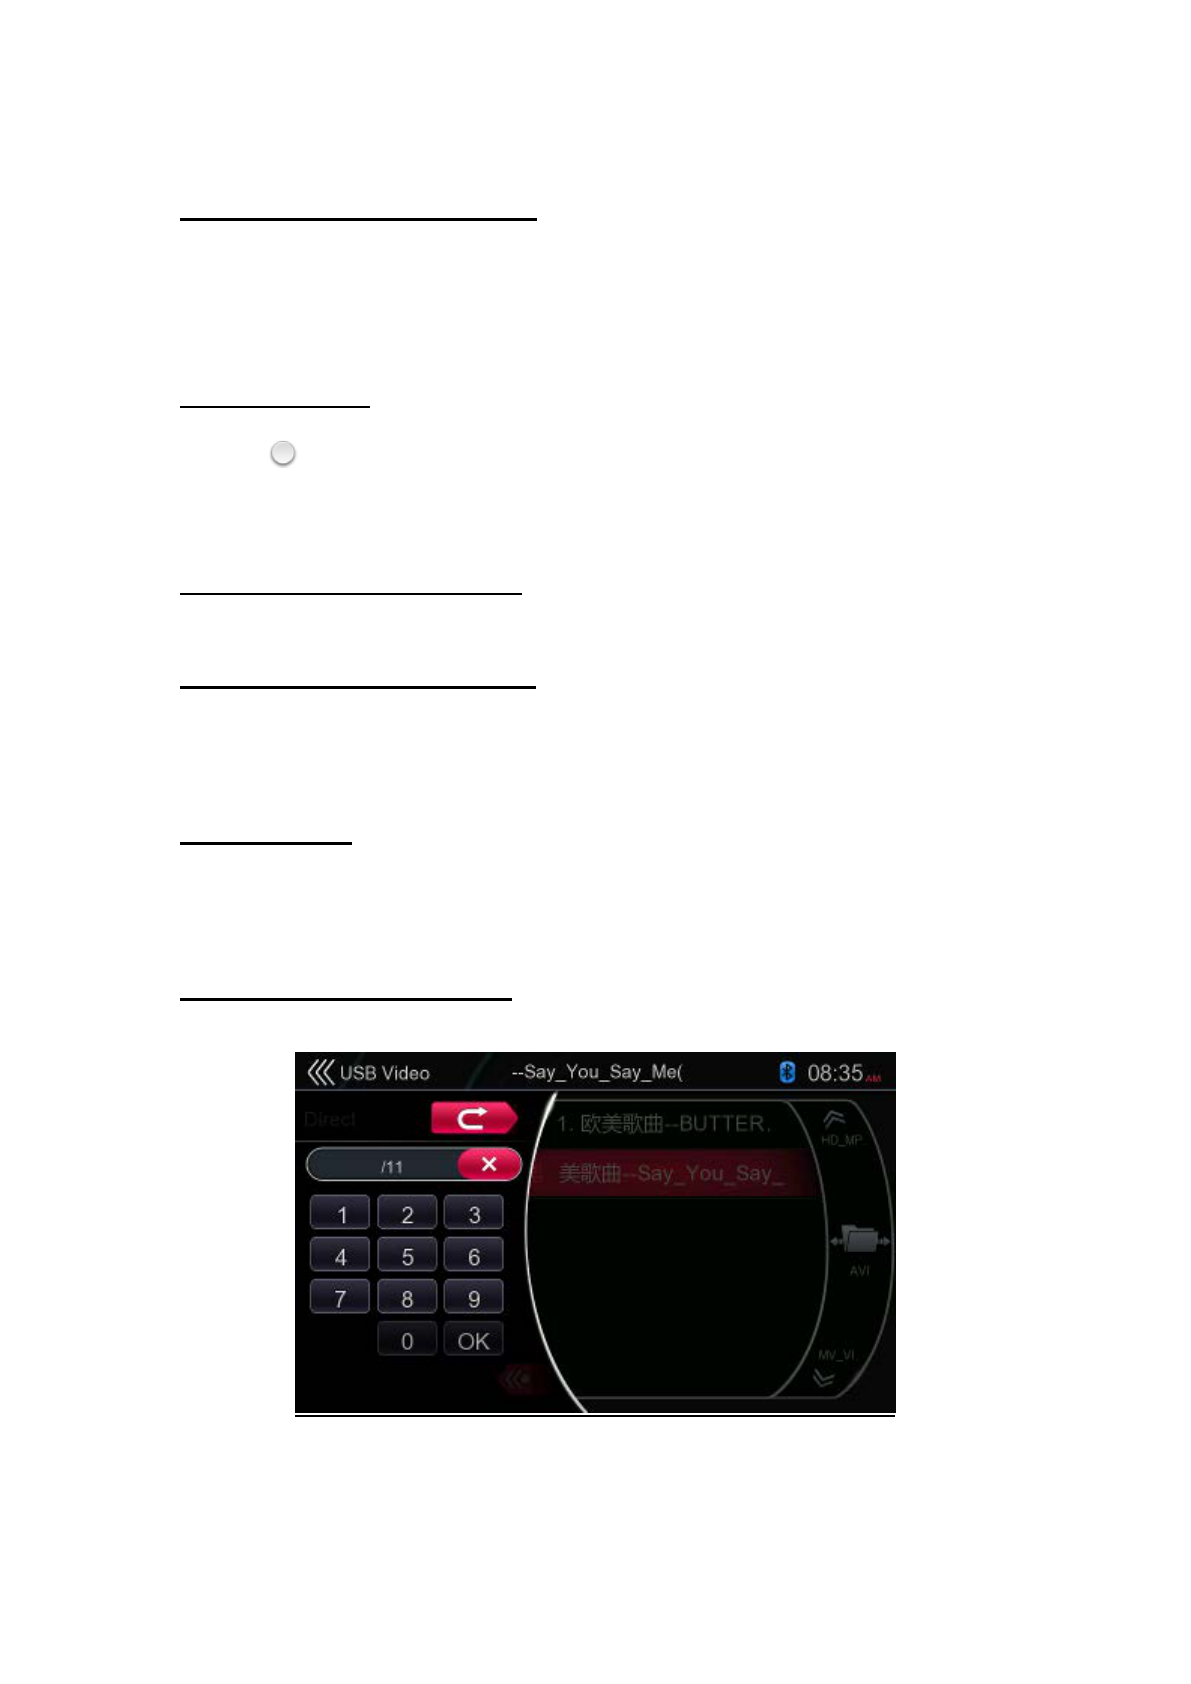
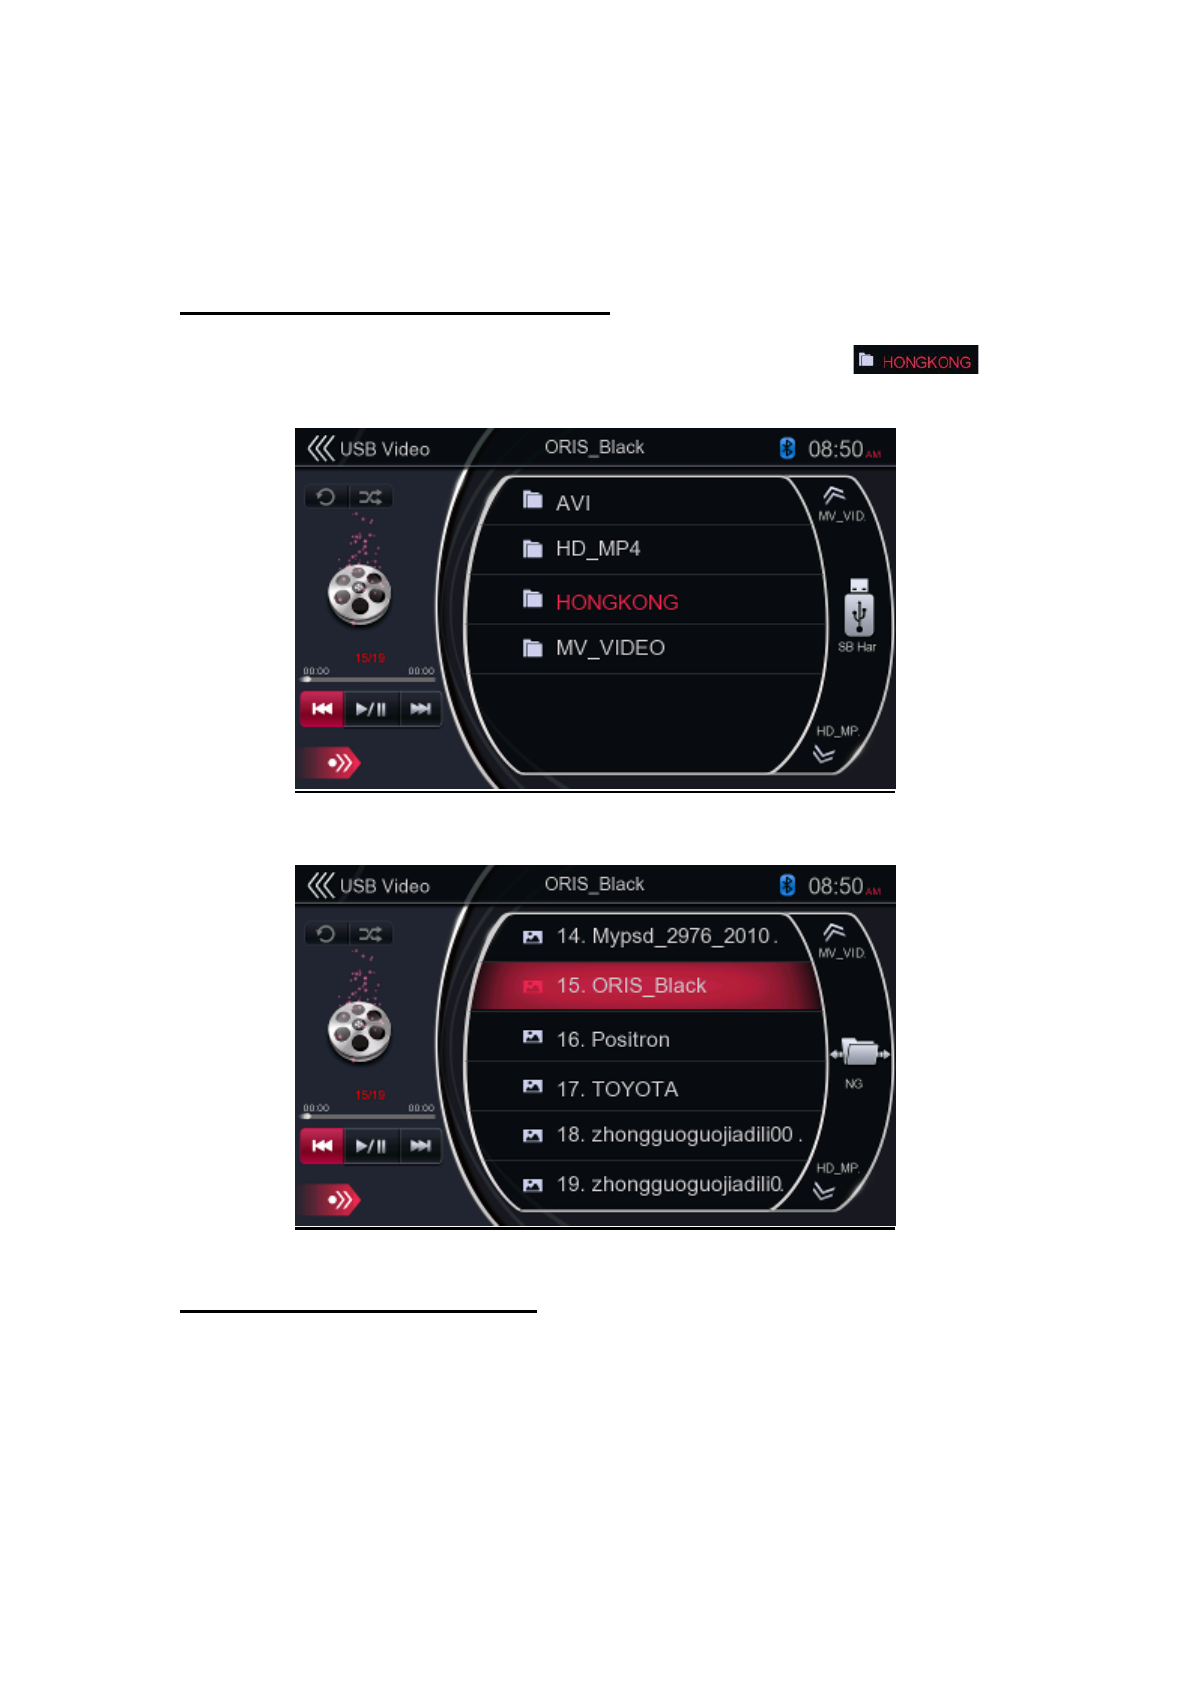
Switch USB Video Menu
Touch [] button playback will be paused, and the screen will switch to USB
Video List.
1 - Previous File / Fast Backward button
2 - Play / Pause button
3 - Next File / Fast Forward button
4 - Video files in list
5 - Next Folder button
6 - Current Folder button
7 - Previous Folder button
8 - System time
9 - Current file information area
16
11
8
12
10
61
3
1
15
5
49
14
2
71
9
13
17
18
19
20
10 - Total time
11 - Shuffle button
12 - Return button (to Main Menu)
13 - Repeat button
14 - Playback status information
15 - Album information
16 - Elapsed playing time
17 - Option button
18 - Direct button
19 - Scan button
20 - Close option menu button
Play / Pause Playback
On USB Video menu screen, playback status is paused.
Touch [ ] button to resume playback. The screen will go to video screen
automatically.
Previous / Next File Switch
Touch [ ] or [ ] button during playback to play previous/next file.
Touch [ ] button to start playback from the beginning of the next file.
Touch [ ] button to start playback from the beginning of the current file, when
this button is touched again within about 5 seconds, playback starts from the
beginning of previous file.
Repeat Playback
The repeat set as the factory default is Repeat All.
Touch the [ ] button once for Repeat File, again for Repeat Folder, again for
Repeat All.
Shuffle Playback
1. Touch [] button to shuffle the tracks in playing folder during playback.
2. Touch this button again to turn off the feature.
Current File Information Area
This area displays information of current video file: file name, number of current
file/total number in current folder, elapsed playing time/total time of current file.
Skip by Seek Bar
Touch [ ] on seek bar and drag it to any position where you want to start
playback.
Select a Folder on Display List
This operation is same as USB Audio mode.
Select a File on the Display List
This operation is same as USB Audio mode.
Scan the Files
This operation is same as USB Audio mode.
Search with the File Number
This operation is same as USB Audio mode.
This system can play USB picture files (JPG, BMP…etc.) stored in an USB memory
which is recognized as “USB Mass Storage Class device”. You can use your USB
memory as a picture device by simply copying desired picture files into it.
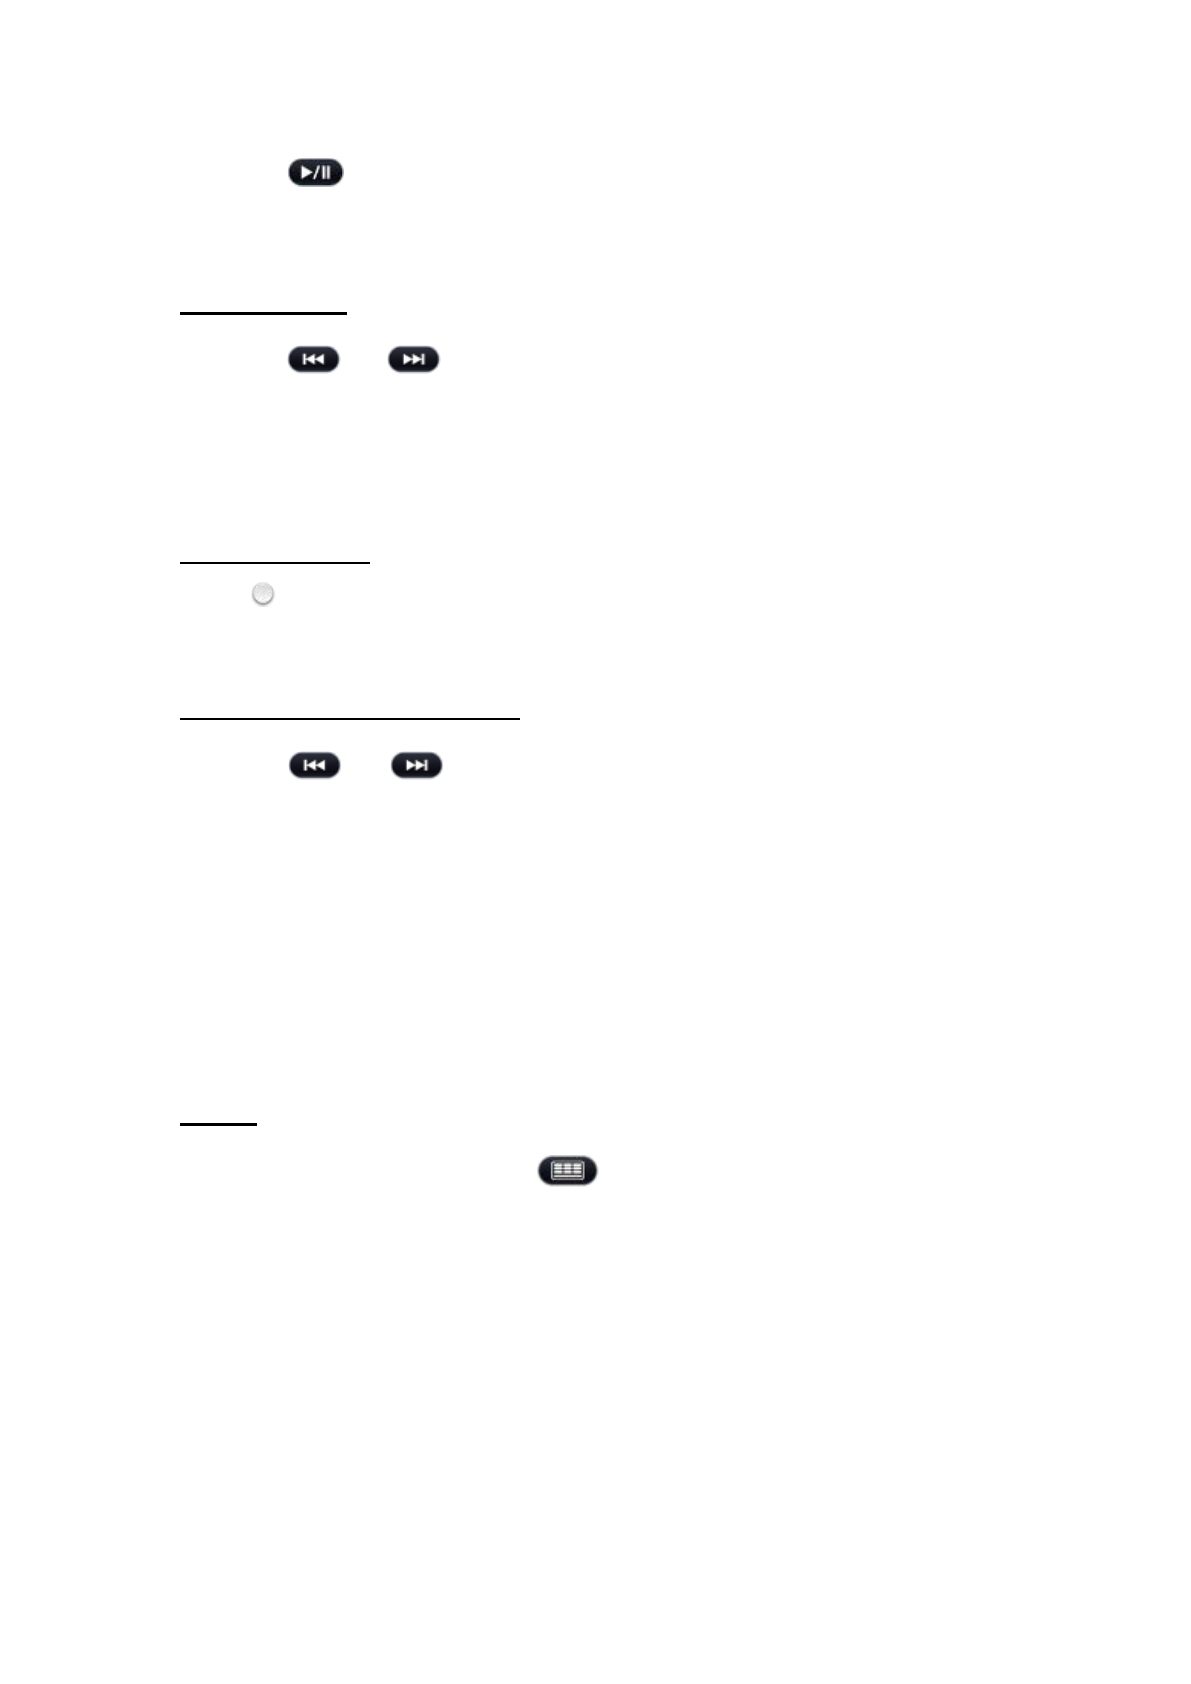
PLAY PICTURE FILES IN USB MEMORY
In USB Video mode touch the folder with picture files, for example [ ] in
below case.
Current File Information Area
This area displays information of current picture file: file name, number of current
file/total number in current folder.
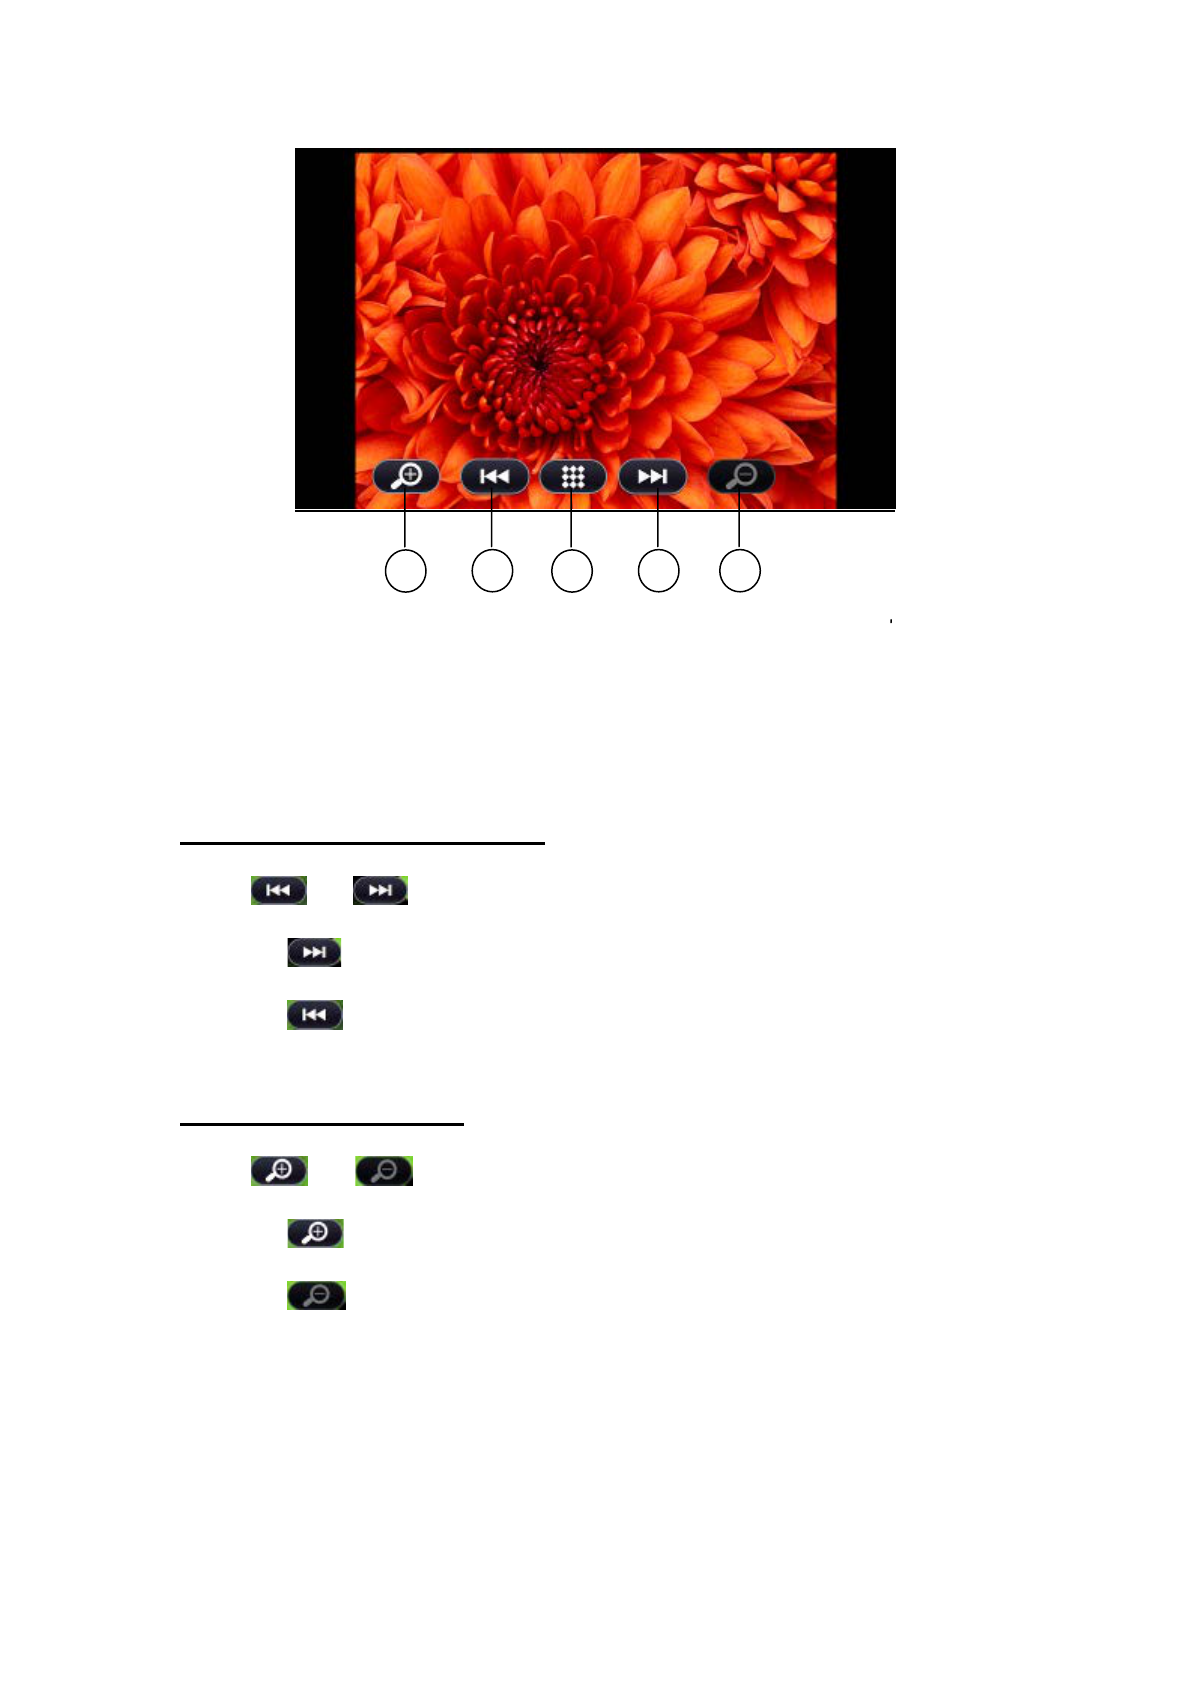
1 - Magnify button
2 - Previous Picture button
3 - Menu List
4 - Next Picture button
5 - Minify button
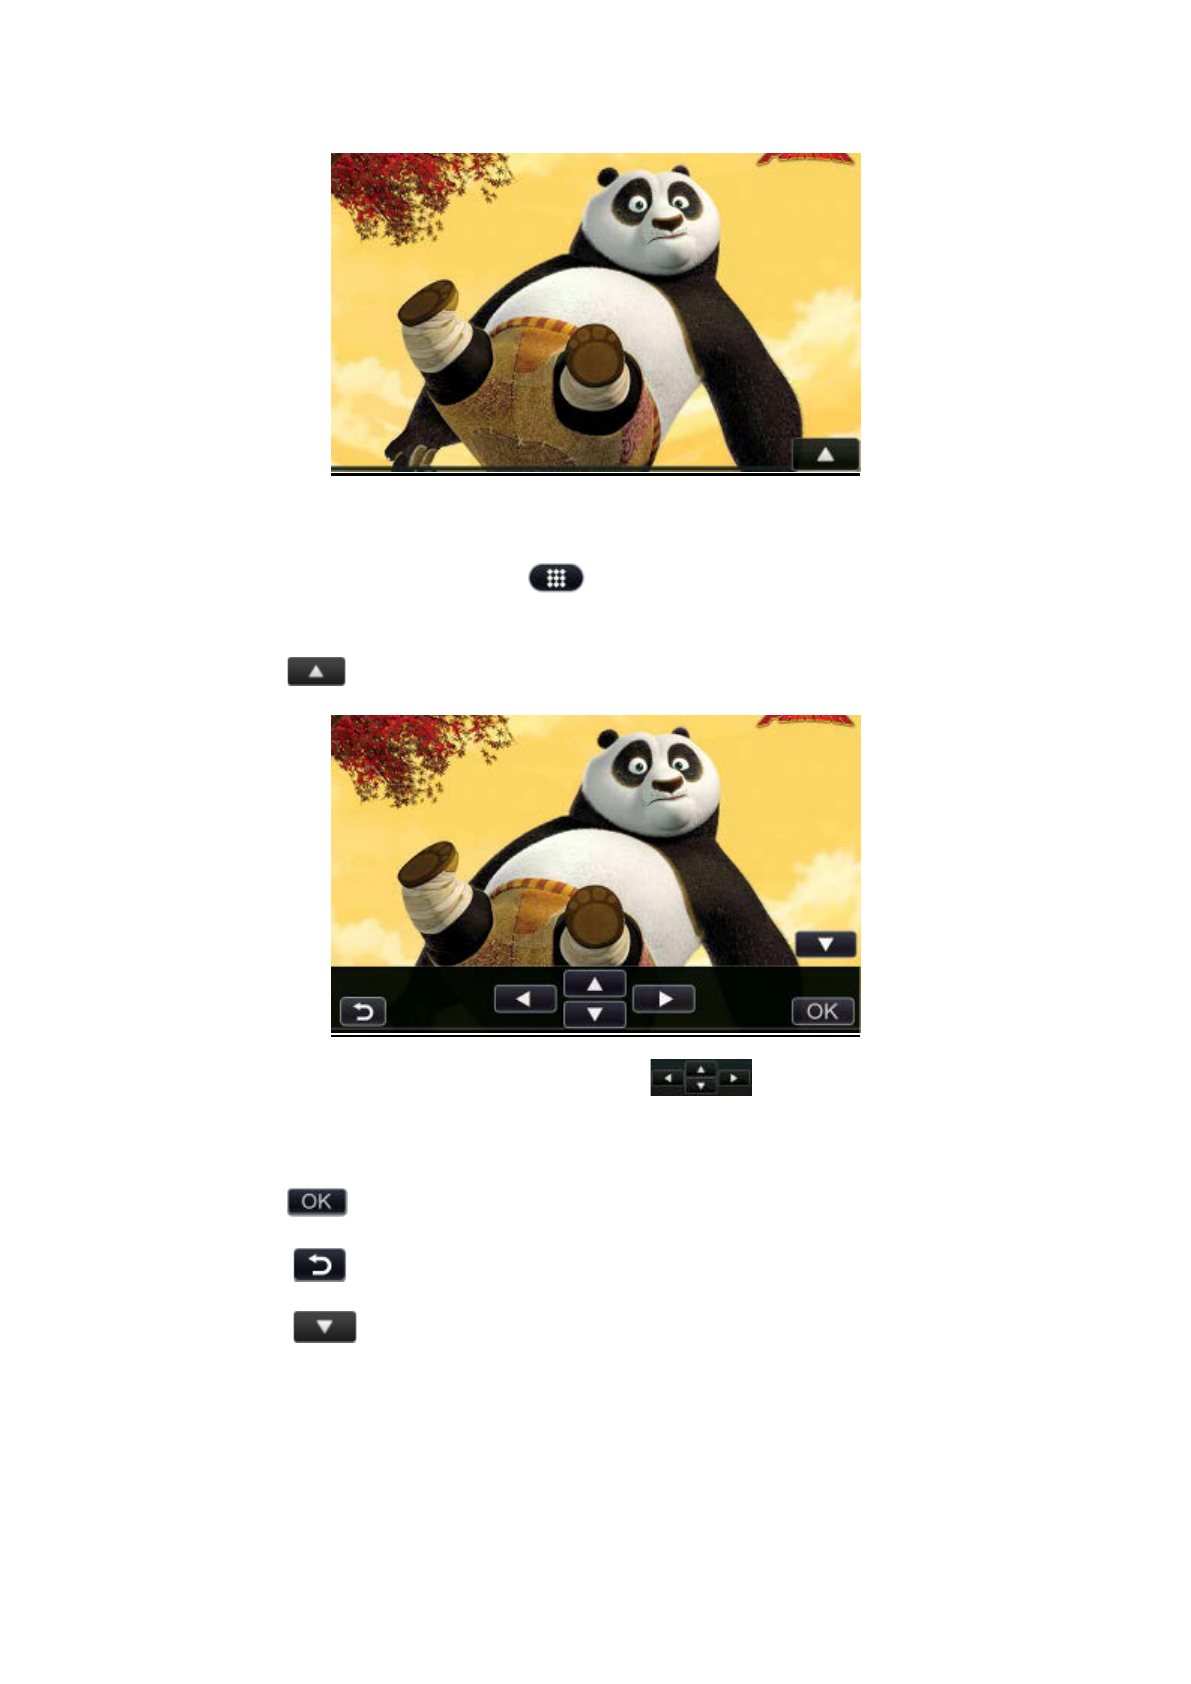
Previous / Next Picture Switch
Touch [] or [ ] button during playback to play previous/next picture.
Touch [ ] button to start playback of the next picture.
Touch [ ] button to start playback of previous picture.
Magnify / Minify Picture
Touch [] or [ ] button during playback to magnify or minify current picture.
Touch [ ] button to magnify the picture.
Touch [ ] button to minify the picture.
1
2
3
4
5
B
BL
LU
UE
ET
TO
OO
OT
TH
H
A
AU
UD
DI
IO
O
P
PL
LA
AY
YE
ER
R
O
OP
PE
ER
RA
AT
TI
IO
ON
NS
S
Some Bluetooth-enabled phones have audio features, and some portable audio
players support the Bluetooth feature. These devices will be called as “Bluetooth
Audio Players” in this manual. This system can play audio data stored in a Bluetooth
Audio Player.
Note:
This system will not operate or may operate improperly with some Bluetooth
Audio Players.
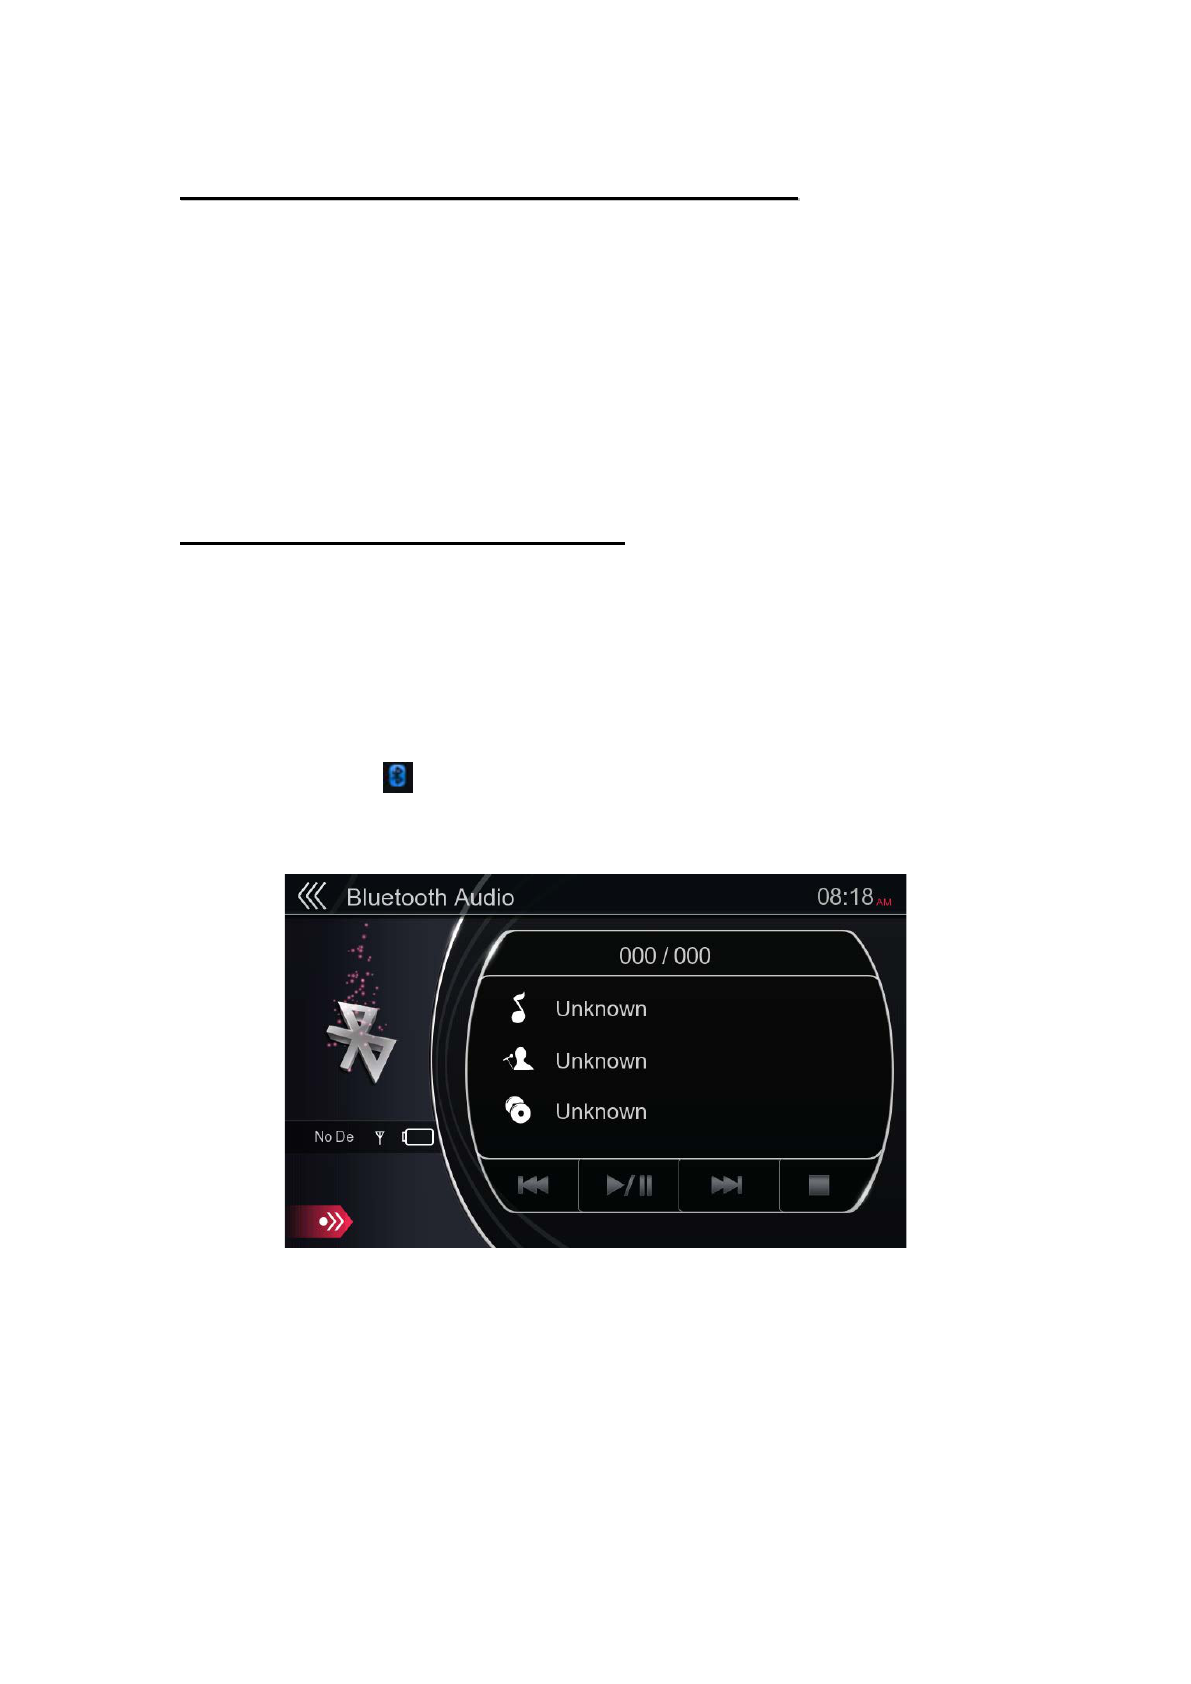
SELECT THE BLUETOOTH AUDIO MODE
1. Touch the [Bluetooth Audio] button to select the Bluetooth Audio mode.
The system changes to the Bluetooth mode. If the connection with a Bluetooth Audio
Player has already been established, you may select the Music function.
When the connection with blue icon a Bluetooth Audio Player has been
established, the [ ] icon is displayed at the top of the screen.
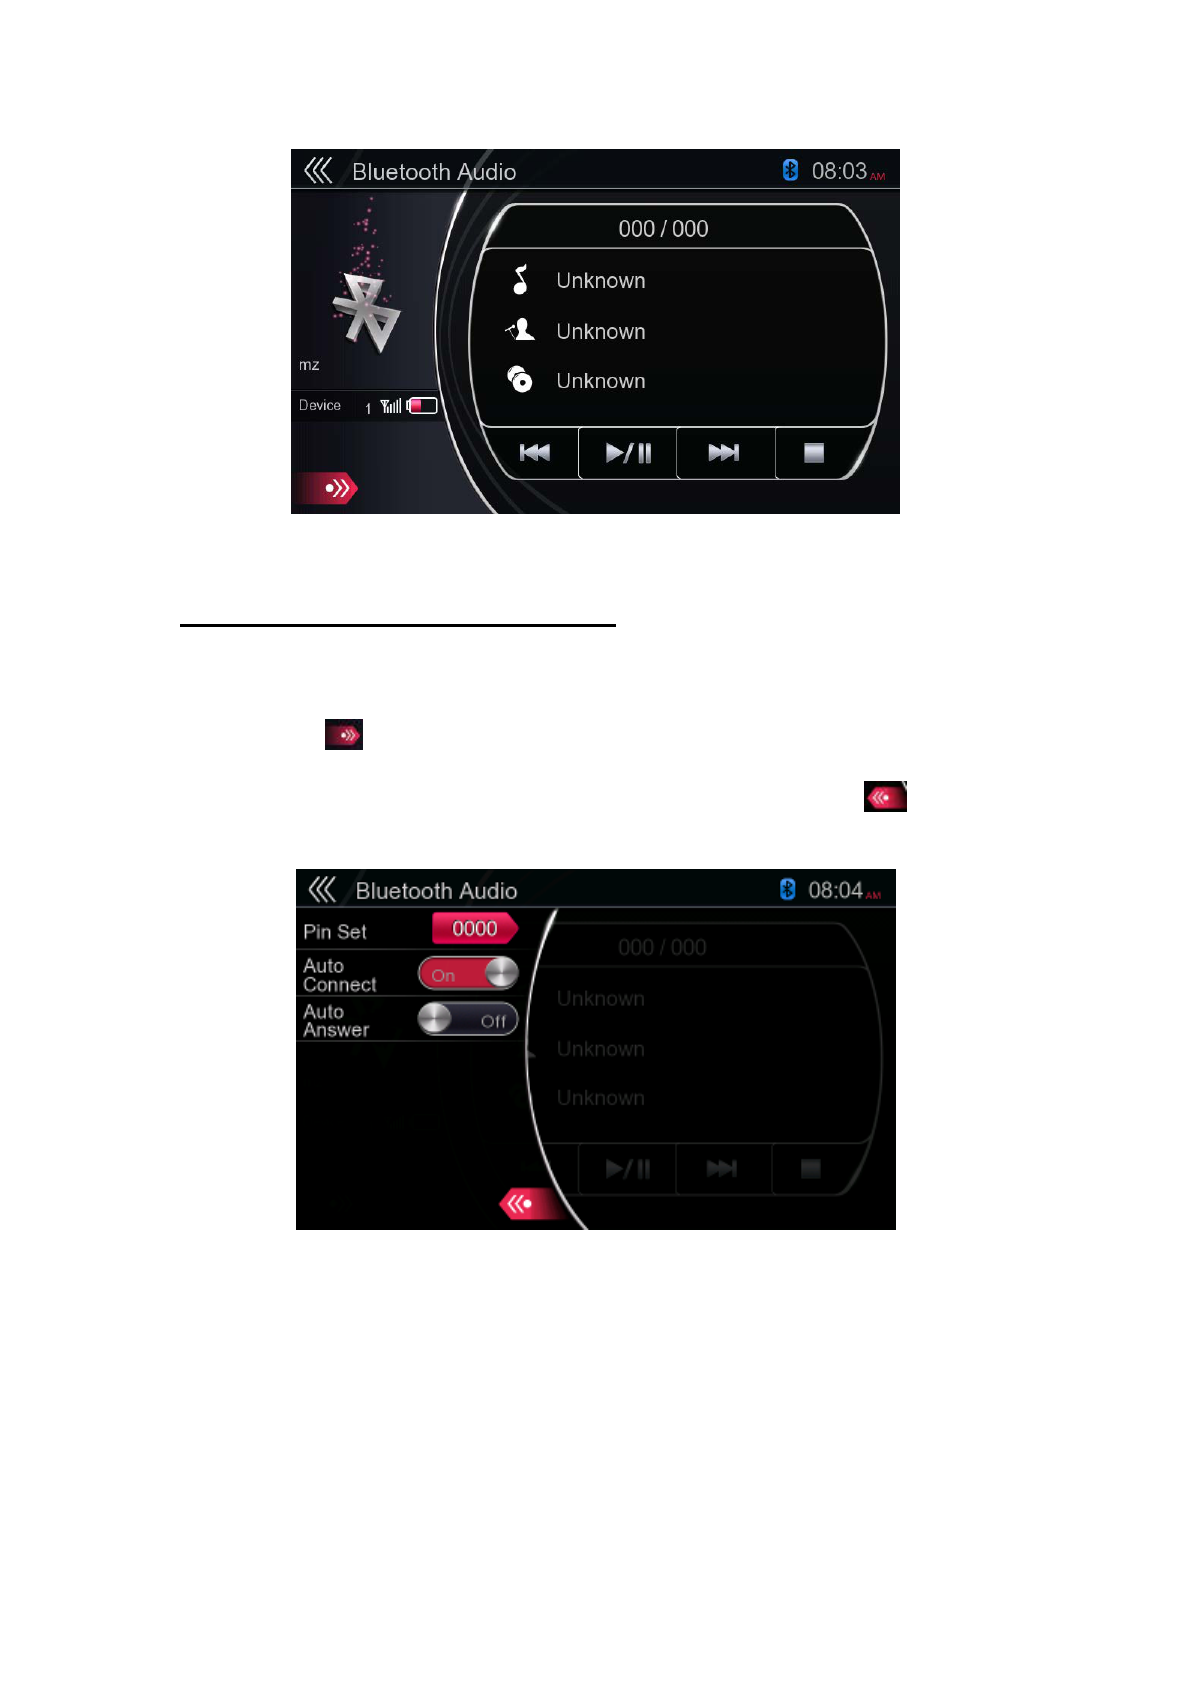
BLUETOOTH AUDIO PLAYER SETTINGS
You can confirm various information concerning about the Bluetooth interface
features.
1. Touch the [ ] button to display the information on the screen.
2. When you finish confirming the Bluetooth information, touch the [ ] button to
return to the previous screen.
If you want to change the Pin Code setting of this unit, perform the following steps.
The factory default setting is “0000”.
3. Touch the text box of the Pin Code item to display the numerical keypad screen.
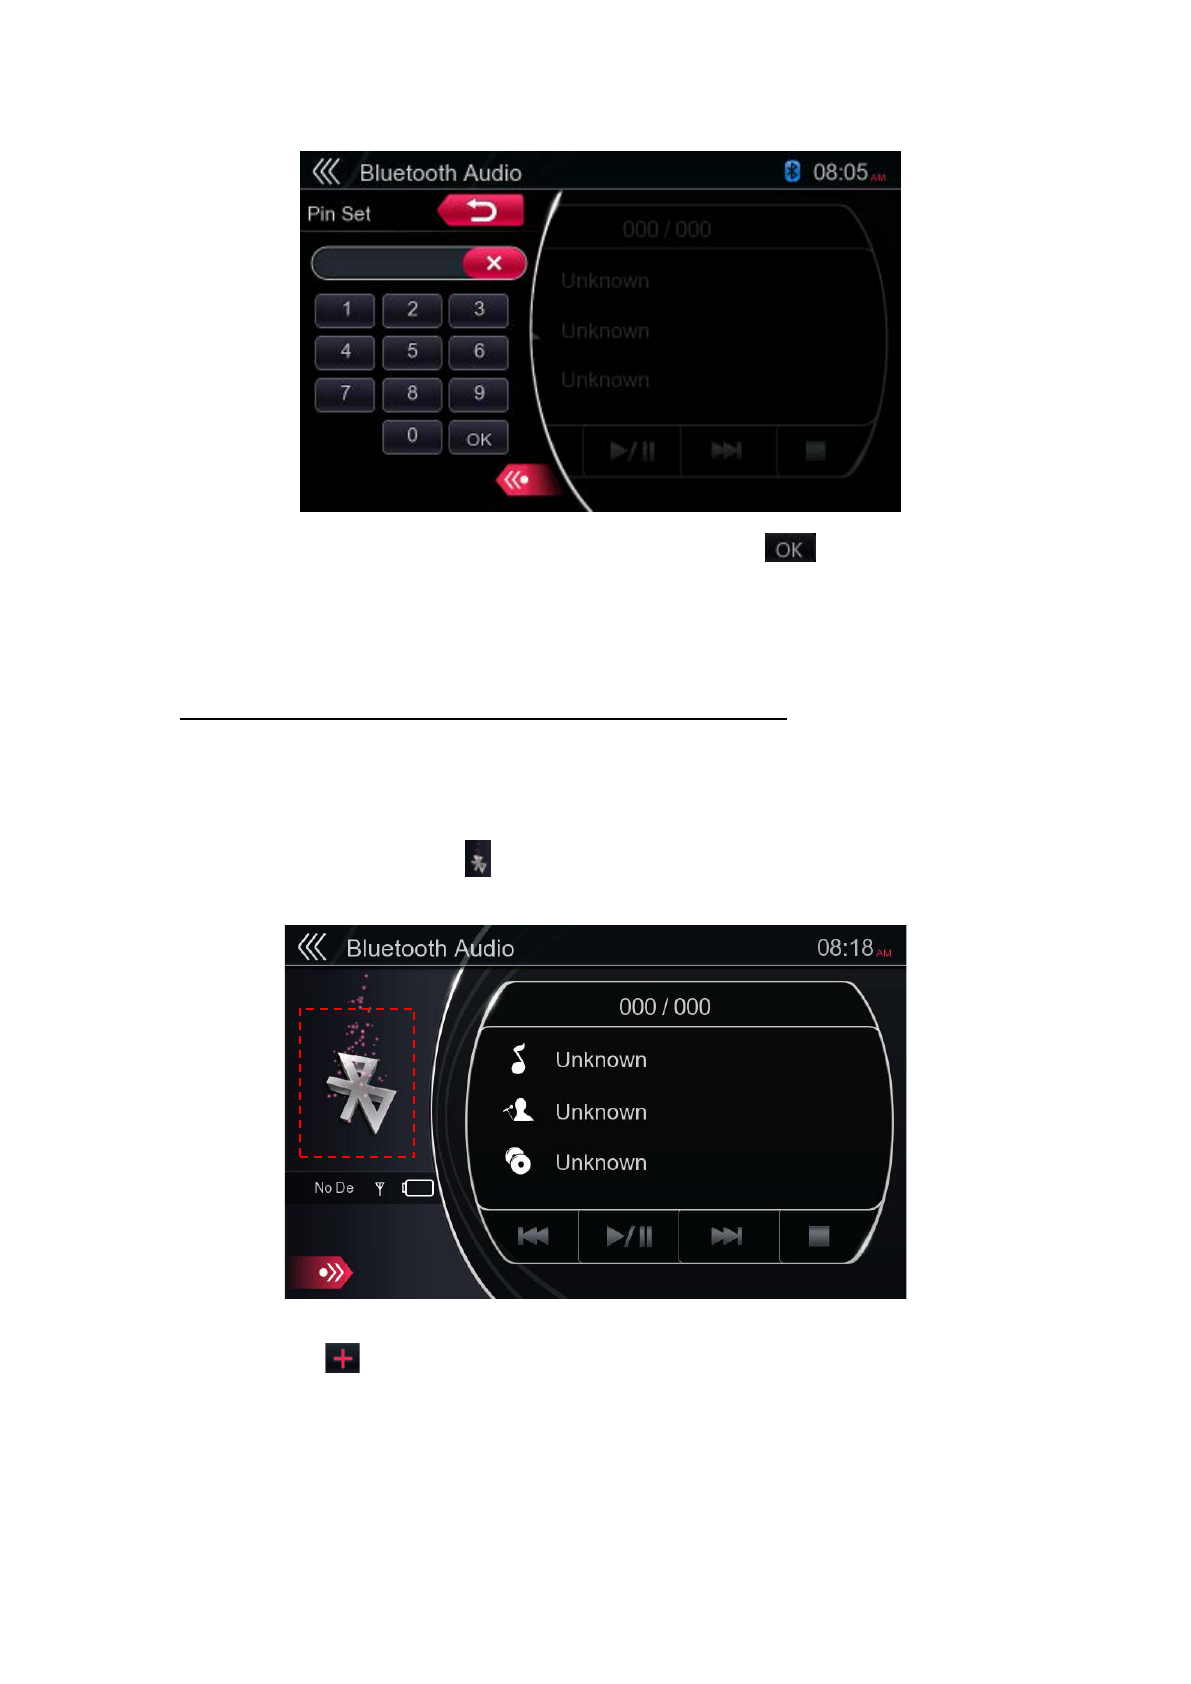
4. Enter your desired 4-digit Pin Code, and then touch the [ ] button.
REGISTER THE BLUETOOTH AUDIO PLAYER (PAIRING)
You can register up to 5 Bluetooth Audio Players.
1. Turn on the power of the Bluetooth Audio Player you wish to register.
2. Touch the device button [ ] to display the Device Select screen.
3. Touch the [] button to display the Inquiring Device screen.
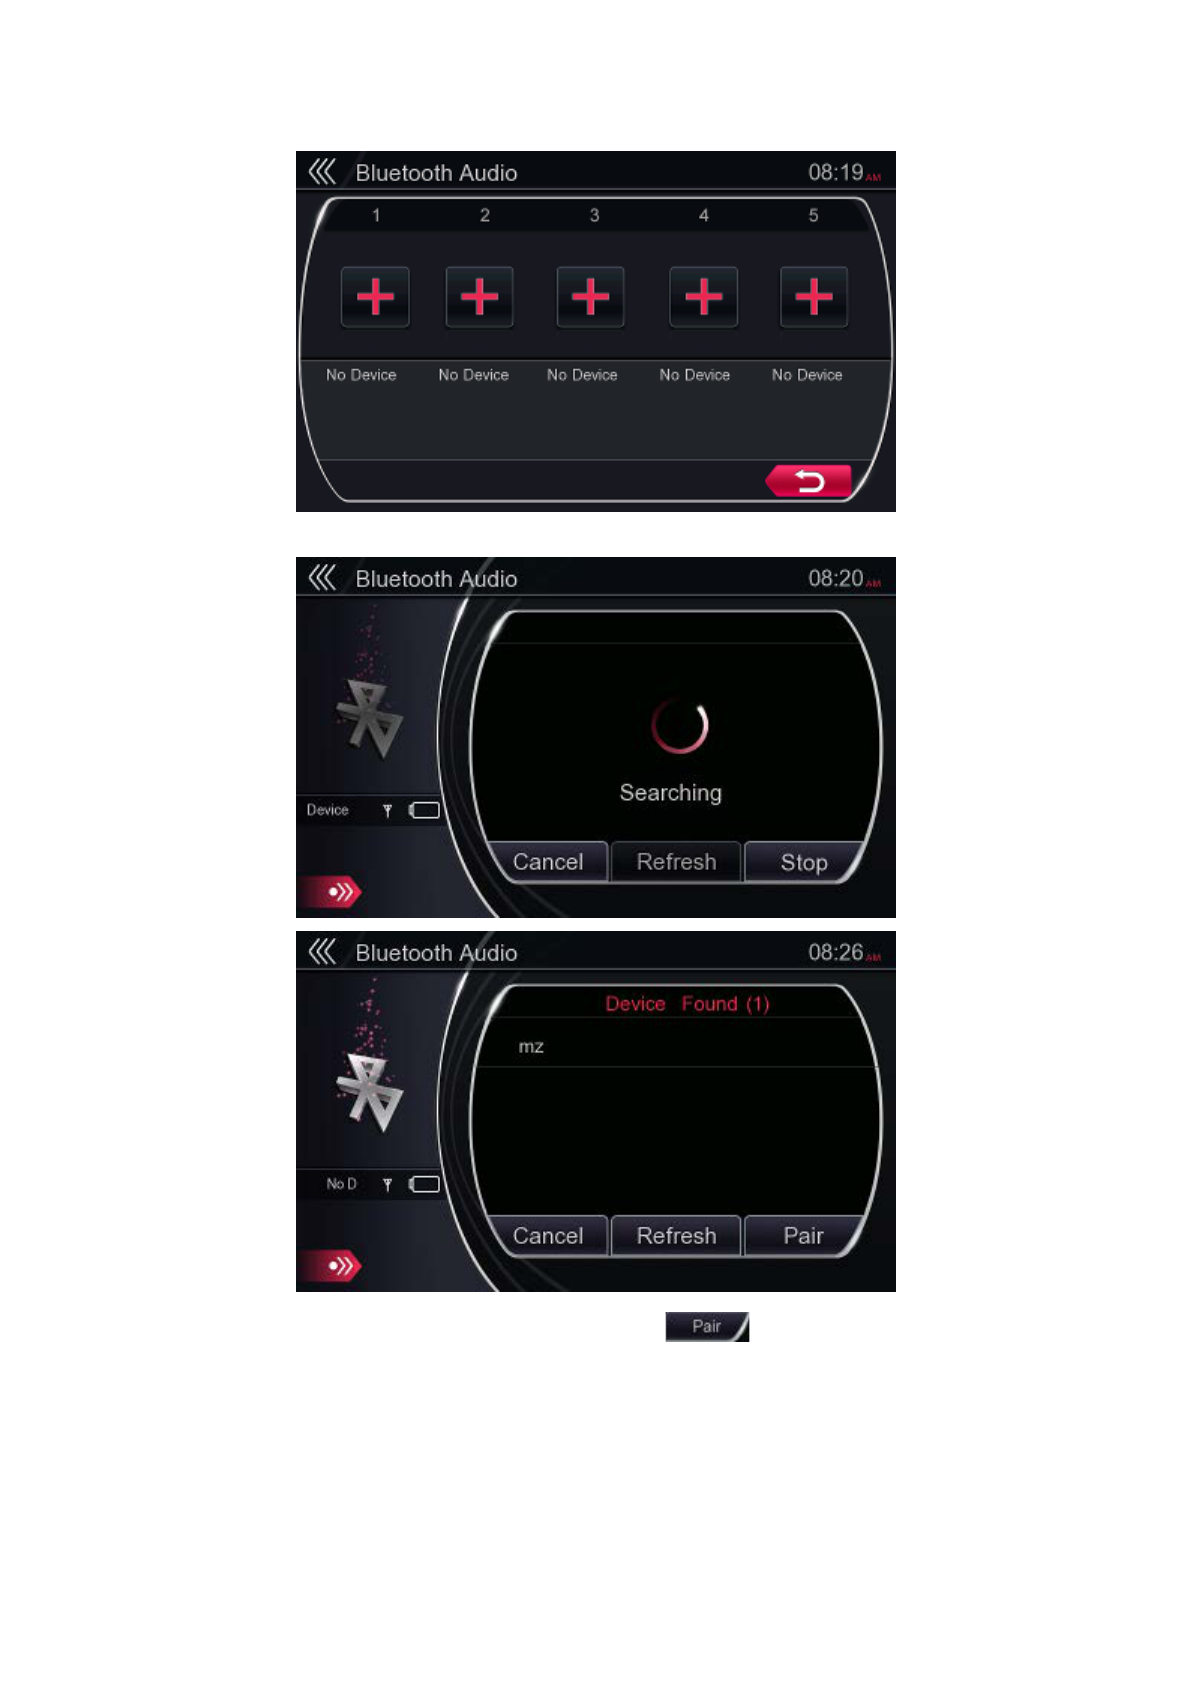
4. Touch your desired device button and touch [ ] button to register for the
Bluetooth Audio Player.
When the pairing operation completes, the registered Bluetooth Audio Player is set
as the current device, the display will return to the Bluetooth Audio mode screen.
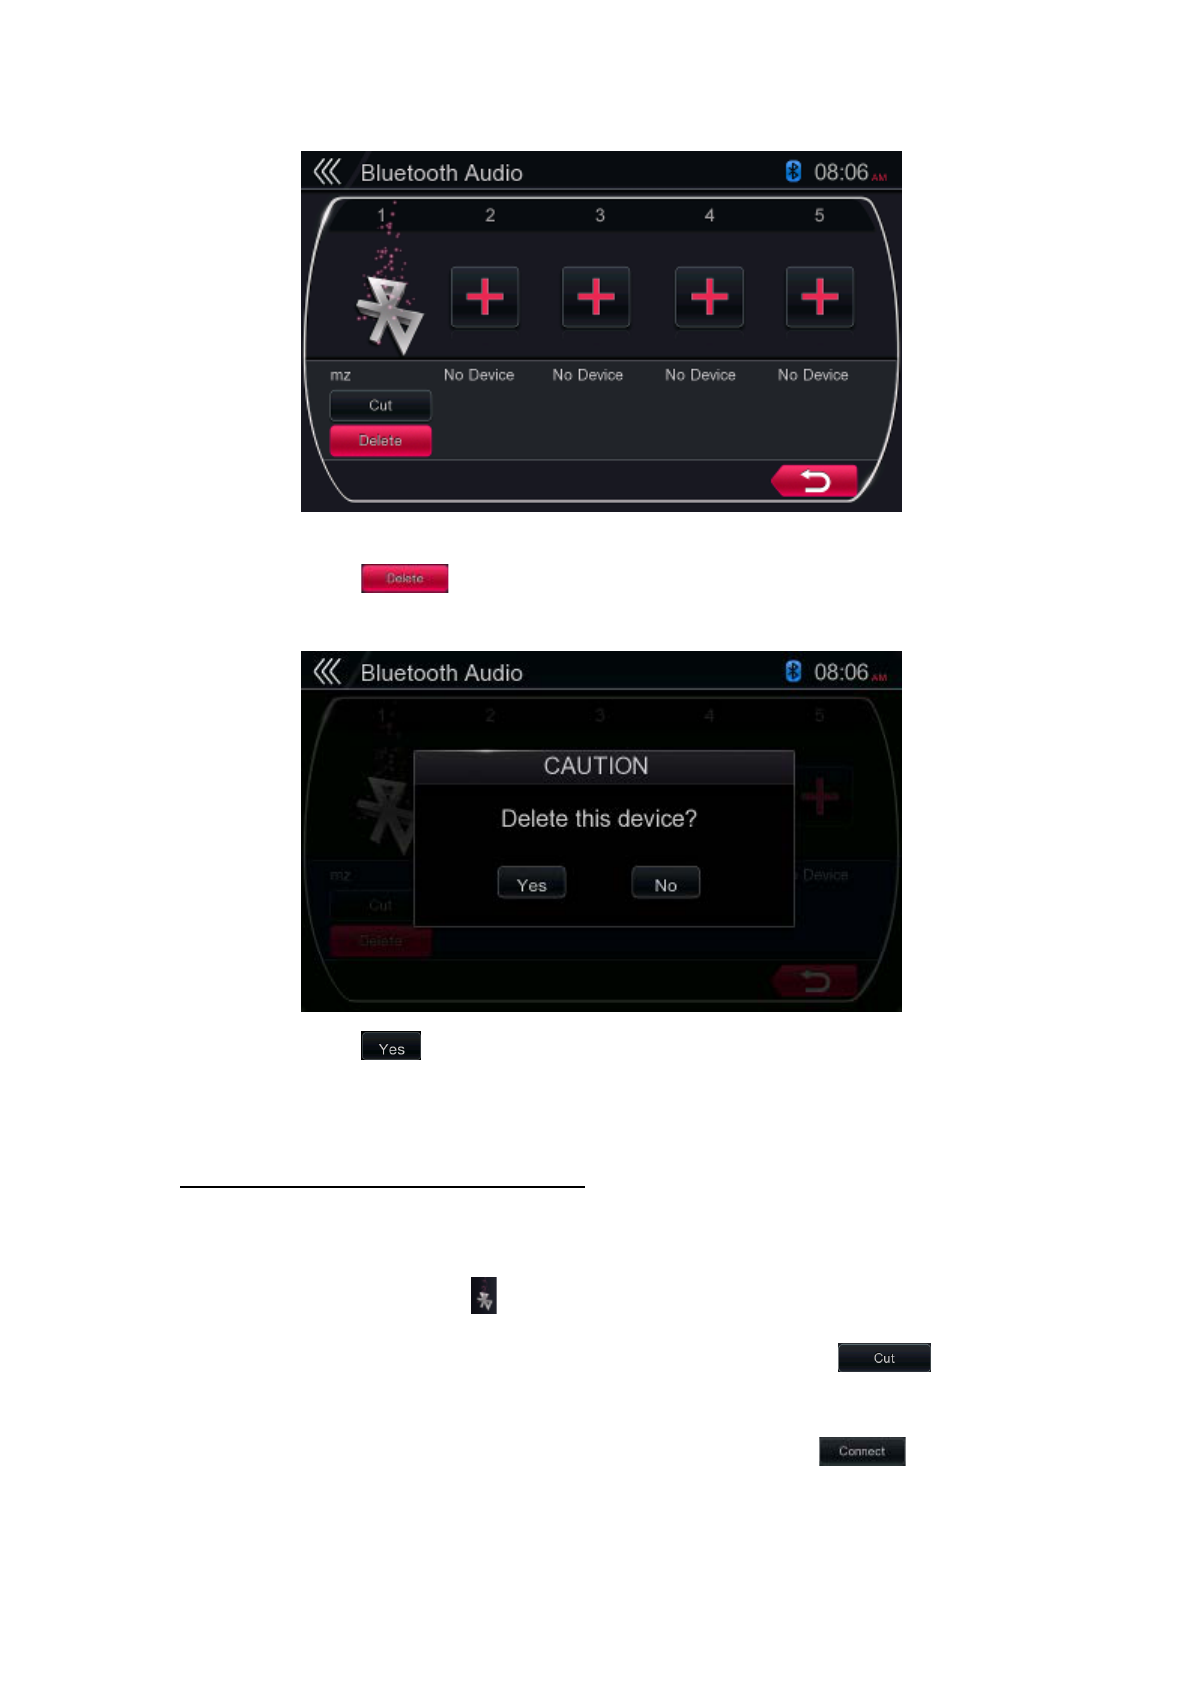
To delete the Bluetooth Audio Player registration
1. Touch the [] button to delete the device.
A confirmation screen is displayed.
2. Touch the [ ] button to confirm delete.
SELECT BLUETOOTH AUDIO PLAYER
To change the current Bluetooth Audio Player to the other device which is already
registered, perform the following operation.
1. Touch the device button [ ] to display the Device Select screen.
2. Touch the currently connected device button, then touch the [ ] button
to disconnect the active device.
3. Touch the desired device button you wish to use. Touch the [ ] button to
select it as your active device.
4. Touch the [ ] button to return to the previous screen.
CONTROL THE BLUETOOTH AUDIO PLAYER
Note:
Occasionally, depending on the environment, playback sounds may be
fragmented, or switch noises may be generated.
Play Music
After the connection with a Bluetooth Audio Player is established, the play mode is
automatically engaged.
When playback is not started for some devices, touch the [ ] button manually.
Pause Playback
1. Touch the [ ] button during playback.
2. To resume playback, touch the [ ] button. Playback resumes.
Skip a Track (Search)
3. Touch the [] or [] button during playback.
Stop Playback
4. Touch the [ ] button during playback.
Tracks are stopped, touch the [] button to playback the first track.
B
BL
LU
UE
ET
TO
OO
OT
TH
H
T
TE
EL
LE
EP
PH
HO
ON
NE
E
O
OP
PE
ER
RA
AT
TI
IO
ON
NS
S
When the connection with your Bluetooth-enabled cellular phone is established, the
following functions are available on this system.
Listen to your telephone calls on the car speakers.
Answer to an incoming call.
Make a call using the numerical keypad screen.
Make a call using the Phone Book data in the selected cellular phone.
Make a call using the history data of the dialed/received calls.
Note:
Some cellular phones may not be able to transfer the phone book data to system.
The phone book data transmission may take a long time. The operations of
sending calls are disabled during the data transmission.
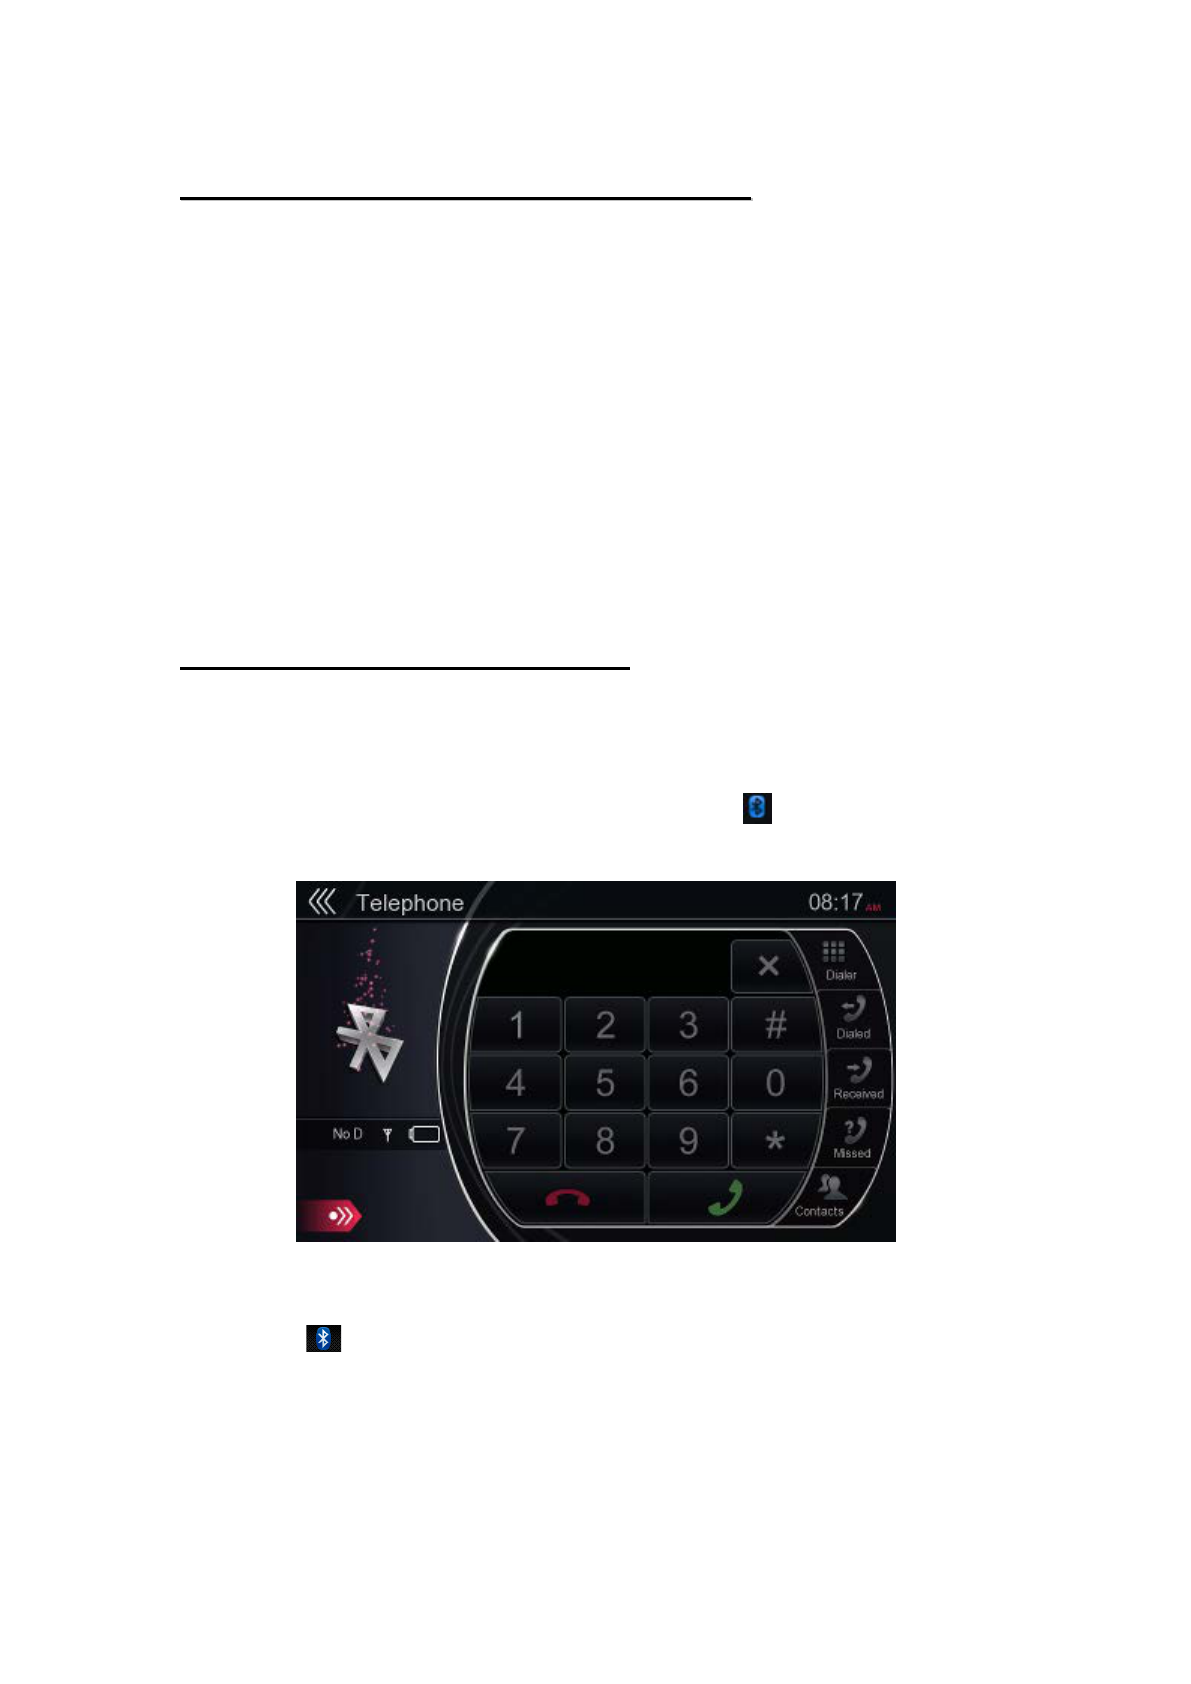
SELECT THE BLUETOOTH PHONE MODE
1. Touch the [Telephone] button to select the Bluetooth Telephone mode.
The Telephone screen is displayed.
When no Bluetooth Telephone is connected, the [ ] icon is not displayed at
the top of the screen.
When the connection with a Bluetooth Telephone has been established, the
icon [] is displayed at the top of the screen.
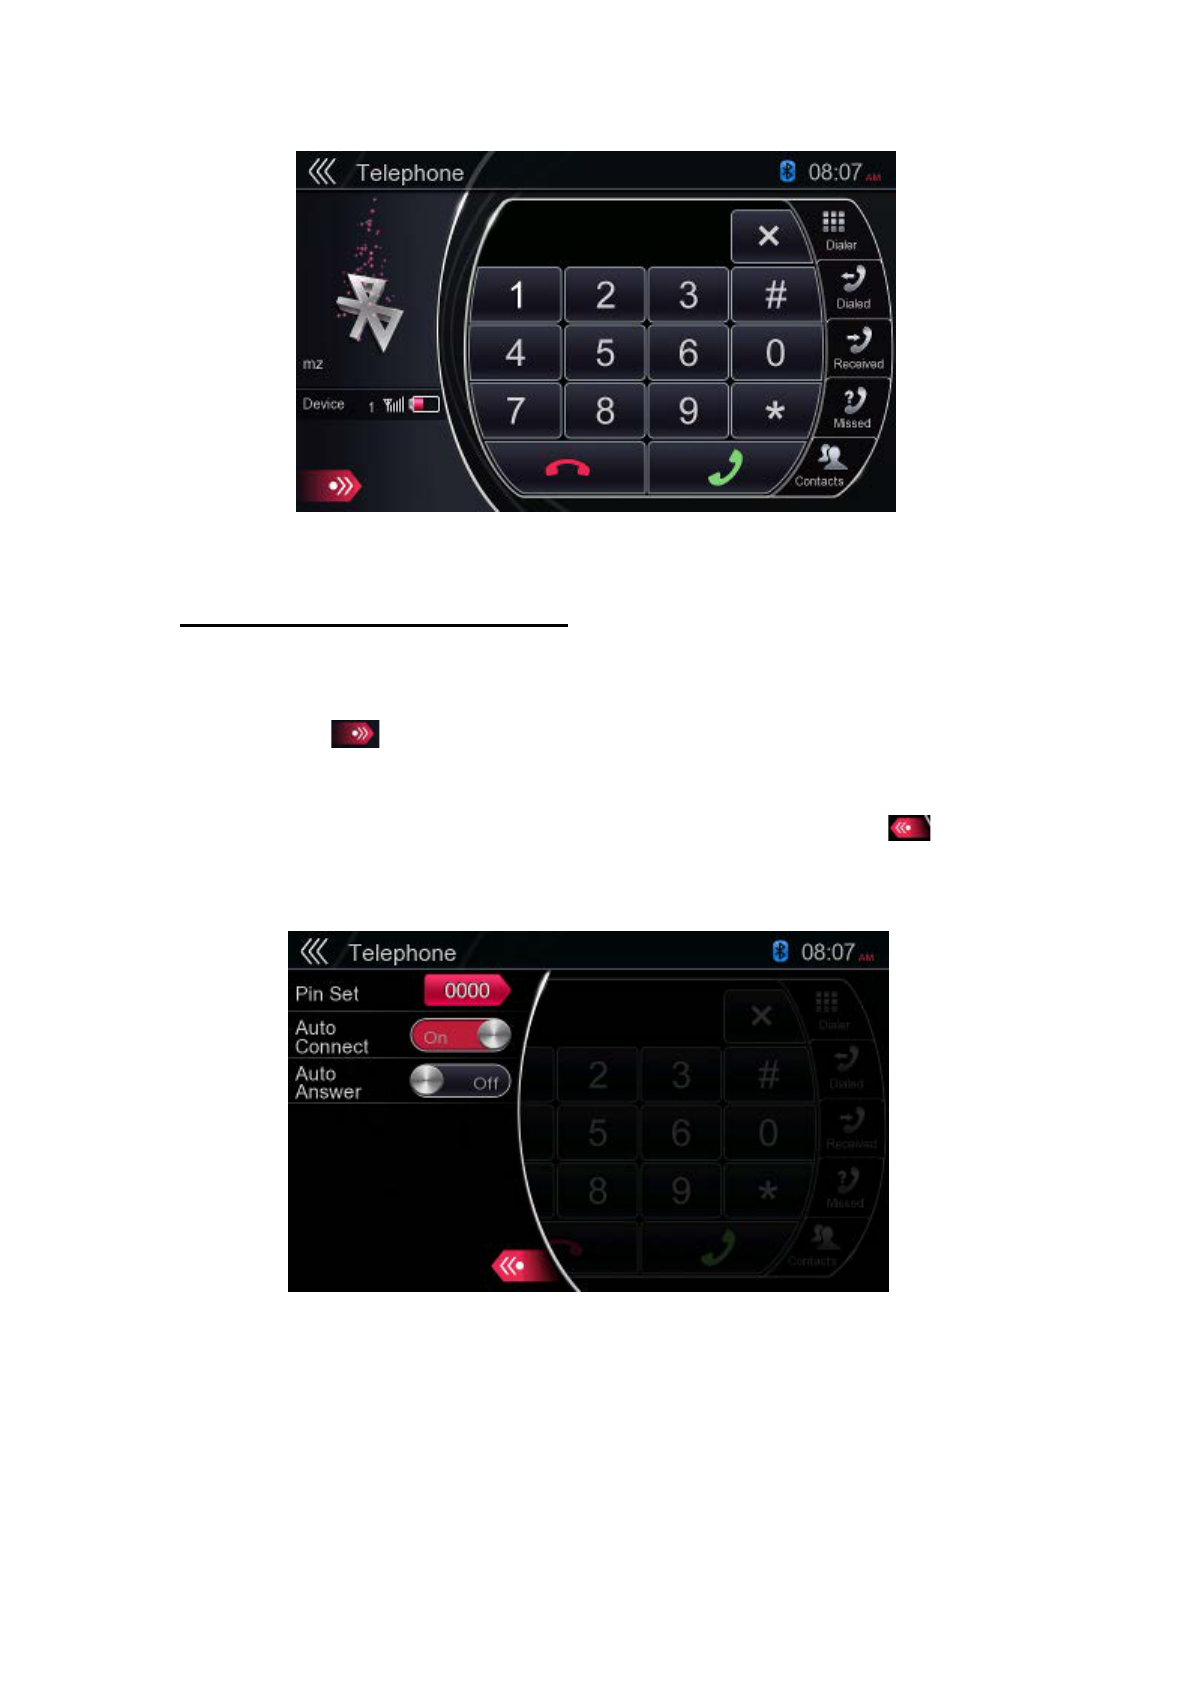
BLUETOOTH TELEPHONE SETTING
You can confirm various information concerning about the Bluetooth interface
features.
1. Touch the [ ] button to display the information on the screen.
2. Perform setting for the desired item. See the following sections for detail.
3. When you finish confirming the Bluetooth information, touch the [ ] button
to return to previous screen.
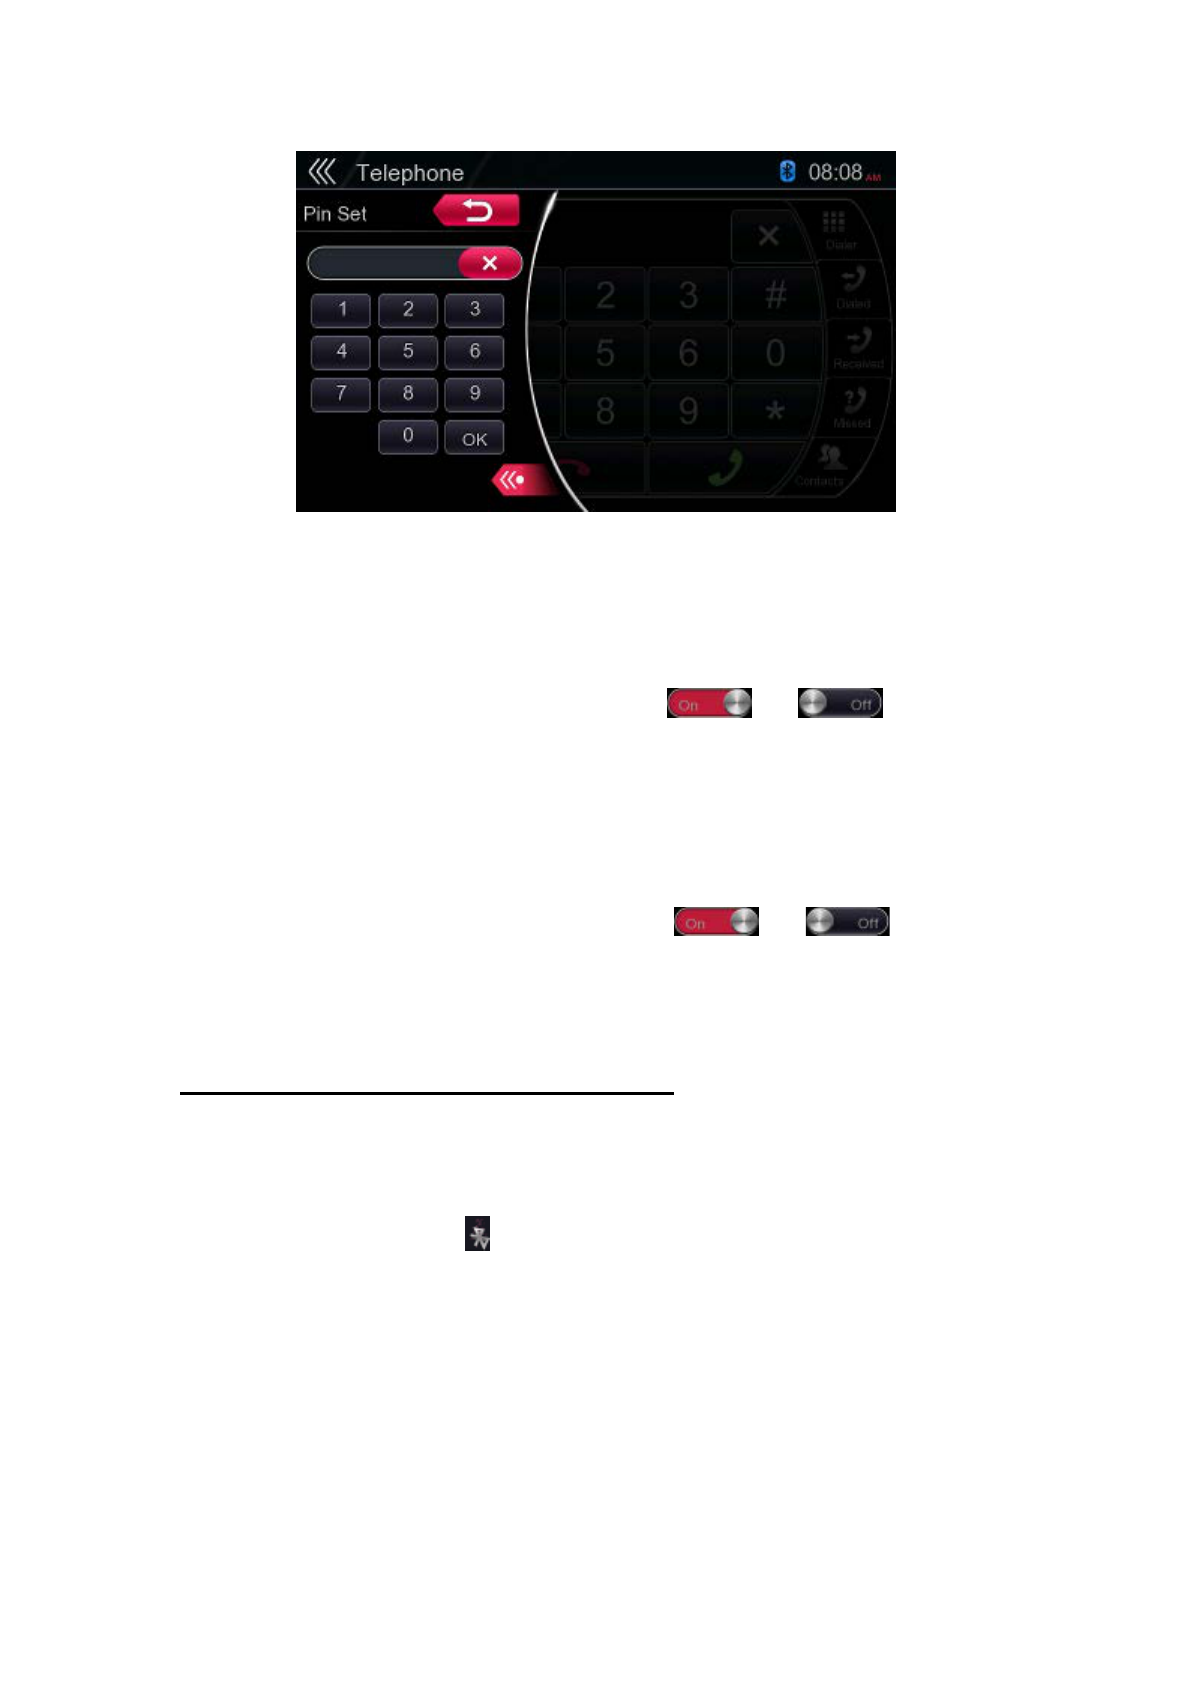
Automatic Connection Setting
The system automatically reconnects the cellular phone after the connection is lost
or the system is restarted.
The factory default setting is “ON”. Touch the [] or [] button of
the Automatic Connection item to set the function ON or OFF.
Automatic Answer Setting
If a call comes in, answer automatically after 5 seconds.
The factory default setting is “OFF”. Touch the [] or [] button of
the Automatic Answer item to set the function ON or OFF.
REGISTER THE CELLULAR PHONE (PAIRING)
You can register up to 5 cellular phones. The register method is same as “Register
The Bluetooth Audio Player”.
1. Turn on the power of the cellular phone you wish to register.
2. Touch the device button [ ] to display the Device Select screen.
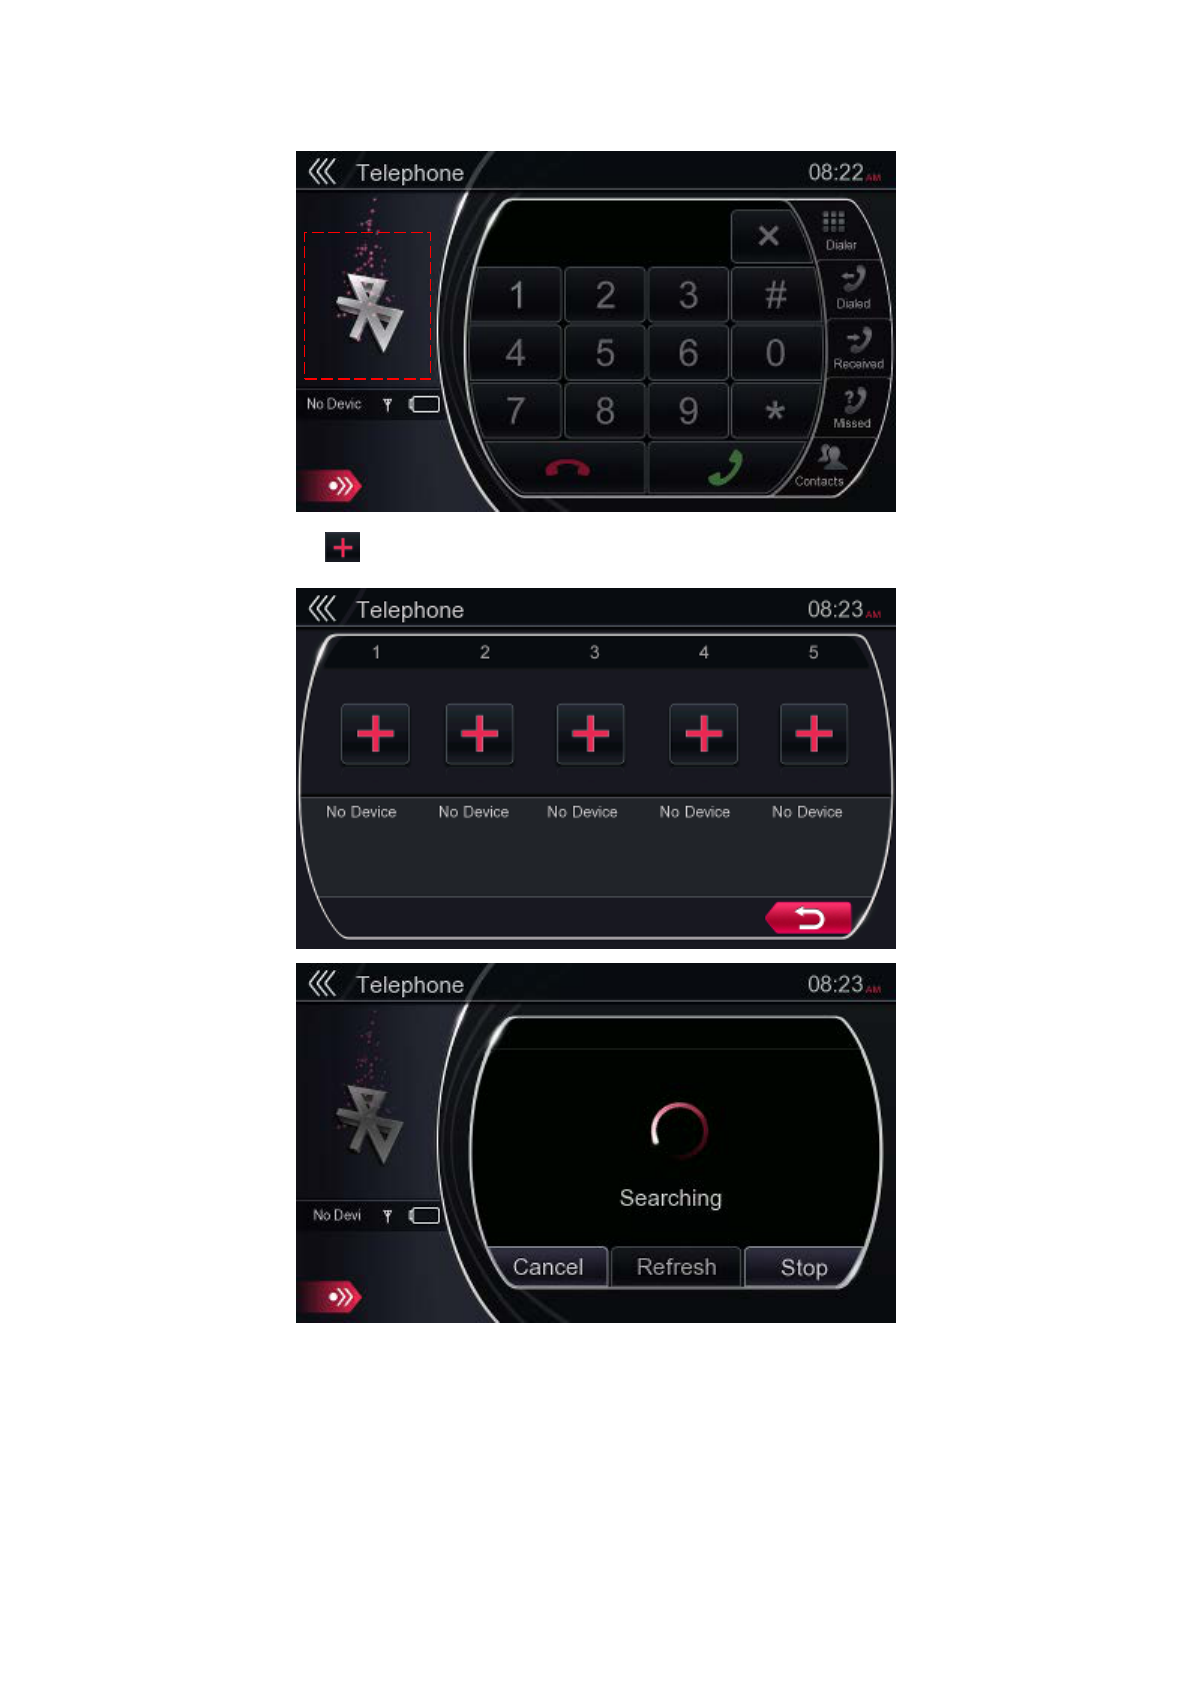
3. Touch the [ ] button to display the Inquiring Device screen.
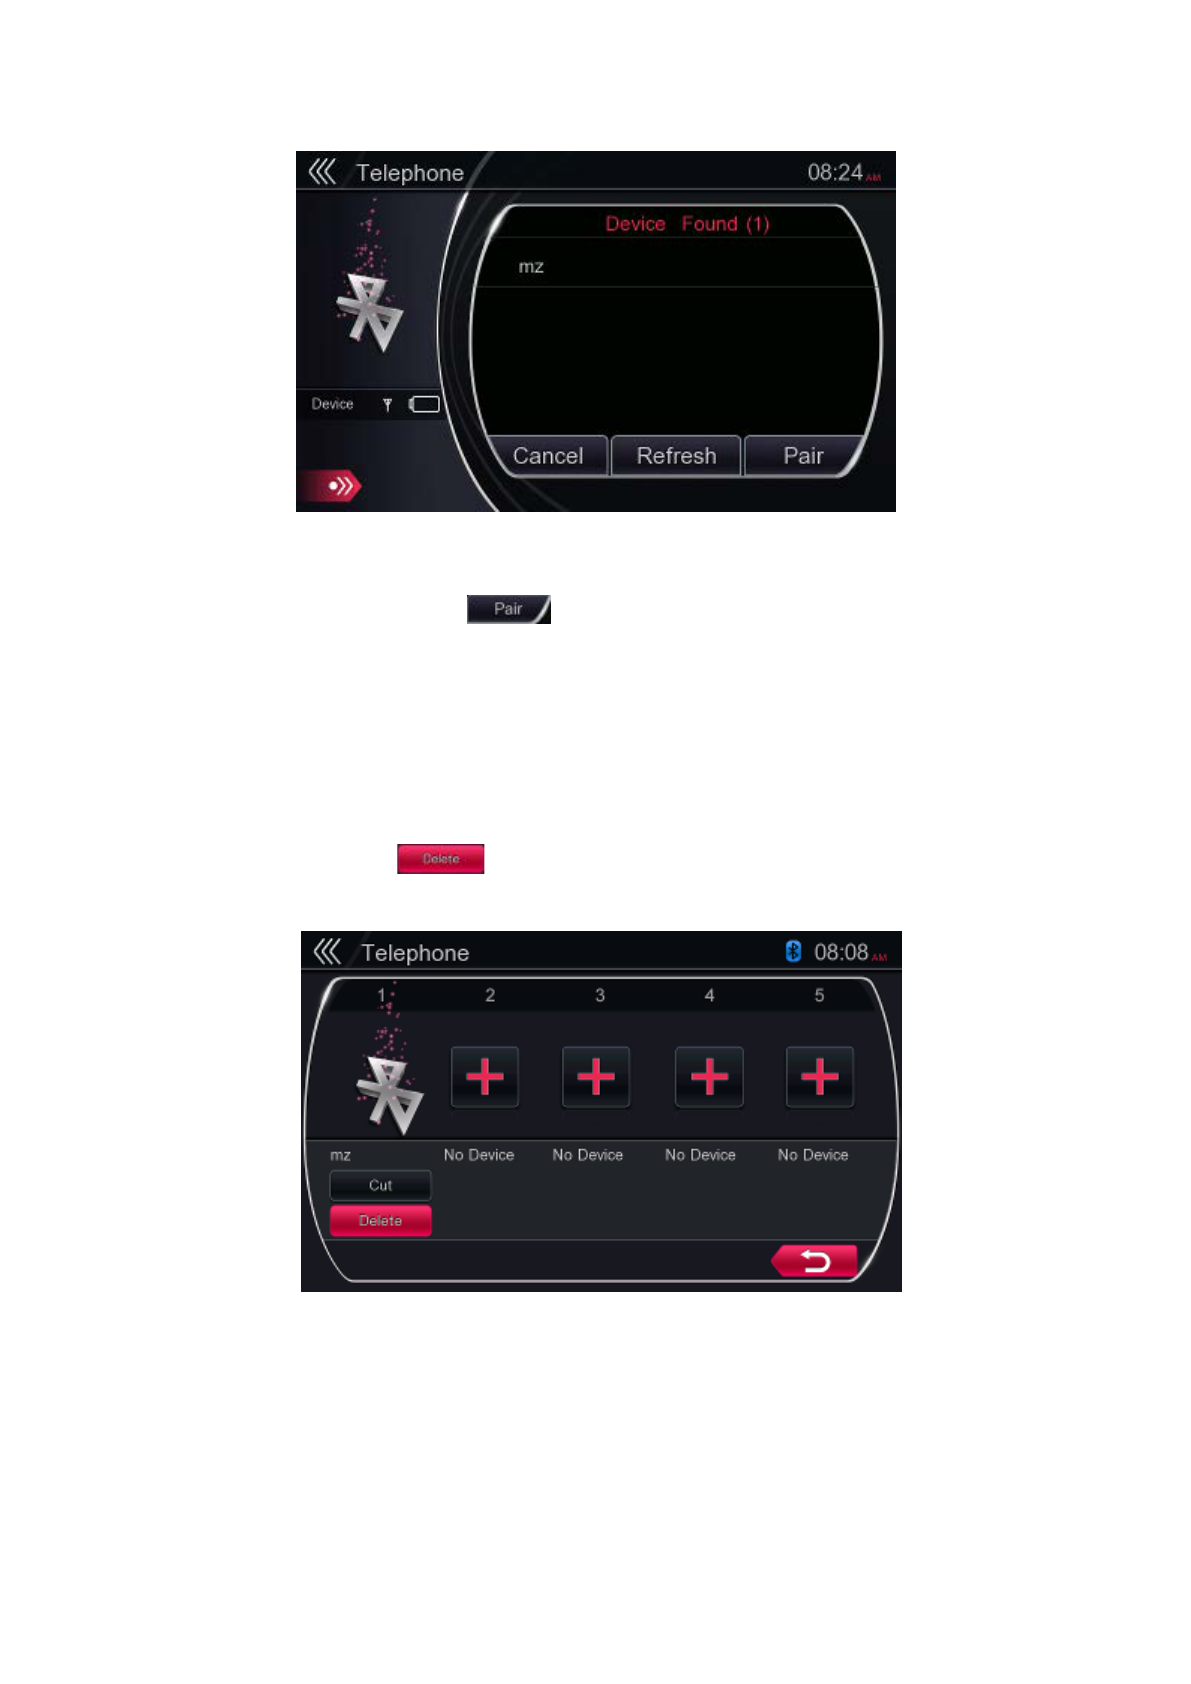
4. Touch your desired cellular button to select the button for the cellular phone to
be registered, and touch [ ] button to register for the Bluetooth cellular
phone.
When the pairing operation completes, the registered cellular phone is set as the
current telephone, and the display returns to the Telephone screen.
To delete the Bluetooth Audio Player registration
1. Touch the [] button to delete the device.
A confirmation screen is displayed.
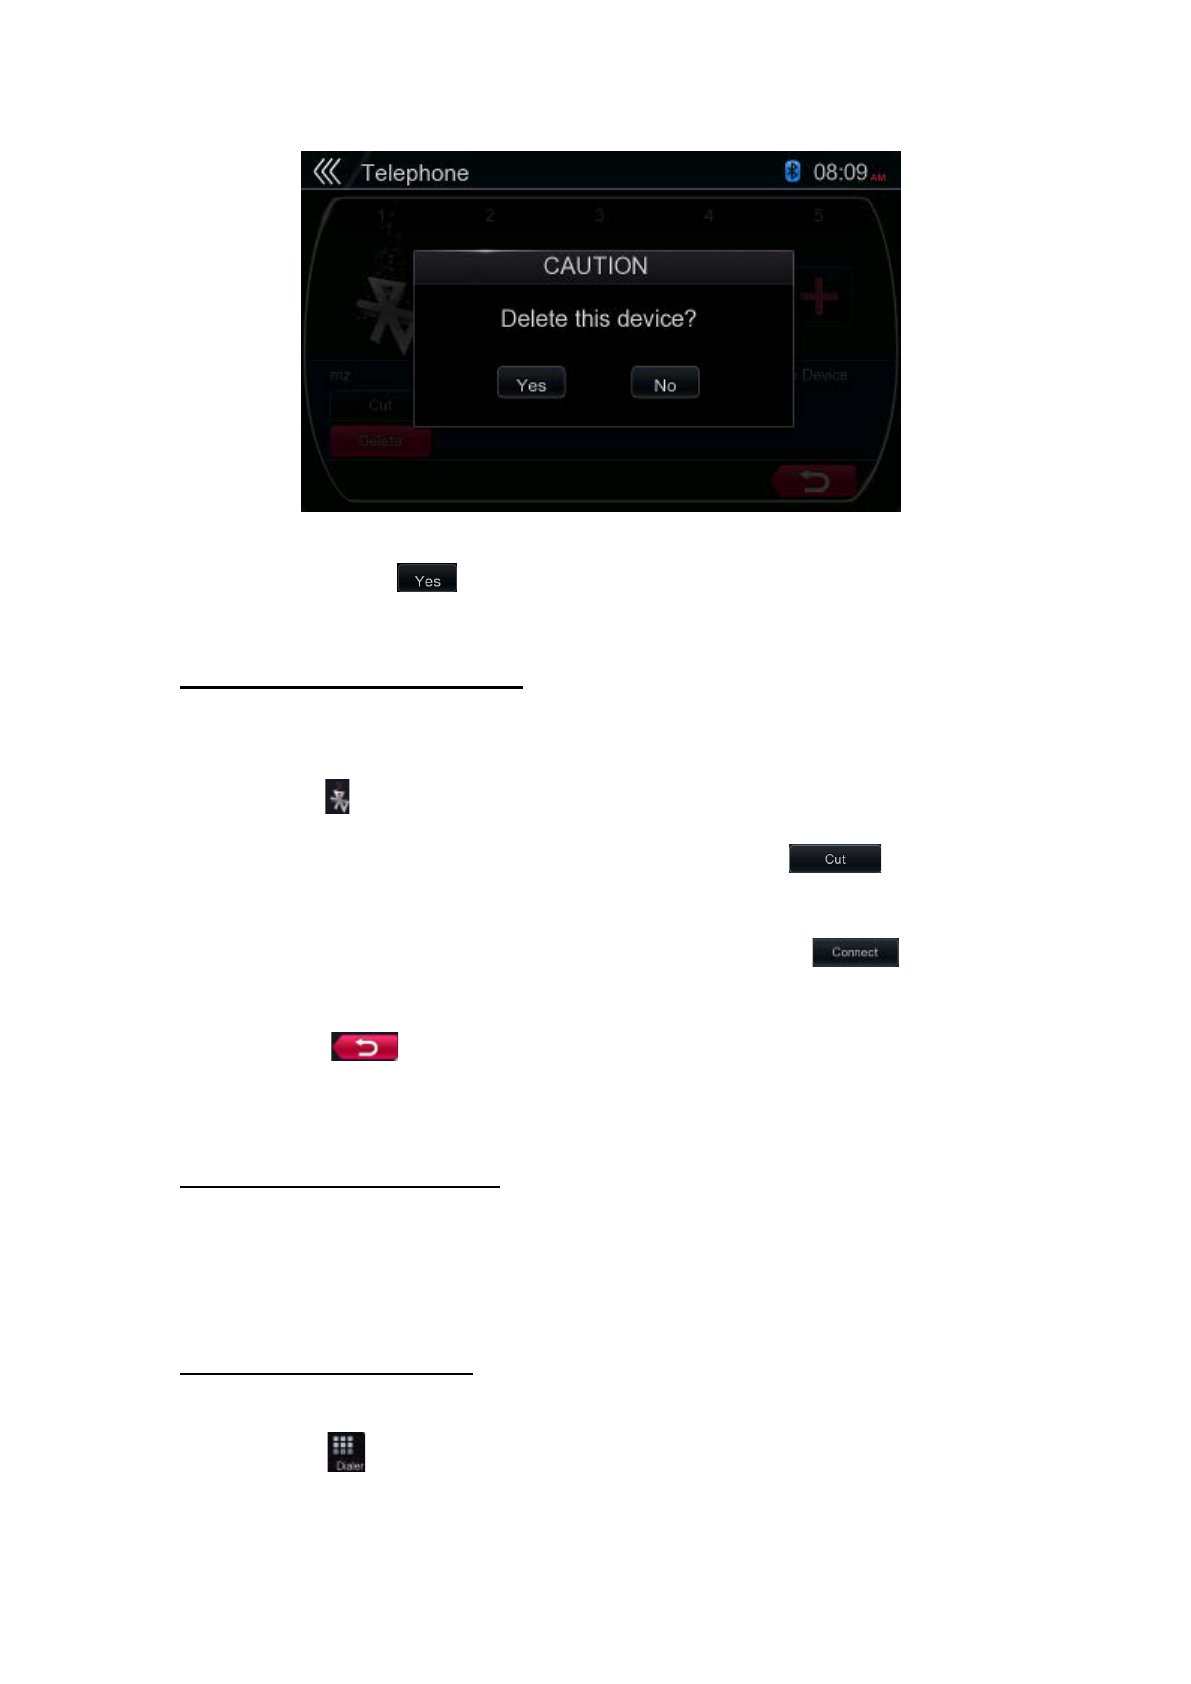
2. Touch the [ ] button to confirm delete.
SELECT THE CELLULAR PHONE
To change the current cellular phone to the other device which is already registered,
perform the following operation.
1. Touch the [ ] button to display the Device Select screen.
2. Touch the currently connected device, then touch [ ] button to
disconnect the active device.
3. Touch the desired device button you wish to use. Touch [ ] button to
select it as your active device.
4. Touch the [] button to return to the previous screen.
OBTAIN PHONE BOOK DATA
Sending the phone book data from the cellular phone enables you to make a call
using the phone book function from this system.
TELEPHONE OPERATIONS
Make a call using the numerical keypad
1. Touch the [] button to display the numerical keypad screen.
2. Enter the telephone number by using the numerical keypad displayed on screen.
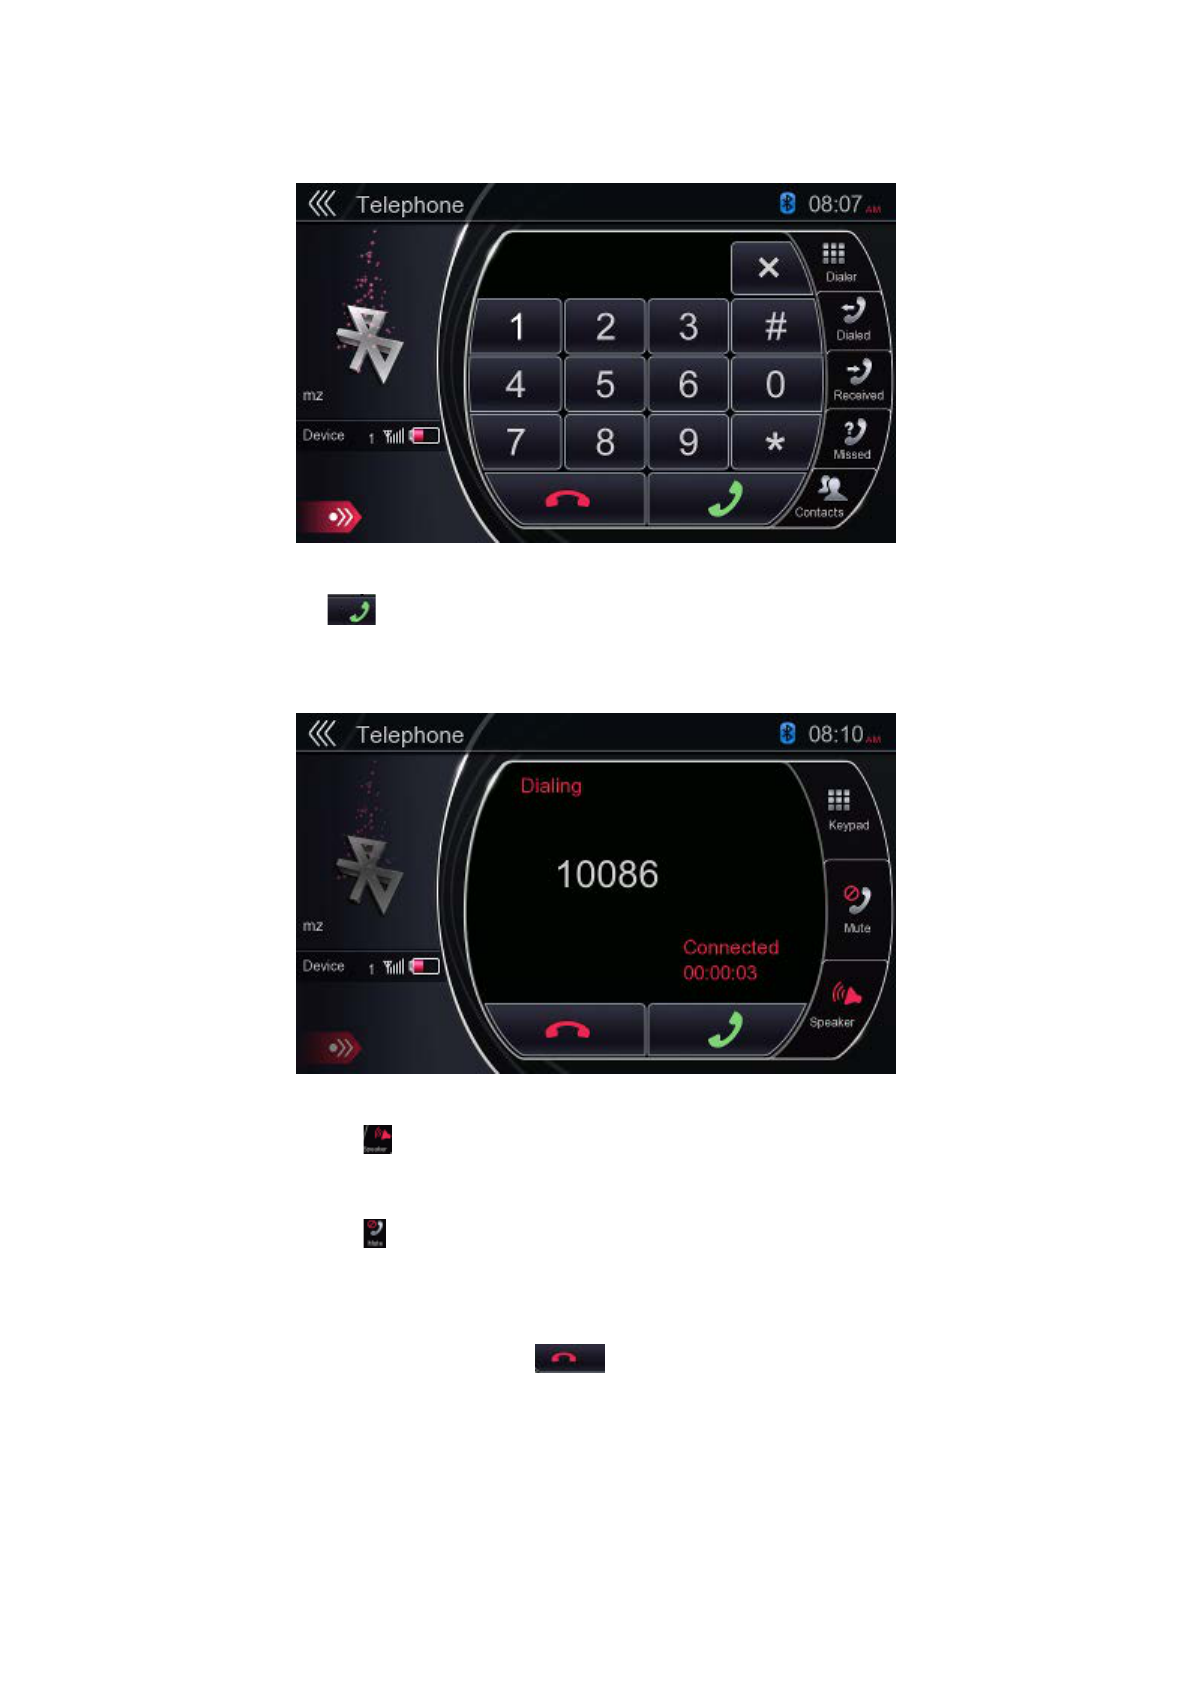
3. Touch the [ ] button to call the entered number.
The following Telephone Interrupt screen is displayed during phone call.
Touch the [ ] button to talk by using the cellular phone and cancelling the
hands-free function (Private mode).
Touch the [ ] button to mute the microphone. Now you can hear the other
side, but the other side cannot hear you.
4. When the call is finished, touch [ ] button to hang up.
Note:
Depending on some special cellular phone, the Telephone Interrupt screen may
be closed and the connection with this system may be disconnected when
entering the Private mode.
Make a call using the Phone Book
You can use the phone book data obtained from the cellular phone to make a call
from this system.
Note:
Before using this function, the phone book data must be sent from the cellular
phone.
Only the phone book items with at least one telephone number registered in the
captured phone book data are displayed on the Phone Book screen.
1. Touch the [ ] button to display the Phone Book screen.
2. Touch the desired name button you wish to dial.
Flick the list up and down to scroll the list.
3. Touch the [ ] button to call the specified number. The Telephone Interrupt
screen is displayed, and calling starts.
When the call is finished, touch the [] button to hang up.
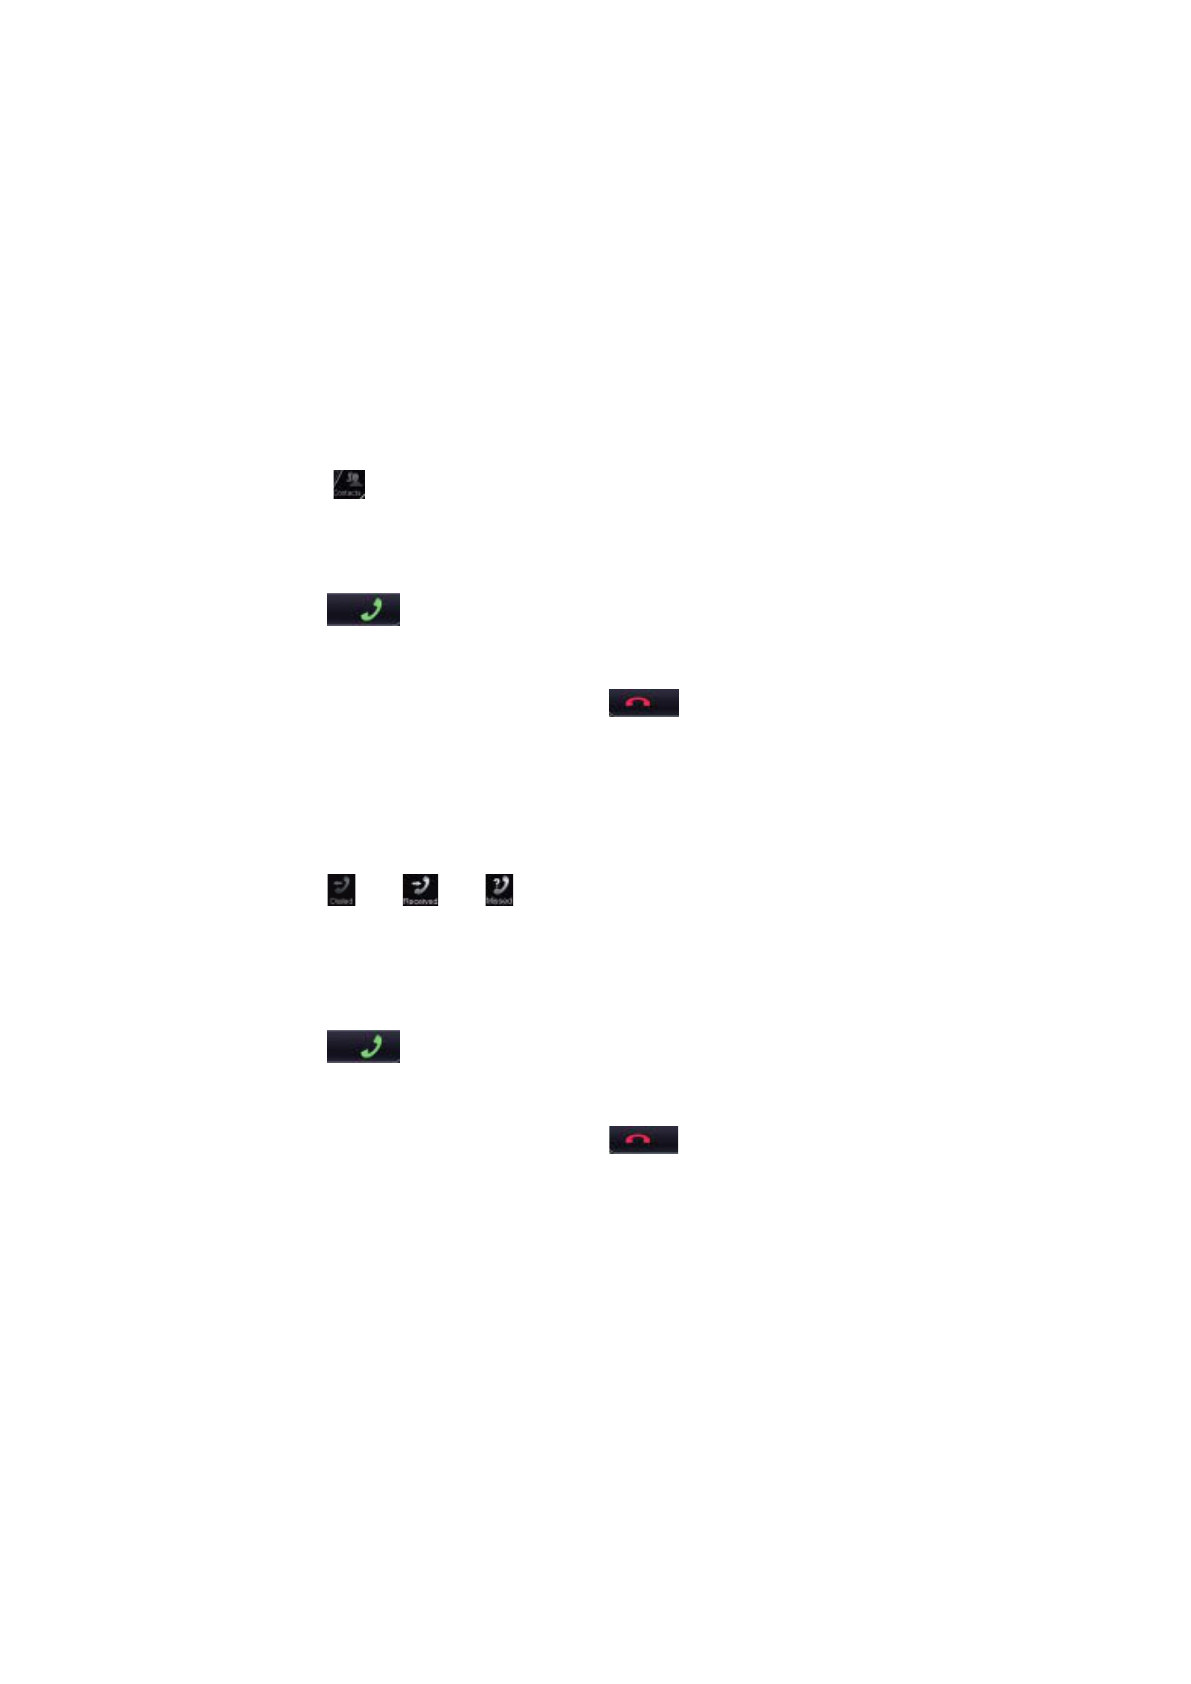
Make a Call using History
The system will memorize the dialed/received calls record data in the memory. You
can confirm it and use it to make a call from this system.
1. Touch the [ ] or [ ] or [ ] button. The Dialed, Received or Missed Calls List
screen is displayed.
Flick the list up and down to scroll the list.
2. Touch the desired item key you wish to dial.
3. Touch the [] button to call the specified number. The Telephone Interrupt
screen is displayed, and calling starts.
When the call is finished, touch the [ ] button to hang up.
Answer an Incoming Call
When a call comes in, the following Telephone Interrupt screen appears.
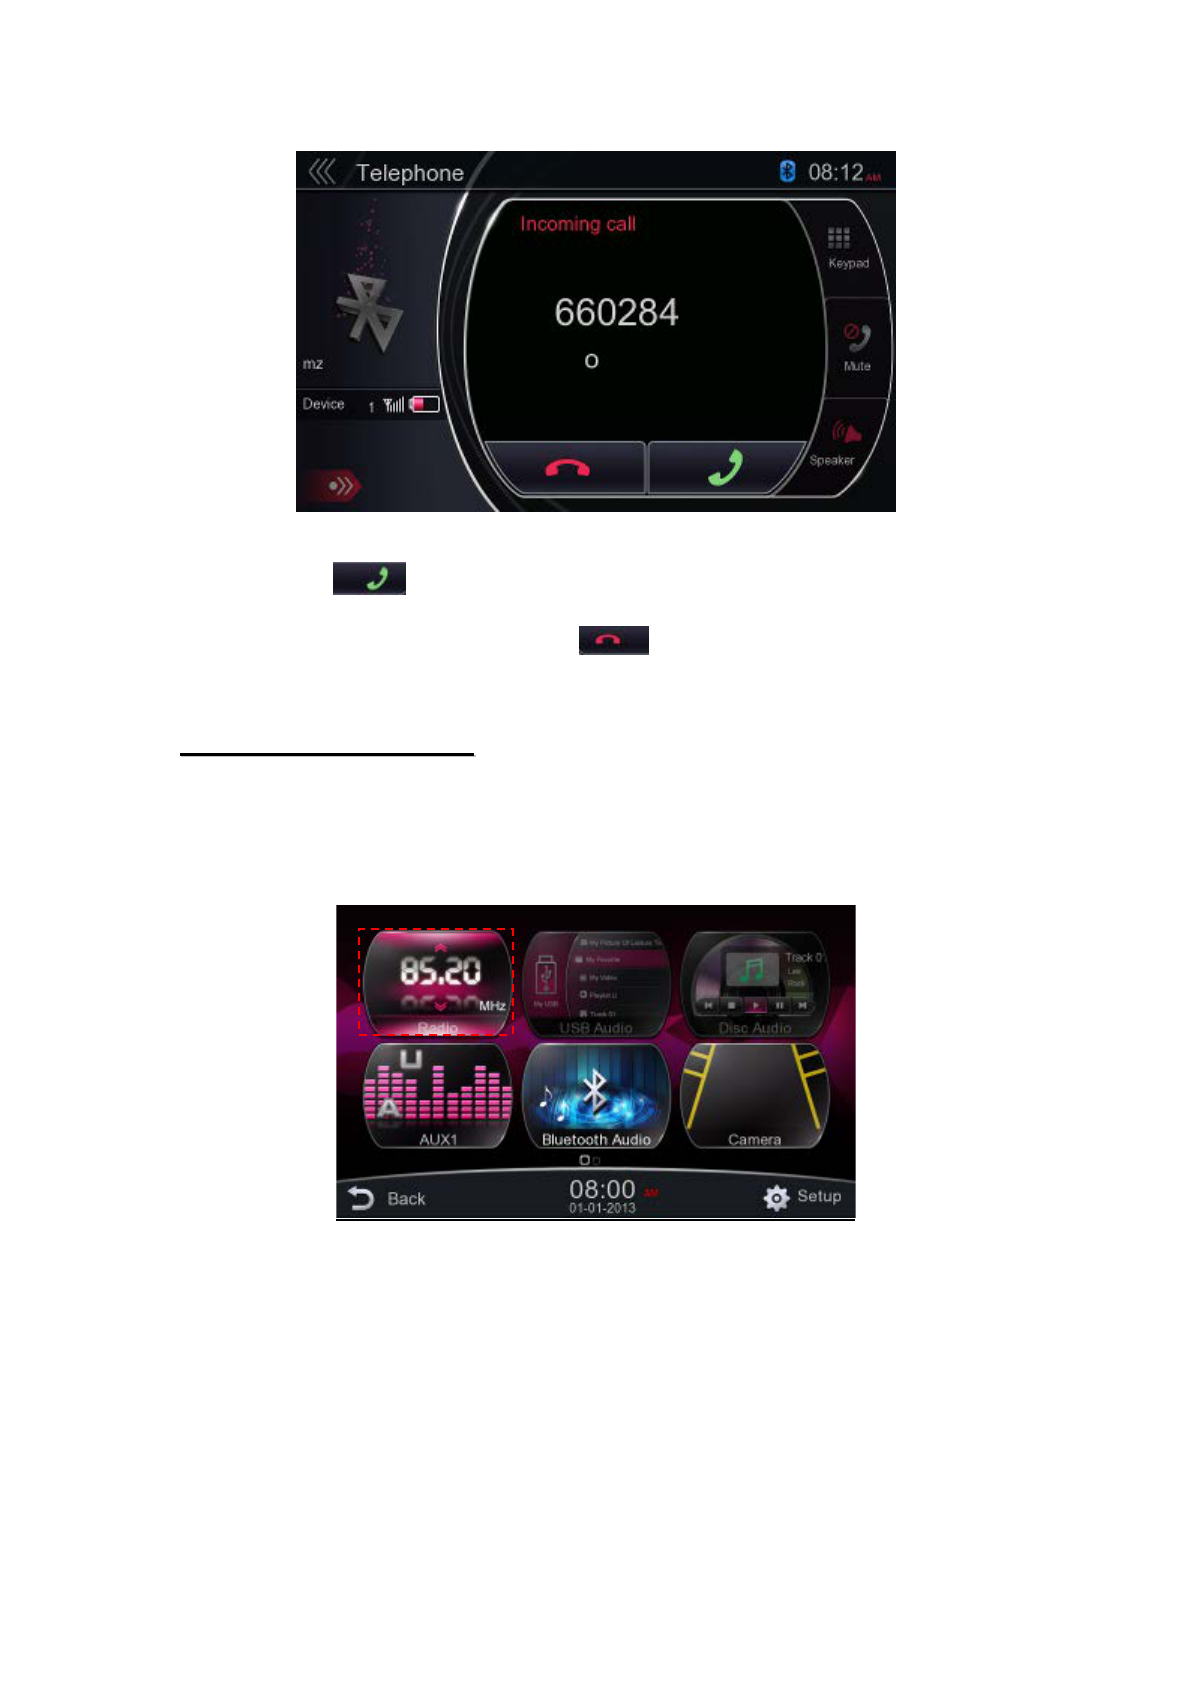
You can answer to the incoming call on this system by the following operation.
1. Touch the [ ] button to answer the call.
2. When the call is finished, touch the [ ] button to hang up.
R
RA
AD
DI
IO
O
O
OP
PE
ER
RA
AT
TI
IO
ON
NS
S
Listen to the Radio
1. Touch the [Radio] button on the Main Menu display. The Radio mode screen is
displayed.
2. Touch the [FM1/FM2/FM3/AM1/AM2] button to select the radio band. Each
time the button is touched, the radio reception band changes in the following
order: FM1 -> FM2 -> FM3 -> AM1 -> AM2 -> FM1….
1
3
5
7
9
8
16
17
15
16
13
14
6
10
4
11
12
2
1
3
5
18

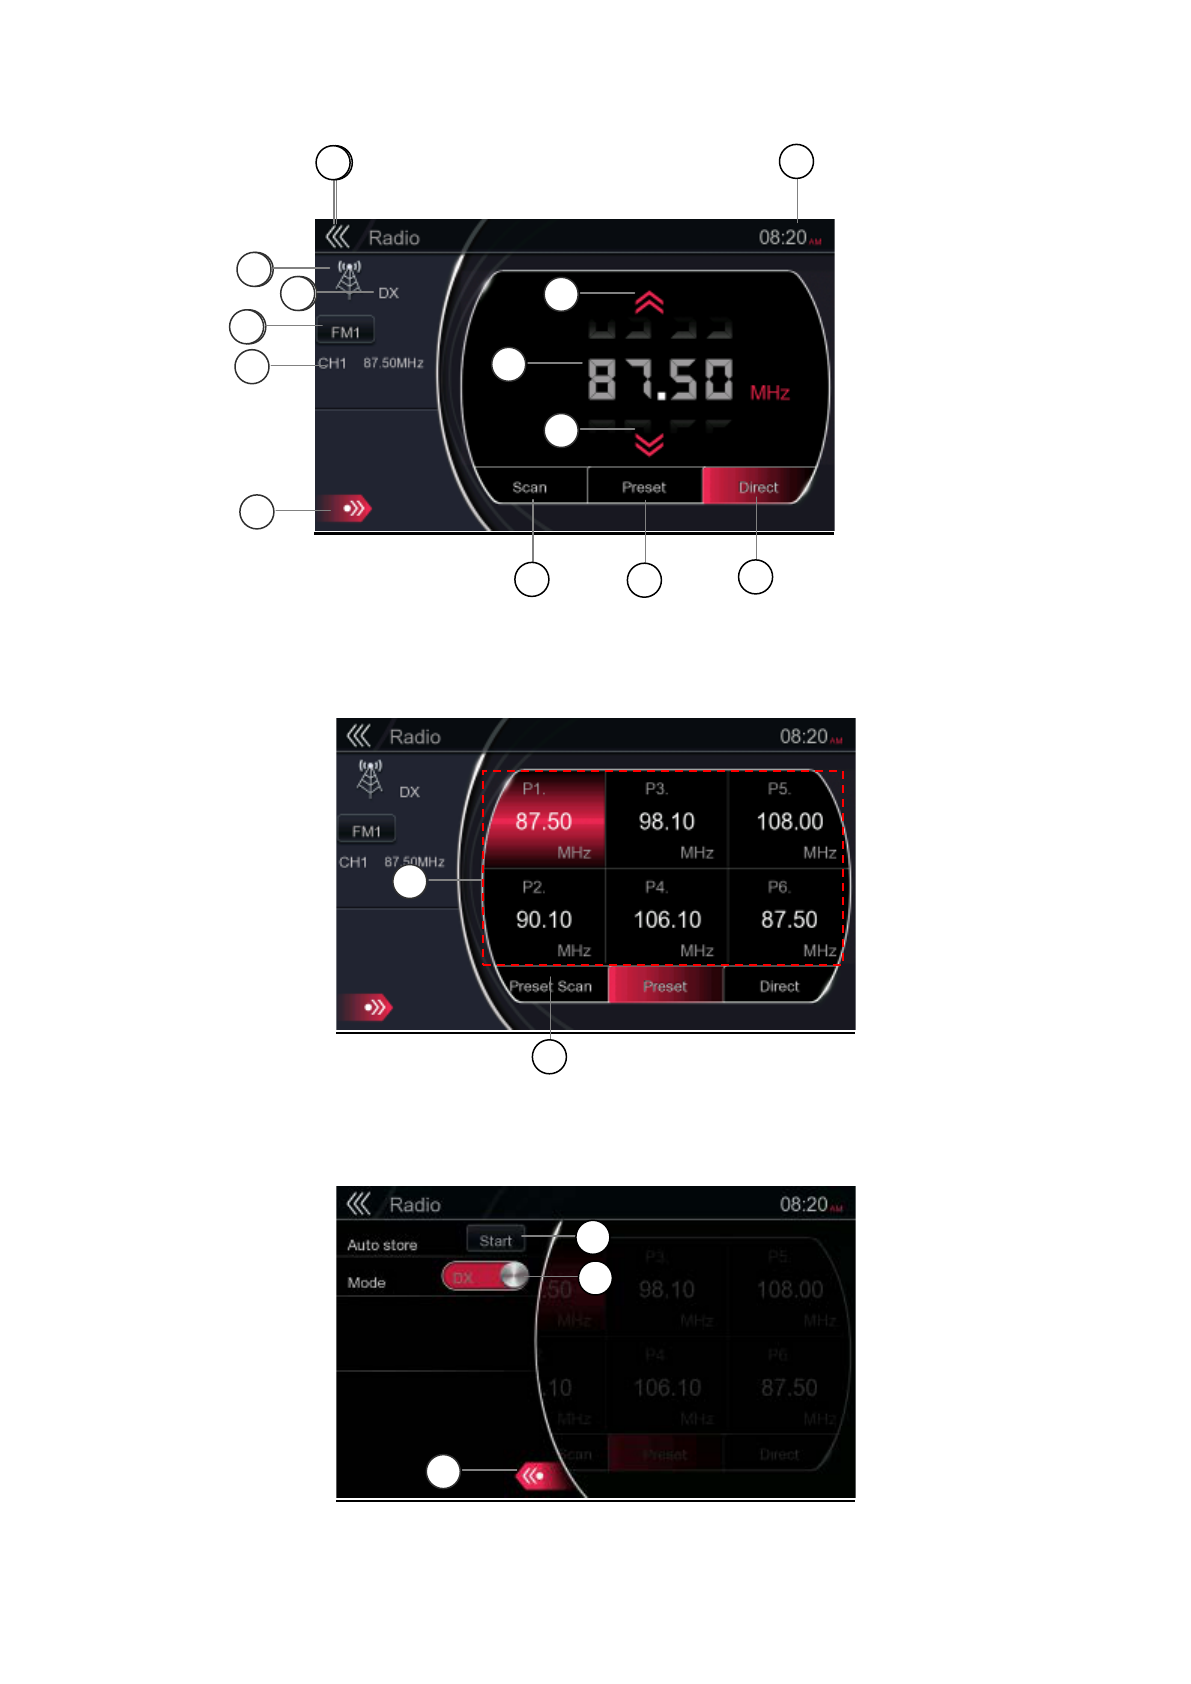
1 - Band button
2 - Current Channel indicator
3 - DX/Local indicator
4 - System time
5 - Signal Strength indicator
6 - Option button
7 - Seek Up button
8 - Current Frequency display
9 - Seek Down button
10 - Radio station scanning,click this button to search station starting with the
current frequency and the station researching work would go on after 10
seconds.
11 - [ ]-preset button. If the current page is in the preset station store
mode (This button shows in highlighted red color), the click of the button
would show nothing,if the current page is the direct mode (The button shows
in red color), the click of the button will switch the page into preset station
store state.
12 - [ ]-If the current page is in the direct state(This button shows in
red color), the click of the button would show nothing,if the current page is in
the preset station state,the click of the button will switch the page into direct
state.
13 - Frequencies display
14 - Preset Scan button
15 - Auto Store setting
16 - DX/Local Setting
17 - Close option menu button
18 - Return button (to Main Menu)
Seek Tuning
1. Touch the [FM1 / FM2 / FM3 / AM1 / AM2] button to select the radio band (FM
or AM).
2. Touch the [ ] or [ ] button.
When touch the [ ] button, the station is searched in the direction of
higher frequency.
When touch the [ ] button, the station is searched in the direction of lower
frequency.

Recall a Preset Station
1. Touch the [FM1 / FM2 / FM3 / AM1 / AM2] button to select the desired band
(FM or AM) on the radio.
2. Touch [] button to display the preset list, touch the preset station (1 to
6).
Manual Memory
1. Touch the desired band button to select the band you wish to store.
2. Tune to a station you want to store using the step tuning or preset tuning.
3. Touch and hold the desired Preset button you want to store for about 2 seconds.
Auto Store
The Auto Store is a function for storing up to 6 stations that are automatically
searched in sequentially. If the number of receivable stations cannot reach to 6, the
previous stored station remains.
1. Touch the [FM1 / FM2 / FM3 / AM1 / AM2] button to select the desired band
(AM or FM).
2. Touch the [ ] button, and then touch the [ ] button to start the Auto
Store.
A beep sounds and the stations with good reception are stored automatically to
the preset list.
Note:
After Auto Store, the previous stored stations will be overwritten.
Preset Scan
The Preset Scan receives the stations stored in the preset memory in order. This
function is useful when searching for the desired station in memory.
1. Touch the [FM1 / FM2 / FM3 / AM1 / AM2] button to select the desired band.
(FM or AM)

2. Touch the [Preset Scan] button to start the Preset Scan. The system starts
scanning each station for 10 seconds sequentially. But the station stored is not a
valid station, the scanning time is only 2 seconds.
3. When the desired station is tuned in, touch the [Preset Scan] button again to
stay in that station.
DX/Local Setting
The DX/Local setting changes the radio sensitivity in order to separate closely spaced
stations. This feature is useful in areas that have many radio stations in close
proximity.
A
AU
UX
X
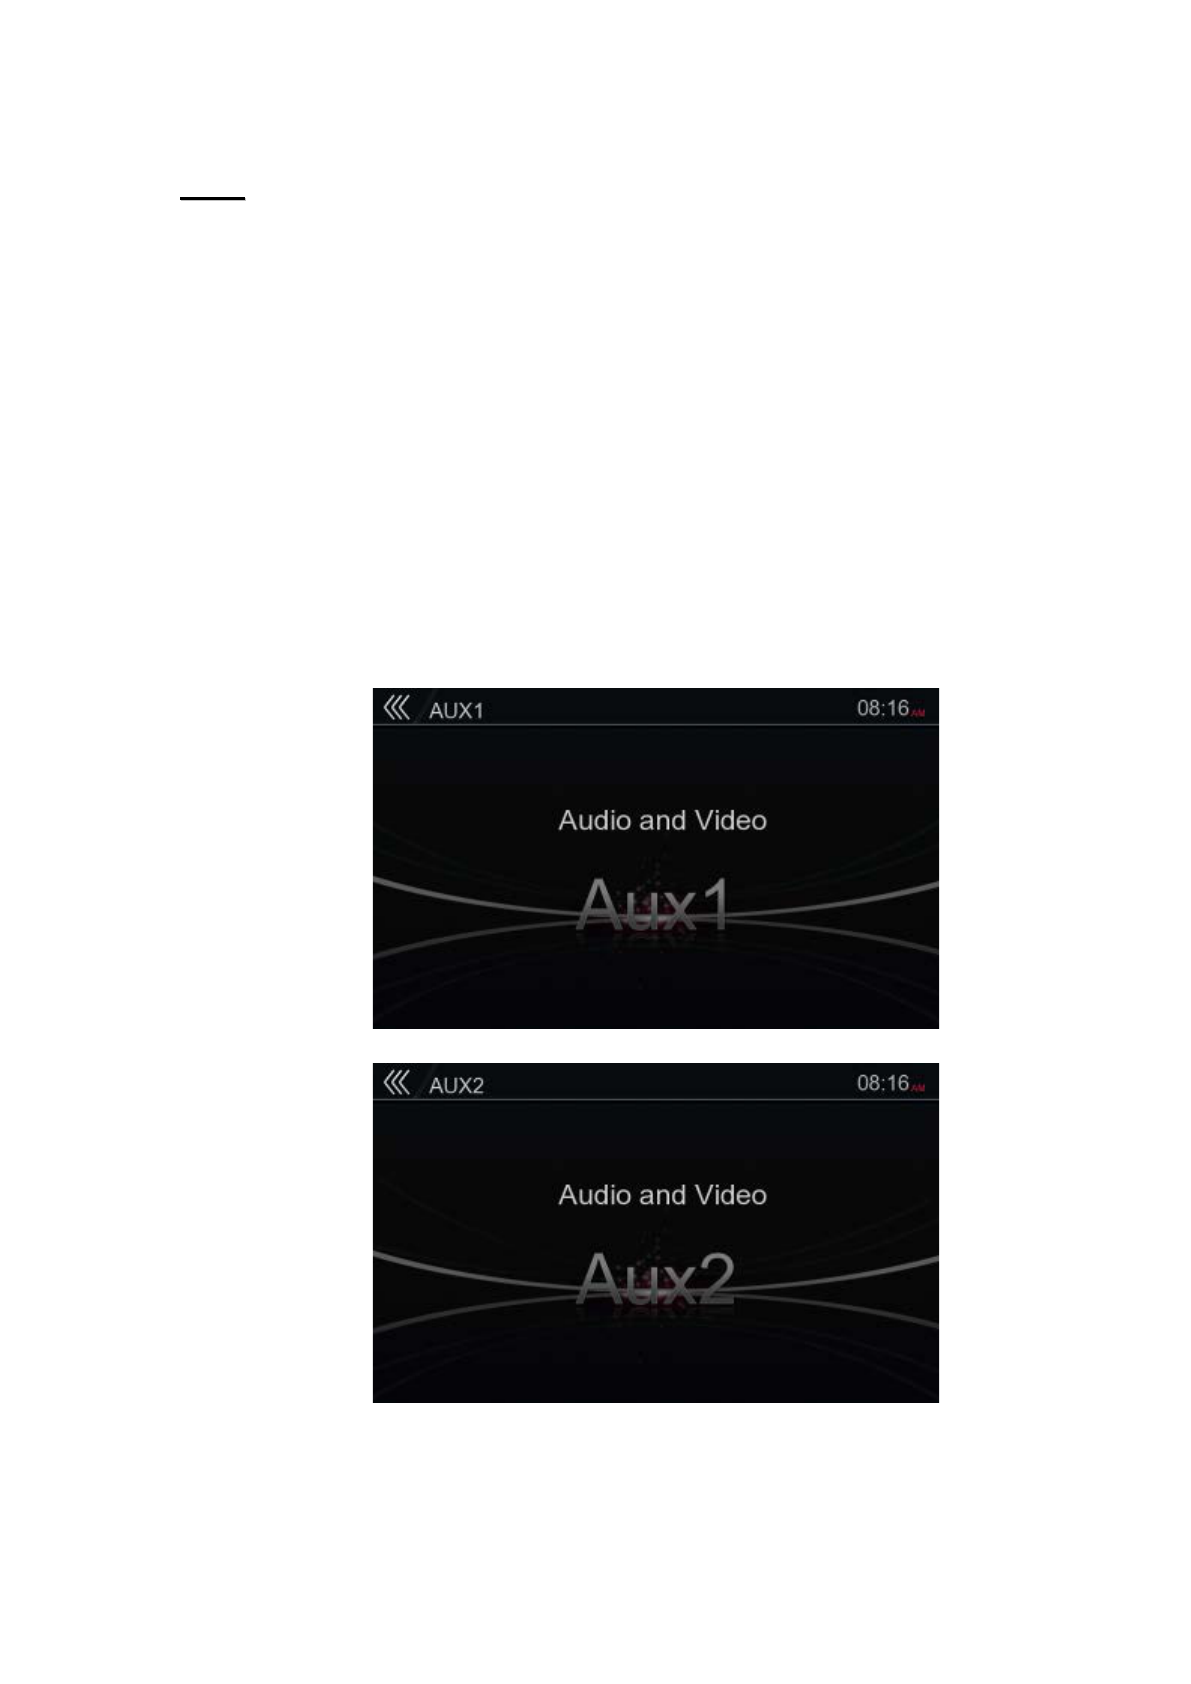
External audio/video devices, including a game console, camcorder, navigation
unit…etc. can be connected to the AUX connector on the front or back of this system
using the A/V media cables.
Switch to AUX IN
Touch [AUX1] or [AUX2] button on the Main Menu to select desired mode. If the
external device connected to AUX input have audio signal, the system will broadcast
audio of external device.
You cannot directly control external devices connected to AUX input.
C
CA
AM
ME
ER
RA
A
I
IN
NP
PU
UT
T
O
OP
PE
ER
RA
AT
TI
IO
ON
NS
S
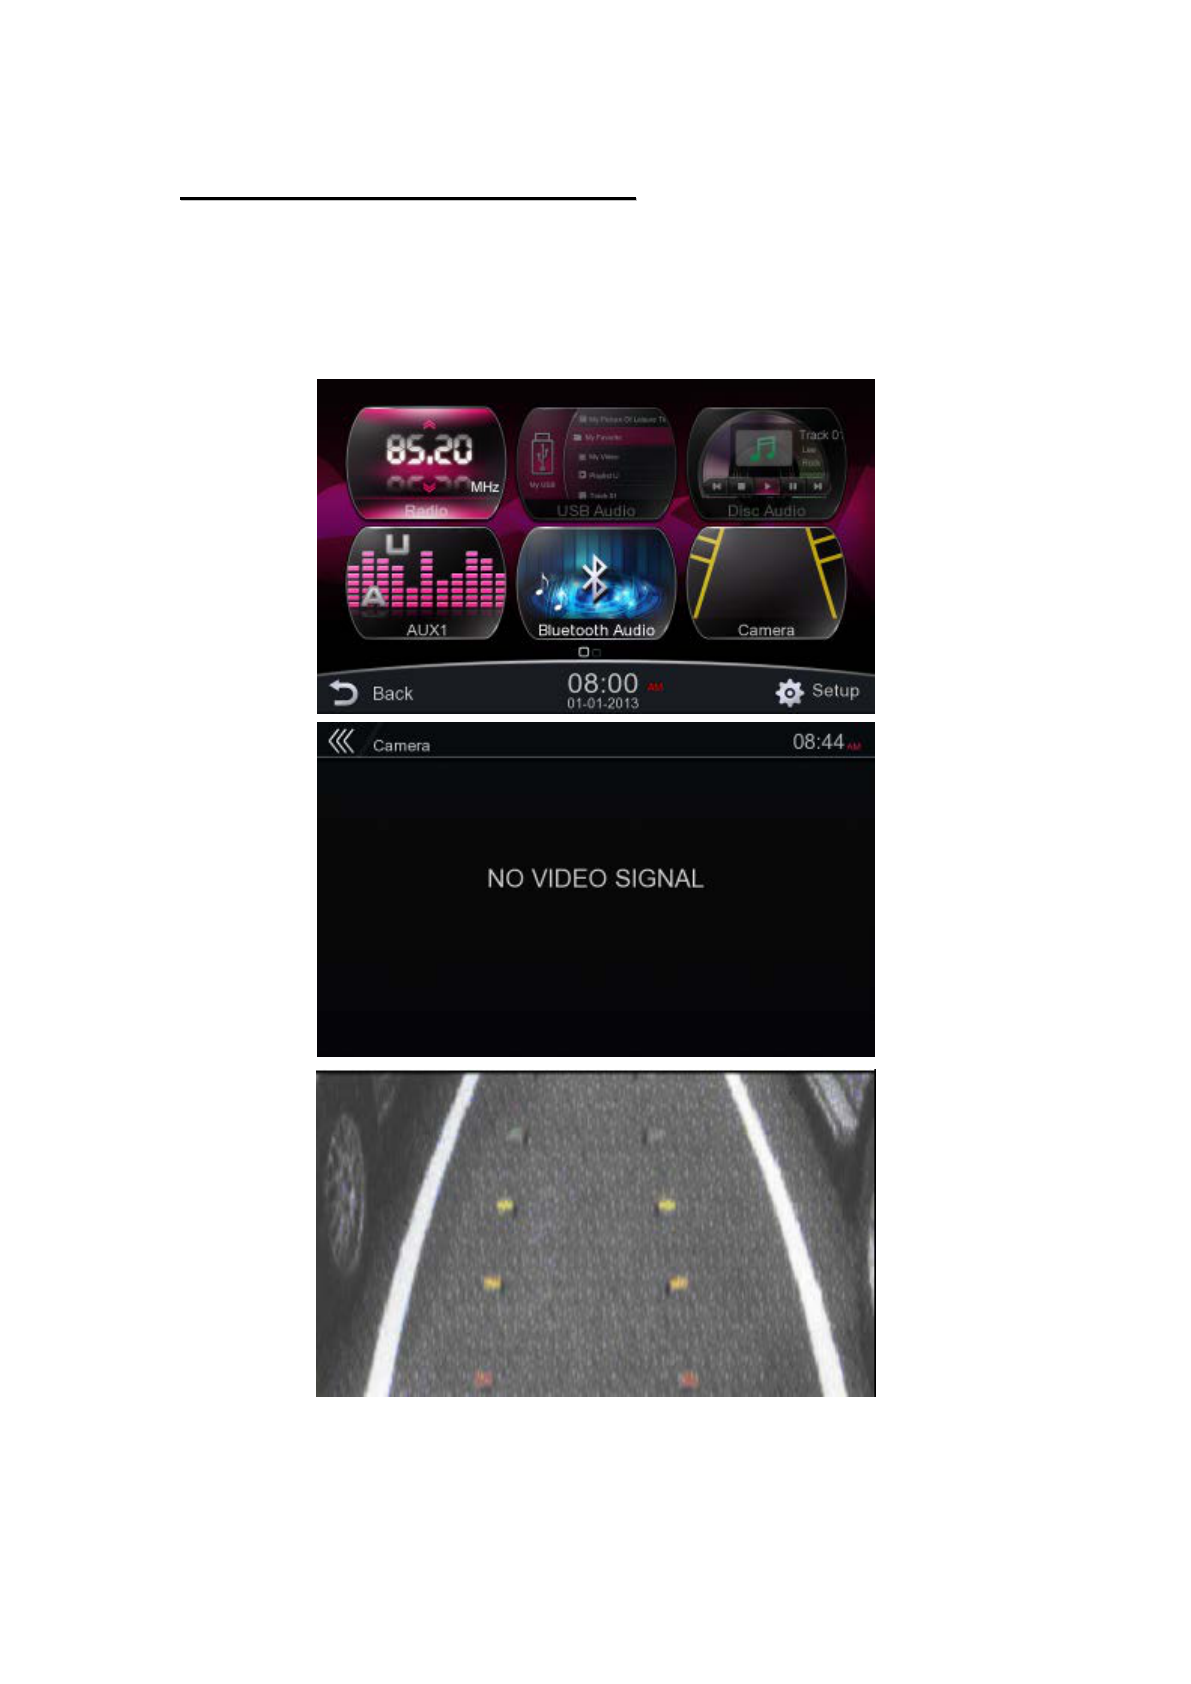
Switch to Camera mode
Touch [Camera] button on Main Menu.
The screen will display the external camera video. The screen will display “NO VIDEO
SIGNAL” message, if a valid camera is not connected to this system.
Note:
If the reverse cable is connected correctly to the vehicle or Furrion Multiplexer, the
system goes to camera mode automatically when the reverse signal or left/right
signal (only for Furrion Multiplexer) is turned on.
S
SE
ET
TU
UP
P
O
OP
PE
ER
RA
AT
TI
IO
ON
NS
S
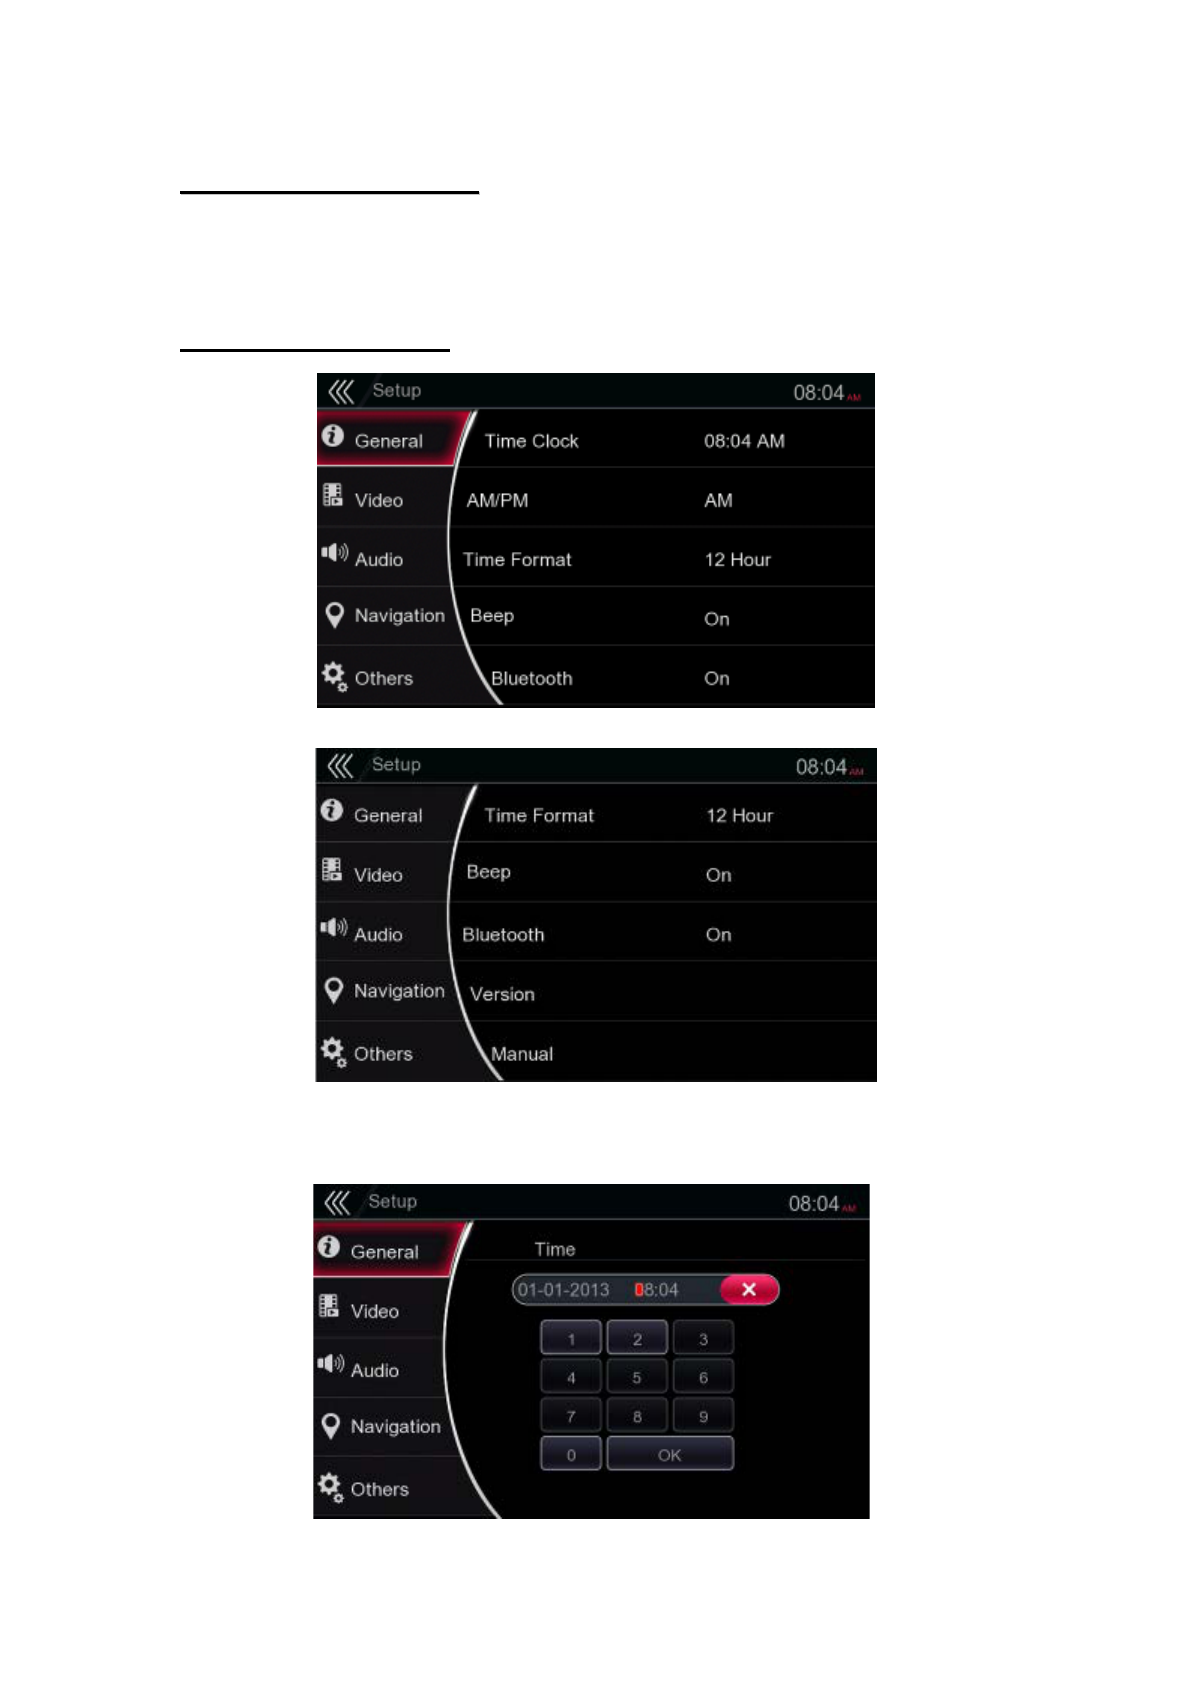
Touch the [Setup] button on the Main Menu screen. The Setup menu screen will be
displayed.
GENERAL SETUP MENU
Time Clock: Set system clock.
AM/PM: Set time in AM or PM.
Time Format: Set the time display mode.
Beep: Turn on or turn off the beep confirmation sound.
Bluetooth: Set the Bluetooth on or off.
Version: Display system firmware version.
Manual: Display manual.
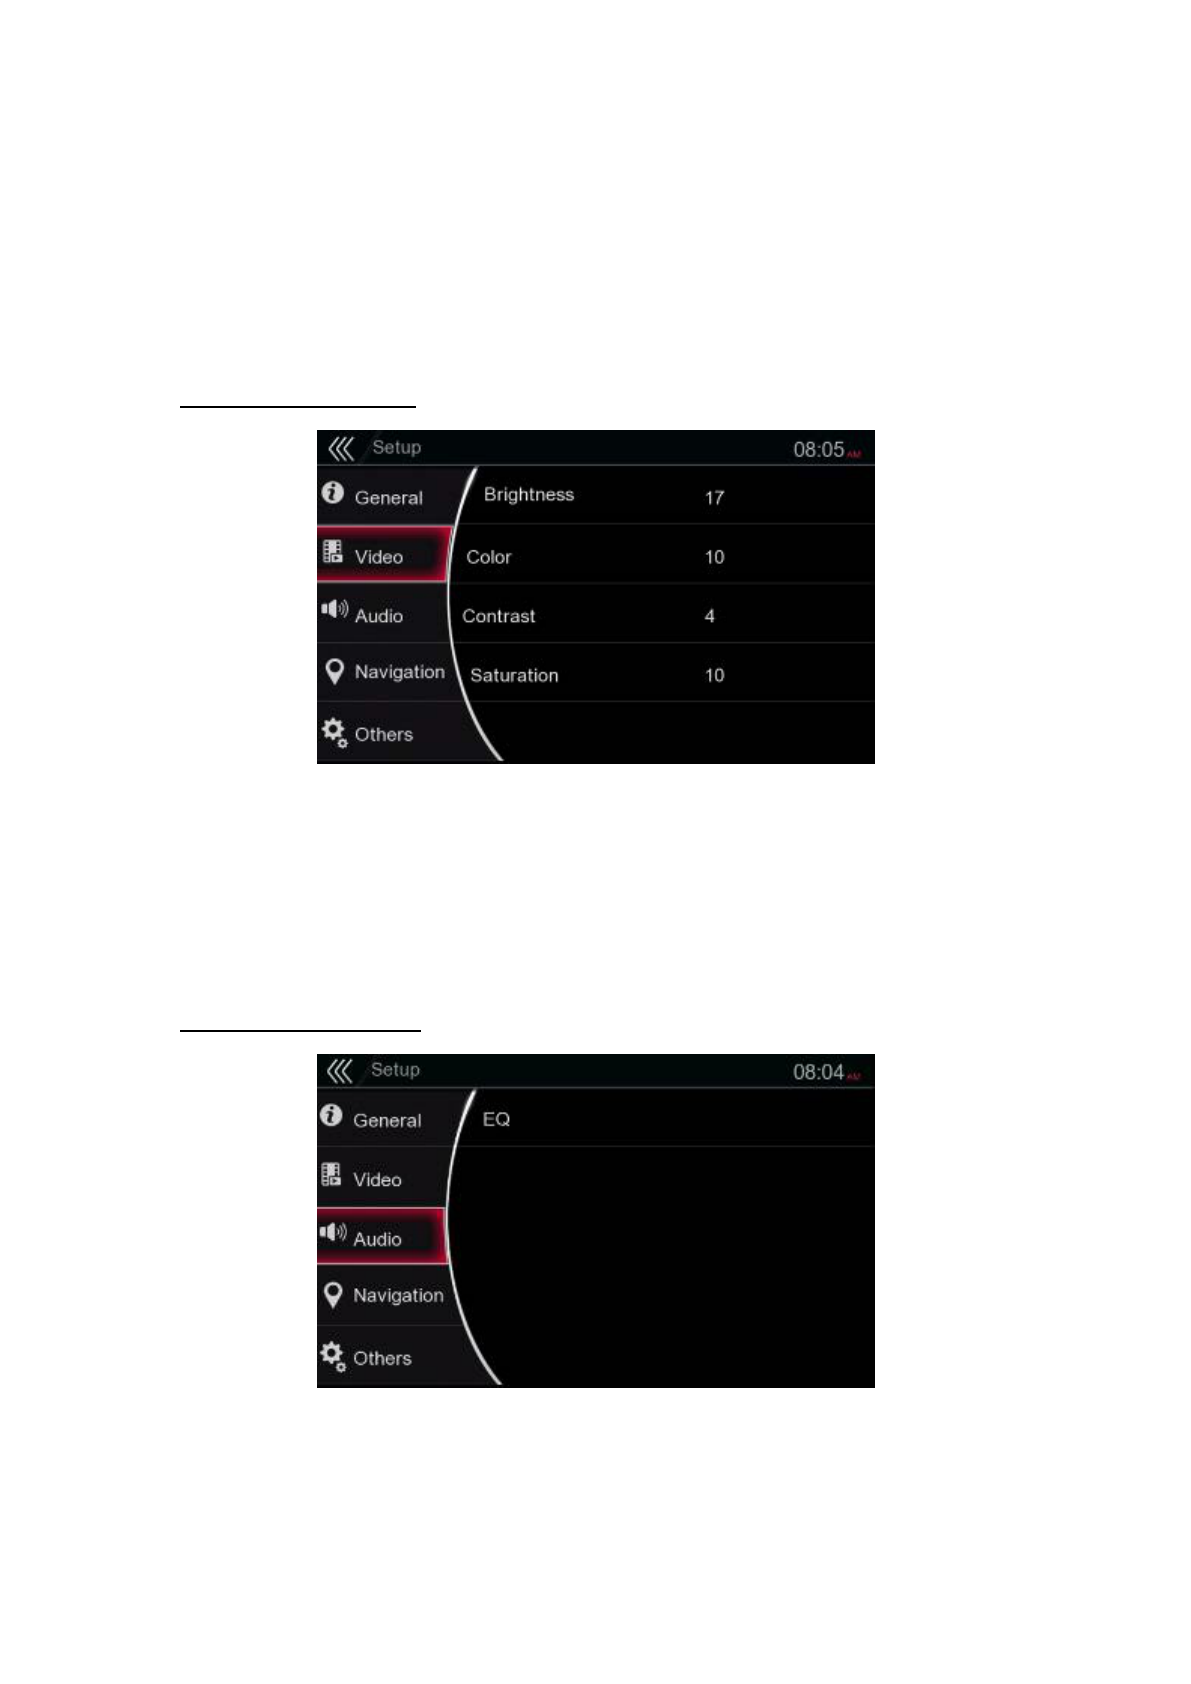
VIDEO SETUP MENU
This menu includes: Brightness, Color, Contrast, and Saturation.
Brightness: Set Brightness value from 0 to 20.
Color: Set Color value from 0 to 20.
Contrast: Set Contrast value from 0 to 20.
Saturation: Set Saturation value from 0 to 20.
AUDIO SETUP MENU
This menu includes: EQ.
EQ: Choose the desired volume for left and right, front and rear speaker.
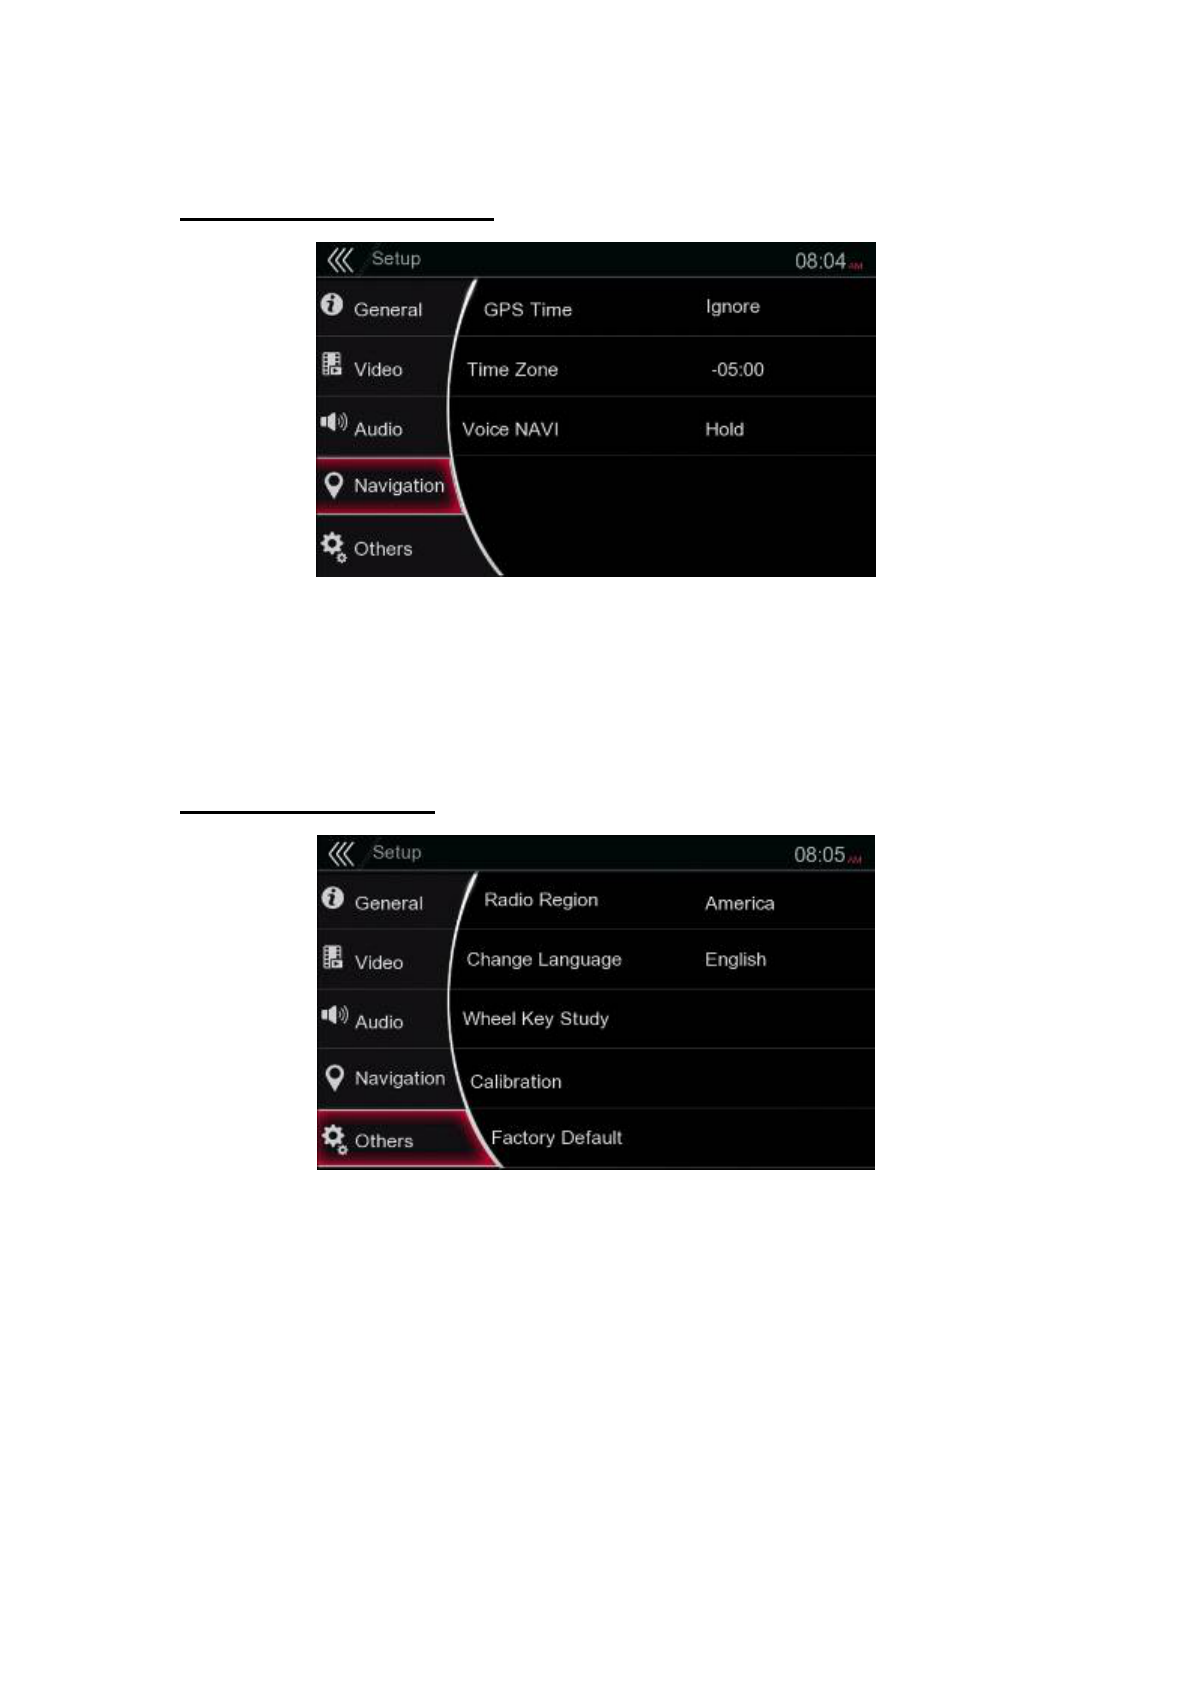
NAVIGATION SETUP MENU
This menu includes: GPS Time and Time Zone.
GPS Time: Set the system time to be synchronized with GPS local time or not.
Time Zone: Set the time zone.
Voice NAVI: set the voice mixed.
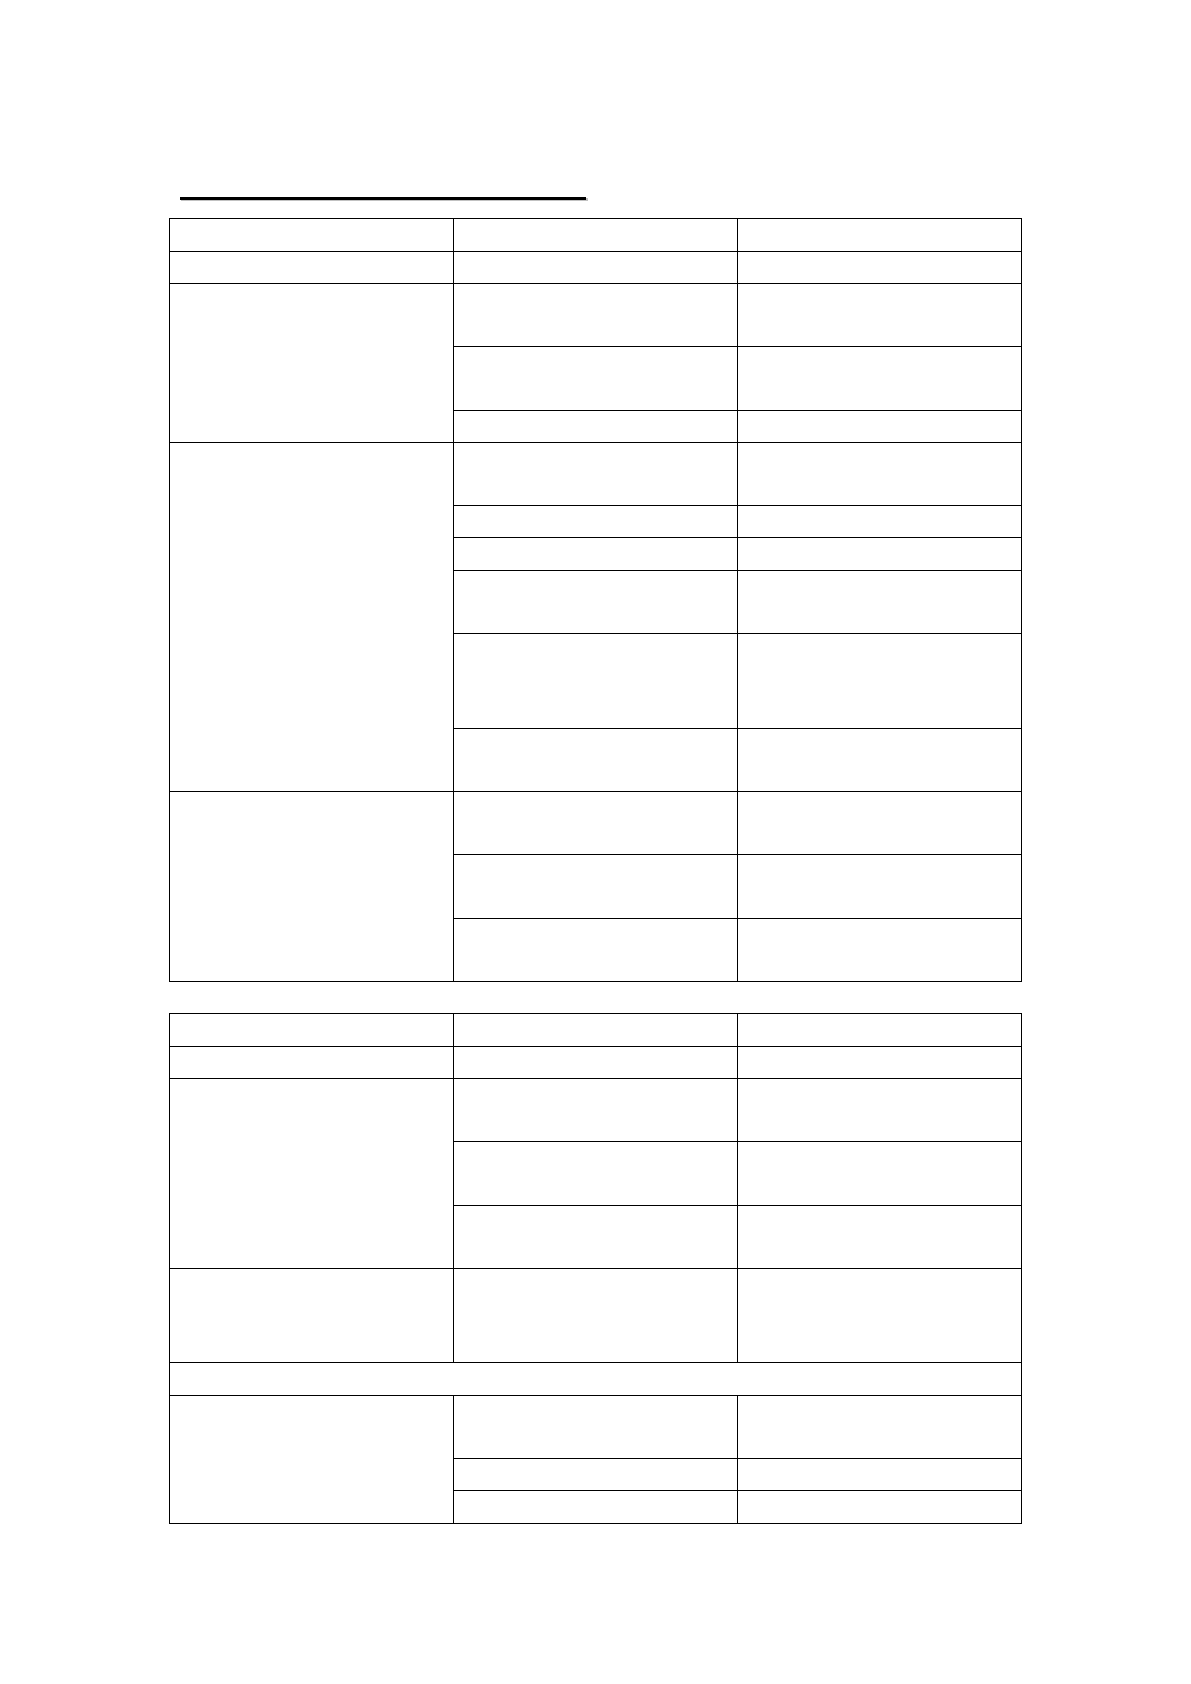
OTHERS SETUP MENU
This menu includes: Change Language, Wheel Key Study, Calibration, and Factory
Default.
Radio Region: Set the Radio Region.
Change Language: Set the Language for Menu.
Wheel Key Study: Refer to “Wheel Key Study” section.
Calibration: Select the screen calibration Yes or No.
Factory Default: Select to load factory default or not.

R
RE
EP
PL
LA
AC
CE
E
R
RE
EM
MO
OT
TE
E
C
CO
ON
NT
TR
RO
OL
L
B
BA
AT
TT
TE
ER
RI
IE
ES
S
1. Press the retention tab and pull out the battery tray and remove the old battery.
2. Insert the new CR2025 battery and slide the battery tray back in the remote
control the same direction that you removed it. Please ensure the tray is inserted
in the correct direction.
CAUTIONS
Keep the battery out of the reach of children.
Should the battery be swallowed, consult a doctor immediately.
Batteries (battery pack or batteries installed) must not be exposed to excessive
heat such as sunshine, fire or the like.
T
TR
RO
OU
UB
BL
LE
ES
SH
HO
OO
OT
TI
IN
NG
G
G
GU
UI
ID
DE
E
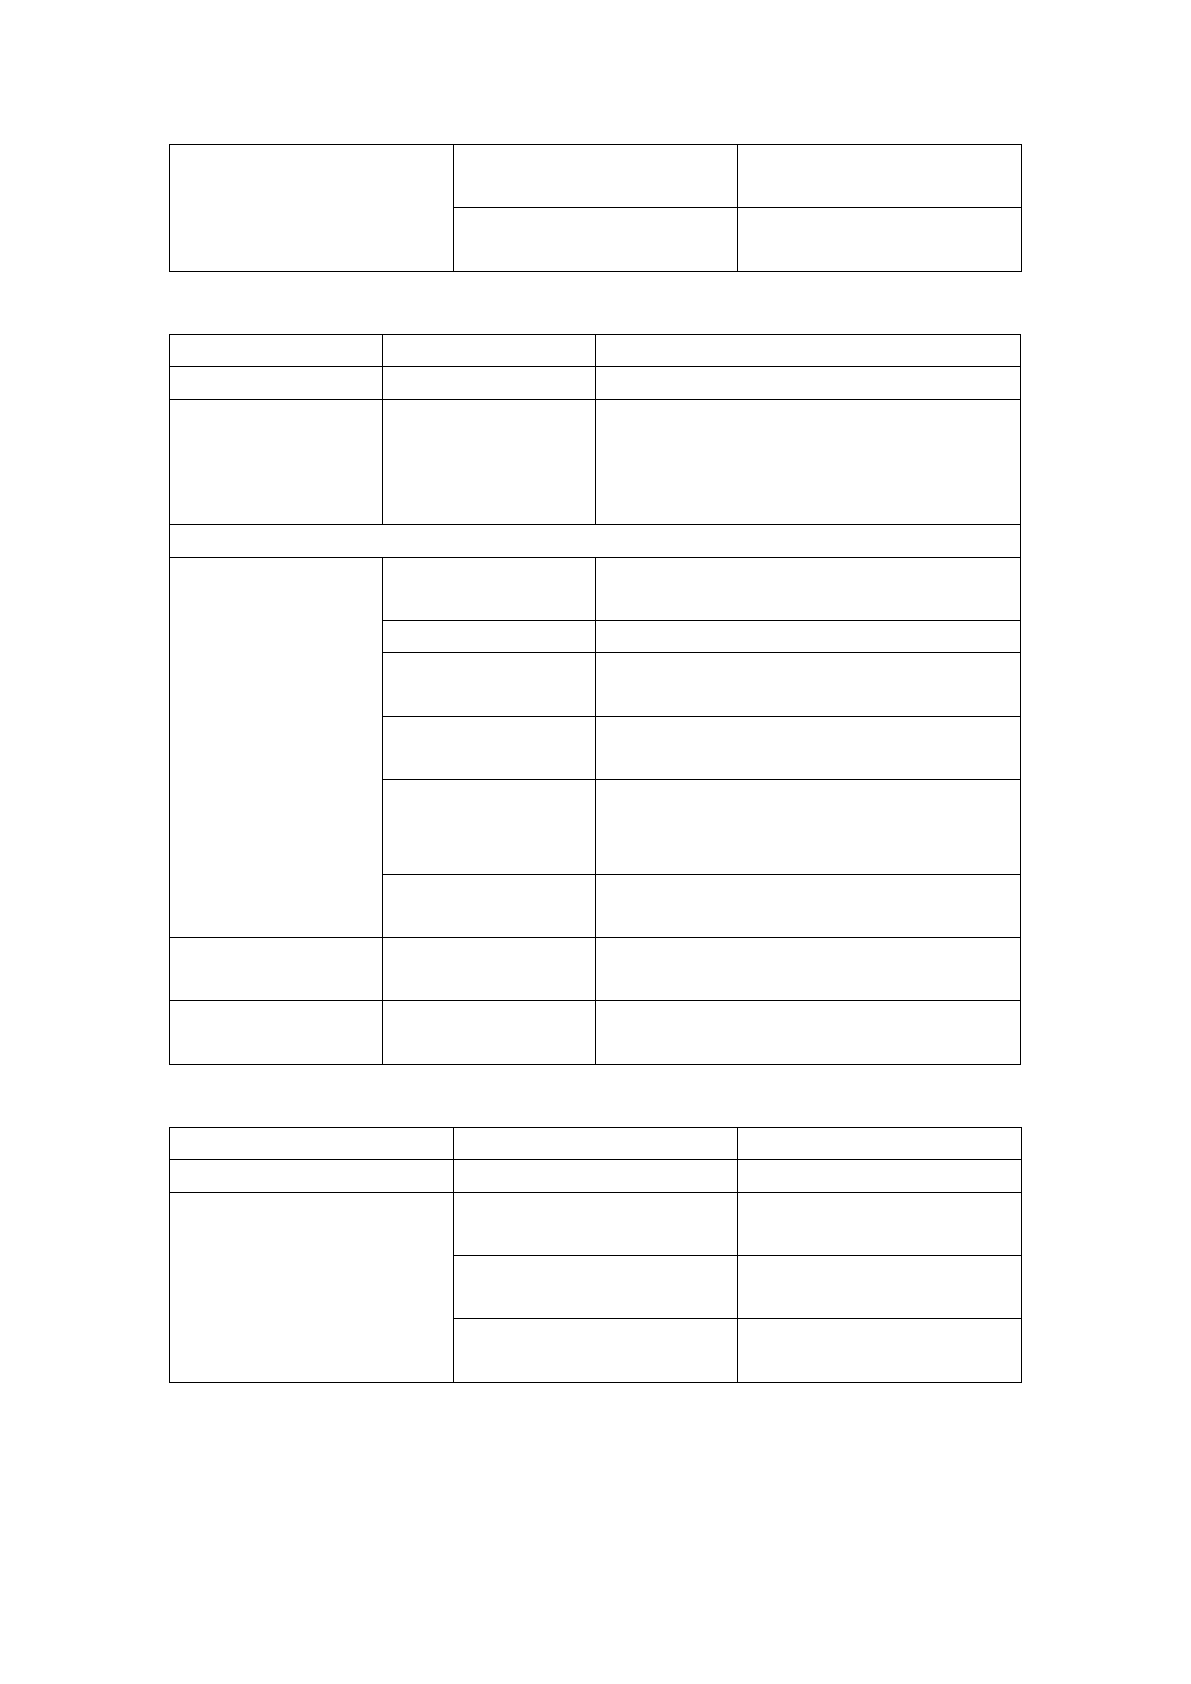
Problem
Cause
Solution
GENERAL
Unit will not power on. Radio fuse blown. Install new fuse with
correct rating.
Car battery fuse blown. Install new fuse with
correct rating.
Illegal operation.
Press the RESET button.
No/Low audio output
Improper audio output
connection.
Check wiring and connect.
Volume set too low.
Increase volume level.
Speakers damaged.
Replace speakers.
Only one channel is
playing.
Check the balance and
fader adjustments.
Speaker wiring is in
contact with metal part of
car.
Insulate all speaker wiring
connections or replace the
speaker cable.
Mute is activated.
Turn off the Mute
function.
Poor sound quality or
distortion.
Unauthorized disc is in
use.
Use original disc.
Speaker power rating not
compatible with unit.
Connect proper speakers.
Speaker is shorted.
Check speaker
connections.
Problem
Cause
Solution
TFT SCREEN
No Image.
The parking brake is not
engaged.
Stop vehicle in a safe place
and apply parking brake.
The parking wire was
wrong or not connected.
Please connect the parking
wire correctly.
The “Monitor off” –
function is activated.
Touch the monitor to
activate the display.
Prolonged image or
improper height / width
ratio.
Improper aspect ratio
setup.
Use correct aspect ratio
setting.
TUNER
Weak station searching.
Auto antenna not properly
connected.
Connect the auto antenna
cable properly.
REG function is activated.
Turn REG function off.
The adapter with antenna
Connect the antenna
power supply is not
connected
power supply adapter
properly.
The AF function is not
activated.
Activate the AF function.
Problem
Cause
Solution
MP3
The ID3 tags are
shown incorrectly.
Message is longer
than LCD can
display or ID3 tag is
not compatible.
Use proper ID3 tag information.
CD PLAYER
Disc does not play
back.
Disc is warped or
scratched.
Use disc in good condition.
Disc is dirty or wet.
Clean disc with soft cloth.
Incompatible disc is
used.
Use compatible disc.
Laser pickup is
dirty
Clean laser pickup with
cleaning disc
Disc region code is
not compatible
with unit
Use disc with proper
region code
Disc is inserted
upside down.
Insert disc with label side up.
Cannot insert disc.
Disc already inside
out.
Eject current disc and insert new one.
Image blurred,
distorted or dark
Disc is illegally
copied
Use original disc
Problem
Cause
Solution
REMOTE CONTROL
Remote control does not
function.
Battery is covered with
insulation Touch
Pull out the insulation
Touch
Battery depleted
Replace battery with new
one
Battery installed
incorrectly
Remove battery and install
correctly

S
SP
PE
EC
CI
IF
FI
IC
CA
AT
TI
IO
ON
NS
S
FM Radio
Frequency Range: 87.5MHz to 107.9MHz (USA)
87.5MHz to 108MHz (Europe)
Usable Sensitivity: 15dBuV (mono), 26dBuV (stereo)
Stereo Separation: 22db (1 kHz)
Frequency Response (-3db): 50Hz to12kHz
AM Radio
Frequency Range: 87.5MHz to 107.9MHz (USA)
87.5MHz to 108MHz (Europe)
Usable Sensitivity: 32dBuV
DVD Player System
Usable Discs: DVD Video Disc, Compact Disc
Frequency Response: 20Hz to 18kHz
Signal/Noise Ratio: 70dbA (1 W Ref)
Distortion: 0.3%
Video System: NTSC/PAL
Audio/Video Input
Audio Input Voltage: 650mv<= V RMS
Video Input Voltage: 1.0V p-p@75 Ohm
Audio Input Sensitivity (at 2V Output)
Mid: 650mV RMS
Audio/Video Output
Video Output Voltage: 0.8~1.2V p-p@75 Ohm
Screen Size: 6.2”
Pixels: 1,152,000
Resolution: 800 x 480 x 3 (RGB)
Bluetooth
Specification: Bluetooth Version 2.1+EDR
Profile: A2DP (Advanced Audio Distribution Profile)
HFP (Hands-free Profile)
PBAP (Phone Book Access Profile)
AVRCP (Audio/Video Remote Control Profile)
GAVDP (Generic Audio Video Distribution Profile)
IOPT (Interoperability Profile)

USB
Specification: 2.0
Playable Audio Format: MP3, WMA
Playable Video Format, AVI, MP4, MPG/MPEG, 3GP
General
Power Source Voltage: 12VDC (10.5 to 16.0V allowable)
Ground: Negative
Auto Antenna Rated Current: 100mA less
Note:
Specifications and design are subject to change without notice for further
improvement.
FCC ID:
Changes or modifications not expressly approved by the party responsible for
compliance could void the user’s authority to operate the equipment.
This equipment has been tested and found to comply with the limits for a Class B
digital device, pursuant to Part 15 of the FCC Rules. These limits are designed to
provide reasonable protection against harmful interference in a residential
installation. This equipment generates, uses and can radiate radio frequency energy
and, if not installed and used in accordance with the instructions, may cause harmful
interference to radio communications. However, there is no guarantee that
interference will not occur in a particular installation.
If this equipment does cause harmful interference to radio or television reception,
which can be determined by turning the equipment off and on, the user is
encouraged to try to correct the interference by one or more of the following
measures:
-- Reorient or relocate the receiving antenna.
-- Increase the separation between the equipment and receiver.
-- Connect the equipment into an outlet on a circuit different from that to which the
receiver is connected.
-- Consult the dealer or an experienced radio/TV technician for help.
FDA