Furuno USA 9ZWFS1575 GMDSS SSB User Manual FS1575 2575 5075 OME Frontcover
Furuno USA Inc GMDSS SSB FS1575 2575 5075 OME Frontcover
Contents
- 1. users manual part 1A
- 2. users manaul part 1B
- 3. users manual part 2
- 4. users manual part 3
users manaul part 1B
4. DSC DISTRESS OPERATIONS
4-9
• Relay the distress alert in the following cases:
• You have not received a distress acknowledge call from a coast station within five
minutes after receiving a distress call.
• You have not received a distress relay from other ship.
• You cannot receive distress communications from other ship over radiotele-
phone.
• The ship relaying the distress alert should establish communications with the sta-
tion controlling the distress as directed and render such assistance as required
and appropriate.
• If it is clear the ship or persons in distress are not near your ship and/or other ves-
sels are better placed to assist, superfluous communications which could interfere
with search and rescue activities should be avoided. Details should be recorded in
the log.
• When the received distress frequency is different from the current communication
frequency, do the following:
1. Rotate the ENTER knob to select [CHANGE] then push the knob.
2. Rotate the ENTER knob to select the frequency same as the received distress
one then push the knob.
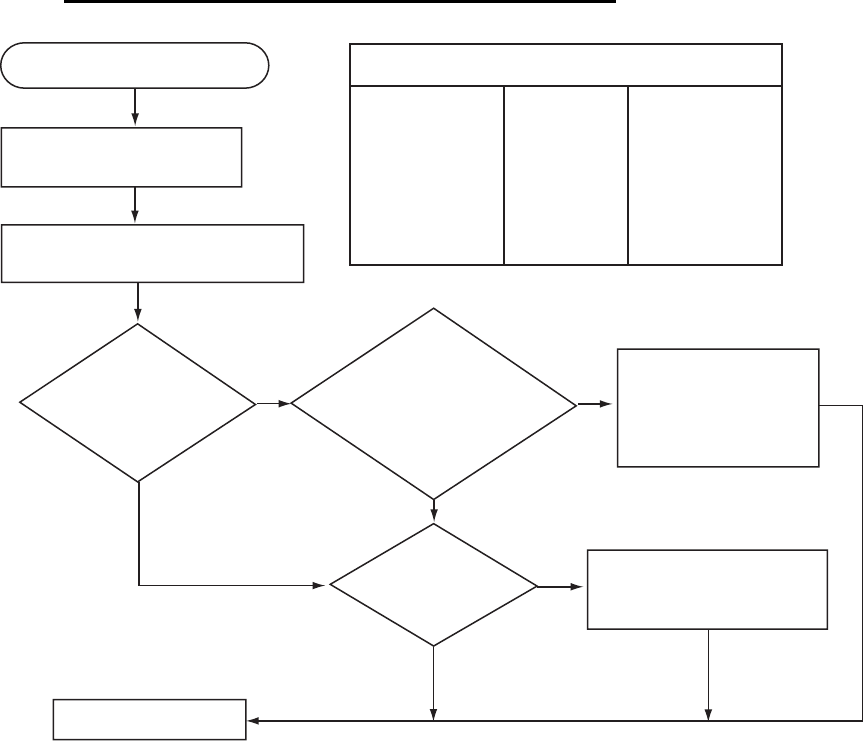
Action for ship receiving distress alert on HF band
No
Yes Yes
Yes
No
No
DSC distress alert received.
Press the CANCEL key
to silence alarm.
Listen to associated RTF* or
NBDP channel(s) for 5 minutes.
Is the alert
acknowledged or
relayed by CS and/
or RCC?
HF DSC, RTF AND NBDP CHANNELS (kHz)
* = Radiotelephone
DSC RTF* NBDP
4207.5
6312.0
8414.5
12577.0
16804.5
4125
6215
8291
12290
16420
4177.5
6268
8376.5
12520
16695
Is distress
communication in
progress on
associated RTF*
channels?
Transmit distress
relay on HF to CS
and inform RCC.
Is your ship
able to
assist?
Contact RCC via most
efficient medium to
offer assistance.
CS = Coast Station
RCC = Rescue Coordination Center
Enter details in log.
4. DSC DISTRESS OPERATIONS
4-10
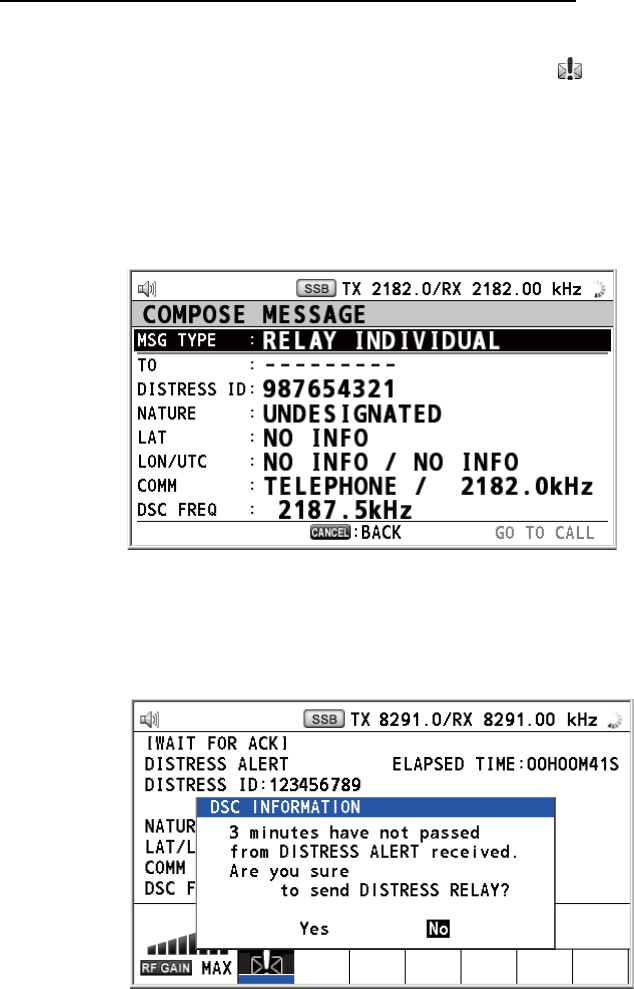
Send the distress relay to coast station (on HF band)
When you receive a distress alert from a ship in distress, the audio alarm sounds and
the LED flashes in red. The icon for DISTRESS receiving ( ) appears in the tab area
and the pop-up message appears on the screen.
1. Press the CANCEL key to silence the audio alarm and stop the flashing of the
LED.
2. Rotate the ENTER knob to select [RELAY] in the user options area then push the
knob.
If three minutes have not passed after receiving the distress alert from the ship in
distress, the following message appears on the screen. If you are sure to acknowl-
edge the distress call, rotate the ENTER knob to select [Yes] then push the knob
to erase the pop-up message and show the above screen.
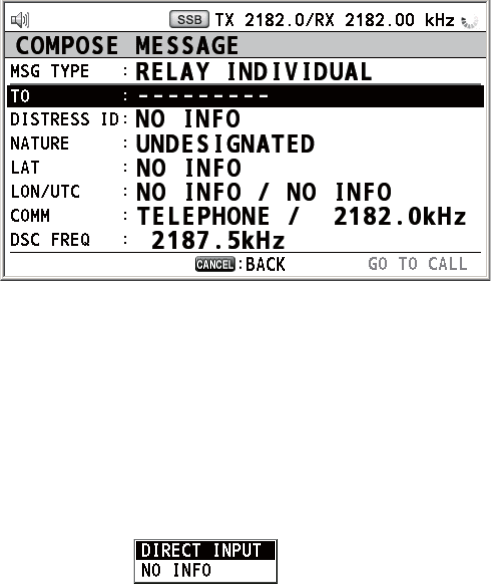
3. With [RELAY INDIVIDUAL] selected, push the ENTER knob.
4. With [TO] selected, push the ENTER knob.
5. Rotate the ENTER knob to select [DIRECT INPUT] or [ADDRESS BOOK DATA]
then push the knob.
[ADDRESS BOOK DATA]: Select a MMSI from the [ADDRESS BOOK] (see
section 6.15) then push the ENTER knob.
[DIRECT INPUT]: Enter the MMSI of the coast station, where to send the distress
relay, with the numeric keys then push the ENTER knob.
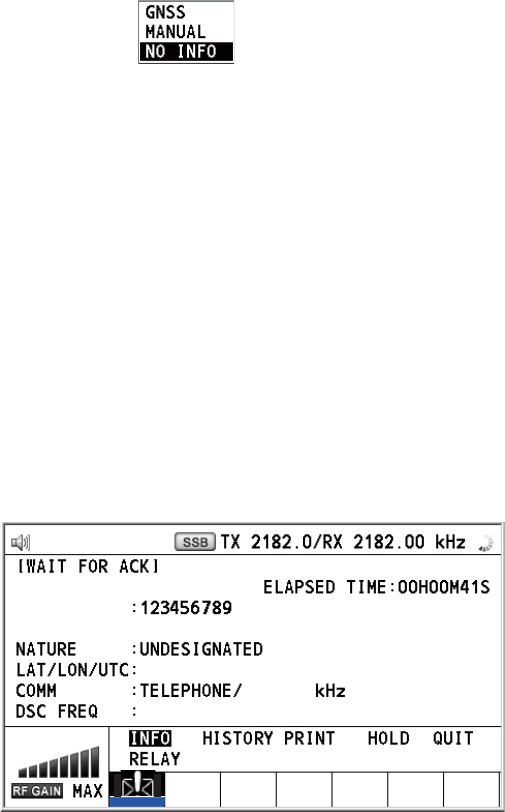
6. With [DSC FREQ] selected, push the ENTER knob.
7. Rotate the ENTER knob to select a frequency then push the knob. You should first
select [8414.5 kHz].
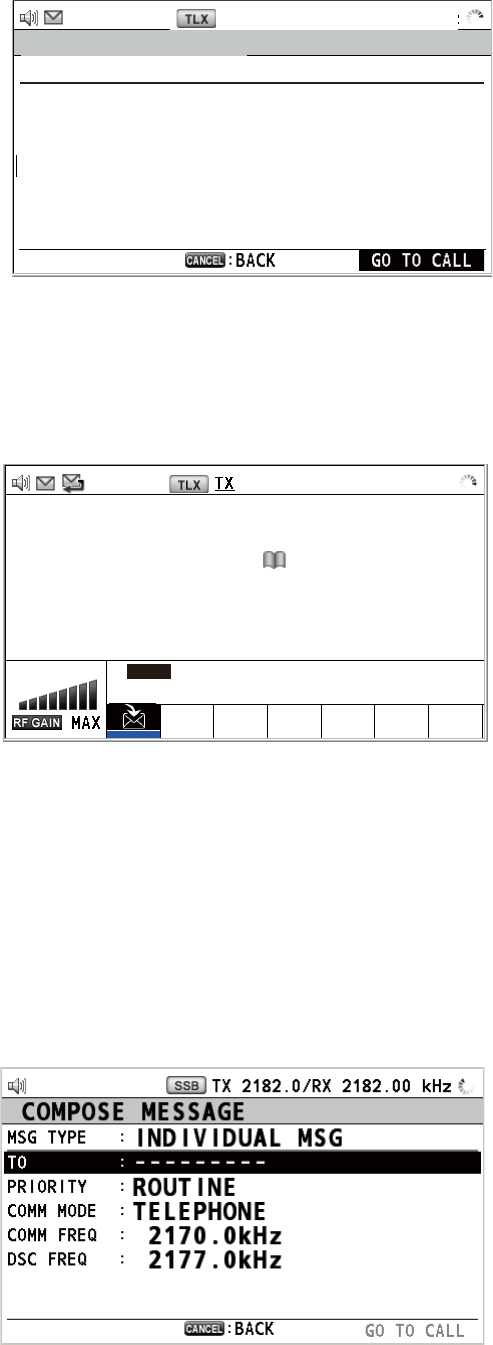
8. With [GO TO CALL] selected, push the ENTER knob. The screen changes to the
one for transmitting. After transmitting, the WAIT FOR ACK screen appears.
4. DSC DISTRESS OPERATIONS
4-11
When you receive the distress relay individual acknowledgement from the coast sta-
tion, the audio alarm sounds and a pop-up message appears. Press the CANCEL key
to silence the alarm and erase the pop-up message. Communicate with the coast sta-
tion by telephone, over the frequency specified. If you do not receive the distress ac-
knowledgement from a coast station, select [RELAY] then push the ENTER knob to
transmit the distress relay again, over a different frequency.
4.3 How to Send Distress Relay on Behalf of a Ship
in Distress
4.3.1 How to send distress relay to coast station
You can send the distress relay to a coast station on behalf of a ship in distress in the
following cases:
• You are near the ship in distress and the ship in distress cannot transmit the distress
alert.
• When the master or person responsible for your ship considers that further assis-
tance is necessary.
Note: Do not use the DISTRESS key to relay distress.
1. Press the DISTRESS MSG key and the OTHER DSC MSG key simultaneously to
open the composing screen for the distress relay individual.
2. With [TO] selected, push the ENTER knob.
3. Rotate the ENTER knob to select [DIRECT INPUT] or [ADDRESS BOOK DATA]
then push the knob.
[ADDRESS BOOK DATA]: Select a MMSI from the [ADDRESS BOOK] (see
section 6.15) then push the ENTER knob.
[DIRECT INPUT]: Enter the MMSI of the coast station, where to send the distress
relay, with the numeric keys then push the ENTER knob.
4. With [DISTRESS ID] selected, push the ENTER knob.
5. Rotate the ENTER knob to select [DIRECT INPUT] or [NO INFO] then push the
knob. For [DIRECT INPUT], go to step 6. For [NO INFO], go to step 7.
6. Enter the ID (MMSI) of the ship in distress with the numeric keys then push the
ENTER knob.
7. With [NATURE] selected, push the ENTER knob.
4. DSC DISTRESS OPERATIONS
4-12
8. Rotate the ENTER knob to select nature of distress then push the knob.
9. With [LAT] and [LON/UTC] selected, push the ENTER knob.
10. Rotate the ENTER knob to select [GNSS], [MANUAL] or [NO INFO] then push the
knob. For [MANUAL], go to step 11. For others, go to step 12.
11. Use the numeric keys to enter latitude and longitude of the ship in distress. (If nec-
essary, switch coordinates: 1 key to switch to North (East for longitude); 2 key to
switch to South (West for longitude).) Push the ENTER knob. Also, enter the UTC
time then push the ENTER knob.
12. With [COMM] selected, push the ENTER knob.
13. Rotate the ENTER knob to select [TELEPHONE] or [NBDP-FEC] then push the
knob.
14. With [DSC FREQ] selected, push the ENTER knob.
15. Rotate the ENTER knob to select the frequency then push the knob.
16. With [GO TO CALL] selected, push the ENTER knob. The distress relay is trans-
mitted to the coast station. After transmitting, the WAIT FOR ACK screen appears.
The elapsed time since transmitting is displayed.
When you receive the distress relay individual acknowledgement from the coast sta-
tion, the audio alarm sounds and the pop-up message "RELAY INDIVIDUAL ACK re-
ceived! [CANCEL]: Stop alarm" appears. Press the CANCEL key to silence the alarm
and erase the pop-up message. Communicate with the coast station by telephone,
over the frequency specified. To close the distress receiving session, select [QUIT] in
the user options area then push the ENTER knob.
4.3.2 How to send distress relay to ships in your area
If a coast station directs you to send a distress relay to ships in your area, follow the
procedure below. Do not transmit a distress relay unless directed to do so by a coast
station.
FROM
: 987654321
RELAY INDIVIDUAL MSG
TO
DISTRESS ID : NO INFO
NO INFO
/
NO INFO
/
NO INFO
2182.0
TX
2187.5 kHz
CHANGE RESEND
4. DSC DISTRESS OPERATIONS
4-13
1. Press the DISTRESS MSG key and the OTHER DSC MSG key simultaneously to
open the screen for composing the distress relay individual.
2. Rotate the ENTER knob to select [MSG TYPE] then push the knob.
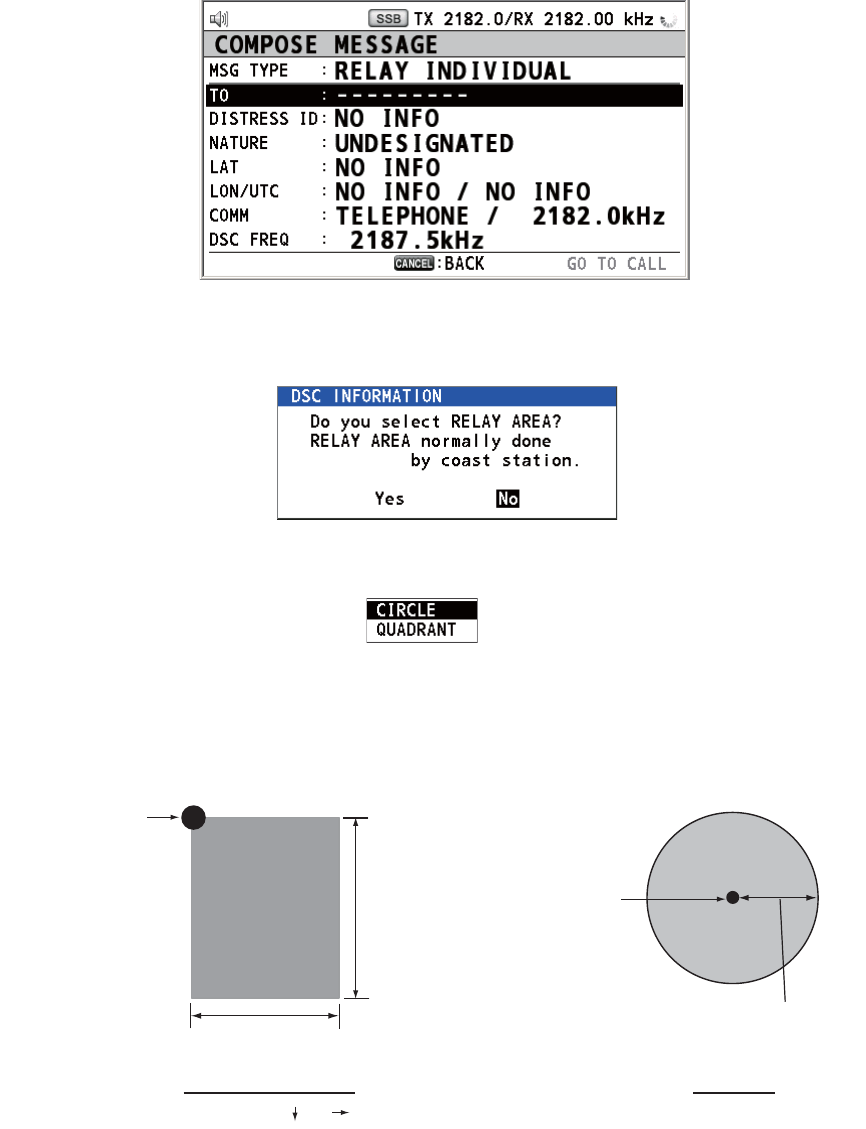
3. Rotate the ENTER knob to select [RELAY AREA] then push the knob. The follow-
ing message appears on the screen.
4. Rotate the ENTER knob to select [Yes] then push the knob.
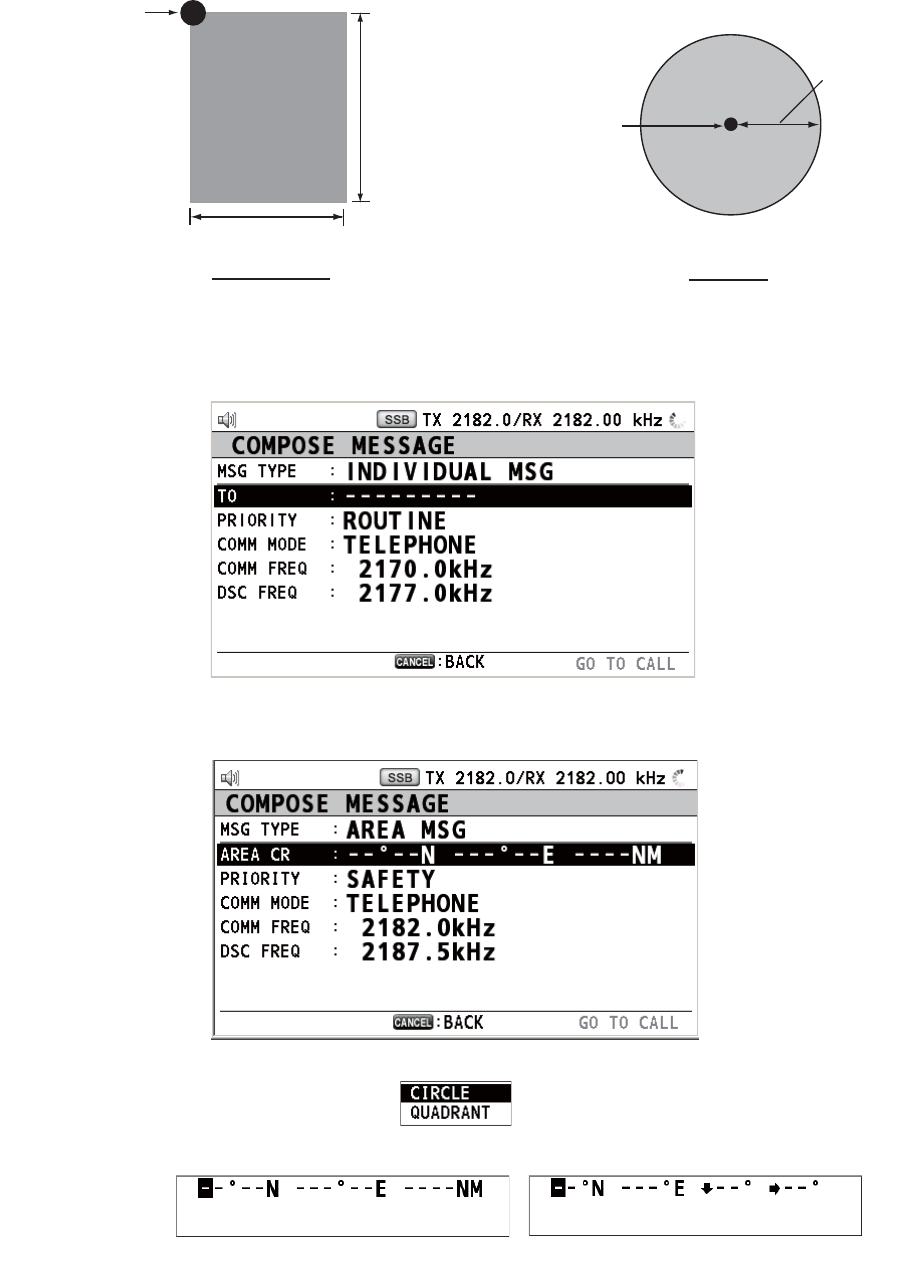
5. With [AREA CR] selected, push the ENTER knob.
6. Rotate the ENTER knob to select [CIRCLE] or [QUADRANT] then push the knob.
7. Set the area with the numeric keys (see step 5 in paragraph 5.3.1). The geograph-
ical area call is for sending a call to all ships within the area you designated. In the
figure below, for example, the call will be sent to all ships within 24-34°N, 135-
140°W (QUADRANT (LL)) and 34°N, 140°W, range: 500 NM (CIRCLE).
8. With [DISTRESS ID] selected, push the ENTER knob.
9. Rotate the ENTER knob to select [DIRECT INPUT] or [NO INFO] then push the
knob. For [DIRECT INPUT], go to step 10. For [NO INFO], go to step 11.
10. Enter the ID (MMSI) of the ship in distress with the numeric keys then push the
ENTER knob.
11. With [NATURE] selected, push the ENTER knob.
12. Rotate the ENTER knob to select nature of distress then push the knob.
13. With [LAT] and [LON/UTC] selected, push the ENTER knob.
QUADRANT (LL)
34°N, 140°W, 10° 5°
34°N
24°N
10°
5°
140°W135°W
Reference point
(For example,
34°N, 140°W)
500 NM
CIRCLE
34°00N, 140°00W, 0500NM
Reference point
(For example,
34°00N, 140°00W)
4. DSC DISTRESS OPERATIONS
4-14
14. Rotate the ENTER knob to select [GNSS], [MANUAL] or [NO INFO] then push the
knob. For [MANUAL], go to step 15. For others, go to step 16.
15. Use the numeric keys to enter latitude and longitude of the ship in distress. (If nec-
essary, switch coordinates: 1 key to switch to North (East for longitude); 2 key to
switch to South (West for longitude).) Push the ENTER knob. Also, enter the UTC
time then push the ENTER knob.
16. With [COMM] selected, push the ENTER knob.
17. Rotate the ENTER knob to select [TELEPHONE] or [NBDP-FEC] then push the
knob.
18. With [DSC FREQ] selected, push the ENTER knob.
19. Rotate the ENTER knob to select the frequency then push the knob.
20. With [GO TO CALL] selected, push the ENTER knob. The distress relay is trans-
mitted to the ships within the area specified at step 7.
4.4 How to Receive Distress Relay from Coast Sta-
tion
Your ship receives the distress relay when:
• The coast station sends the distress relay to your ship (DISTRESS RELAY INDI-
VIDUAL).
• The coast station sends the distress relay to the area where you are navigating
(DISTRESS RELAY AREA).
When you receive a distress relay message from a coast station, continue monitoring
distress and safety frequencies. The audio alarm sounds and the LED flashes in red.
The icon ( ) appears in the tab area and the pop-up message appears on the
screen.
1. Press the CANCEL key to silence the audio alarm, stop the flashing of the LED
and erase the pop-up message.
2. Watch distress/safety frequency.
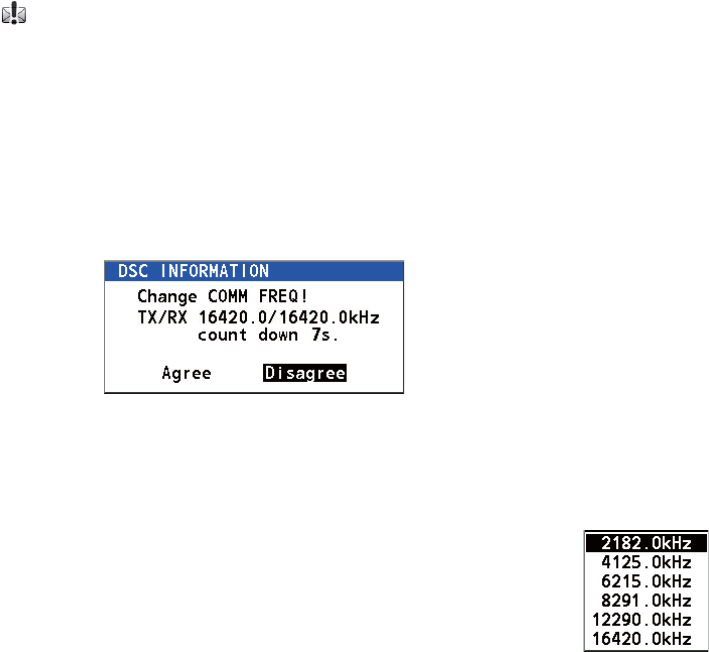
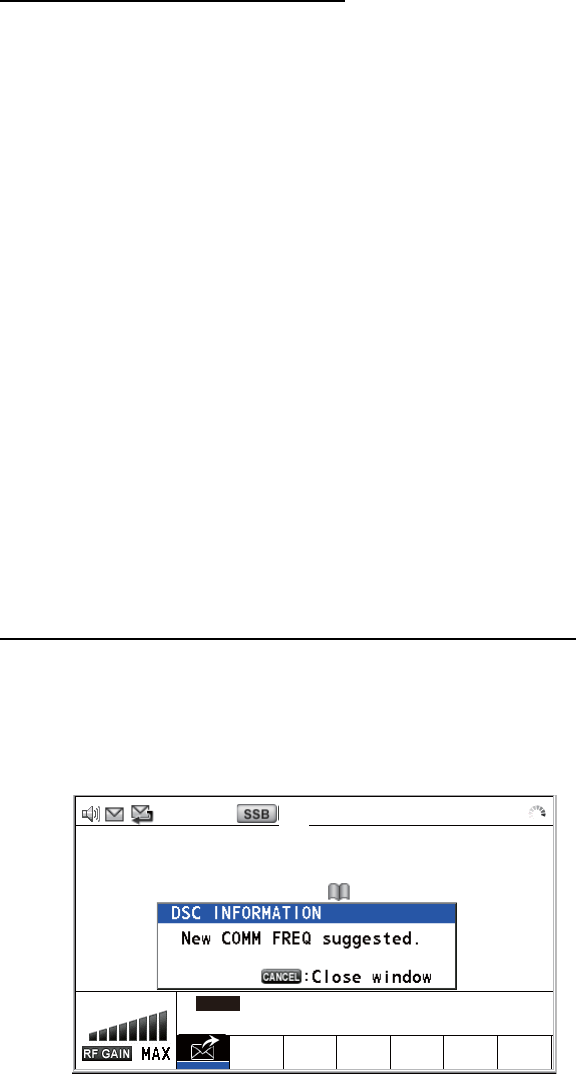
If you receive a DISTRESS RELAY INDIVIDUAL call with the different frequency from
the transceiver unit, for example, the following message appears on the screen.
Rotate the ENTER knob to select [Agree] then push the knob. The radiotelephone au-
tomatically sets working frequency.
If you change the communication frequency, do the following:
1. Rotate the ENTER knob to select [CHANGE] in the user options
area then push the knob.
2. Rotate the ENTER knob to select working frequency then push
the knob.
4. DSC DISTRESS OPERATIONS
4-15
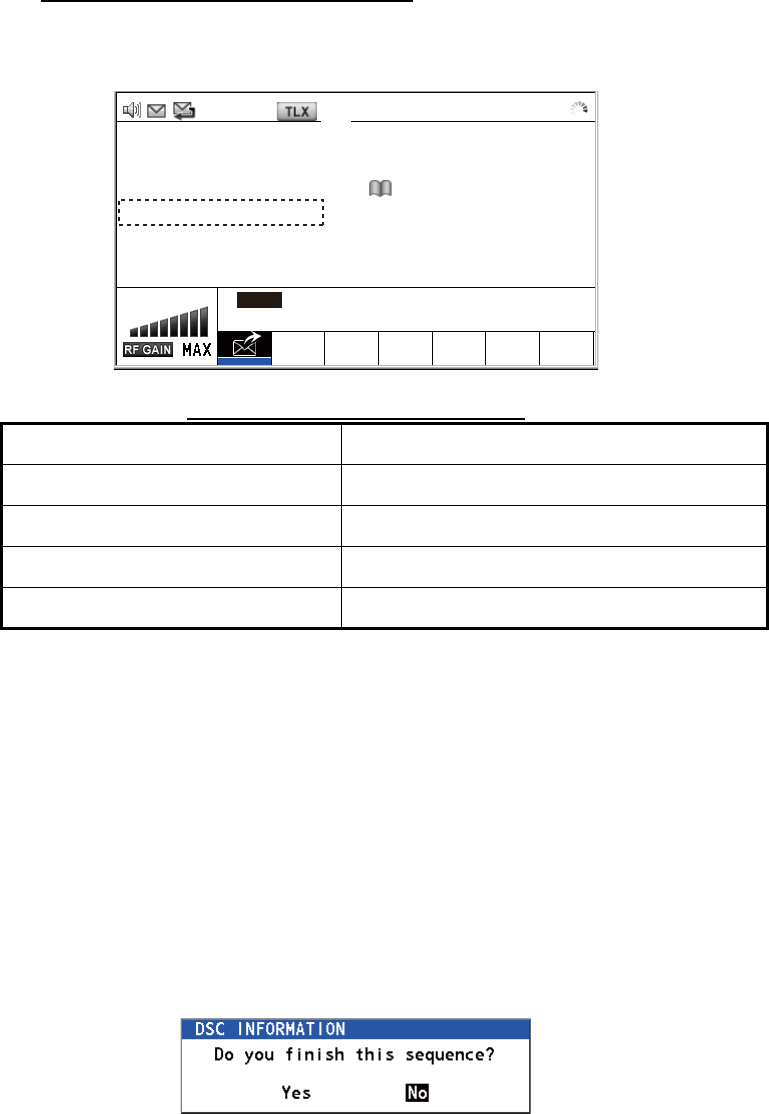
4.5 How to Cancel Distress Alert
You can cancel the distress alert while it is being sent or while waiting for its acknowl-
edgement as follows.
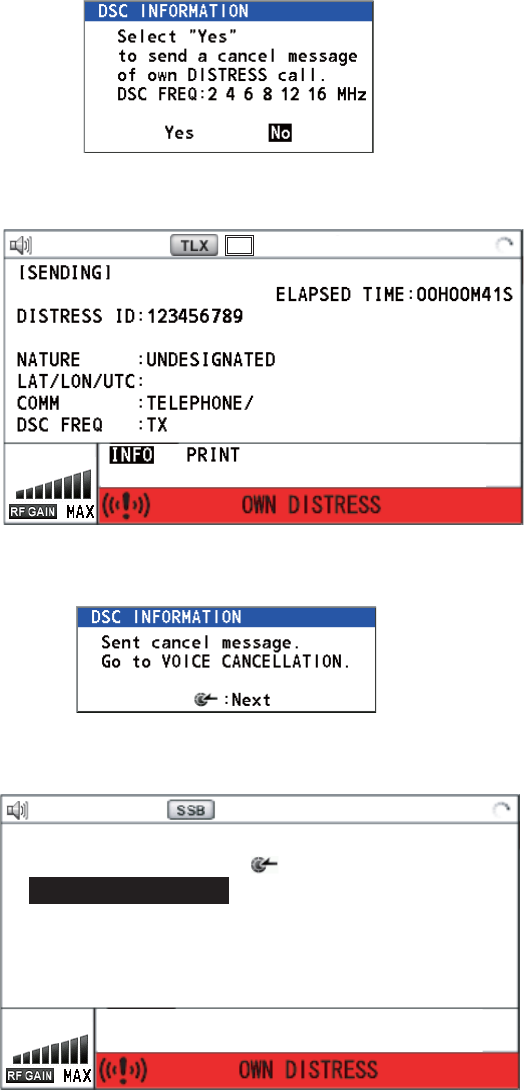
1. Rotate the ENTER knob to select [CANCEL] in the user options area then push
the knob. The following message appears on the screen.
2. Rotate the ENTER knob to select [Yes] then push the knob to cancel the distress
alert. The screen changes as below.
After transmitting the distress cancel call, the following message appears on the
screen.
3. Push the ENTER knob to erase the message. The screen for the selection of fre-
quency appears.
PRINT
TX 2187 . 5 / RX 2187 . 50 kHz
CANCEL ACK
FROM :
987654321
NO INFO/NO INFO/NO INFO
2182 . 0 kHz
2187 . 5 kHz
PRINT
TX 2182 . 0 / RX 2182 . 00 kHz
DISTRESS CANCEL MODE
SELECT FREQUENCY AND : ENTER
2M-2182.0kHz 8M- 8291.0kHz
4M-4125.0kHz 12M-12290.0kHz
6M-6215.0kHz 16M-16420.0kHz
4. DSC DISTRESS OPERATIONS
4-16
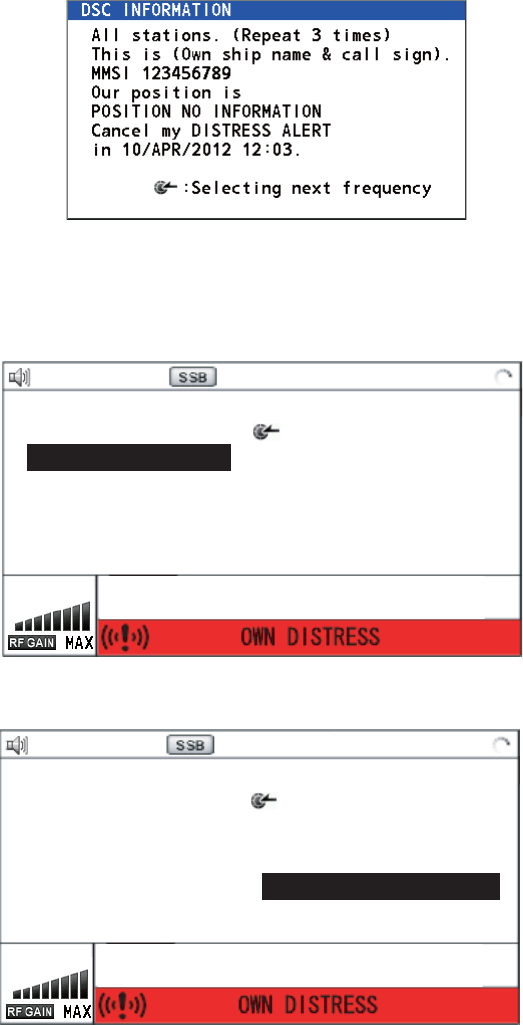
4. Rotate the ENTER knob to select a frequency then push the knob. The following
message appears on the screen.
5. Communicate with all ships via radiotelephone referring to the message at step 4.
6. Push the ENTER knob. The screen for the selection of frequency appears again.
The frequency marked by asterisk shows that the call cancellation by voice was
completed for that frequency.
7. Repeat steps 4 through 6 to cancel for ALL frequencies. When cancellation on all
frequencies is completed, the options [Finish] and [Resend] appear.
8. Rotate the ENTER knob to select [Finish] then push the knob.
PRINT
TX 2182 . 0 / RX 2182 . 00 kHz
DISTRESS CANCEL MODE
SELECT FREQUENCY AND : ENTER
2M-2182.0kHz 8M- 8291.0kHz
4M-4125.0kHz 12M-12290.0kHz
6M-6215.0kHz 16M-16420.0kHz
*
PRINT
TX 16420 . 0 / RX 16420 . 00 kHz
DISTRESS CANCEL MODE
SELECT FREQUENCY AND : ENTER
2M-2182.0kHz 8M- 8291.0kHz
4M-4125.0kHz 12M-12290.0kHz
6M-6215.0kHz 16M-16420.0kHz
*
Finish Resend
*
*
*
**

5-1
5. DSC GENERAL MESSAGE
CALLING, RECEIVING
General procedure for non-distress DSC messages
The procedure for sending and receiving non-distress DSC messages is similar
among message types. The following is an example of the sequence for an individual
call.
1. Send the individual message.
2. Wait for the individual message acknowledgement.
3. Start the communication.
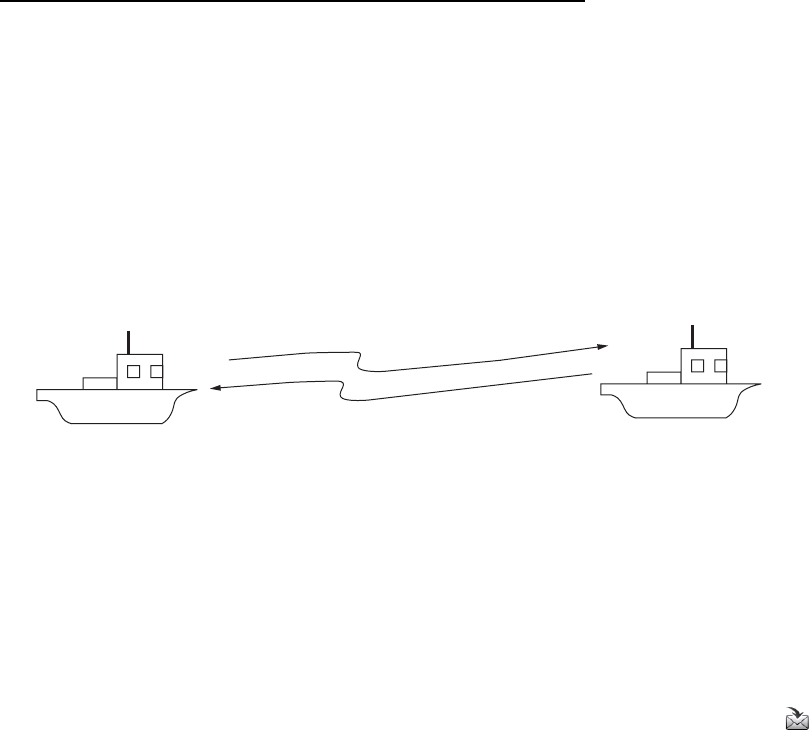
5.1 Individual Call
The individual call is for calling a specific station. After sending an individual call,
called ACK RQ transmission, wait to receive the acknowledge back (ACK BQ) signal
from the receiving station.
5.1.1 How to send an individual call
1. Press the OTHER DSC MSG key.
(1)
(2)
(3)
Your Ship Coast
Station
(1) DSC Message [Called Acknowledge
Request (ACK RQ) Signal]
(2) Acknowledge Back (ACK BQ) Signal
(3) Voice or telex communication
5. DSC GENERAL MESSAGE CALLING, RECEIVING
5-2
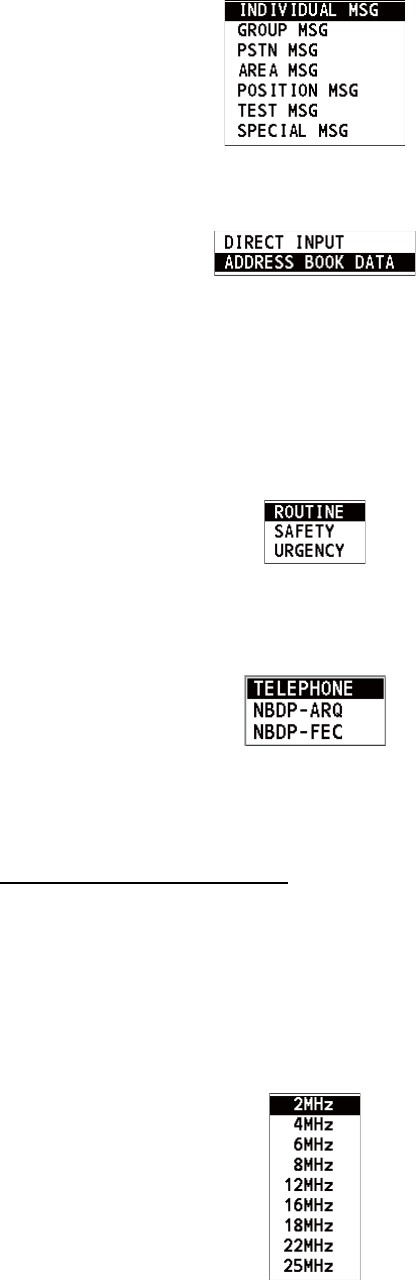
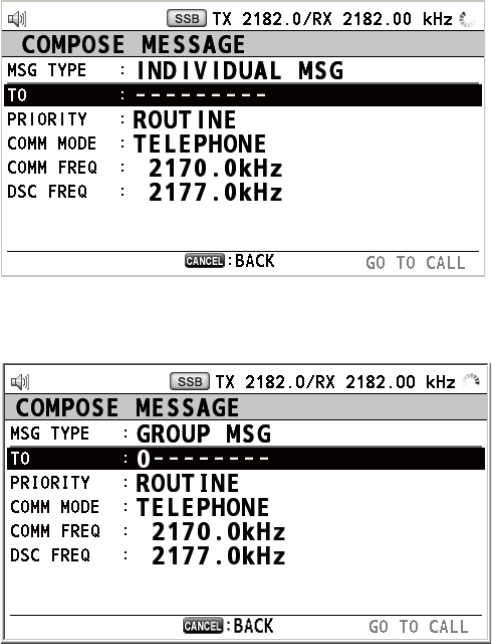
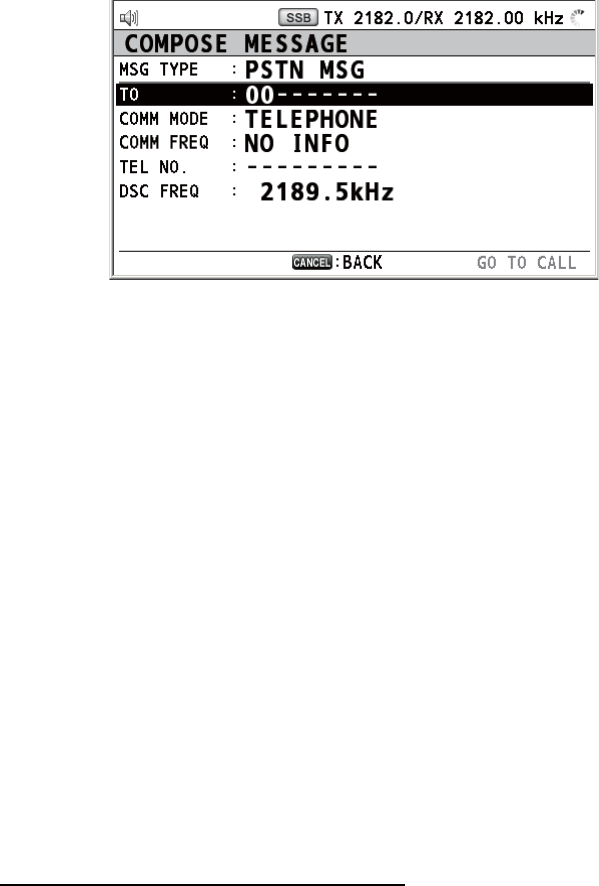
2. Rotate the ENTER knob to select [MSG TYPE] then push the knob.
3. Rotate the ENTER knob to select [INDIVIDUAL MSG] then push the knob.
4. With [TO] selected, push the ENTER knob.
5. Rotate the ENTER knob to select [DIRECT INPUT] or [ADDRESS BOOK DATA]
then push the knob.
[ADDRESS BOOK DATA]: Select a MMSI from the [ADDRESS BOOK] (see
section 6.15) then push the ENTER knob.
[DIRECT INPUT]: Enter the MMSI of the station where to send the call then push
the ENTER knob.
6. Rotate the ENTER knob to select [PRIORITY] then push the knob.
7. Rotate the ENTER knob to select [ROUTINE], [SAFETY] or [URGENCY] then
push the knob.
8. With [COMM MODE] selected, push the ENTER knob.
9. Rotate the ENTER knob to select communication mode then push the knob.
Note: NBDP terminal unit is required for [NBDP-ARQ] and [NBDP-FEC].
10. Follow "How to set DSC frequency" to set DSC frequency.
How to set DSC frequency
The [COMM FREQ] is automatically set to the same pair frequency as the DSC
frequency. If you change the communication frequency, set the [DSC FREQ] be-
fore setting the [COMM FREQ].
Routine priority
1) Rotate the ENTER knob to select [DSC FREQ] then push the knob.
5. DSC GENERAL MESSAGE CALLING, RECEIVING
5-3
2) Rotate the ENTER knob to select DSC band then push the knob. One of the
menus shown below appears depending on the band selected.
3) Rotate the ENTER knob to select DSC frequency then push the knob. The
screen shows the DSC frequency band selected, at [DSC FREQ].
Urgency or safety priority
1) Rotate the ENTER knob to select [DSC FREQ] then push the knob.
2) Rotate the ENTER knob to select the frequency then push the knob.
If you change the communication frequency, go to step 11. If not, go to step 13.
11. Rotate the ENTER knob to select [COMM FREQ] then push the knob.
Note: When you send an individual call to a coast station, [COMM FREQ] is au-
tomatically set to [POSITION] or [NO INFO]. [NO INFO] lets the receiving station
set the working frequency.
12. Follow "How to set working channel, frequency" to set working channel or fre-
quency.
How to set working channel, frequency
To send a call, set the working frequency as below, to communicate with the re-
ceiving station. The working frequency can be entered by TX and RX frequencies
or channel number.
1) Rotate the ENTER knob to select [FREQUENCY] or [CHANNEL] then push
the knob.
2) Enter TX/RX frequency or channel with the numeric keys then push the EN-
TER knob.
4MHz
6MHz
8MHz
12MHz
16MHz
18MHz
22MHz
25MHz
2MHz: To the coast station
2MHz: To the ship station
Channel setting window
0 . 0
Frequency setting window
5. DSC GENERAL MESSAGE CALLING, RECEIVING
5-4
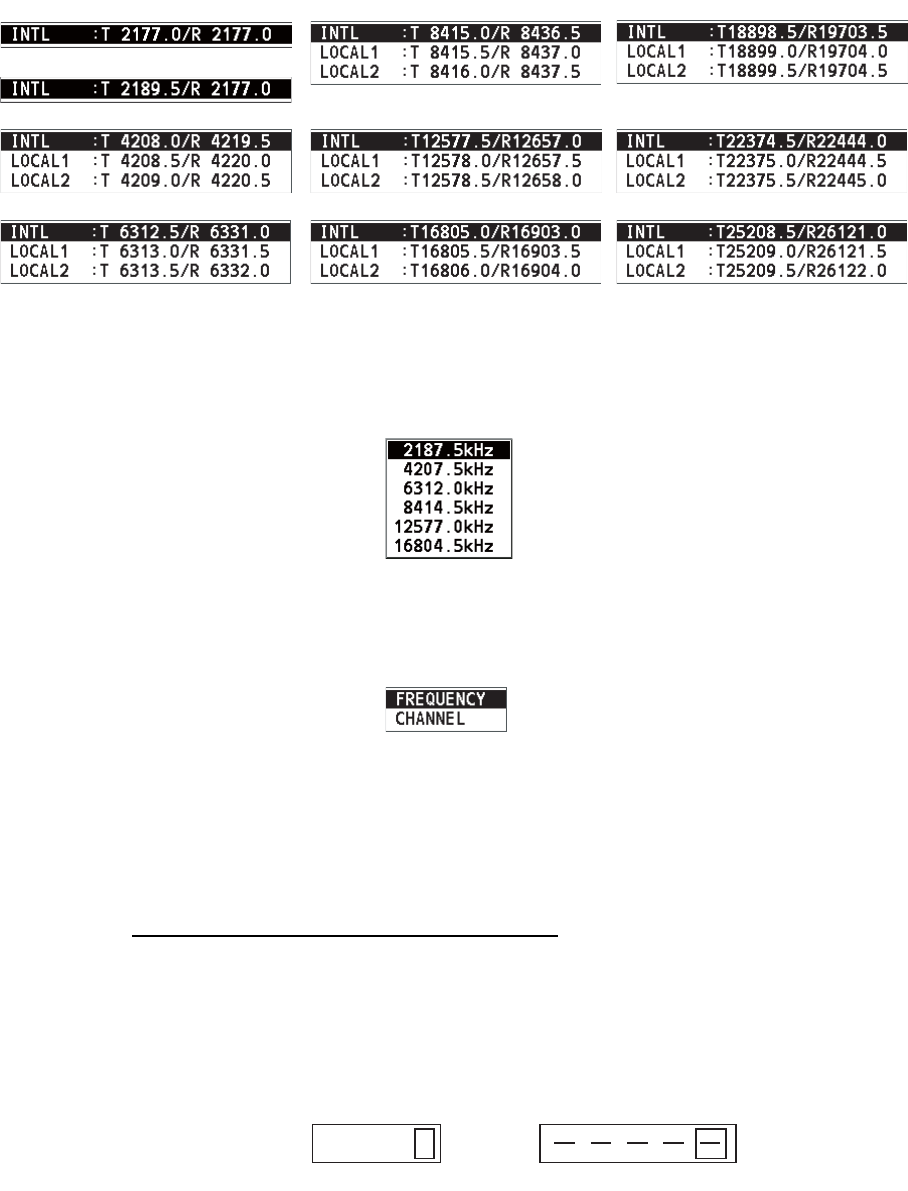
13. Rotate the ENTER knob to select [GO TO CALL] then push the knob to send the
individual call. The screen changes as below.
The timer starts counting up the time since the call was sent. After the call is sent,
the equipment waits for acknowledgement of the call, showing the WAIT FOR
ACK screen as below.
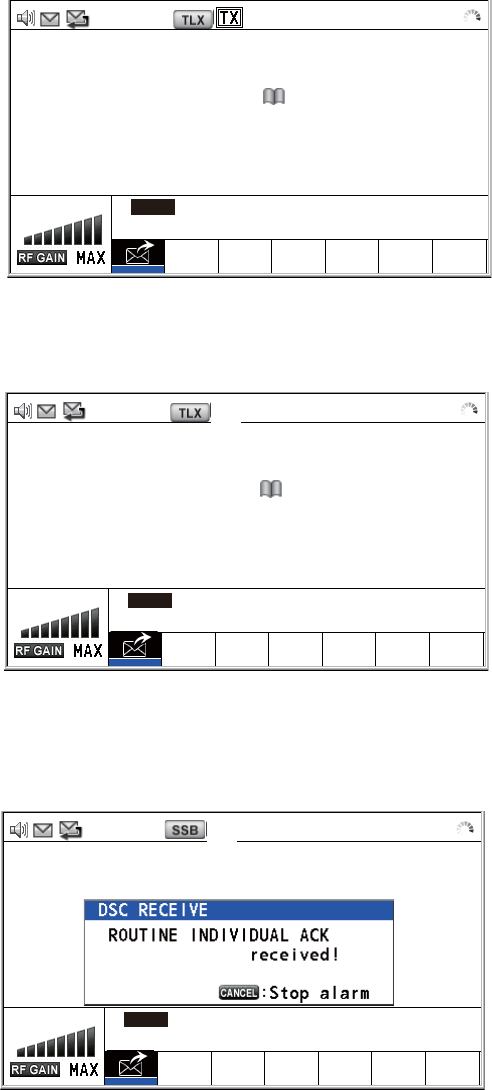
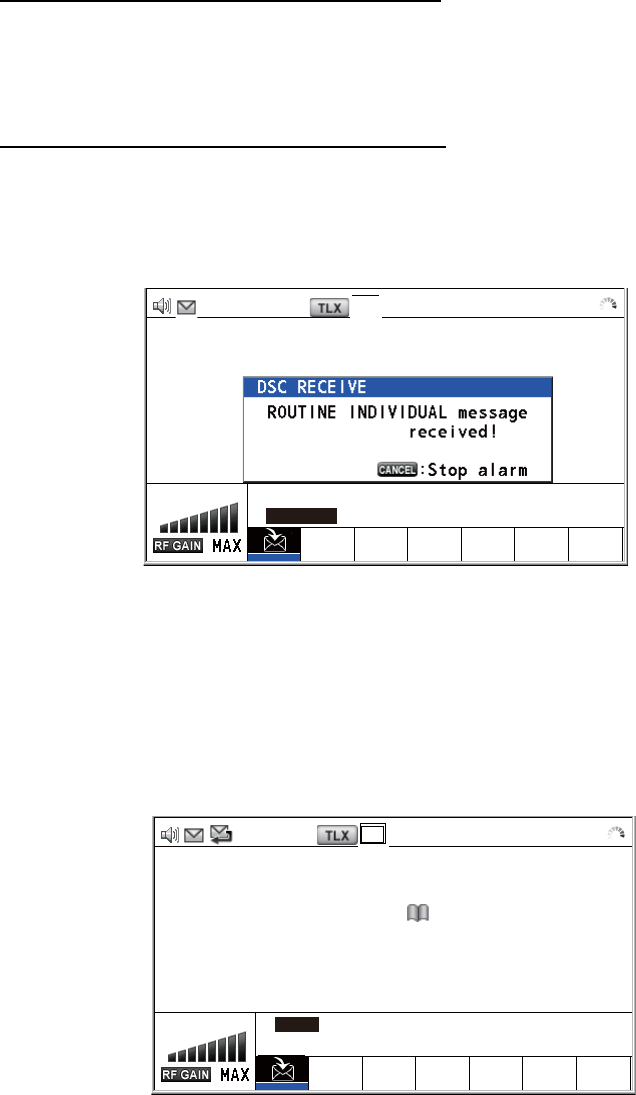
When the ACK is received, the audio alarm sounds and the pop-up message
"ROUTINE (or SAFETY, URGENCY) INDIVIDUAL ACK received! [CANCEL]:
Stop alarm" appears on the screen as below. The timer starts counting up the time
since the ACK was received.
There are three types of ACK messages; [ABLE ACK], [UNABLE ACK] and [ABLE
CHANGE FREQ].
14. Do one of the following depending on the message type shown at step 13.
2177.0/ RX 2177.00 kHz
[SENDING] ELAPSED TIME:
INDIVIDUAL MSG 00H00M02S
TO :
123456789 CAPTAIN_5075
COMM MODE : TELEPHONE
COMM FREQ : TX 2170.0 /RX 2170.0 kHz
INFO PRINT
[WAIT FOR ACK] ELAPSED TIME:
INDIVIDUAL MSG 00H00M58S
TO :
123456789 CAPTAIN_5075
COMM MODE : TELEPHONE
COMM FREQ : TX 2170.0 /RX 2170.0 kHz
INFO PRINT HOLD QUIT
RESEND
TX 2177.0/ RX 2177.00 kHz
[ACKNOWLEDGED] ELAPSED TIME:
INDIV ABLE ACK 00H00M04S
FROM :
123456789 CAPTAIN_5075
COMM MODE : TELEPHONE
COMM FREQ : TX 2170.0 /RX 2170.0 kHz
INFO PRINT HOLD QUIT
TX 2170.0/ RX 2170.00 kHz
5. DSC GENERAL MESSAGE CALLING, RECEIVING
5-5
Able acknowledge call received
1) Press the CANCEL key to silence the audio alarm and erase the pop-up mes-
sage.
2) The working frequency is automatically set; you can communicate by radio-
telephone or NBDP (see the following "How to send message by NBDP ter-
minal unit").
3) After you have completed communications, rotate the ENTER knob to select
[QUIT] in the user options area then push the knob.
How to send message by NBDP terminal unit
The message "STATION ENTRY COMPLETED FROM DSC. Press any key to
escape." appears on the screen of the NBDP terminal unit.
1) Press any key on the NBDP terminal unit to erase the message.
2) Press the function key F3 on the keyboard of the NBDP terminal unit to open
the [Operate] menu.
3) Select [Call Station] then press the Enter key.
4) With [DSC] selected; press the Enter key. "Connect" appears in reverse vid-
eo.
5) Type and transmit your message.
6) After you send the message, press the function key F10 to disconnect the line.
Able to change frequency acknowledge call received
This call means that the station you sent the individual call to accepts your call with
the frequency or communication mode that the station requires.
1) Press the CANCEL key to silence the audio alarm and erase the pop-up mes-
sage. The following message appears on the screen.
2) Press the CANCEL key to erase the message. The working frequency is
changed to one that the station requires. You can communicate by radiotele-
phone or NBDP, whichever the station requires.
3) After you have completed communications, rotate the ENTER knob to select
[QUIT] in the user options area then push the knob.
[ACKNOWLEDGED] ELAPSED TIME:
INDIV ABLE ACK 00H00M04S
FROM :
123456789 CAPTAIN_5075
COMM MODE : TELEPHONE
COMM FREQ : TX 2170.0 /RX 2170.0 kHz
INFO PRINT HOLD QUIT
TX 6500.0/ RX 6500.00 kHz
5. DSC GENERAL MESSAGE CALLING, RECEIVING
5-6
Unable acknowledge call received
1) Press the CANCEL key to silence the audio alarm and erase the pop-up mes-
sage. The reason for [UNABLE ACK] is displayed on the screen.
Reason for unable to acknowledge
*: Coast station use
2) Rotate the ENTER knob to select [QUIT] in the user options area then push
the knob.
Note: If the coast station sends the message "QUEUE INDICATION", wait un-
til your turn comes.
If there is no response from the receiving station, do one of the following procedures:
• Resend call: Rotate the ENTER knob to select [RESEND] in the user options area
then push the knob.
• Cancel call: Rotate the ENTER knob to select [QUIT] in the user options area then
push the knob. The following message appears.
Rotate the ENTER knob to select [Yes] then push the knob.
5.1.2 How to receive an individual call
Unable acknowledge is sent automatically or manually depending on the acknowl-
edgement method setting (see section 6.17). Able acknowledge is sent only manually.
Note: The handset must be on hook and all sessions must be quit to enable automatic
acknowledge.
• NO REASON • CAN'T USE CH
• BUSY • CAN'T USE MODE
• EQUIP ERROR • CONGESTION AT CENTER*
• QUEUE INDICATION • OPERATOR ABSENT
• STATION BARRED • TEMP. UNAVAILABLE
[ACKNOWLEDGED] ELAPSED TIME:
INDIV UNABLE ACK 00H00M04S
FROM :
123456789 CAPTAIN_5075
REASON :
BUSY
INFO PRINT HOLD QUIT
TX 2177.0/ RX 2177.00 kHz
5. DSC GENERAL MESSAGE CALLING, RECEIVING
5-7
Send unable acknowledge automatically
If the frequency or mode specified by the sending station is one that you cannot use,
an unable acknowledge [CAN’T USE CH] is sent automatically. The [ACK SETTINGS]
menu is set to [AUTO (UNABLE)]. It takes about seven seconds to transmit the call.
Send able/unable acknowledge manually
When an individual call is received with the setting [MANUAL] on the [ACK SET-
TINGS] menu, the audio alarm sounds and a pop-up message appears on the screen
as below.
Press the CANCEL key to silence the audio alarm and erase the pop-up message.
There are three types of ACK transmission; able acknowledge, able to change fre-
quency and unable acknowledge. Follow the appropriate procedure on this and the
next page.
• How to send able acknowledge call
1. With [ACCEPT] selected, push the ENTER knob to send the able acknowledge
call.
2. Communicate by radiotelephone or NBDP (see "Communication by NBDP ter-
minal unit" on page 5-9).
[SELECT AN ACK] ELAPSED TIME:
INDIVIDUAL MSG 00H00M58S
FROM :
987654321 CAPTAIN_2575
COMM MODE : TELEPHONE
COMM FREQ : TX 2170.0 /RX 2170.0 kHz
INFO PRINT HOLD QUIT
ACCEPT UNABLE PROPOSE
TX 2177.0/ RX 2177.00 kHz
[SENDING] ELAPSED TIME:
INDIV ABLE ACK 00H00M31S
TO :
987654321 CAPTAIN_2575
COMM MODE : TELEPHONE
COMM FREQ : TX 2170.0 /RX 2170.0 kHz
INFO PRINT
TX 2177.0/ RX 2177.00 kHz
5. DSC GENERAL MESSAGE CALLING, RECEIVING
5-8
3. After you have completed communications, rotate the ENTER knob to select
[QUIT] in the user options area then push the knob.
• How to send unable acknowledge call
1. Rotate the ENTER knob to select [UNABLE] in the user options area then push
the knob.
2. Push the ENTER knob.
3. Rotate the ENTER knob to select the reason for unable then push the knob.
4. With [GO TO CALL] selected, push the ENTER knob to send unable acknowl-
edge call.
[ACKNOWLEDGED] ELAPSED TIME:
INDIV ABLE ACK 00H00M31S
TO :
987654321 CAPTAIN_2575
COMM MODE : TELEPHONE
COMM FREQ : TX 2170.0 /RX 2170.0 kHz
INFO PRINT HOLD QUIT
RESEND
TX 2170.0/ RX 2170.00 kHz
TX 2177.0/ RX 2177.00 kHz
COMPOSE MESSAGE
MSG TYPE : INDIVIDUAL ACK
TO : 987654321 CAPTAIN_2575
PRIORITY : ROUTINE
COMM MODE : UNABLE TO COMPLY
REASON : NO REASON
DSC FREQ : 2177.0 kHz
GO TO CALL
NO REASON
BUSY
EQUIP ERROR
CAN’T USE CH
CAN’T USE MODE
QUEUE INDICATION
STATION BARRED
OPERATOR ABSENT
TEMP. UNAVAILABLE
5. DSC GENERAL MESSAGE CALLING, RECEIVING
5-9
• How to send able acknowledge call and change frequency
1. Rotate the ENTER knob to select [PROPOSE] in the user options area then
push the knob.
2. Rotate the ENTER knob to select [COMM MODE] then push the knob.
3. Rotate the ENTER knob to select [TELEPHONE], [NBDP-ARQ] or [NBDP-FEC]
then push the knob.
4. With [COMM FREQ] selected, push the ENTER knob.
5. Rotate the ENTER knob to select [FREQUENCY] or [CHANNEL] then push the
knob.
6. Referring to "How to set working channel, frequency" on page 5-3, set the fre-
quency or channel.
7. With [GO TO CALL] selected, push the ENTER knob to send the able to change
frequency acknowledge call.
8. Communicate by radiotelephone or NBDP (see the following "Communication
by NBDP terminal unit").
9. After you have completed communications, rotate the ENTER knob to select
[QUIT] in the user options area then push the knob.
Communication by NBDP terminal unit
After acknowledging an individual call, do the following to communicate by NBDP ter-
minal unit. The message from the other party appears on your NBDP terminal unit.
1. After receiving the message from the other party, type your message and transmit
it.
2. Press the function key F10 to disconnect the line.
TX 2177.0/ RX 2177.00 kHz
COMPOSE MESSAGE
MSG TYPE : INDIVIDUAL ACK
TO : 987654321 CAPTAIN_2575
PRIORITY : ROUTINE
COMM MODE : TELEPHONE
COMM FREQ : 2170.0 kHz
DSC FREQ : 2177.0 kHz
GO TO CALL
5. DSC GENERAL MESSAGE CALLING, RECEIVING
5-10
5.2 Group Call
A group call is for calling a specific group by specifying its group MMSI.
5.2.1 How to send a group call
1. Press the OTHER DSC MSG key.
2. Rotate the ENTER knob to select [MSG TYPE] then push the knob.
3. Rotate the ENTER knob to select [GROUP MSG] then push the knob.
4. With [TO] selected, push the ENTER knob.
5. Rotate the ENTER knob to select [DIRECT INPUT] or [ADDRESS BOOK DATA]
then push the knob.
[ADDRESS BOOK DATA]: Select a MMSI from the [ADDRESS BOOK] (see
section 6.15) then push the ENTER knob.
[DIRECT INPUT]: Enter group MMSI (eight digits) with the numeric keys then
push the ENTER knob.
6. With [COMM MODE] selected, push the ENTER knob.
7. Rotate the ENTER knob to select [TELEPHONE] or [NBDP-FEC] then push the
knob.
8. Rotate the ENTER knob to select [DSC FREQ] then push the knob.
9. Rotate the ENTER knob to select DSC frequency desired then push the knob (see
"How to set DSC frequency" on page 5-2). The communication frequency chang-
es in conjunction with DSC frequency. If you change the communication frequen-
cy, go to step 10. If not, go to step 13.
10. Rotate the ENTER knob to select [COMM FREQ] then push the knob.
11. Rotate the ENTER knob to select [FREQUENCY] or [CHANNEL] then push the
knob.
5. DSC GENERAL MESSAGE CALLING, RECEIVING
5-11
12. Referring to "How to set working channel, frequency" on page 5-3, set the fre-
quency or channel.
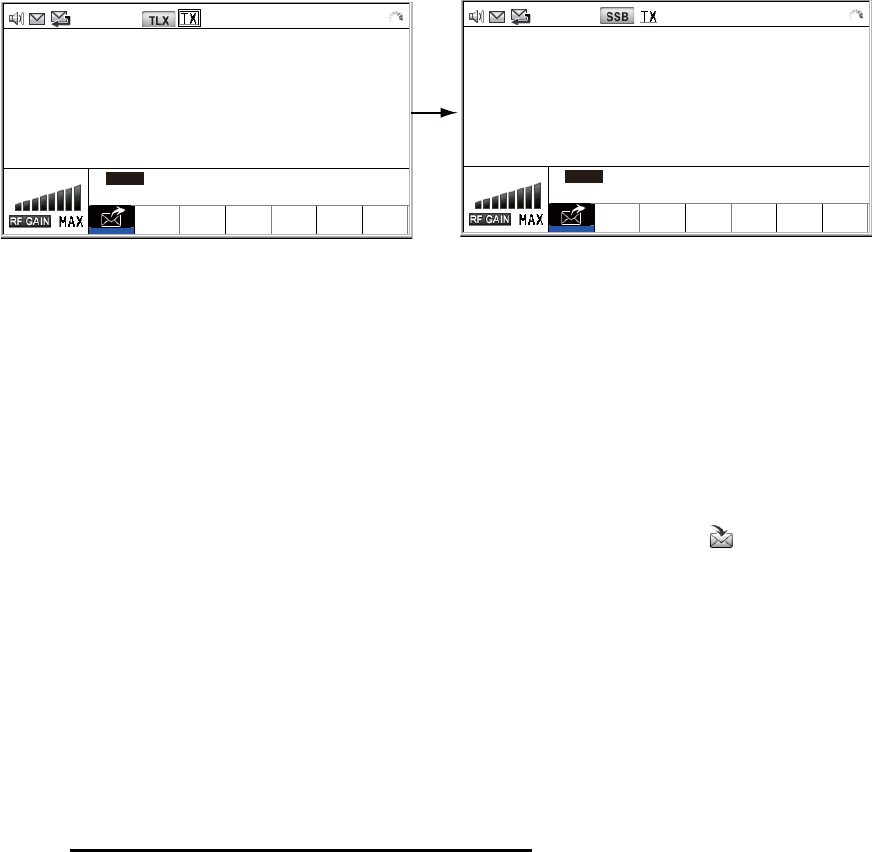
13. Rotate the ENTER knob to select [GO TO CALL] then push the knob to send the
group call. The screen changes as below.
14. Communicate by radiotelephone or NBDP (see "How to send message by NBDP
terminal unit" on page 5-5).
15. After you have completed communications, rotate the ENTER knob to select
[QUIT] in the user options area then push the knob.
5.2.2 How to receive a group call
Group MMSI must be registered in order to receive a group call (see
paragraph 6.15.2).
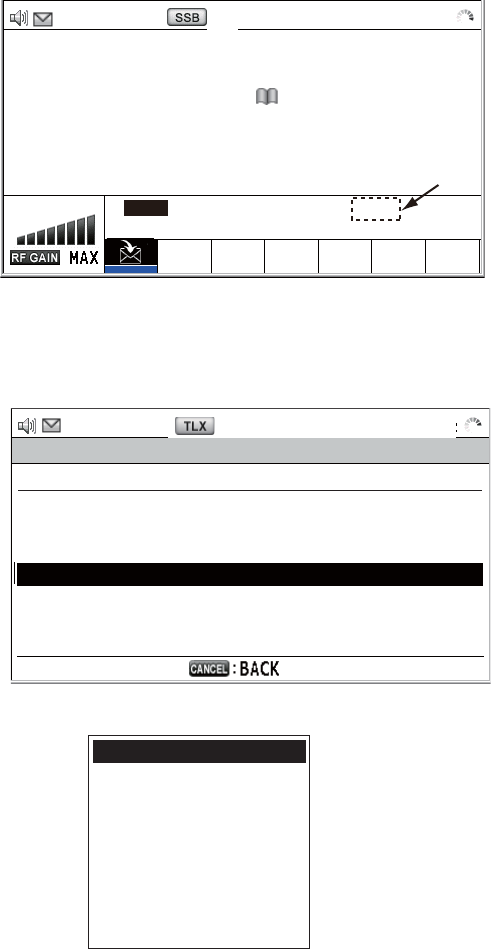
When a group call is received, the audio alarm sounds. The icon ( ) appears in the
tab area, and the pop-up message "GROUP message received! [CANCEL]: Stop
alarm" appears.
1. Press the CANCEL key to silence the audio alarm and erase the pop-up mes-
sage. The frequency is automatically tuned to the received frequency.
2. Watch on the working frequency. Communicate by radiotelephone or NBDP (see
the following "Group call received by NBDP terminal unit").
3. After you have completed communications, rotate the ENTER knob to select
[QUIT] in the user options area then push the knob.
Group call received by NBDP terminal unit
After receiving a group call, confirm the following.
• The control unit's screen shows the TX and RX frequencies.
• The message from the sending station appears on your NBDP terminal unit.
2177.0/ RX 2177.00 kHz
[SENDING]
ELAPSED TIME:
GROUP MSG 00
H
00
M
04
S
TO :
012345678
COMM MODE :
TELEPHONE
COMM FREQ :
TX 2170.0 /RX 2170.0
kHz
INFO PRINT
2170.0/ RX 2170.00 kHz
[ACKNOWLEDGED]
ELAPSED TIME:
GROUP MSG 00
H
00
M
58
S
TO :
012345678
COMM MODE :
TELEPHONE
COMM FREQ :
TX 2170.0 /RX 2170.0
kHz
INFO PRINT HOLD QUIT
RESEND
5. DSC GENERAL MESSAGE CALLING, RECEIVING
5-12
5.3 Geographical Area Call
The purpose of a geographical area call is to send a call to all ships within the area
you designate. In the figure below, for example, the call is sent to all ships within 24-
34°N, 135-140°W (QUADRANT) and 34°N, 140°W, range: 500 NM (CIRCLE).
5.3.1 How to send a geographical area call
1. Press the OTHER DSC MSG key.
2. Rotate the ENTER knob to select [MSG TYPE] then push the knob.
3. Rotate the ENTER knob to select [AREA MSG] then push the knob.
4. With [AREA CR] selected, push the ENTER knob.
5. Rotate the ENTER knob to select [CIRCLE] or [QUADRANT] then push the knob.
QUADRANT CIRCLE
Reference point
(For example,
34°N, 140°W)
Reference point
(For example,
34°N, 140°W)
500 NM
34°N
10°
24°N
5°
140°W 135°W
CIRCLE setting window QUADRANT setting window
5. DSC GENERAL MESSAGE CALLING, RECEIVING
5-13
[CIRCLE]: Using the numeric keys, enter latitude and longitude of reference point
and radius of area. To change coordinate, select it and press the 1 key for North
or East; 2 key for South or West. After entering data, push the ENTER knob.
[QUADRANT]: Using the numeric keys, enter latitude and longitude of reference
point and southerly degrees and easterly degrees of area. To change coordinate,
select it and press the 1 key for North or East; 2 key for South or West. After en-
tering data, push the ENTER knob.
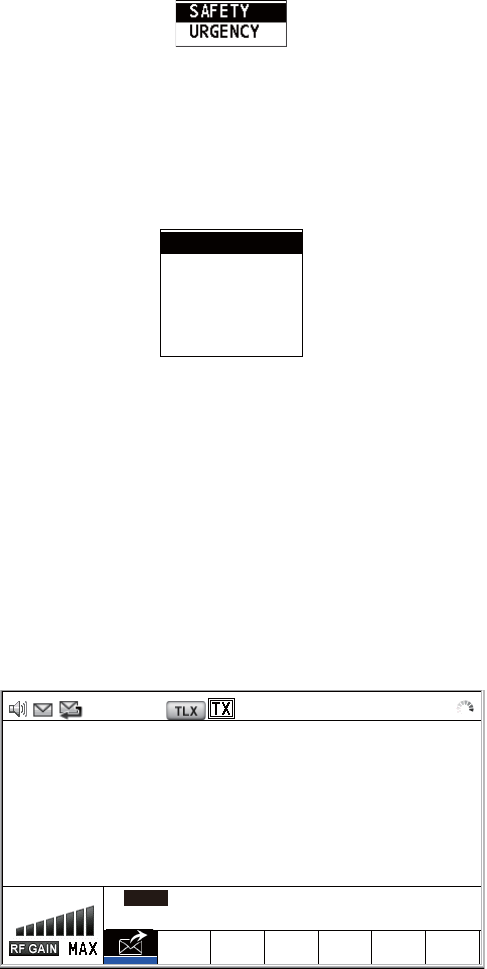
6. With [PRIORITY] selected, push the ENTER knob.
7. Rotate the ENTER knob to select [SAFETY] or [URGENCY] then push the knob.
8. With [COMM MODE] selected, push the ENTER knob.
9. Rotate the ENTER knob to select [TELEPHONE] or [NBDP-FEC] then push the
knob.
10. Rotate the ENTER knob to select [DSC FREQ] then push the knob.
11. Rotate the ENTER knob to select DSC frequency desired then push the knob. The
communication frequency changes in conjunction with DSC frequency. If you
change the communication frequency, go to step 12. If not, go to step 15.
12. Rotate the ENTER knob to select [COMM FREQ] then push the knob.
13. Rotate the ENTER knob to select [FREQUENCY] or [CHANNEL] then push the
knob.
14. Referring to "How to set working channel, frequency" on page 5-3, set the fre-
quency or channel.
15. Rotate the ENTER knob to select [GO TO CALL] then push the knob to send the
call.
16. Communicate by radiotelephone or NBDP (see "How to send message by NBDP
terminal unit" on page 5-5).
17. After you have completed communications, rotate the ENTER knob to select
[QUIT] in the user options area then push the knob.
2187.5 kHz
4207.5 kHz
6312.0 kHz
8414.5 kHz
12577.0 kHz
16804.5 kHz
2187.5/ RX 2187.50 kHz
[SENDING]
ELAPSED TIME:
AREA MSG 00
H
00
M
04
S
AREA :
34
°
00 ’ N / 135
°
00 ’ E 0500NM
COMM MODE :
TELEPHONE
COMM FREQ :
TX 2182.0 /RX 2182.0
kHz
INFO PRINT
5. DSC GENERAL MESSAGE CALLING, RECEIVING
5-14
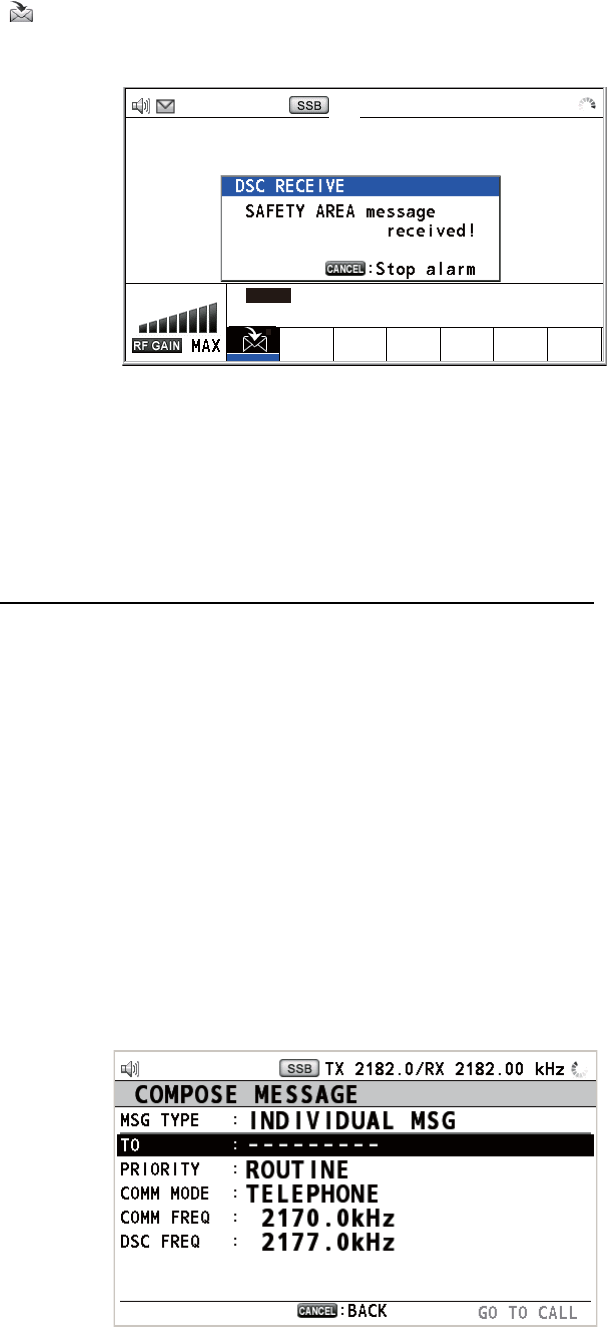
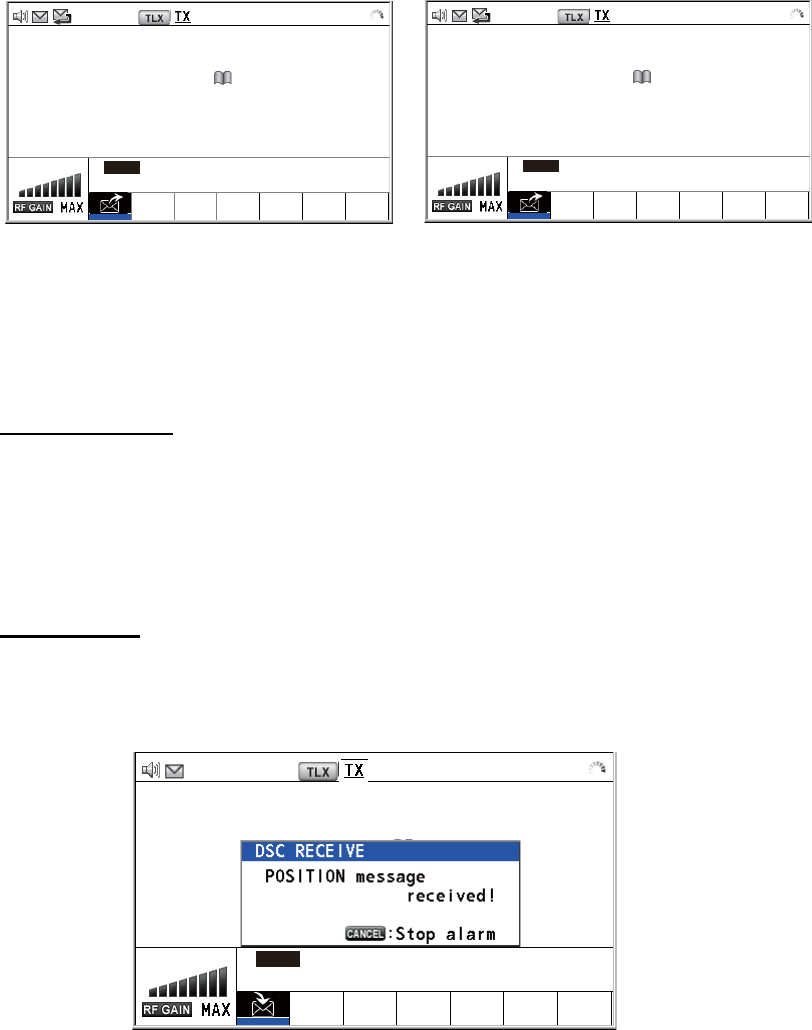
5.3.2 How to receive a geographical area call
When you receive a geographical area message, the audio alarm sounds. The icon
( ) appears in the tab area, and the pop-up message "SAFETY (URGENCY) AREA
message received! [CANCEL]: Stop alarm" appears.
1. Press the CANCEL key to silence the audio alarm and erase the pop-up mes-
sage. The frequency is automatically tuned to the received frequency.
2. Watch on the working frequency. Communicate by radiotelephone or NBDP (see
the following "Geographical area call received by NBDP terminal unit").
3. After you have completed communications, rotate the ENTER knob to select
[QUIT] in the user options area then push the knob.
Geographical area call received by NBDP terminal unit
After receiving a geographic area call, confirm the following.
• The control unit's screen shows the TX and RX frequencies.
• The message from the sending station appears on your NBDP terminal unit.
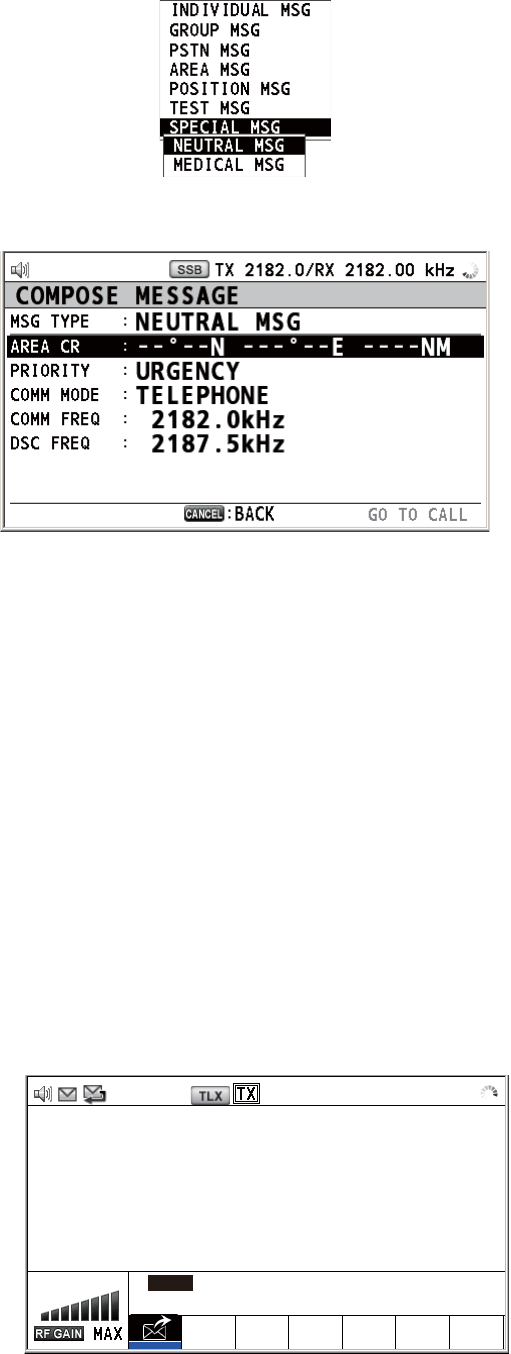
5.4 Neutral Craft Call
The neutral craft call, which contains your ship’s position and MMSI, informs all ships
that your ship is not a participant in an armed conflict. The neutral craft call must be
enabled on the [SPECIAL MSG] menu. See section 6.18.
5.4.1 How to send a neutral craft call
1. Press the OTHER DSC MSG key.
2. Rotate the ENTER knob to select [MSG TYPE] then push the knob.
[ACKNOWLEDGED] ELAPSED TIME:
AREA MSG 00H00M31S
TO :
987654321 CAPTAIN_2575
COMM MODE : TELEPHONE
COMM FREQ : TX 2170.0 /RX 2170.0 kHz
INFO PRINT HOLD QUIT
TX 2182.0/ RX 2182.00 kHz
5. DSC GENERAL MESSAGE CALLING, RECEIVING
5-15
3. Rotate the ENTER knob to select [SPECIAL MSG] then push the knob.
4. Rotate the ENTER knob to select [NEUTRAL MSG] then push the knob. [PRIOR-
ITY] is automatically selected to [URGENCY].
5. With [AREA CR] selected, push the ENTER knob.
6. Enter the area range referring to step 5 in paragraph 5.3.1.
7. With [COMM MODE] selected, push the ENTER knob.
8. Rotate the ENTER knob to select [TELEPHONE] or [NBDP-FEC] then push the
knob.
9. Rotate the ENTER knob to select [DSC FREQ] then push the knob.
10. Rotate the ENTER knob to select DSC frequency desired then push the knob. The
communication frequency changes in conjunction with DSC frequency. If you
change the communication frequency, go to step 11. If not, go to step 14.
11. Rotate the ENTER knob to select [COMM FREQ] then push the knob.
12. Rotate the ENTER knob to select [FREQUENCY] or [CHANNEL] then push the
knob.
13. Referring to "How to set working channel, frequency" on page 5-3, set the fre-
quency or channel.
14. Rotate the ENTER knob to select [GO TO CALL] then push the knob to send the
neutral craft call.
2187.5/ RX 2187.50 kHz
[SENDING]
ELAPSED TIME:
NEUTRAL MSG 00
H
00
M
04
S
AREA :
34
°
00 ’ N / 135
°
00 ’ E 0500NM
COMM MODE :
TELEPHONE
COMM FREQ :
TX 2182.0 /RX 2182.0
kHz
INFO PRINT
5. DSC GENERAL MESSAGE CALLING, RECEIVING
5-16
15. Inform all ships by radiotelephone that your ship is not a participant in armed con-
flict. For communication by NBDP, see "How to send message by NBDP terminal
unit" on page 5-5.
16. After you have completed communications, rotate the ENTER knob to select
[QUIT] in the user options area then push the knob.
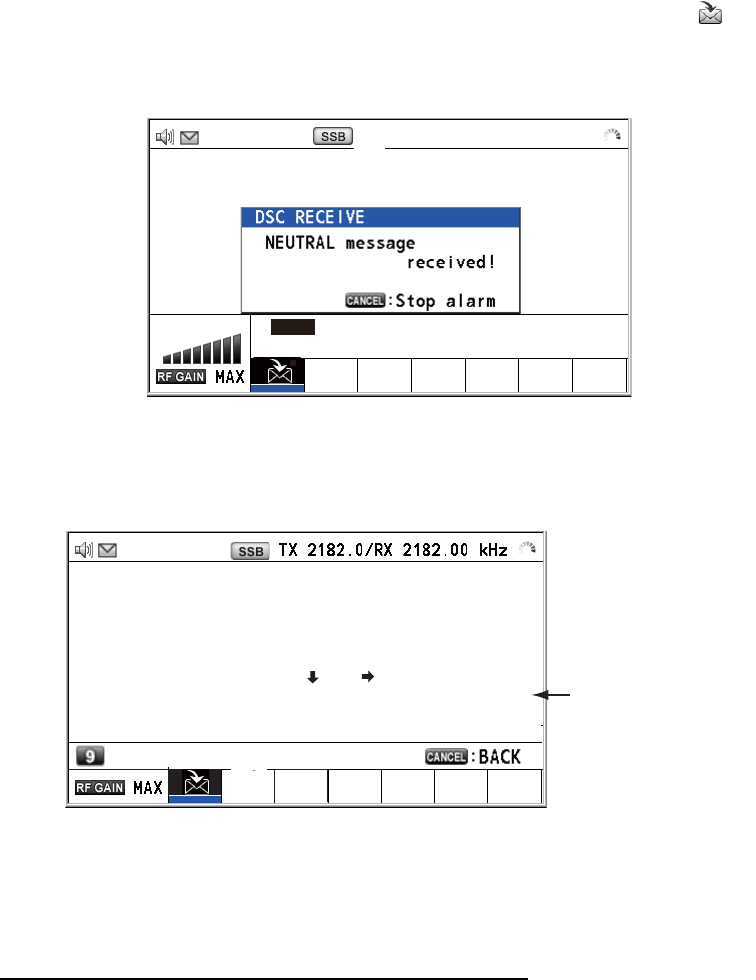
5.4.2 How to receive a neutral craft call
When you receive a neutral craft call, the audio alarm sounds. The icon ( ) appears
in the tab area, and the pop-up message "NEUTRAL message received! [CANCEL]:
Stop alarm" appears.
1. Press the CANCEL key to silence the audio alarm and erase the pop-up mes-
sage.
2. With [INFO] selected, push the ENTER knob to see the detailed information.
3. Watch on the working frequency. Communicate by radiotelephone or NBDP (see
the following "Neutral craft call received by NBDP terminal unit").
4. After you have completed communications, rotate the ENTER knob to select
[QUIT] in the user options area then push the knob.
Neutral craft call received by NBDP terminal unit
After receiving a neutral craft call, confirm the following.
• The control unit's screen shows the TX and RX frequencies.
• The message from the sending station appears on your NBDP terminal unit.
[ACKNOWLEDGED] ELAPSED TIME:
NEUTRAL MSG 00H00M31S
TO :
987654321 CAPTAIN_2575
COMM MODENEUTRALE
COMM FREQ : TX 2170.0 /RX 2170.0 kHz
INFO PRINT HOLD QUIT
TX 2182.0/ RX 2182.00 kHz
[ACKNOWLEDGED] (INFO 1/2)
NEUTRAL MSG ELAPSED TIME : 00H01M58S
PRIORITY
: URGENCY
FROM
: 987654321
NAME
: CAPTAIN_2575
AREA : 44
°
N/124
°
E 18
°
22
°
COMM MODE
: TELEPHONE
KIND
: NEUTRAL
COMM FREQ
: TX 2182.0 / RX 2182.0 kHz
: ADDRESS REGISTER
Rotate the ENTER
knob to see the
information hidden.
5. DSC GENERAL MESSAGE CALLING, RECEIVING
5-17
5.5 Medical Transport Call
The medical transport call informs all ships, by urgency priority, that your ship carries
medical supplies. The medical transport call must be enabled on the [SPECIAL MSG]
menu. See section 6.18.
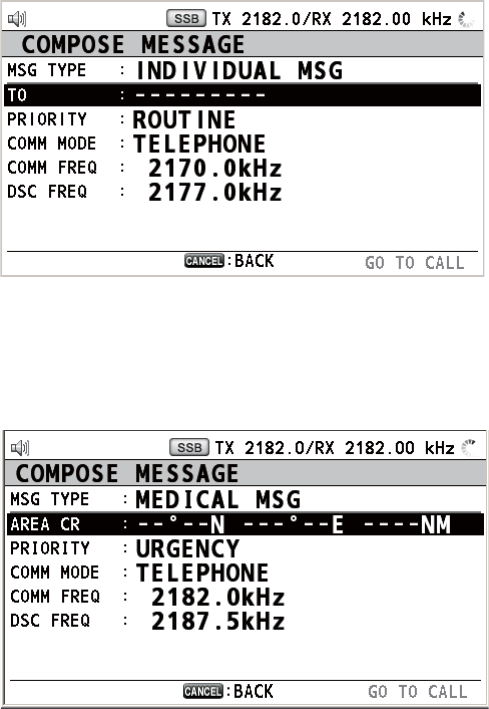
5.5.1 How to send a medical transport call
1. Press the OTHER DSC MSG key.
2. Rotate the ENTER knob to select [MSG TYPE] then push the knob.
3. Rotate the ENTER knob to select [SPECIAL MSG] then push the knob.
4. Rotate the ENTER knob to select [MEDICAL MSG] then push the knob. [PRIOR-
ITY] is automatically selected to [URGENCY].
5. With [AREA CR] selected, push the ENTER knob.
6. Enter the area range referring to step 5 in paragraph 5.3.1.
7. With [COMM MODE] selected, push the ENTER knob.
8. Rotate the ENTER knob to select [TELEPHONE] or [NBDP-FEC] then push the
knob.
9. Rotate the ENTER knob to select [DSC FREQ] then push the knob.
10. Rotate the ENTER knob to select DSC frequency desired then push the knob. The
communication frequency changes in conjunction with DSC frequency. If you
change the communication frequency, go to step 11. If not, go to step 14.
11. Rotate the ENTER knob to select [COMM FREQ] then push the knob.
12. Rotate the ENTER knob to select [FREQUENCY] or [CHANNEL] then push the
knob.
13. Referring to "How to set working channel, frequency" on page 5-3, set the fre-
quency or channel.
5. DSC GENERAL MESSAGE CALLING, RECEIVING
5-18
14. Rotate the ENTER knob to select [GO TO CALL] then push the knob to send the
medical transport call.
15. Inform all ships by radiotelephone that your ship is transporting medical supplies.
For communication by NBDP, see "How to send message by NBDP terminal unit"
on page 5-5.
16. After you have completed communications, rotate the ENTER knob to select
[QUIT] in the user options area then push the knob.
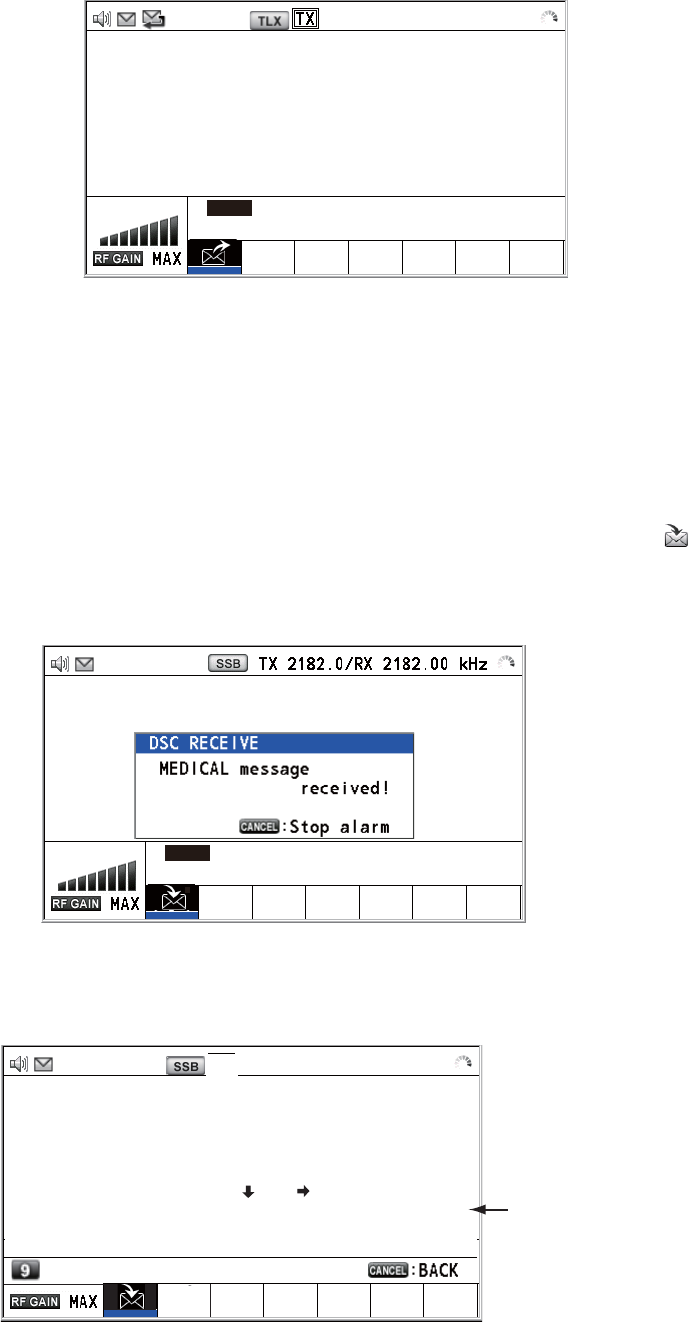
5.5.2 How to receive a medical transport call
When you receive a medical transport call, the audio alarm sounds. The icon ( ) ap-
pears in the tab area, and the pop-up message "MEDICAL message received! [CAN-
CEL]: Stop alarm" appears.
1. Press the CANCEL key to silence the audio alarm and erase the pop-up mes-
sage.
2. With [INFO] selected, push the ENTER knob to see the detailed information.
2187.5/ RX 2187.50 kHz
[SENDING]
ELAPSED TIME:
MEDICAL MSG 00
H
00
M
04
S
AREA :
34
°
00 ’ N / 135
°
00 ’ E 0500NM
COMM MODE :
TELEPHONE
COMM FREQ :
TX 2182.0 /RX 2182.0
kHz
INFO PRINT
[ACKNOWLEDGED] ELAPSED TIME:
MEDICAL MSG 00H00M31S
TO :
987654321 CAPTAIN_2575
COMM MODENEUTRALE
COMM FREQ : TX 2170.0 /RX 2170.0 kHz
INFO PRINT HOLD QUIT
TX 2182.0/ RX 2182.00 kHz
[ACKNOWLEDGED] (INFO 1/2)
MEDICAL MSG ELAPSED TIME : 00H01M58S
PRIORITY
: URGENCY
FROM
: 987654321
NAME
: CAPTAIN_2575
AREA : 44
°
N/124
°
E 18
° 22°
COMM MODE
: TELEPHONE
KIND
: MEDICAL
COMM FREQ
: TX 2182.0 / RX 2182.0 kHz
: ADDRESS REGISTER
Rotate the ENTER
knob to see the
information hidden.
5. DSC GENERAL MESSAGE CALLING, RECEIVING
5-19
3. Watch on the working frequency. Communicate by radiotelephone or NBDP (see
the following "Medical transport call received by NBDP terminal unit").
4. After you have completed communications, rotate the ENTER knob to select
[QUIT] in the user options area then push the knob.
Medical transport call received by NBDP terminal unit
After receiving a medical transport call, confirm the following.
• The control unit's screen shows the TX and RX frequencies.
• The message from the sending station appears on your NBDP terminal unit.
5.6 How to Receive a Polling Request
Polling means another ship wants to confirm if it is within communicating range of your
ship.
5.6.1 Automatic reply
When a polling request message is received with [AUTO] setting on [POLLING MSG]
of the [ACK SETTINGS] menu, an acknowledge is sent automatically. For details see
section 6.17 ([PRIORITY]: [ROUTINE] only).
5.6.2 Manual reply
When you receive a polling request message, the audio alarm sounds. The icon ( )
appears in the tab area, and the pop-up message "POLLING message received!
[CANCEL]: Stop alarm" appears. The equipment is set up for manual acknowledge:
[POLLING MSG] on the [ACK SETTINGS] menu is [MANUAL].
1. Press the CANCEL key to silence the audio alarm and erase the pop-up mes-
sage.
2. Rotate the ENTER knob to select [ACK] then push the knob to send the polling
acknowledge message.
3. Rotate the ENTER knob to select [QUIT] then push the knob.
(1) Polling
(2) Acknowledge
Other Ship Your Ship

5. DSC GENERAL MESSAGE CALLING, RECEIVING
5-20
5.7 Position Call
There are two types of position calls: your ship requests position of another ship and
other station requires your ship's position.
Find position of other station
Send your ship's position to other station
5.7.1 How to request other ship's position
1. Press the OTHER DSC MSG key.
2. Rotate the ENTER knob to select [MSG TYPE] then push the knob.
3. Rotate the ENTER knob to select [POSITION MSG] then push the knob. [PRIOR-
ITY] is automatically selected to [SAFETY].
4. With [TO] selected, push the ENTER knob.
(1) Position request call
(2) Position Information
Your Station Other Station
Your Station
(1) Request ship's position
(2) Send position Information
Other Station
5. DSC GENERAL MESSAGE CALLING, RECEIVING
5-21
5. Rotate the ENTER knob to select [DIRECT INPUT] or [ADDRESS BOOK DATA]
then push the knob.
[ADDRESS BOOK DATA]: Select a MMSI from the [ADDRESS BOOK] (see
section 6.15) then push the ENTER knob.
[DIRECT INPUT]: Enter MMSI of station, which you want to know its position, with
the numeric keys then push the ENTER knob.
6. With [DSC FREQ] selected, push the ENTER knob.
7. Rotate the ENTER knob to select DSC frequency desired then push the knob.
8. With [GO TO CALL] selected, push the ENTER knob to send the position call. The
screen changes as below.
After the call has been sent, the WAIT FOR ACK screen appears as below. The
elapsed time since sending the call is displayed.
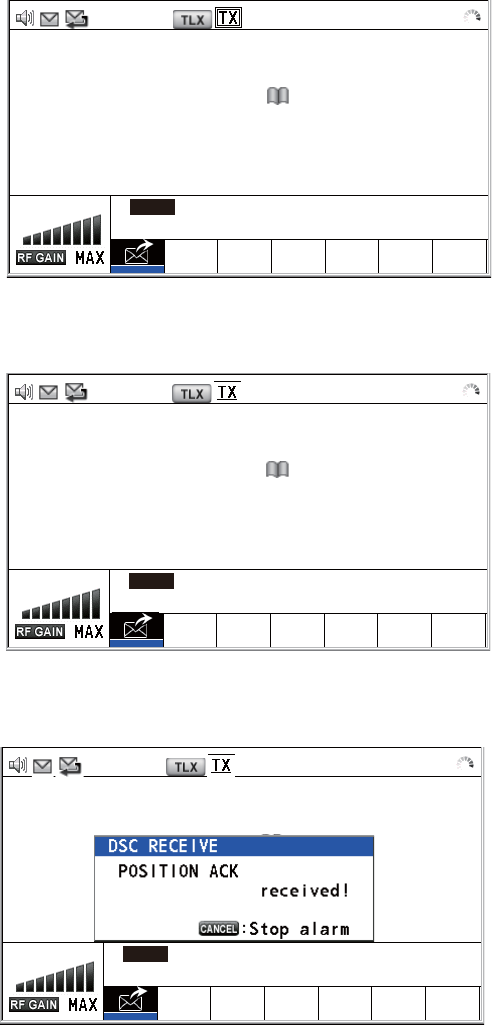
When you receive an acknowledge message, the audio alarm sounds and a pop-
up message appears.
2187.5/ RX 2187.50 kHz
[SENDING] ELAPSED TIME:
POSITION MSG 00H00M04S
TO :
123456789 CAPTAIN_5075
INFO PRINT
2187.5/ RX 2187.50 kHz
[WAIT FOR ACK] ELAPSED TIME:
POSITION MSG 00H00M12S
TO :
123456789 CAPTAIN_5075
INFO PRINT HOLD QUIT
RESEND
2187.5/ RX 2187.50 kHz
[ACKNOWLEDGED] ELAPSED TIME:
POSITION ACK 00H01M12S
FROM :
123456789 CAPTAIN_5075
LAT
LON/UTC
INFO PRINT HOLD QUIT
5. DSC GENERAL MESSAGE CALLING, RECEIVING
5-22
9. Press the CANCEL key to silence the audio alarm and erase the pop-up mes-
sage. There are two types of ACK screens; one with position information and one
with no position information.
5.7.2 Other ship requests your position
You can turn automatic acknowledge of position request on with [POSITION MSG] on
the [ACK SETTINGS] menu (see section 6.17).
Automatic reply
When another ship requests your position and the setting of [POSITION MSG] on the
[ACK SETTINGS] menu is [AUTO], the equipment automatically transmits a reply.
There are two types of automatic replies; one with position information (the setting is
[AUTO (ABLE)]) and the other with no position information (the setting is [AUTO (UN-
ABLE)]).
Manual reply
When a position request message is received and the setting of [POSITION MSG] on
the [ACK SETTINGS] menu is [MANUAL], send the reply manually.
To silence the audio alarm, press the CANCEL key.
[ACKNOWLEDGED]
ELAPSED TIME:
POSITION ACK 00
H
01
M
16
S
FROM :
123456789
CAPTAIN_5075
LAT :
34
°
42.2800’N
LON/UTC :
135
°
19.5900’E / 11:41
INFO PRINT HOLD QUIT
[ACKNOWLEDGED]
ELAPSED TIME:
POSITION ACK 00
H
01
M
16
S
FROM :
123456789
CAPTAIN_5075
LAT :
--
°
--
’
-
LON/UTC :
---
°
--
’
-
/
--
:
--
INFO PRINT HOLD QUIT
Position information included No position information
2187.5/
RX
2187.50 k
H
z2187.5/
RX
2187.50 k
H
z
2187.5/ RX 2187.50 kHz
[SELECT AN ACK] ELAPSED TIME:
POSITION MSG 00H00M04S
TO :
987654321 CAPTAIN_5075
INFO PRINT HOLD QUIT
RESEND UNABLE
5. DSC GENERAL MESSAGE CALLING, RECEIVING
5-23
• Send the ACK with position information:
1) With [ACCEPT] selected, push the ENTER knob.
2) With [GO TO CALL] selected, push the ENTER knob.
• To send the ACK with no position information, rotate the ENTER knob to select
[UNABLE] in the user options area then push the knob. The screen changes as be-
low.
5.8 PSTN Call
The PSTN call allows the making and receiving of telephone calls over public switched
telephone networks. To use the PSTN call feature, use a handset which has a HOOK
ON/OFF function. The standard supply handset has this feature.
5.8.1 How to send a PSTN call
1. Press the OTHER DSC MSG key.
TX 2187.5/ RX 2187.50 kHz
COMPOSE MESSAGE
MSG TYPE : POSITION ACK
TO : 987654321 CAPTAIN_2575
PRIORITY : SAFETY
LAT :
09° 12.1234’ N
LON/UTC : 123° 45.1234’ E /12 : 34
DSC FREQ : 2187.5 kHz
2187.5/ RX 2187.50 kHz
[SENDING] ELAPSED TIME:
POSITION ACK 00H01M16S
TO :
987654321 CAPTAIN_2075
POS/UTC :
--
°
--
’
- ---
°
--
’
-
/
--
:
--
INFO PRINT
5. DSC GENERAL MESSAGE CALLING, RECEIVING
5-24
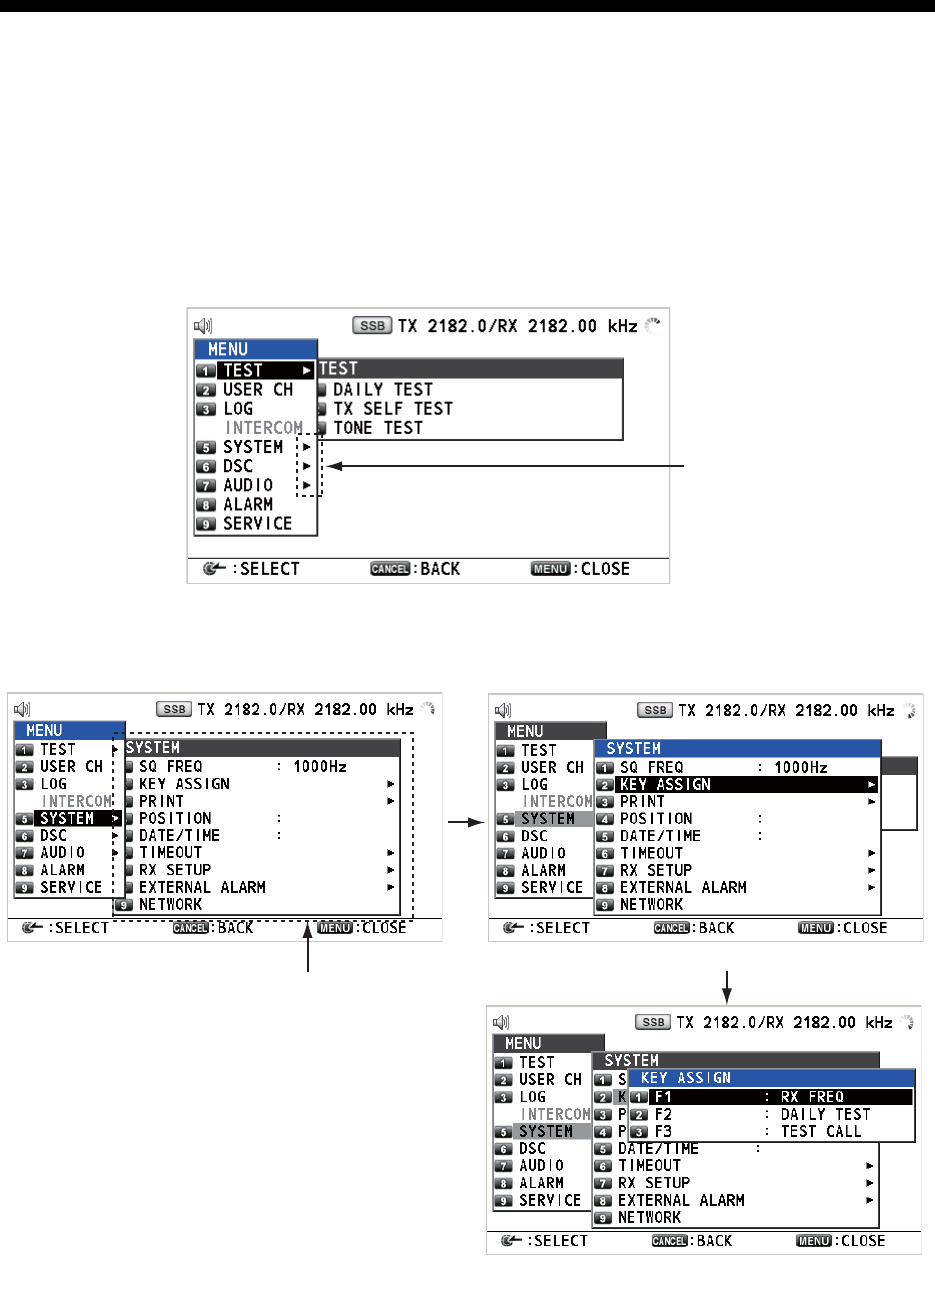
2. Rotate the ENTER knob to select [MSG TYPE] then push the knob.
3. Rotate the ENTER knob to select [PSTN MSG] then push the knob.
4. With [TO] selected, push the ENTER knob.
5. Rotate the ENTER knob to select [DIRECT INPUT] or [ADDRESS BOOK DATA]
then push the knob.
[ADDRESS BOOK DATA]: Select a MMSI from the [ADDRESS BOOK] (see sec-
tion 6.13) then push the ENTER knob.
[DIRECT INPUT]: Enter MMSI of coast station (seven digits) with the numeric
keys then push the ENTER knob.
6. Rotate the ENTER knob to select [TEL NO.] then push the knob.
7. Enter telephone no. (up to 16 digits) with the numeric keys then push the ENTER
knob.
8. With [DSC FREQ] selected, push the ENTER knob.
9. Rotate the ENTER knob to select DSC frequency then push the knob (see "Rou-
tine priority" in "How to set DSC frequency" on page 5-2).
10. With [GO TO CALL] selected, push the ENTER knob to send the PSTN call. After
the call has been sent, the WAIT FOR ACK screen appears. The elapsed time
since sending the call is displayed. When you receive an acknowledge message,
a pop-up message appears.
11. Do one of the following depending on ACK message.
Able acknowledge message received
If you rececived PSTN ABLE ACK from a coast station, the pop-up message "PSTN
calling! Pick up HANDSET!" appears and the audio alarm sounds. The communication
frequcency changes to the working frequency and PSTN CONNECTION CALL is sent
automatically. (PSTN CONNECTION CALL has a role to check quality of communica-
tion on the working frequency.)
Note 1: If you have already picked up the handset before the pop-up message ap-
pears, a pop-up message which suggests you to push the ENTER knob appears.
Push the ENTER knob to accept.
Note 2: If you do not receive PSTN ACK message within 25 seconds, the pop-up mes-
sage "PSTN disconnected because of timeout. [CANCEL]: Close window" appears.
1. To start the communications:
If you received ABLE ACK, which indicates the quality test is successful, on the
working frequency within 25 seconds of starting transmission of PSTN CONNEC-
TION CALL, the PSTN call is connected. Pick up the handset and communicate

5. DSC GENERAL MESSAGE CALLING, RECEIVING
5-25
with the party you called. The elapsed time since starting communication is dis-
played.
Note: When you receive this ABLE ACK on the working frequcency in on hook
condition, END OF CALL is sent automatically. The communication is disconnect-
ed.
2. To quit the communications, do one of the following.
• On hook the handset or press the CANCEL key. END OF CALL is sent auto-
matically. The waiting ACK for END OF CALL screen appears. When you re-
ceive the ACK, rotate the ENTER knob to select [QUIT] then push the knob.
• When the PSTN line is disconnected by the coast station, you receive the END
OF ACK message. Rotate the ENTER knob to select [QUIT] then push the
knob.
Unable acknowledge message received
When you receive an unable acknowledge message, the audio alarm sounds and a
pop-up message appears. Rotate the ENTER knob to select [QUIT] then push the
knob.
5.8.2 How to receive a PSTN call
When a PSTN call is received, the icon appears in the tab area. An able/unable
acknowledge is sent automatically according to the setting of [PSTN] on the [ACK
SETTINGS].
• [AUTO (ABLE)]: The automatic able acknowledge (which means you can call with
party) is sent.
• [AUTO (UNABLE)]: The automatic unable acknowledge (which means you cannot
call with party) is sent.
Able acknowledgement
The automatic able acknowledge is sent and the pop-up message "PSTN connected
pick up HANDSET!" appears.
Note: If you have already picked up the handset before the pop-up message appears,
a pop-up message which suggests you to push the ENTER knob appears. Push the
ENTER knob to accept.
1. Pick up the handset. When you receive PSTN ACK of connection, the screen for
telephone calling appears. Communicate with the party. The elapsed time since
starting communication is displayed.
2. To quit the communication, do one of the following.
• On hook the handset or press the CANCEL key. END OF CALL is sent auto-
matically. The waiting ACK for END OF CALL screen appears. When you re-
ceive the ACK, rotate the ENTER knob to select [QUIT] then push the knob.
• When the PSTN line is disconnected by the coast station, you receive the END
OF ACK message. Rotate the ENTER knob to select [QUIT] then push the
knob.
After disconnection of PSTN line, the charge information is sent.

5. DSC GENERAL MESSAGE CALLING, RECEIVING
5-26
Unable acknowledgement
The automatic unable acknowledge is sent. The audio alarm sounds and the LED
flashes in green. Press the CANCEL key.
6-1
6. MENU OPERATION
The menu can be accessed from both the RT and DSC screens.
Note: The menu can not be opened when awaiting acknowledgement of a distress
alert.
6.1 How to Open/Close the MENU Screen
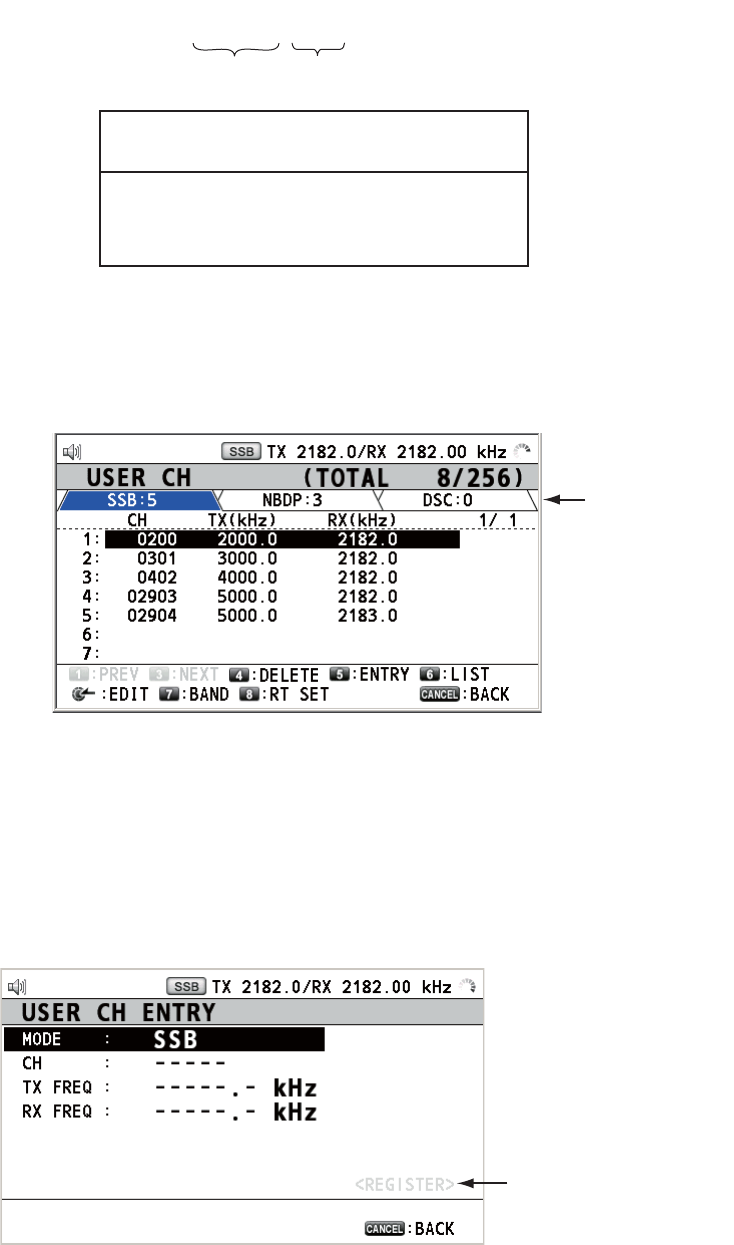
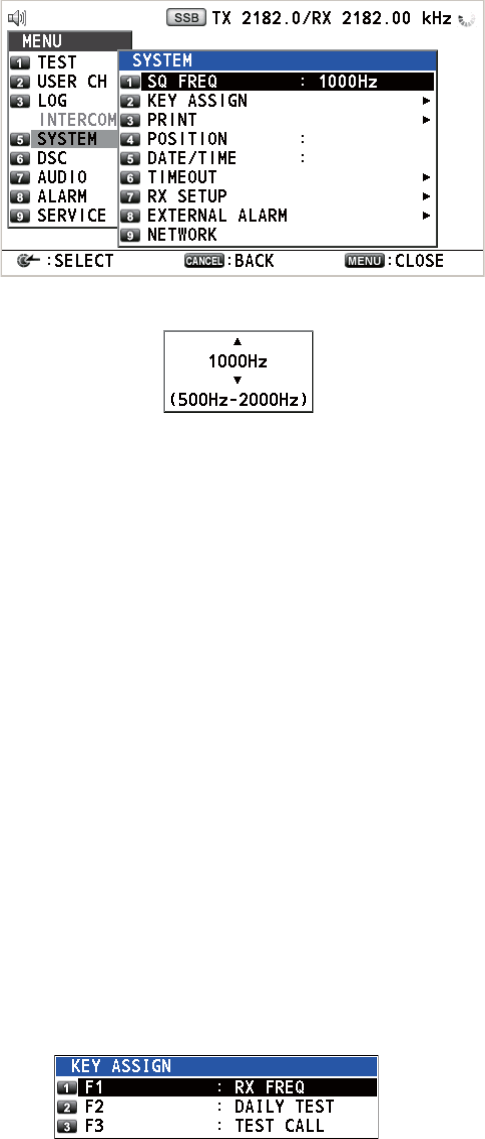
1. Press the MENU key to open the [MENU] screen.
2. Rotate the ENTER knob to select the desired menu item then push the knob. You
can also select the desired menu item by pressing the 1 to 9 keys. The menu items
that have a X indicate additional menus.
Example screens for [SYSTEM]
3. To close the menu screen, press the MENU key.
These marks indicate
additional menus.
Menu items in next layer
Second layer
Third layer
6. MENU OPERATION
6-2
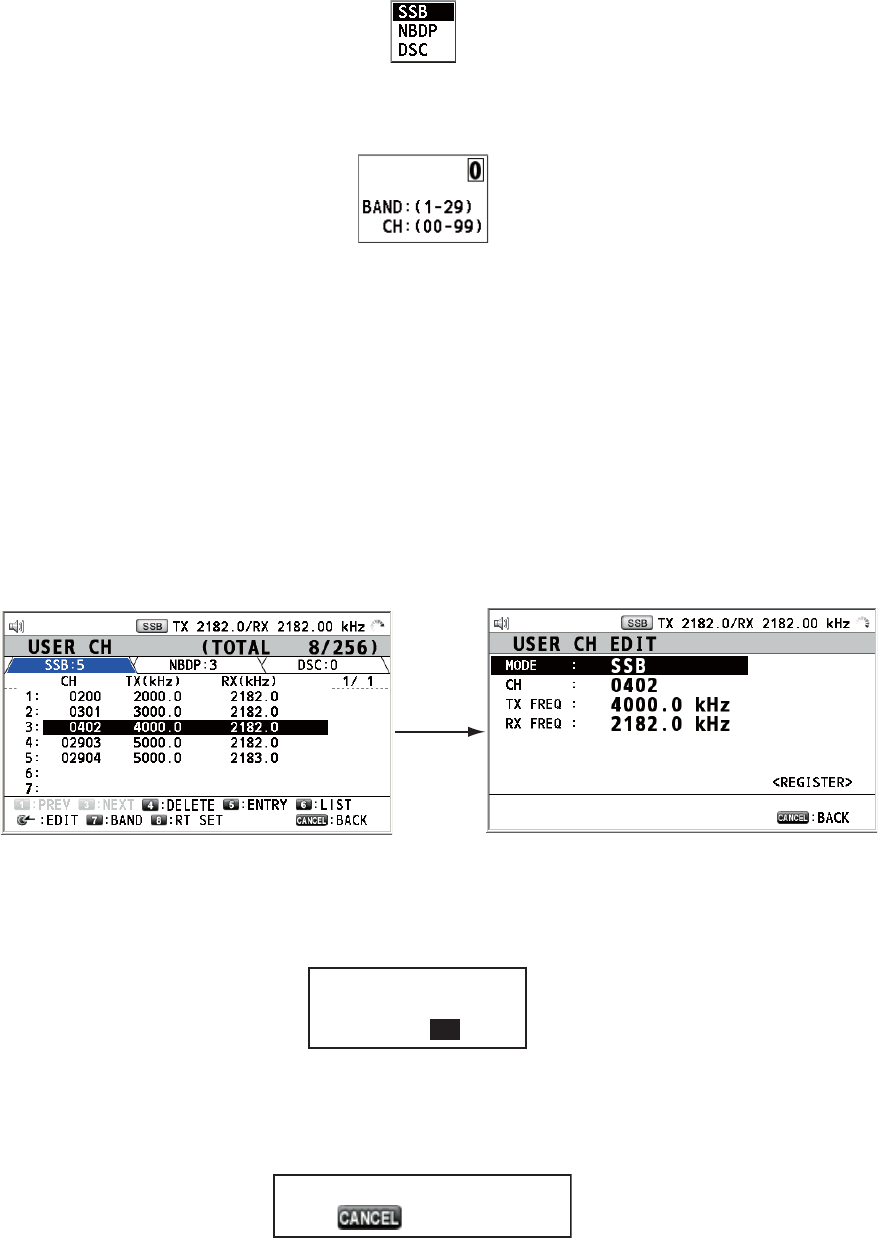
6.2 User Channels
The [USER CH] menu allows registration and deleting of user TX and RX channels,
which are available where permitted by the Authorities. A maximum of 256 channels
can be registered. A user channel consists of four or five digits. The setting range is
01 to 029 for band, 00 to 99 for band channel.
6.2.1 List for user channels
Rotate the ENTER knob to select [USER CH] on the [MENU] screen then push the
knob. The list for user channels appears.
Press the 6 key several times to select a desired mode among [SSB], [NBDP] and
[DSC]. Rotate the ENTER knob (or press the 1 key for the previous page and the 3
key for the next page) to scroll the screen. To return to the [MENU] screen, press the
CANCEL key.
6.2.2 How to register user channels
1. Press the 5 key on the [USER CH] list to open the [USER CH ENTRY] screen.
0 1 2 3 4
Band Band channel
NOTICE
FURUNO will assume no responsibility for
the disturbance caused by the unlawful or
improper setting of user channels.
Mode
This is unavailable until
all items have been set.
6. MENU OPERATION
6-3
2. With [MODE] selected, push the ENTER knob.
3. Rotate the ENTER knob to select the mode desired then push the knob.
4. With [CH] selected, push the ENTER knob.
5. Enter band and band channel with the numeric keys.
6. With [TX FREQ] selected, push the ENTER knob.
7. Enter TX frequency with the numeric keys.
8. With [RX FREQ] selected, push the ENTER knob.
9. Enter RX frequency with the numeric keys.
10. With [REGISTER] selected, push the ENTER knob.
6.2.3 How to edit user channels
1. Rotate the ENTER knob to select the user channel to edit on the [USER CH] list
then push the knob.
2. Rotate the ENTER knob to select the item to edit then push the knob.
3. Edit the settings referring to paragraph 6.2.2.
4. Rotate the ENTER knob to select [REGISTER] then push the knob.
Note: If the MODE and CH settings are also assigned to another channel, the
alarm sounds and the following warning message appears when selecting [REG-
ISTER].
5. Rotate the ENTER knob to select [Yes] then push the knob.
Push
the
ENTER
knob.
Overwrite this channel
Are you sure?
Yes No
Channel number overlaps.
: Close window
6. MENU OPERATION
6-4
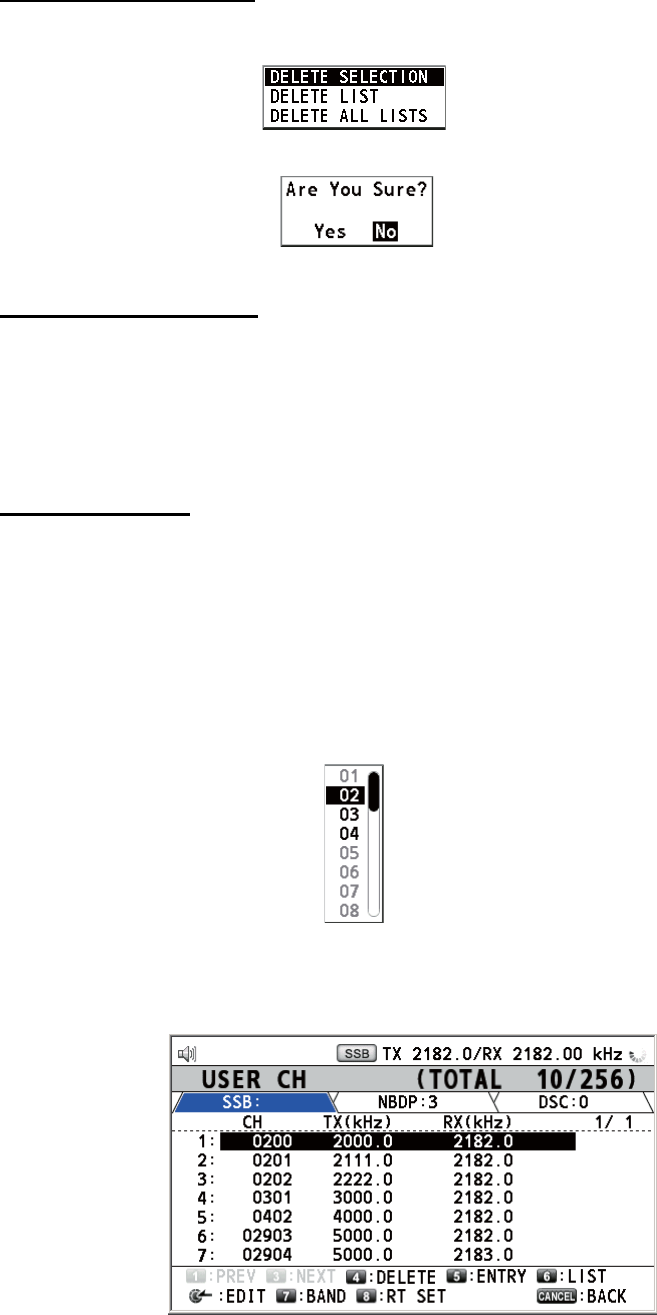
6.2.4 How to delete user channels
Open the [USER CH] list then follow the applicable procedure below.
Individual user channel
1. Rotate the ENTER knob to select the user channel to delete then press the 4 key.
2. With [DELETE SELECTION] selected, push the ENTER knob.
3. Rotate the ENTER knob to select [Yes] then push the knob.
User channels by mode
1. Press the 6 key several times to select the desired mode.
2. Press the 4 key.
3. Rotate the ENTER knob to select [DELETE LIST] then push the knob.
4. Rotate the ENTER knob to select [Yes] then push the knob.
All user channels
1. Press the 4 key.
2. Rotate the ENTER knob to select [DELETE ALL LISTS] then push the knob.
3. Rotate the ENTER knob to select [Yes] then push the knob.
6.2.5 How to sort the USER CH list by band
1. Press the 7 key on the [USER CH] list.
2. Rotate the ENTER knob to select the band desired then push the knob. For ex-
ample, select [02]. Then the user channels are sorted in numerical order from the
02 band.
7
6. MENU OPERATION
6-5
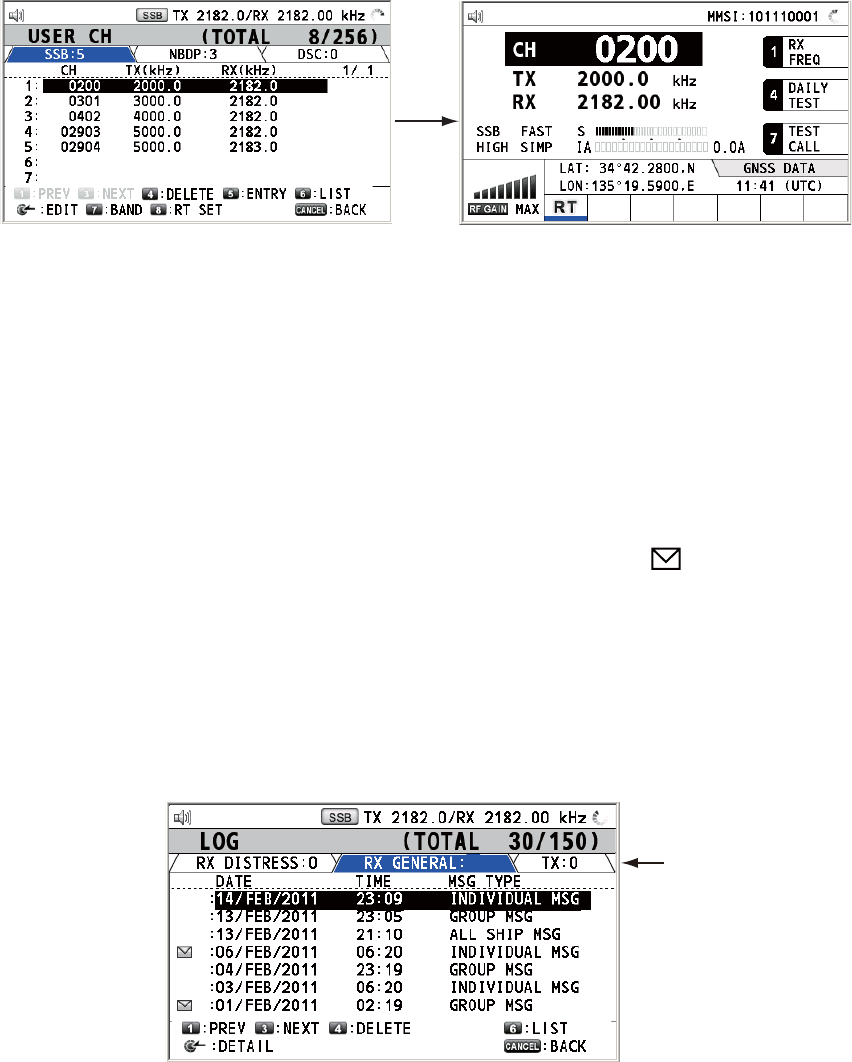
6.2.6 How to select user channels for SSB mode
Rotate the ENTER knob to select the user channel desired on the [USER CH] list then
press the 8 key. The RT screen for the selected user channel appears.
6.3 Log File
Three log file modes are provided for storage of calls:
• [RX GENERAL] (received ordinary log)
• [RX DISTRESS] (received distress log)
• [TX] (transmitted log)
Each mode stores 50 calls. The latest call is saved as log no.1 and the log no. of all
previous calls in that log increments by one. When the storage capacity is exceeded,
the oldest call is deleted to make a room for the latest. The icon ( ) indicates unread
calls. Received distress calls are automatically deleted after 48 hours.
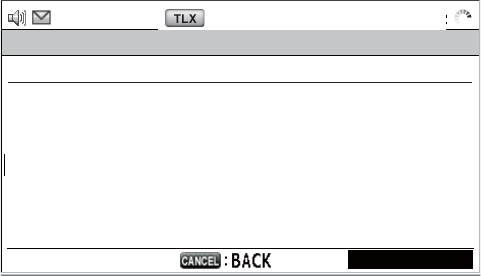
6.3.1 How to open a log file
The procedure to open a log is common to all logs.
1. Rotate the ENTER knob to select [LOG] on the [MENU] screen then push the
knob.
2. Press the 6 key to switch the log file mode in the sequence of [RX DISTRESS] →
[RX GENERAL] → [TX] → [RX DISTRESS] → ...
Press
the 8
key.
Mode
LIST
30
2 / 5
8
9
10
11
12
13
14
6. MENU OPERATION
6-6
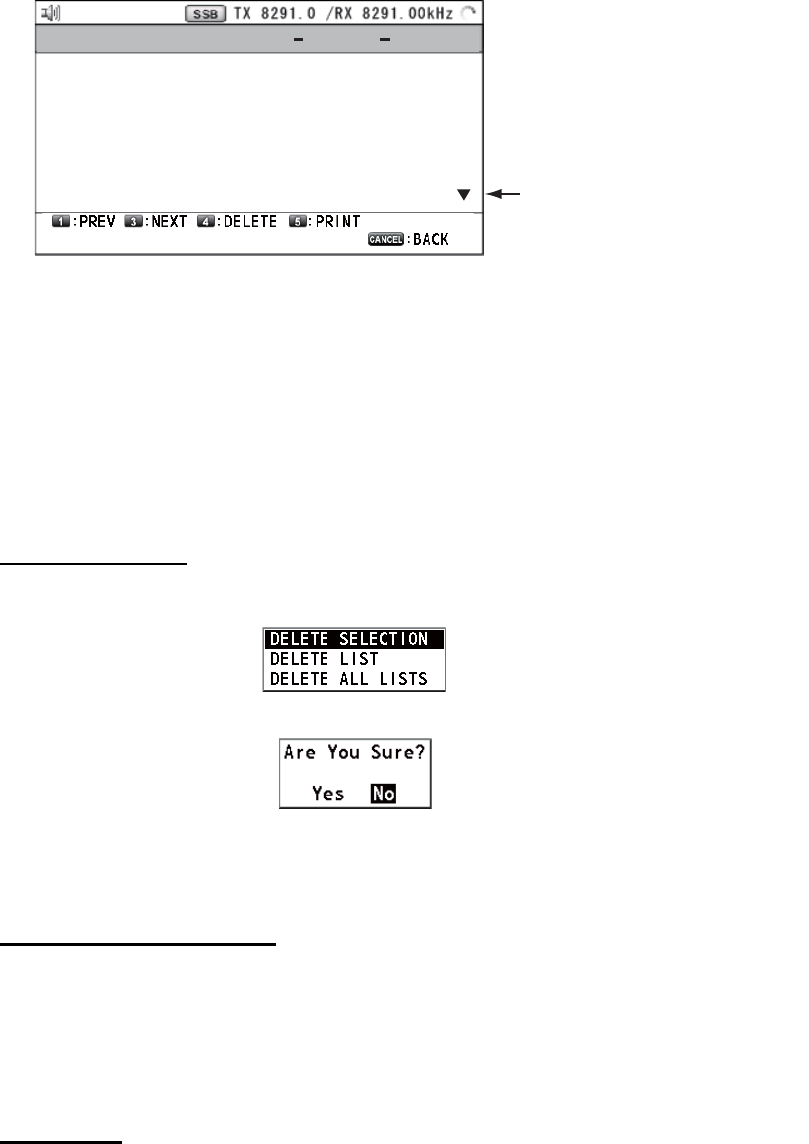
3. When there are multiple pages, press the 1 key for the previous page and the 3
key for the next page. Rotate the ENTER knob to select a desired log then push
the knob. The contents of the selected log file are displayed as below. To return
to the [MENU] screen, press the CANCEL key.
4. Rotate the ENTER knob to scroll the log. Press the 1 key for the previous log file
and the 3 key for the next log file.
5. To print the selected log, press the 5 key.
6. To return to the log list, press the CANCEL key.
6.3.2 How to delete log files
You can delete the log files except RX DISTRESS. Open the log file list then follow the
applicable procedure below.
Individual log file
1. Rotate the ENTER knob to select the log file to delete then press the 4 key.
2. With [DELETE SELECTION] selected, push the ENTER knob.
3. Rotate the ENTER knob to select [Yes] then push the knob.
You can delete a log file by pressing the 4 key on the screen shown at step 3 in
paragraph 6.3.1.
Specify log files by mode
1. Press the 6 key several times to select [RX GENERAL] or [TX].
2. Press the 4 key.
3. Rotate the ENTER knob to select [DELETE LIST] then push the knob.
4. Rotate the ENTER knob to select [Yes] then push the knob.
All log files
1. Press the 4 key.
2. Rotate the ENTER knob to select [DELETE ALL LISTS] then push the knob.
3. Rotate the ENTER knob to select [Yes] then push the knob.
The log files are renumbered to reflect the deletion.
Rotate the ENTER knob to see
the information not shown on
this screen.
INDIVIDUAL 10/APRL/
2012
19:17
PRIORITY
: SAFETY
FROM
:
123456789
TO
:
987654321
COMM MODE : TELEPHONE
COMM OPTION : NO INFO
COMM FREQ
: TX
16420.0
kHz/RX
16420.0
kHz
RX GENERAL LOG NO. 1
6. MENU OPERATION
6-7
6.4 Squelch Frequency
The squelch frequency (ex. for high voice) can be changed as follows (default setting:
1000 Hz):
1. Rotate the ENTER knob to select [SYSTEM] on the [MENU] screen then push the
knob.
2. With [SQ FREQ] selected, push the ENTER knob.
3. Rotate the ENTER knob to adjust frequency (setting range: 500-2000 Hz) then
push the knob.
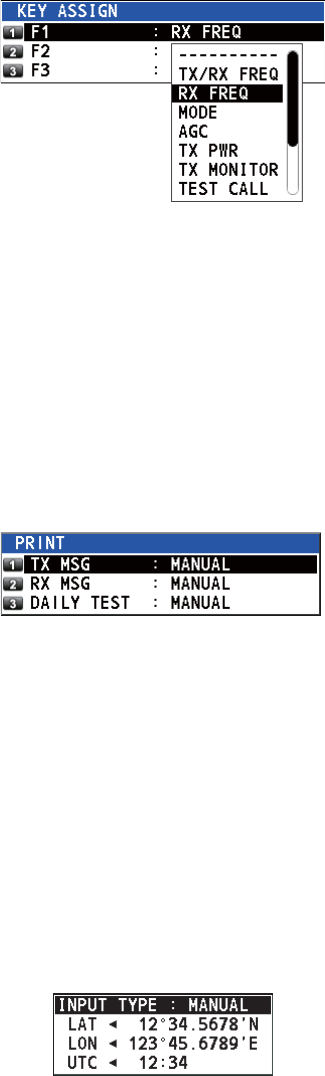
6.5 Key Assignment
You can program the 1, 4 and 7 keys to provide one-touch access to a required func-
tion. The 1 key is assigned with F1, the 4 key with F2 and the 7 key with F3. The default
programs are [RX FREQ] for F1, [DAILY TEST] for F2, and [TEST CALL] for F3. You
can program the keys with the functions listed below.
*: NONE: Not assigned any function
Note: You cannot assign the same function to two function keys.
1. Rotate the ENTER knob to select [SYSTEM] on the [MENU] screen then push the
knob.
2. Rotate the ENTER knob to select [KEY ASSIGN] then push the knob.
• TX/RX FREQ
• AGC
• TEST CALL
• LOG
• ---------- (NONE)*
• RX FREQ
• TX PWR
• MSG FILE
• INTERCOM
• MODE
• TX MONITOR
• DAILY TEST
• CLARIFIER
6. MENU OPERATION
6-8
3. Rotate the ENTER knob to select [F1], [F2] or [F3] then push the knob.
4. Rotate the ENTER knob to select the function desired then push the knob.
6.6 How to Print Messages
The [PRINT] menu enables/disables automatic printing of all transmitted and received
calls and the results of the daily test.
1. Rotate the ENTER knob to select [SYSTEM] on the [MENU] screen then push the
knob.
2. Rotate the ENTER knob to select [PRINT] then push the knob.
3. With [TX MSG] selected, push the ENTER knob.
4. Rotate the ENTER knob to select [AUTO] or [MANUAL] then push the knob.
5. Set [RX MSG] and [DAILY TEST] similarly.
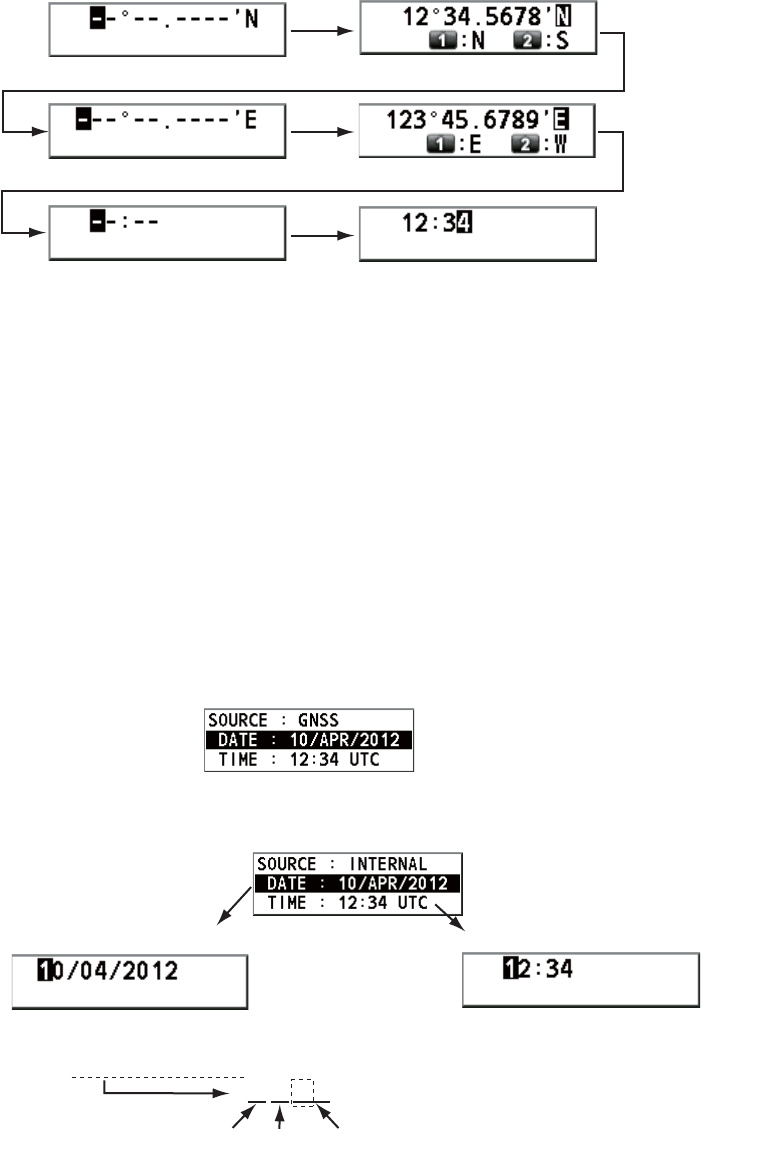
6.7 Position Setting
Do the following to set your position:
1. Rotate the ENTER knob to select [SYSTEM] on the [MENU] screen then push the
knob.
2. Rotate the ENTER knob to select [POSITION] then push the knob.
3. With [INPUT TYPE] selected, push the ENTER knob.
4. Rotate the ENTER knob to select [GNSS], [MANUAL] or [NO INFO] then push the
knob.
[GNSS]: The position data from GPS
[MANUAL]: Set the position data manually
[NO INFO]: No position data
For [MANUAL], go to next step.
6. MENU OPERATION
6-9
5. For manual input, use the numeric keys to enter latitude/longitude of your position,
and UTC. To change coordinate, select it and press the 1 key for North or East;
the 2 key for South or West. After entering each data, push the ENTER knob.
Note: When the setting of [INPUT TYPE] is [MANUAL], the message "WARNING: Po-
sition data is not updated! Position data was older than 4.0H. Update it. [CANCEL]:
Stop alarm" appears to ask you to update position.
6.8 Date and Time Setting
Set the date and time for the system.
1. Rotate the ENTER knob to select [SYSTEM] on the [MENU] screen then push the
knob.
2. Rotate the ENTER knob to select [DATE/TIME] then push the knob.
• Date or time cannot be adjusted when they are input from GPS navigator.
• If date or time is not input from GPS navigator, enter date and time with the nu-
meric keys.
Note: When manually entering date and time, use UTC (Universal Time Coor-
dinated). Do not use local time.
Setting window for latitude Enter latitude.
Setting window for longitude
Push the
ENTER knob.
Enter longitude. Push the
ENTER knob.
Setting window for UTC Enter UTC then push the
ENTER knob.
Select [DATE] or [TIME]
then push the ENTER
knob.
Setting window for [DATE]
Enter time then push the ENTER knob.
Setting window for [TIME]
Enter date then push the ENTER knob.
For example, 10/APR/2012 is entered as
100412 (20 of 2012 is fixed).
10042012
Day Month Year
6. MENU OPERATION
6-10
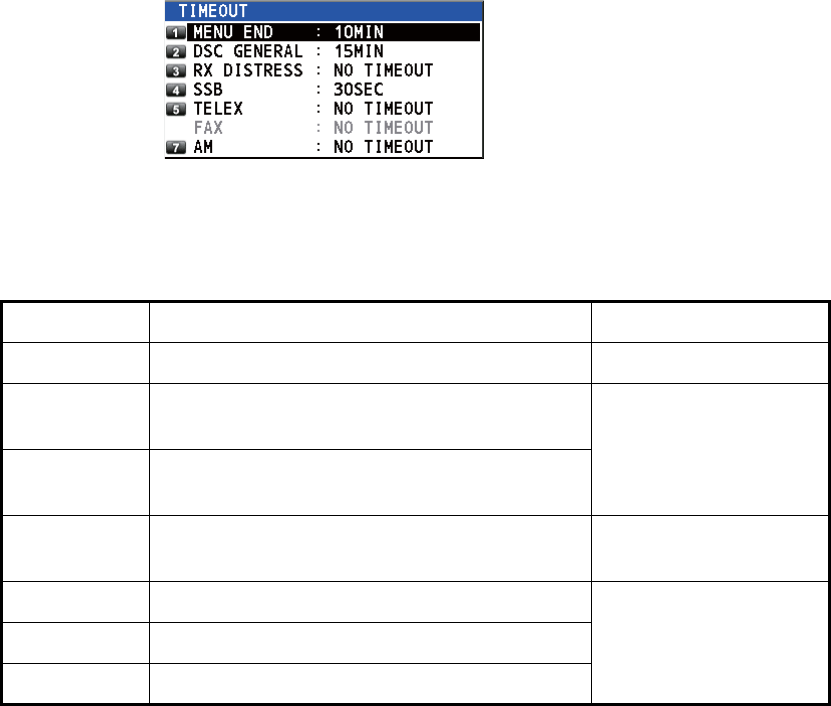
6.9 Timeout Setting
The menu screen and/or the inactive sessions (icons) can be closed automatically
when there is no menu operation for a specific time. You can set the time interval for
auto closing of the menu and inactive session.
1. Rotate the ENTER knob to select [SYSTEM] on the [MENU] screen then push the
knob.
2. Rotate the ENTER knob to select [TIMEOUT] then push the knob.
3. Rotate the ENTER knob to select the item desired then push the knob.
4. Rotate the ENTER knob to select time interval then push the knob. [NO TIME-
OUT] leaves the menu screen and/or the inactive sessions open until you close
them manually.
*: Refer to section 6.10.
6.10 FAX Enable/Disable
You can enable or disable FAX use as follows.
1. Rotate the ENTER knob to select [SYSTEM] on the [MENU] screen then push the
knob.
2. Rotate the ENTER knob to select [RX SETUP] then push the knob.
3. Rotate the ENTER knob to select [FAX RX] then push the knob.
Item Description Option
[MENU END] Close the menu screen automatically. 10MIN, NO TIMEOUT
[DSC
GENERAL]
Close the inactive sessions except the dis-
tress alert.
15MIN, NO TIMEOUT
[RX
DISTRESS]
Close the inactive sessions for the receiving
distress alert.
[SSB] Close the inactive sessions for RT of SSB and
LSB.
10SEC, 30SEC, 10MIN
[TELEX] Close the inactive sessions for RT of TELEX. 10SEC, 30SEC,
10MIN, NO TIMEOUT
[FAX]* Close the inactive sessions for RT of FAX.
[AM] Close the inactive sessions for RT of AM.
*: [FAX] is unavailable.
6. MENU OPERATION
6-11
4. Rotate the ENTER knob to select [ENABLE] or [DISABLE] then push the knob.
For [ENABLE], "FAX" is added to the class of emission selection menu.
6.11 How to Select the Antenna
Select the antenna to use for TX and RX, common or separate.
1. Rotate the ENTER knob to select [SYSTEM] on the [MENU] screen then push the
knob.
2. Rotate the ENTER knob to select [RX SETUP] then push the knob.
3. Rotate the ENTER knob to select [ANT SELECT] then push the knob.
4. Rotate the ENTER knob to select [TRX ANT] or [RX ANT] then push the knob.
Note 1: You can not select [RX ANT] without R_ANT. Contact your dealer.
Note 2: When sharing the WR antenna with R_ANT, select [RX ANT] so that you
can always watch the frequency during transmission.
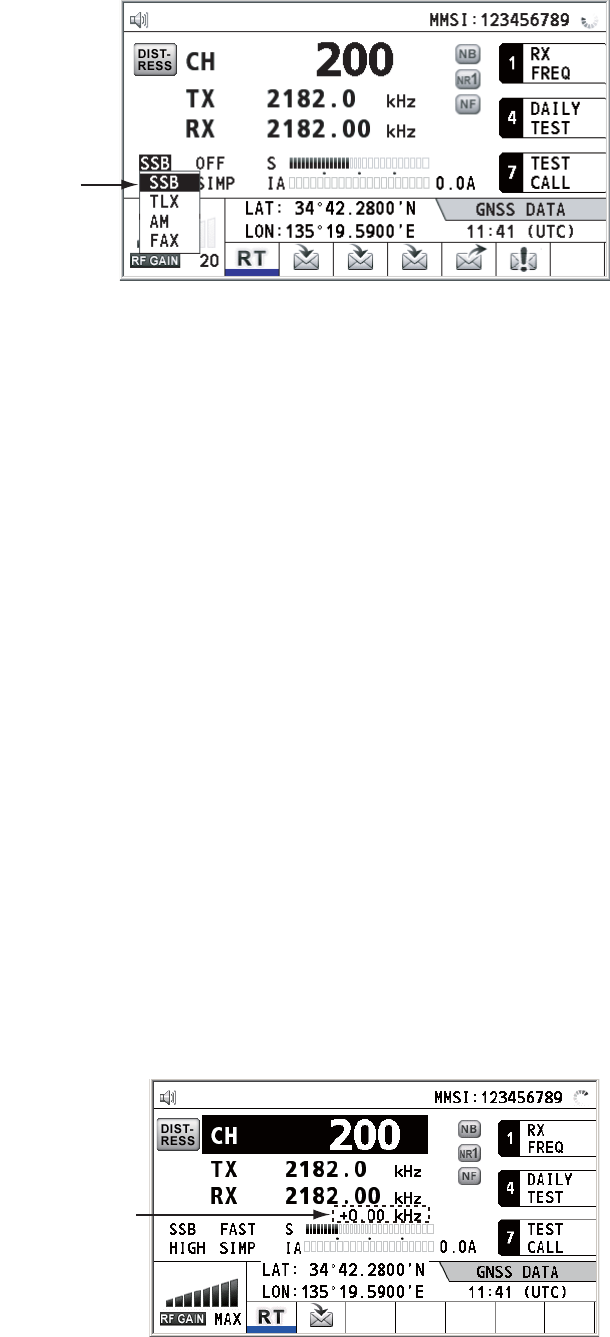
6.12 Clarifier Setting
You can fine-tune the receiving frequency with the clarifier.
1. Rotate the ENTER knob to select [SYSTEM] on the [MENU] screen then push the
knob.
2. Rotate the ENTER knob to select [RX SETUP] then push the knob.
3. Rotate the ENTER knob to select [CLARIFIER] then push the knob.
4. Rotate the ENTER knob to select [ON] or [OFF] then push the knob.
For [ON], the indication for clarifier setting appears on the RT screen as shown
below.
Class of
emission
Indication for
clarifier setting