Fusion Sport SMARTSPEED XBEE-PRO OEM RF MODULE User Manual users manual 1a
Fusion Sport Pty Ltd XBEE-PRO OEM RF MODULE users manual 1a
Contents
- 1. users manual 2
- 2. users manual 1a
- 3. users manual 1b
users manual 1a

SMARTSPEED User Guide Chapter 1 – System Overview
!FUSION SPORT Pty Ltd, 2006 2
USER GUIDE
Table of Contents
System Overview ...................................................................................................................................5
Introduction ........................................................................................................................................5
System Components .........................................................................................................................5
Your IPAQ Pocket PC...................................................................................................................5
“Sportsweb” Base Station.............................................................................................................6
Reactive Data Units ......................................................................................................................6
Tripods ...........................................................................................................................................6
Charger Unit ..................................................................................................................................6
Software CD ..................................................................................................................................6
Quick Start Guide...................................................................................................................................7
Tripods and Units...............................................................................................................................7
Aligning gates ....................................................................................................................................8
PDA set up .........................................................................................................................................8
Protocol Set Up..................................................................................................................................9
Protocol Run ....................................................................................................................................13
Software Overview ...............................................................................................................................14
Viewing and Saving data ................................................................................................................14
To Save........................................................................................................................................15
Data on Computer.......................................................................................................................16
Adding New Team ...........................................................................................................................16
Adding New Players ........................................................................................................................18
Alternative Entry Method (Importation of players).........................................................................19
Pacing Protocol................................................................................................................................20
Edit Team Name..............................................................................................................................21
Edit Player Name.............................................................................................................................23
Deleting Team(s) .............................................................................................................................24
Deleting Player(s) ............................................................................................................................25
New Protocol....................................................................................................................................26
Software Installation ....................................................................... Error! Bookmark not defined.
Functional Overview ........................................................................... Error! Bookmark not defined.
Applications: Lap Mode .................................................................. Error! Bookmark not defined.
Defensive Agility Drill ................................................................. Error! Bookmark not defined.
4 Gate Lap Drill .......................................................................... Error! Bookmark not defined.
Applications: Straight Lane Mode.................................................. Error! Bookmark not defined.
Standing 40m Sprint .................................................................. Error! Bookmark not defined.
Standing 20m Sprint .................................................................. Error! Bookmark not defined.
Modified Phosphate Decrement Test ....................................... Error! Bookmark not defined.
Applications: Tree Mode..................................................................... Error! Bookmark not defined.
Tree Protocols................................................................................. Error! Bookmark not defined.
Single Cut Tree Protocol ........................................................... Error! Bookmark not defined.
Double Cut Tree Protocol .......................................................... Error! Bookmark not defined.
Applications: Serpentine Mode .......................................................... Error! Bookmark not defined.
Serpentine Protocols ...................................................................... Error! Bookmark not defined.
4 gate Serpentine Protocol........................................................ Error! Bookmark not defined.
Applications: Grid Mode...................................................................... Error! Bookmark not defined.
Grid Protocols ................................................................................. Error! Bookmark not defined.
6 Point Grid................................................................................. Error! Bookmark not defined.
4 Point Grid................................................................................. Error! Bookmark not defined.
Applications: Pacing Protocol ........................................................ Error! Bookmark not defined.
SMARTSPEED User Guide Chapter 1 – System Overview
!FUSION SPORT Pty Ltd, 2006 3
Pacing Protocol .......................................................................... Error! Bookmark not defined.
Health and Saftey................................................................................ Error! Bookmark not defined.
Exposure to Radio-Frequancy Energy ..................................... Error! Bookmark not defined.
Precautions When Using Batteries ........................................... Error! Bookmark not defined.
Electronic Devices ..................................................................... Error! Bookmark not defined.
Appendix .............................................................................................. Error! Bookmark not defined.
Care and Maintenance................................................................... Error! Bookmark not defined.
Glossary .......................................................................................... Error! Bookmark not defined.
Trouble Shooting ................................................................................. Error! Bookmark not defined.
SMARTSPEED User Guide Chapter 1 – System Overview
!FUSION SPORT Pty Ltd, 2006 4
PART ONE
FCC STATEMENTS
This equipment has been tested and found to comply with the limits for a Class B digital device,
pursuant to Part 15 of the FCC Rules. These limits are designed to provide reasonable protection
against harmful interference in a residential installation. This equipment generates uses and can
radiate radio frequency energy and, if not installed and used in accordance with the instructions,
may cause harmful interference to radio communications. However, there is no guarantee that
interference will not occur in a particular installation.
If this equipment does cause harmful interference to radio or television reception, which can be
determined by turning the equipment off and on, the user is encouraged to try to correct the
interference by one or more of the following measures: Re-orient or relocate the receiving
antenna, Increase the separation between the equipment and receiver, Connect equipment and
receiver to outlets on different circuits, or Consult the dealer or an experienced radio/TV
technician for help.
US FCC Labeling Requirements (FCC Part 15.19)
This device complies with Part 15 of the FCC Rules.
Operation is subject to the following two conditions: (1) this device may not
cause harmful interfer ence, and (2) this device must accept any interference
received, including interference that may cause undesired operation.
US FCC Modification warning (FCC Part 15.21)
Warning: Any changes or modifications not expressively approved by Fusion
Sport could void the user's authority to operate this equipment.
SMARTSPEED User Guide Chapter 1 – System Overview
!FUSION SPORT Pty Ltd, 2006 5
SYSTEM OVERVIEW
Introduction
SMARTSPEED is a revolutionary electronic coaching tool that will transform your training
program.
SMARTSPEED’s patented innovation gives you greater control over the training environment,
and provides a new world of challenges and feedback for athletes.
System Components
Your 6 Gate SMARTSPEED kit contains –
• 1 IPAQ Pocket PC handheld computer (with Active sync cable and software)
• 1 Fusion Sport “Sportsweb” Base Station (with antenna)
• 6 Reactive Data Units
• 6 Reflector units
• 13 Tripods in Vinyl bag
• 1 Recharge unit (2 power boards with 7 AC adaptors)
• Pocket PC and Workstation software packages
• 1 PDA to “Sportsweb” base station cord
• 7 unit protector covers
• 1 Mobile tool chest
(NB. If you have purchased a system with more or less Reactive data units the number of
reflectors, tripods, etc will change accordingly).
Your IPAQ Pocket PC
The IPAQ pocket PC offers many of the normal functions of a desktop computer in the palm of
your hand. Your pocket computer comes pre-installed with the Smartspeed Pocket PC software,
ready to be your assistant in the field.
WARNING – Potential Data Loss
SMARTSPEED User Guide Chapter 1 – System Overview
!FUSION SPORT Pty Ltd, 2006 6
Pocket PC technology requires application data to be stored in the computers “short
term memory”. If your Pocket PC is allowed to discharge completely, you must recharge
the unit within a given time period to prevent data loss. Failure to do so may erase any
data, including the Smartspeed software, from your Pocket PC.
DO NOT leave your Pocket PC in the Smartspeed case for prolonged periods of time, as
it will eventually become discharged and lose memory.
“Sportsweb” Base Station
The Sportsweb base station is the wireless centre point of the Smartspeed on-field network. The
base unit is attached to either your Pocket PC or workstation computer to coordinate the delivery
of information to and from the reactive data units.
Reactive Data Units
Fusion Sport’s Reactive Data Units are revolutionary to the sporting market. The combination of
advanced wireless technology and intelligent on-board microcomputers provides the units with
the ability to perform a wide range of functions.
Tripods
Fusion has specifically designed tripods for use in the sporting environment. These tripods will
provide a stable platform for the reactive units and reflectors in a variety of terrains and weather
conditions.
Charger Unit
The charger unit is designed for 240V AC and can charge up to 6 remote units plus the base
station at any one time.
Software CD
The Smartspeed software CD contains both workstation and Pocket PC software packages.
SMARTSPEED User Guide Chapter 5 – Applications: Lap Mode
!FUSION SPORT Pty Ltd, 2006 7
QUICK START GUIDE
Prior to assembling and using your SMARTSPEED system, you should ensure that all Reactive
Data Units, the Sportsweb Base Unit and the Pocket PC are completely charged. For charging
instructions, refer to the maintenance section of this guide.
Tripods and Units
1. Remove the tripod from the bag. Adjust the height of the tripod using the
adjustable sections. To adjust a section twist the upper half of the black section
in a counter-clockwise direction, and adjust the height.
2. Once the tripod has been set at the desired height, twist the black section in a
clockwise direction to secure the height.
3. Once the tripod is free standing, remove a Reactive Data Unit from the case and
mount on the tripod using the quick release attachment. This attachment should
fasten easily – if not, do not attempt to force it into place.
4. Repeat this procedure for as many Reactive Data Units as needed.
5. Now place the same number of reflectors as Reactive Data Units onto tripods
using the quick release attachment. This attachment should fasten easily – if not,
do not attempt to force it into place.
6. Remove the “Sportsweb” Base Unit from the case and attach onto a tripod using
the quick release attachment. This attachment should fasten easily – if not, do
not attempt to force it into place.
7. Attach the Antenna to the top of “Sportsweb” Base Unit by rotating it until it is
secure.
8. Turn on the “Sportsweb” Base Unit by flicking the switch at the bottom of the unit
which will cause a green LED to turn on.
SMARTSPEED User Guide Chapter 5 – Applications: Lap Mode
!FUSION SPORT Pty Ltd, 2006 8
Aligning gates
1. Place a reflector and Reactive Data Unit approximately 2m apart.
2. The photocell should be facing the reflector (see diagram 2 for photocell)
3. The Alignment LED will turn red when aligned.
4. A high pitched noise will emit from the Reactive Data Unit if not aligned.
5. This will be your first gate.
6. Repeat this for as many gates as needed.
7. Once all units are in place, turned on and aligned, the system is ready for use.
PDA set up
1. If the PDA screen is blank (in sleep mode) push the button located on the top
right hand corner of the PDA.
2. Check the icon located in the bottom right hand corner of the desktop is
activated. Press once the icon in the corner and select the top pop up line to
activate the “Bluetooth on”.
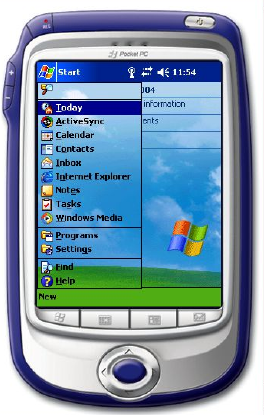
3. With your PDA pencil, touch once the icon in the top left hand corner named
Start.
4. From the drop down box, touch once on the icon named Programs.
5. Touch once the folder located at the bottom of the page named Smartspeed
SMARTSPEED User Guide Chapter 5 – Applications: Lap Mode
!FUSION SPORT Pty Ltd, 2006 9
Protocol Set Up
1. To activate the Zigbee sleeve, insert your PDA into the cradle and push down
gently. Touch the Zigbee icon once in the middle of the screen which will connect
your PDA to the Zigbee sleeve. A red LED located in the bottom right hand
corner will flash to show you it is connected and ready to use).
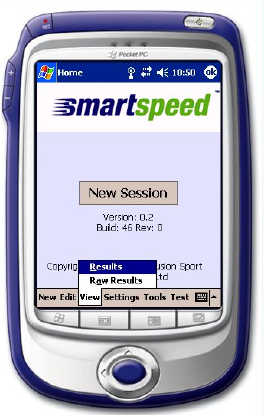
2. Touch once the icon located in the centre of the screen named New Session
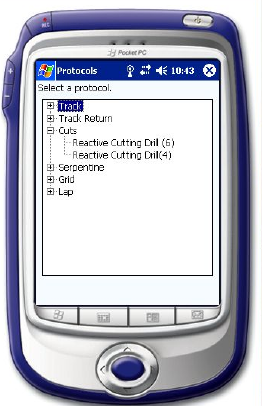
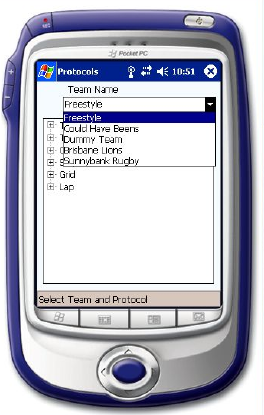
3. Once on the Select Protocol page, you can select the particular protocol by
touching once the down arrow on the bar below the icon named protocol. The
Select Protocol page allows you to choose the desired protocol, the number of
tracks (lanes) that you would like to use, and displays the generic set up for the
selected drill.
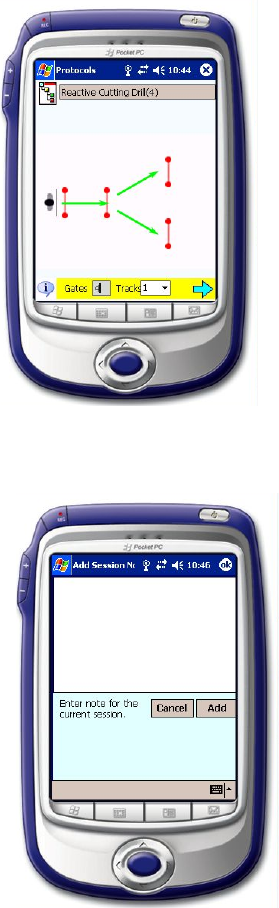
4. Then select the number of tracks you want to use by touching the down arrow
next to the word Tracks. For most reactive protocols, only one track should be
used for effective system speed.
SMARTSPEED User Guide Chapter 5 – Applications: Lap Mode
!FUSION SPORT Pty Ltd, 2006 10
5. Tapping the “I” icon will provide the user with a basic description of instructions
for the drill selected
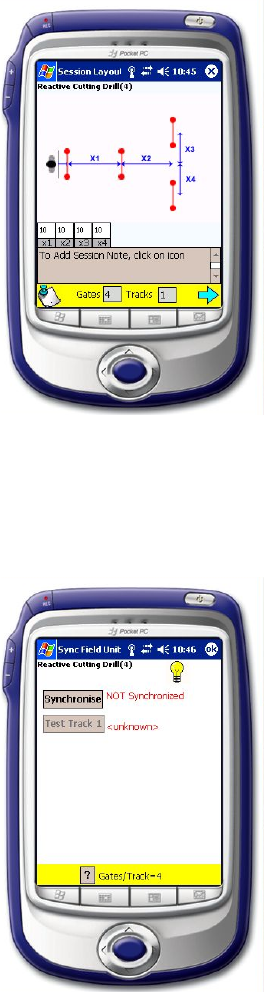
6. The session layout screen allows you to make notes on the layout and
instructions for the protocol. Once you are ready to proceed click the arrow on
the bottom right to proceed to the “Sync Field Units” page.
SMARTSPEED User Guide Chapter 5 – Applications: Lap Mode
!FUSION SPORT Pty Ltd, 2006 11
7. Touch the light bulb icon. All the gates that are switched on and functioning will
flash to signal communications. If one or more units do not flash see the
“Protocol Set-Up” section in the trouble shooting guide.
8. Then once the lights have flashed press Synchronize.
9. If the system is ready to proceed synchronization must be successful. If the
Synchronization is not successful, refer to the “Protocol Set-Up” section in the
trouble shooting guide.
10. After the synchronization, you may want to check battery status by tapping the
icon in the top right hand corner. Click ok to return to the synchronization screen.
11. Both bars on the top of the screen will be green.
12. Touch once the icon in the top right hand corner named OK.
SMARTSPEED User Guide Chapter 5 – Applications: Lap Mode
!FUSION SPORT Pty Ltd, 2006 12
13. To proceed with the setup, tap the “Test Track” button once. This step requires
you to walk through each gate in order to program the role of each unit. Follow
the diagram from point A to B and press once, when finished. Once the page
Track 1 has appeared walk between the reflector and the Reactive Data Unit. A
beeping noise will occur which signifies that the beam has been broken.
14. Once this has been completed touch once the icon located in the right bottom
corner named Done.
15. If the Test Track stage is unsuccessful refer to the “Protocol Set-Up” and
“Protocol Running” section in the trouble shooting guide.
16. Repeat the test track procedure for each track for the given protocol.
17. Once the test tracks have been completed, press the arrow to proceed to the
Select Players page.
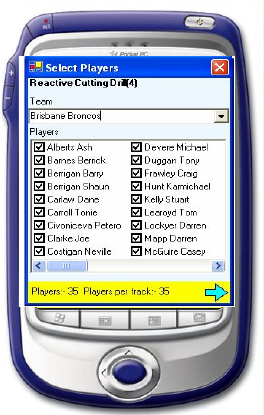
18. On the next screen touch once the bar located below Team, which has an icon
located at the far right hand section pointing Down.
19. Select the team you wish to use by touching once the team name from the drop
down bar.
20. Once you have selected your team you may deselect certain players from that
particular team by touching their names. To reselect that player press that person
once again.
21. Having selected the players to be used in the drill touch once the icon in the
bottom right hand corner that is an Arrow.
22. Touch once the icon located centre right at the bottom that is named Ready.
23. Touch once the icon located at the bottom right that is named Go.
SMARTSPEED User Guide Chapter 5 – Applications: Lap Mode
!FUSION SPORT Pty Ltd, 2006 13
Protocol Run
1. Before you press the go button you must first select the mode in which you want
to run the protocol.
2. There are three choices Auto, Manual and Freestyle. Auto mode runs your
players through with no changes available to the line up. Manual mode allows
you to skip forward, and ignore players. Freestyle mode continuously runs with
no data being recorded to the database.
3. Once the “Go” icon has been touched the protocol previously selected is up and
running. The Reactive Data Unit(s) will flash and then the set of green LED’s will
turn on (as in a traffic light start… go when ready)
4. On completion of the protocol the Reactive Data Unit(s) will flash their red LED’s
3 times followed by the pop up of the data for all players in a spreadsheet format.
5. Once you have finished looking at the data touch once the icon located in the top
right hand corner named OK.
6. To exit out of the protocol touch once the icon located in the top right hand corner
named OK.
7. To select different players for the same drill just completed select them in the
manner described above and touch once the icon in the bottom right hand corner
that is an Arrow.
8. If, however you wish to pick a new drill touch once the icon located in the top
right hand corner named OK. Do this again in the next page.
9. Pick another drill using the same method as mentioned in Protocol Set Up.
10. If, however you are finished with Smartspeed tm then touch once the icon located
in the top right hand corner named OK.
11. To exit file explorer touch once the icon located in the top right hand corner
named X.
N.B. Protocols have individual description in the “Protocol Overview” section
SMARTSPEED User Guide Chapter 5 – Applications: Lap Mode
!FUSION SPORT Pty Ltd, 2006 14
SOFTWARE OVERVIEW
Viewing and saving data
1. On the opening Smartspeed page touch once the icon located on the bottom of
the screen called View.
2. On the pop up box that occurs, touch once the button called Results.
3. On the next screen select the Protocol results you wish to view by touching the
particular drill.
4. Then select the team you wish to view by touching once on the bar located below
team. Then touch once the team you wish to view.
SMARTSPEED User Guide Chapter 5 – Applications: Lap Mode
!FUSION SPORT Pty Ltd, 2006 15
5. Then select the session you wish to view by touching once the date and time of
the session in the box located below Sessions.
6. The results will then be shown by name order (last name) with splits 0 and
onwards following the name.
7. You can view the results by time by touching once the un-filled circle located next
to the word Total.
8. To view the results by name order touch once the un-filled circle located next to
the word Name.
9. To exit this particular set of results press once the icon located in the top right
hand corner named OK.
10. To choose another protocol and/or team results follow the same procedure.
11. To exit the results page press once the icon located in the top right hand corner
named OK.
To Save
1. Enter the results as above
2. Press once the icon located on the bottom left of the screen named “Save as
XML” or “Save as CSV”.
3. On the following screen type using the keyboard (or letter recognizer) the name
you wish to call the file (e.g. 1st XI_40m session 1)
4. Then select the folder you wish to save the results to by touching once the drop
down bar located next to the icon that is named Folder.