Future Systems FCX200B Secuway Card 2000 User Manual users manual
Future Systems, Inc. Secuway Card 2000 users manual
UserManual.wiki
>
Future Systems
>
FCX200B User Manual
users manual
Navigation menu
Upload a User Manual
Namespaces
Wiki Guide
HTML
PDF
Info
Views
User Manual
Discussion / Help
Navigation
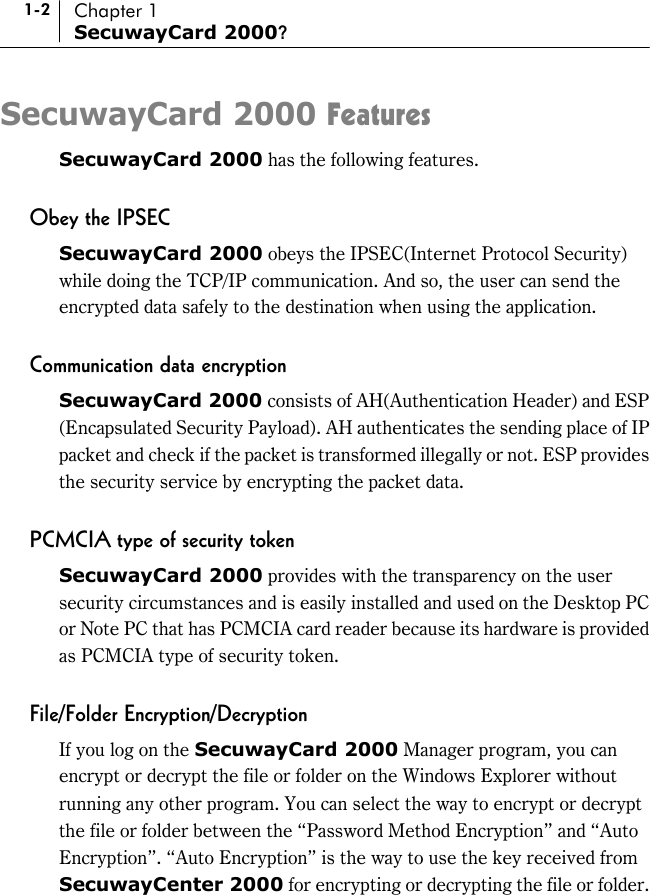

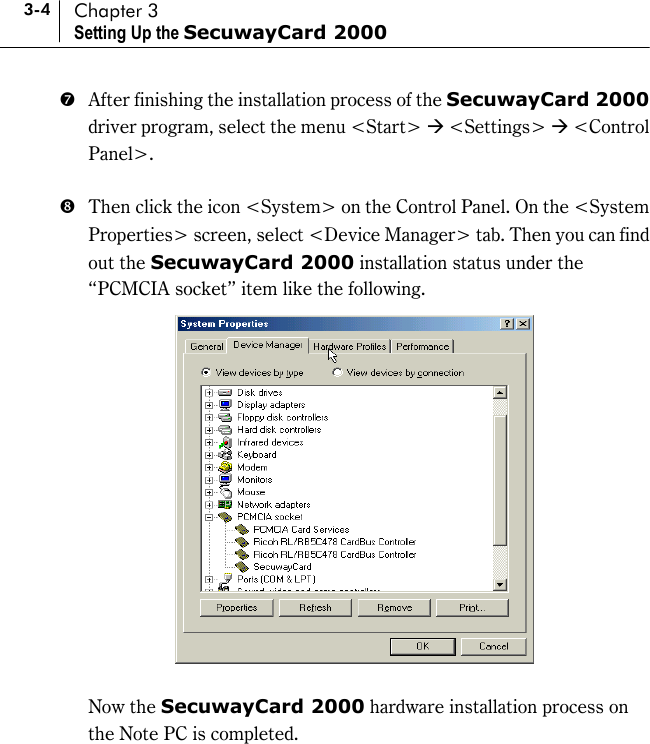
![3-2 Chapter 3 Setting Up the SecuwayCard 2000 % In a few seconds, the installation process for the SecuwayCard 2000 driver is started. Select the “Automatic search for a better driver(Recommended)” and click [Next>] button. & After the operating system find out the driver for SecuwayCard 2000 on the CD-ROM and then the following message is displayed. If you click [Next>] button, then the installation process of the SecuwayCard 2000 driver is started.](https://usermanual.wiki/Future-Systems/FCX200B/User-Guide-222365-Page-10.png)
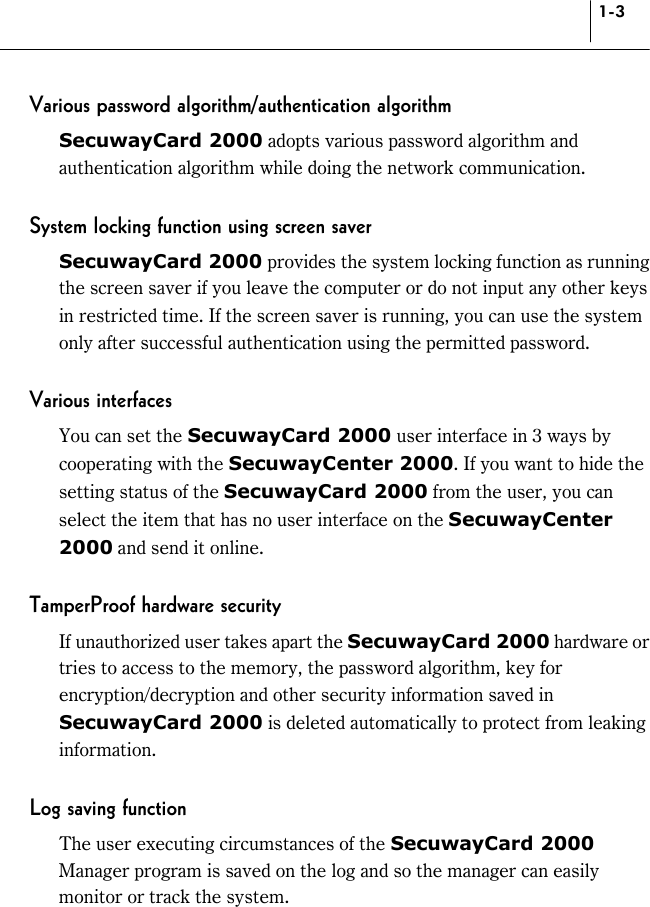
![3-3 ' After the copying process of the SecuwayCard 2000 driver installation program is completed, the following message is displayed. Click the [Finish] button. ( The final step of driver installation process is started with the following message. To click [Yes] and reboot the computer is recommended at this time. After rebooting the computer, the installation process of the SecuwayCard 2000 driver program is finished.](https://usermanual.wiki/Future-Systems/FCX200B/User-Guide-222365-Page-11.png)

![3-7 $ SecuwayCard 2000 program is provided with CD. Insert the SecuwayCard 2000 driver CD in the CD-ROM drive of PC. And click “setup.exe” among the files on the CD. Then the following screen is displayed. % Click [Next] button and then the <Software License Agreement> is displayed. Read the text very carefully and you agree to the contents, click [Yes] button. & <Choose Destination Location> screen which is to select the destination folder is displayed. Basically the folder “C:\…\Program Files\FUTURE\SecuwayCard 2000” is selected but you can change the folder as you want. If you want to select other folder, click [Browse…] button and select the folder you want. After selecting the folder, click [Next>] button.](https://usermanual.wiki/Future-Systems/FCX200B/User-Guide-222365-Page-15.png)
![3-8 Chapter 3 Setting Up the SecuwayCard 2000 ' “Select Program Folder” screen is displayed. The screen is to add the program folder for the SecuwayCard 2000 program. Basically, “SecuwayCard 2000” is selected but you can select one of existing folders or set the new one. After setting the folder, click [Next>] button. ( Then the program copying is started. While copying the program, the copying ratio screen is displayed. After copying the files, the steps for installing the L2TP(Layer2 Tunneling Protocol) driver may be displayed. In this case, do not stop it and just wait. In the case that the steps for installing the L2TP driver is not disaplayed, you should also stop it and just wait because the driver is not necessary on your circumstances.](https://usermanual.wiki/Future-Systems/FCX200B/User-Guide-222365-Page-16.png)
![3-9 ) After completing the copy process, <Setup Complete> screen is displayed. To use the SecuwayCard 2000 normally, you should reboot the computer at this time. Select <Yes, I want to restart my computer now> and then click [Finish] button. Then the computer is rebooted. After the rebooting, <Security Register Wizard> screen is displayed. You can log on the SecuwayCard 2000 Manager program and set the administration process only after you registering the security through the <Security Register Wizard> The way to register the security through the <Security Register Wizard> is introduced on the Chapter 4 of this guide.](https://usermanual.wiki/Future-Systems/FCX200B/User-Guide-222365-Page-17.png)
![4-2 Chapter 4 Online Security Registration Now let’s see the steps for online security registration using the <Security Register Wizard> program. # After copying the installation program and rebooting the system, the SecuwayCard 2000 displays the <Security Register Wizard> screen. Click [Next>] button after reading the “Security Token Initialize” information on the screen. $ Then the following screen to select the Security Register Method is displayed. You should move the mouse while the following screen is displayed. There are two kinds of ways for security registration. !"Offline Regist (Using file for security token setup) : It is the way to regist security using the diskette received from the SecuwayCenter 2000. !"Online Regist : It is the way to send and receive the key via network that is necessary for security communication. Select <Online Regist> on the <Security Register Method> and click the [Next>] button.](https://usermanual.wiki/Future-Systems/FCX200B/User-Guide-222365-Page-19.png)
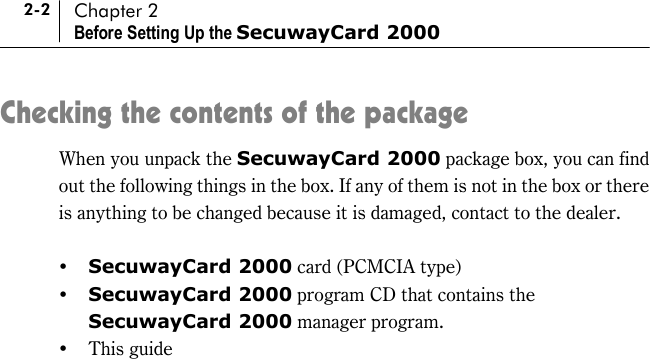
![4-3 If the SecuwayCard 2000 is not installed in your computer when you register the security or the computer can not perceive the SecuwayCard 2000 which is installed, the following screen is displayed. After check and reinstall the SecuwayCard 2000 normally and click [Token Query], then you can do the following steps % The following step is to input properties for Online Security Registration. The meaning and available input values of each item are like the following.](https://usermanual.wiki/Future-Systems/FCX200B/User-Guide-222365-Page-20.png)
![4-5 You should receive each value of these items from the SecuwayCenter 2000 administrator. If you input uncorrected values on these items, the Online Security Registration process is not executed. After input the Online Security Registration information, click the [Next>] button. & Then the Online Security Registration information you set is displayed like the following. After reading it carefully and click [Register Done] button if there are no uncorrected values. ' Then the Online Security Registration is started with the following screen.](https://usermanual.wiki/Future-Systems/FCX200B/User-Guide-222365-Page-22.png)
![4-6 Chapter 4 Online Security Registration If the Online Security Registration is completed, [Register Done] button is changed to be selectable. When you click [Register Done] button, the Online Security Registration process is finished. If the Online Security Registration is completed normally, the <SecuwayCard 2000 Manager> log on screen is displayed like the following. For the detailed information of logging on and operating the <SecuwayCard 2000 Manager> program, see the Part 2 of this manual. Do not remove the SecuwayCard 2000 hardware from the PCMCIA card reader while doing the Online Security Registration. If you enter the uncorrect values for the Online Security Registration, an error message is displayed. At this time, click [Back] button to go back to the previous screen and change the values to the correct one and go on.](https://usermanual.wiki/Future-Systems/FCX200B/User-Guide-222365-Page-23.png)
![5-1 Chapter 5 Uninstalling the SecuwayCard 2000 This chapter describes the way to uninstall the SecuwayCard 2000 program because there are any problems on the program after installing it. You may not be able to uninstall the SecuwayCard 2000 manager program completely while running it. Close the program before uninstalling it. # Select the <Start> * <Program> * <SecuwayCard 2000> * <Remove SecuwayCard 2000>. $ The <Confirm File Deletion> message is displayed. If you click [Yes], the SecuwayCard 2000 program is removed.](https://usermanual.wiki/Future-Systems/FCX200B/User-Guide-222365-Page-24.png)
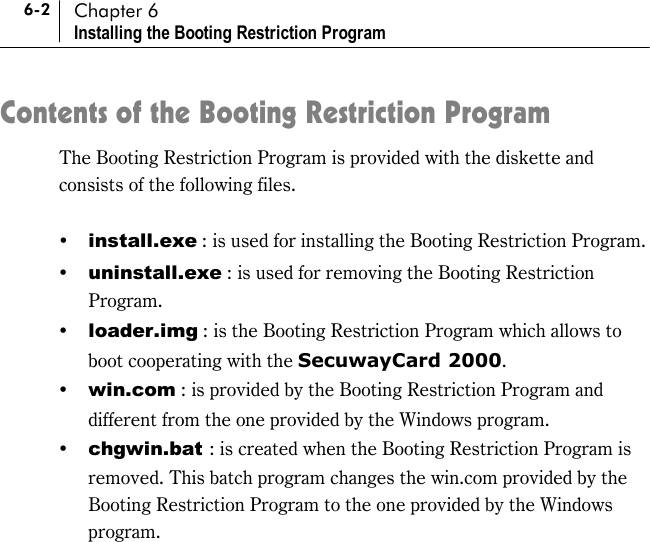
![6-3 The Steps for installing the Booting Restriction Program The Steps for installing the Booting Restriction Program is like the following. # At first, boot the system with the safe mode. For booting with the safe mode, press F8 while the system is booting the Windows operating system after power on. $ Insert the SecuwayCard 2000 hardware in the PCMCIA slot of your computer and the Booting Restriction Program diskette in the diskette drive. Depending on your Note PC model, you should probably set the “Plug&Play” item as “No” on the BIOS setup to allow the computer perceive the SecuwayCard. The name “Plug&Play” can be different depending on your Note PC model. For more detailed information about it, see the user guide provided with your Note PC. % Execute the “install loader.img” command in the diskette like the following. Syntax A:> install loader.img [retrialCount] [y|n] [master boot image name to be saved] Option [retrial Count] : If you input the incorrect password repeatedly up to the times you set this option, the data on the harddisk drive is removed.](https://usermanual.wiki/Future-Systems/FCX200B/User-Guide-222365-Page-27.png)
![6-4 Chapter 6 Installing the Booting Restriction Program [y|n] : If you set this option as “y” and input the incorrect password repeatedly up to the times you set this option, the data on the harddisk drive is removed. If you set this option as “n” and input the incorrect password repeatedly over the times you set this option, the system is stopped running without removing the data on the harddisk drive. Example A:> install loader.img 10 y img_0267.dat [ENTER] The previous example shows the case that you set the option [retrialCount] as “10” and “y”. In this case, if you input the incorrect password over 10 times while booting the system, the data on the harddisk drive is removed. If you set “n” instead of “y” at this option and input the incorrect password repeatedly over 10 times, the system is stopped running without removing the data on the harddisk drive. In this case, the SecuwayCard 2000 is initialized at this time and so you should receive the SecuwayCard 2000 security key from the SecuwayCenter 2000 manager again to use it. img_0267.dat is the name of the master boot image file. If you do not set it especially, the name is created automatically as the one related with the serial number of the SecuwayCard 2000. After executing “install loader.img”, the MBR (Master Boot Record) is created on the floppy disk. This file should be saved safely because it is used when you execute “uninstall.exe” to remove the Boot Restriction Program.](https://usermanual.wiki/Future-Systems/FCX200B/User-Guide-222365-Page-28.png)
![6-6 Chapter 6 Installing the Booting Restriction Program The Steps for removing the Booting Restriction Program The manager can remove the Booting Restriction Program anytime. To remove the Booting Restriction Program, you should do the process using the Master boot image file which is created when you install the program. # Insert the bootable disk in the diskette drive of your computer and boot the computer. You must boot the system using the bootable diskette because the Partition table cannot be restored if you boot the system on the harddisk drive. $ Execute the “uninstall” program like the following steps. Syntax A:> uninstall [Master boot image file name] [ENTER] Example A:> uninstall img_0267.dat [ENTER] Restoring Original MBR is finished. For complete uninstall, Please reboot by this floppy diskette and run a:\chgwin.bat! % Boot the system using the bootable diskette. After booting the system, execute “chgwin.bat” on the diskette. This batch file is created automatically when you execute the “uninstall” command. Then the “win.com” file provided by the Booting Restriction Program is replaced with the one provided by the Windows program.](https://usermanual.wiki/Future-Systems/FCX200B/User-Guide-222365-Page-30.png)
![6-7 To execute the “chgwin.bat” is like the following A:> chgwin.bat [ENTER] Then you can confirm the restoration process like the following. Del C :\WIN98\WIN.COM Copy C :\WIN98\WINA.COM C:\WIN98\WIN.COM Del C :\WIN98\WINA.COM You should follow the notices below when using the Booting Restriction Program. ! To use the program that modifies the partition program like fdisk, you should remove the Booting Restriction Program in advance. ! You should install the ZIP driver before installing the Booting Restriction Program because it is impossible to install the ZIP driver after installing the Booting Restriction Program. ! You must boot the system using the bootable diskette and execute the uninstall program of the Booting Restriction Program because the Partition table can not be restored if you boot the system on the harddisk drive. ! If the Booting Restriction Program is removed, only the name of the “win.com” is changed to “wina.com”. You should execute the “chgwin.bat” after uninstalling the Booting Restriction Program and booting with the bootable diskette. Or you should replace the name “wina.com” on the Windows directory with “win.com” after booting on “safe mode only”. You should delete “win.com” (the size is about 9KB) which is installed by the Booting Restriction Program.](https://usermanual.wiki/Future-Systems/FCX200B/User-Guide-222365-Page-31.png)
![1-1 Chapter 1 Logging On and Off the SecuwayCard 2000 Manager Program This chapter tells you the way to log on and off the SecuwayCard 2000 Manager program. Logging on the SecuwayCard 2000 Manager Program To log on the SecuwayCard 2000 Manager Program, follow the instructions below. Check if the SecuwayCard 2000 Manager Program is installed normally before login on the program. See the Part 1 for the description of the way to install the program. # Select <Start> * <Program> * <SecuwayCard 2000> * <SecuwayCard Manager>. Then the following message requests you to input the user ID and password. Input the available ID and password received from the SecuwayCenter 2000 manager. When you click [OK] after input ID and password, you can log on the SecuwayCard 2000 program.](https://usermanual.wiki/Future-Systems/FCX200B/User-Guide-222365-Page-33.png)
![1-3 If you logging on the SecuwayCard 2000 Manager program for the first time after installing it If you logging on the SecuwayCard 2000 Manager program for the first time after installing it, the following confirm message is displayed. Click [OK] then the <Setting System Security Default Value> screen is displayed. See the “Chapter 2 : Setting the Security functions” for the detailed information of the features and the available options on the screen.](https://usermanual.wiki/Future-Systems/FCX200B/User-Guide-222365-Page-35.png)
![1-4 Chapter 1 Logging On and Off the SecuwayCard 2000 Manager Program Logging off the SecuwayCard 2000 Manager Program To log off the SecuwayCard 2000 Manager Program, follow the instructions below. If you log off the SecuwayCard 2000 Manager Program, click the right button of the mouse while selecting the icon . Then the following menu is displayed. Select <Exit(X)> from the menu. Then the following message is displayed. Click [Yes] and then the SecuwayCard 2000 manager program is closed. If the SecuwayCard 2000 is closed, the icon on the bottom of the Windows is disappeared.](https://usermanual.wiki/Future-Systems/FCX200B/User-Guide-222365-Page-36.png)

![2-8 Chapter 2 Setting the Security Functions % Run the Windows Explorer. Select the folder you want to encrypt on the Windows Explorer and then click the right button of the mouse. The submenu is displayed like the following. & Select <Folder Encryption>. The following message is displayed. Click [Yes].](https://usermanual.wiki/Future-Systems/FCX200B/User-Guide-222365-Page-44.png)
![2-9 ' Then the following screen to set the folder encryption is displayed. If you click [Encrypt] button after setting each items, the folder is encrypted. The feature and meaning of each item is like the following. <Folder Encryption> There are two ways to encrypt folder like the following. AutoEncryption If you select this option, you need not set the password differently each time when encrypt or decrypt the folder. The security key allotted by SecuwayCenter 2000 when you register online security is used when encrypt or decrypt the folder as a default. Select the encryption type. This option is to set the access authority which is allotted to all the users commonly. This option is to set the access authority which is allotted to the registered users individually](https://usermanual.wiki/Future-Systems/FCX200B/User-Guide-222365-Page-45.png)
![2-13 % Select <Folder Decryption>. Then the following message is displayed. Click [Yes]. & Then the folder is decrypted and the folder icon is changed to . If you select “Auto Encryption” on the <Folder Encryption> item of the <Setting of Folder Encryption> screen, you need not enter any password to decrypt the folder. But you select “Password Method Encryption”, you should enter the password correctly on the following message to decrypt the folder. If you decrypt the folder, the files in the folder are decrypted automatically.](https://usermanual.wiki/Future-Systems/FCX200B/User-Guide-222365-Page-49.png)
![2-15 % Run the Windows Explorer. Select the file you want to encrypt on the Windows Explorer and then click the right button of the mouse. The submenu is displayed like the following. & Select <File Encryption>. Then the following message is displayed. Click [Yes].](https://usermanual.wiki/Future-Systems/FCX200B/User-Guide-222365-Page-51.png)
![2-16 Chapter 2 Setting the Security Functions ' Then the following message to encrypt the file is displayed. If you click [Encrypt] button after setting each items, the file is encrypted. The feature and meaning of each item is like the following. <File Encryption> There are two ways to encrypt file like the following. AutoEncryption If you select this option, you need not set the password differently each time when encrypt or decrypt the file. The security key allotted by SecuwayCenter 2000 when you register online security is used when encrypt or decrypt file as a default. Select the encryption type. This option is to set the access authority which is allotted to all the users commonly. This option is to set the access authority which is allotted to the registered users individually.](https://usermanual.wiki/Future-Systems/FCX200B/User-Guide-222365-Page-52.png)
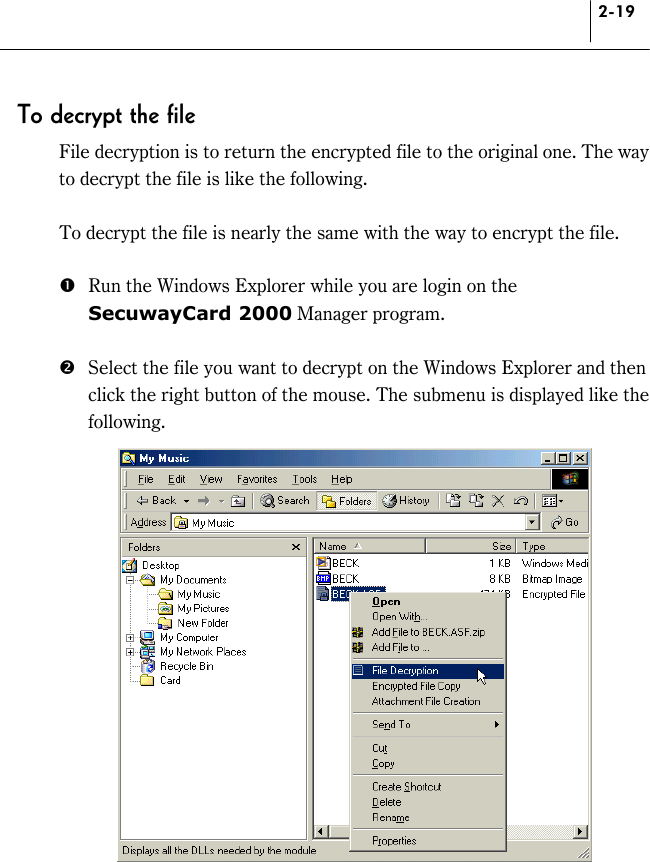
![2-20 Chapter 2 Setting the Security Functions % Select <File Decryption>. Then the following message is displayed. Click [Yes]. & Then the file is decrypted and the file icon is return to the original one. If you select “Auto Encryption” on the <File Encryption> item of the <Setting of File Encryption> screen, you need not enter any password to decrypt the file. But you select “Password Method Encryption”, you should enter the password correctly on the following message to decrypt the file. If you decrypt the folder, the files in the folder are decrypted automatically.](https://usermanual.wiki/Future-Systems/FCX200B/User-Guide-222365-Page-56.png)
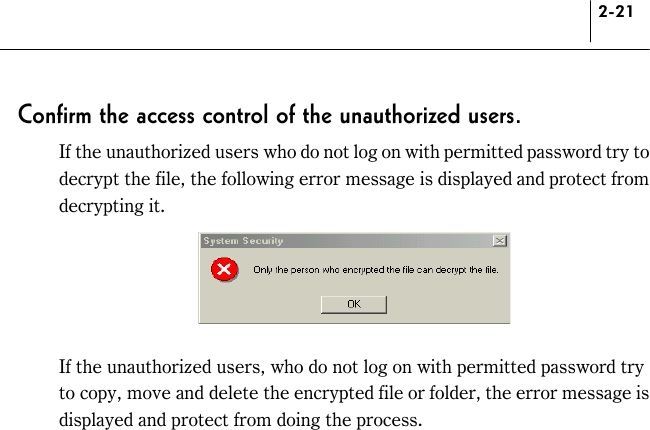
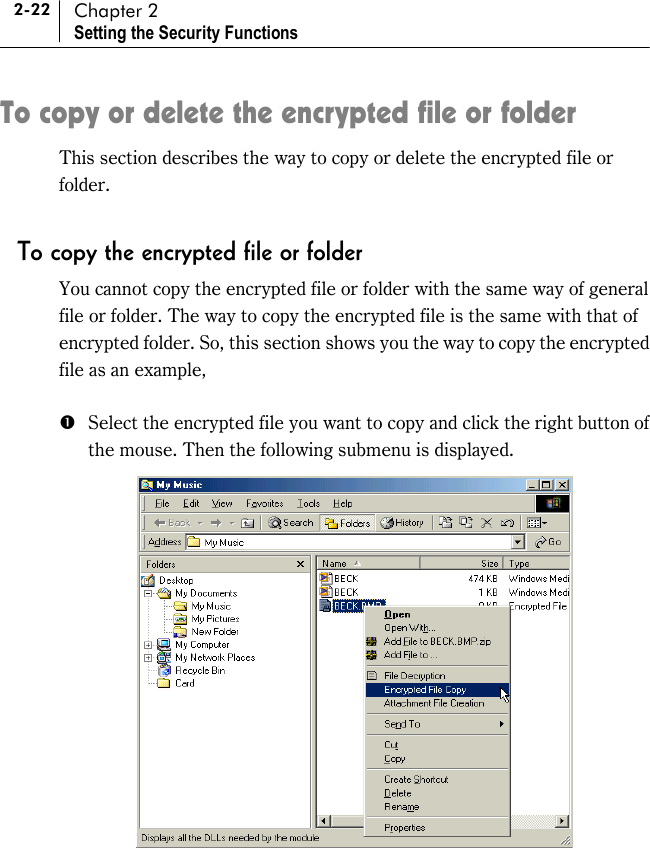
![2-23 $ Select <Encrypted File Copy> Then the screen to select the folder to be copied is displayed. % Select the folder to be copied and click [OK] button. & Then the encrypted file is copying and the following message is displayed after copying is completed. If unauthorized user who do not log on the SecuwayCard 2000 Manager program with permitted password try to copy the encrypted file, the following error message is displayed and protect from copying.](https://usermanual.wiki/Future-Systems/FCX200B/User-Guide-222365-Page-59.png)
![2-24 Chapter 2 Setting the Security Functions To delete the encrypted file or the file in the encrypted folder This section tells you the way to delete the encrypted file or the file in the encrypted folder. To delete the encrypted file There are 3 kinds of ways to delete the encrypted files. ! Using the [Delete] key Press the [Delete] key on the keyboard after selecting the encrypted file you want to delete. Then the <Confirm File Delete> window is displayed with the message “Are you sure you want to send … to the Recycle Bin?” If you click [Yes], the selected file is sent to the Recycle Bin. In this case, you should run “Delete” command again after selecting the file on the Recycle Bin to delete the file completely. ! Pressing the [Delete] key while pressing [Shift] key Press the [Delete] key while pressing [Shift] key on the keyboard after selecting the encrypted file you want to delete. Then <Confirm File Delete> window is displayed with the message “Are you sure you want to delete…?” If you click [Yes], the selected file is deleted completely. ! Using the <Delete> command of the <File> menu on the Windows Explorer Select <Delete> command of the <File> menu on the Windows Explorer after selecting the encrypted file you want to delete. Then the <Confirm File Delete> window is displayed with the message “Are you sure you want to send … to the Recycle Bin?” If you click [Yes], the selected file is sent to the Recycle Bin. In this case, you should run “Delete” command again after selecting the file on the Recycle Bin to delete the file completely.](https://usermanual.wiki/Future-Systems/FCX200B/User-Guide-222365-Page-60.png)
![2-25 To delete the encrypted folder or file in the encrypted folder To delete the encrypted folder or file in the encrypted folder, press [Delete] key while pressing [Shift] key on the keyboard after selecting the file or folder you want to delete. The encrypted folder or file in the encrypted folder cannot be deleted by [Delete] key only. The following table shows you the way to delete the encrypted file, encrypted folder, and the file in the encrypted folder. Send to the Recycle Bin (Using the [Delete] key) Delete directly without sending it to the Recycle Bin (Using the[Shift]+ [Delete] key) Encrypted file O O File in the Encrypted folder X O Encrypted folder X O](https://usermanual.wiki/Future-Systems/FCX200B/User-Guide-222365-Page-61.png)
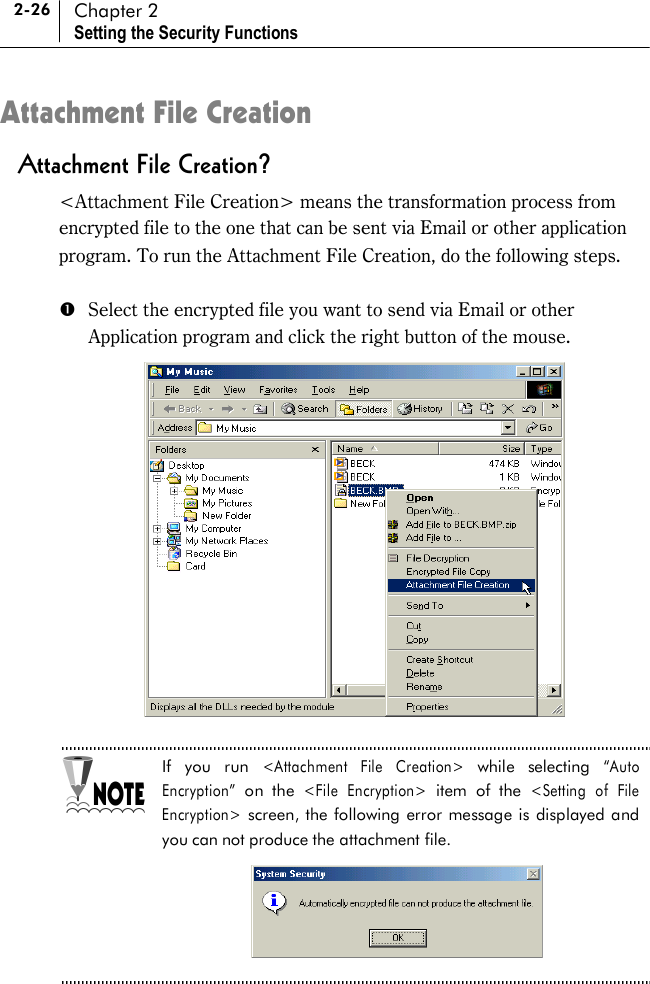
![2-27 $ If you select “Password Method Encryption” on the <File Encryption> item of the <Setting of File Encryption> screen, you can run the <Attachment File Creation> command. In this case the following message is displayed if you run the <Attachment File Creation>. % If you enter the correct password you set on the <Setting of File Encryption> screen and [OK], the attachment file is created with the following message. If you run the “Attachment file creation “, the extension of the encrypted file name is changed from “.fes” to “.fts” Eg.> *](https://usermanual.wiki/Future-Systems/FCX200B/User-Guide-222365-Page-63.png)
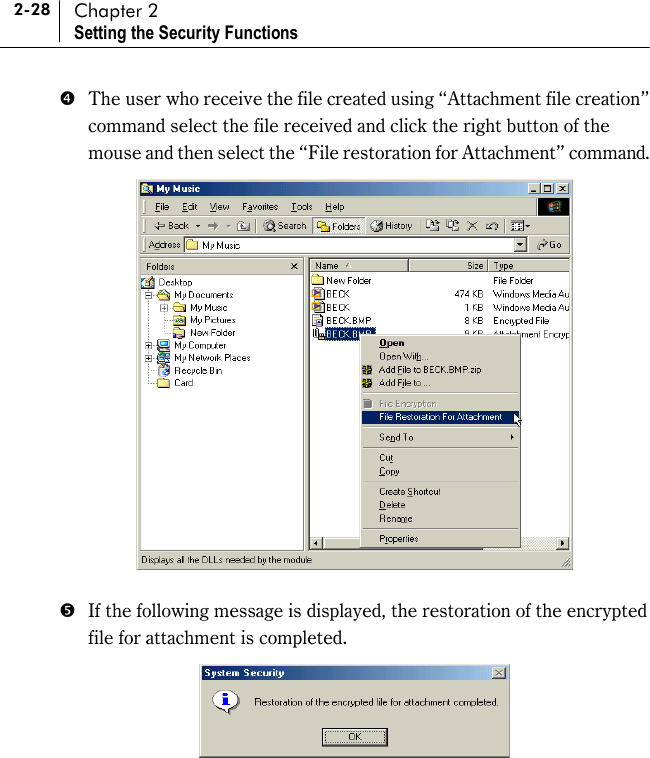
![2-29 ( Click [OK] and if click the restored file to open it, the following message to enter the password is displayed. At this time, you should enter the password you set when encrypt the file for the first time. So, the user who sends the encrypted file should give the password to the user who receives the file.](https://usermanual.wiki/Future-Systems/FCX200B/User-Guide-222365-Page-65.png)
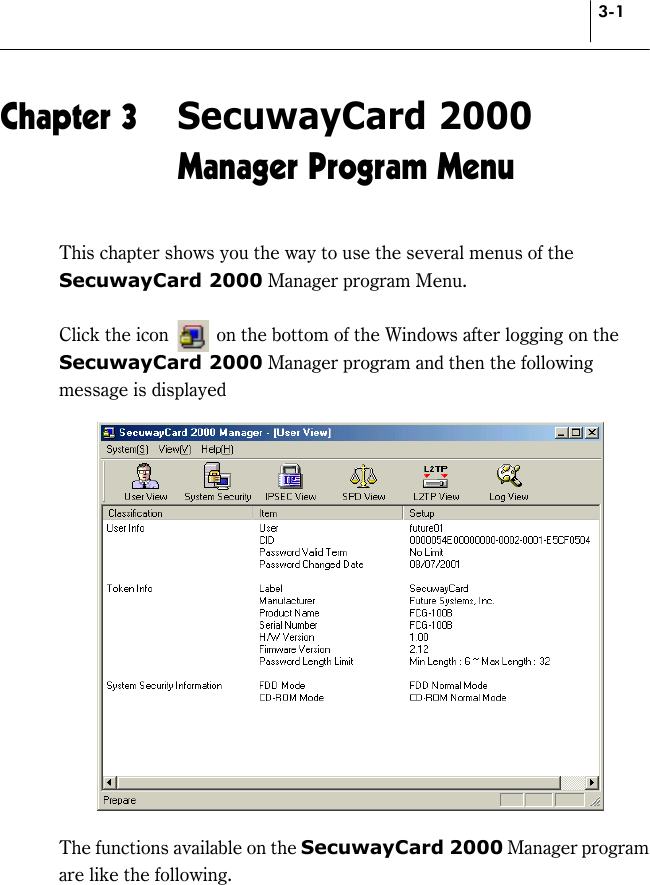
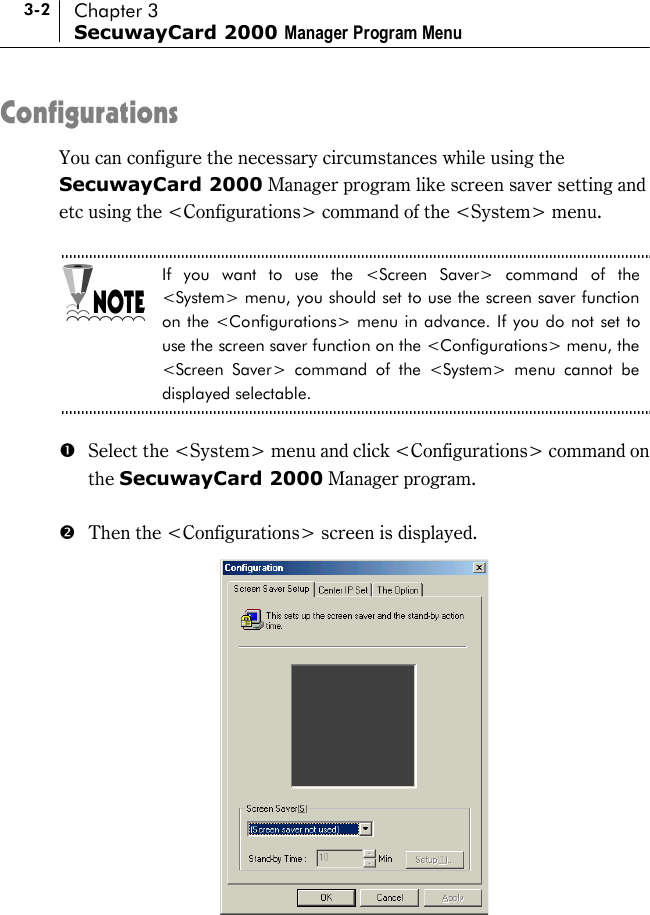
![3-4 Chapter 3 SecuwayCard 2000 Manager Program Menu <Settings> This item is available to select if you can select the screen image you want to display while the Screen Saver is running like the “Windows Logo”. The Screen Saver function provided by the SecuwayCard 2000 is different from the one provided by the Windows Me. And so it is executed independently of the one of Windows Me. After completing to select the items on the <Screen Saver Setup>, click [OK] button to save the settings.](https://usermanual.wiki/Future-Systems/FCX200B/User-Guide-222365-Page-69.png)

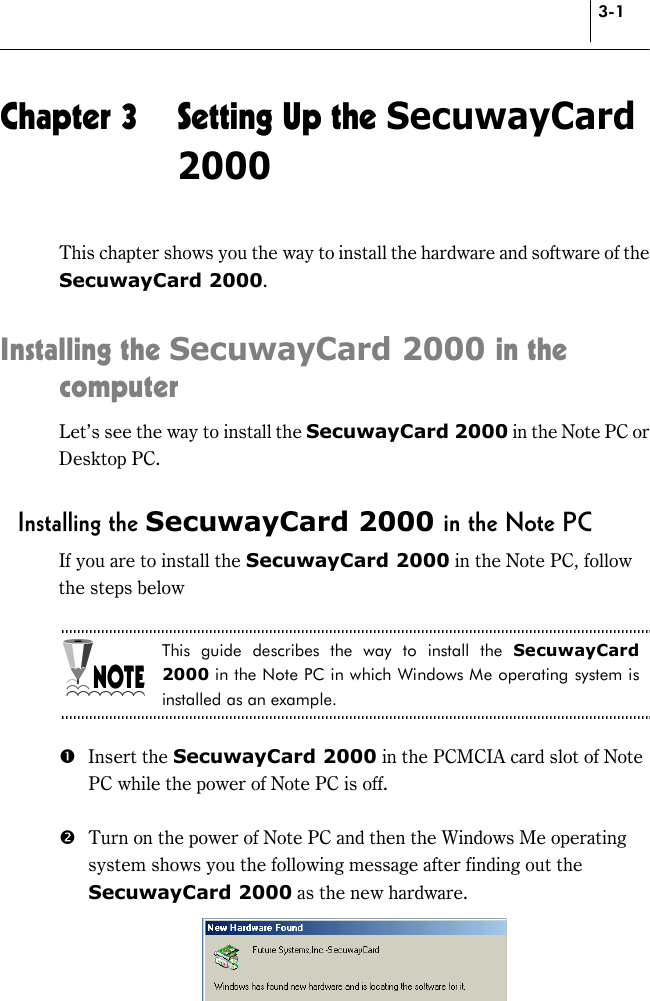
![3-12 Chapter 3 SecuwayCard 2000 Manager Program Menu Auto Upgrade FTP Server <Setting Auto Upgrade FTP Server> command is to set the server for sending the upgrade file automatically whenever the SecuwayCard 2000 Manager program is upgraded. If you want to use the <Setting Auto Upgrade FTP Server>, you should set the FTP server in advance. You can download the FTP server program free from the web site. For more detailed information of setting the FTP server, see the online help or printed manual provided with the FTP server program. Input the FTP server name on the “Server” item and press [OK] button. Then the setting the auto upgrade server is completed.](https://usermanual.wiki/Future-Systems/FCX200B/User-Guide-222365-Page-77.png)

![4-16 Chapter 4 Features of the Icons on the SecuwayCard 2000Manager Program Select the log file you want to open and [Open] button and then the log file is displayed on the <View Backup Log> screen. Log Print This icon is used to print the log file displayed on the current screen. Before printing it, check if the printer is connect to the computer you are using. Log Management This icon is to set the log backup cycle. If you click this icon, the following message to set the log backup cycle is displayed. Select the log backup cycle you want and click [OK].](https://usermanual.wiki/Future-Systems/FCX200B/User-Guide-222365-Page-94.png)