Future Systems FCX200B Secuway Card 2000 User Manual users manual
Future Systems, Inc. Secuway Card 2000 users manual
users manual

DASTEK EMC Lab,
DASTEK EMC Lab,DASTEK EMC Lab,
DASTEK EMC Lab, 204 Chuge-Ri Yangji-Myeon Yongin-Shi Kyunggi-Do,Korea
Tel:82-31-335-9341 Fax: 82-31-335-9343

!"#$%!&'#() *"+##()#")#,*(,-.%(,)./.'&012!) ) #0!'!)"-.3*0*"",!4!)*0
,#5!/#&%3"%*()).&*3).-) #%0#" #"#0!'!)"*3#,#"!4(#,).&3.5!,#3#*".(*+0#
&3.)#/)!.(*4*!(") *3'-%0!()#3-#3#(/#!(*3#"!,#()!*0!(")*00*)!.( !"#$%!&'#()4#(#3*)#"
%"#"*(,/*(3*,!*)#3*,!.-3#$%#(/1#(#341*(,!-(.)!(")*00#,*(,%"#,!(*//.3,*(/#2!)
) #!(")3%/)!.("'*1/*%"# *3'-%0!()#3-#3#(/#).3*,!./.''%(!/*)!.(.2#5#3) #3#!"
(.4%*3*()##) *)!()#3-#3#(/#2!00(.).//%3!(*&*3)!/%0*3!(")*00*)!.(-) !"#$%!&'#(),.#"
/*%"# *3'-%0!()#3-#3#(/#).3*,!..3)#0#5!"!.(3#/#&)!.(2 !/ /*(+#,#)#3'!(#,+1
)%3(!(4) ##$%!&'#().--*(,.() #%"#3!"#(/.%3*4#,).)31)./.33#/)) #!()#3-#3#(/#+1
.(#.3'.3#.-) #-.00.2!(4'#*"%3#"
6#.3!#().33#0./*)#) #3#/#!5!(4*()#((*
6(/3#*"#) #"#&*3*)!.(+#)2##() ##$%!&'#()*(,3#/#!5#3
6.((#/)) ##$%!&'#()!().*(.%)0#).(*.!3/%!),!--#3#(/#-3.'
) *)).2 !/ ) #3#/#!5#3!"/.((#/)#,
6.("%0)) #,#*0#3.-*(#7!#(/#,3*,!.8)#/ (!/!*(-.3 #0&
!"%(!)2*")#")#,2!) " !#0,#,/*+0#".() #!& #3*0,#5!/#" !#0,#,/*+0#"
'%")+#%"#,2!) ) #%(!)).!("%3#/.'&0!*(/#
#'*(%-*/)%3#3!"(.)3#"&.("!+0#-.3*(13*,!..3!()#3-#3#(/#/*%"#,+1
%(*%) .3!9#,'.,!-!/*)!.(").) !"#$%!&'#()%/ '.,!-!/*)!.("/.%0,5.!,) #%"#3:"
*%) .3!)1)..*)#) ##$%!&'#()

Part 1
SecuwayCard 2000
Installation

1-1
Chapter 1 SecuwayCard 2000?
The SecuwayCard 2000 is a part of the SecuwaySuite 2000
package as mentioned previously on this manual. Cooperating with the
SecuwayCenter 2000, SecuwayGate 2000,
SecuwayClient 2000 and SecuwayCard 2000 provides the
End-to-End total security solution from sender to receiver.
SecuwayCard 2000 provides Network communication security
service that encrypts/decrypts the network packet using key management
method based on IPSEC. SecuwayCard 2000 also gives you the
hardware security token function that encrypts/decrypts the hard disk,
floppy disk and booting restriction program which allows only authorized
user to use the system from booting. The booting restriction program is
optional part and you can install it regardless of SecuwayCard 2000.
SecuwayCard 2000 have the security policy and the key received
from SecuwayCenter 2000 administrator. SecuwayCard 2000
uses the key and security policy for network communication. You can use
the security function easily without any other operation because it is
provided automatically only by installing the PCMCIA card on the
computer with which you use the SecuwayCard 2000.
SecuwayCard 2000 can be easily installed and used transparently
not only on the Desktop PC but also Note PC because its hardware is
provided with the type of PCMCIA card.

1-2 Chapter 1
SecuwayCard 2000?
SecuwayCard 2000
Features
SecuwayCard 2000 has the following features.
Obey the IPSEC
SecuwayCard 2000 obeys the IPSEC(Internet Protocol Security)
while doing the TCP/IP communication. And so, the user can send the
encrypted data safely to the destination when using the application.
Communication data encryption
SecuwayCard 2000 consists of AH(Authentication Header) and ESP
(Encapsulated Security Payload). AH authenticates the sending place of IP
packet and check if the packet is transformed illegally or not. ESP provides
the security service by encrypting the packet data.
PCMCIA type of security token
SecuwayCard 2000 provides with the transparency on the user
security circumstances and is easily installed and used on the Desktop PC
or Note PC that has PCMCIA card reader because its hardware is provided
as PCMCIA type of security token.
File/Folder Encryption/Decryption
If you log on the SecuwayCard 2000 Manager program, you can
encrypt or decrypt the file or folder on the Windows Explorer without
running any other program. You can select the way to encrypt or decrypt
the file or folder between the “Password Method Encryption” and “Auto
Encryption”. “Auto Encryption” is the way to use the key received from
SecuwayCenter 2000 for encrypting or decrypting the file or folder.

1-3
Various password algorithm/authentication algorithm
SecuwayCard 2000 adopts various password algorithm and
authentication algorithm while doing the network communication.
System locking function using screen saver
SecuwayCard 2000 provides the system locking function as running
the screen saver if you leave the computer or do not input any other keys
in restricted time. If the screen saver is running, you can use the system
only after successful authentication using the permitted password.
Various interfaces
You can set the SecuwayCard 2000 user interface in 3 ways by
cooperating with the SecuwayCenter 2000. If you want to hide the
setting status of the SecuwayCard 2000 from the user, you can
select the item that has no user interface on the SecuwayCenter
2000 and send it online.
TamperProof hardware security
If unauthorized user takes apart the SecuwayCard 2000 hardware or
tries to access to the memory, the password algorithm, key for
encryption/decryption and other security information saved in
SecuwayCard 2000 is deleted automatically to protect from leaking
information.
Log saving function
The user executing circumstances of the SecuwayCard 2000
Manager program is saved on the log and so the manager can easily
monitor or track the system.

2-1
Chapter 2 Before Setting Up the
SecuwayCard 2000
This chapter tells you the system requirements to set up the
SecuwayCard 2000 and some notices you should know before
setting up the SecuwayCard 2000.
System Requirements
The system requirement to setup the SecuwayCard 2000 is like the
following.
!" 486 Mhz CPU or higher PC
!" Windows 95, Windows 98, Windows Me (Installed in PC)
!" Networking environment using Microsoft TCP/IP protocol stack
!" Desktop PC or Note PC installed with PCMCIA card reader
If you use Note PC, you can install the SecuwayCard 2000 in
your Note PC without installing any other application program
because PCMCIA card reader is already installed in Note PC
basically. If you use Desktop PC, you should install the PCMCIA
card reader program before installing the SecuwayCard
2000 because PCMCIA card reader is not installed in Note PC
basically.

2-2 Chapter 2
Before Setting Up the SecuwayCard 2000
Checking the contents of the package
When you unpack the SecuwayCard 2000 package box, you can find
out the following things in the box. If any of them is not in the box or there
is anything to be changed because it is damaged, contact to the dealer.
!" SecuwayCard 2000 card (PCMCIA type)
!" SecuwayCard 2000 program CD that contains the
SecuwayCard 2000 manager program.
!" This guide
3-1
Chapter 3 Setting Up the SecuwayCard
2000
This chapter shows you the way to install the hardware and software of the
SecuwayCard 2000.
Installing the
SecuwayCard 2000
in the
computer
Let’s see the way to install the SecuwayCard 2000 in the Note PC or
Desktop PC.
Installing the SecuwayCard 2000 in the Note PC
If you are to install the SecuwayCard 2000 in the Note PC, follow
the steps below
This guide describes the way to install the SecuwayCard
2000 in the Note PC in which Windows Me operating system is
installed as an example.
# Insert the SecuwayCard 2000 in the PCMCIA card slot of Note
PC while the power of Note PC is off.
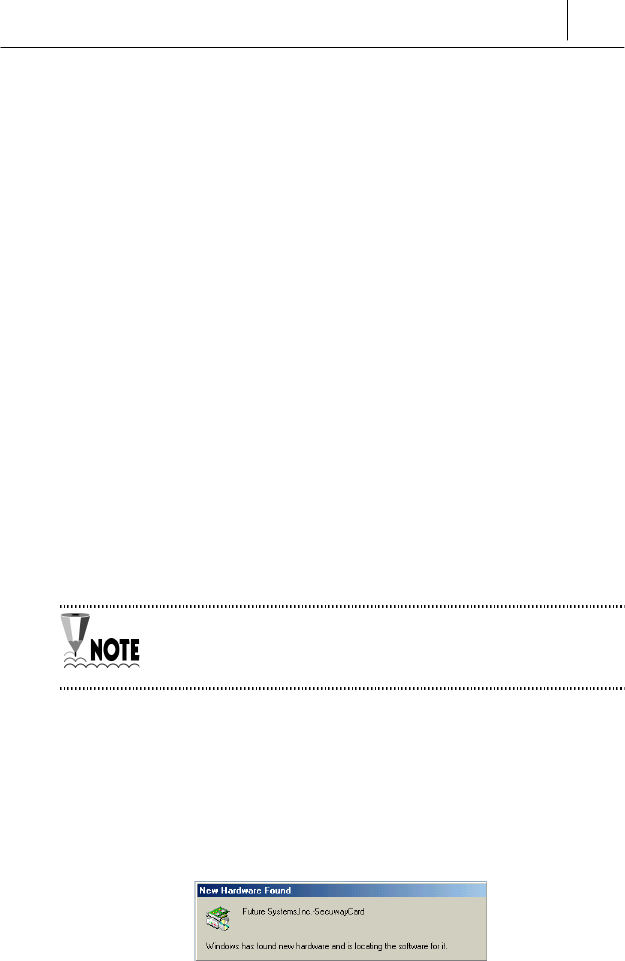
$ Turn on the power of Note PC and then the Windows Me operating
system shows you the following message after finding out the
SecuwayCard 2000 as the new hardware.
3-2 Chapter 3
Setting Up the SecuwayCard 2000
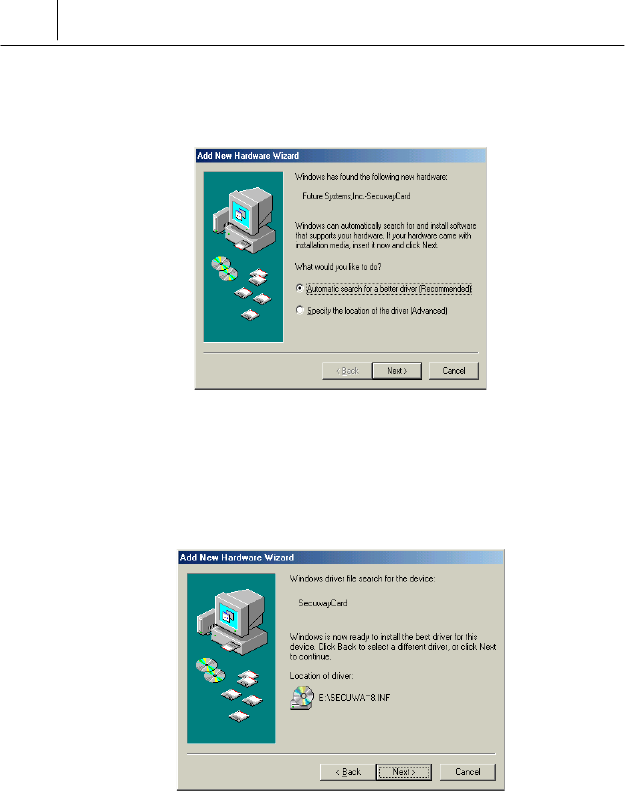
% In a few seconds, the installation process for the SecuwayCard
2000 driver is started.
Select the “Automatic search for a better driver(Recommended)” and
click [Next>] button.
& After the operating system find out the driver for SecuwayCard
2000 on the CD-ROM and then the following message is displayed.
If you click [Next>] button, then the installation process of the
SecuwayCard 2000 driver is started.

3-3
' After the copying process of the SecuwayCard 2000 driver
installation program is completed, the following message is displayed.
Click the [Finish] button.
( The final step of driver installation process is started with the following
message.
To click [Yes] and reboot the computer is recommended at this time.
After rebooting the computer, the installation process of the
SecuwayCard 2000 driver program is finished.
3-4 Chapter 3
Setting Up the SecuwayCard 2000
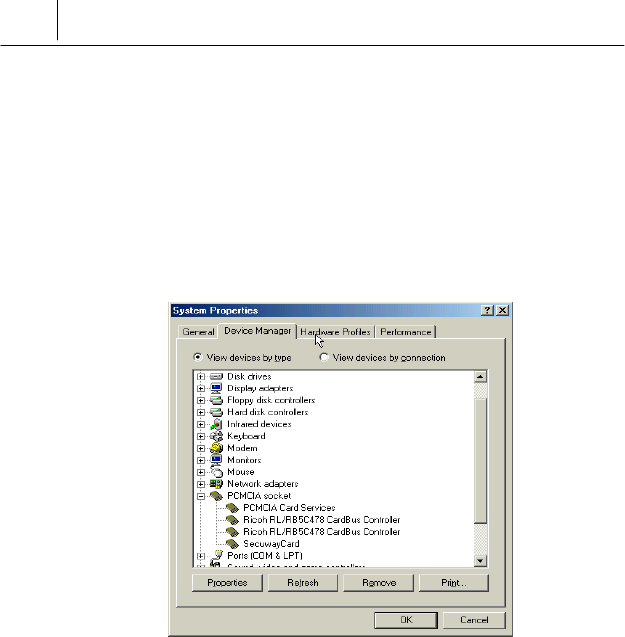
) After finishing the installation process of the SecuwayCard 2000
driver program, select the menu <Start> * <Settings> * <Control
Panel>.
+ Then click the icon <System> on the Control Panel. On the <System
Properties> screen, select <Device Manager> tab. Then you can find
out the SecuwayCard 2000 installation status under the
“PCMCIA socket” item like the following.
Now the SecuwayCard 2000 hardware installation process on
the Note PC is completed.
3-5
Installing the SecuwayCard 2000 in the Desk top PC
Generally, most of the Desktop PC has no built in PCMCIA card reader.
And so, you must install the PCMCIA card reader on the Desktop PC
before installing the SecuwayCard 2000.
PCMCIA card reader is provided with ISA type, PCI type and so
on. The PCMCIA card installation program is provided by the
vender or operating system. If the installation program is
provided by the operating system, the way to install it is very
simple. If the operating system provides the PnP(Plug & Play)
function, you can install it just by insert the card in the slot.
After installing the PCMCIA card reader, follow the steps of the
installation process of the SecuwayCard 2000 hardware on the Note
PC.

3-6 Chapter 3
Setting Up the SecuwayCard 2000
Installing the
SecuwayCard 2000
software
driver
If you have finally installed the SecuwayCard 2000 hardware in your
Note PC or Desktop PC, then you should install the software driver like
the following.
This guide shows you the case of using the operating system
Windwos ME as an example. If you use the Windows 95 or
Windows 98, the screen displays of the SecuwayCard 2000
installation process may be slightly different from those of this
guide.
# Turn on the Note PC in which you are to install the SecuwayCard
2000 program and run the Windows Me.
When you complete the installation of the SecuwayCard
2000 program, you should reboot the computer. So, if you’re
running the other programs, you’d better save and exit them
safely before installing the SecuwayCard 2000 program.
3-7
$ SecuwayCard 2000 program is provided with CD. Insert the
SecuwayCard 2000 driver CD in the CD-ROM drive of PC. And
click “setup.exe” among the files on the CD. Then the following screen
is displayed.
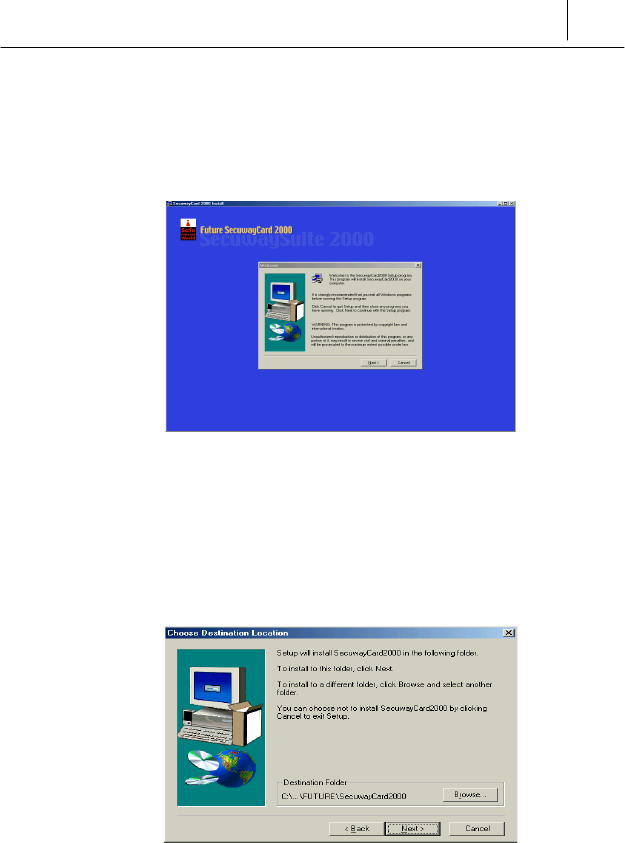
% Click [Next] button and then the <Software License Agreement> is
displayed. Read the text very carefully and you agree to the contents,
click [Yes] button.
& <Choose Destination Location> screen which is to select the
destination folder is displayed.
Basically the folder “C:\…\Program Files\FUTURE\SecuwayCard
2000” is selected but you can change the folder as you want. If you
want to select other folder, click [Browse…] button and select the
folder you want. After selecting the folder, click [Next>] button.
3-8 Chapter 3
Setting Up the SecuwayCard 2000
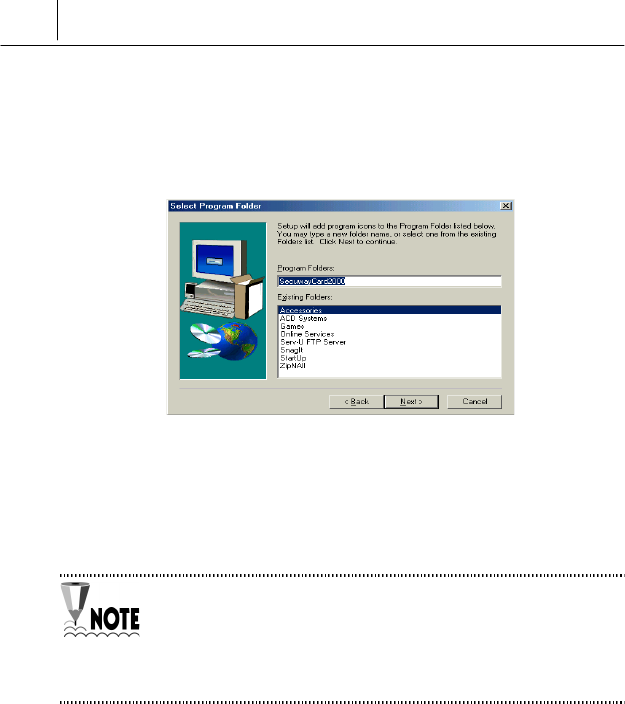
' “Select Program Folder” screen is displayed. The screen is to add the
program folder for the SecuwayCard 2000 program. Basically,
“SecuwayCard 2000” is selected but you can select one of
existing folders or set the new one.
After setting the folder, click [Next>] button.
( Then the program copying is started. While copying the program, the
copying ratio screen is displayed.
After copying the files, the steps for installing the L2TP(Layer2
Tunneling Protocol) driver may be displayed. In this case, do not
stop it and just wait. In the case that the steps for installing the
L2TP driver is not disaplayed, you should also stop it and just wait
because the driver is not necessary on your circumstances.
3-9
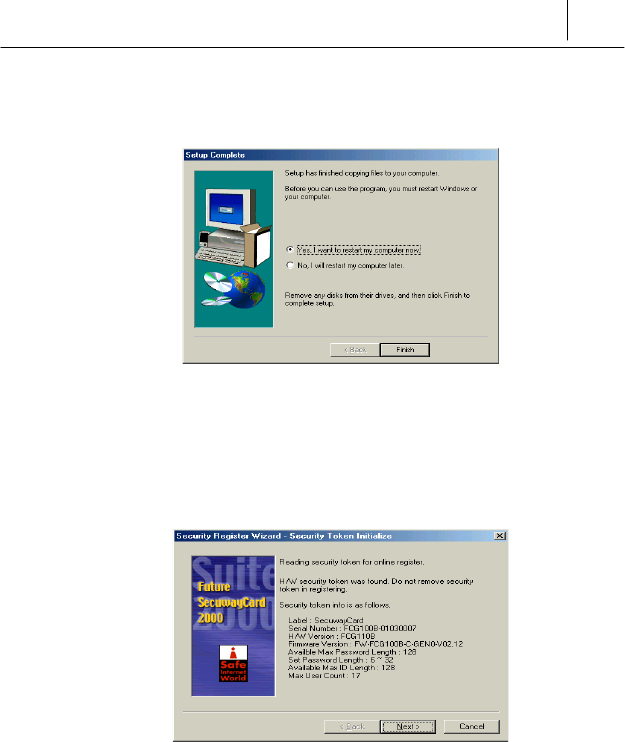
) After completing the copy process, <Setup Complete> screen is
displayed.
To use the SecuwayCard 2000 normally, you should reboot the
computer at this time. Select <Yes, I want to restart my computer
now> and then click [Finish] button. Then the computer is rebooted.
After the rebooting, <Security Register Wizard> screen is displayed.
You can log on the SecuwayCard 2000 Manager program and set
the administration process only after
you registering the security
through the <Security Register Wizard> The way to register
the
security through the <Security Register Wizard> is introduced on the
Chapter 4 of this guide.

4-1
Chapter 4 Online Security Registration
This chapter guides you to precede the Online Security Registration after
installing the SecuwayCard 2000.
Online Security Registration?
You should do the Online Security Registration process in order to use the
user authentication and data encryption function provided by the
SecuwayCard 2000.
When you complete the online registration, you can receive the security
key from the SecuwayCenter 2000 that is necessary for the user
authentication and data encryption. You can communicate with other hosts
using this security key after online security registration
! The <Security Register Wizard> program which is used for
online security registration is executed automatically once only
after installing the SecuwayCard 2000 program and
rebooting the computer. If you do not online registeration at
this time, you can execute the <Security Register Wizard>
program manually like this. Execute <Start> * <Program>
* <SecuwayCard 2000> * <SecuwayCard 2000
Manager program> and then the <Security Register
Wizard> program is displayed.
! If you are using the SecuwayCard 2000 Manager program
want to remove and reinstall the program, you should do the
online security registration again.
4-2 Chapter 4
Online Security Registration
Now let’s see the steps for online security registration using the
<Security Register Wizard> program.
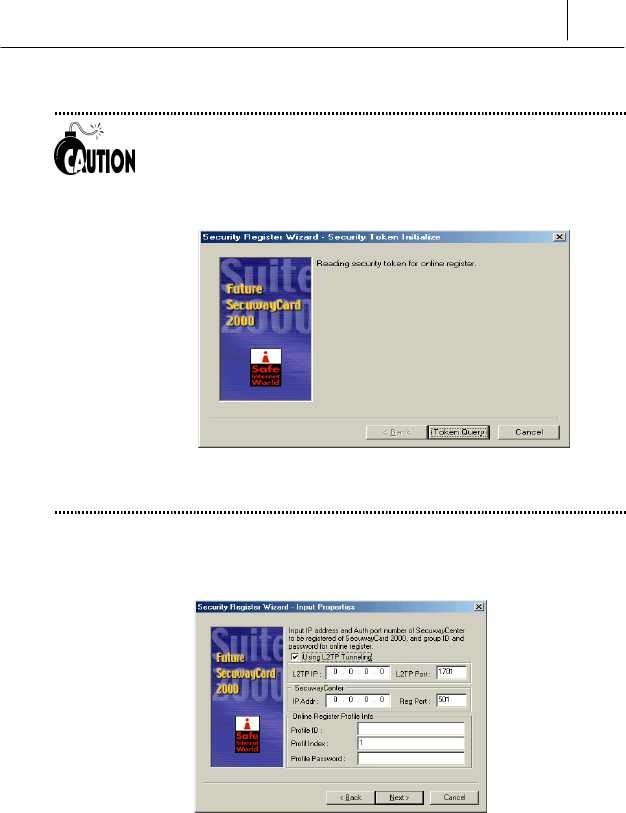
# After copying the installation program and rebooting the system, the
SecuwayCard 2000 displays the <Security Register Wizard>
screen.
Click [Next>] button after reading the “Security Token Initialize”
information on the screen.
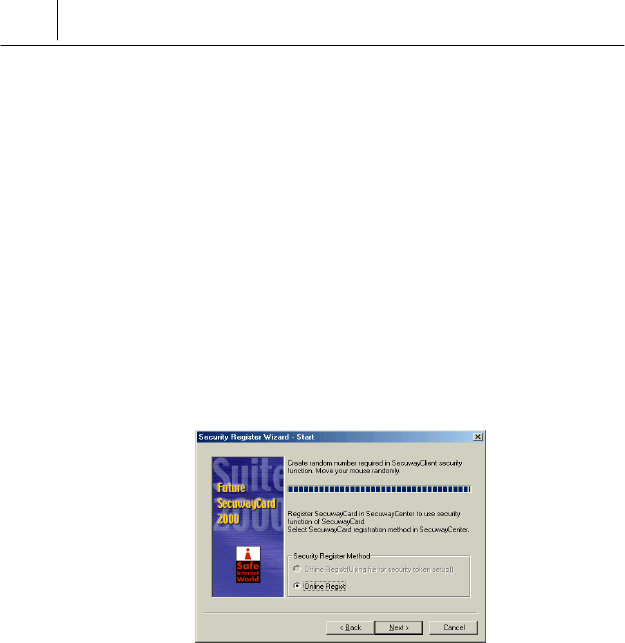
$ Then the following screen to select the Security Register Method is
displayed. You should move the mouse while the following screen is
displayed.
There are two kinds of ways for security registration.
!"Offline Regist (Using file for security token setup) : It is the way to
regist security using the diskette received from the
SecuwayCenter 2000.
!"Online Regist : It is the way to send and receive the key via
network that is necessary for security communication.
Select <Online Regist> on the <Security Register Method> and click
the [Next>] button.
4-3
If the SecuwayCard 2000 is not installed in your computer
when you register the security or the computer can not perceive
the SecuwayCard 2000 which is installed, the following
screen is displayed.
After check and reinstall the SecuwayCard 2000 normally
and click [Token Query], then you can do the following steps
% The following step is to input properties for Online Security
Registration.
The meaning and available input values of each item are like the
following.

4-4 Chapter 4
Online Security Registration
You should receive and input the available values of each items
from the administrator of the SecuwayCenter.
Using L2TP Tunneling
L2TP (Layer 2 Tunneling Protocol) allows the remote users to
communicate safely with the internal network through tunneling protocol.
!" L2TP IP : If you are to use L2TP function, you should input the
SecuwayGate 2000 IP address that can assign the new IP
address for tunneling on the <L2TP IP> item
SecuwayCenter
This is the information of the SecuwayCenter 2000 connected with
the SecuwayGate 2000.
!" IP Addr: Input the IP address of SecuwayCenter 2000 from
which you can receive the security key and policy via Online Security
Registration of the SecuwayCard 2000.
!" Reg Port: Means the UDP port that can set, cancel, or exchange the
information with the SecuwayCenter 2000 for online security
registration. UDP 501 is set as the authentication port on the
SecuwayCard 2000.
Only the IP address of SecuwayCenter 2000 that can
respond to your request of Online Security Registration should be
input on the “IP Addr” item.
Online Register Profile Info
This item is for input the Profile ID, Profile Index, and Profile Password
that are used by the SecuwayCard 2000 while Online Security
Registration.
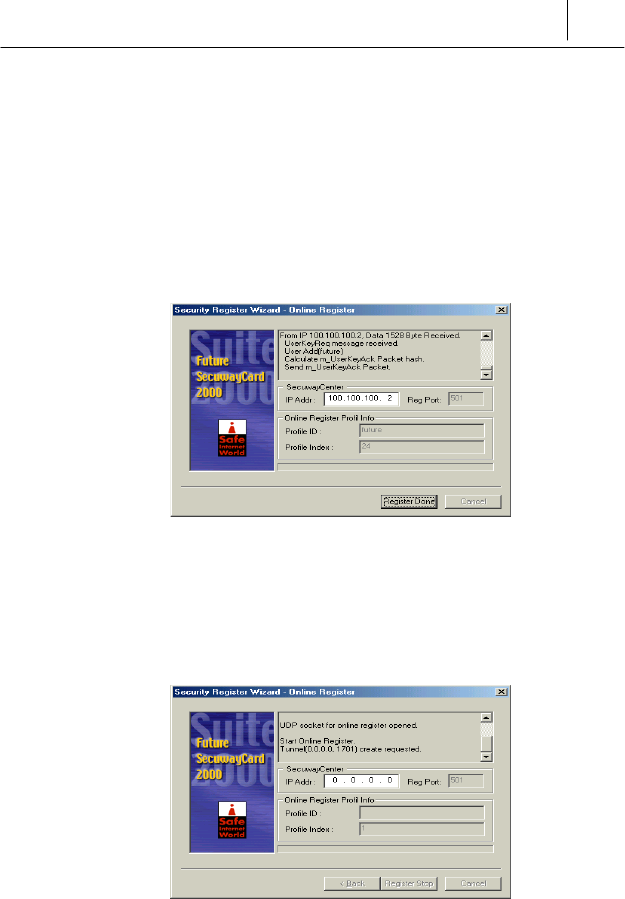
4-5
You should receive each value of these items from the
SecuwayCenter 2000 administrator. If you input uncorrected values
on these items, the Online Security Registration process is not executed.
After input the Online Security Registration information, click the [Next>]
button.
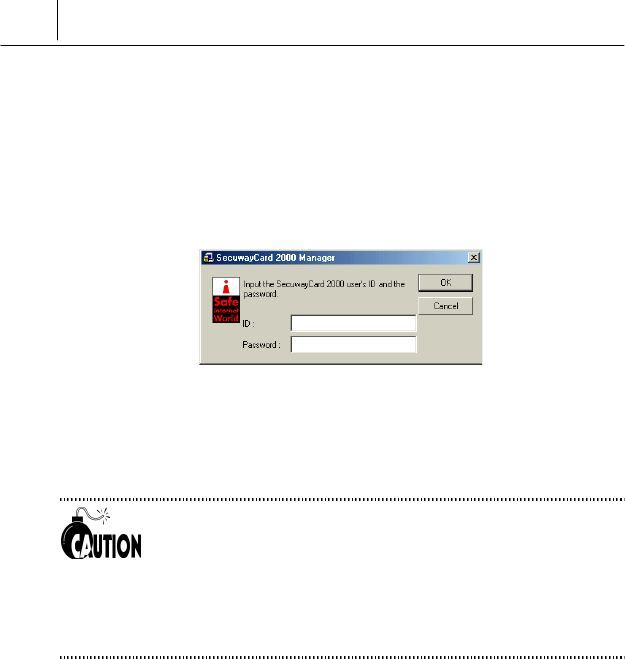
& Then the Online Security Registration information you set is displayed
like the following.
After reading it carefully and click [Register Done] button if there are
no uncorrected values.
' Then the Online Security Registration is started with the following
screen.
4-6 Chapter 4
Online Security Registration
If the Online Security Registration is completed, [Register Done] button is
changed to be selectable.
When you click [Register Done] button, the Online Security Registration
process is finished. If the Online Security Registration is completed
normally, the <SecuwayCard 2000 Manager> log on screen is
displayed like the following.
For the detailed information of logging on and operating the
<SecuwayCard 2000 Manager> program, see the Part 2 of this
manual.
Do not remove the SecuwayCard 2000 hardware from the
PCMCIA card reader while doing the Online Security Registration.
If you enter the uncorrect values for the Online Security
Registration, an error message is displayed. At this time, click
[Back] button to go back to the previous screen and change the
values to the correct one and go on.
5-1
Chapter 5 Uninstalling the
SecuwayCard 2000
This chapter describes the way to uninstall the SecuwayCard 2000
program because there are any problems on the program after installing it.
You may not be able to uninstall the SecuwayCard 2000
manager program completely while running it. Close the
program before uninstalling it.
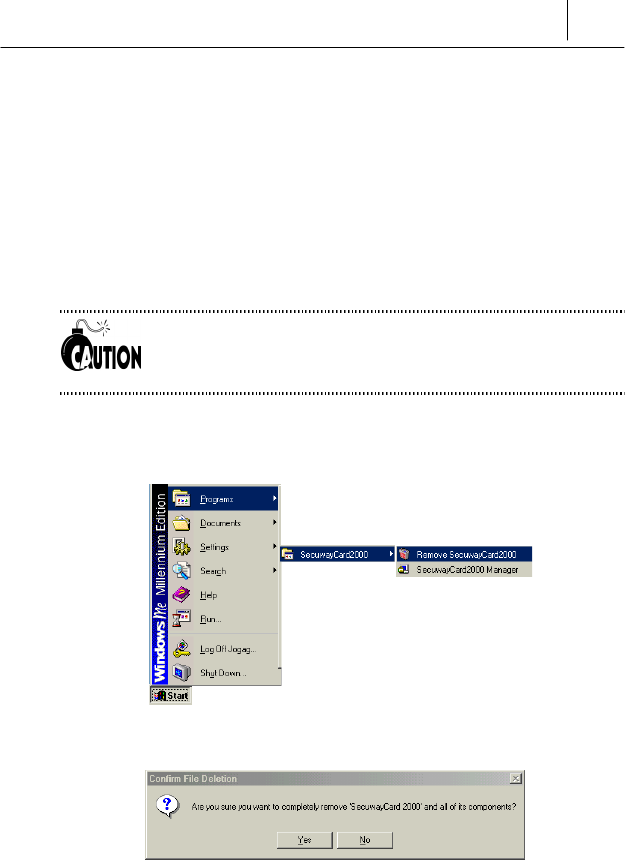
# Select the <Start> * <Program> * <SecuwayCard 2000>
* <Remove SecuwayCard 2000>.
$ The <Confirm File Deletion> message is displayed.
If you click [Yes], the SecuwayCard 2000 program is removed.
6-1
Chapter 6 Installing the Booting Restriction
Program
This chapter tells you the way to install the more powerful security
restriction program from the booting procedure which allows only
authorized user to use the system.
Using this program, only the user who encrypts using the MBR (Master
Boot Record) and then log on the SecuwayCard 2000 can boot the
system after decrypt the MBR information.
The Booting Restriction Program is optional product and you can
select if installing it or not.
The Booting Restriction Program should be installed only after
installing the SecuwayCard 2000. Only the system security
manager should do Installing and Removing the Booting
Restriction Program.

6-2 Chapter 6
Installing the Booting Restriction Program
Contents of the Booting Restriction Program
The Booting Restriction Program is provided with the diskette and
consists of the following files.
!" install.exe : is used for installing the Booting Restriction Program.
!" uninstall.exe : is used for removing the Booting Restriction
Program.
!" loader.img : is the Booting Restriction Program which allows to
boot cooperating with the SecuwayCard 2000.
!" win.com : is provided by the Booting Restriction Program and
different from the one provided by the Windows program.
!" chgwin.bat : is created when the Booting Restriction Program is
removed. This batch program changes the win.com provided by the
Booting Restriction Program to the one provided by the Windows
program.

6-3
The Steps for installing the Booting Restriction
Program
The Steps for installing the Booting Restriction Program is like the
following.
# At first, boot the system with the safe mode. For booting with the safe
mode, press F8 while the system is booting the Windows operating
system after power on.
$ Insert the SecuwayCard 2000 hardware in the PCMCIA slot of
your computer and the Booting Restriction Program diskette in the
diskette drive.
Depending on your Note PC model, you should probably set the
“Plug&Play” item as “No” on the BIOS setup to allow the
computer perceive the SecuwayCard. The name “Plug&Play”
can be different depending on your Note PC model. For more
detailed information about it, see the user guide provided with
your Note PC.
% Execute the “install loader.img” command in the diskette like
the following.
Syntax
A:> install loader.img [retrialCount] [y|n] [master boot image name
to be saved]
Option
[retrial Count] : If you input the incorrect password repeatedly up to
the times you set this option, the data on the harddisk drive is removed.

6-4 Chapter 6
Installing the Booting Restriction Program
[y|n] : If you set this option as “y” and input the incorrect password
repeatedly up to the times you set this option, the data on the harddisk
drive is removed. If you set this option as “n” and input the incorrect
password repeatedly over the times you set this option, the system is
stopped running without removing the data on the harddisk drive.
Example
A:> install loader.img 10 y img_0267.dat [ENTER]
The previous example shows the case that you set the option
[retrialCount] as “10” and “y”. In this case, if you input the incorrect
password over 10 times while booting the system, the data on the
harddisk drive is removed. If you set “n” instead of “y” at this option
and input the incorrect password repeatedly over 10 times, the system
is stopped running without removing the data on the harddisk drive. In
this case, the SecuwayCard 2000 is initialized at this time and so
you should receive the SecuwayCard 2000 security key from the
SecuwayCenter 2000 manager again to use it.
img_0267.dat is the name of the master boot image file. If you
do not set it especially, the name is created automatically as the
one related with the serial number of the SecuwayCard
2000.
After executing “install loader.img”, the MBR (Master Boot Record)
is created on the floppy disk. This file should be saved safely
because it is used when you execute “uninstall.exe” to remove the
Boot Restriction Program.

6-5
& If you complete to install the Boot Restriction Program, reboot the
system. At this time it is recommended to reboot the system using the
power button.
If the Boot Restriction Program is installed normally, the message that
requests you to input the log on name and password is displayed before
booting. If you input the log on name and password correctly, the
system will boot like the general system. If you don’t input the log on
name and password as you received from the SecuwayCenter
2000, the system will not boot.
If you install the Boot Restriction Program on your computer, the
system can’t boot without the SecuwayCard 2000 hardware.
6-6 Chapter 6
Installing the Booting Restriction Program
The Steps for removing the Booting Restriction
Program
The manager can remove the Booting Restriction Program anytime. To
remove the Booting Restriction Program, you should do the process using
the Master boot image file which is created when you install the program.
# Insert the bootable disk in the diskette drive of your computer and boot
the computer.
You must boot the system using the bootable diskette because the
Partition table cannot be restored if you boot the system on the
harddisk drive.
$ Execute the “uninstall” program like the following steps.
Syntax
A:> uninstall [Master boot image file name] [ENTER]
Example
A:> uninstall img_0267.dat [ENTER]
Restoring Original MBR is finished.
For complete uninstall, Please reboot by this floppy diskette and run
a:\chgwin.bat!
% Boot the system using the bootable diskette. After booting the system,
execute “chgwin.bat” on the diskette. This batch file is created
automatically when you execute the “uninstall” command. Then the
“win.com” file provided by the Booting Restriction Program is replaced
with the one provided by the Windows program.

6-7
To execute the “chgwin.bat” is like the following
A:> chgwin.bat [ENTER]
Then you can confirm the restoration process like the following.
Del C :\WIN98\WIN.COM
Copy C :\WIN98\WINA.COM C:\WIN98\WIN.COM
Del C :\WIN98\WINA.COM
You should follow the notices below when using the Booting
Restriction Program.
! To use the program that modifies the partition program like
fdisk, you should remove the Booting Restriction Program in
advance.
! You should install the ZIP driver before installing the Booting
Restriction Program because it is impossible to install the ZIP
driver after installing the Booting Restriction Program.
! You must boot the system using the bootable diskette and
execute the uninstall program of the Booting Restriction
Program because the Partition table can not be restored if you
boot the system on the harddisk drive.
! If the Booting Restriction Program is removed, only the name of
the “win.com” is changed to “wina.com”. You should execute
the “chgwin.bat” after uninstalling the Booting Restriction
Program and booting with the bootable diskette. Or you should
replace the name “wina.com” on the Windows directory with
“win.com” after booting on “safe mode only”. You should
delete “win.com” (the size is about 9KB) which is installed by the
Booting Restriction Program.

Part 2
SecuwayCard 2000
Administration
1-1
Chapter 1 Logging On and Off the
SecuwayCard 2000
Manager Program
This chapter tells you the way to log on and off the SecuwayCard
2000 Manager program.
Logging on the
SecuwayCard 2000
Manager
Program
To log on the SecuwayCard 2000 Manager Program, follow the
instructions below.
Check if the SecuwayCard 2000 Manager Program is
installed normally before login on the program. See the Part 1 for
the description of the way to install the program.
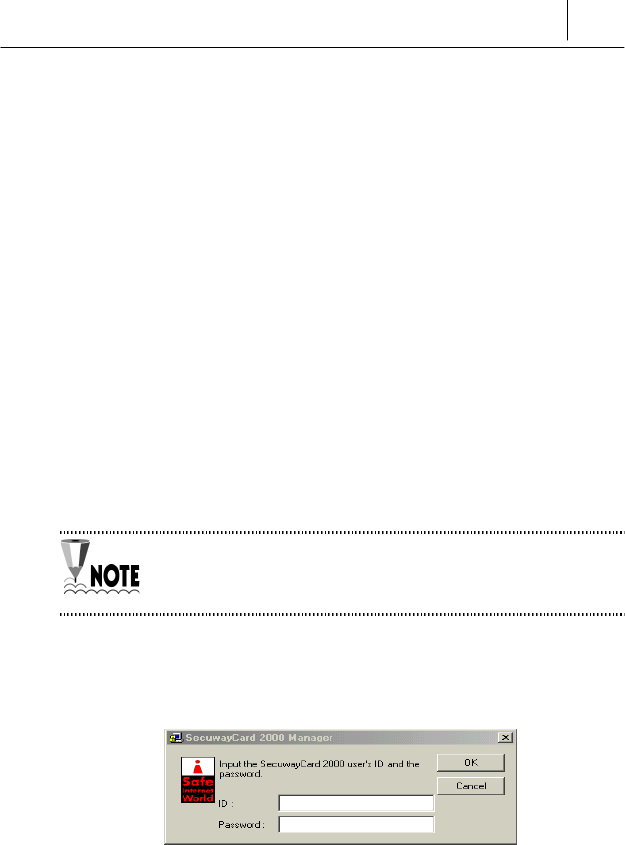
# Select <Start> * <Program> * <SecuwayCard 2000> *
<SecuwayCard Manager>. Then the following message
requests you to input the user ID and password.
Input the available ID and password received from the
SecuwayCenter 2000 manager. When you click [OK] after input
ID and password, you can log on the SecuwayCard 2000 program.
1-2 Chapter 1
Logging On and Off the SecuwayCard 2000 Manager Program
If you have input the incorrect password over 10 times, you can’t
log on the SecuwayCard 2000 although you input correct
password finally because of the locking function. In this case, you
should request to the manager to log on.
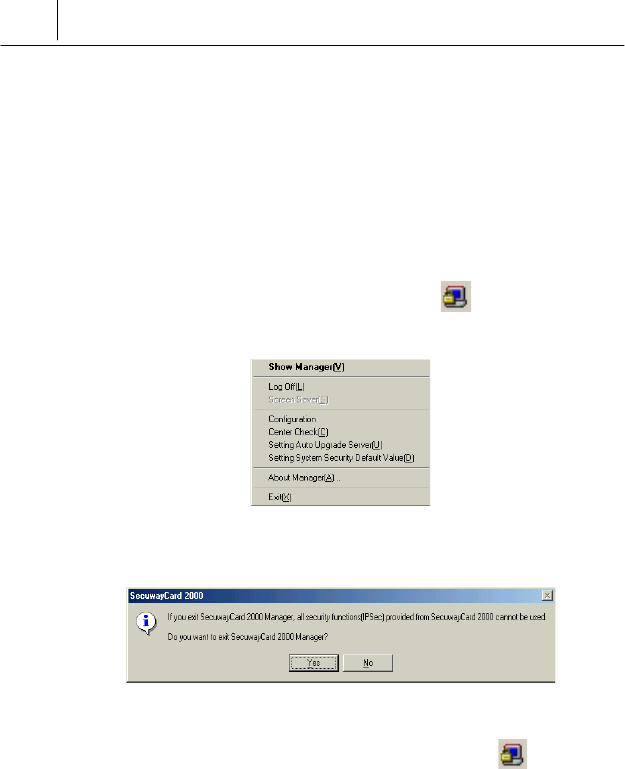
$ While you’re logging on the SecuwayCard 2000 program, the
following icon is placed on the bottom of the Windows.
Click the icon then the main window of the SecuwayCard 2000
manager program is displayed.
1-3
If you logging on the SecuwayCard 2000 Manager
program for the first time after installing it
If you logging on the SecuwayCard 2000 Manager program for the
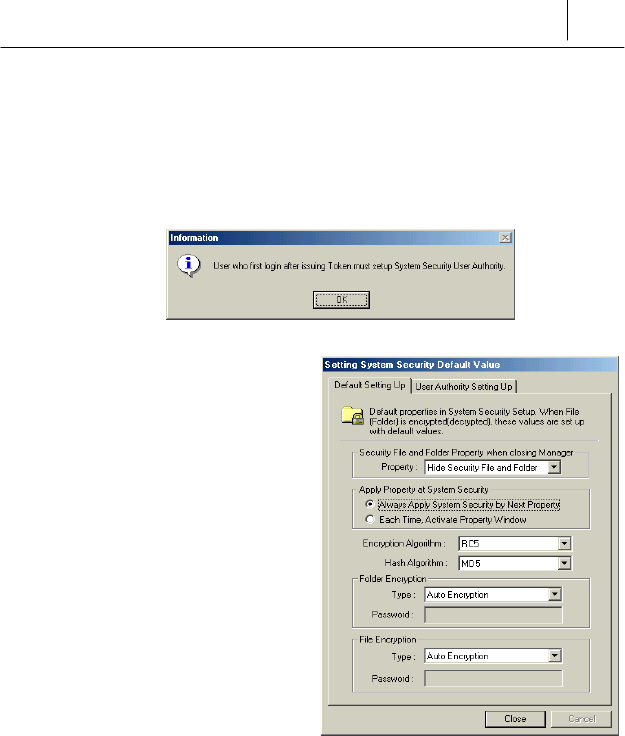
first time after installing it, the following confirm message is displayed.
Click [OK] then the <Setting
System Security Default
Value> screen is displayed.
See the “Chapter 2 : Setting the
Security functions” for the
detailed information of the
features and the available
options on the screen.
1-4 Chapter 1
Logging On and Off the SecuwayCard 2000 Manager Program
Logging off the
SecuwayCard 2000
Manager
Program
To log off the SecuwayCard 2000 Manager Program, follow the
instructions below.
If you log off the SecuwayCard 2000 Manager Program, click the
right button of the mouse while selecting the icon .
Then the following menu is displayed.
Select <Exit(X)> from the menu. Then the following message is displayed.
Click [Yes] and then the SecuwayCard 2000 manager program is
closed. If the SecuwayCard 2000 is closed, the icon on the
bottom of the Windows is disappeared.
2-1
Chapter 2 Setting the Security Functions
This Chapter describes how to set and use the security functions provided
by SecuwayCard 2000 Manager program.
Using the security functions of SecuwayCard 2000, you can encrypt
or decrypt the folder or file. Under the case that the multi users are
registered on the SecuwayCard 2000 program, you can set if any
users can access the file or folder and make the accessible user lists.
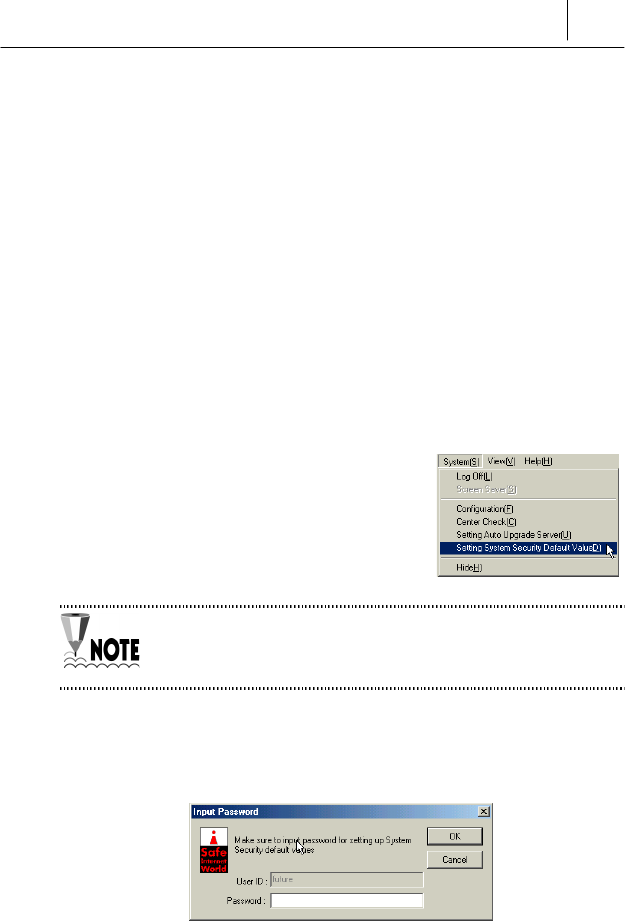
Execute the System Security function
To set the system security functions, select the
6th command <Setting System Security Default
Value> on the <System(S)> menu of
SecuwayCard 2000 Manager program.
When you log on SecuwayCard 2000 Manager program for
the first time after install it, the<Setting System Security Default
Value> screen is displayed.
If you select <Setting System Security Default Value>, the following
screen to input password is displayed again although you have already
input password when log in SecuwayCard 2000 Manager program.
2-2 Chapter 2
Setting the Security Functions
If you enter the password correctly, <Setting System Security Default
Value> screen is displayed.
When you log on SecuwayCard 2000 Manager program for
the first time after install it, the<Setting System Security Default
Value> screen is displayed.
The detailed information of each items are like the following.
<Default Setting Up> tab
On the <Default Setting Up> tab, you can set the basic functions of the
system security. The parameters you set on these items will be the default
value of file or folder encryption or decryption.
The meanings and functions of each item are described below:

2-3
<Security File and Folder Property when closing Manager>
This item is to set the file and folder property when closing
SecuwayCard 2000 Manager program. The features of each option
are like the following.
Hide Security File and Folder
If you select this option, encrypted file or folder are not displayed on the
Windows Explorer after closing SecuwayCard 2000 Manager
program.
This is to protect from the access of unauthorized users (who do not log on
with permitted password) to the encrypted file or folder as hiding the
encrypted file or folder on the Windows Explorer.
Show Security File and Folder
If you select this option, encrypted file or folder are displayed on the
Windows Explorer after closing SecuwayCard 2000 Manager
program. But unauthorized user cannot open the encrypted file or folder
because they should input the password when they open the file or folder.
Show Security File only
If you select this option, encrypted files are displayed (but encrypted
folders are not displayed) on the Windows Explorer after closing
SecuwayCard 2000 Manager program. But unauthorized user cannot
open the encrypted file because they should input the password when they
open the file.
2-4 Chapter 2
Setting the Security Functions
<Apply Property at System Security>
This item is to select if set Security property differently each time when
encrypt file or folder, or set the same Security property after setting it
once.
Always Apply System Security by Next Property
If you select this option, the same Security property is adopt to file or
folder when encrypt file or folder after setting it once.
Each Time, Activate Property Window
If you select this option, the same Security property is adopt to file or
folder when encrypt file or folder after setting it once.
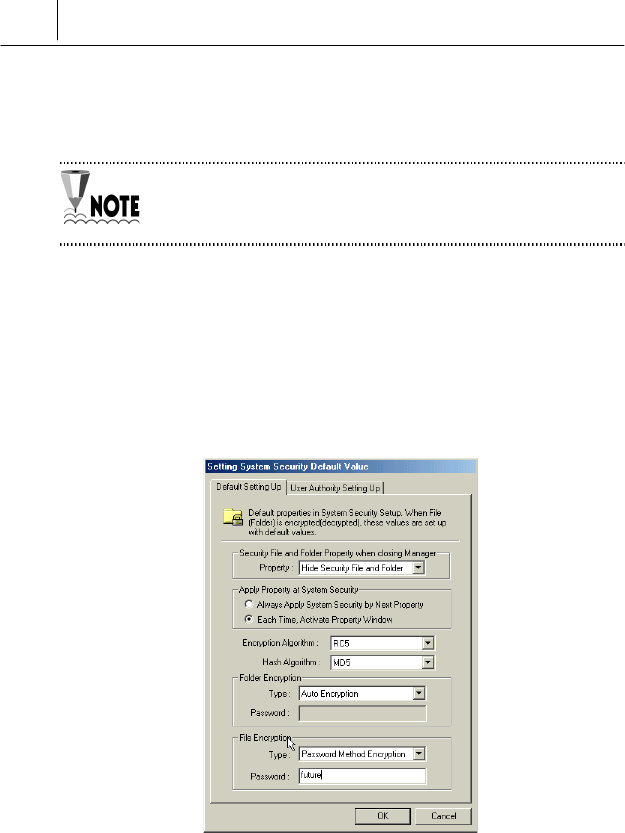
<Folder Encryption>/<File Encryption>
There are two ways to encrypt folder or file like the following.
AutoEncryption
If you select this option, you need not set the password differently each
time when encrypt or decrypt file or folder. The security key allotted by
SecuwayCenter 2000 when you register online security is used
when encrypt or decrypt file or folder as a default.
Password Method Encryption
If you select this option, you can set the password differently each time
when encrypt or decrypt file or folder.
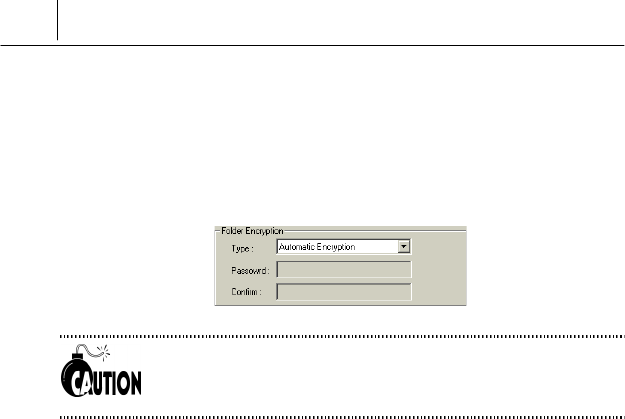
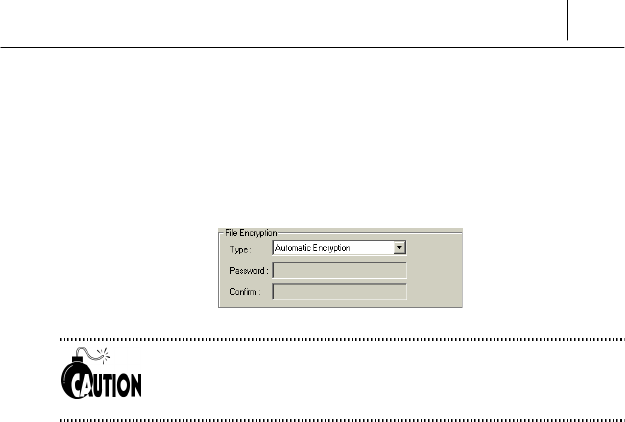
If you select “Password Method Encryption” on the <Type> of <Folder
Encryption> or <File Encryption> item, <Password> changes to blank
space where you can input any password.
Input any password on the <Password> you want.
2-5
If you select “Password Method Encryption”, you should
remember the password. If you forget the password, you can’t
open the encrypted file or folder.
About the way to encrypt or decrypt the file or folder, see the “ To
encrypt or decrypt the folder” or “ To encrypt or decrypt the file”
on this chapter.
<User Authority Setting Up> tab
You can set the items on this tab to protect from the access of
unauthorized user to the encrypted file or folder.

2-6 Chapter 2
Setting the Security Functions
<Default Authority>
This option is to set the access authority which is allotted to all the users
commonly. For example, if you select “List Authority”, List Authority is
allotted to all the users who are listed on the “Users”.
<Individual Authority>
This option is to set the access authority which is allotted to the registered
users individually. Select the user you want to allot the authority and then
select the appropriate authority to him.
To copy the file or folder
For example, if you want to copy the encrypted file/folder A to the
file/folder B, allot the List and Access authority to the user who use the
file/folder A and allot the List and Write authority to the user who use the
file/folder B.
2-7
To encrypt or decrypt the folder
This section describes the way to encrypt or decrypt the folder.
! Encryption? : The transformation of data into a form
unreadable by anyone without a secret decryption key. Its
purpose is to ensure privacy by keeping the informationn
hidden from anyone for whom it is not intended.
! Decryption? : The transformation of data that is encrypted once
into a form readerble one again.
To encrypt the folder
The way to encrypt the folder is like the following.
# To encrypt the folder, you should install the SecuwayCard 2000
hardware and software in advance. Please read the Part 1 of this
manual about the way to install SecuwayCard 2000 and check it
is normally operated on your computer.
$ Log on the SecuwayCard 2000 Manager program.
2-8 Chapter 2
Setting the Security Functions
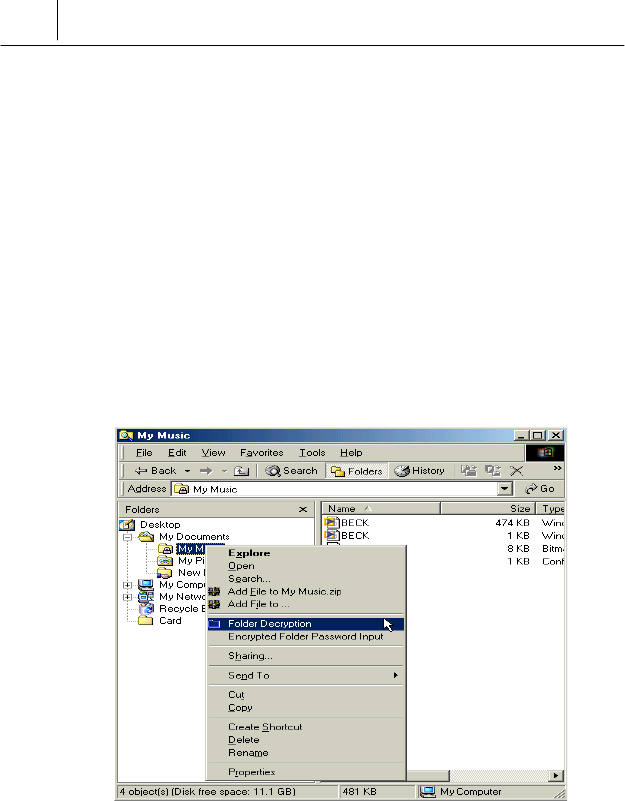
% Run the Windows Explorer. Select the folder you want to encrypt on
the Windows Explorer and then click the right button of the mouse.
The submenu is displayed like the following.
& Select <Folder Encryption>. The following message is displayed.
Click [Yes].
2-9
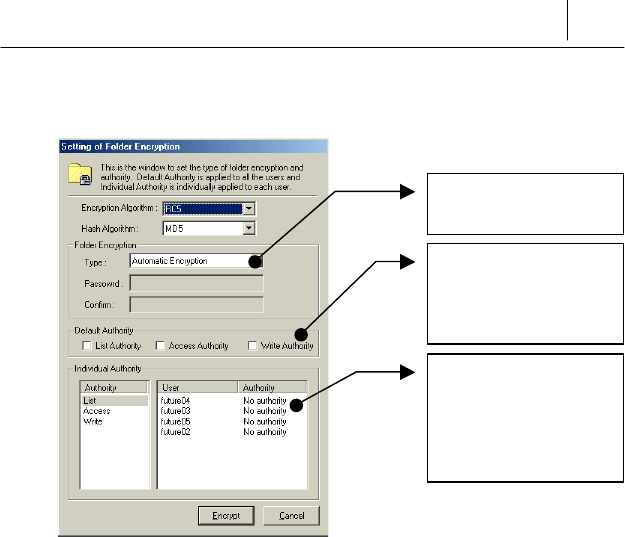
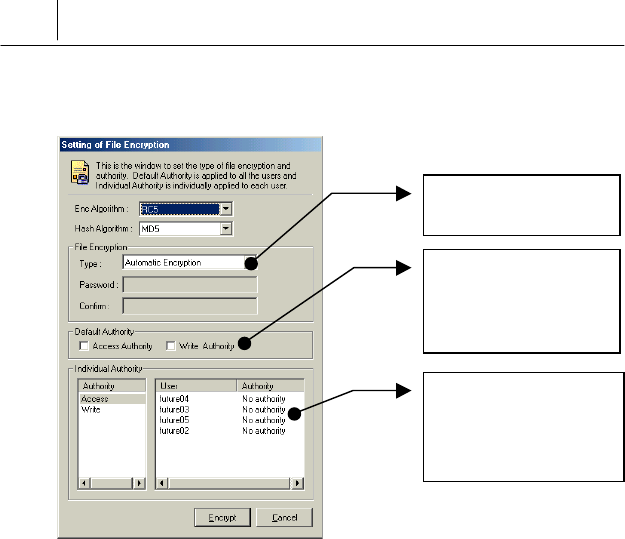
' Then the following screen to set the folder encryption is displayed.
If you click [Encrypt] button after setting each items, the folder is
encrypted. The feature and meaning of each item is like the following.
<Folder Encryption>
There are two ways to encrypt folder like the following.
AutoEncryption
If you select this option, you need not set the password differently each
time when encrypt or decrypt the folder. The security key allotted by
SecuwayCenter 2000 when you register online security is used
when encrypt or decrypt the folder as a default.
Select the encryption
type.
This option is to set the
access authority which
is allotted to all the
users commonl
y
.
This option is to set the
access authority which
is allotted to the
registered users
individually
2-10 Chapter 2
Setting the Security Functions
Password Method Encryption
If you select this option, you can set the password differently each time
when encrypt or decrypt the folder. If you select “Password Method
Encryption” on the <Type> of <Folder Encryption> item, <Password>
changes to blank space where you can input any password.
If you select “Password Method Encryption”, you should
remember the password. If you forget the password, you can’t
open the encrypted folder.
<Default Authority>
This option is to set the access authority which is allotted to all the users
commonly. For example, if you select “List Authority”, List Authority is
allotted to all the users who are listed on the “Users”.
<Individual Authority>
This option is to set the access authority which is allotted to the registered
users individually. Select the user you want to allot the authority and then
select the appropriate authority to him.
To copy the folder
For example, if you want to copy the encrypted folder A to the folder B,
allot the List and Access authority to the user who use the folder A and
allot the List and Write authority to the user who use the folder B.
2-11
! If you encrypt the folder, the folder icon is changed to .
! If you encrypt the folder, the files in the encrypted folder are
encrypted automatically. Unauthorized user who does not log
on the SecuwayCard 2000 Manager program with
permitted password can’t read the files on the encrypted folder.
But the extension of the file name and its icon is not changed.
! If there is any encrypted files on the folder, you can’t encrypt the
folder.
2-12 Chapter 2
Setting the Security Functions
To decrypt the folder
Folder decryption is to return the encrypted folder to the original one. The
way to decrypt the folder is like the following.
To decrypt the folder is nearly the same with the way to encrypt the folder.
# Run the Windows Explorer while you are login on the
SecuwayCard 2000 Manager program.
$ Select the folder you want to decrypt on the Windows Explorer and
then click the right button of the mouse. The submenu is displayed like
the following.
2-13
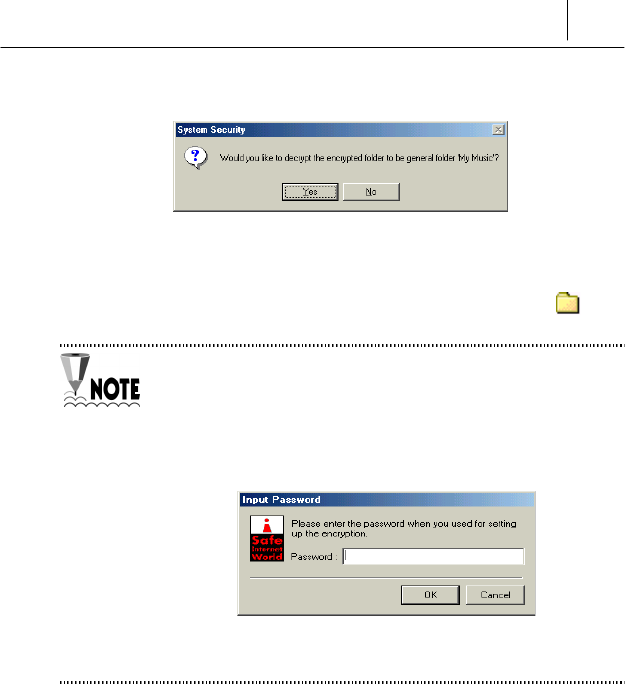
% Select <Folder Decryption>. Then the following message is displayed.
Click [Yes].
& Then the folder is decrypted and the folder icon is changed to .
If you select “Auto Encryption” on the <Folder Encryption> item of the
<Setting of Folder Encryption> screen, you need not enter any password
to decrypt the folder.
But you select “Password Method Encryption”, you should enter the
password correctly on the following message to decrypt the folder.
If you decrypt the folder, the files in the folder are decrypted
automatically.

2-14 Chapter 2
Setting the Security Functions
To encrypt or decrypt the file
This section describes the way to encrypt or decrypt the file.
! Encryption? : The transformation of data into a form
unreadable by anyone without a secret decryption key. Its
purpose is to ensure privacy by keeping the informationn
hidden from anyone for whom it is not intended.
! Decryption? : The transformation of data that is encrypted once
into a form readerble one again.
To encrypt the file
The way to encrypt the file is like the following.
# To encrypt the file, you should install the SecuwayCard 2000
hardware and software in advance. Please read the Part 1 of this
manual about the way to install SecuwayCard 2000 and check it
is normally operated on your computer.
$ Log on the SecuwayCard 2000 Manager program.
2-15
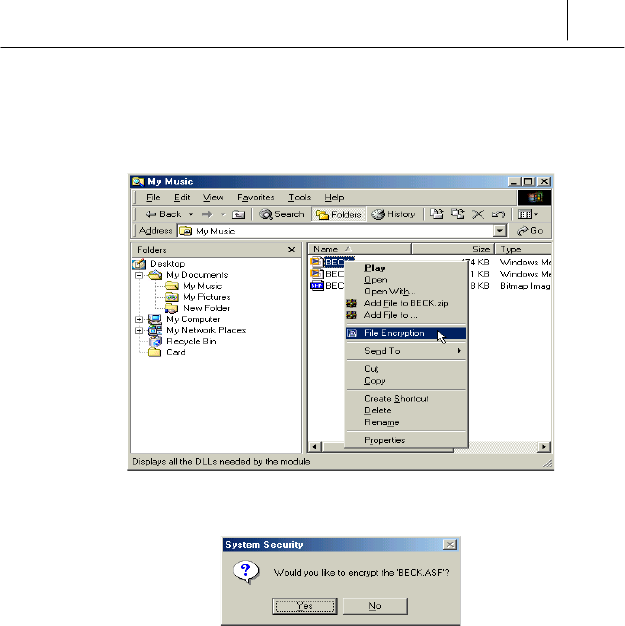
% Run the Windows Explorer. Select the file you want to encrypt on the
Windows Explorer and then click the right button of the mouse. The
submenu is displayed like the following.
& Select <File Encryption>. Then the following message is displayed.
Click [Yes].
2-16 Chapter 2
Setting the Security Functions
' Then the following message to encrypt the file is displayed.
If you click [Encrypt] button after setting each items, the file is encrypted.
The feature and meaning of each item is like the following.
<File Encryption>
There are two ways to encrypt file like the following.
AutoEncryption
If you select this option, you need not set the password differently each
time when encrypt or decrypt the file. The security key allotted by
SecuwayCenter 2000 when you register online security is used
when encrypt or decrypt file as a default.
Select the encryption
type.
This option is to set the
access authority which
is allotted to all the
users commonly.
This option is to set the
access authority which is
allotted to the registered
users individually.
2-17
Password Method Encryption
If you select this option, you can set the password differently each time
when encrypt or decrypt the file. If you select “Password Method
Encryption” on the <Type> of <File Encryption> item, <Password>
changes to blank space where you can input any password.
If you select “Password Method Encryption”, you should
remember the password. If you forget the password, you can’t
open the encrypted file.
<Default Authority>
This option is to set the access authority which is allotted to all the users
commonly. For example, if you select “List Authority”, List Authority is
allotted to all the users who are listed on the “Users”.
<Individual Authority>
This option is to set the access authority which is allotted to the registered
users individually. Select the user you want to allot the authority and then
select the appropriate authority to him.
2-18 Chapter 2
Setting the Security Functions
! If you encrypt the file, the file icon is changed to and the
extension “.fes” is attached to the file name. For example, if the
original file name is “BECK.ASF”, the encrypted file name is
“BECK.ASF.fes”.
! If the file is encrypted, only the authorized user who log on the
SecuwayCard 2000 Manager program with the permitted
password can read the file.
! If the folder in which you want to encrypt the file is already
encrypted, re-encryption process for the file can not be
executed.
2-19
To decrypt the file
File decryption is to return the encrypted file to the original one. The way
to decrypt the file is like the following.
To decrypt the file is nearly the same with the way to encrypt the file.
# Run the Windows Explorer while you are login on the
SecuwayCard 2000 Manager program.
$ Select the file you want to decrypt on the Windows Explorer and then
click the right button of the mouse. The submenu is displayed like the
following.
2-20 Chapter 2
Setting the Security Functions
% Select <File Decryption>. Then the following message is displayed.
Click [Yes].
& Then the file is decrypted and the file icon is return to the original one.
If you select “Auto Encryption” on the <File Encryption> item of the
<Setting of File Encryption> screen, you need not enter any password to
decrypt the file.
But you select “Password Method Encryption”, you should enter the
password correctly on the following message to decrypt the file.
If you decrypt the folder, the files in the folder are decrypted
automatically.
2-21
Confirm the access control of the unauthorized users.
If the unauthorized users who do not log on with permitted password try to
decrypt the file, the following error message is displayed and protect from
decrypting it.
If the unauthorized users, who do not log on with permitted password try
to copy, move and delete the encrypted file or folder, the error message is
displayed and protect from doing the process.
2-22 Chapter 2
Setting the Security Functions
To copy or delete the encrypted file or folder
This section describes the way to copy or delete the encrypted file or
folder.
To copy the encrypted file or folder
You cannot copy the encrypted file or folder with the same way of general
file or folder. The way to copy the encrypted file is the same with that of
encrypted folder. So, this section shows you the way to copy the encrypted
file as an example,
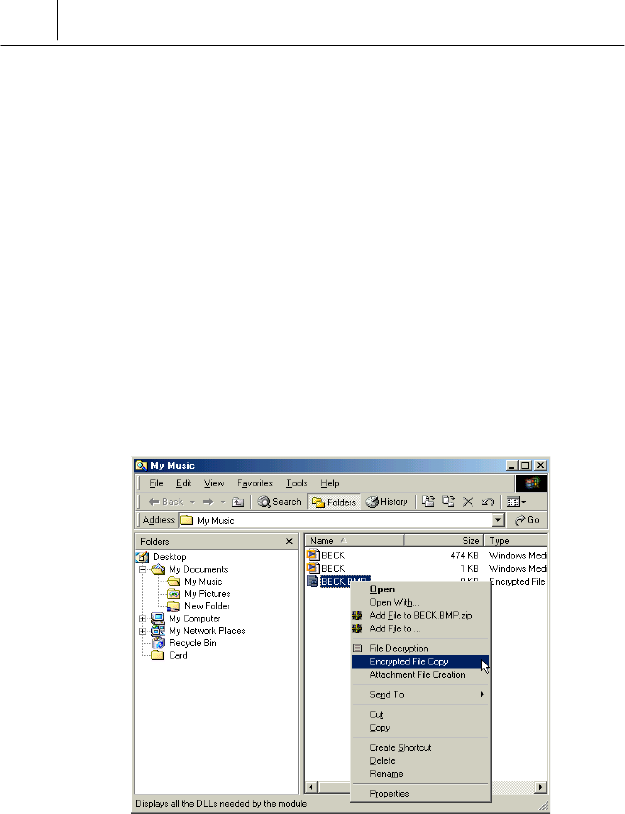
# Select the encrypted file you want to copy and click the right button of
the mouse. Then the following submenu is displayed.
2-23
$ Select <Encrypted File
Copy> Then the screen to
select the folder to be copied is
displayed.
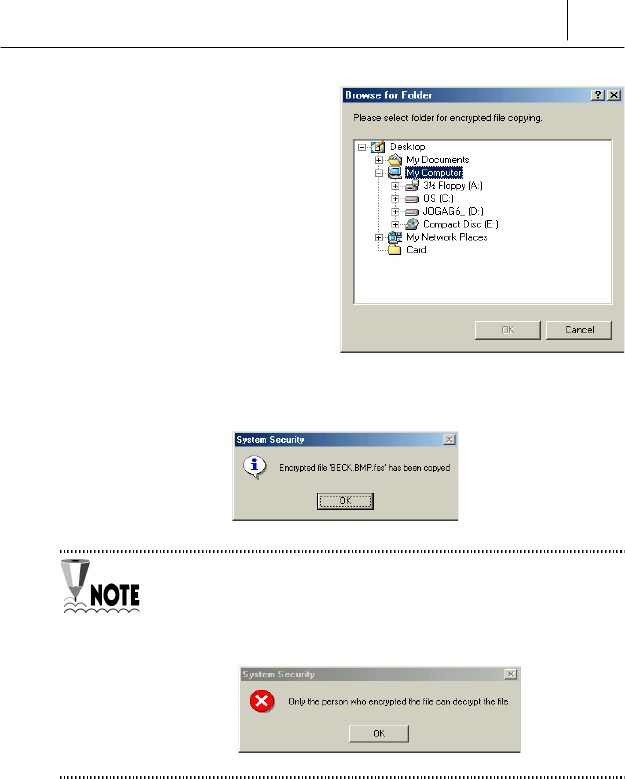
% Select the folder to be copied
and click [OK] button.
& Then the encrypted file is copying and the following message is
displayed after copying is completed.
If unauthorized user who do not log on the SecuwayCard
2000 Manager program with permitted password try to copy the
encrypted file, the following error message is displayed and
protect from copying.

2-24 Chapter 2
Setting the Security Functions
To delete the encrypted file or the file in the encrypted folder
This section tells you the way to delete the encrypted file or the file in the
encrypted folder.
To delete the encrypted file
There are 3 kinds of ways to delete the encrypted files.
! Using the [Delete] key
Press the [Delete] key on the keyboard after selecting the encrypted file
you want to delete. Then the <Confirm File Delete> window is displayed
with the message “Are you sure you want to send … to the Recycle Bin?”
If you click [Yes], the selected file is sent to the Recycle Bin. In this case,
you should run “Delete” command again after selecting the file on the
Recycle Bin to delete the file completely.
! Pressing the [Delete] key while pressing [Shift] key
Press the [Delete] key while pressing [Shift] key on the keyboard after
selecting the encrypted file you want to delete. Then <Confirm File
Delete> window is displayed with the message “Are you sure you want to
delete…?” If you click [Yes], the selected file is deleted completely.
! Using the <Delete> command of the <File> menu on the
Windows Explorer
Select <Delete> command of the <File> menu on the Windows Explorer
after selecting the encrypted file you want to delete. Then the <Confirm
File Delete> window is displayed with the message “Are you sure you
want to send … to the Recycle Bin?” If you click [Yes], the selected file is
sent to the Recycle Bin. In this case, you should run “Delete” command
again after selecting the file on the Recycle Bin to delete the file
completely.

2-25
To delete the encrypted folder or file in the encrypted folder
To delete the encrypted folder or file in the encrypted folder, press
[Delete] key while pressing [Shift] key on the keyboard after selecting the
file or folder you want to delete. The encrypted folder or file in the
encrypted folder cannot be deleted by [Delete] key only.
The following table shows you the way to delete the encrypted file,
encrypted folder, and the file in the encrypted folder.
Send to the
Recycle Bin
(Using the [Delete]
key)
Delete directly without
sending it to the Recycle Bin
(Using the[Shift]+ [Delete]
key)
Encrypted file O O
File in the
Encrypted folder X O
Encrypted folder X O
2-26 Chapter 2
Setting the Security Functions
Attachment File Creation
Attachment File Creation?
<Attachment File Creation> means the transformation process from
encrypted file to the one that can be sent via Email or other application
program. To run the Attachment File Creation, do the following steps.
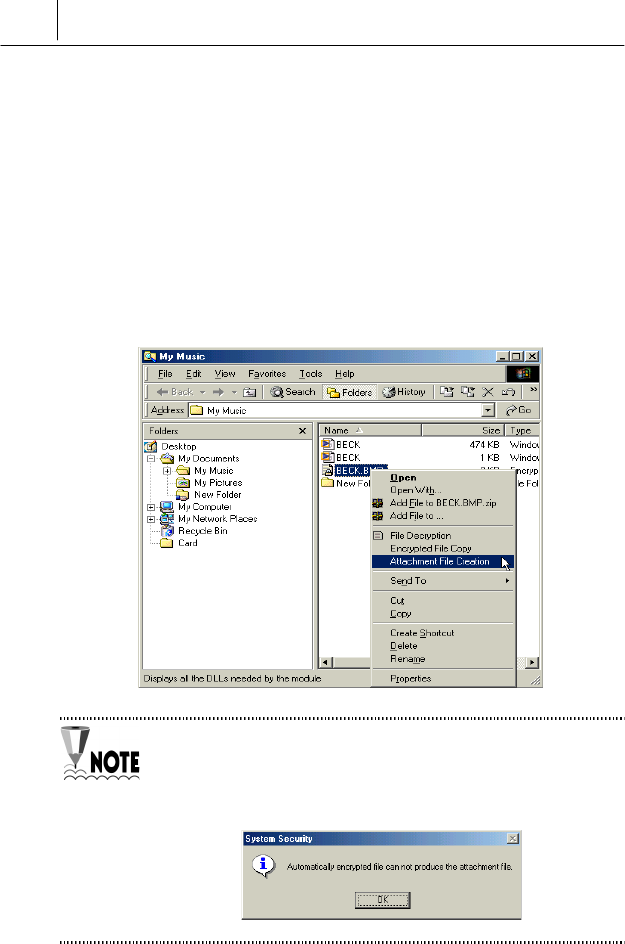
# Select the encrypted file you want to send via Email or other
Application program and click the right button of the mouse.
If you run
<Attachment File Creation>
while
selecting
“Auto
Encryption”
on
the
<File Encryption>
item
of
the
<Setting of File
Encryption>
screen
,
the
following
error
message
is
displayed
and
you
can
not
produce
the attachment file.
2-27
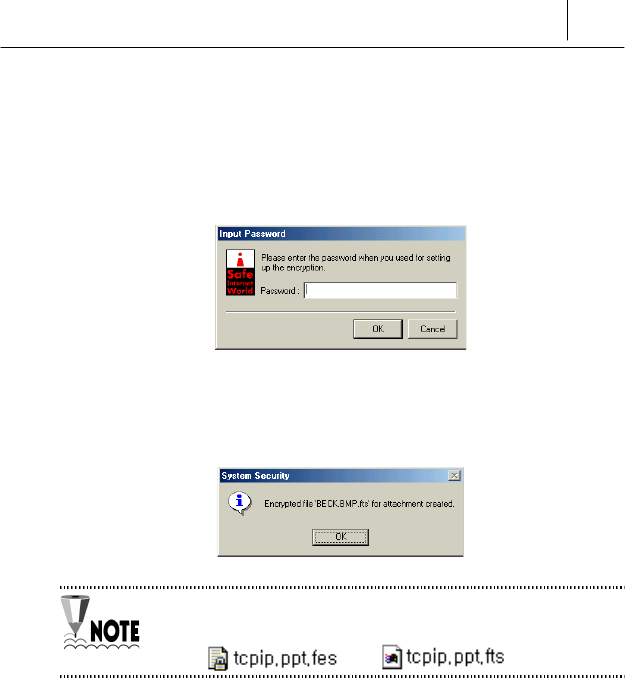
$ If you select “Password Method Encryption” on the <File
Encryption> item of the <Setting of File Encryption> screen, you can
run the <Attachment File Creation> command. In this case the
following message is displayed if you run the <Attachment File
Creation>.
% If you enter the correct password you set on the
<Setting of File
Encryption> screen
and [OK], the attachment file is created with the
following message.
If you run the “Attachment file creation “, the extension of the
encrypted file name is changed from “.fes” to “.fts”
Eg.> *
2-28 Chapter 2
Setting the Security Functions
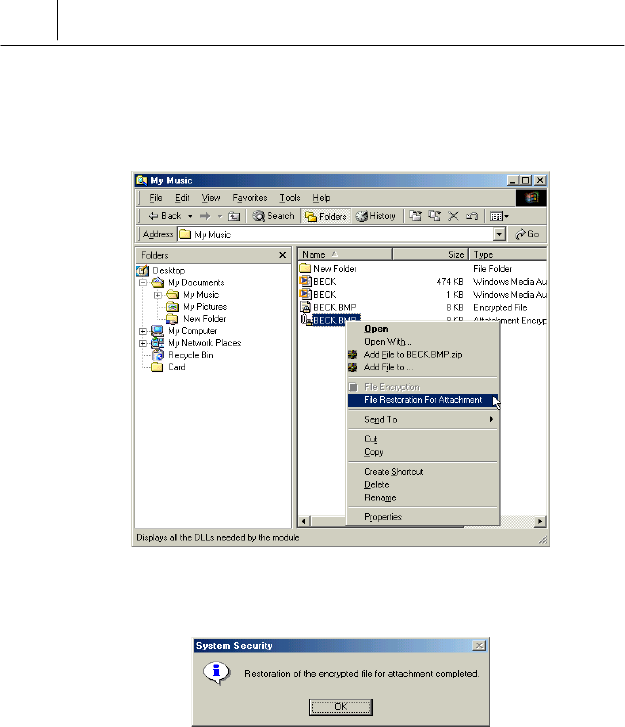
& The user who receive the file created using “Attachment file creation”
command select the file received and click the right button of the
mouse and then select the “File restoration for Attachment” command.
' If the following message is displayed, the restoration of the encrypted
file for attachment is completed.
2-29
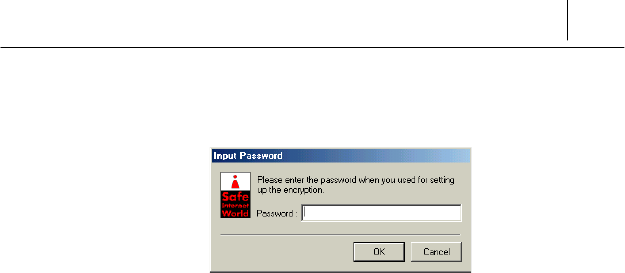
( Click [OK] and if click the restored file to open it, the following
message to enter the password is displayed.
At this time, you should enter the password you set when encrypt the
file for the first time. So, the user who sends the encrypted file should
give the password to the user who receives the file.
3-1
Chapter 3 SecuwayCard 2000
Manager Program Menu
This chapter shows you the way to use the several menus of the
SecuwayCard 2000 Manager program Menu.
Click the icon on the bottom of the Windows after logging on the
SecuwayCard 2000 Manager program and then the following
message is displayed
The functions available on the SecuwayCard 2000 Manager program
are like the following.
3-2 Chapter 3
SecuwayCard 2000 Manager Program Menu
Configurations
You can configure the necessary circumstances while using the
SecuwayCard 2000 Manager program like screen saver setting and
etc using the <Configurations> command of the <System> menu.
If you want to use the <Screen Saver> command of the
<System> menu, you should set to use the screen saver function
on the <Configurations> menu in advance. If you do not set to
use the screen saver function on the <Configurations> menu, the
<Screen Saver> command of the <System> menu cannot be
displayed selectable.
# Select the <System> menu and click <Configurations> command on
the SecuwayCard 2000 Manager program.
$ Then the <Configurations> screen is displayed.

3-3
<Screen Saver Setup> tab
There are 3 kinds of tabs on the <Configurations>. The features and
options of the first tab <Screen Saver Setup> are like the following.
<Screen Saver(S)>
The screen saver provides the locking function that prevent unauthorized
user from using the computer while the authorized user is leaving the
computer. If the authorized user does not operations (key input or mouse
action) for a limited time, the screen saver perceives that the user has left
the computer and executes the locking function.
- If you select “Screen Saver not used”
If you select “Screen Saver not used” among the options of the <Screen
Saver(S)> command, the Screen Saver function cannot be executed and is
displayed unavailable on the <System> menu.
- If you select the other options except “Screen Saver not used”
If you select the other options except “Screen Saver not used”, the Screen
Saver function can be executed and is displayed available on the
<System> menu.
You can select the screen image you want to display while the Screen
Saver function is running among the other options.
<Stand-by Time>
This item is not displayed if you select “Screen Saver not used” among the
options of the <Screen Saver(S)> command. This item is available to
select if you select the other options except “Screen Saver not used”. If
you do not any operations (key input or mouse action) in the time set at
the item, the Screen Saver function is executed. The time can be input by
the minute.

3-4 Chapter 3
SecuwayCard 2000 Manager Program Menu
<Settings>
This item is available to select if you can select the screen image you want
to display while the Screen Saver is running like the “Windows Logo”.
The Screen Saver function provided by the SecuwayCard
2000 is different from the one provided by the Windows Me.
And so it is executed independently of the one of Windows Me.
After completing to select the items on the <Screen Saver Setup>, click
[OK] button to save the settings.

3-5
<Center IP Set> tab
Let’s see the function of <Center IP Set> tab.
The features and available values of the <Center IP Set> tab are like the
following.
!" Pri Center IP : The IP address you set on the “Online Security
Registration” is displayed. If the IP address of the SecuwayCenter
is changed, input the changed IP address on this item.
!" Sec Center IP : In case that you install the second Center to backup
the system, input the IP address of the second center.
If the SecuwayCenter 2000 manager has set the Pri IP and
Second IP while doing “Online Security Registration” process, you
should receive the IP information from the SecuwayCenter
2000 manager.
3-6 Chapter 3
SecuwayCard 2000 Manager Program Menu
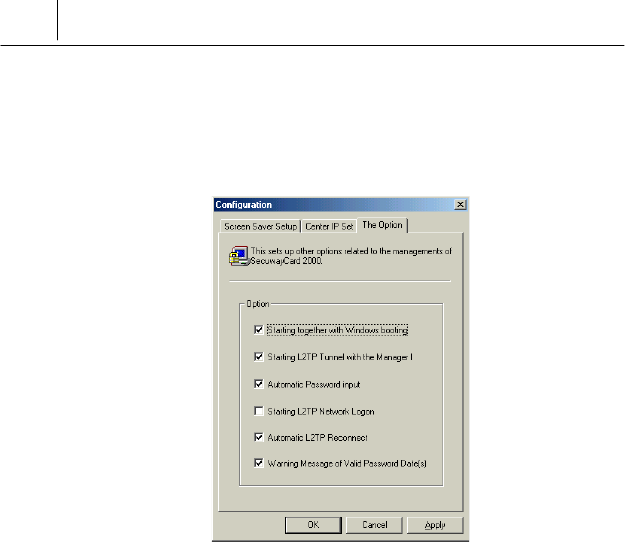
<The Option> tab
The items of <The Option> tab are useful for using the SecuwayCard
2000 Manager program.
The features of the items of <The Option> tab are like the following.
Starting together with Windows booting
If you select this item, the SecuwayCard 2000 program is executed
automatically when the Windows program is booting. If you don’t select
this item, you should execute the SecuwayCard 2000 program
whenever you need after the Windows program is booting.
Starting L2TP Tunnel with the Manager
If you select this item, the L2TP tunnel is created automatically when the
SecuwayCard 2000 Manager program is started. If your
circumstances use the L2TP, you’d better select this item. But if your
circumstance does not use L2TP, do not select this item.

3-7
Automatic Password input
If you don’t select this item, you should input the password whenever you
log on the SecuwayCard 2000. If you select this item, you don’t need
input the password whenever you log on and the SecuwayCard 2000
is directly running because the password is input automatically.
Starting L2TP Network Logon
If you select this item, the dialog box is displayed to log on the network
when the server is created the tunnel and located to connect.
Automatic L2TP Reconnect
This item allows restarting the tunnel automatically if the tunnel is
disconnected due to the network error or the SecuwayGate 2000
system error.
Warning Message of Valid Password Date(s)
If the SecuwayCard 2000 manager set to change the password in the
designated date and select this item, the message like that you should
change the password is sent to the SecuwayCard 2000 user.

3-8 Chapter 3
SecuwayCard 2000 Manager Program Menu
Screen Saver
The screen saver provides the locking function that prevent unauthorized
user from using the computer while the authorized user is leaving the
computer. If the authorized user does not operations (key input or mouse
action) for a limited time, the screen saver perceives that the user has left
the computer and executes the locking function.
If you want to use the <Screen Saver> command of the
<System> menu, you should set to use the screen saver function
on the <Configurations> menu in advance.
If the SecuwayCard 2000 user does not enter any key or
mouse action in the designated time, the screen saver is
executed.
If you do not set to use the screen saver function on the
<Configurations> menu, the <Screen Saver> command of the
<System> menu cannot be displayed selectable. For the detailed
information about the way to set the screen saver function, see
the description of the command “Configurations” on this manual.

3-9
To stop the Screen Saver
If you use the SecuwayCard 2000 manager program while the
screen saver is running, press any key or move the mouse.
Then the screen to input the user ID and password is displayed.
If you don’t input the same password with the one you use to log on the
SecuwayCard 2000, you can’t stop the screen saver and use the
SecuwayCard 2000 Manager program. With this way the screen
saver provides the locking function that prevent unauthorized user from
using the computer while the authorized user is leaving the computer.
The 4 kinds of cases for executing the screen saver
The screen saver is executed for 4 kinds of the cases like the following.
! When you log off the SecuwayCard 2000 Manager
program
If the screen saver is executed when you log off the SecuwayCard
2000 Manager program, you should input the user ID and password to
log on again.
! When you execute the <Screen Saver> command on the
<System> menu
If the screen saver is executed because you execute the<Screen
Saver> command on the <System> menu, you should input the
password to exit the screen saver function.

3-10 Chapter 3
SecuwayCard 2000 Manager Program Menu
! When you remove the SecuwayCard 2000 in the PCMCIA
slot
The screen saver is executed if you remove the SecuwayCard
2000 hardware in the PCMCIA slot while using the SecuwayCard
2000 system. In this case, reinsert the SecuwayCard 2000
hardware in the slot and input the user ID and password on the dialog
box of the screen and then you can use the system again.
! When the designated time of the screen saver is passed
When the designated time set on the <Stand-by time> item of the
<Screen Saver> command is passed, the screen saver is executed
automatically. If you exit the screen saver mode, move the mouse and
input the password on the dialog box of the screen.
If the screen saver is executed when you log off the
SecuwayCard 2000 Manager program, the TCP/IP network
is disconnected. In this case the program which is communicating
is diconnected. But if the screen saver is executed because you
execute the <Screen Saver> command on the <System> menu,
the encryption process using TCP/IP is still available.
3-11
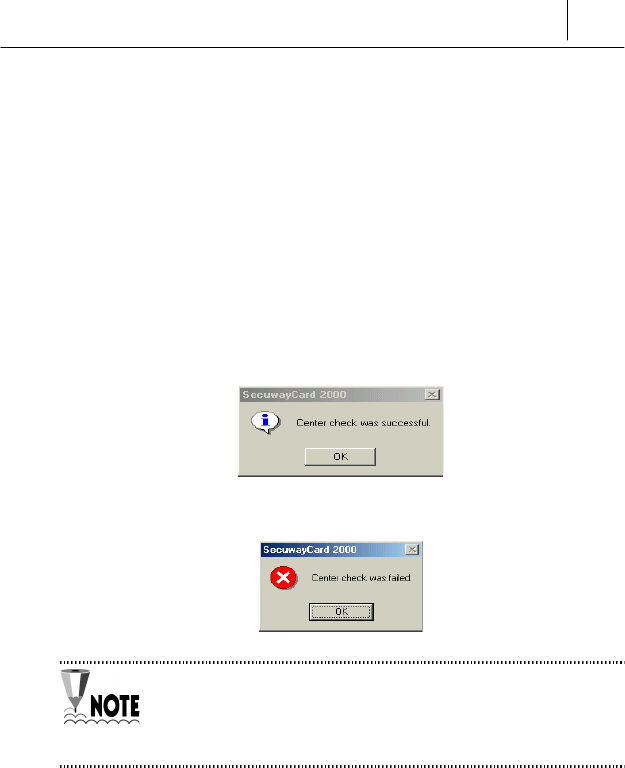
Center Check
<Center Check> command is used to confirm the connection status
between the SecuwayCard 2000 Manager program and the
SecuwayCenter.
You can also use the <Center Check> command when you can’t connect
with the host through security communication or see the security policy
even though you did online security registration.
If the connection status is normal, the following message is displayed.
If the connection status is not normal, the following message is displayed.
If the connection status is not normal, you can’t do the security
communication and receive the security policy normally from the
SecuwayCenter 2000. In this case, check if the status of the
online security registration.

3-12 Chapter 3
SecuwayCard 2000 Manager Program Menu
Auto Upgrade FTP Server
<Setting Auto Upgrade FTP Server> command is to set the server for
sending the upgrade file automatically whenever the SecuwayCard
2000 Manager program is upgraded.
If you want to use the <Setting Auto Upgrade FTP Server>, you
should set the FTP server in advance. You can download the FTP
server program free from the web site. For more detailed
information of setting the FTP server, see the online help or
printed manual provided with the FTP server program.
Input the FTP server name on the “Server” item and press [OK] button.
Then the setting the auto upgrade server is completed.

3-13
Setting System Security Default Value
<Setting System Security Default Value> command shows the same
screen with the one you can see when you log on the SecuwayCard
2000 Manager program for the first time after installing it.
If you click the <Setting System Security Default Value> command, the
message to request the password is displayed. If you input the password
correctly, the <Setting System Security Default Value> screen is
displayed.
For detailed information of the <Setting System Security Default
Value> screen, see the Part 2, Chapter 2 : Setting the Security
functions of this manual.
Hide
If you want to hide the SecuwayCard 2000 Manger program on the
screen, use the <Hide> command. Click the icon bottom left of the
Windows to show the SecuwayCard 2000 Manger program on the
screen again.
4-1
Chapter 4 Features of the Icons on the
SecuwayCard 2000
Manager Program
This chapter introduce you the features and utilization method of the icons
on the SecuwayCard 2000 Manger program.
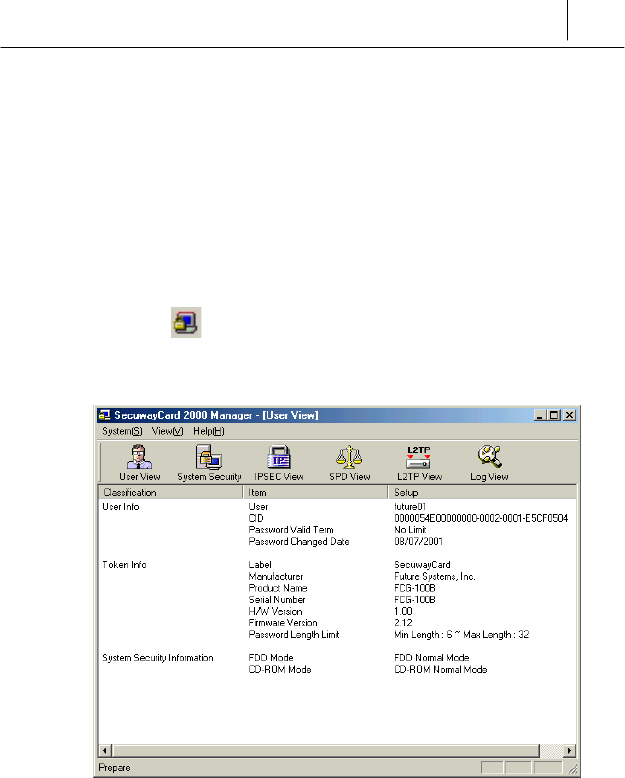
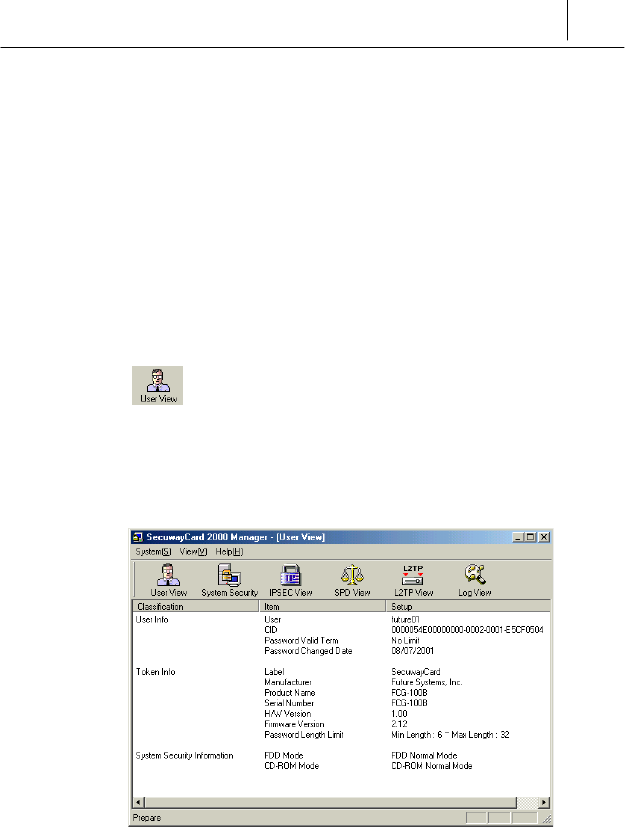
User View
The first screen when you execute the SecuwayCard 2000 Manager
program shows the SecuwayCard 2000 user information. This is the
executing result of the User View icon which is on the left most of the
SecuwayCard 2000 Manager program icon group.
The features of each items on the <User View> screen is like the
following.

4-2 Chapter 4
Features of the Icons on the SecuwayCard 2000Manager Program
<User Info>
User
This item shows the user ID who is currently logging on the
SecuwayCard 2000 Manager program. Over the one user can log on
the system in which the SecuwayCard 2000 is installed using their
own ID. With this item, you can check the user ID who is currently logging
on.
CID
This item is the discrimination of the SecuwaySuite 2000 users.
Each users have their own CID uniquely. So, CID is used as the
discrimination mainly rather than IP because IP is more changeable than
CID. Under the PPP or ADSL environment, CID is used for user
authentication or security communication.
Password valid term
Password valid term is set by the SecuwayCenter 2000 Manager.
Password Changed Date
The date when the password has changed recently is displayed.
<Token Info>
The information that the SecuwayCenter 2000 Manager sends to the
SecuwayCard 2000 user is displayed. This information is received
when the SecuwayCard 2000 is installed and does the online
security registration.

4-3
<System Security Information>
FDD Mode
This is to encrypt the data on the FDD. The mode set by the
SecuwayCenter 2000 is displayed on this item.
CD-ROM Mode
This is to encrypt the data on the CD-ROM. The mode set by the
SecuwayCenter 2000 is displayed on this item.
All the items on the <User Info>, <Token Info>, and <System
Security Information> are set by the SecuwayCenter 2000.
So all the values on each items can not be changed and removed
by the SecuwayCard 2000 Manager on his own authority.
4-4 Chapter 4
Features of the Icons on the SecuwayCard 2000Manager Program
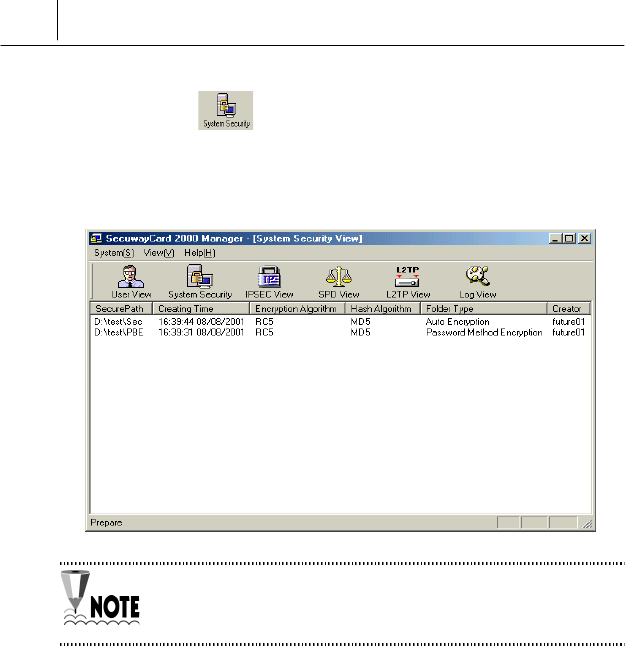
System Security
If you click the Second icon from the leftmost on the SecuwayCard
2000 Manager program icon group, the information of the encrypted
folders is displayed.
For more information of the way to encrypt the folder, see the
description “Chapter 2 : Setting the Security functions” on this
manual.
4-5
IPSEC(IP Layer Security Protocol) View
IPSEC icon shows the security information received from the
SecuwayCenter 2000, key token used for communication, the
password used for security of the communication information between two
hosts, Authentication Algorithm, SA (Security Association) information,
and etc.
IPSEC information is the security information that the
SecuwayCenter 2000 Manager send to the
SecuwayCard 2000 user. This information can not be
changed by the SecuwayCard 2000 Manager.
<View Key token> and <View SA1> are created while communicating,
displayed when selecting each of them, and removed when rebooting the
system or logging off the SecuwayCard 2000 Manager program.
The SecuwayCard 2000 Manager program user can remove the
<View Key token> and <View SA1> directly.

4-6 Chapter 4
Features of the Icons on the SecuwayCard 2000Manager Program
If you click the IPSEC Information icon, the Host Properties, Master key
Information, the SecuwayCenter 2000 information, and the
Message Protection information are displayed.
All the information displayed by the IPSEC is the security
information that the SecuwayCenter 2000 Manager send to
the SecuwayCard 2000 user. This information can not be
changed by the SecuwayCard 2000 Manager.
The features of each item are like the following.
Host Properties
This item shows the available range of the IP address. Within the range of
the IP address, the IP currently used by the SecuwayCard 2000 user
is existed.
Masterkey Information
This item is the Master key information created and sent by the
SecuwayCenter 2000 and necessary for encryption and
authentication. After the available period, the system tries to communicate
with the SecuwayCenter 2000, received the new master key
information, and operates normally.
4-7
SecuwayCenter
Center ID and IP address are received from the SecuwayCenter
2000 while the online security registration. The Management Ports are
for communication with the SecuwayCenter 2000 and displayed as
the UDP(User Diagram Protocol) number.
Message Protection
This item shows the Authentication Algorithm and Encryption Algorithm
to secure the message used for communicating between the
SecuwayCenter 2000 and the SecuwayCard 2000. The
SecuwayCenter 2000 Manager also sets this information and so the
SecuwayCard 2000 Manager can’t change on his own authority.
Keytoken is used commonly for the user authentication and security
communication. Keytoken is created automatically after received from the
SecuwayCenter 2000 when the users try to communicate.
To communicate normally, you should do the user authentication
using the Keytoken information before starting to communicate If
the user does not received authentication normally from the
SecuwayCenter 2000, the keytoken can not be created and
the communication can not be done normally.
4-8 Chapter 4
Features of the Icons on the SecuwayCard 2000Manager Program
The Keytoken can be deleted by the user and be recreated if the user tries
to communicate. Although the Keytoken is deleted while communicating,
it can be created if you try to communicate again and so you can do the
user authentication and security communication without giving any
interruption to the communication status.
Q: If the keytoken is not created when the user try to do the
security communication or authentication although the user is
authenticated normally on the SecuwayCenter2000, it
means the status is not available to communicate normally.
A: In this case, check the connection status with the
SecuwayCenter 2000 and ask the system manager if
the SecuwayCenter 2000 is set to prohibit the service to
the SecuwayCard 2000 user.
SA (Security Association) means the password, authentication mechanism
key shared for security of the hosts communicated with each other. This
information is displayed while sending and receiving the information
to/from the connected host after receiving the Keytoken from the
SecuwayCenter 2000.
SA Information is displayed only when the Keytoken is received.
SA information is not the item set by the SecuwayCard 2000
Manager program user separately but created automatically when
connecting with the opposite side who can communicate with.
The SA information can be recreated although SA has been removed while
using it. The communication with the opposite is proceed with 2 steps,
SA1 and SA2, and displayed with these steps.
4-9
If the communication status is normal, the Keytoken, SA1 and SA2 are
created. If the “Send” and “Receive” on the <View SA> item are created
like the following, the security communication is completed.
4-10 Chapter 4
Features of the Icons on the SecuwayCard 2000Manager Program
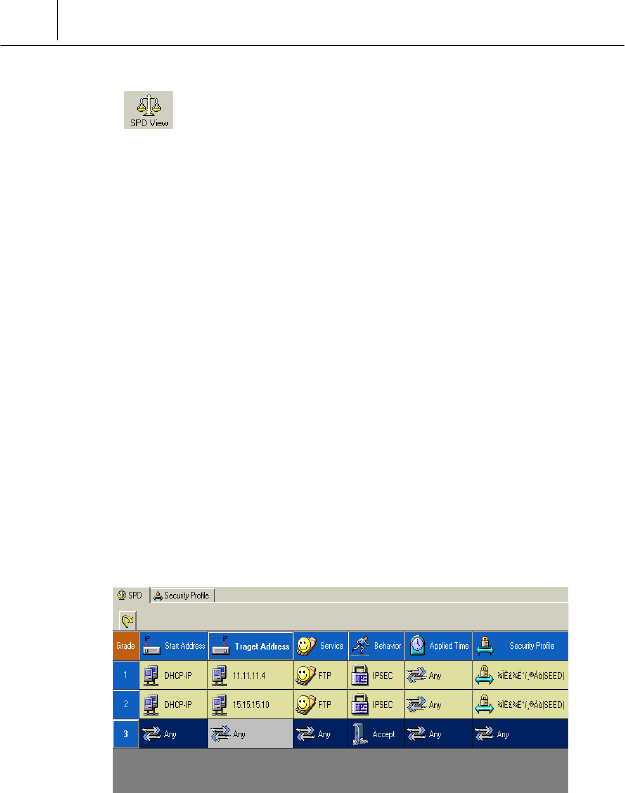
SPD View
This icon shows the security profile that set with which password
algorithm and authentication algorithm for the security policy related with
the way to manage the IP packet sent and received and the packet defined
by the security policy.
The security policy is used for doing the user authentication and packet
filtering and sent by the SecuwayCenter 2000 manager to the
SecuwayCard 2000 Manger program via online after setting fitted
for the network environment.
Security Policy?
The security policy is a kind of database that saves the policy related with
the way to manage the IP packet sent and received. The security policy
consists of the several kinds of rules that have the priority. The security
policy checks the rules from the 1st priority by the order and concludes
how manage the packets.
In other words, security policy is a set of filtering rules that govern packet
exchange. All packets are filtered according to these rules. Packets, which
don’t meet a rule’s conditions, are not forwarded to the destination and are
discarded.
4-11
Because of the hierarchical structure, the rule No. 1 is applied first to
examine a packet. If the rule No. 1 is not relevant to the examined packet,
the following rules are applied, and so on until a relevant rule is found. If a
relevant rule is not found, the examined packet is dropped.
SecuwayCard2000 automatically receives security policies
from the SecuwayCenter 2000 upon logging. In the case
there are changes to the security policy, the SecuwayCenter
2000 also sends to the SecuwayCard 2000 necessary
updates.
SecuwayCard 2000 applies the security policy received from the
SecuwayCenter 2000. Therefore, if SecuwayCenter 2000
administrator restricts SecuwayCard 2000 users the access to a
certain server or network, you will not be able to access the prohibited
resource.
If you cannot access to a server or a network, check security policy and
contact SecuwayCenter 2000 administrator, if necessary.
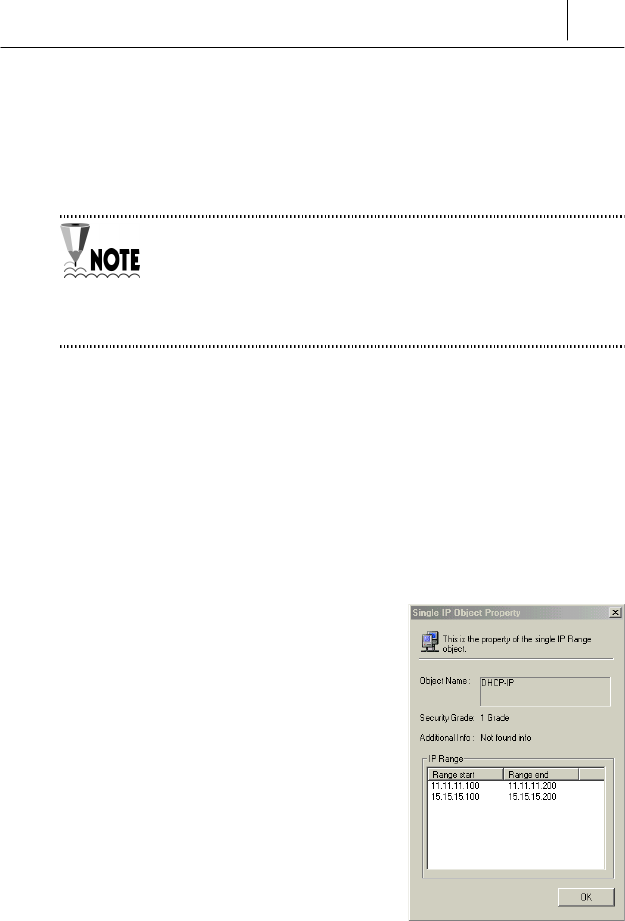
Security Policy Object
SecuwayCard 2000 administrator
cannot modify or delete a security policy.
You can view the security policy objects in
the Security Policy window. Double-click on
the object to see details.
If you cannot connect to a server or
network, view the security policy object and
find out relevant rules, as shown in the
right screen.
4-12 Chapter 4
Features of the Icons on the SecuwayCard 2000Manager Program
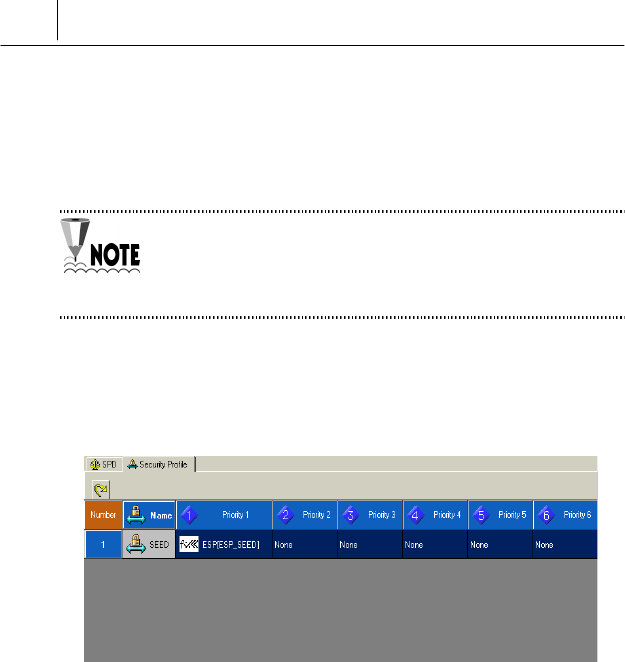
Security Profiles
To process packets, security profiles specify encryption and authentication
algorithms according to the security policy settings.
Security profiles as well as security policy are managed
SecuwayCenter 2000 administrator.
Therefore, SecuwayCard 2000 users are not allowed to
modify security profiles. But they can view profile details.
If security policy governs packet transmission, security profiles become
unnecessary. Security profiles are applied when IPSec is enabled. In other
words, security profiles are not activated when filtering rules are in force,
and IPSec is not used.
Each security rule can accommodate up to 5 profiles priorities from 1 to 5.
A security profile incorporates sub-rules, which are assigned sequence
numbers starting from 1. If no security profiles are relevant to the
communicating hosts, the connection to the hosts is disabled. On the other
hand, if there is a relevant security profile, you can communicate to such
host.
4-13
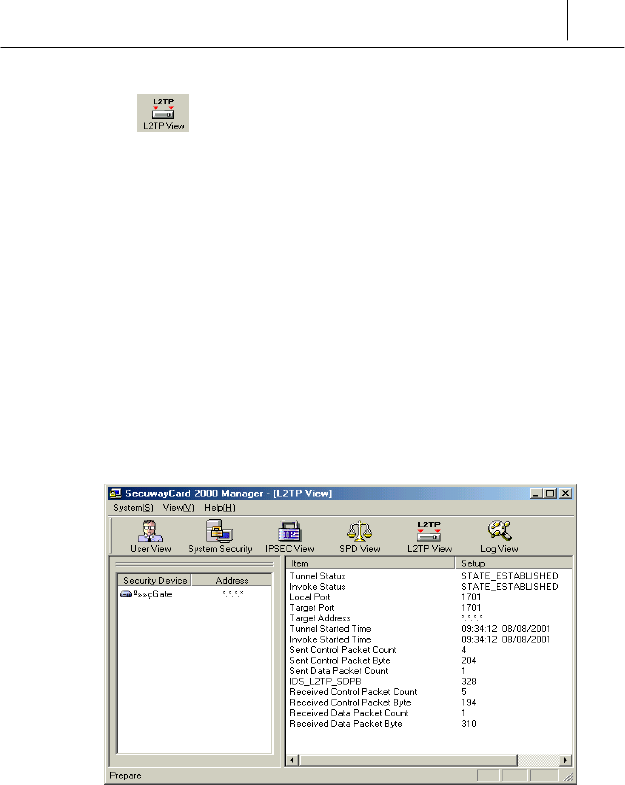
L2TP View
L2TP provides a tunnel for authenticated dial-up, ADSL and cable modem
users (with dynamic IP address). The tunnel allows remote users a safe
access to the intranet servers.
L2TP(Layer 2 Tunneling Protocol)?
L2TP is a two-way tunneling protocol that encapsulates the PPP frame
with a header and transmits them over Internet, X.25, Frame Relay or
ATM in IP networks through UDP port 1701. IPSec is used for data
encryption and VPN (Virtual Private Network) functions for users
authentication.
If you click the L2TP icon, the following information is displayed.
The current screen is the status that the L2TP communication is started.
If the L2TP communication is started, several kinds of the tunnel
information are displayed on the right of the screen. If you want to exit the
L2TP communication, select “xxxx Gate” on the right of the screen and
then click the right button of the mouse.
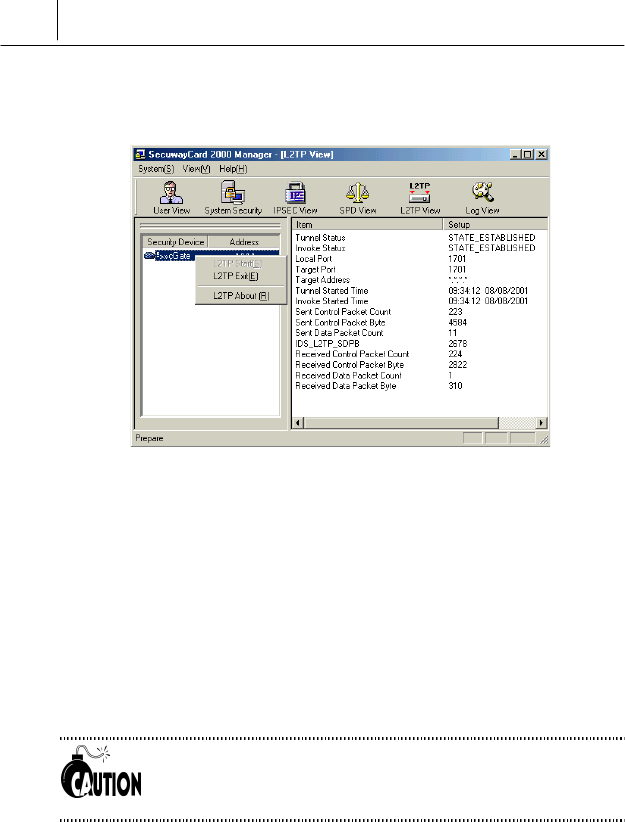
4-14 Chapter 4
Features of the Icons on the SecuwayCard 2000Manager Program
Then the submenu which contains the <LT2P Start> and <L2TP Exit>
command is displayed.
Select < L2TP Start> to display the L2TP box where you can supply the
necessary information for tunneling. To disable tunneling, select <L2TP
Exit>. Then the tunneling information will be deleted and L2TP disable.
Once you create a tunnel, it remains active until you quit the program.
There is no need to create a tunnel or disable tunneling while the program
is running.
If the SecuwayGate 2000 is restarted when SecuwayCard
2000 is running, tunneling becomes disabled. To restore tunneling, you
have to create a tunnel again.
In order to configure L2TP at SecuwayCard 2000,
SecuwayGate 2000 must be prepared for working with
L2TP.
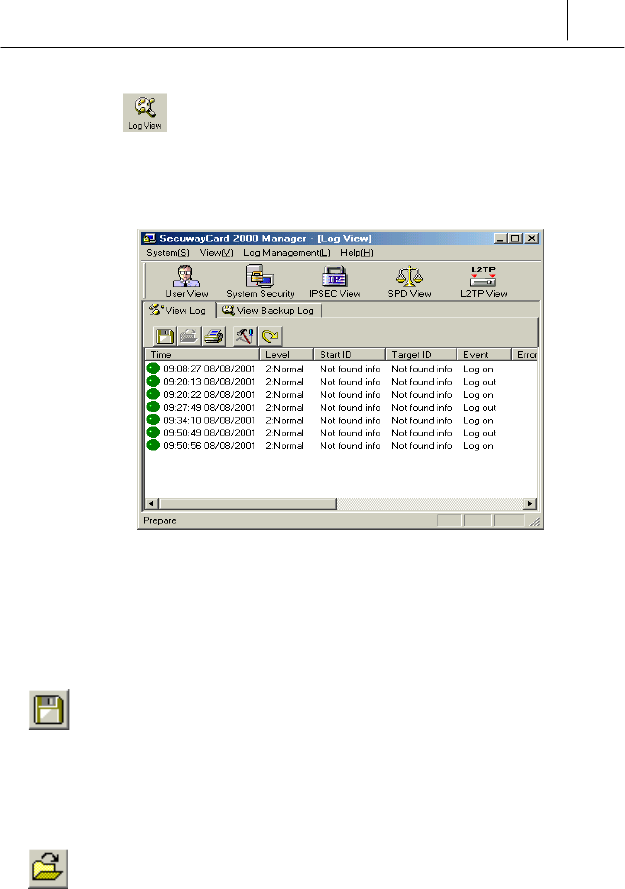
4-15
Log View
The Logs window enables you to view log records so you can inspect them
and trace users’ activity. This can help you detect security breaches and
locate errors, as well as estimate overall system operation.
The Logs window provides such information as the logging period, user ID,
user activity data and error causes.
The figure below shows an example of Logs window.
Log save
You can save logs into a file. When you save logs, logs taken out by the log
tab menu of the token are deleted, instead they are saved as files named
after the date they are created.
Log view
To view the saved logs select View Backup Log tab and click this icon. If
you click the icon, the following message is displayed.

4-16 Chapter 4
Features of the Icons on the SecuwayCard 2000Manager Program
Select the log file you want to open and [Open] button and then the log file
is displayed on the <View Backup Log> screen.
Log Print
This icon is used to print the log file displayed on the current screen.
Before printing it, check if the printer is connect to the computer you are
using.
Log Management
This icon is to set the log backup cycle. If you click this icon, the following
message to set the log backup cycle is displayed.
Select the log backup cycle you want and click [OK].