Fuzhou Emax Electronic W1 Wi-Fi Weather Station with Clock User Manual W1 Manual TX07
Fuzhou Emax Electronic Co., Ltd. Wi-Fi Weather Station with Clock W1 Manual TX07
UserManual.wiki
>
Fuzhou Emax Electronic
>
W1 User Manual
User manual
Navigation menu
Upload a User Manual
Namespaces
Wiki Guide
HTML
PDF
Info
Views
User Manual
Discussion / Help
Navigation
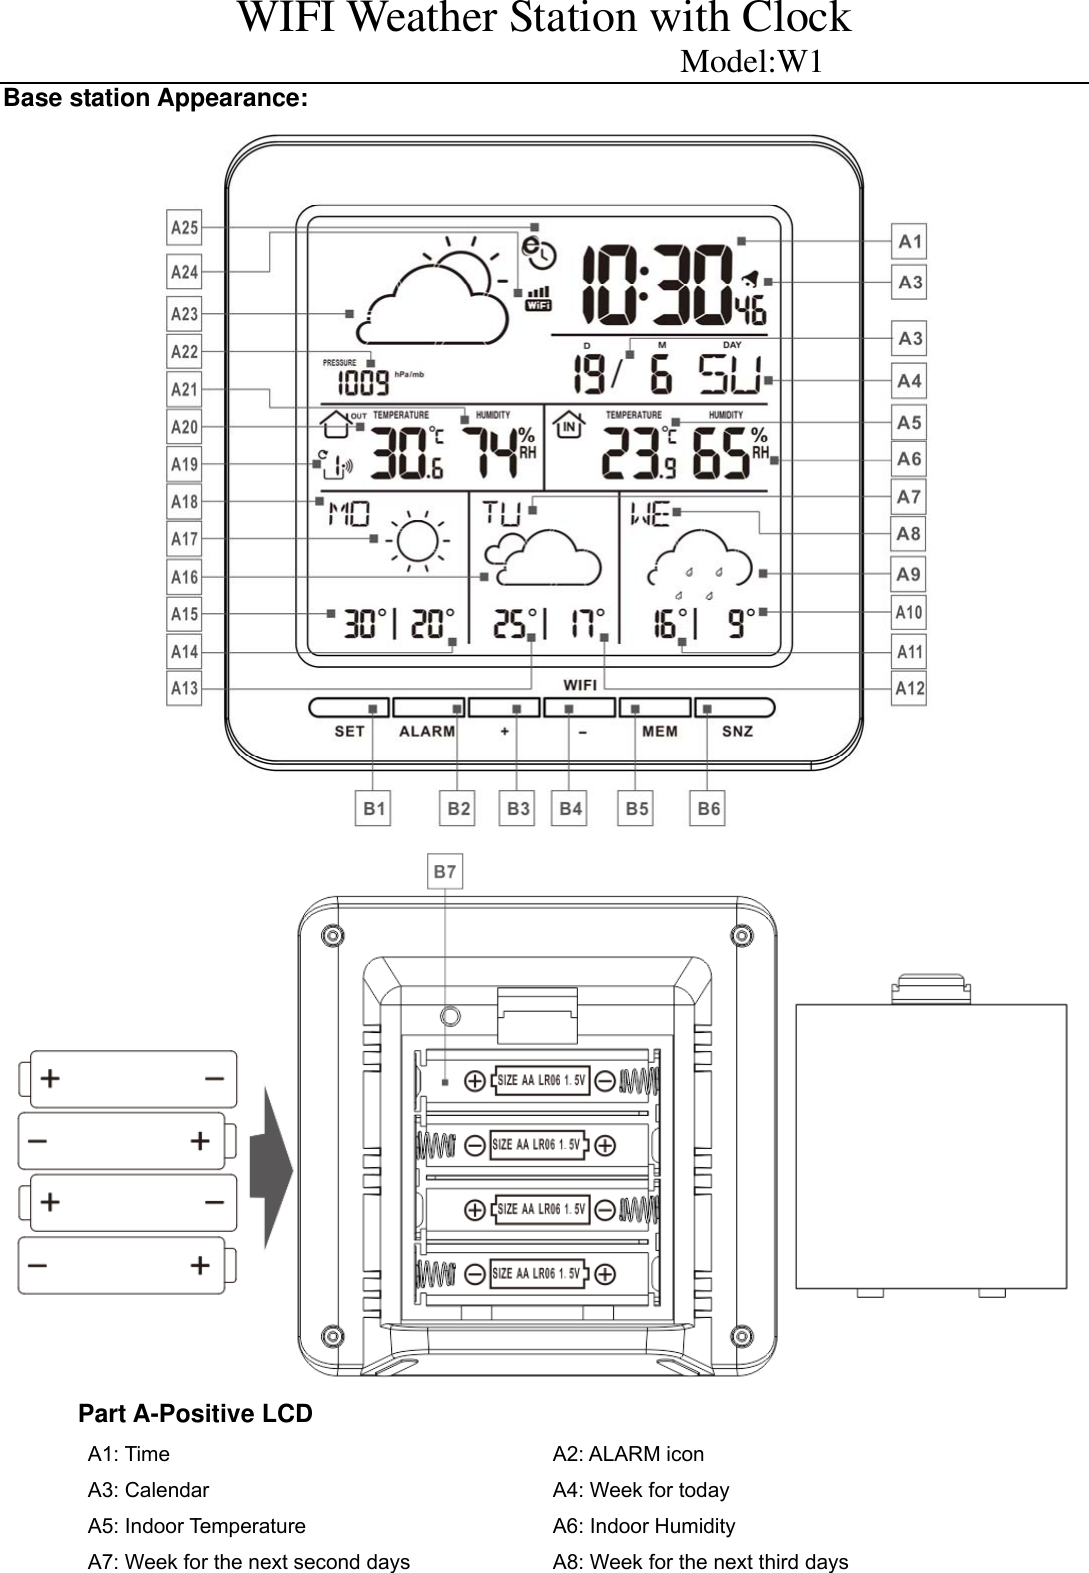
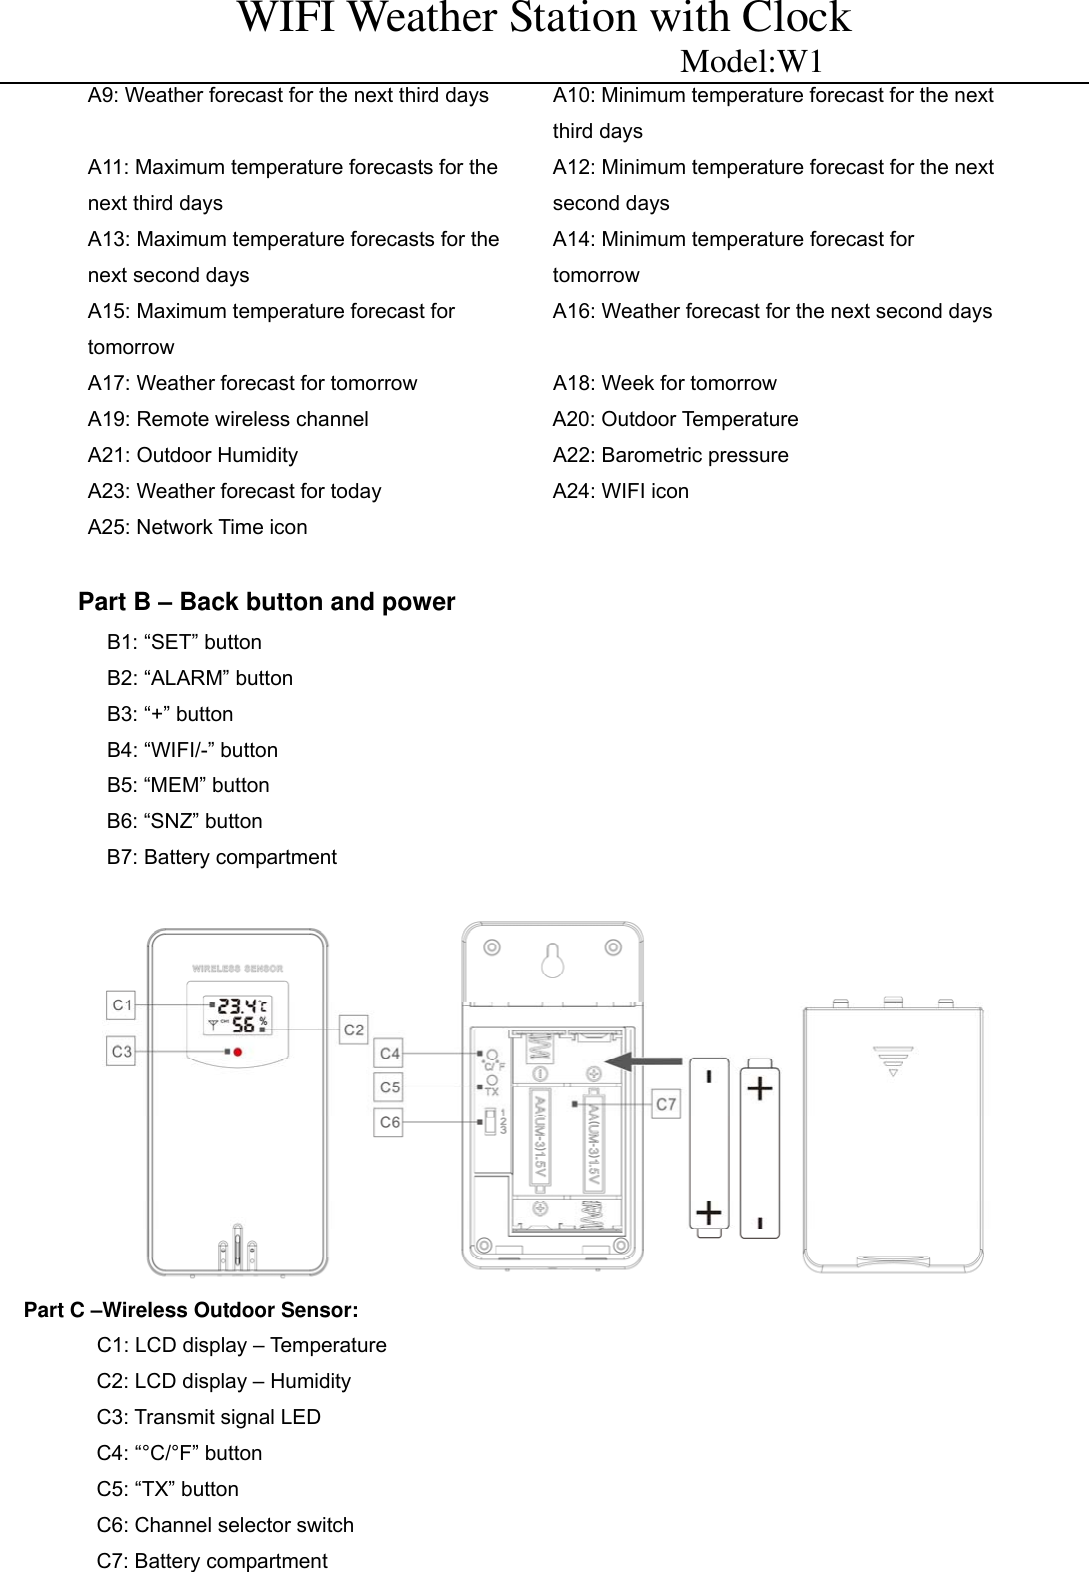
![W1 Manual Initial operation: Replace Wireless Outdoor Sensor battery compartment cover ,Push the Channel selector switch in the battery compartment of the Wireless Outdoor Sensor, set the correct channel ,Insert 2 x AA batteries observing polarity [ “+” and “–“ marks] When you insert the batteries, all the icon on the LCD display will briefly light up for 3 seconds, the Wireless Outdoor Sensor began to switch to the normal working mode, to detect the temperature and humidity in the environment .At this time, the sensor will transmit 1 wireless signals, and the interval of about 1 minutes will automatically transmit the 1 wireless signal, each transmitted 1 wireless signal emission sensor indicator will flash 1 times. APP software for installing base station: DOWNLOAD APP: Hardware Requirements: iPhone 4s (or above) enabled smart device Software Requirements iOS 7 (or above) or Android 4.3 (or above) Download APP (Weather Sense) Download IOS APP application software URL: https://itunes.apple.com/cn/app/weathersense/id1273633929?mt=8 Download Android APP application software URL: https://play.google.com/store/apps/details?id=com.emax.weahter User registration: After downloading the APP, open APP, the program will jump out of a registration interface, according to the registration shown below, after registration is completed, enter the mailbox for account activation](https://usermanual.wiki/Fuzhou-Emax-Electronic/W1/User-Guide-3824627-Page-4.png)
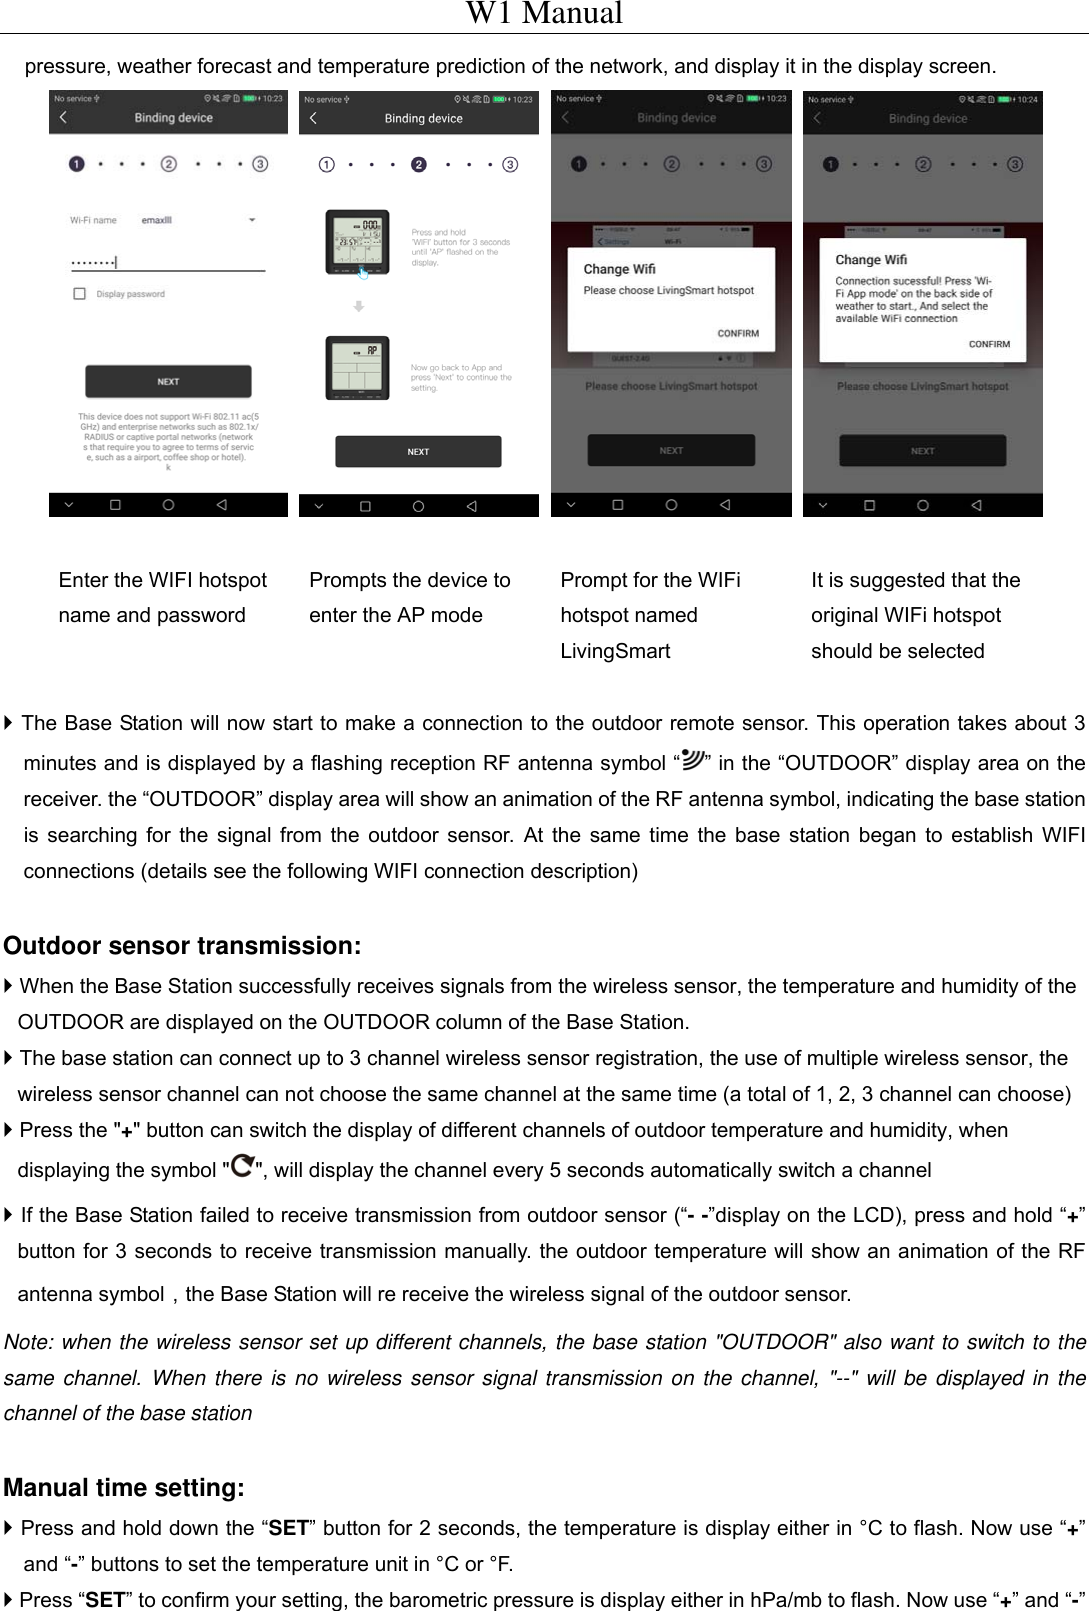
![W1 Manual AccountlogininterfaceAccountregistrationinterfacePromptmailboxaccountactivation Base station with APP bonding After registration and activation, login in the login interface, APP display will jump to the base station interface, please according to the environmental needs, choose the need to connect with the base station router name, and enter WIFI login password, jump the next interface according to NEXT Appearance hint based on base station Icon,Open the battery compartment cover of base station,Insert 4 x AA batteries observing polarity [ “+” and “–“ marks],After you pass on the power supply, all the symbols on the display screen will be displayed after about 3 seconds,If the base station is used for the first time, the base station will automatically enter the AP mode, and the display will display AP.If not for the first time use, the base station began to switch to the normal working mode, to detect the temperature, and humidity in the environment .At the same time, because the WIFI is not set up, the network weather forecast information can not be obtained, and the air pressure, weather forecast and temperature prediction have no content display. In this case, when the “WIFI” button is held down for more than 3 seconds, the base station will automatically enter the AP mode. After confirming the base station enters the AP mode, click "NEXT" on the APP interface, And according to the prompt click the prompt box, will automatically jump to the system's WI-FI settings, select the WI-FI hot spot "LivingSmart" and confirm the completion of the connection. Click the "<Weathersen..." icon on the top left to automatically return to the APP interface.and select the WIFI link named "LivingSmart" according to the APP prompt. Return to the APP interface, continue to click on "NEXT", start the base station bonding, about a few seconds later, if the match is successful, the APP interface will pop up the prompt box matching success, at this time, hold down “WIFI” button of the base station for more than 3 seconds, let the base station exit AP mode. At the same time click the prompt box, will jump to the system's WI-FI settings again, select the original WI-FI hot spot, and then click on the top left corner of the "<Weathersen..." icon to return to the APP interface. After the APP interface is returned, APP will automatically set the location of the base station, and show the main boundary after the success. At the same time, the base station is automatically connected with the WIFI hot spot after the AP mode is exited. After the connection is successful, the base station will automatically obtain the time, air](https://usermanual.wiki/Fuzhou-Emax-Electronic/W1/User-Guide-3824627-Page-5.png)