Fuzhou Emax Electronic W1 Wi-Fi Weather Station with Clock User Manual W1 Manual TX07
Fuzhou Emax Electronic Co., Ltd. Wi-Fi Weather Station with Clock W1 Manual TX07
User manual

WIFI Weather Station with Clock
Model:W1
Technical Data and Features
Base station:
Perpetual Calendar Up to Year 2099
Day of week in 8 languages user selectable: English, German, Italian, French, Spanish, Dutch, Danish and Russian
Time in optional 12/24 hour format.
Automatic calibration of network time service
Barometric pressure:
— Air pressure data source network
— Pressure alternatively in hPa/mb or inHg or mmHg
Indoor humidity measurable range: 20%RH to 95%RH
Indoor temperature:
— Temperature measurement ranges:-20°C to 60°C or(-4°F to 140°F)
— Temperature alternatively in °C or °F.
Minimum/maximum display for humidity and temperature
The future weather forecast and temperature report function, weather forecast information provided by the network
Connects directly to wifi network
Power Supply:
Battery: 4 x LR06 (UM-3), 1.5 V (size AA)
Wireless Outdoor Sensor:
— Outdoor temperature measurement ranges: -40°C (-4°F) ~ 70°C (158°F)
— Outdoor measurable range: 20%RH to 95%RH
— Data transmission frequency: 433 MHz
— Wireless range: max. 60 m (open area)
— Batteries: 2 x LR06 (UM-3), 1.5 V (size AA)
— Protection class: IPX4
WIFI Weather Station with Clock
Model:W1
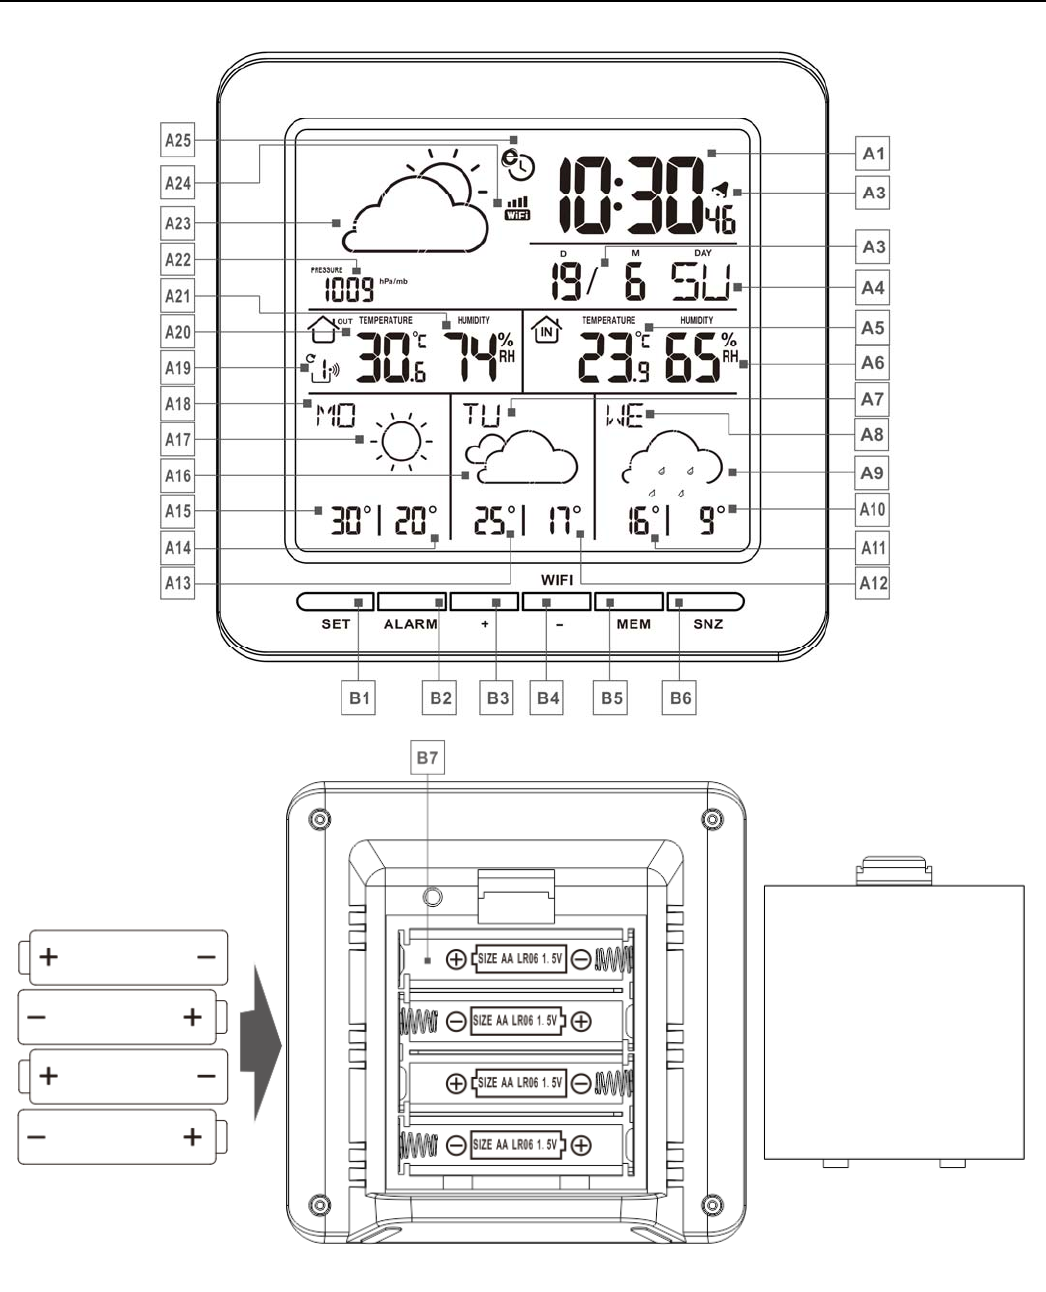
Base station Appearance:
Part A-Positive LCD
A1: Time A2: ALARM icon
A3: Calendar A4: Week for today
A5: Indoor Temperature A6: Indoor Humidity
A7: Week for the next second days A8: Week for the next third days
WIFI Weather Station with Clock
Model:W1
A9: Weather forecast for the next third days A10: Minimum temperature forecast for the next
third days
A11: Maximum temperature forecasts for the
next third days
A12: Minimum temperature forecast for the next
second days
A13: Maximum temperature forecasts for the
next second days
A14: Minimum temperature forecast for
tomorrow
A15: Maximum temperature forecast for
tomorrow
A16: Weather forecast for the next second days
A17: Weather forecast for tomorrow A18: Week for tomorrow
A19: Remote wireless channel A20: Outdoor Temperature
A21: Outdoor Humidity A22: Barometric pressure
A23: Weather forecast for today A24: WIFI icon
A25: Network Time icon
Part B – Back button and power
B1: “SET” button
B2: “ALARM” button
B3: “+” button
B4: “WIFI/-” button
B5: “MEM” button
B6: “SNZ” button
B7: Battery compartment
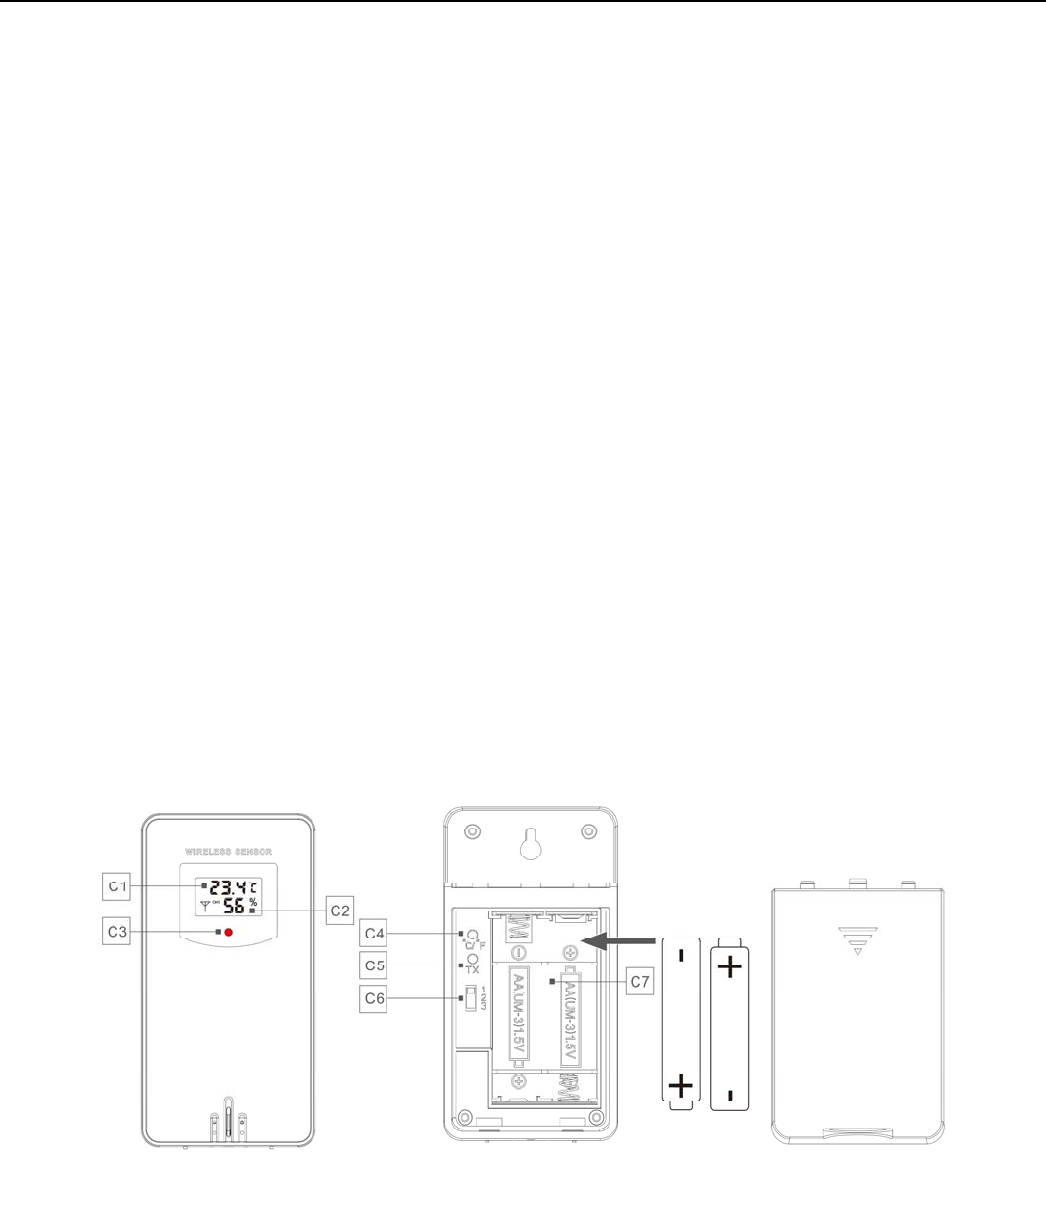
Part C –Wireless Outdoor Sensor:
C1: LCD display – Temperature
C2: LCD display – Humidity
C3: Transmit signal LED
C4: “°C/°F” button
C5: “TX” button
C6:
Channel selector switch
C7: Battery compartment
W1 Manual
Initial operation:
Replace Wireless Outdoor Sensor battery compartment cover ,Push the Channel selector switch in the battery
compartment of the Wireless Outdoor Sensor, set the correct channel ,Insert 2 x AA batteries observing polarity [ “+”
and “–“ marks]
When you insert the batteries, all the icon on the LCD display will briefly light up for 3 seconds, the Wireless Outdoor
Sensor began to switch to the normal working mode, to detect the temperature and humidity in the environment .At
this time, the sensor will transmit 1 wireless signals, and the interval of about 1 minutes will automatically transmit the
1 wireless signal, each transmitted 1 wireless signal emission sensor indicator will flash 1 times.
APP software for installing base station:
DOWNLOAD APP:
Hardware Requirements:
iPhone 4s (or above) enabled smart device
Software Requirements
iOS 7 (or above) or Android 4.3 (or above)
Download APP (Weather Sense)
Download IOS APP application software URL:
https://itunes.apple.com/cn/app/weathersense/id1273633929?mt=8
Download Android APP application software URL:
https://play.google.com/store/apps/details?id=com.emax.weahter
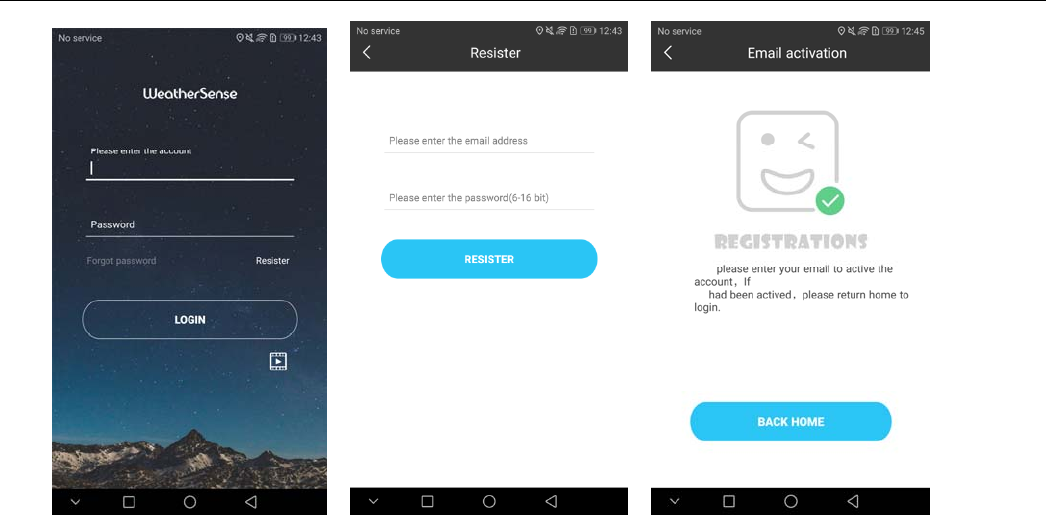
User registration:
After downloading the APP, open APP, the program will jump out of a registration interface, according to the
registration shown below, after registration is completed, enter the mailbox for account activation
W1 Manual
AccountlogininterfaceAccountregistration
interface
Promptmailboxaccount
activation
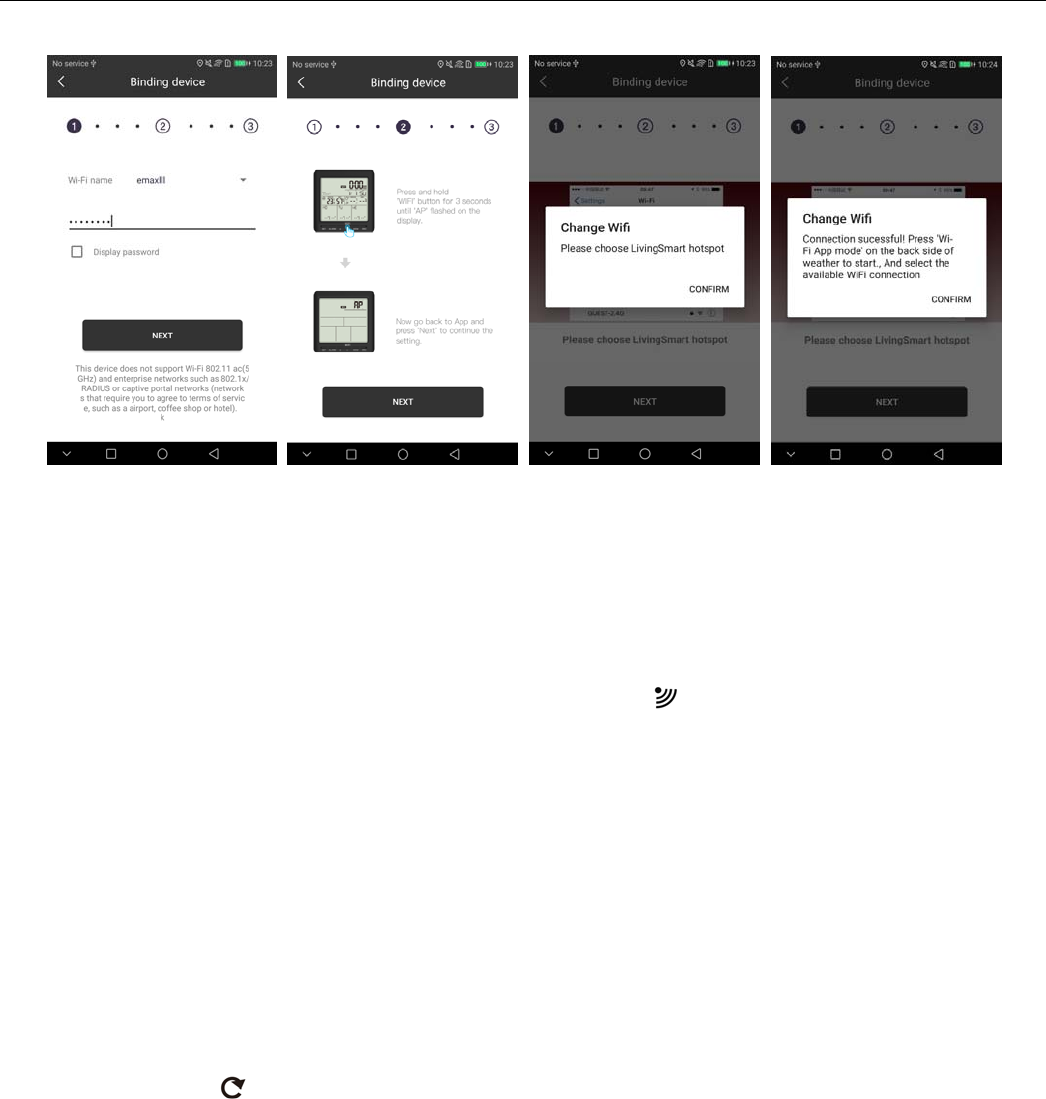
Base station with APP bonding
After registration and activation, login in the login interface, APP display will jump to the base station interface,
please according to the environmental needs, choose the need to connect with the base station router name, and
enter WIFI login password, jump the next interface according to NEXT
Appearance hint based on base station Icon,Open the battery compartment cover of base station,Insert 4 x AA
batteries observing polarity [ “+” and “–“ marks],After you pass on the power supply, all the symbols on the display
screen will be displayed after about 3 seconds,If the base station is used for the first time, the base station will
automatically enter the AP mode, and the display will display AP.
If not for the first time use, the base station began to switch to the normal working mode, to detect the
temperature, and humidity in the environment .At the same time, because the WIFI is not set up, the network
weather forecast information can not be obtained, and the air pressure, weather forecast and temperature prediction
have no content display. In this case, when the “WIFI” button is held down for more than 3 seconds, the base station
will automatically enter the AP mode.
After confirming the base station enters the AP mode, click "NEXT" on the APP interface, And according to the
prompt click the prompt box, will automatically jump to the system's WI-FI settings, select the WI-FI hot spot
"LivingSmart" and confirm the completion of the connection. Click the "<Weathersen..." icon on the top left to
automatically return to the APP interface.and select the WIFI link named "LivingSmart" according to the APP
prompt.
Return to the APP interface, continue to click on "NEXT", start the base station bonding, about a few seconds
later, if the match is successful, the APP interface will pop up the prompt box matching success, at this time, hold
down “WIFI” button of the base station for more than 3 seconds, let the base station exit AP mode. At the same time
click the prompt box, will jump to the system's WI-FI settings again, select the original WI-FI hot spot, and then click
on the top left corner of the "<Weathersen..." icon to return to the APP interface.
After the APP interface is returned, APP will automatically set the location of the base station, and show the main
boundary after the success. At the same time, the base station is automatically connected with the WIFI hot spot
after the AP mode is exited. After the connection is successful, the base station will automatically obtain the time, air
W1 Manual
pressure, weather forecast and temperature prediction of the network, and display it in the display screen.
Enter the WIFI hotspot
name and password
Prompts the device to
enter the AP mode
Prompt for the WIFi
hotspot named
LivingSmart
It is suggested that the
original WIFi hotspot
should be selected
The Base Station will now start to make a connection to the outdoor remote sensor. This operation takes about 3
minutes and is displayed by a flashing reception RF antenna symbol “ ” in the “OUTDOOR” display area on the
receiver. the “OUTDOOR” display area will show an animation of the RF antenna symbol, indicating the base station
is searching for the signal from the outdoor sensor. At the same time the base station began to establish WIFI
connections (details see the following WIFI connection description)
Outdoor sensor transmission:
When the Base Station successfully receives signals from the wireless sensor, the temperature and humidity of the
OUTDOOR are displayed on the OUTDOOR column of the Base Station.
The base station can connect up to 3 channel wireless sensor registration, the use of multiple wireless sensor, the
wireless sensor channel can not choose the same channel at the same time (a total of 1, 2, 3 channel can choose)
Press the "+" button can switch the display of different channels of outdoor temperature and humidity, when
displaying the symbol " ", will display the channel every 5 seconds automatically switch a channel
If the Base Station failed to receive transmission from outdoor sensor (“- -”display on the LCD), press and hold “+”
button for 3 seconds to receive transmission manually. the outdoor temperature will show an animation of the RF
antenna symbol,the Base Station will re receive the wireless signal of the outdoor sensor.
Note: when the wireless sensor set up different channels, the base station "OUTDOOR" also want to switch to the
same channel. When there is no wireless sensor signal transmission on the channel, "--" will be displayed in the
channel of the base station
Manual time setting:
Press and hold down the “SET” button for 2 seconds, the temperature is display either in °C to flash. Now use “+”
and “-” buttons to set the temperature unit in °C or °F.
Press “SET” to confirm your setting, the barometric pressure is display either in hPa/mb to flash. Now use “+” and “-”

W1 Manual
buttons to set the pressure unit in hPa/mb or inHg or mmHg.
Press “SET” to confirm your setting, the 12/24 hour mode display starts to flash. Now use “+” and “-” buttons to set
the correct 12/24 hour mode.
Press “SET” to confirm your setting, the Time zones start to flash, Now use “+” and “-” buttons set a correct time zone
(-12 to +12).
Press “SET” to confirm your setting, the Hour display starts to flash. Now use“+” and “-” buttons to set the correct
hour.
Press “SET” to confirm your setting, the Minute displays starts to flash. Now use “+” and “-” buttons to set the correct
minute.
Press “SET” button to confirm your setting, the Month and Date icon display starts to flash. Now use “+” and “-”
buttons to set the date display on Month/Date or Date/Month.
Press “SET” button to confirm your setting, the Year display 2017 starts to flash. Now use “+” and “-” buttons to set
the correct year.
Press “SET” button to confirm your setting, the Month display starts to flash. Now use “+” and “-” buttons to set the
correct month.
Press “SET” button to confirm your setting, the Date display starts to flash. Now use “+” and “-” buttons to set the
correct date.
Press“SET” button to confirm your setting, the language selection for the Weekday displays starts to flash. Now use
“+” and “-” buttons to select a language.
Language Sunday Monday Tuesday Wednesday Thursday Friday Saturday
English, EN SU MO TU WE TH FR SA
German, GE SO MO DI MI DO FR SA
French, FR DI LU MA ME JE VEN SA
Italian, IT DO LU MA ME GI VEN SA
Spanish, SP DO LU MA MI JU VIE SA
Dutch, DU ZO MA DI WO DO VRI ZA
Danish, DA SO MA TI ON TO FRE LO
Russian, RU BC ПН BT CP ЧТ ПТ СБ
Press “MODE” to confirm your setting and to end the setting procedures, enter the clock mode.
F.Y.I.:
After 20 seconds without pressing any button, the clock switches automatically from Set Mode to Normal Time Mode.
There are 8 languages of Weekday: English, German, Italian, French, Spanish, Dutch, Danish and Russian
When the WIFI connection is successful, the time will be automatically updated to the network time, the symbol “ ”
will display, at the time of setting, time and time zones are not to change.
Setting the daily alarms:
Press once “ALARM” button, the display conversion to alarm activation mode. In this mode, press the “ALARM”
button again to activate the alarm function, at the same time, the sound of "BI" sounded, while the alarm icon " " is
displayed which means alarm has been activated. And then press “ALARM” button again, you can turn off the alarm
function, the alarm icon " " does not shows.
Press and hold down “ALARM” button for 2 seconds until Alarm Time hour display starts to flash. Use the“+” and “-”

W1 Manual
buttons to set the required hour.
Press “ALARM” button to confirm your setting, the Minute display starts to flash. Use the “+” and “-” buttons to set
the required minute.
Press “ALARM” button to confirm your setting, the snooze time of the Alarm starts to flash. Use the “+” and “-”
buttons to set the minute of snooze you need.
Press “ALARM” button to confirm your setting and to end the setting procedure
F.Y.I.:
After 20 seconds without pressing any button the clock switches automatically from setting mode to Normal clock
mode.
The alarm will sound for 2 minutes if you do not deactivate it by pressing any button. In this case the alarm will be
repeated automatically after 24 hours.
Rising alarm sound (crescendo, duration: 2 minutes) changes the volume 4 times whilst the alarm signal is heard.
The snooze time setting range: 5 ~ 60MIN, OFF, when set to OFF, means no snooze function. Snooze time unit is
minutes.
Switching off the alarm signal
While the alarm is sounding, press any button except the “SNZ” button or press hold the “SNZ” button for 3 seconds
to stop the alarm signal.
Snooze Function:
While the alarm is sounding, press the “SNZ” button once to activate the snooze function. The alarm signal sounds
again after already been set.
In snooze mode, press any button except the “SNZ” button or press hold the “SNZ” button for 3 seconds to exit the
snooze mode.
F.Y.I.:
When the snooze function is set to OFF, while the alarm is sounding, press “SNZ” does not have this snooze function.
Maximum/Minimum Temperature/Relative Humidity
To toggle indoor/outdoor maximum, minimum temperature and humidity data, press the “MEM” button:
Once to show the maximum temperature and humidity values.
Twice to sow the minimum temperature and humidity values.
Three times to return to the current temperature and humidity levels.
To reset the maximum and minimum temperature and humidity, press and hold down the “MEM” button about 2
seconds. This will reset all minimum and maximum data recorded to the current displayed values.
F.Y.I.:
If the temperature reading is below ranges, the LL.L will be displayed. If the temperature reading is above ranges,
the HH.H will be displayed.
LOW BATTERY:
If the battery icon “ ” appears in the "IN" column, please change the battery of the base station in time.
If the battery icon “ ” appears in the "OUT" column, please confirm the channel of the battery prompt and change
the remote sensor battery of the channel timely

W1 Manual
Explanation of network weather forecast
After the base station is connected with the WIFI hotspot, the weather information of the base station will be updated
automatically every hour after the weather forecast information obtained from the network.
Base station also can press “WIFI” button once, open the WI-FI function, manually connect the network for
information update.
The base station automatically downloads real-time air pressure from the network, today's weather forecasts, the
next three days of weather forecasts and forecasts of the highest and lowest temperatures
The base station automatically uploads the data of indoor and outdoor temperature and humidity from the base
station to the server, and the APP can download the data automatically from the server through the network.
W1 Manual
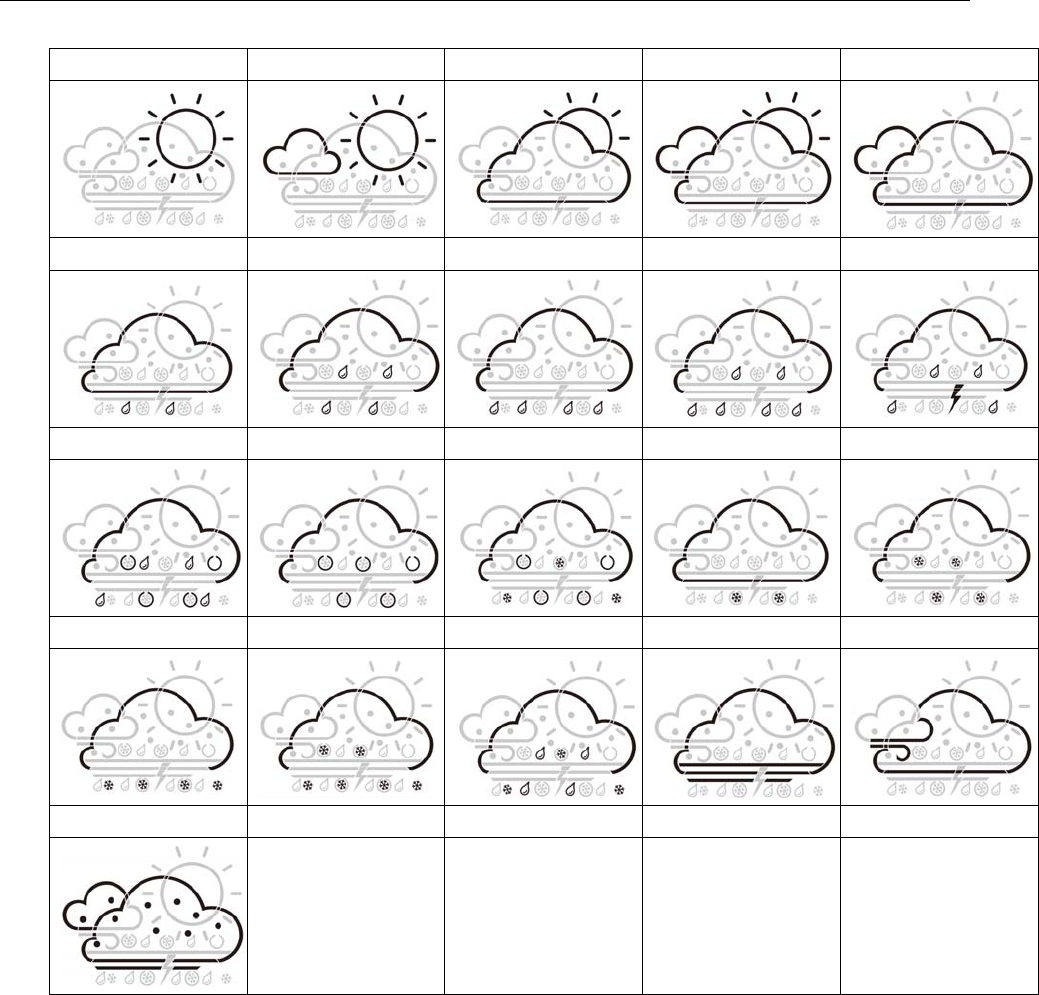
Weather forecast icon that can be displayed on the base station:
sunny Mostly sunny Partly cloudy Mostly cloudy Cloudy
Patchy Rain Mostly Rain Showers Heavy Rain Thunder Rain
Rain and Hail Hail Snow and Hail Patchy Snow Mostly Snow
Snow shower Heavy Snow Rain and Snow Foggy windy
Haze
W1 Manual
APP interface specification:
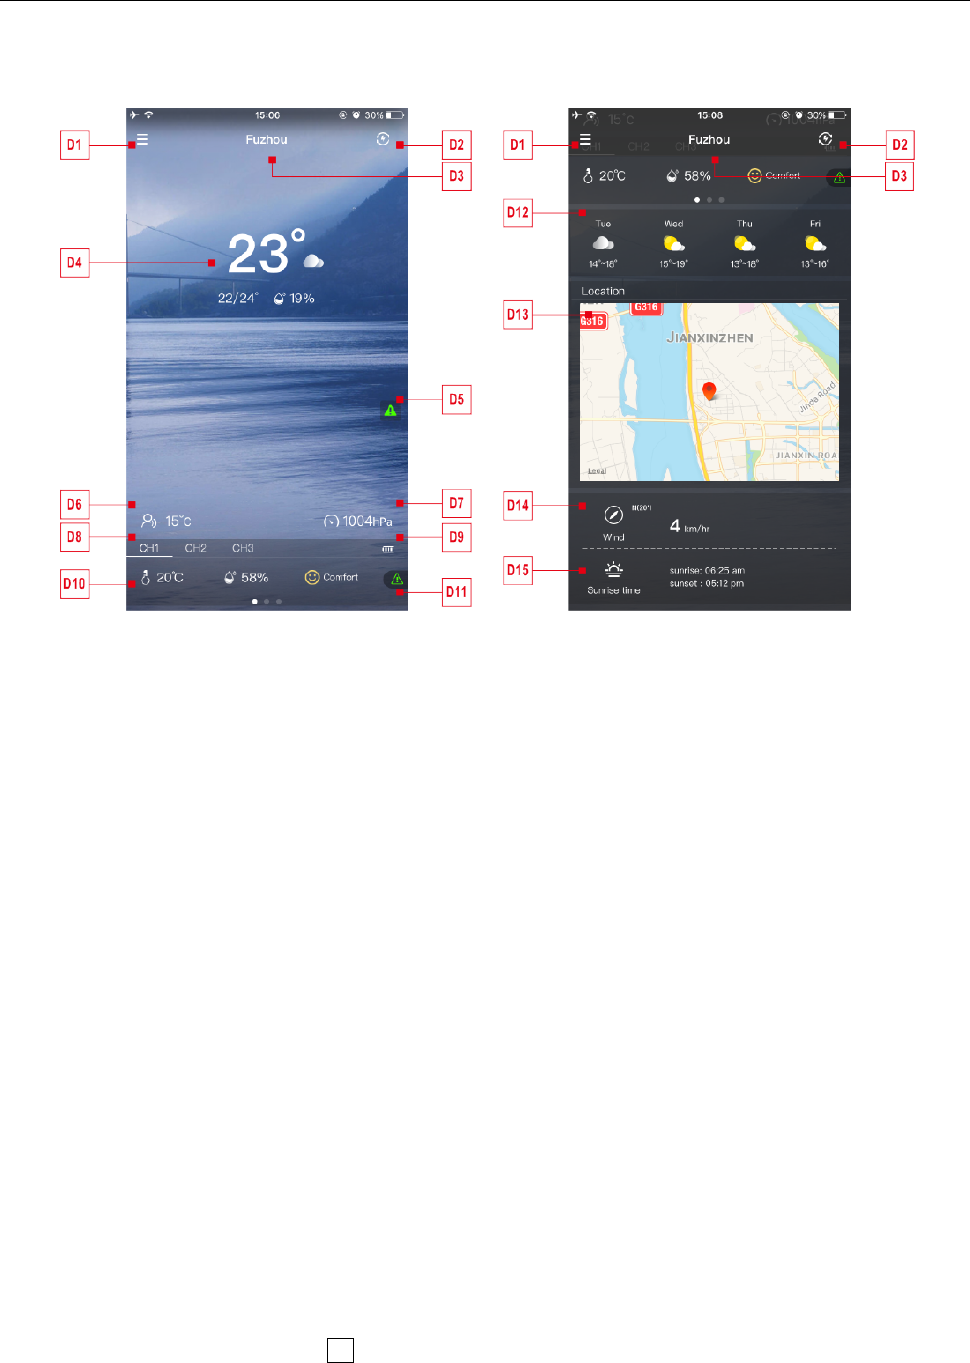
Front page data display:
< home page data display _1> < home page data display _2>
D1: Main menu bar D2: Data Refresh
D3: Location City D4: Temperature and humidity data of main
equipment and weather today
D5: Quick setting of temperature and humidity
alert for main equipment
D6: Feel Like
D7: Today's barometer pressure D8: Wireless remote sensor device name
D9: Battery power for wireless remote sensor
devices
D10: Temperature and humidity data of wireless
remote sensor equipment
D11: Quick setting of temperature and humidity
alert for wireless remote sensor equipment
D12: Weather forecast for the next four days
D13: Map display of device location D14: Today's wind speed and direction
D15: Today's sunrise and sunset tomorrow
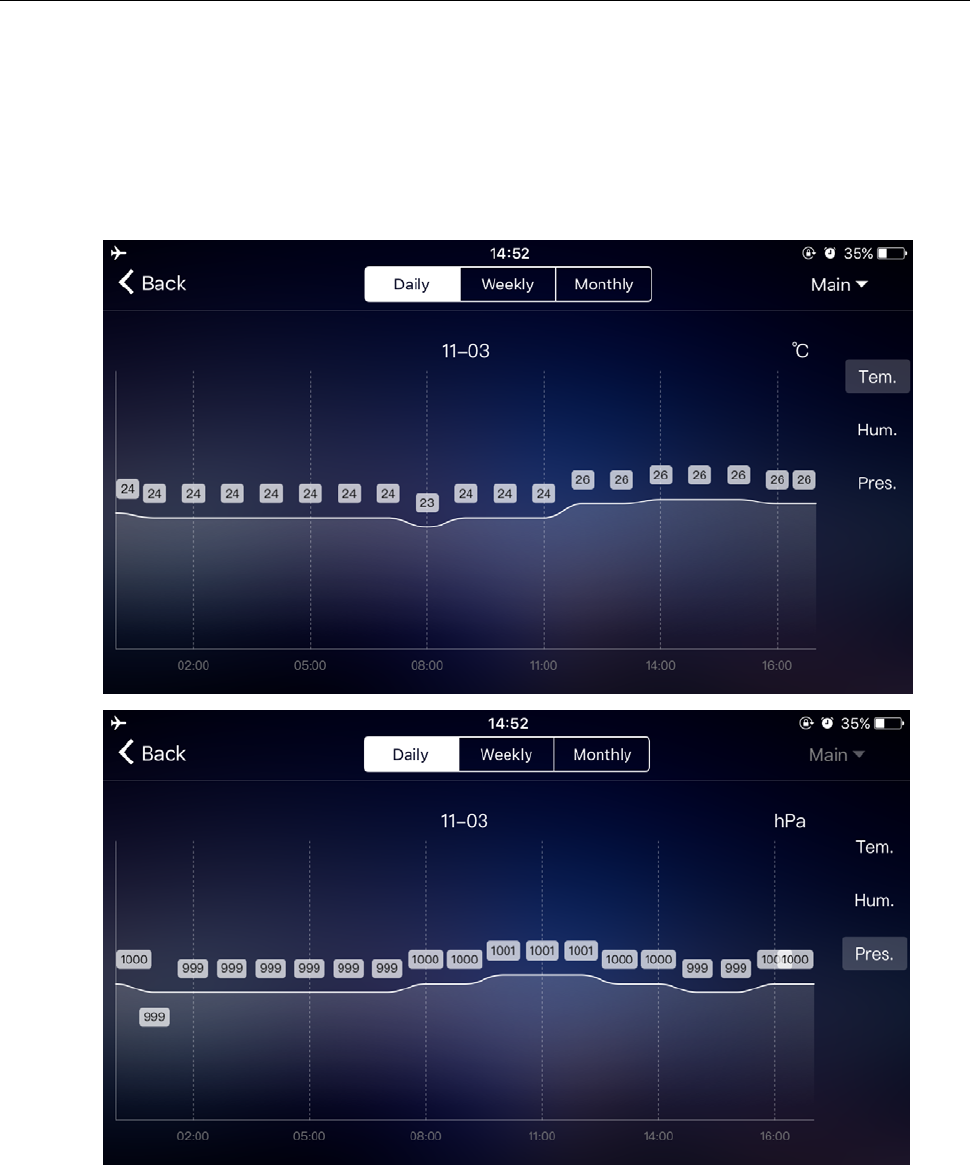
Data chart display:
Click on the temperature value “D4”of < Home Page Data Display _1>, APP automatically jump to <
Data Display Interface >, Click the <MAIN> column in the top right corner of the <Data Display Interface> ,
You can choose to view the data chart of the base station or wireless remote sensor
W1 Manual
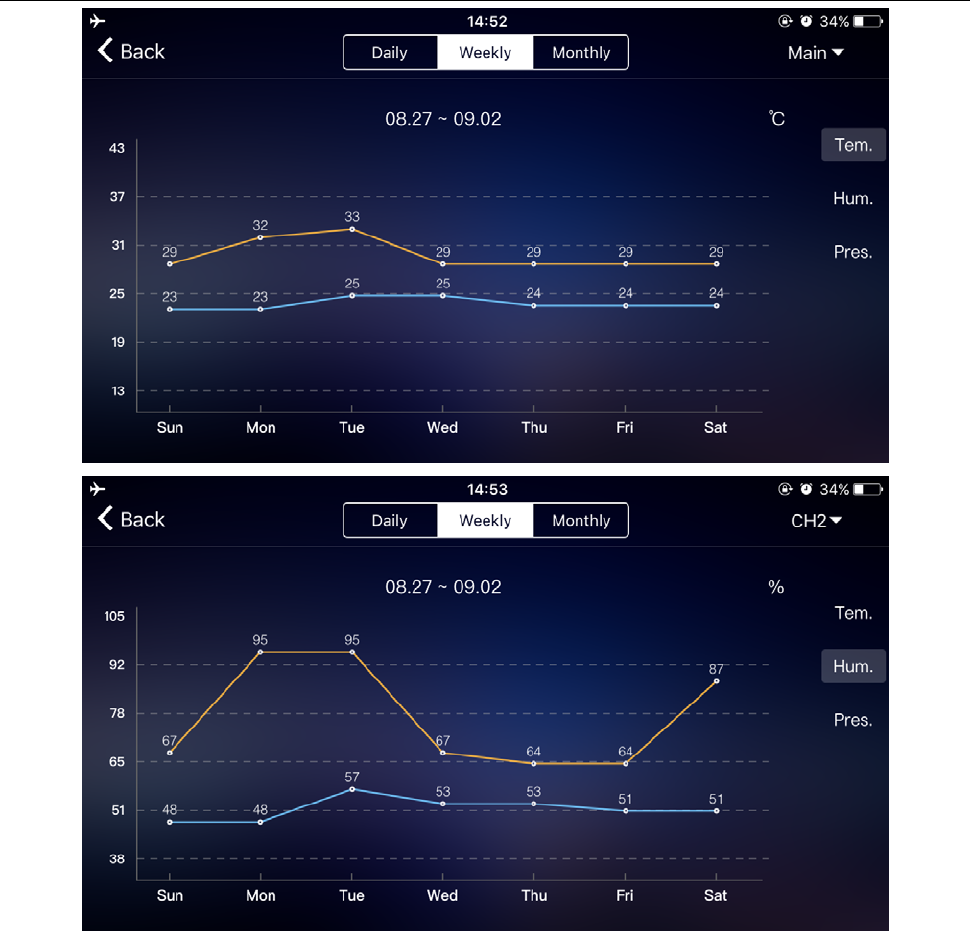
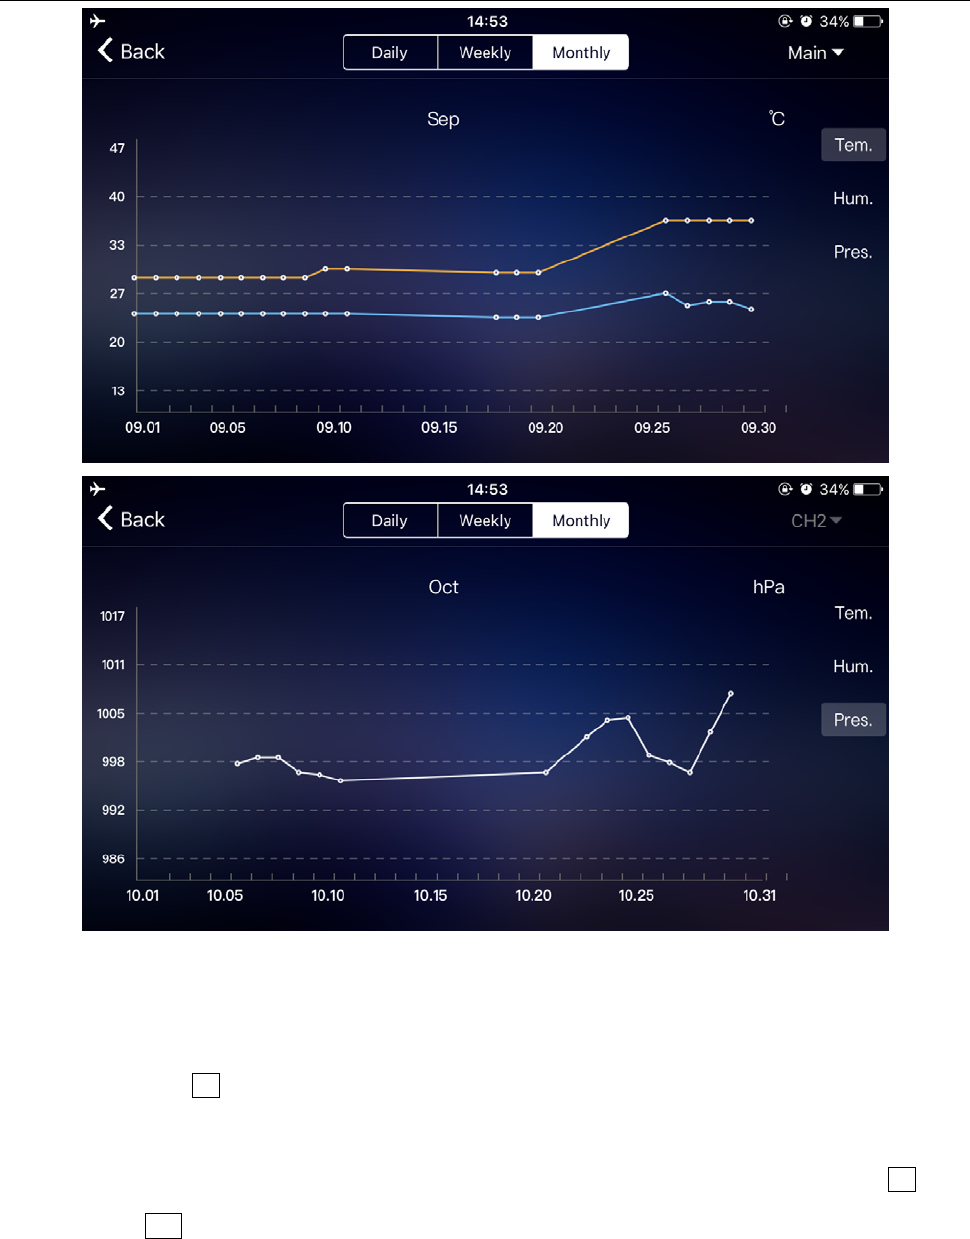
Click on the "Daily", "Weekly" and "Monthly" boxes above the < Data Display Interface >, and you can
choose to view the daily, weekly and monthly data charts, Slide the screen to the left or right to view data
charts at different times.
Click the "Tem.", "Hum." and "Pres." on the right side of the screen and select the historical chart record
of temperature, humidity, or air pressure
.
Data chart presentation - Daily
W1 Manual
Data chart presentation – Weekly
W1 Manual
Data chart presentation – Monthly
Temperature and humidity alert setting
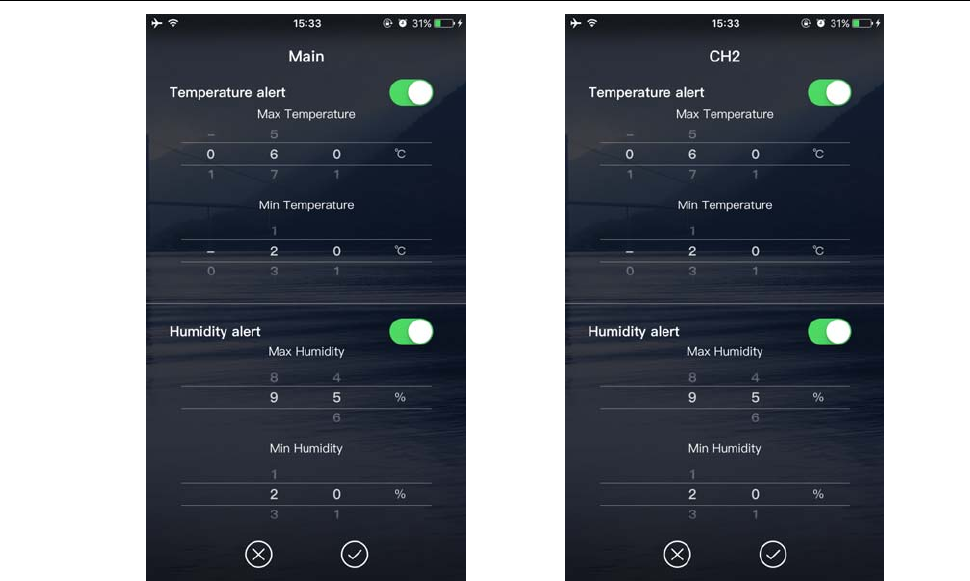
Click on the "D5" in the home page, you can quickly enter the temperature and humidity alert settings
interface of the main equipment.
Set up wireless sensor for temperature and humidity alert, click on the channel selected by “D8”, and
then click “D11”, quickly enter the wireless sensor temperature and humidity alarm interface to set the
channel.
W1 Manual
Temperature and humidity alert
setting for main equipment
Temperature and humidity alert
settings for wireless device
Temperature and humidity alert
Temperature and humidity alarm setup is complete, click on the "V" after the confirmation, the base
station next time you open WI-F, will automatically set. When the base station activates the temperature or
humidity alarm, it will open the WIFI immediately and send the alarm information to the APP. After the APP
receives the information, it will automatically prompt the alarm
W1 Manual
Menu description
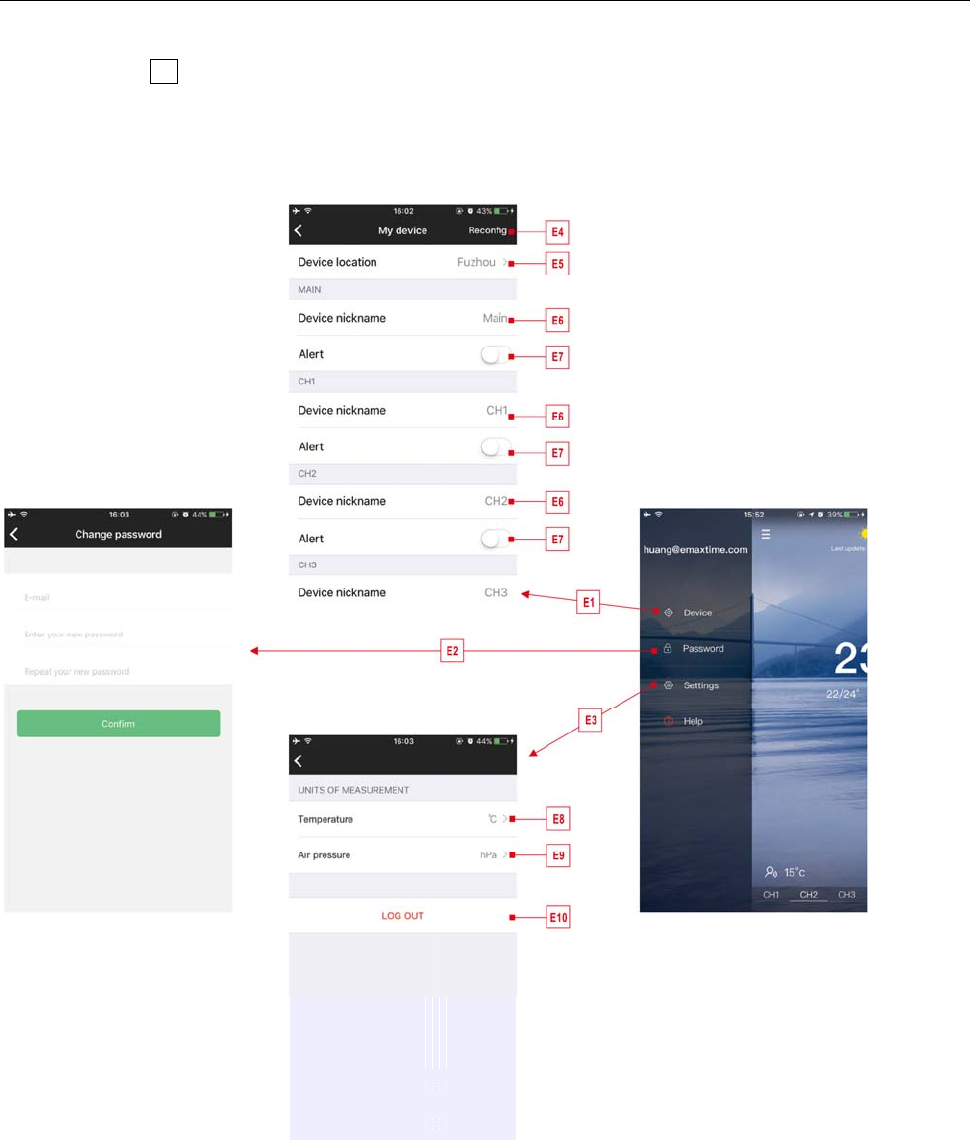
Click on the “D1”in the home page, and the left side will slide out of the main menu, Click on the area or
function block of the icon, which corresponds to the function settings of the table below.
E1: Access device management E2: Change account password
E3: Location City E4: Re bonding equipment
E5: Re positioning equipment E6: Change device name
E7: Open the temperature and humidity aert
function of the equipment
E8: Setting temperature display unit
E9: Set air pressure display unit E10: Cancellation account

W1 Manual
FCC Warning
Any Changes expressly or modifications not approved by the party responsible for compliance could
void the user's authority to operate the equipment.
This device complies with part 15 of the FCC Rules. Operation is subject to the following two conditions:
(1) This device may not cause harmful interference,and (2) this device must accept any interference received,
including interference that may cause undesired operation.
Note: This equipment has been tested and found to comply with the limits for a Class B digital device,
pursuant to part 15 of the FCC Rules. These limits are designed to provide reasonable protection
against harmful interference in a residential installation. This equipment generates, uses and can
radiate radio frequency energy and, if not installed and used in accordance with the instructions,
may cause harmful interference to radio communications. However, there is no guarantee that
interference will not occur in a particular installation. If this equipment does cause
harmful interference to radio or television reception, which can be determined by turning the
equipment off and on, the user is encouraged to try to correct the interference by one or more of
the following measures:
—Reorient or relocate the receiving antenna.
—Increase the separation between the equipment and receiver.
—Connect the equipment into an outlet on a circuit different from that to which the receiver is
connected.
—Consult the dealer or an experienced radio/TV technician for help.
FCC Radiation Exposure Statement:
This equipment complies with FCC radiation exposure limits set forth for an uncontrolled environment .
This transmitter must not be co‐located or operating in conjunction with any other antenna or transmitter.
This equipment should be installed and operated with minimum distance 20cm between the radiator &you
body.